
The Yellow Submarine goes Nuclear


Thread Starter
V8 Miata Participant
Joined: Nov 2010
Posts: 286
Likes: 3
From: Grand Rapids, MI
19th February 2011 21:48
________________________________________
Build Update:
Parts Arrival - Pulley and belt to eliminate power steering, and some fuel line fittings.

Radiator Fan Shroud - Finished up the paint, came out nice.

Gas Pedal - Worked on getting the GTO pedal in the car.
Stock Miata pedal assembly:

Miata pedal, mount stud and cruise lever removed:

I mocked up a few times, but not done with it so I'll spare you the photos until it is right.
________________________________________
Build Update:
Parts Arrival - Pulley and belt to eliminate power steering, and some fuel line fittings.
Radiator Fan Shroud - Finished up the paint, came out nice.
Gas Pedal - Worked on getting the GTO pedal in the car.
Stock Miata pedal assembly:
Miata pedal, mount stud and cruise lever removed:
I mocked up a few times, but not done with it so I'll spare you the photos until it is right.
Thread Starter
V8 Miata Participant
Joined: Nov 2010
Posts: 286
Likes: 3
From: Grand Rapids, MI
19th February 2011 21:49
________________________________________
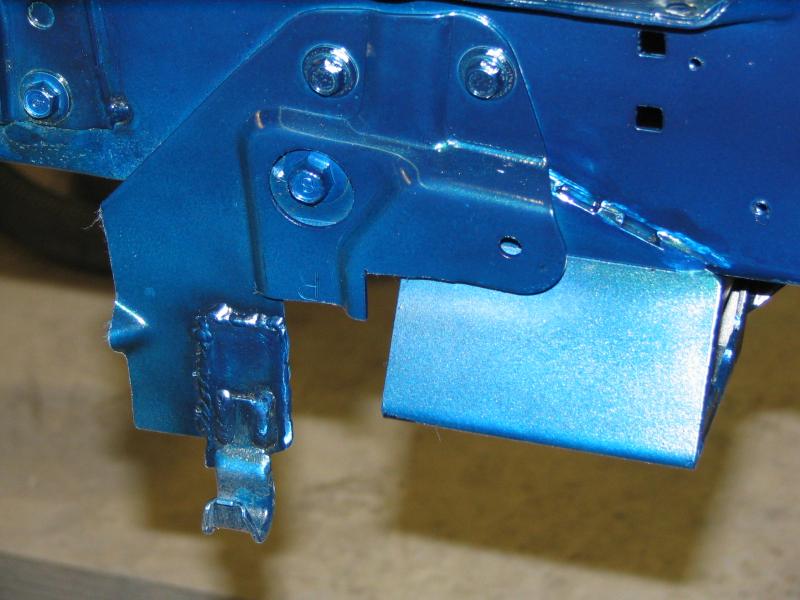
Frog Arms - Installed! Drilled the holes for the wire tuck also.


Driver's side looks the same (but different!)
Miata Body Wiring Thinning - Messed around with the Miata body harness, pulled out everything that was Miata engine related. Have a few loose wires to contend with but not bad.

Accident Damage Repair - Worked on the body damage, got it to a point where I think it looks fine.


________________________________________
Frog Arms - Installed! Drilled the holes for the wire tuck also.
Driver's side looks the same (but different!)
Miata Body Wiring Thinning - Messed around with the Miata body harness, pulled out everything that was Miata engine related. Have a few loose wires to contend with but not bad.
Accident Damage Repair - Worked on the body damage, got it to a point where I think it looks fine.
Thread Starter
V8 Miata Participant
Joined: Nov 2010
Posts: 286
Likes: 3
From: Grand Rapids, MI
19th February 2011 21:50
________________________________________
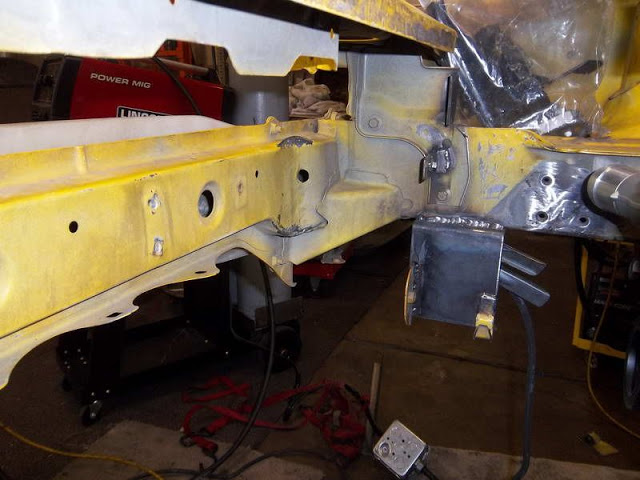
Frame Rail Stiffeners - Got them in the right place, had to beat the stock rails (they were all smushed into weird shapes from hitting speed bumps) until they fit.

Here is where the fronts of the rails ended up.. this was to make the tranny cross brace line up perfectly on both sides.
Driver:

Passenger:

Tranny Crossmember - Mocked up into place as well.


________________________________________
Frame Rail Stiffeners - Got them in the right place, had to beat the stock rails (they were all smushed into weird shapes from hitting speed bumps) until they fit.
Here is where the fronts of the rails ended up.. this was to make the tranny cross brace line up perfectly on both sides.
Driver:
Passenger:
Tranny Crossmember - Mocked up into place as well.
Thread Starter
V8 Miata Participant
Joined: Nov 2010
Posts: 286
Likes: 3
From: Grand Rapids, MI
20th February 2011 20:07
________________________________________
Build Update:
GTO Gas Pedal - I really struggled with pedal placement, I couldn't find a location that felt "right", but I think that was due to wearing steel toe work boots.. so I figured putting it back to the Miata setup would at least insure I liked it no less than that. Unfortunately, I forgot to measure the stock pedal so a call to my buddy Steve (thanks pal!) and his NA Miata yielded the info I needed.
2 7/8" between the clutch and brake pedal pads
2 7/8" between brake and gas pedal pads
Gas pedal set back (towards firewall) about 1"
Gas pedal hangs 1" lower than the brake.
So, my setup mimics that orientation.


Installed! Fabricated a beautiful mount, if I do say so myself! The GTO pedal looks like it had a slip-fit securing method at the bottom, the bottom hole can't be used for a screw as it would prevent WOT. This also means no stud mount for the top, since you have to slip the pedal into position. So, I welded up a similar setup, with nuts welded to the back of the plate.
I think it looks pretty dang good, and very happy with it.

________________________________________
Build Update:
GTO Gas Pedal - I really struggled with pedal placement, I couldn't find a location that felt "right", but I think that was due to wearing steel toe work boots.. so I figured putting it back to the Miata setup would at least insure I liked it no less than that.
Unfortunately, I forgot to measure the stock pedal so a call to my buddy Steve (thanks pal!) and his NA Miata yielded the info I needed. 2 7/8" between the clutch and brake pedal pads
2 7/8" between brake and gas pedal pads
Gas pedal set back (towards firewall) about 1"
Gas pedal hangs 1" lower than the brake.
So, my setup mimics that orientation.
Installed! Fabricated a beautiful mount, if I do say so myself! The GTO pedal looks like it had a slip-fit securing method at the bottom, the bottom hole can't be used for a screw as it would prevent WOT. This also means no stud mount for the top, since you have to slip the pedal into position. So, I welded up a similar setup, with nuts welded to the back of the plate.
I think it looks pretty dang good, and very happy with it.
Thread Starter
V8 Miata Participant
Joined: Nov 2010
Posts: 286
Likes: 3
From: Grand Rapids, MI
20th February 2011 20:29
________________________________________
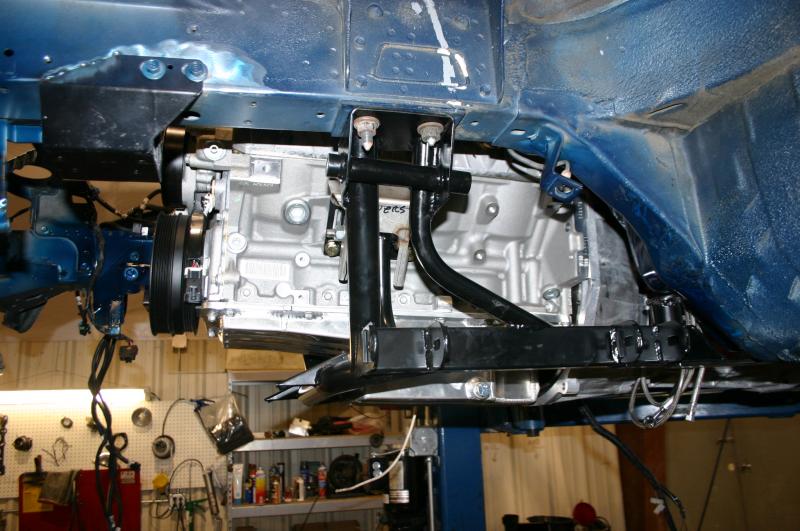
Frame Stiffeners - Installed, with tranny cross member.


Took some measurements on the final product:
V8R front crossmember to oil pan, Driver's side: 6 7/8"
V8R front crossmember to oil pan, Passenger's side: 6"
Distance between V8R Frame Stiffeners: 28 1/4"
Driver V8R frame stiffener to center of output shaft: 14 7/8"
Passenger V8R frame stiffener to center of output shaft: 13 3/8"
Driver's rear LCA to center of Getrag output: 10 3/4"
Passengers's rear LCA to center of Getrag output: 8 5/8"
Put the drivehaft in to help with tranny alignment.. just a taste of what is to come!

Shifter landed just a shade left of center, looks good to me:

________________________________________
Frame Stiffeners - Installed, with tranny cross member.
Took some measurements on the final product:
V8R front crossmember to oil pan, Driver's side: 6 7/8"
V8R front crossmember to oil pan, Passenger's side: 6"
Distance between V8R Frame Stiffeners: 28 1/4"
Driver V8R frame stiffener to center of output shaft: 14 7/8"
Passenger V8R frame stiffener to center of output shaft: 13 3/8"
Driver's rear LCA to center of Getrag output: 10 3/4"
Passengers's rear LCA to center of Getrag output: 8 5/8"
Put the drivehaft in to help with tranny alignment.. just a taste of what is to come!
Shifter landed just a shade left of center, looks good to me:
Thread Starter
V8 Miata Participant
Joined: Nov 2010
Posts: 286
Likes: 3
From: Grand Rapids, MI
22nd February 2011 00:02
________________________________________
Build Update:
Radiator - Worked on the radiator and AC condensor mounting. Got the old mounts trimmed off and cut back:

Worked out placement for the bottom mounts and whatnot as well:


Then got sidetracked when some Miata buddies stopped over. Oh well, that's all good too.
Strut Tower Brace - After they left, put the old FM strut tower brace on the car just to see if it would fit and I am happy to report it fits fine!

Super Secret Thinga-ma-bob - Can't tell ya. I need a DGN or DFX file of the cylinder head plate area, specifically the bolt holes to aid in this endeavour. Any help appreciated!
________________________________________
Build Update:
Radiator - Worked on the radiator and AC condensor mounting. Got the old mounts trimmed off and cut back:
Worked out placement for the bottom mounts and whatnot as well:
Then got sidetracked when some Miata buddies stopped over. Oh well, that's all good too.
Strut Tower Brace - After they left, put the old FM strut tower brace on the car just to see if it would fit and I am happy to report it fits fine!
Super Secret Thinga-ma-bob - Can't tell ya.
I need a DGN or DFX file of the cylinder head plate area, specifically the bolt holes to aid in this endeavour. Any help appreciated!
Thread Starter
V8 Miata Participant
Joined: Nov 2010
Posts: 286
Likes: 3
From: Grand Rapids, MI
23rd February 2011 22:59
________________________________________
Build Update:
Parts Arrival -Professional Products bare LS2 fuel rail kit came in, as did a couple of the strip LED's I bought.

Sway Bar Mounts - I gots me a problem.
I am at the point of installing the sway and rad mounts, and trying to figure out how this all fits.. cuz it ain't fitting. (started a thread on it: Sway Bar issue - V8R Rearward kit - MX-5 Miata Forum)
I am missing something. I moved the FM heavy duty mounts forward 1.25" in order to clear the CTS accessory pulleys and leave just enough space to slip the belt on.


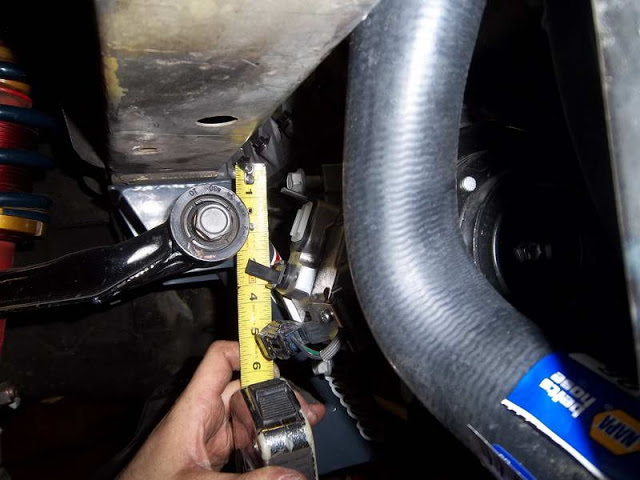
I also swapped the mounts left-right to create more clearance for the lower rad mounts (reverses the mount ears to the back on the inside of the rails). The end links are about 2" from the outer hole.. see photo:

Oh, and I can't get the upper control arm bolt in, it gets hung up inside the sway mount (as shown - meaning I would have to drop the entire subframe if I ever needed to replace the upper ball joint??)
________________________________________
Build Update:
Parts Arrival -Professional Products bare LS2 fuel rail kit came in, as did a couple of the strip LED's I bought.
Sway Bar Mounts - I gots me a problem.
I am at the point of installing the sway and rad mounts, and trying to figure out how this all fits.. cuz it ain't fitting.
(started a thread on it: Sway Bar issue - V8R Rearward kit - MX-5 Miata Forum)I am missing something. I moved the FM heavy duty mounts forward 1.25" in order to clear the CTS accessory pulleys and leave just enough space to slip the belt on.
I also swapped the mounts left-right to create more clearance for the lower rad mounts (reverses the mount ears to the back on the inside of the rails). The end links are about 2" from the outer hole.. see photo:
Oh, and I can't get the upper control arm bolt in, it gets hung up inside the sway mount (as shown - meaning I would have to drop the entire subframe if I ever needed to replace the upper ball joint??)
Thread Starter
V8 Miata Participant
Joined: Nov 2010
Posts: 286
Likes: 3
From: Grand Rapids, MI
23rd February 2011 23:00
________________________________________
How can FM be reusing the stock mount positions (pre-V8 bar offering)?
FM's Build Diary, "Dan's 97":
Looks like they moved it maybe 3/8" (based off the end of it aligning with the under-hole on the rail). They say they moved it forward, but this shot sure looks like they are using the stock hole under the rad mount:
The front bar I have is 9 3/8" from back of bar to end of arms. I dug around in my parts bin and found what I think is a stock bar, measures a touch over 9 3/4" end of arm to back of bar (and with the bar being smaller that difference is actually slightly more).
So, what am I missing? I am almost 2" off on my end links, no way I can get them to reach with the current parts I have.
My questions:
1 - I moved the mounts forward 1.25" to clear the pulley, is that correct?
2 - Is my bar abnormally short in the arm (no manhood jokes!)?
3 - Are the end links part of the problem too?
It seems apparent I have to change bars, this front one is too short in the arms to be useable... or do I have something else jacked up??? Was hoping to get the rad mounts in this week but this is screwing that all up.. grrrrr....
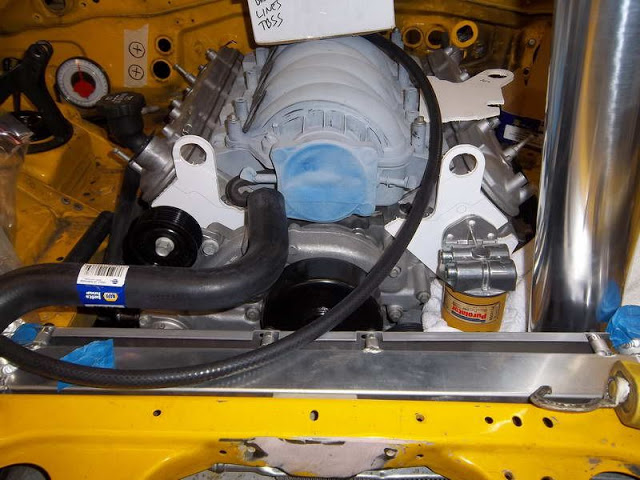
Fuel Rail - I mocked up (lamely, I know) the fuel rail, just trying to get an idea of how it is going to look.

My 90* fittings at the back won't work, will have to go to 45's. Also, may have to abandon the no-front-crossover idea, depending on how things fit. Regardless, I think the black hoses with the red rails will look good.
________________________________________
How can FM be reusing the stock mount positions (pre-V8 bar offering)?
FM's Build Diary, "Dan's 97":
Looks like they moved it maybe 3/8" (based off the end of it aligning with the under-hole on the rail). They say they moved it forward, but this shot sure looks like they are using the stock hole under the rad mount:
The front bar I have is 9 3/8" from back of bar to end of arms. I dug around in my parts bin and found what I think is a stock bar, measures a touch over 9 3/4" end of arm to back of bar (and with the bar being smaller that difference is actually slightly more).
So, what am I missing? I am almost 2" off on my end links, no way I can get them to reach with the current parts I have.
My questions:
1 - I moved the mounts forward 1.25" to clear the pulley, is that correct?
2 - Is my bar abnormally short in the arm (no manhood jokes!)?
3 - Are the end links part of the problem too?
It seems apparent I have to change bars, this front one is too short in the arms to be useable... or do I have something else jacked up??? Was hoping to get the rad mounts in this week but this is screwing that all up.. grrrrr....
Fuel Rail - I mocked up (lamely, I know) the fuel rail, just trying to get an idea of how it is going to look.
My 90* fittings at the back won't work, will have to go to 45's. Also, may have to abandon the no-front-crossover idea, depending on how things fit. Regardless, I think the black hoses with the red rails will look good.
Thread Starter
V8 Miata Participant
Joined: Nov 2010
Posts: 286
Likes: 3
From: Grand Rapids, MI
24th February 2011 12:09
________________________________________
Was hoping you would chime in.. thank you!!
So basically, I need to convert over to a 1.8 bar setup.. mount moves forward, bar is longer. Hmmm... never knew the 1.8 bar was different in that way. Makes sense, I suppose.
I'm also looking at the BMW E36 bar as a possible option, might fit the bill as well (Another sway bar option for V8 conversions - Page 2 - MX-5 Miata Forum) and yield me more clearance in front of the alternator for my air intake I want to put it in front of driver's wheel (similar to Nathan's intake @ Swaptastic)
Do you happen to have the arm lengths of a stock 1.6 and 1.8 bar, end of arm to back of bar? Just curious what the difference actually is.
Know I know the "why", just need to decide on a "how" to fix. Thanks for the info!!
________________________________________
Quote:
________________________________________
Originally Posted by Keith Tanner (@ LS1Tech)
The difference is that your car is a 1990-93 chassis. On the early cars, the stock sway bar mounts are further back, so they need to be moved further in order to clear the V8. Bars for the 1.6 cars are also designed with shorter arms. That's why our 1.6 bars are a smaller diameter than the 1.8 ones, because the shorter arms means less leverage on the bar.
________________________________________
________________________________________
Originally Posted by Keith Tanner (@ LS1Tech)
The difference is that your car is a 1990-93 chassis. On the early cars, the stock sway bar mounts are further back, so they need to be moved further in order to clear the V8. Bars for the 1.6 cars are also designed with shorter arms. That's why our 1.6 bars are a smaller diameter than the 1.8 ones, because the shorter arms means less leverage on the bar.
________________________________________
So basically, I need to convert over to a 1.8 bar setup.. mount moves forward, bar is longer. Hmmm... never knew the 1.8 bar was different in that way. Makes sense, I suppose.
I'm also looking at the BMW E36 bar as a possible option, might fit the bill as well (Another sway bar option for V8 conversions - Page 2 - MX-5 Miata Forum) and yield me more clearance in front of the alternator for my air intake I want to put it in front of driver's wheel (similar to Nathan's intake @ Swaptastic)
Do you happen to have the arm lengths of a stock 1.6 and 1.8 bar, end of arm to back of bar? Just curious what the difference actually is.
Know I know the "why", just need to decide on a "how" to fix. Thanks for the info!!
Thread Starter
V8 Miata Participant
Joined: Nov 2010
Posts: 286
Likes: 3
From: Grand Rapids, MI
3rd March 2011 14:00
________________________________________
Yeah, I'm slacking. Been a tough couple of weeks to try and get out there. GF weekend last weekend for my birthday, helpign a friend with a remodel of a room, and date night last night and tonight Dad is coming home from partial knee replacement so visiting him... plus working a little late here and there. Oh, and shovelling **^%$!! snow (should have fixed my tractor before winter, dammit). Things to report.. let's see... I didn't really think these were worth reporting, but hey, you asked.
Build Update:
Parts Arrived - Finally got the stainless fuel rail covers, and a bit ashamed at the price I paid and the length I waited for them and what they finally came in as.. they may not go on the car and might make my own. They are shorter than I hoped (front to back), and stupid simple. I just need to find someone with a metal brake to bend tham and I'll get something made up.
LEDs all arrived from Hong Kong, one bad but still usable. Should work very nicely for the intended locations, I think.
Parts Ordered - Ordered a couple more fittings for the fuel system, going to have to change the plan based ont he lack of room available. Not sure the final config yet, but will likely be a single feed at the rear and have a crossover in the front (which I was hoping to avoid for visual reasons).
Parts Designed - Been working in CAD on a new head plate to allow for custom mounting of... (TBA - hehe) and to replace the factory lift hook lost when the power steering res. mount was removed. Have some drymounted foam core to play with and verify shape and size this weekend. Think I have the mounting holes all laid out for both front and back of the heads.
Bandwidth Issue - Got a note from the buddy that is currently hosting all my images, these threads are hitting the bandwidth a bit heavy so I may need to change to some other image hosting, Picasa is the likely solution. May have to resize all current images to compress more sicne I don't know how I could repath them all at this point.. we shall see.
Front Sway - Got my hands on an aftermarket 1.8 unit and it still leaves me 1-1.5" short on the arms. Going to buy a BMW E36 unit and see how that works out. Waiting on a reply from a guy that is supposed to have some E36 sways for sale, but nothing yet.
Radiator Mounts - Changed plans after seeing a better option (and embarassed I didn't think of it). So, reworking those with...
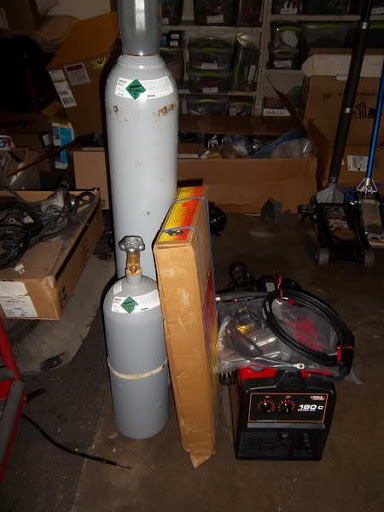
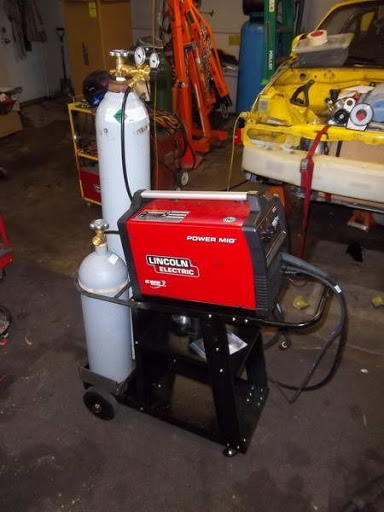
New Tool - a brand new welder! Will take some getting used to, but I figure with all the welding I want to do it was time to upgrade to a big boy welder. Picked up a brand new Lincoln 180C (rebate right now on them), 100 spoolgun (on order), 125cf Argon/CO2, 60cf Argon, and a cart. Will be able to do aluminum, stainless, and a much better job on steel. Started modifying the cart when I got it to hold a pair of tanks (instead of the one it is designed for), but ran out of stock so will finish that tomorrow night. So far, loving it. Gas MIG beats flux core like Mike Tyson could beat a 4th grader... it's amazing the difference.
________________________________________
Quote:
________________________________________
Originally Posted by Lee Bohon (Post 5033342)
A week gone by and no updates???? You still kick'n, Wallyman?
________________________________________
________________________________________
Originally Posted by Lee Bohon (Post 5033342)
A week gone by and no updates????
You still kick'n, Wallyman?________________________________________
Build Update:
Parts Arrived - Finally got the stainless fuel rail covers, and a bit ashamed at the price I paid and the length I waited for them and what they finally came in as.. they may not go on the car and might make my own. They are shorter than I hoped (front to back), and stupid simple. I just need to find someone with a metal brake to bend tham and I'll get something made up.
LEDs all arrived from Hong Kong, one bad but still usable. Should work very nicely for the intended locations, I think.
Parts Ordered - Ordered a couple more fittings for the fuel system, going to have to change the plan based ont he lack of room available. Not sure the final config yet, but will likely be a single feed at the rear and have a crossover in the front (which I was hoping to avoid for visual reasons).
Parts Designed - Been working in CAD on a new head plate to allow for custom mounting of... (TBA - hehe) and to replace the factory lift hook lost when the power steering res. mount was removed. Have some drymounted foam core to play with and verify shape and size this weekend. Think I have the mounting holes all laid out for both front and back of the heads.
Bandwidth Issue - Got a note from the buddy that is currently hosting all my images, these threads are hitting the bandwidth a bit heavy so I may need to change to some other image hosting, Picasa is the likely solution. May have to resize all current images to compress more sicne I don't know how I could repath them all at this point.. we shall see.
Front Sway - Got my hands on an aftermarket 1.8 unit and it still leaves me 1-1.5" short on the arms. Going to buy a BMW E36 unit and see how that works out. Waiting on a reply from a guy that is supposed to have some E36 sways for sale, but nothing yet.
Radiator Mounts - Changed plans after seeing a better option (and embarassed I didn't think of it). So, reworking those with...
New Tool - a brand new welder! Will take some getting used to, but I figure with all the welding I want to do it was time to upgrade to a big boy welder. Picked up a brand new Lincoln 180C (rebate right now on them), 100 spoolgun (on order), 125cf Argon/CO2, 60cf Argon, and a cart. Will be able to do aluminum, stainless, and a much better job on steel. Started modifying the cart when I got it to hold a pair of tanks (instead of the one it is designed for), but ran out of stock so will finish that tomorrow night. So far, loving it. Gas MIG beats flux core like Mike Tyson could beat a 4th grader... it's amazing the difference.
Thread Starter
V8 Miata Participant
Joined: Nov 2010
Posts: 286
Likes: 3
From: Grand Rapids, MI
3rd March 2011 16:23
________________________________________
Couple of reasons:
1 - I still have to move the mounts forward with their bar because I have a 1.6 chassis.
2 - I'll get more clearance with the BMW bar (MUCH more.. the bar routes down instead of forward and the mounts move backwards, away from the stuff that I want to avoid) Bar would be under pulleys instead of in front of.
3 - BMW bar is cheaper (at least for a stocker).
I want to route my air intake down in front of the alternator, and the sway will make it much more difficult. Since I have to relocate mounts regardless, might as well move it back instead of forward and gain some room.
If only FM had a bar like the E36 setup with a 5" drop in the center to go under the harmonic balancer, THAT would be handy... and they could design it with arm length that doesn't require mount relocation, to boot. Oh well, I am sure they have their reasons for the bar they created.
So, that's my thought process, anyhow.
________________________________________
Plan is for footwell lighting and trunk lighting.. and plan ole white, so no ricer worries. Just wanted to upgrade the lacking stock stuff to actually be usable. I need to come up with some mountings but that should be fairly easy. Trunk will go around the perimeter of the opening behind the gasket, footwell is going to span the width under the lip of the dash. Should be ncie without being over the top. Still would like some Audi-type DRLs but not sure I care that much, honestly.
Build Update:
Front Sway - Bought a couple of stock BMW E36 front bars off eBay: 24mm and 25.5mm. We'll see how they work out.
________________________________________
Not for the 90-93 chassis, you have to move the mounts to the 1.8 location per the V8 bar info page.
________________________________________
Quote:
________________________________________
Originally Posted by chpmnsws6 (Post 5033522)
Why not just order FM's v8 bar?
________________________________________
________________________________________
Originally Posted by chpmnsws6 (Post 5033522)
Why not just order FM's v8 bar?
________________________________________
1 - I still have to move the mounts forward with their bar because I have a 1.6 chassis.
2 - I'll get more clearance with the BMW bar (MUCH more.. the bar routes down instead of forward and the mounts move backwards, away from the stuff that I want to avoid) Bar would be under pulleys instead of in front of.
3 - BMW bar is cheaper (at least for a stocker).
I want to route my air intake down in front of the alternator, and the sway will make it much more difficult. Since I have to relocate mounts regardless, might as well move it back instead of forward and gain some room.
If only FM had a bar like the E36 setup with a 5" drop in the center to go under the harmonic balancer, THAT would be handy... and they could design it with arm length that doesn't require mount relocation, to boot. Oh well, I am sure they have their reasons for the bar they created.
So, that's my thought process, anyhow.
________________________________________
Quote:
________________________________________
Originally Posted by switched (Post 5033728)
What are you going to do with the LEDs? Going for that Fast and Furious look?
________________________________________
________________________________________
Originally Posted by switched (Post 5033728)
What are you going to do with the LEDs? Going for that Fast and Furious look?
________________________________________
Build Update:
Front Sway - Bought a couple of stock BMW E36 front bars off eBay: 24mm and 25.5mm. We'll see how they work out.
________________________________________
Quote:
________________________________________
Originally Posted by john j (Post 5034913)
Wallyman, according to FM if you buy their heavy duty sway bar mounting brackets everything will fit with the stock location. At least that was what I was led to believe when I order my FM V8 sway bar. Of course I am still waiting for the sway bar and with the mounts I have welded in place I will need more alterations to install mine.
________________________________________
________________________________________
Originally Posted by john j (Post 5034913)
Wallyman, according to FM if you buy their heavy duty sway bar mounting brackets everything will fit with the stock location. At least that was what I was led to believe when I order my FM V8 sway bar. Of course I am still waiting for the sway bar and with the mounts I have welded in place I will need more alterations to install mine.
________________________________________
Thread Starter
V8 Miata Participant
Joined: Nov 2010
Posts: 286
Likes: 3
From: Grand Rapids, MI
4th March 2011 23:42
________________________________________
Build Update:
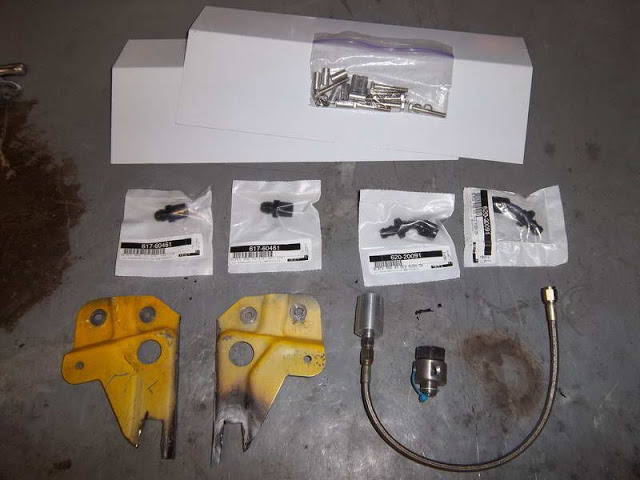
Parts Arrived - More fuel rail parts.. pair of 3/8NPT to -6AN adapters and a pair of -6AN 45* push on ends.
Also, the custom oil pressure adapter. Goes in place of the stock sending unit, which gets relocted to the end of a -3AN line so you can stick it on the firewall or wherever. Photos forthcoming.
Tool Fun - Doesn't really count as car, but related anyhow.. Finished the mods to the welding cart, photos coming on that too.
Radiator Mounts - finished up the lower mounts, and welded tabs on for the upper mounts. Will drill them tomorrow.
AC Condenser Mounts - working on the mounts for the ac condenser, trying to figure out spacing relative to the radiator.
________________________________________
Build Update:
Parts Arrived - More fuel rail parts.. pair of 3/8NPT to -6AN adapters and a pair of -6AN 45* push on ends.
Also, the custom oil pressure adapter. Goes in place of the stock sending unit, which gets relocted to the end of a -3AN line so you can stick it on the firewall or wherever. Photos forthcoming.
Tool Fun - Doesn't really count as car, but related anyhow.. Finished the mods to the welding cart, photos coming on that too.
Radiator Mounts - finished up the lower mounts, and welded tabs on for the upper mounts. Will drill them tomorrow.
AC Condenser Mounts - working on the mounts for the ac condenser, trying to figure out spacing relative to the radiator.
Thread Starter
V8 Miata Participant
Joined: Nov 2010
Posts: 286
Likes: 3
From: Grand Rapids, MI
6th March 2011 00:55
________________________________________
[moved images over to Picasa, we'll see how this works...]
Build Update:
Parts - Top down: Fuel rail covers with bolts/stand offs, NPT fuel rail fittings, factory radiator mount plates (with rad hooks and AC condenser plate removed) and the oil pressure adapter stuff.
New Welder
Some assembly required!
POOF! Assembled and ready to play!
Head Plate Lift Hooks - Templates look pretty good, not sure about the angle tho (that's straight up as shown). Stock lift hook in front angles outwards.
Thread Starter
V8 Miata Participant
Joined: Nov 2010
Posts: 286
Likes: 3
From: Grand Rapids, MI
6th March 2011 00:56
________________________________________
Radiator Mounts - Done. Cut the stock hooks off the bottom and reused them, new plate on the top. Moved as far forward as possible without cutting radiator top support. Top of radiator is flush with radiator support and about 1/8" away.
Bottom of hook is 9 1/4" from top of frame rail lip, if anyone is wondering.
NOOB Hint #1 - Make sure you take everything in the area into consideration on the radiator mounts: sway mounts. AC condenser mounts, top clearance, CAI (if you plan to route it low like I do). One thing I failed to realize is that the bottom hooks are offset towards the radiator, and for a reason. The mount rails stick out and rub if you just weld the hooks to a flat plate. So, in my case, I ground the side mounts down to clearance them a little, and may have to cut part of the lower plate out as well. Make sure you tack pieces in, then install and remove the radiator a few times to make sure it's clear.
AC Condenser - Also done. Cut the stock lower mounts loose and reused them. Beat the front bumper support in where the dryer goes for some extra clearance.
[img]https://lh3.googleusercontent.com/_ZfljZpGJ9d4/TXMOl92QhxI/AAAAAAAAB_A/bHwqzGKi5uc/s640/100_0831.jpg[/img
NOOB Hint #2 - Same deal for the AC, but more so. The top was a stud from the factory, and if you mount like I did (all the way forward against the hood latch), you can't possibly slide it over a stud. I had to rework everything twice (after I had it all welded up) because I had it tucked inside the radiator support which put it so close to the radiator that the top mount screws for the AC hit the end tanks of the rad. So, today's advice: Double check everything.. twice... then check again. Install and remove all parts a couple of times with the proposed mounts. And (if you did like me and you stripped the car to the bone) make sure you take into consideration the parts you removed, like the hood latch.
Thread Starter
V8 Miata Participant
Joined: Nov 2010
Posts: 286
Likes: 3
From: Grand Rapids, MI
6th March 2011 00:57
________________________________________
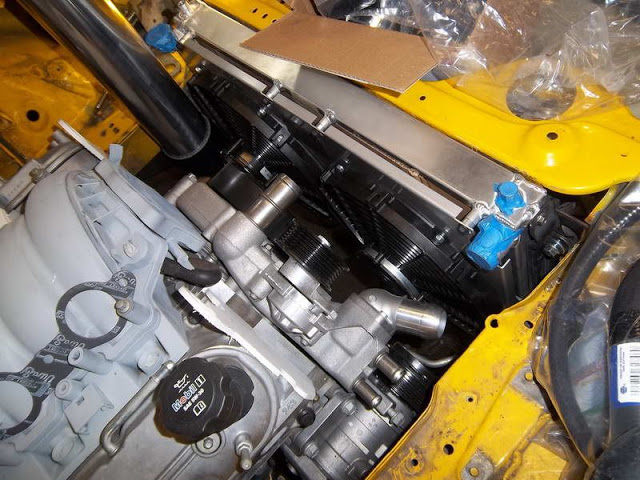
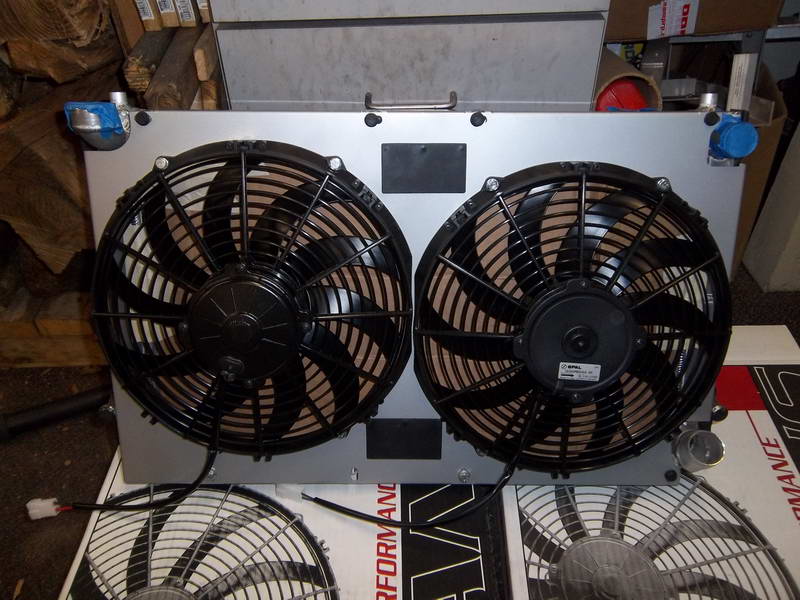
Radiator Fans & Shroud - Assembled the shroud with the SPAL fans, looks good. Once I tried to attach to the radiator, it all went to hell. Missing bolts, bolts I have are wrong length, overflow fitting stripped out, holes not lining up, can't figure out how the hoses are supposed to run.. just not going well. I managed to at least get it together enough to test fit. Looks good. All the other issues are minor and will get resolved later.
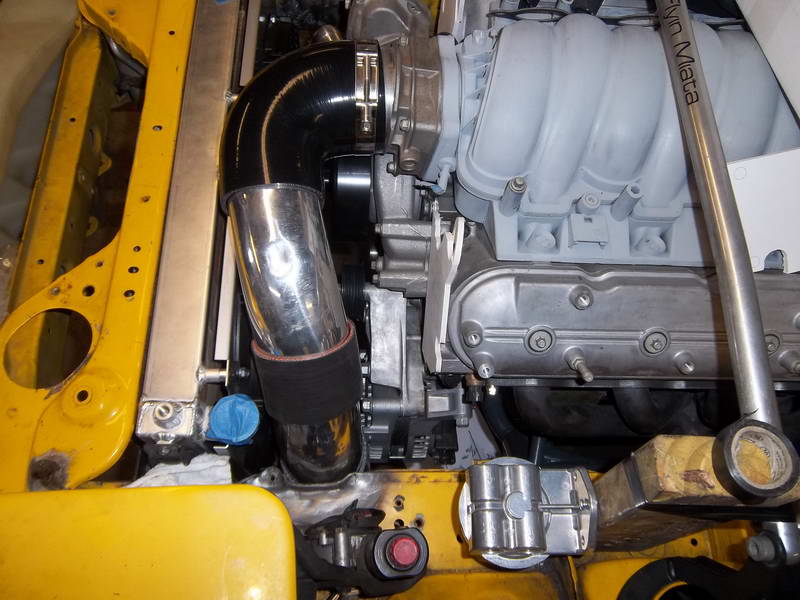
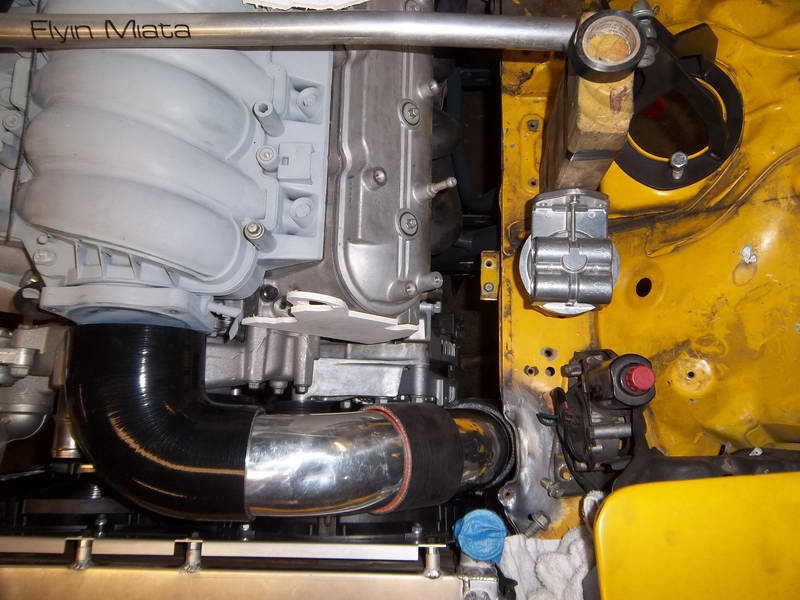
True Cold Air Intake - It's going to be tight.
I want the filter in front of the driver front wheel for cold air pickup. I think I can make it work, but not 100% sure. Going to have to trim the lip on the frame rail to give me a little more room to work.
Coolant Hose Routing - Test fit the upper, lower and heater hoses.
Upper needs a cut/splice and should be fine, and heater hoses will be fine (and simple).
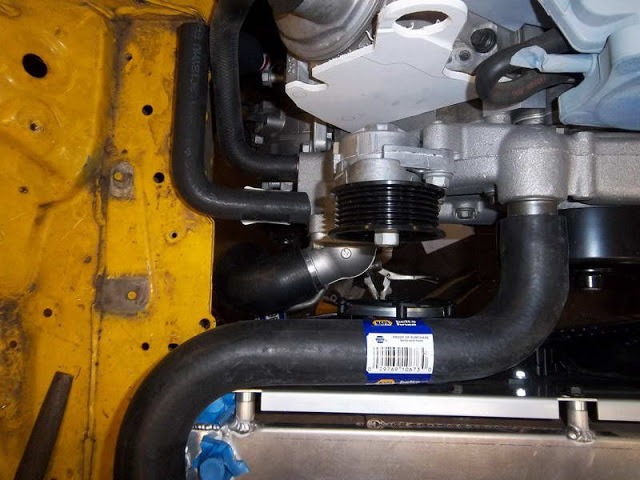
Potential heater core fittings location, not sure if this is the one or not but it's an option.
Lower almost works if the neck pointed down a little more? Might be able to make it fit. Glad I'm not trying to route a sway in front of the pulleys!
________________________________________
Radiator Fans & Shroud - Assembled the shroud with the SPAL fans, looks good. Once I tried to attach to the radiator, it all went to hell. Missing bolts, bolts I have are wrong length, overflow fitting stripped out, holes not lining up, can't figure out how the hoses are supposed to run.. just not going well. I managed to at least get it together enough to test fit. Looks good. All the other issues are minor and will get resolved later.
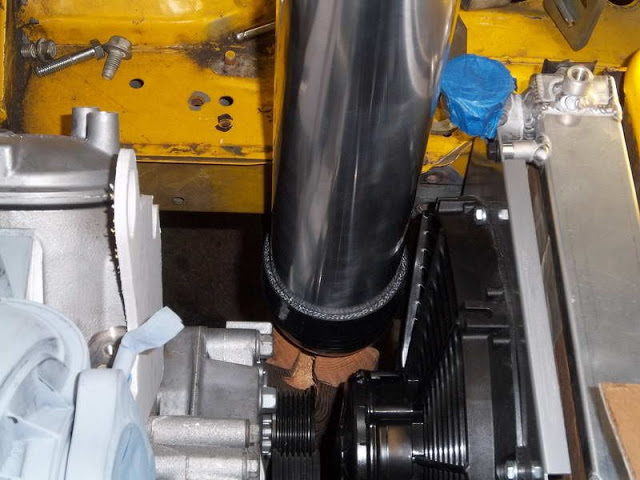
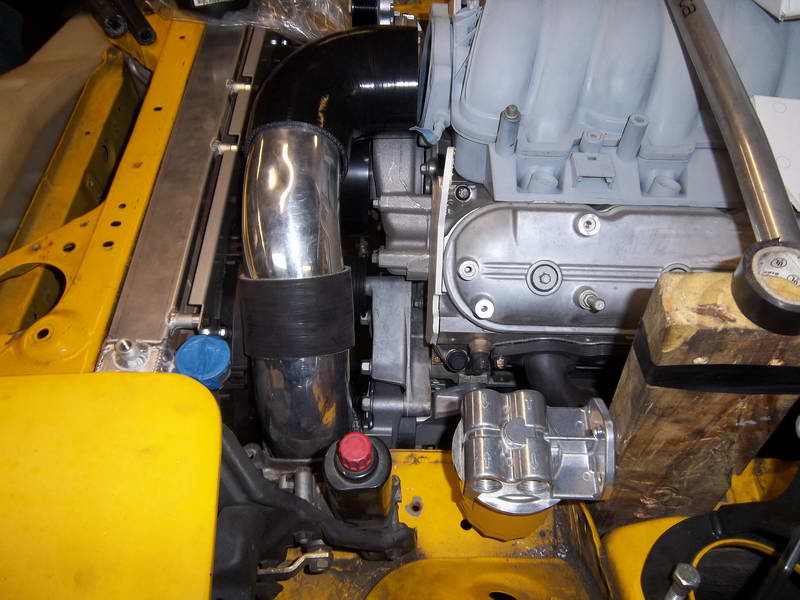
True Cold Air Intake - It's going to be tight.
I want the filter in front of the driver front wheel for cold air pickup. I think I can make it work, but not 100% sure. Going to have to trim the lip on the frame rail to give me a little more room to work.
Coolant Hose Routing - Test fit the upper, lower and heater hoses.
Upper needs a cut/splice and should be fine, and heater hoses will be fine (and simple).
Potential heater core fittings location, not sure if this is the one or not but it's an option.
Lower almost works if the neck pointed down a little more? Might be able to make it fit. Glad I'm not trying to route a sway in front of the pulleys!
Thread Starter
V8 Miata Participant
Joined: Nov 2010
Posts: 286
Likes: 3
From: Grand Rapids, MI
6th March 2011 01:00
________________________________________
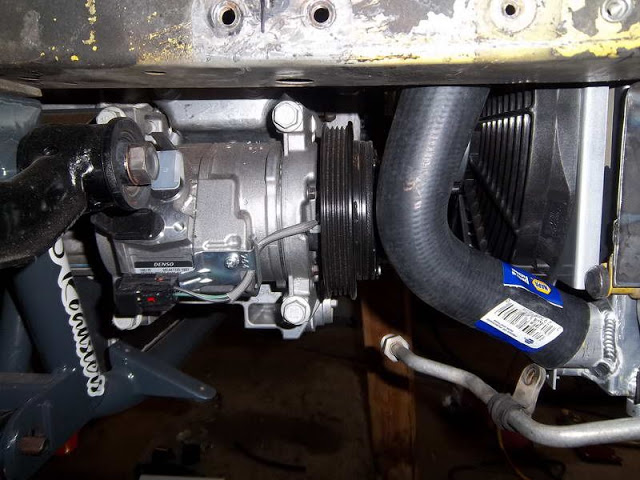
AC Lines - Took some measurements so I can figure out what adapter block I need.
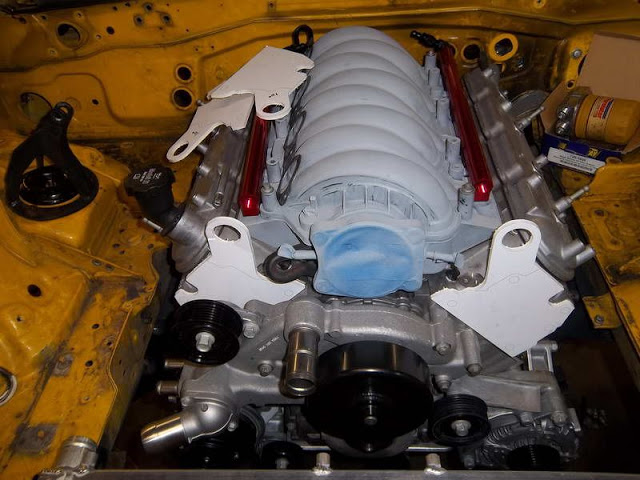
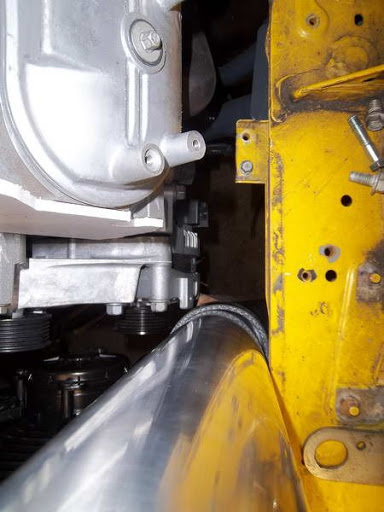
Remote Oil Filter - So here is my big plan.. I am entertaining the idea of putting the remote oil filter on the front of the driver's head. This helps balance the engine visually, puts it in an accessible location, and solves the issue of having no place for it.
Going to be tight around the CAI but I think it will work out.
________________________________________
AC Lines - Took some measurements so I can figure out what adapter block I need.
Remote Oil Filter - So here is my big plan.. I am entertaining the idea of putting the remote oil filter on the front of the driver's head. This helps balance the engine visually, puts it in an accessible location, and solves the issue of having no place for it.
Going to be tight around the CAI but I think it will work out.
Thread Starter
V8 Miata Participant
Joined: Nov 2010
Posts: 286
Likes: 3
From: Grand Rapids, MI
7th March 2011 00:11
________________________________________
Build Update:
Fan Shroud - Photo:
Cold Air Intake - Messed around with it some more. Ignore the dented and scratched pipes, mock up pieces will be replaced with nice stuff.
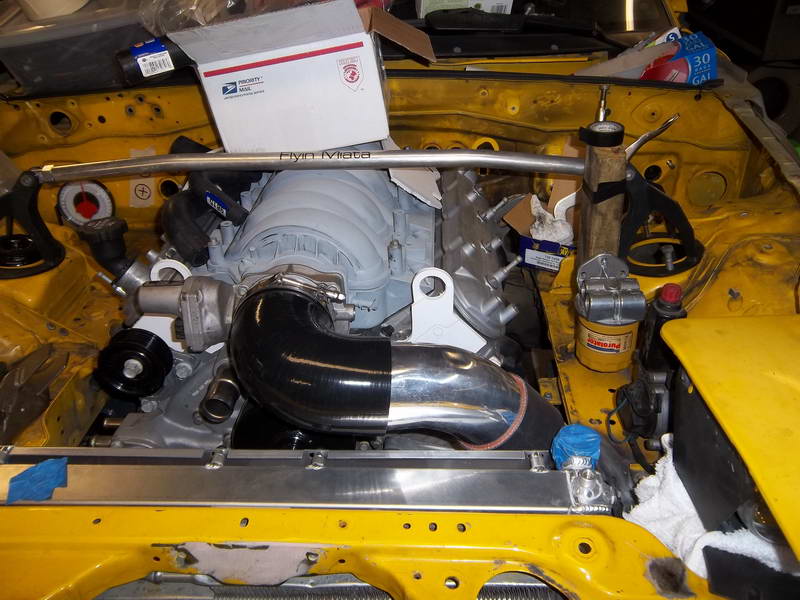
The approximate layout of the intake, minus filter:
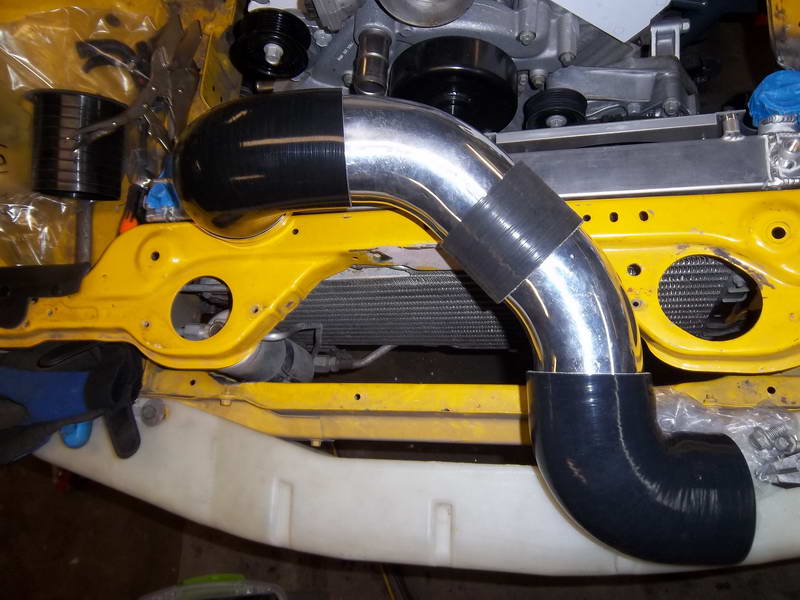
Top-down clearance, notice the gray area of the body; heated it and bent it up to add clearance, looks almost factory, I must say.
________________________________________
Build Update:
Fan Shroud - Photo:
Cold Air Intake - Messed around with it some more. Ignore the dented and scratched pipes, mock up pieces will be replaced with nice stuff.
The approximate layout of the intake, minus filter:
Top-down clearance, notice the gray area of the body; heated it and bent it up to add clearance, looks almost factory, I must say.
Thread Starter
V8 Miata Participant
Joined: Nov 2010
Posts: 286
Likes: 3
From: Grand Rapids, MI
7th March 2011 00:12
________________________________________
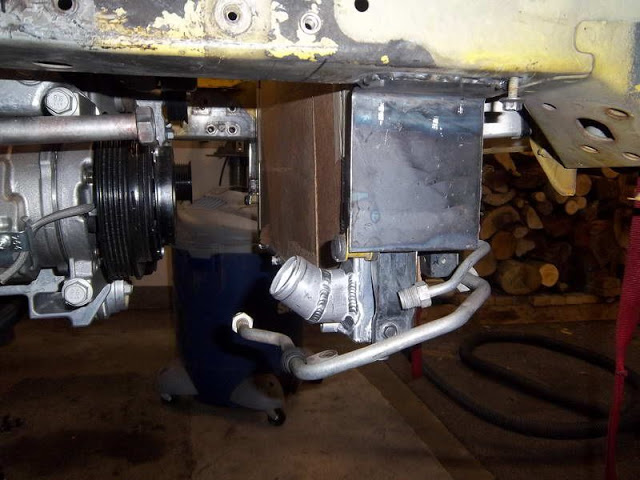
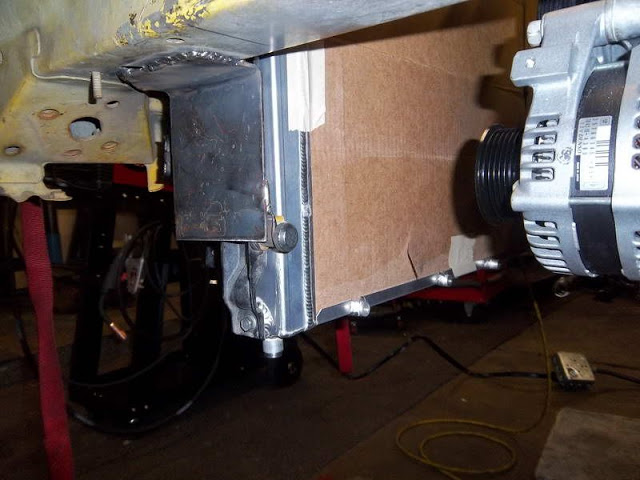
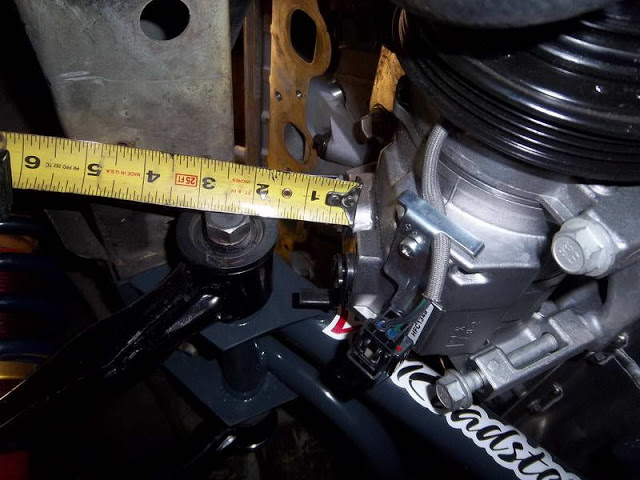
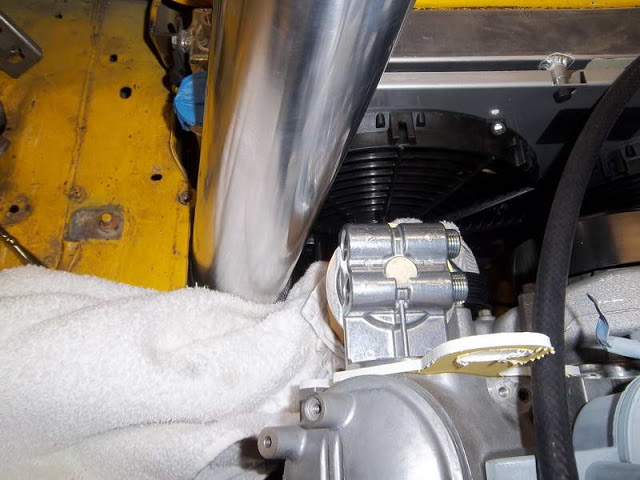
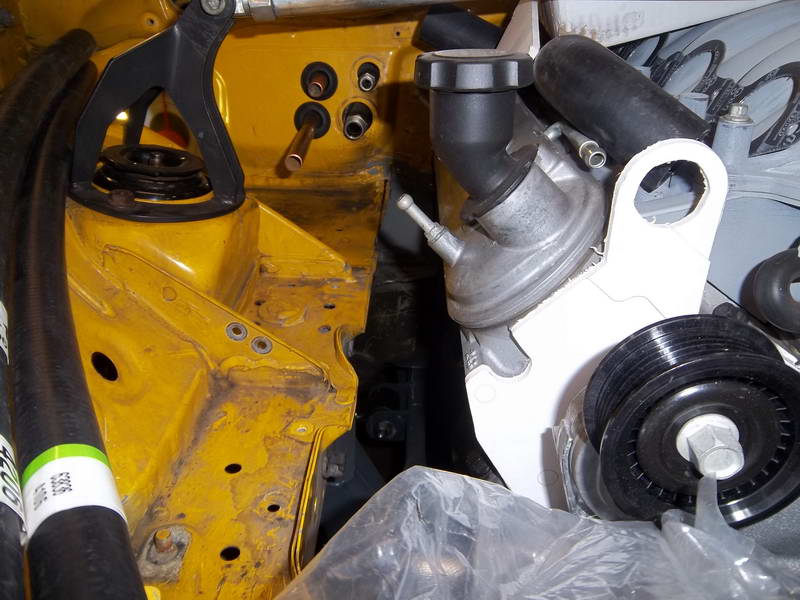
Remote Oil Filter - I don't think the oil filter will work on the head plate... so went with the ever-popular 2x4 mounting method. Can't put it where I want, so think I am going to rig up a small mount plate and stick it here:
I think that will work out fine, and look nice. Hose routing is simple, will 90 out of it straight down and route inside the cradle away from the header, right to the fittings on the side of the pan. If I want to add the oil cooler, I may flip it to the other side, we shall see. Still working that part out.
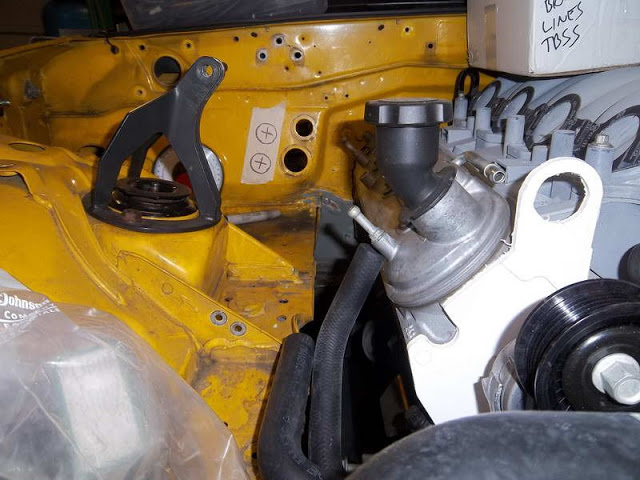
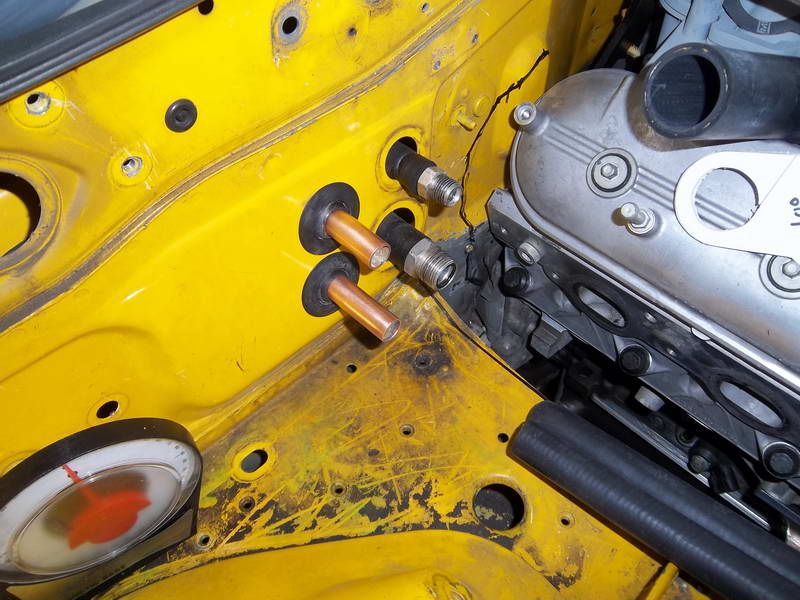
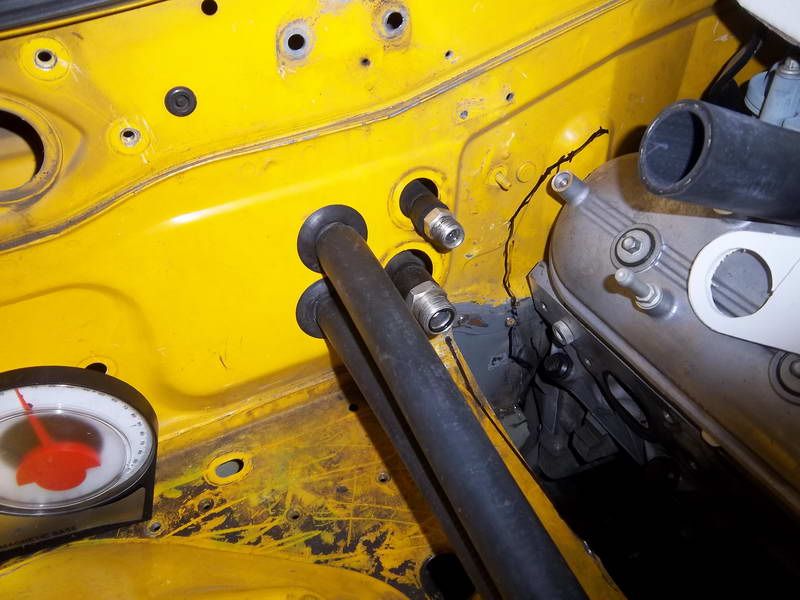
Heat Core Inlet/Outlet Relocation - Drilled the firewall, came out nicely I think:
Closer:
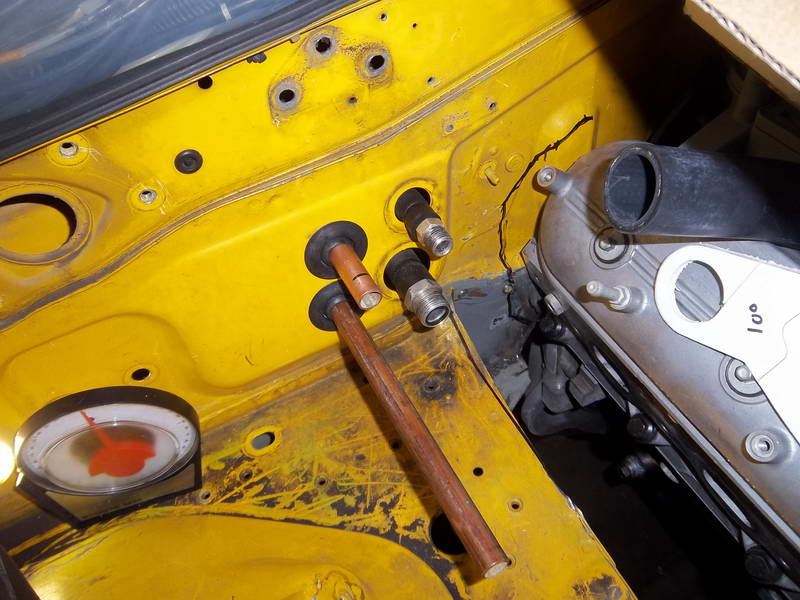
Inside view:
At the heater core:
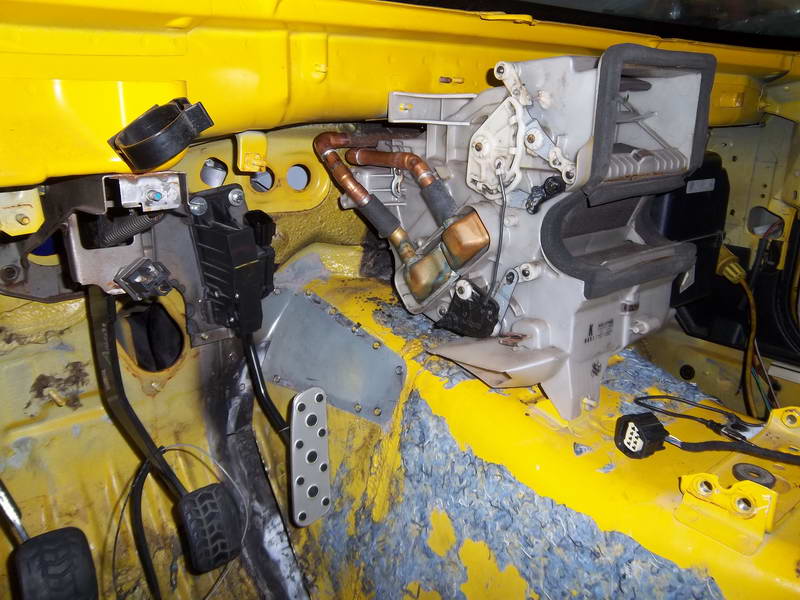
Picked up a couple of heater hoses at Autozone.. perfect. One 5/8", the other 3/4". Both about 24"+ long with a simple 90 at one end. The firewall end is not done yet, hope to finish it up tomorrow night and pressure test it. Will get some measurements of the final pieces, etc. Need to figure out a good way to support the lines inside the cabin, not sure on that yet.
________________________________________
Remote Oil Filter - I don't think the oil filter will work on the head plate... so went with the ever-popular 2x4 mounting method.
Can't put it where I want, so think I am going to rig up a small mount plate and stick it here:I think that will work out fine, and look nice. Hose routing is simple, will 90 out of it straight down and route inside the cradle away from the header, right to the fittings on the side of the pan. If I want to add the oil cooler, I may flip it to the other side, we shall see. Still working that part out.
Heat Core Inlet/Outlet Relocation - Drilled the firewall, came out nicely I think:
Closer:
Inside view:
At the heater core:
Picked up a couple of heater hoses at Autozone.. perfect. One 5/8", the other 3/4". Both about 24"+ long with a simple 90 at one end. The firewall end is not done yet, hope to finish it up tomorrow night and pressure test it. Will get some measurements of the final pieces, etc. Need to figure out a good way to support the lines inside the cabin, not sure on that yet.
Thread Starter
V8 Miata Participant
Joined: Nov 2010
Posts: 286
Likes: 3
From: Grand Rapids, MI
7th March 2011 13:41
________________________________________
Only one: Not done yet. It's all cut to fit, just need to make final sweats on the inside, figure out a mounting system, then cut the stubs to length (about 2" or so out from firewall))
Not done yet, either. The plan was this:
1. Preliminary cuts of firewall and frame rails
2. Tunnel Widening based on various writeups and build diary photos
3. Assemble driveline to the point of being physically the right size and shape (all accessories are jsut ont he motor, not torqued, etc)
4. Stuff driveline in
5. Mark any issues found (passenger head at firewall for example).
6. Mock up everything involving cutting, drilling, grinding, welding. (DBW pedal, heater core reloc, rad, AC cond, remote oil filter, sway mounts, etc etc)
7. Remove Driveline
8. Finish tunnel, frame rail, and engine bay welding
9. Then cleanup for engine bay paint, engine paint, etc.
So the braces will go back on once the tunnel is done (which is isn't yet.)
Good catch, tho!
[Looks like work is going to be long hours this week, not sure I will get any car time in until next Thursday, dang it... deadline on the 16th]
________________________________________
Quote:
________________________________________
Originally Posted by DaleMiata (Post 5039566)
Love the heater hose relocation wally! looks great.
Any reason to have the lower pipe stick out so far?
________________________________________
________________________________________
Originally Posted by DaleMiata (Post 5039566)
Love the heater hose relocation wally! looks great.
Any reason to have the lower pipe stick out so far?
________________________________________
It's all cut to fit, just need to make final sweats on the inside, figure out a mounting system, then cut the stubs to length (about 2" or so out from firewall))
Quote:
________________________________________
Originally Posted by Vettedrmr (Post 5039813)
Just noticed, no tunnel braces?
________________________________________
________________________________________
Originally Posted by Vettedrmr (Post 5039813)
Just noticed, no tunnel braces?
________________________________________
1. Preliminary cuts of firewall and frame rails
2. Tunnel Widening based on various writeups and build diary photos
3. Assemble driveline to the point of being physically the right size and shape (all accessories are jsut ont he motor, not torqued, etc)
4. Stuff driveline in
5. Mark any issues found (passenger head at firewall for example).
6. Mock up everything involving cutting, drilling, grinding, welding. (DBW pedal, heater core reloc, rad, AC cond, remote oil filter, sway mounts, etc etc)
7. Remove Driveline
8. Finish tunnel, frame rail, and engine bay welding
9. Then cleanup for engine bay paint, engine paint, etc.
So the braces will go back on once the tunnel is done (which is isn't yet.)
Good catch, tho!
[Looks like work is going to be long hours this week, not sure I will get any car time in until next Thursday, dang it... deadline on the 16th]
Thread Starter
V8 Miata Participant
Joined: Nov 2010
Posts: 286
Likes: 3
From: Grand Rapids, MI
8th March 2011 13:45
________________________________________
Good Call. Was planning to wrap them somehow, just not sure how yet.
________________________________________
Quote:
________________________________________
Originally Posted by Ken Hill (Post 5042163)
I wonder how much heat will be thrown off the copper tubing running from the core to the holes in the firewall. Perhaps some insulation on the tubes would keep cabin and foot well temperatures down.
________________________________________
________________________________________
Originally Posted by Ken Hill (Post 5042163)
I wonder how much heat will be thrown off the copper tubing running from the core to the holes in the firewall. Perhaps some insulation on the tubes would keep cabin and foot well temperatures down.
________________________________________
Thread Starter
V8 Miata Participant
Joined: Nov 2010
Posts: 286
Likes: 3
From: Grand Rapids, MI
8th March 2011 22:57
________________________________________
Got a reprieve from work, so was able to put a few hours in.
Build Update:
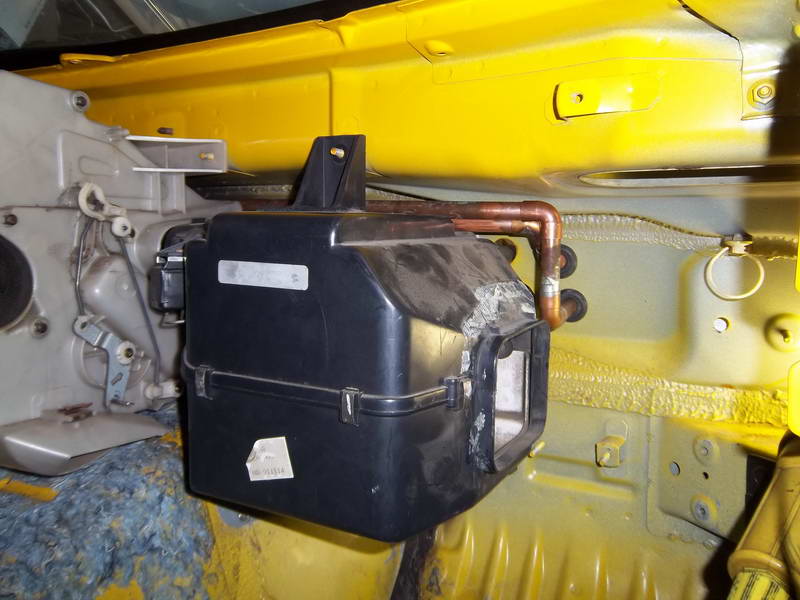
Heater Core Inlet/Outlet Relocation - Finished! Welded a stud neat the firewall for a support.
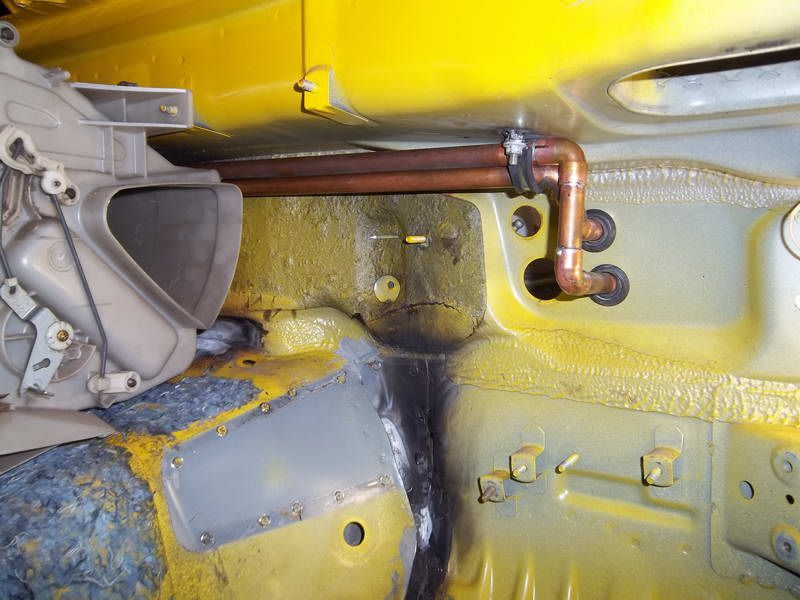
Also, heated the AC box and pushed in the corner a little for some clearance.
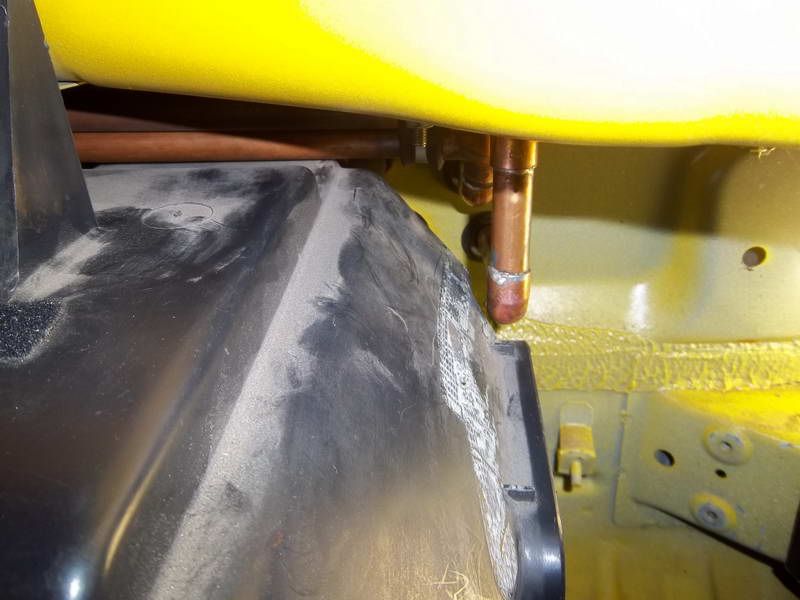

Trimmed the ends up.
Used the Autozone hoses, trimmed to fit and good to go! Still need to rig up a strap at the passenger strut tower but otherwise in good shape.
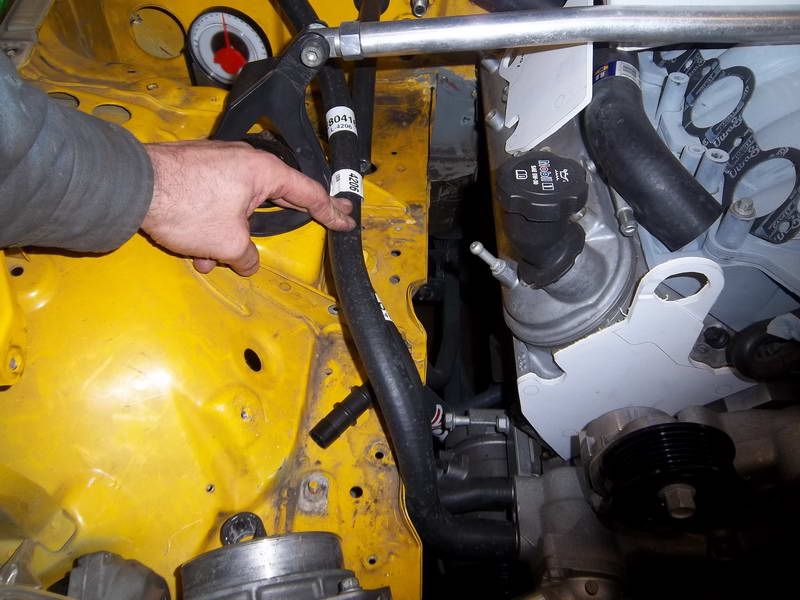
Pressure checked the lines once but then adjusted so need to redo that.
________________________________________
Got a reprieve from work, so was able to put a few hours in.
Build Update:
Heater Core Inlet/Outlet Relocation - Finished! Welded a stud neat the firewall for a support.
Also, heated the AC box and pushed in the corner a little for some clearance.
Trimmed the ends up.
Used the Autozone hoses, trimmed to fit and good to go! Still need to rig up a strap at the passenger strut tower but otherwise in good shape.
Pressure checked the lines once but then adjusted so need to redo that.
Thread Starter
V8 Miata Participant
Joined: Nov 2010
Posts: 286
Likes: 3
From: Grand Rapids, MI
10th March 2011 13:49
________________________________________
Build Update:
Parts Arrival - BMW E36 Swaybars arrived.. a 24mm from a '97 328i and a 25.5mm from a '99 323i. Didn't measure them up, but they look quite promising.
Some unconfirmed info from various sources for anyone considering this route... do your own homework, because there is some conflicting info out there!:
All US E36 Models
318i, 318is, 318ic (1992�1995) M42B18
318ti (1994�1996) M42B18 [Wrong mounting point (attached to strut)]
318i, 318ti (1996�1998) M44B19
320i (1994) M52B20
323i, 323is, 323ic (1996�1998) M52B25
325i, 325is, 325ic (1992) M50B25
325i, 325is, 325ic (1993�1995) M50TUB25
328i, 328is, 328ic (1996�1998) M52B28
M3 (1995-1999 coupe, 1997-1998 sedan, 1998-1999 convertible) S50B30US (1995) and S52B32 (1996�1999) [Wrong mounting point (attached to strut)]
22.5mm - spring rate ~375 lb/inch
BMW 320i 92 Front; 22.5mm
BMW 325i 92 Front; Cpe and Sdn, 22.5mm
23mm- spring rate ~409 lb/inch
BMW 318i 93 Front; (Cpe & Sdn), 23mm
BMW 318i 94-95 Front; 23mm
24mm- spring rate ~486 lb/inch
BMW 320i 93-95 Front
BMW 323i 98 Front; 24mm
BMW 323i 99 Front; Cpe and Conv, 24mm
BMW 325i 93 Front; Cpe and Sdn (24mm)
BMW 325i 94-95 Front
BMW 328i 96-98 Front; 24mm
BMW 328i 99 Front; Cpe and Conv, 24mm
25.5mm- spring rate ~619 lb/inch
BMW 318i 96-98 Front; 25.5mm (Conv)
BMW 323i 98 Front; 25.5mm
BMW 323i 99 Front; Cpe and Conv, 25.5mm
BMW 328i 96-98 Front; 25.5mm
BMW 328i 99 Front; Cpe and Conv, 25.5mm
All the spring rates are calculated based on the distance between the turns on the arms, so that may be subjective but all were using the same location so you can get an 'order of magnitude' change difference between bars at least.
Mazda Miata
Stock 1.6 - spring rate ~144 lb/inch
FM V8 solid (1")- spring rate ~540 lb/inch
FM non-V8 solid (1") - spring rate ~497 lb/inch
Thread Starter
V8 Miata Participant
Joined: Nov 2010
Posts: 286
Likes: 3
From: Grand Rapids, MI
10th March 2011 18:41
________________________________________
Apparently I recieved a pair of 24mm bars... grrrr... contacting the seller to get resolved. Fun fun.
Mockup continues, regardless.
________________________________________
Quote:
________________________________________
Originally Posted by Wallyman (Post 5046294)
Build Update:
Parts Arrival - BMW E36 Swaybars arrived.. a 24mm from a '97 328i and a 25.5mm from a '99 323i. Didn't measure them up, but they look quite promising.
________________________________________
________________________________________
Originally Posted by Wallyman (Post 5046294)
Build Update:
Parts Arrival - BMW E36 Swaybars arrived.. a 24mm from a '97 328i and a 25.5mm from a '99 323i. Didn't measure them up, but they look quite promising.
________________________________________
Mockup continues, regardless.
Thread Starter
V8 Miata Participant
Joined: Nov 2010
Posts: 286
Likes: 3
From: Grand Rapids, MI
11th March 2011 13:40
________________________________________
Build Update:
Parts Bought - Just picked up some 3"w x 4"h x 4"l x 1/8" thick steel tube for the sway mounts (the FM heavy duty ones are going up for sale).. also got some 1/4" aluminum to shim the mount if I need to. Following Shawn's lead on the sway setup he is doing, need to source the Energy Suspension greasable mounts yet then I can finish that up.
Big thanks to Shawn for chatting last night and walking me through his setup, very helpful. Thanks Dude!!!
Thread Starter
V8 Miata Participant
Joined: Nov 2010
Posts: 286
Likes: 3
From: Grand Rapids, MI
14th March 2011 22:34
________________________________________
Build Update:
Parts Ordered - Energy Suspension 9.5160R greasable sway bar mounts, for a 24mm bar (see E36 bar below). Ordered up some 3.5" sweep 90s too, not sure if they will help but figured it's worth trying out. Might fit nicely in my setup, or look nice in my parts bins.
Parts Refund - ebay junkyard I bought the sways off refunded the full price including shipping for the wrong bar they sent me, and told me to keep it.. sweet! So, I have a spare 24mm E36 sway bar to get rid of.. Think I am going to just proceed with the 24mm for now, and if I stumble across a 25.5mm cheap I'll snap it up later.
Parts Arrival - CAI parts, supplimental. Pair of 3.5" aluminum 45 degree elbows, a 3.5" silicone coupler, a 3.5" to 3/75" silicone coupler (MAF inlet), and a few more T-Bolt straps.
BMW E36 Front Sway Bar - Doing some research on end links and sway mounts. Sway mounts should be easy.... following Shawn's lead, going to use the Energy Suspension 9.5160 greaseable sway bar mounts (for a 24mm bar).
End links, slightly more involved. I need to piece together some adjustable end links (my old Racing Beat ones are pretty tired), have found no less than 15 options from $17.80 to $190.00 (yikes!). My adjustable end links are set at 3.25" center to center on the mount holes, and that seems ok or maybe just a touch long. If anything I might go a tad shorter to lower the bar slightly away from the alternator and AC compressor, so I need to be able to get under 3.25". More to come once I sort it out..
New Tool - Not really build related, but picked up the Harbor Freight sandblast cabinet. It finally went on sale and snapped it up for around $185 or so. Running out of space in the garage, though (seriously) so not sure where it will end up. For now it's shoved over by the woodstove. Have to do some air line plumbing to get it hooked up, which was on the to-do list anyhow.
________________________________________
Build Update:
Parts Ordered - Energy Suspension 9.5160R greasable sway bar mounts, for a 24mm bar (see E36 bar below). Ordered up some 3.5" sweep 90s too, not sure if they will help but figured it's worth trying out. Might fit nicely in my setup, or look nice in my parts bins.
Parts Refund - ebay junkyard I bought the sways off refunded the full price including shipping for the wrong bar they sent me, and told me to keep it.. sweet! So, I have a spare 24mm E36 sway bar to get rid of.. Think I am going to just proceed with the 24mm for now, and if I stumble across a 25.5mm cheap I'll snap it up later.
Parts Arrival - CAI parts, supplimental.
Pair of 3.5" aluminum 45 degree elbows, a 3.5" silicone coupler, a 3.5" to 3/75" silicone coupler (MAF inlet), and a few more T-Bolt straps. BMW E36 Front Sway Bar - Doing some research on end links and sway mounts. Sway mounts should be easy.... following Shawn's lead, going to use the Energy Suspension 9.5160 greaseable sway bar mounts (for a 24mm bar).
End links, slightly more involved. I need to piece together some adjustable end links (my old Racing Beat ones are pretty tired), have found no less than 15 options from $17.80 to $190.00 (yikes!). My adjustable end links are set at 3.25" center to center on the mount holes, and that seems ok or maybe just a touch long. If anything I might go a tad shorter to lower the bar slightly away from the alternator and AC compressor, so I need to be able to get under 3.25". More to come once I sort it out..
New Tool - Not really build related, but picked up the Harbor Freight sandblast cabinet. It finally went on sale and snapped it up for around $185 or so. Running out of space in the garage, though (seriously) so not sure where it will end up. For now it's shoved over by the woodstove. Have to do some air line plumbing to get it hooked up, which was on the to-do list anyhow.


