The Yellow Submarine goes Nuclear
 07-23-2016, 10:14 PM
#201
V8 Miata Participant
Thread Starter

18th March 2011 23:49
________________________________________
Build Update:
Header Dimples - As requested, photos of the dimples in the driver's header. This was as delivered, and dimples were put in by Flyin Miata for Elvis where these headers came from. I assume it will fit my car as well but time will tell.


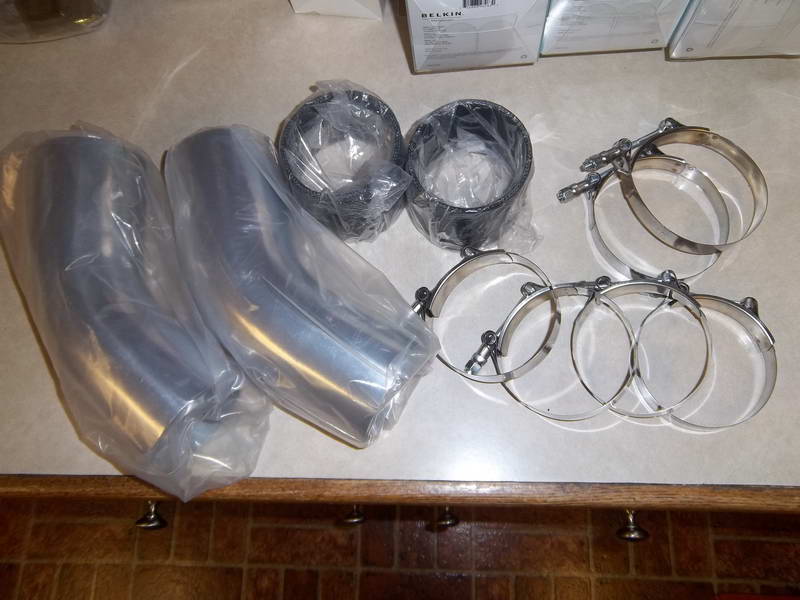
Parts Arrived - The 90* elbows came in (no photos tho.. most likely won't be using them anyhow). Photos of the 45* elbows and silicone couplers:
The Energy Suspension sway mounts:

New Tool - Been looking for one of these for a long time... a horizontal band saw! Picked up this 1978 vintage old skool Cummin brand band saw off Craiglist, a steal at $80!

Even came on that fancy wooden cart. [/QUOTE]
________________________________________
Quote:
________________________________________
Originally Posted by Wallyman (Post 5055996)
You got it, will be Friday night at the earliest.. Will post that up with the header dimple photos. I'll give you some measurements, too.
________________________________________
________________________________________
Originally Posted by Wallyman (Post 5055996)
You got it, will be Friday night at the earliest.. Will post that up with the header dimple photos. I'll give you some measurements, too.
________________________________________
Header Dimples - As requested, photos of the dimples in the driver's header. This was as delivered, and dimples were put in by Flyin Miata for Elvis where these headers came from. I assume it will fit my car as well but time will tell.
Parts Arrived - The 90* elbows came in (no photos tho.. most likely won't be using them anyhow). Photos of the 45* elbows and silicone couplers:
The Energy Suspension sway mounts:
New Tool - Been looking for one of these for a long time... a horizontal band saw! Picked up this 1978 vintage old skool Cummin brand band saw off Craiglist, a steal at $80!
Even came on that fancy wooden cart.
[/QUOTE]
 07-23-2016, 10:15 PM
#202
V8 Miata Participant
Thread Starter
18th March 2011 23:50
________________________________________
Sway bar mounts, version 2.0 - Mocked up the E36 bar using the 3"w x 4"h x 4"l x 1/8" thich tube. Positioning looks good, but not liking how it would interfere with the CAI.. and the visual isn't quite there for me. I've gone a different route (below) but here's the visual for anyone else trying this path:


Sway bar mounts, verison 3.0 - Decided to do some custom mounts, similar to the stock style. Did a bunch of measurements and whipped this up in AutoCAD:

Yellow = frame rail
Blue = sway bar
Orange = sway mount
Red = sway bushing
Black = steel I need to create
All measurements shown in inches. I cut the pieces using a digital caliper and the band saw per those measurements, and prepared to weld them:


________________________________________
Sway bar mounts, version 2.0 - Mocked up the E36 bar using the 3"w x 4"h x 4"l x 1/8" thich tube. Positioning looks good, but not liking how it would interfere with the CAI.. and the visual isn't quite there for me. I've gone a different route (below) but here's the visual for anyone else trying this path:
Sway bar mounts, verison 3.0 - Decided to do some custom mounts, similar to the stock style. Did a bunch of measurements and whipped this up in AutoCAD:
Yellow = frame rail
Blue = sway bar
Orange = sway mount
Red = sway bushing
Black = steel I need to create
All measurements shown in inches. I cut the pieces using a digital caliper and the band saw per those measurements, and prepared to weld them:
07-23-2016, 10:16 PM
#203
V8 Miata Participant
Thread Starter
18th March 2011 23:51
________________________________________
One side tacked together:

Other side tacked:

In place with Energy Suspension mounts:


Leading edge of the steel is 7 3/4" from the stud in the foreground.

The curved sharpie line is the area that has to be cut out for clearnace on the 3.5" CAI I am going to do.. still leaves plenty of metal for support.
First try came out very nice, but I think I may need to tweak it a little to offset them more towards the middle maybe 1/8" to 1/4" each. Need to look at it again tomorrow and decide.
________________________________________
One side tacked together:
Other side tacked:
In place with Energy Suspension mounts:
Leading edge of the steel is 7 3/4" from the stud in the foreground.
The curved sharpie line is the area that has to be cut out for clearnace on the 3.5" CAI I am going to do.. still leaves plenty of metal for support.
First try came out very nice, but I think I may need to tweak it a little to offset them more towards the middle maybe 1/8" to 1/4" each. Need to look at it again tomorrow and decide.
07-23-2016, 10:17 PM
#204
V8 Miata Participant
Thread Starter
19th March 2011 14:33
________________________________________
Build Update:
Sway Bar Mounts - Pulled the driver's side unit apart and notched it for the CAI routing.


________________________________________
Build Update:
Sway Bar Mounts - Pulled the driver's side unit apart and notched it for the CAI routing.
07-23-2016, 10:18 PM
#205
V8 Miata Participant
Thread Starter
19th March 2011 22:02
________________________________________
Build Update:
Remote Oil Filter Mount - Done! Got a little side-tracked with it, but whatever, it had to be done sometime. Different than the previous mock-up, but super pleased with how it turned out. Just enough space to remove the filter, simple and elegant, and not bulky. Ugly bolts are temporary.


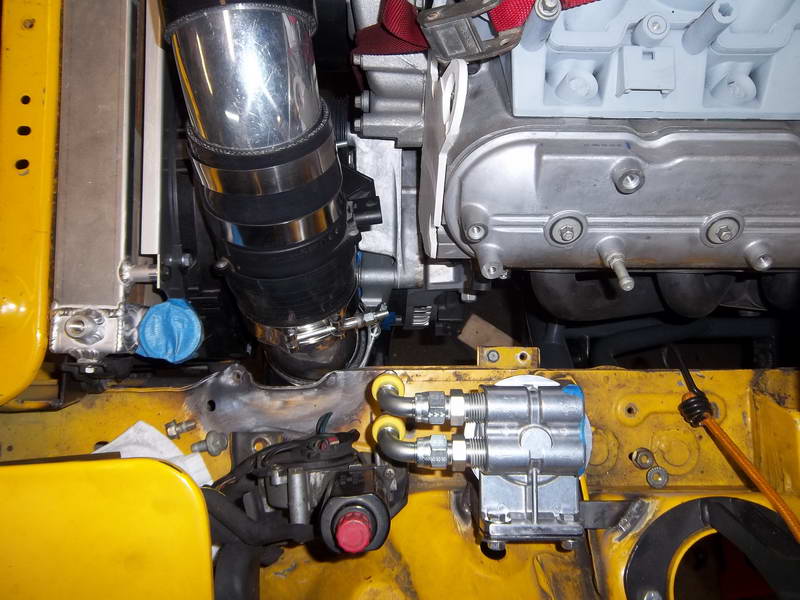
True Cold Air intake - Very close to done.. I think I have the right configuration of pipes and elbows now. Very tricky with all the joints to get things to position perfectly. Will probably pull the old nose out of the attic and make sure it has proper clearance in there prior to final welding of the sway mount. Still need to source a filter.


________________________________________
Build Update:
Remote Oil Filter Mount - Done! Got a little side-tracked with it, but whatever, it had to be done sometime. Different than the previous mock-up, but super pleased with how it turned out. Just enough space to remove the filter, simple and elegant, and not bulky. Ugly bolts are temporary.
True Cold Air intake - Very close to done.. I think I have the right configuration of pipes and elbows now. Very tricky with all the joints to get things to position perfectly. Will probably pull the old nose out of the attic and make sure it has proper clearance in there prior to final welding of the sway mount. Still need to source a filter.
07-23-2016, 10:18 PM
#206
V8 Miata Participant
Thread Starter
19th March 2011 22:05
________________________________________

Trimmed up the TB end elbow to angle the pipe towards the engine and away from the radiator.

Just a bit of clearance at the radiator.

Tight to the sway mount, a little more trimming is required.

Sway Mounts - Once the CAI is good, will finish them up tomorrow.

Total side note, was finally able to sell my old LT1 I had in the first RX7 build.. $80 for a complete long block. Guess they aren't as expensive as they used to be. Whatever, paid for the band saw!
________________________________________
Trimmed up the TB end elbow to angle the pipe towards the engine and away from the radiator.
Just a bit of clearance at the radiator.
Tight to the sway mount, a little more trimming is required.
Sway Mounts - Once the CAI is good, will finish them up tomorrow.
Total side note, was finally able to sell my old LT1 I had in the first RX7 build.. $80 for a complete long block. Guess they aren't as expensive as they used to be. Whatever, paid for the band saw!
07-23-2016, 10:20 PM
#207
V8 Miata Participant
Thread Starter
20th March 2011 19:32
________________________________________
Build Update:
Heater Hoses - Finished them up. Heated up the frame rail and bent some additional clearance.


Welded a tab on the passenger strut tower and strapped the hoses down there.

Very pleased with the routing.

The two hoses I used are 63836 and 63936, both are simple elbows with one really long leg... one is a 5/8", the other is a 3/4". I cut and spliced them at the strut tower and converted the 3/4" to 5/8" at that point.
Remote Oil Filter - Heated up the frame rail and bent some additional clearance over there for the hoses.

Started on the hoses, which got me sidetracked into the oil cooler... I am thinking about using it again, just need to get it repaired since one fitting stripped out and the other one is siezed (which means it will strip out too). Going to take it to a radiator shop and see if they can weld a couple of new fittings on it.
Air Conditioning - Started a new thread dealing with the CTS-V accessories and the AC lines and whatnot needed, thread located here. Not sure where I am going to source up the proper blocks, maybe the shop I pick to fix the oil cooler can help with it, who knows.
________________________________________
Build Update:
Heater Hoses - Finished them up. Heated up the frame rail and bent some additional clearance.
Welded a tab on the passenger strut tower and strapped the hoses down there.
Very pleased with the routing.
The two hoses I used are 63836 and 63936, both are simple elbows with one really long leg... one is a 5/8", the other is a 3/4". I cut and spliced them at the strut tower and converted the 3/4" to 5/8" at that point.
Remote Oil Filter - Heated up the frame rail and bent some additional clearance over there for the hoses.
Started on the hoses, which got me sidetracked into the oil cooler... I am thinking about using it again, just need to get it repaired since one fitting stripped out and the other one is siezed (which means it will strip out too). Going to take it to a radiator shop and see if they can weld a couple of new fittings on it.
Air Conditioning - Started a new thread dealing with the CTS-V accessories and the AC lines and whatnot needed, thread located here. Not sure where I am going to source up the proper blocks, maybe the shop I pick to fix the oil cooler can help with it, who knows.
07-23-2016, 10:21 PM
#208
V8 Miata Participant
Thread Starter
21st March 2011 16:12
________________________________________
385 tasks, 200 started (51.95%), 165 done (42.86%).. 220 left. $21,857.39 spent to date.
This fabrication really has slowed me down.. burning hours on the littlest things. I can't wait to get past it to the wiring and paint and whatnot, hopefully it will speed up then. I do feel really good about the detail work, however. The little things are coming out exactly how I envision them and the effect is excatly what I want. Remote oil filter looks trick, TCAI is going to be slick, heater core reloc very much cleans up the engine, sway bar is going to be sweet.. the fuel system should be very subdued/subtle too. So, time well spent just taking (what seems like) forever.
Doesn't help I got sidetracked on Sunday and cleaned the entire garage, put every tool away, sorted everything on the workbench, bought more storage containers and labelled things and put them away... was out there 10 hours, spent 2 on the actual car. But a clean and organized garage is critical to the process (at least at my place!) so while it takes away I think it pays in spades later.
Build Update:
Oil Cooler - Got a Mocal cooler I am going to reuse, but the BSP fittings stripped out. Went to my local speedshop and picked up a pair of aluminum -8AN weld on fittings, and dropped it all off to my local Blacksmith (yes, blacksmith.. Ebling and Sons Blacksmith.. gotta love the name!) so they can weld it up. Should have it back by end of week. In the mean time I plan to buy some fittings for it (aluminum -8AN 90s), so when it is done I can mock it up and get all the oil lines done.
Oil Pressure Gauges - Ordered up some -3AN to 1/8NPT fittings to allow me to remote mount the sending units. Once I get a chance, I'll measure out the lines needed. aforementioned speedshop has premade -3AN stainless lines in stock fairly cheap in various lengths so I can just pop in there and snap something up.
True Cold Air intake - need to order up a 4" t-bolt clamp, a 3.5" metal coupler and a K&N filter (either RU-5114 and CM-4508DK or RX-4140 and RU-1470PK [filter and protective sock]). Once I have those, I should be able to finish the mockup and devise a mount location in the wheel well or something.
Air Conditioning - sent a note to DocsBlocks for some clarification on a couple of parts, waiting on a reply. Just need to figure out how to marry GM and Mazda fittings together on the same line.
________________________________________
Quote:
________________________________________
Originally Posted by Irish350
so hows the to do list, wally?
________________________________________
________________________________________
Originally Posted by Irish350
so hows the to do list, wally?
________________________________________
This fabrication really has slowed me down.. burning hours on the littlest things. I can't wait to get past it to the wiring and paint and whatnot, hopefully it will speed up then. I do feel really good about the detail work, however. The little things are coming out exactly how I envision them and the effect is excatly what I want. Remote oil filter looks trick, TCAI is going to be slick, heater core reloc very much cleans up the engine, sway bar is going to be sweet.. the fuel system should be very subdued/subtle too. So, time well spent just taking (what seems like) forever.
Doesn't help I got sidetracked on Sunday and cleaned the entire garage, put every tool away, sorted everything on the workbench, bought more storage containers and labelled things and put them away... was out there 10 hours, spent 2 on the actual car. But a clean and organized garage is critical to the process (at least at my place!) so while it takes away I think it pays in spades later.
Build Update:
Oil Cooler - Got a Mocal cooler I am going to reuse, but the BSP fittings stripped out. Went to my local speedshop and picked up a pair of aluminum -8AN weld on fittings, and dropped it all off to my local Blacksmith (yes, blacksmith.. Ebling and Sons Blacksmith.. gotta love the name!) so they can weld it up. Should have it back by end of week. In the mean time I plan to buy some fittings for it (aluminum -8AN 90s), so when it is done I can mock it up and get all the oil lines done.
Oil Pressure Gauges - Ordered up some -3AN to 1/8NPT fittings to allow me to remote mount the sending units. Once I get a chance, I'll measure out the lines needed. aforementioned speedshop has premade -3AN stainless lines in stock fairly cheap in various lengths so I can just pop in there and snap something up.
True Cold Air intake - need to order up a 4" t-bolt clamp, a 3.5" metal coupler and a K&N filter (either RU-5114 and CM-4508DK or RX-4140 and RU-1470PK [filter and protective sock]). Once I have those, I should be able to finish the mockup and devise a mount location in the wheel well or something.
Air Conditioning - sent a note to DocsBlocks for some clarification on a couple of parts, waiting on a reply. Just need to figure out how to marry GM and Mazda fittings together on the same line.
07-23-2016, 10:23 PM
#209
V8 Miata Participant
Thread Starter
25th March 2011 20:21
________________________________________
Build Update:
Parts Recieved - Some stuff arrived:
Oil Pressure Senders
3x -3AN to NPT fittings for the oil pressure senders
Adjustable End Links
The end link stuff was ordered wrong, sent it back and ordered the right stuff. Dammit. New ones showed up today, look good!
True Cold Air Intake
4.00" T-Bolt clamp (inlet of MAF)
4.25" T-bolt isolation mount (near filter)
4.50" T-bolt clamp (in case 4.25" is too small)
3.5" stainless steel joiner tube (at filter)
Fuel System
2.25" T-bolt isolation mount (for fuel filter or fuel pump)
2.50" T-bolt clamp (in case 2.25" is too small)
Parts Bought - Bought/Ordered a slew of stuff:
Radiator Hoses
Upper Radiator Hose - WP side - Dayco B70989
Upper Radiator Hose - Rad side - Dayco C70687
Lower Radiator Hose - Dayco 70690
Oil Cooler
2x Aluminum -8AN 90* elbow to push-on hose
True Cold Air Intake
K&N RU-5114 filter
K&N CM-4508DK pre-filter 'sock'
Air Conditioning
GM 5.3L Compressor Block - Suction side - AA2209
GM 5.3L Compressor Block - Discharge side - AA2210
STANDARD DIMENSION OEM AIR CONDITIONING HOSE Size: -8 (13/32" ID) - AT012
REDUCED DIMENSION OEM AIR CONDITIONING HOSE Size: -10 (1/2" ID) - AT010
STANDARD DIMENSION OEM AIR CONDITIONING HOSE Size: -6 (5/16" ID) - AT013
FITTING-45 DEG FEMALE FLARE (FF)-ALUMINUM 7/8"-14 THRD #10 FITTING #10 HOSE -BLA1113
FITTING-STRAIGHT FEMALE O-RING (FOR) WITH SWITCH OR SERVICE PORT-ALUMINUM 5/8" - 18" THRD #6 FITTING #6 HOSE 3/16" R12 - BLA1301-2
FITTING-STRAIGHT FEMALE O-RING (FOR) WITH SWITCH OR SERVICE PORT-ALUMINUM 7/8" -14" THRD #10 FITTING #10 HOSE 16MM R134 - BLA1303-9
FITTING-45 DEGREE FEMALE O-RING (FOR) WITH SWITCH OR SERVICE PORT-ALUMINUM 5/8"- 18 THRD #6 FITTING #6 HOSE 16MM R134 - BLA1311-3
FITTING-90 DEG FEMALE FLARE (FF) -ALUMINUM 3/4"-16 THRD #8 FITTING #8 HOSE - BLA1122
FITTING-STRAIGHT FEMALE FLARE (FF)-ALUMINUM 3/4"-16 THRD #8 FITTING #8 HOSE - BLA1102
Discharge sealing washer, #8 - AC0142
Suction sealing washer, #10 - AC0141
Radiator Hoses - I was not liking how the hoses Flyin Miata supplied with the radiator fit. They were close, but not close enough for my tastes. Spent some time behind the counter at Autozone and came up with a 99.9% perfect fit for the lower and a nice fit for the upper with a splice. Had to cut down the splice tube they included in the radiator kit to half length. Photos coming on those, I'll try and compare mine to theirs for reference. Left the thermostat housing pointing towards the frame rail.
Oil Cooler - Went with aluminum fittings to match the male -8AN fittings that were put on the cooler. Picked it up from the blacksmith, good job as always.
True Cold Air intake - Went with a 3.5" inlet, 5" diameter, 6" long K&N with the pre-filter. Should be located in the wheel well in front of the driver's side tire. Will be taking some thin aluminum or plastic or something to rig up a splash shield to protect it from tire splash.
Fuel System - Bought a couple of straps for either the fuel filter or the fuel pump (if I use the inline Pierburg).. figured for the low price might as well grab them from siliconeintakes when I bought the straps I needed for the TCAI.
Air Conditioning - Spent some time sorting out the AC system. Called Docs Blocks (phone number is on the Stark Mfg. website, their parent company) and talked to them about the peices I need. Did a bunch of research, and came up with the list above. It should be close, if not accurate. Hard to tell lengths of various fittings so some of the ends might have to be switched out to 45's or 90's as needed. Regardless I learned something:
Noob Hint - If you intend on using the '06 GTO AC control like I do, make sure you get the pressure switch with your pullout! That little ****** is $120+ new from GM. It is located on one of the lines, so make sure to grab that piece as well. It is a variable resistor, not just a simple analog switch so you need the correct one for the GTO system, I think.
Also, I have a better idea of what makes up the Mazda AC system. It appears to be all standard fittings. Based on my measurements, here is what I think it is for the Denso 10S17F compressor from the GMPP CTS accessory setup combined with the Mazda system (starting at the discharge port on the compressor) :
Denso 10S17F Compressor discharge port
#8 compressor discharge to condensor
Condensor (stock Mazda)
#6 condensor to accumulator (remains stock Mazda)
Accumulator (stock Mazda)
#6 accumulator to evaporator, with high side pressure switch and high side test port
Evaporator
#10 evaporator to compressor suction, with low side test port
Compressor suction port
I have some sketches I made, I may snap photos of them when I piece the hoses together. If you intend on using the BMW E36 sway bar, relocation of the sway mounts puts them very close to the compressor so routing becomes trickier. I think discharge will go down and back, and suction will go up.. but regardless there will be some modification of the compressor block lines to make it work. I went with hoses for everything instead of hard line so routing is easier.
07-23-2016, 10:24 PM
#210
V8 Miata Participant
Thread Starter
4th April 2011 12:54
________________________________________
Every single AC part I order is wrong, Motherfrickin' son of a monkey...
The Mazda stuff looks looks like it is the same size, but it isn't. The little line is smaller than a #6. The line that looked like a #10 the threads are different. Totally pissed about it...
Going to call Doc's blocks and see if they can steer me to the right parts, worst case I take all my old shiznit to a local shop and see what they can hack and splice together.
Oh, and the blocks don't fit the frickin' compressor, either.. the shoulder on them is too big and won't fit down into the port.

What was the cost on your custom stuff?
I am making terrible progress for a variety of reasons.. and my "backup" RX7 is pissing oil all over out from under the intake bolts... I get a puddle on the intake after a 2 mile drive. Aggravating!!!!
Everything I ordered last week was wrong or incomplete.
Intake tube - short.
AC fittings - wrong.
End links - need bolts and spacers and crap.
Just frustrtating!
________________________________________
Every single AC part I order is wrong, Motherfrickin' son of a monkey...
The Mazda stuff looks looks like it is the same size, but it isn't. The little line is smaller than a #6. The line that looked like a #10 the threads are different. Totally pissed about it...
Going to call Doc's blocks and see if they can steer me to the right parts, worst case I take all my old shiznit to a local shop and see what they can hack and splice together.
Oh, and the blocks don't fit the frickin' compressor, either.. the shoulder on them is too big and won't fit down into the port.
What was the cost on your custom stuff?
I am making terrible progress for a variety of reasons.. and my "backup" RX7 is pissing oil all over out from under the intake bolts... I get a puddle on the intake after a 2 mile drive. Aggravating!!!!
Everything I ordered last week was wrong or incomplete.
Intake tube - short.
AC fittings - wrong.
End links - need bolts and spacers and crap.
Just frustrtating!
07-23-2016, 10:25 PM
#211
V8 Miata Participant
Thread Starter
11th April 2011 07:43
________________________________________
Sadly, working too much lately and dealing with other issues (spring yard cleanup took over the weekend and the RX7 is puking oil everywhere to the point of leaving a puddlle.. oh the fun)
Build Update:
True Cold Air intake - Filter and filter sock came in, ordered a 24" 3.5" tube to extend the filter a little away from the frame rail.
Air Conditioning - Every single part was wrong for one reason or another. The Miata stuff is NOT standard #6, #8, #10 stuff as far as I can tell. Trying to reach Docs Blocks to get an RMA and discussion fitting options with them. Maybe they offer some Mazda-compatible parts, who knows.
Oil Cooler - -8AN elbows came in, so I can mock that up anytime (anytime I find time, that is).
That's about all. I don't expect to put much of any time in between now and May 5th or so, work has a lot of deadlines and putting in very long days. So... that sucks.
07-23-2016, 10:26 PM
#212
V8 Miata Participant
Thread Starter
17th April 2011 22:38
________________________________________
I've been bad, I know.. neglecting my vehicular duties! Worked a 64 hour week in 5 days last week (and I left at noon on Friday, jezzzz), but managed to find some time to work on the car (finally) this weekend. I think work is going to slack up (thanks to a seriously kickass group of coworkers that knuckled down and put in the hours with me - they rock!!). So, I hope to get back on track.
Build Update:
Air Conditioning - This is really kicking my ****. I called Doc's Blocks, and they said if I can provide measurements they can probably help me out.. so I'm going to get it all drawn up and emailed over to them. I finally said screw it and moved ahead with the rest of the build. I should be able to create some custom solution to work around the mounts and whatnot.
Parts Photos - Various bits.... first up we have adjustable end links, the boxes for the -8an weld on aluminum fittings, 3.5" coupler (didn't need) and some t-bolt clamps with straps.

Next up, all the AC parts from DocsBlocks that were wrong.. (except maybe the hose), a couple of -8an 90* elbows for the oil cooler, three -3an to NPT fittings for oil pressure sending units and the repaired oil cooler.

K&N Filter with pre-filter sock.

________________________________________
I've been bad, I know.. neglecting my vehicular duties! Worked a 64 hour week in 5 days last week (and I left at noon on Friday, jezzzz), but managed to find some time to work on the car (finally) this weekend. I think work is going to slack up (thanks to a seriously kickass group of coworkers that knuckled down and put in the hours with me - they rock!!). So, I hope to get back on track.
Build Update:
Air Conditioning - This is really kicking my ****. I called Doc's Blocks, and they said if I can provide measurements they can probably help me out.. so I'm going to get it all drawn up and emailed over to them. I finally said screw it and moved ahead with the rest of the build. I should be able to create some custom solution to work around the mounts and whatnot.
Parts Photos - Various bits.... first up we have adjustable end links, the boxes for the -8an weld on aluminum fittings, 3.5" coupler (didn't need) and some t-bolt clamps with straps.
Next up, all the AC parts from DocsBlocks that were wrong.. (except maybe the hose), a couple of -8an 90* elbows for the oil cooler, three -3an to NPT fittings for oil pressure sending units and the repaired oil cooler.
K&N Filter with pre-filter sock.
07-23-2016, 10:27 PM
#213
V8 Miata Participant
Thread Starter
17th April 2011 22:40
________________________________________
E36 Sway Bar - Done. Mounts are welded in (the outer side anyhow, inner will be done once the engine is out of the way).
ACTION SHOT! Wally with a Welder!

ARTISTIC SHOT! Finished welding, passenger side ready to be grinded and driver's side done. Almost ready to weld in...

ANOTHER ACTION SHOT! Wally with a Grinder!

Welded in.. sway bolted up:

I modified the driver side, since I moved the filter forward it left an ugly gap so I reworked it and weded in a piece.

________________________________________
E36 Sway Bar - Done. Mounts are welded in (the outer side anyhow, inner will be done once the engine is out of the way).
ACTION SHOT! Wally with a Welder!
ARTISTIC SHOT! Finished welding, passenger side ready to be grinded and driver's side done. Almost ready to weld in...
ANOTHER ACTION SHOT! Wally with a Grinder!
Welded in.. sway bolted up:
I modified the driver side, since I moved the filter forward it left an ugly gap so I reworked it and weded in a piece.
07-23-2016, 10:28 PM
#214
V8 Miata Participant
Thread Starter
17th April 2011 22:41
________________________________________
True Cold Air intake - DONE. Had to rotate it towards the front of the car to clear the wheel (seemed like a good idea, heh). Cut the 24" tube down to a 6" piece, still a shade long but allows for some adjustment in the placement once everything in put all back together.
Here it is, removed, viewed from the front of the car:

From the rear:

I don't have a good shot of it in the car yet, forgot to put it back after welding in the sway mounts... I'll get one, though.
________________________________________
True Cold Air intake - DONE. Had to rotate it towards the front of the car to clear the wheel (seemed like a good idea, heh). Cut the 24" tube down to a 6" piece, still a shade long but allows for some adjustment in the placement once everything in put all back together.
Here it is, removed, viewed from the front of the car:
From the rear:
I don't have a good shot of it in the car yet, forgot to put it back after welding in the sway mounts... I'll get one, though.
07-23-2016, 10:29 PM
#215
V8 Miata Participant
Thread Starter
17th April 2011 22:42
________________________________________
Oil Cooler - Mocked up, 98% done. Need to finish the mounting on the cooler, but otherwise complete. I used a ton of hose, almost 13' of it. Hose routing:
Engine out to filter in
Filter out to cooler in
Cooler out to engine in
At the filter (note cool sharpie drawing of the routing "O" out to "I" in):


At the cooler:

Cooler toward engine:

At the engine:

Need to finish some hose mounts.. plan to tie off to the block above the oil pan, to the driver's side sway mount/frame rail, and to the passenger sway mount. Hose routing notes:
From pan, over the steering shaft, behind alternator, up to filter.
From filter, down behind alternator, over steering shaft, parallel to the rack to the passenger side, routing between the tubes of the subframe, under the upper control arm and forward to the cooler.
From cooler back the same way as the 'from filter hose'.
Adjustable Spherical End Links - Mostly done. Need to finalize the lengths. I was going to order up stainless spacers, but couldn't find a good place or price to get them so went with some steel tubing and Grade 8 bolts.
A bunch of Grade 8 stuff, with the end links.. the short bolts in the middle are for the sway mounts.

You can see the mounts in some of the other pictures above.. still working on the top spacers, put in .75" worth of washers for now. Pretty sure I am going to slim that down some based on the angles on the sway bar ends, and use some of that steel tubing like I did on the lower. Better shots coming of this once it's squared away.
That's all for this weekend, more to come this week!
________________________________________
Oil Cooler - Mocked up, 98% done. Need to finish the mounting on the cooler, but otherwise complete. I used a ton of hose, almost 13' of it. Hose routing:
Engine out to filter in
Filter out to cooler in
Cooler out to engine in
At the filter (note cool sharpie drawing of the routing "O" out to "I" in):
At the cooler:
Cooler toward engine:
At the engine:
Need to finish some hose mounts.. plan to tie off to the block above the oil pan, to the driver's side sway mount/frame rail, and to the passenger sway mount. Hose routing notes:
From pan, over the steering shaft, behind alternator, up to filter.
From filter, down behind alternator, over steering shaft, parallel to the rack to the passenger side, routing between the tubes of the subframe, under the upper control arm and forward to the cooler.
From cooler back the same way as the 'from filter hose'.
Adjustable Spherical End Links - Mostly done. Need to finalize the lengths. I was going to order up stainless spacers, but couldn't find a good place or price to get them so went with some steel tubing and Grade 8 bolts.
A bunch of Grade 8 stuff, with the end links.. the short bolts in the middle are for the sway mounts.
You can see the mounts in some of the other pictures above.. still working on the top spacers, put in .75" worth of washers for now. Pretty sure I am going to slim that down some based on the angles on the sway bar ends, and use some of that steel tubing like I did on the lower. Better shots coming of this once it's squared away.
That's all for this weekend, more to come this week!
07-23-2016, 11:20 PM
#217
V8 Miata Participant
Thread Starter
Build update:
Let's see.. I'll do some quick summaries with more detail to follow perhaps tomorrow. The delay of the project has given me time to re-evaluate some concepts, given time for solutions to mature and other things to become more affordable.
Project Inventory - Took the last two weeks to open every box, and look at every part I have. Restarting a project after 5 years and a move is hard but I'm spinning up quickly.
Nose Splitter - Swiped and installed on the 94 Black-n-Tan, need to replace. Looks sweet on that car so definitely going to install on the Sub.
Car Alarm - Swiped and installed on the 94 Black-n-Tan, need to replace. Generally don't like the alarm anyhow, the remote is triggered far too often while in my pocket, so probably going to find something different.
S2000 Start Button - Going to bail on it. Time now gives me the next option, a Skyline GT-R start button. Already received the Nissan Altima version (same style and connection, just not red) with a pigtail to begin playing. Will be coupled to a proper keyless push button ignition (retaining the key), which one is TBD.
Westach Gauges - Most likely bailing on these as Speedhut has some very nice customizable CanBUS units. Will allow me to only need the fuel sending unit, everything else fed off the ECU.
Air Intake - Bailing on the CAI I was building. Concerns over clearance with the tire, plus all the crap that will get thrown on it, etc. Time have provided a cheaper alternative. Picked up a 3800 mile used 2006 Z06 intake complete for $50 shipped off eBay. Add two $25 pieces from FM and I should be able to replicate their style intake. This change means I will need to do hood pins and switch to the LS7 blade style MAF.
Hood Pins - Probably doing the set from FM. Found an identical Simpson vented hood like I have for $80 in Detroit with some fiberglass damage. Perfect for mockup of hood pins and trimming for the intake, and may be able to repair and use it, keeping my original hood intact.
Hood Lifts - Going with the I.L motorsports dual kit FM uses.
Front Sway Bar - Probably bailing on the BMW setup. Concerns over strength of the mounts, general 'hokey-ness' and the FM solution is fully vetted now. FM Sway ordered and received. Already have the HD sway mounts.
Fuel System - Probably bailing on the DIY solution from tank to engine bay. FM Fuel Kit ordered and received. May use the line I bought in place of the AN braided in the FM kit, not sure yet. More on that as I install it.
AC System - Bailed on DIY setup, bought and received the FM kit.
Cooling Overflow - Going with the Canton aluminum unit.
Washer Fluid Bottle - Going with the Cappuccino unit.
Coil/Fuel Rail/Engine Covers - Going with stock Holden Commodore VZ units. Look like the GTO units but read "6.0 / Gen-4" instead. Still working on an overall color scheme.
Engine Wiring - My pullout harness is incomplete. I only have 2 of 3 connectors for the ECU, and am missing the BCM and throttle pedal harness. Questions over the ability to do cruise, the need for additional wires/plugs and a desire to have the cleanest install possible led me to choose Hot Rod Therapy. They are a reseller for PSI harnesses, and is the supplier for the cruise control system FM sells. I have spoken with Adam at length (very helpful) and we've come up with the plan, more later.
Cruise Control - Going with the Hot Rod Therapy unit. Uncertainty about the ability to recreate GTO cruise led me to this decision.
Power Windows - Was going with a DEI module (535T) to eliminate motor load in the switches. After discussion with Adam @ Hot Rod Thereapy, may attempt control via GTO BCM.
Power Locks - Was going with a DEI module (451M) to eliminate need for two large relays. After discussion with Adam @ Hot Rod Thereapy, may attempt control via GTO BCM.
Let's see.. I'll do some quick summaries with more detail to follow perhaps tomorrow. The delay of the project has given me time to re-evaluate some concepts, given time for solutions to mature and other things to become more affordable.
Project Inventory - Took the last two weeks to open every box, and look at every part I have. Restarting a project after 5 years and a move is hard but I'm spinning up quickly.
Nose Splitter - Swiped and installed on the 94 Black-n-Tan, need to replace. Looks sweet on that car so definitely going to install on the Sub.
Car Alarm - Swiped and installed on the 94 Black-n-Tan, need to replace. Generally don't like the alarm anyhow, the remote is triggered far too often while in my pocket, so probably going to find something different.
S2000 Start Button - Going to bail on it. Time now gives me the next option, a Skyline GT-R start button.
Already received the Nissan Altima version (same style and connection, just not red) with a pigtail to begin playing. Will be coupled to a proper keyless push button ignition (retaining the key), which one is TBD.Westach Gauges - Most likely bailing on these as Speedhut has some very nice customizable CanBUS units. Will allow me to only need the fuel sending unit, everything else fed off the ECU.
Air Intake - Bailing on the CAI I was building. Concerns over clearance with the tire, plus all the crap that will get thrown on it, etc. Time have provided a cheaper alternative. Picked up a 3800 mile used 2006 Z06 intake complete for $50 shipped off eBay. Add two $25 pieces from FM and I should be able to replicate their style intake. This change means I will need to do hood pins and switch to the LS7 blade style MAF.
Hood Pins - Probably doing the set from FM. Found an identical Simpson vented hood like I have for $80 in Detroit with some fiberglass damage. Perfect for mockup of hood pins and trimming for the intake, and may be able to repair and use it, keeping my original hood intact.
Hood Lifts - Going with the I.L motorsports dual kit FM uses.
Front Sway Bar - Probably bailing on the BMW setup. Concerns over strength of the mounts, general 'hokey-ness' and the FM solution is fully vetted now. FM Sway ordered and received. Already have the HD sway mounts.
Fuel System - Probably bailing on the DIY solution from tank to engine bay. FM Fuel Kit ordered and received. May use the line I bought in place of the AN braided in the FM kit, not sure yet. More on that as I install it.
AC System - Bailed on DIY setup, bought and received the FM kit.
Cooling Overflow - Going with the Canton aluminum unit.
Washer Fluid Bottle - Going with the Cappuccino unit.
Coil/Fuel Rail/Engine Covers - Going with stock Holden Commodore VZ units. Look like the GTO units but read "6.0 / Gen-4" instead. Still working on an overall color scheme.
Engine Wiring - My pullout harness is incomplete. I only have 2 of 3 connectors for the ECU, and am missing the BCM and throttle pedal harness. Questions over the ability to do cruise, the need for additional wires/plugs and a desire to have the cleanest install possible led me to choose Hot Rod Therapy. They are a reseller for PSI harnesses, and is the supplier for the cruise control system FM sells. I have spoken with Adam at length (very helpful) and we've come up with the plan, more later.
Cruise Control - Going with the Hot Rod Therapy unit. Uncertainty about the ability to recreate GTO cruise led me to this decision.
Power Windows - Was going with a DEI module (535T) to eliminate motor load in the switches. After discussion with Adam @ Hot Rod Thereapy, may attempt control via GTO BCM.
Power Locks - Was going with a DEI module (451M) to eliminate need for two large relays. After discussion with Adam @ Hot Rod Thereapy, may attempt control via GTO BCM.

 07-26-2016, 08:07 PM
#220
V8 Miata Participant
Thread Starter
08-01-2016, 05:58 PM
#221
V8 Miata Participant
Thread Starter
Taking a break from the vacation at Great Wolf Lodge to post a little update...
Build Update:
Parts Arrived
CAI - My ~3800 mile '06 Z06 intake assembly arrived. Looks good and low mileage.. and farking HUGE, I didn't get how big it really is since the width of it is usually hidden behind the bumper. I did a little giggle and maniacal laugh when I pulled it out of the box.
MAF - Brand new GM 5 wire blade MAF arrived, sealed and pretty.
Fuse Block Pins - Got the DelCity and TE/AMP units, work great to add wires to the existing Miata cabin fuse block with simple mods (more info here: https://www.v8miata.net/v8-miata-wir...one-done-2915/). Will allow me to utilize the stock 6 fuse positions currently unoccupied. Very happy.
Radiator Overflow - Canton aluminum tank arrived, slight issue with the lower mount but I think a little heat and plier treatment will fix it up.
Parts Ordered & Already Arrived
T56 right angle backup switch - picked this up from another thread, gives more clearance in the tunnel. Instead of connecting right to the switch, this unit has a pigtail at a right angle. Should really help.
Bling - Ordered up the factory Roadster badge, not 100% sure if I am going to use it until I can mock it up. It is pretty sharp looking, but I haven't finalized the overall look of the exterior so not sure if it fits or not.
Power Stuff - Rear main fuse block - Ordered up a 93-95 FD RX7 battery mounted fuse block. Going to put in the trunk with the battery (battery TBD - debate on that here: https://www.v8miata.net/v8-miata-wir...endation-2917/).
Power Stuff - Front fuse block - Ordered up what appears to be the last in existence NOS 88-92 FC RX7 underhood fuse block, which will be going underhood to replace the Miata one but with modified mounts. I already had one of these from a previous parts FC, but it was pretty beat up. Landed another one from a junkyard for $5 this week too, but again, not in great shape.
Power Stuff - Feed cables - Ordered up a bunch of high strand count wire in 2 AWG, 6 AWG and 8 AWG (battery to fuses, alternator, starter).
Parts Ordered
CAI - Ordered up the FM cut-in piece and deflector, should be the last major pieces needed to make the Z06 CAI work.
Stand Alone Harness - Paid Hot Rod Therapy (who is supplying the PSI unit) for the E40 GTO LS2 harness, using 5 wire blade MAF, 2 fan relays and the starter relay.
Cruise control - coupled with the harness I bought the Hot Rod Therapy cruise solution, which allows me to use all stock Mazda control pieces and the GTO engine pieces. Need to ship parts to Adam so he can calibrate them as a system.
Fuel Rail Covers (engine covers, coil covers) - Ordered up a set of Holden Commodore L76 covers from Australia. No "GTO" for me, looking forward to seeing "6.0" and "Gen-4" under the hood! Still working on the color scheme under the hood.. going to be a mix of silver, black, carbon fiber and black but not sure how each piece will look. Once I get these I can do some mock up.
Power Stuff - SPDT Relays - Also ordered up (10) 40A weatherproof relay sockets and SPDT relays. Not sure how many or where the relays are going to go, still working that out. I'm still drawing up the whole plan.
So the current questions I am struggling with:
Also, my Shop Camera bit the dust (well, more accurately bit the concrete - oops!) so that is why my photos are lagging right now. Boogered up the focus system so it can't anymore, and blurry shots of an CAI aren't very fun. I have a replacement, just need to get it talking to my PC and start uploading photos.
Build Update:
Parts Arrived
CAI - My ~3800 mile '06 Z06 intake assembly arrived. Looks good and low mileage.. and farking HUGE, I didn't get how big it really is since the width of it is usually hidden behind the bumper. I did a little giggle and maniacal laugh when I pulled it out of the box.
MAF - Brand new GM 5 wire blade MAF arrived, sealed and pretty.
Fuse Block Pins - Got the DelCity and TE/AMP units, work great to add wires to the existing Miata cabin fuse block with simple mods (more info here: https://www.v8miata.net/v8-miata-wir...one-done-2915/). Will allow me to utilize the stock 6 fuse positions currently unoccupied. Very happy.
Radiator Overflow - Canton aluminum tank arrived, slight issue with the lower mount but I think a little heat and plier treatment will fix it up.
Parts Ordered & Already Arrived
T56 right angle backup switch - picked this up from another thread, gives more clearance in the tunnel. Instead of connecting right to the switch, this unit has a pigtail at a right angle. Should really help.
Bling - Ordered up the factory Roadster badge, not 100% sure if I am going to use it until I can mock it up. It is pretty sharp looking, but I haven't finalized the overall look of the exterior so not sure if it fits or not.
Power Stuff - Rear main fuse block - Ordered up a 93-95 FD RX7 battery mounted fuse block. Going to put in the trunk with the battery (battery TBD - debate on that here: https://www.v8miata.net/v8-miata-wir...endation-2917/).
Power Stuff - Front fuse block - Ordered up what appears to be the last in existence NOS 88-92 FC RX7 underhood fuse block, which will be going underhood to replace the Miata one but with modified mounts. I already had one of these from a previous parts FC, but it was pretty beat up. Landed another one from a junkyard for $5 this week too, but again, not in great shape.
Power Stuff - Feed cables - Ordered up a bunch of high strand count wire in 2 AWG, 6 AWG and 8 AWG (battery to fuses, alternator, starter).
Parts Ordered
CAI - Ordered up the FM cut-in piece and deflector, should be the last major pieces needed to make the Z06 CAI work.
Stand Alone Harness - Paid Hot Rod Therapy (who is supplying the PSI unit) for the E40 GTO LS2 harness, using 5 wire blade MAF, 2 fan relays and the starter relay.
Cruise control - coupled with the harness I bought the Hot Rod Therapy cruise solution, which allows me to use all stock Mazda control pieces and the GTO engine pieces. Need to ship parts to Adam so he can calibrate them as a system.
Fuel Rail Covers (engine covers, coil covers) - Ordered up a set of Holden Commodore L76 covers from Australia. No "GTO" for me, looking forward to seeing "6.0" and "Gen-4" under the hood! Still working on the color scheme under the hood.. going to be a mix of silver, black, carbon fiber and black but not sure how each piece will look. Once I get these I can do some mock up.
Power Stuff - SPDT Relays - Also ordered up (10) 40A weatherproof relay sockets and SPDT relays. Not sure how many or where the relays are going to go, still working that out. I'm still drawing up the whole plan.
So the current questions I am struggling with:
- Which battery to use - leaning towards Odyssey and probably the PC1200 (or maybe PC925)
- How many and where to mount underhood relays - I think it's Headlights, Headlight retractors, Horn, Driving Lights. Cooling fans should be part of the PSI harness. Fuel pump relay will be moved to the trunk so I can feed it with a 10 AWG right off the rear fuse holder.
- Oil Cooler Thermostat - suggested by acedeuce802. Need to look at hose routing and figure out where to put one, but I believe right front wheel well right before the cooler or perhaps left side where the lines route towards it. The oil cooler/remote filter are all -6 AN so shouldn't be difficult to fit it in.
- Research as to how much of the GTO BCM I can utilize for Miata body crap.. locks, windows, alarm, RKE, who knows what all goodness lurks beneath it's dull gray exterior. I need to pour over the mitchell wiring diagrams and do some testing once it all is here. Aside from the LS2, this is the one thing that I am most excited about right now..
Also, my Shop Camera bit the dust (well, more accurately bit the concrete - oops!) so that is why my photos are lagging right now. Boogered up the focus system so it can't anymore, and blurry shots of an CAI aren't very fun. I have a replacement, just need to get it talking to my PC and start uploading photos.
08-03-2016, 10:45 AM
#222
V8 Miata Participant
Thread Starter
Some Photos of the stuff previously mentioned...
Dead Center - Box and Switch
T56 right angle backup switch - picked this up from another thread, gives more clearance in the tunnel. Instead of connecting right to the switch, this unit has a pigtail at a right angle. Should really help.
Bottom Left - Bag, Block and Lid
Power Stuff - Rear main fuse block - Ordered up a 93-95 FD RX7 battery mounted fuse block. Going to put in the trunk with the battery (battery TBD - debate on that here: https://www.v8miata.net/v8-miata-wir...endation-2917/).
Upper Left - two used blocks
Upper Right - New lid (spare)
Lower Right - Lid, Block & Bag
Power Stuff - Front fuse block - Ordered up what appears to be the last in existence NOS 88-92 FC RX7 underhood fuse block, which will be going underhood to replace the Miata one but with modified mounts. I already had one of these from a previous parts FC, but it was pretty beat up. Landed another one from a junkyard for $5 this week too, but again, not in great shape.

Top Left - 2AWG
Top Right - 8AWG
Bottom Left - 6AWG
Power Stuff - Feed cables - Ordered up a bunch of high strand count wire in 2 AWG, 6 AWG and 8 AWG (battery to fuses, alternator, starter).

Dead Center - Box and Switch
T56 right angle backup switch - picked this up from another thread, gives more clearance in the tunnel. Instead of connecting right to the switch, this unit has a pigtail at a right angle. Should really help.
Bottom Left - Bag, Block and Lid
Power Stuff - Rear main fuse block - Ordered up a 93-95 FD RX7 battery mounted fuse block. Going to put in the trunk with the battery (battery TBD - debate on that here: https://www.v8miata.net/v8-miata-wir...endation-2917/).
Upper Left - two used blocks
Upper Right - New lid (spare)
Lower Right - Lid, Block & Bag
Power Stuff - Front fuse block - Ordered up what appears to be the last in existence NOS 88-92 FC RX7 underhood fuse block, which will be going underhood to replace the Miata one but with modified mounts. I already had one of these from a previous parts FC, but it was pretty beat up. Landed another one from a junkyard for $5 this week too, but again, not in great shape.
Top Left - 2AWG
Top Right - 8AWG
Bottom Left - 6AWG
Power Stuff - Feed cables - Ordered up a bunch of high strand count wire in 2 AWG, 6 AWG and 8 AWG (battery to fuses, alternator, starter).
08-03-2016, 10:56 AM
#223
V8 Miata Participant
Thread Starter
Some more photos:
Bottom Right - Bag and Sensor
MAF - Brand new GM 5 wire blade MAF arrived, sealed and pretty.
Bottom Left
Bling - Ordered up the factory Roadster badge, not 100% sure if I am going to use it until I can mock it up. It is pretty sharp looking, but I haven't finalized the overall look of the exterior so not sure if it fits or not.

Bling (sort of) - Gates Power Grip Hose 'clamps' - Guess I didn't mention these, but I ordered up a bunch to do all the heater hoses, upper and lower radiator hoses. Going to see how they work, reviews seem to be positive and I like the idea of no ugly hose clamps (always hated them on the LT1 RX7).
Bottom Center (4) - Upper Radiator Hose
Lower Left (2) - Lower Radiator Hose
Upper Left (8) - Heater connections at firewall (2), smaller hose splice point (2), larger hose splice point (1), smaller hose @ engine (1), 2 spare
Center (4) - Larger heater hose at splice point (1), larger hose at engine (1), 2 spare
Upper Right - Instructions (glad I ordered 8 of the smallest, it came in that box)
Enlarged instructions front and back:


Bottom Right - Bag and Sensor
MAF - Brand new GM 5 wire blade MAF arrived, sealed and pretty.
Bottom Left
Bling - Ordered up the factory Roadster badge, not 100% sure if I am going to use it until I can mock it up. It is pretty sharp looking, but I haven't finalized the overall look of the exterior so not sure if it fits or not.
Bling (sort of) - Gates Power Grip Hose 'clamps' - Guess I didn't mention these, but I ordered up a bunch to do all the heater hoses, upper and lower radiator hoses. Going to see how they work, reviews seem to be positive and I like the idea of no ugly hose clamps (always hated them on the LT1 RX7).
Bottom Center (4) - Upper Radiator Hose
Lower Left (2) - Lower Radiator Hose
Upper Left (8) - Heater connections at firewall (2), smaller hose splice point (2), larger hose splice point (1), smaller hose @ engine (1), 2 spare
Center (4) - Larger heater hose at splice point (1), larger hose at engine (1), 2 spare
Upper Right - Instructions (glad I ordered 8 of the smallest, it came in that box)
Enlarged instructions front and back:
08-03-2016, 12:53 PM
#224
V8 Miata Participant
Thread Starter
CAI - My ~3800 mile '06 Z06 intake assembly arrived. Looks good and low mileage.. and farking HUGE, I didn't get how big it really is since the width of it is usually hidden behind the bumper. I did a little giggle and maniacal laugh when I pulled it out of the box.


08-03-2016, 01:07 PM
#225
V8 Miata Participant
Thread Starter
Lower right bag
GarageStar Delrin Door Bushings - Figured might as well try these out since I am doing all kinds of other upgrades to try and tighten the car up. Ordered a set for the 94 as well.
Upper Left Corner
FM Exhaust Bracket - Apparently this comes with the exhuast kit now, but since I bought a take off from Elvis, I didn't get this piece so I ordered it up separate. Mounts to tranny mount, and is supposed to align pipes and hold them perfectly relative to the tranny cross beam arches. Assuming I will have to rework the take off exhaust to hit this properly.
Everything else in the photo
FM AC System Hookup Kit - Bailed on DIY setup, bought and received the FM kit. Should have everything needed to make it work except the GTO high pressure switch and bung (if anyone has that line or the switch with bung, PM me!! 2004-06 GTO only part)

Bottom Right Corner
23mm Switchback LED's - Previously not mentioned. Black shell units are white/yellow, chrome units are white/red. I did this mod to the Mustang, loved how it turned out. Retrofitted these into the side markers. More details when I work them up later... should work out nicely.
Everything else in the photo
FM Fuel System Kit - Bailed on the DIY solution from tank to engine bay. FM Fuel Kit ordered and received. May use the line I bought in place of the AN braided in the FM kit, not sure yet. Will depend on how I am able to route things. More on that as I install it.

GarageStar Delrin Door Bushings - Figured might as well try these out since I am doing all kinds of other upgrades to try and tighten the car up. Ordered a set for the 94 as well.
Upper Left Corner
FM Exhaust Bracket - Apparently this comes with the exhuast kit now, but since I bought a take off from Elvis, I didn't get this piece so I ordered it up separate. Mounts to tranny mount, and is supposed to align pipes and hold them perfectly relative to the tranny cross beam arches. Assuming I will have to rework the take off exhaust to hit this properly.
Everything else in the photo
FM AC System Hookup Kit - Bailed on DIY setup, bought and received the FM kit. Should have everything needed to make it work except the GTO high pressure switch and bung (if anyone has that line or the switch with bung, PM me!! 2004-06 GTO only part)
Bottom Right Corner
23mm Switchback LED's - Previously not mentioned. Black shell units are white/yellow, chrome units are white/red. I did this mod to the Mustang, loved how it turned out. Retrofitted these into the side markers. More details when I work them up later... should work out nicely.
Everything else in the photo
FM Fuel System Kit - Bailed on the DIY solution from tank to engine bay. FM Fuel Kit ordered and received. May use the line I bought in place of the AN braided in the FM kit, not sure yet. Will depend on how I am able to route things. More on that as I install it.


