V8R sloooww build - 94 Miata - North Carolina

 12-23-2013, 11:49 PM
#126
V8 Miata Fanatic

Thread Starter

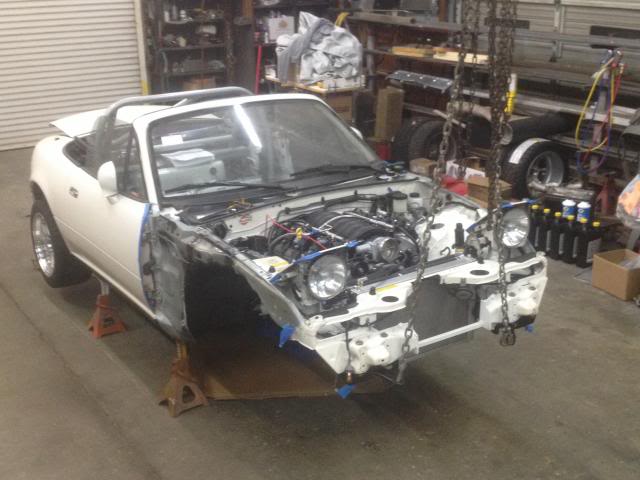
The plan this week of Christmas '13 is to complete the wiring - sometime before Christmas '14. I think I can do that. Since my main, unwrapped harness and fuse boxes were back in the car, I felt like it was a good time to go ahead and drop in the dash wiring - although preliminary at the moment - along with the steering column harness (turn signals, head lights, etc) and a new battery out back. I reunited the headlight assemblies with the Mazda and tested out as many functions as I could. All went well - flashers, headlight motors, horn, high and low beams, and even the heater fan worked on all speeds! I had put a small fire extinguisher next to the car in case something decided to go up in flames or smoke. Luckily, nothing dramatic occurred!
Determining wire routing is kinda fun. The unwrapped harness still has a lot of "memory" which helps with identifying where and how the harnesses correctly lay under the retracted headlights... For example.
Wiring up the PCM and tying in the stand-alone fuse box to the Mazda harness has been pretty straightforward. I was also able to located the original firewall insulation and put it back in, at least partially.
It's slowly coming together... After the final wiring gets in place - I can proceed with wrapping it up with the flex-braid. Tommorow's pics should give us more details on this
Last edited by ToySnakePMC; 12-24-2013 at 04:25 AM.
 12-26-2013, 09:50 PM
#127
V8 Miata Fanatic
Thread Starter
Awesome, awesome day today... I actually heard and saw my LS2 spin over with the twist of the key! More on that in a bit.
Had a full day in the shop with my Dad and excellent friend, Tad. Tad's experience with building his DOHC 4.6L FFR Cobra the past few years brought some good insight and knowledge for my wiring questions. And my Dad began tearing into old Ford flathead cars at the age of 13 or 14 in 1946 and his car intellect and diagnosis makes my problem-solving skills look like a 9 yr-old in comparison...! So, the dynamic duo were on the job today.
Wiring concern #1 of mine was deciding where and how to run the 8 gauge wire from the GM fuses/ relay box to the battery. I thought I had read somewhere before that someone had issues with connecting that wire to the post on the GM starter - had to do with voltage (or amperage?) drop to the GM PCM when the starter was engaged. So..., we decided to run this wire straight to the battery in the trunk. To facilitate today's desire to bump the starter (and confirm my engine would spin freely), we ran the wire temporarily. I will go back tomorrow and wrap & secure it properly.
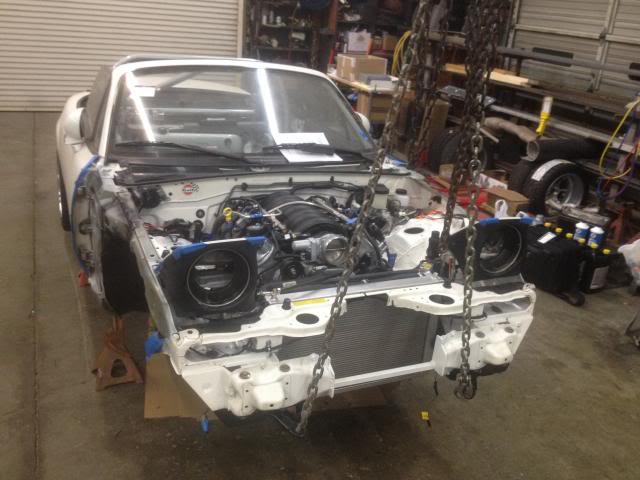
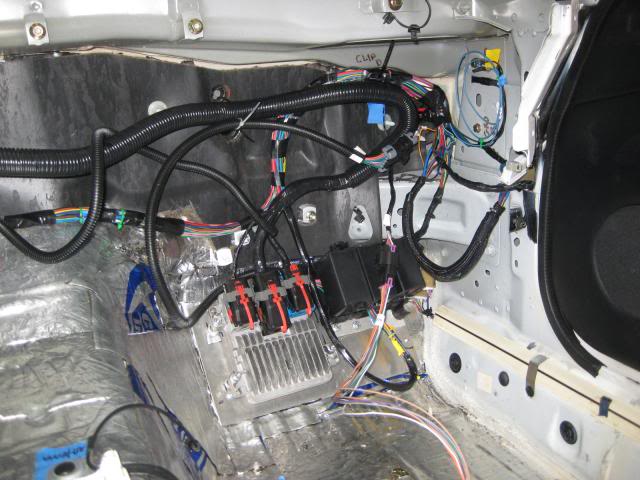
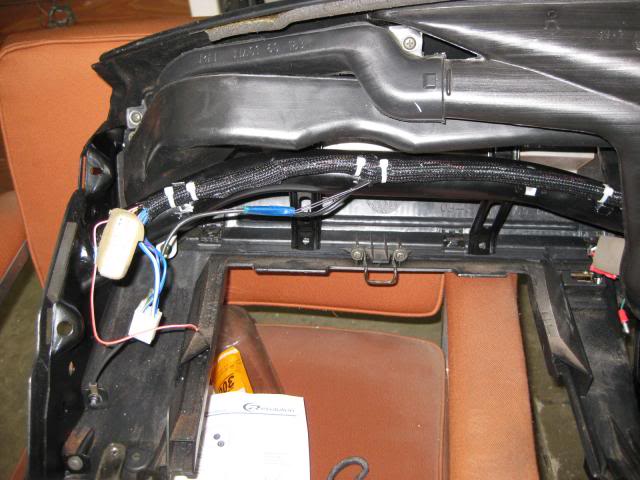
At this point, the GM PCM & fusebox are wired into the Mazda! I still have the OBD port and 2 other wires in that small bundle to wire properly - but that will all be completed just before the dash, I guess, goes back in. Here's a look of the GM wiring before I wrap it up and secure it for good!! I've not routed the stuff, mind you, just connected it up to for the initial test.
Steering column was slid into place. I had a small dilemma that Tad saw an easy fix to much sooner than I did!! My DBW GTO pedal installation interfered with the RH column brace's bolt hole. A quick zip of the $9.98 HarborFreight cut-off tool fixed the problem and new bolt hole in the bracket was made about a 1/2 inch closer-in from the previous hole. All is good! Column secured at the firewall and ignition switch was plugged in.
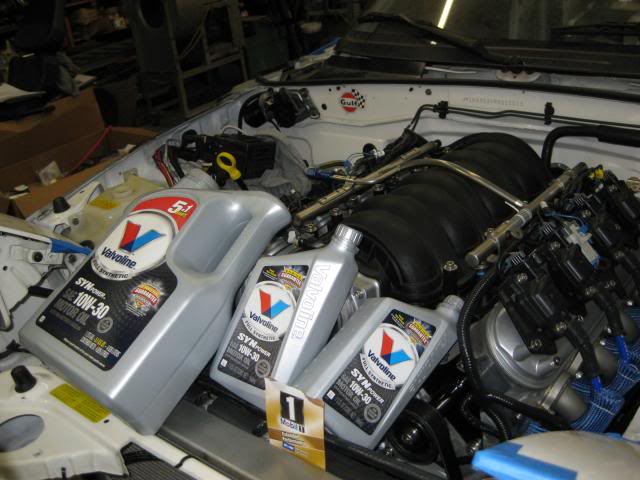
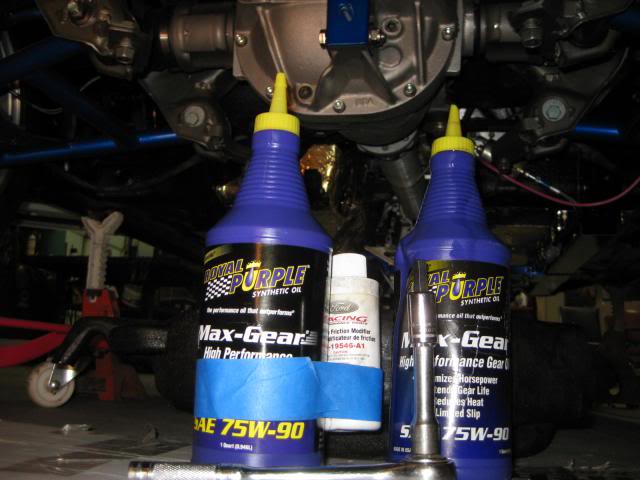
But before you start an expensive, aluminum engine, it is often recommended that you fill it with proper lubrication fluid... That was done with approx 6.5 Qts of synthetic 10W-30 and the somewhat long oil filter (that hangs about an inch below the oil pan - should be okay - I don't plan to Off Road the car intentionally).
Next up, were the T56 and Ford Diff - they crave fluids too. I was not planning to "start" the engine - just bump the motor over and confirm no bad smells from burning wires and such... So, with no working clutch pedal, the tranny would "bump" too and need oil to slowly spin in. I put almost 4 full Qts of Mobil 1 synthetic ATF in the tranny and something a bit less than 2 Qts of Royal Purple and Ford Friction Modifier in the diff. The driveshaft was installed temporarily as well - so the tranny wouldn't leak out the back. I still need to order the four, correct Ford bolts for the pinion flange/ driveshaft connection.
With the powertrain full of various oils and wire connections confirmed, we connected the Miata battery -- no smoke. We then turned the key switch to ON -- no smoke & no weird noises - just a few clicks from around the LS2. We then plugged in the fuel pump, turned key back to ON -- no smoke & no noise from the fuel pump. I thought it would click on... We then turn the key briefly to START -- no smoke - just the GTO starter doing its job and the fuel pump make a noise or two. And just as quickly, it all went silent when the key was turned back to OFF...
So, it sorta works! No fuel in the tank as of yet and no completed heater core plumbing so no coolant either. But, I'm closer to the end this evening than I was this morning.
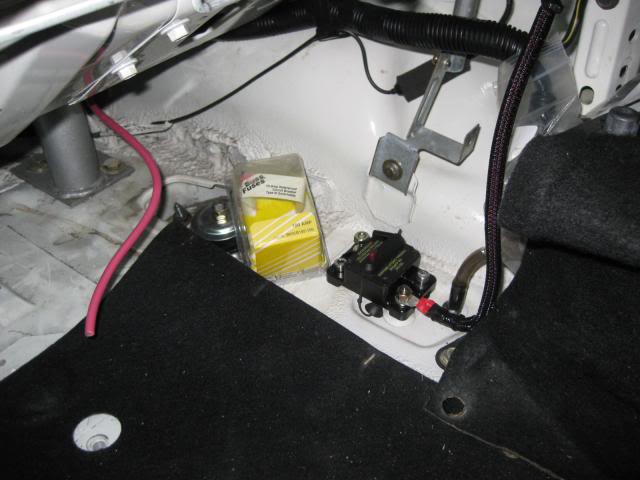
Tomorrow will complete the wiring, I think. I'll also complete this 100 AMP circuit breaker installation in the trunk - just forward of the battery. This is to protect the car and the PCM in case we should ever develop a dead short in that LONG 8 gauge wire running 2/3 the length of the car. (I'm surprised Mazda didn't have a fuse or something near the battery to protect the rest of the car in case anything ever shorted out the wire at the starter... Oh well.
Since, I'm using a more decent camera now and not my iPhone - here are 2 better resolution pics...

Had a full day in the shop with my Dad and excellent friend, Tad. Tad's experience with building his DOHC 4.6L FFR Cobra the past few years brought some good insight and knowledge for my wiring questions. And my Dad began tearing into old Ford flathead cars at the age of 13 or 14 in 1946 and his car intellect and diagnosis makes my problem-solving skills look like a 9 yr-old in comparison...! So, the dynamic duo were on the job today.
Wiring concern #1 of mine was deciding where and how to run the 8 gauge wire from the GM fuses/ relay box to the battery. I thought I had read somewhere before that someone had issues with connecting that wire to the post on the GM starter - had to do with voltage (or amperage?) drop to the GM PCM when the starter was engaged. So..., we decided to run this wire straight to the battery in the trunk. To facilitate today's desire to bump the starter (and confirm my engine would spin freely), we ran the wire temporarily. I will go back tomorrow and wrap & secure it properly.
At this point, the GM PCM & fusebox are wired into the Mazda! I still have the OBD port and 2 other wires in that small bundle to wire properly - but that will all be completed just before the dash, I guess, goes back in. Here's a look of the GM wiring before I wrap it up and secure it for good!!
I've not routed the stuff, mind you, just connected it up to for the initial test.Steering column was slid into place. I had a small dilemma that Tad saw an easy fix to much sooner than I did!! My DBW GTO pedal installation interfered with the RH column brace's bolt hole. A quick zip of the $9.98 HarborFreight cut-off tool fixed the problem and new bolt hole in the bracket was made about a 1/2 inch closer-in from the previous hole. All is good! Column secured at the firewall and ignition switch was plugged in.
But before you start an expensive, aluminum engine, it is often recommended that you fill it with proper lubrication fluid... That was done with approx 6.5 Qts of synthetic 10W-30 and the somewhat long oil filter (that hangs about an inch below the oil pan - should be okay - I don't plan to Off Road the car intentionally).
Next up, were the T56 and Ford Diff - they crave fluids too. I was not planning to "start" the engine - just bump the motor over and confirm no bad smells from burning wires and such... So, with no working clutch pedal, the tranny would "bump" too and need oil to slowly spin in. I put almost 4 full Qts of Mobil 1 synthetic ATF in the tranny and something a bit less than 2 Qts of Royal Purple and Ford Friction Modifier in the diff. The driveshaft was installed temporarily as well - so the tranny wouldn't leak out the back. I still need to order the four, correct Ford bolts for the pinion flange/ driveshaft connection.
With the powertrain full of various oils and wire connections confirmed, we connected the Miata battery -- no smoke. We then turned the key switch to ON -- no smoke & no weird noises - just a few clicks from around the LS2. We then plugged in the fuel pump, turned key back to ON -- no smoke & no noise from the fuel pump. I thought it would click on... We then turn the key briefly to START -- no smoke - just the GTO starter doing its job and the fuel pump make a noise or two. And just as quickly, it all went silent when the key was turned back to OFF...
So, it sorta works! No fuel in the tank as of yet and no completed heater core plumbing so no coolant either. But, I'm closer to the end this evening than I was this morning.
Tomorrow will complete the wiring, I think. I'll also complete this 100 AMP circuit breaker installation in the trunk - just forward of the battery. This is to protect the car and the PCM in case we should ever develop a dead short in that LONG 8 gauge wire running 2/3 the length of the car. (I'm surprised Mazda didn't have a fuse or something near the battery to protect the rest of the car in case anything ever shorted out the wire at the starter... Oh well.
Since, I'm using a more decent camera now and not my iPhone - here are 2 better resolution pics...
Last edited by ToySnakePMC; 12-26-2013 at 09:55 PM.
12-30-2013, 09:35 AM
#128
V8 Miata Fanatic
Thread Starter
Boys & Girls -- I'm happy to report that this Sloooww Build is Speeding UP!
I've had the good fortune of being able to put in quite a few hours in the shop this holiday season. (I think my wife is tired of it not being done - for whatever reason - and wants me to finish this thing - so she's pretty happy I'm in the shop - I think - or maybe she just wants me out of the house during my time off from work!) Anyway, back to the build...
I'll go sorta quick here - as I want to update the thread but also get back to work on the car behind me.
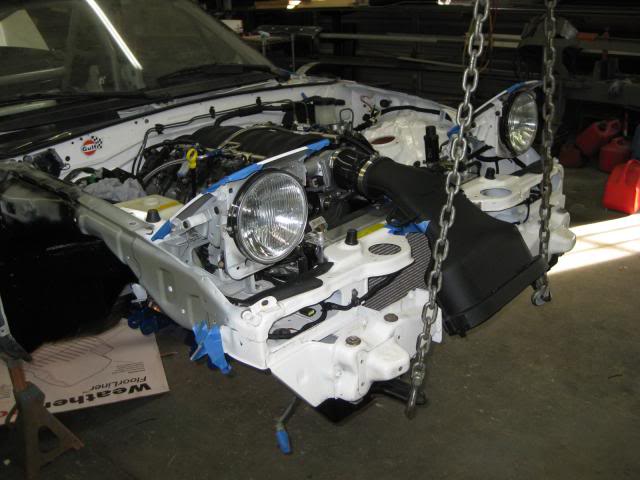
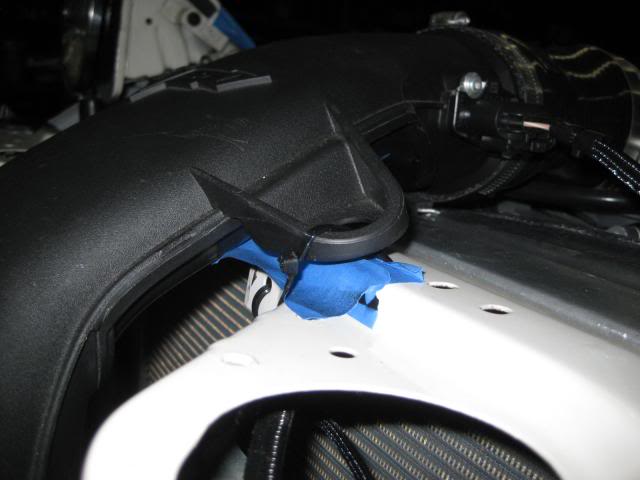
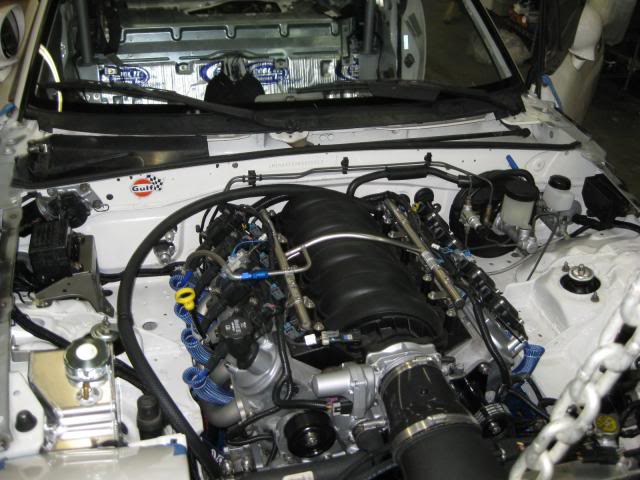
Z06 intake on with new MAF plugged in. Did not drill the two holes to permanently mount the think because my eBay silicone hose connector is, in my opinion, about 1/2" - 3/4" too short. On FlyinMiata photos, I see that their mounting holes appear to be right in the middle of the fold/ deep crease of the core support. I cannot get there - perhaps need the factory Z06 connector with bellows that would stretch further...
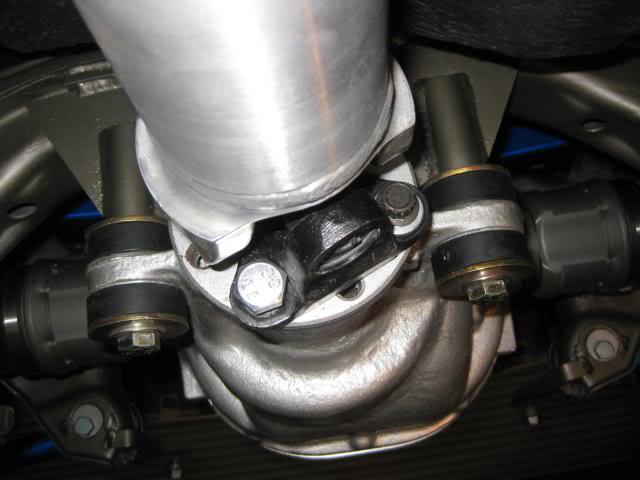
For the previous engine "start & spin" to confirm my wiring, I had temporarily bolted in the driveshaft. This photo will show that regular 12mm hex head bolts won't fit properly on the 8.8 pinion flange. Went to the local Ford dealer and the parts guys gave me the correct 12 point, hardened bolts for free! I think they liked the idea of a big Ford rearend in the @ss of this little car. That's cool with me - I just had to promise to bring it by their place when completed.
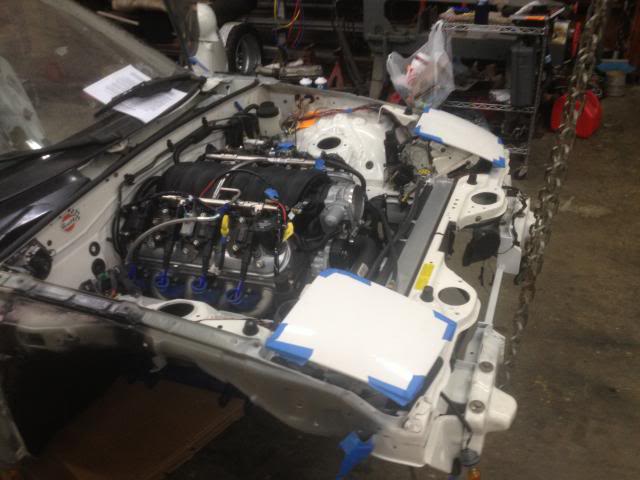
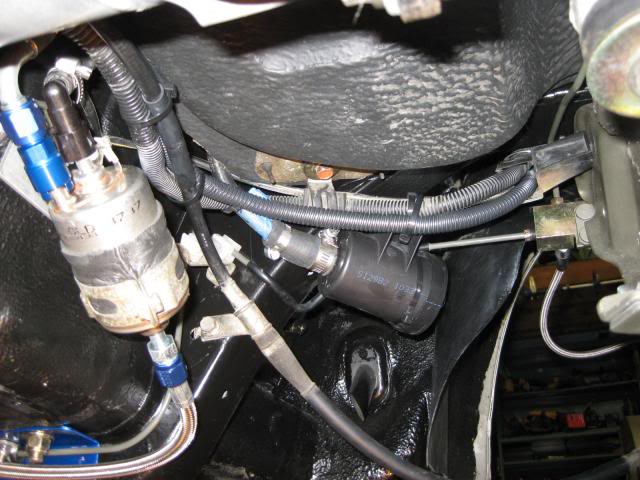
Back to more wiring... Can now wrap up more of the harness since it all seems to be okay. I wrapped RH engine compartment with flexbraid and secured it to my liking. I have the new fan wiring in its own wrap for easy access if I need to make any changes in the future since I haven't had the opp to see them come on as of yet... Also, I got one piece of jewelry for the engine compartment - the Canton overflow tank! I won't have any plastic tanks near the engine - just aluminum for more uniform look.
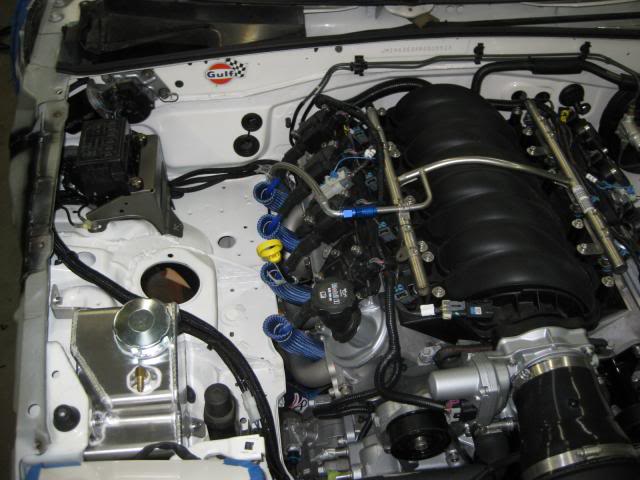
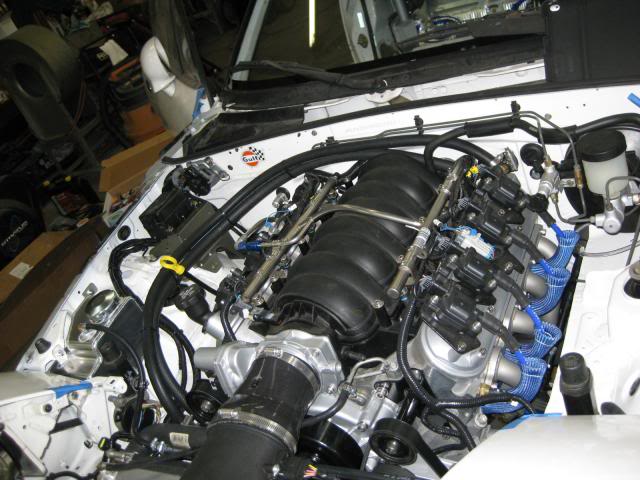
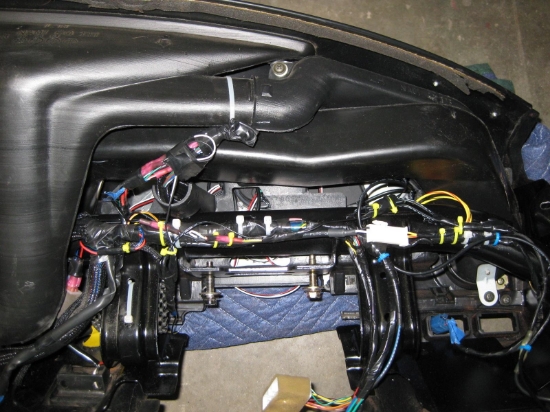
While we're on the RH side of the motor, I'm very pleased on how my final wiring looks around the fuse box. It was a bundle of wires before I wrapped and secured everything. Clean & tidy now!

I've had the good fortune of being able to put in quite a few hours in the shop this holiday season. (I think my wife is tired of it not being done - for whatever reason - and wants me to finish this thing - so she's pretty happy I'm in the shop - I think - or maybe she just wants me out of the house during my time off from work!) Anyway, back to the build...
I'll go sorta quick here - as I want to update the thread but also get back to work on the car behind me.
Z06 intake on with new MAF plugged in. Did not drill the two holes to permanently mount the think because my eBay silicone hose connector is, in my opinion, about 1/2" - 3/4" too short. On FlyinMiata photos, I see that their mounting holes appear to be right in the middle of the fold/ deep crease of the core support. I cannot get there - perhaps need the factory Z06 connector with bellows that would stretch further...
For the previous engine "start & spin" to confirm my wiring, I had temporarily bolted in the driveshaft. This photo will show that regular 12mm hex head bolts won't fit properly on the 8.8 pinion flange. Went to the local Ford dealer and the parts guys gave me the correct 12 point, hardened bolts for free! I think they liked the idea of a big Ford rearend in the @ss of this little car. That's cool with me - I just had to promise to bring it by their place when completed.
Back to more wiring... Can now wrap up more of the harness since it all seems to be okay. I wrapped RH engine compartment with flexbraid and secured it to my liking. I have the new fan wiring in its own wrap for easy access if I need to make any changes in the future since I haven't had the opp to see them come on as of yet... Also, I got one piece of jewelry for the engine compartment - the Canton overflow tank! I won't have any plastic tanks near the engine - just aluminum for more uniform look.
While we're on the RH side of the motor, I'm very pleased on how my final wiring looks around the fuse box. It was a bundle of wires before I wrapped and secured everything. Clean & tidy now!
Last edited by ToySnakePMC; 12-30-2013 at 10:07 AM.
12-30-2013, 10:27 AM
#129
V8 Miata Fanatic
Thread Starter
Perhaps a little overkill, but I want to fight the enemy - HEAT - as much as possible before this thing is on the road. The GTO starter is rather compact, but it's wrapped up with the header just inch(s) away on the front and bottom sides -- as opposed to the factory cast iron manifold that skirted above the starter when new. I've cut and wrapped the starter and its solenoid individually for a more secure fit and to prevent the wrap from coming in contact with the positive posts. The starter wiring, obviously, is wrapped in that same vicinity - along with the RF steel brake line that is just to the outside of the header.

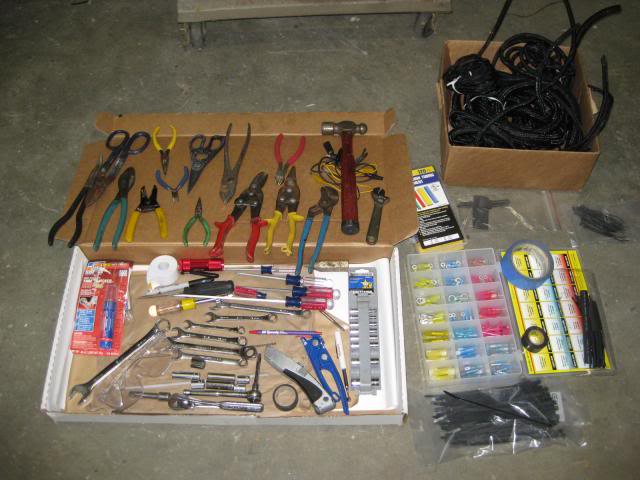
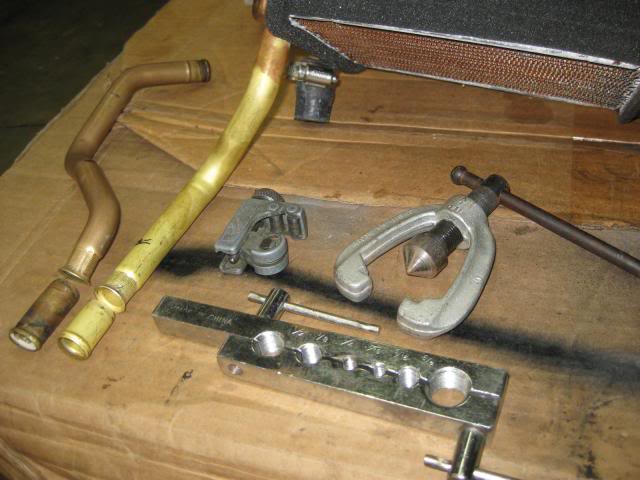
A lot of more time was spent securing and wrapping the main harness inside the car before the dash, heater core, A/C evap, and fan motor go back in place. I'll update pics on that soon as well. Here's about all that you need - tool wise - to put this transformation back together. The blue tubing tool was going to be employed to try and bend the engine dipstick forward, but it won't accommodate the larger diameter - just small plumbing & brakelines will fit this $8 HFreight tool. I think there will be hood clearance issues if I don't - just wont know until the sheetmetal goes back on...
100 amp circuit breaker wired in the trunk for the GM fuse box/ PCM. Its 8 gauge wiring is secured & protected under the car from heat, vibration, and sharp edges!

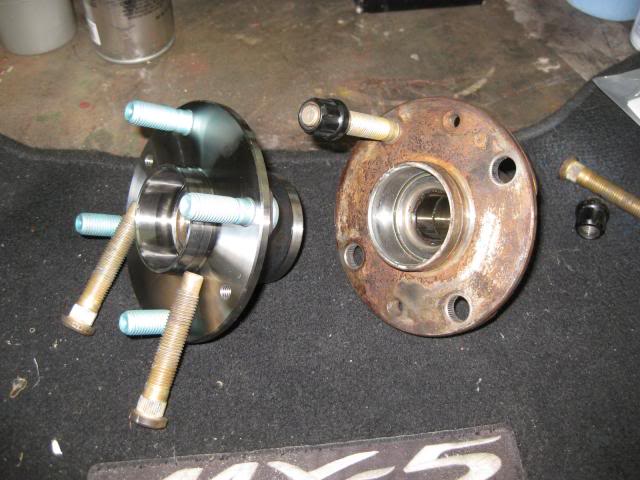
More various projects: Ordered new Timken front hubs (might as well freshen EVERYTHING up, huh?) and re-installed my ARP extended lugs. Front suspension is quickly coming to the top of my to-do list.
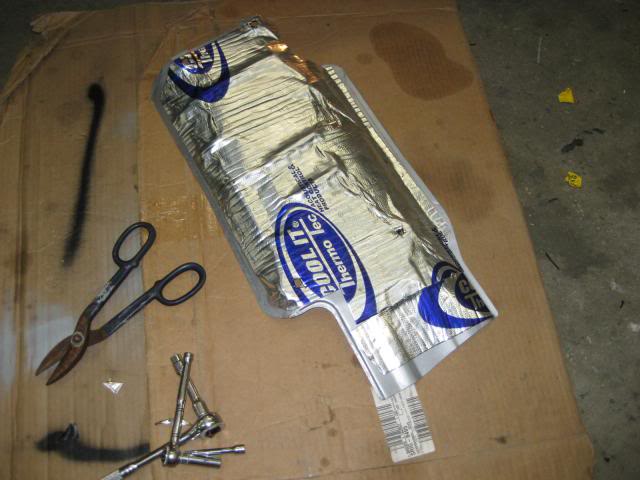
Had some left-over heat insulation so I cleaned & painted the muffler shield with engine paint and wrapped the topside to better keep the trunk cool and eliminate possible heat shield rattles when the go peddle gets pushed down...
Next update should be more on front suspension, heater hose lines, and.... ENGINE START!!! This time with actual 93 octane fuel.
A lot of more time was spent securing and wrapping the main harness inside the car before the dash, heater core, A/C evap, and fan motor go back in place. I'll update pics on that soon as well. Here's about all that you need - tool wise - to put this transformation back together. The blue tubing tool was going to be employed to try and bend the engine dipstick forward, but it won't accommodate the larger diameter - just small plumbing & brakelines will fit this $8 HFreight tool. I think there will be hood clearance issues if I don't - just wont know until the sheetmetal goes back on...
100 amp circuit breaker wired in the trunk for the GM fuse box/ PCM. Its 8 gauge wiring is secured & protected under the car from heat, vibration, and sharp edges!
More various projects: Ordered new Timken front hubs (might as well freshen EVERYTHING up, huh?) and re-installed my ARP extended lugs. Front suspension is quickly coming to the top of my to-do list.
Had some left-over heat insulation so I cleaned & painted the muffler shield with engine paint and wrapped the topside to better keep the trunk cool and eliminate possible heat shield rattles when the go peddle gets pushed down...
Next update should be more on front suspension, heater hose lines, and.... ENGINE START!!! This time with actual 93 octane fuel.
 12-31-2013, 07:40 AM
#131
V8 Miata Fanatic
Thread Starter
The final days of 2013 are counting down and about 16 hours of the 30th was spent in the shop - with a few, minimal distractions for work thrown in the mix as well... Anywho, here we go with the latest:
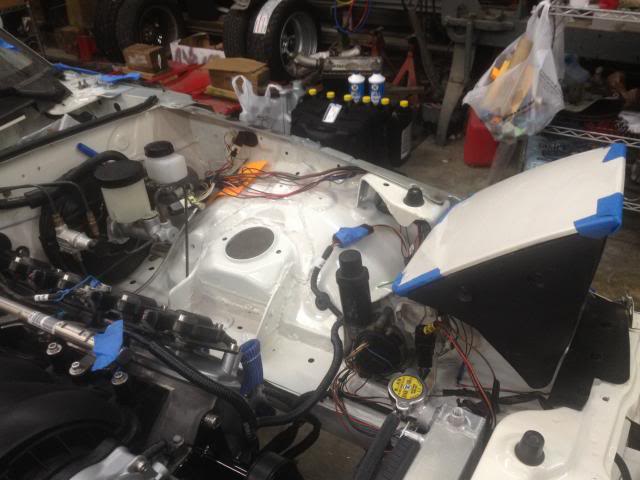
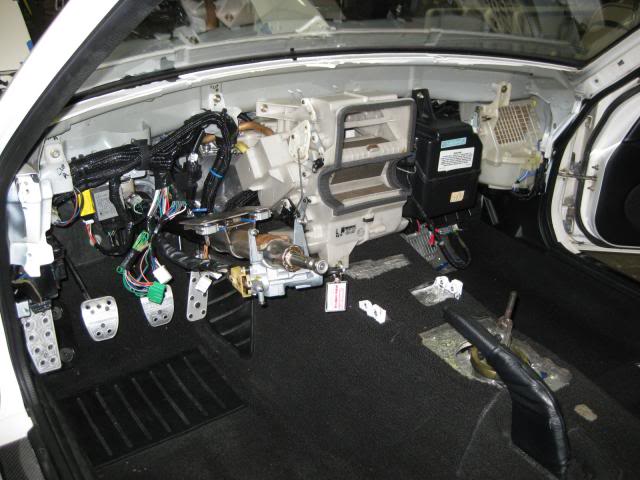
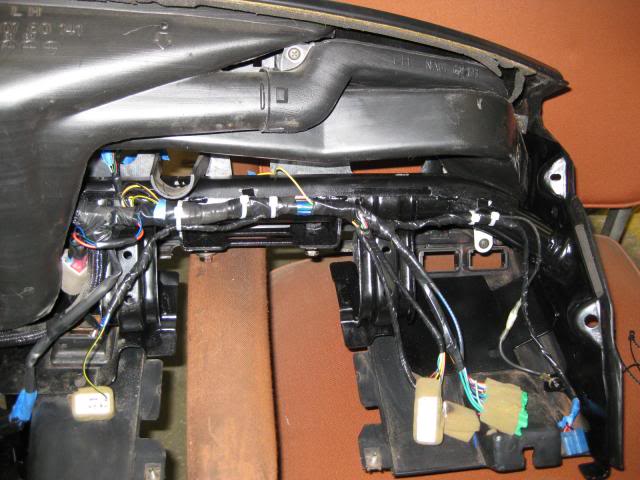
LH side of main harness in the dash area was wrapped and secured. I left a few pigtails somewhat loose and will wrap them later after I connect them to various dash harness plugs - don't want anything in a bind or on the wrong side of the steering column!
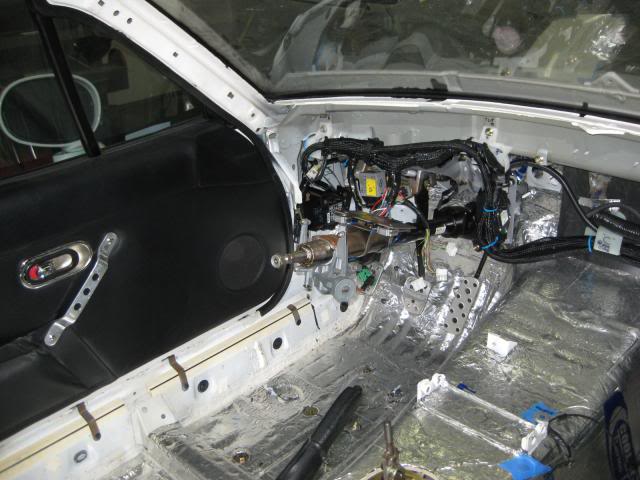
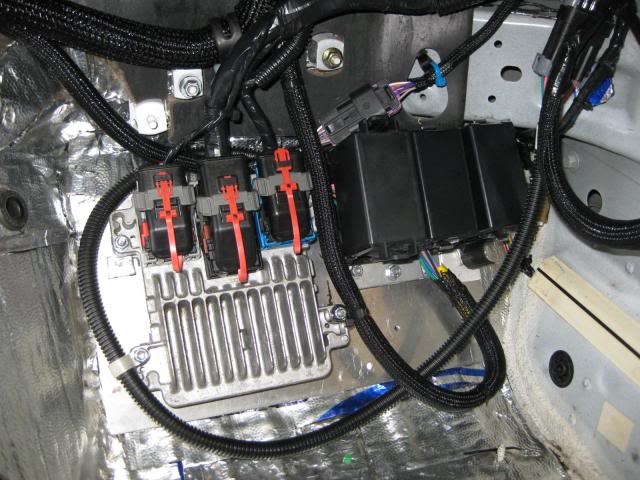
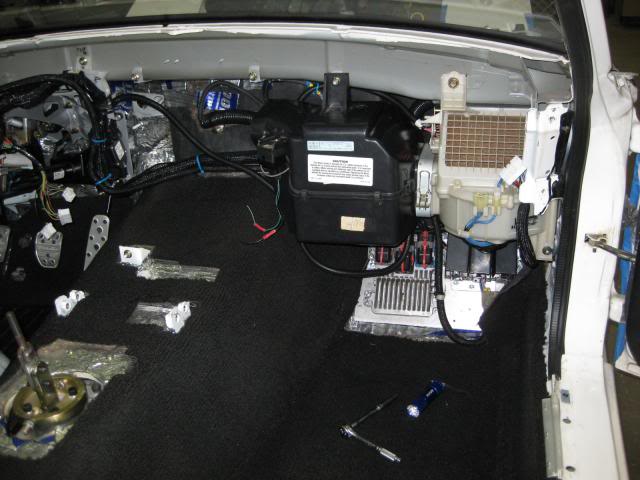
RH side shows a completed GM PCM and stand-alone fuse box wrapped and secured. BP Automotive in Kentucky did a nice job on the GTO harness... I'll have full access to this with a cover plate to keep high heels and sneakers out of this spot - it will also have to be strong enough to withstand folks pushing themselves into the seat when a sharp LH or RH curve approaches...
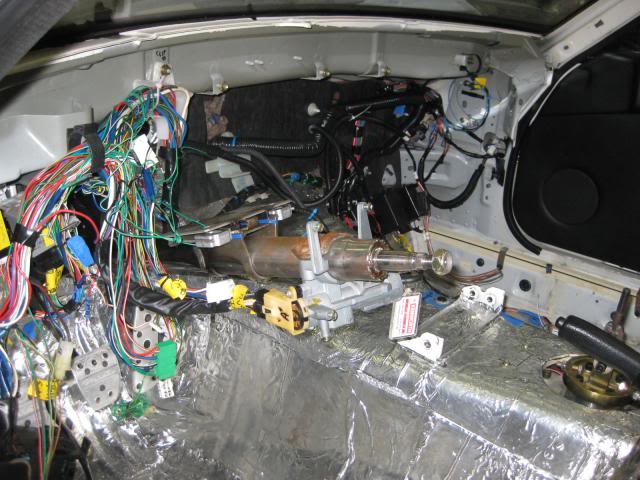
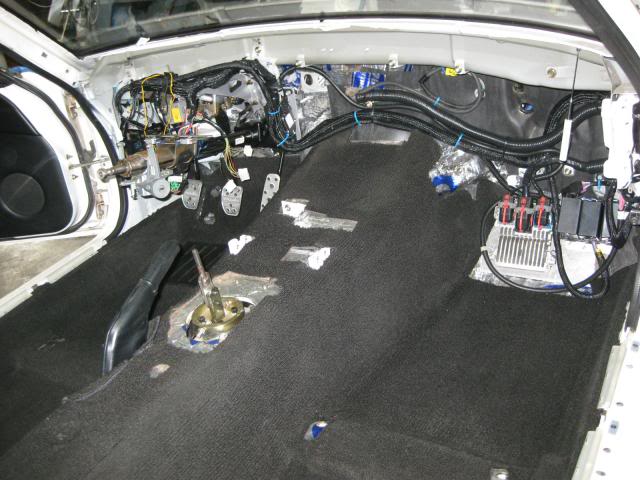
Tidying up the rear here with last pieces of Thermo Tec mat installed.
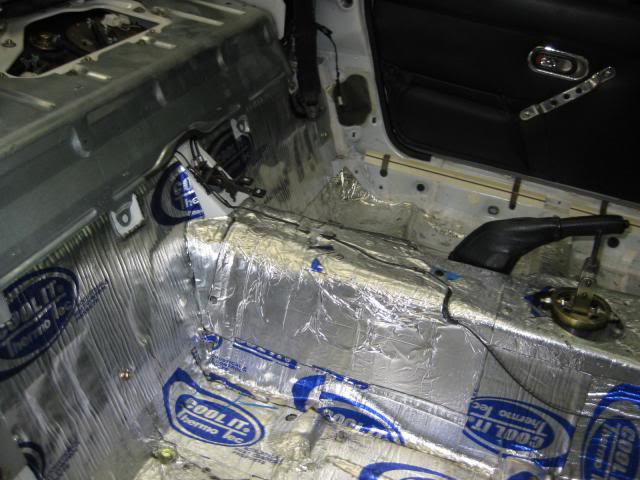
I always chuckle when I look at this spot under the car -- it's the Times Square of my car - the busiest intersection of wiring, plumbing, gas tank vent, etc!
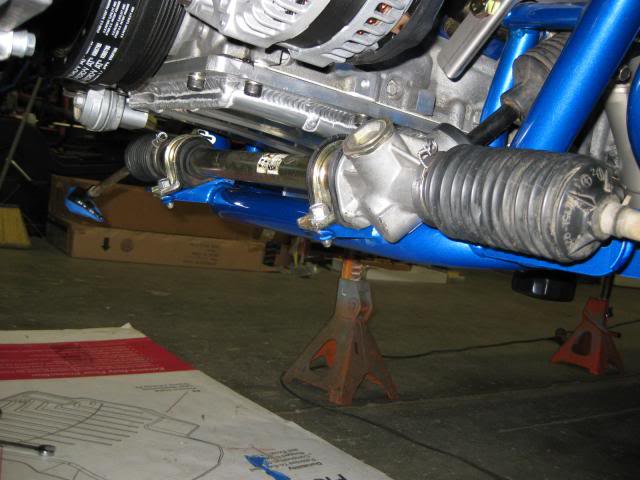
Now for more glamour shots -- cleaned up and installed a manual rack that I've had in storage for about 12 years! Notice the extra clearance with the oil pan as it's more narrow in the middle than the power version.
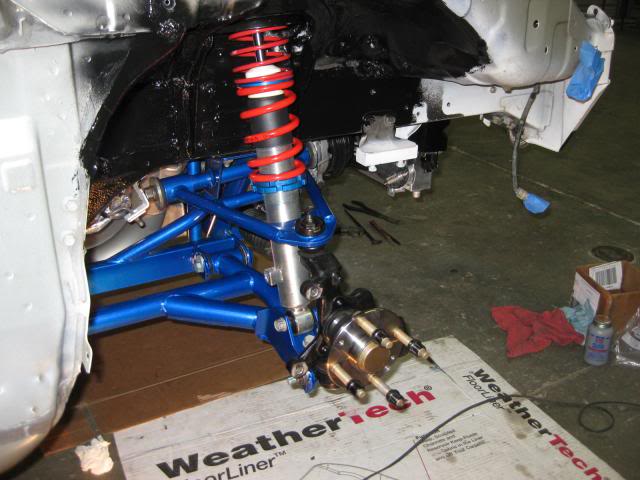
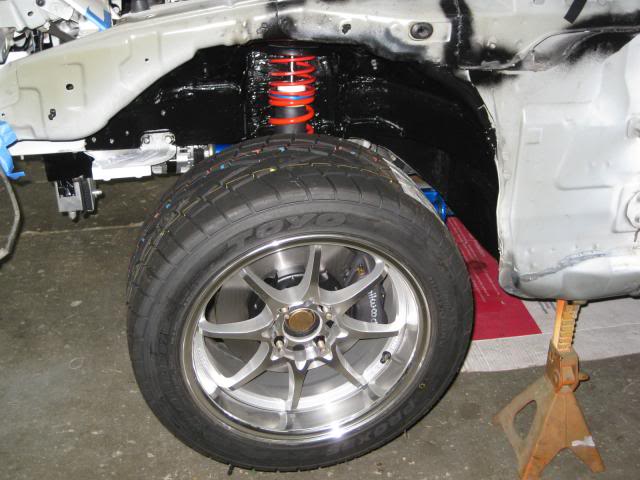
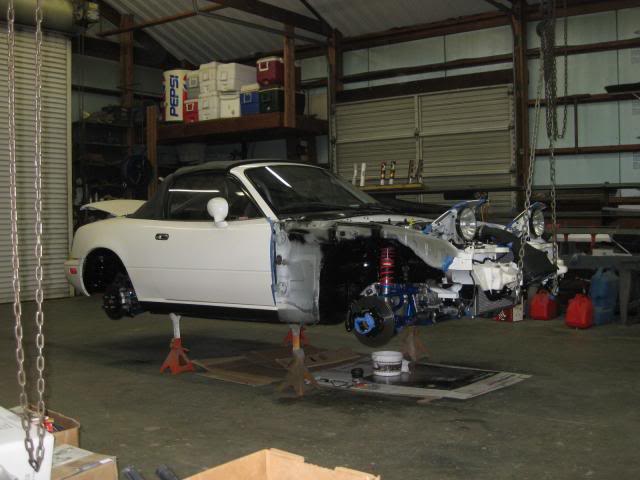
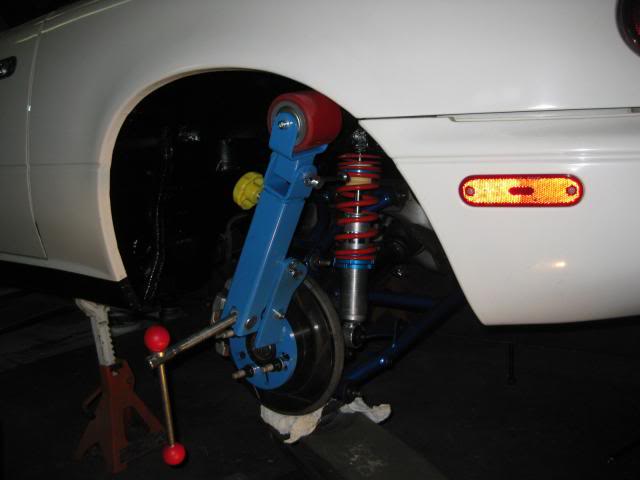
Right Front suspension is installed. I can only imagine how bad my alignment will be the first few days with my initial settings... V-Maxx coilovers, new hubs, V8R A arms, and new lower ball joints along with R-Package tie rod ends complete the package.
LF version - but with installed caliper bracket!
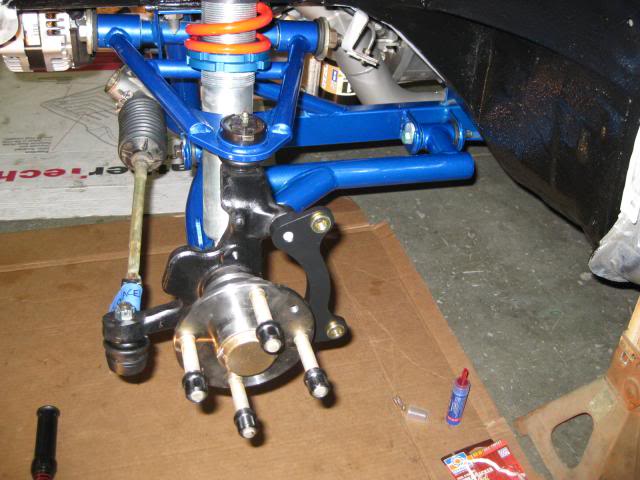
Larger brake kit went on easily - as you would want or expect for a complete BBK from Good-Win Racing.
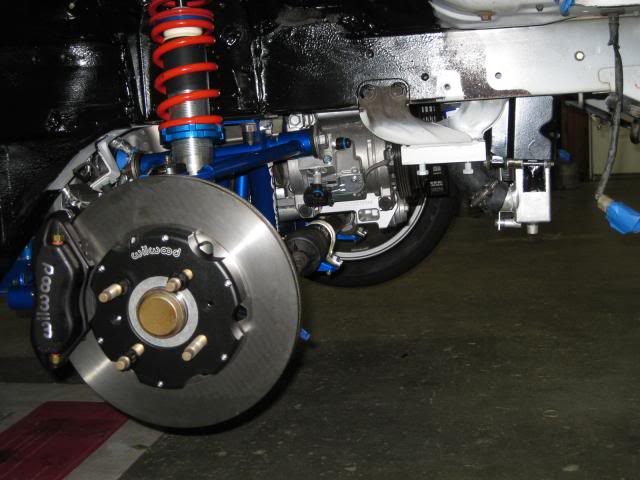
Caliper clearances are good. Starting to look like a go-kart! This thing will be able to roll around on its own 4 tires and wheels for the first time since Nov 2012.
Last edited by ToySnakePMC; 01-01-2014 at 02:53 AM.
12-31-2013, 07:53 AM
#132
V8 Miata Fanatic
Thread Starter
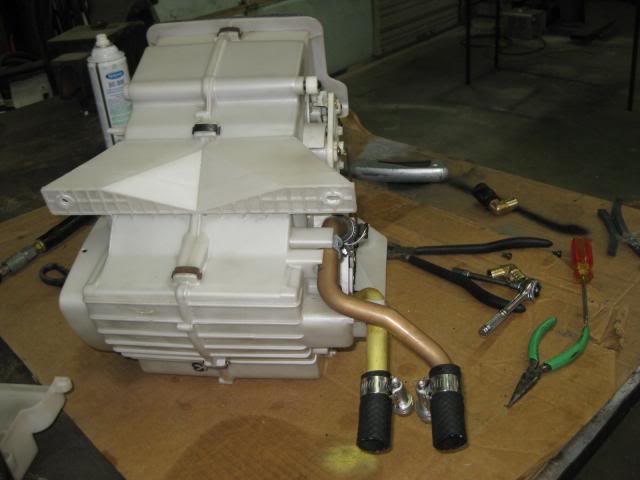
Final plumbing has begun - and it's heater hose time... Starting with the heater core, I've decided to shorten the copper lines coming out of the interior heat exchanger so I can secure short 5/8" heater hose "nipples" with 5/8" barb 90 elbows immediately on the engine side of the firewall. This should allow for ease of installation or removal of 5/8" and 1/2" heater hoses to the LS2 waterpump.
The 5/8" OD copper pipes were a bit too large for the flaring tool - but I was shown the technique of using a hammer and beating the tool as you tighten the tool down! I LIKE how it squeezed down and then the flare (my home-made barb end) will slide into the 5/8" heater hose and be secured with pipe clamps. This will give me peace of mind as I do not want hot coolant dripping on my left foot!
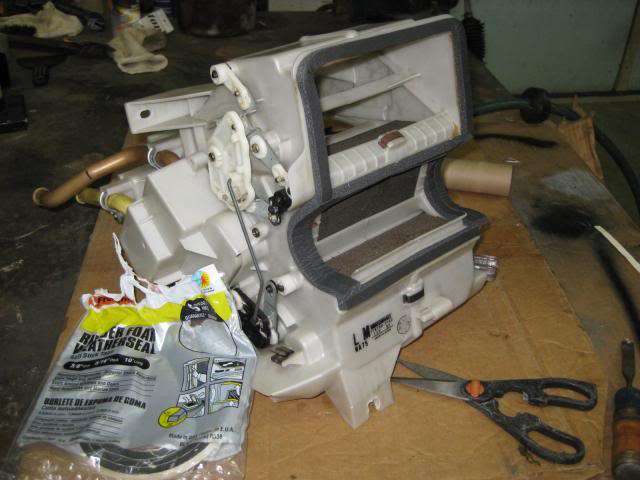
Cleaned up the heater box - 20 years of dust does accumulate somewhere... I removed the old, dried-out weatherstripping and used this Lowe's $3 stuff! Awesome - and ready for installation today.
Keep you posted as 2013 winds down!
The 5/8" OD copper pipes were a bit too large for the flaring tool - but I was shown the technique of using a hammer and beating the tool as you tighten the tool down! I LIKE how it squeezed down and then the flare (my home-made barb end) will slide into the 5/8" heater hose and be secured with pipe clamps. This will give me peace of mind as I do not want hot coolant dripping on my left foot!
Cleaned up the heater box - 20 years of dust does accumulate somewhere... I removed the old, dried-out weatherstripping and used this Lowe's $3 stuff! Awesome - and ready for installation today.
Keep you posted as 2013 winds down!
12-31-2013, 08:16 AM
#133

Great work Patrick! I really like the power and mpg everyone gets with a LS conversion, only thing I don't like is the busy cluttered look when the hood goes up. Looks like your car will be the exception. Looking forward to that first drive and the enthusiastic review.
12-31-2013, 08:27 AM
#134
V8 Miata Fanatic
Thread Starter
I agree with you though - the GM coilpacks are not the prettiest thing I've ever seen under the hood either... And the darn heater hoses are going to wrap the motor up on 2 sides... Ughhhh. And then there's the A/C plumbing that will be done later in 2014 (I hope) and that, too, will add to the confusion. That is a lot of stuff!
12-31-2013, 08:42 AM
#135
Jim Stainer

Man where were you last spring when I needed that heater hose idea! That is a great one but I think if I were to do it again I'd move the holes up too. You can move them a good inch higher with no trouble and that would help a lot.
I really admire clean engine bays too and I think yours is going to look great. But you can rest well knowing I set the bench mark for the worst most cluttered engine bay on the planet and you can't possibly do worse!!!
Love love love this build thread!!!
I really admire clean engine bays too and I think yours is going to look great. But you can rest well knowing I set the bench mark for the worst most cluttered engine bay on the planet and you can't possibly do worse!!!
Love love love this build thread!!!
12-31-2013, 06:32 PM
#136
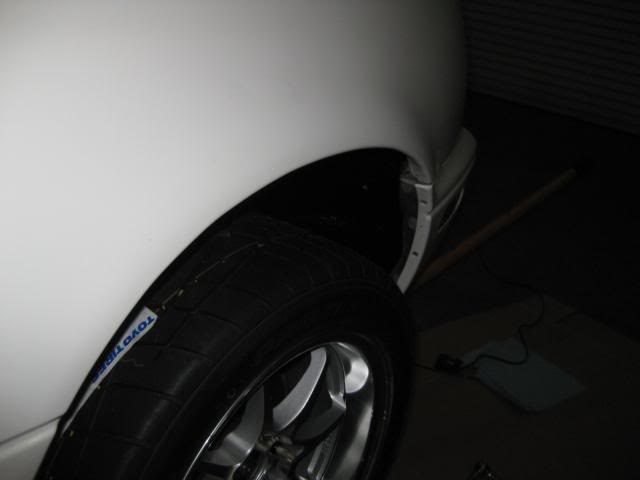
I know, no wire tuck. But consider the note on the image below. You could go a couple different ways since the fender is off. The option I chose which is to route the headlight and fan wires behind the shock tower brace, or drill a hole behind the fuse block and route just outside the inner fender.
Regardless of the minor tuck decision, that's one nice build.
Regardless of the minor tuck decision, that's one nice build.
01-02-2014, 08:55 PM
#137
V8 Miata Fanatic
Thread Starter
Well, it's been a few days since any updates and it's the 2nd day of the new year. To move forward with possibly running the engine for extended period of time, I wanted to get the heater core plumbed in. And in my opinion, I decided to proceed with installing the HVAC items on the firewall (behind dash).
First, you must install the carpet before the heater core - otherwise, you'll have to struggle to get it under the heater box and not have ripples and waves in it around the tranny tunnel... Been there - done that on another old Miata. For 20 yr-old carpet, it's looking good after a quick vacuum! I also trimmed the carpet for my GM electronics - although a bit too wide on the LH side - but that's okay. That will all be hidden behind a carpeted false floor/ access door in the near future.
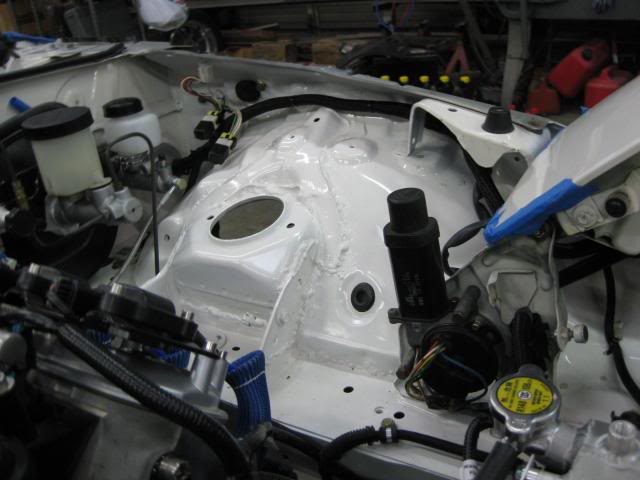
Fan assembly went in first. I had to test fit it a few times and move some harnesses around for best clearance. A/C evap was next. Again, to better accommodate the LS2 wiring, I cut out a trough in the firewall blanket so the big bundle of wires were actually recessed about 2/3 of the way in. Nothing in a bind - all is good.

Back to the previously worked-on heater core/ box. After cutting & flaring the pipes, I added my 5/8" hose "nipples" to stub through the firewall...
Heater unit is back in place with plenty of clearances on the backside for Mazda and LS2 wiring.

Now, here's what I am aiming for - a way to make my 90 turn with the heater piping as close to the firewall and away from the engine - AND - do it without putting additional stresses on the thin Mazda copper pipes! I think I like it - a lot. This is actually a 3/4" PEX piping brass elbow. It has barb ends just long enough for my hose clamps to make good seals.
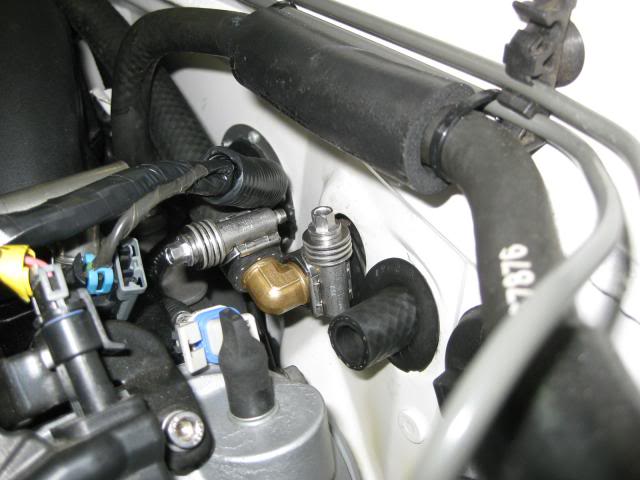
Now, to admit my most recent oversight.., the reason you see only one heater hose installed is that I was fully prepared to run a 5/8" hose off the large GM waterpump outlet and a 1/2" on the smaller outlet. Well guess what? The waterpump outlets ARE 5/8" & 3/4"! So much for my planning and ordering of fittings... Oh well, I will go in search of 3/4" heater hose & fittings to reduce it down to the 5/8" on the other Mazda heater outlet.
First, you must install the carpet before the heater core - otherwise, you'll have to struggle to get it under the heater box and not have ripples and waves in it around the tranny tunnel... Been there - done that on another old Miata. For 20 yr-old carpet, it's looking good after a quick vacuum! I also trimmed the carpet for my GM electronics - although a bit too wide on the LH side - but that's okay. That will all be hidden behind a carpeted false floor/ access door in the near future.
Fan assembly went in first. I had to test fit it a few times and move some harnesses around for best clearance. A/C evap was next. Again, to better accommodate the LS2 wiring, I cut out a trough in the firewall blanket so the big bundle of wires were actually recessed about 2/3 of the way in. Nothing in a bind - all is good.
Back to the previously worked-on heater core/ box. After cutting & flaring the pipes, I added my 5/8" hose "nipples" to stub through the firewall...
Heater unit is back in place with plenty of clearances on the backside for Mazda and LS2 wiring.
Now, here's what I am aiming for - a way to make my 90 turn with the heater piping as close to the firewall and away from the engine - AND - do it without putting additional stresses on the thin Mazda copper pipes! I think I like it - a lot. This is actually a 3/4" PEX piping brass elbow. It has barb ends just long enough for my hose clamps to make good seals.
Now, to admit my most recent oversight.., the reason you see only one heater hose installed is that I was fully prepared to run a 5/8" hose off the large GM waterpump outlet and a 1/2" on the smaller outlet. Well guess what? The waterpump outlets ARE 5/8" & 3/4"! So much for my planning and ordering of fittings... Oh well, I will go in search of 3/4" heater hose & fittings to reduce it down to the 5/8" on the other Mazda heater outlet.
Last edited by ToySnakePMC; 01-02-2014 at 08:57 PM.
01-02-2014, 09:42 PM
#138
V8 Miata Noob

Join Date: Feb 2013
Posts: 5
Likes: 0
Received 0 Likes
on
0 Posts
Great progress during the holidays PMC.
Consider the heatshrink Gates Power Clamps in the link below to really clean up the underhood area due to multiple heater hose connections/clamps. They work great and remove the bulky clutter of traditional hose clamps. I used them with my project to gain some needed space and couldn't be more satisfied. No leaks!
MossMotors.com - Restoration Parts And Accessories For British Cars
I think NAPA had them for a better price than Moss but you get the idea...
Last edited by tad240; 01-02-2014 at 09:46 PM.
01-03-2014, 06:39 AM
#139
V8 Miata Fanatic
Thread Starter
Great progress during the holidays PMC.
Consider the heatshrink Gates Power Clamps in the link below to really clean up the underhood area due to multiple heater hose connections/clamps. They work great and remove the bulky clutter of traditional hose clamps. I used them with my project to gain some needed space and couldn't be more satisfied. No leaks!
Consider the heatshrink Gates Power Clamps in the link below to really clean up the underhood area due to multiple heater hose connections/clamps. They work great and remove the bulky clutter of traditional hose clamps. I used them with my project to gain some needed space and couldn't be more satisfied. No leaks!
01-03-2014, 08:36 AM
#140
V8 Miata Zealot

Looks great. One thing that you may want to do (that I wish I had done) is to add a hole through the firewall on both sides of the engine compartment just in case you ever decide to add something such as gauges. The holes could be plugged-off if not used. I am in the process of adding a mechanical oil pressure gauge, water temp. gauge, & a water/methanol kit. Trying to get the lines & wires fed through the firewall is a pain.
01-05-2014, 06:36 PM
#141
V8 Miata Fanatic
Thread Starter
First full 2014 wknd behind us, and have some forward progress to report:
1. Got the heater hoses on completely. PEX plbg 1"x3/4" reducer barb coupling fits our 3/4" and 5/8" ID hoses and a short 3/4" molded hose with a 90 degree bend made my plumbing complete. Thank you Lowe's for the fitting!
2. Finished up some more interior wiring. Wrapped my separate dash harness and set it aside and just prior, I plugged it all together to confirm & test the wiring for the Speedhut gauages. To do so, I thought I'd test the fuel gauge and connect it to the Mazda yellow wire I had set aside. A few jumper wires with alligator clips and a twist of the key to the ON position confirmed everything there is A-OK !!
The camera flash bleaches out the gauge, but it looks good in person. The LED pointer was lit up. The gauge actually reads too high right now, but Speedhut gives you easy directions on setting the right electrical resistance for your fuel level sender...
While testing the wiring and lighting (for the gauge), my darn RH headlight motor went on the fritz as I stood nearby. Unbelievable... Checked wiring, the headlight motor was pretty hot to the touch, got the multimeter out and checked the resistance on both headlight motors. Had resistance b/tn 2 sets of wires on LH motor and NOTHING on the RH side. Think she's shorted out & fried... I'll be on the lookout for a used one to get me going again. Never had one of these quit on me before...
Then later, I tidied up the GM's OBD II wiring near the driver's LH foot rest. Installed more trim around carpet with a pair of old RatsBack Racing carbon fiber threashold plates and front kick panels.
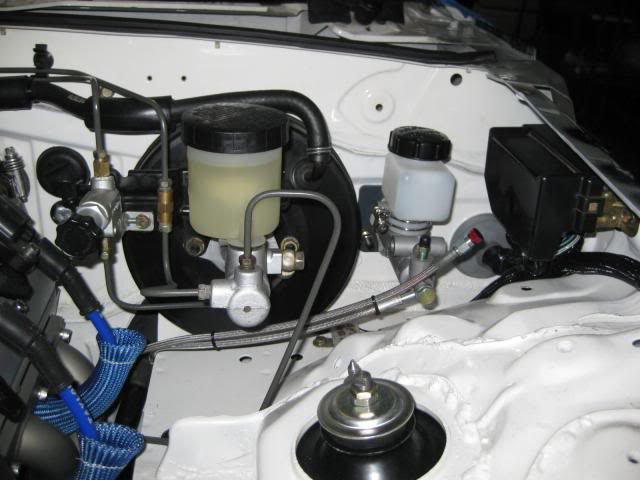
Next up on the check list is brake and hydraulic fluid. My Dad and I handled the tasks rather easily and quicker than I anticipated. The brakes pumped up, small leak at rear axle hard line was tightened, air pocket on Wilwood calipers finally cleared and the job was wrapped up. Then, the T56 slave cylinder and Wilwood clutch master cylinder were bled beautifully and in record time!
Then.., the bad news appeared! Fluid on the floor under the bellhousing -- that means a wide-@ss open leak. So, guess what that means? Yup - the T56 has got to be dropped down so the problem can be confirmed. ...And I tried so hard to properly tighten the slave cylinder lines many months ago because of what I had read from others having leak issues! Damn. We'll put it on a lift next Saturday and drop the tranny from the bellhousing (hopefully) so the LS2 doesn't have to come out as well. Both master cylinders were full 20 min before this pic was snapped:
So, while were discussing "issues" --- here's what all I'm facing right now with some hopefully, final hurdles to jump over:
1. Leak with clutch slave cylinder.
2. Headlight motor - RIP.
3. The 2005 GTO drive-by-wire throttle pedal NOT talking to the Throttle Body. I've actually RAN the LS2 for about 5 minutes on a rough idle (not certain if I've shared that here on the forum before or not...) but the motor chokes off after 3 - 4 minutes. No need to run it anymore until the motor can get some fresh air up through the Z06 intake and run smoothly. Need to get the motor warm to properly top off the coolant, etc...
After all that gets resolved, then it's off to the muffler shop for exhaust and 02 bungs for the one pair of oxygen sensors. No cats on this car and no rear pair of 02 sensors either... We'll get there - just have a few setbacks to deal with.
But, I'm still very stoked with this Mazda so far!!!!
1. Got the heater hoses on completely. PEX plbg 1"x3/4" reducer barb coupling fits our 3/4" and 5/8" ID hoses and a short 3/4" molded hose with a 90 degree bend made my plumbing complete. Thank you Lowe's for the fitting!
2. Finished up some more interior wiring. Wrapped my separate dash harness and set it aside and just prior, I plugged it all together to confirm & test the wiring for the Speedhut gauages. To do so, I thought I'd test the fuel gauge and connect it to the Mazda yellow wire I had set aside. A few jumper wires with alligator clips and a twist of the key to the ON position confirmed everything there is A-OK !!
The camera flash bleaches out the gauge, but it looks good in person. The LED pointer was lit up. The gauge actually reads too high right now, but Speedhut gives you easy directions on setting the right electrical resistance for your fuel level sender...
While testing the wiring and lighting (for the gauge), my darn RH headlight motor went on the fritz as I stood nearby. Unbelievable... Checked wiring, the headlight motor was pretty hot to the touch, got the multimeter out and checked the resistance on both headlight motors. Had resistance b/tn 2 sets of wires on LH motor and NOTHING on the RH side. Think she's shorted out & fried... I'll be on the lookout for a used one to get me going again. Never had one of these quit on me before...
Then later, I tidied up the GM's OBD II wiring near the driver's LH foot rest. Installed more trim around carpet with a pair of old RatsBack Racing carbon fiber threashold plates and front kick panels.
Next up on the check list is brake and hydraulic fluid. My Dad and I handled the tasks rather easily and quicker than I anticipated. The brakes pumped up, small leak at rear axle hard line was tightened, air pocket on Wilwood calipers finally cleared and the job was wrapped up. Then, the T56 slave cylinder and Wilwood clutch master cylinder were bled beautifully and in record time!
Then.., the bad news appeared! Fluid on the floor under the bellhousing -- that means a wide-@ss open leak.
So, guess what that means? Yup - the T56 has got to be dropped down so the problem can be confirmed. ...And I tried so hard to properly tighten the slave cylinder lines many months ago because of what I had read from others having leak issues! Damn. We'll put it on a lift next Saturday and drop the tranny from the bellhousing (hopefully) so the LS2 doesn't have to come out as well. Both master cylinders were full 20 min before this pic was snapped:So, while were discussing "issues" --- here's what all I'm facing right now with some hopefully, final hurdles to jump over:
1. Leak with clutch slave cylinder.
2. Headlight motor - RIP.
3. The 2005 GTO drive-by-wire throttle pedal NOT talking to the Throttle Body. I've actually RAN the LS2 for about 5 minutes on a rough idle (not certain if I've shared that here on the forum before or not...) but the motor chokes off after 3 - 4 minutes. No need to run it anymore until the motor can get some fresh air up through the Z06 intake and run smoothly. Need to get the motor warm to properly top off the coolant, etc...
After all that gets resolved, then it's off to the muffler shop for exhaust and 02 bungs for the one pair of oxygen sensors. No cats on this car and no rear pair of 02 sensors either... We'll get there - just have a few setbacks to deal with.
But, I'm still very stoked with this Mazda so far!!!!
01-12-2014, 10:32 PM
#142
V8 Miata Fanatic
Thread Starter
Somewhat slow wknd in the shop but can check off another task or two as complete.
Here's where I left off last week - and where I'm at with it:
1. Leak with clutch slave cylinder. Still leaks, I guess. Hope to get the Mazda on a lift next Saturday to pull the tranny as easily as possible...
2. Headlight motor - RIP. Used eBay replacement arrived for $23 + $6 shipping, cleaned up, installed, and works perfectly.
3. The 2005 GTO drive-by-wire throttle pedal NOT talking to the Throttle Body. Talked to my excellent out-of-state GM wiring guy. Hope to perform a few tests next Saturday to confirm the current failure - - wiring or bad pedal...
In addition to the headlight motor, I worked on my instrument panel. Have several pics to share in case anyone else wants to build their custom set-up.
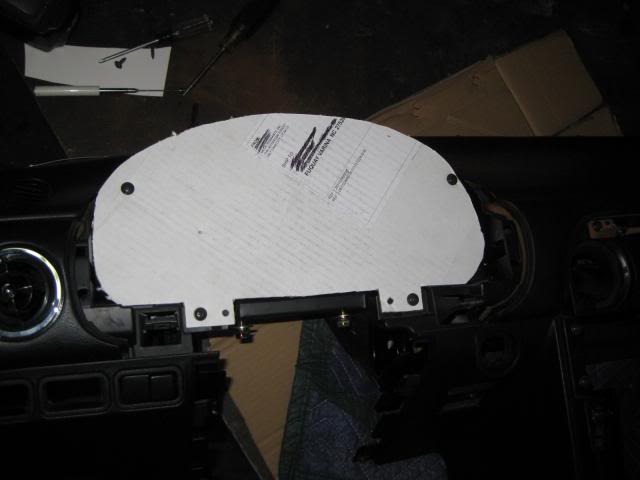
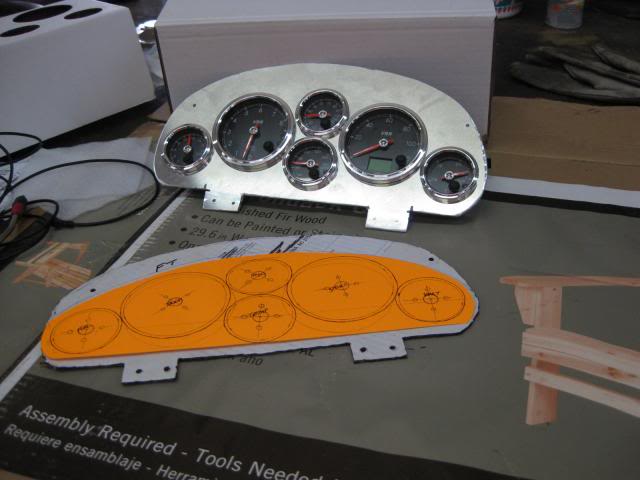
First, I traced out the old instrument panel onto poster board so I could compare how much open gap I'd have with the test fitting the gauge hood.
Drew and cut up a 2nd sheet of paper to follow the contour of the gauge hood - combined the two and came up with this cardboard template.
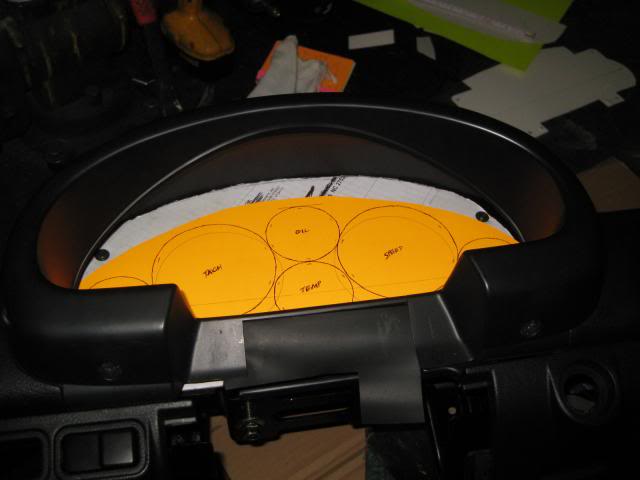
Set my old orange layout drawing on the new template to place "gauges" exactly where I want them to be...
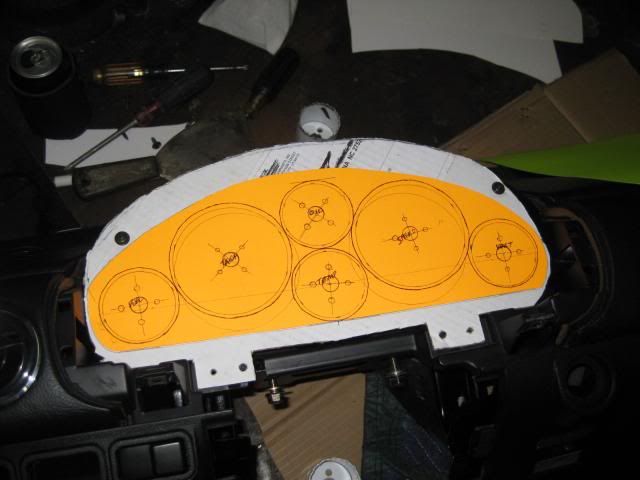
Here's what it would look like if your head happened to be on floor of the Mazda and was staring up at the dash...
Took my two-foot McMaster Carr 3/16" sheet of aluminum out for a little weight reduction and transferred all my info here with Sharpie and center-punch...
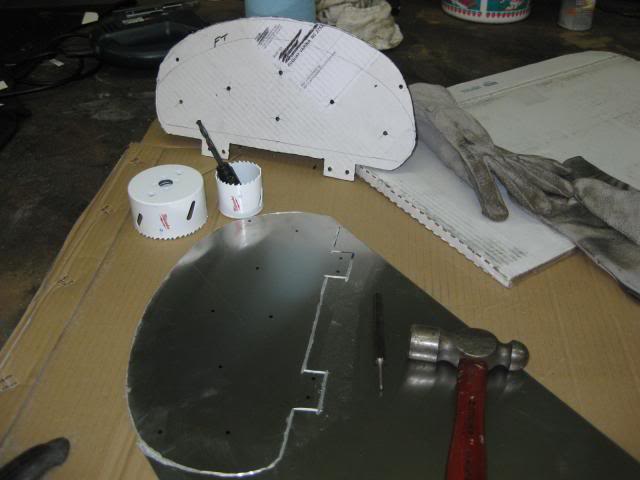
Drill press, hole saws, and the ever-fabulous HarborFreight $9.98 cutting tool were my best friends that day.
A quick test fit and after elongating a few screw holes with a round file, the gauge panel fit like a glove!
Then the sharp edges were removed with what must be a 60+ yr-old belt sander in the corner of the shop. It's ugly, but it worked. Once the corners were smooth and potential for slicing my arm off was gone, I did a test-fit with the gauges! They were TIGHT, but it went A-OK after I trimmed the "nubbies" off the threaded collars on the back of the gauges for clearance reasons. With the collars' new smaller diameters, they fit together like a glove.
A view from the front - aluminum "in the raw"
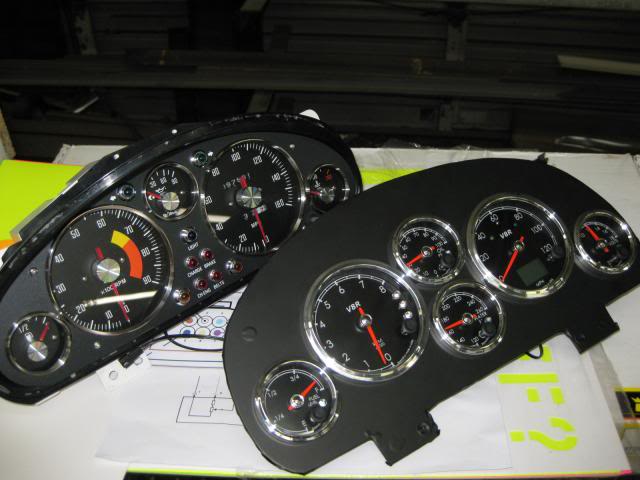
Gauges were pulled back out and a sheet of 3M Flat Black vinyl wrap was applied to make it more "OEM" or subtle looking. Then gauges were put back in -- just in time to for a quick photo next to the previous set of Mazda/ KGWorks/ and custom gauge faces I used to have the pleasure of looking at. (After 3 variations of gauge faces in this car over the last 8 yrs or so, I had JUST gotten the look and style I wanted... now they're going on the shelf!) I decided to go with SpeedHut's Freedom Can-Bus gauges to utilize the LS2's ability to provide speedo, tach, and all other gauges (except for Fuel level. Fuel level reads off the Mazda sending unit.)
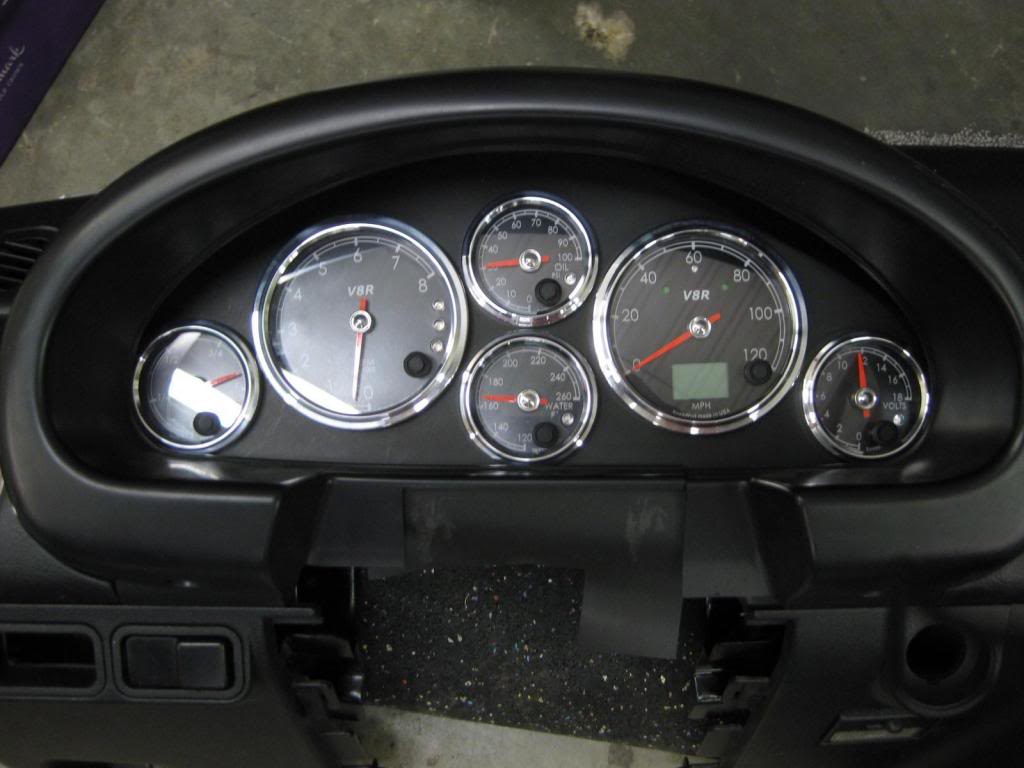
And voila !! Gauges sitting in place. The wiring will be very simple - have turn signals, high beam, ground, key-ON power, fuel level, and SpeedHut's dimmer for the LED backlighting. Should go pretty quick when I'm ready to re-attach the dash wiring harness back to the dash support beam.
Here's where I left off last week - and where I'm at with it:
1. Leak with clutch slave cylinder. Still leaks, I guess. Hope to get the Mazda on a lift next Saturday to pull the tranny as easily as possible...
2. Headlight motor - RIP. Used eBay replacement arrived for $23 + $6 shipping, cleaned up, installed, and works perfectly.
3. The 2005 GTO drive-by-wire throttle pedal NOT talking to the Throttle Body. Talked to my excellent out-of-state GM wiring guy. Hope to perform a few tests next Saturday to confirm the current failure - - wiring or bad pedal...
In addition to the headlight motor, I worked on my instrument panel. Have several pics to share in case anyone else wants to build their custom set-up.
First, I traced out the old instrument panel onto poster board so I could compare how much open gap I'd have with the test fitting the gauge hood.
Drew and cut up a 2nd sheet of paper to follow the contour of the gauge hood - combined the two and came up with this cardboard template.
Set my old orange layout drawing on the new template to place "gauges" exactly where I want them to be...
Here's what it would look like if your head happened to be on floor of the Mazda and was staring up at the dash...
Took my two-foot McMaster Carr 3/16" sheet of aluminum out for a little weight reduction and transferred all my info here with Sharpie and center-punch...
Drill press, hole saws, and the ever-fabulous HarborFreight $9.98 cutting tool were my best friends that day.
A quick test fit and after elongating a few screw holes with a round file, the gauge panel fit like a glove!
Then the sharp edges were removed with what must be a 60+ yr-old belt sander in the corner of the shop. It's ugly, but it worked. Once the corners were smooth and potential for slicing my arm off was gone, I did a test-fit with the gauges! They were TIGHT, but it went A-OK after I trimmed the "nubbies" off the threaded collars on the back of the gauges for clearance reasons. With the collars' new smaller diameters, they fit together like a glove.
A view from the front - aluminum "in the raw"
Gauges were pulled back out and a sheet of 3M Flat Black vinyl wrap was applied to make it more "OEM" or subtle looking. Then gauges were put back in -- just in time to for a quick photo next to the previous set of Mazda/ KGWorks/ and custom gauge faces I used to have the pleasure of looking at. (After 3 variations of gauge faces in this car over the last 8 yrs or so, I had JUST gotten the look and style I wanted... now they're going on the shelf!) I decided to go with SpeedHut's Freedom Can-Bus gauges to utilize the LS2's ability to provide speedo, tach, and all other gauges (except for Fuel level. Fuel level reads off the Mazda sending unit.)
And voila !! Gauges sitting in place. The wiring will be very simple - have turn signals, high beam, ground, key-ON power, fuel level, and SpeedHut's dimmer for the LED backlighting. Should go pretty quick when I'm ready to re-attach the dash wiring harness back to the dash support beam.
Last edited by ToySnakePMC; 01-13-2014 at 04:18 PM.
 01-13-2014, 04:24 PM
#144
V8 Miata Fanatic
Thread Starter
Yes they are & the high beam indicator is sitting just below the "60".
The other LED lamps in the gauges are programmable HI or LOW level warnings for low fuel, low oil pressure, hi water temp, programmable shift lamps, etc. The speedo also has OBD II diagnostic codes that I could toggle through where the digital odometer is. I have some readin' up to do when this thing is up and running!
I have a small eBay amber LED indicator light in black housing ordered that will be the MIL - Malfunction Indicator Light for the GM PCM. I'm not sure where it will go as of yet - but don't think I'll put it with the gauges. I have a small, rectangular carbon fiber blank just below the radio that would work for the MIL...
No pop up light indicator, seat belt indicator, or other Mazda lamps are coming back either - just keeping it plain and simple, I hope!
Last edited by ToySnakePMC; 01-13-2014 at 04:27 PM.
01-19-2014, 07:20 PM
#145
V8 Miata Fanatic
Thread Starter
Small update on Slooooowww build:
Remember my recent To-Do list? There's not much to report this week as my friend (who operates his own auto repair shop) could not locate his Weather-Pack de-pinning tool. Darn. Have to go another week or so to hopefully get DBW pedal working and then we can look into the slave cylinder issue...
1. Leak with clutch slave cylinder. Still leaks.
2. The 2005 GTO drive-by-wire throttle pedal NOT talking to the Throttle Body. Still not talking...
So, I worked on some loose ends instead.
1. Received my used Z06 rubber coupling between throttle body & air intake to replace my too-short eBay silicone coupling. Perfect fit! It gave me the adjustability and extra 1/2" length to drill holes in the appropriate place in the Mazda core support. Very happy with this one. Go OEM with this stuff, okay?
While searching for the above OEM coupling, I learned that my MAF needed a gasket. Decided to make my own out of a sheet of somewhat spongy cork gasket material. Should be OK.

2. Rolled rear fenders. Received my eBay $118 (incl frt) fender roller and used it in conjunction with my dad's Ace Hardware heat gun. ...I hope I did OK with rolling my first pair of fenders - I have nothing to compare it to. Are the lips supposed to be FLAT against the inside of the rear quarter panels? I don't know. But, my lips are rolled into an upside down "U" and sort of parallel with the 1/4 panel. Just hope that gives my 225 tires enough clearance - otherwise, I'll find out the hard way when the tires rub. And, actually, I tried to jack up one side of the rear suspension (with lower shock bolt removed!), and the jack would pick up the whole damn corner of the car off of the jack stands. So, I never could push the tire up into the fender. I think my V8R suspension is TIGHT!!!
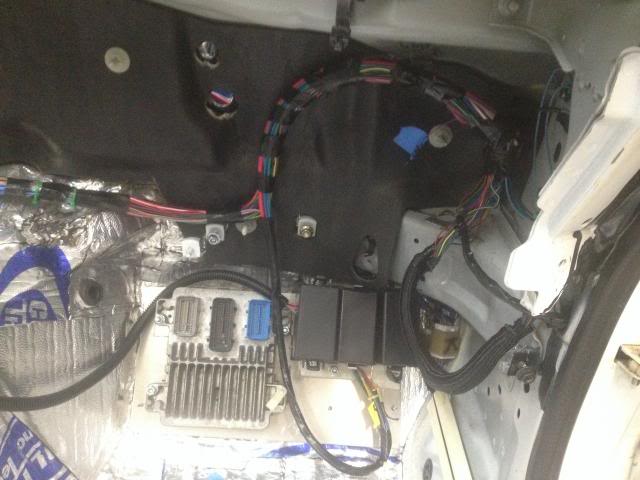
3. Decided to install the updated and less-bulky dash wiring harness - because I had nothing else to do... The below 2 pics are just the remaining Mazda wiring...
This pic shows the LH driver's side after wiring in all the connections for the SpeedHut OBD II gauges. Had to hook up fuel sender wire and ground wire for same fuel gauge, + and - for dash lighting, + and - for needle pointers, & + and - for the gauges themselves. All the above come with small SpeedHut wiring harnesses so it was actually about 6 connections for everything! I also zip-tied in a small black box behind the dash and rheostat with **** for dimming these LED-lit gauges.
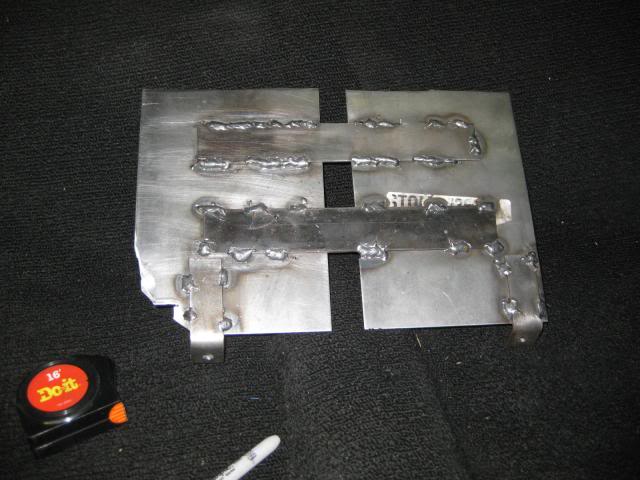
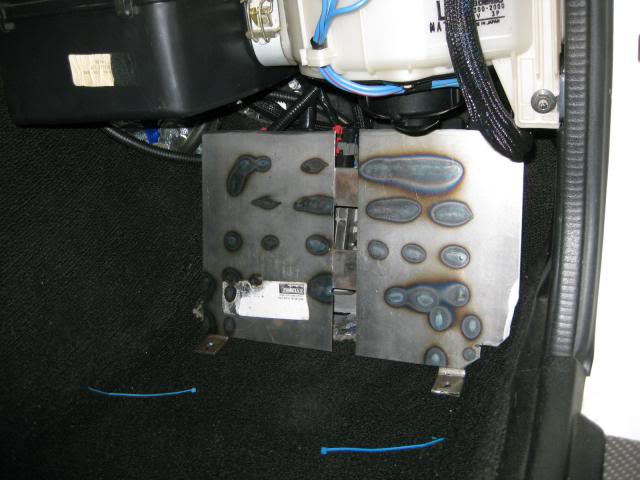
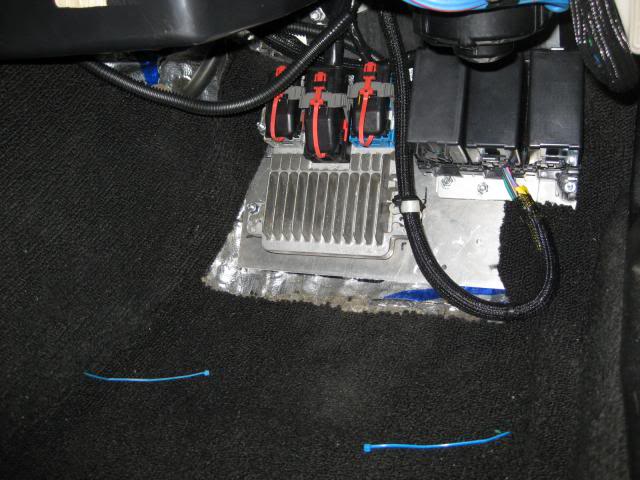
4. Next up is this false floor "to protect & to serve" the GM PCM and fuse box in passenger RH floorboard. I really feel that somewhere deep within me lurks a true-welder, an artisan, struggling to get out! So, I made a 8.5" x 13" rectangle with two angled, lower mounting tabs and trimmed it to fit the contour of the floor. These welds are extreme, and very amateurish, I know! But, I love any and every opp to get the MIG welder going. I wish I was better at it this art craft. One day...
Here's the backside for your viewing pleasure. This bottom will be bolted to the Mazda threaded studs that were used on '90-93 Miatas to protect their ECMs. The top will have a threaded bolt or something to tie to the forward-facing floorboard to keep this from touching the GM fuse box and PCM. The front-side will be probably be covered in Mazda carpet for OEM good looks!
Here's where it sits:
Here's what it protects:
So, that's it for right now. Once I get the LS2 throttle pedal working and the clutch operating, it will be a quick install of interior and front-end sheetmetal/ front bumper!!! I'm getting anxious to wrap this build up!
Remember my recent To-Do list? There's not much to report this week as my friend (who operates his own auto repair shop) could not locate his Weather-Pack de-pinning tool. Darn. Have to go another week or so to hopefully get DBW pedal working and then we can look into the slave cylinder issue...
1. Leak with clutch slave cylinder. Still leaks.
2. The 2005 GTO drive-by-wire throttle pedal NOT talking to the Throttle Body. Still not talking...
So, I worked on some loose ends instead.
1. Received my used Z06 rubber coupling between throttle body & air intake to replace my too-short eBay silicone coupling. Perfect fit! It gave me the adjustability and extra 1/2" length to drill holes in the appropriate place in the Mazda core support. Very happy with this one. Go OEM with this stuff, okay?
While searching for the above OEM coupling, I learned that my MAF needed a gasket. Decided to make my own out of a sheet of somewhat spongy cork gasket material. Should be OK.
2. Rolled rear fenders. Received my eBay $118 (incl frt) fender roller and used it in conjunction with my dad's Ace Hardware heat gun. ...I hope I did OK with rolling my first pair of fenders - I have nothing to compare it to. Are the lips supposed to be FLAT against the inside of the rear quarter panels? I don't know. But, my lips are rolled into an upside down "U" and sort of parallel with the 1/4 panel. Just hope that gives my 225 tires enough clearance - otherwise, I'll find out the hard way when the tires rub. And, actually, I tried to jack up one side of the rear suspension (with lower shock bolt removed!), and the jack would pick up the whole damn corner of the car off of the jack stands. So, I never could push the tire up into the fender. I think my V8R suspension is TIGHT!!!
3. Decided to install the updated and less-bulky dash wiring harness - because I had nothing else to do... The below 2 pics are just the remaining Mazda wiring...
This pic shows the LH driver's side after wiring in all the connections for the SpeedHut OBD II gauges. Had to hook up fuel sender wire and ground wire for same fuel gauge, + and - for dash lighting, + and - for needle pointers, & + and - for the gauges themselves. All the above come with small SpeedHut wiring harnesses so it was actually about 6 connections for everything! I also zip-tied in a small black box behind the dash and rheostat with **** for dimming these LED-lit gauges.
4. Next up is this false floor "to protect & to serve" the GM PCM and fuse box in passenger RH floorboard. I really feel that somewhere deep within me lurks a true-welder, an artisan, struggling to get out!
So, I made a 8.5" x 13" rectangle with two angled, lower mounting tabs and trimmed it to fit the contour of the floor. These welds are extreme, and very amateurish, I know! But, I love any and every opp to get the MIG welder going. I wish I was better at it this art craft. One day...Here's the backside for your viewing pleasure. This bottom will be bolted to the Mazda threaded studs that were used on '90-93 Miatas to protect their ECMs. The top will have a threaded bolt or something to tie to the forward-facing floorboard to keep this from touching the GM fuse box and PCM. The front-side will be probably be covered in Mazda carpet for OEM good looks!
Here's where it sits:
Here's what it protects:
So, that's it for right now. Once I get the LS2 throttle pedal working and the clutch operating, it will be a quick install of interior and front-end sheetmetal/ front bumper!!! I'm getting anxious to wrap this build up!
Last edited by ToySnakePMC; 01-20-2014 at 11:51 AM.
01-21-2014, 11:36 PM
#146
V8 Miata Fan

Join Date: Dec 2013
Location: Des Moines, IA
Posts: 99
Likes: 0
Received 0 Likes
on
0 Posts
What ever you do, dont stop posting, I love this thread, dont let the lack of replies discourage you, this thread is a gold mine of very useful information. I dont even own a miata and its because of great builds like this that have me scouring the wanted ads for a car to buy and do my own. Thanks for everything
01-22-2014, 12:02 AM
#147
V8 Miata Fanatic
Thread Starter
What ever you do, dont stop posting, I love this thread, dont let the lack of replies discourage you, this thread is a gold mine of very useful information. I dont even own a miata and its because of great builds like this that have me scouring the wanted ads for a car to buy and do my own. Thanks for everything
And really, one of my goals from the beginning has been to share the little stuff (heater hose sizes, fuel filter/ regulator mounting, metal cutting, wire routing, etc) that I wasn't finding on other Miata LS swap sites.
Gold mine - LOL! My wife uses those same words about this build, but for different reasons! Now, go out and find your donor Miata to start your build or just swing through NC and take a ride in this one when it's done.
01-25-2014, 09:04 PM
#148
V8 Miata Follower

What ever you do, dont stop posting, I love this thread, dont let the lack of replies discourage you, this thread is a gold mine of very useful information. I dont even own a miata and its because of great builds like this that have me scouring the wanted ads for a car to buy and do my own. Thanks for everything
i have different LS1 cars before but had different people helping me to do it at different stages
i m planning on doing this LS1 miata all by myself
this thread has been awesome
da moar picz da bettah !!!!
good luck on your DBW situation, i'll be using standard wire pedal
01-26-2014, 06:24 PM
#149
V8 Miata Fanatic
Thread Starter
+1
i have different LS1 cars before but had different people helping me to do it at different stages
i m planning on doing this LS1 miata all by myself
this thread has been awesome
da moar picz da bettah !!!!
good luck on your DBW situation, i'll be using standard wire pedal[/QUOTE]
Thanks MSM, and best of luck on your Miata project! My DBW saga continues... All wiring is correct - just think my GTO pedal decided to die while in storage..? These '05 pedals apparently have a poor reputation so I have a replacement ordered. I hate to throw parts at the problem, but I don't have a GM diagnostics tool to problem solve with. But gut instinct after researching the deal says it's the pedal. Hope so.
02-02-2014, 08:44 AM
#150
V8 Miata Fanatic
Thread Starter
Really hate posting up without having forward progress to report, but I'm about dead in my tracks as I try to sort out the lack of communication between my GTO pedal, PCM, and throttle body -- all off of the same car.
Earlier this week, we plugged in a new, correct-replacement pedal hoping that this was the culprit for no throttle body blade movement... Unfortunately, it did not make any difference. With the key ON, the throttle body should respond to the pedal - but that doesn't happen. My throttle body DOES do its initial start-up sequence when it sorta zero's out as soon as it powers up. So, I feel like the throttle body may be OK. But perhaps not... I have read that on the E40 PCM that I have, there can be an issue where the PCM goes bad and does not send enough voltage to the stepper motor in the throttle body to create movement.
Need to do more homework or wish for an experienced GM tech to fall from the sky with a backpack full of diagnostic tools! ...I'd pay his bus fare back to wherever he came from, I promise.


