V8R sloooww build - 94 Miata - North Carolina


 07-31-2013, 03:15 PM
#77
V8 Miata Fan

Join Date: Jul 2013
Location: Alexandria, Virginia
Posts: 25
Likes: 0
Received 0 Likes
on
0 Posts
Fuel injected, Chevy powered LS motors Miata have a clear advantage over the Ford EFI engine as far as an induction practical design goes. You can built the LS Chevy's air intake going center, to the right, or to the left; it has lots of options. The Ford EFI powered Miatas have some features that the Chevys don't have but not in this area. It really looks cool to see a centered air induction duct work.
It's always a pleasure to see how someone can worked out some of these problems while keeping in mind the visual presentation aspect of hot rodding...... It's really shaping up; keep up the good work!
Cheers,
Jacko
It's always a pleasure to see how someone can worked out some of these problems while keeping in mind the visual presentation aspect of hot rodding...... It's really shaping up; keep up the good work!
Cheers,
Jacko
Last edited by mgb-v8; 07-31-2013 at 03:20 PM. Reason: re-phrasing
08-12-2013, 09:47 PM
#78
V8 Miata Fanatic

Thread Starter

Only small steps taken the last two weeks on this build journey with work and family obligations - but that's okay - I'm taking this build at whatever pace I can. Some weeks will see more accomplishments than others, which leads me to this weak post! 
Received a box from McMaster Carr with the final, needed stainless steel socket screws and a 1/16"x12"x24" sheet of aluminum during the week so I could at least make my bellhousing dust shield. I first took an expensive, flat piece of cardboard from some previous shipment and made my template. Template was traced out on the aluminum and then put my seldom-used Blk & Decker jigsaw to work! Note to any of you doing the same: if your jigsaw has a variable speed -- crank it up to max. Damn thing will slice through some metal then... All rough edges were sanded down and two holes were drilled out. She's good to go!

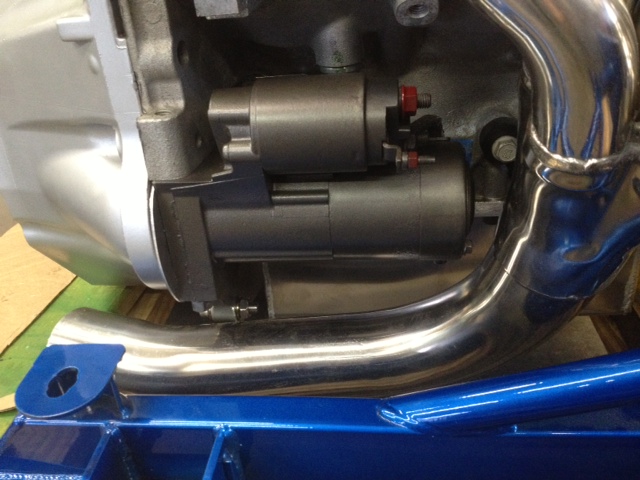
Also, I had previously sanded the bad original paint on the LS2/GTO starter and painted it with high temp dark bronze paint I had lying around. Got her bolted back in for the first time. Also, threw the header back on to see how they're going to get along & they fit just fine. That starter will need to be wrapped in a blanket to prevent the dreaded heat soak I hear about too often on these V8Miata swaps.
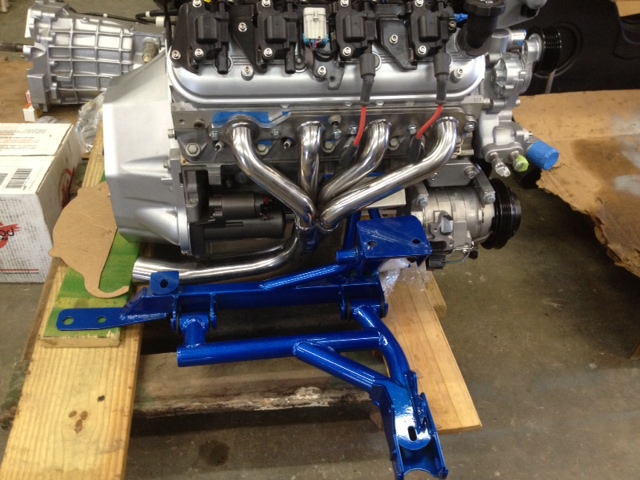
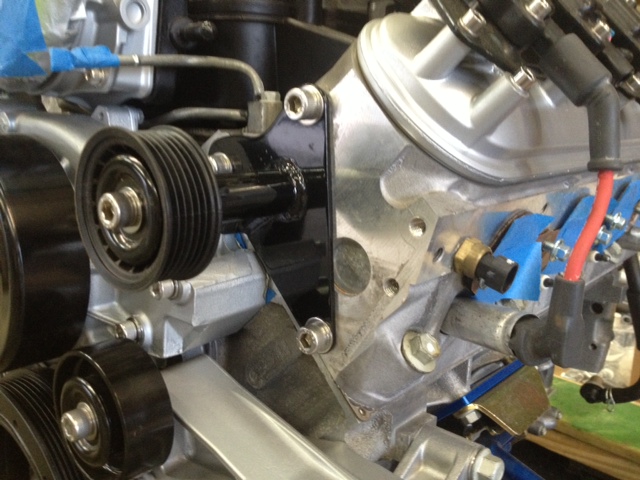
Replaced various GM bolts on the front drive accessories, brackets, coil brackets, etc with stainless steel socket screws to tidy up the engine. I'm thinking it adds about 0.36 HP overall... Well, maybe not - but I do like the look. I got addicted to this idea after I ordered my first small kit for the intake bolts and it sorta went from there...
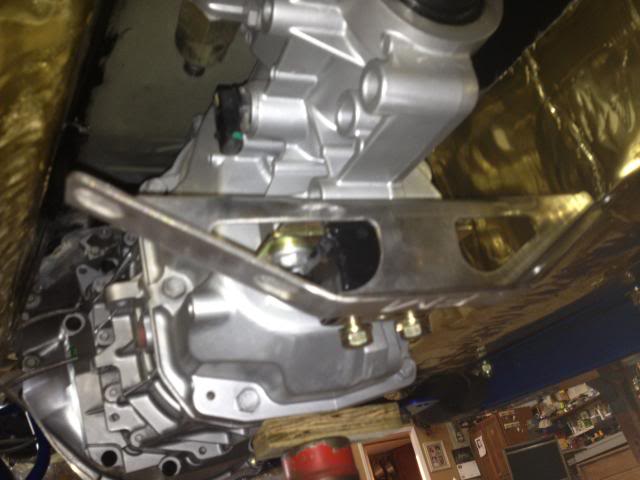
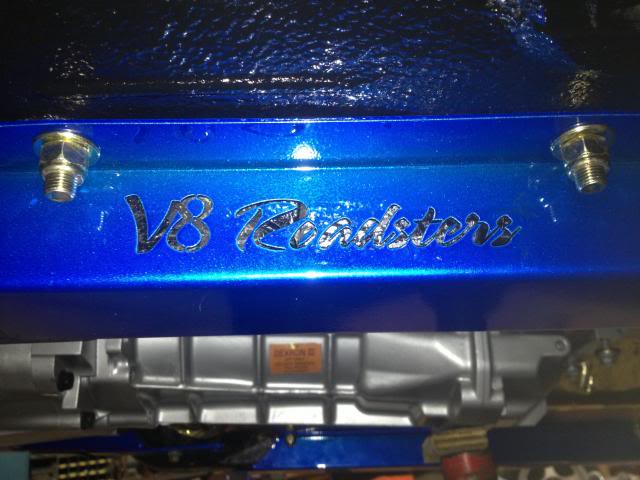
Here, you get a good look at the V8Roadsters power steering delete bracket for better chance of retaining the factory LS belt routing. Many others have done without the bracket and invented a way to keep their serpentine belt properly wrapped, but I sorta dig how this one looks!
So that's where I'm at. The next big task will be the welding up of the floor/ firewall. My welder SHOULD call me soon, right?? Hello? Is this thing on??
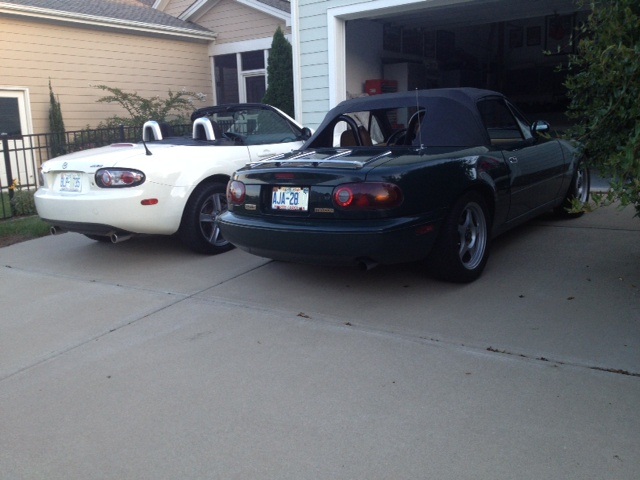
When I got home from the shop yesterday evening, I couldn't pull into our short driveway... My wife was sweeping and cleaning up the garage -- God, I love that woman!! She had the other two Mazdas rolled out of the way. the white '06 MX5 just joined the family last month. If you haven't driven an NC Miata, you should. The chassis is so much tighter than the NA's that I love so much. I hope more LS swap MX5's start happening - that would be the ultimate...
Received a box from McMaster Carr with the final, needed stainless steel socket screws and a 1/16"x12"x24" sheet of aluminum during the week so I could at least make my bellhousing dust shield. I first took an expensive, flat piece of cardboard from some previous shipment and made my template. Template was traced out on the aluminum and then put my seldom-used Blk & Decker jigsaw to work! Note to any of you doing the same: if your jigsaw has a variable speed -- crank it up to max. Damn thing will slice through some metal then... All rough edges were sanded down and two holes were drilled out. She's good to go!
Also, I had previously sanded the bad original paint on the LS2/GTO starter and painted it with high temp dark bronze paint I had lying around. Got her bolted back in for the first time. Also, threw the header back on to see how they're going to get along & they fit just fine. That starter will need to be wrapped in a blanket to prevent the dreaded heat soak I hear about too often on these V8Miata swaps.
Replaced various GM bolts on the front drive accessories, brackets, coil brackets, etc with stainless steel socket screws to tidy up the engine. I'm thinking it adds about 0.36 HP overall... Well, maybe not - but I do like the look. I got addicted to this idea after I ordered my first small kit for the intake bolts and it sorta went from there...
Here, you get a good look at the V8Roadsters power steering delete bracket for better chance of retaining the factory LS belt routing. Many others have done without the bracket and invented a way to keep their serpentine belt properly wrapped, but I sorta dig how this one looks!
So that's where I'm at. The next big task will be the welding up of the floor/ firewall. My welder SHOULD call me soon, right?? Hello? Is this thing on??
When I got home from the shop yesterday evening, I couldn't pull into our short driveway... My wife was sweeping and cleaning up the garage -- God, I love that woman!! She had the other two Mazdas rolled out of the way. the white '06 MX5 just joined the family last month. If you haven't driven an NC Miata, you should. The chassis is so much tighter than the NA's that I love so much. I hope more LS swap MX5's start happening - that would be the ultimate...
08-17-2013, 09:50 PM
#79
V8 Miata Fanatic
Thread Starter
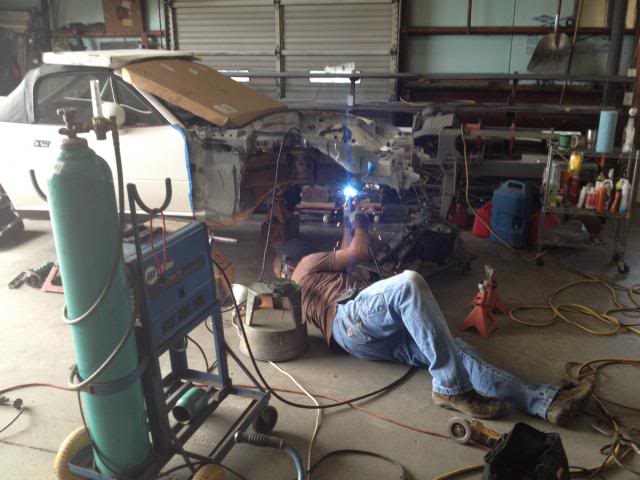
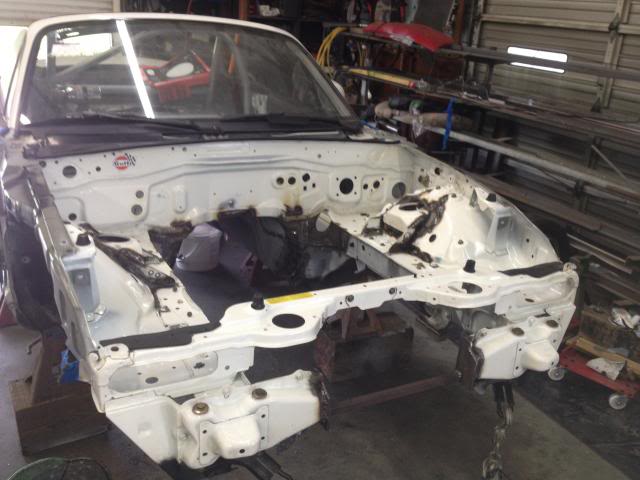
With about 8 months into this build, this weekend was a turning point. The welder came by Friday AM and finished about 6 hours later. I feel like now it's a down hill grade as the MX5 will begin to come together piece-by-piece. Not that it's gonna happen overnight, but at least it won't be deconstruction as much as it will be build, install, wire, plumb, etc...
Action shot of this awesome welder and new friend - KC. Sweet work, very talented, cell phones don't do it justice.
Here's a close up of sorts on LH side of firewall with the installation of the FM frame reinforcements. This is before he welded up the tranny tunnel down below.
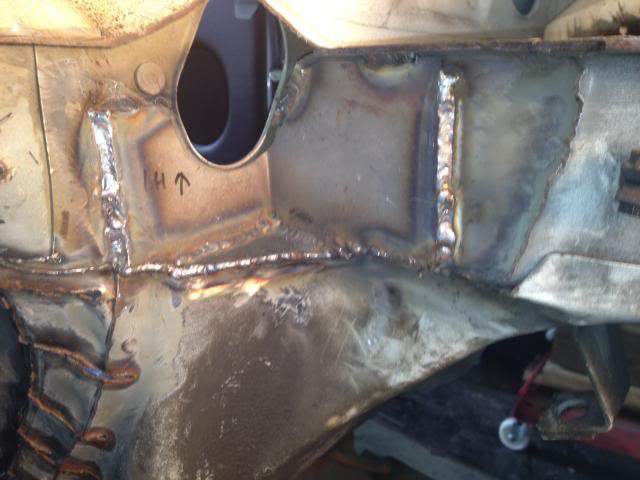
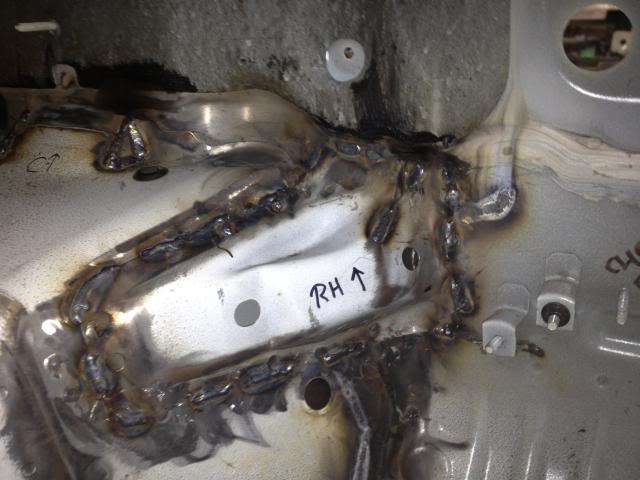
The RH side pic shows how KC welded up the corner and the MANY tunnel slices that were previously cut so the metal could be folded over like fingers. He welded so much on the tunnel that she's gotta be a lot more stiff than when new.
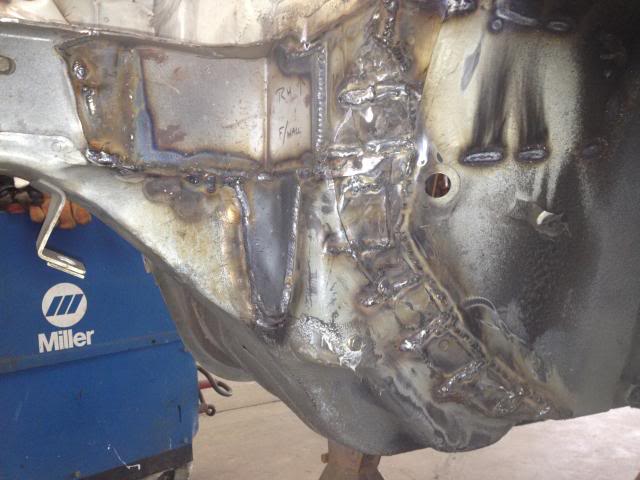
Reinforcements were put back in on the backside of the firewall. These things had to be manipulated, cut, bent, and beat on severely to fit snug & properly. This 20 yr-old tub is going to be stout and ready for 6.0L of fuel-injected torque...
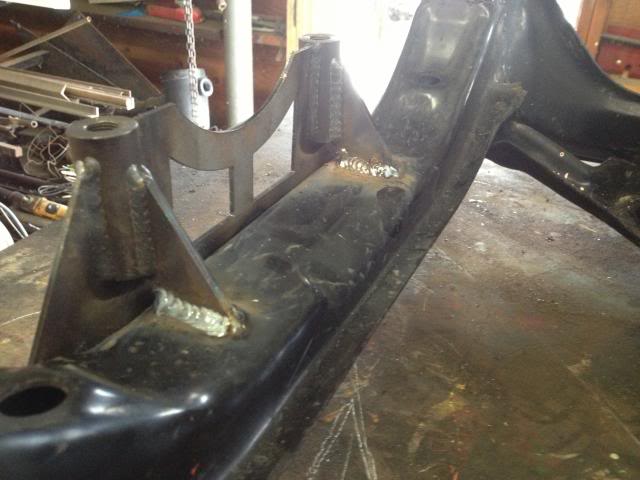
Next, KC tackled the rear 8.8 diff front support. He and I weren't certain what V8R had in mind when they had these items laser-cut made since one rear tab doesn't quite reach the subframe and the lower lip (when upside down like in my pics) doesn't reach the spot-welded flange of the subframe. So KC welded in some bar stock to give this ft piece some substantial support.
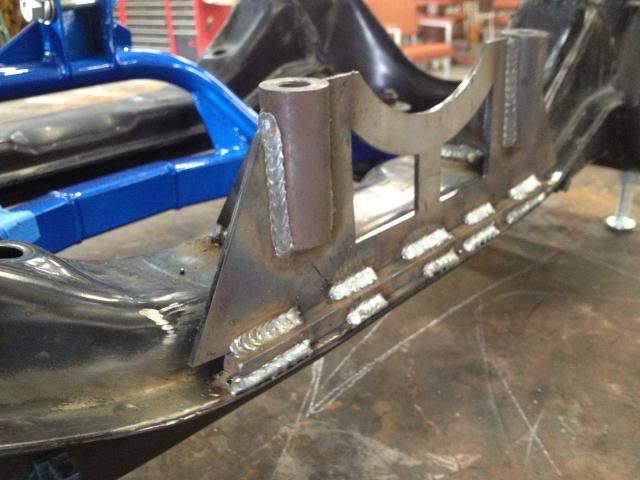
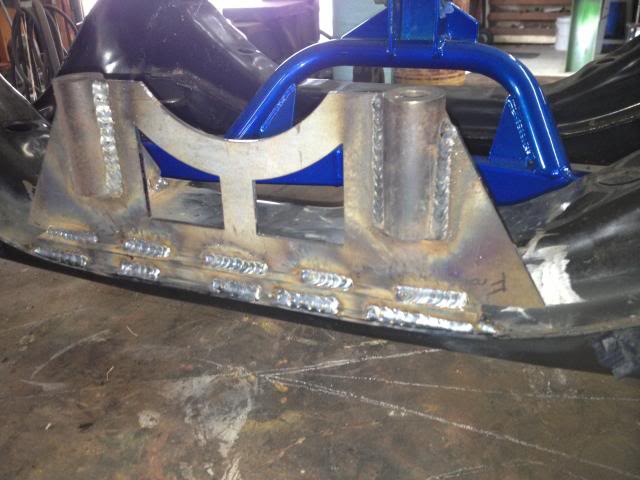
She's fully welded in now. The rear subframe will now need to be cleaned, primed, and painted so the rear diff, axles and suspension can all go back together one day...
End of the day called for me to clean up the engine bay and interior with some Purple stuff and paper towels. I'm actually typing with no fingerprints as they got removed this afternoon with that intense cleaner -- but my firewall and engine compartment look good and will soon receive seam sealer, primer, and Mazda white paint for better appearance.
Action shot of this awesome welder and new friend - KC. Sweet work, very talented, cell phones don't do it justice.
Here's a close up of sorts on LH side of firewall with the installation of the FM frame reinforcements. This is before he welded up the tranny tunnel down below.
The RH side pic shows how KC welded up the corner and the MANY tunnel slices that were previously cut so the metal could be folded over like fingers. He welded so much on the tunnel that she's gotta be a lot more stiff than when new.
Reinforcements were put back in on the backside of the firewall. These things had to be manipulated, cut, bent, and beat on severely to fit snug & properly. This 20 yr-old tub is going to be stout and ready for 6.0L of fuel-injected torque...
Next, KC tackled the rear 8.8 diff front support. He and I weren't certain what V8R had in mind when they had these items laser-cut made since one rear tab doesn't quite reach the subframe and the lower lip (when upside down like in my pics) doesn't reach the spot-welded flange of the subframe. So KC welded in some bar stock to give this ft piece some substantial support.
She's fully welded in now. The rear subframe will now need to be cleaned, primed, and painted so the rear diff, axles and suspension can all go back together one day...
End of the day called for me to clean up the engine bay and interior with some Purple stuff and paper towels. I'm actually typing with no fingerprints as they got removed this afternoon with that intense cleaner -- but my firewall and engine compartment look good and will soon receive seam sealer, primer, and Mazda white paint for better appearance.
 08-18-2013, 08:00 PM
#81
V8 Miata Fanatic
Thread Starter
Thanks WGT!! I agree - it's time to build this Frankenstein! And like the monster, it needs a brain - I need to get a WORD back from my wiring harness and PCM mad scientist -- I hope he'll finish the GTO wiring diet and PCM re-flash sooner than later - dang it...
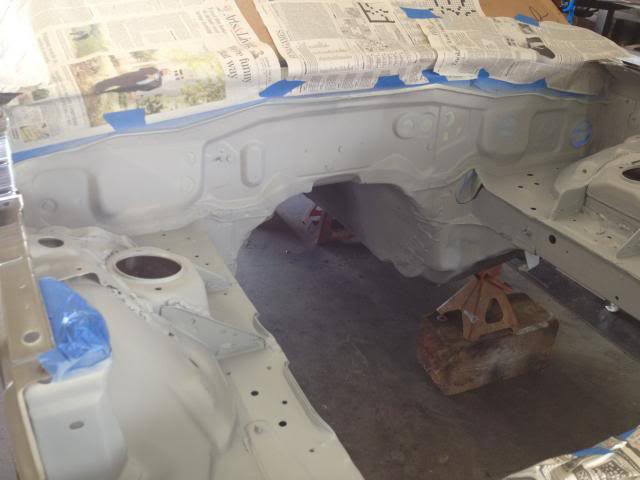
This was a GREAT weekend! Started with the welder on Friday and ended today with most of the engine bay primed, seam-sealed, and painted. However, my one 12 oz spray can from Paintscratch.com of 94 Mazda PT white ran out before I was finished. I've ordered another can and will finish up with white and clearcoat next week. On to the PHOTOS!!!
I used a flexible sanding block, wire wheel, 200 grit on the somewhat rusty welds from 4 months ago, and went over the entire engine bay. Then cleaned with mineral spirits and compressed air before masking off the top of the firewall and the radiator core support.
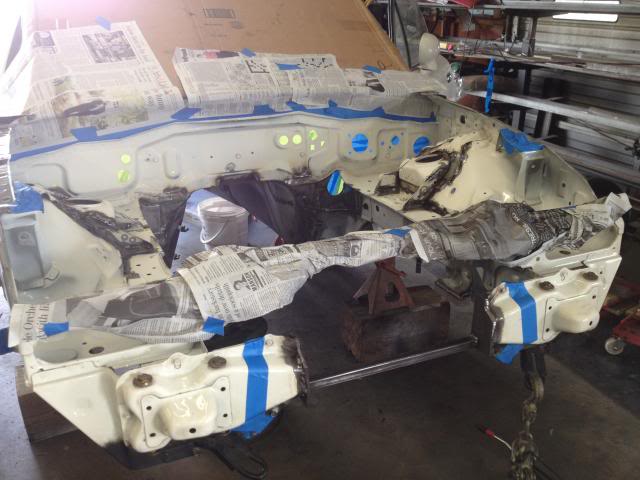
I used a self-etching primer on the bare metal and some regular sandable primer for the engine bay and inside around the tranny tunnel.
So, before I employed the 3M seam sealer (one tube - $31 bucks, damn), I happened to read the directions and it stated -"do not use directly on self-etching primer", so I found some CAT yellow primer to go over where the seam sealer is needed.
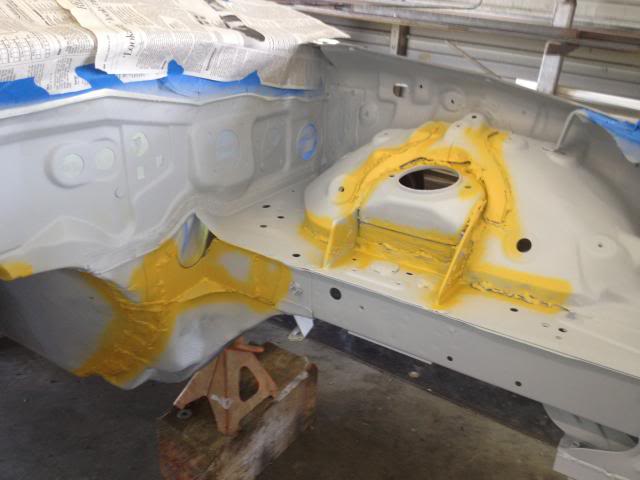
I let this other primer dry and then put on this beige seam sealer. You talk about sticky! This stuff is 10x worse than household caulk. Sticky stuff, no doubt... Here you can see the 1" solid block swaybar mounts that KC, the welder, fabbed up and installed.
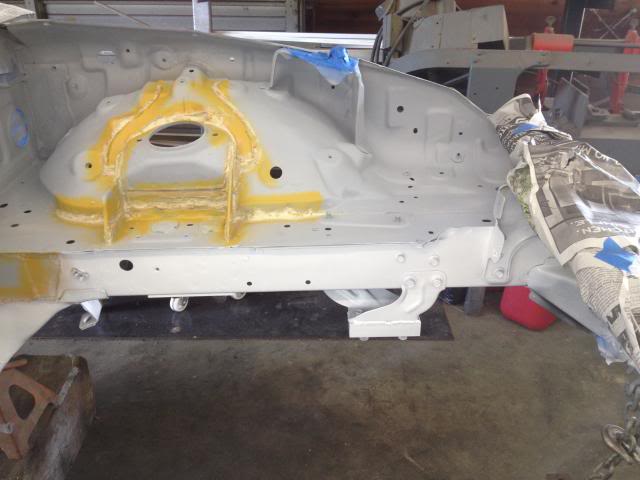
Seam sealer dried and then used some Duplicolor Nissan white on the inside and along the lower frame rails in the engine compartment.

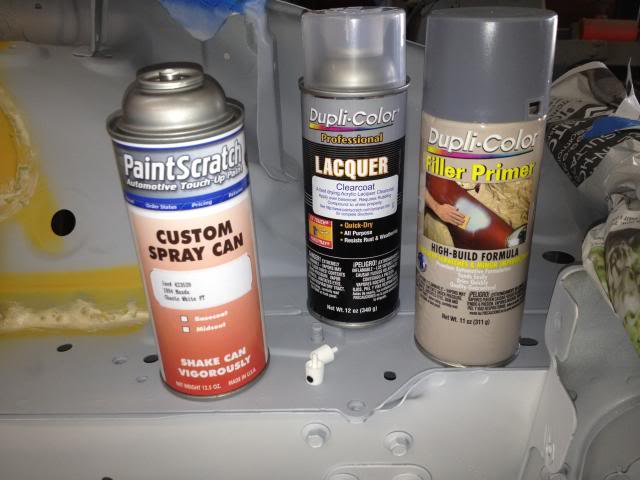
This is the paint that I used for the engine compartment's finish coat. I got the idea from GoKart and his NB - LS2 build... All 3 cans came in one kit. Unfortunately, one can didn't cover what I thought it would. Oh well...
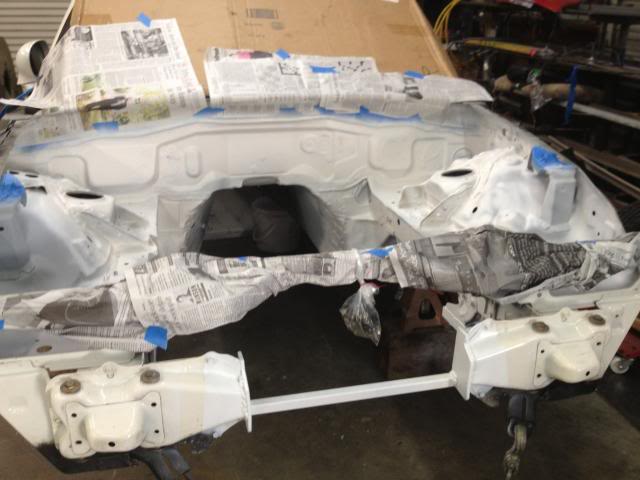
Did all I could do when the paint ran out... The white paint on the front end's horizontal bar was the icebox white, Nissan paint - that bar will be hidden behind the bumper.
Last Frankenstein photo for the day is the white firewall that will need its clearcoat next week after I get another can to finish the wheelwells, etc.
It's looking pretty good - the seam sealer helps hide the funky stitch welding around the shock towers...
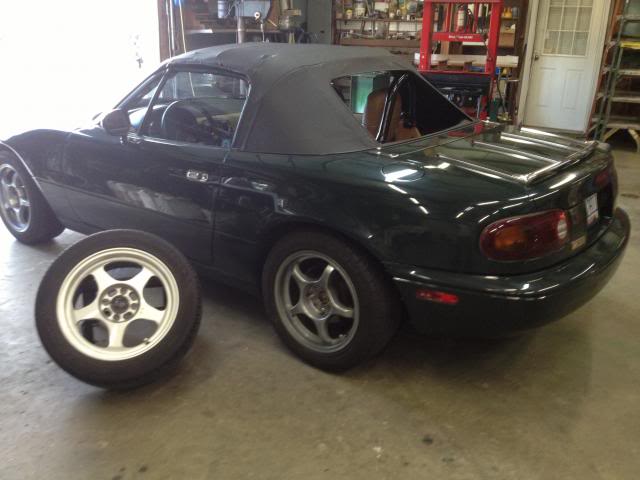
So, I'm ready to go home tonite, and the BRG has a flat left-rear tire. I rolled the car back & forth, but could NOT find the nail. So, I yanked the 4 wheels off and slapped on the Advan repo's that used to ride under the white MX5. All is good - I can go home now...
This was a GREAT weekend! Started with the welder on Friday and ended today with most of the engine bay primed, seam-sealed, and painted.
However, my one 12 oz spray can from Paintscratch.com of 94 Mazda PT white ran out before I was finished. I've ordered another can and will finish up with white and clearcoat next week. On to the PHOTOS!!!I used a flexible sanding block, wire wheel, 200 grit on the somewhat rusty welds from 4 months ago, and went over the entire engine bay. Then cleaned with mineral spirits and compressed air before masking off the top of the firewall and the radiator core support.
I used a self-etching primer on the bare metal and some regular sandable primer for the engine bay and inside around the tranny tunnel.
So, before I employed the 3M seam sealer (one tube - $31 bucks, damn), I happened to read the directions and it stated -"do not use directly on self-etching primer", so I found some CAT yellow primer to go over where the seam sealer is needed.
I let this other primer dry and then put on this beige seam sealer. You talk about sticky! This stuff is 10x worse than household caulk. Sticky stuff, no doubt... Here you can see the 1" solid block swaybar mounts that KC, the welder, fabbed up and installed.
Seam sealer dried and then used some Duplicolor Nissan white on the inside and along the lower frame rails in the engine compartment.
This is the paint that I used for the engine compartment's finish coat. I got the idea from GoKart and his NB - LS2 build... All 3 cans came in one kit. Unfortunately, one can didn't cover what I thought it would. Oh well...
Did all I could do when the paint ran out... The white paint on the front end's horizontal bar was the icebox white, Nissan paint - that bar will be hidden behind the bumper.
Last Frankenstein photo for the day is the white firewall that will need its clearcoat next week after I get another can to finish the wheelwells, etc.
It's looking pretty good - the seam sealer helps hide the funky stitch welding around the shock towers...
So, I'm ready to go home tonite, and the BRG has a flat left-rear tire. I rolled the car back & forth, but could NOT find the nail. So, I yanked the 4 wheels off and slapped on the Advan repo's that used to ride under the white MX5. All is good - I can go home now...
Last edited by ToySnakePMC; 08-18-2013 at 10:32 PM.
08-25-2013, 11:09 PM
#82
V8 Miata Fanatic
Thread Starter
In honor of the title of my build thread, I had some slow, but forward progress this wknd. I can go several directions right now as I wait for the harness and PCM to show up (should be in this week per Bill !!) and the Mazda white paint to finish up the engine compartment, but I decided to start building the rear suspension and final drive.
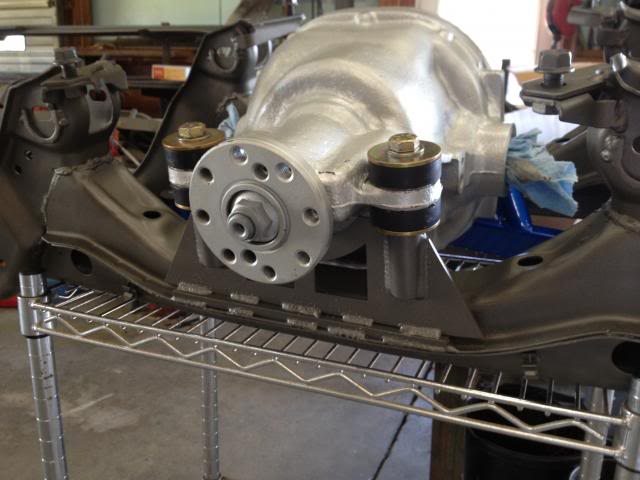
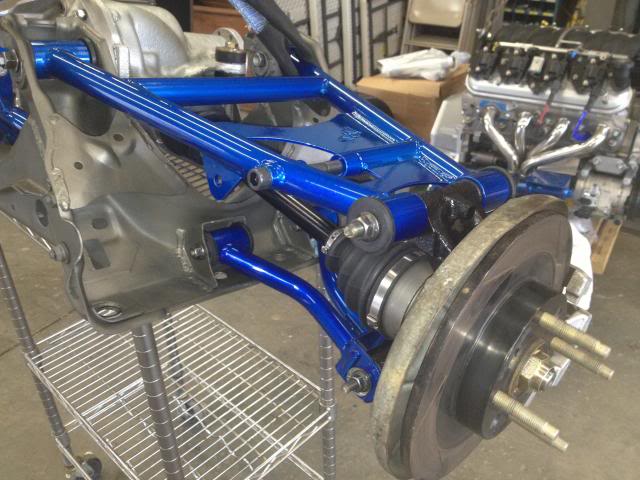
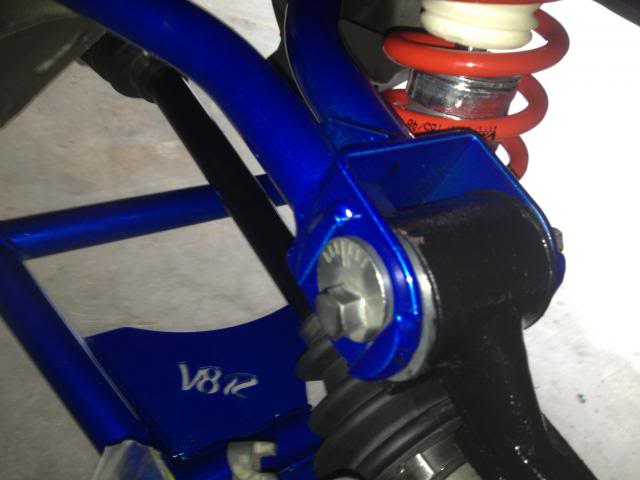
The subframe was cleaned, primed, and painted a bronze engine paint color - just to set it apart from the gloss black chassis it will eventually marry up to. Then the first thing to go in was the rear diff and V8R 8.8 diff bracket along with the new bushings from V8 Roadsters.
Next up was unpacking the tubular, rear A arms, again from V8Roadsters. This was the last chance for such a group shot... The slow and dirty work was greasing up the bushings and pressing in the inner sleeves. Did all 8 of the inner bushings so the rear subframe could begin to come together.

Didn't get a pic today of all 4 A arms installed, but just imagine both sides done!
Here's LH driver side done, and of course, the whole thing is upside down on my old kitchen island cart. Never had a good use for that thing until this weekend.
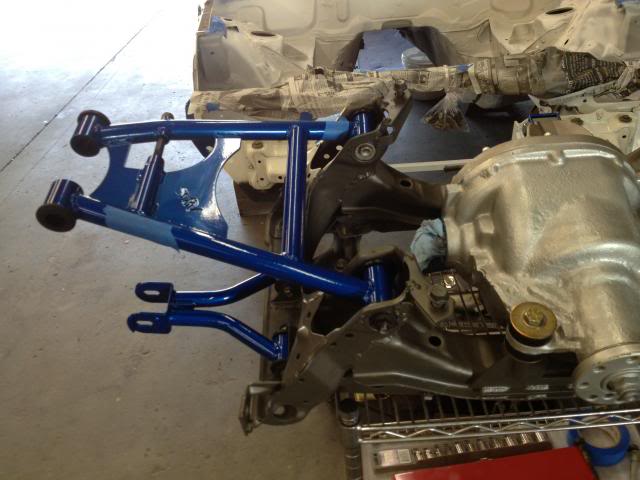
Another photo. These things are just works of art - I just hope that I've got the bushings set up properly since they're so stiff. To me, the bushings are mostly thicker (think wider) than the OEM bushings... May need to contact V8R for insight.
Should be clean and finished by next weekend. I've cleaned and painted the rear uprights so it'll all be detailed and tidy one day!
Hitting the road this week for work, but Labor Day wknd should be fruitful and will hopefully have the MX5 rear wheels back on the ground so we can sneak up under the chain hoist and prepare for the engine to drop in after wiring harness and brake lines are finished (next on the list). Thanks for dropping by. I'm amazed at how many looks there's been at the thread so far. That's pretty cool.
The subframe was cleaned, primed, and painted a bronze engine paint color - just to set it apart from the gloss black chassis it will eventually marry up to. Then the first thing to go in was the rear diff and V8R 8.8 diff bracket along with the new bushings from V8 Roadsters.
Next up was unpacking the tubular, rear A arms, again from V8Roadsters. This was the last chance for such a group shot... The slow and dirty work was greasing up the bushings and pressing in the inner sleeves. Did all 8 of the inner bushings so the rear subframe could begin to come together.
Didn't get a pic today of all 4 A arms installed, but just imagine both sides done!
Here's LH driver side done, and of course, the whole thing is upside down on my old kitchen island cart. Never had a good use for that thing until this weekend.
Another photo. These things are just works of art - I just hope that I've got the bushings set up properly since they're so stiff. To me, the bushings are mostly thicker (think wider) than the OEM bushings... May need to contact V8R for insight.
Should be clean and finished by next weekend. I've cleaned and painted the rear uprights so it'll all be detailed and tidy one day!
Hitting the road this week for work, but Labor Day wknd should be fruitful and will hopefully have the MX5 rear wheels back on the ground so we can sneak up under the chain hoist and prepare for the engine to drop in after wiring harness and brake lines are finished (next on the list). Thanks for dropping by. I'm amazed at how many looks there's been at the thread so far. That's pretty cool.
08-30-2013, 11:30 PM
#83
V8 Miata Fanatic
Thread Starter
A little final paint work tonite... Used up that 2nd can of white and then later went over it with a clear lacquer. A little too white, but it will do.

08-31-2013, 10:24 PM
#84
V8 Miata Fanatic
Thread Starter
The fun today was focusing on the rear end to get this sub-assembly back together and eventually up under the car. Of course, the fuel tank plumbing is what I need to be working on - maybe later this wknd I'll tackle it.
I started with burning out the original rear hub/ upright bushings with big @ss acetylene torch. That took about 2 minutes total to heat up the iron, punch out a flaming goo of rubber, and repeat. Sad thing is that I'd just painted these uprights last week... Oh well, I didn't know the V8R's require larger eccentric bolt in lieu of the smaller, non-adjustable one in Mazda's upper A arm. Wire brushed the goo off, new bushings in - followed by fresh paint.

Assembled the goodies, slid in the V8R axles first in the diff with a nice "click" and then into the Mazda hubs.
Full screen shot of current condition! She's nasty - and needs chaining up to hold her back..! Well, actually - I'm getting worried that my kitchen cart will either flip over or cave in under the weight!
I started with burning out the original rear hub/ upright bushings with big @ss acetylene torch. That took about 2 minutes total to heat up the iron, punch out a flaming goo of rubber, and repeat. Sad thing is that I'd just painted these uprights last week... Oh well, I didn't know the V8R's require larger eccentric bolt in lieu of the smaller, non-adjustable one in Mazda's upper A arm. Wire brushed the goo off, new bushings in - followed by fresh paint.
Assembled the goodies, slid in the V8R axles first in the diff with a nice "click" and then into the Mazda hubs.
Full screen shot of current condition! She's nasty - and needs chaining up to hold her back..! Well, actually - I'm getting worried that my kitchen cart will either flip over or cave in under the weight!
09-02-2013, 09:46 PM
#85
V8 Miata Fanatic
Thread Starter
Gotta like forward progress! Had a hall pass from the wife to spend most of Labor Day wknd in the shop.. Woo hoo! And got a few tasks done - including changing her MX5 oil for my first time, and had to google m.net to find the filter hidden behind the steel access plate secured with 5 screws. You'd think the '06 MX5 is built to withstand IED's or something...
OK, on with the build. 1st thing is to plumb the fuel tank. Installed the 300 liter /hr pump from FM. That was easy - as it's a direct fit and even has good Miata-specific directions in the box... I also wiped out the surprisingly tiny bit of tank sediment from past 19 yrs before buttoning it back up.
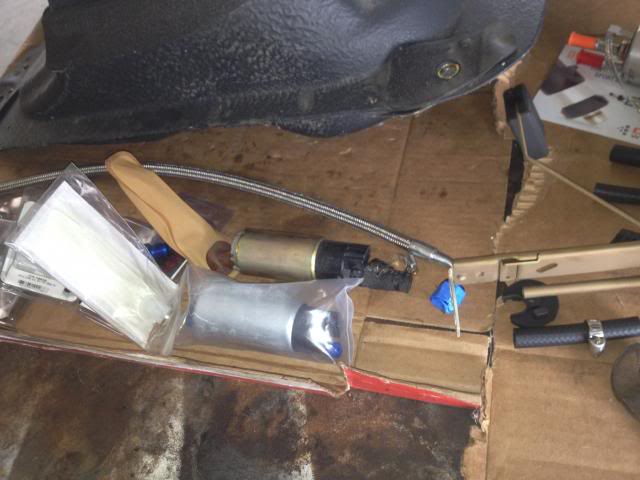
OK... Not 100% certain that I've given myself enough room to plumb in the filter/ regulator below, but I've used every little inch of tubing that FM supplied me. I wish they didn't play it so close, but it's all on at the top. Decided to label the tank ports with supply & return while it was out - ya never know when that would come in handy I guess... Venting the tank is another strategy that I felt like I'm on my own to a large degree - I THINK the 2 valves in this fancy, shmancy tank vent piping are 1. Roll-over protection valve, and 2. One-way check valve. I'm not sure, so I'm going to use the 23.8879" length of 1/4" FM hose to tie into my just-ordered Land Rover charcoal canister from eBay. No purge valve - just a darn vent that, I guess, goes to the atmosphere any and all times of the day. My bud, Big T, (Tad), said he kept his simple on his FFR Cobra with its tiny 4.6L Cobra power plant...
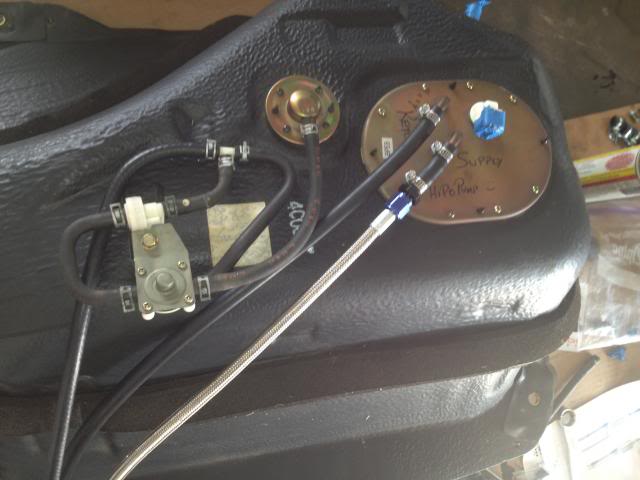
Tank popped into place and then mounted & plumbed in the Vette regulator/ filter. I first cut off the cheesy bracket it came with while saving the ground strap (wonder why it has that? Fear of Static electricity?). Then used the much nicer Mazda bracket and utilized just the RH bolt to slide the thing more to the right for better clearances with the driveshaft that will one day come here to live. Outlet line will be plumbed in after V8R frame rail brackets go in.
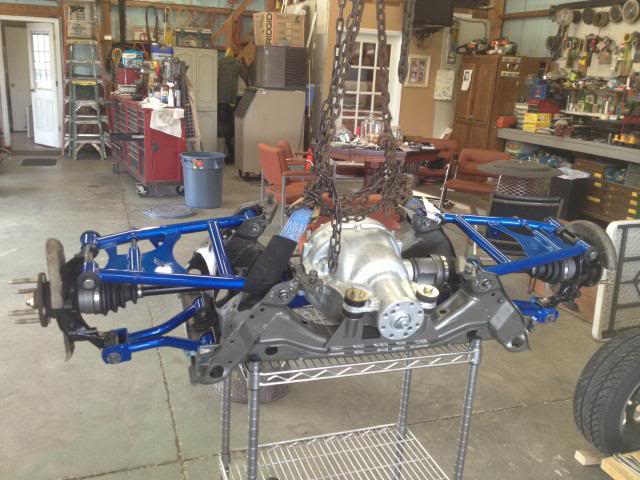
Time for rear end to re-join the family! Let her down to the floor & slowly flipped it over for its 25' journey via 2 floor jacks.
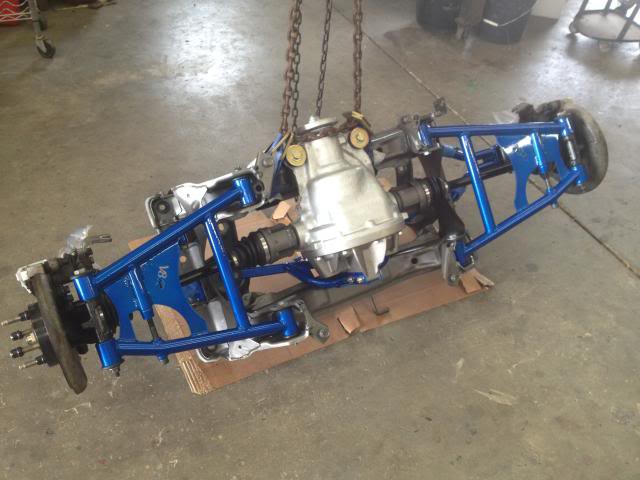
This procedure went well thanks to my Dad showing up. I needed another set of hands since the assembly was precariously balanced on short 2x6's on the separate jacks, and I didn't want it to face plant 2' off the ground - right on the pinion!! He jacked it right into place while I secured the 4 nuts and 2 bolts. That would have taken me an hour or more on my own - we had it done in 6 minutes at the most.

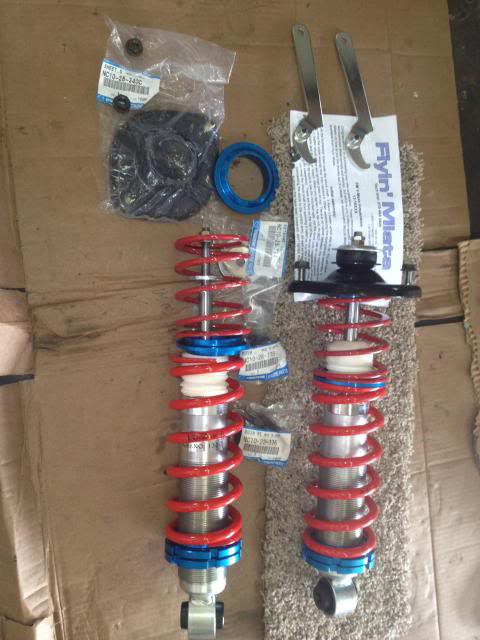
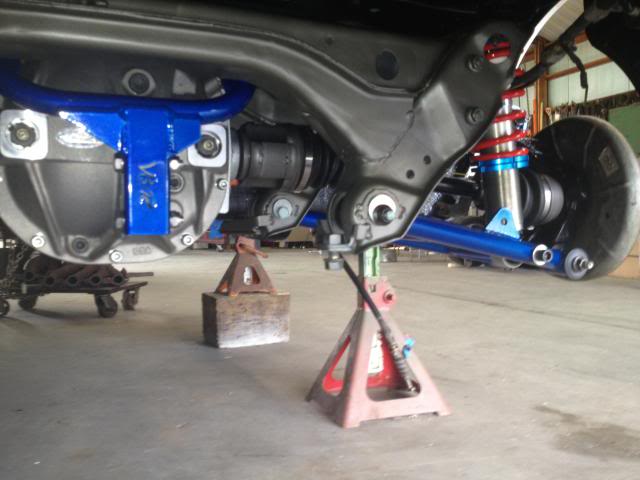
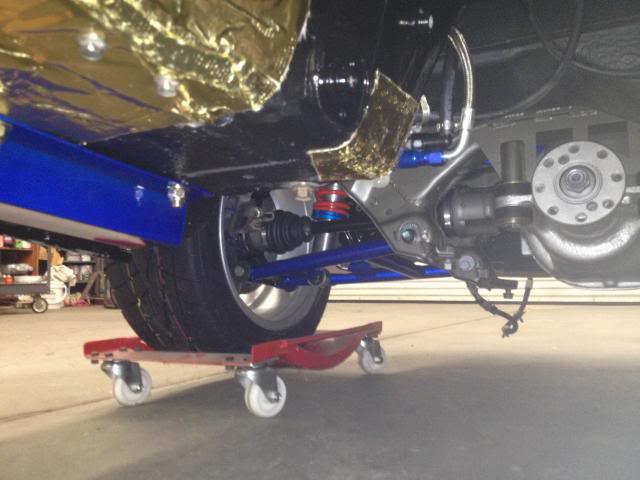
Time for rear shocks! Assembled the V-Maxx non-adjustables per Flyin Miata's instructions using all new NB shock tops and hardware. Most time consuming was using the supplied wrenches to run the collars up with... Slow going, but I didn't want to scratch them up the first time I touch them. I like how they look - don't know much about setting them up, however, as these are my first true, coilovers that I've ever owned.
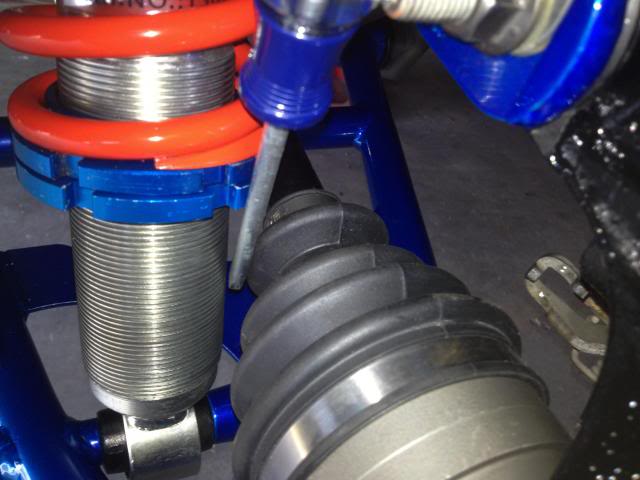
Threw 'em on - but first, raised the collars some more to clear the big @ss, outer CV boots. Looking spiffy, I think!! Oh yeah, big concern this week was whether the shock bodies would be rubbing the axle boots, and I'm happy to report that they're about 8mm apart. Doesn't sound like much, but may be significant enough to alleviate concerns and/ or drastic fixes that others have faced. Maybe the V8R lower a arms push the shock further away from the CV boots - Dont know for sure.
Beauty shot while its still clean!!
Looking more and more complete to me - but I know there's plent of work left to do... It's been fun, nonetheless!
OK, on with the build. 1st thing is to plumb the fuel tank. Installed the 300 liter /hr pump from FM. That was easy - as it's a direct fit and even has good Miata-specific directions in the box... I also wiped out the surprisingly tiny bit of tank sediment from past 19 yrs before buttoning it back up.
OK... Not 100% certain that I've given myself enough room to plumb in the filter/ regulator below, but I've used every little inch of tubing that FM supplied me. I wish they didn't play it so close, but it's all on at the top. Decided to label the tank ports with supply & return while it was out - ya never know when that would come in handy I guess... Venting the tank is another strategy that I felt like I'm on my own to a large degree - I THINK the 2 valves in this fancy, shmancy tank vent piping are 1. Roll-over protection valve, and 2. One-way check valve. I'm not sure, so I'm going to use the 23.8879" length of 1/4" FM hose to tie into my just-ordered Land Rover charcoal canister from eBay. No purge valve - just a darn vent that, I guess, goes to the atmosphere any and all times of the day. My bud, Big T, (Tad), said he kept his simple on his FFR Cobra with its tiny 4.6L Cobra power plant...
Tank popped into place and then mounted & plumbed in the Vette regulator/ filter. I first cut off the cheesy bracket it came with while saving the ground strap (wonder why it has that? Fear of Static electricity?). Then used the much nicer Mazda bracket and utilized just the RH bolt to slide the thing more to the right for better clearances with the driveshaft that will one day come here to live. Outlet line will be plumbed in after V8R frame rail brackets go in.
Time for rear end to re-join the family! Let her down to the floor & slowly flipped it over for its 25' journey via 2 floor jacks.
This procedure went well thanks to my Dad showing up. I needed another set of hands since the assembly was precariously balanced on short 2x6's on the separate jacks, and I didn't want it to face plant 2' off the ground - right on the pinion!! He jacked it right into place while I secured the 4 nuts and 2 bolts. That would have taken me an hour or more on my own - we had it done in 6 minutes at the most.
Time for rear shocks! Assembled the V-Maxx non-adjustables per Flyin Miata's instructions using all new NB shock tops and hardware. Most time consuming was using the supplied wrenches to run the collars up with... Slow going, but I didn't want to scratch them up the first time I touch them. I like how they look - don't know much about setting them up, however, as these are my first true, coilovers that I've ever owned.
Threw 'em on - but first, raised the collars some more to clear the big @ss, outer CV boots. Looking spiffy, I think!! Oh yeah, big concern this week was whether the shock bodies would be rubbing the axle boots, and I'm happy to report that they're about 8mm apart. Doesn't sound like much, but may be significant enough to alleviate concerns and/ or drastic fixes that others have faced. Maybe the V8R lower a arms push the shock further away from the CV boots - Dont know for sure.
Beauty shot while its still clean!!
Looking more and more complete to me - but I know there's plent of work left to do... It's been fun, nonetheless!
09-05-2013, 10:24 PM
#86
V8 Miata Fanatic
Thread Starter
...Hmmm. Looks like the delivery guy stopped by while I was away, and he dropped off BP Automotive's stand-alone harness (re-worked from my GTO take-out powertrain) and the re-flashed PCM that's absent from the pics. It appears that Bill did a nice job setting this harness up with 2 fan relays, A/C relay, starter relay, various fuses, firewall grommet, etc.. with connectors and other wires all clearly labeled.
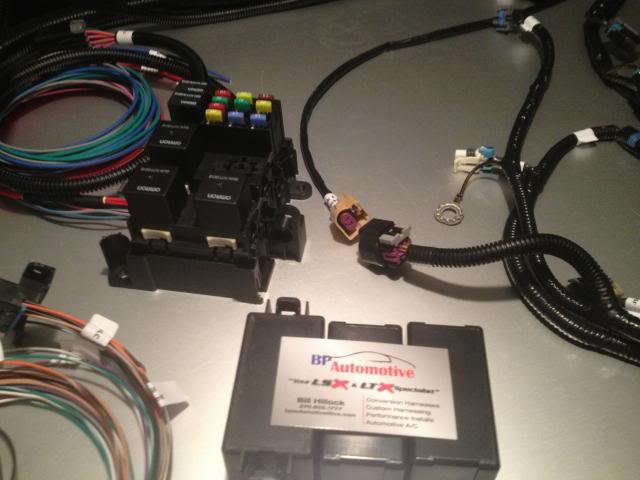
Glad to have this here and available when I'm ready - which will be sooner than later. My plans now are the following: paint bottom of floorplan and front fender wells, trim & install gold heat barrier in tranny tunnel, run brake lines, install V8R frame rail stiffeners, figure out what will remain of Mazda wiring, install LS2 wiring harness, PCM, and relays, and finally pop in engine and T56!!!!
Then front suspension, radiator, and get ready for test fire #1.
Last edited by ToySnakePMC; 09-06-2013 at 07:08 AM.
09-08-2013, 09:25 PM
#88
V8 Miata Fanatic
Thread Starter
Thanks WGT. You and me both. You'll probably get finished with your project before I do. 
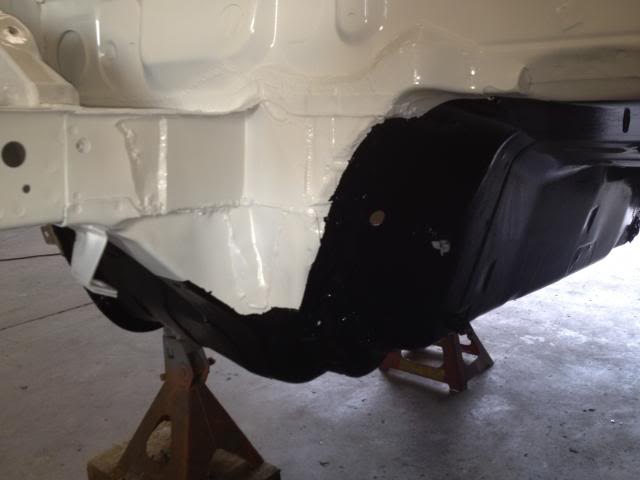
Had an afternoon this wknd to get the tub ready for the frame rails and the eventual fuel line, brake lines, and wiring. It took longer than expected just to clean and scrape either Mazda factory undercoating or some dealer-installed stuff. I really think it was factory since it was applied pretty sparingly and not just everywhere... I scraped, scrubbed with mineral spirits on a rag to cut thru the asphalt stuff, and then washed with purple stuff, soap and water. Got it fairly clean then used up my one qt of Tractor Supply black enamel to cover the underside of the floor and front wheelwells.
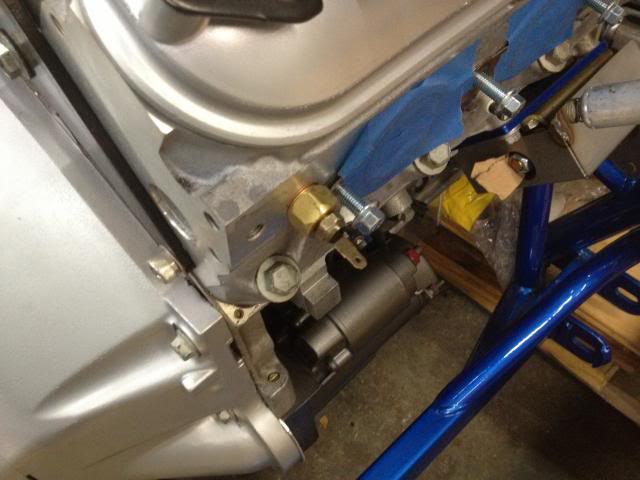
Got the shop cleaned up and the paint off my hands, legs, and arms - but felt like I needed to do something mechanical before leaving for the week. So, I installed the 1994 Miata oil sending unit on the LS2. First, remove the GM unit and give to friend for his eventual use, then thread in the Autometer 2268 adapter M16 x 1/8 npt female.
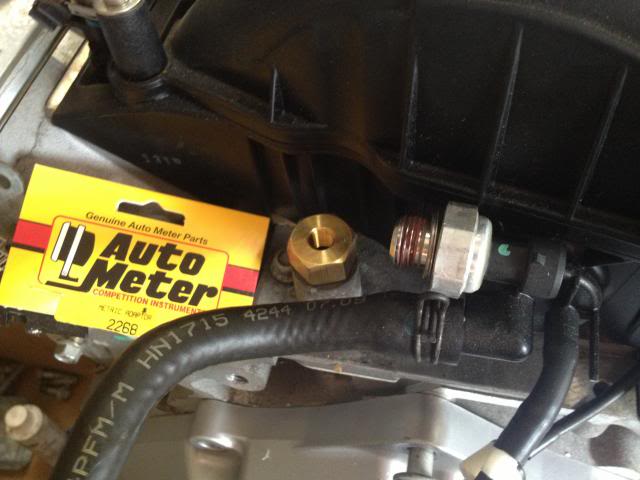
Tightened her up and used a 1/8" street 45 elbow to sorta offset the large Mazda unit up and close beside the intake with a small amount of pipe dope. i think it will be out of the way here but not too conspicuous.

Had an afternoon this wknd to get the tub ready for the frame rails and the eventual fuel line, brake lines, and wiring. It took longer than expected just to clean and scrape either Mazda factory undercoating or some dealer-installed stuff. I really think it was factory since it was applied pretty sparingly and not just everywhere... I scraped, scrubbed with mineral spirits on a rag to cut thru the asphalt stuff, and then washed with purple stuff, soap and water. Got it fairly clean then used up my one qt of Tractor Supply black enamel to cover the underside of the floor and front wheelwells.
Got the shop cleaned up and the paint off my hands, legs, and arms - but felt like I needed to do something mechanical before leaving for the week. So, I installed the 1994 Miata oil sending unit on the LS2. First, remove the GM unit and give to friend for his eventual use, then thread in the Autometer 2268 adapter M16 x 1/8 npt female.
Tightened her up and used a 1/8" street 45 elbow to sorta offset the large Mazda unit up and close beside the intake with a small amount of pipe dope. i think it will be out of the way here but not too conspicuous.
Last edited by ToySnakePMC; 09-09-2013 at 04:12 AM.
09-09-2013, 06:31 AM
#89
Jim Stainer

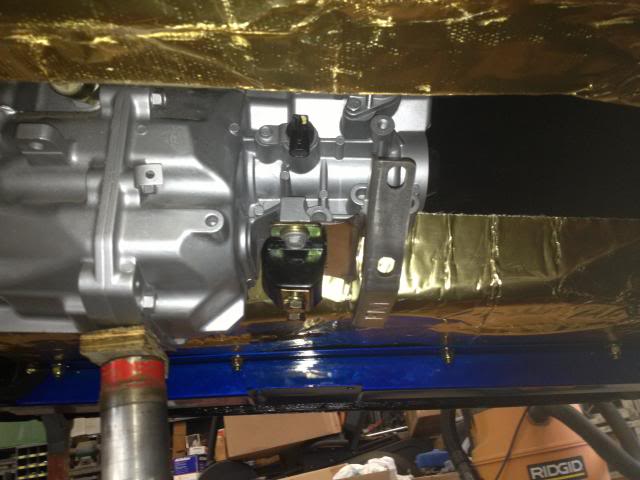
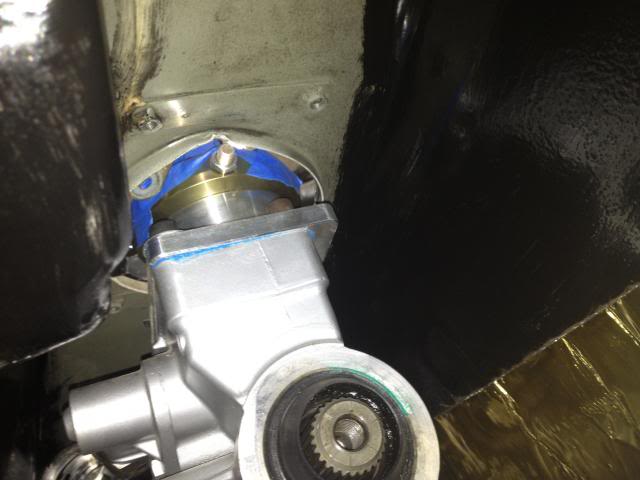
Pat do you have any photos from the top looking down on that pressure sensor? From the look of this shot I think it is going to be smashed into your firewall. And you probably will never see it if it does. The engine harness has to run through there and it is a bit of a challenge to squeeze that vacuum line out for the brakes too.
This is the same area in mine.
This is the same area in mine.
Last edited by charchri4; 09-09-2013 at 12:53 PM.
 09-09-2013, 09:43 PM
#91
V8 Miata Fanatic
Thread Starter
Pat do you have any photos from the top looking down on that pressure sensor? From the look of this shot I think it is going to be smashed into your firewall. And you probably will never see it if it does. The engine harness has to run through there and it is a bit of a challenge to squeeze that vacuum line out for the brakes too.
I'm not sure who's conversion had this same oil pressure config in the recent past, but I got the idea probably off of m.net I think.
CVX20, yes you can tap the fitting above the oil filter, but I'm not certain if there's room for the Miata sending unit down there.
It will be interesting to see how this all comes together in that one spot. The LS2/GTO harness exits the motor in that area as well. Hopefully, I can situate the wiring more towards the center of the intake as it exits thru the firewall and stay clear of the oil sending unit. We'll all see how this plays out together!
09-12-2013, 07:34 PM
#93
V8 Miata Fan

Join Date: Apr 2013
Location: I hear Banjos - GA
Posts: 31
Likes: 0
Received 0 Likes
on
0 Posts
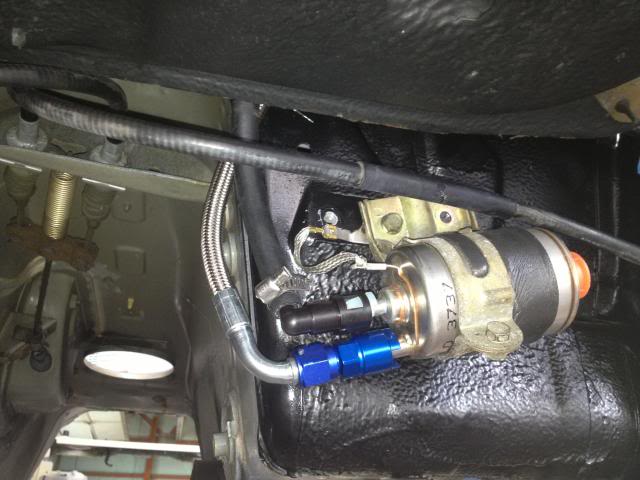
Also - on the fuel filter, I built an extension bracket to move the fuel filter outboard about 2-inches. Just a 1x1/8 bar about 4-inches long with 2-holes in it for the locations in the miata and others for the filter bracket. This makes it further from the exhaust - where I also added a heat shield on the inboard side of the filter area, effectively lightly enclosing the filter with the plastic guard and the heat shield mated together.
09-13-2013, 09:32 AM
#94
V8 Miata Fanatic
Thread Starter
Also - on the fuel filter, I built an extension bracket to move the fuel filter outboard about 2-inches. Just a 1x1/8 bar about 4-inches long with 2-holes in it for the locations in the miata and others for the filter bracket. This makes it further from the exhaust - where I also added a heat shield on the inboard side of the filter area, effectively lightly enclosing the filter with the plastic guard and the heat shield mated together.
09-14-2013, 09:36 PM
#95
V8 Miata Fanatic
Thread Starter
Back from vacation - and got about 2 hours in the shop this evening. Hey.., ya gotta celebrate the little victories!
Installed clutch assy tonite. Started with new pilot bearing with lightly sanding any surface rust in the back of the crank and having to cut a small, approx 1"x1"x4" wood "dowel" to hold between the bearing and the 2.5# hammer. It lasted until the final 1/4" of travel - so used another hammer (more so, the length of its wood handle) and got her flush. Then next, cleaned up the Monster 18# steel flywheel and the Stage 1 clutch & pressure plate for installation with new GM bolts and Red Loctite gel. She went in nice & easy and was torqued down in the identical GM and Monster torque sequences.
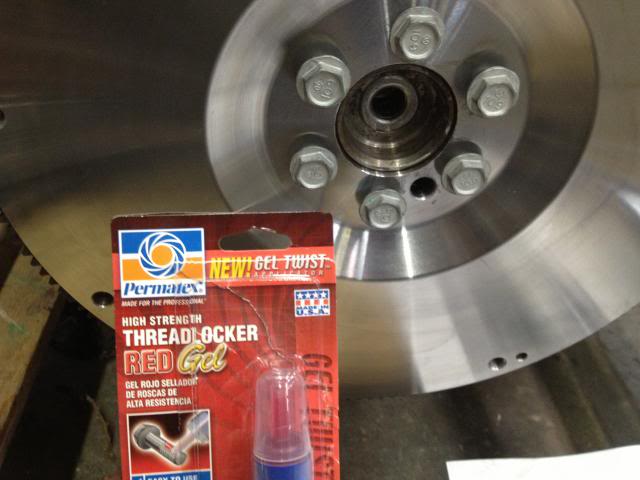
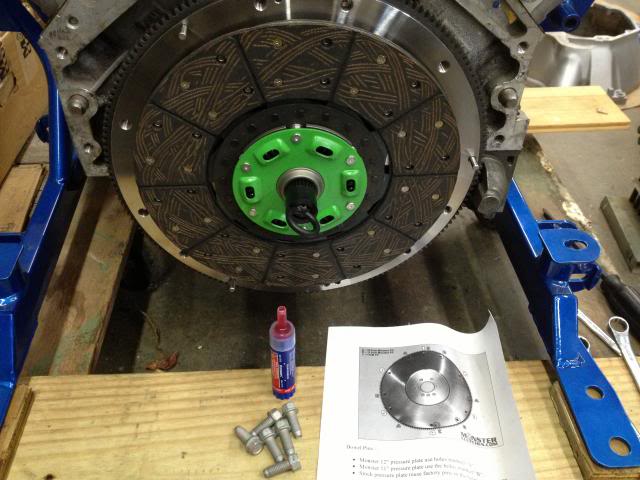
Installed clutch assy tonite. Started with new pilot bearing with lightly sanding any surface rust in the back of the crank and having to cut a small, approx 1"x1"x4" wood "dowel" to hold between the bearing and the 2.5# hammer. It lasted until the final 1/4" of travel - so used another hammer (more so, the length of its wood handle) and got her flush. Then next, cleaned up the Monster 18# steel flywheel and the Stage 1 clutch & pressure plate for installation with new GM bolts and Red Loctite gel. She went in nice & easy and was torqued down in the identical GM and Monster torque sequences.
Last edited by ToySnakePMC; 09-14-2013 at 09:38 PM.
09-15-2013, 08:11 PM
#96
V8 Miata Fanatic
Thread Starter
Let's pick up where we left off - the tranny. Today was fairly straight-forward with a one-man show of putting together the slave cyl and assemblying the big GM powerplant with it's best friend, the Tremec.
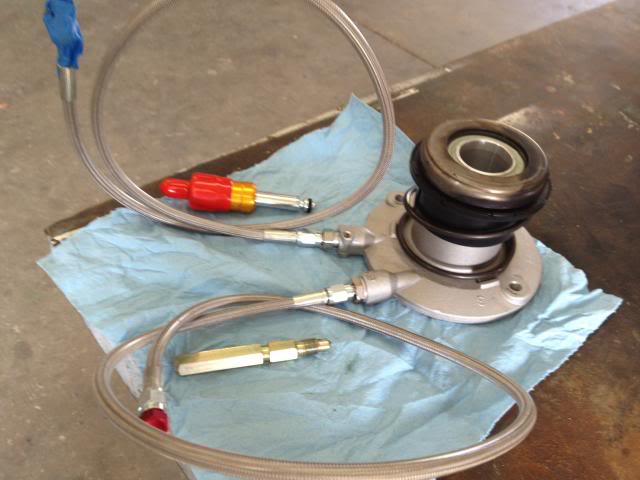
Using the V8R clutch master cylinder kit and a new, '02 F-body slave cylinder from Monster, I carefully knocked out the small rolled pin so the V8R braided hose can go in its place and also, removed the bleeder and threaded in the new remote bleeder hose. Some folks have legitimate concerns about the hose/ adapter not fitting well. Mine seems to fit very securely - but I did knock it firmly into its place TIGHTLY with a 13mm socket before whacking the rolled pin back home. Otherwise, that pin will want to fight you - don't let it fight you, okay?
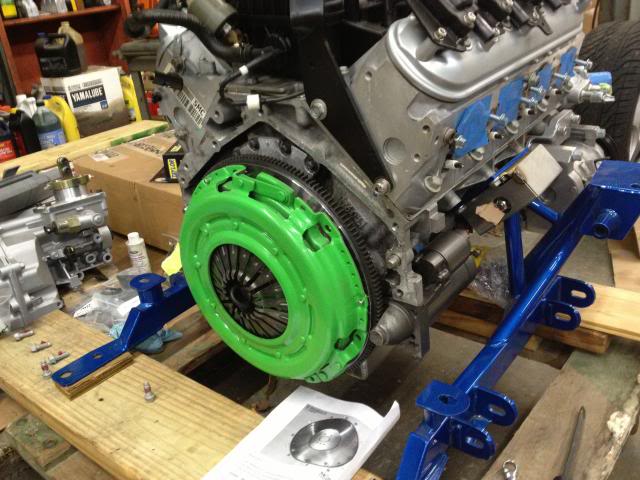
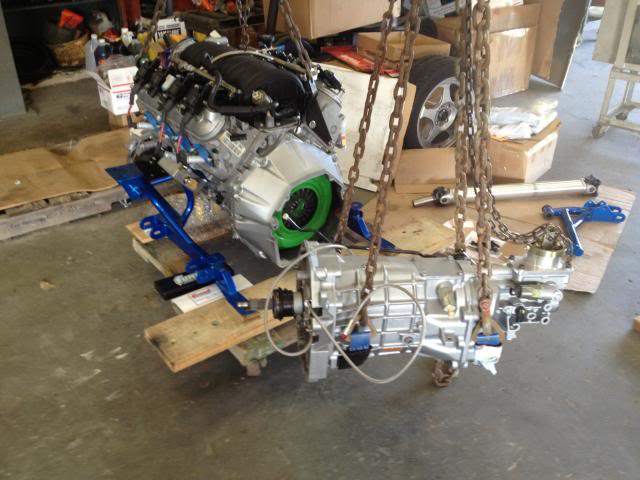
Next up was slapping in the bellhousing and my dust shield on the forward side. Then, I improvised a way to marry the two big items together with my newest best friends, the 2 chain hoists. These were a huge help as I could adjust the angles of both the LS2 and the T56 as I wrestled the tranny and bolted her in place.
Got the two together and torqued as required.
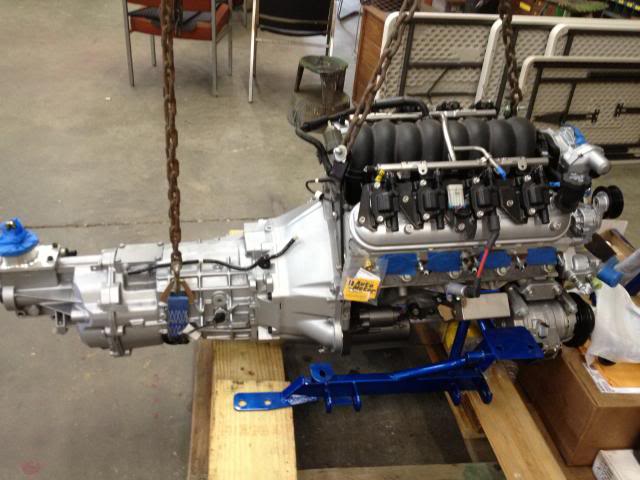
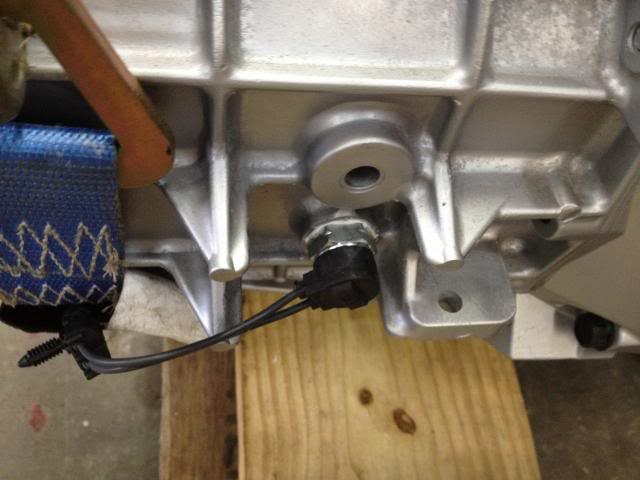
And finally, - while I thought about it - I replaced the back up switch with the Ford 90 degree version (part # near the front of this build thread) - used a tad of pipe dope to keep moisture out and eventual tranny fluid in.
Using the V8R clutch master cylinder kit and a new, '02 F-body slave cylinder from Monster, I carefully knocked out the small rolled pin so the V8R braided hose can go in its place and also, removed the bleeder and threaded in the new remote bleeder hose. Some folks have legitimate concerns about the hose/ adapter not fitting well. Mine seems to fit very securely - but I did knock it firmly into its place TIGHTLY with a 13mm socket before whacking the rolled pin back home. Otherwise, that pin will want to fight you - don't let it fight you, okay?
Next up was slapping in the bellhousing and my dust shield on the forward side. Then, I improvised a way to marry the two big items together with my newest best friends, the 2 chain hoists. These were a huge help as I could adjust the angles of both the LS2 and the T56 as I wrestled the tranny and bolted her in place.
Got the two together and torqued as required.
And finally, - while I thought about it - I replaced the back up switch with the Ford 90 degree version (part # near the front of this build thread) - used a tad of pipe dope to keep moisture out and eventual tranny fluid in.
09-23-2013, 09:47 PM
#97
V8 Miata Fanatic
Thread Starter
Overdue on what's become a weekly update here lately... This was a somewhat productive wknd with slow and steady progress. I'll just throw out my updates as they happened over the past week.
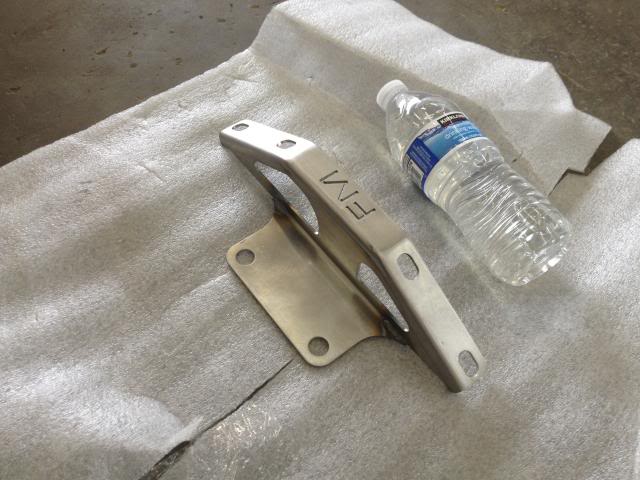
First up is the Flyin Miata exhaust bracket that bolts in the rear tranny x-member. For the nominal $2x.xx cost, it's pretty awesome. I felt like I needed to go ahead and get this so whoever fabs up my exhaust will have a convenient way to secure the pipes about 2' back of where the headers will terminate.
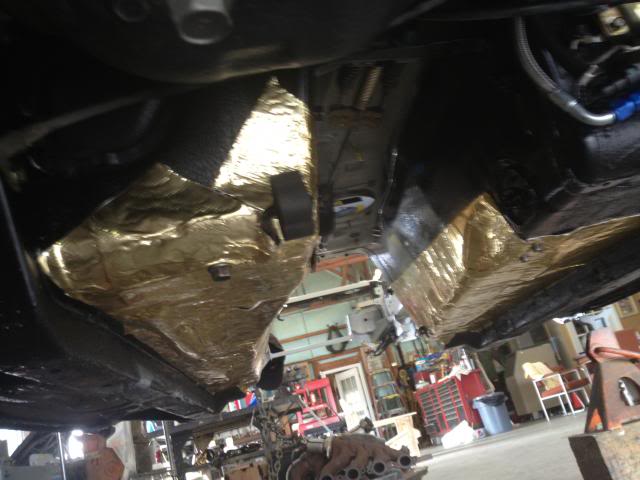
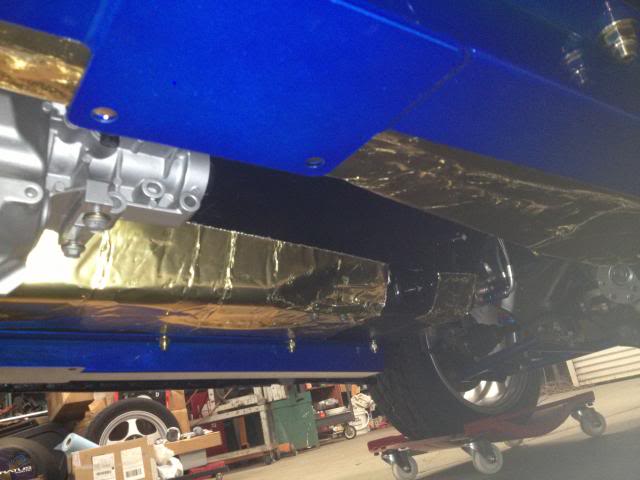
Used my roll of Thermo Tec gold, reflective heat protection stuff in 24" widths just inside of the LH and RH frame rails to combat future exhaust and tranny heat. I could have used about 1 or 2 more sq ft just under the pass seat, but I can add that later if needed.
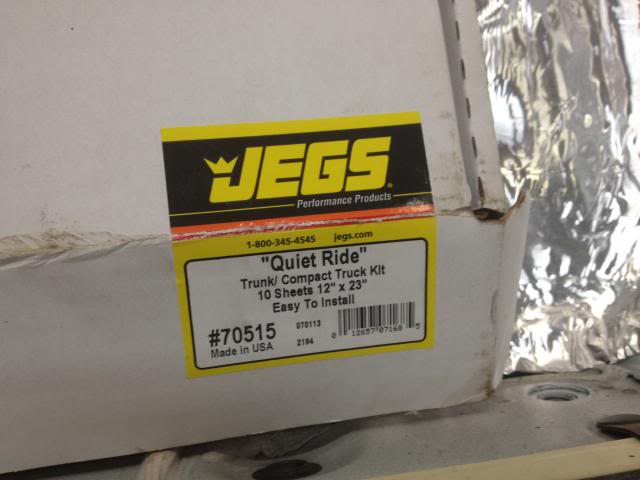
Next up was the interior floor and transmission tunnel with these 12"x24" sheets from JEG's. This is fun stuff to work with as it easily sticks and conforms to the contours of the Mazda sheetmetal. Unfortunately the 10 sheets wasn't enough so I ordered more to finish up the pass side, more of the firewall and use whatever is left behind the seats.
Did something sorta mechanical - less artistic and threaded the Autometer adapter 12M x 1/8 NPT and the Mazda coolant sensor from the back of my 1.8 motor.
Got an anniversary card from the much better half of my marriage... Actually, she also gave me a sweet and sentimental card. Good woman!

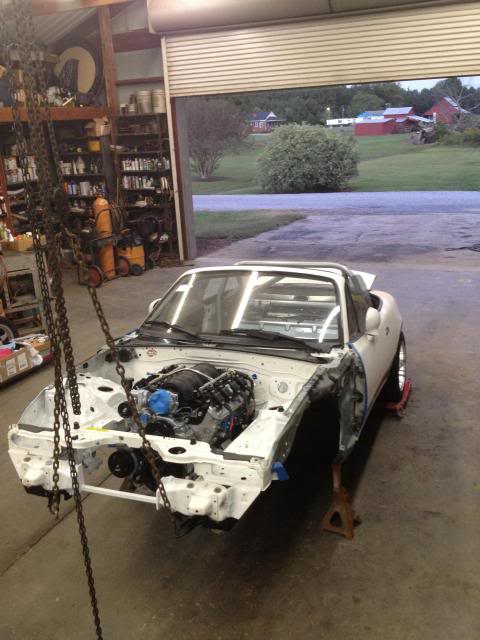
Thought long and hard about this... and decided to re-insert the engine and T56 for final test fit. The reason being is that I had only stuck in the LS2 and the bellhousing for checking clearances - I had never installed the T56 for obtaining tranny x-member measurements and thus, where to drill for the frame rail reinforcements. I had initially tried to just take measurements of everything as it sat outside the car and base my installation on those numbers... GLAD I DID NOT DO THAT. The extra work of an hour or two was well worth it. My V8R frame rails would have been OFF, and I would have been upset having to redrill 22 holes.
A friend, Jonathan, came by and helped out so we could install the powerplant and then get accurate measurements and placement of the rails. First, the RH rail went in, drilled holes, and bolted it in with the grade 8 hardware.
Discovered that the rear bolt in the Pro5.0 shifter was easily pushing up into the Mazda sheetmetal... That upset me a bit - so my $9 cutoff tool came out and opened the hole up to allow the T56 to get properly in place.
This is that FM exhaust bracket. Two U-shaped clamps hold those 2.5" diameter pipes. The two bolts will secure the V8R crossmember to the above Energy Suspension poly mount.
The Mazda wants to be left alone after an eventful Sunday afternoon...
First up is the Flyin Miata exhaust bracket that bolts in the rear tranny x-member. For the nominal $2x.xx cost, it's pretty awesome. I felt like I needed to go ahead and get this so whoever fabs up my exhaust will have a convenient way to secure the pipes about 2' back of where the headers will terminate.
Used my roll of Thermo Tec gold, reflective heat protection stuff in 24" widths just inside of the LH and RH frame rails to combat future exhaust and tranny heat. I could have used about 1 or 2 more sq ft just under the pass seat, but I can add that later if needed.
Next up was the interior floor and transmission tunnel with these 12"x24" sheets from JEG's. This is fun stuff to work with as it easily sticks and conforms to the contours of the Mazda sheetmetal. Unfortunately the 10 sheets wasn't enough so I ordered more to finish up the pass side, more of the firewall and use whatever is left behind the seats.
Did something sorta mechanical - less artistic
and threaded the Autometer adapter 12M x 1/8 NPT and the Mazda coolant sensor from the back of my 1.8 motor.Got an anniversary card from the much better half of my marriage... Actually, she also gave me a sweet and sentimental card. Good woman!
Thought long and hard about this... and decided to re-insert the engine and T56 for final test fit. The reason being is that I had only stuck in the LS2 and the bellhousing for checking clearances - I had never installed the T56 for obtaining tranny x-member measurements and thus, where to drill for the frame rail reinforcements. I had initially tried to just take measurements of everything as it sat outside the car and base my installation on those numbers... GLAD I DID NOT DO THAT. The extra work of an hour or two was well worth it. My V8R frame rails would have been OFF, and I would have been upset having to redrill 22 holes.
A friend, Jonathan, came by and helped out so we could install the powerplant and then get accurate measurements and placement of the rails. First, the RH rail went in, drilled holes, and bolted it in with the grade 8 hardware.
Discovered that the rear bolt in the Pro5.0 shifter was easily pushing up into the Mazda sheetmetal... That upset me a bit - so my $9 cutoff tool came out and opened the hole up to allow the T56 to get properly in place.
This is that FM exhaust bracket. Two U-shaped clamps hold those 2.5" diameter pipes. The two bolts will secure the V8R crossmember to the above Energy Suspension poly mount.
The Mazda wants to be left alone after an eventful Sunday afternoon...
Last edited by ToySnakePMC; 09-24-2013 at 06:10 AM.
09-23-2013, 10:02 PM
#98
V8 Miata Fanatic
Thread Starter
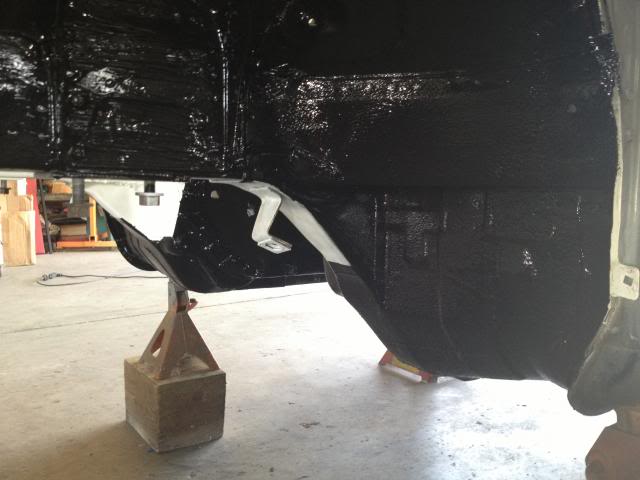
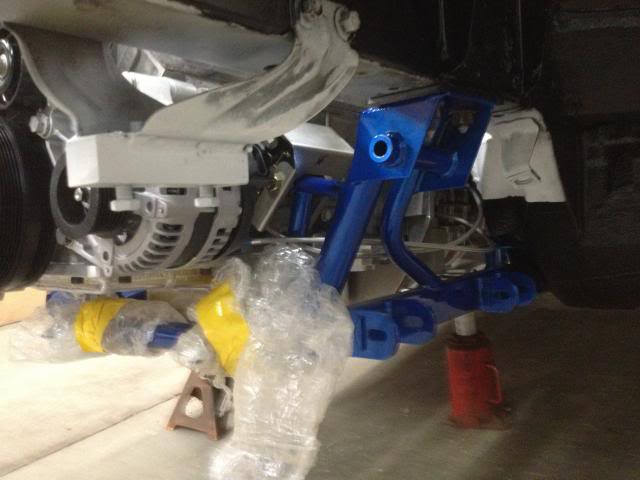
Back at it tonite and installed the LH rail. These V8R rails are pretty stout and will tighten this ol' tub up big time!!!
Beauty shot!!! Well, if I had a great camera and actually knew how to properly master the art of photography.
Rails are in - the underside of the Mazda is looking more finished. I can now, at some point, run fuel lines, brake lines, and figure out what wiring will come from the battery and where to best secure them all...
Will keep the drivetrain in for another week or so. The plan is to lay out the LS2 stand-alone harness and see where I want to drill a TWO INCH hole into the firewall. Yikes! I'm not looking forward to that. I've ordered more interior silver/ heat stuff and a split 2" grommet with 1" hole so I pull the harness into it's eventual home. It will be a tight fit regardless on where I put this stuff!!
She needs completing. I think things are moving along fairly well. I packed up the FM headers and the V-band clamps I got from Summit so I can take them to an exhaust shop to have them welded on now versus when the headers will be in the car. Now is the time to get this stuff done. I'll also see about having them coated to help keep heat out of the engine compartment.
Last edited by ToySnakePMC; 09-24-2013 at 06:13 AM.
10-05-2013, 10:34 PM
#99
V8 Miata Fanatic
Thread Starter
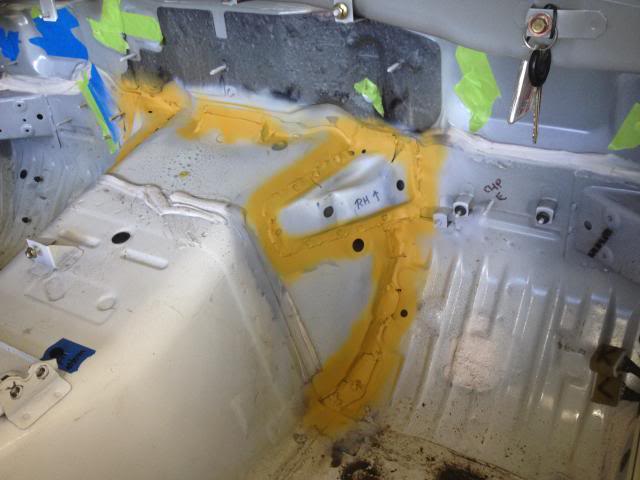
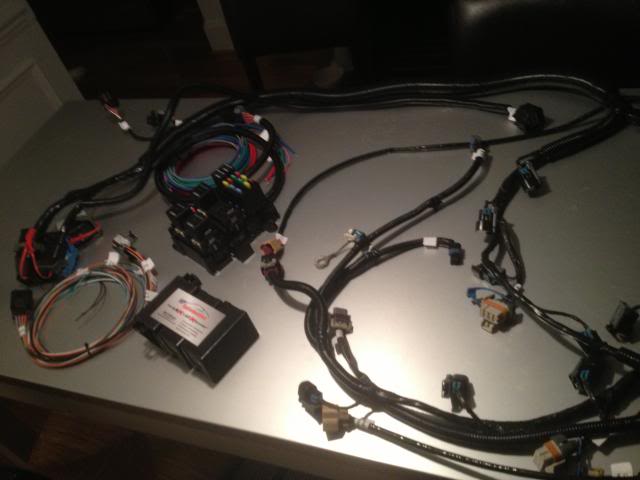
Another sloooww build day today... I spent hours - somehow - just looking at, studying, and confirming the placement of the PCM and stand-alone fuse box provided by BP Automotive. This GTO LS2 harness is designed to exit the back of the LH head while all the LS builds that I've studied on line have their harnesses enter the firewall closer to the RH head. I THINK I have it now figured out - and this is critical since I have to cut my firewall hole very soon, & I've tried to confirm that the harness will reach all the sensors, injectors, etc - with a hole just to the left of the heater connections (more or less centered behind the intake) and still reach the PCM and fuse box placement in the passenger footwell.
Here's the general desired location for the "stuff." I don't want the PCM, nor the fuses/ relays, under the hood, so I think I'll have to sacrifice passenger legroom - which won't affect the Mrs as she's about 5'2ish" and can't touch the far end of the footwell anyway...
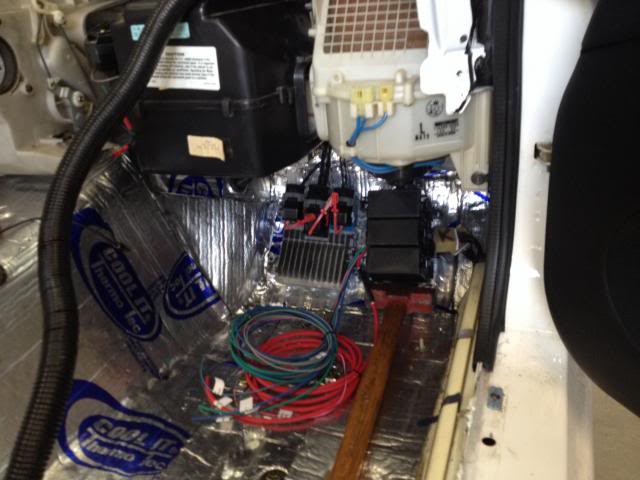
Since this is where the early 1.6L cars had their ecm's, I think it will work out fairly well here. I also double checked the DBW throttle pedal to make certain that the harness reaches the connector - and it did with relative ease. All this is just a mock up with the heater core, fan assy, A/C evap, and the throttle - brake pedal assy. I'll pull that stuff back out for the upcoming Mazda harness diet that I'm dreading so intensely...
I THINK I will turn the fuse box 90 degrees and, thus, get it further up on the slanted floor boards. All of this is going to be secured to a flat 1/16" alum panel with a "false floor" - kick board - in front of it - ala' 1.6L Miata... Just ignore the stand-in hand model... I will try not to let that happen again...

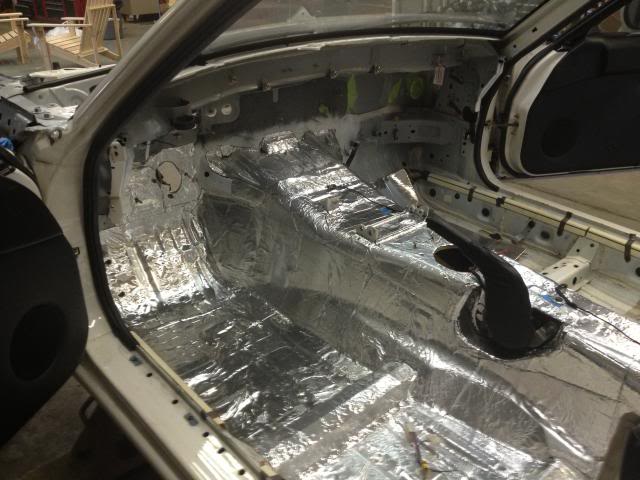
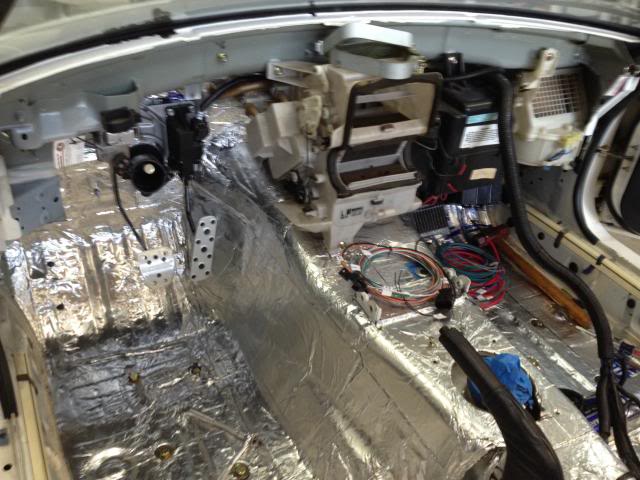
And lastly, an overall pic of the interior in its current state with completed heat & sound deadening stuff.
Here's the general desired location for the "stuff." I don't want the PCM, nor the fuses/ relays, under the hood, so I think I'll have to sacrifice passenger legroom - which won't affect the Mrs as she's about 5'2ish" and can't touch the far end of the footwell anyway...
Since this is where the early 1.6L cars had their ecm's, I think it will work out fairly well here. I also double checked the DBW throttle pedal to make certain that the harness reaches the connector - and it did with relative ease. All this is just a mock up with the heater core, fan assy, A/C evap, and the throttle - brake pedal assy. I'll pull that stuff back out for the upcoming Mazda harness diet that I'm dreading so intensely...
I THINK I will turn the fuse box 90 degrees and, thus, get it further up on the slanted floor boards. All of this is going to be secured to a flat 1/16" alum panel with a "false floor" - kick board - in front of it - ala' 1.6L Miata... Just ignore the stand-in hand model... I will try not to let that happen again...
And lastly, an overall pic of the interior in its current state with completed heat & sound deadening stuff.
Last edited by ToySnakePMC; 10-06-2013 at 12:10 AM.
10-06-2013, 09:50 PM
#100
V8 Miata Fanatic
Thread Starter
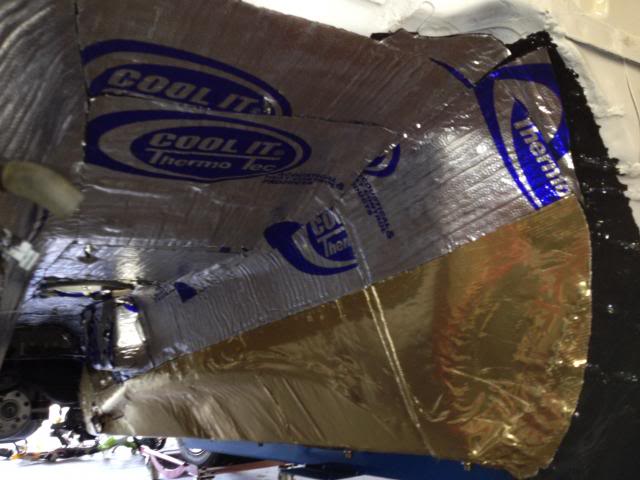
Had some time today to pull the engine/tranny now that I have my ideas on the wiring and previously measured & drilled holes in the T56 x-member/ brace. Since I finished the interior yesterday with the last bit of work installing the Cool-It mat, I decided to use the remaining stuff to complete the bottom side of the transmission tunnel.
I wasn't certain this stuff would be suitable under the car, but I checked out Thermo-Tec's website and found this: "The Suppressor is ideal when both sound and radiant heat control is needed. In addition to the polyethylene film, the foil surface provides direct protection from radiant heat up to 2000 Deg F and direct temperatures up to 300 Deg F." I think I'm OK since this mat is only in the top section of the tunnel - not up close to the mythical exhaust system that will one day find a home here...
A few other things done today: dropped off flash-drive at Staples to print some 11x17" 1994 Miata wiring diagrams that I picked off the interweb, did final install on the LS2's water-pump, thermostat, and front drive accy's as they all needed to be torqued down with the previously, missing gaskets. Installed new NGK sparkplugs, Taylor wires, and some trick insulated, blue spark plug boot covers.
Wiring, plumbing for fuel lines and brake lines are the next 3 priorities. Hope some form of forward momentum sticks with me until this project gets wrapped up.


