V8R sloooww build - 94 Miata - North Carolina

 02-02-2014, 09:53 AM
#151
Jim Stainer

LOL! I spent 8 miserable years as a line tech at a Chevy dealer and have a couple thoughts for you. 1st search ebay and buy the factory manuals for your drive train. Sure 80% of the books is GTO stuff you won't ever use but that other 20% is priceless. 2nd go to your local Chevy dealer and ask the parts guys (not the service writers) who is their best driveablity tech and where is stall is. Best to find someone under about 35 if you can. Look for a side door near his stall and hopefully you can sneak past the gate keeper (service writers) to talk to him in the shop. Techs are comfortable in their stall but don't like being up front where the service writers are or in the customer waiting room. Approach said tech with a plate of homemade cookies and your best pitiful look and ask him if he does work on the side. Most of them do and would be glad to help but if not ask him who he would recommend. If it was me and I was still in the dealer I'd do it just for a chance to road test the car but most would be glad to help for a few bucks in cash.
Last edited by charchri4; 02-02-2014 at 10:46 PM.
 02-03-2014, 04:54 AM
#152
V8 Miata Fanatic

Thread Starter

Thanks Jim. I hope to find time to speak to some local folks today, and get going with this. I do like your idea of starting with the parts guys for tech recommendation - good idea! Keep y'all posted.
02-09-2014, 08:38 AM
#153
V8 Miata Fanatic
Thread Starter
Back after taking last weekend off from the build and glad to accomplish a couple of things as the project list begins to wind down somewhat...
Knowing that the DBW pedal and the throttle body still refuse to talk to each other, I have a plan in place to get the car over to a local expert, Carolina Auto Masters in Durham. After getting a recommendation on them from a friend who road races a hot Z06 and talking to the owner, I'm convinced he and his GM scan tool will persuade my car to behave better. Carolina Auto Masters That will be next week or so, but to get to that point, I need a steering wheel in place and a working clutch.
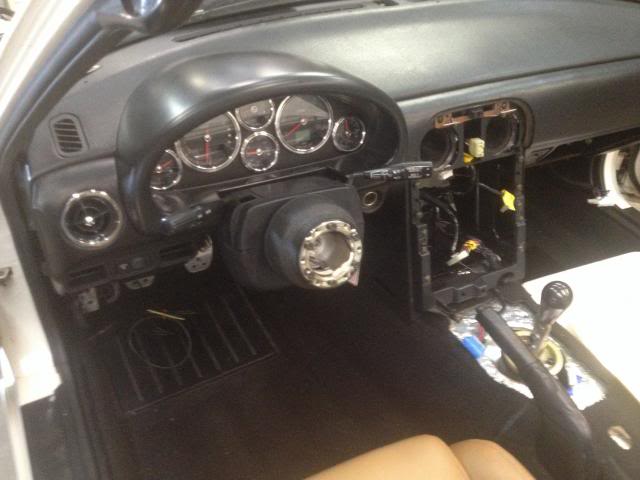
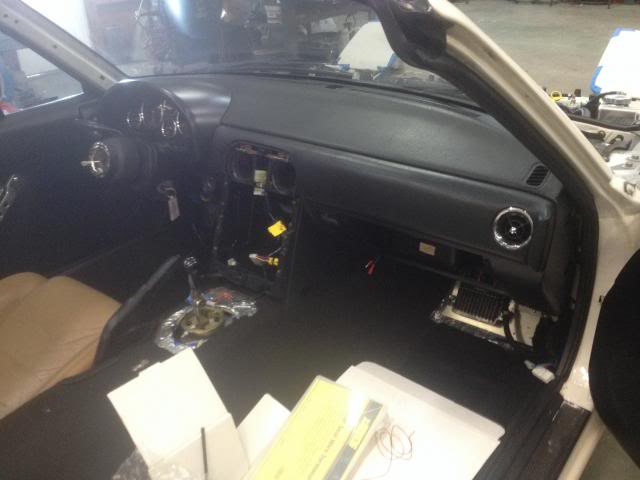
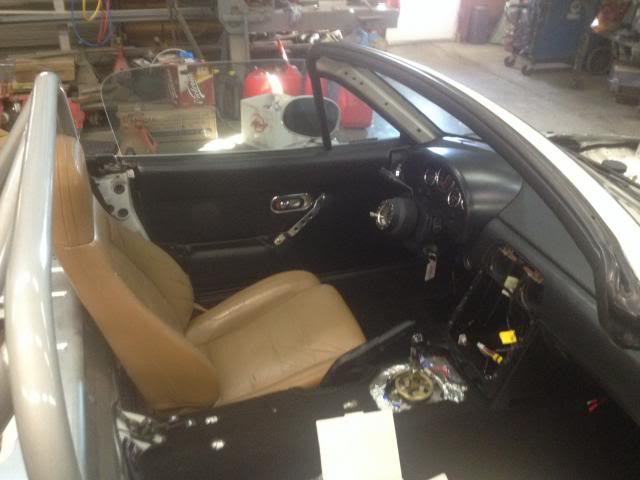
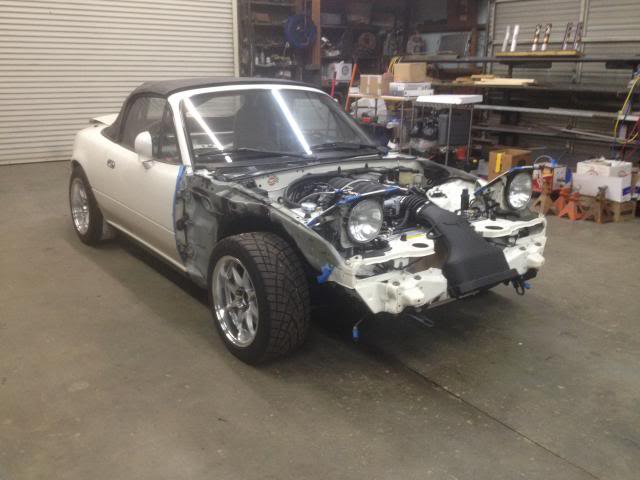
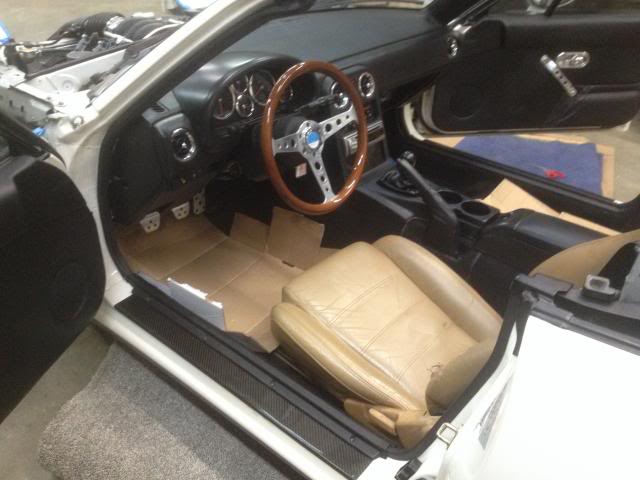
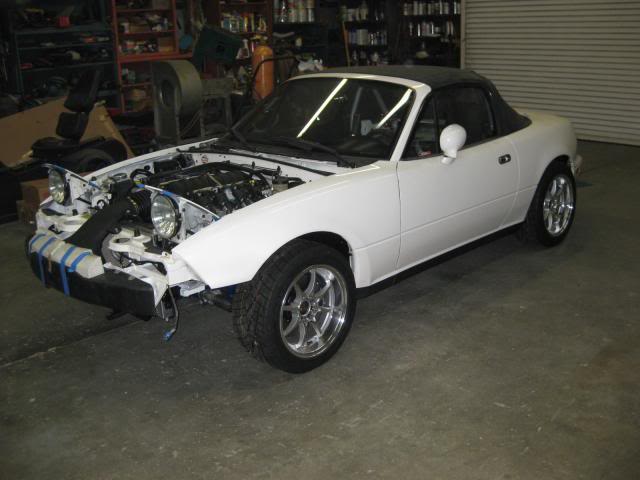
So, the dash went back in - that takes like 8 minutes - love the design of this thing! Bolted steering column to dash bar and connected most of the wiring harnesses up. There is still direct access to the LS2 throtle pedal so C.A.M. can easily plug and replace pedals if needed.
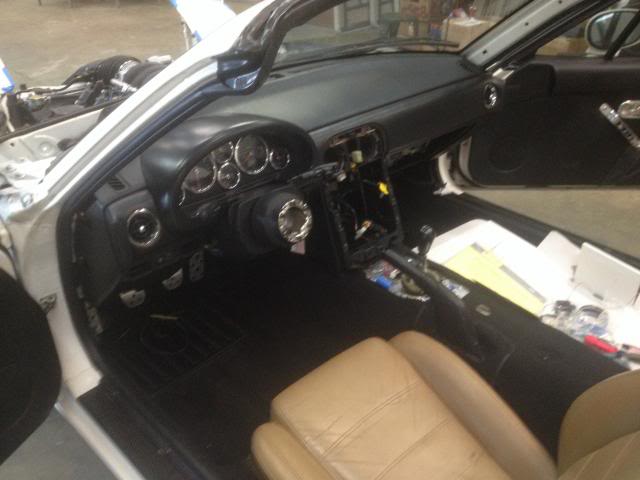
Pardon the bad pics - left the real camera at home, darn it...
Cleaned up and threw in a spare '91 BRG seat so my regular seats don't get shop worn in the next couple of weeks...
Next up was getting the car down from the jack stands. She hasn't sat on four tires in over a year! Hard to believe that I started on this Thanksgiving 2012.
So front wheels go on, drop her down on all fours and the front end BOTTOMS out. I had some serious front stance! LOL. I quickly learn that LOTS of adjustment is needed to crank up the coil-overs and get it up to a proper height.
Got that done and torqued the wheels down.

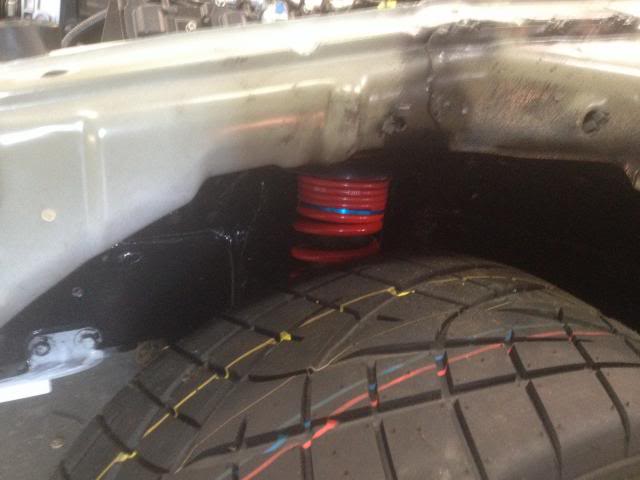
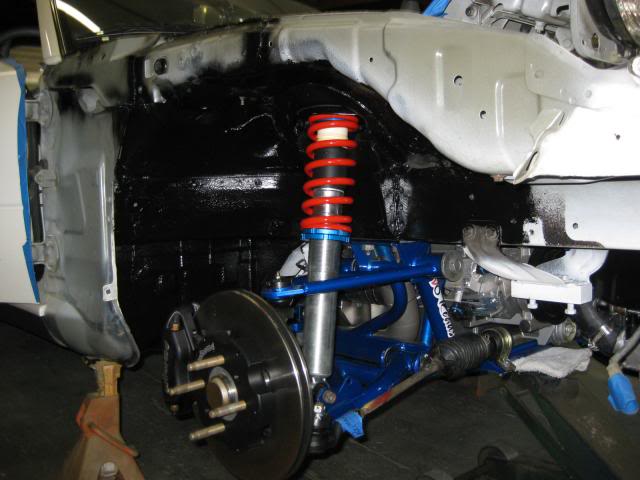
Here's an interesting pic and a reason why I may have to do some further work on my suspension... These VMaxx front shocks are using FM's standard small, top spring. I was worried that if I installed their V8 top spring, I would have some negative rake issues. Well, I won't - because these new-to-me coil overs have TONS of adjustment (that I just learned about today!). See how these are compressed to the max?
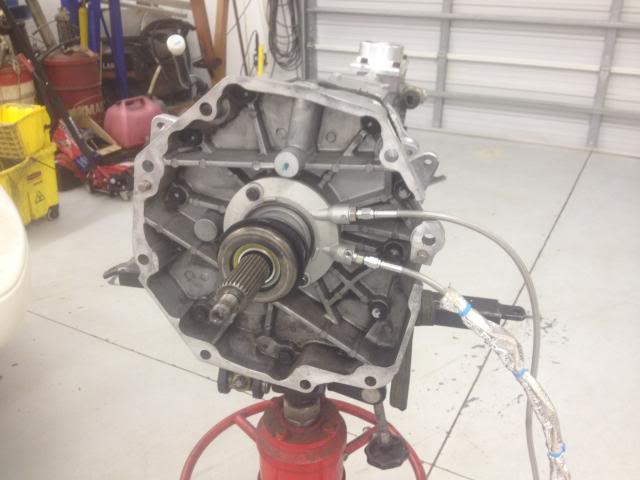
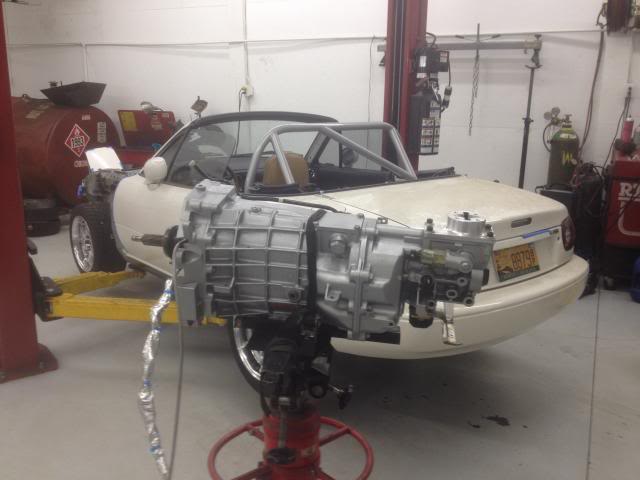
Clutch time, finally. So with seat and steering wheel (not shown) in place, I loaded the Mazda on friend's rollback for 400 yard ride to his shop and much-desired 2-post lift. Threw it up there, and we had the T56 out in 24 minutes. Damn! Air ratchets, lifts, and transmission jacks can make one very productive!!!
Remember my massive slave cylinder leak? Well, the good news is that the slave cylinder is A-OK. The bad news (if there is any) is that I saw first-hand that a finger-tight hydraulic fitting is not desireable in the bellhousing. Yes, the remote bleeder was not tight... Another 1/2 hour and the tranny and driveshaft were back in place. Clutch was bled - no leaks - and a good pedal, we think.
Rolled the Mazda back on the rollback for its short, return journey home last nite. Did some more wiring for the MIL light, and she's ready to go to school in Durham for the Gifted and Talented - LS2 diagnostic work and probable tuning!
Front sheet metal and exhaust installation are the final big pieces needed to complete this puzzle. Keep you posted...
Knowing that the DBW pedal and the throttle body still refuse to talk to each other, I have a plan in place to get the car over to a local expert, Carolina Auto Masters in Durham. After getting a recommendation on them from a friend who road races a hot Z06 and talking to the owner, I'm convinced he and his GM scan tool will persuade my car to behave better. Carolina Auto Masters That will be next week or so, but to get to that point, I need a steering wheel in place and a working clutch.
So, the dash went back in - that takes like 8 minutes - love the design of this thing! Bolted steering column to dash bar and connected most of the wiring harnesses up. There is still direct access to the LS2 throtle pedal so C.A.M. can easily plug and replace pedals if needed.
Pardon the bad pics - left the real camera at home, darn it...
Cleaned up and threw in a spare '91 BRG seat so my regular seats don't get shop worn in the next couple of weeks...
Next up was getting the car down from the jack stands. She hasn't sat on four tires in over a year! Hard to believe that I started on this Thanksgiving 2012.
So front wheels go on, drop her down on all fours and the front end BOTTOMS out. I had some serious front stance! LOL. I quickly learn that LOTS of adjustment is needed to crank up the coil-overs and get it up to a proper height.
Got that done and torqued the wheels down.
Here's an interesting pic and a reason why I may have to do some further work on my suspension... These VMaxx front shocks are using FM's standard small, top spring. I was worried that if I installed their V8 top spring, I would have some negative rake issues. Well, I won't - because these new-to-me coil overs have TONS of adjustment (that I just learned about today!). See how these are compressed to the max?
Clutch time, finally. So with seat and steering wheel (not shown) in place, I loaded the Mazda on friend's rollback for 400 yard ride to his shop and much-desired 2-post lift. Threw it up there, and we had the T56 out in 24 minutes. Damn! Air ratchets, lifts, and transmission jacks can make one very productive!!!
Remember my massive slave cylinder leak? Well, the good news is that the slave cylinder is A-OK. The bad news (if there is any) is that I saw first-hand that a finger-tight hydraulic fitting is not desireable in the bellhousing. Yes, the remote bleeder was not tight... Another 1/2 hour and the tranny and driveshaft were back in place. Clutch was bled - no leaks - and a good pedal, we think.
Rolled the Mazda back on the rollback for its short, return journey home last nite. Did some more wiring for the MIL light, and she's ready to go to school in Durham for the Gifted and Talented - LS2 diagnostic work and probable tuning!
Front sheet metal and exhaust installation are the final big pieces needed to complete this puzzle. Keep you posted...
Last edited by ToySnakePMC; 02-09-2014 at 08:45 AM.
02-09-2014, 12:08 PM
#154
V8 Miata Participant

With the springs as compressed as they are, you will have no suspension movement at all. Time for you to rethink your front suspension set up.
Bill S.
Bill S.
02-09-2014, 04:34 PM
#155
V8 Miata Fanatic
Thread Starter
Thx,
Pat
02-09-2014, 05:47 PM
#156
V8 Miata Participant

The main coils don"t appear to be particularly compressed, just the "helper springs" which are only there to keep the main springs from coming out of their pockets when extended.
Mike
Mike
02-09-2014, 07:31 PM
#157
V8 Miata Fanatic
Thread Starter
That's what I was thinking - I just hadn't had time to research the concern as of yet... Do you have an opinion as to whether I should change out now or give 'em a try since these pancaked helper springs are already there?
02-09-2014, 10:57 PM
#159
Jim Stainer
Those little springs are not helper springs. They are only about 100 ftlb springs with just enough spring to overcome the shock and they designed to be fully compressed like that. They are there to extend the travel of the shock and keep the big spring from going slack on you. I'm not exactly sure when the big spring would go to full droop on the road but that is what they are there for.
02-10-2014, 03:41 AM
#160
V8 Miata Participant
Bill S.
02-10-2014, 05:56 AM
#161
Jim Stainer
I think you guys need to relax and give him a couple thousand miles to sort things out. That V-maxx system is tried and proven over and over to be an excellent set up and I have no doubt it is going to be perfect for what he is doing.
Last edited by charchri4; 02-10-2014 at 06:02 AM.
02-10-2014, 11:49 AM
#162

Those little springs are not helper springs. They are only about 100 ftlb springs with just enough spring to overcome the shock and they designed to be fully compressed like that. They are there to extend the travel of the shock and keep the big spring from going slack on you. I'm not exactly sure when the big spring would go to full droop on the road but that is what they are there for.
02-10-2014, 12:05 PM
#163
V8 Miata Participant
Since I'm the one who initiated this discussion by using the term "helper springs" here's a reference to them by a reputable spring manufacturer:
Hypercoils HELPERSPRG-2.25 : Hypercoils 2-1/4" Coil-Over Helper Spring
While not a helper spring in the traditional truckers sense, the do "help" keep the spring located at full droop.
Mike
Hypercoils HELPERSPRG-2.25 : Hypercoils 2-1/4" Coil-Over Helper Spring
While not a helper spring in the traditional truckers sense, the do "help" keep the spring located at full droop.
Mike
Last edited by cvx_20; 02-10-2014 at 12:07 PM.
02-10-2014, 01:50 PM
#164
Jim Stainer
Sorry my bad guys. The term helper spring as I was thinking is a spring designed to increase payload so a vehicle can carry more weight than it otherwise would have been able to. I have not heard the term used for these little springs before. Good to know!
02-10-2014, 05:01 PM
#165
I do a lot of four wheeling (jeep) and the guys that don't quite get their coils quite right get a "helper spring" to keep the main coils seated at full droop so they don't damage the shock. I just assumed that it was called the same thing on cars.
OK, I'm done cluttering your build thread. By the way, I hope you are part of the SCCA. I currently live in Greenville but will be relocating to the Charlotte area later this year. Maybe we can autocross sometime. Great build, I hope to be right behind you soon enough.
OK, I'm done cluttering your build thread. By the way, I hope you are part of the SCCA. I currently live in Greenville but will be relocating to the Charlotte area later this year. Maybe we can autocross sometime. Great build, I hope to be right behind you soon enough.
02-15-2014, 09:25 PM
#166
V8 Miata Fanatic
Thread Starter
I do a lot of four wheeling (jeep) and the guys that don't quite get their coils quite right get a "helper spring" to keep the main coils seated at full droop so they don't damage the shock. I just assumed that it was called the same thing on cars.
OK, I'm done cluttering your build thread. By the way, I hope you are part of the SCCA. I currently live in Greenville but will be relocating to the Charlotte area later this year. Maybe we can autocross sometime. Great build, I hope to be right behind you soon enough.
OK, I'm done cluttering your build thread. By the way, I hope you are part of the SCCA. I currently live in Greenville but will be relocating to the Charlotte area later this year. Maybe we can autocross sometime. Great build, I hope to be right behind you soon enough.
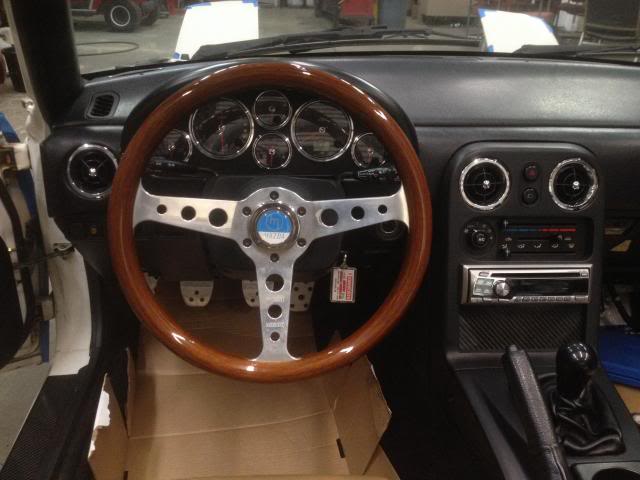
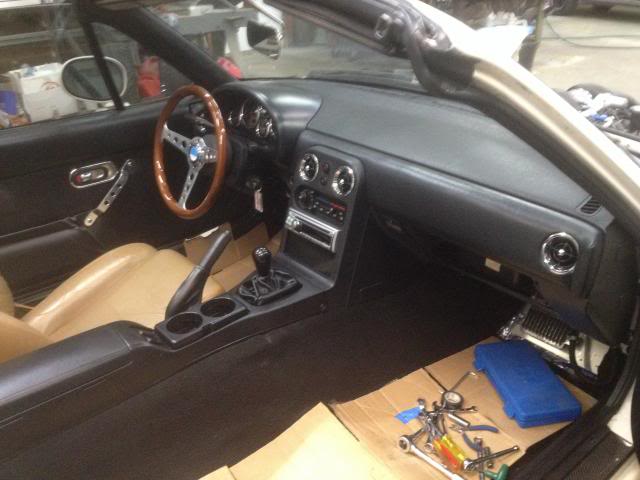
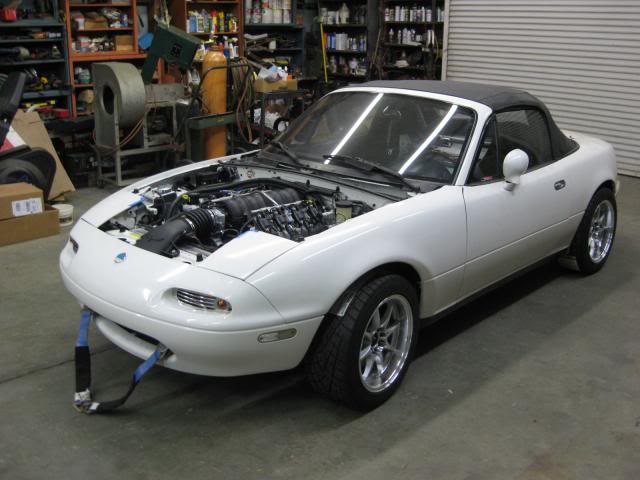
So, this weekend I've got the interior pretty much together with the complete dash minus the glove box door so my engine tuner has full visibility to the PCM and such. Steering wheel is an older polished Momo Super Indy 330mm with a KGWorks horn button. Older Alpine head unit, HVAC controls, power windows are all hooked back up with the console, and hidden shifter boot also in place.
This is a 1990 dash swap I did a few yrs ago with a clean little red one that I whipped into shape. It's new, unsuspecting owner got a clean 1994 dash without knowing any different!
So, the plan is to get this car to a local LSx guru with proper GM tooling to diagnose throttle issue and go ahead and confirm VATS is off, fans are set properly, etc. Don't need a license plate on the car right now as it needs an off-road exhaust and whatever else to get this car back on the road soon. The Mazda will have no cats and only have to pass an NC safety inspection (about $9.00) to comply with our state regs. Front sheetmetal is next, but may not bother with it until I know the LS2 is running properly. Stay tuned...
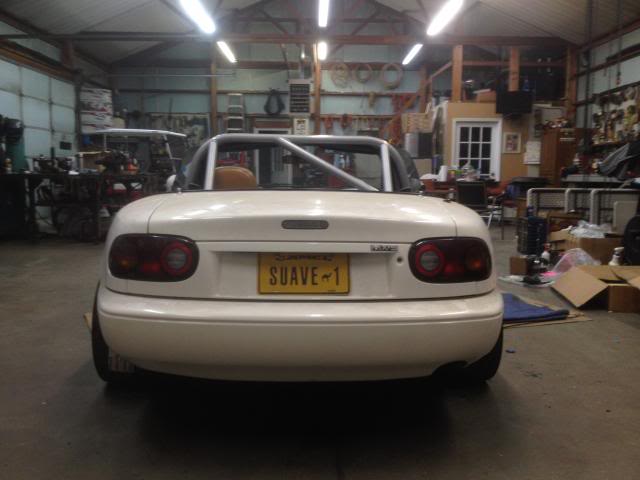
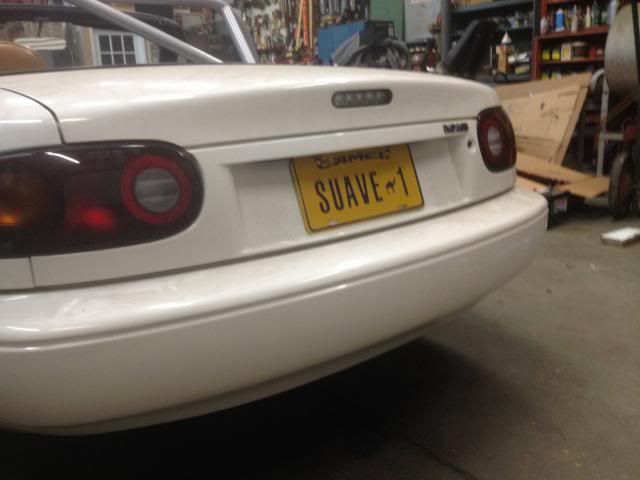
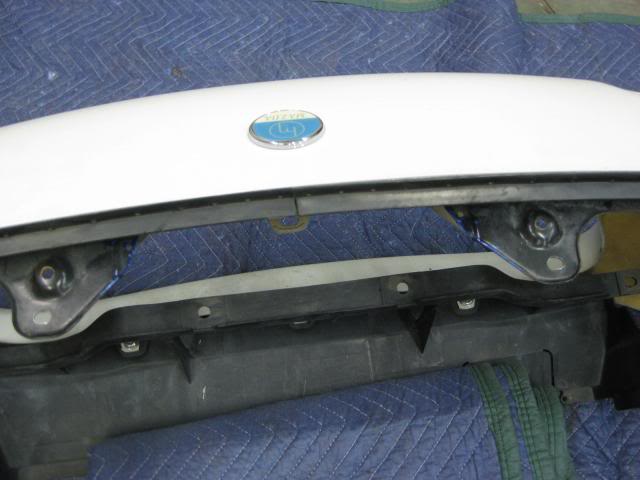
European rear finish panel with Joe Camel's personalized plate. He's an old dear friend from the glory days of IMSA racing!

Last edited by ToySnakePMC; 02-15-2014 at 09:42 PM.
 02-17-2014, 07:24 AM
#168
V8 Miata Fanatic
Thread Starter
Thanks Chuck - I, too, like the vintage look. With the exception of this modern drivetrain, the plan for this car has always been to simplify - no ABS, no airbags, no P/S (can convert back to it if manual rack doesn't feel right), no power antenna, and new manual rearview mirrors to replace the big factory power ones are on the shelf.
Here's the quick, down & dirty for the last jobs performed this weekend.
1. Removed front coil-overs and extracted the regular V-Maxx 2-spring set-up & replaced them with FM's single, heavier front springs. Cranked the perches up and reinstalled. The Mazda now sits a tad too high up front - about 1.5" - but that can be rectified later. There's plenty of adjustment in these shocks - for low, low stance to off-road rally setting, I guess!
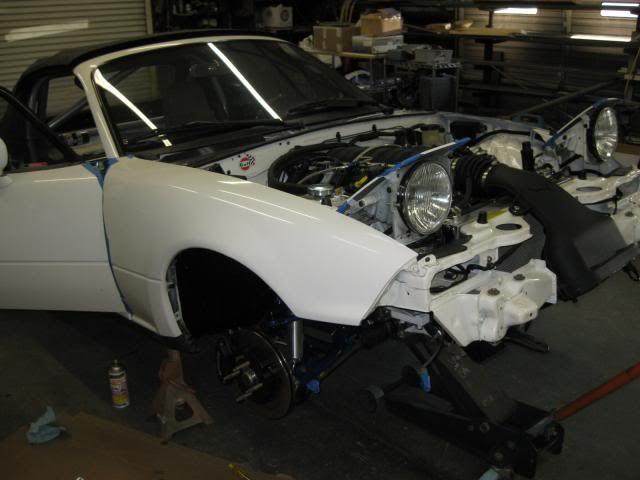
2. Carefully installed the pair of front fenders. That was super easy as the bagged & tagged bolts went perfectly back in their place for proper fender gaps. Also pulled out the fender roller and did a slight roll to the lips - may have to get more intense with smashing the lip up in the fender - but not sure until she's all together and height is adjusted and alignment is set.
3. Preparing for front bumper to be installed. Wow. What a lot of trimming one must do to the black plastic support just behind the bumper to accommodate the Z06 intake. My $9.98 HF cut-off tool got a work out trimming & cutting as we kept test fitting the thing until it fit flush. I had never heard of anyone doing this, but one must if you want to give the urethane front bumper the proper support from behind.
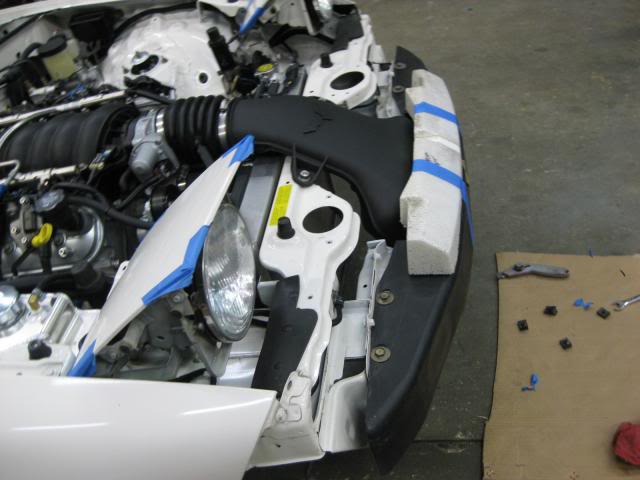
3. Still on 3... Attempted to fasten the bumper to the Mazda, but could only get it within 3/4" from lining up. So it appeared that the upper metal support brace was hitting the plastic intake. I removed about 7" of material, filed the rough metal down, and used some handy touch up paint (blue for now - will go to black soon) to cover the bare metal. Bumper still did not fit completely - same 3/4" concern. Well - later in the evening, I found two 10mm nuts screwed up on their respective RH and LH studs hidden on the bumper assy facing the headlights - the two threaded studs obviously could not fit tightly on the car. I think I found my problem, and we will mount the bumper tomorrow when I'm not so tired.
Here's the quick, down & dirty for the last jobs performed this weekend.
1. Removed front coil-overs and extracted the regular V-Maxx 2-spring set-up & replaced them with FM's single, heavier front springs. Cranked the perches up and reinstalled. The Mazda now sits a tad too high up front - about 1.5" - but that can be rectified later. There's plenty of adjustment in these shocks - for low, low stance to off-road rally setting, I guess!
2. Carefully installed the pair of front fenders. That was super easy as the bagged & tagged bolts went perfectly back in their place for proper fender gaps. Also pulled out the fender roller and did a slight roll to the lips - may have to get more intense with smashing the lip up in the fender - but not sure until she's all together and height is adjusted and alignment is set.
3. Preparing for front bumper to be installed. Wow. What a lot of trimming one must do to the black plastic support just behind the bumper to accommodate the Z06 intake. My $9.98 HF cut-off tool got a work out trimming & cutting as we kept test fitting the thing until it fit flush. I had never heard of anyone doing this, but one must if you want to give the urethane front bumper the proper support from behind.
3. Still on 3... Attempted to fasten the bumper to the Mazda, but could only get it within 3/4" from lining up. So it appeared that the upper metal support brace was hitting the plastic intake. I removed about 7" of material, filed the rough metal down, and used some handy touch up paint (blue for now - will go to black soon) to cover the bare metal. Bumper still did not fit completely - same 3/4" concern. Well - later in the evening, I found two 10mm nuts screwed up on their respective RH and LH studs hidden on the bumper assy facing the headlights - the two threaded studs obviously could not fit tightly on the car. I think I found my problem, and we will mount the bumper tomorrow when I'm not so tired.
Last edited by ToySnakePMC; 02-17-2014 at 09:39 PM.
02-17-2014, 07:25 PM
#169
V8 Miata Fanatic
Thread Starter
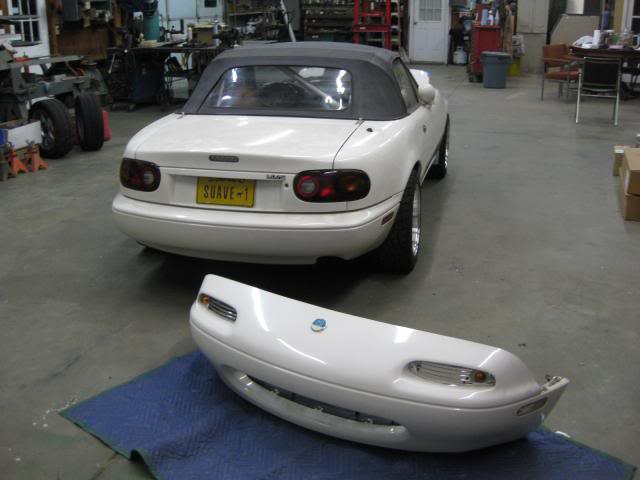
Gotta love bolting on somewhat shiny body panels for instant gratification! Came back to the shop tonite to get the front bumper cover bolted and fastened on completely. Everything has lined up perfectly and the air cleaner assembly has 1/2" of clearance where it sits behind the bumper cover.
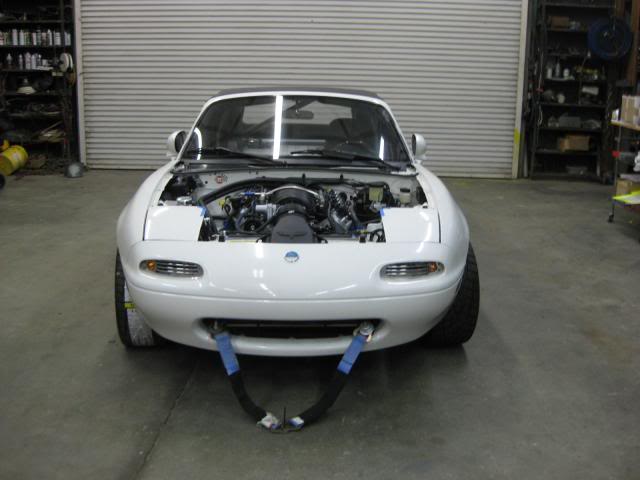
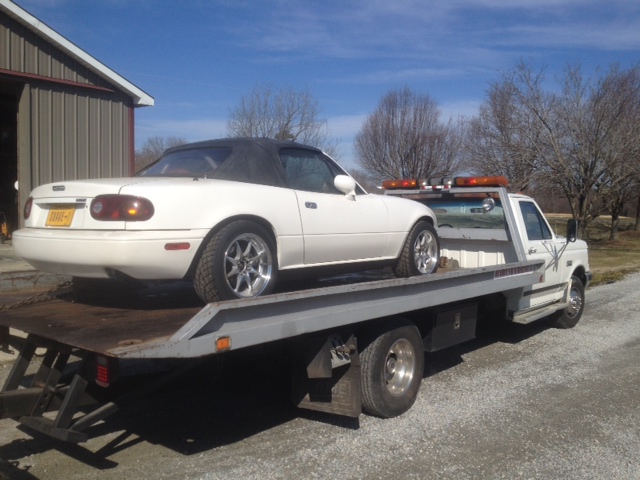
With the Mazda baby-teeth tow hooks still in place (temporarily) I secured two axle straps with bolts and washers for the convenience of my roll-back operator. We will load this thing up tomorrow and take it on it's 45 minute ride to Carolina Auto Masters in Durham. I'm looking forward to meeting Jeff and seeing what's wrong with this DBW pedal/ PCM/ Throttle body.
So with no hood modifications done as of yet, the Mazda will show up topless, if you will. The weather is supposed to cooperate with no rain in the forecast. This weekend, I hope to cut out the necessary front understructure where the latch currently resides and get the Sparco hood pins in their proper place. (I hate cutting on perfectly good sheetmetal, but oh well...)
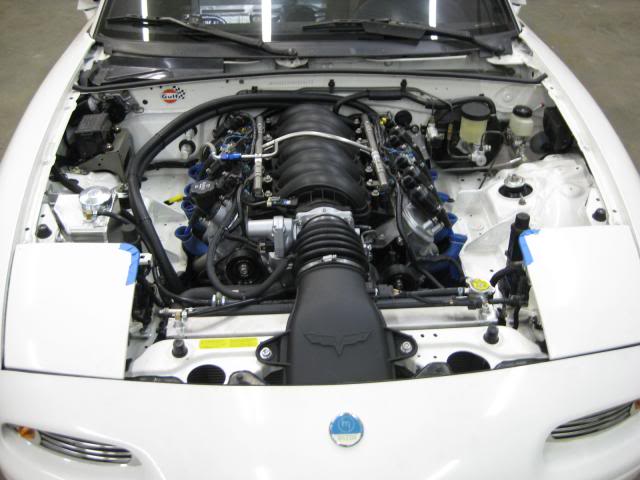
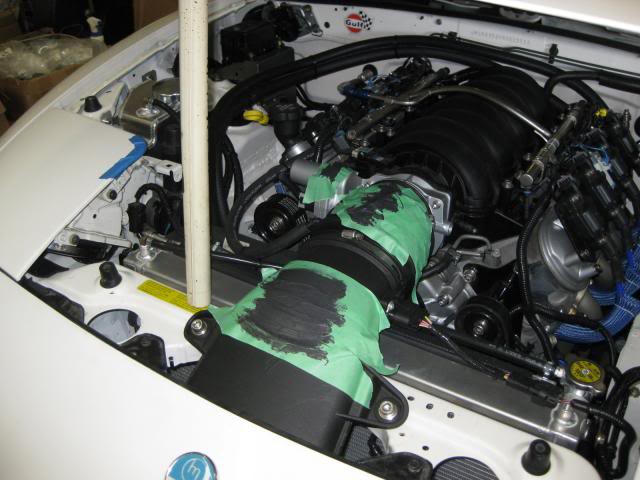
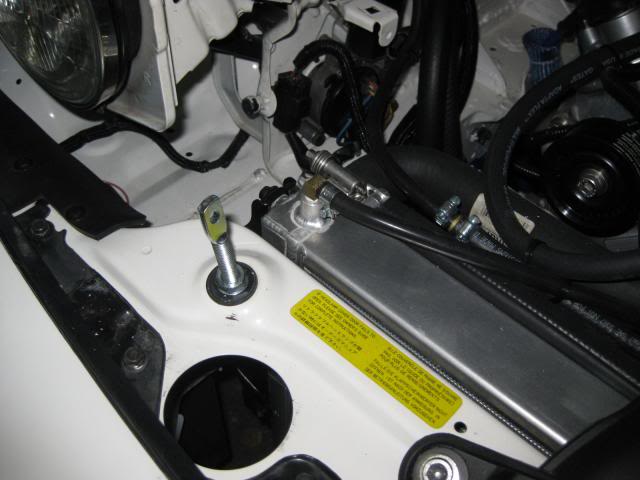
Here's a decent engine compartment shot with everything in place. I will have to install the Suzuki Cappuccino washer bottle that mounts in the wiper tray behind the master cylinder (away from heat - and lessen the under hood clutter).
Keep you posted on this week's progress with the LS2. I hope the technical experts at CAM will jump right on it - but don't want to get my hopes up too high just yet! Cheers.
With the Mazda baby-teeth tow hooks still in place (temporarily) I secured two axle straps with bolts and washers for the convenience of my roll-back operator. We will load this thing up tomorrow and take it on it's 45 minute ride to Carolina Auto Masters in Durham. I'm looking forward to meeting Jeff and seeing what's wrong with this DBW pedal/ PCM/ Throttle body.
So with no hood modifications done as of yet, the Mazda will show up topless, if you will. The weather is supposed to cooperate with no rain in the forecast. This weekend, I hope to cut out the necessary front understructure where the latch currently resides and get the Sparco hood pins in their proper place. (I hate cutting on perfectly good sheetmetal, but oh well...)
Here's a decent engine compartment shot with everything in place. I will have to install the Suzuki Cappuccino washer bottle that mounts in the wiper tray behind the master cylinder (away from heat - and lessen the under hood clutter).
Keep you posted on this week's progress with the LS2. I hope the technical experts at CAM will jump right on it - but don't want to get my hopes up too high just yet! Cheers.
02-18-2014, 06:58 AM
#170
V8 Miata Zealot

I hope they get it sorted out for you. Your car looks great.
As a precaution, you may want to affix some blue painter's tape to the headlight doors with a message telling your tuner "DO NOT LEAN ON THIS!!!!" to avoid them getting bent. For some reason, those are the first things that others rest their hand on when leaning over the engine.
As a precaution, you may want to affix some blue painter's tape to the headlight doors with a message telling your tuner "DO NOT LEAN ON THIS!!!!" to avoid them getting bent. For some reason, those are the first things that others rest their hand on when leaning over the engine.
02-18-2014, 03:53 PM
#171

Great build Pat!
I have read this thread twice from beginning to end and know this will be my go to guide when I am assembling my car this summer.
Thanks for taking the time to document your build so well!
I have read this thread twice from beginning to end and know this will be my go to guide when I am assembling my car this summer.
Thanks for taking the time to document your build so well!
02-18-2014, 07:03 PM
#172
V8 Miata Fanatic
Thread Starter
I hope they get it sorted out for you. Your car looks great.
As a precaution, you may want to affix some blue painter's tape to the headlight doors with a message telling your tuner "DO NOT LEAN ON THIS!!!!" to avoid them getting bent. For some reason, those are the first things that others rest their hand on when leaning over the engine.
As a precaution, you may want to affix some blue painter's tape to the headlight doors with a message telling your tuner "DO NOT LEAN ON THIS!!!!" to avoid them getting bent. For some reason, those are the first things that others rest their hand on when leaning over the engine.
Amellrotts: I have read this thread twice from beginning to end and know this will be my go to guide when I am assembling my car this summer.
Thanks for taking the time to document your build so well!
You are certainly welcome! That's one of the main results that I'm hoping for -- anything that can help make other LSx MX5 swaps go smooth is awesome. If you have any questions before or during the swap - don't hesitate to contact me. I'm no expert - just someone who also read just about any build thread that's out there. Good luck - keep us posted here, too.
 02-18-2014, 07:40 PM
#173
V8 Miata Fanatic
Thread Starter
First day of school was today, that is GM High Tech School at Carolina Auto Masters where this Mazda LS2 overcame some learning disabilities in the early afternoon and progressed all the way to a spirited victory lap around the block on some downtown Durham city streets with open headers!!!! It just doesn't get any cooler than that in my book! Excited? Yes, pretty much. It was a lot to take in from about 1 to 4 pm today.
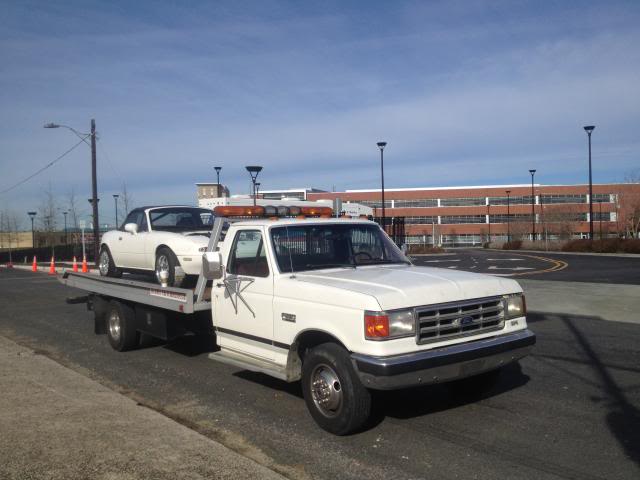
Left the shop at 11 AM with this Ford rollback leading the way on our 45 minute drive and me following in a '91 BRG survivor car (has 171K and runs awesome). PS - I know that I have two wheels/tires crisscrossed with the tread pattern running the wrong way! Noticed that as I followed it out of the driveway...)
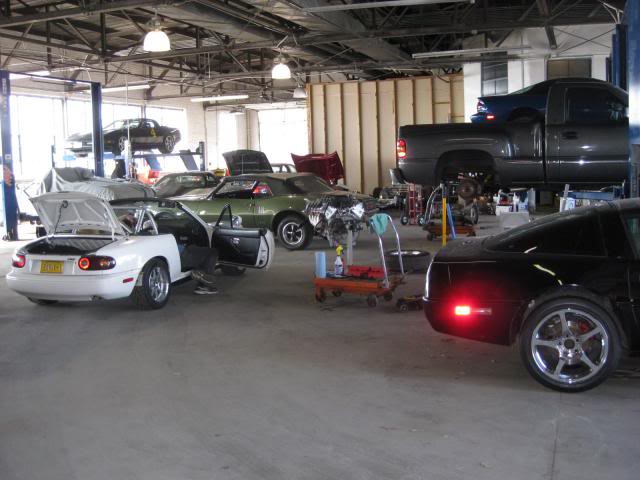
Dropped it off at C.A.M. just as they were deciding to head out for lunch - perfect timing. The shop was full of LS-powered C5's, Camaros, conversion projects, road race cars, etc.... I left for an hour or so as well and met up with an old friend at a local hot dog dive on Angier Avenue for two all-the-way and came back to their shop to find this scene had already unfolded!
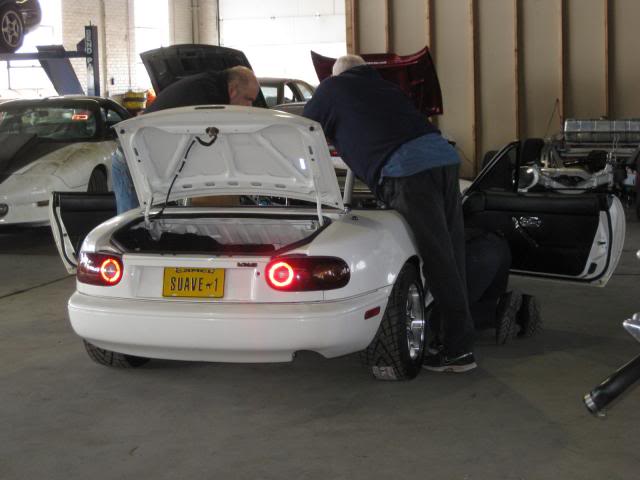
These guys had my car in the building and were swarming about it with multimeter, laptop, diagrams, GM Tech 2 tool, etc! I felt very comfortable there as these guys are all true enthusiasts who wanted to see this car alive to-day! What great attitudes and true fans of fun GM-powered projects.
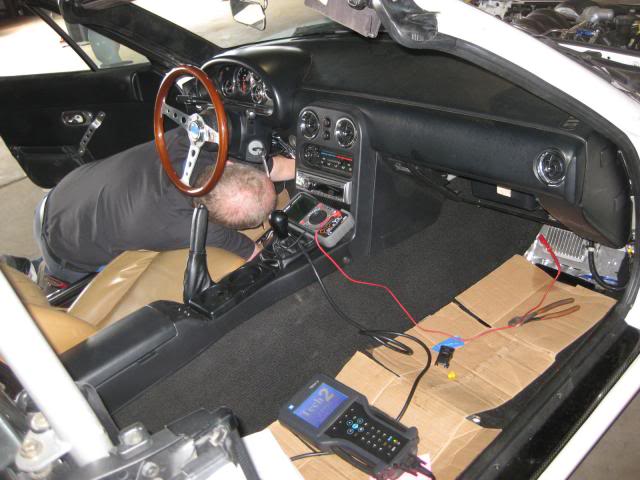
Well, after an hour or so of diagnosing, we were down to an intermittent reference voltage from the pedal to the PCM. My greatest fears were me having to pull the dash right then and there - not feeling good at this moment... But then, they determined that it was the pin on the PCM connector. After about 3 attempts to get that pin to fit snug, they got it right and voltage was good to go! DBW looked promising...
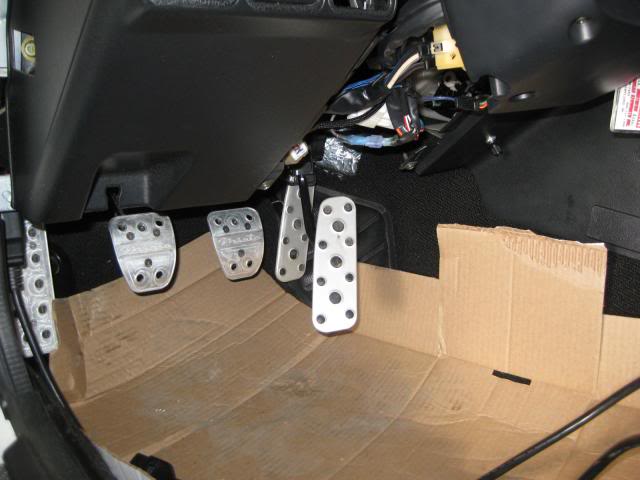
Then the GTO Pedal showed its true colors and quit cooperating. So I had 2 issues going on that were interconnected, if you will. So, they lowered down a numbers-matching C2 Vette convertible that's getting a GTO LS2 swap in the next few weeks. The idea was to "borrow" its pedal and see what we had.
My pedal harness was unplugged and the donor pedal went in. To everyone's delight, MY engine fired up and rev'd to whatever as it popped and crackled with its open headers in that big building. It was awesome! Pedal worked. I now have a pedal coming in from GM Parts distribution center in Lansing, MI. Here is a scene not often seen: 5 pedal Mazda - dead, clutch, brake, donor throttle, and my throttle.
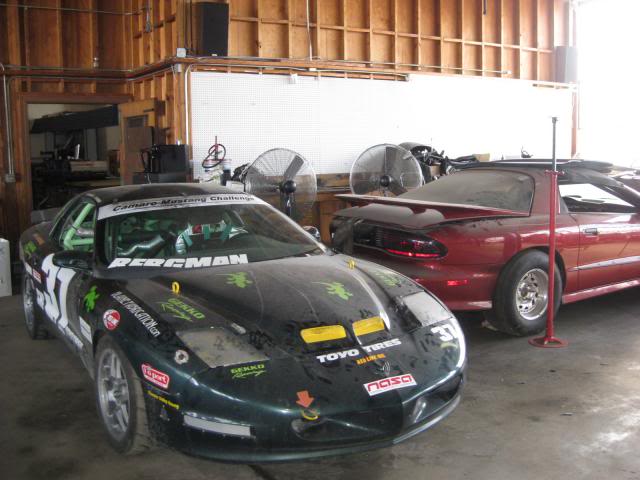
These guys know what they're doing and have a pretty good following in the Southeast... Some of my Mazda's classmates:
Once the LS2 proved it would respond and run with a proper pedal, Jeff Creech, the proprietor of C.A.M., "uploaded" (?) my PCM files onto his laptop and spent 20 minutes adjusting things such as my LS7 MAF and some other things he didn't like in my mail-order tune. He downloaded them into the Mazda and she ran SO SMOOTH (and loud, still!).
It's not documented anywhere, but we then put the Mazda in reverse - under its own power - and ventured out on the streets of Durham. I insisted that one of them have the honors and rode on the floor where the pass seat would have been! The driver/ helper is an experienced PCA, BMWCCA, NASA, etc driving instructor who plays on VIR for fun! He gave me a thrill just bumping the pedal and hearing the motor reverberate off the old brick buildings as we circled the large block! What a hoot! Best 3 minutes of 2014, so far!
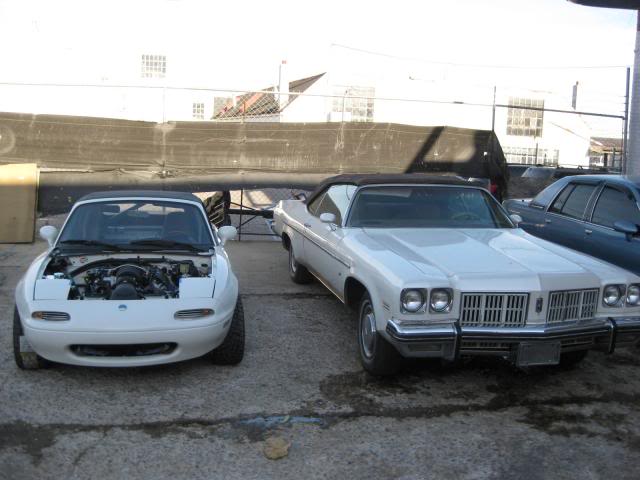
Well, pedal is on order. Car is left with CAM. Don't know for sure if you can pick it out of the lineup, but it's one of the white 2-door convertibles that both have GM power under their hood... That's right - mine doesn't have a hood. Other than that, they're practically identical!
Pick it up in a day or two and then make an appointment with the exhaust shop... See ya soon.
Left the shop at 11 AM with this Ford rollback leading the way on our 45 minute drive and me following in a '91 BRG survivor car (has 171K and runs awesome). PS - I know that I have two wheels/tires crisscrossed with the tread pattern running the wrong way! Noticed that as I followed it out of the driveway...)
Dropped it off at C.A.M. just as they were deciding to head out for lunch - perfect timing. The shop was full of LS-powered C5's, Camaros, conversion projects, road race cars, etc.... I left for an hour or so as well and met up with an old friend at a local hot dog dive on Angier Avenue for two all-the-way and came back to their shop to find this scene had already unfolded!
These guys had my car in the building and were swarming about it with multimeter, laptop, diagrams, GM Tech 2 tool, etc! I felt very comfortable there as these guys are all true enthusiasts who wanted to see this car alive to-day! What great attitudes and true fans of fun GM-powered projects.
Well, after an hour or so of diagnosing, we were down to an intermittent reference voltage from the pedal to the PCM. My greatest fears were me having to pull the dash right then and there - not feeling good at this moment... But then, they determined that it was the pin on the PCM connector. After about 3 attempts to get that pin to fit snug, they got it right and voltage was good to go! DBW looked promising...
Then the GTO Pedal showed its true colors and quit cooperating. So I had 2 issues going on that were interconnected, if you will. So, they lowered down a numbers-matching C2 Vette convertible that's getting a GTO LS2 swap in the next few weeks. The idea was to "borrow" its pedal and see what we had.
My pedal harness was unplugged and the donor pedal went in. To everyone's delight, MY engine fired up and rev'd to whatever as it popped and crackled with its open headers in that big building. It was awesome! Pedal worked. I now have a pedal coming in from GM Parts distribution center in Lansing, MI. Here is a scene not often seen: 5 pedal Mazda - dead, clutch, brake, donor throttle, and my throttle.
These guys know what they're doing and have a pretty good following in the Southeast... Some of my Mazda's classmates:
Once the LS2 proved it would respond and run with a proper pedal, Jeff Creech, the proprietor of C.A.M., "uploaded" (?) my PCM files onto his laptop and spent 20 minutes adjusting things such as my LS7 MAF and some other things he didn't like in my mail-order tune. He downloaded them into the Mazda and she ran SO SMOOTH (and loud, still!).
It's not documented anywhere, but we then put the Mazda in reverse - under its own power - and ventured out on the streets of Durham. I insisted that one of them have the honors and rode on the floor where the pass seat would have been! The driver/ helper is an experienced PCA, BMWCCA, NASA, etc driving instructor who plays on VIR for fun! He gave me a thrill just bumping the pedal and hearing the motor reverberate off the old brick buildings as we circled the large block! What a hoot! Best 3 minutes of 2014, so far!
Well, pedal is on order. Car is left with CAM. Don't know for sure if you can pick it out of the lineup, but it's one of the white 2-door convertibles that both have GM power under their hood... That's right - mine doesn't have a hood. Other than that, they're practically identical!
Pick it up in a day or two and then make an appointment with the exhaust shop... See ya soon.
Last edited by ToySnakePMC; 02-19-2014 at 06:12 AM.
02-22-2014, 08:42 PM
#175
V8 Miata Fanatic
Thread Starter
Another big day for the Roadster V8 project - or more so, a big day for me at least... Made the return trip to Durham in the rollback to retrieve the little car from C.A.M. They were THE best people for this job - I look forward to working more with them in the future - even if it's just the dyno run that I'll do after everything is broken in on this car. Pick it up and headed home:
Took a pic of the Mazda riding behind me at 75+ mph - this time on Ford Power... classic 460CI powered F350!
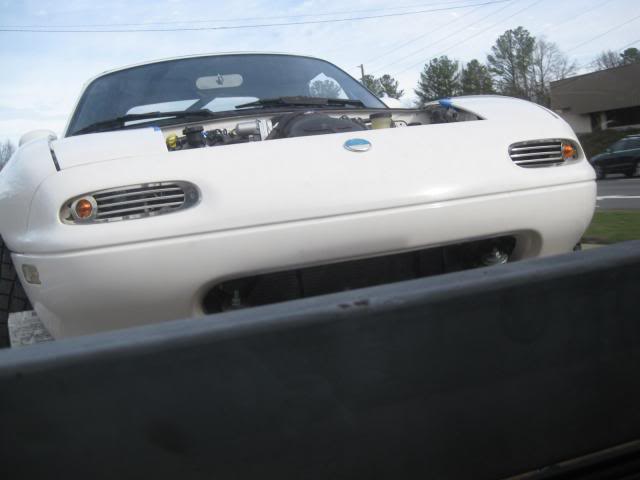
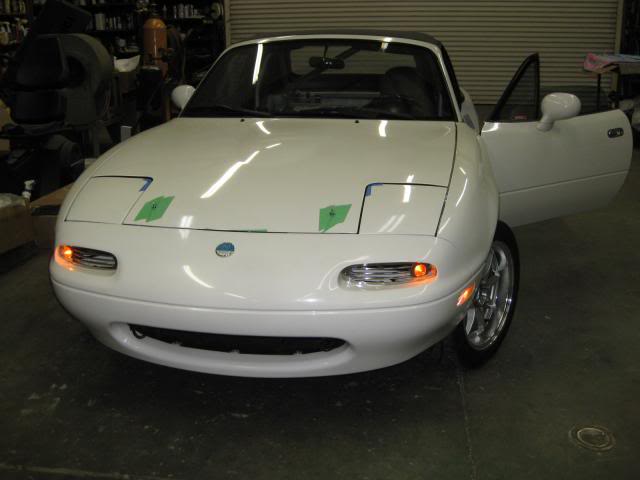
Got her home and took this car for a quick spin up and down the rural road in front of the shop. W-O-W !!!! What a trip! With open headers and a rev-happy 6.0L under the right foot, it was 90 seconds of FUN. It's just a surreal experience to have so much TORQUE at your disposal in a Mazda Miata. I've heard and read others say the same, but you just cannot imagine it until you experience that feeling. And I only experienced it for 1.5 minutes! ...I need to learn how to download my iPhone video of the car idling - not working for me right now.
So, now's the time to get the hood on and figure out what needs to be trimmed out to accommodate the GM air cleaner assembly. I put the hood on a table layered with beach towels and took several measurements of what I thought would work for the cut-out. Took my Sharpie and tape measure to come up with this outline of ink dots - which I then put down some masking tape to protect the paint from my Harbor Freight cut-off tool.
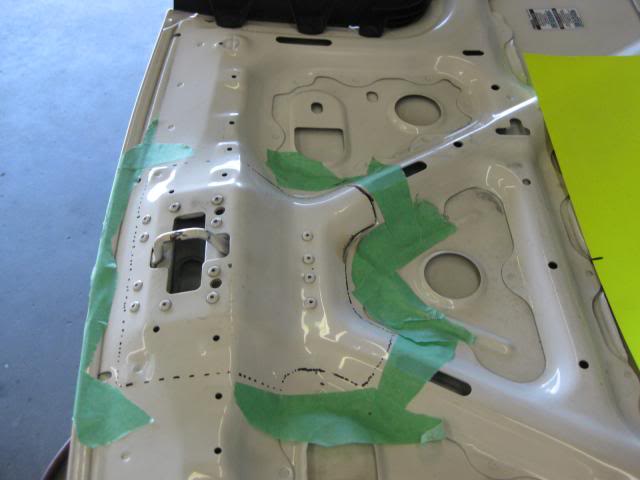
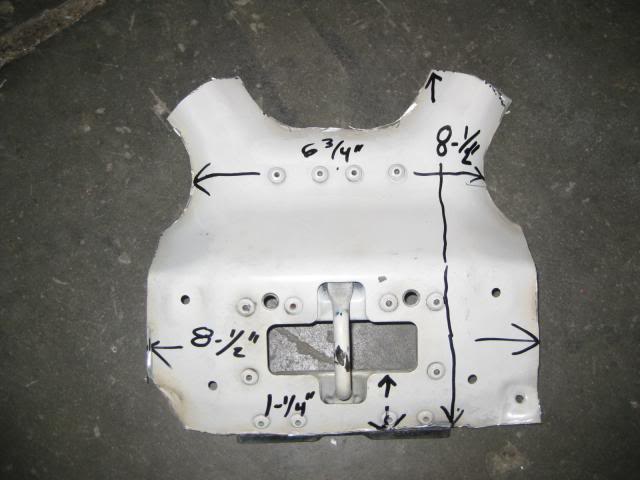
So, here for your viewing pleasure, I have put some dimensions on my cut-off piece so you can get a feel for what it takes to put a C6 Z06 intake in a NA Miata.
Here's the underside of the hood. I will clean up some rough edges (which is just about ALL of them), and perhaps some white touch-up paint for the bare areas. I might even paint that area, but that's not high on my list right now. If you look to the far right, you can see where I drilled out for the LH hood pin. I'm going with a Sparco set - just plain and simple for me. I could always replace them with those other latches that require more hood surgery, but for now, I like what I have in mind.
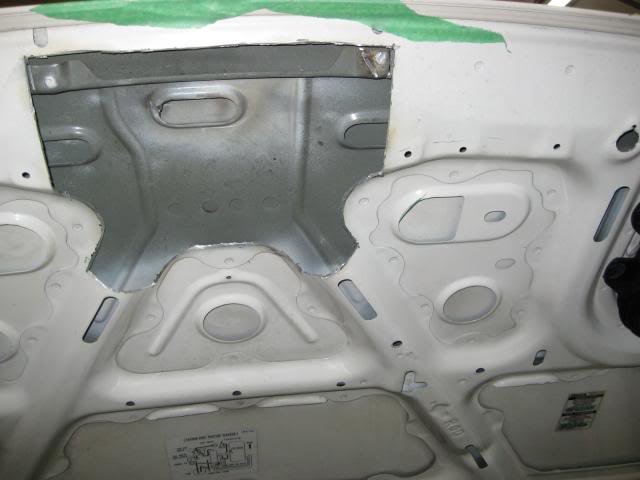
The next step involved masking tape and grease. I saw this on one of FM's build diaries and thought that's a good idea. Put the grease on the tape and closed the hood to see what was going to touch. Surprisingly, I only have one spot touching the hood and that's the rubber bellows that ever so slightly touch a round piece of hood understructure. I can either trim that understructure a bit or put a small strip of rubber edging on the offending sharp edge.
Installed the hood pins - set the height to what I thought would be close and used the provided 2 nuts and 2 washers per pin to "lock" them in place. By the way, the holes for the Mazda round, rubber hood bumpers are the exact size for these threaded pins!
Here's the early results: Looking sharp. Hood took some adjustment to get it back square, but the gaps are now pretty much acceptable to me.
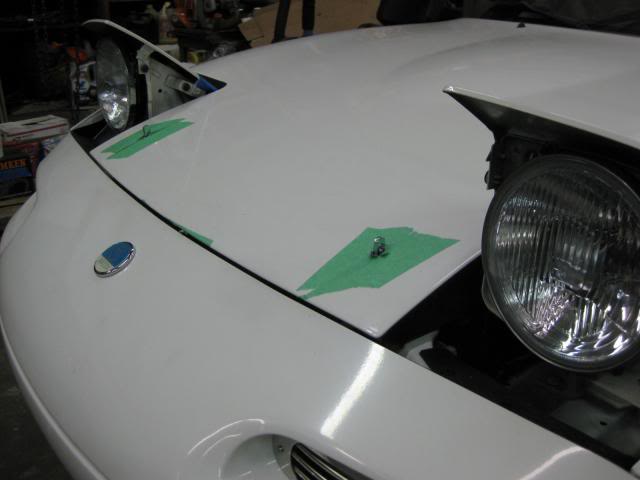
Headlights down, pins thru the hood, and pretty much looking complete. Tomorrow, I will work on installing the latches and tidying up a few small details.

I can't tell you how much I dreaded cutting up my original, unscratched hood for the past 14 months... But all in all, it went pretty easy cutting out the underside and drilling the pin holes. Small projects are getting fewer and fewer now! Still needs exhaust and alignment.
Took a pic of the Mazda riding behind me at 75+ mph - this time on Ford Power... classic 460CI powered F350!
Got her home and took this car for a quick spin up and down the rural road in front of the shop. W-O-W !!!! What a trip! With open headers and a rev-happy 6.0L under the right foot, it was 90 seconds of FUN. It's just a surreal experience to have so much TORQUE at your disposal in a Mazda Miata. I've heard and read others say the same, but you just cannot imagine it until you experience that feeling. And I only experienced it for 1.5 minutes! ...I need to learn how to download my iPhone video of the car idling - not working for me right now.
So, now's the time to get the hood on and figure out what needs to be trimmed out to accommodate the GM air cleaner assembly. I put the hood on a table layered with beach towels and took several measurements of what I thought would work for the cut-out. Took my Sharpie and tape measure to come up with this outline of ink dots - which I then put down some masking tape to protect the paint from my Harbor Freight cut-off tool.
So, here for your viewing pleasure, I have put some dimensions on my cut-off piece so you can get a feel for what it takes to put a C6 Z06 intake in a NA Miata.
Here's the underside of the hood. I will clean up some rough edges (which is just about ALL of them), and perhaps some white touch-up paint for the bare areas. I might even paint that area, but that's not high on my list right now. If you look to the far right, you can see where I drilled out for the LH hood pin. I'm going with a Sparco set - just plain and simple for me. I could always replace them with those other latches that require more hood surgery, but for now, I like what I have in mind.
The next step involved masking tape and grease. I saw this on one of FM's build diaries and thought that's a good idea. Put the grease on the tape and closed the hood to see what was going to touch. Surprisingly, I only have one spot touching the hood and that's the rubber bellows that ever so slightly touch a round piece of hood understructure. I can either trim that understructure a bit or put a small strip of rubber edging on the offending sharp edge.
Installed the hood pins - set the height to what I thought would be close and used the provided 2 nuts and 2 washers per pin to "lock" them in place. By the way, the holes for the Mazda round, rubber hood bumpers are the exact size for these threaded pins!
Here's the early results: Looking sharp. Hood took some adjustment to get it back square, but the gaps are now pretty much acceptable to me.
Headlights down, pins thru the hood, and pretty much looking complete. Tomorrow, I will work on installing the latches and tidying up a few small details.
I can't tell you how much I dreaded cutting up my original, unscratched hood for the past 14 months... But all in all, it went pretty easy cutting out the underside and drilling the pin holes. Small projects are getting fewer and fewer now! Still needs exhaust and alignment.


