
The Yellow Submarine goes Nuclear


Thread Starter
V8 Miata Participant
Joined: Nov 2010
Posts: 286
Likes: 3
From: Grand Rapids, MI
21st December 2010 17:33
________________________________________
Some photos of the progress. Calling it quits for the day, put in about 8 hours or so. From driving to gutted, I figure I am at around 40-50 actual work time.
Before the harness came out:


________________________________________
Some photos of the progress. Calling it quits for the day, put in about 8 hours or so. From driving to gutted, I figure I am at around 40-50 actual work time.
Before the harness came out:


Thread Starter
V8 Miata Participant
Joined: Nov 2010
Posts: 286
Likes: 3
From: Grand Rapids, MI
21st December 2010 17:41
________________________________________
The wiring harness laid out:

Some Closeups...
Driver's side:

Closeup of driver side , near firewall:

Passenger side :

Closeup of passenger side, near firewall:

________________________________________
The wiring harness laid out:
Some Closeups...
Driver's side:
Closeup of driver side , near firewall:
Passenger side :
Closeup of passenger side, near firewall:


Thread Starter
V8 Miata Participant
Joined: Nov 2010
Posts: 286
Likes: 3
From: Grand Rapids, MI
21st December 2010 23:52
________________________________________
Research Update:
Wire Tuck - I want a clean engine bay, so been doing a bunch of research on wire tucked LSx motors.. not finding much, sadly. The LT1 was a nicely tuckable motor, the LS series with coils on top, not so much. If anyone has examples of a clean LSx motor with wiring tucked, please share.
I did stumble across this thread: Full-detailed tuck/delete write-ups for NA's! - ClubRoadster.net which looks to be quite handy, so I'll be at least attempting to tuck all the stock Miata wires when it gets reinstalled. Not sure how much I can do but I'm optimistic. I should be able to hide all the stock Miata wiring in the fenders, I think.
Thread Starter
V8 Miata Participant
Joined: Nov 2010
Posts: 286
Likes: 3
From: Grand Rapids, MI
28th December 2010 11:13
________________________________________
Build Update:
Parts Ordered - Broke down and orderd some POR-15 for the engine, some red caliper paint and some high temp paint for the headers/exhaust. I swore last time to never do it again... but I hate an ugly motor so expect much bitching on this in the future..
Parts Delivery - More parts arrived! Oil pan and related, frame rales and related, clutch hydraulic kit, and the Body Control Module.
V8Roadsters remote oil filter pan:


The baffle system is fairly slick, and yet dirt simple. 4 hingles with retainer 'springs' over the holes that flop open based on g-forces and oil slosh.
Baffles shut:

Baffles open:

________________________________________
Build Update:
Parts Ordered - Broke down and orderd some POR-15 for the engine, some red caliper paint and some high temp paint for the headers/exhaust. I swore last time to never do it again... but I hate an ugly motor so expect much bitching on this in the future..
Parts Delivery - More parts arrived! Oil pan and related, frame rales and related, clutch hydraulic kit, and the Body Control Module.
V8Roadsters remote oil filter pan:
The baffle system is fairly slick, and yet dirt simple. 4 hingles with retainer 'springs' over the holes that flop open based on g-forces and oil slosh.
Baffles shut:
Baffles open:


Thread Starter
V8 Miata Participant
Joined: Nov 2010
Posts: 286
Likes: 3
From: Grand Rapids, MI
28th December 2010 15:21
________________________________________
Build Update:
Frog Arms - Didn't have a pciture of these yet.. so here they are.

Did a mockup of them, after we pulled the fenders:


________________________________________
Build Update:
Frog Arms - Didn't have a pciture of these yet.. so here they are.
Did a mockup of them, after we pulled the fenders:
Thread Starter
V8 Miata Participant
Joined: Nov 2010
Posts: 286
Likes: 3
From: Grand Rapids, MI
28th December 2010 15:24
________________________________________
Wire Tuck - Sorted out the idea on the body wire tuck..
Driver's side reference photos:


Passenger's side reference photos:


Basically going to come out into the fender and route behind the frog arm. hard to explain, but it'll make sense later when I show the routing. Figured might as well get the before photos up while I am thinking about it.
________________________________________
Wire Tuck - Sorted out the idea on the body wire tuck..
Driver's side reference photos:
Passenger's side reference photos:
Basically going to come out into the fender and route behind the frog arm. hard to explain, but it'll make sense later when I show the routing. Figured might as well get the before photos up while I am thinking about it.
Thread Starter
V8 Miata Participant
Joined: Nov 2010
Posts: 286
Likes: 3
From: Grand Rapids, MI
28th December 2010 15:32
________________________________________
Removed the pedals and firewall/floor heat shielding.

Lastly, closeup of the damage (very minor) with the fender out of the way. purely cosmetic, the mounts are fine:


Calling it for the day, need some rest (still fighting a cold) but 5 hours is better than none. Hope to finalize cam selection later today (going off the shelf, I'm not that bloody picky to make that much difference since it is a toy street car not a competition car).. Was thinking VRX5, that may be a tad lumpy for a DD so may go VRX4 or similar (basically staying ~230 max duration). Still not sure. Bottom line, I think it is going to be fine regardless as long as I get it programmed for it. I would call my LT1 RX7 quite lumpy (IMNSHO) with a 230/236 576/570 CC467, and it is perfectly acceptable to me as a DD so I don't think I can go wrong with the 4 or 5.
Oh, and Merry Christmas to everyone.. hope Santa found you good enough to bring you lots of shiny parts.
________________________________________
Removed the pedals and firewall/floor heat shielding.
Lastly, closeup of the damage (very minor) with the fender out of the way. purely cosmetic, the mounts are fine:
Calling it for the day, need some rest (still fighting a cold) but 5 hours is better than none. Hope to finalize cam selection later today (going off the shelf, I'm not that bloody picky to make that much difference since it is a toy street car not a competition car).. Was thinking VRX5, that may be a tad lumpy for a DD so may go VRX4 or similar (basically staying ~230 max duration). Still not sure. Bottom line, I think it is going to be fine regardless as long as I get it programmed for it. I would call my LT1 RX7 quite lumpy (IMNSHO) with a 230/236 576/570 CC467, and it is perfectly acceptable to me as a DD so I don't think I can go wrong with the 4 or 5.
Oh, and Merry Christmas to everyone.. hope Santa found you good enough to bring you lots of shiny parts.
Thread Starter
V8 Miata Participant
Joined: Nov 2010
Posts: 286
Likes: 3
From: Grand Rapids, MI
30th December 2010 00:34
________________________________________
It wasn't too bad, the driver I cut about 2" above the RB then worked it out of there. Passenger took more farting around, worst part was sliding it out.
Sadly, I think they are going to have to come off fully, the frog arms are going to prevent sliding the fenders back in.. but they were cracking along the joint anyhow, so might as well just do it right. I was hoping to skip that but I can't do it, it would look like crap.
Progress is going to slow, I f-d up and am out of sequence. I need the motor swapped to GMPP and V8R trim in order to get it in the car for clearancing, but I need parts painted before I do final assembly (and I just bought paint yesterday - went POR-15, arrives on 1/3), and I need the cam swap parts in the motor before painted parts can even be installed.. and the cam isn't bought or even picked out yet. Sooooo, I am frantically trying to decide on a cam.
VRX4 or VRX5 are the current favs.. depending on who you believe and what you read, the 5 is too large for a stock LS2 or is it the cat's meow.. not sure what to believe. I've talked to 2 different cam vendors, and both told me the same thing, I want two different goals. Both conversations happened in email, and I think the goal is being lost in translation. So, I was going to call Vengeance and talk to those guys but I am thinking they are off this week (went to voicemail). Will call back down there tomorrow and see if they can help me out.
Fast Motorsports (recommended by a pal) suggested this:
22x 23x ~600 ~600 114
(final specs after payment for cam selection fee so no clue what it really is)
Cam motion suggested this:
226 233 588 578 112
VRX4
228 230 588 592 112
VRX5
236 238 601 605 113
The Cam Motion has the lowest lift, which makes me lean towards the 4 or 5... still unsure. Spent 5 hours today surfing youtube and here for opinions and dyno results, no more decided than yesterday.
________________________________________
Quote:
________________________________________
Originally Posted by Ken Hill (Post 4927477)
Wow, and I thought I took that car apart! How did you remove the front fenders without removing the Racing Beat side skirts?
________________________________________
[/qoute]
[qoute]Quote:
________________________________________
Originally Posted by Lee Bohon (Post 4928073)
I was wondering the same thing. I would imagine there would have to be a little damage incurred (to the RB side skirts) to get the fenders out but would be repaired since the car is getting a repaint anyway. Looks like you did a pretty good job getting them out w/o too much damage.
Progress is moving along great, btw.
________________________________________
________________________________________
Originally Posted by Ken Hill (Post 4927477)
Wow, and I thought I took that car apart! How did you remove the front fenders without removing the Racing Beat side skirts?
________________________________________
[/qoute]
[qoute]Quote:
________________________________________
Originally Posted by Lee Bohon (Post 4928073)
I was wondering the same thing. I would imagine there would have to be a little damage incurred (to the RB side skirts) to get the fenders out but would be repaired since the car is getting a repaint anyway. Looks like you did a pretty good job getting them out w/o too much damage.
Progress is moving along great, btw.
________________________________________
Sadly, I think they are going to have to come off fully, the frog arms are going to prevent sliding the fenders back in.. but they were cracking along the joint anyhow, so might as well just do it right. I was hoping to skip that but I can't do it, it would look like crap.
Progress is going to slow, I f-d up and am out of sequence. I need the motor swapped to GMPP and V8R trim in order to get it in the car for clearancing, but I need parts painted before I do final assembly (and I just bought paint yesterday - went POR-15, arrives on 1/3), and I need the cam swap parts in the motor before painted parts can even be installed.. and the cam isn't bought or even picked out yet. Sooooo, I am frantically trying to decide on a cam.
VRX4 or VRX5 are the current favs.. depending on who you believe and what you read, the 5 is too large for a stock LS2 or is it the cat's meow.. not sure what to believe. I've talked to 2 different cam vendors, and both told me the same thing, I want two different goals. Both conversations happened in email, and I think the goal is being lost in translation. So, I was going to call Vengeance and talk to those guys but I am thinking they are off this week (went to voicemail). Will call back down there tomorrow and see if they can help me out.
Fast Motorsports (recommended by a pal) suggested this:
22x 23x ~600 ~600 114
(final specs after payment for cam selection fee so no clue what it really is)
Cam motion suggested this:
226 233 588 578 112
VRX4
228 230 588 592 112
VRX5
236 238 601 605 113
The Cam Motion has the lowest lift, which makes me lean towards the 4 or 5... still unsure. Spent 5 hours today surfing youtube and here for opinions and dyno results, no more decided than yesterday.
Thread Starter
V8 Miata Participant
Joined: Nov 2010
Posts: 286
Likes: 3
From: Grand Rapids, MI
30th December 2010 17:11
________________________________________
Oil Dipstick - Soooo... I'm missing something.
The LS2 GTO pan has the dipstick in it. The V8R pan has no provision for a dipstick. The GTO block seems to have no plug to pop out for a diptick.
What am I missing??? How am I to put a dipstick in once I swap pans?? Was looking at the Lokar ED-5008, but no place to put it makes it kind of hard to check oil!
Thread Starter
V8 Miata Participant
Joined: Nov 2010
Posts: 286
Likes: 3
From: Grand Rapids, MI
30th December 2010 17:44
________________________________________
Found this via LS1Tech:
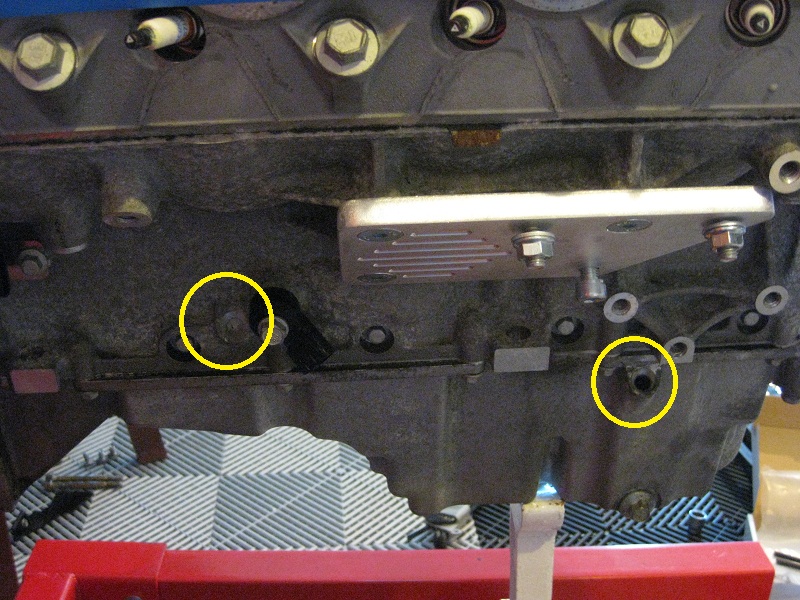
The left is the block hole, the right is the pan hole. My block certainly doesn't have a plug in the block, but there is a recess there. Guess it gets drilled out... weeee.
________________________________________
Found this via LS1Tech:
The left is the block hole, the right is the pan hole. My block certainly doesn't have a plug in the block, but there is a recess there. Guess it gets drilled out... weeee.
Thread Starter
V8 Miata Participant
Joined: Nov 2010
Posts: 286
Likes: 3
From: Grand Rapids, MI
30th December 2010 23:58
________________________________________
Build Update:
Parts Purchased - Ordered up some stuff today to try and turn the tide back to the proper order:
RockAuto - Wix 33737 Fuel Filter and oil pan gasket
PartsExpress - various sizes of Techflex from 1/8" to 1"
AutoPartsDealer - Professional Products 10612 Fuel Rail
Speedway Motors - remote oil filter mount, 14' of -8 silicone oil line, mounting tab for the clutch slave bleeder line
Michigan Fluid Power - remote oil filter fittings for oil pan and mount (45* -8 thread to -8 flare, 45* -8 flare to 8 pushon hose barb, 1/2" NPT thread to 1/2" hose barb)
Fleabay - Lokar ED-5008 oil dipstick
A lot of that stuff falls into the dreaded "$50 to death" category that you never seem to account for or consider. Fuel filter was $33, oil pan gasket was $33, Techflex was almost $100, remote oil filter mount is $25, hose is $42, mounting tab was $10, oil filter fittings was $47, dipstick was $50. All told spent over $300 today on crap that never seems to register on the radar when you are putting together the initial cost guesstimate.
So, take note, newbies and "how much does a swap cost" folks: This is the stuff that kills your initial budget. You have to have a decent sized contingency in your plan or you will get really annoyed at all this stuff! I still see a bunch of it coming like fuel line fittings, misc. electrical crap (wires, tape, supplies), all the fluids, etc. so there is more still to go.
________________________________________
Build Update:
Parts Purchased - Ordered up some stuff today to try and turn the tide back to the proper order:
RockAuto - Wix 33737 Fuel Filter and oil pan gasket
PartsExpress - various sizes of Techflex from 1/8" to 1"
AutoPartsDealer - Professional Products 10612 Fuel Rail
Speedway Motors - remote oil filter mount, 14' of -8 silicone oil line, mounting tab for the clutch slave bleeder line
Michigan Fluid Power - remote oil filter fittings for oil pan and mount (45* -8 thread to -8 flare, 45* -8 flare to 8 pushon hose barb, 1/2" NPT thread to 1/2" hose barb)
Fleabay - Lokar ED-5008 oil dipstick
A lot of that stuff falls into the dreaded "$50 to death" category that you never seem to account for or consider. Fuel filter was $33, oil pan gasket was $33, Techflex was almost $100, remote oil filter mount is $25, hose is $42, mounting tab was $10, oil filter fittings was $47, dipstick was $50. All told spent over $300 today on crap that never seems to register on the radar when you are putting together the initial cost guesstimate.
So, take note, newbies and "how much does a swap cost" folks: This is the stuff that kills your initial budget.
You have to have a decent sized contingency in your plan or you will get really annoyed at all this stuff! I still see a bunch of it coming like fuel line fittings, misc. electrical crap (wires, tape, supplies), all the fluids, etc. so there is more still to go.
Thread Starter
V8 Miata Participant
Joined: Nov 2010
Posts: 286
Likes: 3
From: Grand Rapids, MI
1st January 2011 11:36
________________________________________
Build Update
Parts Purchase - replacement coil (used) coming. Finally got the refund for the busted/missing parts on the pullout.. $393 and the BCM. Returned the stock parts and found a used coil (single) cheap, so that is coming. Sooooo glad to be done with the junkyard, that was getting on my nerves. Over 2 months from date of purchase to get it resolved. Ugh. But that is done, so happy day!
Parts Arrival - Partsexpress is quick, dang! Got the Techflex next day. Bought 25' packs, various lengths. It is the FlexoPET stuff (Techflex - Flexo Pet), not the super high heat that Marky522 used. Cost is significantly lower, and FlexoPET is rated for 257* continuous, 482* melt and given I shouldn't have contact with anything that hot, I think it will be fine. If not, I guess it becomes heat shrink.
1 x 1/8"
2 x 1/4"
2 x 3/8"
1 x 1/2"
1 x 3/4"
1 x 1"
Techflex:

Took some shots of the remote oil filter parts, too. Tucks up nicely above bottom of pan:


________________________________________
Build Update
Parts Purchase - replacement coil (used) coming. Finally got the refund for the busted/missing parts on the pullout.. $393 and the BCM. Returned the stock parts and found a used coil (single) cheap, so that is coming. Sooooo glad to be done with the junkyard, that was getting on my nerves. Over 2 months from date of purchase to get it resolved. Ugh. But that is done, so happy day!
Parts Arrival - Partsexpress is quick, dang! Got the Techflex next day. Bought 25' packs, various lengths. It is the FlexoPET stuff (Techflex - Flexo Pet), not the super high heat that Marky522 used. Cost is significantly lower, and FlexoPET is rated for 257* continuous, 482* melt and given I shouldn't have contact with anything that hot, I think it will be fine. If not, I guess it becomes heat shrink.
1 x 1/8"
2 x 1/4"
2 x 3/8"
1 x 1/2"
1 x 3/4"
1 x 1"
Techflex:
Took some shots of the remote oil filter parts, too. Tucks up nicely above bottom of pan:
Thread Starter
V8 Miata Participant
Joined: Nov 2010
Posts: 286
Likes: 3
From: Grand Rapids, MI
1st January 2011 12:59
________________________________________
Build Update
Firewall/tunnel clearancing - Tool of the day: Harbor Freight 95343 Rotary Spot Weld Cutter.
Spot welds drilled out:

Braces removed:


Pulling those any other way would be insanity.. $5 well spent, just be sure to have it running full speed as you gently make contact with the metal. I used cutting oil too to prolong the life of the bit.
________________________________________
Build Update
Firewall/tunnel clearancing - Tool of the day: Harbor Freight 95343 Rotary Spot Weld Cutter.
Spot welds drilled out:
Braces removed:
Pulling those any other way would be insanity.. $5 well spent, just be sure to have it running full speed as you gently make contact with the metal. I used cutting oil too to prolong the life of the bit.
Thread Starter
V8 Miata Participant
Joined: Nov 2010
Posts: 286
Likes: 3
From: Grand Rapids, MI
1st January 2011 19:44
________________________________________
Build Progess:
Firewall Clearancing - First cuts of the engine bay humps done with combo of air cut-off, sawzall, and 4.5" electric grinder.
Driver:

Passenger:

________________________________________
Build Progess:
Firewall Clearancing - First cuts of the engine bay humps done with combo of air cut-off, sawzall, and 4.5" electric grinder.
Driver:
Passenger:
Thread Starter
V8 Miata Participant
Joined: Nov 2010
Posts: 286
Likes: 3
From: Grand Rapids, MI
1st January 2011 19:56
________________________________________
More build progress:
Cut the floor apart from the firewall, beat it into the cabin just to see how flexible it is. Passenger side is easy, driver will take some persuation:
Driver:

Driver inside:

Passenger:

In the engine bay, I took out the left over 'edges' from the pieces that were cut (note horizontal spot welds remaining along top of primer colored spots). FM leaves these, but I will seam weld the piece under it to clean that up a little. Hell, you probably can't even see those spots once the engine is in! I'll still know, so that's what matters, I guess.
Both sides (with more cleaned up cuts on the corners also).

Realized after I was cutting that I don't have the re-enforcement plates from FM. Missing those, the flywheel cover plate, and one other thing I can't remember at the moment. Was hoping to get the engine bay sorted out this weekend but without the plates I don't know how much to trim so I can't get it sized. So, turned my attention to the LS2 and pulled all the GTO accessories and front dress off, so that is done.
________________________________________
More build progress:
Cut the floor apart from the firewall, beat it into the cabin just to see how flexible it is. Passenger side is easy, driver will take some persuation:
Driver:
Driver inside:
Passenger:
In the engine bay, I took out the left over 'edges' from the pieces that were cut (note horizontal spot welds remaining along top of primer colored spots). FM leaves these, but I will seam weld the piece under it to clean that up a little. Hell, you probably can't even see those spots once the engine is in!
I'll still know, so that's what matters, I guess.Both sides (with more cleaned up cuts on the corners also).
Realized after I was cutting that I don't have the re-enforcement plates from FM.
Missing those, the flywheel cover plate, and one other thing I can't remember at the moment. Was hoping to get the engine bay sorted out this weekend but without the plates I don't know how much to trim so I can't get it sized. So, turned my attention to the LS2 and pulled all the GTO accessories and front dress off, so that is done.
Thread Starter
V8 Miata Participant
Joined: Nov 2010
Posts: 286
Likes: 3
From: Grand Rapids, MI
1st January 2011 21:36
________________________________________
Build Update:
LS2 disassembly - All front mount accessories, water pump, crank pulley, exhuast manifolds, tranny, clutch disc and pressure plate removed. Engine on a stand for oil pan removal and wiring work.


http://files.polarmoment.net/SUB/100_0178.jpg
The final pile of Miata removed parts that go back in the car (95% of it anyhow):

Moved it all up into the attic storage, tired of tripping over it.
Calling it for the night :thumbs:, feeling good about the progress! Not sure what tomorrow will bring, maybe cleaning of suspension parts and building the front cradle? Would like to continue work on the tranny tunnel and I need a built cradle/motor/tranny to get it in there for sizing. We shall see...
________________________________________
Build Update:
LS2 disassembly - All front mount accessories, water pump, crank pulley, exhuast manifolds, tranny, clutch disc and pressure plate removed. Engine on a stand for oil pan removal and wiring work.
http://files.polarmoment.net/SUB/100_0178.jpg
The final pile of Miata removed parts that go back in the car (95% of it anyhow):
Moved it all up into the attic storage, tired of tripping over it.
Calling it for the night :thumbs:, feeling good about the progress! Not sure what tomorrow will bring, maybe cleaning of suspension parts and building the front cradle? Would like to continue work on the tranny tunnel and I need a built cradle/motor/tranny to get it in there for sizing. We shall see...
Thread Starter
V8 Miata Participant
Joined: Nov 2010
Posts: 286
Likes: 3
From: Grand Rapids, MI
2nd January 2011 11:32
________________________________________
Thanks! I've been fortunate enough that many before me took notes and made the effort to share the knowledge, just want to do the same. If even one person benefits, it was worth the time spent.
Picking up the garage, sweeping and vacuuming for the next big push - stock suspension disassembly and cleaning. So much easier with a clean work space!
________________________________________
Quote:
________________________________________
Originally Posted by 5.0MX5 (Post 4932971)
Huge THUMBSUP. This will no doubt be a reference article for years.
________________________________________
________________________________________
Originally Posted by 5.0MX5 (Post 4932971)
Huge THUMBSUP. This will no doubt be a reference article for years.
________________________________________
Picking up the garage, sweeping and vacuuming for the next big push - stock suspension disassembly and cleaning. So much easier with a clean work space!
Thread Starter
V8 Miata Participant
Joined: Nov 2010
Posts: 286
Likes: 3
From: Grand Rapids, MI
2nd January 2011 15:40
________________________________________
Build Update:
Rear Subframe - Completely disassembled it. Proof that good antisieze works, the axles slid out of the hubs without need of a torch or BFG.


Cleaned the rear brake parts and the rear control arms, next up is the subframe itself.
Looks like I need to move some exhaust hanger(s) since I am using the take-off exhaust from FM's Elvis which is a NB. The mount on the rear subframe for the inlet side of the muffler appears to be too far to the passenger side. Here is the one I am referring to at the 12" mark, viewed from behind the car, driver side is on left. Going to have to cut it loose and move it over prior to painting the subframe.


________________________________________
Build Update:
Rear Subframe - Completely disassembled it. Proof that good antisieze works, the axles slid out of the hubs without need of a torch or BFG.
Cleaned the rear brake parts and the rear control arms, next up is the subframe itself.
Looks like I need to move some exhaust hanger(s) since I am using the take-off exhaust from FM's Elvis which is a NB. The mount on the rear subframe for the inlet side of the muffler appears to be too far to the passenger side. Here is the one I am referring to at the 12" mark, viewed from behind the car, driver side is on left. Going to have to cut it loose and move it over prior to painting the subframe.
Thread Starter
V8 Miata Participant
Joined: Nov 2010
Posts: 286
Likes: 3
From: Grand Rapids, MI
2nd January 2011 22:14
________________________________________
Build Update:
Rear Subframe - Well, was going to set the rear diffy up, but apparently I am missing the mounting hardware for it.. Soooo, can't do anything there till Shandelle @ V8R sends the stuff over. At least unboxed the Getrag and looked at it.


________________________________________
Build Update:
Rear Subframe - Well, was going to set the rear diffy up, but apparently I am missing the mounting hardware for it..
Soooo, can't do anything there till Shandelle @ V8R sends the stuff over. At least unboxed the Getrag and looked at it.
Thread Starter
V8 Miata Participant
Joined: Nov 2010
Posts: 286
Likes: 3
From: Grand Rapids, MI
2nd January 2011 22:18
________________________________________
Who says you can't have fun in the garage?

Front & Rear Suspension - Disassembled front suspension, cleaned all the parts up.

Cleaned, wire wheeled, primed and painted all 8 control arms.


Calling it for the night... 12 hours is plenty.
________________________________________
Who says you can't have fun in the garage?
Front & Rear Suspension - Disassembled front suspension, cleaned all the parts up.
Cleaned, wire wheeled, primed and painted all 8 control arms.
Calling it for the night... 12 hours is plenty.
Thread Starter
V8 Miata Participant
Joined: Nov 2010
Posts: 286
Likes: 3
From: Grand Rapids, MI
2nd January 2011 22:23
________________________________________
Good advice, thanks Mike. I've got a couple kicking around here somewhere..
________________________________________
Quote:
________________________________________
Originally Posted by Vettedrmr (Post 4933898)
One hint, use a digital inclinometer to set your pinion angle. V8R recommended just levelling the mount pads and then setting the angle.
HTH, and have a good one,
Mike
________________________________________
________________________________________
Originally Posted by Vettedrmr (Post 4933898)
One hint, use a digital inclinometer to set your pinion angle. V8R recommended just levelling the mount pads and then setting the angle.
HTH, and have a good one,
Mike
________________________________________
Thread Starter
V8 Miata Participant
Joined: Nov 2010
Posts: 286
Likes: 3
From: Grand Rapids, MI
3rd January 2011 22:05
________________________________________
Research Update:
Firewall gaskets - been searching high and low for something that is similar in style to the OEM type, with a (for lack of a better word) protruding 'foreskin' to cover the wires that can be taped around, as opposed to the flat 'circumsized' style that is basically a rubber donut. Found this at JEGS.. looks promising:
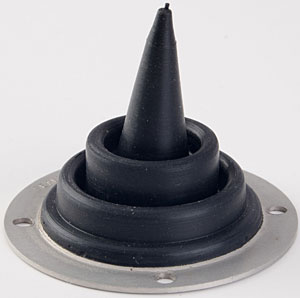
Item 60778, $15.99 each... 2" size and cut to fit.
Anyone else have leads of a similar part? The OEM Mazda one is apparently part of the wiring harness assembly from what I see in the part diagrams, so I am trying to find some new item that I can use.
________________________________________
Research Update:
Firewall gaskets - been searching high and low for something that is similar in style to the OEM type, with a (for lack of a better word) protruding 'foreskin' to cover the wires that can be taped around, as opposed to the flat 'circumsized' style that is basically a rubber donut. Found this at JEGS.. looks promising:
Item 60778, $15.99 each... 2" size and cut to fit.
Anyone else have leads of a similar part? The OEM Mazda one is apparently part of the wiring harness assembly from what I see in the part diagrams, so I am trying to find some new item that I can use.


