
V8R sloooww build - 94 Miata - North Carolina


V8 Miata Noob
Joined: Jun 2013
Posts: 8
Likes: 0
From: Scottsdale AZ
For SB5700 and ToySnakePMC, here are some pics I took of the gusset mods. The only "mistake" I made was to be over zealous on widening the driver side, but I caught it before welding when I dry fit the pedals. I had to pound it back an inch for proper pedal clearance (remembering the carpet thickness too). I also had to trim the frame reinforcements to fit snugly as my frame rails were not square with the firewall (in a rotational sense - they were tilted in toward the engine bay. The dimensions for the tunnel opening are in the FM instructions, btw.
I did have to trim and twist the gussets to maintain the original angle instead of being twisted upward like a gusset smiley! That was an interesting experience.
I don't know if these images will appear inline or as attachments ... still learning. I have more pics if you want/need. If they don't show up at all, let me know and I can send them to you.
Alvin

Thread Starter
V8 Miata Fanatic

Joined: Oct 2012
Posts: 550
Likes: 34
From: Fuquay Varina, NC
Thanks PT for posting the pics and your notes. Your outcome on the interior gussets looks great. At first, I was somewhat surprised in how you cut them off. But after seeing them welded back in place, it looks so sanitary. And, you had left yourself a thicker surface to weld to with flange parts of the gussetts left intact. Cool. Why don't you swing by NC and wrap mine up!? 

V8 Miata Noob
Joined: Apr 2013
Posts: 12
Likes: 0
If i didnt live several hours away I would love to help you get this thing together.... but when you are close to your first start I would imagine a few of us would love to stop by. My wife has been begging for an out of state (florida) vacation and havent convinced myself to go somewhere for no reason. I would love to stop by when you are ready...
V8 Miata Noob
Joined: Jun 2013
Posts: 8
Likes: 0
From: Scottsdale AZ
I'd love to take credit for that, but that would be a lie! I followed the FM instructions and that was the way they did it. I notice now that they drill out the spot welds and take the whole thing off, but having that extra metal does have the added benefit of a good welding base. If you just slap them back on, they are tilted up because of the widened tunnel and that just didn't look good. Incidentally, mine is an NB. I think your tunnel is a little different.
Hmm ... NC ... how long can you wait? :-) My wife was born in Greenville SC, but no family there anymore. My daughter worked at the BMW plant for a while (Spartanberg), but has moved on as well.
When I was doing this it was a great learning experience. Btw, I did most of the cutting (everywhere) with a Dremel tool. I, too, would have liked to have a plasma cutter, but alas the money was not there. Some of the cutting was with a craftsman handyman multitool (in the corners mostly). That broke - the Dremel kept on going. Lots of little cutting disks consumed!
Thread Starter
V8 Miata Fanatic
Joined: Oct 2012
Posts: 550
Likes: 34
From: Fuquay Varina, NC
Brandog & PT.., you'd be welcome to visit anytime! The wiring is going to be a pain, but I'll look at some options here soon so I can decide what path to take.
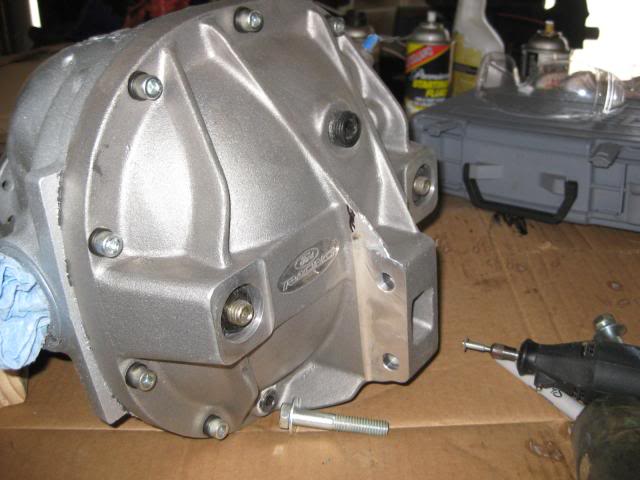
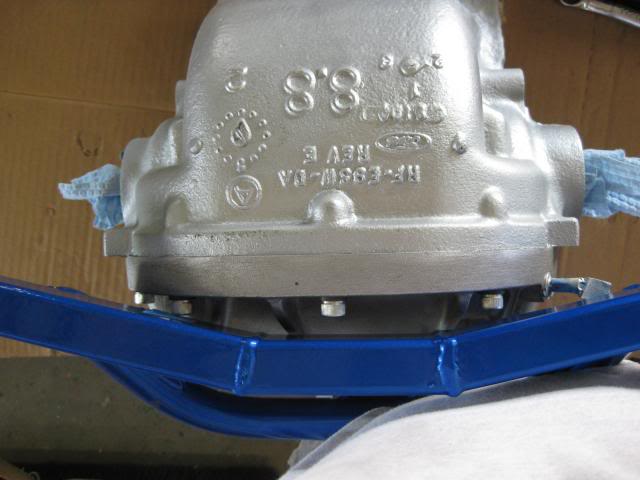
Had just a few hours this week to spend in the shop so I cleaned and detailed the rear diff. Wire wheel'd, wire brushed, chiseled some rust spots (was this thing from northern MI?? - no offense, just not used to seeing rust!), and primed and painted a hi-temp silver. Left the rear cover in its raw aluminum...
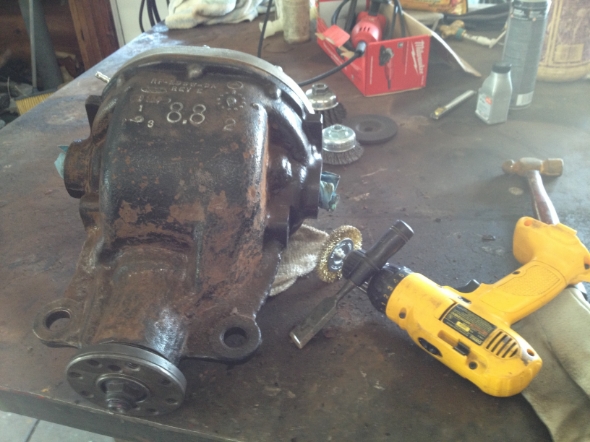
One friend commented that the diff looks like it came out of a rock crawler! It is huge & can't wait to get it tucked under the MX5...

Put one of my duplicate FM catalogs to use and help mask off the rear cover:
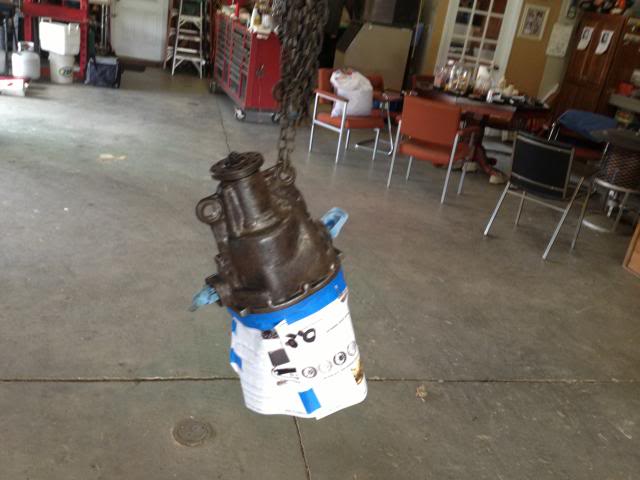
Done! I think the silver paint gives it at least a 10# weight reduction...
Had just a few hours this week to spend in the shop so I cleaned and detailed the rear diff. Wire wheel'd, wire brushed, chiseled some rust spots (was this thing from northern MI?? - no offense, just not used to seeing rust!), and primed and painted a hi-temp silver. Left the rear cover in its raw aluminum...
One friend commented that the diff looks like it came out of a rock crawler! It is huge & can't wait to get it tucked under the MX5...
Put one of my duplicate FM catalogs to use and help mask off the rear cover:
Done! I think the silver paint gives it at least a 10# weight reduction...
Last edited by ToySnakePMC; Jun 18, 2013 at 05:52 PM.
Thread Starter
V8 Miata Fanatic
Joined: Oct 2012
Posts: 550
Likes: 34
From: Fuquay Varina, NC
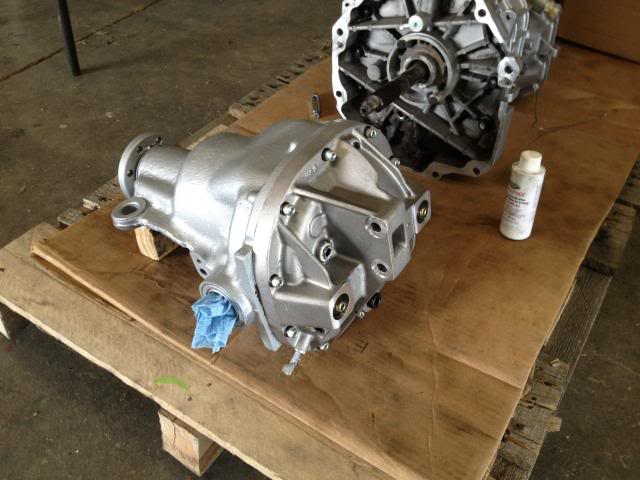
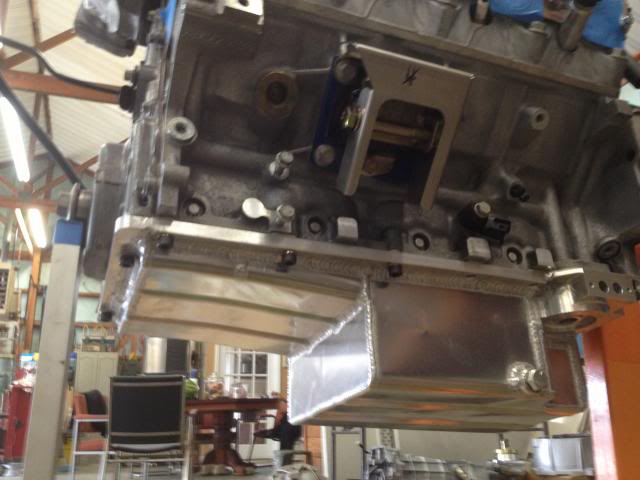
In other big news to me... I received some long-awaited FedEx boxes from V8Roadsters. What is supposed to be the newly-updated alum oil pan arrived in all its glory and splendor. It is expensive - no doubt - but it is such a work of art. The milled flange looks beefy and should be a perfect fit. Also received the V8R power steering delete pulley bracket and their A/C block for hose installation on the CTS-V compressor. (Didn't take pics but can if so desired...)
A few pan pics!!
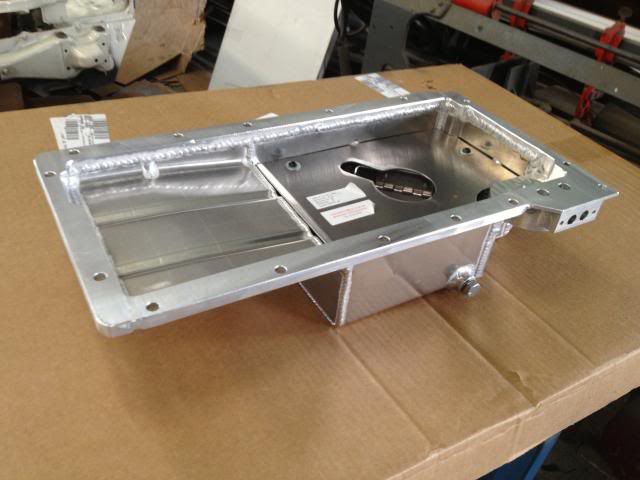
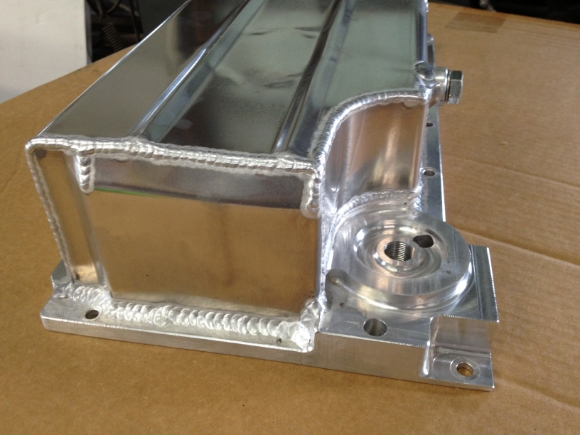
Well, this is the final main piece to my puzzle that I've been missing for months. Next steps will include installing pan with its new pick-up tube, and dropping the LS2 on the tubular K member with bellhousing temp bolted on. I can then test fit the firewall/ tranny clearances. Then temporarily bolt on front accy's and front sway bar to mark how far the radiator and a/c condenser needs to be slid forward. Let the build-up begin! Well, whenever I get the next free day to play, that is.
A few pan pics!!
Well, this is the final main piece to my puzzle that I've been missing for months. Next steps will include installing pan with its new pick-up tube, and dropping the LS2 on the tubular K member with bellhousing temp bolted on. I can then test fit the firewall/ tranny clearances. Then temporarily bolt on front accy's and front sway bar to mark how far the radiator and a/c condenser needs to be slid forward. Let the build-up begin! Well, whenever I get the next free day to play, that is.
Thread Starter
V8 Miata Fanatic
Joined: Oct 2012
Posts: 550
Likes: 34
From: Fuquay Varina, NC
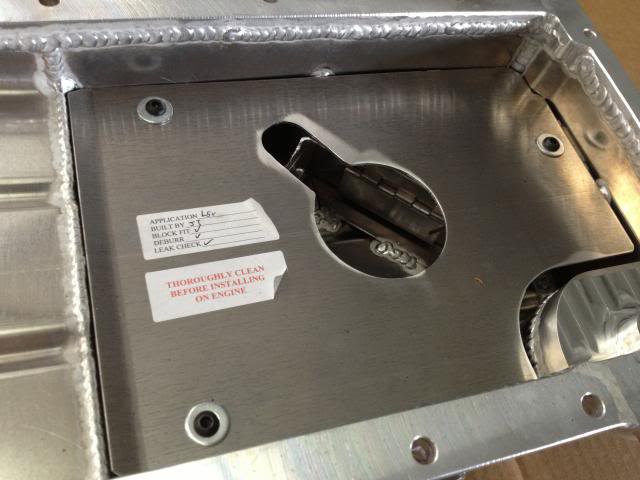
Past Sunday afternoon yielded a few hours of shop duty, thankfully..! Plan was to pull GTO cast alum pan and install V8R pan so the tubular V8R K member can be fitted to the engine. ...All baby steps to get this powerplant in for its first test-fit in the chassis...
Pulled pan, windage tray, and GTO pickup tube.
Cut up windage tray by following FM's instructions and what I saw on GoKart's build thread on m.net.
Cleaned up windage tray and V8R pick up tube are installed. Special attn was paid on removing the clear tape that was covering the intake screen!
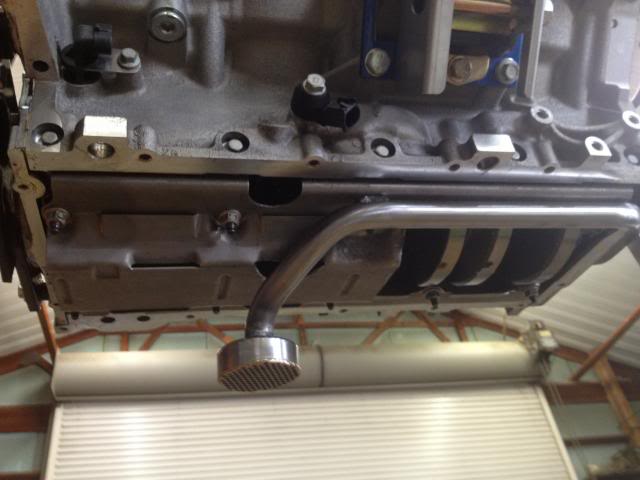
Pan is on with standard GM oil pan gasket - what a nice gasket - really like how GM does this! Prior to this, I quadrupple checked clearance b/tn pan and pick up tube to better protect the investment. I used a dab of white lithium grease inside pan - about 3/8" tall to see if the pick up tube interfered Did a test fit, adjusted, and am happy with approx 1/2" clearance from bottom of pan.
Beauty shot!!
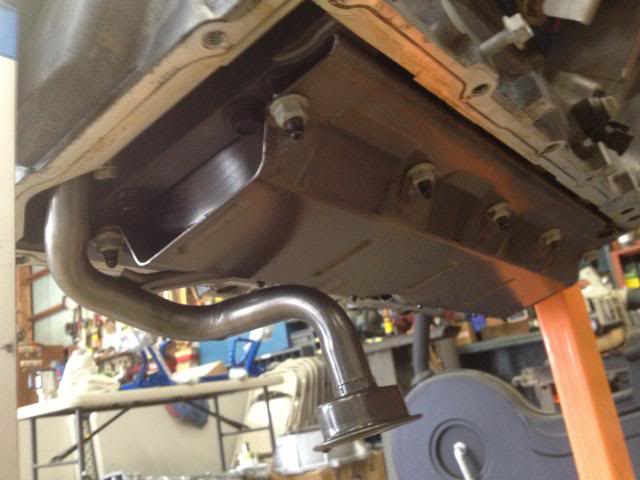
Looks like enough time left over to install new GM CTS-V harmonic balancer and ARP bolt. I used an eBay $12 tool that was all-thread rod with nuts and washers to better prevent stripping a few threads inside the crank! Impact gun didn't slow us down either as we torqued the bolt in place...

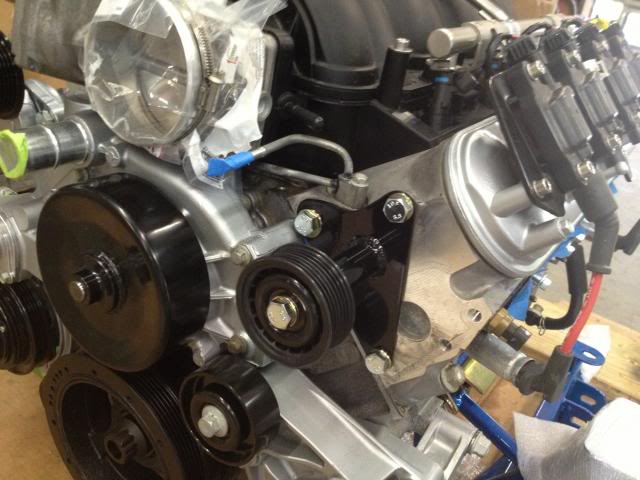
Still on a roll this past Sunday afternoon so I decided to temporarily install front engine accy's while the LS2 sat on the ground close to the project car. Need the engine dressed up so proper radiator clearance can be soon determined.
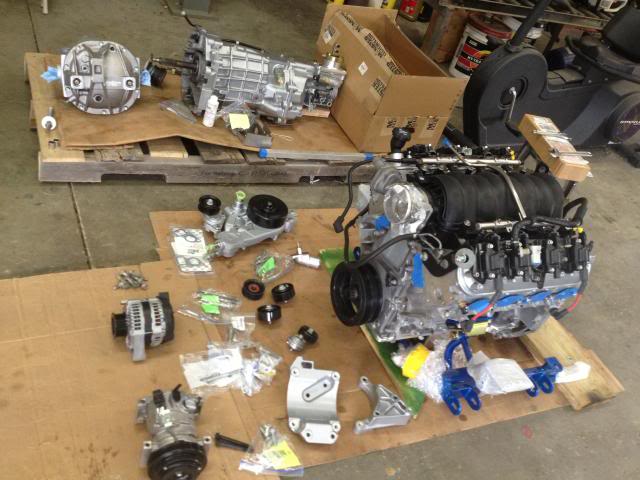
The CTS-V accessories do make this a pretty compact build...
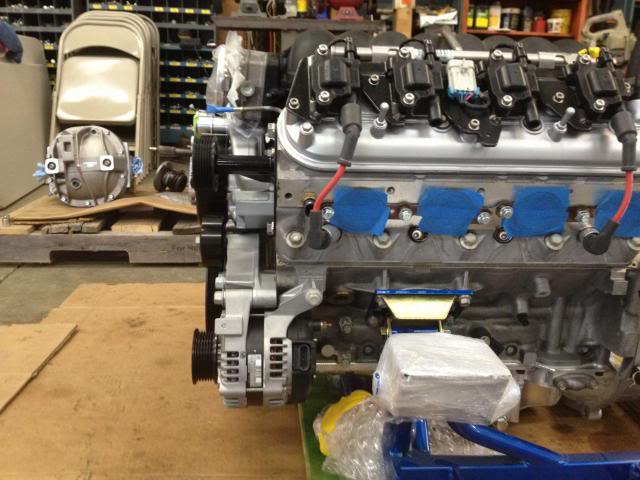
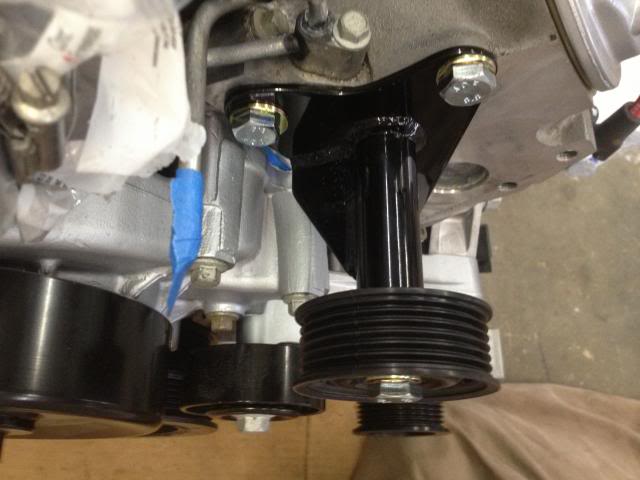
Picked up the P/S delete pulley bracket from V8Roadsters. I like this -- clean but effective! The pulley bracket requires a GM style pulley too.
She's about ready for "take off"!!! More work to follow this coming wknd.
Pulled pan, windage tray, and GTO pickup tube.
Cut up windage tray by following FM's instructions and what I saw on GoKart's build thread on m.net.
Cleaned up windage tray and V8R pick up tube are installed. Special attn was paid on removing the clear tape that was covering the intake screen!
Pan is on with standard GM oil pan gasket - what a nice gasket - really like how GM does this! Prior to this, I quadrupple checked clearance b/tn pan and pick up tube to better protect the investment. I used a dab of white lithium grease inside pan - about 3/8" tall to see if the pick up tube interfered Did a test fit, adjusted, and am happy with approx 1/2" clearance from bottom of pan.
Beauty shot!!
Looks like enough time left over to install new GM CTS-V harmonic balancer and ARP bolt. I used an eBay $12 tool that was all-thread rod with nuts and washers to better prevent stripping a few threads inside the crank! Impact gun didn't slow us down either as we torqued the bolt in place...
Still on a roll this past Sunday afternoon so I decided to temporarily install front engine accy's while the LS2 sat on the ground close to the project car. Need the engine dressed up so proper radiator clearance can be soon determined.
The CTS-V accessories do make this a pretty compact build...
Picked up the P/S delete pulley bracket from V8Roadsters. I like this -- clean but effective! The pulley bracket requires a GM style pulley too.
She's about ready for "take off"!!! More work to follow this coming wknd.
Last edited by ToySnakePMC; Jun 25, 2013 at 10:44 PM.

V8 Miata Noob
Joined: Feb 2013
Posts: 4
Likes: 0
What can you say about this build other than it is over the top. So well designed. The oil pan is great and looks like it was well worth the delay. Cannot wait until this beast fires up. I don't think you could have assembled all these parts in your wildest dreams. Everything is top notch. I can remember back in 1990 talking to you about Miatas and how it was a perfect car, maybe a little down on HP but that was not what the car was about. HA HA looking back. I guess you are fixing that design flaw x's 3!!!!
Thread Starter
V8 Miata Fanatic
Joined: Oct 2012
Posts: 550
Likes: 34
From: Fuquay Varina, NC
I admire your earlier optimism!! But, I will say that this past wknd was the first time that I didn't feel like I was "tearing the car apart" but actually making a small step forward.
HFC3... - Nothing like having "big brother's support. Thanks! I hope it will someday keep the back roads hot between Raleigh & Richmond!
HFC3... - Nothing like having "big brother's support.
Thanks! I hope it will someday keep the back roads hot between Raleigh & Richmond!

V8 Miata Fan
Joined: Apr 2013
Posts: 31
Likes: 0
From: I hear Banjos - GA
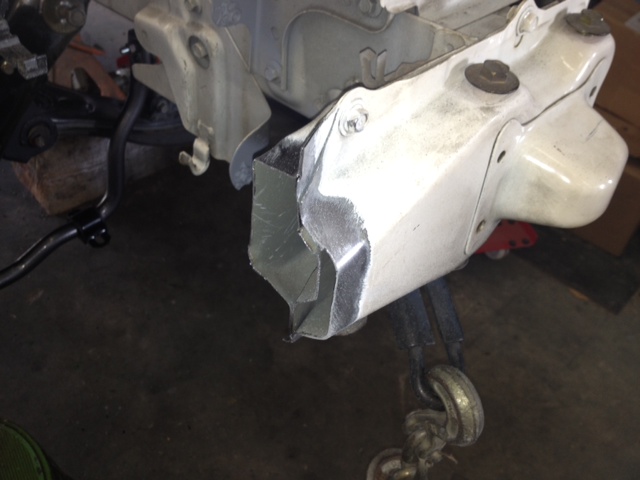
Looking good! Put those motor mount heat shields on before you go much further. Its nearly impossible to get the passenger one on after its in the car.
I did not have these with my supplies, ordered them (backordered) and have since installed the engine in the car. I had to "manipulate" the passenger side one to get it in.
I did not have these with my supplies, ordered them (backordered) and have since installed the engine in the car. I had to "manipulate" the passenger side one to get it in.
Thread Starter
V8 Miata Fanatic
Joined: Oct 2012
Posts: 550
Likes: 34
From: Fuquay Varina, NC
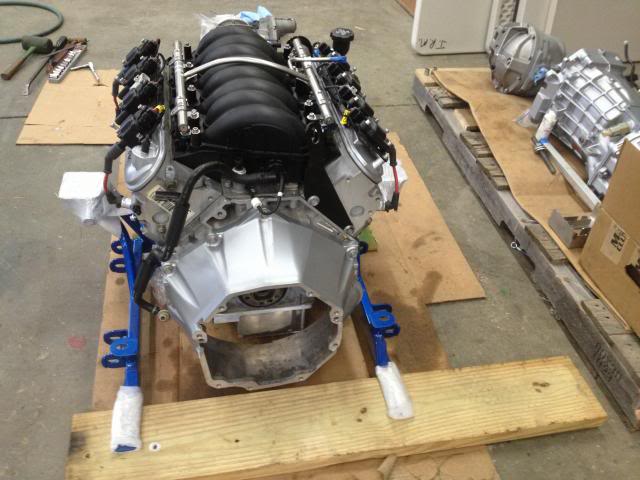
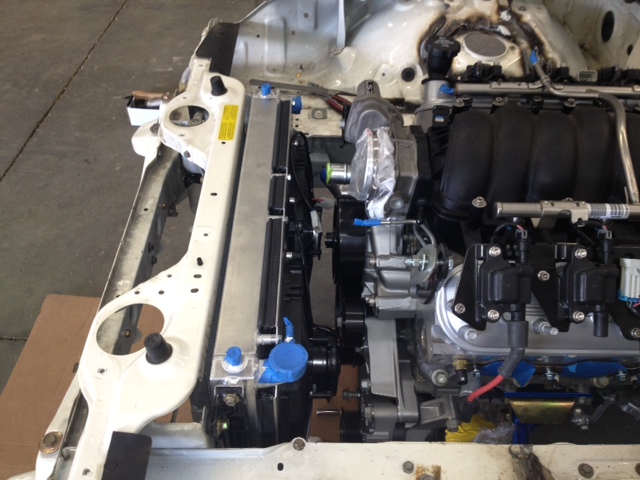
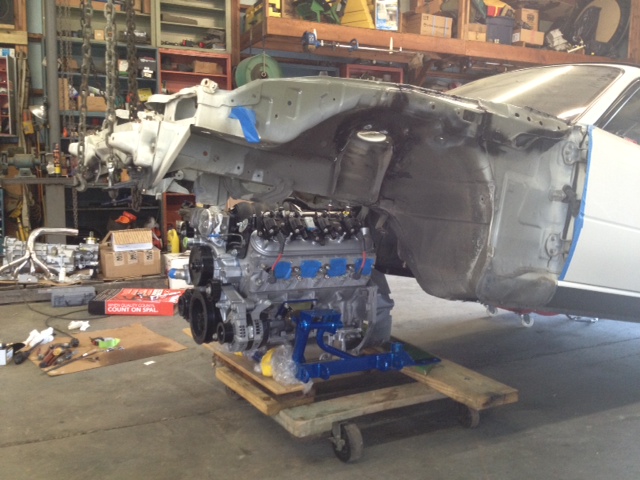
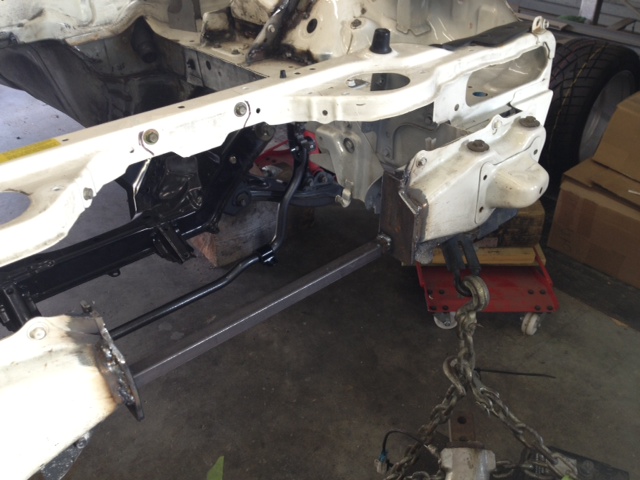
Today was sort of a big milestone for a V8 Miata buid, I would think. Today was the first time the mighty LSx was dropped in for it's first brief visit in the new home. Without headers, steering components, wiring, and plumbing anywhere near the engine compartment, It looked like I had room for a 454 Big Block!!
Today was all about rolling the LS2 and bellhousing under the car and looking for clearance issues - front and rear - starting with the firewall and then going to the front looking for the same with the radiator and fans.
Open Up... WIDER!

Rolling the motor around on what must be a 90 yr-old antique furniture dolly, It was so easy to position it under the car suspended by the chain hoist from its re-attached baby teeth tow hooks.
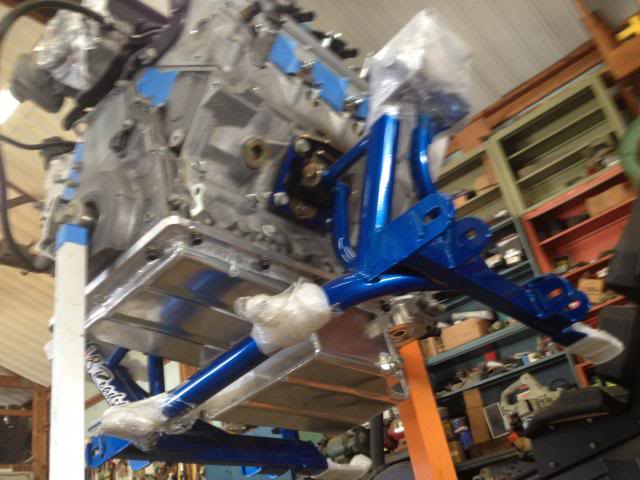
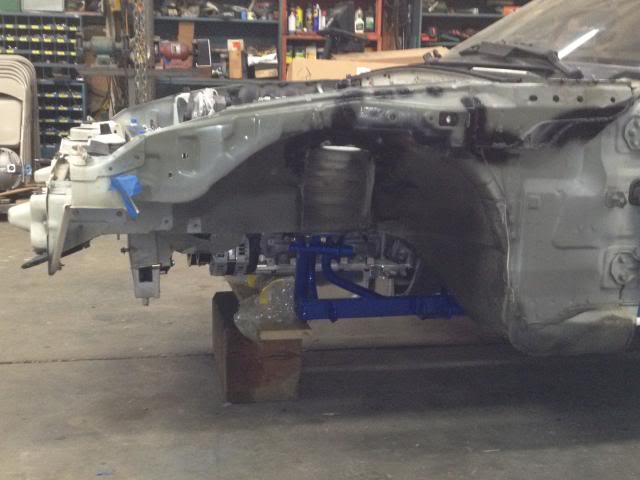
V8Roadsters' tubular K member was easy to align as the Miata was lowered down. V8R pleasantly surprised me on the 100% hole alignment for the factory 8 bolts - no prying or, even worse, having to elongate any holes for this critical component to be attached to the car.
Checking completely around the rear of the motor and bellhousing, I only have one interference with the firewall and that is on the RH side at the bellhousing. It's just barely touching the corner of my widened tunnel - maybe a 1/4" size spot. I marked it with Sharpie and will proceed to knock and tap that corner up and in. The LH side is fine and i have 1/2", maybe, of space between firewall and the very close RH head.
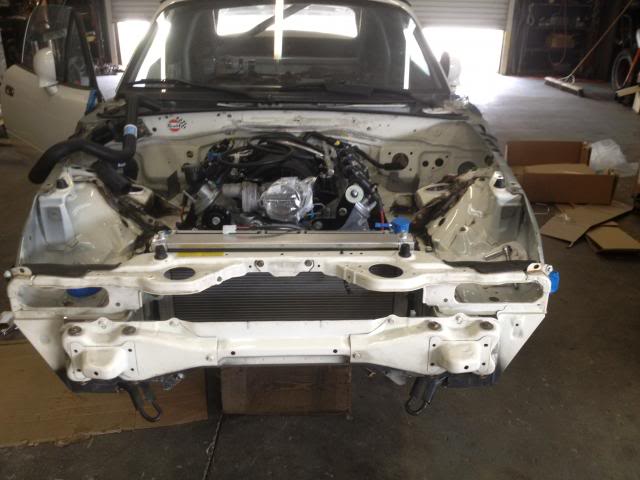
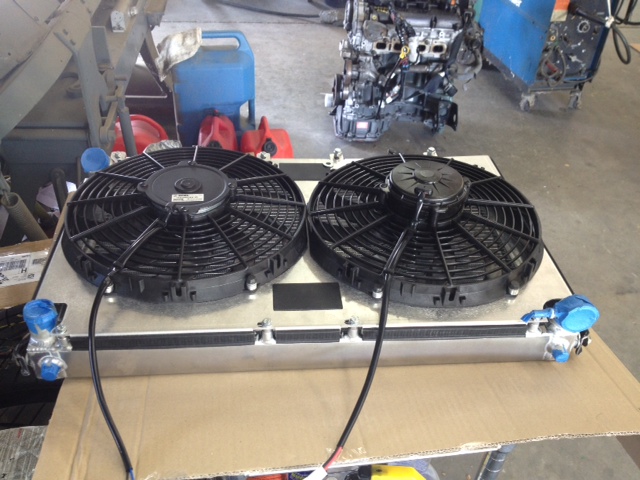
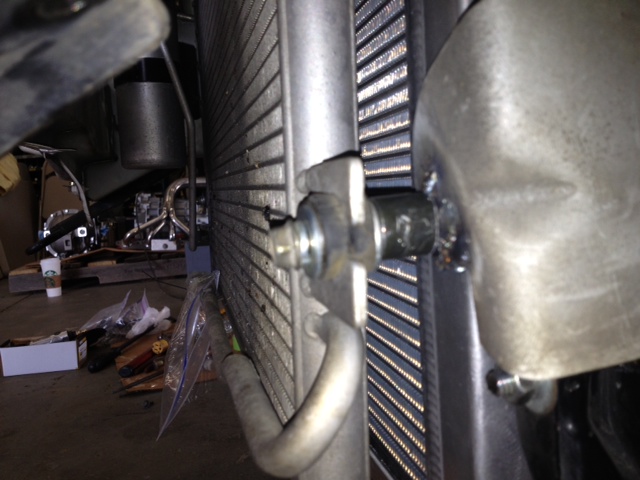
Next step was to do a quick assembly on the FM radiator, and Stage 2 fan kit so it can be dropped in and eyeballed. Remember my praises for the V8R parts? ...Well, I'm not feeling it with my radiator and fan kit. While the parts are mostly self-explanitory, I can really use some instructions/advice on utilizing the hardware kit. I stumbled through it, but I have welded, uneven, alum bolt bosses on the radiator that, IMHO, makes the shroud sit uneven, I don't have enough small bolts to secure the fans - looks like 6 in lieu of 8, and the wiring instructions, I assume, is in the FM V8 installation guide. And, the supplied radiator hoses appear useless when it comes to the radiator outlets and my waterpump outlets. Oh well, I will give FM a call to help me sort through this.
Radiator in for test fit. It's up too high (about 3/4" or so) and does lean back on the bottom towards the engine pullies. My dad saw the easy remedy first -- we'll modify the Mazda rad brackets and lower pins for the J hook to fix the above. That will prevent hacking on the core support and brackets on the A/C condenser. I have to get the radiator down to fit under the Z06/ LS7 intake - so in the near future, there will be some cutting and hacking to do! Who am I kidding..?
All in all, a good Saturday.
Today was all about rolling the LS2 and bellhousing under the car and looking for clearance issues - front and rear - starting with the firewall and then going to the front looking for the same with the radiator and fans.
Open Up... WIDER!
Rolling the motor around on what must be a 90 yr-old antique furniture dolly, It was so easy to position it under the car suspended by the chain hoist from its re-attached baby teeth tow hooks.
V8Roadsters' tubular K member was easy to align as the Miata was lowered down. V8R pleasantly surprised me on the 100% hole alignment for the factory 8 bolts - no prying or, even worse, having to elongate any holes for this critical component to be attached to the car.
Checking completely around the rear of the motor and bellhousing, I only have one interference with the firewall and that is on the RH side at the bellhousing. It's just barely touching the corner of my widened tunnel - maybe a 1/4" size spot. I marked it with Sharpie and will proceed to knock and tap that corner up and in. The LH side is fine and i have 1/2", maybe, of space between firewall and the very close RH head.
Next step was to do a quick assembly on the FM radiator, and Stage 2 fan kit so it can be dropped in and eyeballed. Remember my praises for the V8R parts? ...Well, I'm not feeling it with my radiator and fan kit. While the parts are mostly self-explanitory, I can really use some instructions/advice on utilizing the hardware kit. I stumbled through it, but I have welded, uneven, alum bolt bosses on the radiator that, IMHO, makes the shroud sit uneven, I don't have enough small bolts to secure the fans - looks like 6 in lieu of 8, and the wiring instructions, I assume, is in the FM V8 installation guide. And, the supplied radiator hoses appear useless when it comes to the radiator outlets and my waterpump outlets. Oh well, I will give FM a call to help me sort through this.
Radiator in for test fit. It's up too high (about 3/4" or so) and does lean back on the bottom towards the engine pullies. My dad saw the easy remedy first -- we'll modify the Mazda rad brackets and lower pins for the J hook to fix the above. That will prevent hacking on the core support and brackets on the A/C condenser. I have to get the radiator down to fit under the Z06/ LS7 intake - so in the near future, there will be some cutting and hacking to do! Who am I kidding..?
All in all, a good Saturday.
Last edited by ToySnakePMC; Jun 30, 2013 at 07:45 AM.
Thread Starter
V8 Miata Fanatic
Joined: Oct 2012
Posts: 550
Likes: 34
From: Fuquay Varina, NC
Quick update on radiator: FM has emailed me the missing instructions that 'splains how their full radiator and fan shroud kit goes together. (Thanks Brandon!) In the meantime, I was able to make adjustments to the Mazda rad brackets and now have it lowered about 7/8" and have the bottom kicked out towards the front of the car. This will give me better clearances with engine pulleys..., but not out of harm's way with the FM V8 sway bar. That's okay, as I will have to fabricate and lower the sway bar mounting locations down about 1". Again, this is a result from making room on the top of the radiator for the Z06 intake.

Last edited by ToySnakePMC; Jul 3, 2013 at 11:57 AM.
Thread Starter
V8 Miata Fanatic
Joined: Oct 2012
Posts: 550
Likes: 34
From: Fuquay Varina, NC
Final (is it ever final?) up-fit to the cooling package was done last weekend. Using the FM instructions, I got the fans and shroud set properly but will save any wire splicing and such when we get to that point in the build...
Then it was on to the A/C condenser coil. With the FM radiator lowered and pulled forward at the bottom, the condenser wanted to touch at the bottom. My goal here is to see if I can get these heat transfer units installed, clear the CTS-V pulleys, accommodate the FM sway bar, AND not cut up the core support and mounting points for the two. So, I used my hi-speed H.Freight cut-off wheel and sliced off Mazda's 3 welded nuts and 1 welded stud from the back of the condenser tabs. I then welded 4 nuts on the front of the tabs. This 3/8" difference is all that I needed - along with a small spacer of about the same length on the 2 bottom studs to get this coil more upright as well.
We're there. I think all that will have to be done at the front of the engine is weld in 1" lower plates and fabricate some stiffeners for front sway to clear the fans ( because rad was lowered to accept the Z06 intake...), and trim for said intake later in the build.
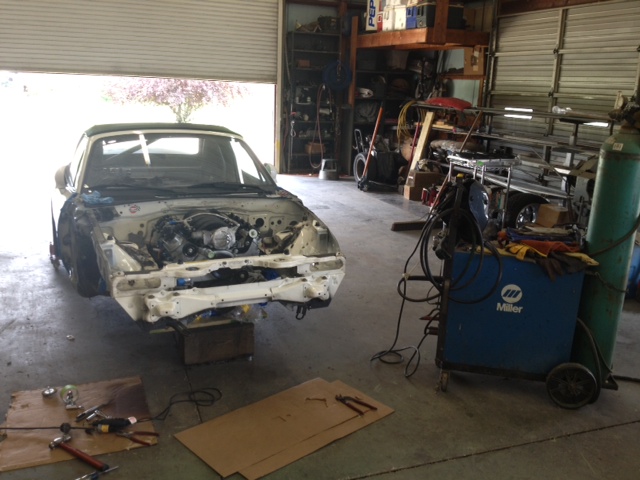
Remove trial-fit motor:
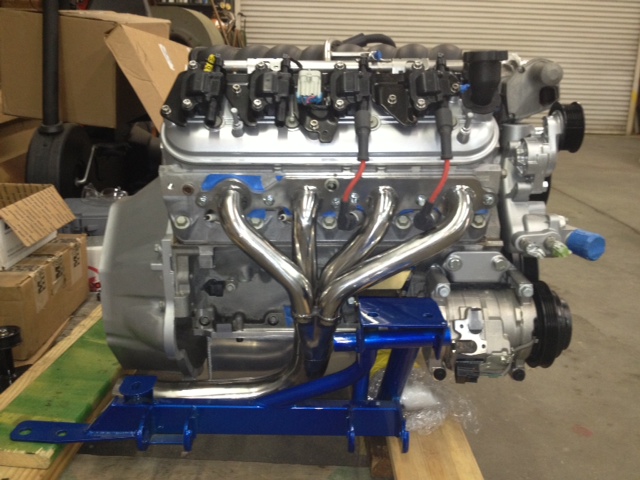
Test fit the FM stainless steel headers, well, at least 1 side just to add some eye-candy to the shop's atmosphere for a while...
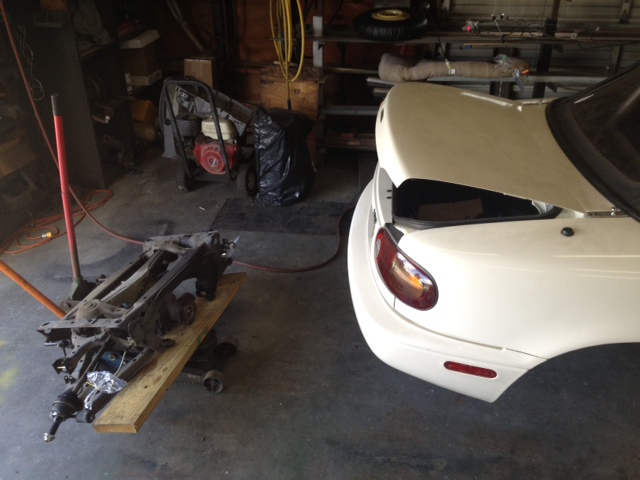
Rolled the MX5 over to the side of shop so it can be raised up for removing the rear sub-frame, diff and suspension, and so all the mods can be welded up in one convenient location.
Here's a lesson that I want to share with you. If you're like me and not accustomed to throwing a stripped-down Miata shell up on 4 jackstands and you do it like you always have... Well, the law of physics take over real quick -- After setting the final pair of stands behind the front doors, I let the jack down and the car tilted over -- but not too quickly! The @ss end was too heavy, obviously with no motor or front suspension on the car. i jacked the rear diff back up real quick and chained the front tow hook to a 1" thick steel-plate dolly with other pieces of steel, GTO headers, and a used truck battery! It is now steady, thank goodness. I picked up one scratch on bottom of rear bumper cover when it fell down on the jack handle... Moving on...
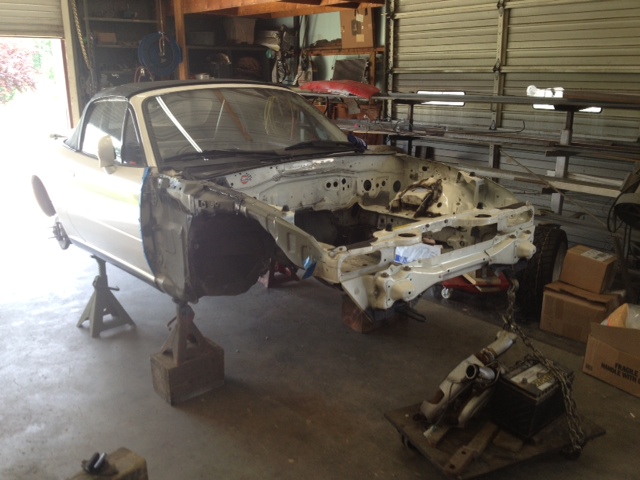
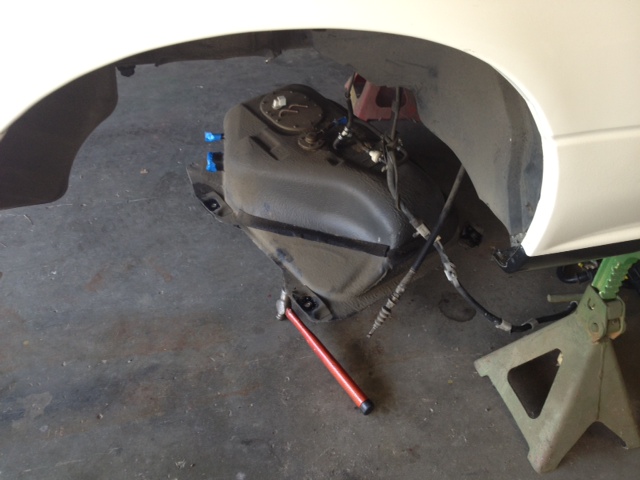
Rear end and suspension is out. And fuel tank is disconnected all the way around and dropped down as well. It seems the only things left in this shell are a Hard Dog, two door assemblies, soft top and rear trim!
Then it was on to the A/C condenser coil. With the FM radiator lowered and pulled forward at the bottom, the condenser wanted to touch at the bottom. My goal here is to see if I can get these heat transfer units installed, clear the CTS-V pulleys, accommodate the FM sway bar, AND not cut up the core support and mounting points for the two. So, I used my hi-speed H.Freight cut-off wheel and sliced off Mazda's 3 welded nuts and 1 welded stud from the back of the condenser tabs. I then welded 4 nuts on the front of the tabs. This 3/8" difference is all that I needed - along with a small spacer of about the same length on the 2 bottom studs to get this coil more upright as well.
We're there. I think all that will have to be done at the front of the engine is weld in 1" lower plates and fabricate some stiffeners for front sway to clear the fans ( because rad was lowered to accept the Z06 intake...), and trim for said intake later in the build.
Remove trial-fit motor:
Test fit the FM stainless steel headers, well, at least 1 side just to add some eye-candy to the shop's atmosphere for a while...
Rolled the MX5 over to the side of shop so it can be raised up for removing the rear sub-frame, diff and suspension, and so all the mods can be welded up in one convenient location.
Here's a lesson that I want to share with you. If you're like me and not accustomed to throwing a stripped-down Miata shell up on 4 jackstands and you do it like you always have... Well, the law of physics take over real quick -- After setting the final pair of stands behind the front doors, I let the jack down and the car tilted over -- but not too quickly! The @ss end was too heavy, obviously with no motor or front suspension on the car. i jacked the rear diff back up real quick and chained the front tow hook to a 1" thick steel-plate dolly with other pieces of steel, GTO headers, and a used truck battery! It is now steady, thank goodness. I picked up one scratch on bottom of rear bumper cover when it fell down on the jack handle... Moving on...
Rear end and suspension is out. And fuel tank is disconnected all the way around and dropped down as well. It seems the only things left in this shell are a Hard Dog, two door assemblies, soft top and rear trim!
Last edited by ToySnakePMC; Jul 7, 2013 at 02:18 PM.
Thread Starter
V8 Miata Fanatic
Joined: Oct 2012
Posts: 550
Likes: 34
From: Fuquay Varina, NC
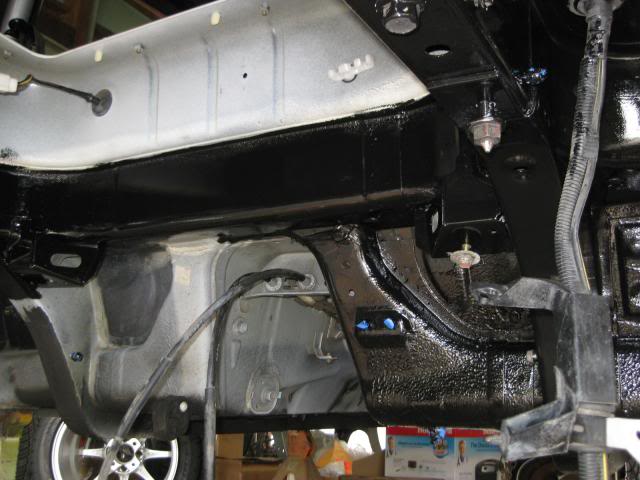
Yesterday and today brought on a desire to focus on the underbody of the Miata. This southern, rust-free tub just needed a wash with soap and water to get the road grime out from under her and a little Purple de-greaser to get some some old grease slung around by a leaky LH CV joint from a few years ago.
I cleaned the rear wheel wells, below the hole for the fuel tank, and everything pretty much rear of the doors. Then I went to work with a 2" brush and a a quart of Tractor Supply's best gloss black paint! I think it is turning out just like I wanted it to. I originally wasn't sure if this paint would cover 20 yr-old random, Mazda undercoating and such, but it did great. Took the better part of 2 afternoons to get the back half done.
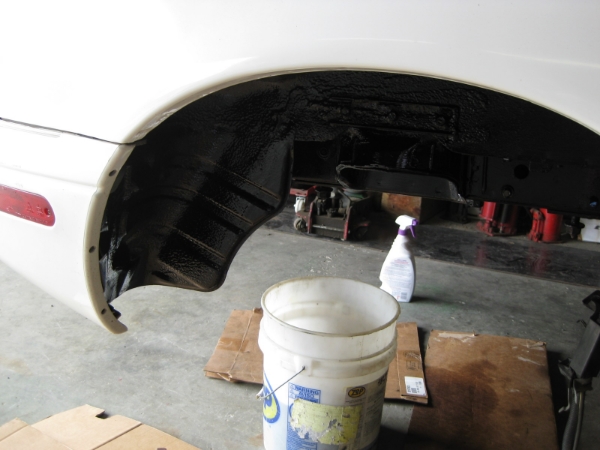
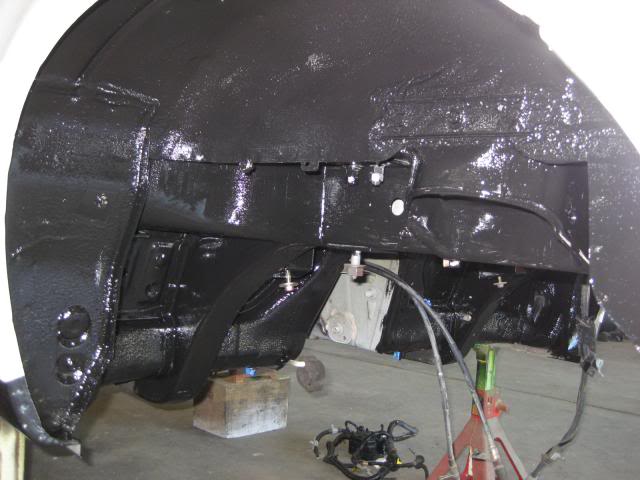
Next on the list will be to hook up with a local welder who comes highly recommended by several folk. I look forward to bringing in an expert to make this chapter in the build come to a close of sorts. I wish I had the skill, but I don't. And, I do not want to compromise the integrity of the build - had I decided to stitch up the firewall and weld in the 8.8 diff/ pinion bracket from V8R...
I cleaned the rear wheel wells, below the hole for the fuel tank, and everything pretty much rear of the doors. Then I went to work with a 2" brush and a a quart of Tractor Supply's best gloss black paint! I think it is turning out just like I wanted it to. I originally wasn't sure if this paint would cover 20 yr-old random, Mazda undercoating and such, but it did great. Took the better part of 2 afternoons to get the back half done.
Next on the list will be to hook up with a local welder who comes highly recommended by several folk. I look forward to bringing in an expert to make this chapter in the build come to a close of sorts. I wish I had the skill, but I don't. And, I do not want to compromise the integrity of the build - had I decided to stitch up the firewall and weld in the 8.8 diff/ pinion bracket from V8R...


Jim Stainer
Joined: Jul 2011
Posts: 2,462
Likes: 62
From: Sunny SW Minnesota
Thanks for the heads up Pat! I wondered about that as I could pick the front of mine up with one hand and very little effort. One more thing FM needs to put in the manual to put a just in case jack stand under the back bumper... GREAT BUILD!!!
Thread Starter
V8 Miata Fanatic
Joined: Oct 2012
Posts: 550
Likes: 34
From: Fuquay Varina, NC
Thanks Jim and MGB-V8 ! This has been a LOT of fun to work on and think through... I want it to be as clean and straight-forward as possible since I plan to hold on and enjoy it for years to come - Lord willing!
I agree about a proper build guide. I would think that V8Roadsters would benefit from even more sales by authoring a complete, on-line instruction manual. I know there are a variety of LSx configs and subsequent PCM's, etc that one cannot address the many variations, but if they offered a build guide with FULL instructions (the FM doesn't...), then I think more people sitting on the fence would be convinced to proceed with such a conversion using their products... I've yet to find a build thread or on-line article that shows me what I want to see on ridding the Mazda wiring harnesses of now unneeded wires...
I agree about a proper build guide. I would think that V8Roadsters would benefit from even more sales by authoring a complete, on-line instruction manual. I know there are a variety of LSx configs and subsequent PCM's, etc that one cannot address the many variations, but if they offered a build guide with FULL instructions (the FM doesn't...), then I think more people sitting on the fence would be convinced to proceed with such a conversion using their products... I've yet to find a build thread or on-line article that shows me what I want to see on ridding the Mazda wiring harnesses of now unneeded wires...
Thread Starter
V8 Miata Fanatic
Joined: Oct 2012
Posts: 550
Likes: 34
From: Fuquay Varina, NC
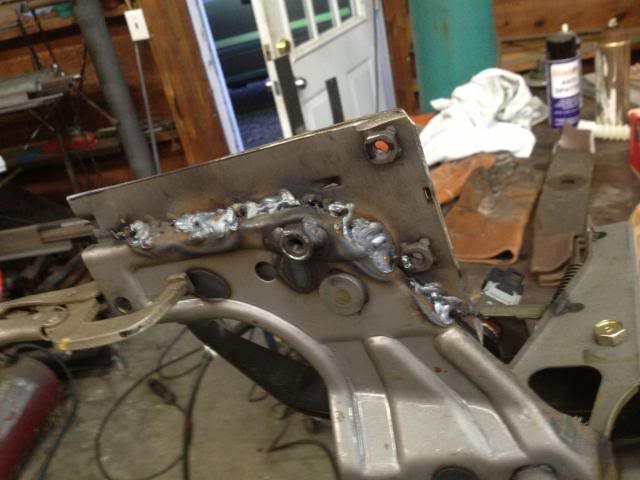
Small job summary: Had some time and wanted to go ahead and set up the DBW throttle pedal that came with my '05 GTO take-out engine.
Here's the pedal and half of the GM bracket. I cut it off of the brake pedal assy as I prepared to mostly follow GoKart's steps on his build thread.
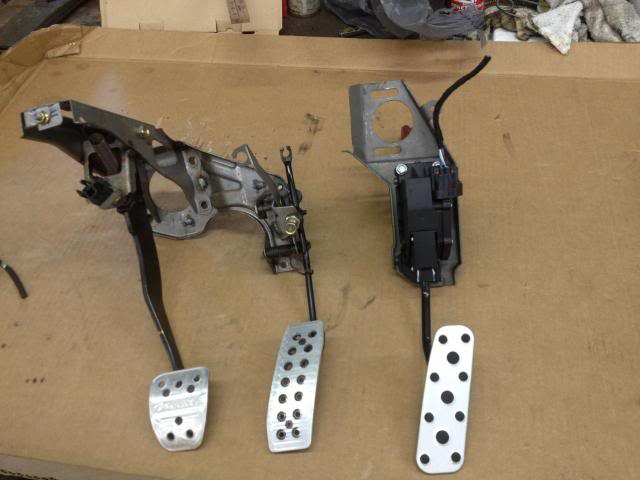
Remove Miata pedal assy and cut down these ears to get it all the raised edges flush. The edges stand about 1/4" tall.
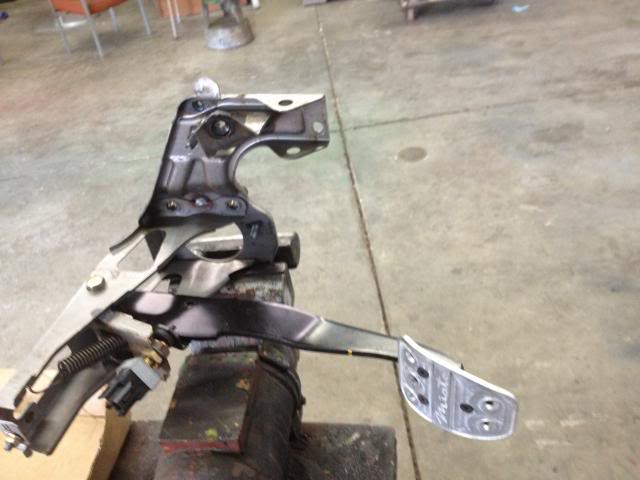
I spaced the bracket to where the pedal will be somewhat closer to the brake pedal for better heel & toe (and to allow for my widened tunnel...). This is not award-winning welding here, but I do have good penetration on most of it & the welds will be facing the firewall.
Now, I had to trim the bottom LH corner of GM pedal assy with my Dremel so there's access to this bolt and the Mazda spacer/ column gasket that will reside behind it.
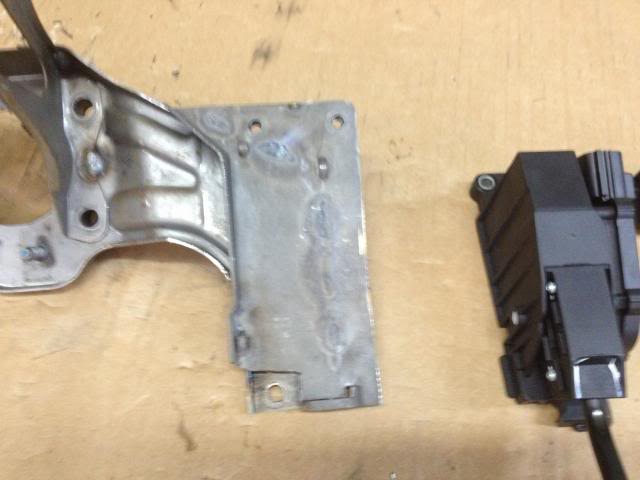
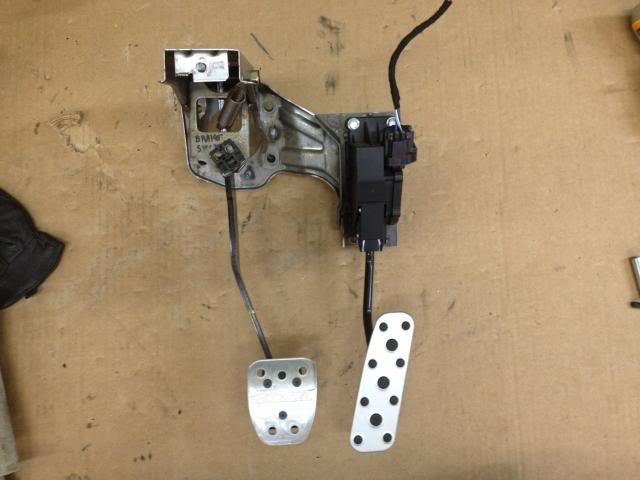
Finished. The GM pedal has a pivot point the centers up with the center of my brake pedal so it should be easy to move from pedal to pedal. I liked how it's laid out during the test fits. Since this photo, I've prepped, primed and painted the assembly silver.
Here's the pedal and half of the GM bracket. I cut it off of the brake pedal assy as I prepared to mostly follow GoKart's steps on his build thread.
Remove Miata pedal assy and cut down these ears to get it all the raised edges flush. The edges stand about 1/4" tall.
I spaced the bracket to where the pedal will be somewhat closer to the brake pedal for better heel & toe (and to allow for my widened tunnel...). This is not award-winning welding here, but I do have good penetration on most of it & the welds will be facing the firewall.
Now, I had to trim the bottom LH corner of GM pedal assy with my Dremel so there's access to this bolt and the Mazda spacer/ column gasket that will reside behind it.
Finished. The GM pedal has a pivot point the centers up with the center of my brake pedal so it should be easy to move from pedal to pedal. I liked how it's laid out during the test fits. Since this photo, I've prepped, primed and painted the assembly silver.
Last edited by ToySnakePMC; Jul 21, 2013 at 08:30 AM.
Thread Starter
V8 Miata Fanatic
Joined: Oct 2012
Posts: 550
Likes: 34
From: Fuquay Varina, NC
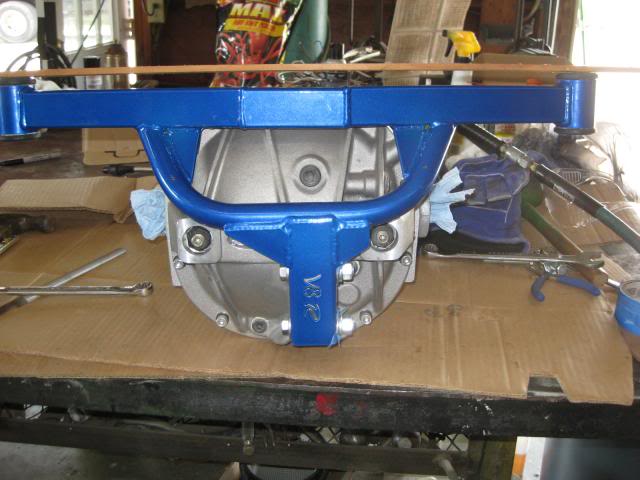
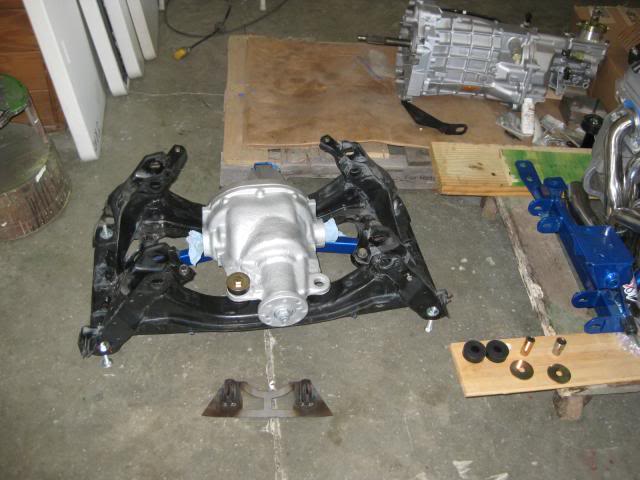
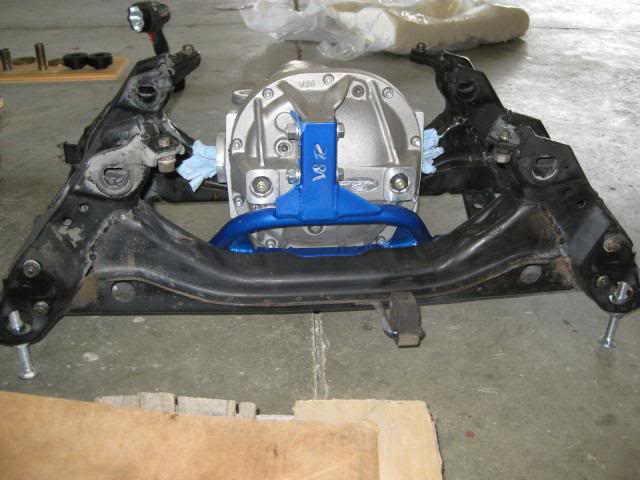
As I prepare (or will it be wait?) to meet up with the recommended professional for eventually weld up the plasma body cuts and my rear diff bracket, I realized I had better mock up the rear assembly so he can quickly confirm the pinion angle and burn that bracket in place...
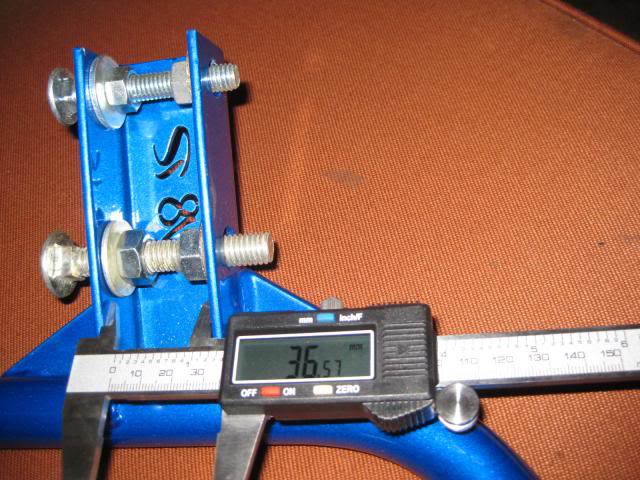
Using my nifty new Summit racing digital caliper (when in S. ATL, you must drop by the Summit store - stumbled upon this place on Thursday. That was fun!) to confirm my suspicions... The V8R bracket is smaller than the width of the rear diff cover.
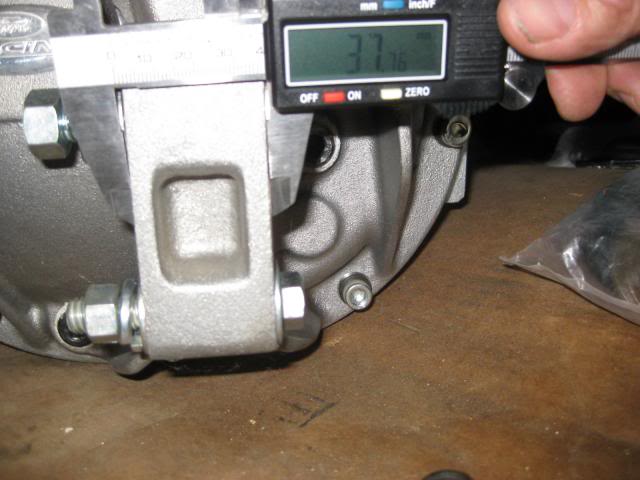
As you can see in above pic, I used two long carraige bolts with nuts and flat washers inside the flange to speard it apart and try to avoid from ruining the powdercoat finish on the outside. It took persuasion, but not too difficult.
Next, I was able to get the bottom hole lined up for the most part only to learn that my Dremel and air-powered cutting wheel would have to trim up the rear diff cover. I could have skipped the Dremel because there was quite a bit of work to perform here... I cut a considerable amount of material out of the upper angle flanges, but by no means, did I destroy the integrity of this rear cover. It's thick!
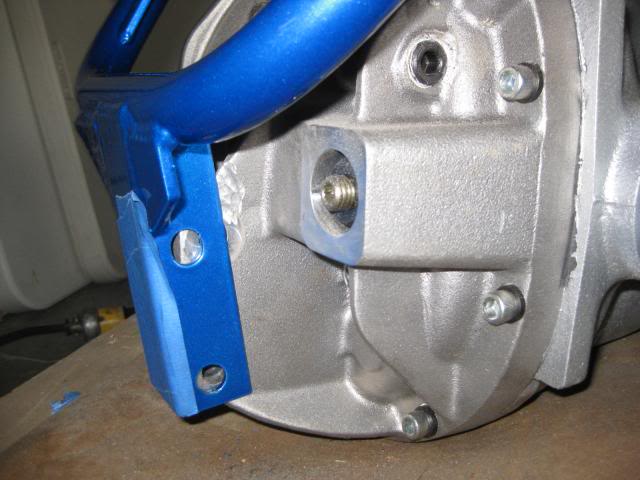
It's on, and I'm using some cheap 7/16" bolts for test fit - but will locate a pair of Grade 8's for final installation.
But here's a problem, perhaps?? I know that the pinion bracket will help point the diff in the correct direction, but right now, the bracket and diff touch ever so slightly against one of the rear cover's allen head screws. I'll keep an eye on this today as I mock up the rear subframe/ pinion bracket layout.

Here's how she sits now:
Using my nifty new Summit racing digital caliper (when in S. ATL, you must drop by the Summit store - stumbled upon this place on Thursday. That was fun!) to confirm my suspicions... The V8R bracket is smaller than the width of the rear diff cover.
As you can see in above pic, I used two long carraige bolts with nuts and flat washers inside the flange to speard it apart and try to avoid from ruining the powdercoat finish on the outside. It took persuasion, but not too difficult.
Next, I was able to get the bottom hole lined up for the most part only to learn that my Dremel and air-powered cutting wheel would have to trim up the rear diff cover. I could have skipped the Dremel because there was quite a bit of work to perform here... I cut a considerable amount of material out of the upper angle flanges, but by no means, did I destroy the integrity of this rear cover. It's thick!
It's on, and I'm using some cheap 7/16" bolts for test fit - but will locate a pair of Grade 8's for final installation.
But here's a problem, perhaps?? I know that the pinion bracket will help point the diff in the correct direction, but right now, the bracket and diff touch ever so slightly against one of the rear cover's allen head screws. I'll keep an eye on this today as I mock up the rear subframe/ pinion bracket layout.
Here's how she sits now:
Last edited by ToySnakePMC; Jul 21, 2013 at 08:56 AM.
Thread Starter
V8 Miata Fanatic
Joined: Oct 2012
Posts: 550
Likes: 34
From: Fuquay Varina, NC
Thanks Jacko - I appreciate the comments. Stay tuned until she's back together. I find this build to be great weekend therapy after a full week of work - even if it's just for a few hours on a Saturday afternoon... Plus, I get to spend the week nights searching on-line for ideas and inspiration. (Do love me some LS1tech.com for their conversions and hybrids. Where else will you find LSx powered 5 series wagons, Chevy Luv's, and 240Z's??)
Thread Starter
V8 Miata Fanatic
Joined: Oct 2012
Posts: 550
Likes: 34
From: Fuquay Varina, NC
Some Z06/ LS7 air intake modifications...
As I patiently await the pro welder's appointment to get my firewall and rear diff work done, I thought now was a good time for me to leave behind some more of my signature noob welding marks on the chassis.
First off, study on-line interweb photos of other NA's that have received this cold air intake and decide where to cut this horizontal support panel, mark it, and use the ab-fabulous Harbor Freight tool to zip through this thing.
Obligatory pic of cut metal:
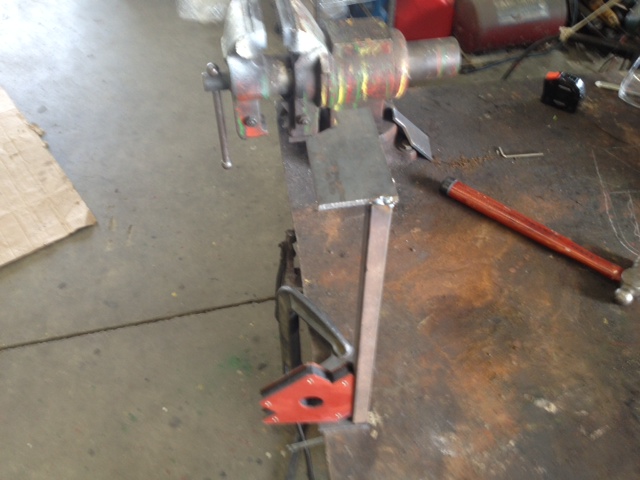
The shop I'm playing in has quite a bit of stock metal, bar, tube, etc to pick from. I used some 1/4"x2-1/2" and cut me two 4" long pieces. Then measured twice and cut me one 3/4" square tubing about 17" long (or whatever the exact # was... can't remember now.) I trimmed the end pieces with a portable band saw to somewhat mimic the cuts on the Miata. And welded it into one surprisingly straight piece!
Had to fit this. Here, you can see inside if you'd like...
With the 4" long end pieces, I felt like I was able to position my 3/4" sq tubing somewhat lower to allow for the air filter assembly plenty of room. Only when I do the final assembly with bumper cover and bumper support will I know for sure how she fits together.
Loose - test fit. The upper core support will need trimming along the front side so this filter will snug up a little closer towards the radiator. I KNOW hood clearances will be important to watch out for... whenever that day comes!
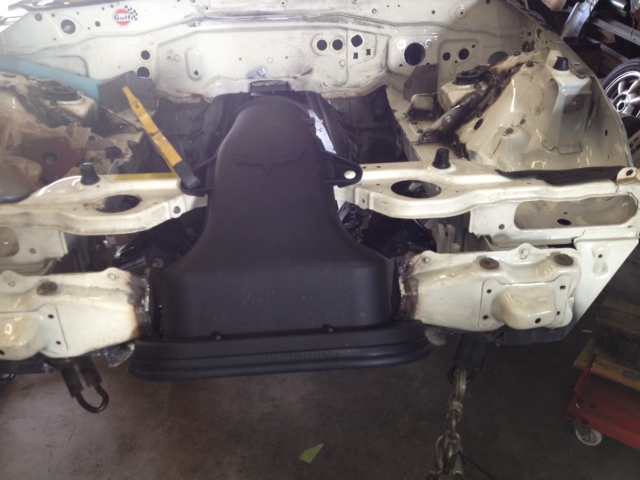
All in all, I'm pretty satisfied with my welding efforts - this time. I actually took my time and tried not to rush it when I pulled the trigger. ...Makes a big difference for me!
As I patiently await the pro welder's appointment to get my firewall and rear diff work done, I thought now was a good time for me to leave behind some more of my signature noob welding marks on the chassis.
First off, study on-line interweb photos of other NA's that have received this cold air intake and decide where to cut this horizontal support panel, mark it, and use the ab-fabulous Harbor Freight tool to zip through this thing.
Obligatory pic of cut metal:
The shop I'm playing in has quite a bit of stock metal, bar, tube, etc to pick from. I used some 1/4"x2-1/2" and cut me two 4" long pieces. Then measured twice and cut me one 3/4" square tubing about 17" long (or whatever the exact # was... can't remember now.) I trimmed the end pieces with a portable band saw to somewhat mimic the cuts on the Miata. And welded it into one surprisingly straight piece!
Had to fit this. Here, you can see inside if you'd like...
With the 4" long end pieces, I felt like I was able to position my 3/4" sq tubing somewhat lower to allow for the air filter assembly plenty of room. Only when I do the final assembly with bumper cover and bumper support will I know for sure how she fits together.
Loose - test fit. The upper core support will need trimming along the front side so this filter will snug up a little closer towards the radiator. I KNOW hood clearances will be important to watch out for... whenever that day comes!
All in all, I'm pretty satisfied with my welding efforts - this time. I actually took my time and tried not to rush it when I pulled the trigger. ...Makes a big difference for me!
Thread Starter
V8 Miata Fanatic
Joined: Oct 2012
Posts: 550
Likes: 34
From: Fuquay Varina, NC
Met with the welder this weekend, and I'm very pleased with our initial meeting. He likes getting involved in unique projects & problem solving... Well, he will get plenty of both with this job. He can either fake sincerity really well or genuinely liked the project car -- so, I think he's going to treat this as if it was his own car. I like that.
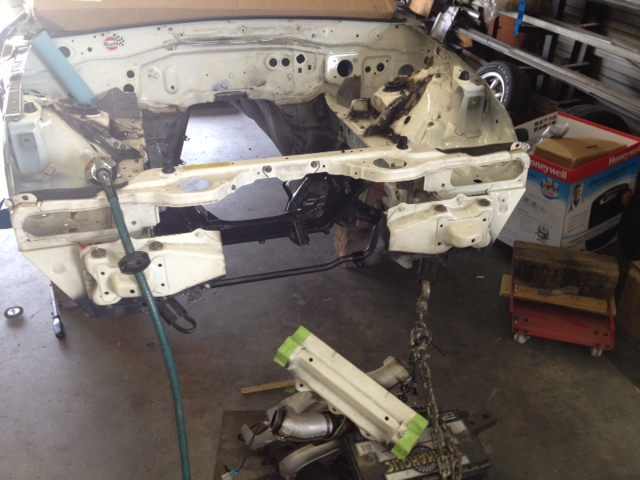
One of the things I did to prepare for this meeting was to mock up a few minimum front suspension components so he could visualize the sway bar concern. This is the FM V8 sway bar. It's beefy and needs to bolt up about 1" lower than the factory bar - for clearing the bottom side of the elec fans. Here's about where the brackets need to be.
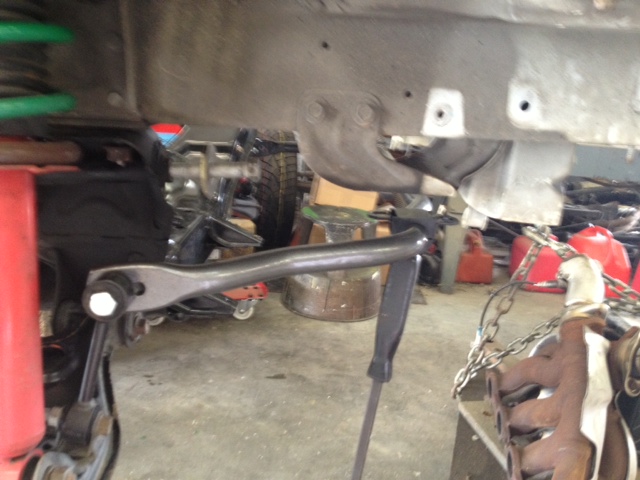
The existing brackets seem a bit flimsy. I know that auto-x folks can damage these brackets with the stress and loads they sometimes put on their sway bars.

So, what the plan is for now. Mr. Welder took measurements and one of my fine thread bolts home with him. He will use some 1" thick stock and cut out solid bracket spacers for me. they will have female threads cut into them and will be welded into position on the existing brackets. As you can see, the new supports will need to be set forward so holes can align properly. (I thought FM created this FM bar so '94 - '97's wouldn't have to make modificaitons to accomodate this bar. There's no way this bar would bolt up easily even if I hadn't lowered the radiator for accommodating the vette air cleaner...
The cool thing is that he will use flat bar stock and reinforce the open space of the brackets = tying them back into the above frame rails. Part of the reason why we're doing this is so I will still have full access to sliding the upper A arm bolts forward for future shock removal/ replacement. This should be pretty bad @ss when it comes together!
Up next, I THINK, will be fuel pump installation and plumbing up the back half of the chassis.
One of the things I did to prepare for this meeting was to mock up a few minimum front suspension components so he could visualize the sway bar concern. This is the FM V8 sway bar. It's beefy and needs to bolt up about 1" lower than the factory bar - for clearing the bottom side of the elec fans. Here's about where the brackets need to be.
The existing brackets seem a bit flimsy. I know that auto-x folks can damage these brackets with the stress and loads they sometimes put on their sway bars.
So, what the plan is for now. Mr. Welder took measurements and one of my fine thread bolts home with him. He will use some 1" thick stock and cut out solid bracket spacers for me. they will have female threads cut into them and will be welded into position on the existing brackets. As you can see, the new supports will need to be set forward so holes can align properly. (I thought FM created this FM bar so '94 - '97's wouldn't have to make modificaitons to accomodate this bar. There's no way this bar would bolt up easily even if I hadn't lowered the radiator for accommodating the vette air cleaner...
The cool thing is that he will use flat bar stock and reinforce the open space of the brackets = tying them back into the above frame rails. Part of the reason why we're doing this is so I will still have full access to sliding the upper A arm bolts forward for future shock removal/ replacement. This should be pretty bad @ss when it comes together!
Up next, I THINK, will be fuel pump installation and plumbing up the back half of the chassis.
Last edited by ToySnakePMC; Jul 30, 2013 at 10:54 PM.


