
V8R sloooww build - 94 Miata - North Carolina


Moderator

Joined: Nov 2009
Posts: 442
Likes: 1
From: Springfield IL
If you have the cash, ATI is king. If you do not, I've had ZERO issues with the ASP pulleys I've had on mine and other peoples cars, and I've installed a few...
Speaking of the pulley, buy an OEM bolt, or soak the ARP in red thread lock and pray you never have to remove it. I've seen 2 ARP units back out now, and one break.

Thread Starter
V8 Miata Fanatic

Joined: Oct 2012
Posts: 550
Likes: 34
From: Fuquay Varina, NC
Good info and insight on LSx dampners. I'm new to my LS2 so it's good to hear some opinions on what's best.
Today, I removed the front accy's for eBay listing. I'm going with most of the CTS-V components, so these GTO parts will go to new homes soon!
Notice the use of a 25 cent piece between the pulley remover and the impact socket sitting on the nose of the crankshaft. I needed something to push against with the tool, got the pulley off easily, but destroyed the quarter!
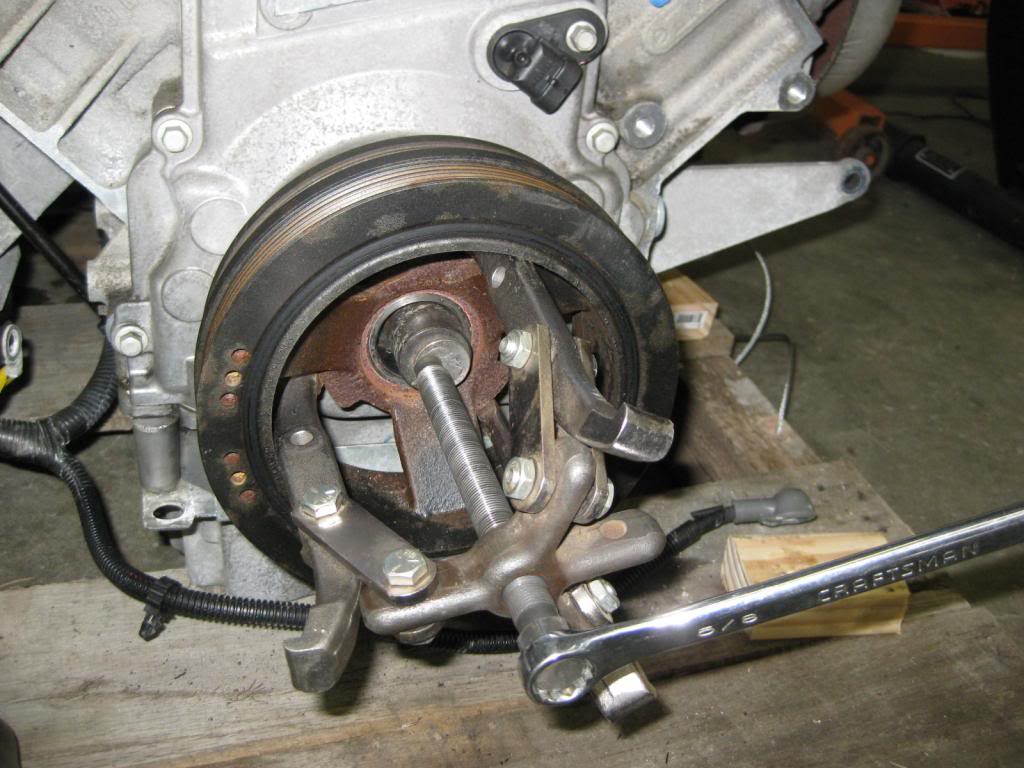
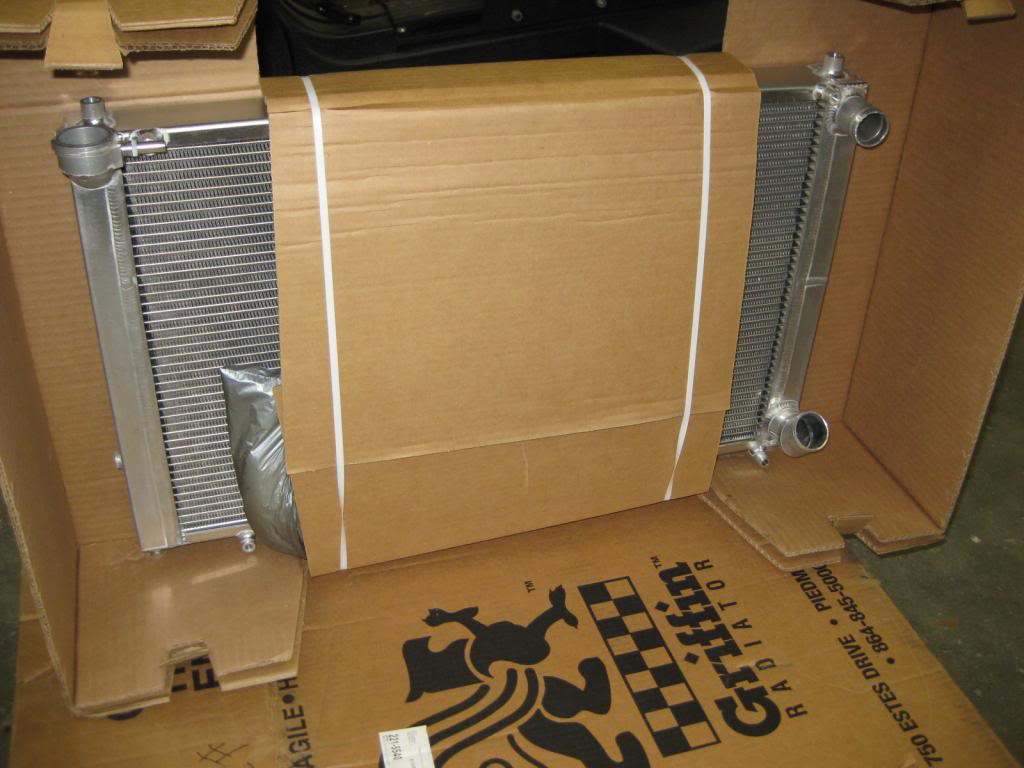
Also, I had the pleasure of 3 boxes of goodness from FM: radiator, front V8 sway bar, fan kit, short shifter,fuel kit, and the Targa V8 DVD for later!!!
Will get back at it tomorrow AM and get the motor ready to put on the engine stand. Cheers.
Today, I removed the front accy's for eBay listing. I'm going with most of the CTS-V components, so these GTO parts will go to new homes soon!
Notice the use of a 25 cent piece between the pulley remover and the impact socket sitting on the nose of the crankshaft. I needed something to push against with the tool, got the pulley off easily, but destroyed the quarter!
Also, I had the pleasure of 3 boxes of goodness from FM: radiator, front V8 sway bar, fan kit, short shifter,fuel kit, and the Targa V8 DVD for later!!!
Will get back at it tomorrow AM and get the motor ready to put on the engine stand. Cheers.
Thread Starter
V8 Miata Fanatic
Joined: Oct 2012
Posts: 550
Likes: 34
From: Fuquay Varina, NC
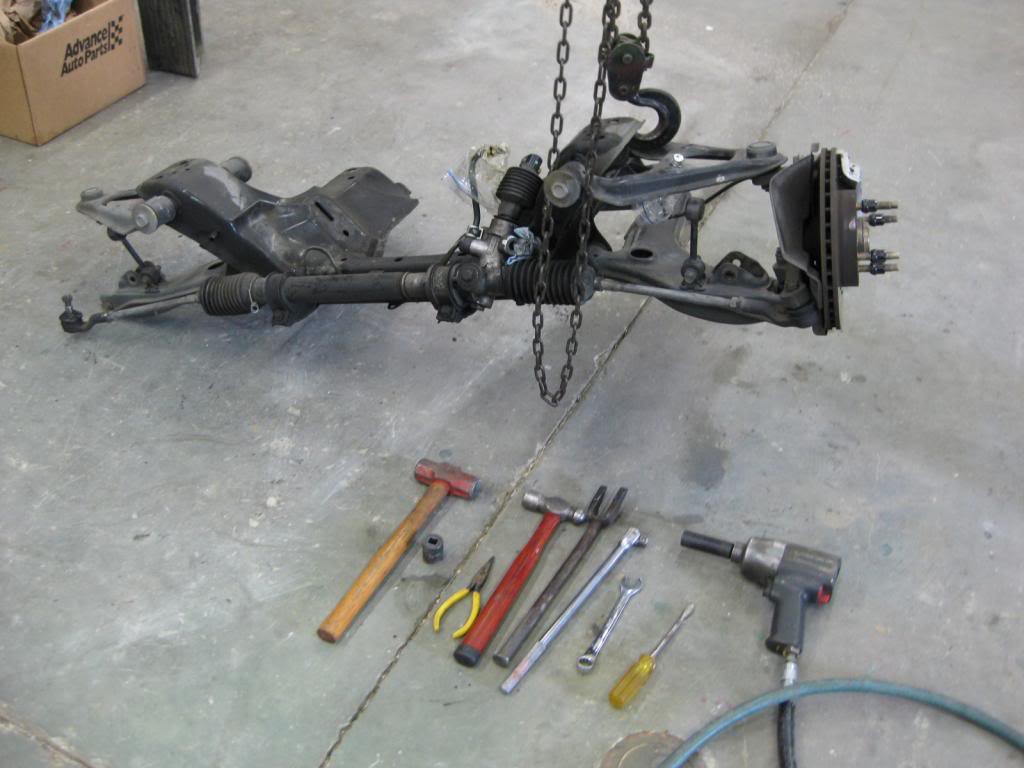
Today was a dirty-job day with a few different tasks. 1 was to disassemble the old Miata front K member and suspension. Wanted to extract the front uprights/ hubs and remove the shocks & springs. The fun part was finding a pickle fork and whacking it with the 2-1/2# hammer to separate the ball joints. While doing that, I went ahead and stripped it apart with removal of all the A arms and stuff.
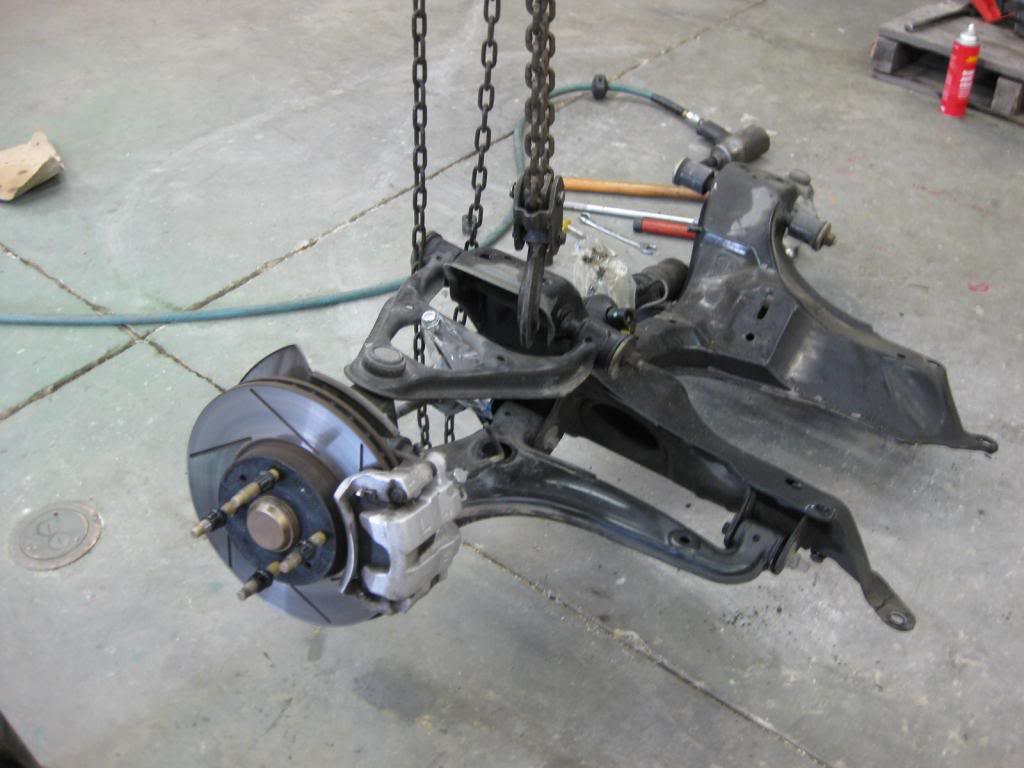
Here's about all you need, tool wise.
Hauling it to away to my storage barn. Glad to have the use of the Gator for the bigger stuff.

Finally, a little more separation between stuff. Seems like all I do take stuff apart these days... Spent an enormous amount of time and effort to pull the tranny away from the motor. It seems the clutch/ pressure plate was seized on the tranny splines. Moisture? Wet? Hmmmm, hope it's okay.
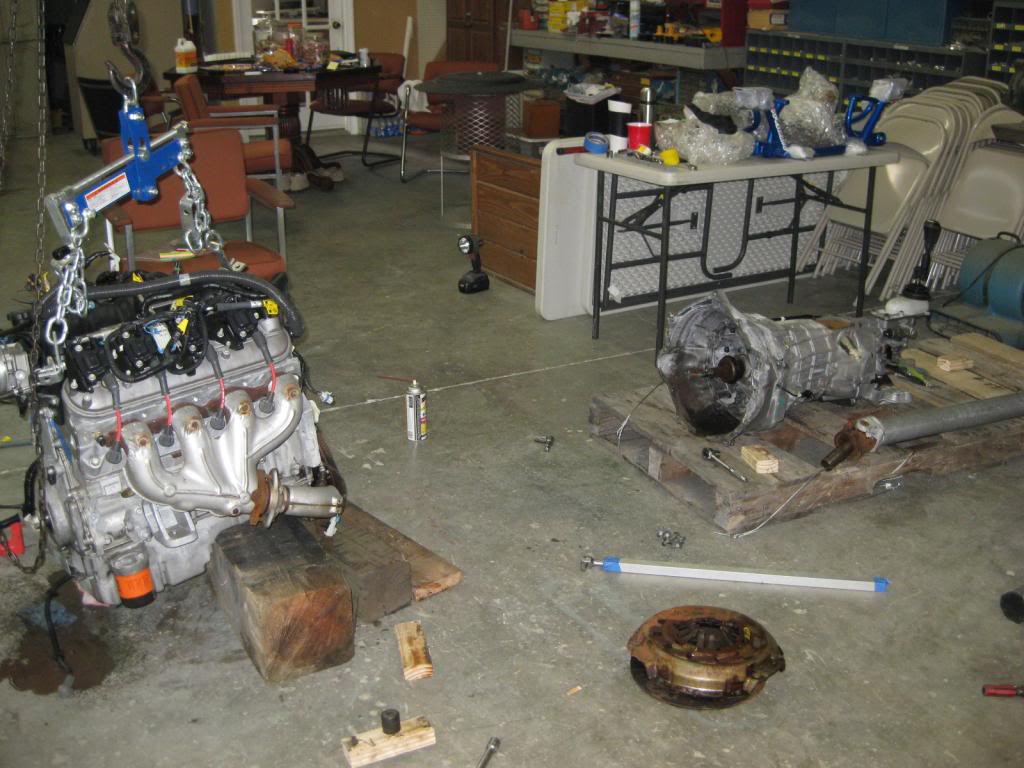
Engine is now on stand and awaiting its V8R alum pan -- better follow up on that - it's been 10 weeks or so, but it hasn't been an issue since I'm on the slow path and will be away from the shop for the next 2 weeks or so. Cheers.
Here's about all you need, tool wise.
Hauling it to away to my storage barn. Glad to have the use of the Gator for the bigger stuff.
Finally, a little more separation between stuff. Seems like all I do take stuff apart these days...
Spent an enormous amount of time and effort to pull the tranny away from the motor. It seems the clutch/ pressure plate was seized on the tranny splines. Moisture? Wet? Hmmmm, hope it's okay. Engine is now on stand and awaiting its V8R alum pan -- better follow up on that - it's been 10 weeks or so, but it hasn't been an issue since I'm on the slow path and will be away from the shop for the next 2 weeks or so. Cheers.

V8 Miata Noob
Joined: Apr 2013
Posts: 12
Likes: 0
You seem to be moving along nicely! My main goal is to let my hobby pay for itself. I buy, fix, and resell cars, but it is a very slow process. If I had all the funding needed I could see me taking around a month to complete, including paint. I absolutely love to wrench on things and I have a hard time going in for dinner.
So if you think your build is slow, think again. You will be on the road in no time.
So if you think your build is slow, think again. You will be on the road in no time.
Thread Starter
V8 Miata Fanatic
Joined: Oct 2012
Posts: 550
Likes: 34
From: Fuquay Varina, NC
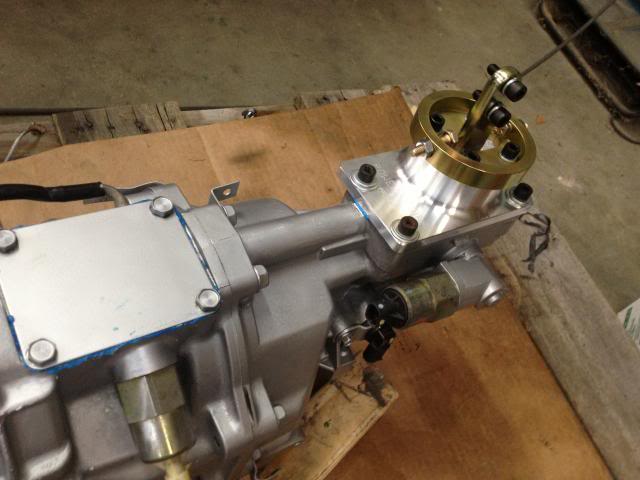
Update time - I'm a week or two behind on the thread, but progress has been slooow, just as my build title states... Here, we will convert the GTO T56 to 2002 Camaro-style with aftermarket shifter.
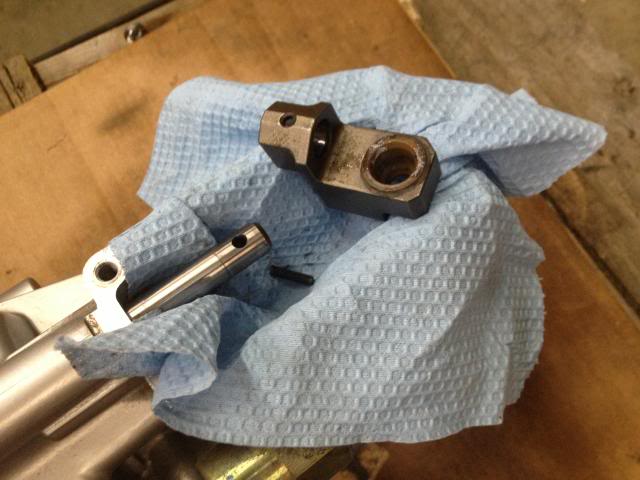
First, remove this set-back shift assy.
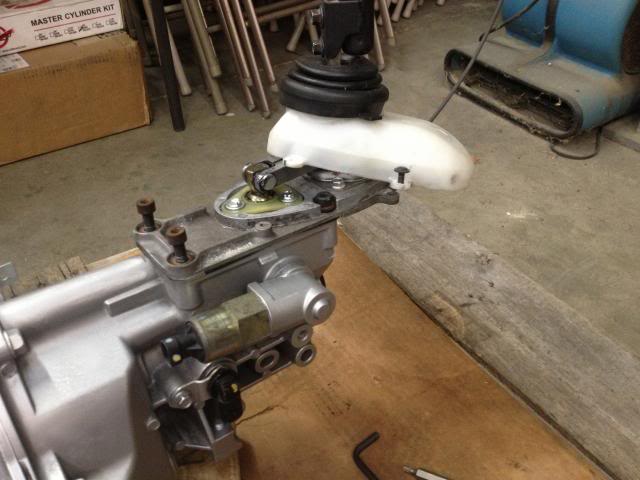
Next, remove the Tremec extension piece that's held into place with the rolled pin. This is where the ball of the shifter sits and pushes and pulls the rod. (You're correct - I'm not a Tremec expert, thus, I don't know the technical terms and descriptions.
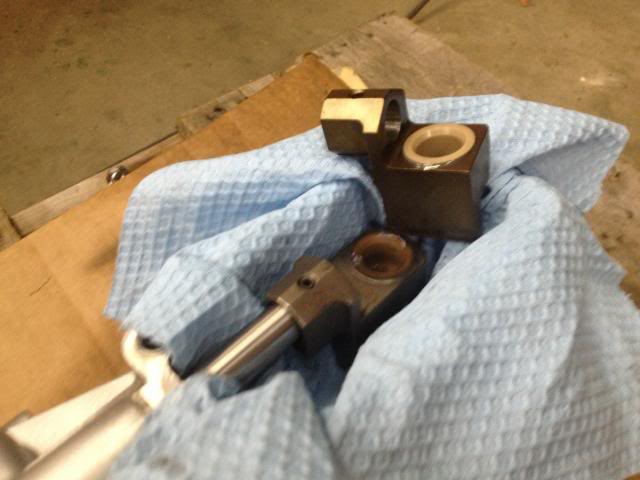
Install the just-arrived Tremec piece that's shorter and designed for 1998-2002 Camaro shifter.
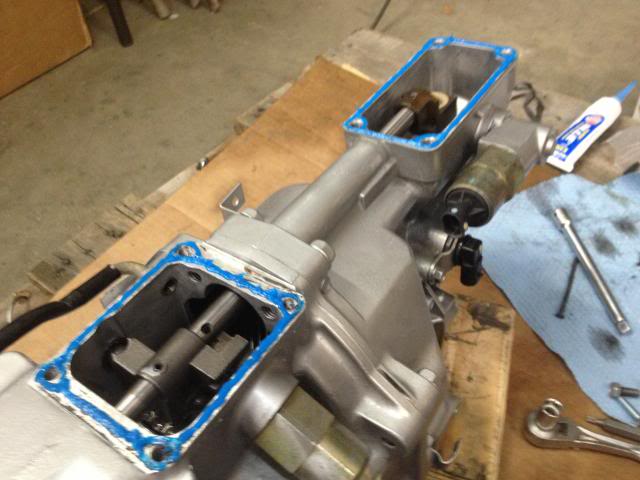
I've already scrubbed, cleaned, and painted the transmission case and belhousing for a spic & span look when she goes under the Miata. Time for fresh gasket material.
Now, let's button it up with a little bit of engineering jewelry: PRO 5.0 shifter that is stout! I've read good reviews so I didn't see why not try one.
First, remove this set-back shift assy.
Next, remove the Tremec extension piece that's held into place with the rolled pin. This is where the ball of the shifter sits and pushes and pulls the rod. (You're correct - I'm not a Tremec expert, thus, I don't know the technical terms and descriptions.
Install the just-arrived Tremec piece that's shorter and designed for 1998-2002 Camaro shifter.
I've already scrubbed, cleaned, and painted the transmission case and belhousing for a spic & span look when she goes under the Miata. Time for fresh gasket material.
Now, let's button it up with a little bit of engineering jewelry: PRO 5.0 shifter that is stout! I've read good reviews so I didn't see why not try one.
Thread Starter
V8 Miata Fanatic
Joined: Oct 2012
Posts: 550
Likes: 34
From: Fuquay Varina, NC
Next up -- I had a slow day in the shop with some repetitive country music on the radio and decided to make the full plunge to 1. Play with a mig welder (I'm not claiming that I can weld -- I can turn it on, make a good ground, and strike an arc and burn some wire -- not weld like a lot of talented V8 conversion folks.) 2. stitch weld/ seam weld the areas that are known to stiffen up this unibody. I have the unique opp to do it NOW with everything removed. Plus no V8R oil pan as of yet so I cannot start test fitting the bellhousing clearances as of yet.
I'm starting up front and will move to inside the car later. So, remove the seam sealer and paint as best you can -- I used wire wheel on DeWalt hi-speed angle grinder and small screwdrivers to pick at it like a mad dentist going after tooth decay.

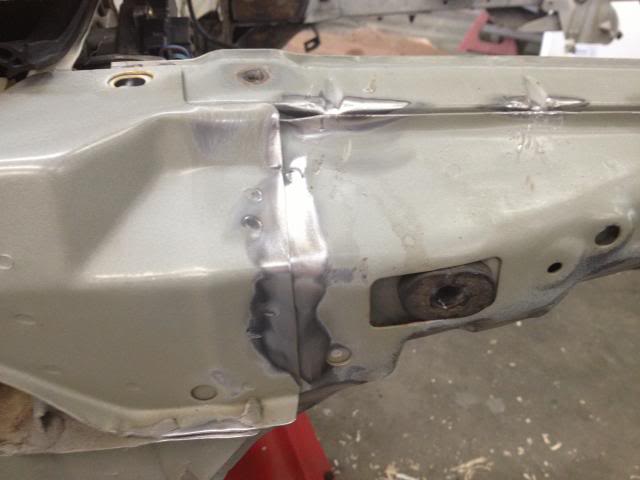
Now, this is the 1st time I've EVER welded. I struggled with an old ill-fitting hood and learned that the scrap, 1/4" metal I played with 20 minutes is easier to spot weld than the Japanese sheet metal!! There are a few areas that I'll have to "fix" later. So, without further delay, I will display my poor performance!
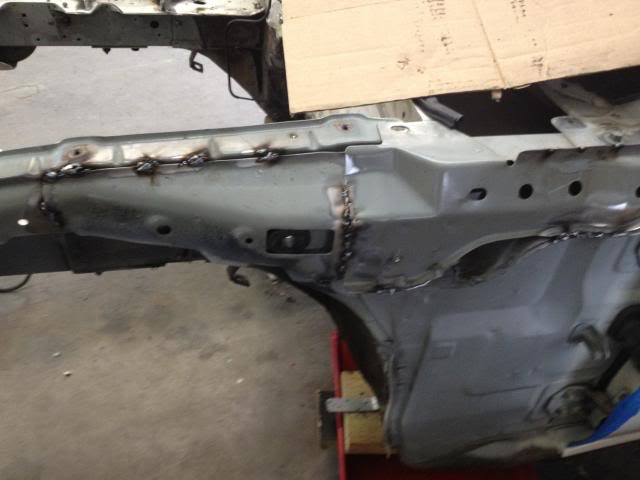
I will have an expert look these over and repair what is needed. But, I want this chassis as tight as I can get it. Plus, it's kinda fun knowing you're putting in some extra effort for, hopefully, better handling results.
I'm starting up front and will move to inside the car later. So, remove the seam sealer and paint as best you can -- I used wire wheel on DeWalt hi-speed angle grinder and small screwdrivers to pick at it like a mad dentist going after tooth decay.
Now, this is the 1st time I've EVER welded. I struggled with an old ill-fitting hood and learned that the scrap, 1/4" metal I played with 20 minutes is easier to spot weld than the Japanese sheet metal!! There are a few areas that I'll have to "fix" later. So, without further delay, I will display my poor performance!
I will have an expert look these over and repair what is needed. But, I want this chassis as tight as I can get it. Plus, it's kinda fun knowing you're putting in some extra effort for, hopefully, better handling results.
Thread Starter
V8 Miata Fanatic
Joined: Oct 2012
Posts: 550
Likes: 34
From: Fuquay Varina, NC
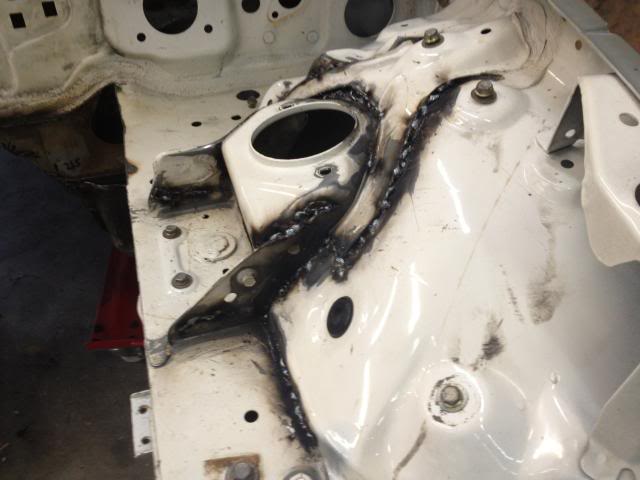
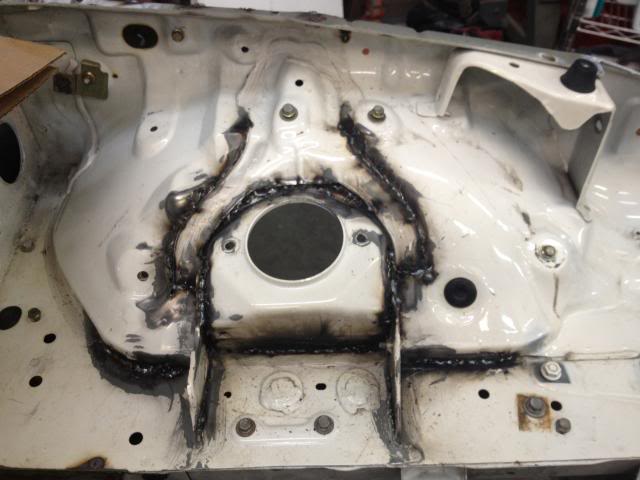
Another brief day of my wknd spent with the MIG welder. This time, I had a new welding hood with auto-dimming lens to wear (thanks to my brother!!) and what a difference that made! You can actually see where you're planning to weld just prior to the bright @ss welding arc popping up! Nice to be in the 21st century...
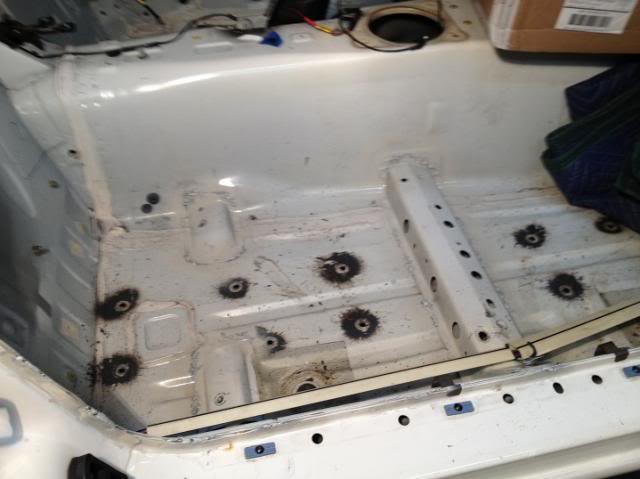
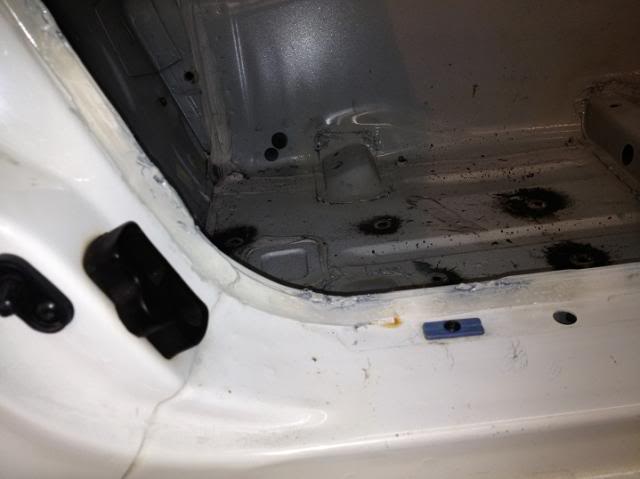
The plan today turned out to be stitching some welds around the door opening / windshield frame and the seat mount areas on the floorboard.
First clean with wire wheel -- this time, I used a small 3" one on cordless drill. Actually did much better than the 4" one I had on a side grinder. I think this lighter duty one had more and smaller wires that were just right for ripping off the paint.
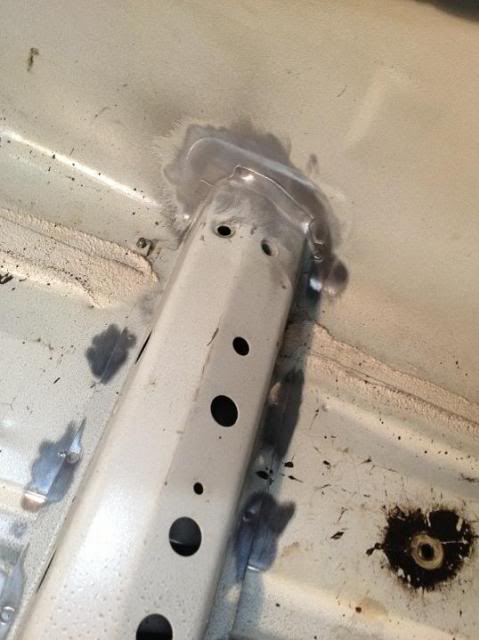
Then use my meager & questionable skills to apply instant, hi-voltage, argon, and wire to make spotty welds appear. Again, they're not pretty - but they seem to penetrate and tie the pieces of metal together somewhat better than the factory spot welds.

Now, clean and prep for some random rattle can paint - this particular shade is a Ford Tractor white - used on the fenders and wheels from 15+ years ago. Doesn't have to be perfect - just completely seal up the exposed metal and then the carpet, moulding, and thermal heat barrier will eventually cover it up.

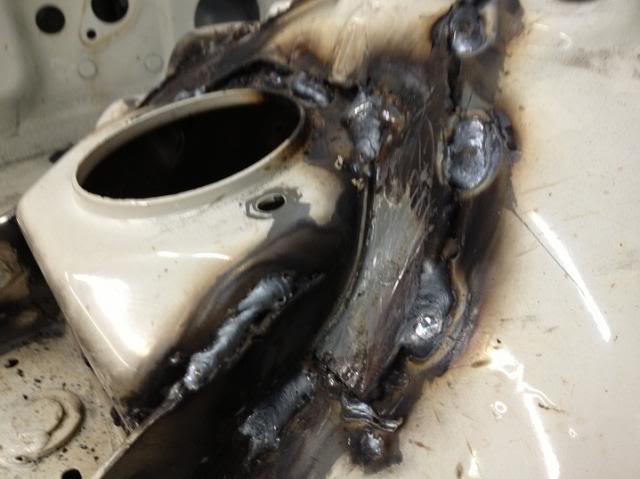
Now... to improve upon what was under the hood, my father-in-law took control of the welder and did what I couldn't do. And that was fill up some seams with lots of metal - big, thick layers of metal. This was done without burning a hole in the Mazda sheet metal - I was impressed. These will get some attention with a grinder, as needed, some seam sealer, and matching Mazda PT white paint ordered off the internet in aerosol cans. Look forward to this Frankenstein engine compartment becoming more civilized in the future...
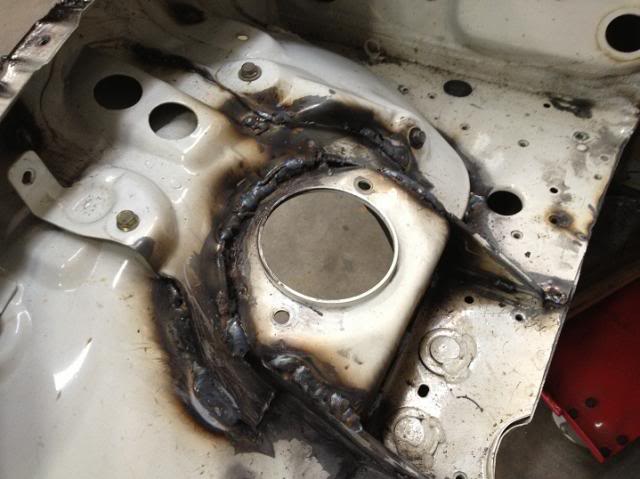
Put 'er away for another day. The Toy Snake will one day get a new LS2 heart transplant and come back to life.
The plan today turned out to be stitching some welds around the door opening / windshield frame and the seat mount areas on the floorboard.
First clean with wire wheel -- this time, I used a small 3" one on cordless drill. Actually did much better than the 4" one I had on a side grinder. I think this lighter duty one had more and smaller wires that were just right for ripping off the paint.
Then use my meager & questionable skills to apply instant, hi-voltage, argon, and wire to make spotty welds appear. Again, they're not pretty - but they seem to penetrate and tie the pieces of metal together somewhat better than the factory spot welds.
Now, clean and prep for some random rattle can paint - this particular shade is a Ford Tractor white - used on the fenders and wheels from 15+ years ago. Doesn't have to be perfect - just completely seal up the exposed metal and then the carpet, moulding, and thermal heat barrier will eventually cover it up.
Now... to improve upon what was under the hood, my father-in-law took control of the welder and did what I couldn't do. And that was fill up some seams with lots of metal - big, thick layers of metal. This was done without burning a hole in the Mazda sheet metal - I was impressed. These will get some attention with a grinder, as needed, some seam sealer, and matching Mazda PT white paint ordered off the internet in aerosol cans. Look forward to this Frankenstein engine compartment becoming more civilized in the future...
Put 'er away for another day. The Toy Snake will one day get a new LS2 heart transplant and come back to life.
Last edited by ToySnakePMC; May 7, 2013 at 08:16 PM.
V8 Miata Noob
Joined: Apr 2013
Posts: 12
Likes: 0
Are you going to be able to reuse the brackets for your cts-v accessories? That's where I'm stumped right now.
I also heard from a little birdy at flyin miata that they might be getting a new oil pan supplier soon.....
I also heard from a little birdy at flyin miata that they might be getting a new oil pan supplier soon.....
Thread Starter
V8 Miata Fanatic
Joined: Oct 2012
Posts: 550
Likes: 34
From: Fuquay Varina, NC
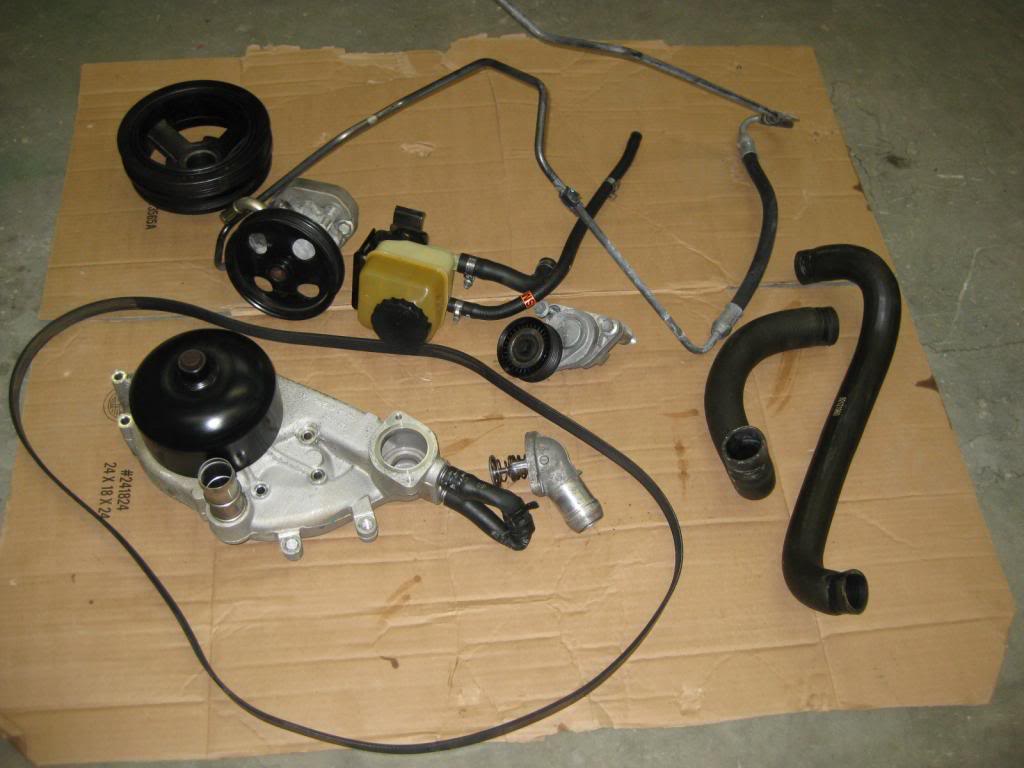
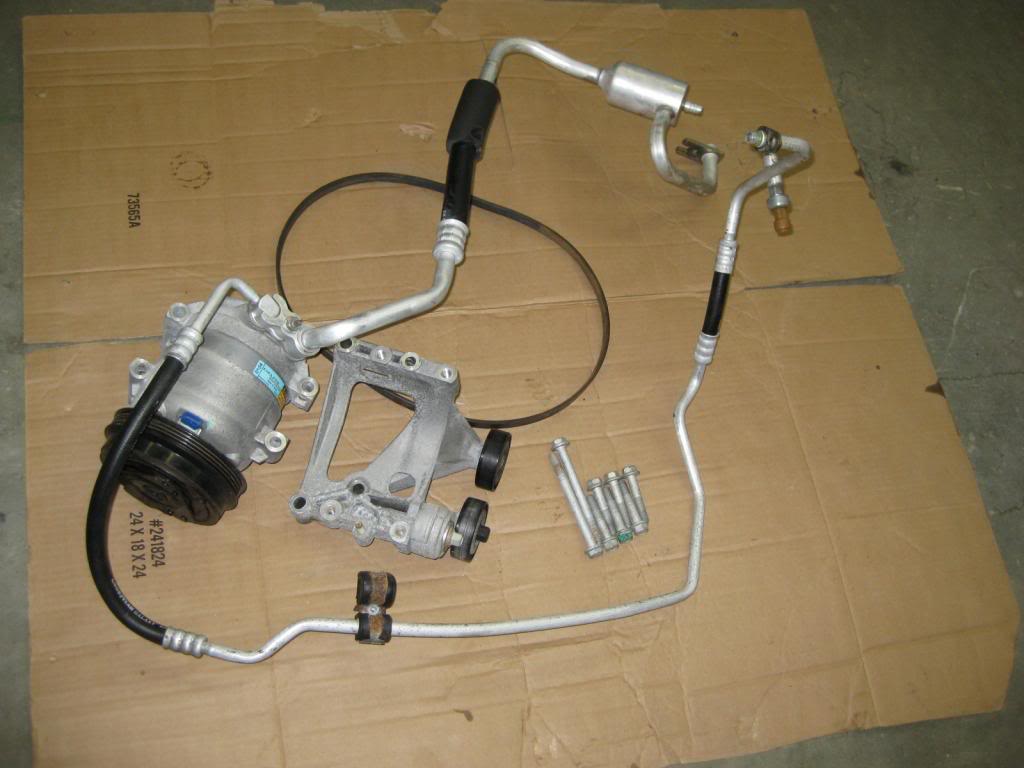
Yeah, I've actually been sourcing CTSV acc's to use on this ex-GTO LS2. I've got the A/C comp and bracket, A/C tensioner pulley, waterpump idler and tensioner pullies, and will have the alternator brkt machined down the necessary 0.7xx" so it will line up properly.
It's funny you say that about the pan, V8R told me that the reason I'm waiting to receive mine is because it will be a new generation of pans. The big difference, they said, was that the mounting flange on the pan is thicker to take more heat as the pan is built and will allow them to run the whole pan on a milling macine to provide a better fitting pan. I wonder if FM and V8R will continue to use the same vendor for these..? Wish mine would hurry up!!
It's funny you say that about the pan, V8R told me that the reason I'm waiting to receive mine is because it will be a new generation of pans. The big difference, they said, was that the mounting flange on the pan is thicker to take more heat as the pan is built and will allow them to run the whole pan on a milling macine to provide a better fitting pan. I wonder if FM and V8R will continue to use the same vendor for these..? Wish mine would hurry up!!

V8 Miata Noob
Joined: Mar 2013
Posts: 3
Likes: 0
From: Hunterdon County NJ
Update time - I'm a week or two behind on the thread, but progress has been slooow, just as my build title states... Here, we will convert the GTO T56 to 2002 Camaro-style with aftermarket shifter.
First, remove this set-back shift assy.
Next, remove the Tremec extension piece that's held into place with the rolled pin. This is where the ball of the shifter sits and pushes and pulls the rod. (You're correct - I'm not a Tremec expert, thus, I don't know the technical terms and descriptions.
Install the just-arrived Tremec piece that's shorter and designed for 1998-2002 Camaro shifter.
I've already scrubbed, cleaned, and painted the transmission case and belhousing for a spic & span look when she goes under the Miata. Time for fresh gasket material.
Now, let's button it up with a little bit of engineering jewelry: PRO 5.0 shifter that is stout! I've read good reviews so I didn't see why not try one.
Thread Starter
V8 Miata Fanatic
Joined: Oct 2012
Posts: 550
Likes: 34
From: Fuquay Varina, NC
No apologies needed on newbie Q's!! We're all learning about the LS - Miata swaps. I will be asking LOTS of wiring questions when I get to that point -- I just don't have a clear understanding as of yet on ALL that needs to be done to integrate GM wiring and PCM into the Mazda chassis. Oh well...
Back to your question: Since my T56 came out of a 2005 GTO, I had to remove that unique shifter assembly because it sits too far back for perfect alignment like the Camaro T56 shifter location gives you. It was simple to do & I sold the GTO shifter and removed Tremec adapter on eBay this past week to help fund the project, although it sold for less than what I thought it would go for...
So, locate either a T56 from a 1998 - 2002 Camaro/ Firebird LS1 car or the GTO 2004-06 and do what I did. (Keep in mind that later T56's from poss 2001 and up received some internal improvements for durability and such...)
The GTO shifter just will not work with it's offset linkage that kicks it further back on the tranny. The factory Camaro will work or any aftermarket upgrade that's labeled for the LS1 Camaro/ Firebirds will also fit (like my Pro 5.0 version.)
Thread Starter
V8 Miata Fanatic
Joined: Oct 2012
Posts: 550
Likes: 34
From: Fuquay Varina, NC
Several weeks have passed & a few things have held up forward progress/ work on the car: other obligations around the house, my dad's 80th surprise b-day (very glad for that!), and the non-arrival of my V8R oil pan. It's due to the re-design I was informed about a few months ago... Oh well, I'll keep my fingers crossed as I hope for its arrival any day on the big brown truck.
In the meantime, I've been doing more interweb research and making some key part acquisitions. I might as well post up some pics with brief commentary:
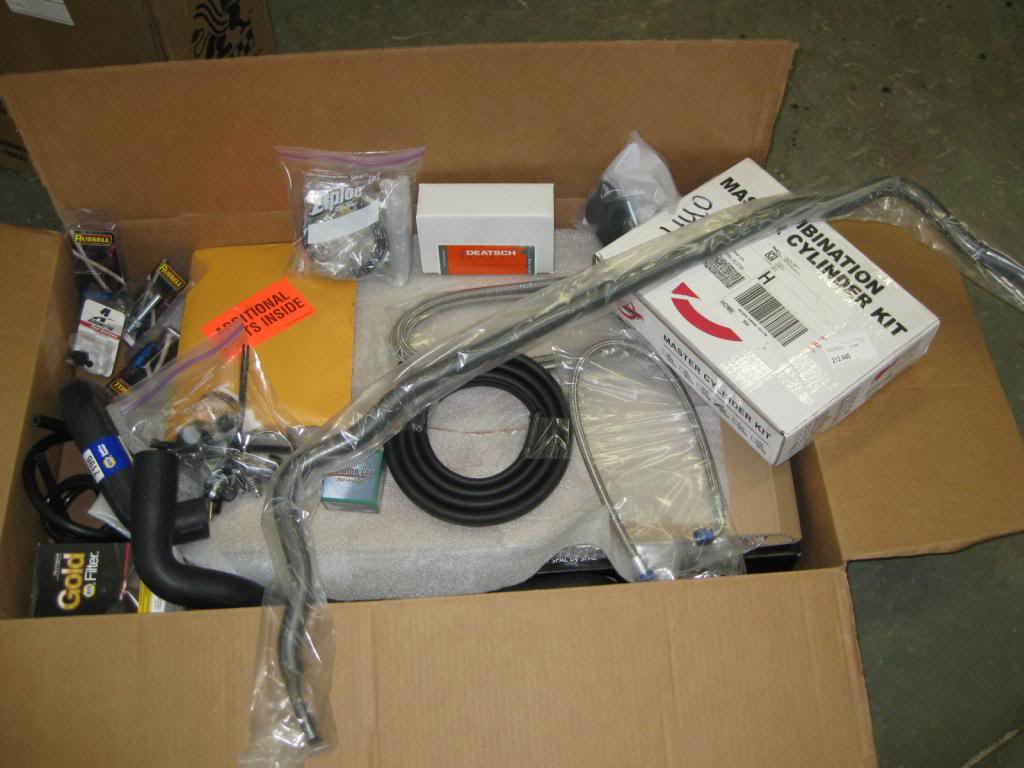
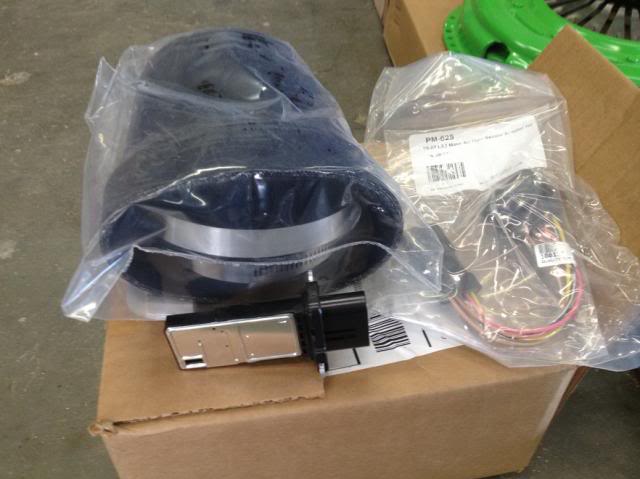
Starting from the front of the car - From 3 vendors, I now have my missing Z06 intake components such as the Hitachi blade-style MAF, wiring harness adapter to tie it into my LS2 harness, and a black, smooth silicone intake adapter that will connect it to the throttle body.
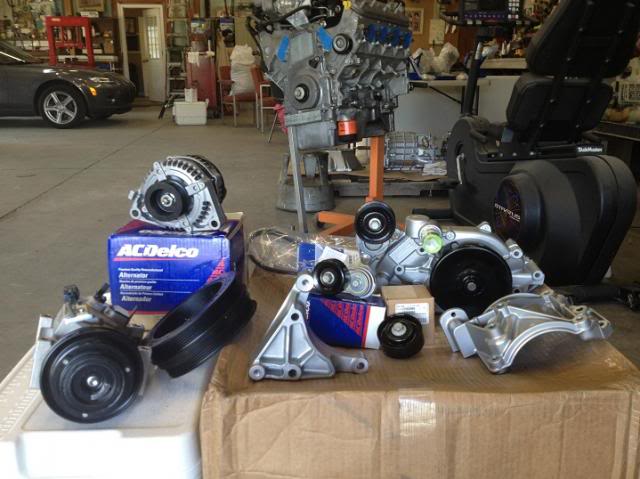
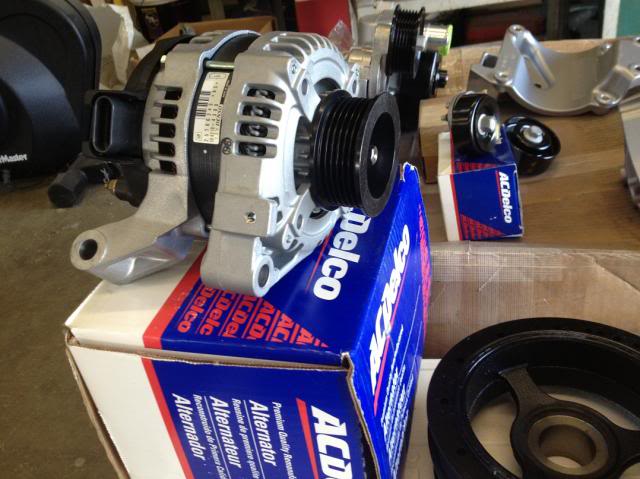
On the front drive accessories, I cobbled up my own CTS-V kit. Since my plans call for no P/S, I didn't want to do the whole GM 19155066 kit. I took the liberty this wknd, to paint the brackets and waterpump with hi-temp silver paint to help preserve the clean looks. After seeing how the bare aluminum brackets and accy's looked on my 7 yr-old LS2 donor, I want to improve it in the looks department. Individual items are either from Delco on Amazon, GM dealer on the web, or eBay vendors. The A/C cond and the alternator were listed as "rebuilt" by reputable eBay vendors, but BOTH arrived as NEW Denso items with Delco/ GM part numbers and Delco boxes. That equaled some big savings! I was going to do a 160F thermostat that I received a few wks ago, but further research indicates that the 180F is what I really need so the LS's engine oil will get hot enough to burn off condensation. New 180F t-stat on the way - new 160F to go on eBay.
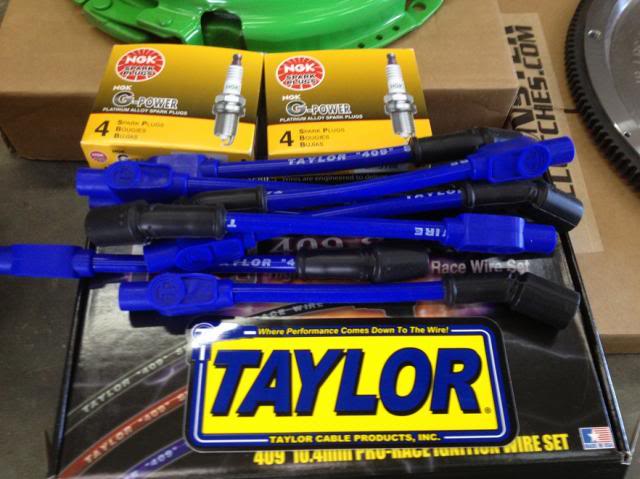
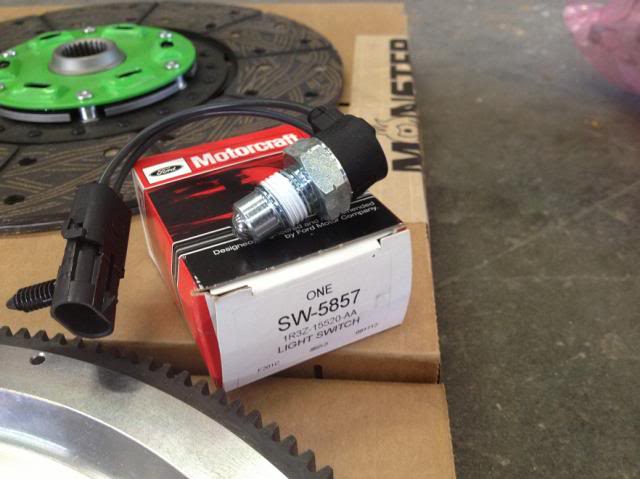
New Taylor wires as one of the original wires broke upon removal - (damn thing was fused on the plug!) New NGK plugs as well. Not seen are my eBay plug wire insulators/boots. They're a blue weave that will be a subtle addition under the hood.
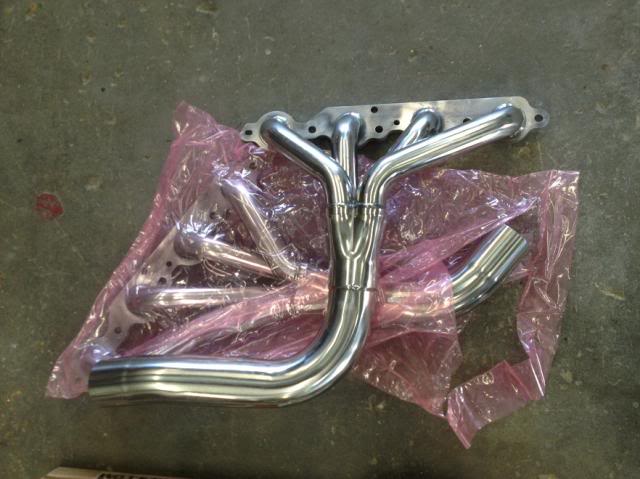
And wrapped up in the wires, will be these FM headers. From what I can tell, the advantage over the Sandersons will be the pipe connections further down in the engine bay.
Motor mount heat shields, anyone? Having never seen a pic of these stainless steel Flyin Miata ones before, I thought I'd post 'em up:

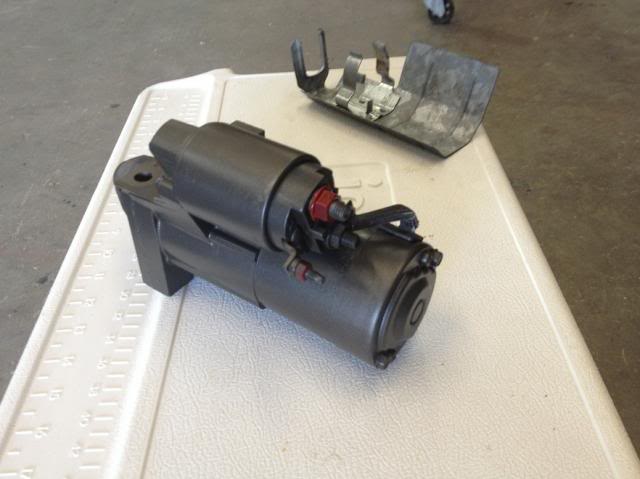
Not new, but I cleaned up the GTO LS2 starter and heatshield. The alum was a little chalky and some surface rust was on the black painted metal. She now has a dark bronze tan to help protect her from the future elements!
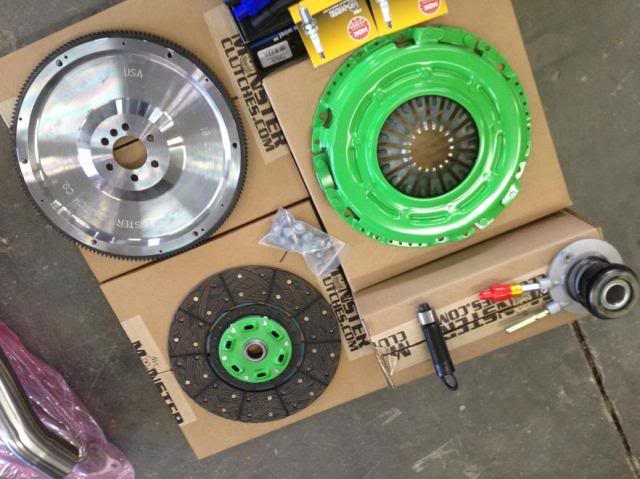
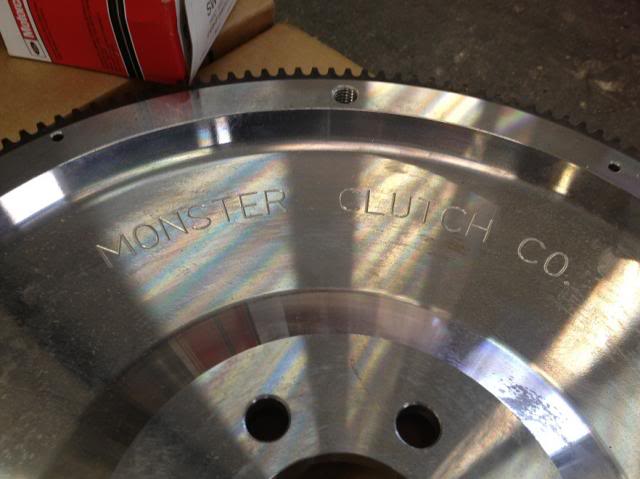
Further back is the new Monster Stage 1 clutch, PP, and lighter-weight steel flywheel at 18lbs. Got this kit from Maryland Speed with their new GM bolts, throwout unit, and pilot bearing.
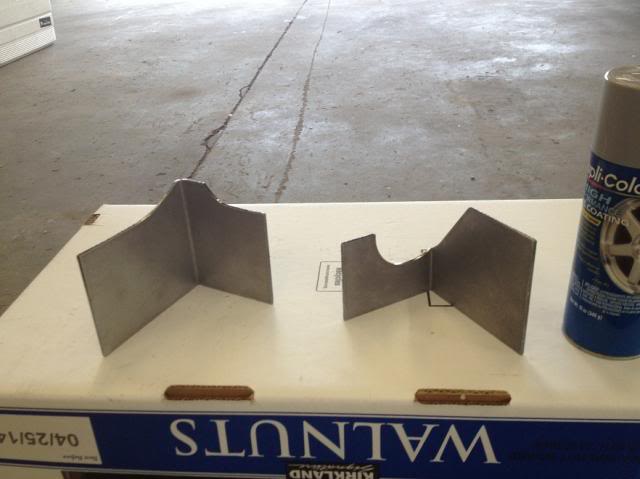
For my cut-up firewall, I'll need these FM weld-in plates to stiffen up the corners. They're heavy gauge - but that's all I can tell you. Paint can is there to illustrate size of the pieces.
From the reading I've done, it sounds like this Motorcraft reverse switch for the T56 will save me a headache as it has a 90 degree bend for better tunnel clearances. Amazon for the win again!
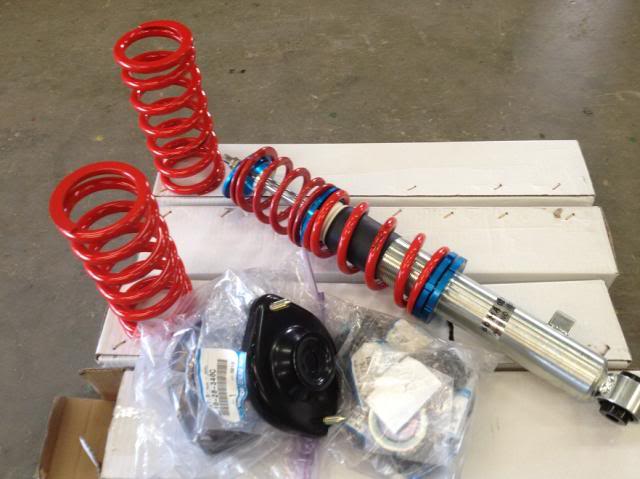
And finally -- brakes, suspension, tires & wheels. I originally thought I'd do this later - like year or 2 later. But the devil kept pushing me along with a demand for more Mission Creep... So, the FM VMaxx Classic with NB Miata upgrade and the FM V8 replacement springs in case it sits too low on the originally-supplied front springs. (I do want this car to keep a relatively lower stance - no original height or taller is acceptable.)
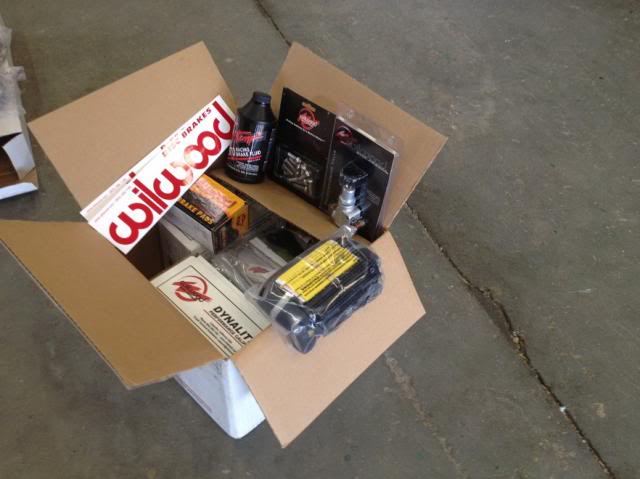
Good-Win Racing supplied the rest: Wilwood BBK - I wimped out and settled on the standard kit with Brian's custom st/steel ft hoses so I won't have to utilize excess Wilwood plumbing adapters. Rotors will be smooth - calipers will be black - no brake bling for me - only guys who have 15" carbon fiber rotors and 6 or 8 piston calipers have the authority to draw attn to their brake set ups!
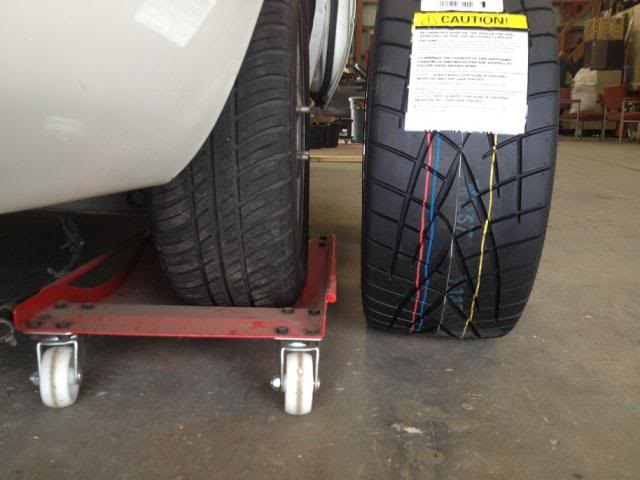
And the tire/ wheel selection -- my preference is for fat tires (yeah, I'm going with no power steering, wish me luck!). These 225/45/15 Toyo Proxes and 15x8 machined-finish Konig Flat Outs will also require some fender lip modifcations. I never wanted to commit adultery to this clean Miata body, but those feelings went out the window after all the stitch welding and cutting that's been going on in recent months!
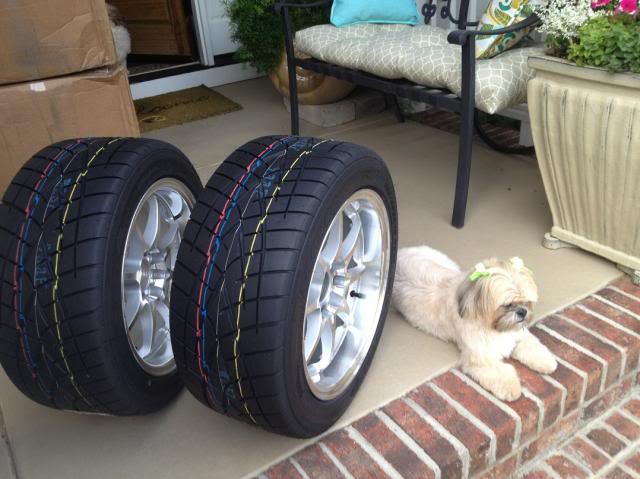
Nikki shared her approval after the FedEx guy left 'em on the porch. She insisted that I take a peek before carrying them to the garage.
Keep you posted as the story continues. BTW, I did take the Ford 8.8 Diff and 3.31:1 ring & pinion to Fastlane Motorsports in Benson, NC. These guys are late-model Mustang experts! They're going to update the diff with Ford Racing bearings, seals, limited slip, etc so she'll be ready to bolt in -- when that day comes.
...Just need an oilpan so the build can resume!!!!!
In the meantime, I've been doing more interweb research and making some key part acquisitions. I might as well post up some pics with brief commentary:
Starting from the front of the car - From 3 vendors, I now have my missing Z06 intake components such as the Hitachi blade-style MAF, wiring harness adapter to tie it into my LS2 harness, and a black, smooth silicone intake adapter that will connect it to the throttle body.
On the front drive accessories, I cobbled up my own CTS-V kit. Since my plans call for no P/S, I didn't want to do the whole GM 19155066 kit. I took the liberty this wknd, to paint the brackets and waterpump with hi-temp silver paint to help preserve the clean looks. After seeing how the bare aluminum brackets and accy's looked on my 7 yr-old LS2 donor, I want to improve it in the looks department. Individual items are either from Delco on Amazon, GM dealer on the web, or eBay vendors. The A/C cond and the alternator were listed as "rebuilt" by reputable eBay vendors, but BOTH arrived as NEW Denso items with Delco/ GM part numbers and Delco boxes. That equaled some big savings! I was going to do a 160F thermostat that I received a few wks ago, but further research indicates that the 180F is what I really need so the LS's engine oil will get hot enough to burn off condensation. New 180F t-stat on the way - new 160F to go on eBay.
New Taylor wires as one of the original wires broke upon removal - (damn thing was fused on the plug!) New NGK plugs as well. Not seen are my eBay plug wire insulators/boots. They're a blue weave that will be a subtle addition under the hood.
And wrapped up in the wires, will be these FM headers. From what I can tell, the advantage over the Sandersons will be the pipe connections further down in the engine bay.
Motor mount heat shields, anyone? Having never seen a pic of these stainless steel Flyin Miata ones before, I thought I'd post 'em up:
Not new, but I cleaned up the GTO LS2 starter and heatshield. The alum was a little chalky and some surface rust was on the black painted metal. She now has a dark bronze tan to help protect her from the future elements!
Further back is the new Monster Stage 1 clutch, PP, and lighter-weight steel flywheel at 18lbs. Got this kit from Maryland Speed with their new GM bolts, throwout unit, and pilot bearing.
For my cut-up firewall, I'll need these FM weld-in plates to stiffen up the corners. They're heavy gauge - but that's all I can tell you. Paint can is there to illustrate size of the pieces.
From the reading I've done, it sounds like this Motorcraft reverse switch for the T56 will save me a headache as it has a 90 degree bend for better tunnel clearances. Amazon for the win again!
And finally -- brakes, suspension, tires & wheels. I originally thought I'd do this later - like year or 2 later. But the devil kept pushing me along with a demand for more Mission Creep... So, the FM VMaxx Classic with NB Miata upgrade and the FM V8 replacement springs in case it sits too low on the originally-supplied front springs. (I do want this car to keep a relatively lower stance - no original height or taller is acceptable.)
Good-Win Racing supplied the rest: Wilwood BBK - I wimped out and settled on the standard kit with Brian's custom st/steel ft hoses so I won't have to utilize excess Wilwood plumbing adapters. Rotors will be smooth - calipers will be black - no brake bling for me - only guys who have 15" carbon fiber rotors and 6 or 8 piston calipers have the authority to draw attn to their brake set ups!
And the tire/ wheel selection -- my preference is for fat tires (yeah, I'm going with no power steering, wish me luck!). These 225/45/15 Toyo Proxes and 15x8 machined-finish Konig Flat Outs will also require some fender lip modifcations. I never wanted to commit adultery to this clean Miata body, but those feelings went out the window after all the stitch welding and cutting that's been going on in recent months!
Nikki shared her approval after the FedEx guy left 'em on the porch. She insisted that I take a peek before carrying them to the garage.
Keep you posted as the story continues. BTW, I did take the Ford 8.8 Diff and 3.31:1 ring & pinion to Fastlane Motorsports in Benson, NC. These guys are late-model Mustang experts! They're going to update the diff with Ford Racing bearings, seals, limited slip, etc so she'll be ready to bolt in -- when that day comes.
...Just need an oilpan so the build can resume!!!!!

V8 Miata Noob
Joined: Feb 2013
Posts: 5
Likes: 0
BTW, I did take the Ford 8.8 Diff and 3.31:1 ring & pinion to Fastlane Motorsports in Benson, NC. These guys are late-model Mustang experts! They're going to update the diff with Ford Racing bearings, seals, limited slip, etc so she'll be ready to bolt in -- when that day comes.
Awesome build ToySnake. You are definitely doing it Right!
Thread Starter
V8 Miata Fanatic
Joined: Oct 2012
Posts: 550
Likes: 34
From: Fuquay Varina, NC
Yeah,they did give me a ballpark range - but that will likely change if they decide not to use my like-new, which they call "used" , ring & pinion that I sourced off of eBay. I also asked if they could locate an alum rear diff cover as I think that the rear diff some guy  (thanks Tad!) gave me is all cast iron/ steel. Regardless, that donated diff is going to a good home one day when it gets suspended up in the back of my Miata!
, ring & pinion that I sourced off of eBay. I also asked if they could locate an alum rear diff cover as I think that the rear diff some guy (thanks Tad!) gave me is all cast iron/ steel. Regardless, that donated diff is going to a good home one day when it gets suspended up in the back of my Miata!

V8 Miata Zealot
Joined: Mar 2010
Posts: 1,220
Likes: 51
From: Canton, Georgia
Take it by your local Ford dealer & slip around back & talk to the techs. Find out who is the differential specialist, & see if he could do your rebuild on the side. The guys in the parts department can probably tell you who you need to talk to. I used to charge $100 + parts for ring & pinion swaps.

Jim Stainer
Joined: Jul 2011
Posts: 2,462
Likes: 62
From: Sunny SW Minnesota
The last set up I paid for was $193 in labor and that was the end of that! Have you guys considered not farming the job out? IMO if you can convert a Miata to a V8 you certainly have the chops to set up a diff. It's not rocket science and if you are using an iron diff the only tool it takes you might not have is a dial indicator. That can be had for way less $$ than the labor to have it set up plus you will have the tools and know how if you ever want to swap them again for a different ratio. The IRS is sweet because it’s easy to do on the bench not like a solid axle lying on your back.
Pat for the little bit of money difference I would go with new gears. 8.8s are pretty forgiving and easy to get quiet but still not worth the gamble if you are paying for set ups.
Pat for the little bit of money difference I would go with new gears. 8.8s are pretty forgiving and easy to get quiet but still not worth the gamble if you are paying for set ups.
Thread Starter
V8 Miata Fanatic
Joined: Oct 2012
Posts: 550
Likes: 34
From: Fuquay Varina, NC
I just decided to take it the local Ford specialty shop after receiving a few recommendations - and no one in my circle - old hot rodders and a Factory Five cobra builder/owner had set up their own rear diffs. The guys at Fastlane were great when I met and dropped it off with them, and I'm glad to give them a little business. They want to see this LSx Miata once it's done! These Mustang heads hadn't heard about this particular swap!
And, I agree -- if they believe there's any reason not to use this 500 mi. ring & pinion, then I agreed that they should go ahead and procure one. I got $80 (I believe?) invested in it & will gladly throw it back on eBay if it goes unused...
And, I agree -- if they believe there's any reason not to use this 500 mi. ring & pinion, then I agreed that they should go ahead and procure one. I got $80 (I believe?) invested in it & will gladly throw it back on eBay if it goes unused...
V8 Miata Zealot
Joined: Mar 2010
Posts: 1,220
Likes: 51
From: Canton, Georgia
The Ford dealer will have the proper special tools to set-up your ring & pinion correctly. This includes a "case expander", which most people have never seen or heard of, unless they have actually read a Ford service manual.
Last edited by tbone heller; May 31, 2013 at 06:55 AM.

V8 Miata Fan
Joined: Apr 2013
Posts: 31
Likes: 0
From: I hear Banjos - GA
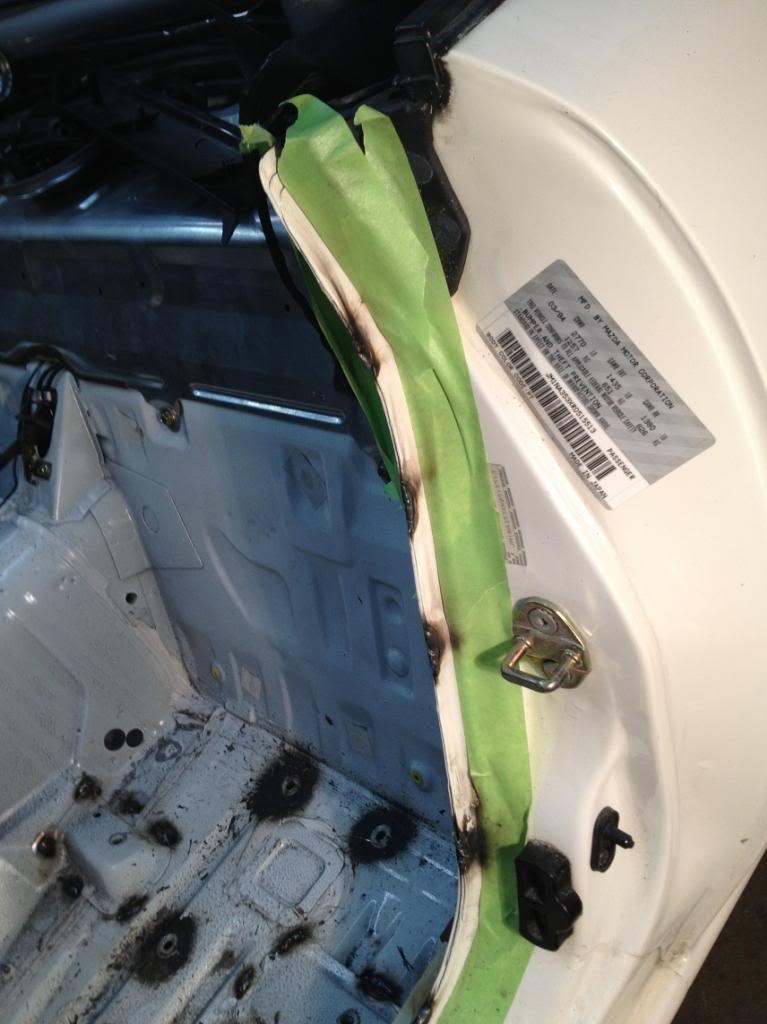
I see in the FM instructions to remove both gussets (inside the car), but I have not seen pictures of the inside drivers side after the widening. How much did you move the drivers side tunnel?
Do you have a picture of the inside after the gussets have been reinstalled?
Also - on the FM instructions, step 13, it states:
"Make sure that our frame reinforcements (that go between the frame rail and firewall) fit properly; adjust them if need be. If you don�t have a pair, call us and we�ll fix that".
Do you have these reinforcement pieces - or a picture of them?
Thanks!!
Thread Starter
V8 Miata Fanatic
Joined: Oct 2012
Posts: 550
Likes: 34
From: Fuquay Varina, NC
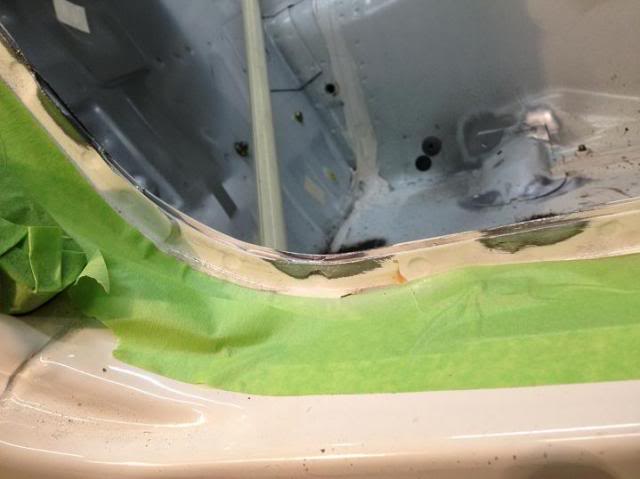
SB5700 - Yes sir, here's a pic of the FM frame rail reinforcements. They're made of fairly heavy gauge metal. This pic was on page 4 in this thread as a matter of fact.

Regarding your Q about inside gussets -- I've only removed my pair at this point - Once I can test-fit the engine and bellhousing, only then will I know what my inside clearances will be and then will reweld the interior gussets.
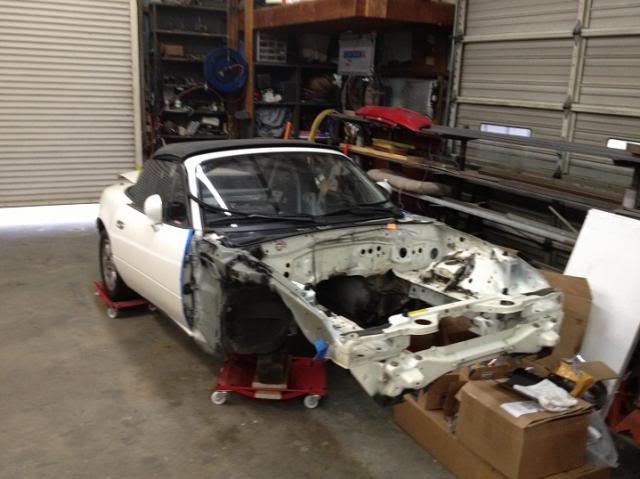
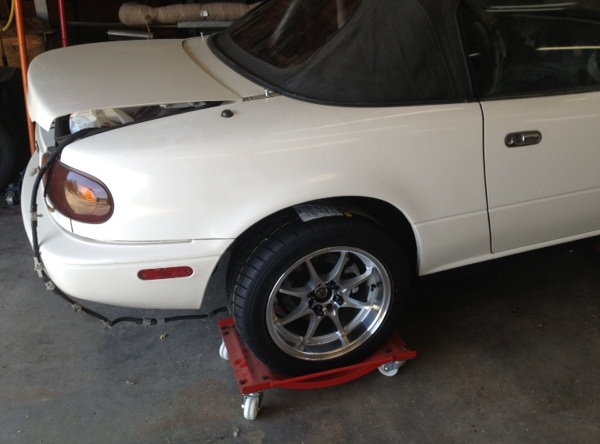
And because I don't have the elusive V8R alum oil pan as of yet and can do the above-mentioned test fitting..., I decided to install one new tire/wheel for the heck of it - just needed some inspiration, I guess. Car is up in the air so this exagerated fender gap will be a thing of the past once it's built and back on the ground!
Regarding your Q about inside gussets -- I've only removed my pair at this point - Once I can test-fit the engine and bellhousing, only then will I know what my inside clearances will be and then will reweld the interior gussets.
And because I don't have the elusive V8R alum oil pan as of yet and can do the above-mentioned test fitting..., I decided to install one new tire/wheel for the heck of it - just needed some inspiration, I guess. Car is up in the air so this exagerated fender gap will be a thing of the past once it's built and back on the ground!
V8 Miata Fan
Joined: Apr 2013
Posts: 31
Likes: 0
From: I hear Banjos - GA
I appreciate the repost - clearly I blew right past that on page 4. I think I can make these up - I have a sheet of 14ga steel that should be perfect for the corner supports.
I wish I had a plasma cutter... but I have not been able to justify the cost in the past.
I wish I had a plasma cutter... but I have not been able to justify the cost in the past.
Thread Starter
V8 Miata Fanatic
Joined: Oct 2012
Posts: 550
Likes: 34
From: Fuquay Varina, NC
Got ALL kind of good news to share this week! First of all, V8R has sent me some FedEx tracking numbers for the belated items such as newly revised alum LSx pan, P/S delete brkt, and my A/C block for the CTS-V compressor to Mazda hoses (at least, that's how I think it fits in - been a while...). Many pics of the pan will be posted as soon as it arrives in NC.
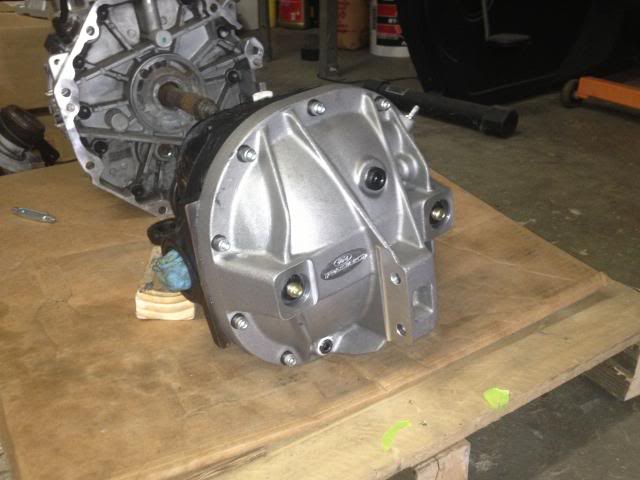
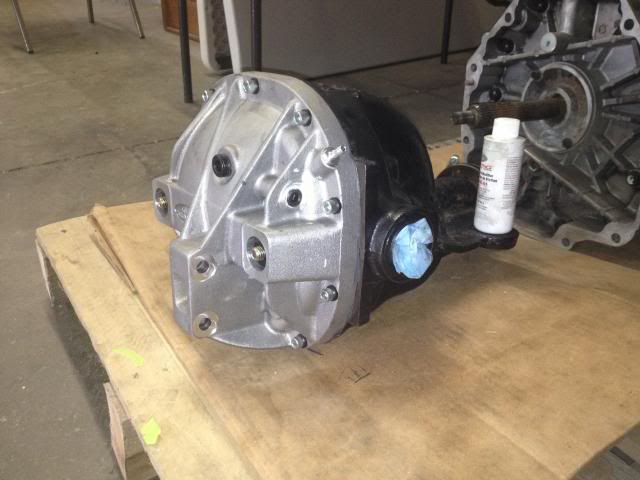
Today was a quick field trip to Fastlane Motorsports, builders of all thing bad@ss when it comes to late model Mustang. I picked up my just-built 8.8 IRS diff with all Ford Racing goodies inside and outside: ring & pinion install kit, 3.31 ring & pin, rebuilt Traction Lok kit, and the alum Cobra IRS girdle cover for some added bling. For those 3 or 4 folks who will be willing to look under this car after it's on the road, ...they will get the special treat of seeing this! For everyone else who fails to look under the rear bumper, ...then it's wasted $ on my part! But I LIKE it! Now, I will need to sand, prep, and paint the black housing to bring the rest of the appearance to proper standards. I think it will be silver/ hi-heat aluminum paint as well for better match.
Now, if I so chose, I can pull the rear suspension and Mazda diff out for proper build up of rear suspension/ diff installation/ etc... Glad to get over the hump as I waited for rear diff and oil pan...


