
99 10ae ls1


V8 Miata Prot�g�

Joined: Nov 2014
Posts: 485
Likes: 37
From: South FL
Yep, not on my Miata but I have one on my truck like that and it works fine. Probably too late now, but I found the best way to remove the seam sealer was a screw driver or scraper. As you saw the wirewheel just melts ig and slings it everywhere.

Thread Starter
V8 Miata Fanatic
Joined: Feb 2015
Posts: 559
Likes: 83
From: Marion Illinois
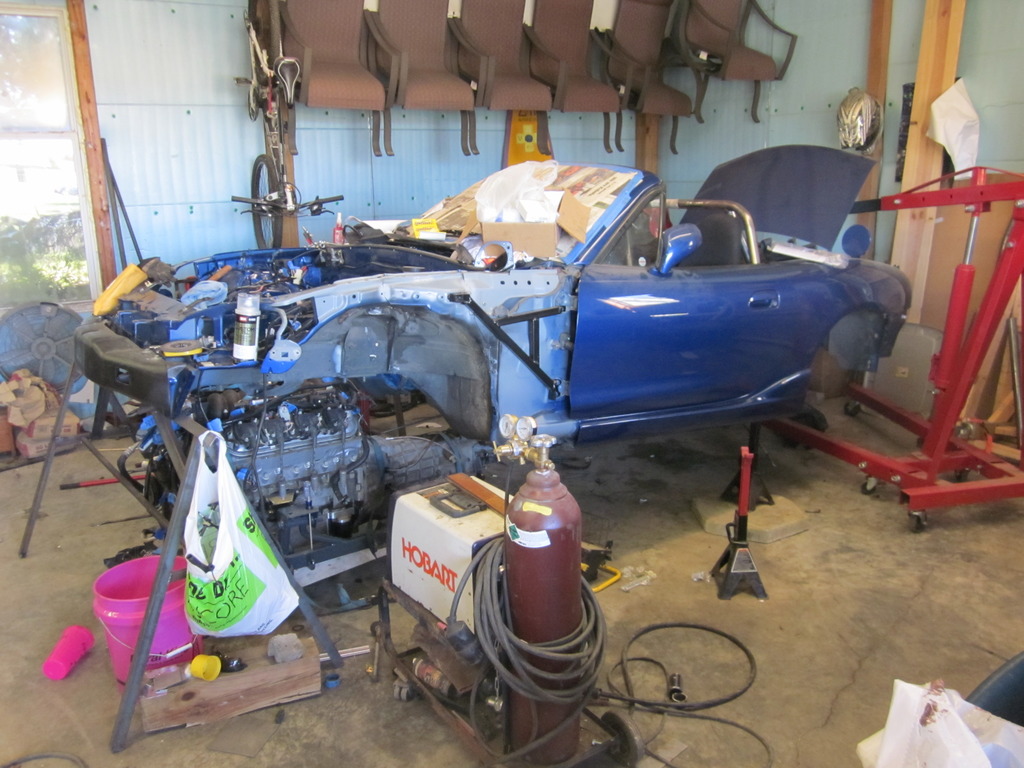
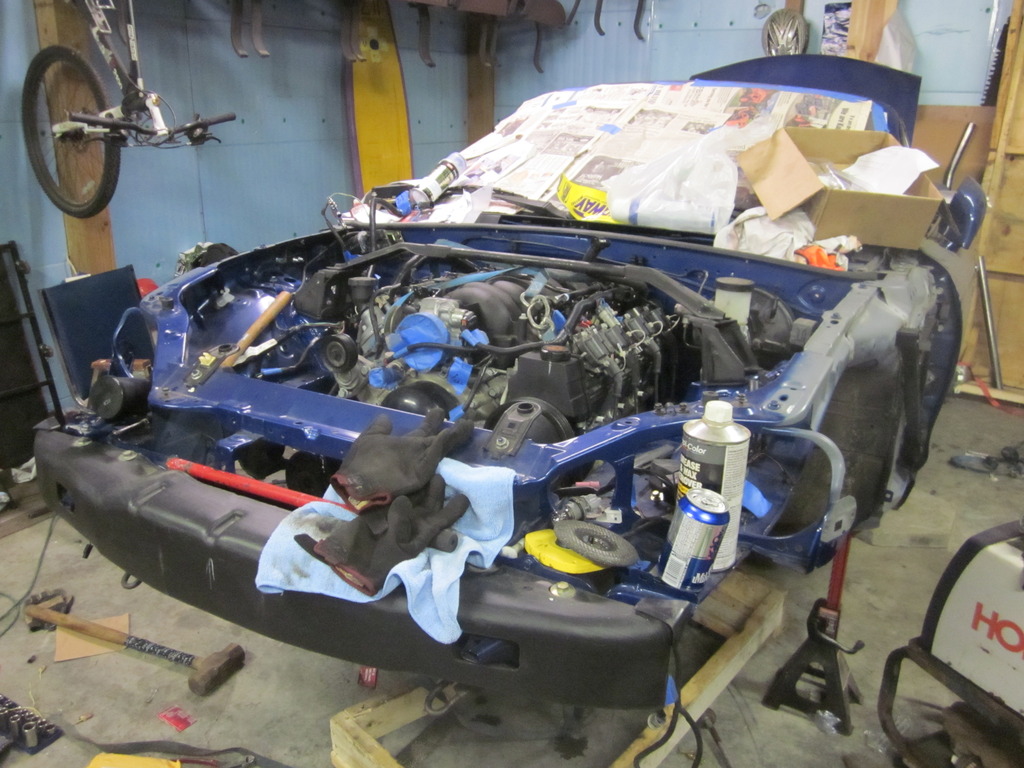
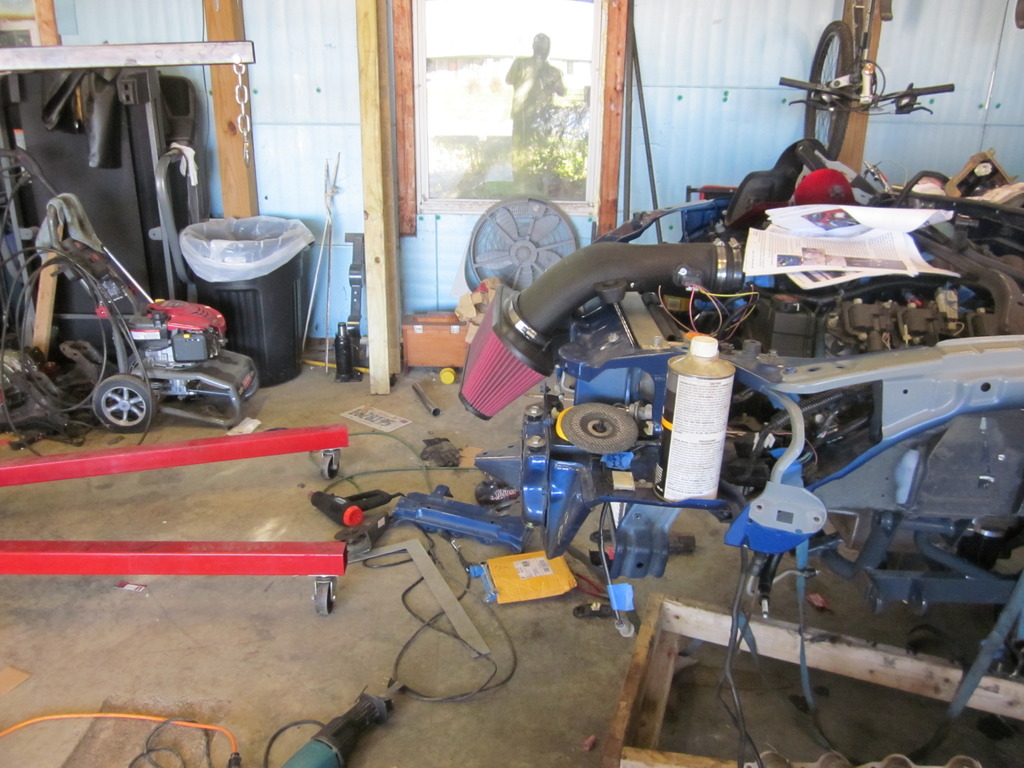
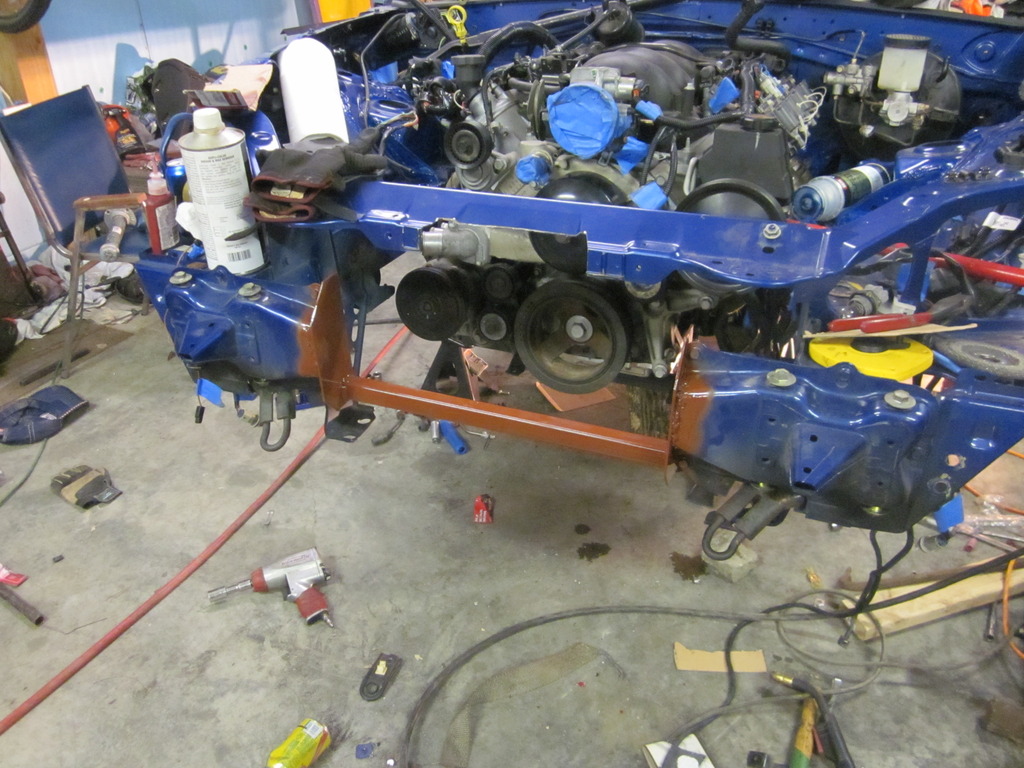
Alright, I'm getting a little tired of watching itsallrigged' progress so I had to put something up. Sorry I know its been about a month since my last real update, I have been working but I just haven't had time to put anything on here.
I came back from vacation and I had left her at a spot that was pretty well close to test fitting the engine...so after about 4-5 tries of installing-massaging-install-massaging, I finally got her in place, and good grief is she tight!! I felt like I had to do a little more loving on the firewall itself than some of you have but oh well!
<a href="http://s353.photobucket.com/user/stng_96/media/IMG_1768_zps0rxylwmw.jpg.html" target="_blank"><img src="http://i353.photobucket.com/albums/r364/stng_96/IMG_1768_zps0rxylwmw.jpg" border="0" alt=" photo IMG_1768_zps0rxylwmw.jpg"/></a>
<a href="http://s353.photobucket.com/user/stng_96/media/IMG_1769_zps79ul9bno.jpg.html" target="_blank"><img src="http://i353.photobucket.com/albums/r364/stng_96/IMG_1769_zps79ul9bno.jpg" border="0" alt=" photo IMG_1769_zps79ul9bno.jpg"/></a>
<a href="http://s353.photobucket.com/user/stng_96/media/IMG_1770_zpslcu9eszz.jpg.html" target="_blank"><img src="http://i353.photobucket.com/albums/r364/stng_96/IMG_1770_zpslcu9eszz.jpg" border="0" alt=" photo IMG_1770_zpslcu9eszz.jpg"/></a>
<a href="http://s353.photobucket.com/user/stng_96/media/IMG_1772_zpscan0e0mw.jpg.html" target="_blank"><img src="http://i353.photobucket.com/albums/r364/stng_96/IMG_1772_zpscan0e0mw.jpg" border="0" alt=" photo IMG_1772_zpscan0e0mw.jpg"/></a>
<a href="http://s353.photobucket.com/user/stng_96/media/IMG_1774_zpsxdxq4npo.jpg.html" target="_blank"><img src="http://i353.photobucket.com/albums/r364/stng_96/IMG_1774_zpsxdxq4npo.jpg" border="0" alt=" photo IMG_1774_zpsxdxq4npo.jpg"/></a>
<a href="http://s353.photobucket.com/user/stng_96/media/IMG_1775_zpssxrtazw2.jpg.html" target="_blank"><img src="http://i353.photobucket.com/albums/r364/stng_96/IMG_1775_zpssxrtazw2.jpg" border="0" alt=" photo IMG_1775_zpssxrtazw2.jpg"/></a>
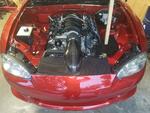
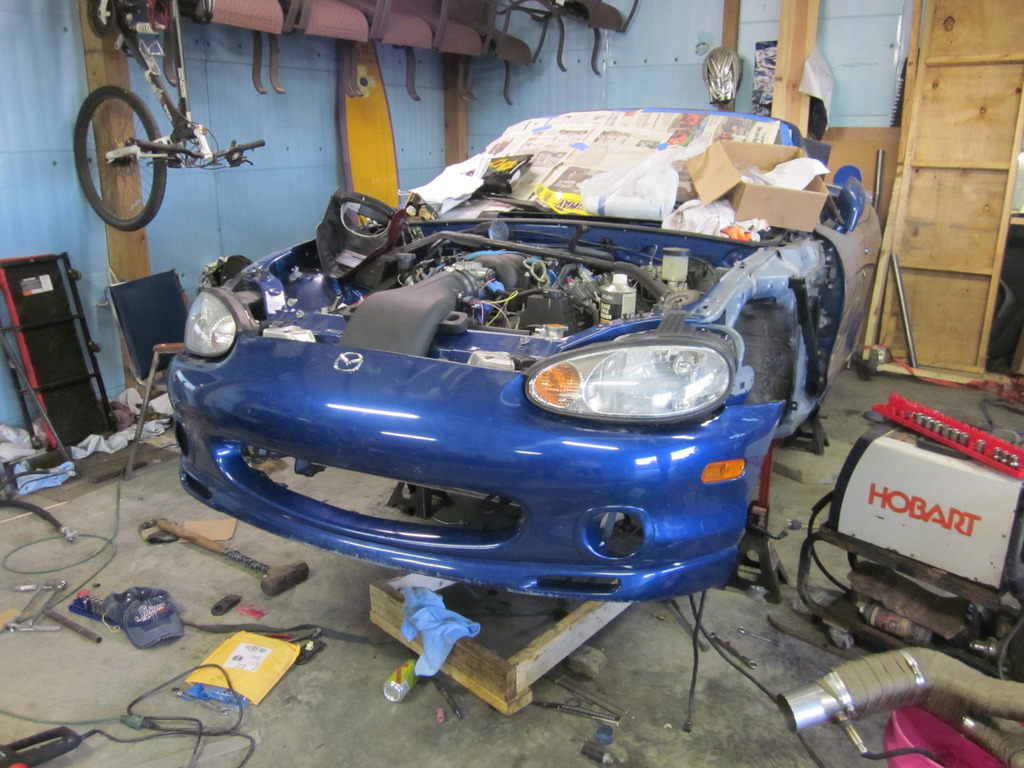
After a few choice words, a few adult beverages, and one very black finger I was relieved to see the engine/trans in the car finally!! Don't get carried away I know the air cleaner does not fit like that! I really just got excited and wanted to see it on there.
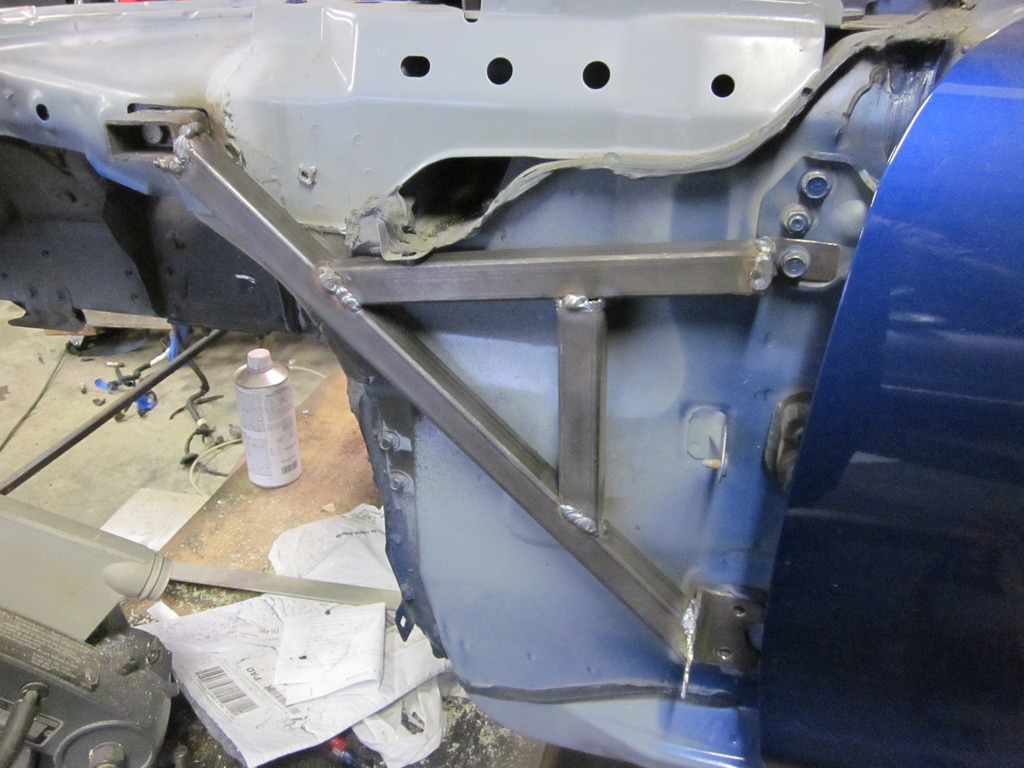
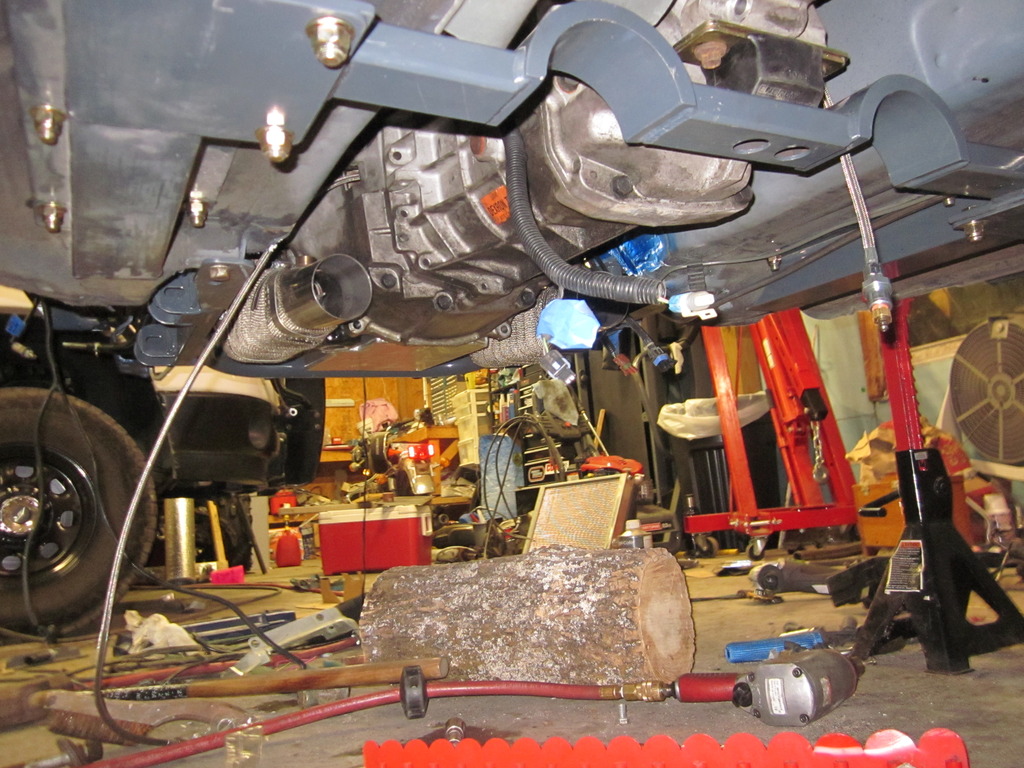
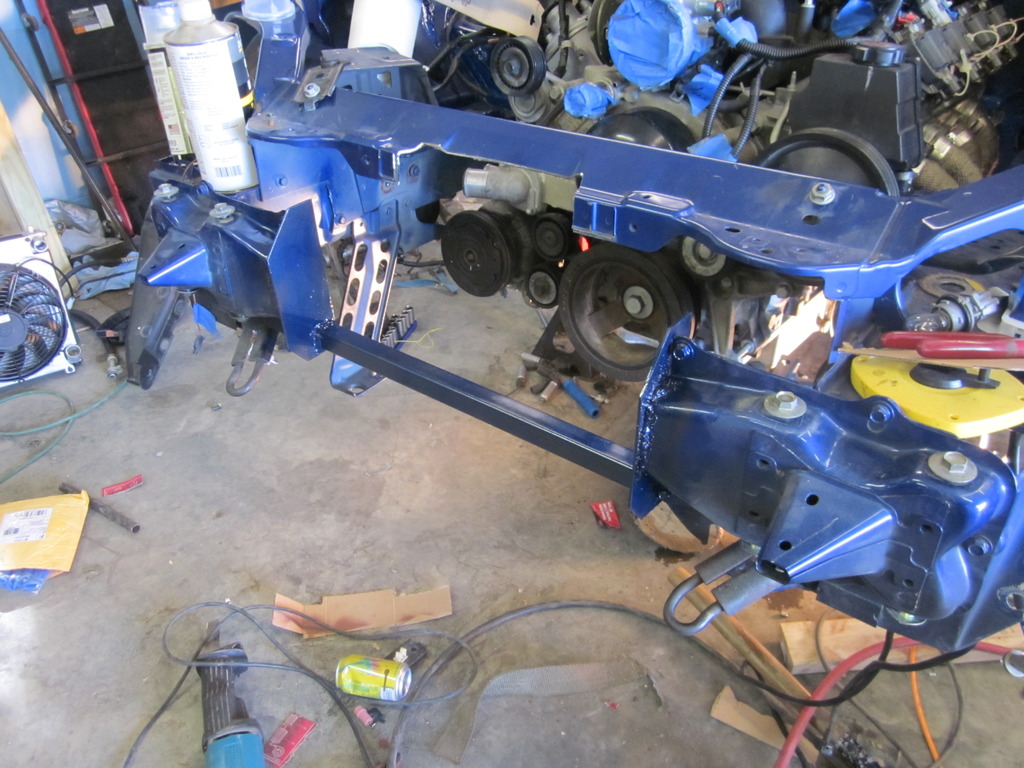
After that I obviously pulled her back out and began the welding process on everything that was left. All the seams that had been exposed or cut were addressed, as well as the tunnel and the support gussets inside.
<a href="http://s353.photobucket.com/user/stng_96/media/IMG_1779_zpssmuedudl.jpg.html" target="_blank"><img src="http://i353.photobucket.com/albums/r364/stng_96/IMG_1779_zpssmuedudl.jpg" border="0" alt=" photo IMG_1779_zpssmuedudl.jpg"/></a>
<a href="http://s353.photobucket.com/user/stng_96/media/IMG_1780_zpsa7ilki63.jpg.html" target="_blank"><img src="http://i353.photobucket.com/albums/r364/stng_96/IMG_1780_zpsa7ilki63.jpg" border="0" alt=" photo IMG_1780_zpsa7ilki63.jpg"/></a>
<a href="http://s353.photobucket.com/user/stng_96/media/IMG_1778_zpsf3ftbwxq.jpg.html" target="_blank"><img src="http://i353.photobucket.com/albums/r364/stng_96/IMG_1778_zpsf3ftbwxq.jpg" border="0" alt=" photo IMG_1778_zpsf3ftbwxq.jpg"/></a>
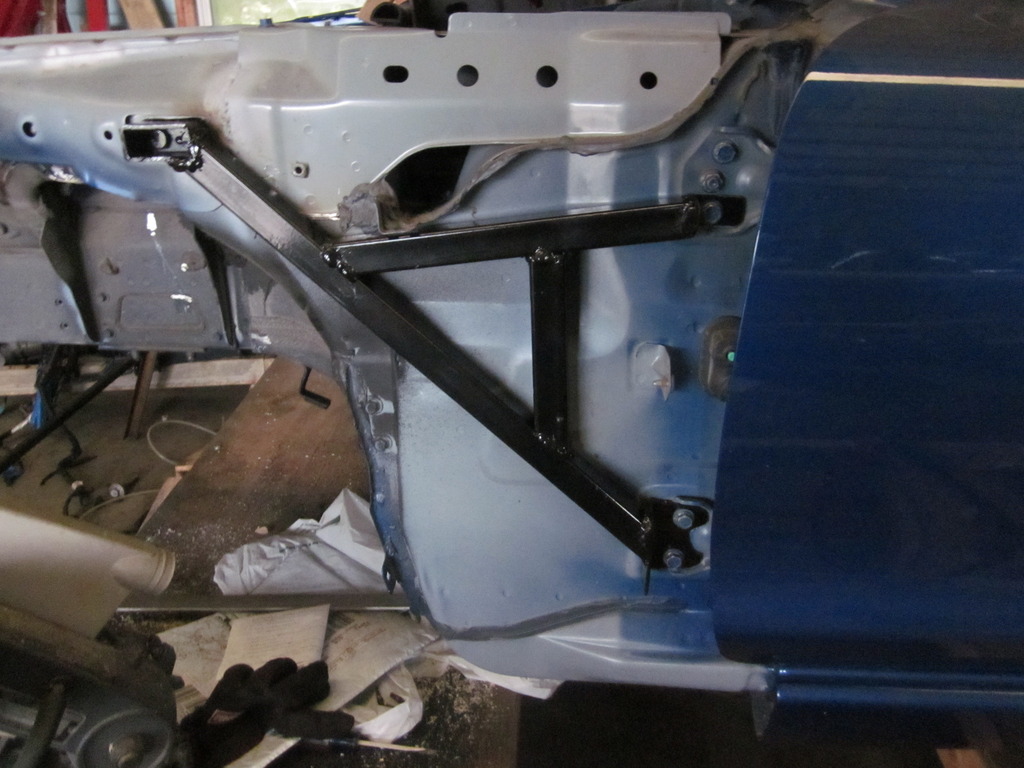
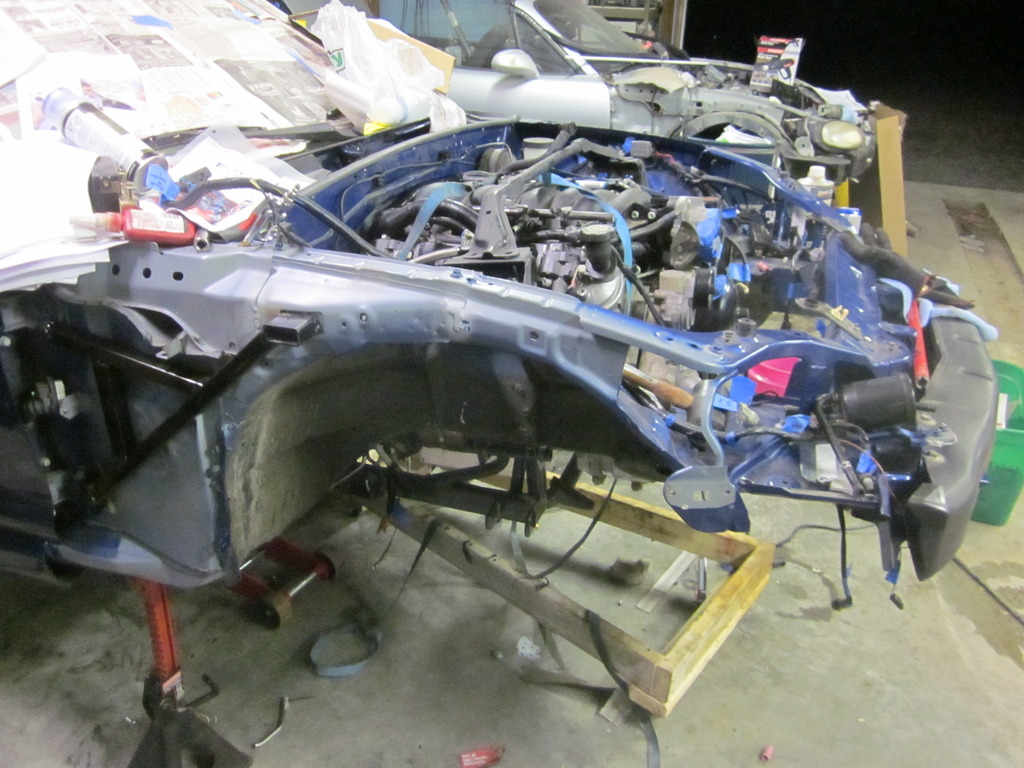
For some reason I didn't take many pictures of the car with the seam sealer back on, but I did put it over all locations I removed it from plus some:
<a href="http://s353.photobucket.com/user/stng_96/media/IMG_1788_zpsp0ojwu2q.jpg.html" target="_blank"><img src="http://i353.photobucket.com/albums/r364/stng_96/IMG_1788_zpsp0ojwu2q.jpg" border="0" alt=" photo IMG_1788_zpsp0ojwu2q.jpg"/></a>
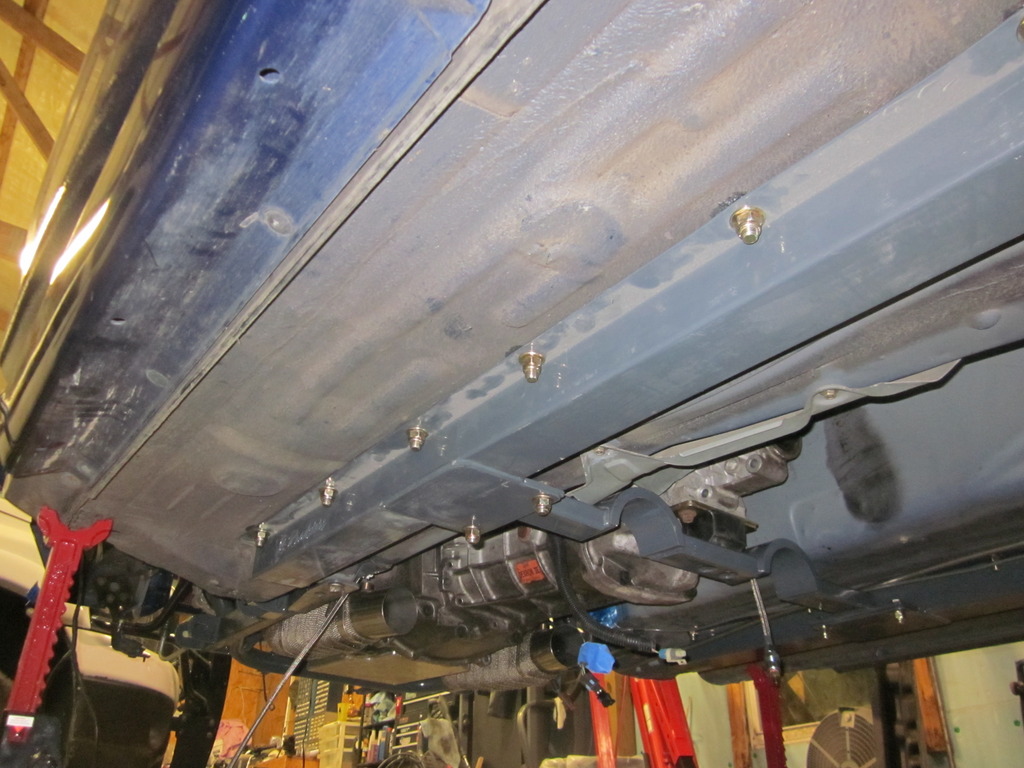
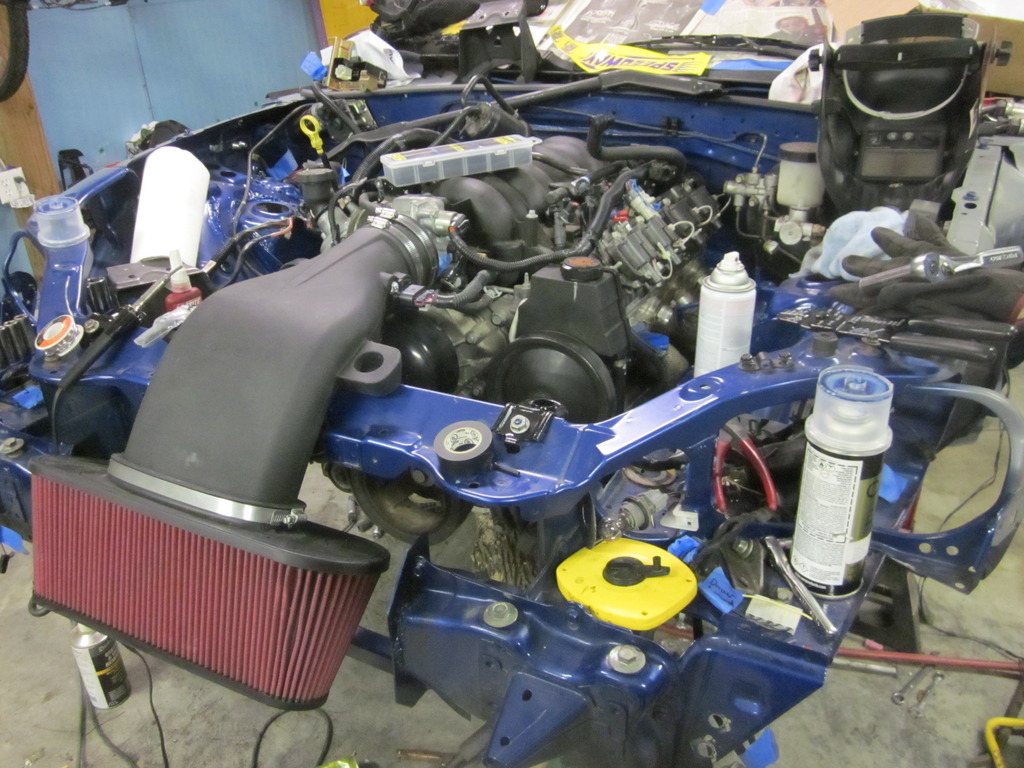
Now that it is all on and dried it was time to paint....I will be undercoating as well but I have not gotten to it yet so don't flame me too bad. I didn't want to change the color of my engine bay, so I went to a local paint shop and had them mix me some paint of my code and put it in an aerosol can(Love the 10AE Blue). It matched really well actually, and it will look even better when I get the rest of the engine bay cleaned up. These pictures don't do it justice with all the dirt in areas I was not working! Worst case scenario I'll just mask and paint the entire engine bay.
<a href="http://s353.photobucket.com/user/stng_96/media/IMG_1787_zpstscn8ubv.jpg.html" target="_blank"><img src="http://i353.photobucket.com/albums/r364/stng_96/IMG_1787_zpstscn8ubv.jpg" border="0" alt=" photo IMG_1787_zpstscn8ubv.jpg"/></a>
<a href="http://s353.photobucket.com/user/stng_96/media/IMG_1786_zpsq1culd0z.jpg.html" target="_blank"><img src="http://i353.photobucket.com/albums/r364/stng_96/IMG_1786_zpsq1culd0z.jpg" border="0" alt=" photo IMG_1786_zpsq1culd0z.jpg"/></a>
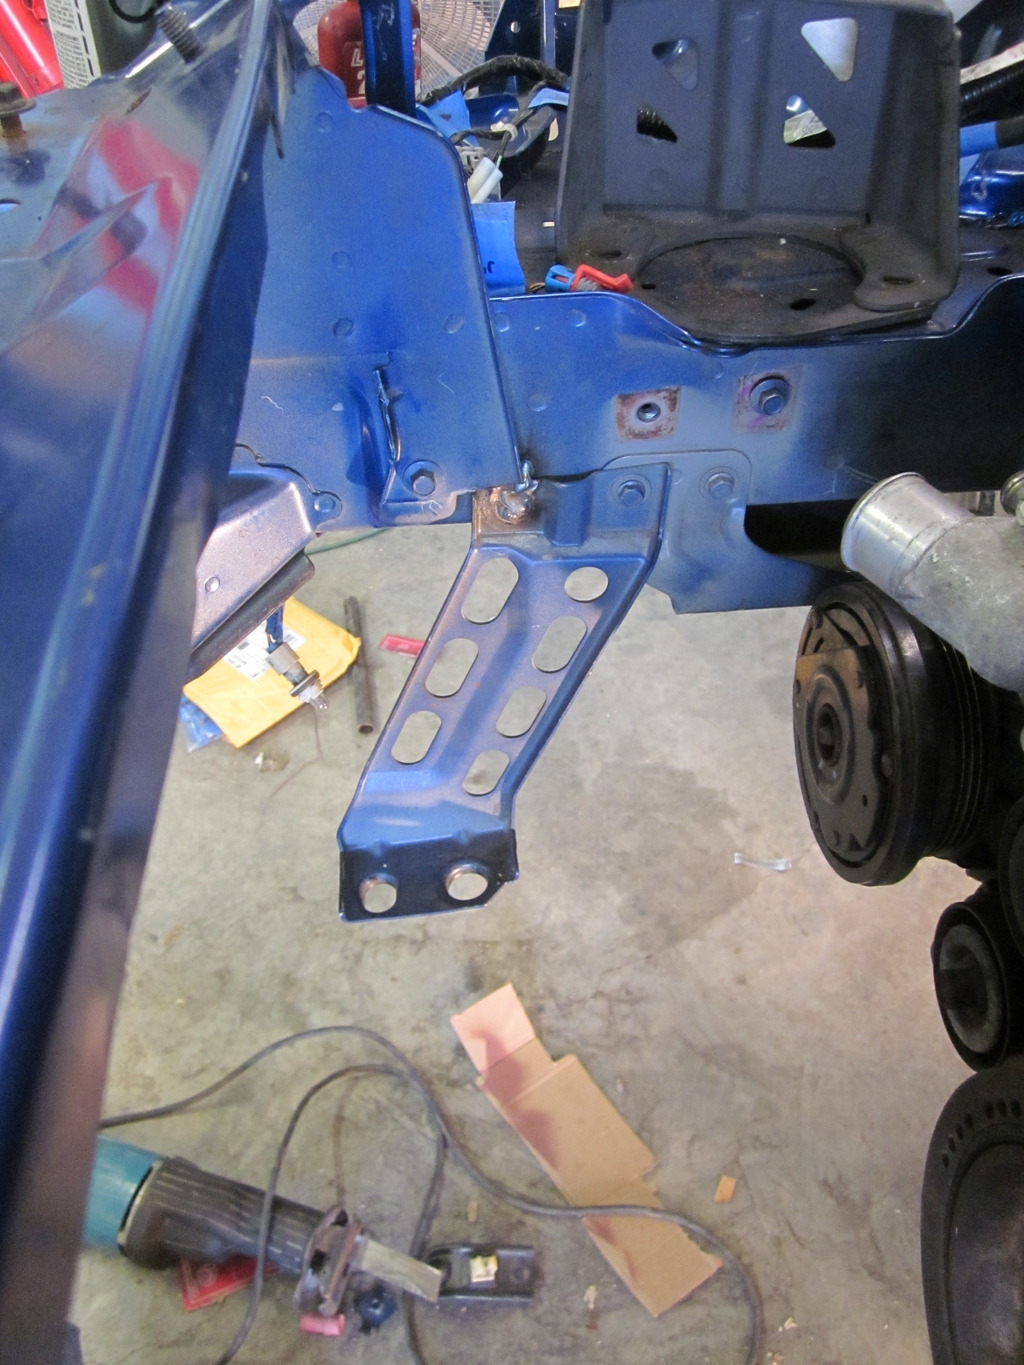
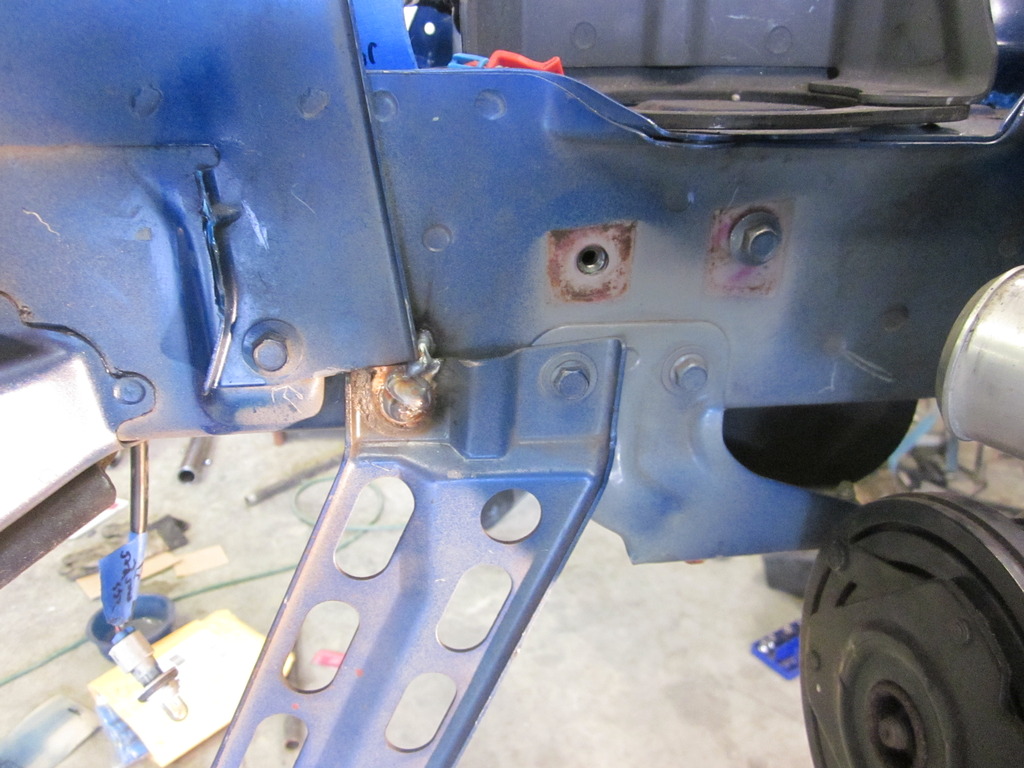
Last real bit of progress to mention on this car is the welding under the kick plates as seen in these pictures. In my opinion, this is one of the key areas to stiffen up for launching the car.
<a href="http://s353.photobucket.com/user/stng_96/media/IMG_1789_zpss1urg55e.jpg.html" target="_blank"><img src="http://i353.photobucket.com/albums/r364/stng_96/IMG_1789_zpss1urg55e.jpg" border="0" alt=" photo IMG_1789_zpss1urg55e.jpg"/></a>
Last but not least, for those of you who have been keeping up regular tabs, I have been parting out another miata as I have been building my car because:
1. I needed some of the parts from it for my car
2. I have been able to use it for a test dummy as I build my car
3. I use the funds from it for my build car, after all said and done, I have netted over $2300 from this car after I kept what I wanted
<a href="http://s353.photobucket.com/user/stng_96/media/IMG_1777_zpstlyggmhx.jpg.html" target="_blank"><img src="http://i353.photobucket.com/albums/r364/stng_96/IMG_1777_zpstlyggmhx.jpg" border="0" alt=" photo IMG_1777_zpstlyggmhx.jpg"/></a>
I had complete intentions of keeping it until my car was complete, but alas....Another Miata has come into my life that will be parted out, so this one is on the way to the scrapper this saturday.
<a href="http://s353.photobucket.com/user/stng_96/media/IMG_1784_zpsxv1yqgdv.jpg.html" target="_blank"><img src="http://i353.photobucket.com/albums/r364/stng_96/IMG_1784_zpsxv1yqgdv.jpg" border="0" alt=" photo IMG_1784_zpsxv1yqgdv.jpg"/></a>
New parts car is also a 99, very rusty so I don't feel bad sacrificing it. It had 120k miles on it with another spun rod bearing.
<a href="http://s353.photobucket.com/user/stng_96/media/miata1_zps7isjcfgz.jpg.html" target="_blank"><img src="http://i353.photobucket.com/albums/r364/stng_96/miata1_zps7isjcfgz.jpg" border="0" alt=" photo miata1_zps7isjcfgz.jpg"/></a>
<a href="http://s353.photobucket.com/user/stng_96/media/IMG_1783_zpswr5anu5x.jpg.html" target="_blank"><img src="http://i353.photobucket.com/albums/r364/stng_96/IMG_1783_zpswr5anu5x.jpg" border="0" alt=" photo IMG_1783_zpswr5anu5x.jpg"/></a>
Alright, time to get back out and work!
I came back from vacation and I had left her at a spot that was pretty well close to test fitting the engine...so after about 4-5 tries of installing-massaging-install-massaging, I finally got her in place, and good grief is she tight!! I felt like I had to do a little more loving on the firewall itself than some of you have but oh well!
<a href="http://s353.photobucket.com/user/stng_96/media/IMG_1768_zps0rxylwmw.jpg.html" target="_blank"><img src="http://i353.photobucket.com/albums/r364/stng_96/IMG_1768_zps0rxylwmw.jpg" border="0" alt=" photo IMG_1768_zps0rxylwmw.jpg"/></a>
<a href="http://s353.photobucket.com/user/stng_96/media/IMG_1769_zps79ul9bno.jpg.html" target="_blank"><img src="http://i353.photobucket.com/albums/r364/stng_96/IMG_1769_zps79ul9bno.jpg" border="0" alt=" photo IMG_1769_zps79ul9bno.jpg"/></a>
<a href="http://s353.photobucket.com/user/stng_96/media/IMG_1770_zpslcu9eszz.jpg.html" target="_blank"><img src="http://i353.photobucket.com/albums/r364/stng_96/IMG_1770_zpslcu9eszz.jpg" border="0" alt=" photo IMG_1770_zpslcu9eszz.jpg"/></a>
<a href="http://s353.photobucket.com/user/stng_96/media/IMG_1772_zpscan0e0mw.jpg.html" target="_blank"><img src="http://i353.photobucket.com/albums/r364/stng_96/IMG_1772_zpscan0e0mw.jpg" border="0" alt=" photo IMG_1772_zpscan0e0mw.jpg"/></a>
<a href="http://s353.photobucket.com/user/stng_96/media/IMG_1774_zpsxdxq4npo.jpg.html" target="_blank"><img src="http://i353.photobucket.com/albums/r364/stng_96/IMG_1774_zpsxdxq4npo.jpg" border="0" alt=" photo IMG_1774_zpsxdxq4npo.jpg"/></a>
<a href="http://s353.photobucket.com/user/stng_96/media/IMG_1775_zpssxrtazw2.jpg.html" target="_blank"><img src="http://i353.photobucket.com/albums/r364/stng_96/IMG_1775_zpssxrtazw2.jpg" border="0" alt=" photo IMG_1775_zpssxrtazw2.jpg"/></a>
After a few choice words, a few adult beverages, and one very black finger I was relieved to see the engine/trans in the car finally!! Don't get carried away I know the air cleaner does not fit like that! I really just got excited and wanted to see it on there.
After that I obviously pulled her back out and began the welding process on everything that was left. All the seams that had been exposed or cut were addressed, as well as the tunnel and the support gussets inside.
<a href="http://s353.photobucket.com/user/stng_96/media/IMG_1779_zpssmuedudl.jpg.html" target="_blank"><img src="http://i353.photobucket.com/albums/r364/stng_96/IMG_1779_zpssmuedudl.jpg" border="0" alt=" photo IMG_1779_zpssmuedudl.jpg"/></a>
<a href="http://s353.photobucket.com/user/stng_96/media/IMG_1780_zpsa7ilki63.jpg.html" target="_blank"><img src="http://i353.photobucket.com/albums/r364/stng_96/IMG_1780_zpsa7ilki63.jpg" border="0" alt=" photo IMG_1780_zpsa7ilki63.jpg"/></a>
<a href="http://s353.photobucket.com/user/stng_96/media/IMG_1778_zpsf3ftbwxq.jpg.html" target="_blank"><img src="http://i353.photobucket.com/albums/r364/stng_96/IMG_1778_zpsf3ftbwxq.jpg" border="0" alt=" photo IMG_1778_zpsf3ftbwxq.jpg"/></a>
For some reason I didn't take many pictures of the car with the seam sealer back on, but I did put it over all locations I removed it from plus some:
<a href="http://s353.photobucket.com/user/stng_96/media/IMG_1788_zpsp0ojwu2q.jpg.html" target="_blank"><img src="http://i353.photobucket.com/albums/r364/stng_96/IMG_1788_zpsp0ojwu2q.jpg" border="0" alt=" photo IMG_1788_zpsp0ojwu2q.jpg"/></a>
Now that it is all on and dried it was time to paint....I will be undercoating as well but I have not gotten to it yet so don't flame me too bad. I didn't want to change the color of my engine bay, so I went to a local paint shop and had them mix me some paint of my code and put it in an aerosol can(Love the 10AE Blue). It matched really well actually, and it will look even better when I get the rest of the engine bay cleaned up. These pictures don't do it justice with all the dirt in areas I was not working! Worst case scenario I'll just mask and paint the entire engine bay.
<a href="http://s353.photobucket.com/user/stng_96/media/IMG_1787_zpstscn8ubv.jpg.html" target="_blank"><img src="http://i353.photobucket.com/albums/r364/stng_96/IMG_1787_zpstscn8ubv.jpg" border="0" alt=" photo IMG_1787_zpstscn8ubv.jpg"/></a>
<a href="http://s353.photobucket.com/user/stng_96/media/IMG_1786_zpsq1culd0z.jpg.html" target="_blank"><img src="http://i353.photobucket.com/albums/r364/stng_96/IMG_1786_zpsq1culd0z.jpg" border="0" alt=" photo IMG_1786_zpsq1culd0z.jpg"/></a>
Last real bit of progress to mention on this car is the welding under the kick plates as seen in these pictures. In my opinion, this is one of the key areas to stiffen up for launching the car.
<a href="http://s353.photobucket.com/user/stng_96/media/IMG_1789_zpss1urg55e.jpg.html" target="_blank"><img src="http://i353.photobucket.com/albums/r364/stng_96/IMG_1789_zpss1urg55e.jpg" border="0" alt=" photo IMG_1789_zpss1urg55e.jpg"/></a>
Last but not least, for those of you who have been keeping up regular tabs, I have been parting out another miata as I have been building my car because:
1. I needed some of the parts from it for my car
2. I have been able to use it for a test dummy as I build my car
3. I use the funds from it for my build car, after all said and done, I have netted over $2300 from this car after I kept what I wanted
<a href="http://s353.photobucket.com/user/stng_96/media/IMG_1777_zpstlyggmhx.jpg.html" target="_blank"><img src="http://i353.photobucket.com/albums/r364/stng_96/IMG_1777_zpstlyggmhx.jpg" border="0" alt=" photo IMG_1777_zpstlyggmhx.jpg"/></a>
I had complete intentions of keeping it until my car was complete, but alas....Another Miata has come into my life that will be parted out, so this one is on the way to the scrapper this saturday.
<a href="http://s353.photobucket.com/user/stng_96/media/IMG_1784_zpsxv1yqgdv.jpg.html" target="_blank"><img src="http://i353.photobucket.com/albums/r364/stng_96/IMG_1784_zpsxv1yqgdv.jpg" border="0" alt=" photo IMG_1784_zpsxv1yqgdv.jpg"/></a>
New parts car is also a 99, very rusty so I don't feel bad sacrificing it. It had 120k miles on it with another spun rod bearing.
<a href="http://s353.photobucket.com/user/stng_96/media/miata1_zps7isjcfgz.jpg.html" target="_blank"><img src="http://i353.photobucket.com/albums/r364/stng_96/miata1_zps7isjcfgz.jpg" border="0" alt=" photo miata1_zps7isjcfgz.jpg"/></a>
<a href="http://s353.photobucket.com/user/stng_96/media/IMG_1783_zpswr5anu5x.jpg.html" target="_blank"><img src="http://i353.photobucket.com/albums/r364/stng_96/IMG_1783_zpswr5anu5x.jpg" border="0" alt=" photo IMG_1783_zpswr5anu5x.jpg"/></a>
Alright, time to get back out and work!
Last edited by stng_96; Sep 9, 2015 at 08:39 AM.

V8 Miata Follower
Joined: Jun 2013
Posts: 154
Likes: 8
From: Central FL
Thread Starter
V8 Miata Fanatic
Joined: Feb 2015
Posts: 559
Likes: 83
From: Marion Illinois
I'm up in the air, the back of the passenger one is trash from contact with the door at sometime in its life, so it's going, I'll probably snag the drivers one though because it just has a few little imperfections.
Thread Starter
V8 Miata Fanatic
Joined: Feb 2015
Posts: 559
Likes: 83
From: Marion Illinois
How about a little update?
Got a handful of things done since my last update, still feels like nothing but it is what it is.....
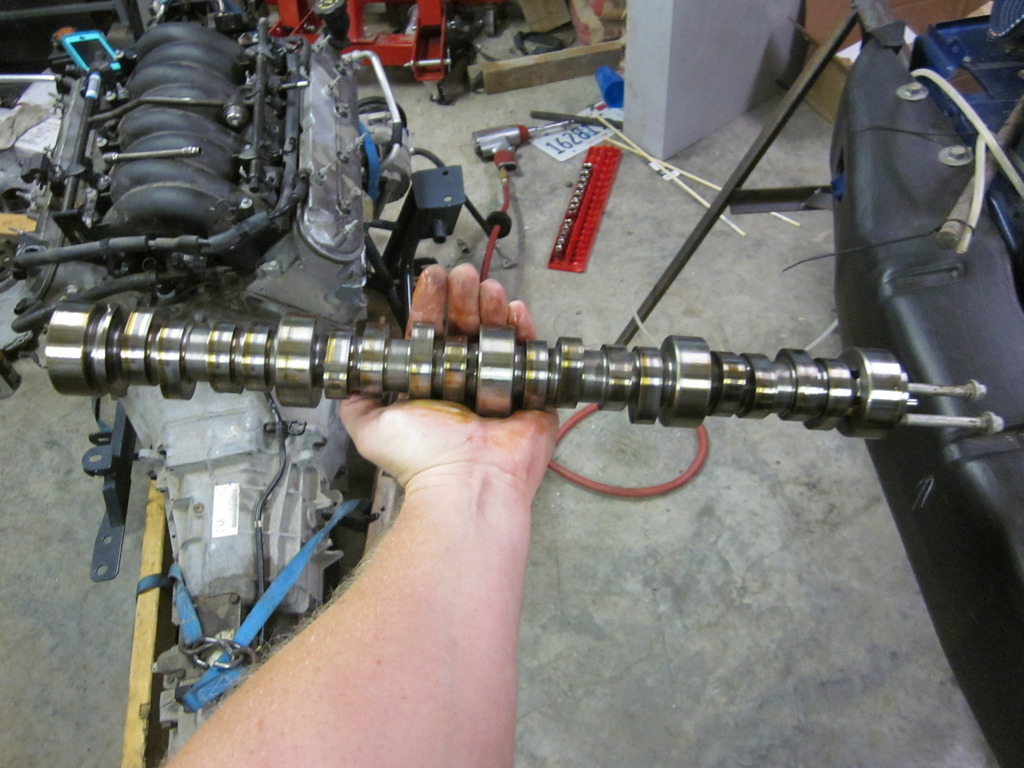
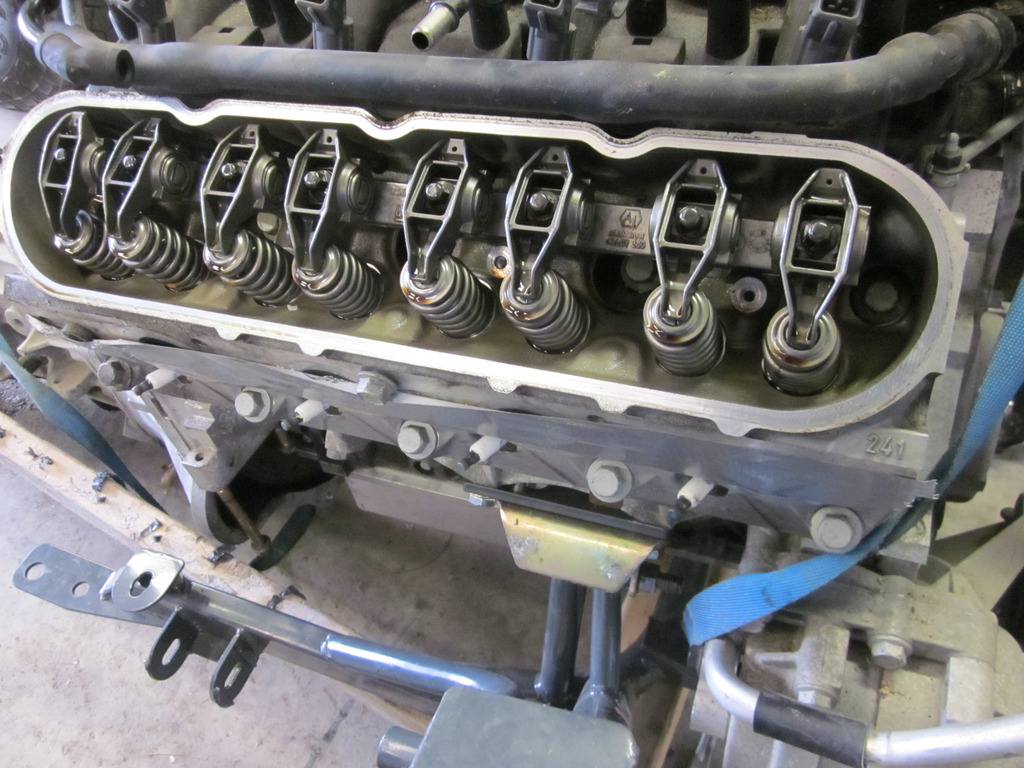
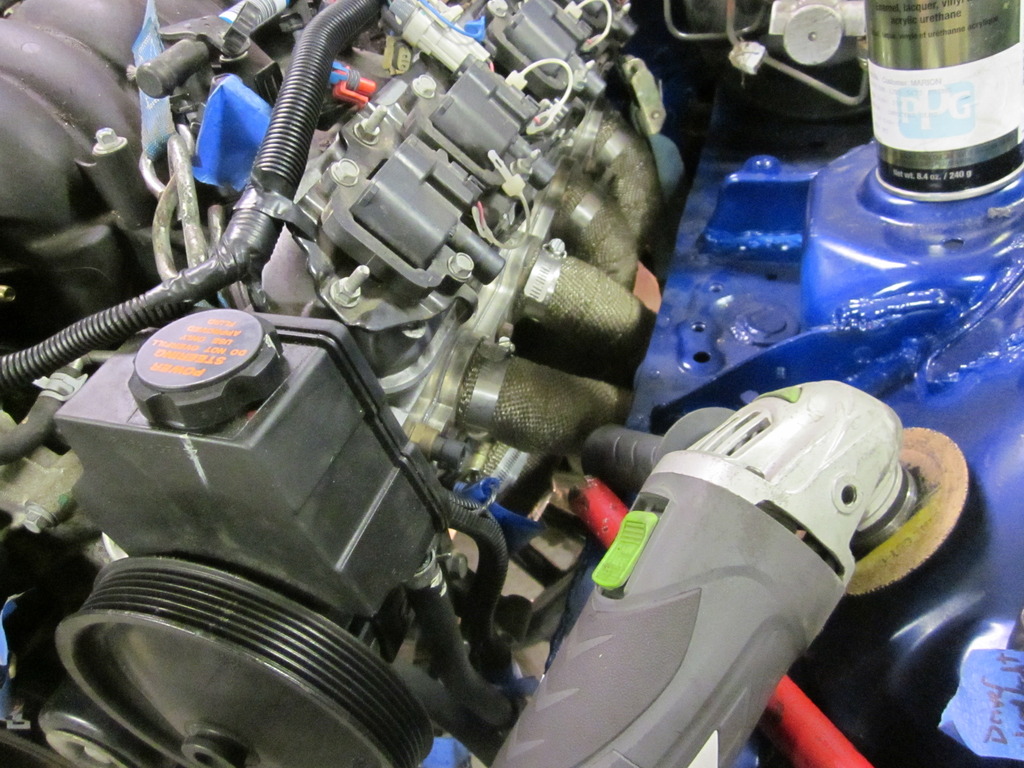
First and foremost I got the new cam/springs/pushrods into the motor. This was my first cam swap on a OHV engine, but I thought it went about as smooth as one can hope for. As I have said before, my engine only has 17k miles on it, and it shows when you pull off the timing cover and valve covers....boy is she clean. I decided to go with a Texas Speed 228r cam, .588 lift, 228 dur, 112 LSA. Obviously I had an advantage since I had nothing in front of the engine to give me trouble, but I honestly think I did the whole swap in just under 3 hours total.

After that I started putting some stuff back together. Got the starter wrapped up and back in, also turned the fuel rail around to come in on the passenger side.

Heres a picture of my helper, hes been with me through it all.

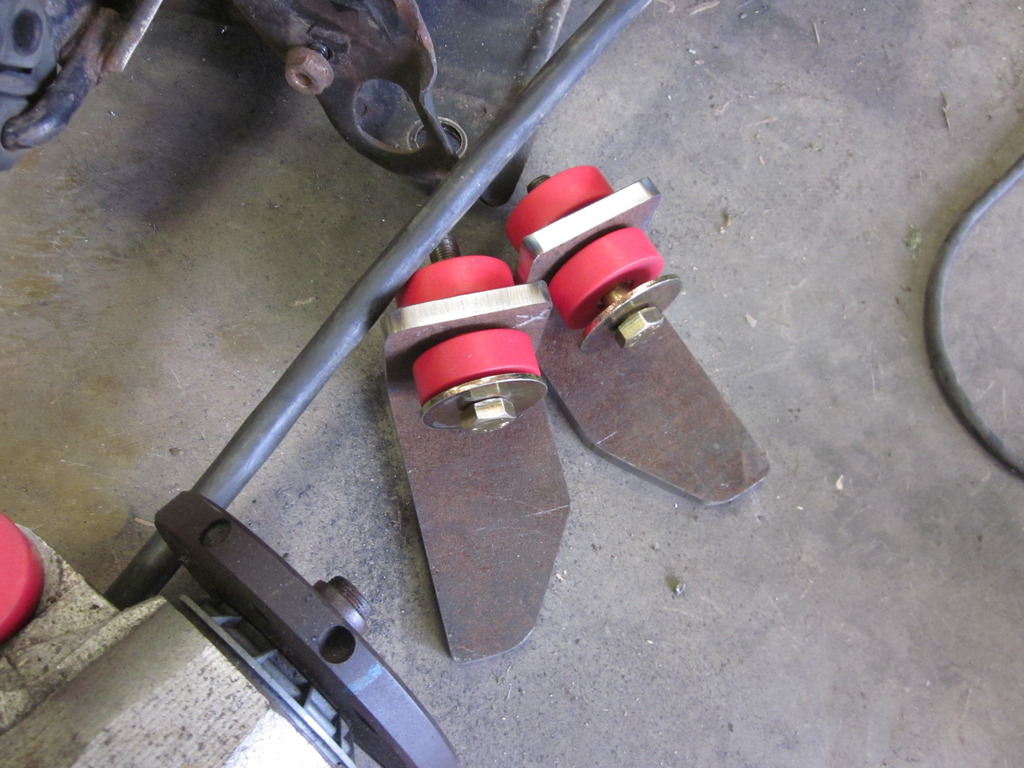
Also got started on the cobra rear end mount setup. I used Mike Moninger's idea seen here (MiataV8 Conversion: Rear subframe) with a little bit of my own changes. I for example used 1/2" plate for the bottom of the backside mount, and drilled/threaded the plate itself for mounting bolts instead of welding lug nuts on the back side.
I worked on it for a while one day and put my tools down for the night, then when reading a few threads I got nervous about my mounting locations on the subframe, so I am going to hold off doing any more of the rear diff mount until I get the axles to verify fitment location.
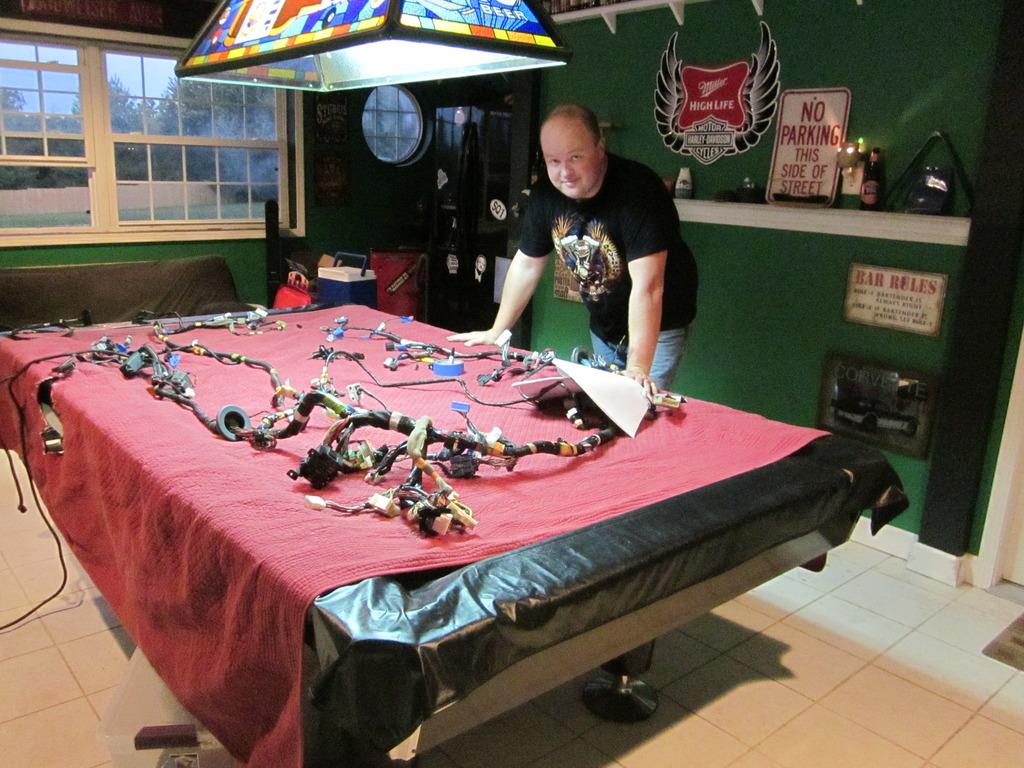
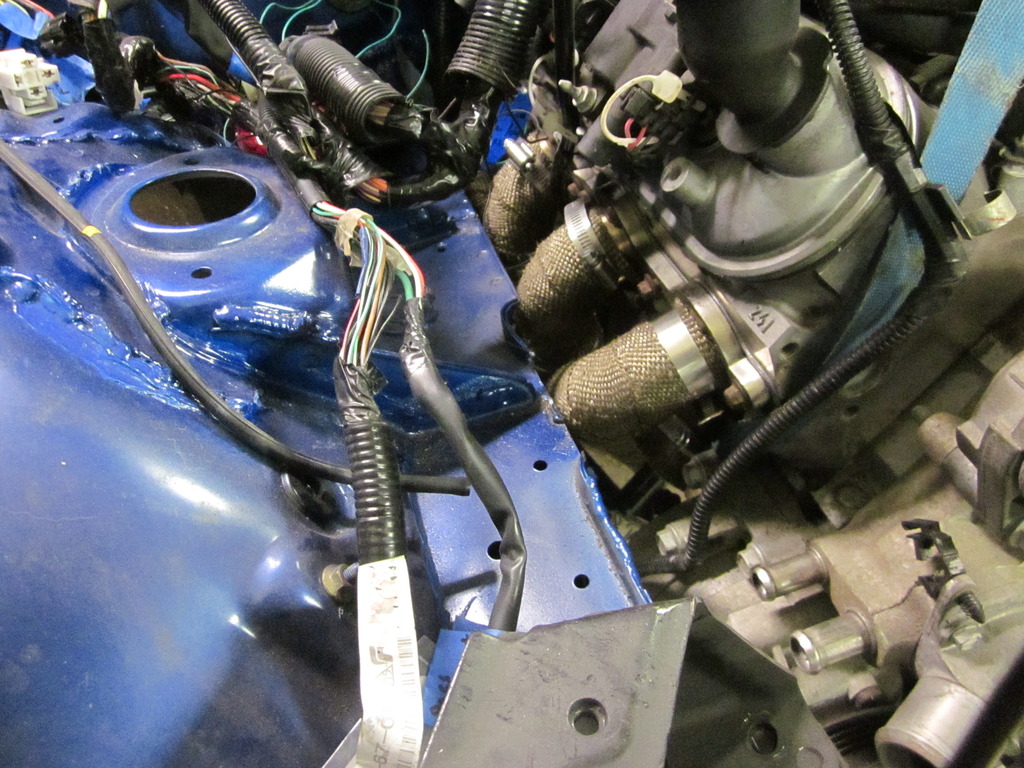
After that I decided I needed to start on something I had been avoiding the whole time....wiring...... My car if you remember came already disassembled a fair amount, so my first probably 8 hours was dedicated to labeling wires with the wiring diagrams. I was able to identify all plugs except for one, but it was on the center leg of the harness that goes over the top of the engine from the factory, so I felt secure enough that it would not be needed and I got rid of it. My wife decided to take a picture of me at work.
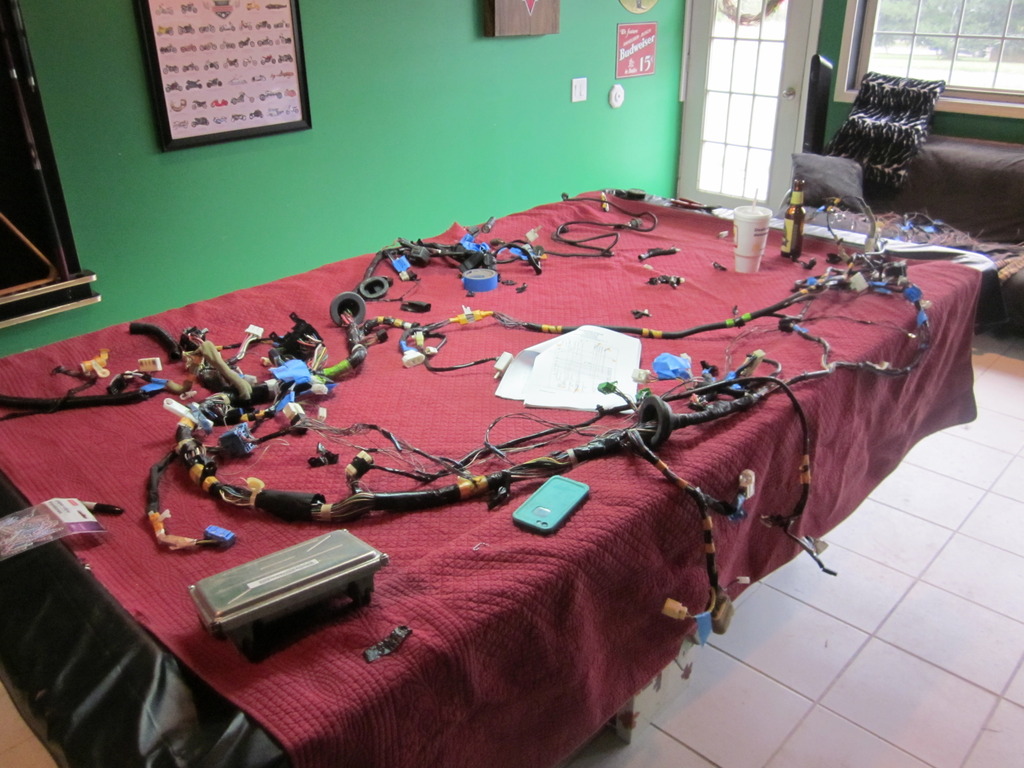
Its hard to tell in this picture, but this is what is left of the factory miata harness after I removed all of the wiring I believe I do not need(Fingers crossed). I kept all the AC stuff, cruise control, and all the stuff required to run the body lights, locks, etc. I decided not to take it completely apart like many of you have done, I instead cut wires at plugs, then pulled them through the length of the harness to a major plug, and un-pinned them there. The factory camaro computer is setting there also, in this picture it had just got back from Brendan at lt1swap.com. I had him do his quick flash to remove VATS, EGR, tune for tire/gear size, 5 wire MAF, etc. Obviously it won't run great with that big cam but this will at least allow me to get it on my trailer to go have it dyno'd.
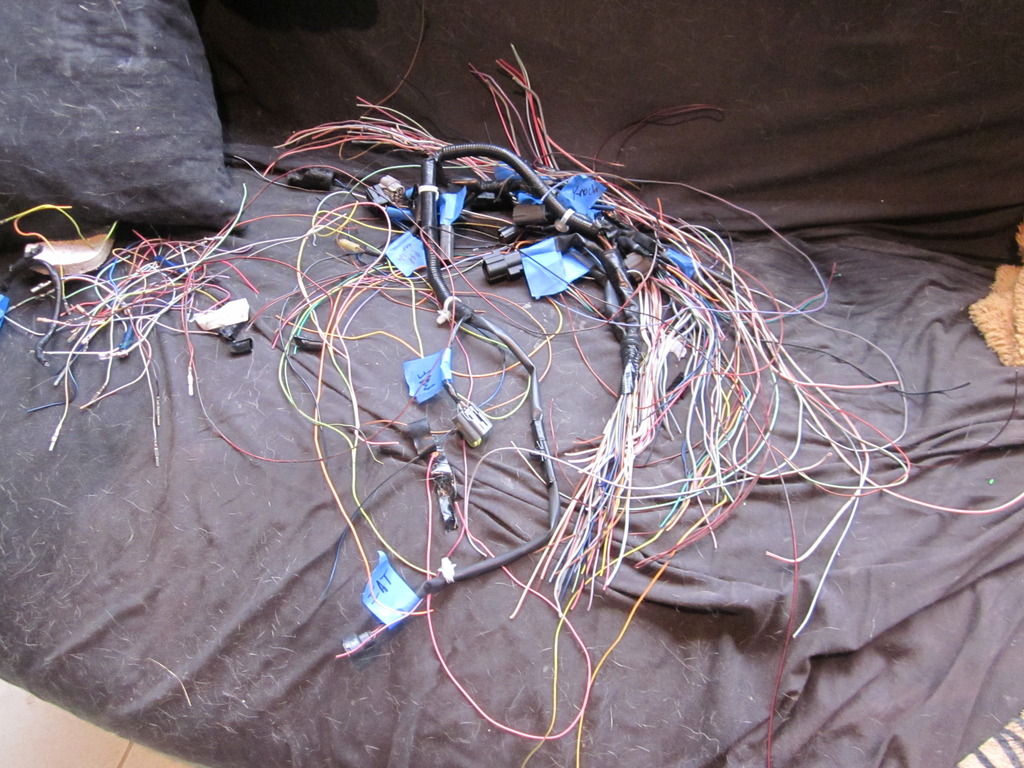
Here is the pile of wires that I removed. Not quite as organized but still a lot of stuff.
I still have to make the connections between the camaro harness and miata, but I think that will end up being better if I do it with the engine in the car, or at least close.
Now back out to the barn to let some sparks fly, I went ahead and made a set of cowl braces. I decided to angle the top brace as far forward as I can to help counteract the moment force on the end of the arm. I think they will work very well. I had to trim a small bit of seam sticking out to get them in but I think they will more than make up for that.
Thats about all I have got for now. I ordered a BUNCH of suspension stuff, so hopefully my next update will have that info and possibly a motor in its final resting spot?
Got a handful of things done since my last update, still feels like nothing but it is what it is.....
First and foremost I got the new cam/springs/pushrods into the motor. This was my first cam swap on a OHV engine, but I thought it went about as smooth as one can hope for. As I have said before, my engine only has 17k miles on it, and it shows when you pull off the timing cover and valve covers....boy is she clean. I decided to go with a Texas Speed 228r cam, .588 lift, 228 dur, 112 LSA. Obviously I had an advantage since I had nothing in front of the engine to give me trouble, but I honestly think I did the whole swap in just under 3 hours total.


After that I started putting some stuff back together. Got the starter wrapped up and back in, also turned the fuel rail around to come in on the passenger side.

Heres a picture of my helper, hes been with me through it all.

Also got started on the cobra rear end mount setup. I used Mike Moninger's idea seen here (MiataV8 Conversion: Rear subframe) with a little bit of my own changes. I for example used 1/2" plate for the bottom of the backside mount, and drilled/threaded the plate itself for mounting bolts instead of welding lug nuts on the back side.


I worked on it for a while one day and put my tools down for the night, then when reading a few threads I got nervous about my mounting locations on the subframe, so I am going to hold off doing any more of the rear diff mount until I get the axles to verify fitment location.
After that I decided I needed to start on something I had been avoiding the whole time....wiring...... My car if you remember came already disassembled a fair amount, so my first probably 8 hours was dedicated to labeling wires with the wiring diagrams. I was able to identify all plugs except for one, but it was on the center leg of the harness that goes over the top of the engine from the factory, so I felt secure enough that it would not be needed and I got rid of it. My wife decided to take a picture of me at work.

Its hard to tell in this picture, but this is what is left of the factory miata harness after I removed all of the wiring I believe I do not need(Fingers crossed). I kept all the AC stuff, cruise control, and all the stuff required to run the body lights, locks, etc. I decided not to take it completely apart like many of you have done, I instead cut wires at plugs, then pulled them through the length of the harness to a major plug, and un-pinned them there. The factory camaro computer is setting there also, in this picture it had just got back from Brendan at lt1swap.com. I had him do his quick flash to remove VATS, EGR, tune for tire/gear size, 5 wire MAF, etc. Obviously it won't run great with that big cam but this will at least allow me to get it on my trailer to go have it dyno'd.

Here is the pile of wires that I removed. Not quite as organized but still a lot of stuff.

I still have to make the connections between the camaro harness and miata, but I think that will end up being better if I do it with the engine in the car, or at least close.
Now back out to the barn to let some sparks fly, I went ahead and made a set of cowl braces. I decided to angle the top brace as far forward as I can to help counteract the moment force on the end of the arm. I think they will work very well. I had to trim a small bit of seam sticking out to get them in but I think they will more than make up for that.


Thats about all I have got for now. I ordered a BUNCH of suspension stuff, so hopefully my next update will have that info and possibly a motor in its final resting spot?
Last edited by stng_96; Oct 13, 2015 at 10:27 AM.
Thread Starter
V8 Miata Fanatic
Joined: Feb 2015
Posts: 559
Likes: 83
From: Marion Illinois
So if you are like me, you did a lot of reading before you started your project, and thought you had it all figured out until it came right down to some of the details leaving you scratching your head a little bit.
GM HARNESS MODS
I managed to complete the diet on my GM harness last week to my liking. Don't get really caught up in this portion of the build, because the GM harness is near standalone as it is. For my diet, I really just wanted to get rid of the 2 connectors that went to the factory F-body dash, and the 3 connectors that ended near the ECM connectors. This for me was strictly for cosmetic reasons, but as you can imagine did serve some functional purpose as well. A few main points to hit.....
-There are 5 pink wires in the c100, c101, and c105 connectors, keep all of them
-There are 2 orange wires in the C100, C101, and C105 connectors, keep them
-Remove your low oil sensor plug, there is no provision for it any of the custom pans
-Re-pin your rear O2's to your front O2 locations, saves on soldering
-Keep wires for Tach, Speedo, CEL, OBD2 if your car is new enough
-Keep the wires to trigger fan relays, there is one on each ECM connector. On the blue connector it is pin #42, green wire, on the red connector it is pin #33, blue wire. This is a big one because many of the write ups you will see are only to get the engine running, and don't discuss this. I haven't finished it yet, but my plan is to use the miata wiring for the fans, and the GM computer to trigger the relay's. I may have to put different relays in place depending on how they are triggered, but the wiring is already there so why not use it?
-Lastly you need to decide how to run your fuel pump, whether by using the GM system or the Miata system. It can be done either way, I think it will be easier for me to use the miata relay. Both ways are discussed in the links below.
Most of the rest of the stuff in those five connectors can be removed or safely taped away.
READ READ READ!! I had three of the following links printed and spread out in front of me, and the wiring diagrams on computer for reference, and I used every bit of them!
LS1 into third generation F-Body
LS1 harness: Start to finish - Third Generation F-Body Message Boards
FM Wiring instructions
https://www.flyinmiata.com/support/i...structions.pdf
Wiring Diagrams for LS1 cars
Wiring information for 1998 to 2002 Camaro & Firebird LS1
Nathans Wiring instructions for NA
Nathan's LS1 Miata
Keep in mind that a combination of all of these led me to what I believe is a good setup. My setup was not exactly like any one of them because I am too cheap to buy a new harness(And its not needed) and I have an NB. Also, I did not do a complete 100% diet of my harness, because a lot of things will be out of sight when all said and done. You can pull it all apart if you want to, just wasn't value added for me.
Now that you have a fair amount of your wiring done, what is left to get the engine in the car? For me its the clutch.....I have done well with holding off buying some parts until they were actually needed, and now that I am ready to put the engine/trans in their final resting spot, I need to get the clutch worked out.
CLUTCH
V8R sells a kit with everything you need to get a working clutch in your car. At $228 shipped to my door, I almost bought it, pretty reasonable. I am however still looking for ways to save some cash, so I spent a little time researching alternative options. To save any onlookers some time, here is what I found.
98+ T-56 transmissions use a quick disconnect fitting that is really convenient if you are using the stock hydraulic line, or could jump in a time machine and go back to when adapters were made. As far as I can find, there is no real reasonably priced options for this on the market anymore, there are options out there, but with the cost of them you would end up being better off buying the V8R kit, which doesn't have the adapter anyway. The V8R kit uses parts that are all readily available elsewhere, except the adapter bracket that anyone who has done the other FAB for this swap should be able to build. Speedway motors is a great place to get stuff for this entire swap, and had everything I needed.
Here is my list of parts bought:
7/8 bore master cylinder(same as V8R)-$69.99
Wilwood Combination Remote Fill Master Cylinder Kit
Adapter kit to make MC outlet in a AN -3-$24.99
LS1 & LT1 T56 Clutch Line AN3 Banjo Bolt Kit
Stainless Braided line-$12.99
Braided Stainless AN 36 Inch Brake Line
Fitting for Throwout bearing(when you remove quick connector)-$13.99
LS1 & LT1 T56 Release Bearing to AN3 Line Fitting
Speed bleeder-$29.99
T56 Release Bearing Remote Bleeder
So total to make this happen is $151.95, or about $77 cheaper than V8R's kit and I have to make the mounting bracket. Not a huge gain, but every penny counts and now I have done all the hard work for you. You could go cheaper by not including the speed bleeder, but it was worth the extra cash for me.
Hope this helps a few people out there. All this information is out there somewhere, It just took me a lot of reading to find it!
Last edited by stng_96; Oct 28, 2015 at 11:46 AM.
Thread Starter
V8 Miata Fanatic
Joined: Feb 2015
Posts: 559
Likes: 83
From: Marion Illinois
My engine and trans only has 17k miles on it, so for now thats one thing that I am saving cash for at a later date. I don't expect to put more than 385-400 at the wheels, so I plan to run the stock clutch until a later date.

Jim Stainer
Joined: Jul 2011
Posts: 2,462
Likes: 62
From: Sunny SW Minnesota
Elevating this thread to the builder resources and links thread for the outstanding detailed write up on the F body wring harness conversion. For all who come behind you I offer a collective THANK YOU!

V8 Miata Fanatic
Joined: Oct 2012
Posts: 550
Likes: 34
From: Fuquay Varina, NC
Just a great thread that's fun to read and has tons of swap info (wiring, fuel lines, etc) for future LS swappers!
Travis, per this question in post #24 if you haven't found your answer...
3. Please see the picture below, This piece goes between the front of the intake manifold, and connects to the fuel supply line, can anyone tell me what it is and what you did with it? Obviously it is not used with my new custom fuel line, but I am still wondering.
Simply remove that useless GM stuff, and cap off that nipple on the intake manifold with a correctly sized rubber cap. It also cleans up that good looking LS intake.
I like how you're salvaging other Miatas and using them as templates and sources of ideas for this bad toy you're building.
Keep doing what you're doing!!
Thread Starter
V8 Miata Fanatic
Joined: Feb 2015
Posts: 559
Likes: 83
From: Marion Illinois
Thanks for the tip and the kind words. I still haven't really figured out what it is there for, but like you said, I have seen several others just cap it off so thats my plan.
V8 Miata Prot�g�
Joined: Nov 2014
Posts: 485
Likes: 37
From: South FL
So following the lead from itsallrigged, and a little motivation from charchi, I have bought all the fuel system parts individually to put together. For someone like me that has NEVER dealt with fuel systems aside from changing a filter, this was a little nerve racking. That being said, I think I have it worked out. For those of you thinking about doing the same thing, my parts list is as follows:
(1)Walboro 255lph fuel pump-GSS342-Ebay-$65.99
(1)Fuel Pump install kit for GSS342 pump-EBAY-$6.99
(1)Wix fuel filter/regulator-33737-Ebay-$31.46
(20')3/8" Stainless Hard fuel line-Ebay-$51.90
(3)GM 3/8" quick connect to -6an fittings-61744113-Speedway motors-$14.99 each
(2)5/16 quick connect to -6an fittings-61744123-Speedway motors-$14.99 each
(1)Male quick connect to GM fitting-Ebay-$9.71
(1)-6an to 3/8 hose fitting-Jegs-799-610025-$9.99
(1)-6an to GM quick connect 90 degree elbow-799-610165-$14.99
(4') 3/8 Steel Braided fuel hose-Jegs-865-29404-$17.99
UPDATE!! 7/13/15 A couple things that I did not include in this list, but am learning as I go....plus one mistake
Like I said, fuel line newb, for each connection that is made you will need a tube nut and tube sleeve to connect to each fitting. I went ahead and ordered six of each, part number 361-AT581906 and 361-AT581806 on Jegs, about an extra $30 for the whole set. Also, as it turns out the return line on the Corvette regulator is actually 5/16" so I will be returning one of my 3/8 fittings and exchanging it for the 5/16-6an
If you are keeping count that is $283.97, which is approximately 200 cheaper than Flyin miata, and 180 cheaper than V8 roadsters.
A note for my particular case, there are a lot of good people on this forum that are willing to help with our common interest. I absolutely love the look of itsallrigged fuel setup so I messaged him with a few questions about it. He was very helpful with my questions, and he also sold me a couple AN fittings that he had accidentally ordered in excess...for half what he gave for them......and then he was such a nice guy he tossed his nice flaring tool and bender in the box with it for my use until I am done.
Just had to plug for a bit
Thread Starter
V8 Miata Fanatic
Joined: Feb 2015
Posts: 559
Likes: 83
From: Marion Illinois
Thread Starter
V8 Miata Fanatic
Joined: Feb 2015
Posts: 559
Likes: 83
From: Marion Illinois
Ok time for another post weekend update, and since I was lazy last week this will account for two weekends. I have actually had a lot of time here lately to get some good work done on the car, and I feel like I have made a lot of progress. I haven't necessarily gotten any one huge thing checked off, but I have gotten a boat load of smaller things done.
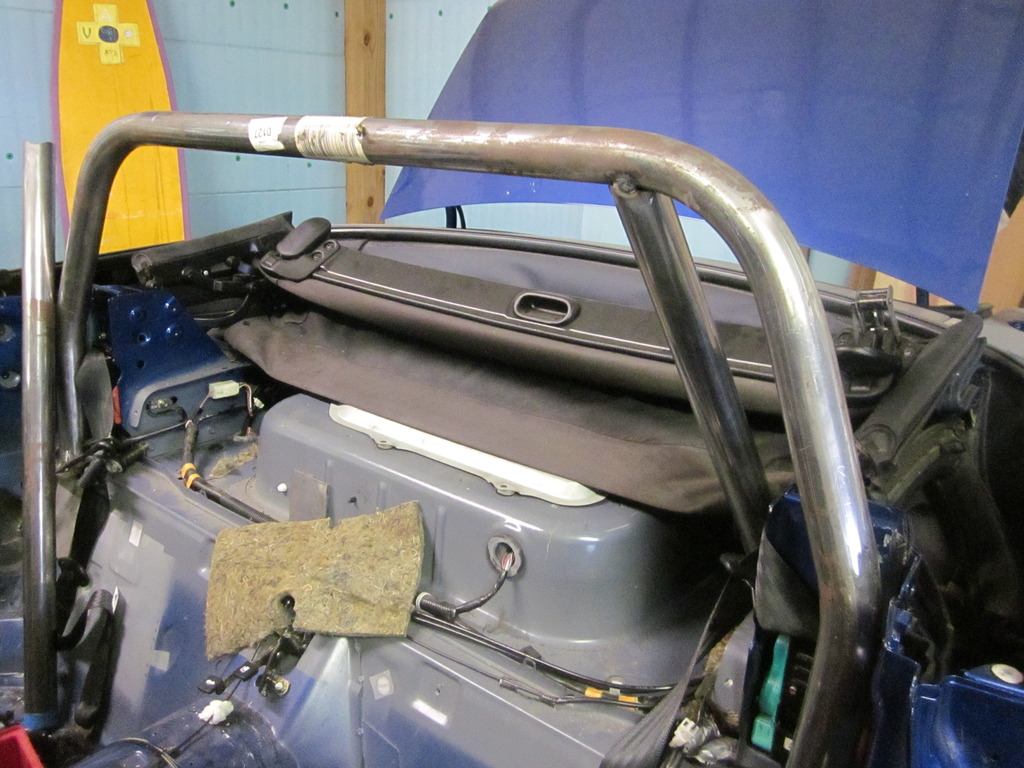
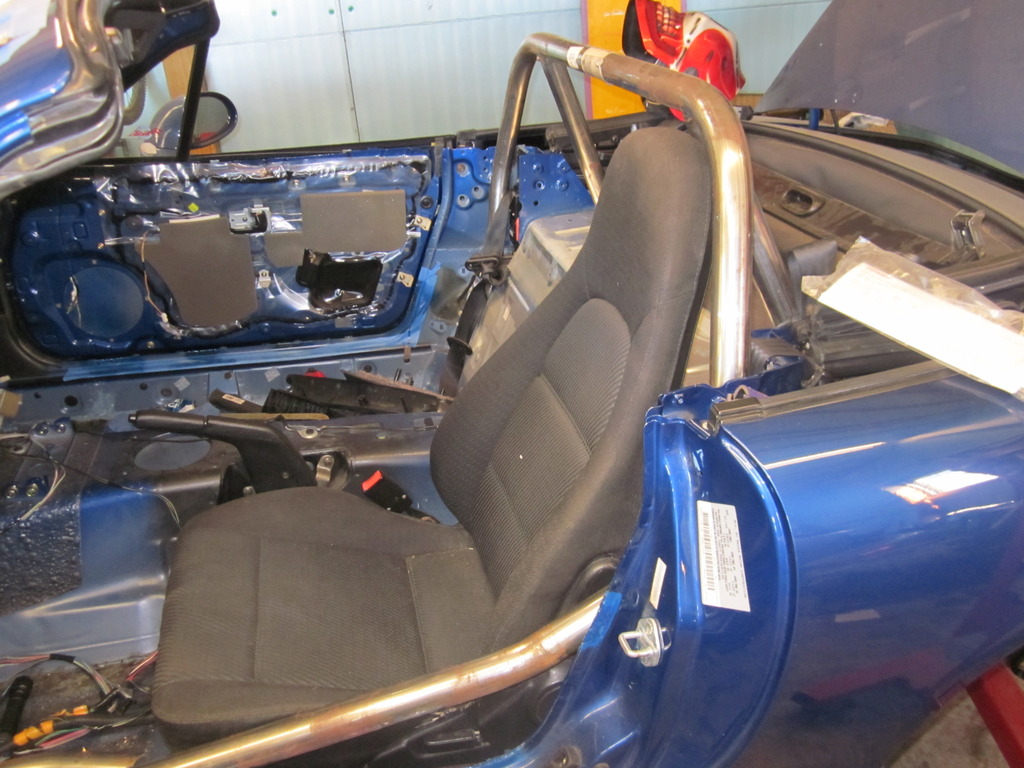
To start off, last weekend i began fitting the roll cage into the car, haven't got it complete yet but it is coming along nicely. I ended up putting it together with the main hoop in the exact same spot that HD puts their Hardcore M2 Hardtop bars. It looks low to me, but unless I have forgotten how to read a tape measure, its correct. Please not it is not complete here, and the door bars are just laying in place.
I'll admit that I wasn't as strong with the camera last weekend as I should have been, but once again most of the things I was working on were just small little tid bits.
I did get the transmission off and I put the new clutch lines/fittings/bleeder in place. I am happy to report that my list from a previous post worked perfectly. I dont yet have the master cylinder installed, but as this point we are good.
I also went ahead and flared the end of the fuel line about where I thought it should be.
Finally, I got the car off the temp stands I built in preparation for installing the engine for hopefully the final time!
Keep on meaning to show off my custom fuel rail covers....what do you guys think?
Now fast forward to this weekend. I had a half day Friday, and my wife was booked up most of the weekend, so game on for miata work!!
Just about the last thing I thought I needed (Be sure you not that I put the last thing i THOUGHT) was to make some heat shields for the motor mounts. Based on the pictures I had seen of FM's shields, and what Jim made for his, I thought I can make a set for sure! I ended up taking the extra package tray from my parts miata and cutting it up. I didn't take as many pictures as I should have, but here is the finished product. I cut them to fit around the top and the sides, figured there was no need to make them along the bottom. I then wrapped some extra heat wrap leftover from my LT's, I think they should work just fine.
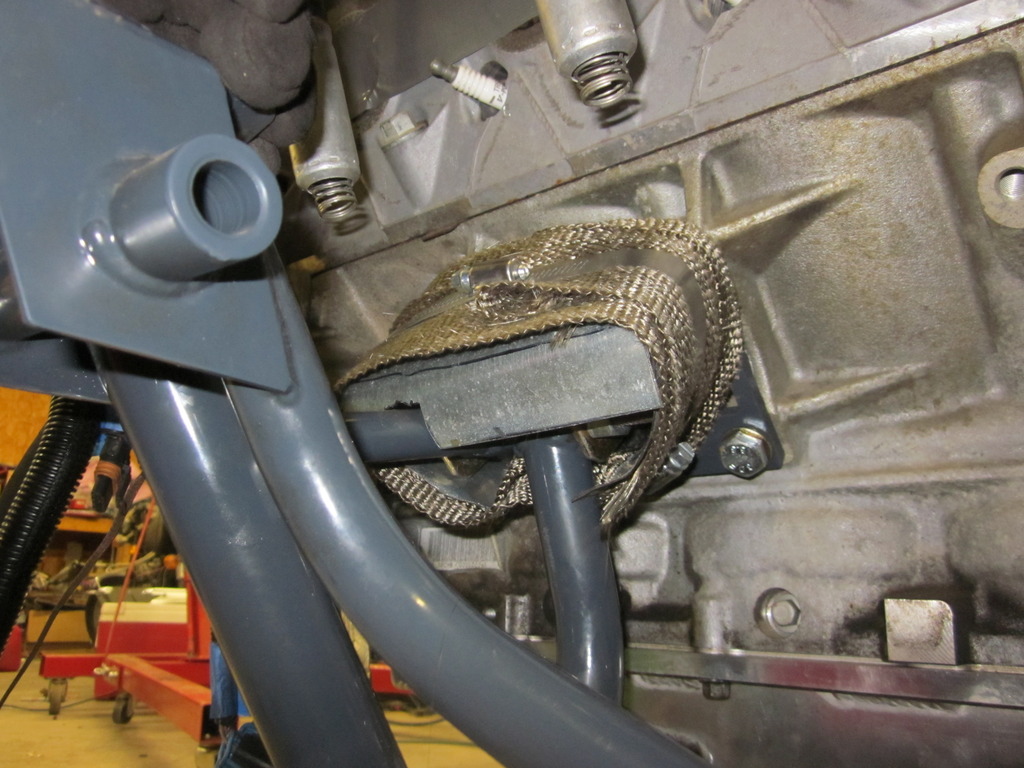
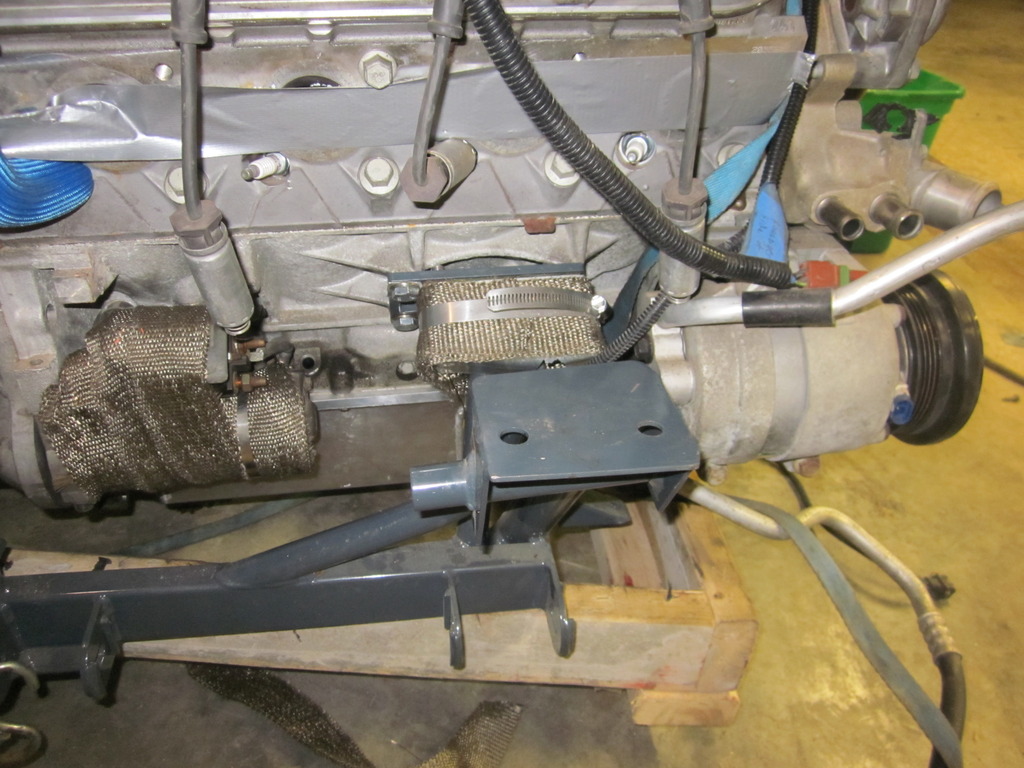
Something that should definitely be noted here is that I made the drivers side shield too big the first time, and had to do it over, no worries, but I didn't notice until I was attempting to install the longtubes, gollee gee they are tight!
After I got the shields done, a nice long look and a beer later, I felt confident that I was ready to lift the motor into its final resting spot. I know most of you do it with the trans separate, coming in from the top. I wheeled the motor under the car, then used my hoist and picked it up through the engine bay, using a floor jack to pick up the transmission.
Home sweet Home-or so I thought
Something to note that I guess I had either not read or not remembered from anyone else. The V8R longtubes will NOT go in on either side with the engine in the car. They look like they might, but they don't....trust me. Oh well, out came the heart one last time and with the LT's loosely in place, back home she went.
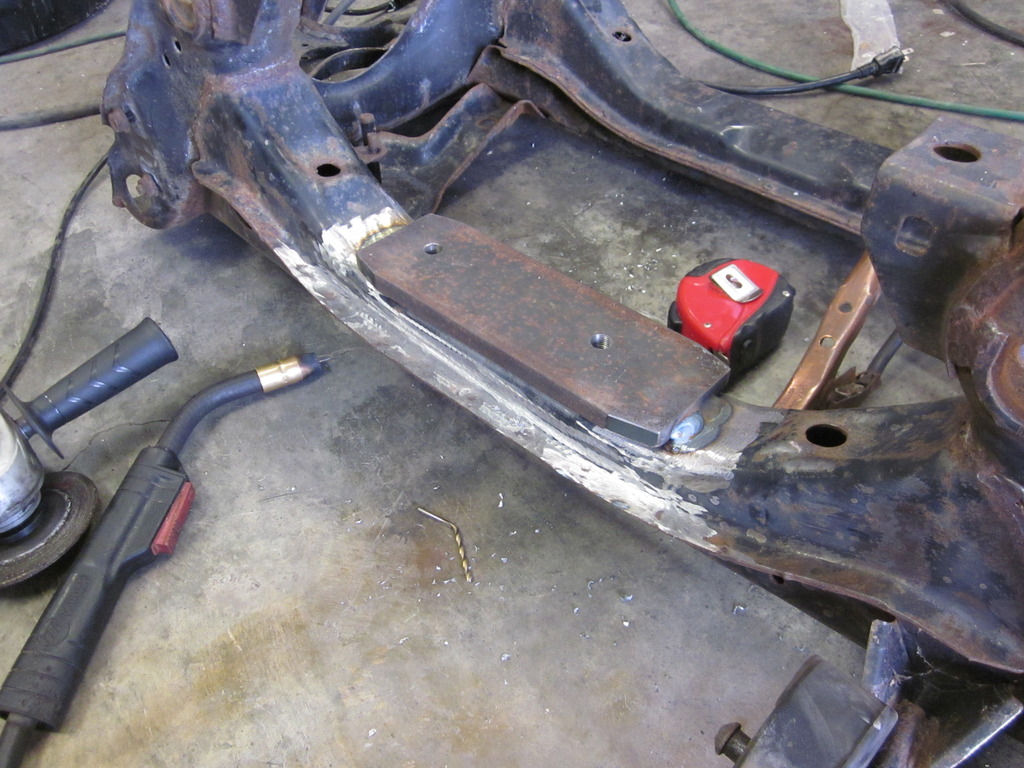
Notice I had already trimmed the pinch weld on the passenger side near the front header tube, I can definitely see where it would have made contact, so thanks to SupaDupaSteve for pointing that out in his build thread. Just goes to show that no matter how many hours you have spent learning, and how much knowledge you have, there are still little quirks here and there and it saved me time just by watching other forum members progress. I ended up cutting it flush with the rest of the rail, then welded it back together and ground it smooth, then painted, looks OEM.
Next, now that I had the whole assembly in place I located the sub frame connectors with the trans mount, and put them in place. Not much exciting here, but I had forgotten to locate them when I test fitted the engine so I had to wait.
Another learning experience for me here.....When I test fitted the engine/trans, I just used my floor jack to hold the trans up about where I thought it should have been....boy did I make things hard on myself there. When It came down to it, The trans was about 4-5 inches lower when I test fitted it than when I actually mounted it. This may not seem like a big deal, but it was HUGE when It came down to the amount of room I had between the firewall and the back of then engine....Lets just say I did some firewall massaging for no reason......oh well.
Well now the engine is in right...time to start it up? Boy I wish.....
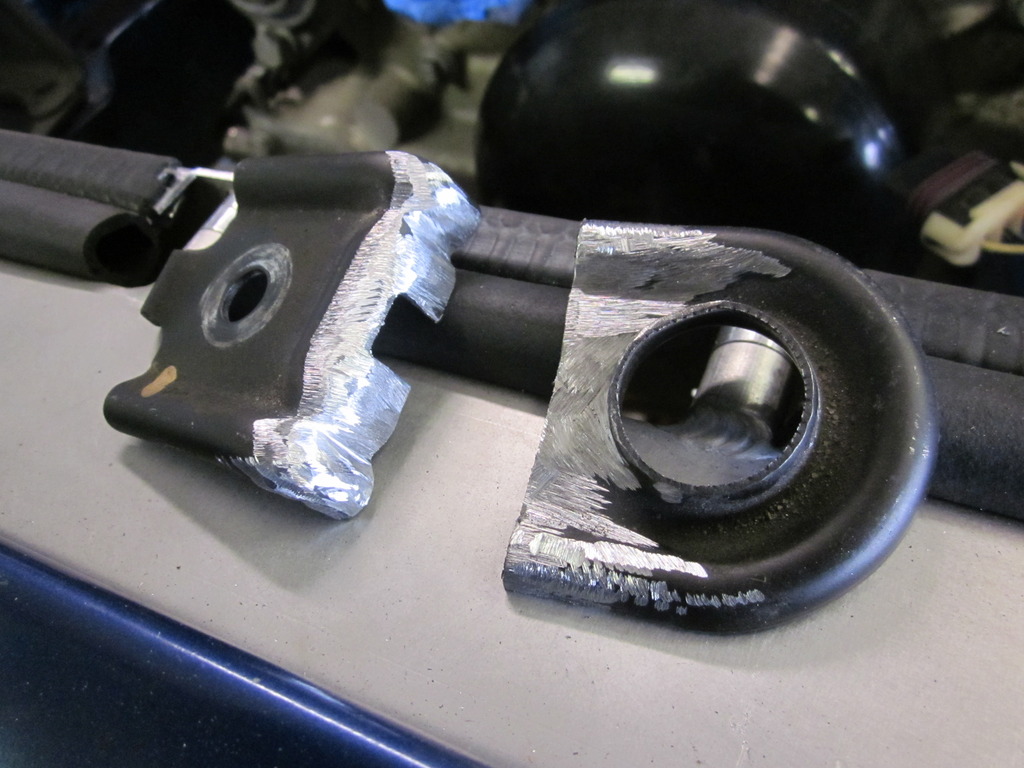
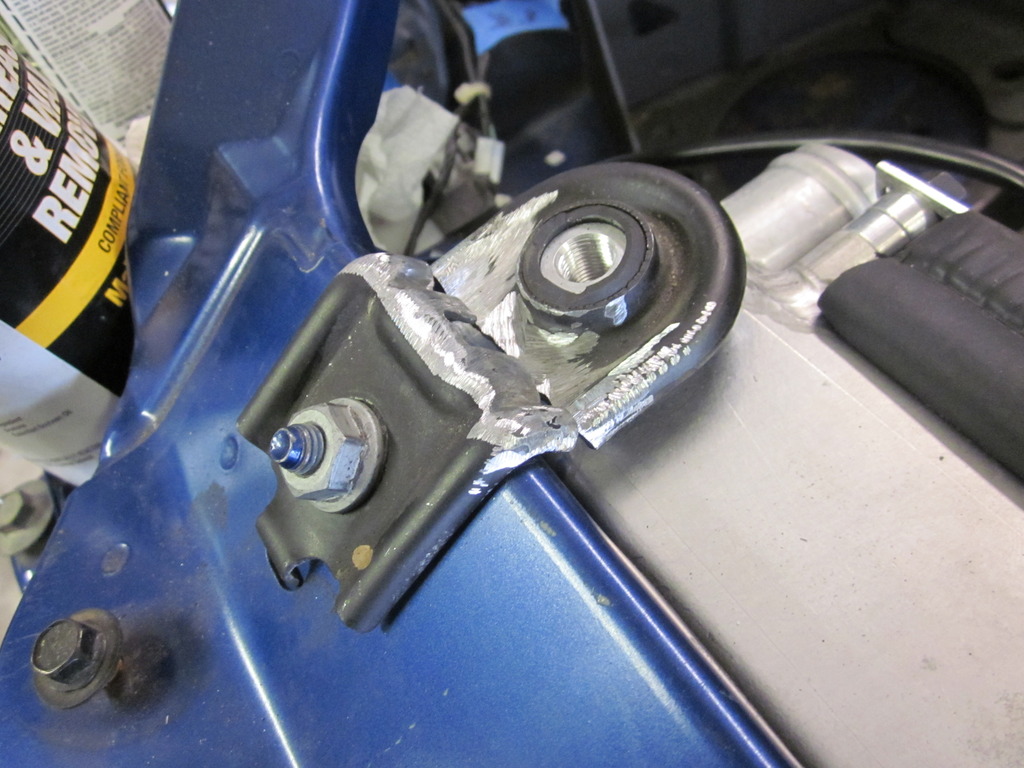
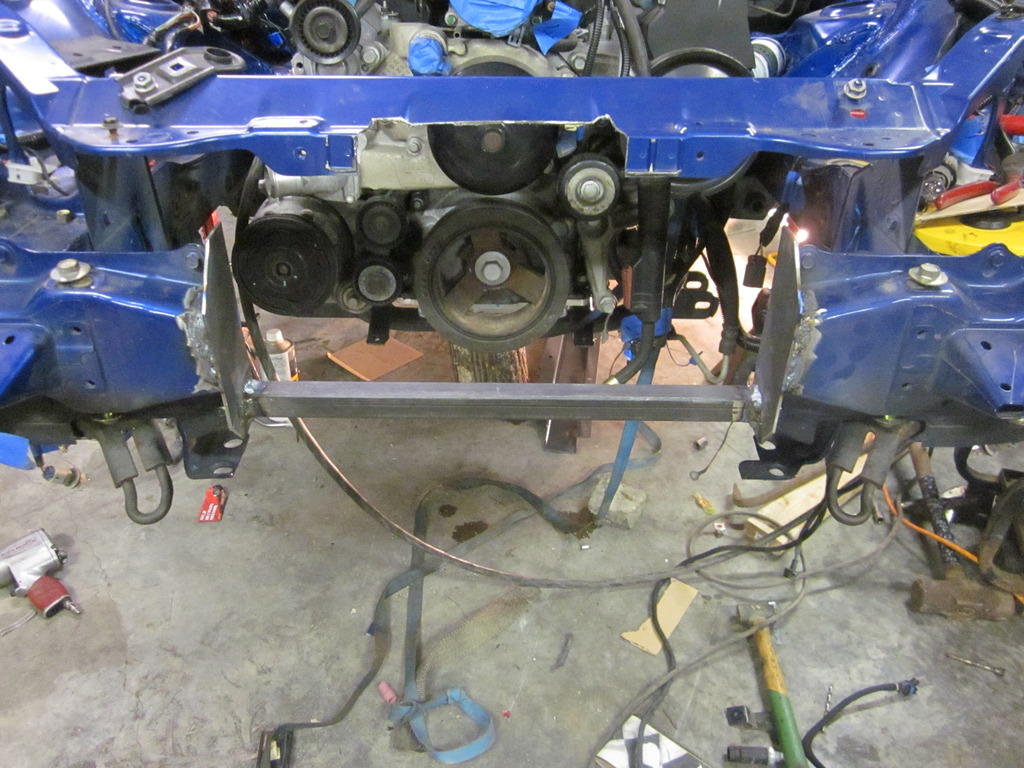
I had my FM radiator all assembled so now I just needed to put in it place. I've seen a lot of pictures of other setups, some lower, some higher, some angled, difference intakes, etc..... I like to make things look as OEM as possible, and obviously if I can I try to make things easier on myself. As you can see in the picture below, I move the radiator bracket down and forward, using the front hole of the sway bar mount to bolt down the rear hold of the radiator mount. I then just cleaned up the front area and welded the hole shut in the front.
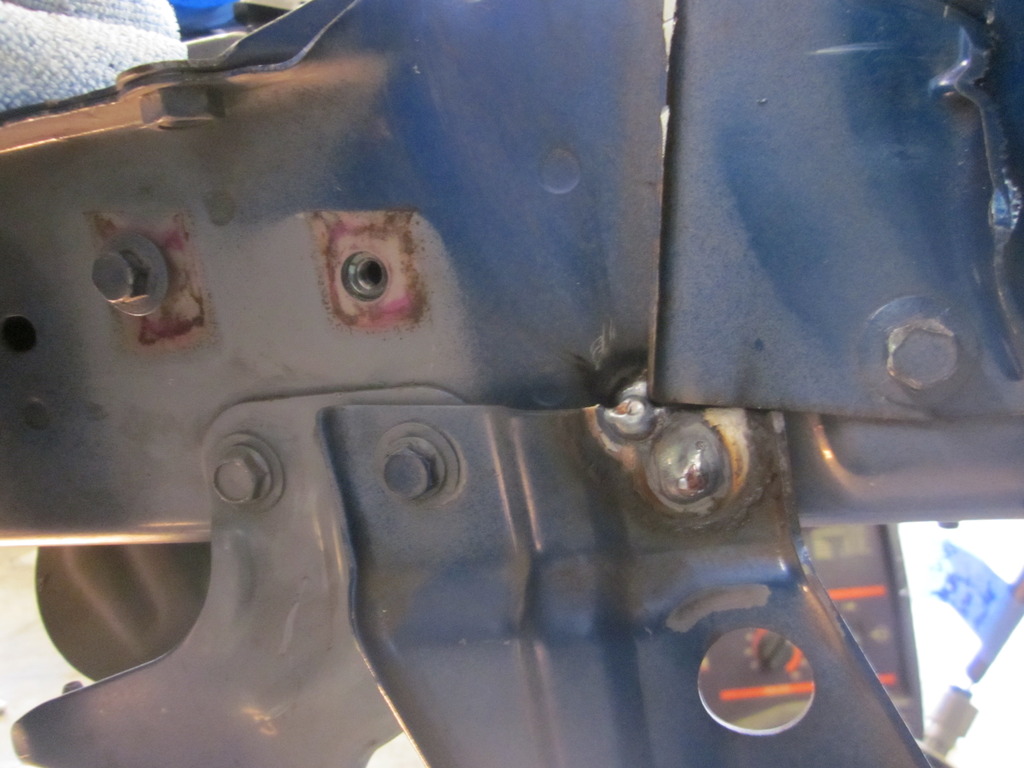
I think this setup will work perfect, still has a fair amount of ground clearance, but with the core support folded forward I have plenty of room.
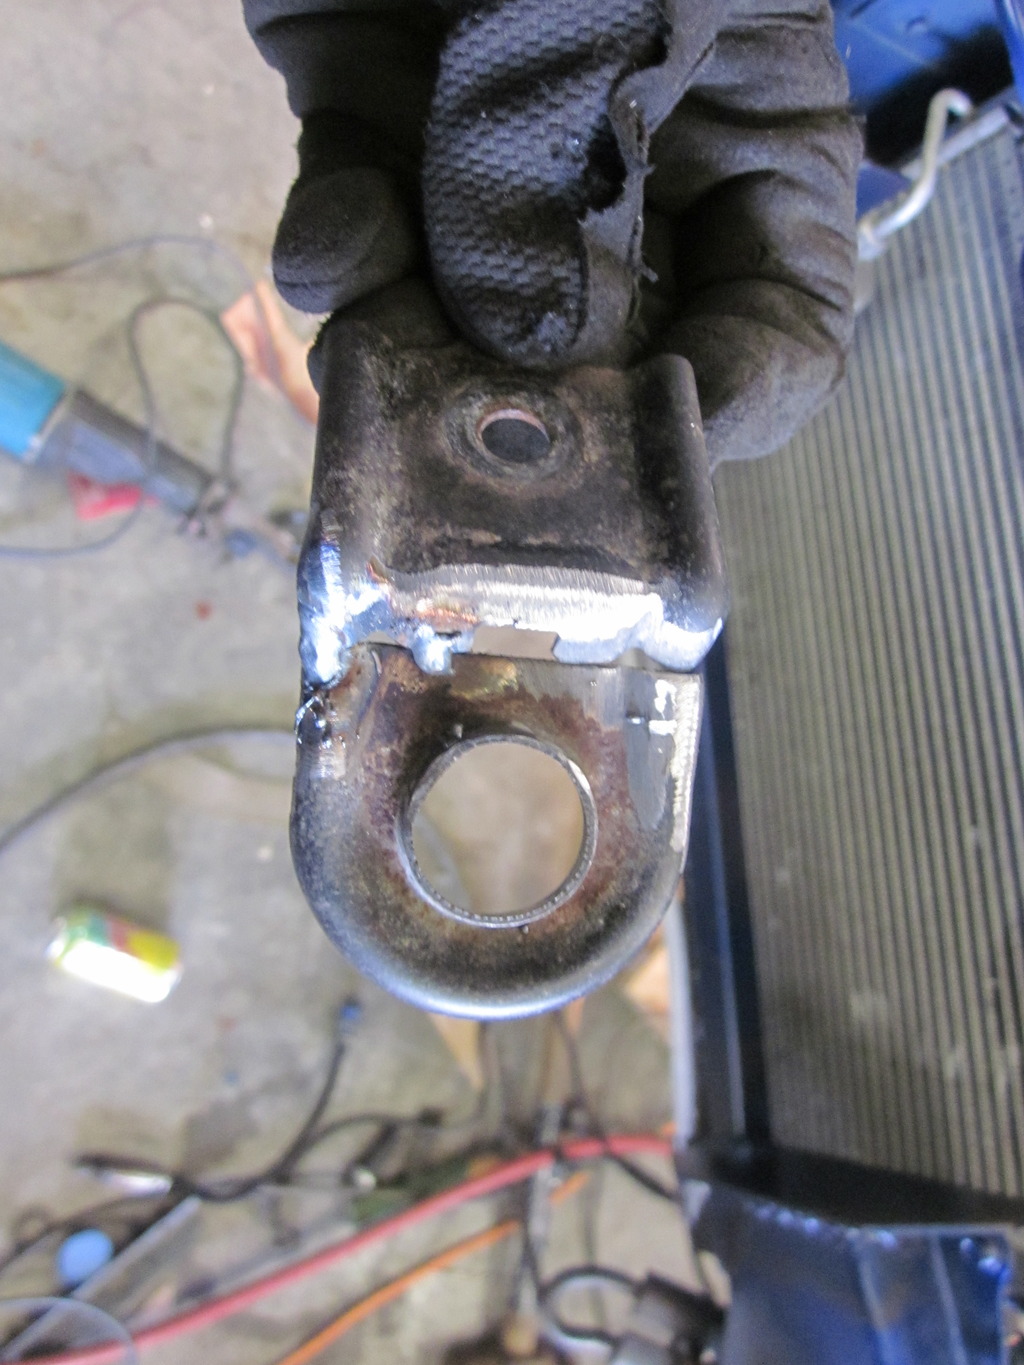
As I said, I things to look at least similar to OEM, I had to modify the upper mounts some since the radiator is now lower. I took the stock mount, beat the curve out of it with my hammer. Then I put it back in place and if you are strong enough(Read that fat) like me, you can fold the mount down around the top of the core support. I then cut it at the correct distance down, removed some its length, and welded it back at the correct spot. Cleaned up and painted. My welds here were less then impressive, but the radiator sure won't go anywhere, and hopefully when I pop my hood they won't be the focal point anyway.

To start off, last weekend i began fitting the roll cage into the car, haven't got it complete yet but it is coming along nicely. I ended up putting it together with the main hoop in the exact same spot that HD puts their Hardcore M2 Hardtop bars. It looks low to me, but unless I have forgotten how to read a tape measure, its correct. Please not it is not complete here, and the door bars are just laying in place.


I'll admit that I wasn't as strong with the camera last weekend as I should have been, but once again most of the things I was working on were just small little tid bits.
I did get the transmission off and I put the new clutch lines/fittings/bleeder in place. I am happy to report that my list from a previous post worked perfectly. I dont yet have the master cylinder installed, but as this point we are good.
I also went ahead and flared the end of the fuel line about where I thought it should be.
Finally, I got the car off the temp stands I built in preparation for installing the engine for hopefully the final time!

Keep on meaning to show off my custom fuel rail covers....what do you guys think?

Now fast forward to this weekend. I had a half day Friday, and my wife was booked up most of the weekend, so game on for miata work!!
Just about the last thing I thought I needed (Be sure you not that I put the last thing i THOUGHT) was to make some heat shields for the motor mounts. Based on the pictures I had seen of FM's shields, and what Jim made for his, I thought I can make a set for sure! I ended up taking the extra package tray from my parts miata and cutting it up. I didn't take as many pictures as I should have, but here is the finished product. I cut them to fit around the top and the sides, figured there was no need to make them along the bottom. I then wrapped some extra heat wrap leftover from my LT's, I think they should work just fine.


Something that should definitely be noted here is that I made the drivers side shield too big the first time, and had to do it over, no worries, but I didn't notice until I was attempting to install the longtubes, gollee gee they are tight!
After I got the shields done, a nice long look and a beer later, I felt confident that I was ready to lift the motor into its final resting spot. I know most of you do it with the trans separate, coming in from the top. I wheeled the motor under the car, then used my hoist and picked it up through the engine bay, using a floor jack to pick up the transmission.
Home sweet Home-or so I thought


Something to note that I guess I had either not read or not remembered from anyone else. The V8R longtubes will NOT go in on either side with the engine in the car. They look like they might, but they don't....trust me. Oh well, out came the heart one last time and with the LT's loosely in place, back home she went.


Notice I had already trimmed the pinch weld on the passenger side near the front header tube, I can definitely see where it would have made contact, so thanks to SupaDupaSteve for pointing that out in his build thread. Just goes to show that no matter how many hours you have spent learning, and how much knowledge you have, there are still little quirks here and there and it saved me time just by watching other forum members progress. I ended up cutting it flush with the rest of the rail, then welded it back together and ground it smooth, then painted, looks OEM.
Next, now that I had the whole assembly in place I located the sub frame connectors with the trans mount, and put them in place. Not much exciting here, but I had forgotten to locate them when I test fitted the engine so I had to wait.


Another learning experience for me here.....When I test fitted the engine/trans, I just used my floor jack to hold the trans up about where I thought it should have been....boy did I make things hard on myself there. When It came down to it, The trans was about 4-5 inches lower when I test fitted it than when I actually mounted it. This may not seem like a big deal, but it was HUGE when It came down to the amount of room I had between the firewall and the back of then engine....Lets just say I did some firewall massaging for no reason......oh well.
Well now the engine is in right...time to start it up? Boy I wish.....
I had my FM radiator all assembled so now I just needed to put in it place. I've seen a lot of pictures of other setups, some lower, some higher, some angled, difference intakes, etc..... I like to make things look as OEM as possible, and obviously if I can I try to make things easier on myself. As you can see in the picture below, I move the radiator bracket down and forward, using the front hole of the sway bar mount to bolt down the rear hold of the radiator mount. I then just cleaned up the front area and welded the hole shut in the front.


I think this setup will work perfect, still has a fair amount of ground clearance, but with the core support folded forward I have plenty of room.
As I said, I things to look at least similar to OEM, I had to modify the upper mounts some since the radiator is now lower. I took the stock mount, beat the curve out of it with my hammer. Then I put it back in place and if you are strong enough(Read that fat) like me, you can fold the mount down around the top of the core support. I then cut it at the correct distance down, removed some its length, and welded it back at the correct spot. Cleaned up and painted. My welds here were less then impressive, but the radiator sure won't go anywhere, and hopefully when I pop my hood they won't be the focal point anyway.


Thread Starter
V8 Miata Fanatic
Joined: Feb 2015
Posts: 559
Likes: 83
From: Marion Illinois
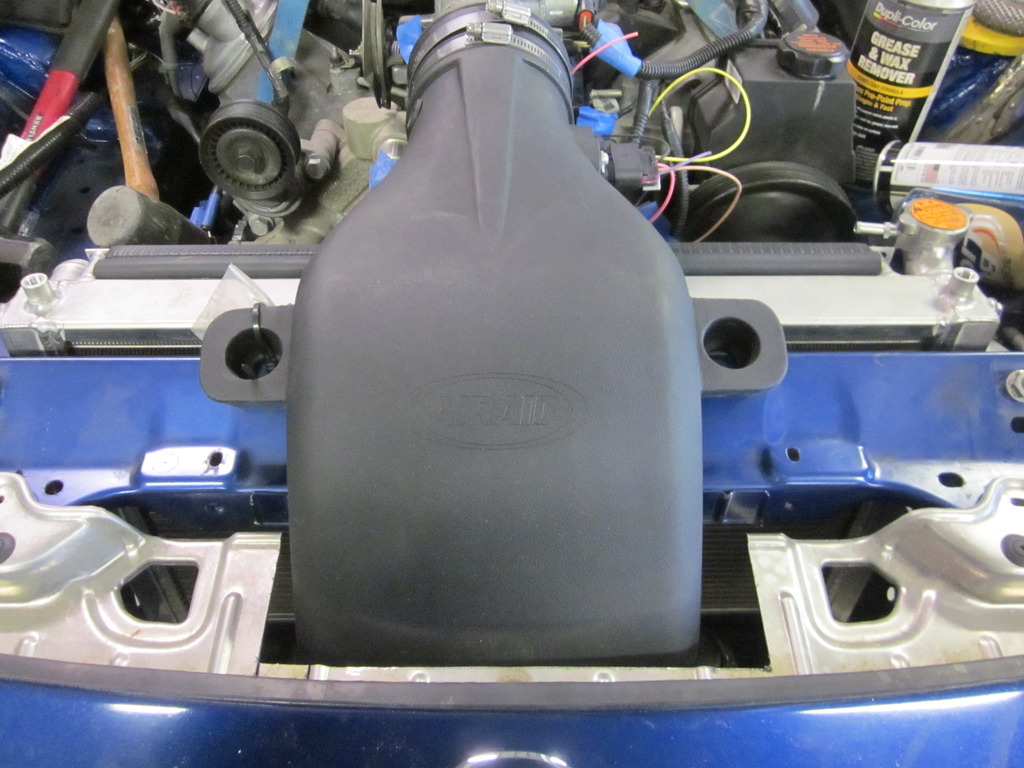
Now it's time to get busy on that big intake....I was scared that the big filter wasn't going to fit under the bumper cover.....it does but by a very small margin.
This was pretty straight forward with all the good ideas from other guys, and the FM plans. Only thing different is I used the CAI from a C7 instead of an OEM unit. I had some square tubing laying around so I did like toysnake and used it instead of the angle a lot of guys use. This will function just the same.

Had to make sure the bumper fit......
Finally here is where I left her at the end of the weekend....My last bit of work involved making the soldered connections for the next 5 wire MAF. Hopefully my next major update will have a video of it started....if you believe in prayer, go ahead and add me to your list! I bought on starter yesterday using supadupasteves part number, hopefully it works!
As far as I can tell, I need to make the wiring connections, put fuel in, put a battery in, install the new starter, and tighten the header flanges.
I don't have power steering hooked to anything right now, will it cause me any trouble to fire it up without any fluid in there, probably 30 seconds max?
This was pretty straight forward with all the good ideas from other guys, and the FM plans. Only thing different is I used the CAI from a C7 instead of an OEM unit. I had some square tubing laying around so I did like toysnake and used it instead of the angle a lot of guys use. This will function just the same.


Had to make sure the bumper fit......


Finally here is where I left her at the end of the weekend....My last bit of work involved making the soldered connections for the next 5 wire MAF. Hopefully my next major update will have a video of it started....if you believe in prayer, go ahead and add me to your list! I bought on starter yesterday using supadupasteves part number, hopefully it works!

As far as I can tell, I need to make the wiring connections, put fuel in, put a battery in, install the new starter, and tighten the header flanges.
I don't have power steering hooked to anything right now, will it cause me any trouble to fire it up without any fluid in there, probably 30 seconds max?
V8 Miata Prot�g�
Joined: Nov 2014
Posts: 485
Likes: 37
From: South FL
You're gonna have to do some fandangling with the headers and all to get that starter in there. It MAY NOT be possible to get it out with the engine/headers in the car.
also, one thing I noticed.. I hope you don't ever have any issues with your sway bar mounts. They are a known weak point, and lots of guys that autox or track their car replace them with heavier duty ones.
also, one thing I noticed.. I hope you don't ever have any issues with your sway bar mounts. They are a known weak point, and lots of guys that autox or track their car replace them with heavier duty ones.


