When you click on links to various merchants on this site and make a purchase, this can result in this site earning a commission. Affiliate programs and affiliations include, but are not limited to, the eBay Partner Network.
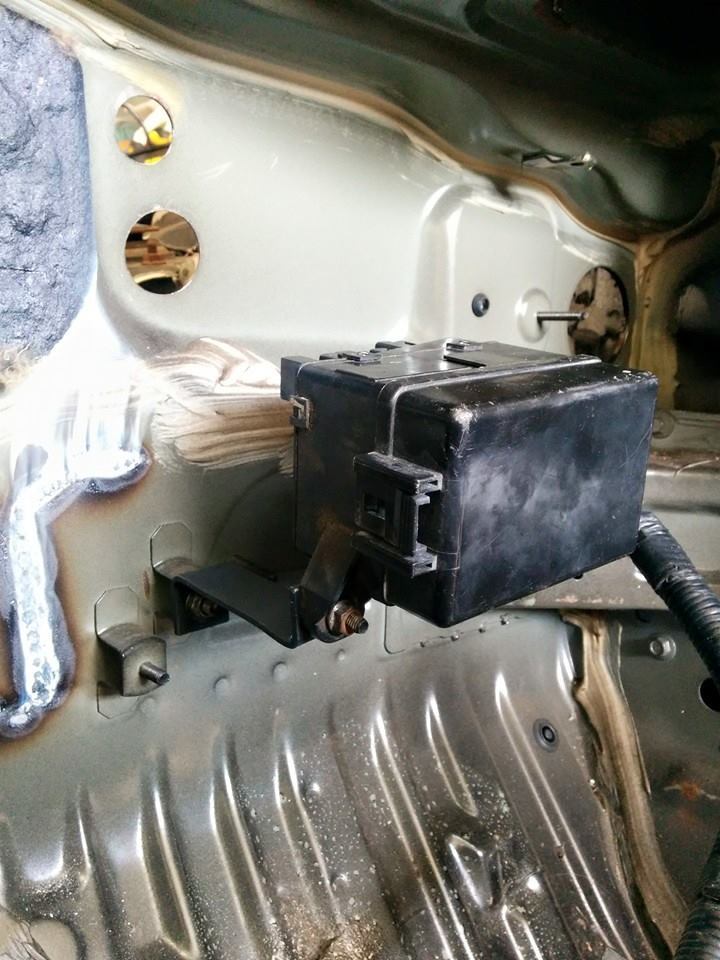
For the front harness(engine/firewall-Not dashboard-) I kept all the lighting circuits on both sides. I moved the fuse box connections to the other side of the grommet which will put the fuse box on the inside of the dash. I removed the 3 mazda ECU plugs. I'm not going to have a heater, evap, or blower in the car so that will leave plenty of room for the fuse box and the GM ECM. I kept the washer pump circuit, I'm unsure at this time what exactly I'll do but I really do like being able to clean my windshield. That's all I kept on the passenger side of the harness. On the drivers side I kept all the lighting, the Fan circuit, and the small blue 12v plug. I moved the relay block (has headlights, pwr mirrors, and horn) to inside the cabin, also moved the ground block under the brake power booster to inside the cabin as well. I completely eliminated the Diagnostics box.
For most of the circuits I snipped the wires a few inches behind the firewall as I did not want to completely dismantle the large section behind the dash and loose it's shape.The only circuit I 100% removed from it was the airbag harness which was wrapped in it's own sheathing so that made it very easy to isolate and remove.
NOTE- I've now realized that the Horn circuit is integrated into the airbag harness and passes through the module. So I'll have to figure out something for that. The relay is still there and has power but no signal, so I'll need to run a signal wire for the horn.
Last edited by SupaDupaSteve; 08-22-2015 at 08:25 AM.
Ha I love those shots! And almost miss those days... It's unreal how much time the wire diet takes and how much tape GM uses to hold everything together. Let us know if you get color blind before you get done. I found after about 8 hours all wires but orange appeared to be the same color. The color of brain fade!
Ha I love those shots! And almost miss those days... It's unreal how much time the wire diet takes and how much tape GM uses to hold everything together. Let us know if you get color blind before you get done. I found after about 8 hours all wires but orange appeared to be the same color. The color of brain fade!
Thanks for the update, this is really great!
No gm harness here. I had one custom made. 100% new. Stripping all occurred on the Mazda harness.
Ha I love those shots! And almost miss those days...
I agree - just love seeing the Mazda harness spread out on the floor. You really can eliminate a bunch of un-needed connectors, wires, etc. The whole car will look better and just feel better knowing that there aren't a few powered-up circuits tucked behind the dash or stuffed into a fender!
Good work! Please keep the updates coming till she's on the road!
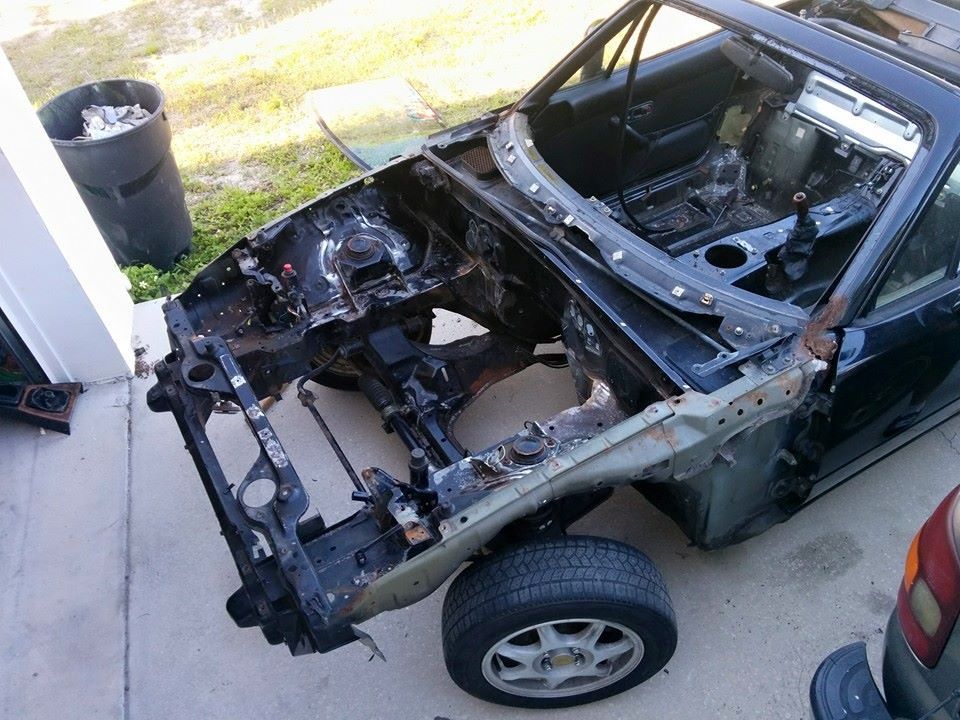
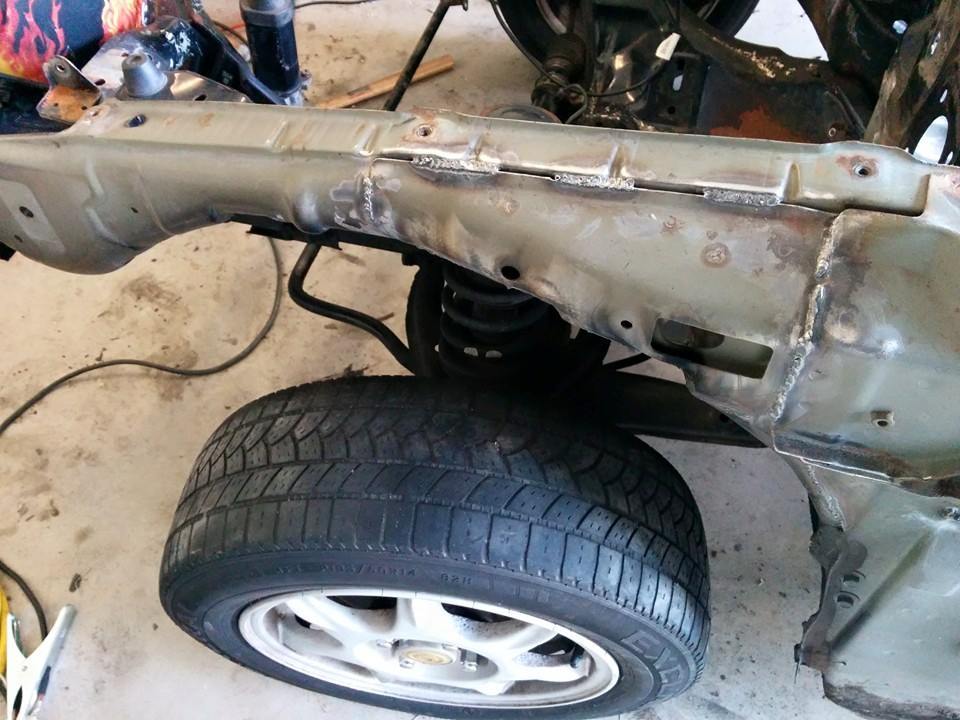
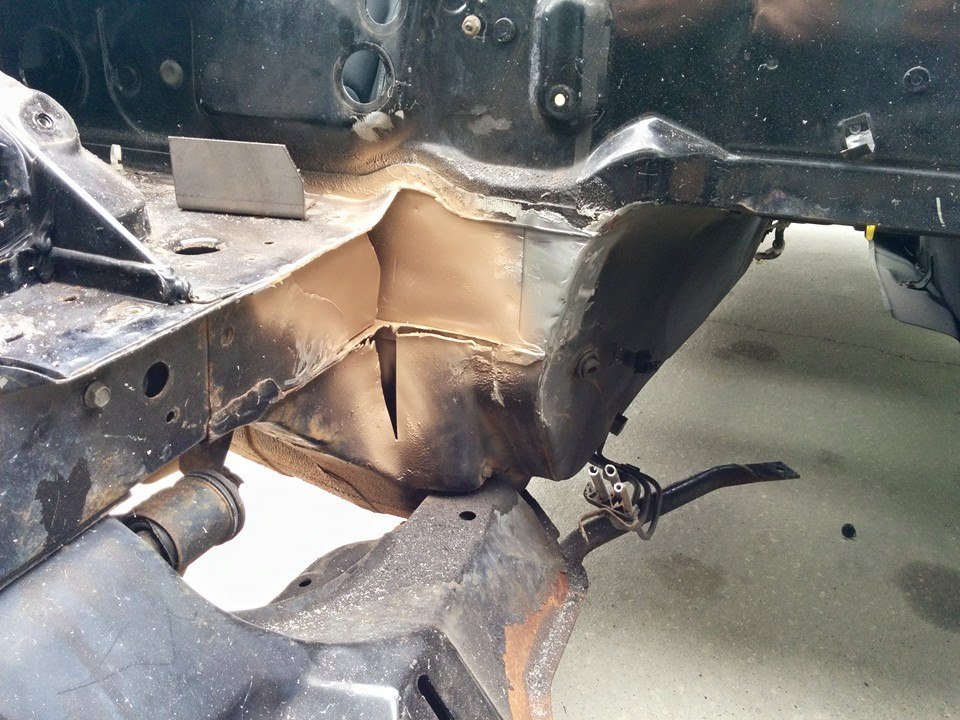
Got the frame rail reinforcements welded in and the interior stripped the rest of the way this weekend.
That gold pain, is CopperCoat, a weld through primer. It prevents rust/corrosion between metals while being conductive and able to be welded through.
I really wish the bracket on the drivers side extended further and had a recess for the stud that is there for the pedal box. Oh well.
Last edited by SupaDupaSteve; 08-22-2015 at 08:41 AM.
Lookin good. I thought the same thing about the driver side reinforcement, strange why it didnt have more material on the firewall. I put mine in, but it didnt really seem like its doing much. Eventually I'd like to weld in some tubing to tie the shock towers into the firewall.
How come you didnt widen the tunnel while you were in there?
Just a heads up, the drivers side doesnt need much beating if youre going with a t56. I almost went too far with it following FM's instructions. Their measurements are quite a bit wider than what I ended up needing.
Cheers
I did some, not much. I've got the Boss Frog subframe which is marginally further forward mounting. Enough to where they say you only need to make a couple small dents where the lower seam goes to the tunnel. What are your final measurements for tunnel widths?
13.5" at the top, 18" near the middle and 19.5" toward the bottom. If I wouldve beat the drivers side 1/8" more it wouldve been too much. But like you said, since you have the BF kit you wont need this much, if at all.
Eventually I'd like to weld in some tubing to tie the shock towers into the firewall.
Cheers
FWIW Running a 1x1 from the outside corner of the firewall across the side of the shock tower to the top of the frame right above where the suspension mounts makes a big difference. It takes all the cowl shake out of the car.
Are those the FM gussets? I got mine from them and they go a bit further across the firewall. Doesn't help you now though.
[img]https://sites.google.com/site/myv8miataproject/_/rsrc/1424497254010/build-blog/Engine%20build%20-%206180.jpg[/mg]
LOL yeah I'm just funnin with ya. Love this build! You can change the title of the thread if you want to just hit go advanced in the first post and title away. If that doesn't work PM me or better yet leave it like it is because really we all set out thinking we will have a budget!
been making some progress over the last week.
finished up my relocation brackets for the fuse box and isolated the battery-> starter cable. removed the alt and other wires that were in that harness as to allow me to relocate the fuse box inside. stock routing has the alt power wire going to one side of the main fuse and the other is lead that is spliced in with the starter terminal. Now obviously these won't work with my new fuse box location and the LS layout. I had some 8GA wires made specifically for those new leads. They will match my nice new engine harness too. Still undecided what I'm going to do for a speedometer. I want to retrofit an NB cluster but can't find much info other than that the connectors are different and wires need to be "changed." I don't really want to use an aftermarket digital speedo.
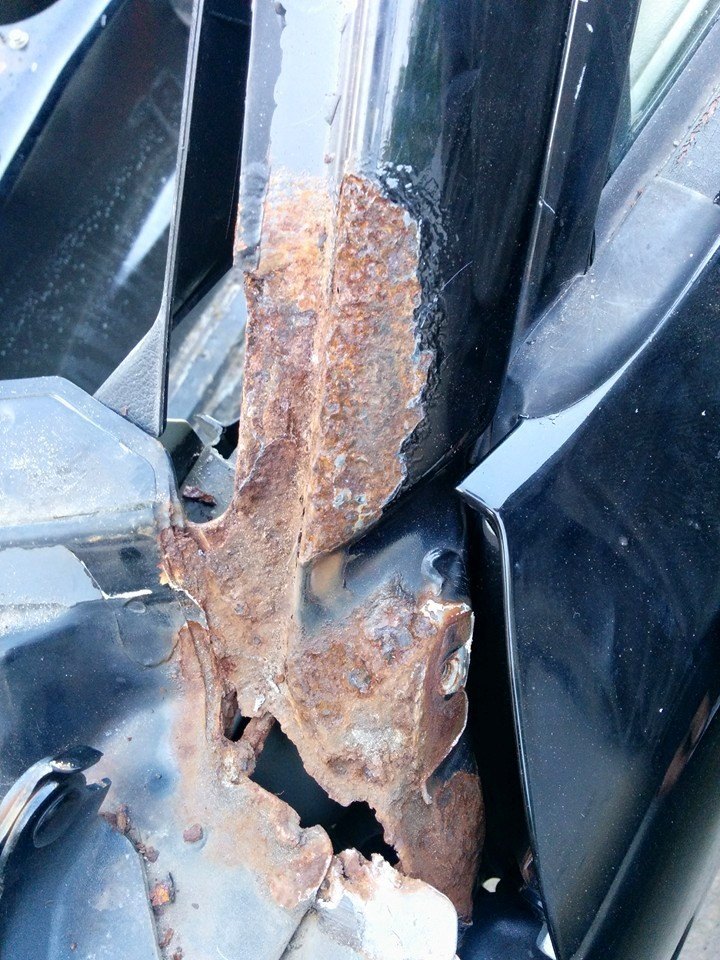
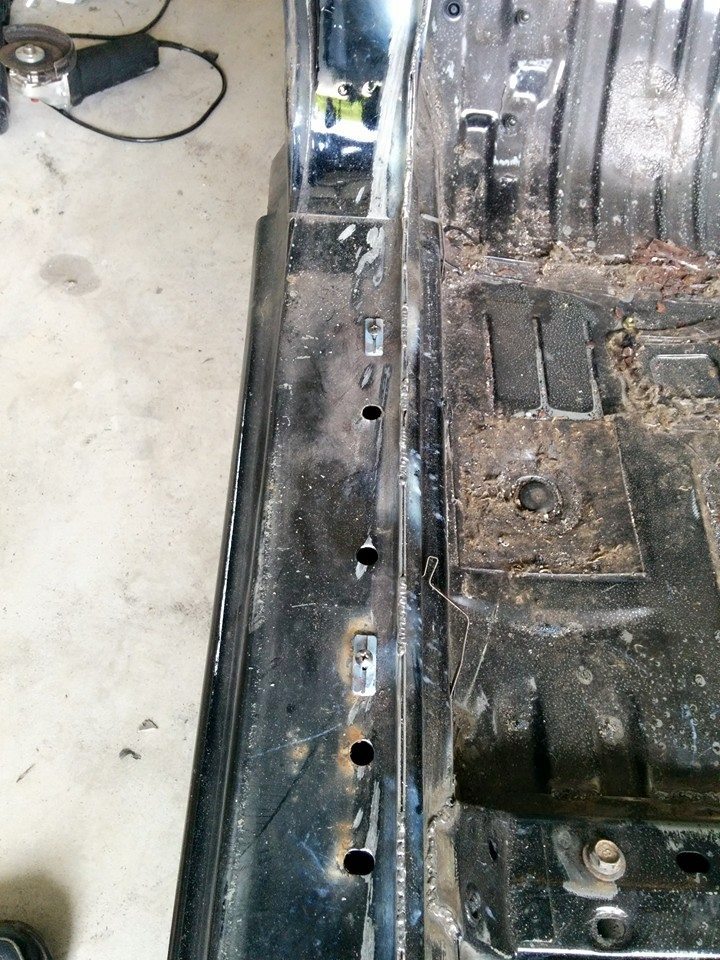
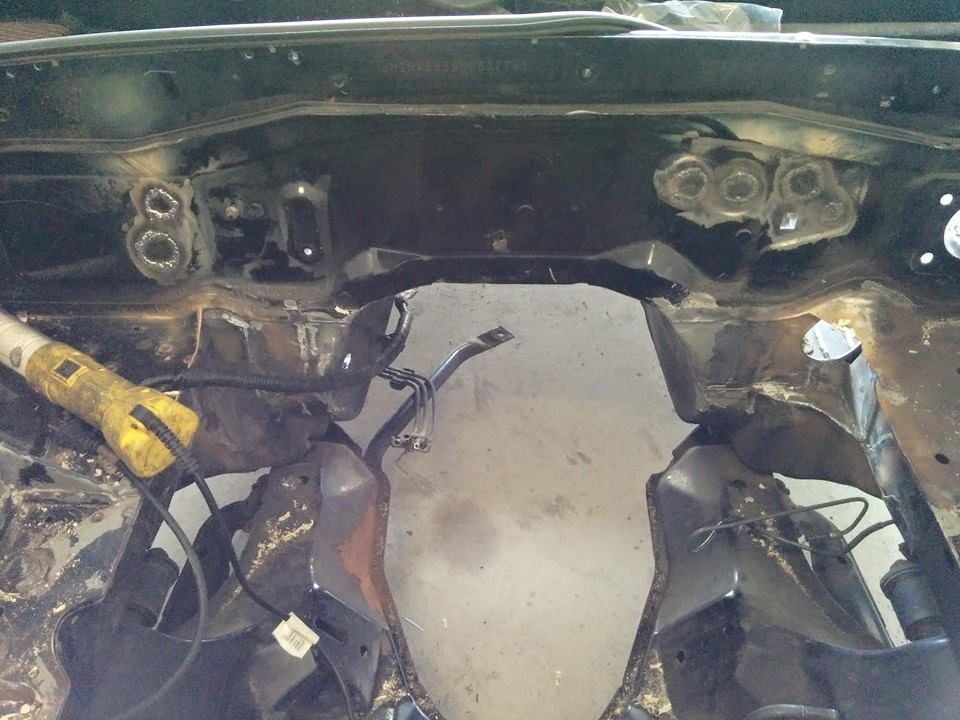
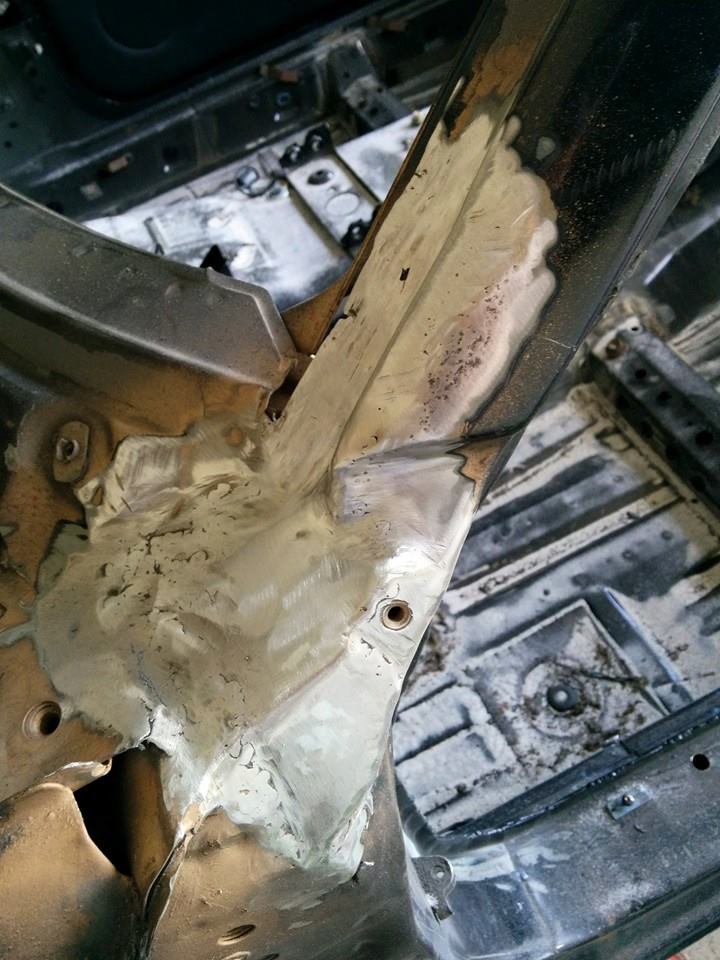
And now comes the nasty part. The RUST!
I originally didn't realize how bad this rust was. I guess I'm learning rust repair now. If anyone has any tips, tricks, ideas etc, feel free to share. I've done some small floor pan rust repair before but never anything of this magnitude.
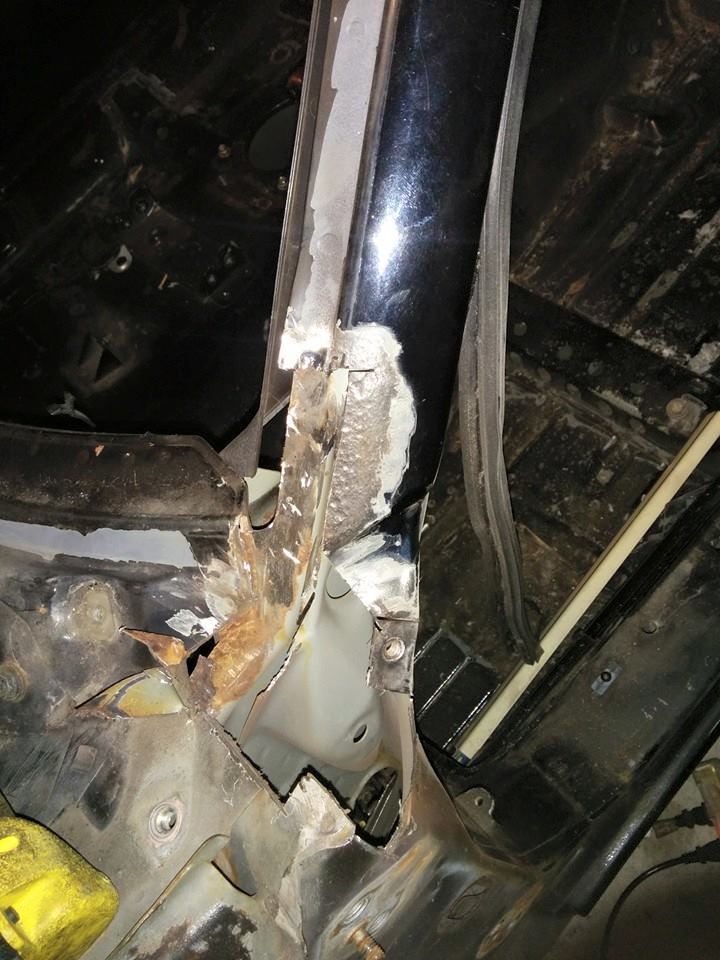
Got most of it cut out. Need to get the dremel and clean up the tight areas, then treat with ospho and slather some por15 inside there. I'll use the weld thru primer too
Last edited by SupaDupaSteve; 08-23-2015 at 06:26 AM.
I've been pretty busy the past couple weeks and will continue to be busy the next month or so. Lots of things going on so there's not much time to work on the miata.
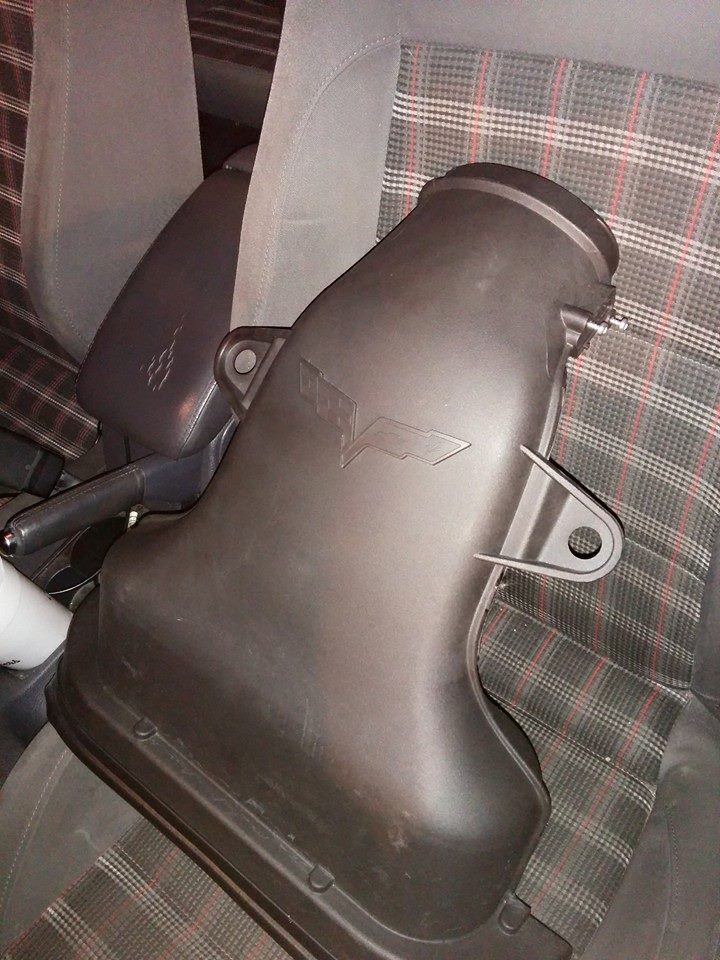
I picked up a z06 intake with an air filter for $75
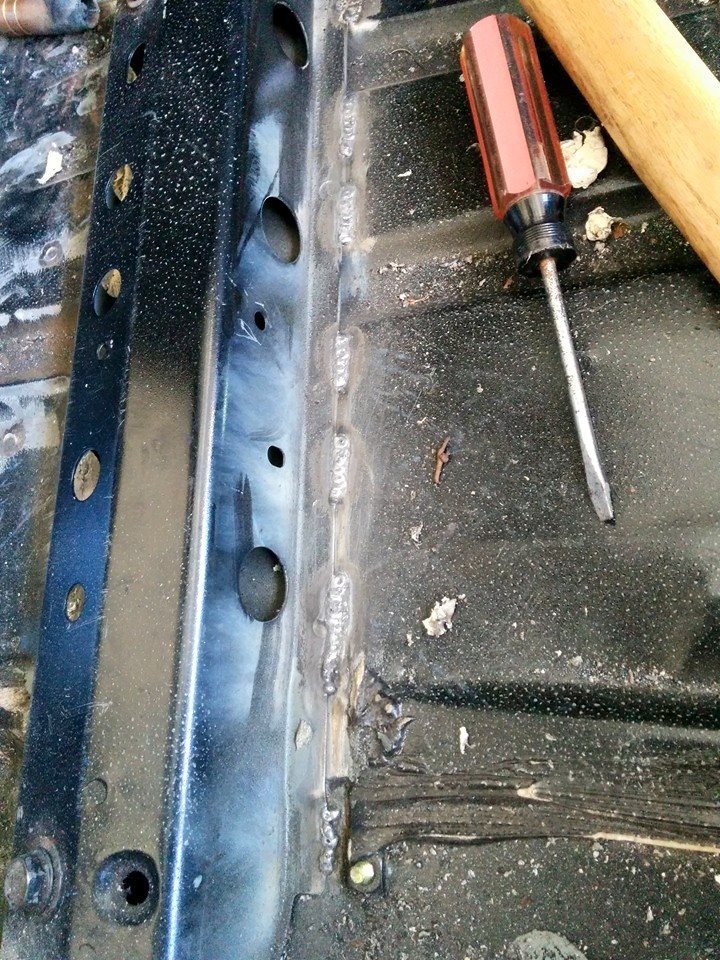
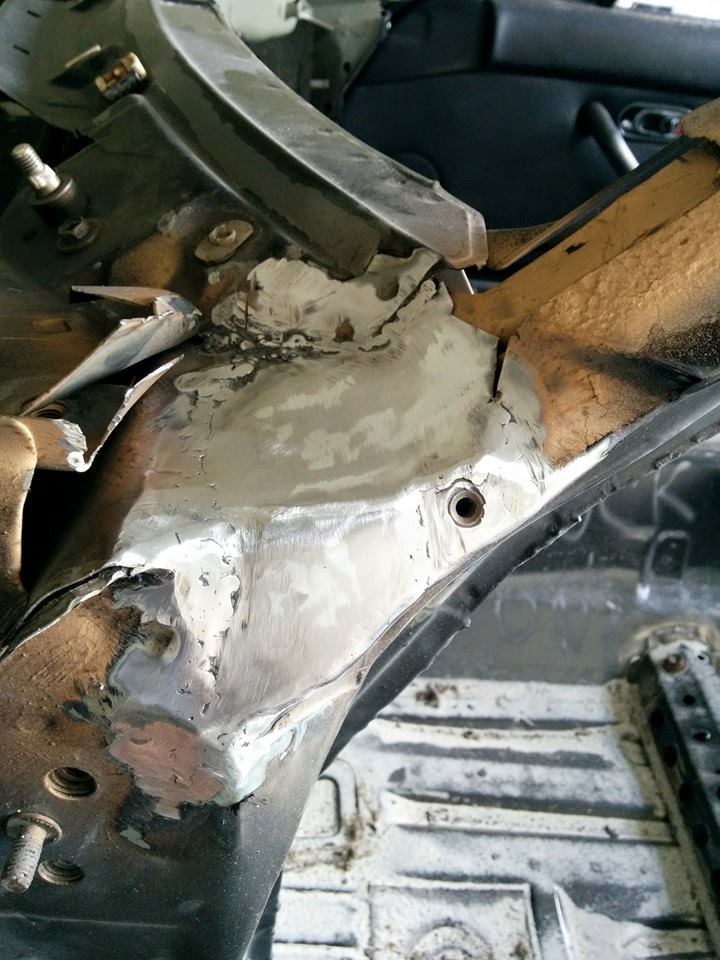
I also started repairing the rust and did some seam welding. I bought a cheap sandblaster from HF to clean the rust better and it works pretty well despite being a cheap tool from HF.
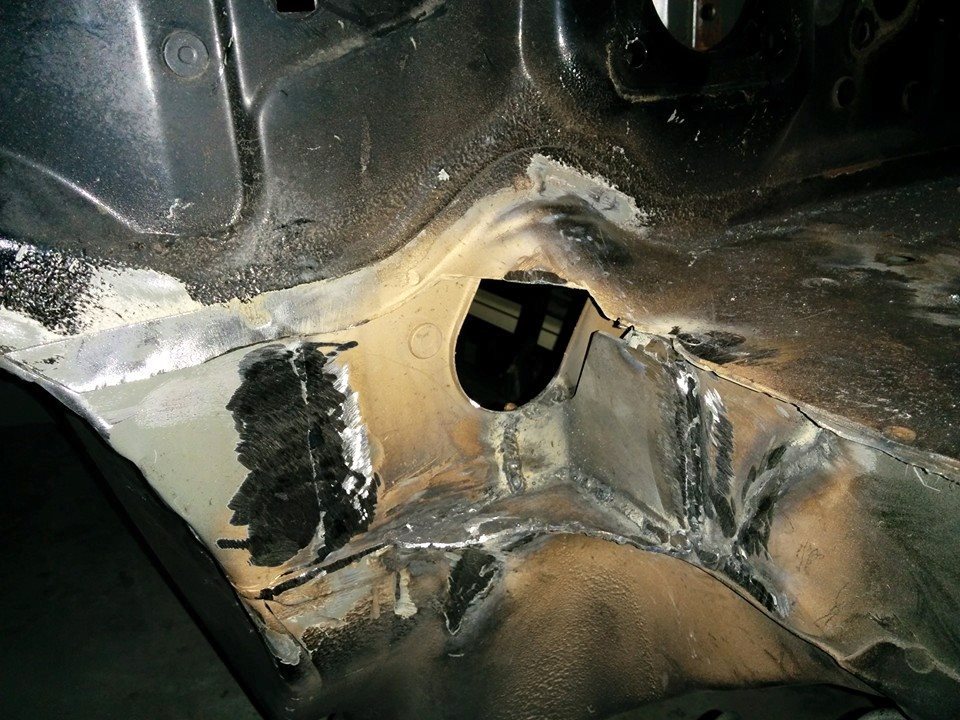
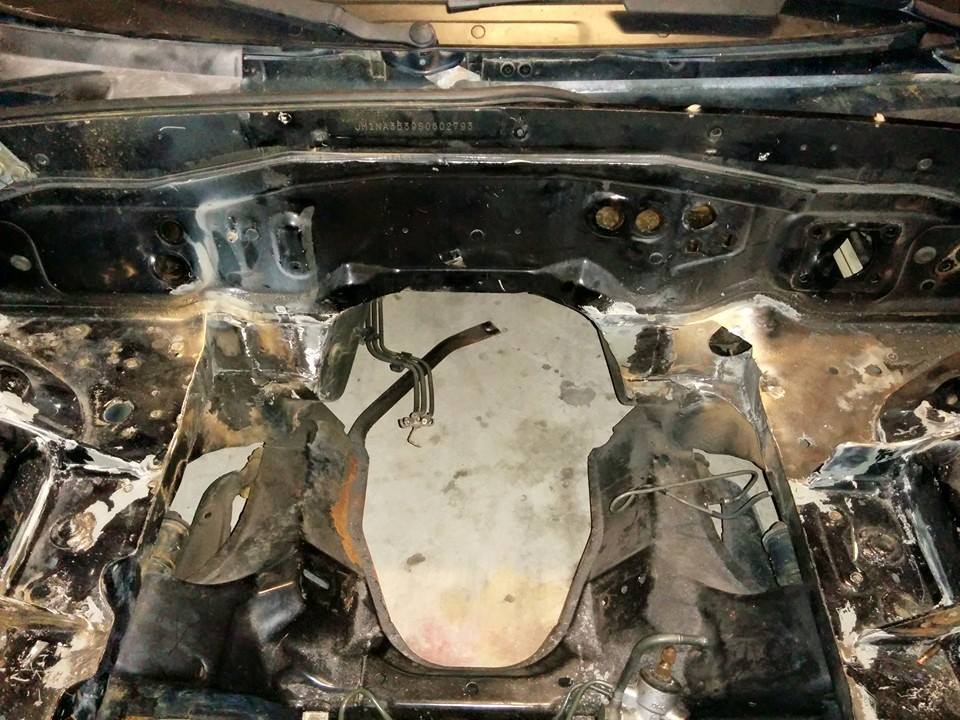
Welded up some filler pieces in the holes where the heater core, ac evap, cruise control and speedo cable came through the fire fall. Still need to grind these down and clean them up.
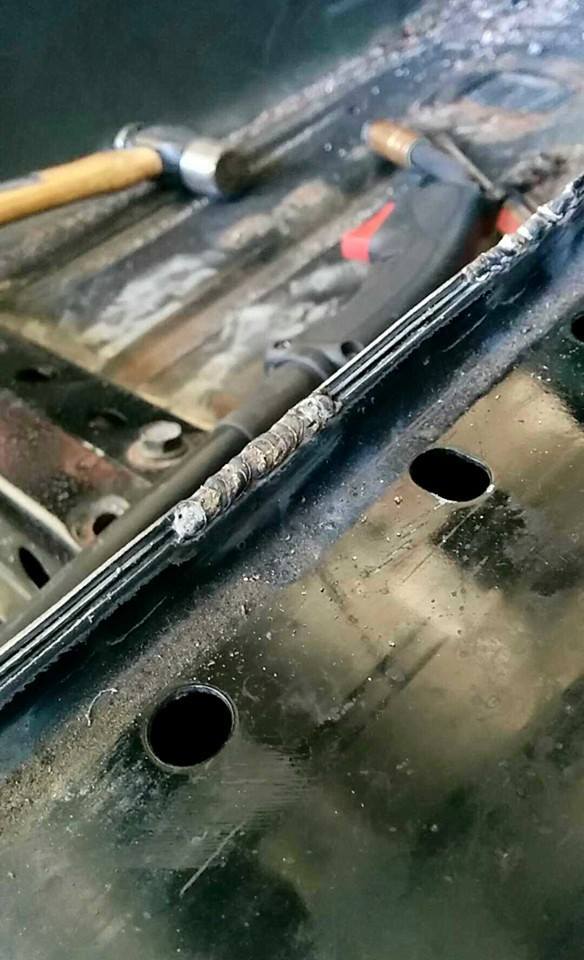
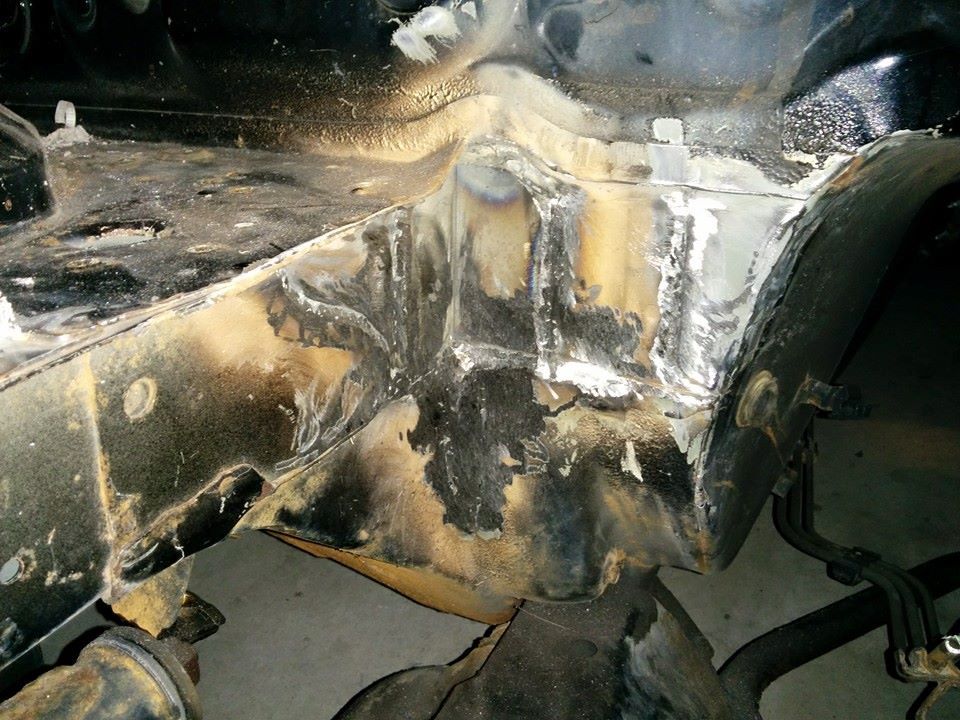
And I started to reconstruct the rusted out area that I cut out.
Last edited by SupaDupaSteve; 08-23-2015 at 10:31 AM.
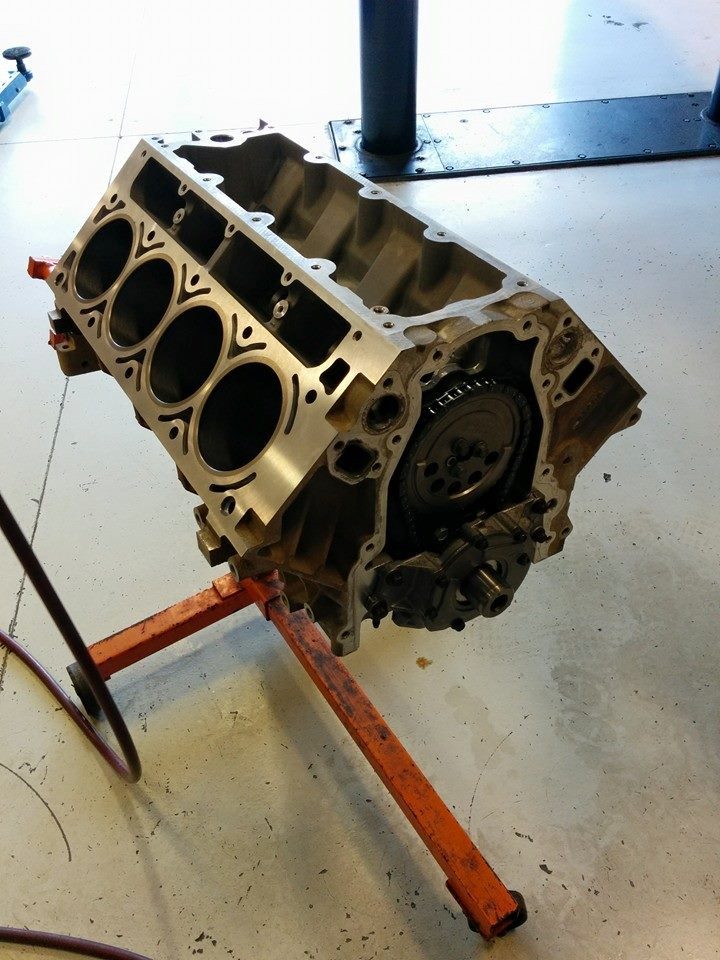
Finally got the bottom end assembled. Still need to send off the heads for porting and get the rest of my internals. (pushrods, lifters, gaskets, etc.) But I want to buy some parts I need for mockup first like a radiator, fan, water pump, fuel system,
Last edited by SupaDupaSteve; 08-23-2015 at 10:45 AM.
Things are starting to come together! Got the drivers side rust finished up today. The passenger side isn't nearly as bad and can be fixed with a small patch on the frame.
I'm pretty proud of how this came out, as I've never fixed anything like this before.
Last edited by SupaDupaSteve; 08-23-2015 at 10:47 AM.

 03-17-2015, 07:13 PM


 It's unreal how much time the wire diet takes and how much tape GM uses to hold everything together. Let us know if you get color blind before you get done. I found after about 8 hours all wires but orange appeared to be the same color. The color of brain fade!


")