v8 Miata Forum - Home of the v8 Miata Conversion
  • LOG IN
  • REGISTER
  • Forums
    • v8Miata - Getting Started
      • Introductions
      • V8 Miata Conversion FAQs and Builder Resources
    • v8Miata - Construction, Performance & Tuning
      • V8 Miata Engines
      • V8 Miata Drivetrains
      • V8 Miata Chassis and Suspension
      • V8 Miata Exhaust
      • V8 Miata Wiring, Electrical, and ECUs
      • V8 Miata Safety, Legal, & Emissions
      • Build Threads
    • Exocet, Catfish, Westfield, etc. Miata based builds
      • General Questons and Basic Information
      • Construction, Performance & Tuning
      • Chassis, Suspension and Brakes
    • v8Miata - General Discussions
      • Exterior Mods
      • Interior Mods
      • DIY How-to Instructions
      • Shop and Tool Talk
      • Non-Miata Build Information
      • Advanced Engineering and Fabrication
    • v8Miata - Life
      • Area Member Gatherings for V8 Miatas
      • Drives, Road Trips, & Travel Adventures
      • Car shows, Club events and Rallies
      • V8 Miata Media
      • Performance Driving
      • V8 Miata Dyno Results
    • v8Miata - Off Topic Chat and General Miscellaneous Fun Stuff
      • Entertainment: Music, Movies, TV, Books, etc.
      • Various Auto News
      • Site Tips & Suggestions
      • MiataTurbo.net
      • MiataForumz.com
      • NoPistons.com
    • V8 Miata Sponsors
    • v8Miata - Classifieds
      • Pricing info - what is this worth?
      • Bargain Hunter's Bulletin Board
      • Cars For Sale
      • Parts For Sale
      • Wanted to Buy - Cars
      • Wanted to Buy - Parts
  • Marketplace
    • Become a Vendor
  • New Posts
  • Tools
    • Car Payment Calculator
    • Tire Rim Calculator
    • Recalls
    • Technical Service Bulletins (TSBs)
    • Members List
    • Live Feed
  • Gallery
  • Log In
  • Register
v8 Miata Forum - Home of the v8 Miata Conversion
    • Threads
      • Advanced
Log In

Forgot your Password?

By logging into your account, you agree to our Terms of Use and Privacy Policy, and to the use of cookies as described therein.
  • Recent
  • Commented
  • Albums
  • My Pictures

My Post Pictures

Dan_W
January 30, 2019
 127
 0
Sort:
Default
  • Default
  • Most Recent
I like to use software to design parts, but resorted to CAD (cardboard) for my timing pointer.
0 2020/12/12 16:15:53 Dan_W
I used a piston stop to find TDC. Rotate clockwise until you find #1’s compression stroke. Pull the rocker arms on #1 and continue until you hit the stop and make a mark, then ccw until you hit it again and make another mark. Half way between them is TDC. I used a measuring tape to find the circumference of the crank pull and divided that by 360 to come up with 1.6mm per degree, then made a few timing marks.  This is all so I can properly calibrate my motors timing when I start tuning.
I used a piston stop to find TDC. Rotate clockwise until you find #1’s compression stroke. Pull the rocker arms on #1 and continue until you hit the stop and make a mark, then ccw until you hit it again and make another mark. Half way between them is TDC. I used a measuring tape to find the circumference of the crank pull and divided that by 360 to come up with 1.6mm per degree, then made a few timing marks. This is all so I can properly calibrate my motors timing when I start tuning.
0 2020/12/12 16:18:20 Dan_W
0 2020/12/12 16:25:18 Dan_W
Some cardboard aided design for my timing pointer. I'm adding this so I can accurately calibrate timing in my tune.
0 2020/12/12 16:26:35 Dan_W
I used a piston stop to find top dead center and then I marked the dampener with a paint pen.
0 2020/12/12 16:27:59 Dan_W
I added a fuel pressure sensor so I can log fuel pressure. I bent 3/8 stainless hardline and covered it with DEI insulated heat sleeving. I decided to try compression fitting/AN adapters on both ends of the Hardline.
0 2020/12/12 16:29:23 Dan_W
And here's the routing at the front of the car.
0 2020/12/12 16:31:18 Dan_W
0 2020/12/16 17:55:57 Dan_W
0 2020/12/16 17:56:14 Dan_W
0 2020/12/16 17:58:49 Dan_W
0 2020/12/19 06:47:20 Dan_W
0 2021/01/05 13:34:35 Dan_W
This is how the geometry works out. With the mount roughly 3/8" in front of the upper control arm bolt.  Horizontal arms, and vertical end links, perfect.
This is how the geometry works out. With the mount roughly 3/8" in front of the upper control arm bolt. Horizontal arms, and vertical end links, perfect.
0 2021/01/05 13:36:27 Dan_W
Another view to show the offset part of the bar. I welded the mounts roughly 1/4" in front of the upper control arm bolt.  I was a little low when I took this picture but the arms are horizontal.
Another view to show the offset part of the bar. I welded the mounts roughly 1/4" in front of the upper control arm bolt. I was a little low when I took this picture but the arms are horizontal.
0 2021/01/05 13:36:52 Dan_W
Here is checking for interference to simulate a bunch of suspension droop.
0 2021/01/05 13:37:17 Dan_W
0 2021/01/05 13:38:28 Dan_W
0 2021/01/05 13:39:04 Dan_W
Parts are pretty all painted up.
0 2021/01/05 13:39:35 Dan_W
With lower control arms horizontal at ride height-ish (it hasn't been on the ground yet with these shocks to check) I've got space to for the dampener and alternator.  Using thick spacers that came with the supermiata endlinks, both endlinks are within 1 degree of vertical in both axes.
With lower control arms horizontal at ride height-ish (it hasn't been on the ground yet with these shocks to check) I've got space to for the dampener and alternator. Using thick spacers that came with the supermiata endlinks, both endlinks are within 1 degree of vertical in both axes.
0 2021/01/05 13:40:07 Dan_W
This picture is intended to show how low my motor sits in the chassis below the frame rails, its about 6 1/8" to the bottom of the crank pulley. I've got those 1/4" spacer plates to move the motor back, so the motor sits .18" higher than the normal monster miata stuff... of course I've also got my own custom trans mount tucking the transmission as high up as it will go so who knows...
0 2021/01/05 13:40:22 Dan_W
This one shows the position of the transmission. My motor and trans are both centered between the frame rails.  The shifter is offset to the drives side of the transmission. This put it about 5/8 of an inch left of center. Its also about 5/8" back from center.
This one shows the position of the transmission. My motor and trans are both centered between the frame rails. The shifter is offset to the drives side of the transmission. This put it about 5/8 of an inch left of center. Its also about 5/8" back from center.
0 2021/01/05 15:23:42 Dan_W
Cool, another opportunity for a fabrication project!
0 2021/01/05 15:27:11 Dan_W
And here we are back in the center of the boot. I'll figure out the shifter handle when I get the console in the car.
0 2021/01/05 15:28:00 Dan_W
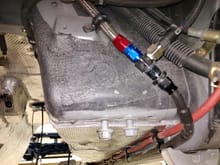
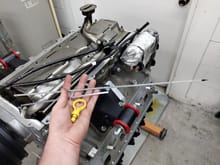
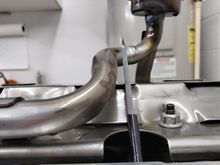
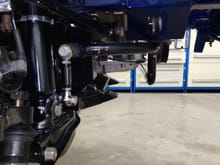
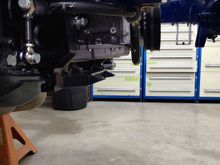
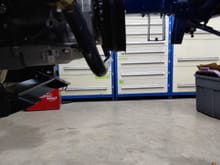
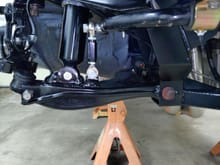
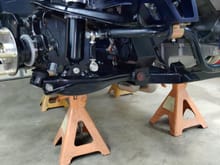
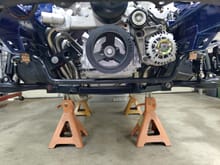
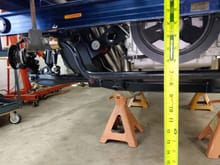
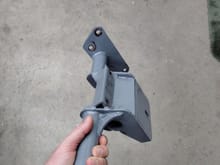
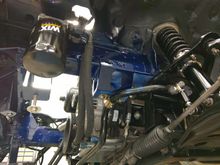
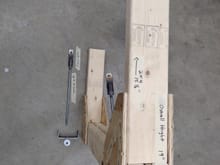
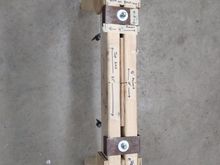
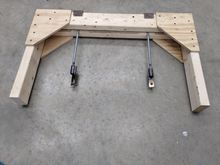
I don't think I posted this picture yet, this is the trans crossmember, don't look too close at it, I welded that exhaust hanger part and forgot to turn the gas on, what a mess. I'm pretty happy with the fitment and function of this but I cant wait to go back and polish the design.
0 2021/01/05 15:29:08 Dan_W
Finally got around to finishing my exhaust. Only had the tips to weld on last time.
0 2021/10/09 10:27:15 Dan_W
One of my favorite pictures of the car so far. Exhaust=finished.
0 2021/10/09 10:30:47 Dan_W
0 2021/10/09 10:35:10 Dan_W
Things get tight by the PS rack so I bent some hard lines to snake through there. This is the left side of the oil pan.
0 2021/10/09 10:37:52 Dan_W
This one shows the other end of the tubing.  Was still waiting on the correct 90 degree -10 AN fittings at this point.
This one shows the other end of the tubing. Was still waiting on the correct 90 degree -10 AN fittings at this point.
0 2021/10/09 10:40:13 Dan_W
I made this engine support Gantry to help with a buddies car. This one has a stock LS1 with a 4l60.
0 2021/10/09 10:43:43 Dan_W
0 2021/10/09 10:46:42 Dan_W
0 2021/10/09 10:46:49 Dan_W
0 2021/10/09 10:46:55 Dan_W
0 2021/10/09 10:47:02 Dan_W
0 2021/10/09 10:47:08 Dan_W
0 2021/10/09 11:18:55 Dan_W
In case someone wants to build one of these. I found it pretty handy. I supported my motor with it while i replaced my pan with the V8R one.
0 2021/10/09 11:21:46 Dan_W
0 2021/10/09 11:22:18 Dan_W
0 2021/10/09 11:22:49 Dan_W
0 2021/10/09 11:23:18 Dan_W
First
Page
3 of 4
Last
Go To
Page
  • 1
  • 2
  • 3
  • 4
3 of 4
Go To GO
Go to page of 4 pages
  • 1
  • 2
  • 3
  • 4

Top
v8 Miata Forum - Home of the v8 Miata Conversion
  • Contact Us
  • FAQ
  • Archive
  • Advertising
  • Cookie Policy
  • Privacy Statement
  • Terms of Service
  • Your Privacy Choices
  • Manage Preferences

© 2026 MH Sub I, LLC dba Internet Brands


When you click on links to various merchants on this site and make a purchase, this can result in this site earning a commission. Affiliate programs and affiliations include, but are not limited to, the eBay Partner Network.