
Canadian Monster Miata SN95 Build


V8 Miata Fan
Joined: Mar 2015
Posts: 98
Likes: 8
From: Sa, Tx
On top of the torque multiplication, I think the forces you are looking at are not the significant reactant forces. The driveshaft puts torque through the input shaft on the differential but the reaction is at the tire/ground interface. This will make the differential want to rotate about the axle axis. I believe the more important loads the mounts will be experiencing are the front mounts in compression and the rear mounts in tension. Thoughts?

V8 Miata Participant
Joined: Feb 2010
Posts: 276
Likes: 13
From: Sarasota, FL
There are definitely multiple forces involved here. The most dramatic examples can be seen in the launch at a drag strip. Depending on the setup, the car twists on the lateral axis from the force on the pinion, and tries to lift the front depending on the chassis setup as regards anti-lift and anti-dive. Obviously drag cars are optimized for weight transfer to the rear, Miatas not so much. But the reactive forces are still there, on the one hand trying to twist the rear end housing along the lateral axis via the pinion acting against the ring, which was presented above, and then along the line thru the axles. And of course, all this being compounded by the amount of traction available.
It does seem that the force on the front mounts is primarily compressive under acceleration, where the rear mount is under tension under those circumstances. But the twisting about the pinion shaft is still significant, as shown above, and by the twisting of the body of the car and the tendency to lift one front wheel under acceleration.
Mike

V8 Miata Habitu�
Joined: May 2015
Posts: 190
Likes: 5
From: East TN
I'm convinced engineering is dark magic. Thank you for sharing all the info esp with the rear diff mounts. I've got a rx7 diff but theory is the same. Have to do something because no exhaust is going to fit through the current mess.

Thread Starter
V8 Miata Fan
Joined: Sep 2015
Posts: 25
Likes: 2
From: Victoria BC Canada
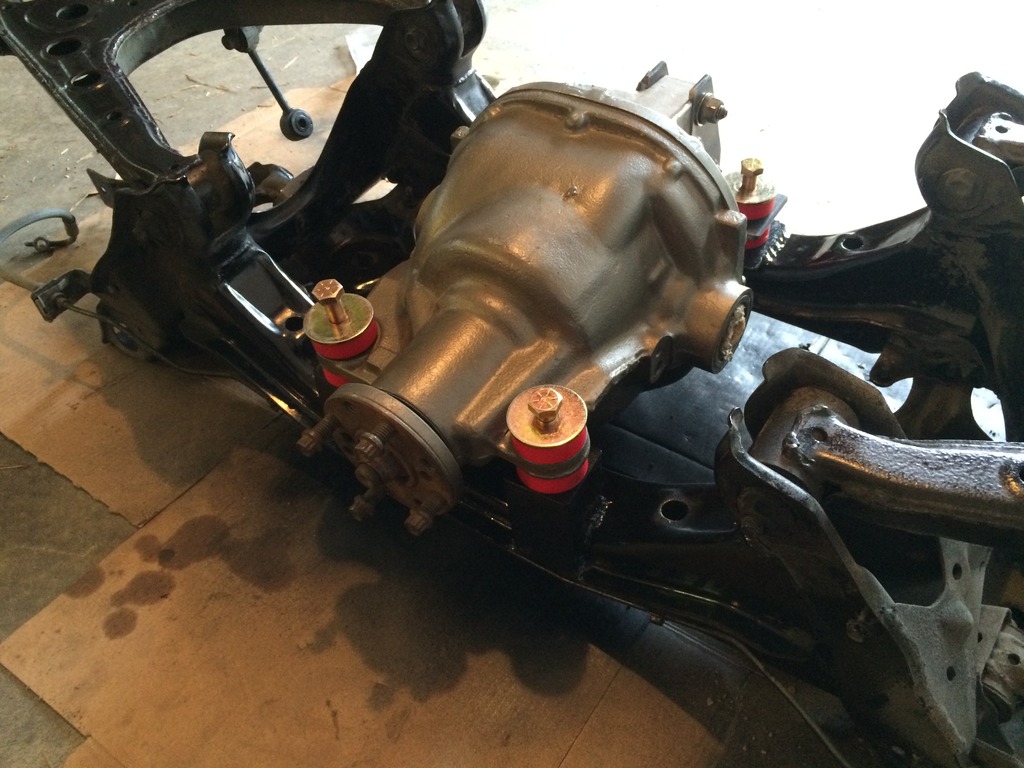
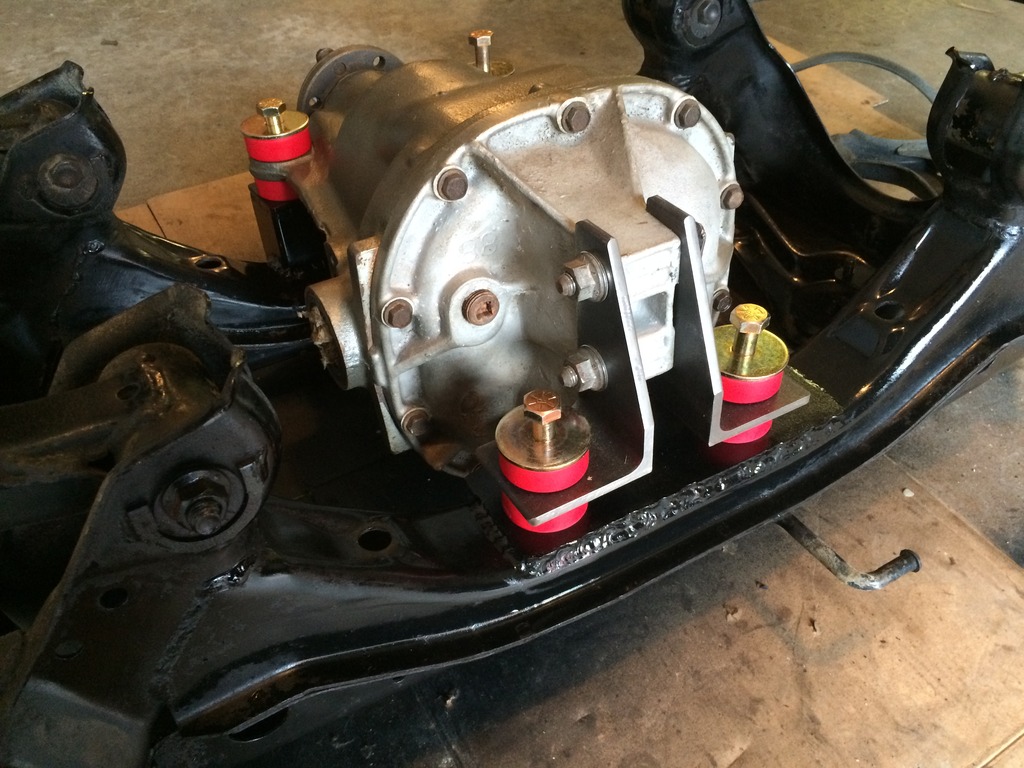
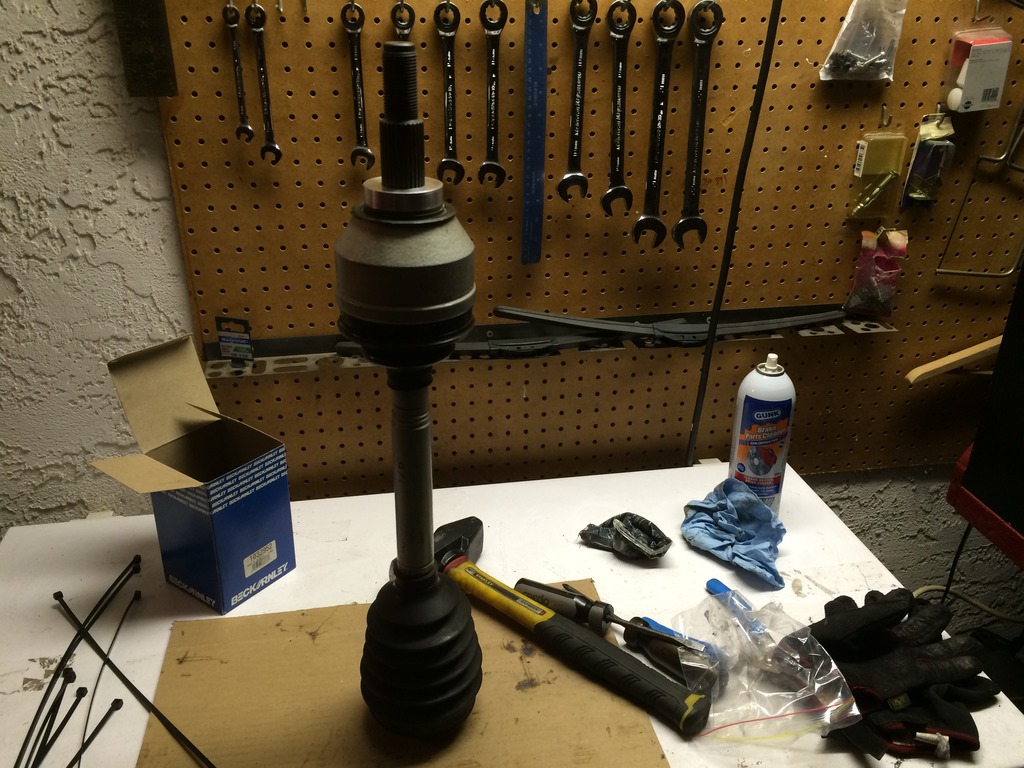
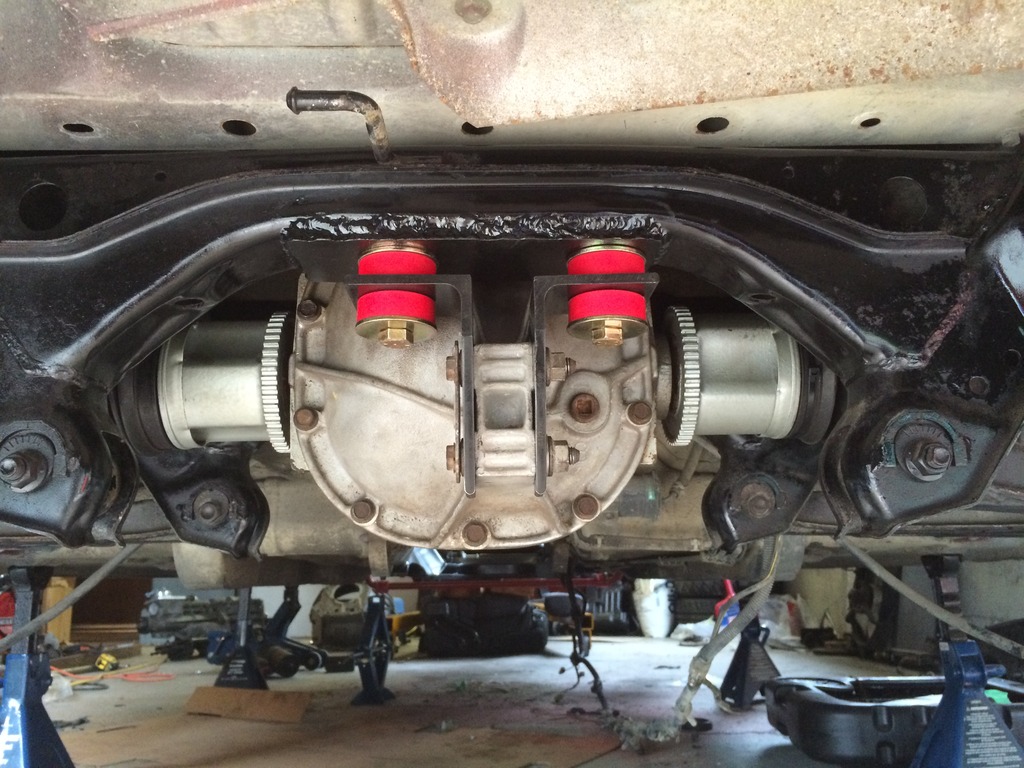
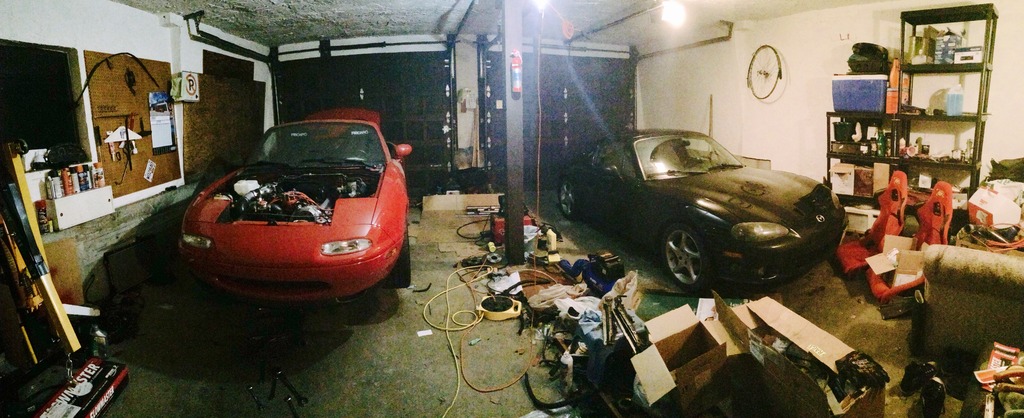
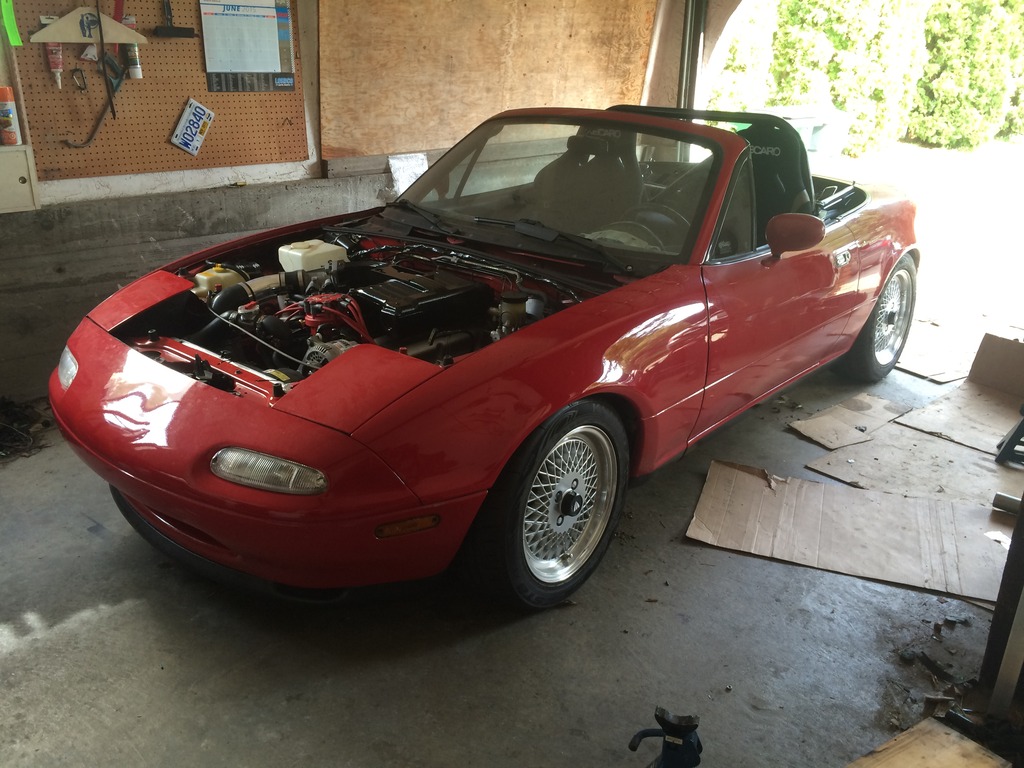
I have now mounted the rear end and threw on a quick coat of paint to the subframe
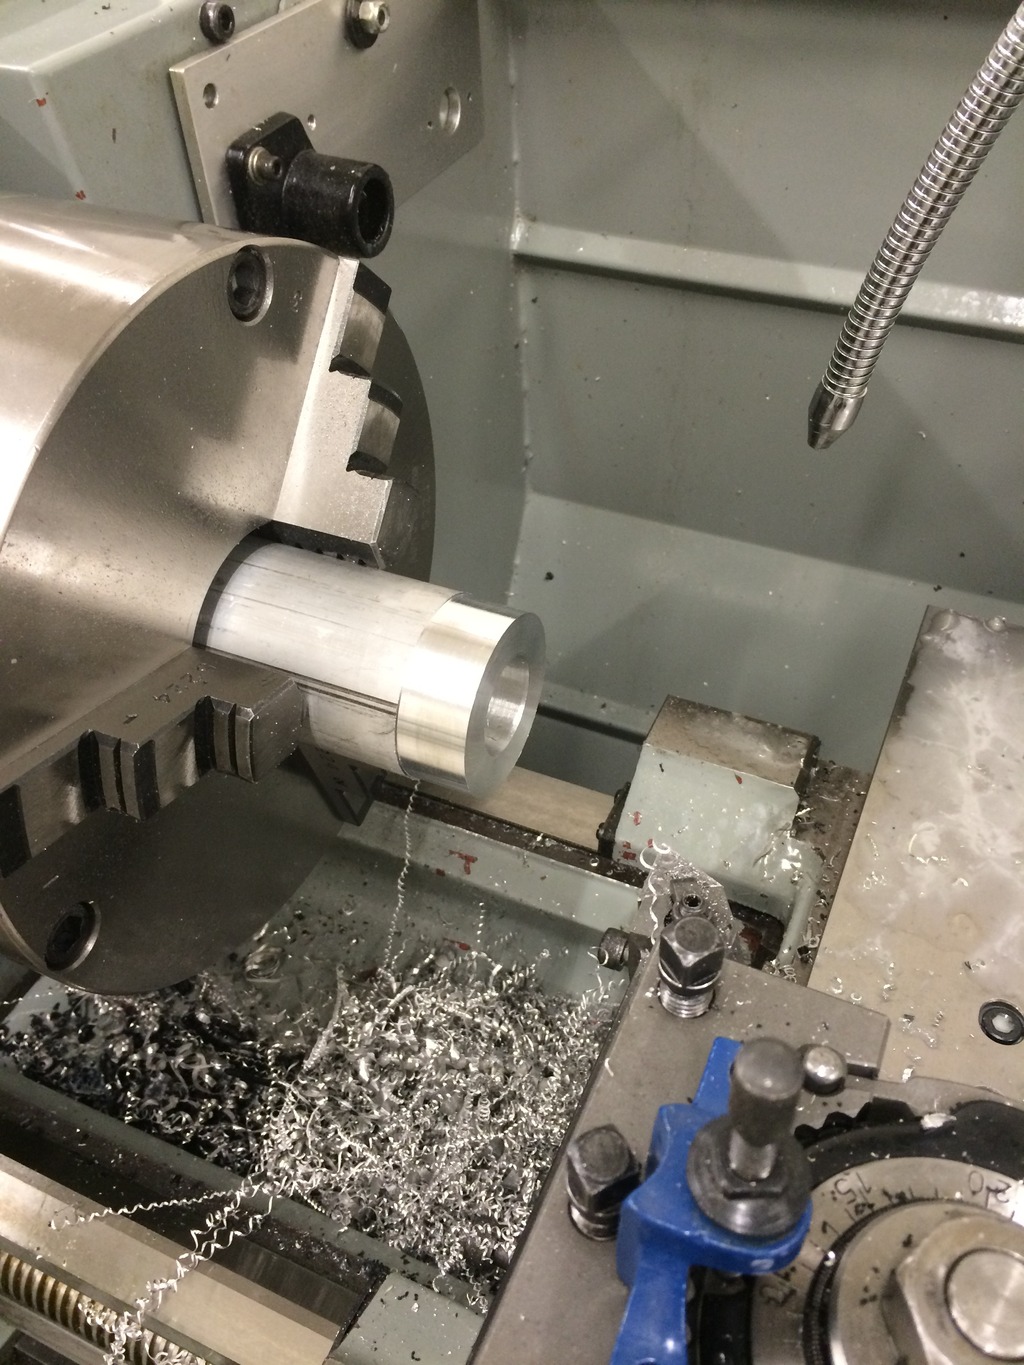
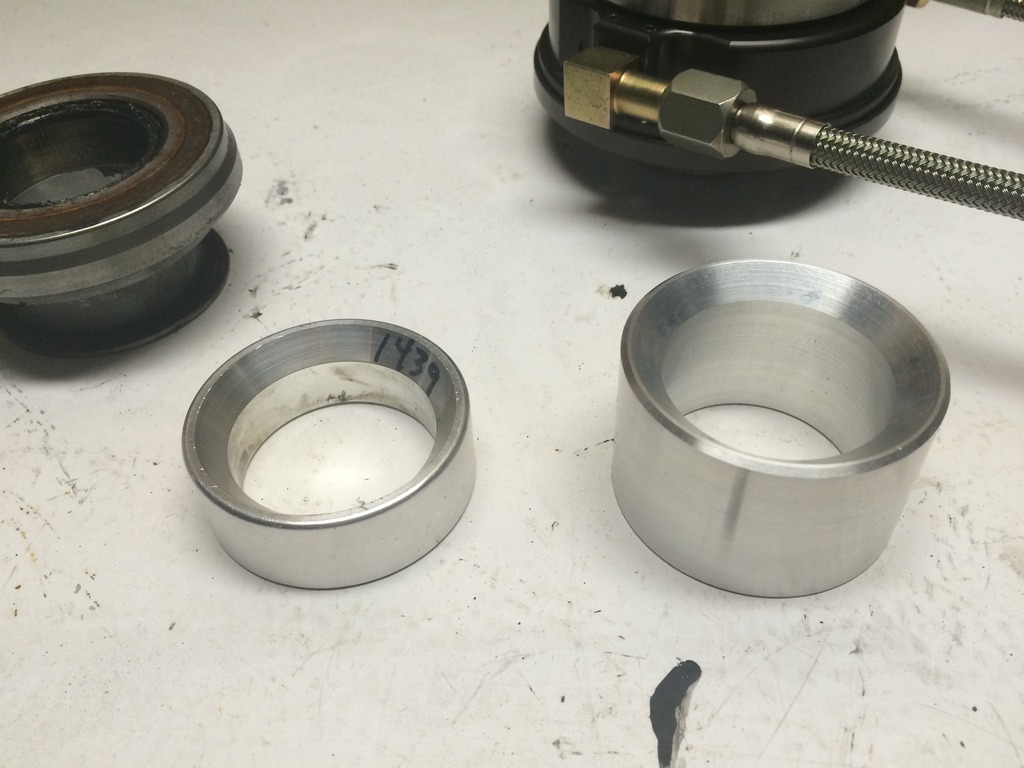
I then made some aluminum spacers for the Thunderbird axles in the miata uprights
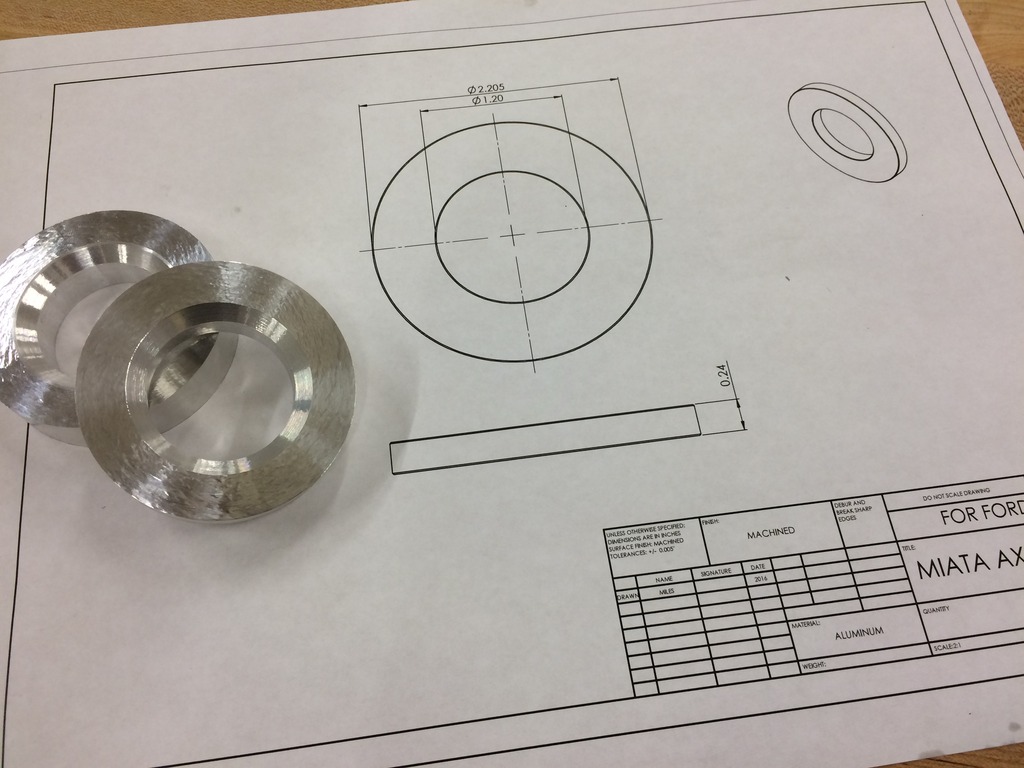
Ignore the thickness dimension on the following drawing, I read it on here somewhere as what somebody used, but its too thin, I had to remake the spacers with a 0.500" thickness which are in the picture
Here's a spacer in place on the axle
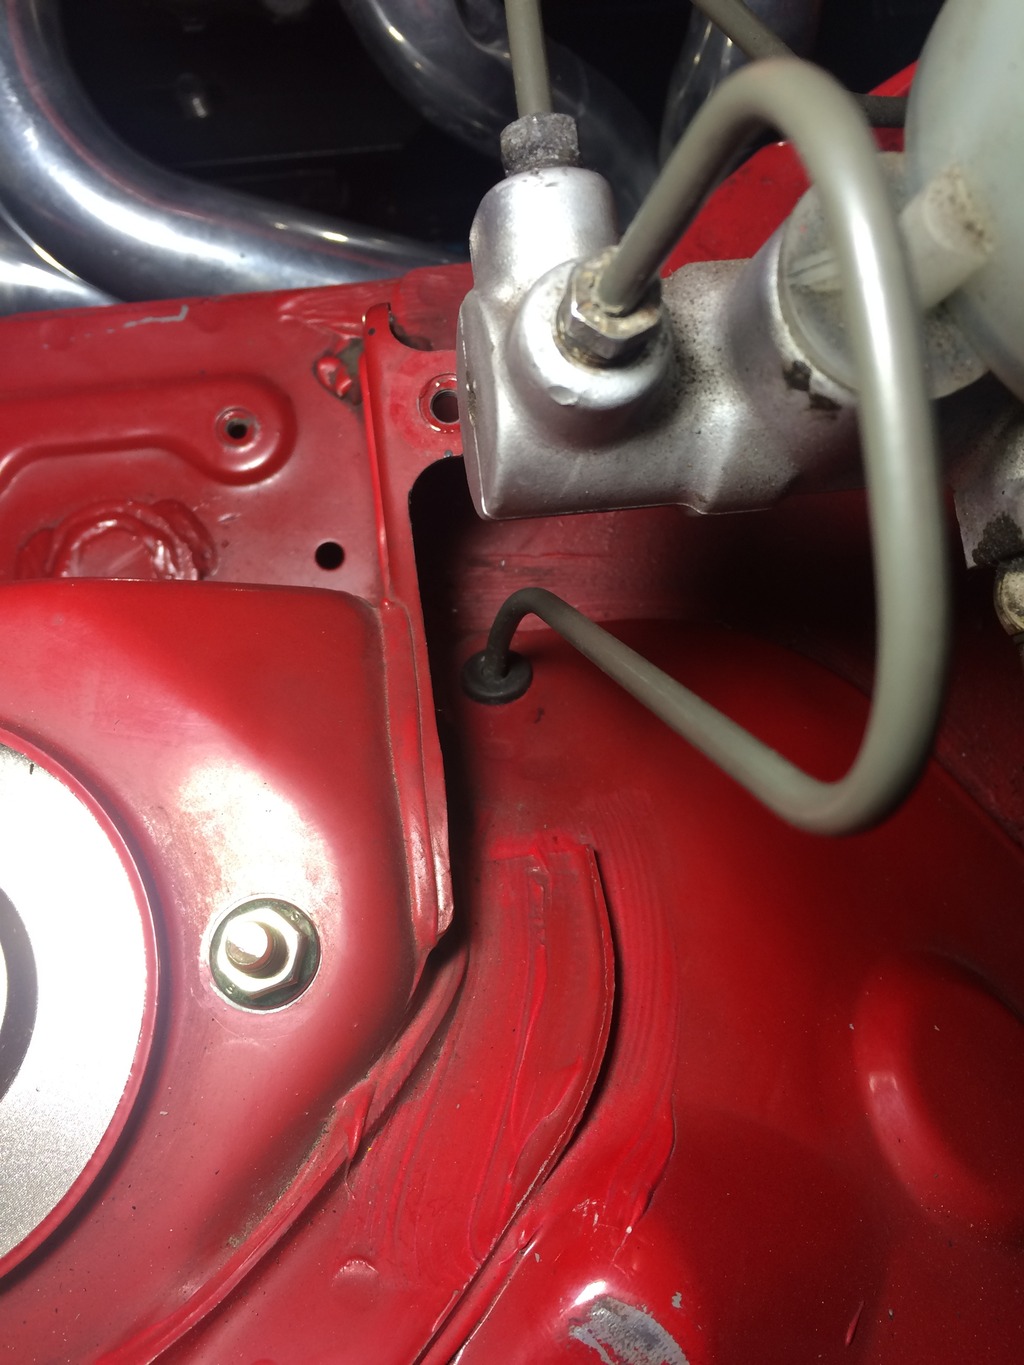
I installed the headers and realized the drivers side brake line was basically touching it, so I drilled a hole and moved it to go through the fender with a rubber grommet
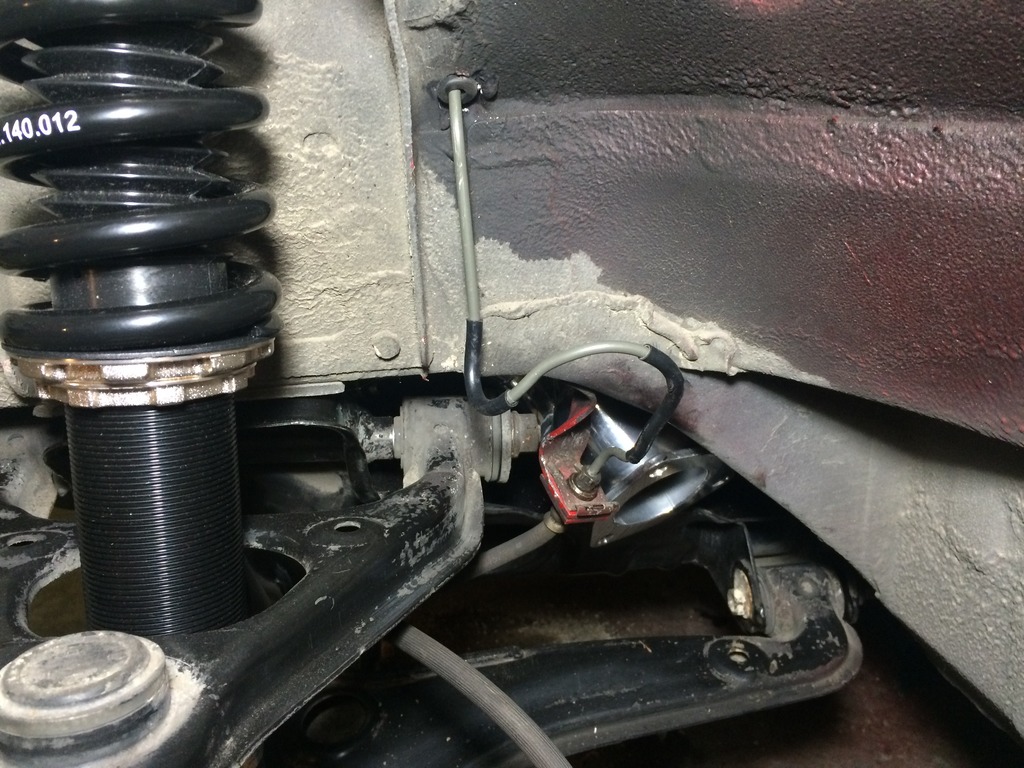
Here it is coming through the other side, you can also see the new suspension with 670 lb/in front springs (rears are 450 lb/in)
Not sure if anybody has done this with a ford build but after reading the issues with the clutch set up commonly used I decided to try a hydraulic throw out bearing from McLeod. I really wasn't a fan of the brackets to hold the miata slave down there and my SN95 bell housing actually puts the slave in the direct path of the exhaust since its lower. I hope to have avoided a couple issues going this route.
Here it is next to the regular throw out bearing
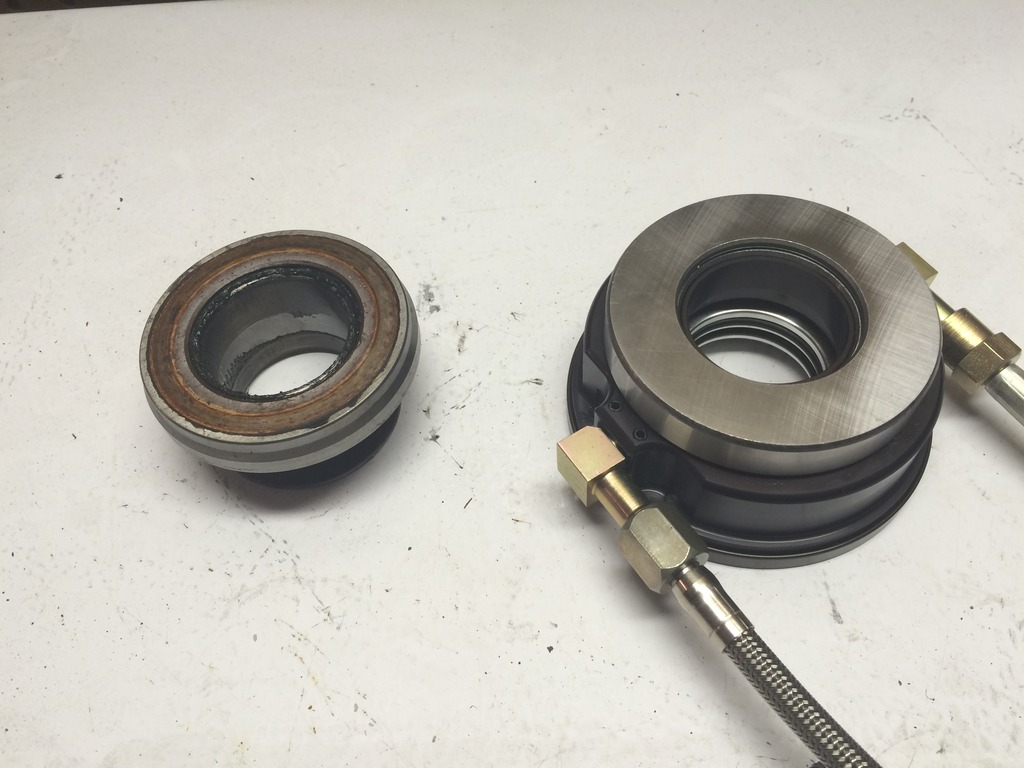
I think the one I got was for a regular 302 / T5 with the shorter input shaft, the spacer I had was too short so I just made a new one with the appropriate length.

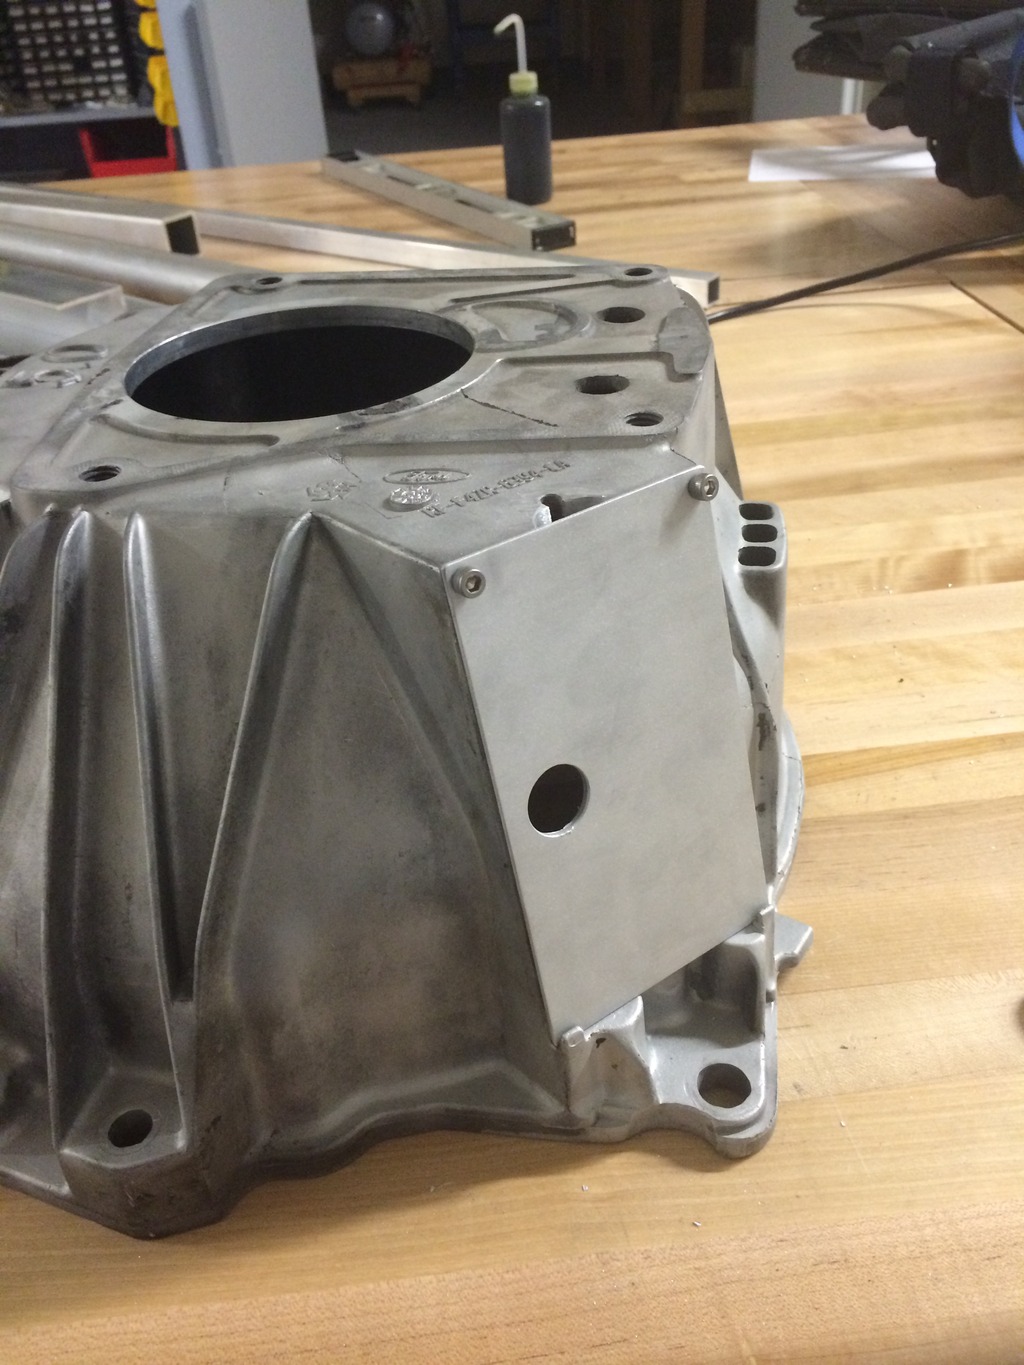
I made an aluminum block off plate for the clutch fork hole
Here you can see the clutch line coming out of the hole with the grommet in it, and the bleeder hose comes out the side facing towards the rear.
The car now has the NB sport package big brakes on it as well, took the driveshaft to a shop yesterday to get shortened.
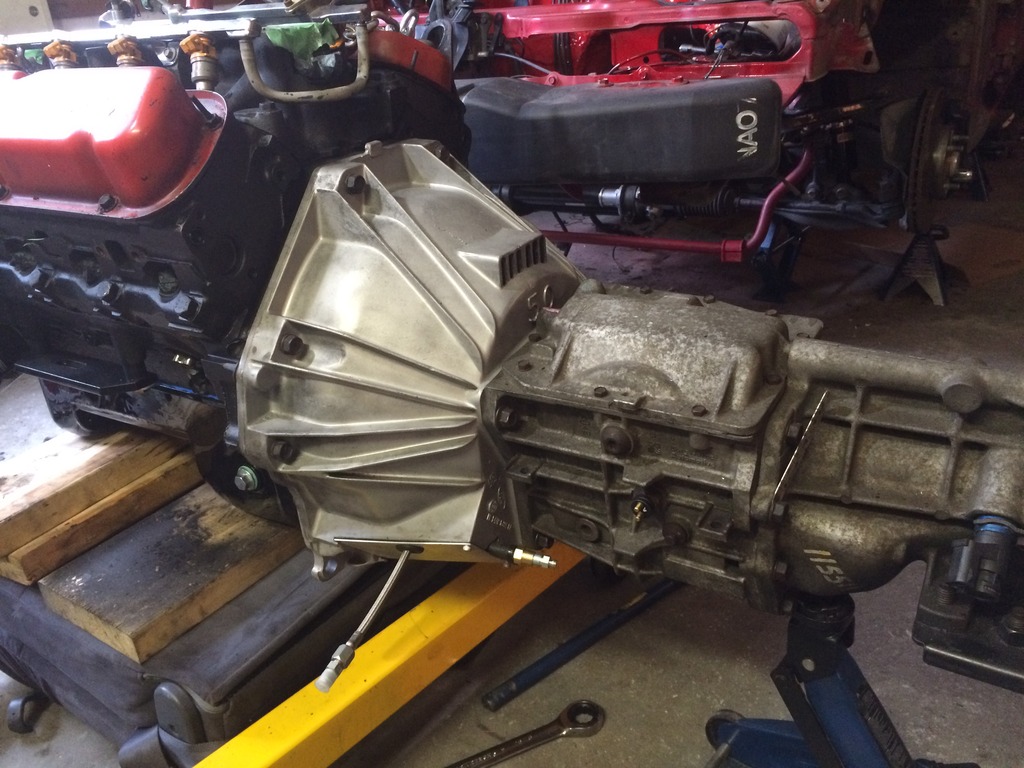
I'm at a good point in this build, everything is starting to go back together. I have a transmission brace tacked together but I'm not going to fully weld it up until the engine is bolted back in with the transmission and I can confirm the exhaust will work.
This engine will be running off a megasquirt 2 which I will hopefully start wiring up in a week or so, getting excited.


I then made some aluminum spacers for the Thunderbird axles in the miata uprights

Ignore the thickness dimension on the following drawing, I read it on here somewhere as what somebody used, but its too thin, I had to remake the spacers with a 0.500" thickness which are in the picture

Here's a spacer in place on the axle


I installed the headers and realized the drivers side brake line was basically touching it, so I drilled a hole and moved it to go through the fender with a rubber grommet

Here it is coming through the other side, you can also see the new suspension with 670 lb/in front springs (rears are 450 lb/in)

Not sure if anybody has done this with a ford build but after reading the issues with the clutch set up commonly used I decided to try a hydraulic throw out bearing from McLeod. I really wasn't a fan of the brackets to hold the miata slave down there and my SN95 bell housing actually puts the slave in the direct path of the exhaust since its lower. I hope to have avoided a couple issues going this route.
Here it is next to the regular throw out bearing

I think the one I got was for a regular 302 / T5 with the shorter input shaft, the spacer I had was too short so I just made a new one with the appropriate length.


I made an aluminum block off plate for the clutch fork hole

Here you can see the clutch line coming out of the hole with the grommet in it, and the bleeder hose comes out the side facing towards the rear.

The car now has the NB sport package big brakes on it as well, took the driveshaft to a shop yesterday to get shortened.
I'm at a good point in this build, everything is starting to go back together. I have a transmission brace tacked together but I'm not going to fully weld it up until the engine is bolted back in with the transmission and I can confirm the exhaust will work.
This engine will be running off a megasquirt 2 which I will hopefully start wiring up in a week or so, getting excited.
Thread Starter
V8 Miata Fan
Joined: Sep 2015
Posts: 25
Likes: 2
From: Victoria BC Canada
Another busy couple weeks. Had my mustang driveshaft chopped down to 29.5" at a local truck shop and reinstalled a week later, fit perfect! (shorter shaft than typical due to the sn95 trans as well as the fact I think my engine might be slightly farther back than typical).
Here you can see it in place
Some super 44's in stainless just came in!
With the driveshaft in I stuck the uprights back on with the broached hubs and then the NB big brakes for the rear
For the last week and a bit I've been doing wiring. I actually ditched the megasquirt route for now from the advice of others, it will be easier to just get it up and running / driving with the stock harness and eec so I just picked up a stock T4M0 eec off ebay.
Going to try and start this beast in the next few days, wiring is a mess right now as its just for testing it out.

Here you can see it in place

Some super 44's in stainless just came in!

With the driveshaft in I stuck the uprights back on with the broached hubs and then the NB big brakes for the rear

For the last week and a bit I've been doing wiring. I actually ditched the megasquirt route for now from the advice of others, it will be easier to just get it up and running / driving with the stock harness and eec so I just picked up a stock T4M0 eec off ebay.
Going to try and start this beast in the next few days, wiring is a mess right now as its just for testing it out.


V8 Miata Fanatic
Joined: Mar 2014
Posts: 636
Likes: 37
From: SW Ont.
Looking good. What coilovers are you using? I like the way you did the DS brake line. I may reroute mine like that one day, though it hasn't been a problem yet (only 2k easy km so far though).
Thread Starter
V8 Miata Fan
Joined: Sep 2015
Posts: 25
Likes: 2
From: Victoria BC Canada
Thanks guys, the coilovers are from BC Racing and have custom rates of 670lb/in front and 450lb/in rear.
It should be noted that these coilovers have quite wide bodies and are fairly close to rubbing the audi CV boots in the rear, I'll try and get a picture of that later

It should be noted that these coilovers have quite wide bodies and are fairly close to rubbing the audi CV boots in the rear, I'll try and get a picture of that later
V8 Miata Habitu�
Joined: May 2015
Posts: 190
Likes: 5
From: East TN
Great choice of coilovers! It's difficult to drop these cars much without clearance problems but trans crossmember is nice. Interested to know what you have in mind for exhaust clearance and oil pan protection.
Thread Starter
V8 Miata Fan
Joined: Sep 2015
Posts: 25
Likes: 2
From: Victoria BC Canada
Thanks man! They seemed appropriate with those spring rates and price. That trans mount in the picture was actually only the tacked together test one, this is the final piece

I reinforced the U channel with some plates and it has very little flex with me jumping on it. I also chamfered the sides to hopefully prevent it from catching on any high up objects.
Originally I looked at running the exhaust below the part like some of the kits use but I think it would just be too low. I'm making my own exhaust so I'll do my best to tuck it up as high as possible.
I wasn't planning on any immediate oil pan protection but we'll see how low I want to go with this car, I don't plan on it being super low or anything.
Also, I started the car a week ago. Now I'm just cleaning up the wiring
Thread Starter
V8 Miata Fan
Joined: Sep 2015
Posts: 25
Likes: 2
From: Victoria BC Canada
I have a bunch of 2.5" stainless tubing I'm going to try and use I think, hopefully it fits okay but I appreciate the tip for the oval style tubes.
If anyone's interested, here's the first start with a couple small throttle blips on open headers
If anyone's interested, here's the first start with a couple small throttle blips on open headers

V8 Miata Fanatic

Joined: Oct 2012
Posts: 550
Likes: 34
From: Fuquay Varina, NC
V8 Miata Habitu�
Joined: May 2015
Posts: 190
Likes: 5
From: East TN

Nice work on the trans brace, those welds make me jealous!
Thread Starter
V8 Miata Fan
Joined: Sep 2015
Posts: 25
Likes: 2
From: Victoria BC Canada
Another Update,
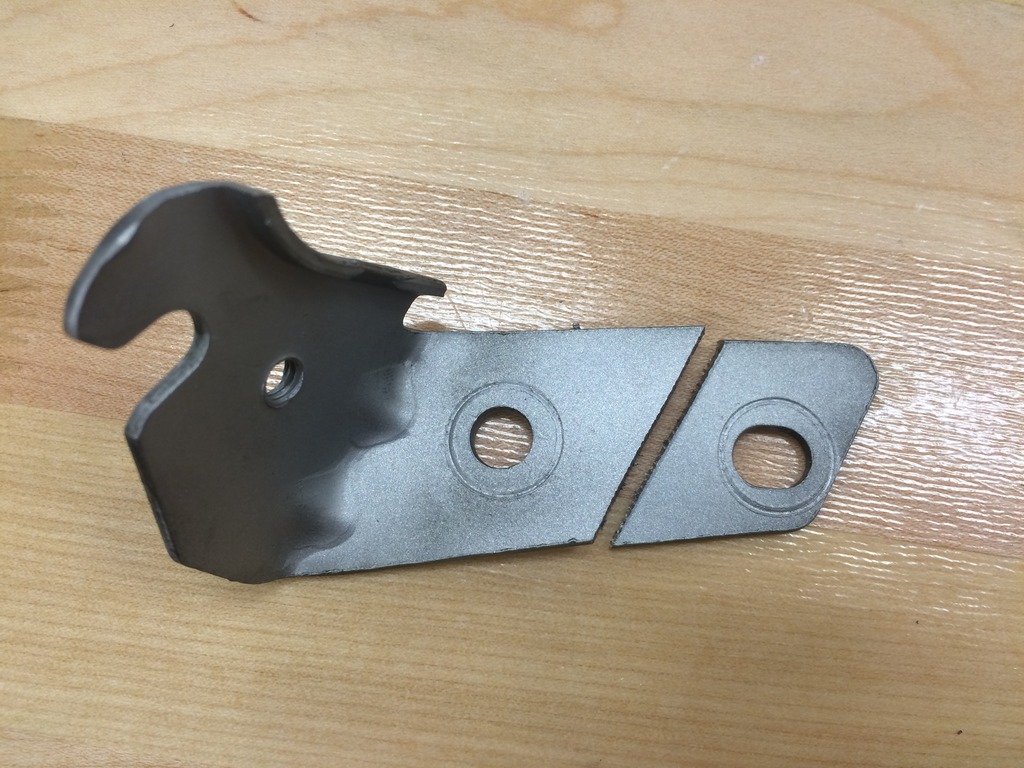
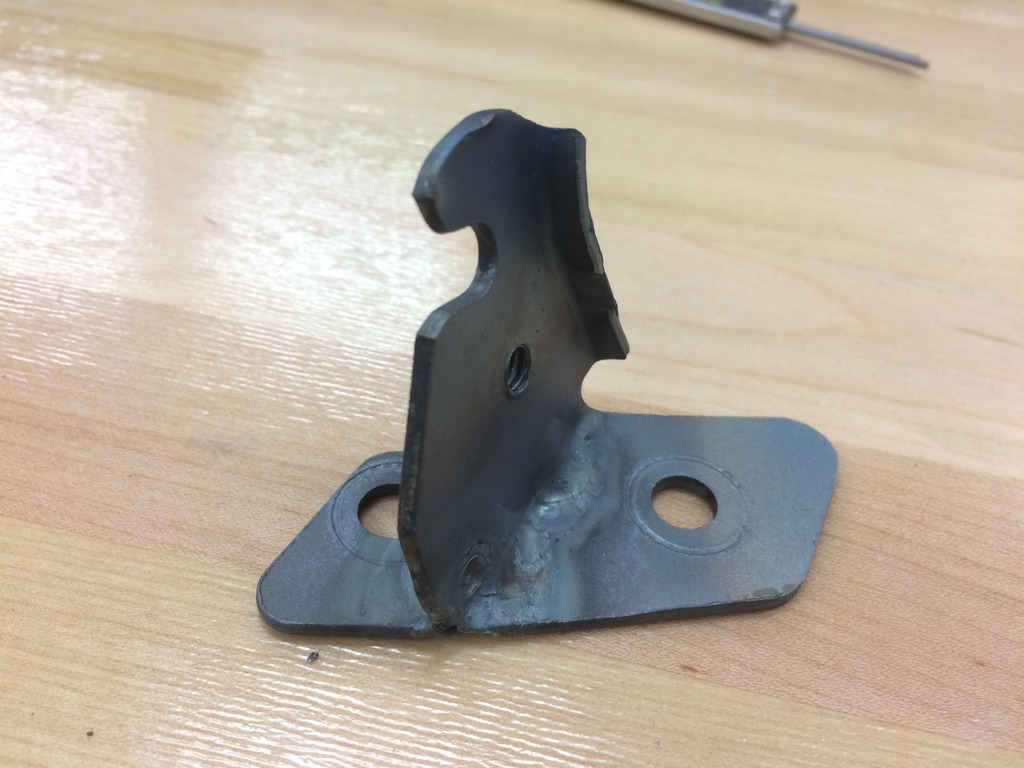
Been working on the car lots as usual. I decided to use the mustang throttle cable which involved drilling a couple holes in the firewall to mount one side. The pedal part snapped in just like the miata cable.
The bracket holding the cable on the intake manifold needed to be moved back to take up slack at the pedal side. I cut the bracket the needed distance back and then welded it to the other side to shift the mount away from the throttle body
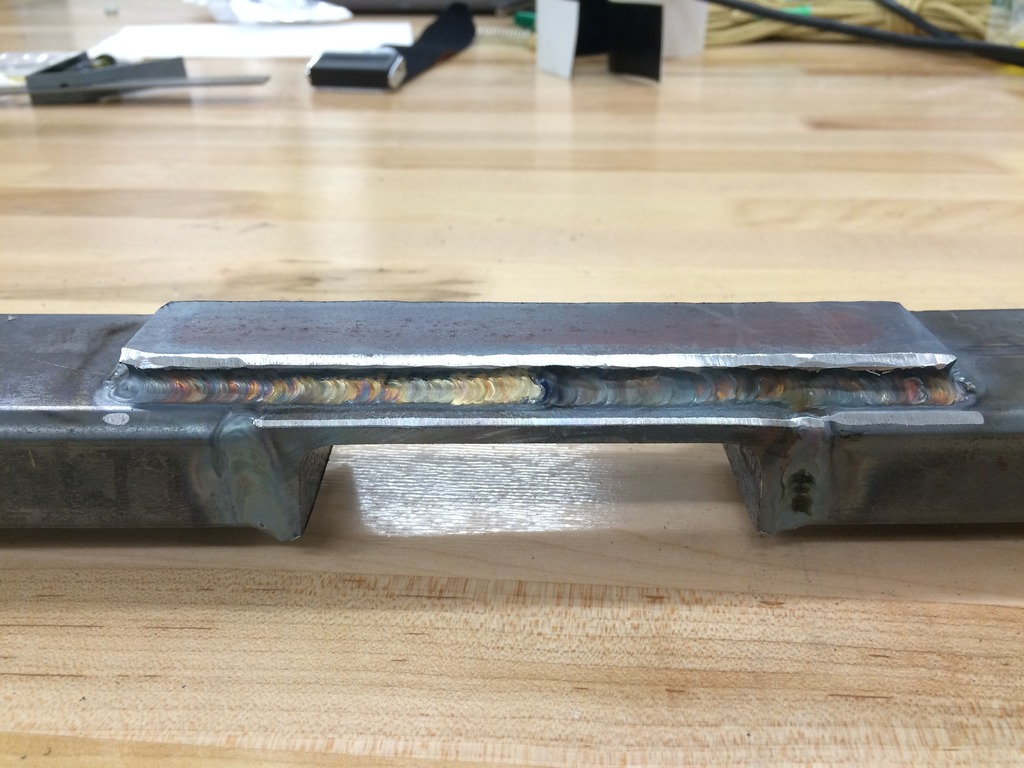
Next I made some sway bar relocators. just 1.25" square tube 0.125" wall and some 0.25" plate
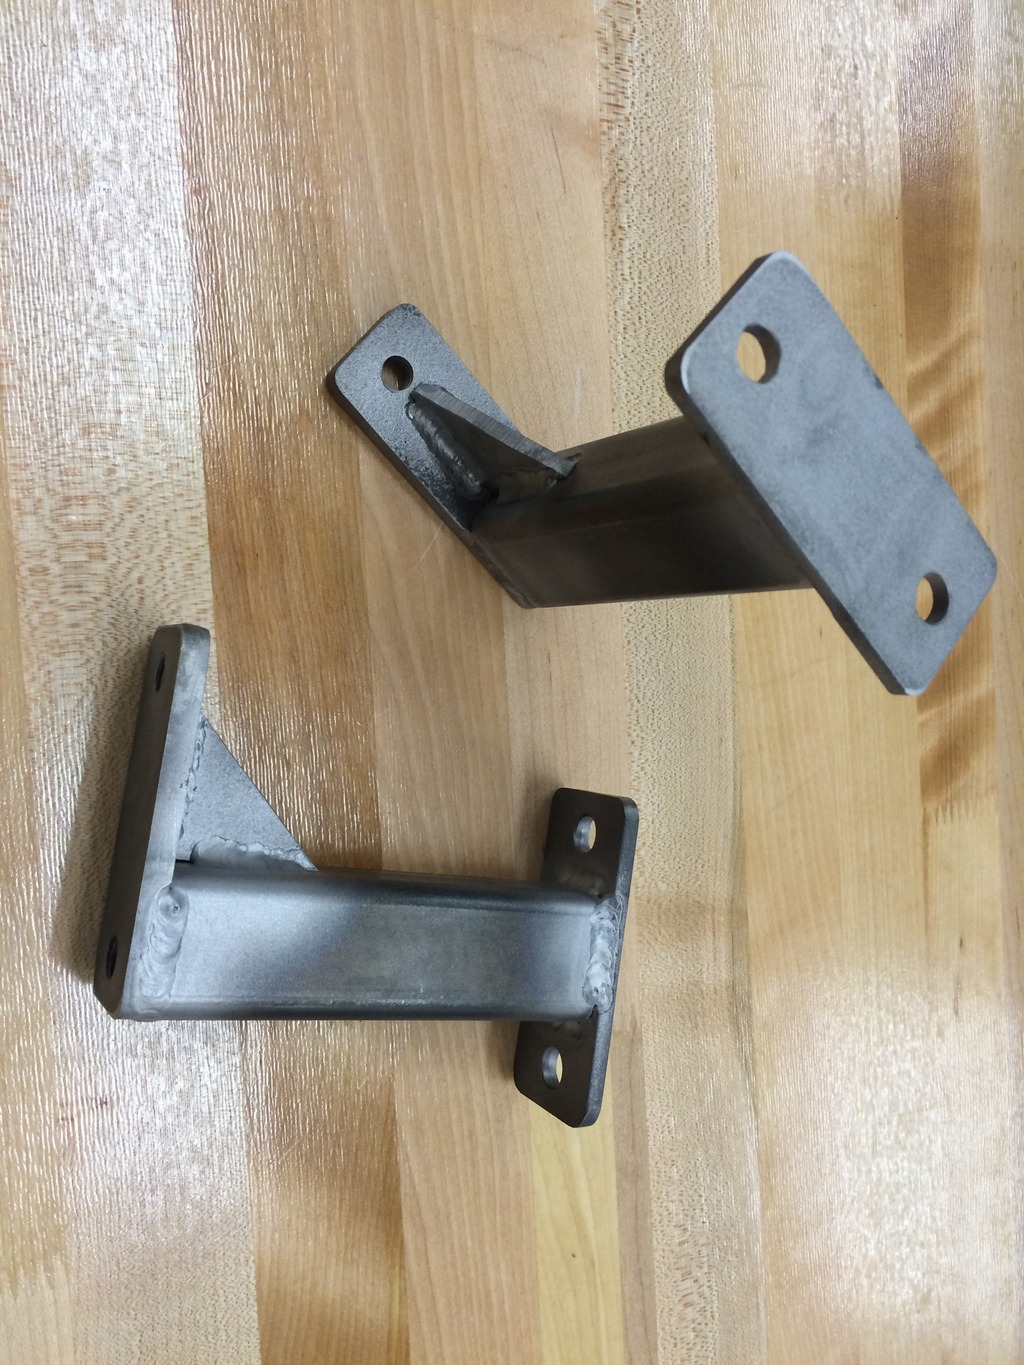
and painted
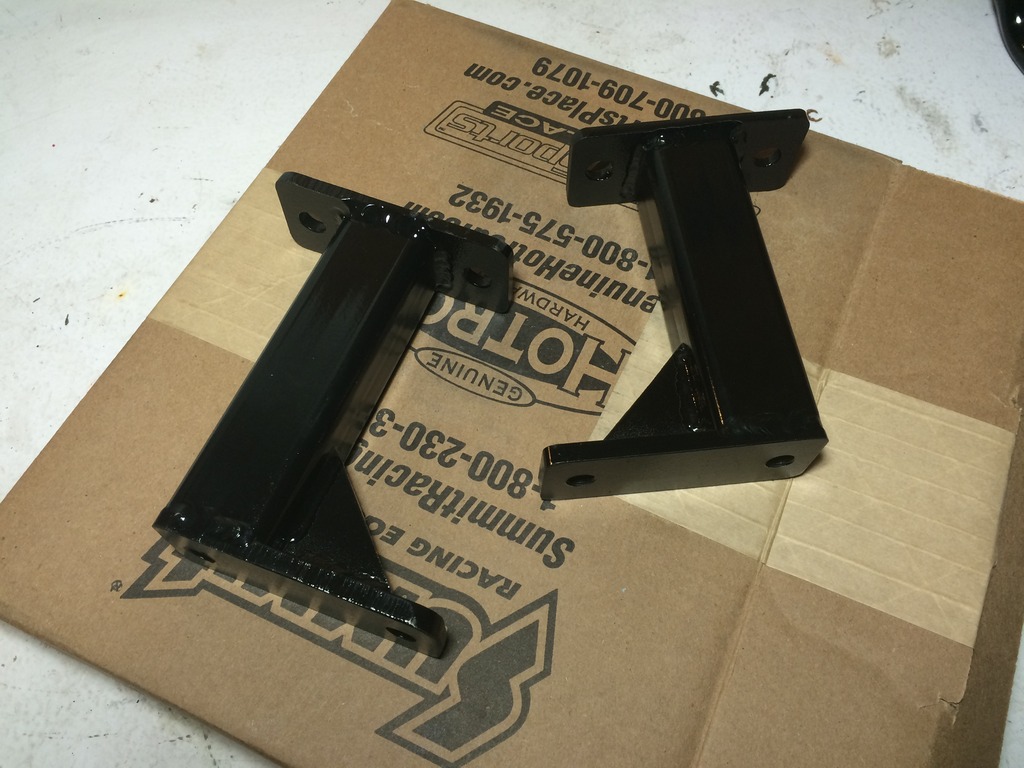
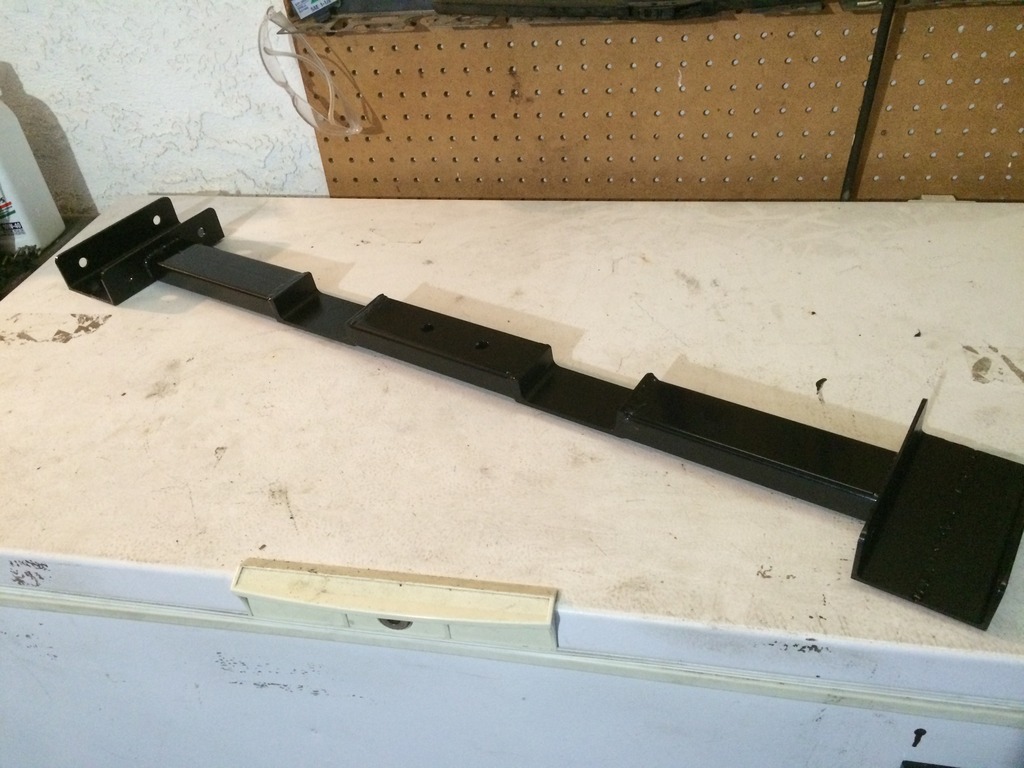
Also painted up my trans brace
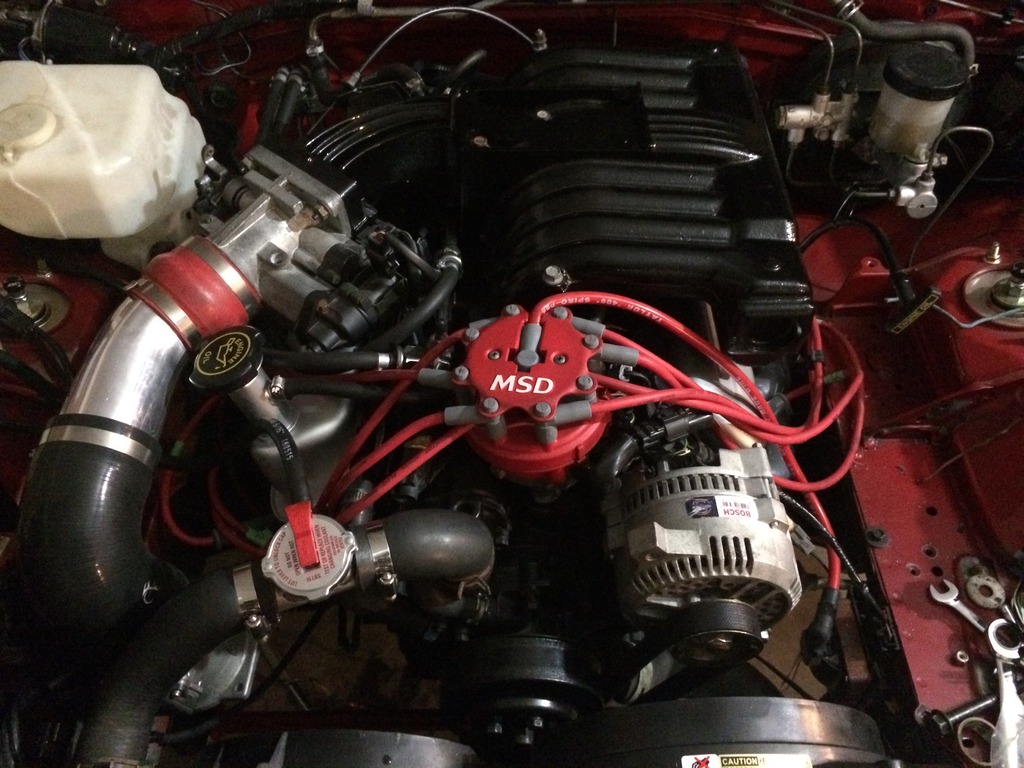
Did some needed cleaning up on the engine, painted the valve covers and upper intake.
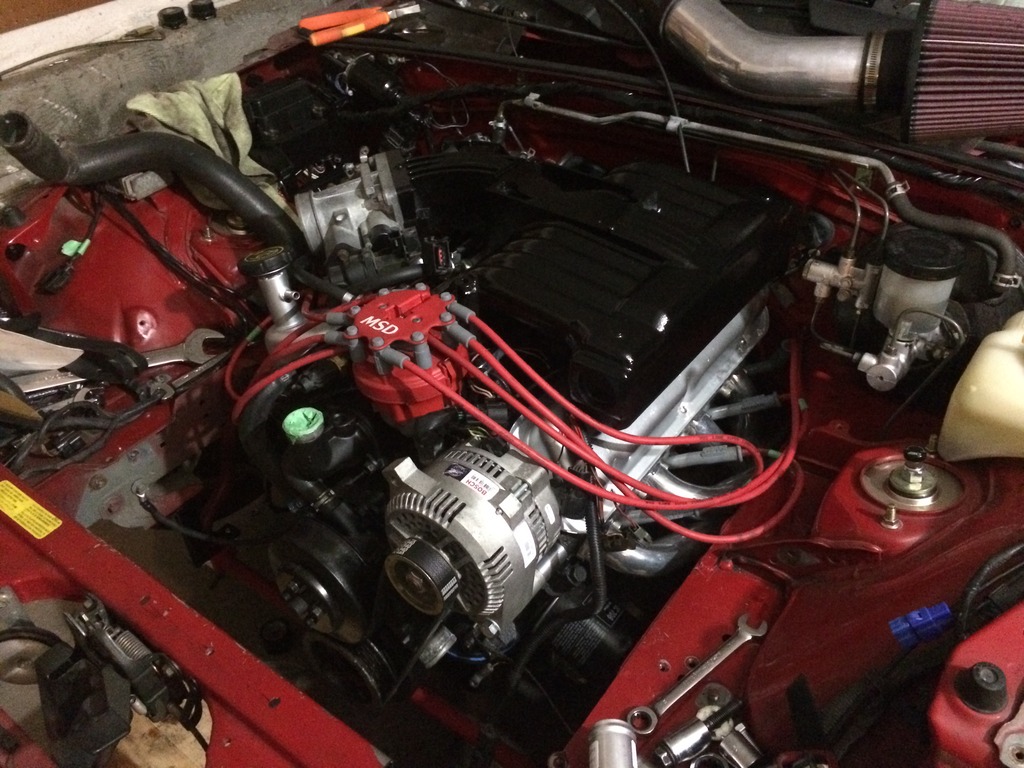
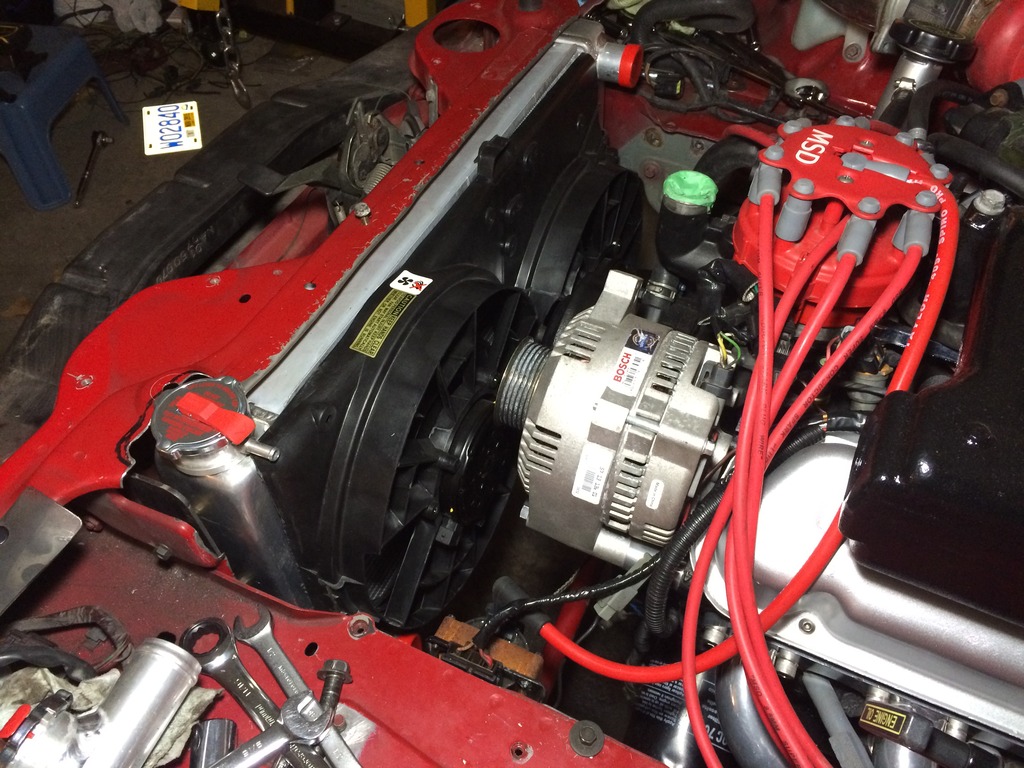
Here's a rough idea of clearance with the sn95 accesories, I'm only running an alternator and water pump.
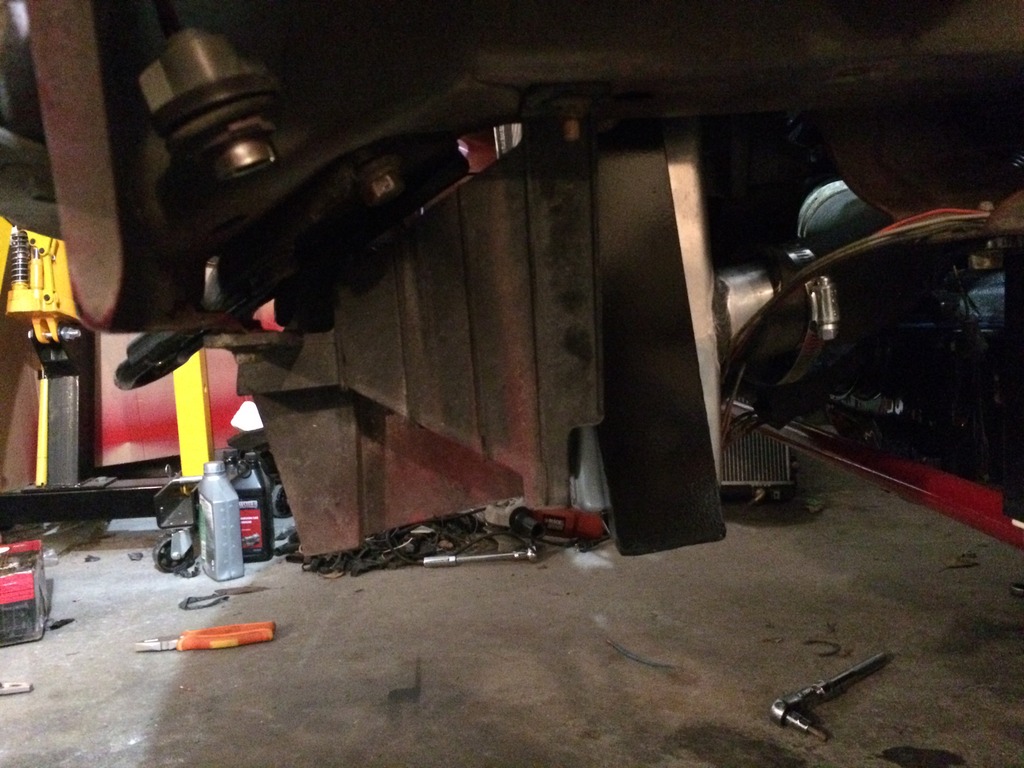
Worked on mounting my rad, just a tacked up bracket for now but so you guys have an idea, its a 26x16 griffen rad, I wont be using that top filler though - I have a remote inline filler to use.

This weekend I've been working to tack together the exhaust, its all roughly done without any hangers yet
Once I have a chance I'm going to pull it out and weld it all up nicely, it comes apart into 3 sections.
That's all for now guys, I'd post more often but I'm working on this thing all the time!
Been working on the car lots as usual. I decided to use the mustang throttle cable which involved drilling a couple holes in the firewall to mount one side. The pedal part snapped in just like the miata cable.

The bracket holding the cable on the intake manifold needed to be moved back to take up slack at the pedal side. I cut the bracket the needed distance back and then welded it to the other side to shift the mount away from the throttle body


Next I made some sway bar relocators. just 1.25" square tube 0.125" wall and some 0.25" plate

and painted

Also painted up my trans brace

Did some needed cleaning up on the engine, painted the valve covers and upper intake.

Here's a rough idea of clearance with the sn95 accesories, I'm only running an alternator and water pump.

Worked on mounting my rad, just a tacked up bracket for now but so you guys have an idea, its a 26x16 griffen rad, I wont be using that top filler though - I have a remote inline filler to use.

This weekend I've been working to tack together the exhaust, its all roughly done without any hangers yet


Once I have a chance I'm going to pull it out and weld it all up nicely, it comes apart into 3 sections.
That's all for now guys, I'd post more often but I'm working on this thing all the time!
Thread Starter
V8 Miata Fan
Joined: Sep 2015
Posts: 25
Likes: 2
From: Victoria BC Canada
What paint did you use? Whatever is on my intake manifold chips off easily.
Thread Starter
V8 Miata Fan
Joined: Sep 2015
Posts: 25
Likes: 2
From: Victoria BC Canada
Thanks a lot man I really appreciate that. I wish I had the time to make these posts more detailed but I've just been too busy - if anyone has a question about how I did something just ask.
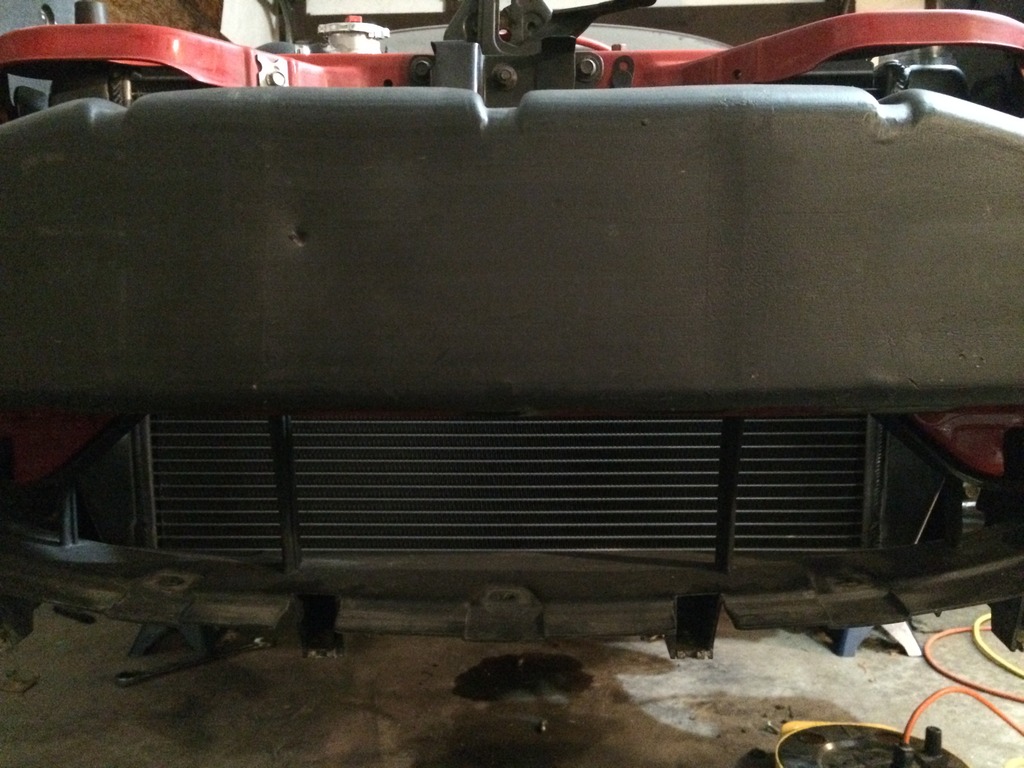
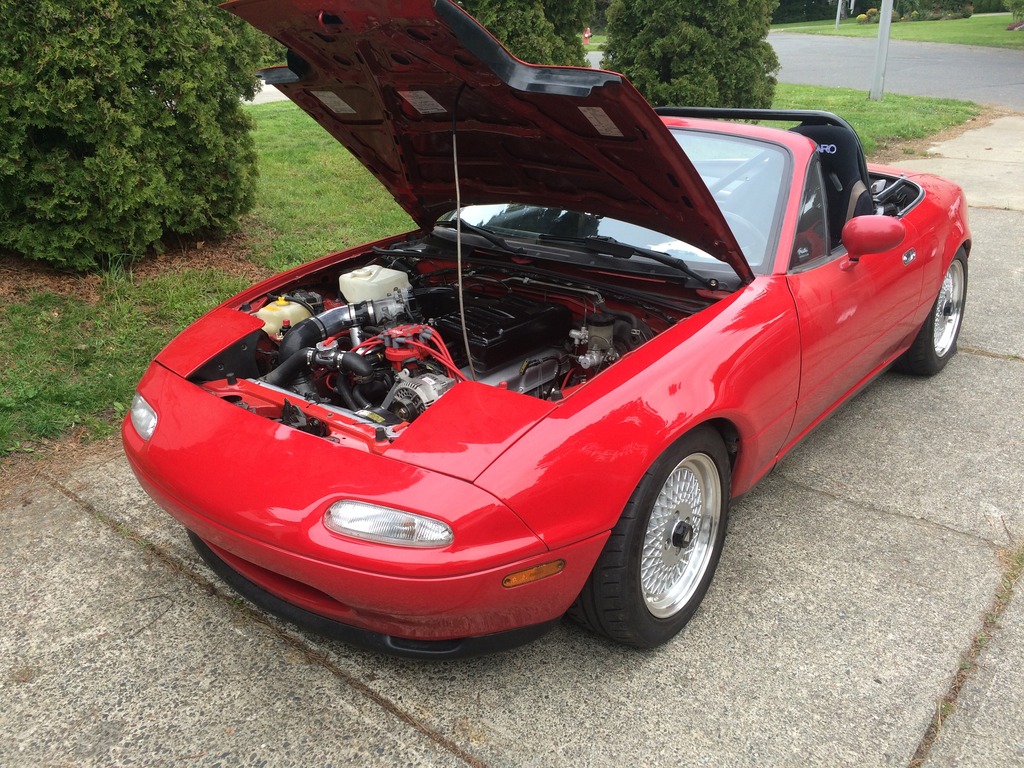
I finished up the rad support by welding some gussets into the corners to strengthen it up a bit

Here's what it looks like in place
and painted up on the freezer you guys see so much of
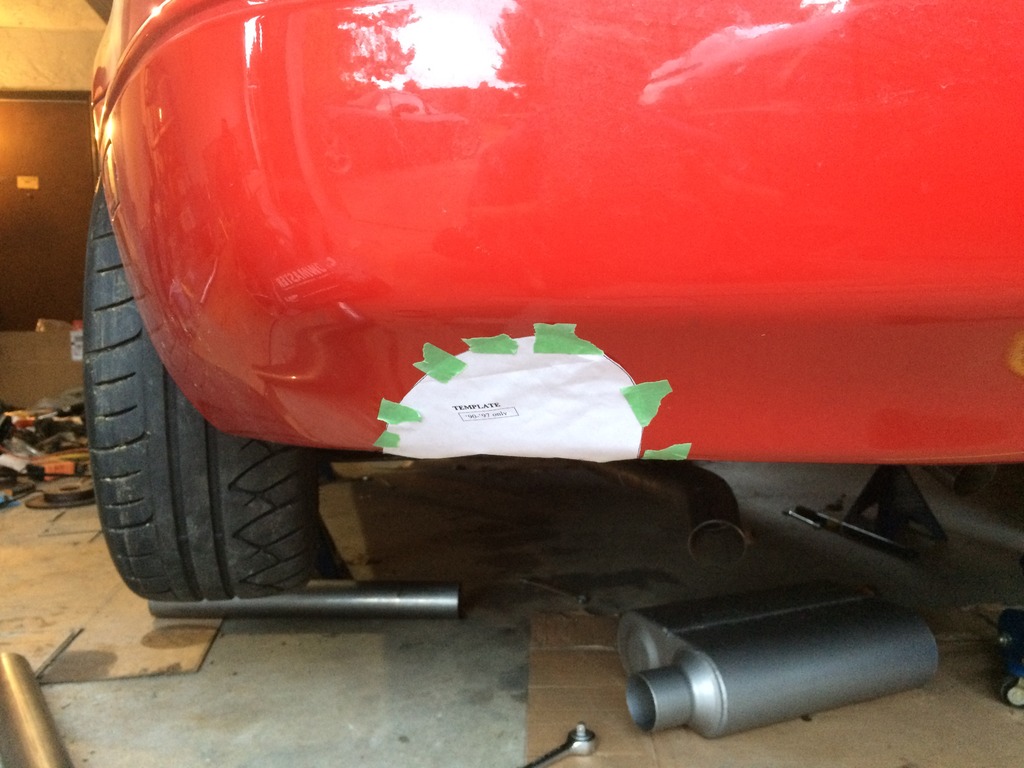
Committed to the exhaust cut out - for some reason I dont have a good post cut picture but it turned out well. I got the cut out template from flyinmiata's website
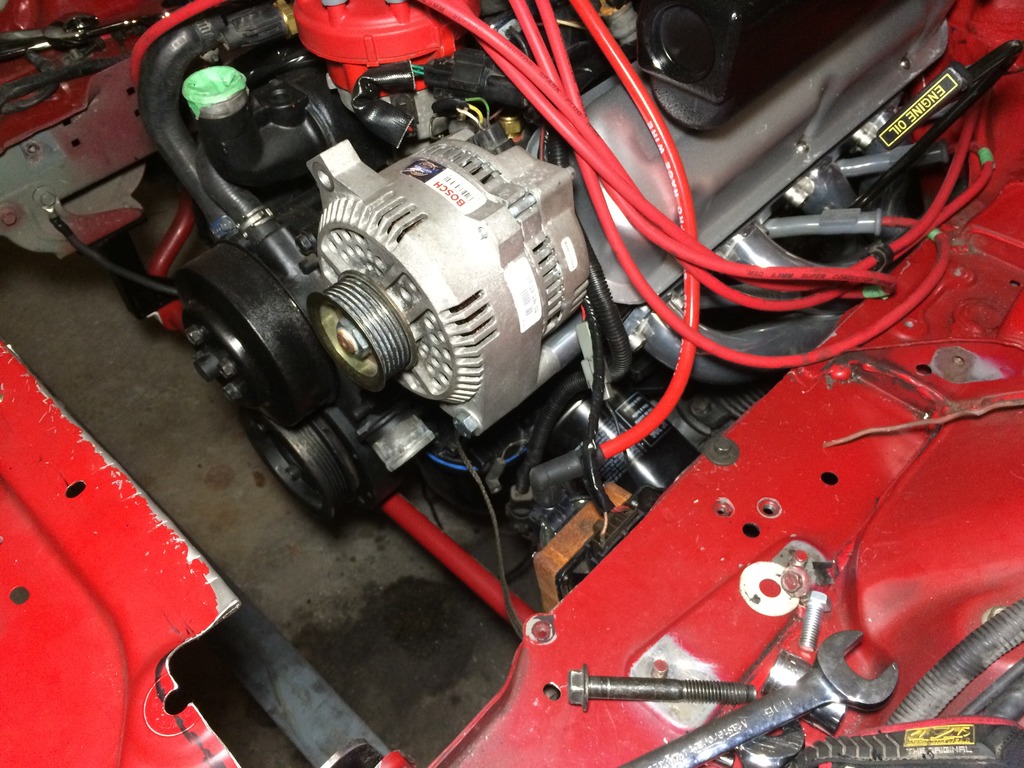
Since I mounted my alternator on the drivers side and removed power steering, I didnt have a place to mount my coil that looked tidy. I ended up making a bent bracket which holds it underneath the lip of the engine bay and is almost hidden

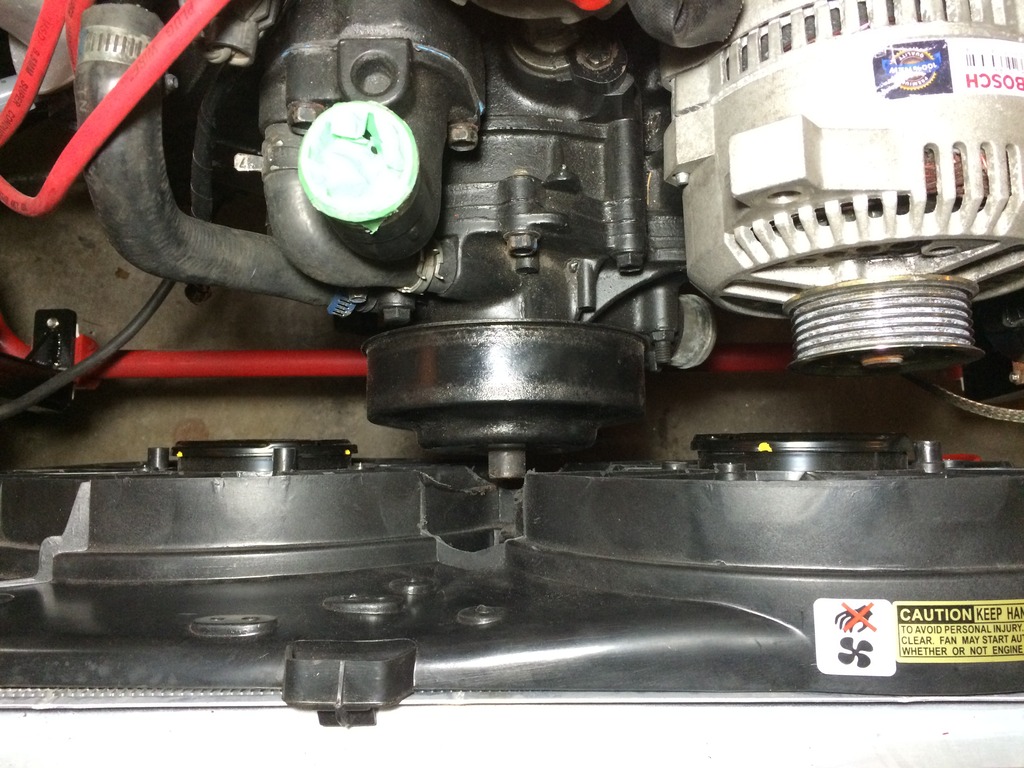
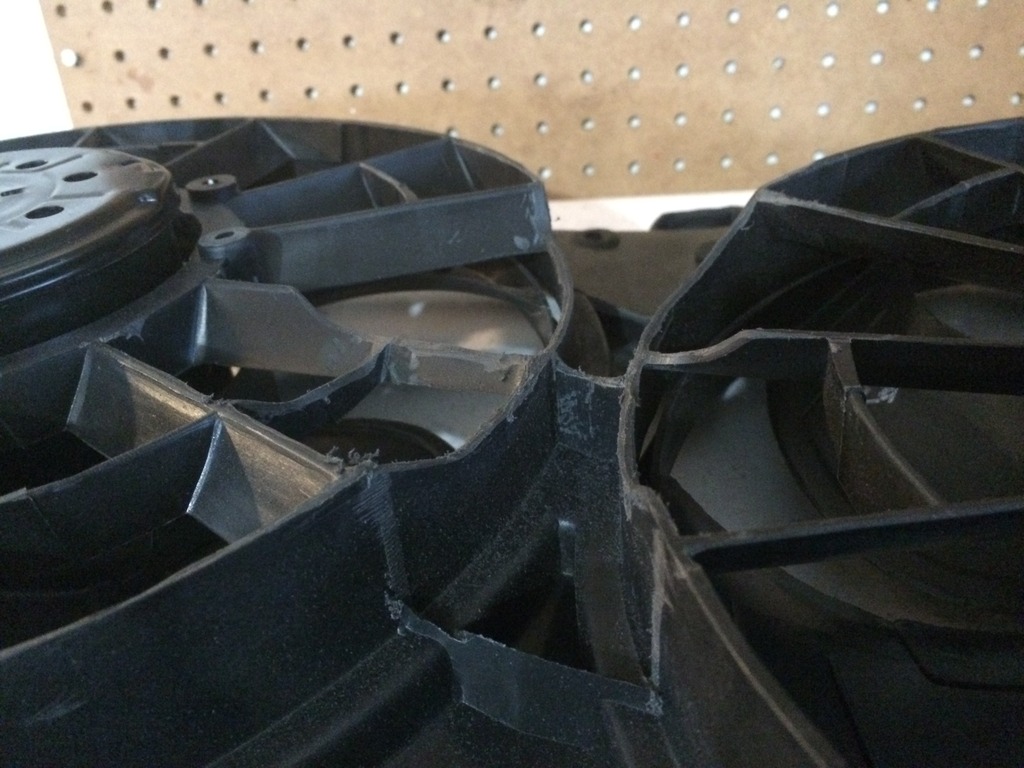
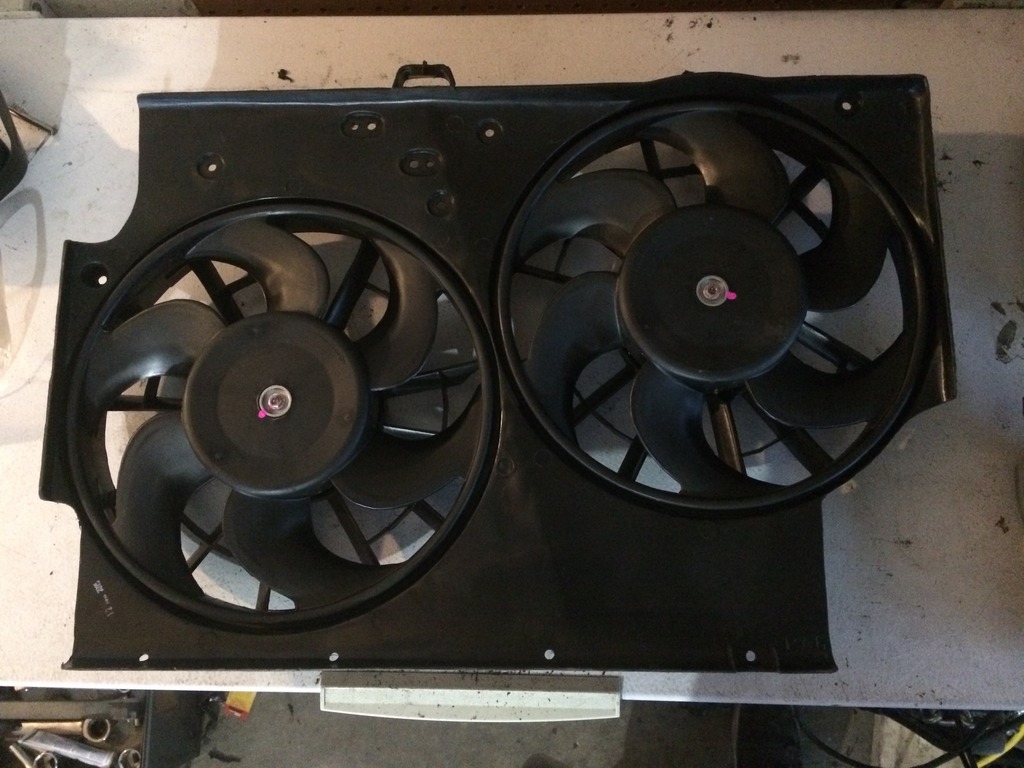
I think I may have mentioned before but I'm using the ford contour / mercury mystique rad fans. I cut them down in some places and ended up fitting them in very nicely. They are a pretty cheap part from rockauto and its nice to be able to use oem stuff
I had to nibble out the center to clear the water pump
I then cleaned it up a bit with a dremel
Here's the overall view so you can get an idea of the cut outs required for the inlet, outlet and drain valve on the rad
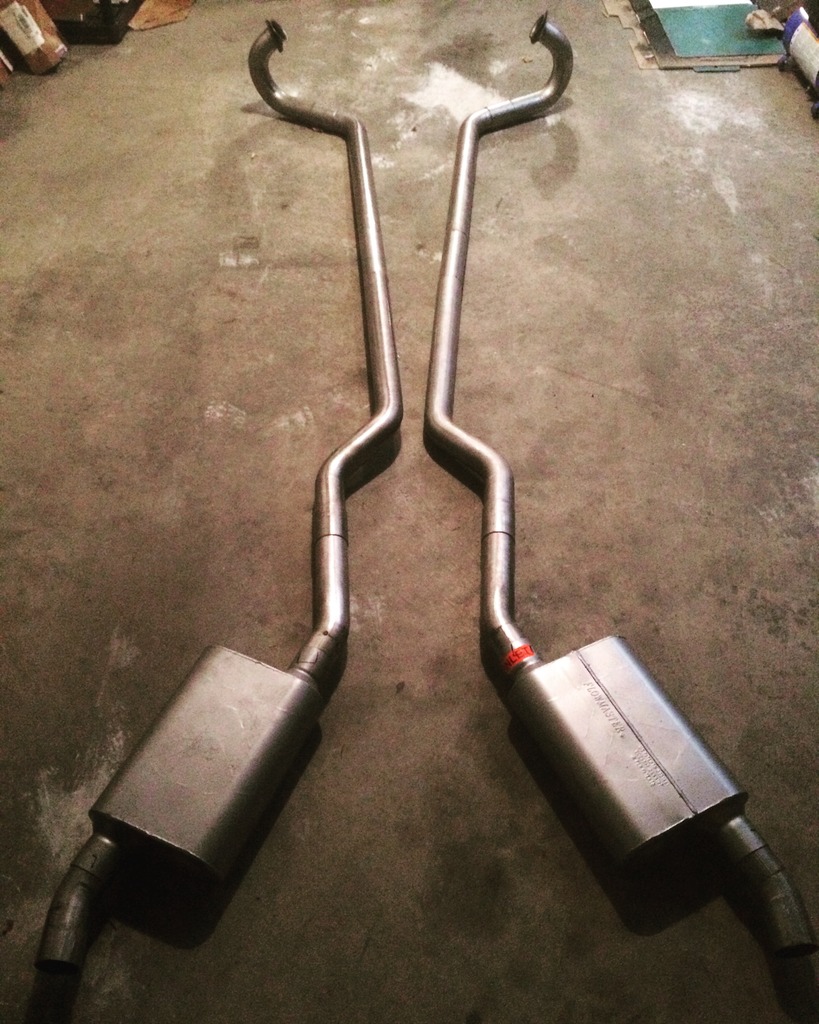
Exhaust time.. I tacked up and marked most of the parts and then pulled it all out to weld up. Here's my exhaust set up for now - no H pipe yet because its too odd to install without v band connectors or something due to the exhaust going above my trans mount
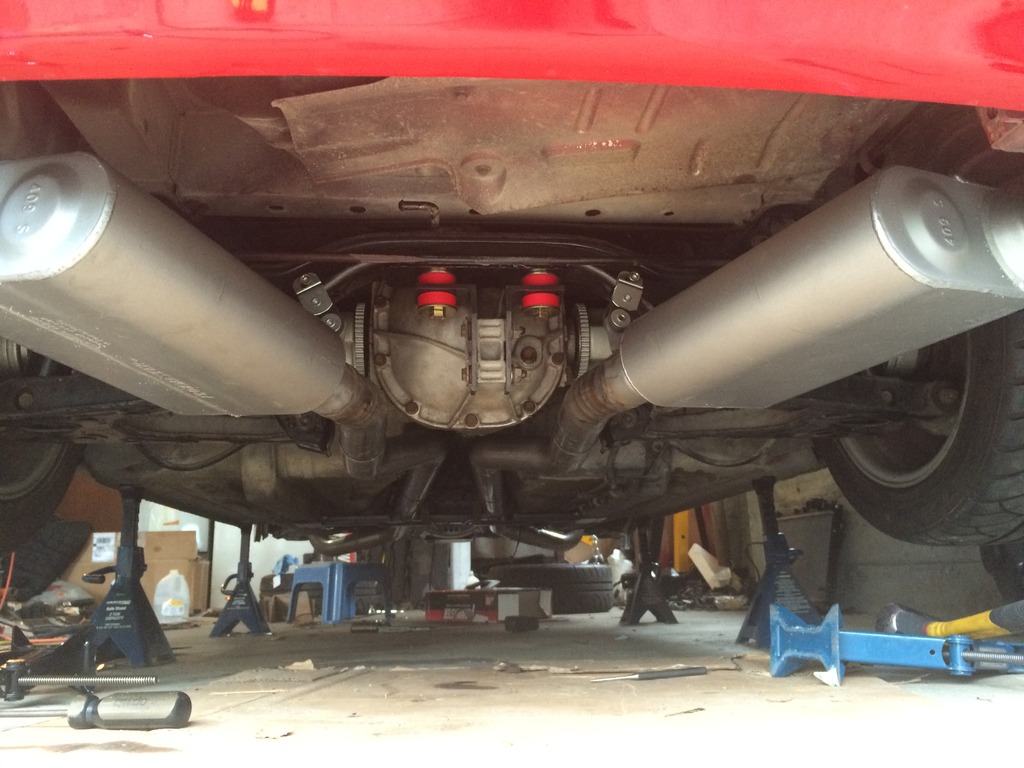
and installed in the car
it sounds great, I'm very happy with the final product. Everything is 409 stainless.
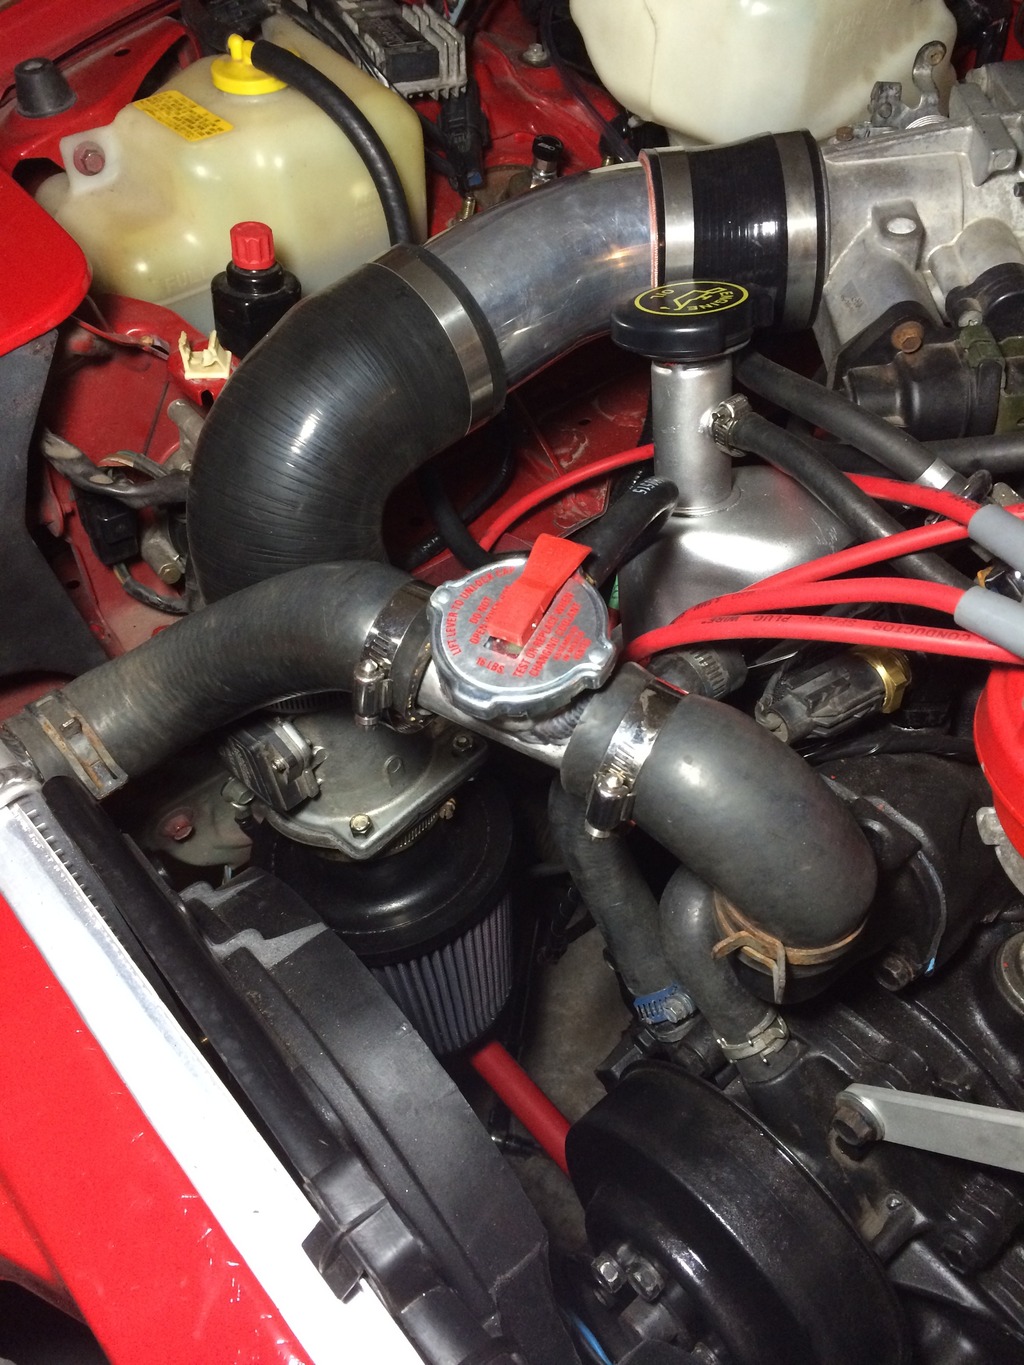
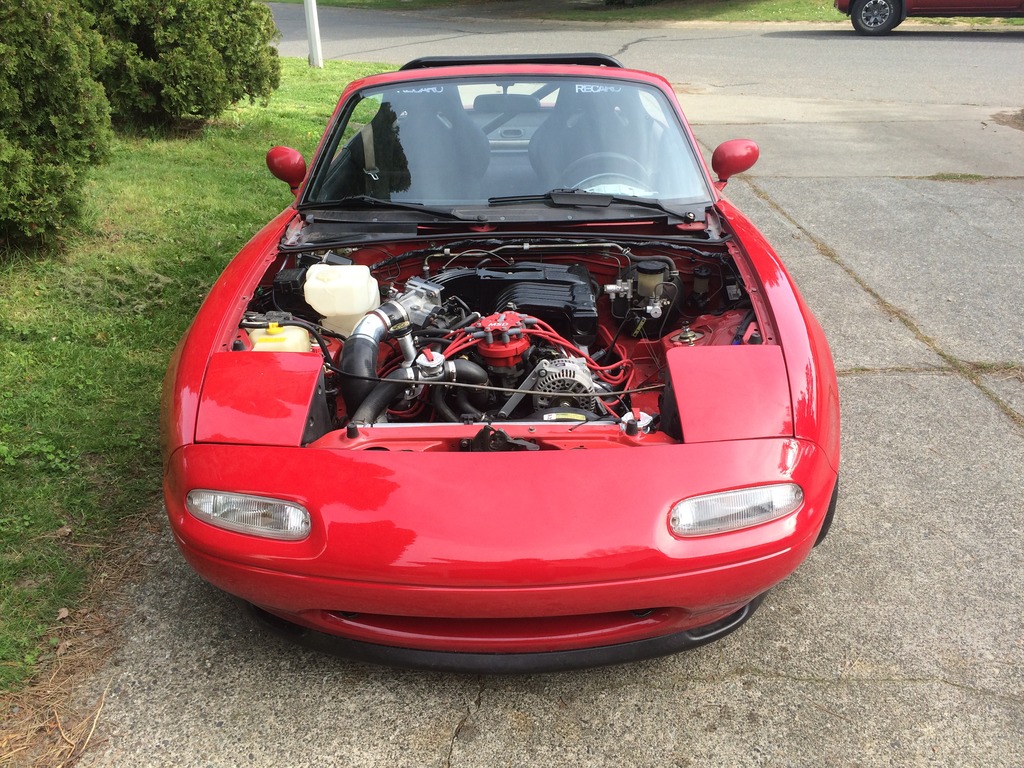
Last interesting thing I did was get the intake more or less sorted out, its going to stick down in front of the radiator because theres really nowhere else for it. I managed to make the old rad expansion tank work in the original spot and don't want to move it.
Also, for those who are interested, the Canadian spec washer bottle normally wont work with the 5.0's but if you're using an sn95 intake it seems to be just fine. I thought it wouldn't fit but the sn95 intake has a sharp curve which gets it well out of the way for the washer bottle, I think its visible in the last pic
not much left before it can hit the streets...
I finished up the rad support by welding some gussets into the corners to strengthen it up a bit

Here's what it looks like in place


and painted up on the freezer you guys see so much of

Committed to the exhaust cut out - for some reason I dont have a good post cut picture but it turned out well. I got the cut out template from flyinmiata's website

Since I mounted my alternator on the drivers side and removed power steering, I didnt have a place to mount my coil that looked tidy. I ended up making a bent bracket which holds it underneath the lip of the engine bay and is almost hidden


I think I may have mentioned before but I'm using the ford contour / mercury mystique rad fans. I cut them down in some places and ended up fitting them in very nicely. They are a pretty cheap part from rockauto and its nice to be able to use oem stuff

I had to nibble out the center to clear the water pump

I then cleaned it up a bit with a dremel

Here's the overall view so you can get an idea of the cut outs required for the inlet, outlet and drain valve on the rad

Exhaust time.. I tacked up and marked most of the parts and then pulled it all out to weld up. Here's my exhaust set up for now - no H pipe yet because its too odd to install without v band connectors or something due to the exhaust going above my trans mount

and installed in the car

it sounds great, I'm very happy with the final product. Everything is 409 stainless.
Last interesting thing I did was get the intake more or less sorted out, its going to stick down in front of the radiator because theres really nowhere else for it. I managed to make the old rad expansion tank work in the original spot and don't want to move it.

Also, for those who are interested, the Canadian spec washer bottle normally wont work with the 5.0's but if you're using an sn95 intake it seems to be just fine. I thought it wouldn't fit but the sn95 intake has a sharp curve which gets it well out of the way for the washer bottle, I think its visible in the last pic
not much left before it can hit the streets...
Thread Starter
V8 Miata Fan
Joined: Sep 2015
Posts: 25
Likes: 2
From: Victoria BC Canada
Another large update because I cant do them frequently enough,
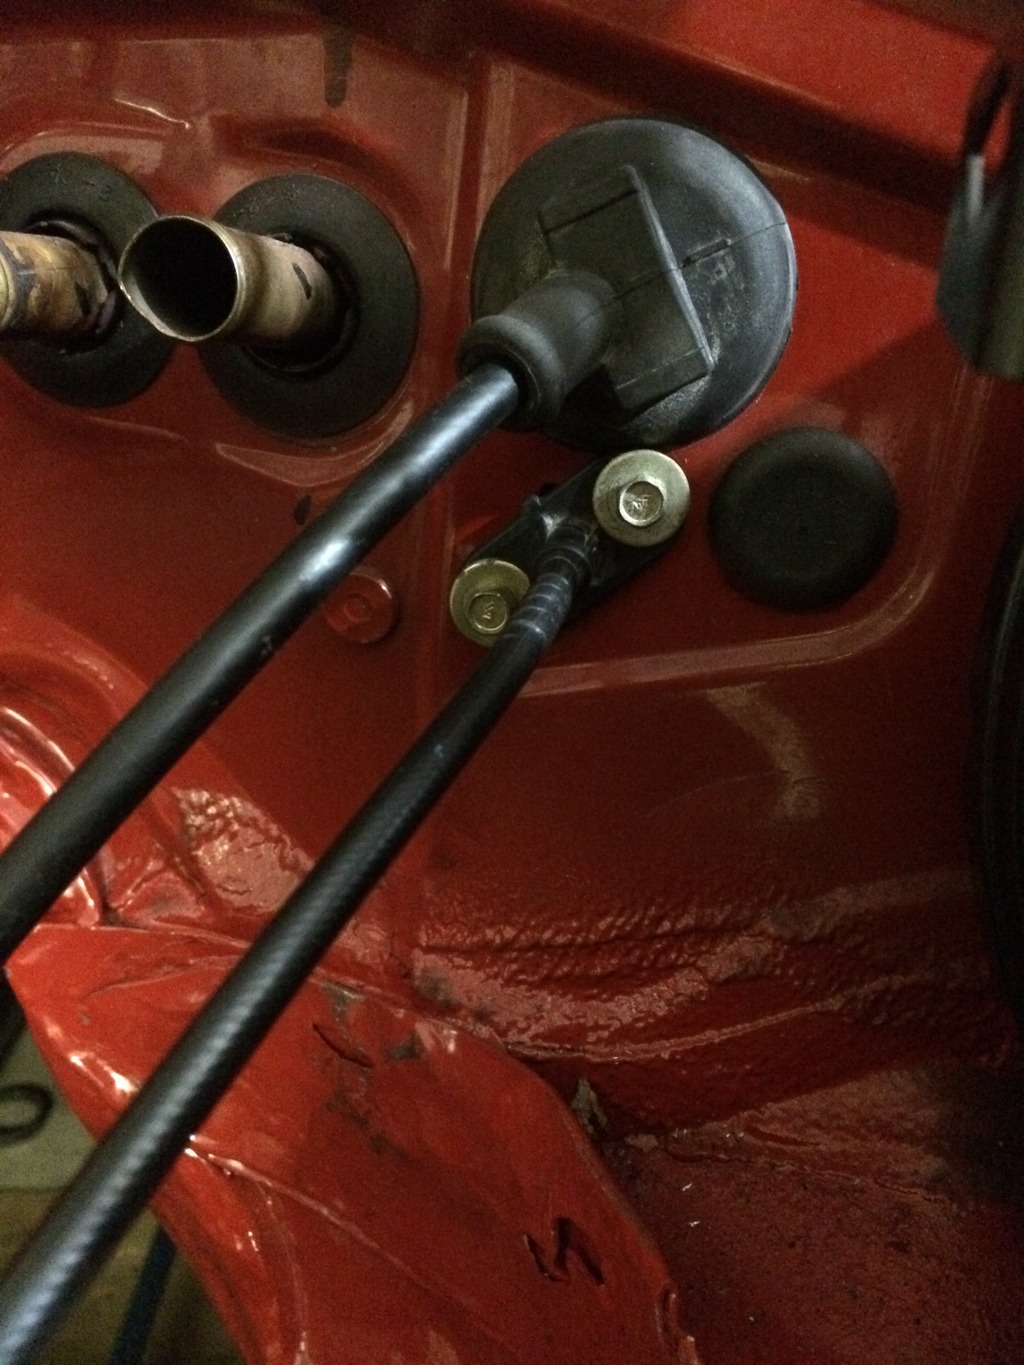
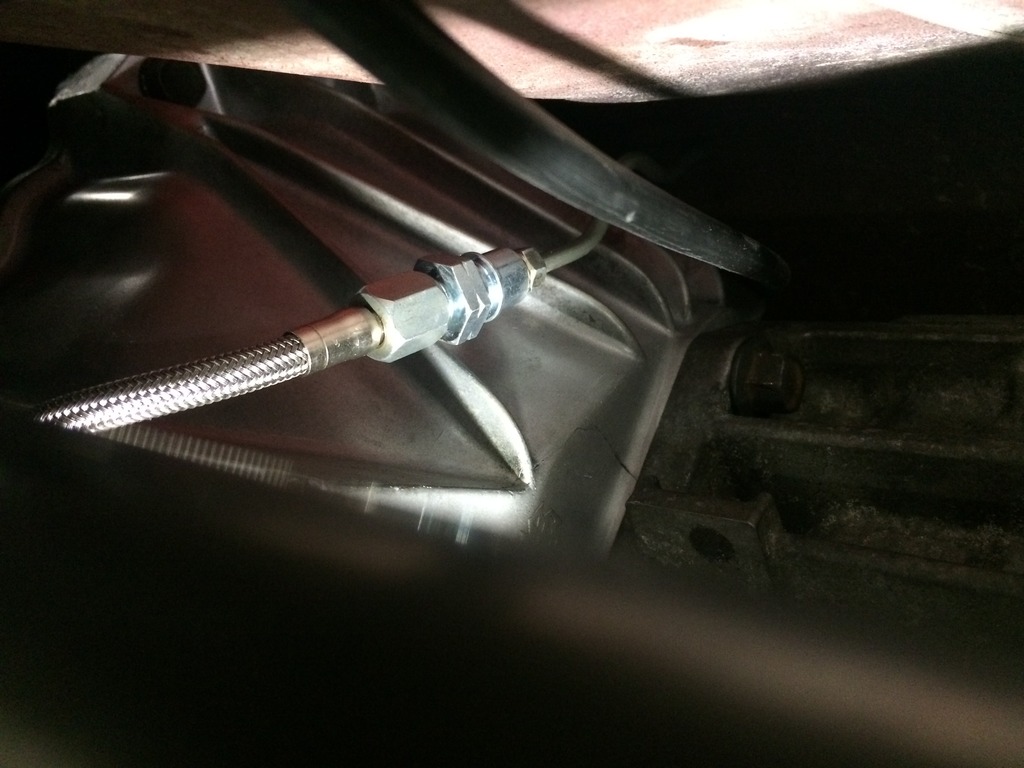
First off I had a bunch of little adapters and stuff come from summit to help me finish things up. This is the adapter for the AN fitting to M10 clutch line adapter. If you haven't noticed from the pictures, I'm using the stock steel clutch line. This connects it nicely to my McLeod hydraulic throw out bearing.
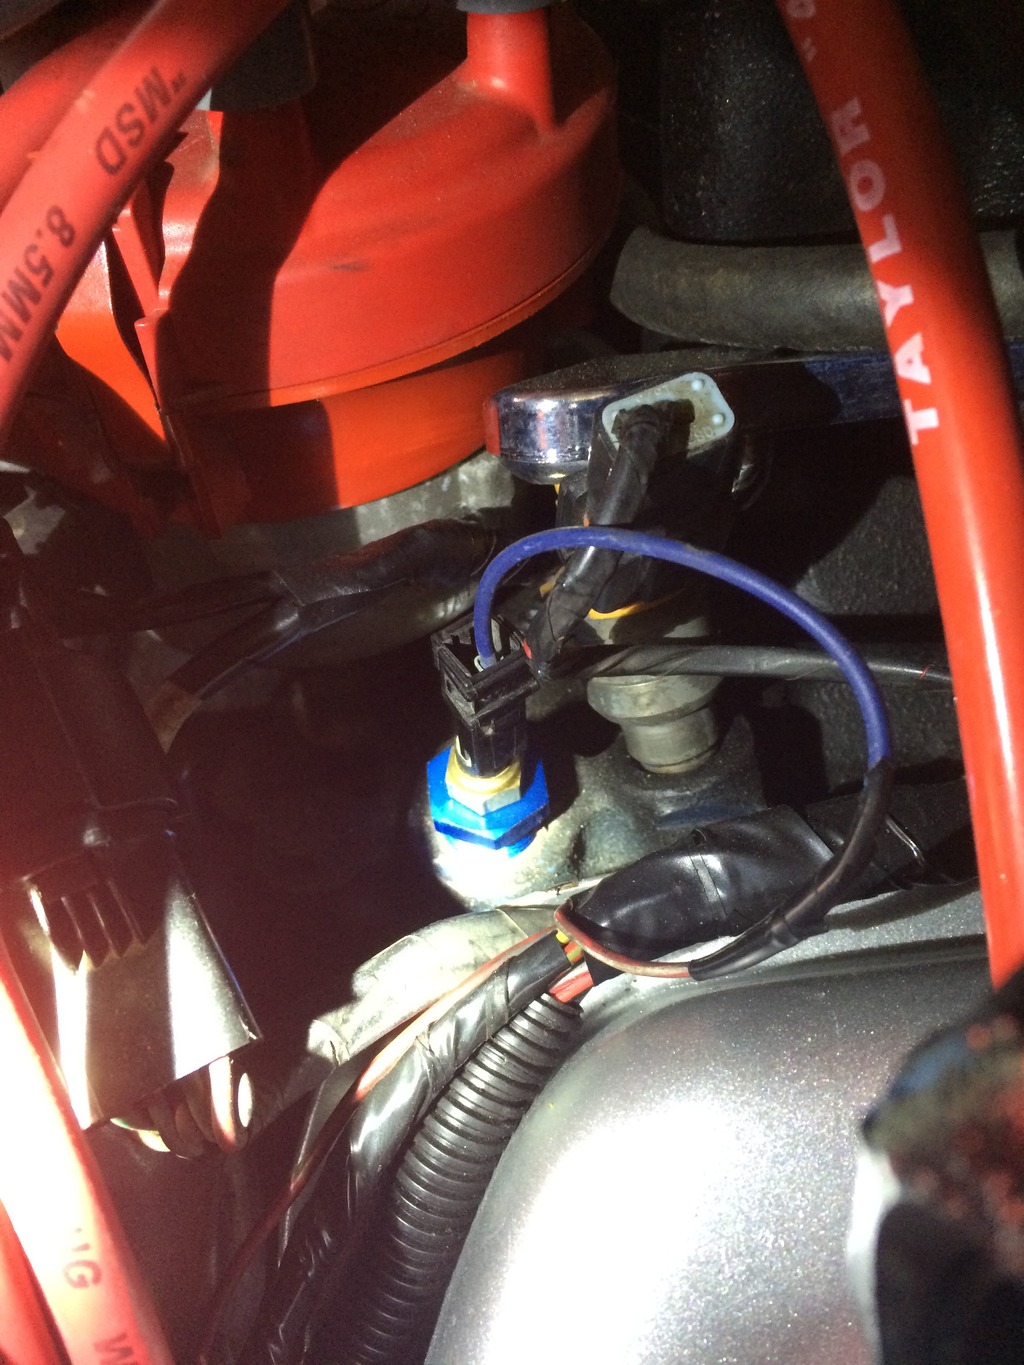
Here's one of the adapters I'm using to run the oem temp sending unit, I'm also running the miata 1.6 oil pressure sender but I don't have a good picture of that one.
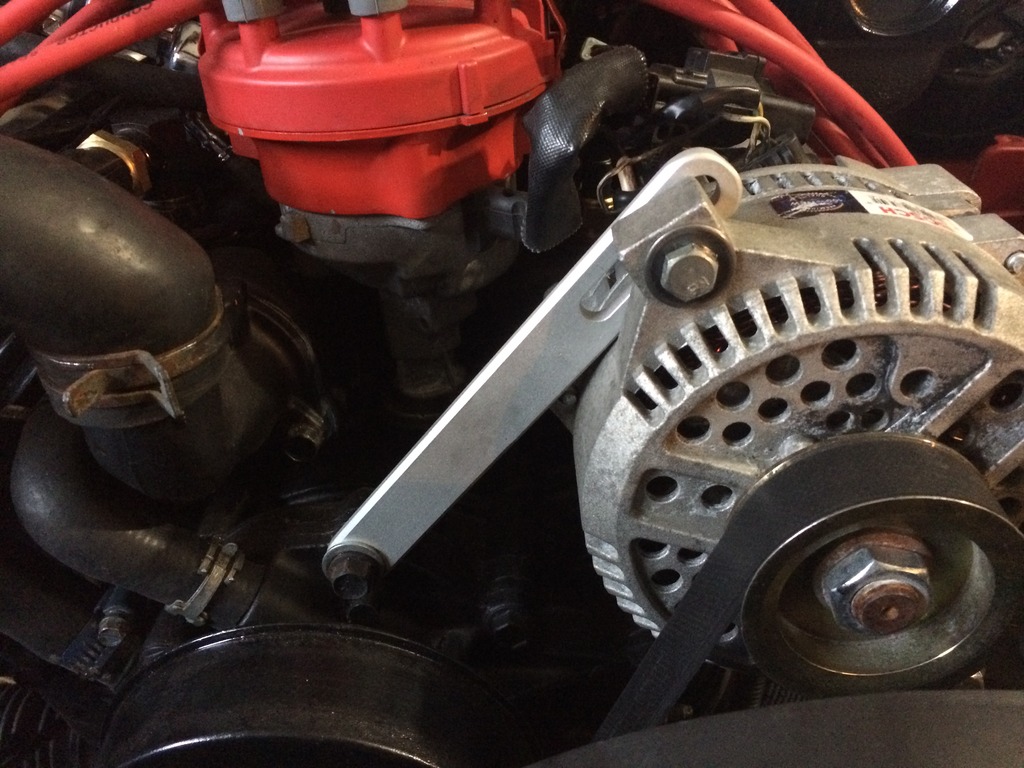
I machined a tensioner bracket for the relocated alternator
Couple shots showing how I fit the stock rad ducting in, not sure if you guys are running that piece or making your own - still need to seal it up on the sides a small amount.
Here's my intake set up, basically routed it down in behind the rad. This was only possible with the relocated alternator
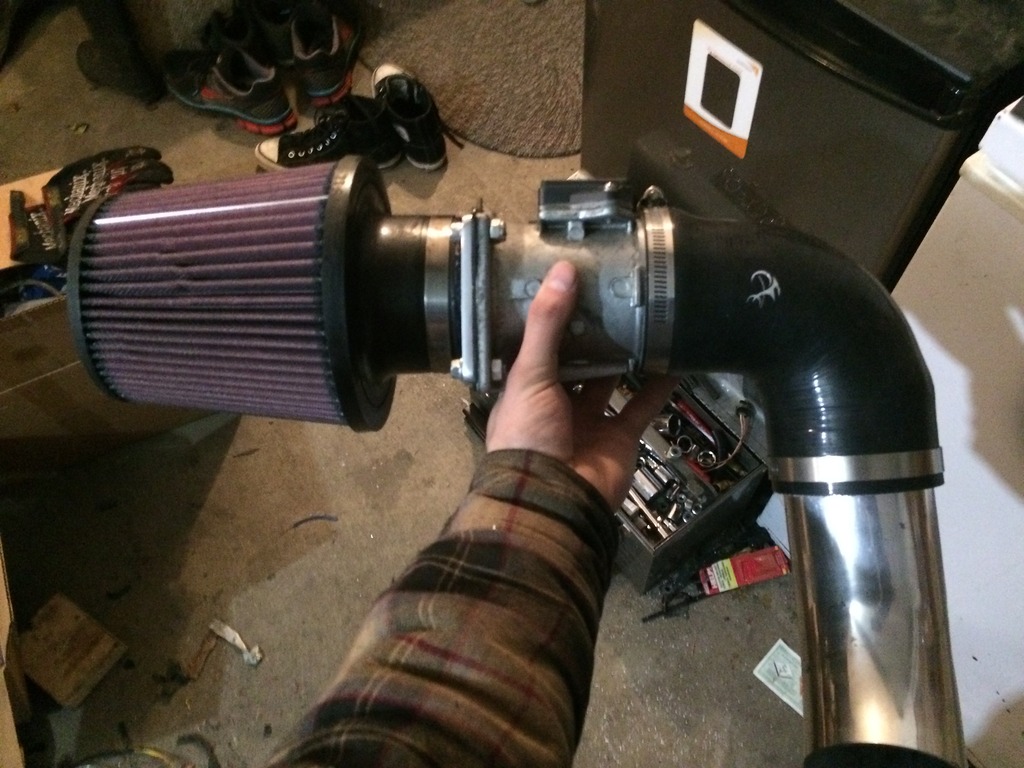
Should be a decent amount of colder air blowing around down there although it is right behind the hot rad
To give you guys an idea of the mess I'm working in
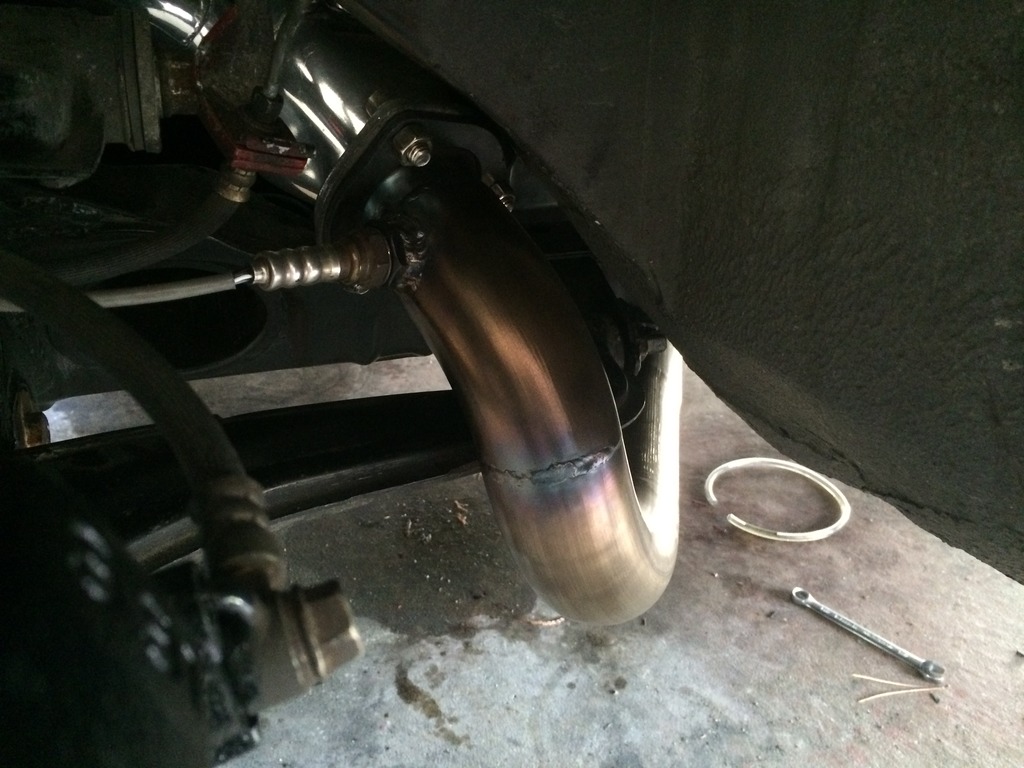
Here's a shot of the driver's side downpipe coloring nicely after some run time.
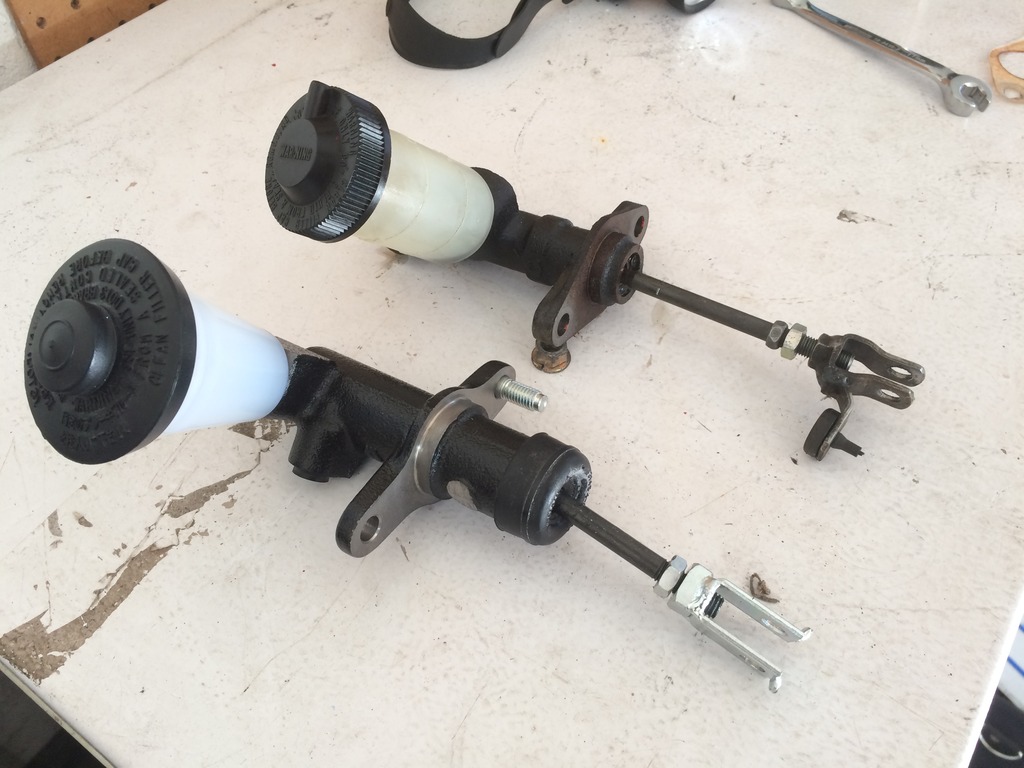
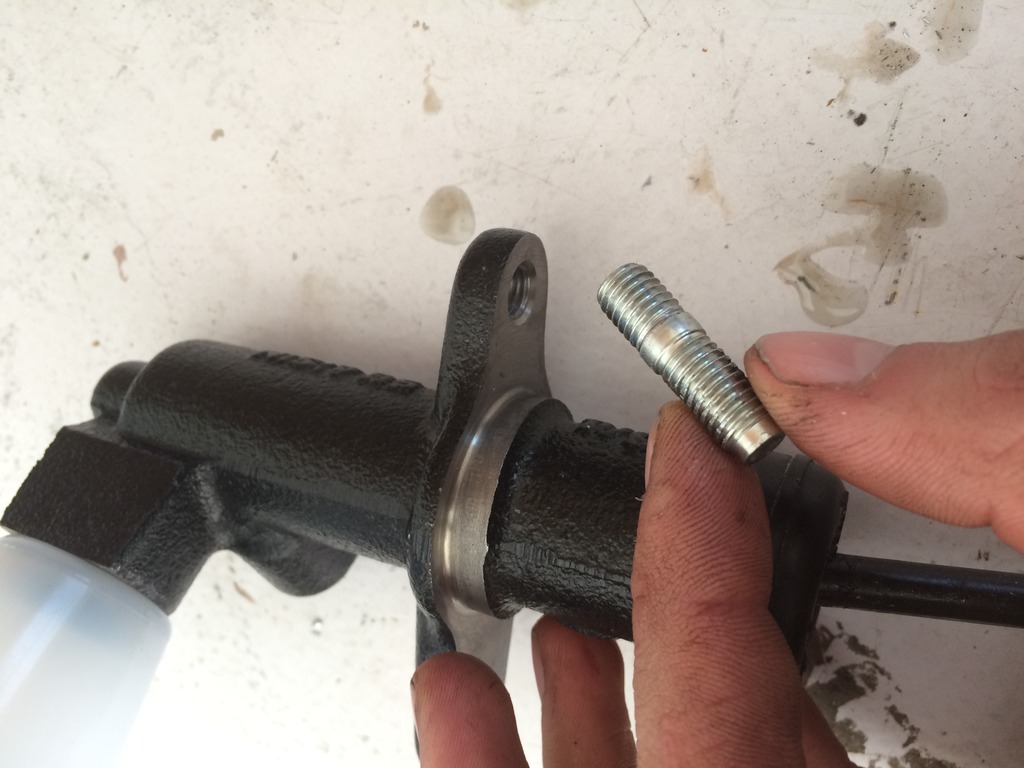
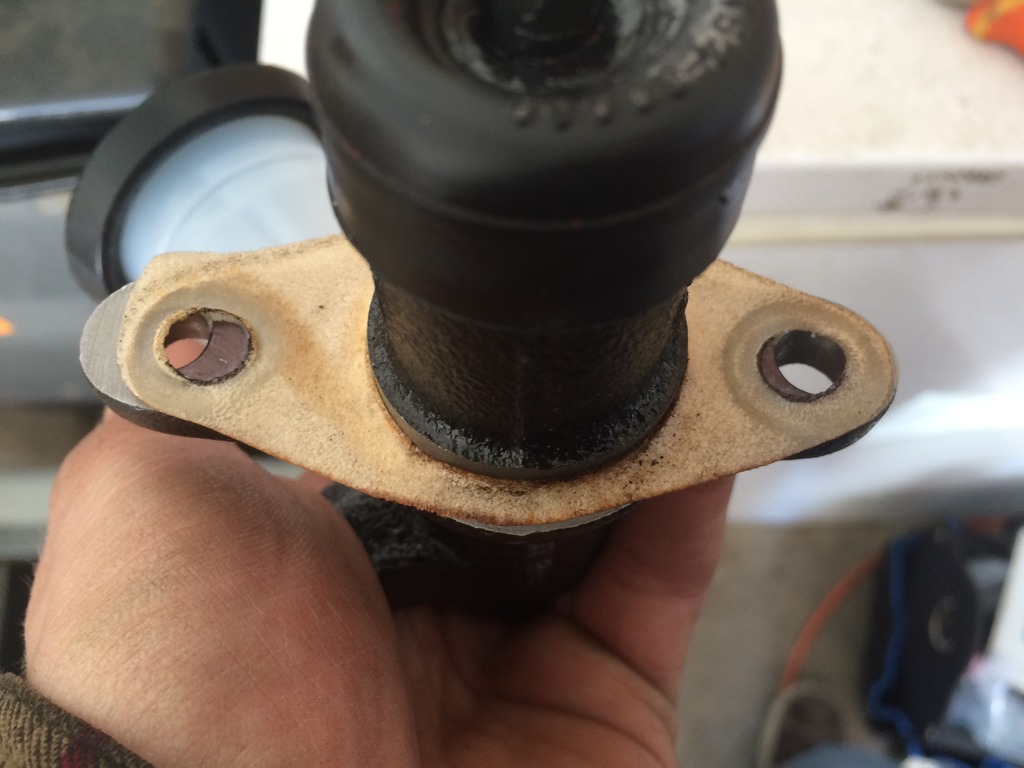
The next issue I ran into is that the McLeod throw out is designed for a 3/4 bore clutch master and the miata is 5/8 I believe. After some research I opted for the budget mod using a 1986 toyota landcruiser master which is almost a bolt in - I'll go over the process here although its also covered on some other site. Here they are side by side with the toyota on the left

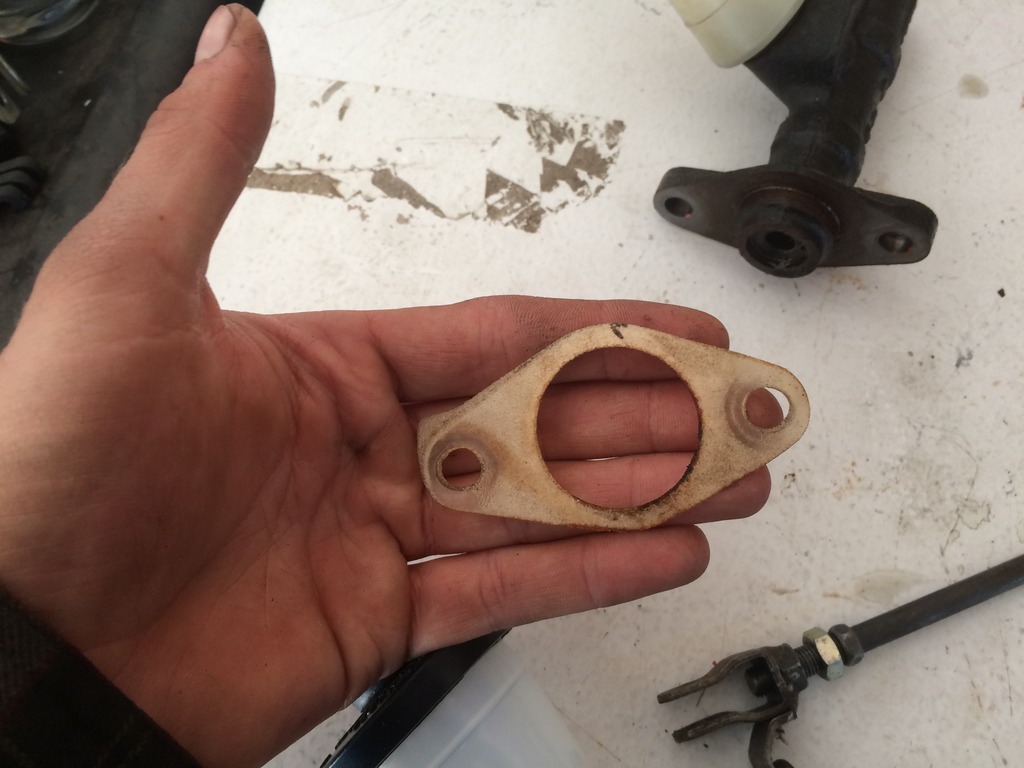
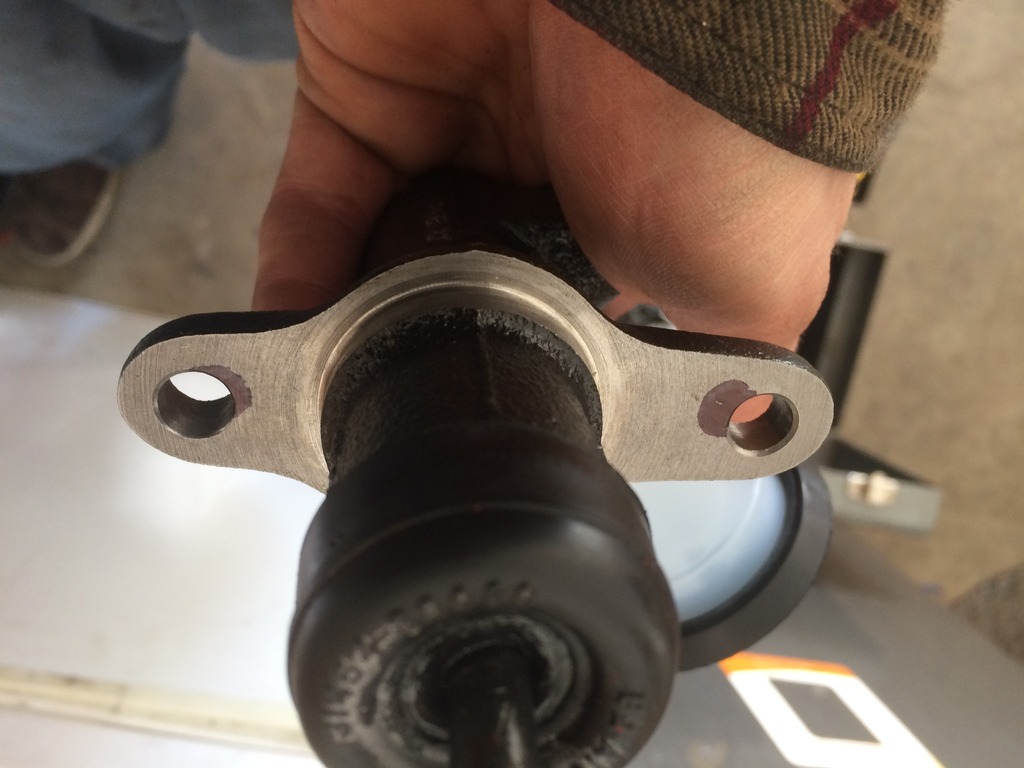
Here I'm going to use this paper gasket that was on the firewall for the old master. I'll use it to trace the hole locations onto the toyota master.
First, pull this stud out
here it is on the toyota all marked out
and the new hole locations
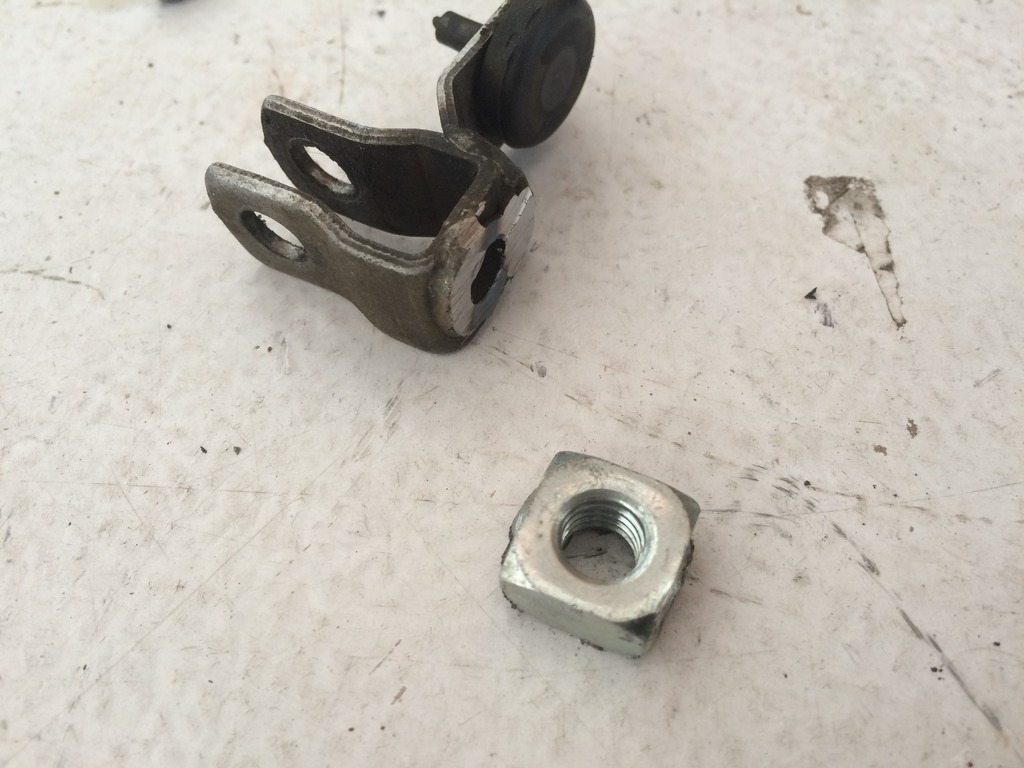
now the two masters have coarse and fine thread pitches on the adjustment rods, you're going to have to adapt the miata end linkage to work with the toyota rod to you can retail the switches on the clutch pedal. Cut the coarse nut off the one that came with the toyota rod and weld it to the linkage for the stock miata one.
you'll probably have to enlarge the firewall hole a bit as I did here
and its in! Stock clutch line and everything!
Here it is from under the dash
That last fix was only a two hour job and allowed the car to be good enough to drop off the jacks, out she comes!
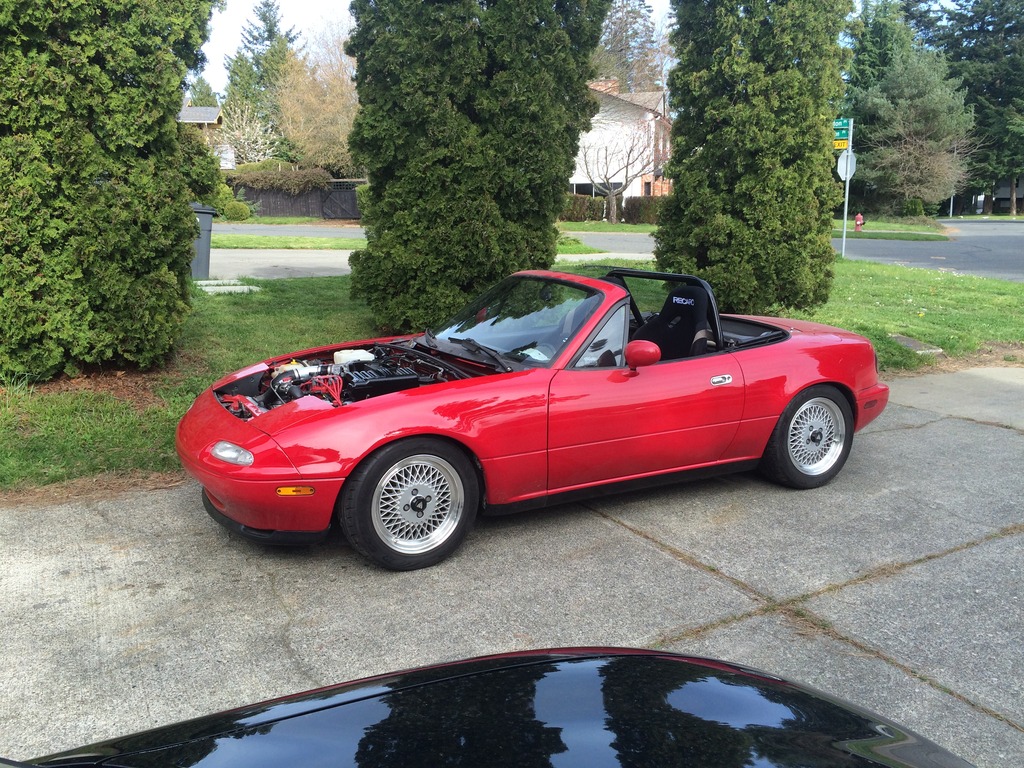
And the hood fits.. NO CUTTING!!
Check out the new shifter! (ignore the shattered radio bezel, I need a new one)
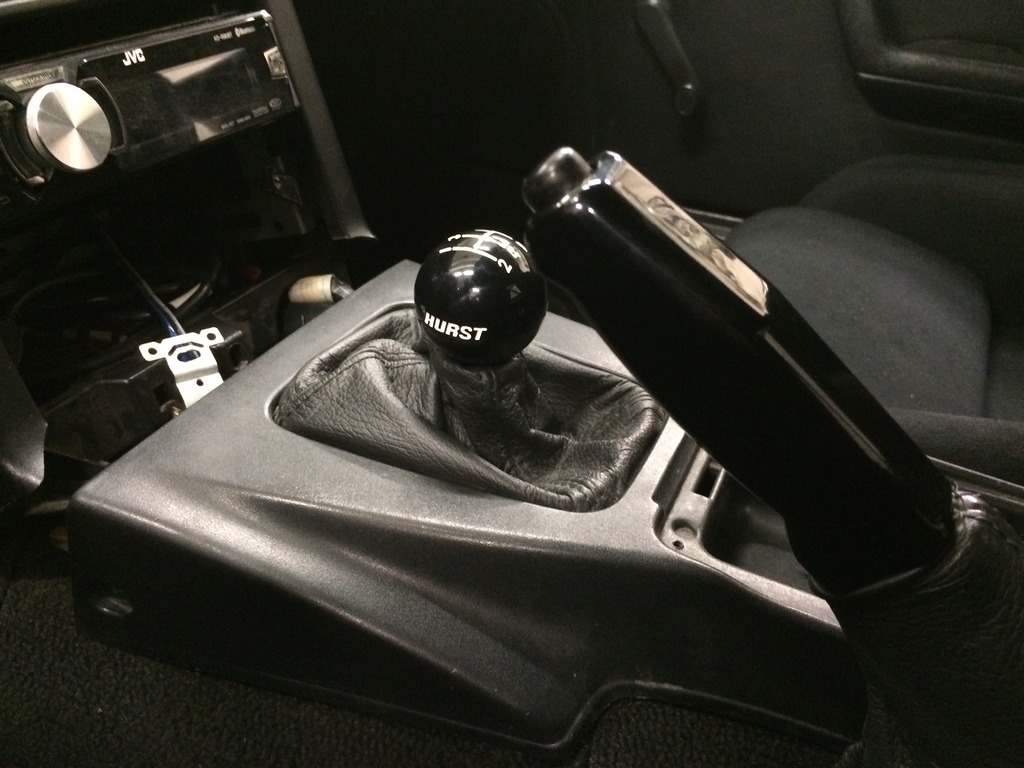
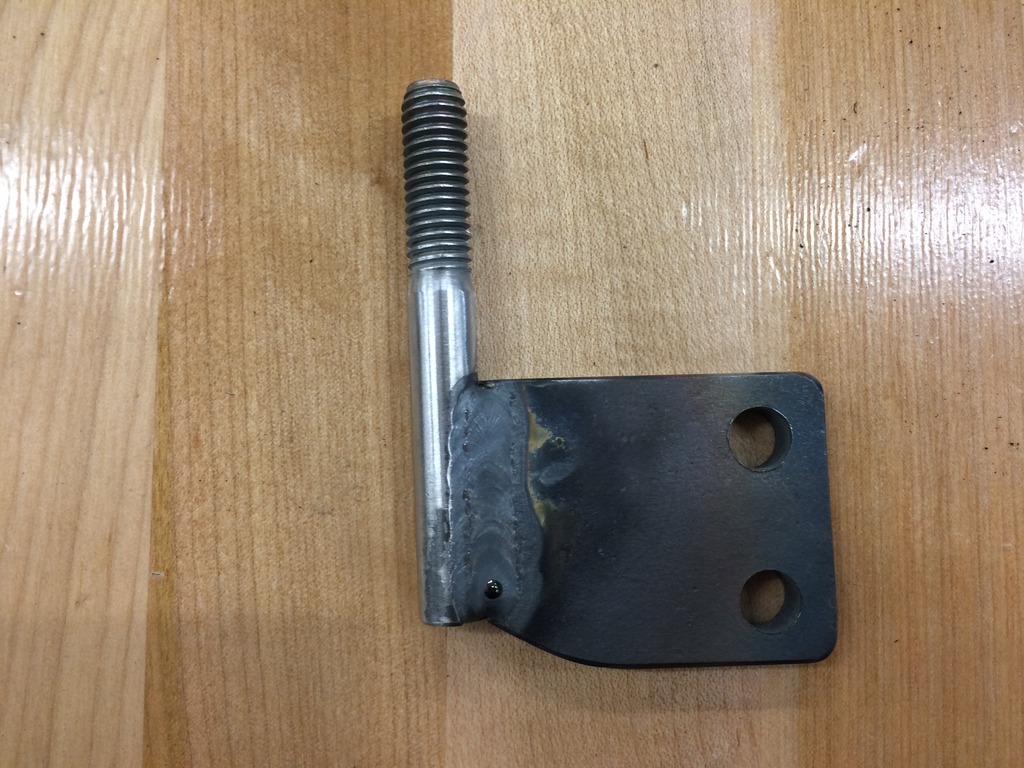
This is the adapter I made to put the hurst 3/8-16 **** in the center of the shift area with the pro5.0 short shift thing on the T5
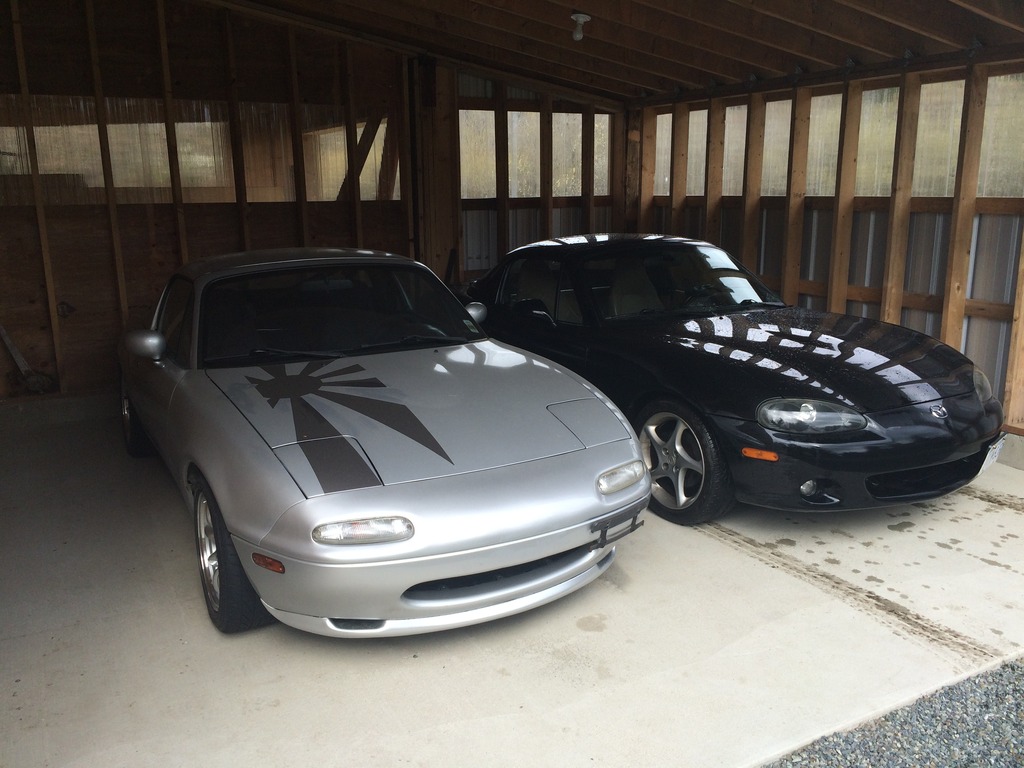
Moved my insurance from my NB to my monster, now parked next to my brother's NA while he's away
Had to quickly adjust the rear calipers to have a working ebrake
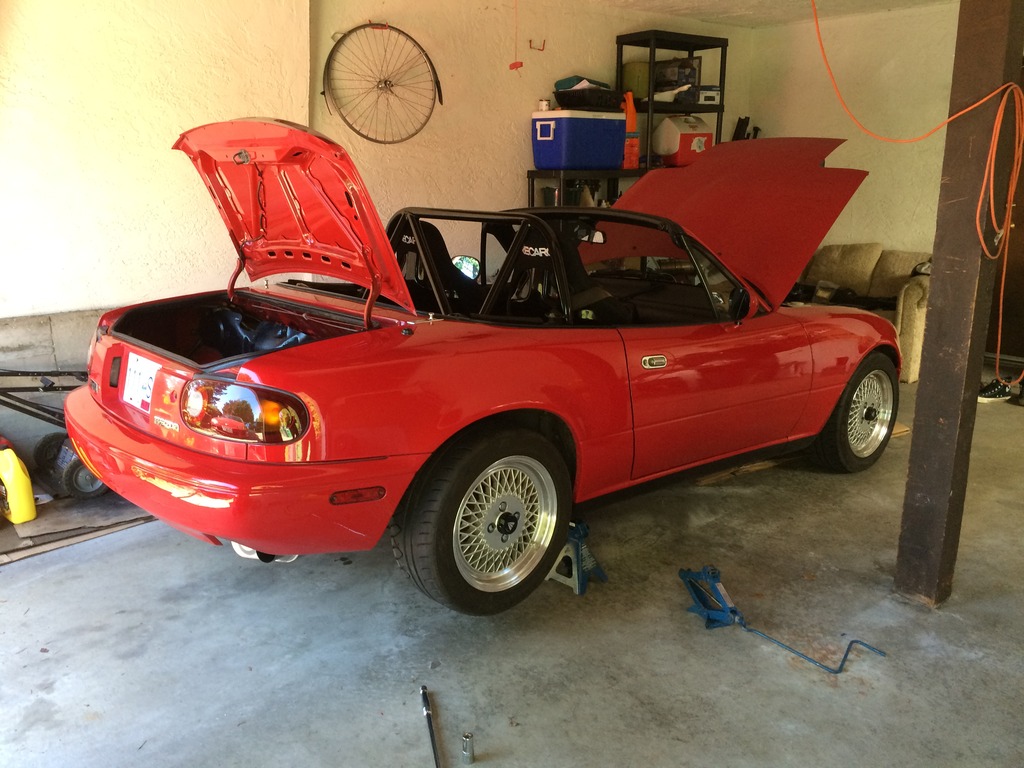
And all cleaned up after gathering dust for a few months
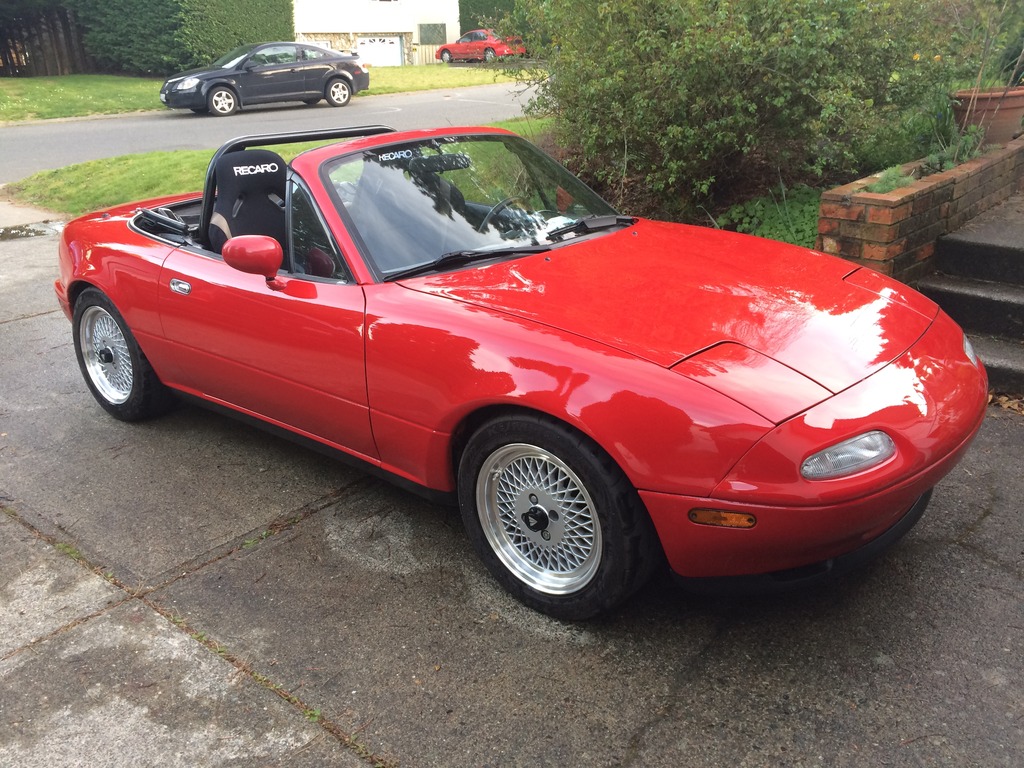
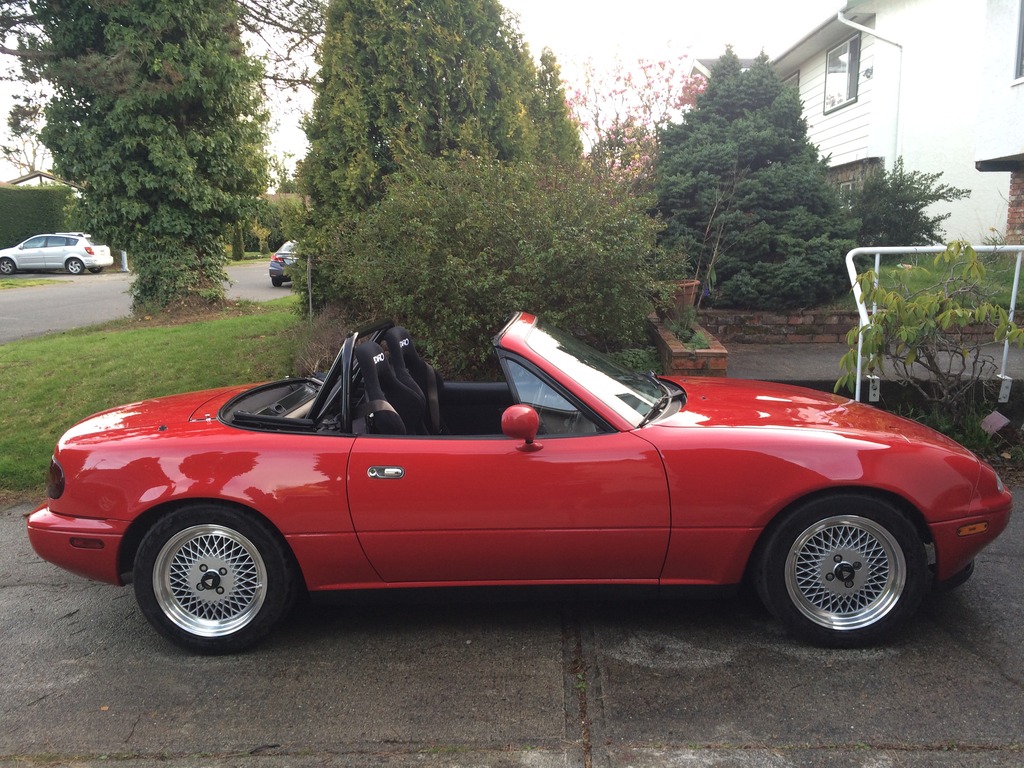
I have a lot of bugs to work out but I've been driving the car since March 28th. I love this thing, its been a huge project but the time put in was worth it. I'll continue to update this thread as I make changes and upgrades.
First off I had a bunch of little adapters and stuff come from summit to help me finish things up. This is the adapter for the AN fitting to M10 clutch line adapter. If you haven't noticed from the pictures, I'm using the stock steel clutch line. This connects it nicely to my McLeod hydraulic throw out bearing.

Here's one of the adapters I'm using to run the oem temp sending unit, I'm also running the miata 1.6 oil pressure sender but I don't have a good picture of that one.

I machined a tensioner bracket for the relocated alternator

Couple shots showing how I fit the stock rad ducting in, not sure if you guys are running that piece or making your own - still need to seal it up on the sides a small amount.


Here's my intake set up, basically routed it down in behind the rad. This was only possible with the relocated alternator

Should be a decent amount of colder air blowing around down there although it is right behind the hot rad

To give you guys an idea of the mess I'm working in

Here's a shot of the driver's side downpipe coloring nicely after some run time.

The next issue I ran into is that the McLeod throw out is designed for a 3/4 bore clutch master and the miata is 5/8 I believe. After some research I opted for the budget mod using a 1986 toyota landcruiser master which is almost a bolt in - I'll go over the process here although its also covered on some other site. Here they are side by side with the toyota on the left


Here I'm going to use this paper gasket that was on the firewall for the old master. I'll use it to trace the hole locations onto the toyota master.

First, pull this stud out

here it is on the toyota all marked out

and the new hole locations

now the two masters have coarse and fine thread pitches on the adjustment rods, you're going to have to adapt the miata end linkage to work with the toyota rod to you can retail the switches on the clutch pedal. Cut the coarse nut off the one that came with the toyota rod and weld it to the linkage for the stock miata one.


you'll probably have to enlarge the firewall hole a bit as I did here

and its in! Stock clutch line and everything!

Here it is from under the dash

That last fix was only a two hour job and allowed the car to be good enough to drop off the jacks, out she comes!


And the hood fits.. NO CUTTING!!

Check out the new shifter! (ignore the shattered radio bezel, I need a new one)

This is the adapter I made to put the hurst 3/8-16 **** in the center of the shift area with the pro5.0 short shift thing on the T5

Moved my insurance from my NB to my monster, now parked next to my brother's NA while he's away

Had to quickly adjust the rear calipers to have a working ebrake

And all cleaned up after gathering dust for a few months


I have a lot of bugs to work out but I've been driving the car since March 28th. I love this thing, its been a huge project but the time put in was worth it. I'll continue to update this thread as I make changes and upgrades.

V8 Miata Zealot
Joined: Mar 2010
Posts: 1,220
Likes: 51
From: Canton, Georgia
Nice work! The only concern I would have is the air intake sucking in the super-heated air coming through the radiator. When the ECM sees those high IAT numbers, it is going to pull out a lot of timing.

V8 Miata Fanatic
Joined: Feb 2015
Posts: 559
Likes: 83
From: Marion Illinois
^^^what he said. If you are heart set on that location then fine, but I would at least try and duct some cooler air up to it, or close it off from the radiator discharge. There is a reason why so many of us LS guys like the vette intakes that pull air from in front of the radiator.
Thread Starter
V8 Miata Fan
Joined: Sep 2015
Posts: 25
Likes: 2
From: Victoria BC Canada
Thanks guys, I think for now I'll try and duct more cool air from under the car up towards it. I considered putting the intake into the passenger fender but I like having the expansion tank in its original location. There is also always the possibility of fitting a centrifugal supercharger in that cavity where the intake filter currently is, lots of room there for that..


