
V8R sloooww build - 94 Miata - North Carolina


V8 Miata Fan
Joined: Nov 2009
Posts: 25
Likes: 3
From: Chatt. TN
Snake,
Did you need to lengthen the starter wires by running the Mazda battery harness on the top of the tunnel like you did?
Trying to get a feel on the best routing for that guy and I like your solution.
About where on the firewall did you end up bringing that harness out at in relation to the block/head/starter?
Thanks! Love your work.

Thread Starter
V8 Miata Fanatic

Joined: Oct 2012
Posts: 550
Likes: 34
From: Fuquay Varina, NC
Snake,
Did you need to lengthen the starter wires by running the Mazda battery harness on the top of the tunnel like you did?
Trying to get a feel on the best routing for that guy and I like your solution.
About where on the firewall did you end up bringing that harness out at in relation to the block/head/starter?
Thanks! Love your work.
Did you need to lengthen the starter wires by running the Mazda battery harness on the top of the tunnel like you did?
Trying to get a feel on the best routing for that guy and I like your solution.
About where on the firewall did you end up bringing that harness out at in relation to the block/head/starter?
Thanks! Love your work.
Please toss up some build info and pics of your TN project. It looks like you've put together a good plan.
V8 Miata Fan
Joined: Nov 2009
Posts: 25
Likes: 3
From: Chatt. TN
Hello Flipt - Thanks for the nice comment. You made me think back a bit when I read the question, but as I recall, the factory Mazda wiring did not need lengthening. It worked out fine as far as the length was concerned. I believe I remember cutting off the ring terminal and installing a new one for the GM/Mitsibishi starter. I think the starter wire ended up about parallel with the starter, actually. So, just below the RH head, I think.
Please toss up some build info and pics of your TN project. It looks like you've put together a good plan.
Please toss up some build info and pics of your TN project. It looks like you've put together a good plan.
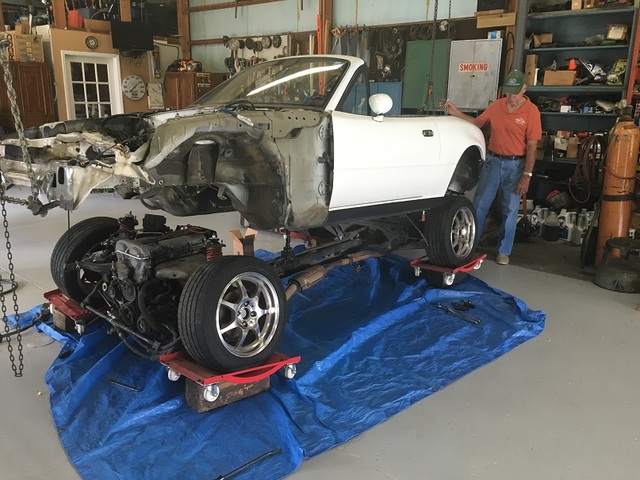
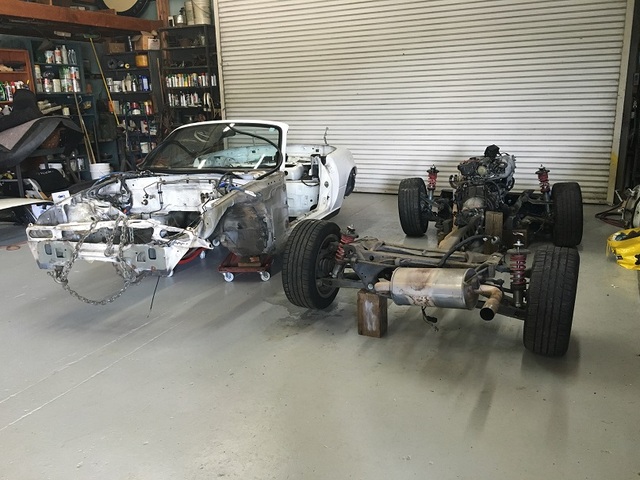
I have done an absolutely horrible job during my "build" of taking pictures... But I am convinced of borrowing my wife's real camera and taking some decent photos of the car and my components as they sit now and documenting it from here on out.
When I get started with any kind of momentum again, I will absolutely start a thread.
Maybe I will see some of you guys at the Mitty this year?
Thanks again,
Will

V8 Miata Fanatic
Joined: Feb 2015
Posts: 559
Likes: 83
From: Marion Illinois
Its been a long time since you posted it, but I am running in to a similar problem now. What did you ever do with the front sway bar mounts, that looked like they were going to run right through the lower hose? I have got a few idears, but I am curious what you did.
Thread Starter
V8 Miata Fanatic
Joined: Oct 2012
Posts: 550
Likes: 34
From: Fuquay Varina, NC
Sorry for the delay... Traveling this week to earn the paycheck!
Here's what I did. I had to look at page 3 and 4 to find text and photos.
From page 3:
Met with the welder this weekend, and I'm very pleased with our initial meeting. He likes getting involved in unique projects & problem solving... Well, he will get plenty of both with this job. He can either fake sincerity really well or genuinely liked the project car -- so, I think he's going to treat this as if it was his own car. I like that.
One of the things I did to prepare for this meeting was to mock up a few minimum front suspension components so he could visualize the sway bar concern. This is the FM V8 sway bar. It's beefy and needs to bolt up about 1" lower than the factory bar - for clearing the bottom side of the elec fans. Here's about where the brackets need to be.
So, what the plan is for now. Mr. Welder took measurements and one of my fine thread bolts home with him. He will use some 1" thick stock and cut out solid bracket spacers for me. they will have female threads cut into them and will be welded into position on the existing brackets. As you can see, the new supports will need to be set forward so holes can align properly. (I thought FM created this FM bar so '94 - '97's wouldn't have to make modificaitons to accomodate this bar. There's no way this bar would bolt up easily even if I hadn't lowered the radiator for accommodating the vette air cleaner...
Hope that helps!
V8 Miata Fanatic
Joined: Feb 2015
Posts: 559
Likes: 83
From: Marion Illinois
Well yeah I had seen that buddy, but then on page 8, post 182 of this thread you posted a picture of the final product, and it looks like the sway bar will make contact with the lower radiator hose. Did the bar just end up fitting?
Thread Starter
V8 Miata Fanatic
Joined: Oct 2012
Posts: 550
Likes: 34
From: Fuquay Varina, NC
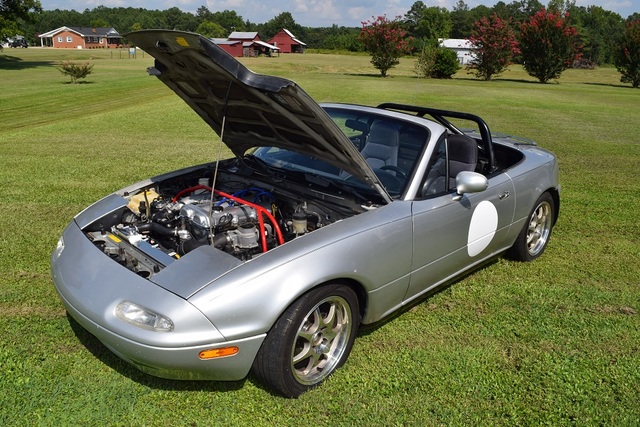
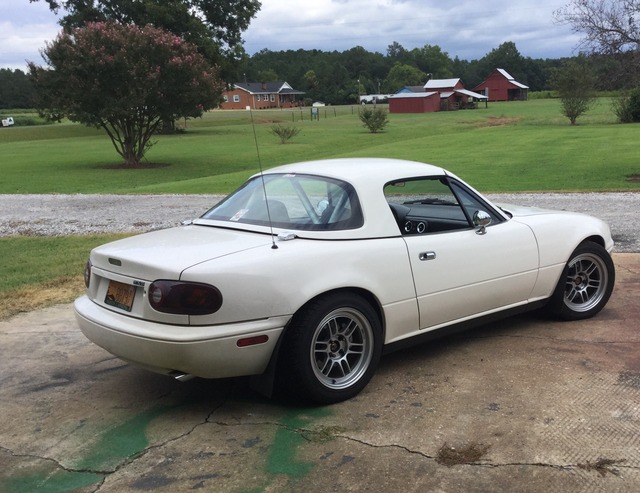
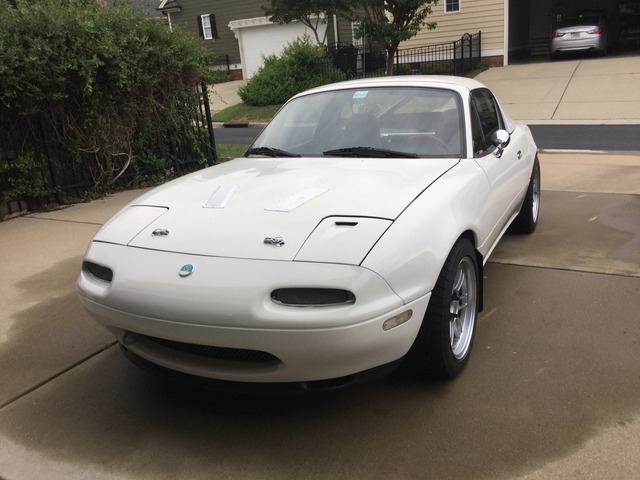
Getting close to the end of Summer 2016 so just adding a few recent pics. Mileage is around 3,400 as it sat inside for most of this hot and busy summer. I travel most weeks for work and when home, the temps were in the 90’s (and I haven’t gotten the AC put together as of yet). I did have fun with it last month at a recent Cars & Coffee in Raleigh. Folks still get a kick out of seeing a LS swap in small Mazdas as most car people are somewhat aware of either Monster Miatas or Flyin’ Miata swaps.
I’ll share some small concerns & updates that I want to address this Fall. I feel like if I share them publicly, then there’s a better chance that I’ll follow through on them!!! Nothing too bad – just want to tweak some things now that it’s mostly done. I may have to post my Q’s in more specific V8m.net threads to get better feedback – which is A-OK, but I want to document here on this build thread as well so the full story stays here.
Concerns:
• I am not in love with my exhaust. It is an adequate job, but could be much better. I like single outlet and will stick with this layout, but I want update to 3” single and new muffler. I have a new 3” Borla, various 3” tight radius elbows, 2-1/2”x3” Y, and new band clamps to help a local competent exhaust shop do the job. Still need to pick out a pair of small 2-1/2” cats… Main problem is the “yellow effect” on the bumper’s white paint around the exhaust tip. I THINK it’s because of no catalytic converters from looking around the web. I’ve read where some LS swaps with no cats had bad exhaust/ gasoline smells, but I haven’t detected that. But then again, I don’t have a great sense of smell either… Just do not like having � my white rear bumper get yellow looking. The stuff comes off with cleaner wax, but I want to prevent it with possibly installing new cats in new exhaust.
• No A/C. I now have the FM A/C plumbing kit for my CTS-V compressor. Just need to read through GunPilot’s A/C thread and find competent shop to make hoses and such.
• Long shot: Engine bay paint on all my seam sealer remains “sticky” and dust and small debris sticks to it. White engine bay will get uglier over time. Would like to have expert prep and paint engine compartment (with wiring harnesses and many items temporarily removed or pulled out of the way…
* Last bullet point --- Wondering about my PCV system and if I should investigate the matter again. I'm thinking I have it sort of plugged and capped off - not certain..? Saw some clean Pontiac G8's at car show with oil catch cans and wonder if I need to plumb a similar system in...? Not certain if I'm causing internal pressure issues or not with what I do have (and I'm not certain what I do have on EVAP side of things...?
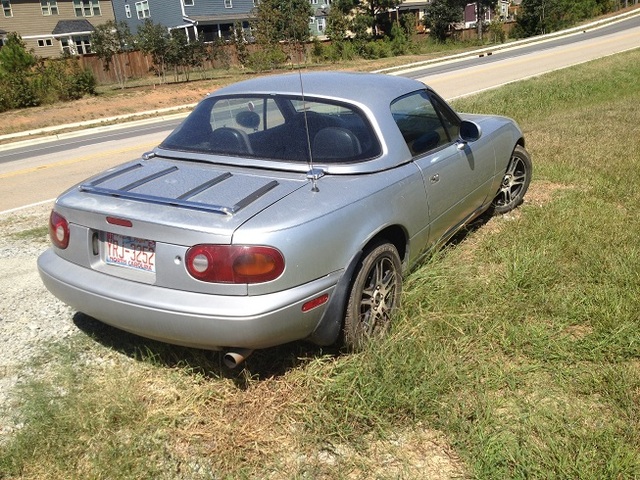
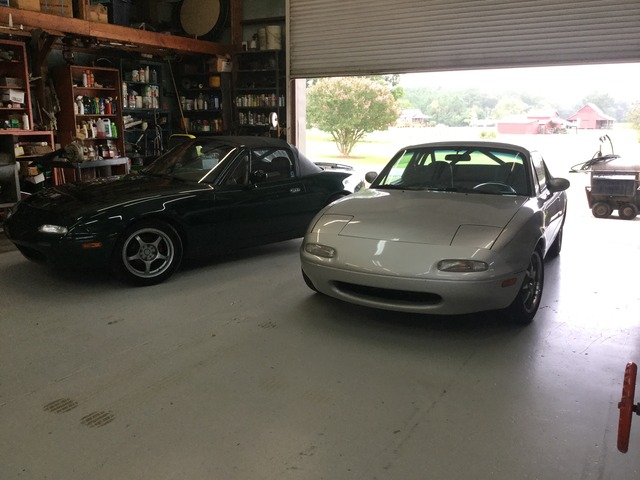
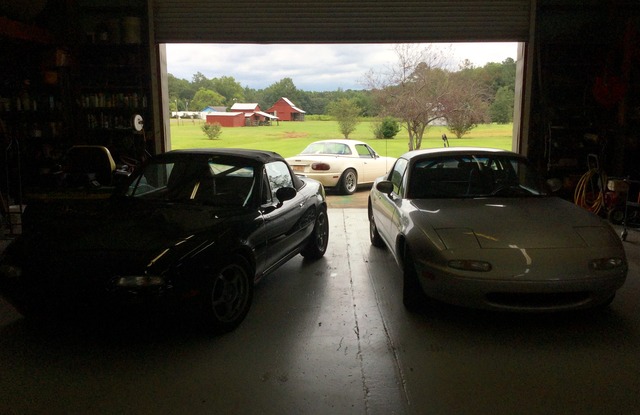
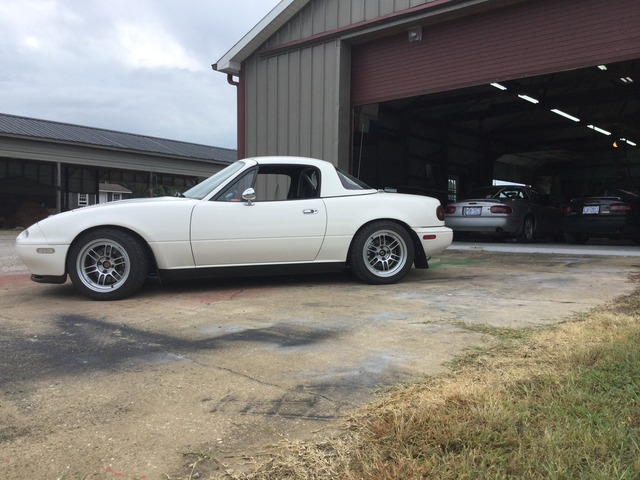
This summer I did have a Miata project… So, about a year ago, I picked up a 275K silver ’91 hardtop on the side of the road for sale with a great body. Let it sit under the shelter. Ran very good – just an overall “tired” car with dirty interior. In June ’16, I came across a wrecked ’92 white hardtop with 104K, clean interior, new poly bushings, Hard Dog not installed, FM sways, and VMaxx coilovers. So, I took 2, made one, and sold some parts. I used it for my first HDPE a few weeks ago and will tool around in this until I decide what to do with it. Pics are below!
I’ll share some small concerns & updates that I want to address this Fall. I feel like if I share them publicly, then there’s a better chance that I’ll follow through on them!!! Nothing too bad – just want to tweak some things now that it’s mostly done. I may have to post my Q’s in more specific V8m.net threads to get better feedback – which is A-OK, but I want to document here on this build thread as well so the full story stays here.
Concerns:
• I am not in love with my exhaust. It is an adequate job, but could be much better. I like single outlet and will stick with this layout, but I want update to 3” single and new muffler. I have a new 3” Borla, various 3” tight radius elbows, 2-1/2”x3” Y, and new band clamps to help a local competent exhaust shop do the job. Still need to pick out a pair of small 2-1/2” cats… Main problem is the “yellow effect” on the bumper’s white paint around the exhaust tip. I THINK it’s because of no catalytic converters from looking around the web. I’ve read where some LS swaps with no cats had bad exhaust/ gasoline smells, but I haven’t detected that. But then again, I don’t have a great sense of smell either… Just do not like having � my white rear bumper get yellow looking. The stuff comes off with cleaner wax, but I want to prevent it with possibly installing new cats in new exhaust.
• No A/C. I now have the FM A/C plumbing kit for my CTS-V compressor. Just need to read through GunPilot’s A/C thread and find competent shop to make hoses and such.
• Long shot: Engine bay paint on all my seam sealer remains “sticky” and dust and small debris sticks to it. White engine bay will get uglier over time. Would like to have expert prep and paint engine compartment (with wiring harnesses and many items temporarily removed or pulled out of the way…
* Last bullet point --- Wondering about my PCV system and if I should investigate the matter again. I'm thinking I have it sort of plugged and capped off - not certain..? Saw some clean Pontiac G8's at car show with oil catch cans and wonder if I need to plumb a similar system in...? Not certain if I'm causing internal pressure issues or not with what I do have (and I'm not certain what I do have on EVAP side of things...?
This summer I did have a Miata project… So, about a year ago, I picked up a 275K silver ’91 hardtop on the side of the road for sale with a great body. Let it sit under the shelter. Ran very good – just an overall “tired” car with dirty interior. In June ’16, I came across a wrecked ’92 white hardtop with 104K, clean interior, new poly bushings, Hard Dog not installed, FM sways, and VMaxx coilovers. So, I took 2, made one, and sold some parts. I used it for my first HDPE a few weeks ago and will tool around in this until I decide what to do with it. Pics are below!
Last edited by ToySnakePMC; Sep 5, 2016 at 09:58 AM.
Thread Starter
V8 Miata Fanatic
Joined: Oct 2012
Posts: 550
Likes: 34
From: Fuquay Varina, NC
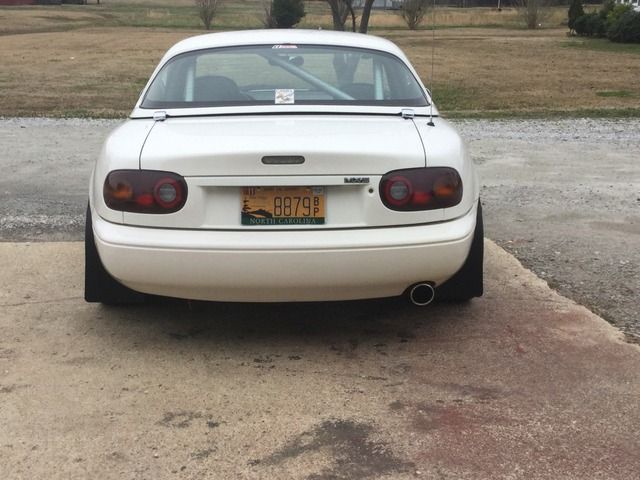
And lastly -- Here are some BEFORE and AFTER pics of my rear bumper. LS2 with no cats. It may or may not be hard to see, but significant "yellowing effect" on area around single RH tailpipe occurs after 50, 100 miles, whatever. It comes off with cleaner-wax, but I want to eliminate it. I wonder if this happens because I do not have the catalytic converters installed..?
This photo doesn't do the issue any justice. But picture this area with yellow tint.., LOL.
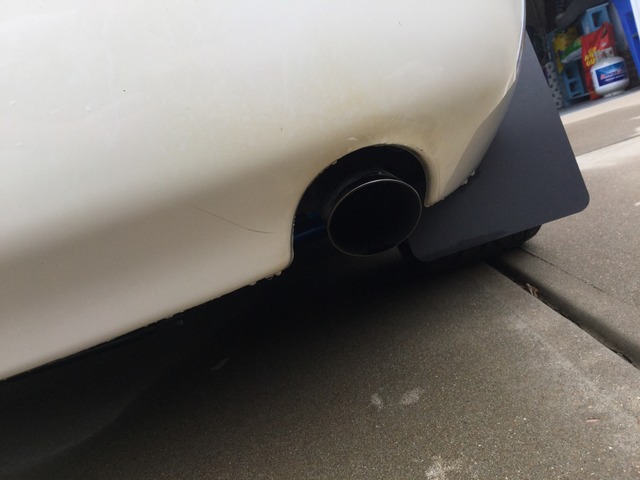
This is after I've cleaned it up with mild rubbing of wax...
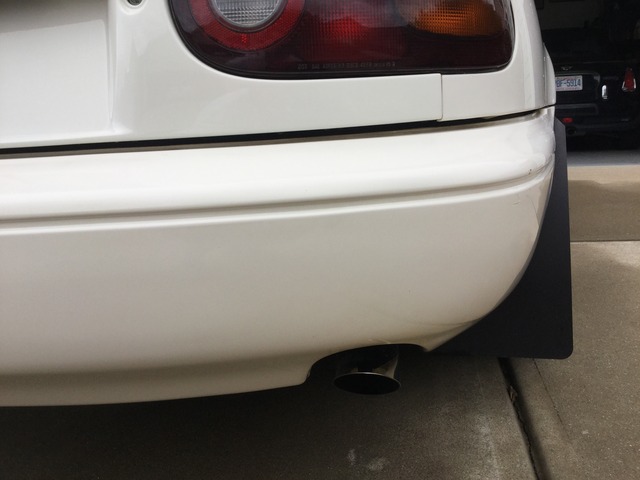
Anybody feel free to weigh in with suggestions or comments.
This photo doesn't do the issue any justice. But picture this area with yellow tint.., LOL.
This is after I've cleaned it up with mild rubbing of wax...
Anybody feel free to weigh in with suggestions or comments.

V8 Miata Prot�g�
Joined: Nov 2014
Posts: 485
Likes: 37
From: South FL
You know, now that you mention it.. my previous Mazda that had no cat developed a yellow/dark tinge on the back corner where the exhaust was. This also is true on a friend's white miata that is catless as well. So I definitely think you're onto something there. I know for a fact both examples I used ran fairly rich at times but not crazy rich.
Don't forget that a cat will significantly quiet the exhaust so you may consider running just 2 cats and a small straight through muffler near the exit.
Don't forget that a cat will significantly quiet the exhaust so you may consider running just 2 cats and a small straight through muffler near the exit.
Thread Starter
V8 Miata Fanatic
Joined: Oct 2012
Posts: 550
Likes: 34
From: Fuquay Varina, NC
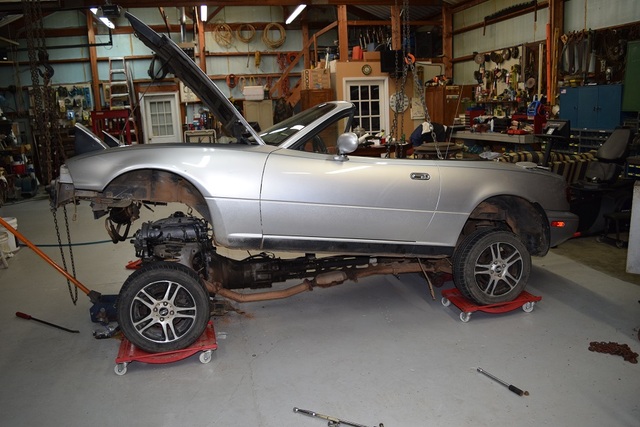
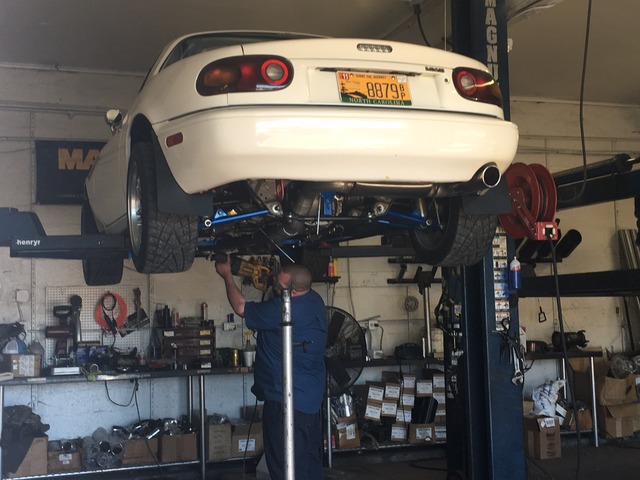
Thanksgiving weekend '16 and got to put a few fun miles on the V8Roadster - along with an opportunity to put it on a friend's lift Saturday evening.
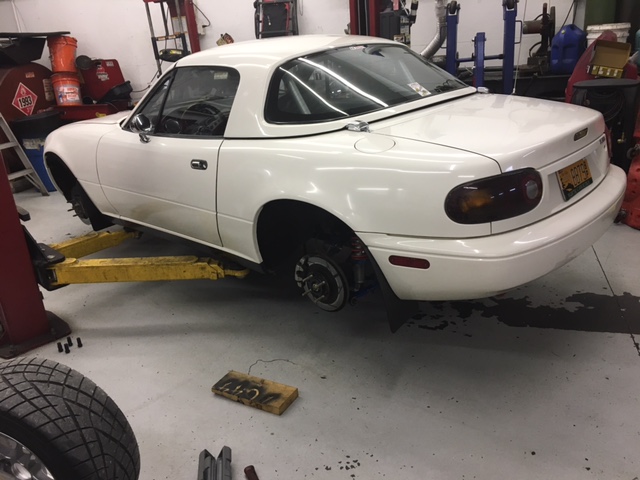
This year didn't see much time behind the wheel for whatever reason (damn time flies...) and the car just hung around the garage with a trickle charger keeping it company most of the time. But I did want to give the car a good look-over and check out the suspension and the underside for any issues or potential problems.
I mainly wanted to confirm that the suspension was still all together as intended from back in 2014 or so... Knowing that I did the work, I wanted to gain some peace of mind that my handiwork was sufficient and all A arms, sway bars, shocks, etc. were still attached and bolts were sufficiently tight.
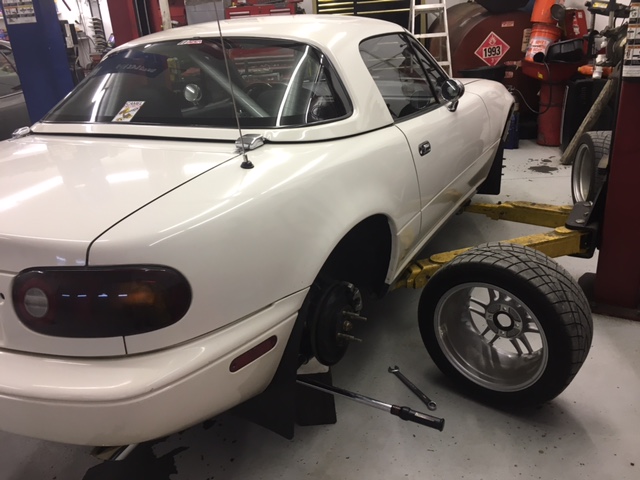
Took the wheels / tires off to gain access to A arms (and to rotate them after the initial 3700 miles). I went ahead and adjusted the rear FM sway bar and moved the links to the softest setting (outside pair of holes). Re-torqued the end links by lowering the lift with the rear tires back on to tighten at ride height.
Checked lower A arm outer bolt torque � it was to spec like everything else at the rear of the car.

Also spent some time up front to confirm all is well with the suspension and that the car is safe� That�s where I find the L-O-N-G upper A arm bolt to be at perhaps 20 ft-lb and NOT at approx 100 ft-lb. � on both sides! Although this car has been to 2 alignment shops, I never would have expected them to check this bolt out since it�s not something they would adjust. Anywho, I put two 21mm wrenches on it and �torqued� both of them to something close to 100 ft-lb.
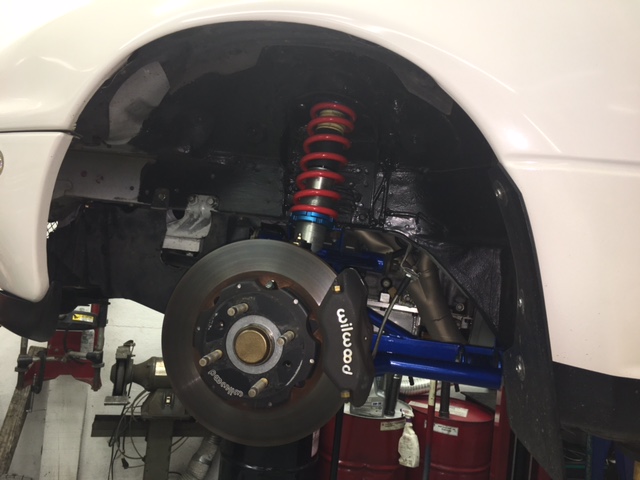
Everything else looked good underneath. I wiped oil mist off of the oil pan and bottom side of the T-56. Always have had a tiny amount of oil seepage from the alum V8Roadsters pan. Might be my handiwork � who knows! As this car continues to age somewhat, it�s important to me to give this thing a good inspection � especially since it wasn�t built at a factory with computerized torque guns and other quality assurance initiatives. I feel assured that this Roadster is ready for a road trip � hopefully this winter to some twisty roads in VA or western NC.
This year didn't see much time behind the wheel for whatever reason (damn time flies...) and the car just hung around the garage with a trickle charger keeping it company most of the time. But I did want to give the car a good look-over and check out the suspension and the underside for any issues or potential problems.
I mainly wanted to confirm that the suspension was still all together as intended from back in 2014 or so... Knowing that I did the work, I wanted to gain some peace of mind that my handiwork was sufficient and all A arms, sway bars, shocks, etc. were still attached and bolts were sufficiently tight.
Took the wheels / tires off to gain access to A arms (and to rotate them after the initial 3700 miles). I went ahead and adjusted the rear FM sway bar and moved the links to the softest setting (outside pair of holes). Re-torqued the end links by lowering the lift with the rear tires back on to tighten at ride height.
Checked lower A arm outer bolt torque � it was to spec like everything else at the rear of the car.
Also spent some time up front to confirm all is well with the suspension and that the car is safe� That�s where I find the L-O-N-G upper A arm bolt to be at perhaps 20 ft-lb and NOT at approx 100 ft-lb. � on both sides! Although this car has been to 2 alignment shops, I never would have expected them to check this bolt out since it�s not something they would adjust. Anywho, I put two 21mm wrenches on it and �torqued� both of them to something close to 100 ft-lb.
Everything else looked good underneath. I wiped oil mist off of the oil pan and bottom side of the T-56. Always have had a tiny amount of oil seepage from the alum V8Roadsters pan. Might be my handiwork � who knows! As this car continues to age somewhat, it�s important to me to give this thing a good inspection � especially since it wasn�t built at a factory with computerized torque guns and other quality assurance initiatives. I feel assured that this Roadster is ready for a road trip � hopefully this winter to some twisty roads in VA or western NC.
Thread Starter
V8 Miata Fanatic
Joined: Oct 2012
Posts: 550
Likes: 34
From: Fuquay Varina, NC
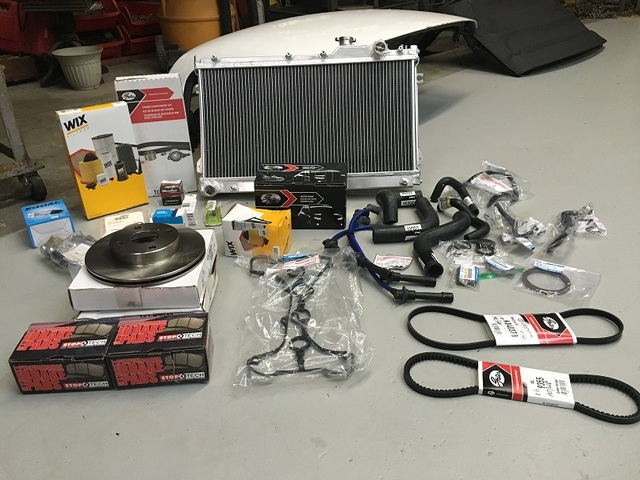
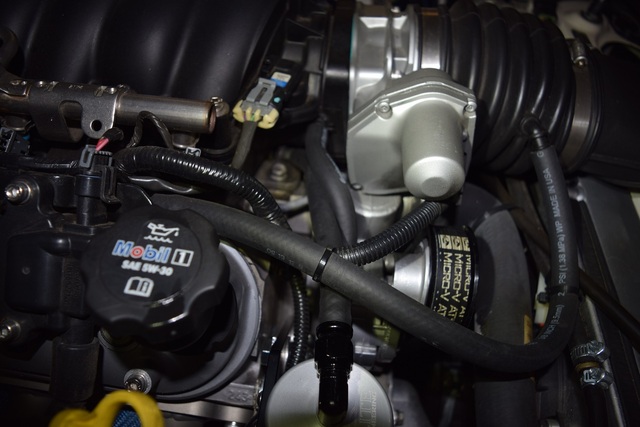
Need to update the thread with the recently installed oil catch can for this LS2. I did this modification a few months ago as a preemptive strike against sucking dirty oil and contaminants into the intake manifold and down into the combustion chambers. At a recent Cars & Coffee, I had checked out two nice Pontiac G8�s with the same Elite Engineering catch cans that caught my eye. Unfortunately, the owners were not standing nearby so I didn�t get their opinions on how these were serving them. But seeing these installed got me thinking about what my motor was working with � or without�
This is what I found and ordered with a step up from normal brass barb fittings: Standard Catch Cans - Elite Engineering
So, the installation began after I test-fitted the unit on the front of the RH cylinder head. Unfortunately, my heater hose piping and fittings were in the way for a standard Corvette installation using only the Elite Engineering �hockey stick� black anodized aluminum mounting bracket� I need to space my catch can up about �� for clearance. So I came up with a 2� wide by about �� thick aluminum flat metal to drill holes and install two, offset mounting bolts for the hockey stick bracket.
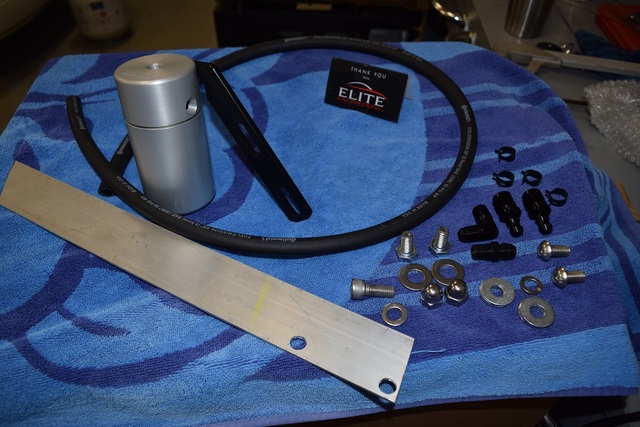
Above is everything I used for the installation. Their hardware, my flat metal bar and a few extra bolts, acorn nuts, and several washers (spacers, mainly!). I cut the aluminum at the faint yellow line and drilled two holes opposite of the two holes already shown in the photo.
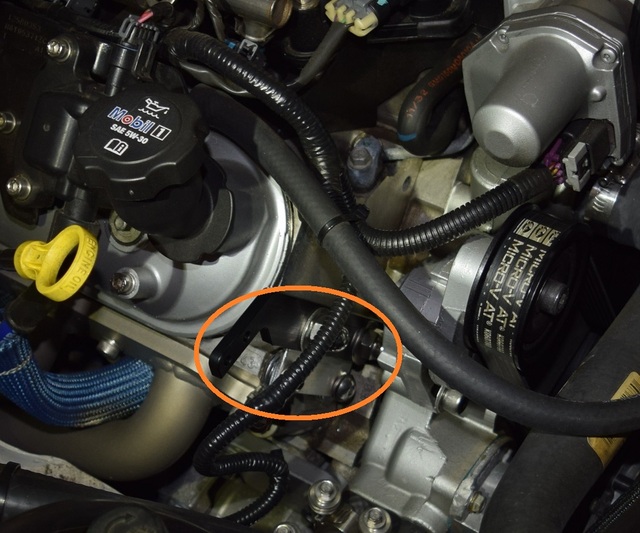
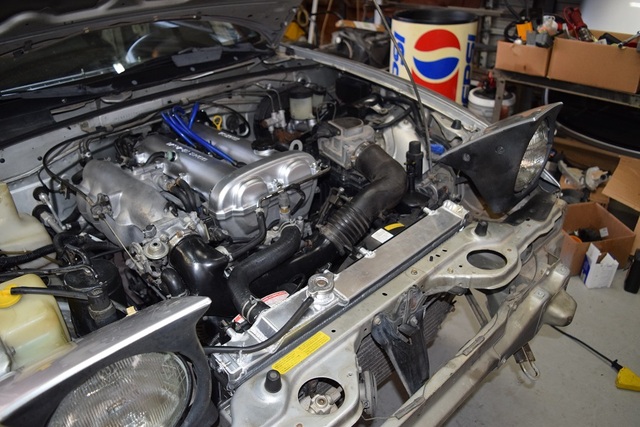
Brackets installed and spaced forward just enough with a few washers between the alum head and the alum bracket so the hex head bolts I installed for securing the hockey stick were flush. The catch can is secured to the hockey stick with two small button-style bolts that thread directly into a horizontal, flat slot in the round catch can.
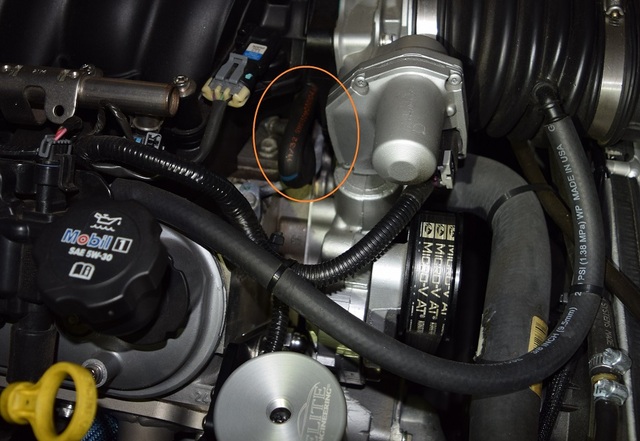
This is the hose that is removed and tossed out. The bottom port that goes into the valley cover is the PCV "source" for the catch can, and the port above in the intake manifold is the "return" to the throttle body from the catch can.
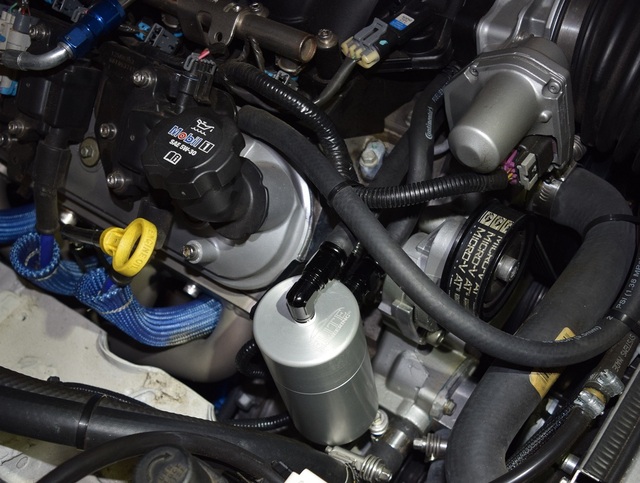
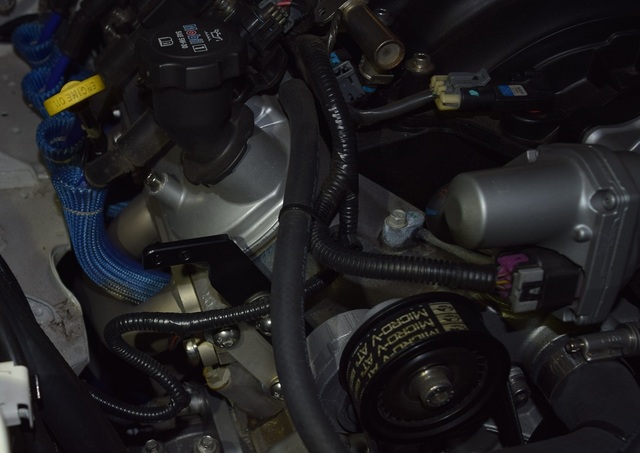
Cut supplied rubber hose to proper length and secured them with supplied clamps where necessary.

All done � no fuss � no mess. I�ll put a few hundred miles on the car and then check the contents of the catch can to see what we�re pulling out of the PCV system.
This is what I found and ordered with a step up from normal brass barb fittings: Standard Catch Cans - Elite Engineering
So, the installation began after I test-fitted the unit on the front of the RH cylinder head. Unfortunately, my heater hose piping and fittings were in the way for a standard Corvette installation using only the Elite Engineering �hockey stick� black anodized aluminum mounting bracket� I need to space my catch can up about �� for clearance. So I came up with a 2� wide by about �� thick aluminum flat metal to drill holes and install two, offset mounting bolts for the hockey stick bracket.
Above is everything I used for the installation. Their hardware, my flat metal bar and a few extra bolts, acorn nuts, and several washers (spacers, mainly!). I cut the aluminum at the faint yellow line and drilled two holes opposite of the two holes already shown in the photo.
Brackets installed and spaced forward just enough with a few washers between the alum head and the alum bracket so the hex head bolts I installed for securing the hockey stick were flush. The catch can is secured to the hockey stick with two small button-style bolts that thread directly into a horizontal, flat slot in the round catch can.
This is the hose that is removed and tossed out. The bottom port that goes into the valley cover is the PCV "source" for the catch can, and the port above in the intake manifold is the "return" to the throttle body from the catch can.
Cut supplied rubber hose to proper length and secured them with supplied clamps where necessary.
All done � no fuss � no mess. I�ll put a few hundred miles on the car and then check the contents of the catch can to see what we�re pulling out of the PCV system.
Thread Starter
V8 Miata Fanatic
Joined: Oct 2012
Posts: 550
Likes: 34
From: Fuquay Varina, NC
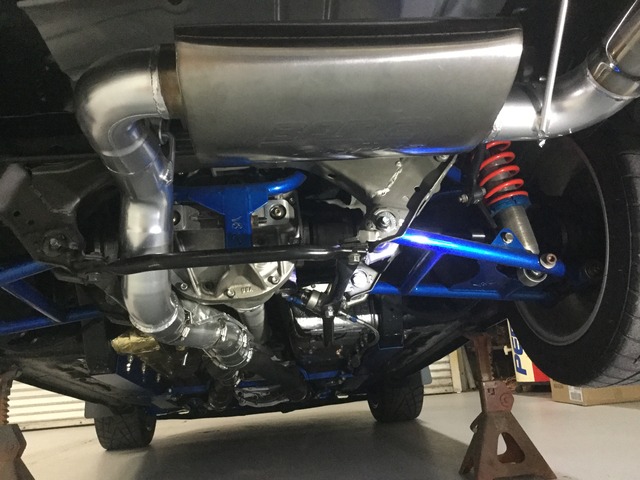
And another, but very brief, update of a long-overdue correction of a previous sin committed with this build... The exhaust.
Original exhaust back of the FM short-tube headers - (because that's all there was back in 2012 when parts were ordered...) was fabricated by a local shop and documented in this thread from back in the day. The problem is that I settled for what the guy was capable of - and that is working with maximum 2-1/2" size pipe. So, my single exhaust has been 2-1/2" with a Dynomax or something muffler that had a spring-loaded "door" that would open when enough CFM's push on it to give you a straight-through design. It was no more than "OK" from day one, and I never liked it much.
So, over the past year, I've been ordering a few items such as Borla ProXS Muffler [Summit #40353] with offset 3" inlet and offset 3" outlet. I also ordered two 90 degree 3" elbows and two 45's - all mandrel bent pieces. And a stainless steel tip in 3.5 or 4", not sure.
Yesterday, I had an appointment with Henry's Muffler Shop in Raleigh for some nice fab work and welding. They provided and installed two 2-1/2" hi-flow cats and installed my parts. I only have this one photo, but will provide more when I get the car back up on the lift. But let me say, it SOUNDS AWESOME now. It's somewhat louder anywhere above idle than it was before. But the sound is what I expected from Borla. So sweet!
The exhaust is comprised of 2-1/2" band clamps on FM headers, 2-1/2" Magnaflow cats, O2 bungs and sensors in front of cats, Magnaflow 2-1/2" to 3" Y, 3" custom mid pipe, 3" bends of 45's and 90's, Borla muffler and st/steel tip.
The technician below is cutting about a 6" space in existing 2-1/2" pipe for catalytic converter.
V8 Miata Fanatic
Joined: Feb 2015
Posts: 559
Likes: 83
From: Marion Illinois
Glad to hear you finally did something with that exhaust, never did set well with me for the perfection that is your car. Have you put any real miles on that thing yet? I put almost 3k on mine this year.

Thread Starter
V8 Miata Fanatic
Joined: Oct 2012
Posts: 550
Likes: 34
From: Fuquay Varina, NC
Appreciate the note. I lived with that compromised exhaust long enough, lol.
Just had it inspected last month (safety only for pre '96) and it went a whopping 360 miles prior 12 months. Sad. But, I took every back road and the long way home Wednesday after leaving the muffler shop just to feel and hear it go thru the revs! Have just 2 or 3 jobs to do on this car but nothing to keep it off the road very long this winter.
Just had it inspected last month (safety only for pre '96) and it went a whopping 360 miles prior 12 months. Sad. But, I took every back road and the long way home Wednesday after leaving the muffler shop just to feel and hear it go thru the revs! Have just 2 or 3 jobs to do on this car but nothing to keep it off the road very long this winter.


Thread Starter
V8 Miata Fanatic
Joined: Oct 2012
Posts: 550
Likes: 34
From: Fuquay Varina, NC
Thanks Chris B! Really enjoy your build thread and killer approach. Makes mine look more like the 1.8L it used to be! 
MSM - I was afraid someone would ask for sound clip one day... I will step out of my comfort zone and learn how to do that for you.
MSM - I was afraid someone would ask for sound clip one day... I will step out of my comfort zone and learn how to do that for you.
Thread Starter
V8 Miata Fanatic
Joined: Oct 2012
Posts: 550
Likes: 34
From: Fuquay Varina, NC
Had some free time this afternoon to jack that @ss up, mask around the new pipe, and use some existing high-temp silver paint. Got a bit too much bling going for it now, but it will lose some of that luster over time.


V8 Miata Noob
Joined: Jan 2016
Posts: 17
Likes: 0
From: Eastern NC
Still keeping an eye on your thread, always fun to see what's been changed. Been doin a few things to my girl over here on the coast as well....just turned 2800mi since we finished the build in June. Need to try to meet up one of these days.


