When you click on links to various merchants on this site and make a purchase, this can result in this site earning a commission. Affiliate programs and affiliations include, but are not limited to, the eBay Partner Network.
The good news is that I was able to remove the bolt a week or so ago using the "weld-a-nut" method. First attempt failed, but on the second attempt I fried the bacon extra crispy and that was enough. Before I did that I soaked the bolt in some penetrant for a few hours. Hard to say if that worked, but you might admire my creativity here.
I used some plumber's putty to create a little trough.
The welded nut
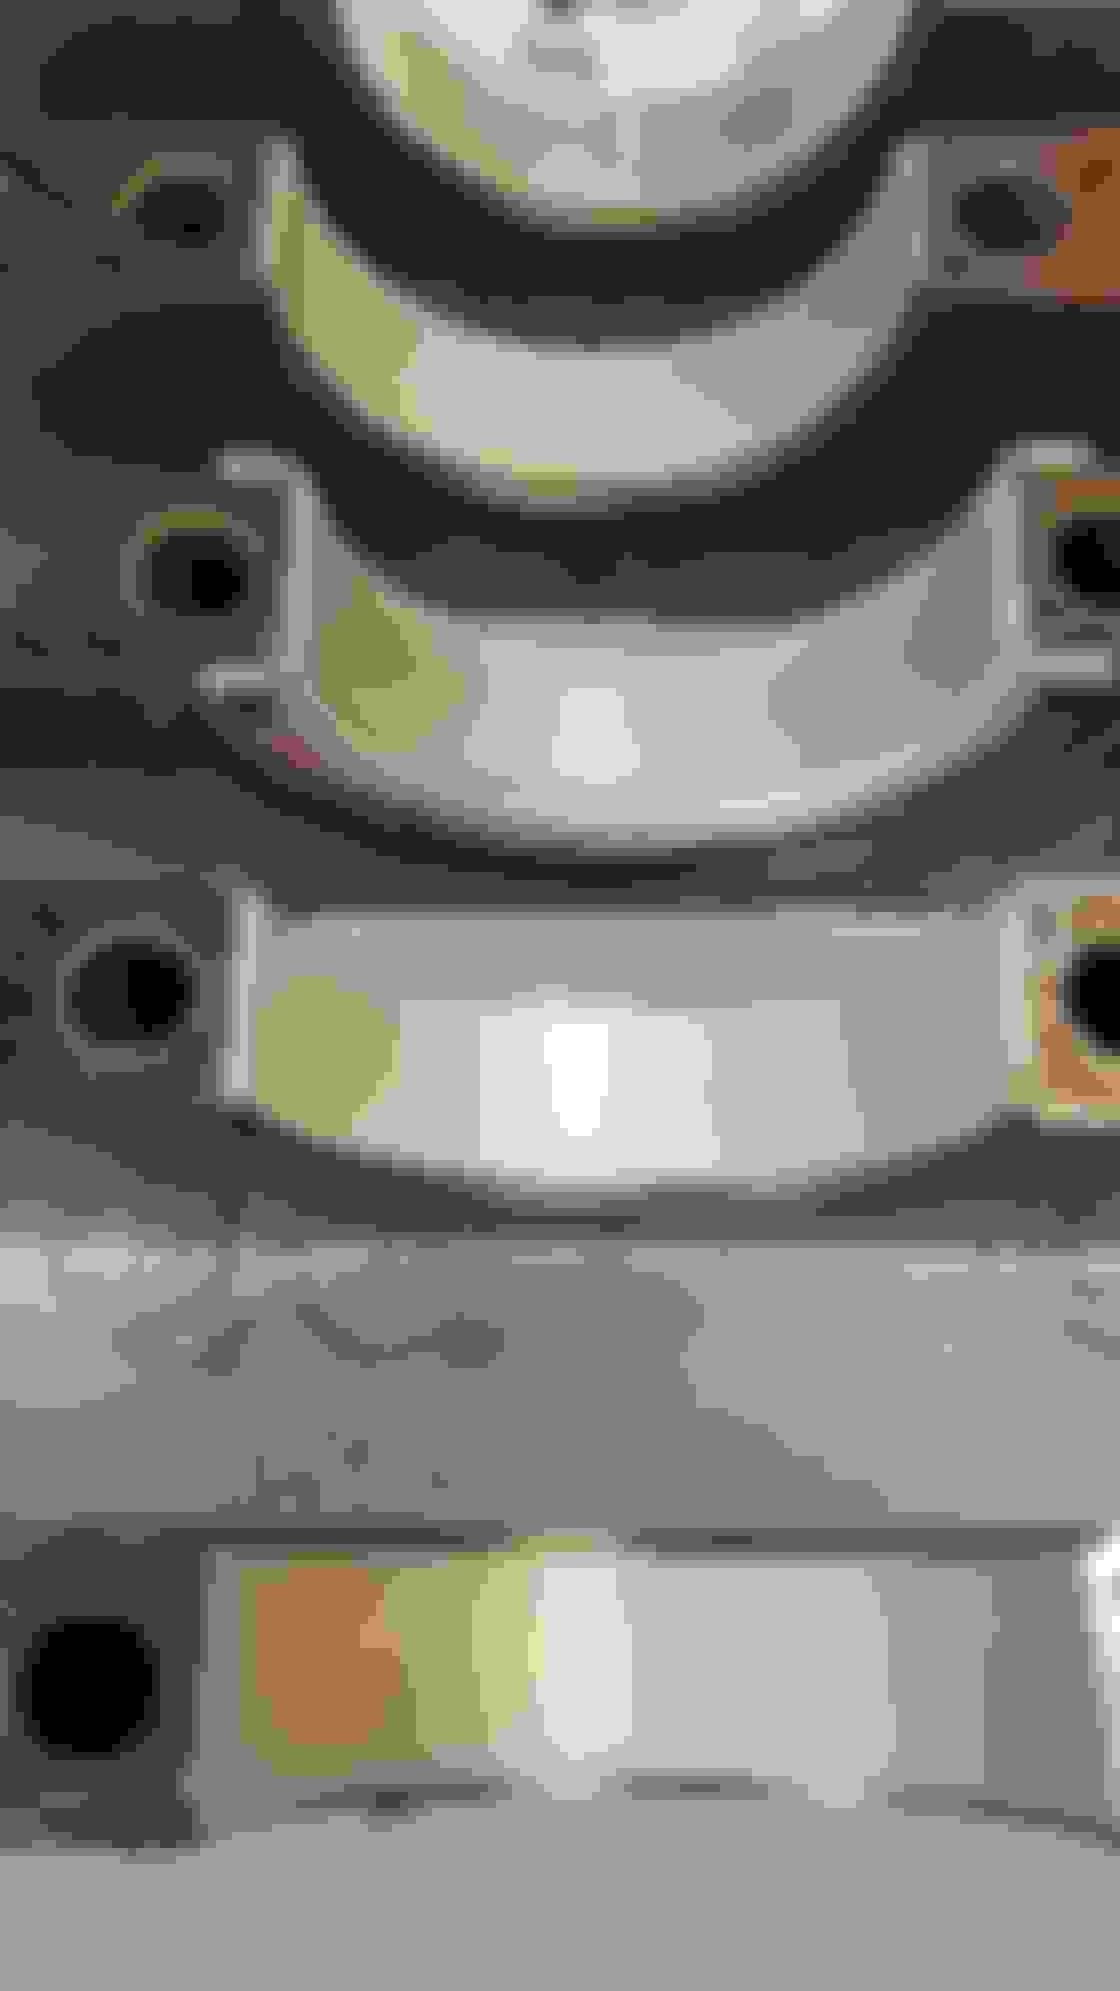
With the balancer off, I began to examine the bottom end and it wasn't pretty. The #1 connecting rod cap is discolored, so it saw some heat.
Bearings on the #1 are gone, the #2 also shows a good bit of wear as well. That's as far as I went. I may have some cylinder wall damage on the #1 because the piston was flopping around from the bearing wear. Not sure if the block is salvageable since there isn't much room for over-boring these blocks, especially the early LS1s, such as this 1998 LS1. The crank journal is probably gone as well. So that's where I stand right now.
My attention will be turning to screening in our deck/porch, so that may be where the bulk of time and money are spent for the rest of the year.
After a bit of a hiatus, I'm getting back to rebuilding the engine. Here are a few more pics of the carnage
The LS1 cracked rod design on the #1 rod that saw some excessive heat, was so warped it couldn't even be realigned back. I already knew it was beyond reuse, but this is just another example of how bad it got.
I was able to pick up a new rod from a seller on eBay for $25. I also picked up a pair of new ARP rod bolts. Luckily they do sell these as a pair for $12 vs. a whole set for $100.
I stripped the block down and made the call to a machine shop in the area, a different one than I used before. The LS aluminum block is not too much to handle by itself, so I could load it in the back of my M3 and drop it off.
The guy has been in business over 30 years and his first impression was that the scoring on the cylinder walls was fixable with a rehone. He works much quicker than the last machine shop I used, so within a day or so he gave me the word it came out very well.
Next step was to find a new crank because the bearings on the old one were too far worn in my opinion. I didn't even bother bringing it to him to check. I didn't feel like running a crank with an oversize bearing one on journal. I had ordered a new GM crank from Texas Speed but soon got word that the GM strike made this and probably alot of other parts, unobtainium for the near future. My machine shop found a good used LS1 crank that he polished up for me for free. It had the 24x reluctor wheel which was nice, so I didn't have to pay extra to swap it.
I swung by to pickup the block and while I waited over lunch he swapped my forged piston onto the new rod. He also did that for free. Kinda cool huh? He also put new cam bearings in the block, and hot tanked it after the hone work. So I think I got off pretty lucky with the block being reusable. I picked up new piston rings, and some other small parts. I had ordered new ARP main studs, head gaskets, etc. awhile back, so I should have everything I need to move at the speed I want.
This is the front of the shop. I used to drive by this place alot when I lived closer and it was hard to miss with the funny car on the wall, and engine blocks guarding the garage door.
I got to work putting the block on the stand and cleaning it up. I filtered the mineral spirits I used for my last rebuild to wash down the block, clean oil passage, head and main bolt holes, etc. I have some parts soaking in spirits and will do some more washing and cleaning. I also have some free time this weekend so we'll see how far I get with it.
My screened porch project is currently being reviewed by the building dept so I think I'm at least a week or two before getting the go ahead to start, so maybe I can get this car done sooner than I thought.
There are a couple spots near the top of the cylinder that don't get honed very well, but are out of the swept area of the piston rings. After cleaning with mineral spirits and a brush, I had used a paper towel and some ATF to wipe them down. Then I checked for cleanliness by wiping with a Kim wipe to make sure the wipe was free of dirt. I can't assume that a hot tank was able to remove alot of that dirt, and apparently it didn't.
I removed the crank from the bag and ran a brush through the oil galleys and washed the journals. Then I blew it off with an air gun, as well the block and all the galleys, bolt holes and mating surfaces. I measured the crank journals and all came out right within spec. Stock LS1 journal diameter should be 2.558" and all were spot on.
I cleaned up the main caps and installed the main bearing shells in the block and on the caps, making sure all were clean front and back before setting into place. You don't use any oil and they should be totally dry. I laid plastigage on all the journals, threaded in the new ARP studs and laid in the caps and torqued to spec. There is no torque to yield procedure on the ARP studs, so it goes a bit quicker than the OEM style. Checked the clearances and they turned out pretty good, tighter than my last rebuild. Last time it was about .002" on all of them, this time it was between .0015 and .002" which is pretty good.
After confirming the clearances, I reinstalled the crank with lube and did the final torque
I didn't realize when I bought the ARP kit that it also came with new side bolts. Saved me some time from having to clean up the thread sealant off the old ones. Applied thread sealant and torqued those in last.
Also installed new cylinder head alignment dowels
Last edited by pj_mcgarvey; 10-16-2019 at 05:34 PM.
Nice with the M3 delivery wagon, LOL. I use my M3 convert for everything, poor BestBuy dude when he helped me load a 60" flat screen into the back, was quite funny. I have even hauled around 8' studs to keep a job moving forward. Rebuild is looking sweet, nice thorough work.
Nice with the M3 delivery wagon, LOL. I use my M3 convert for everything, poor BestBuy dude when he helped me load a 60" flat screen into the back, was quite funny. I have even hauled around 8' studs to keep a job moving forward. Rebuild is looking sweet, nice thorough work.
Thanks, an actual wagon would be kinda cool, but for now this will have to do - and it certainly did.
I was a VW hatchback guy earlier in my life, and have fit everything from xmas trees, to engines/trans, building materials, compost/soil/mulch... Ah the good old days of not having the right vehicle for the job.
I decided to disassemble and clean the lifters as they would likely have alot of contaminated oil in them. Otherwise they seemed in good shape. These are LS7 lifters I got from Texas Speed for about $100, and they don't seem to be available anymore, and I think I would be paying upwards of $200 to replace them.
These particular lifters can be disassembled by removing the clip at the top (far right) and the cap and small shim/spacer should fall out pretty easily.
Then you'll need to get out the guts of the lifter. These don't come out as easily, so what I did was use an air gun to blow into the inside of the lifter. This should force out this middle section and it can come out with some force, so keep your hand over the top of the lifter to catch it. The spring will also come out from behind this piece.
Next was a good soak and brush clean in some mineral spirits. Alot of contaminated oil came out in this process, so it can definitely trap alot of bad stuff. After cleaning, I lubed everything in fresh oil and put it back together. Last step was soaking in oil with the small hole in the side of the lifter facing up to let air out. I tried to actuate the lifter a bit to work the air out, but these have been bathing for a couple days now and should be good to install.
Next small job was to swap the cam gear. I use a double roller timing set, so I had to get the cam gear from my old crank and put it on the new crank. Not any puller will work here, I had to borrow one from my dad's collection. These are a force fit, so you can't just pry them off with a screwdriver. Use a proper puller.
The new timing set can be installed using a tool to press it on. I heated the gear up in the oven while I worked on other stuff, and slid it on super easy.
I got through installing all the pistons and rods, just need to torque the rod bolts to the proper bolt stretch, which will be tedious.
I noticed there had been a visitor in my garage since the last time I was in there. This was directly on top of the plastic sheet I have covering my top end parts.
This is why I cover stuff and why I wrap up the engine tightly when I'm not working on it
Well, v8miata forums ate my words, then ate the words again... soooo.... have a nice day. Here are some pics
Dirty oil pan
Clean oil pan
New pan gasket was installed after I found a chunk of gasket rubber in the pan, though I'm not sure where it came from. Also part of the oil pan gasket rubber was broken in one spot. Kinda weird - I didn't have any oil leaks, but glad I had the new gasket on hand. Pan went on and I turned the engine over to make sure nothing was rubbing, etc. New oil filter installed and the engine was done for the day.
I had been looking at an oil cooler for the car, but I think I'm going to hold off on adding one til I get the car running. At this point I'm still thinking the overheating was due to me screwing up the head gasket install, and I've got a fancy new radiator, so I did add some cooling. New oil cooler setup just seems a bit convoluted right now, and to do it right would be hundreds of dollars.
I will eventually want to add a fuel surge tank as well to fix my starvation issues in one particular corner, and I think that will be where I spend some money before the spring.
Starting to assemble the top end will be the next step, so hopefully I'll be getting to that this week. I have my permit to demo my old deck which I think I'll start this coming weekend, so I'll have two projects at the same time. If the weather works out I'll be demo'ing my deck. If it rains, I'll be in the garage. It's a win-win .
I have the engine assembled to the point where I can put it into the car. I fully disassembled and cleaned the rocker arms to remove any dirty oil. When I did I noticed the brash bushings in the upgraded trunion kit I bought earlier this year, had some wear. Since these are brass, and everything else is steel, I would expect to see wear here. I called CHE and they were very nice to deal with. They made they offer to pay for shipping on the bushings so they could check them and then return them. Their test units have been run without oil and they typically haven't seen any noticeable wear, but had never had one call them with issues, so they were open to gathering some real world data. My hope is that they'll see something they don't like, and send me a fresh set - so we will see. I can always drop the rocker arms in last before I start the car, so this won't really slow me down at the pace I'm going.
Here is my disassembled and cleaned pieces. It took awhile.
On a lighter note, I mentioned the demo of my deck. Turns out, an engine lift makes a handy tool for removing concrete post piers. I figured these are about 300-400 lbs. Once I had them out, I jackhammered them into chunks and tossed them into the dumpster.
I found out where the chunk of gasket came from - my valve cover gasket. I found it in the oil pan, but the oil pan gasket was fine. Not sure how this happened, and didn't notice any leaks, but it's going to get replaced.
Got a new set of damper bolts, as the old ones were rusty. Going to look into how to seal the bolt heads, maybe with some silicone. Being at the front of the engine, they see alot of water, dirt, air, etc. and I don't want another struggle to remove them.
Hope to have the engine running in my next update, so we'll see how long that is.
After contacting CHE about my rocker arm bushings, they agreed they looked a bit worn, but not beyond reusing, but they opted to send me a new full set via Fedex 2 day. I installed them, but in the process noticed that some of the C-clips were not round - they had gotten a bit stretched during removal or on the engine. I emailed my contact from CHE and they were more than happy to send me out a full set of new C-clips as well via Fedex 2 day. I don't often get the experience of dealing with vendors that really aim to please (just check my sig - lol) , so I wanted to give CHE a real shout out here. Matt Thompson was my contact, and they seemed very happy to address my issues and learn from the experience, so lots of thanks to CHE!
Got the engine running, before I got the clips and just did them on the car, which wasn't too bad. I still need to get the car back on the ground and take it for an engine break-in run. Weather has been uncooperative and my time has been limited lately, but I hope to get some miles in before the end of the year. I'm really itching to get back in the car, and regardless of the temperature outside, I'll have the top down on for that drive.
To backtrack a bit, way back before the track day that ended my summer with the car, I had bought a new starter since my starter was having a hard time turning over the engine when it was hot. The new AC-Delco starter is on the top, and is actually about 1/2" shorter than the old starter. I'll need to do some driving with it before I know if it fixed my problem, but it definitely seems to turn the engine just fine, and even sounds slightly different. We will see, and I'll report back - though I assume most are using the OEM starter. Not sure why I cheaped out on this during my build. Meh.
As I was installing the trans, things were going swimmingly. Until I realized as I was bringing the two together with the bolts, I pinched one of the clutch lines. Yeah, that was almost too easy. $45 and a few days later I had a new line from Summit and continued where I left off.
Purchased shortly after my terrible track day, was a new, more efficient radiator. This was when I thought the engine just needed more cooling. I think it was a good move anyway. My old radiator was designed for the 4 cylinder Miata, was a down-flow Mishimoto unit. This is the Flyin Miata V8 Radiator, which is a dual crossflow, has different locations for the filler on the driver's side. It has two ports on the top that are integral with the top rad mountings. So you could add steam ports or overflow ports on either side. The middle of the radiator is kept clean if you want to add a Corvette style intake that goes over the radiator.
Since my fan shroud was designed for the old radiator, the holes for the outlets are different. So I had to create new holes, and patch up the old ones.
I also needed new hoses, so I found some that matched the 1.5" diameter and with a 1.5" coupling, was able to cobble together some new connections.
Also replaced the T56 drain plug with a magnetic one to help keep the trans oil clean and monitor for any wear.
As mentioned before, with the new radiator I could reconfigure the air intake to pull air from the front of the car. It seems like this style intake is known to produce a bit more hp at speed. It might be something I experiment with in the future. Found this on ebay for $40, so I grabbed it. There are some pretty ridiculous asking prices (~$250+) for new kits that include some variation of this tube, some brackets, fancy colors and new air filter.
Next step is to break in the engine, change oil and filter, monitor for any issues, and then enjoy where possible.
I may lay off doing track days this summer, as my new outlook is to just enjoy the car, take it on some nice drives on some nice roads, and avoid the temptation to push it hard. We'll see how long that lasts, but at least that's my intention for now.
Last edited by pj_mcgarvey; 12-14-2019 at 06:43 PM.
Glad to see that you are moving forward with getting it back on the road.
Hopefully this time it will all go together correctly and work without a hitch.
I might have to check out that tiny starter that you found as I am just not happy with the current header clearance.
Glad to see that you are moving forward with getting it back on the road.
Hopefully this time it will all go together correctly and work without a hitch.
I might have to check out that tiny starter that you found as I am just not happy with the current header clearance.
Also, the old OEM connection was a spade connection/plug, but this one didn't have that, so I needed to convert it to a ring terminal connection. Minor issue.
Hi PJ,
how has the starter worked out for you?
I recently got my car on the road and am experiencing some heat soak problems with my ACDELCO #88878289 starter. The header is within 3/4� of the bearing end and, despite heat wrapping the headers, after driving the starter hesitates to turn until it cools down.
The car is hilarious to drive. Now I�m just finishing up a bunch of cosmetic details, in the interior mostly.
Thanks in advance for you answer.
Thom
While the starter works, I haven't had a chance to drive the car much at all lately and heat soak it on a hot day, which would be the real test. I would recommend some heat wrap around the starter as well, you can buy them with velcro or just make your own out of some reflective adhesive material.
Might also want to double check for loose connections as they are hard to reach and get tight.
Been quite awhile since I posted on the car, but happy to report things are back to normal, though obviously not quite so much with the world. In any case, I'm sure the car will be a great escape for me this year. Just to recap a few things, as the road to this point had a few bumps.
When I first got the engine rebuilt and back in the car, I went for a test drive. I had apparently not really checked that the coolant was completely filled. On the LS I've found it's a bit hard to get it filled to capacity, and requires a bit of patience. I had gone for a test drive around the corner, luckily not very far. The temp needle jumped within a mile and I had to pull over and shut it off. The reservoir was dry as a bone and I had no coolant with me and was a mile walk from home. I decided to let it cool for awhile, then start it up real quickly, pick up some speed and then shut if off and coast. I did this a few times to get me through a few intersections and eventually home. Lesson learned - take coolant with you or at least make sure it's at capacity.
For whatever reason, I started to detect a leak from the T56 trans. It seemed like it was coming from the driveshaft seal. It was also coming from the new magnetic drain plug I had just installed. I replaced the drain plug with the original, and started to think that I had installed the driveshaft dry which may have worn out the seal enough to create a leak. I replaced the seal and still had a leak. This lead me to think maybe the driveshaft bearing on the inside of the trans was slightly worn. Not sure why this would be the case, but I decided to investigate. On the T56 you can pull off the rear housing which contains the shifter. There is a bearing the the driveshaft rides in that is replaceable. I picked up a new bearing and dropped the housing, bearing and the driveshaft with a trans shop that I trust. I went to pick it up a few days later and talked it over with the installer. His take was that the clearance was a bit tight. He recommended using some green scotch brite pad to open up the clearance a bit. The bearing has a bronze or copper coating which is soft and can be easily removed. He didn't charge for the install, but I think decided to leave the clearanceing up to me in return
What I did was find a socket that when wrapped with some scotch brite pad would fit inside the bearing race and provide enough friction to "hone" the bearing. I turned the socket slowly in a cordless drill little by little, cleaned out the bearing with brake clean, re-oiled it and then slipped in the driveshaft to see how it fit. Once it fit tightly without sticking I called it done.
So far I think it worked and I haven't seen any leaks which would be a good test that the clearance is not too loose.
In the meantime my M3 had a stuck front caliper, which had been an issue before so I decided it needed some more work. I parked it in the garage for about a month while I I did new wheel bearings, rotors all around, a new caliper and brake pads. Took longer than it should have, but my time was limited with other stuff going on including the screened porch I started in November and just finished last week.
After getting the trans fixed, I had some persistent CELs which I quickly traced to an o2 sensor that was not tightened on the exhaust bung.
The next issue would be a slight ticking noise from the engine above 2k rpm and under load. Eventually it seemed that engine wasn't running right, idle was all over the place, wasn't making power, etc. I supposed it might be the lifters which I did take apart and clean, but I began to think I should have just replaced them in hindsight. The LS7 style lifters I had run before were no longer available for whatever reason so I picked up some from Crane Cams.
Interestingly Crane provides a full page printout of “hydraulic lifter cautions” which I could not find anywhere online, so I'll include a copy here in case it's useful to anyone. What's interesting is that the first thing they say is that issues usually attributed to "bad lifters" are not bad lifters at all. LOL, I thought... nice to tell me that now.
So the process to remove lifters requires removing the heads. So new head gaskets are in order, and removing the valvetrain, etc. Not a difficult job, but somewhat time consuming and can be done in the car. What makes it somewhat difficult on V8 Miatas is the lack of room. I had to remove the head studs before I could remove the heads because of clearance issues with the exhaust headers. One the driver's side I had really finagle around the exhaust manifold just to reach the head stud bolts. I would say I barely was able to remove them or get them back on. I also had to remove the steering rack from the subframe to disconnect the steering shaft just so I could move the exhaust manifolds away from the head enough to reach the head stud bolts. So think about that if you ever need to remove the heads. It can be done, but would probably be a hell of alot easier in a Camaro
So once everything was back together, I swear it took more coolant than I removed... but once I was confident it was full everything has ben good. No lifter noise so in my case the lifter noise was actually lifters!
I'm still dealing with a P1153 CEL which I've seen before. That may be an issue when I go to inspect the car, but in PA if you spend $150 and can't fix an emissions issue, then you get an exemption. I can see an exemption in my future, but what the hell.
Spent the last week or two chasing down an issue where the car seems like it was not running well, would misfire under power, and the fuel trims were off on the driver's side of the engine - Bank 1. In an attempt to find any exhaust leaks, I remembered that I reused my exhaust header gaskets, so replacing them was a cheap/easy attempt but that didn't do it. Also found the exhaust clamp from my header to the exhaust system wasn't covering the connection. I somehow tightened down the clamp but didn't check that it was slid over the slip joint first. While I was there I tried some exhaust sealer since these joints are right before the O2 sensor, and maybe some leakage was throwing things off.
That didn't make a difference so I also replaced spark plugs since it had been awhile and swapped injectors from Bank 1 to Bank 2, and vice versa. They looked OK when I took them out, and that didn't solve it either. I was running out of easy things to do, and considered swapping o2 sensors as well. Then I found what appeared to be a loose plug wire connected to a spark plug. I've run into this before with the MSD wires, they don't make a very positive connection and are kinda squishy when you push them on. And because you can't see very well on the spark plug with the heat protectors on the wires, it's hard to know. Something must've not been on tight, and slowly loosened itself over time. I kept my old OEM wires as they "click" on very nicely and went for a test drive and the car was running much better. So I may be on the lookout for just new oem wires, or an upgraded set of wires that are not squishy MSD. Any suggestions?
They are intended as an aerodynamic improvement to allow air that collects in the wheel well to escape, rather than cause a high pressure area. Might help with brake cooling and maybe some engine cooling as the headers are in that general area.
I think it complements the look of the hood vents, and the cowl stabilizer bar peeks out from behind. For a daily driver, I'd be concerned about removing the fender liners as it could be a place for rain, snow, dirt to collect and develop rust over time. You could just leave the liners and the vents would be just for looks, or just remove the part of the liners to let air flow through and keep the rest, but you'll still allow rain/dirt to get in behind the liners. I don't know, I'm sure it's not a big concern for me, but something to be aware of.
Last edited by pj_mcgarvey; 07-19-2020 at 10:07 AM.
Another thing I checked off the list was improving the stereo sound quality with the top down. Since I'd purchased larger door speakers, and amplifier and subwoofer, it definitely had more potential, but at speed much of the music was getting drowned out.
I had some small buzzes and rattles from the driver's side door and wanted to address that as well. Because I have 8" door speakers that have alot of range and produce some deep bass, I needed to really tighten up the door area to prevent noises from becoming an issue. I went with a cheaper alternative to DynaMat which I was very happy with.
I don't think I used half the box, but I did as much of the door as I could, doing the inner section of the body panels, both sides of the door frame where the door card attaches, without making clearancing issues for the door card, and also the door card itself. Liberal use of a heat gun and roller will help you here. The product doesn't have the smell issue people mentioned in reviews, and it's a bit thicker than the dynamat and other sound deadening I put in the exhaust tunnel and floor pan when I did the swap. Now when I close the door it makes more of a solid "thunk" like a non-convertible. If you tap on the outside of the door with your knuckle there is a big difference - less metallic ringing, no rattles. This was a good start.
The next step was to get some audio tuning expertise. I have a friend who is an audio engineer at a local concert venue. He is recently out of work due to the pandemic, so I asked if he wanted to help me out and pay him for his time. One Friday we spent a couple hours getting things worked out, and I can say the sound is much improved. It's just more balanced from highs to mids, to the lows.
attached to his Ipad with the AudioControl MobileTools app (free) to measure the sound levels. We started with some baseline settings, and then made tweaks to the gain on the amp and the head unit's EQ and I wrote down all the settings in case I lose them if I pull the battery. I picked up the same microphone for myself and plan to do the same with my M3 which I put new speakers in awhile back as well, just to make sure I'm using all of the potential.
With some of these little issues out of the way, the car is running great, so I still plan to just enjoy it this summer. Still getting check engine lights, but I'm going to just ignore those for now, and worry about them later.
That's funny, i bought the exact same stuff to
and just finished doing the floor in my car. Its a good product. I also used dei tunnel shield on the under side of the floor/tunnel.
Couple quick updates on some things. I had a rough running issue over the summer, and discovered that one of my spark plug wires was pretty heat-damaged. I run MSD wires (the ones everyone uses on LS motors) and heat protector boots since the first fire of the engine. While I've seen some discoloration of the boots, I assumed if they weren't disintegrating, then the wires were probably better off. Turns out they weren't.
Once I checked all the wires, and removed the boots, I found the internal connection was damaged so that it kinked the wire 45 degrees or so. One was cooked, and another one was getting there.
After some research, I found Taylor wires, at a reasonable price with good recommendations on ls1tech.com.
They offer a pretty good variety of different wire lengths, colors, and different applications. The wires have much more shielding and go on with a more positive *click* that I never got with the MSD wires. So far, so good. Here's a quick comparison of the OEM wires (came with the engine), MSD and the Taylor wires (second from left).
This appeared to happen at its worst on cylinder 5 where the header comes pretty close to the plug wire. I reused my heat boots and then added some protective aluminum with heat resistant fiberglas insulation stuff I had laying around. I wrapped the plug wire next to the header. So far, so good.
I've been trying to figure out how to get better visibility behind me with the single diagonal Hard Dog rollbar I have (came with the car). The diagonal attaches right where you'd look and see traffic directly behind you in the rear view mirror. I've been in search of a used dual diagonal which should give better visibility, but haven't found one yet. Let me know if you're local and would like to sell or trade for my bar. Anyway, I decided to play with a different mirror placement. I found an old convex racing mirror that I thought I'd use, and just needing to figure out how to attach it to the windshield where I wanted it.
First I used the typical mounting kit glue, but it didn't last a day. So I went all in and used two part epoxy. The new arm is super stiff so it won't sag over time, or jiggle over bumps, or with the engine's lumpy idle. Some creativity with the mounting and here we go
The placement is perfect, visibility is much better. Not an ideal solution (I'm still looking for a different rollbar) but solves the problem for now.
Lastly was another quick fix to the coolant burping out of the reservoir on those hot days. I used an empty can of injector cleaner and a small section of hose to catch the overflow.
Been having "horsepower thoughts" lately, and thinking about what it might take to squeeze some boost under the hood. I don't think I want to go with a turbo, as I had one of those on my VW, and a custom turbo kit always seemed like a bit of a time bomb to me. I focused a bit on the superchargers as I knew very little about them, but I've spent a decent amount of free time reading and researching - and it's been a fun pursuit so far. I originally thought I wanted a positive displacement blower like the E-Force from Edelbrock as it would be a pretty easy swap, likely fit under the hood, have an OEM look, and would really be fun to drive. However, I don't see many of them for sale on the used market, though there are plenty of LSA kits available. As I'd like to use the new found power on the track, my attention turned to a centrifugal kit as they are typically more efficient in terms of less heat soak, and more linear in their power delivery for traction out of corners, etc. and still fun on the street. Don't get me wrong, I think either type of blower would gobs of fun. But I think I've settled on a centrifugal charger right now.
As for which one, I had been looking at the Vortech kits such as https://vortechsuperchargers.com/pro...nt=21975316935 . But i figured for a Miata there would need to be some more customization involved to make things fit, and could be done cheaper, but this kit is my current inspiration. I think I've also settled on a Procharger as it seems there are more options to clock the head unit a bit to make it fit, they come highly recommended, and there is a good used parts market out there. Compressor housings can also rotate 360 to get the outlet where you want. A P-1SC-1 seems to be where I see myself, and there are plenty that come up for sale used under $2k to get me started. Pulleys, brackets, tensioners, etc. can be bought one-off to build a kit.
So the big question is, will it fit? If anyone out there knows of somebody, or has seen a picture, let me know. I've yet to see or hear of one swapped on an LS in a Miata. I've seen them on Ford swaps.
I've taken some measurements of the engine bay, and made my own cardboard template of a Vortech unit, since I haven't found Procharger measurements yet, but they should be about the same as the compressor housings are the biggest part.
Some obvious things that will need to change:
- Move coolant reservoir, likely to the other side of the engine bay (trivial)
- Belt tensioner is a bit bulky and may need to be replaced. My Katech tensioner will probably go and I'll see if an OEM one might work, or make up a new one out of steel using some designs I've seen already to keep the tensioner pulley as low as possible
- My horns are in the way, and moving them is trivial
- Catch can be moved
- Water pump tstat housing and hoses. This will require a straight housing and some new hoses, and I'll need to design the belt tensioners and pulleys to clear it
- Water pump heater hoses. I might reroute these between the engine and rad if needed - trivial
- Trim the frame rail a bit for extra room. Will require some cutting and welding if needed.
Here are some very rough measurements and pictures
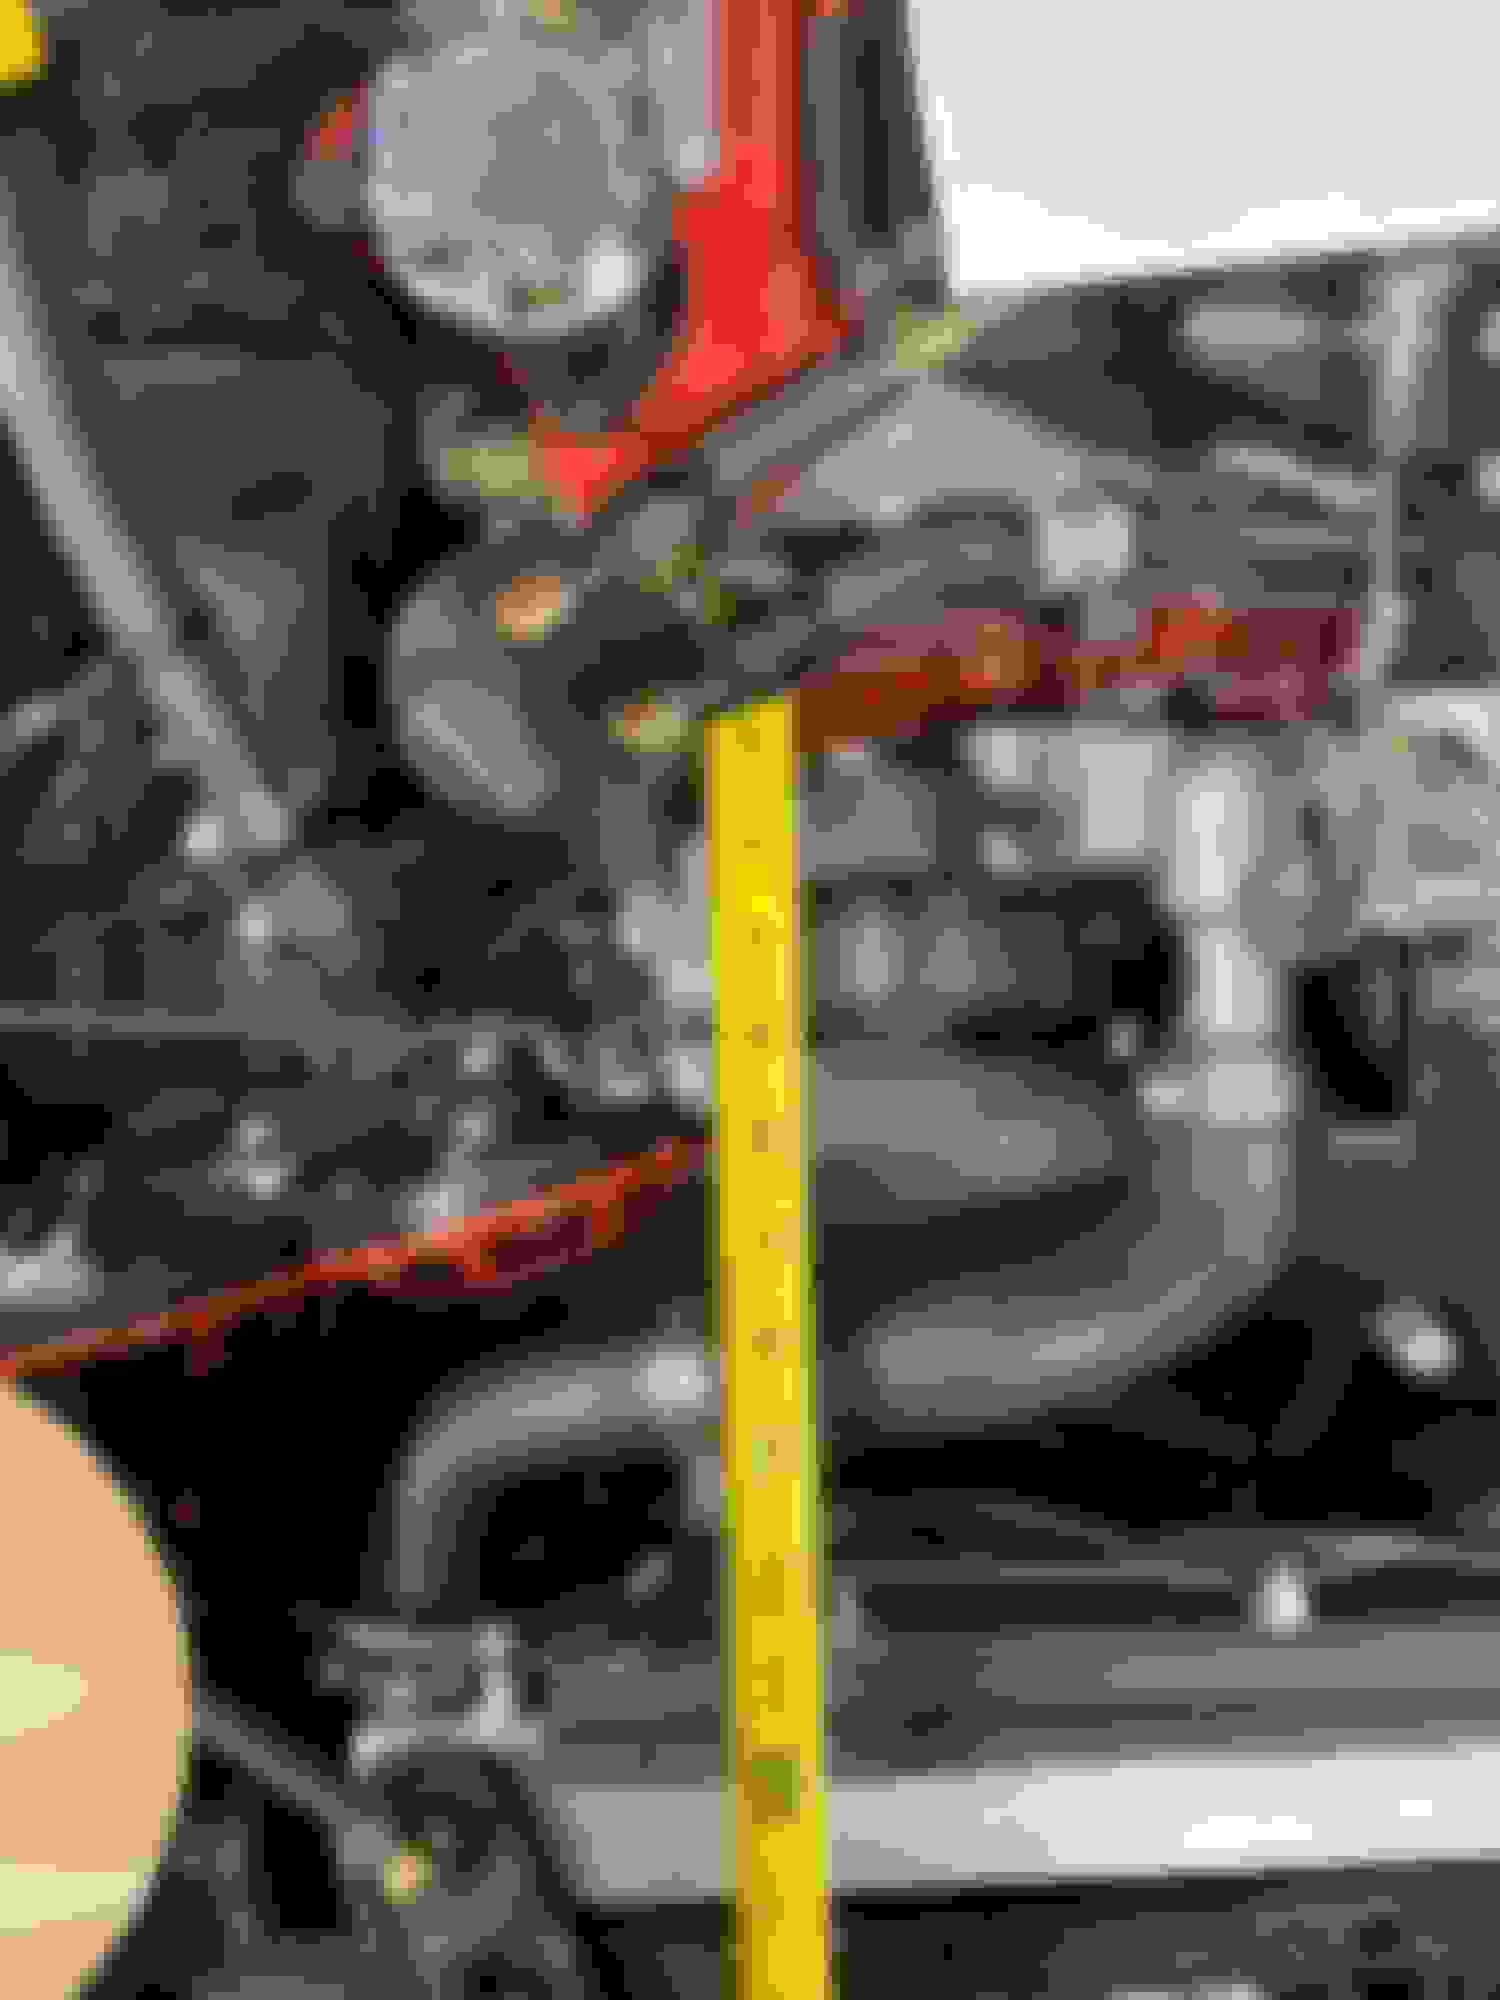
To the underside of the hood from top of the frame rail is about 9" which could barely fit a head unit. If I can clock the head unit a bit, maybe more room? Some trimming of the frame rail, or of the hood vents might give me what I need.
The front of my C5 ATI damper is about 5" from the front of the head (steel ruler is hard to see). At the most I'd need about 8" from the front of the head to widest point of the SC. In addition to a crank pulley for the SC belt (my current accessories and belt will remain untouched) I'd need up to a 2" crank pulley spacer as well. I've not found a spacer that size yet - so it's one thing I'm not sure how much flexibility I have to work with. Once I found a place for the SC to live that I can also find a spacer for, that will determine where my belt can go and I can build the brackets to make it fit.
I'll use plywood at first, and then use either a DIY bracket you can buy that has the predrilled SC mount holes ( https://shop.brutespeed.com/ATI-AB02...AB026A-005.htm ) and then cut the rest to fit and design another mounting plate that attaches to the head with standoffs to get the needed spacing for the SC. Simple right? lol
Option 1 is to place the volute (compressor housing) outlet pointed like so for an easier shot at the throttle body. Tensioner space will be important here, and the right combination of intake bends.
Option 2 is send it away from the engine and do a 180 on the intake tract back to the throttle body. This assumes no intercooler for now, but with my boost levels, I may not need it.
So this could be a long term project in my mind, I first need to do a standalone engine mgmt system like the Holley Terminator X which I've wanted to do anyway, so I can do some boost mgmt, and tuning myself with some professional tuning done to optimize it all.
Curious if anyone has thoughts on whether this could work.
Well, it's been quite awhile since I posted but I have alot of developments in progress, so I'll try to catch up a bit and continue to post as things progress.
I'm continuing with building a custom mounting system for a Procharger P1SC-1 centrifugal supercharger. With the pulley setup I have I'll be shooting for 10psi of boost, through a Treadstone air-to-air intercooler. 550whp should be attainable.
I began with some rough mockups using plywood, to make sure it would fit in the engine bay and the belt, intake routing, etc. would all actually fit. I wanted to avoid any hood modifications, which I accomplished by notching out the pass. side frame rail a bit. I've been working with a local machinist who has made some spacers for the crank pulley once, and other spacers and clearancing of my mounting plates.
Not sure where to start, but one of the first things I did was upgrade to a standalone ECU - the Holley Terminator X. I have it mounted under the glovebox in a little mounting bracket with some protection so it won't get damaged. I didn't want to lose the glove box area and keep it out of the engine bay. The engine has run pretty well on first start with the TermX. I've only scratched the surface but I found most of the Holley stuff to be pretty good - some people seem to have issues with getting everything working but if you read the directions AND follow them (lol) you will be fine.
After proving out that I could fit everything and actually make this work I started using some 1/2 aluminum plate and making the actual brackets. I had to work around the frame rail, the hood, the pass. side cylinder head and also find out how to route the belt around the water pump inlet/outlet. Working around these have presented the biggest challenge. Then it's just alot cutting, trimming, uninstalling and reinstalling the head unit, until everything started to fall together.
I made my own static (non-adjustable) accessory belt tensioner as I needed as much clearance as possible in that area for the head unit to reside. Some thick steel plate and a custom spacer made by my machinist so the pulley spacing is correct.
I first used some threaded rod as my standoffs so I could get the spacing of the supercharger pulley right so I could get working on a crank pulley spacer.
I then made some standoffs using steel pipe from the hobby metals section of HD and welded 10mmx1.5 flanged nuts on each end so the bolts could thread through the mounting plate on each side. Once I had these and the mounting plates where everything fit I was able to have the machinist create the crank pulley spacer. I gave him my ATI crank pulley and the new ATI 8-rib supercharger pulley and gave him the spacing I was looking for. He knocked it out of the park and was able to incorporate the "keys" on the front of the crank pulley and back of the supercharger pulley so the bolts aren't the only thing holding the SC pulley onto the crank pulley.
The SC was still a bit close to the frame rail and I didn't want it to make contact as the engine rocked under power. I boxed in a pretty significant section of the frame rail to allow plenty of room. This is all in front of where the control arms and sway bars mounts, so there isn't alot of structural integrity being lost in the handling, though perhaps the crash structure is a bit compromised.
At the same time as the SC mounting was being worked out I also had to find room to mount a large intercooler. The radiator was moved a bit, but I used an Evo8 intercooler from Treadstone which was priced pretty well, and allows for the top inlet which would work well with how I planned to route the SC outlet and still fit under the hood (BARELY!!). Also clears the belly pan under the engine and also between the frame rails. I removed much of the OEM front structure so more air can get in and pass through the IC and the rad. I plan to make some shrouding around the bumper inlet to get much better cooling efficiencies as I'll be asking alot more of the cooling system with the increased power and the rad being behind the IC.
Last edited by pj_mcgarvey; 07-28-2021 at 10:05 AM.
Re: the mounting system this is basically where I've left off. The tensioner is right at its maximum tensioning and I'm not comfortable with that and I think I need to add another pulley on the right side so th tensioner can do it's job better. I have more alum plate material on its way, then I'll need to remake the plate so I have a place to mount another idler pulley and then have my machinist also recess some of the SC mounting holes again so probably another 2 weeks or so. That doesn't include possibly finding another proper length belt that will work...
In the last week I've turned my attention to the fuel system. I upgrade to a Deatschworks DW300 from my DW200. I'm also adding a surge tank, fuel filter and adjustable fuel regulator and getting rid of the Corvette-style fuel filter/regulator I was running.
The DW300 came with a thicker wiring harness and previously I had a crimped butt connection from the DW200 harness to the in-tank connector. So I found that you can buy the in-tank connectors and crimp terminals so that I could have a continuous run of wire from the pump to the connector. Here are the terminal/connectors: https://www.corsa-technic.com/item.php?item_id=1232
On the surge tank, I figured it was a good idea since I've had fuel issues in one particular corner at a local race track, so this would effectively eliminate any fuel supply issues. The Racetronix tank is reasonably priced, sized, and came with a bunch of the fittings I needed. https://www.racetronix.biz/p/surge-t.../tank-st3618b?
I created a custom mount in the pass. side location between the frame rail and the body, just in front of the rear wheel. I mounted it upside down.
Large Holley fuel filter
Using Aeroquip PTFE (Teflon) line
Fuel filter goes where the carbon canister was. Alum heat shield since it's near the exhaust and rear drivetrain.
Routed the lines along the outside of the frame rail and up through the pass. side wheel well and into the engine bay while also keeping it away from the exhaust under the car and where the headers come off the engine
You might think these are too close to the tires, but they're not. There is plenty of clearance from the tire under compression or droop. I might build a shield either way to protect from heat, and possible damage from things that kick off from the road. Covered in 1/2" ID heater hose as it passes through the body and up into the engine bay since there is alot of wiring I don't want the stainless line to chafe against it.
Holley adjustable fuel regulator. With Holley fuel pressure sensor to feed into the TermX ECU.
That's it for now, I'll post more soon once I have a working belt system.


 07-28-2019, 09:38 PM