
93 Carbed 302 T5 DIY no JB Weld or Duct Tape


Thread Starter
V8 Miata Follower
Joined: Jan 2014
Posts: 151
Likes: 16
From: Greenville, NC
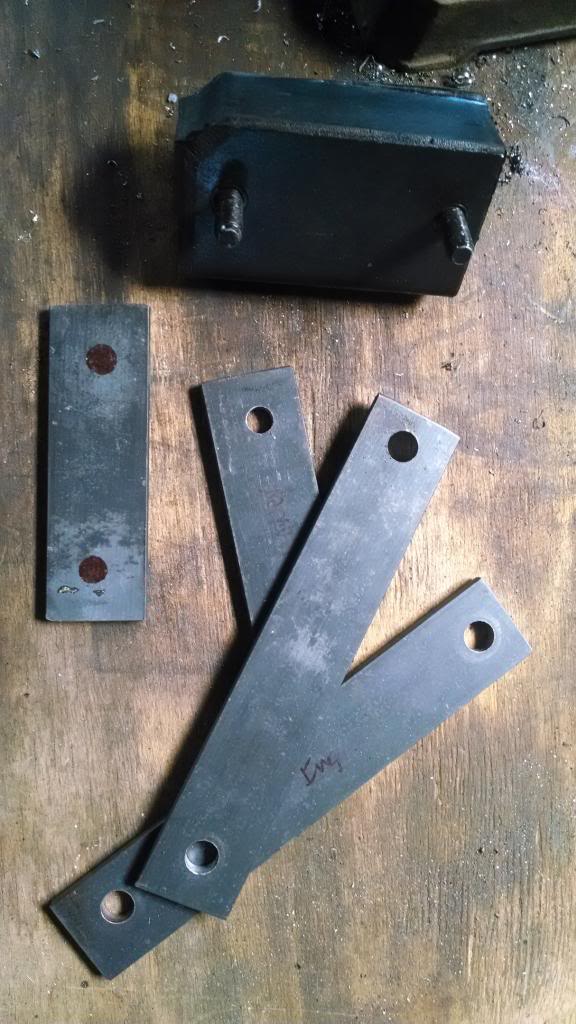
Started fabricating the motor mounts. I think they are going to work really well. Kind of proud of how well it fits up against the block. I made them adjustable so I can make some minor tweaks.
Fabricated motor mount plates:
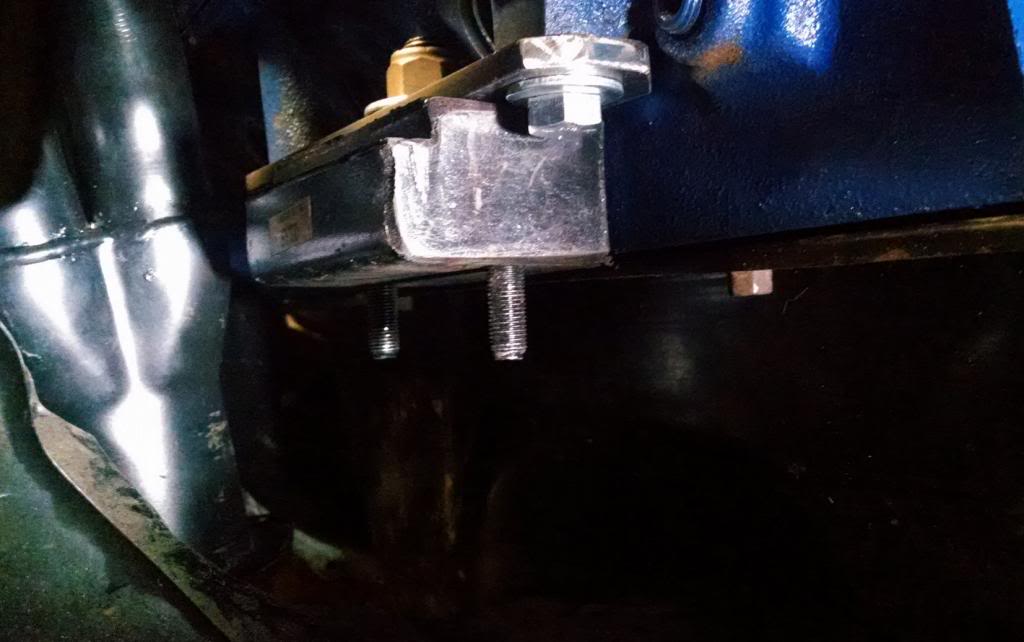
Upper motor mount plate and motor mount installed:
Fabricated motor mount plates:

Upper motor mount plate and motor mount installed:

Last edited by Jack Sprat; Mar 16, 2014 at 08:19 PM.
Thread Starter
V8 Miata Follower
Joined: Jan 2014
Posts: 151
Likes: 16
From: Greenville, NC
Took me way too much time, but the motor mounts are mostly complete. I made them adjustable so I can position the motor exactly where I want it. The subframe welds are 3 overlapping beads with very deep penetration. I may add a couple gussets on the drivers side since it will see very high tension loads when drag racing.
Cool thing is that I can soon move on to the transmission mount.
One thing that I have learned is that it takes much longer to weld from underneath the car since I have to stop frequently to make sure that I haven't caught myself on fire. LOL

Cool thing is that I can soon move on to the transmission mount.
One thing that I have learned is that it takes much longer to weld from underneath the car since I have to stop frequently to make sure that I haven't caught myself on fire. LOL
Last edited by Jack Sprat; Mar 23, 2014 at 08:59 PM.
Thread Starter
V8 Miata Follower
Joined: Jan 2014
Posts: 151
Likes: 16
From: Greenville, NC
This weekend I'll try again to get the rear hubs off so I can send them to Martin for broaching. My first attempt failed because I couldn't get the nut off, tomorrow I will win the battle if I have to put a 6' pipe on my breaker bar.
Tomorrow, I will spend (probably) most of the day in junk yards looking for a radiator that will fit. Unfortunately, I have not had time to do an research so this will be a total shot in the dark.
Tomorrow, I will spend (probably) most of the day in junk yards looking for a radiator that will fit. Unfortunately, I have not had time to do an research so this will be a total shot in the dark.
Thread Starter
V8 Miata Follower
Joined: Jan 2014
Posts: 151
Likes: 16
From: Greenville, NC
I found a radiator that has enough capacity but is too tall. It will at least fit in the car, sort of. I decided to use it anyhow and will either angle it or mount it a little higher up. Haven't decided yet. I don't want to say what it's from until I'm sure it will work.
I picked up some radiator hoses that I thought would work for $1 each. That way I can experiment, get it to work, and then put new ones on.
I picked up some radiator hoses that I thought would work for $1 each. That way I can experiment, get it to work, and then put new ones on.
Last edited by Jack Sprat; Apr 5, 2014 at 03:19 PM.

Thread Starter
V8 Miata Follower
Joined: Jan 2014
Posts: 151
Likes: 16
From: Greenville, NC
It's been a while since I have posted. I have been busy on the car. Made lower radiator supports and brackets for the bolting it in at the top. I think it is going to work just fine.
[IMG] [/IMG]
[IMG]
 [/IMG]
Last edited by Jack Sprat; Apr 27, 2014 at 04:58 PM.
Thread Starter
V8 Miata Follower
Joined: Jan 2014
Posts: 151
Likes: 16
From: Greenville, NC
Subframe boxed (primer shown) and radiator support bracket. Welds are double or triple pass to add rigidity and prevent cracks at seams. They are ugly but I don't want the front end to come apart during hard braking or cornering. I'm going to add stiffening strips and/or gussets throughout. I ended buying 3 headers and redoing some of my original work but I like it.
Radiator support uses the factory grommets to secure and eliminate shock.
[IMG]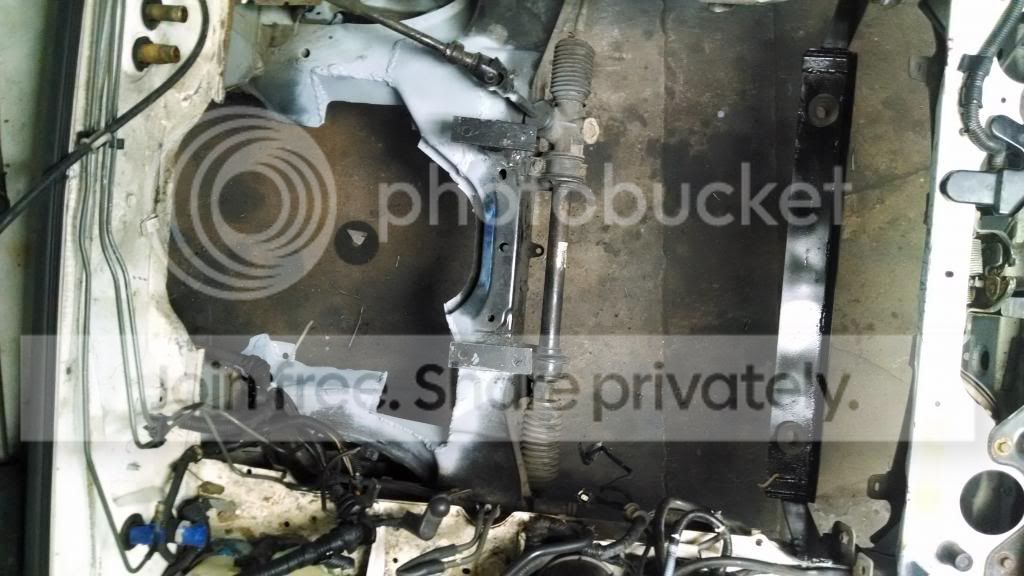 [/IMG]
Radiator support uses the factory grommets to secure and eliminate shock.
[IMG]
 [/IMG]
Thread Starter
V8 Miata Follower
Joined: Jan 2014
Posts: 151
Likes: 16
From: Greenville, NC
Decided to paint the intake before installing. After installing, I found myself in a giant rut where nothing was going right so I decided to paint the FORD emblem just because I needed some kind of (any kind of) progress to make me feel better about the project. Even that fought me because I didn't have a small paintbrush....I prevailed and that was what I needed to get me back in the game.
I installed the oil pan and didn't have to make any modifications to it. I hope this doesn't bite me later but it fits great in the car. Primed oil pump, installed carb, disty, wires etc. Got the starter wired up and working.
Couldn't wait to try it out so dumped some gas in the carb and started it. It ran great for roughly 1.5 seconds. YIPPEE!!! I'll take this as a victory. This engine has been sitting forever and has an unknown JY (ported) intake, with an Ebay carb. Whew!
Got fire, need gas! Fuel pump wiring is next. Wish me luck.
[IMG] [/IMG]
I installed the oil pan and didn't have to make any modifications to it. I hope this doesn't bite me later but it fits great in the car. Primed oil pump, installed carb, disty, wires etc. Got the starter wired up and working.
Couldn't wait to try it out so dumped some gas in the carb and started it. It ran great for roughly 1.5 seconds. YIPPEE!!! I'll take this as a victory. This engine has been sitting forever and has an unknown JY (ported) intake, with an Ebay carb. Whew!
Got fire, need gas! Fuel pump wiring is next. Wish me luck.
[IMG]
 [/IMG]
Thread Starter
V8 Miata Follower
Joined: Jan 2014
Posts: 151
Likes: 16
From: Greenville, NC
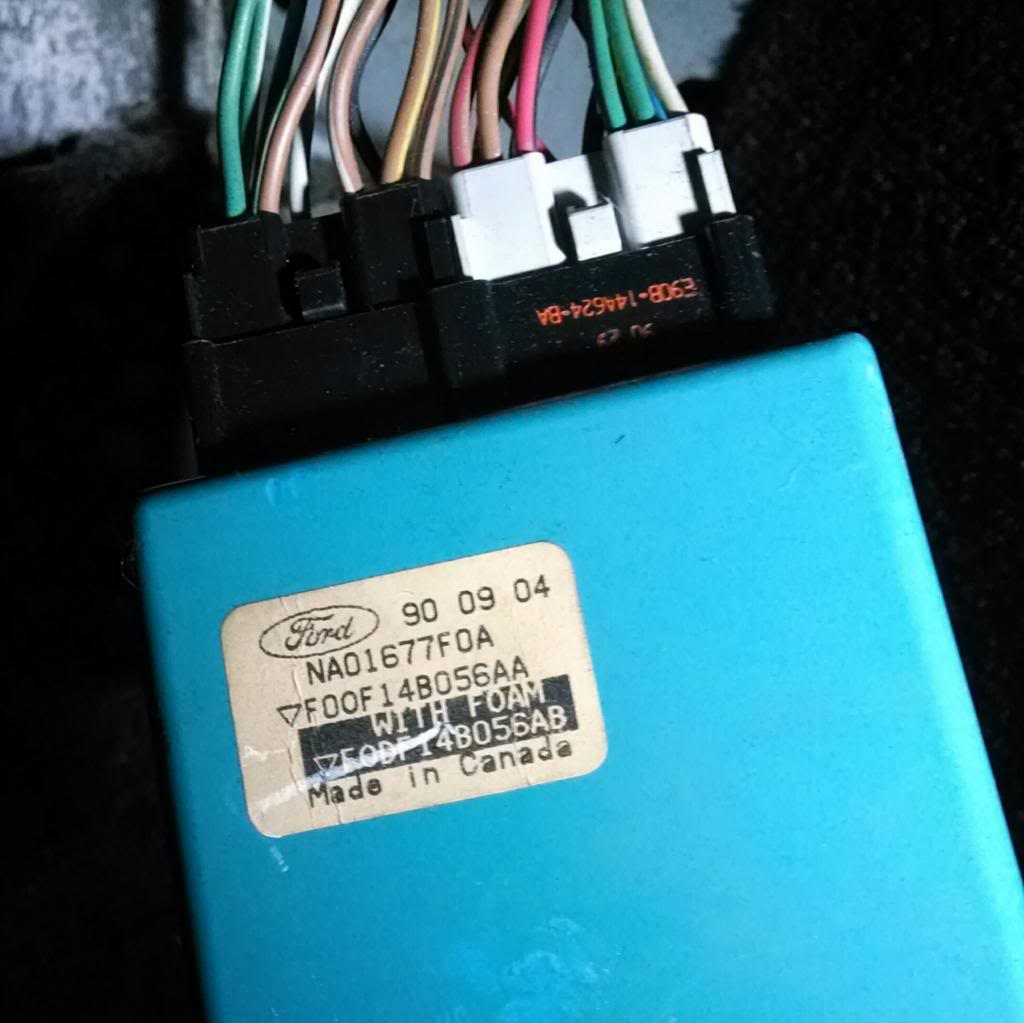
Spent a couple of hours going over the schematic. Bypassed the airflow switch wires so the fuel pump would come on. No fuel pump whirl. Traced down the relays, still no luck. Checked and there is power on the Blue Red wire, still nothing. Opened the gas cap and what do you know it has been on the whole time!!! Miata must have the worlds' quietest fuel pump.
Look what I found hiding up in the dash. I knew Ford owned 25% of Mazda but up until now, have never seen proof. LOL
Look what I found hiding up in the dash. I knew Ford owned 25% of Mazda but up until now, have never seen proof. LOL
Last edited by Jack Sprat; Apr 29, 2014 at 08:56 PM.

V8 Miata Fan
Joined: Dec 2013
Posts: 99
Likes: 0
From: Des Moines, IA
When i bought my car it came with a new fuel pump to install. I installed it and turned the key a few times to prime it, I didnt hear anything, not even the click of the relays...for the hell of it, i tried to start it, expecting nothing...it started right up. these really are some damn quiet fuel pumps.
Thread Starter
V8 Miata Follower
Joined: Jan 2014
Posts: 151
Likes: 16
From: Greenville, NC
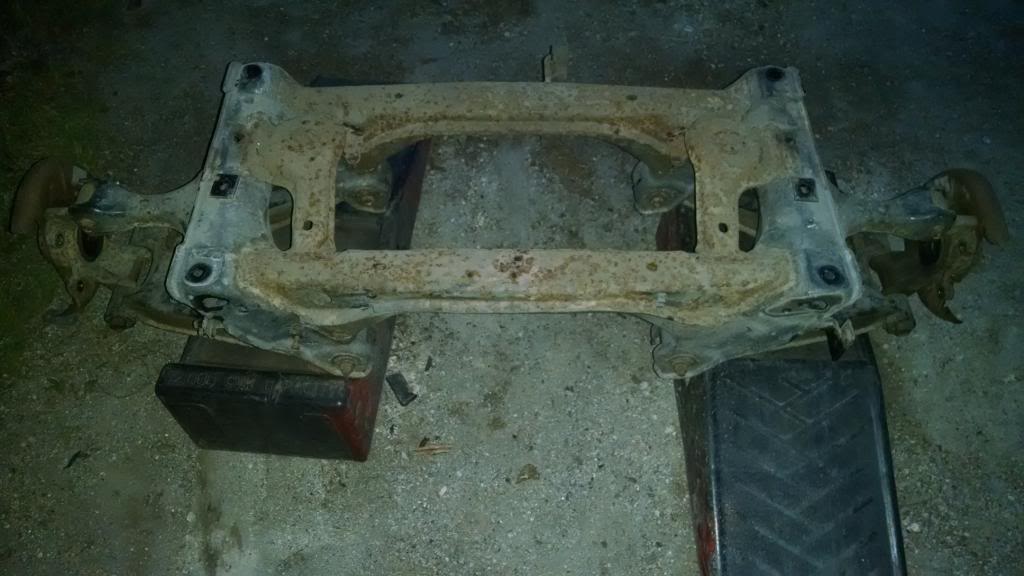
I have hit a brick wall for a couple of weeks with several small things gaining up on me to make me pretty frustrated. I decided to walk away from the things that are bugging me an make some progress. With Cody's help, I dropped the rear subframe tonight. Finally so progress and it was really easy to do. My oldest son is home from college so maybe he can get it cleaned up and painted.
I have finally satisfied two bucket list items: 1 - Drove in an autocross competion 2 - Got to ride in a race prepped Miata several times through the course. It was crazy fast, had no idea a car could go so fast around sharp turns! Sadly, I still haven't driven one yet.
I have finally satisfied two bucket list items: 1 - Drove in an autocross competion 2 - Got to ride in a race prepped Miata several times through the course. It was crazy fast, had no idea a car could go so fast around sharp turns! Sadly, I still haven't driven one yet.

Jim Stainer
Joined: Jul 2011
Posts: 2,462
Likes: 62
From: Sunny SW Minnesota
LOL I really like your bucket list! Glad you had fun and am looking forward to seeing your build on the course!
One piece at a time with 2 steps forward and 1 back is they way they all go. You'll get there just relax and enjoy the build process because it will be on the road before you know it. Believe it or not when it’s done you will wonder what could ever be so fun to work on and miss it!
Great build Jackie!!
Thread Starter
V8 Miata Follower
Joined: Jan 2014
Posts: 151
Likes: 16
From: Greenville, NC
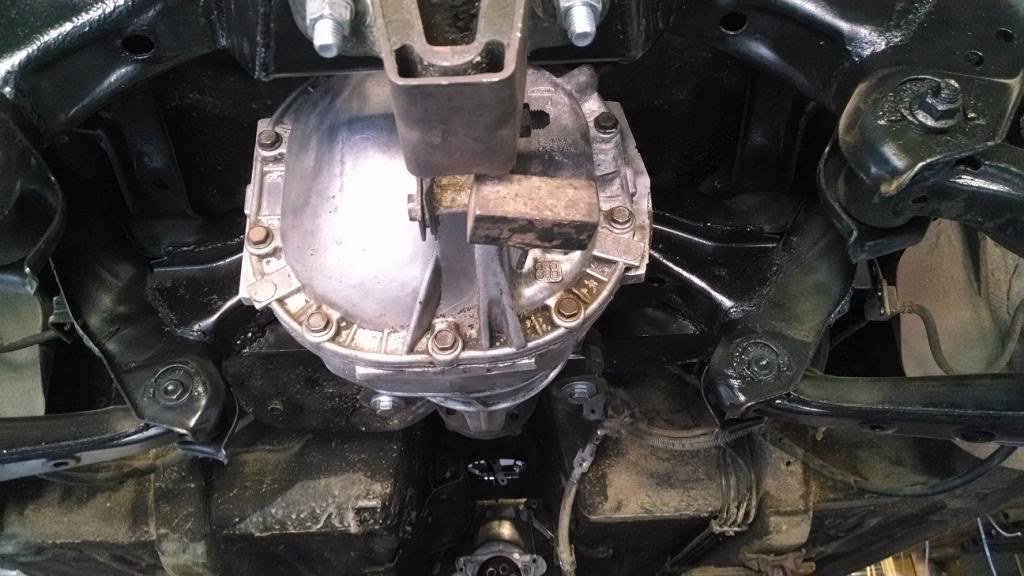
I installed the brackets that hold the 8.8 in. I do not have any measurements so I centered everything and welded the brackets in the best way they would fit and based on images that I have seen.
The problem is the front bracket is shown flush with the chassis and other have spaced it off the chassis as shown in the two pictures. When installed mine flush the rear bolt holes do not line up.
Is there some way to measure the rear differential to tell that it is in the right position and lined up correctly? Does the front bracket need spaced off as in the 2nd picture?
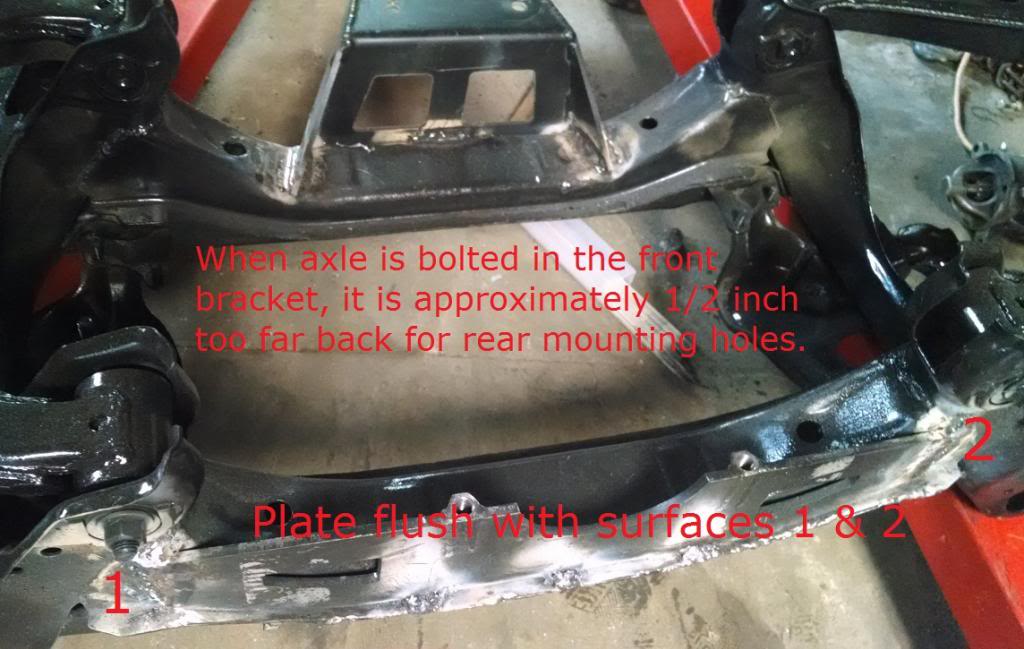
This install has the ends spaced off with two small plates. Is this necessary?
http://i324.photobucket.com/albums/k...ps0789235e.jpg
The problem is the front bracket is shown flush with the chassis and other have spaced it off the chassis as shown in the two pictures. When installed mine flush the rear bolt holes do not line up.
Is there some way to measure the rear differential to tell that it is in the right position and lined up correctly? Does the front bracket need spaced off as in the 2nd picture?
This install has the ends spaced off with two small plates. Is this necessary?
http://i324.photobucket.com/albums/k...ps0789235e.jpg
Jim Stainer
Joined: Jul 2011
Posts: 2,462
Likes: 62
From: Sunny SW Minnesota
Yes it is Jackie. When I welded mine up I welded the back then bolted the it all up to weld the front. There is a very annoying 3/8" gap between the plate and the frame rail. That's why I put in the gussets on the ends and in the center of the thing. All in all that is just a terrible mount and had I known you were going to use it I would have told you to scrap it and build a good one.
Check out the 5th photo down here Jim and Jenna build diary, Miata LS1 Conversion: The other half of the back half
Check out the 5th photo down here Jim and Jenna build diary, Miata LS1 Conversion: The other half of the back half
Thread Starter
V8 Miata Follower
Joined: Jan 2014
Posts: 151
Likes: 16
From: Greenville, NC
Thanks again Jim for your help.
Well, I was bothered by not knowing if my center differential alignment was good so I found a laser flashlight, wrapped tape around it until it fit snugly in the splined area of the hub. I rotated the hub around and watched the laser encircle the opening for the axle shaft as shown in the picture sequence. Looks good to me.
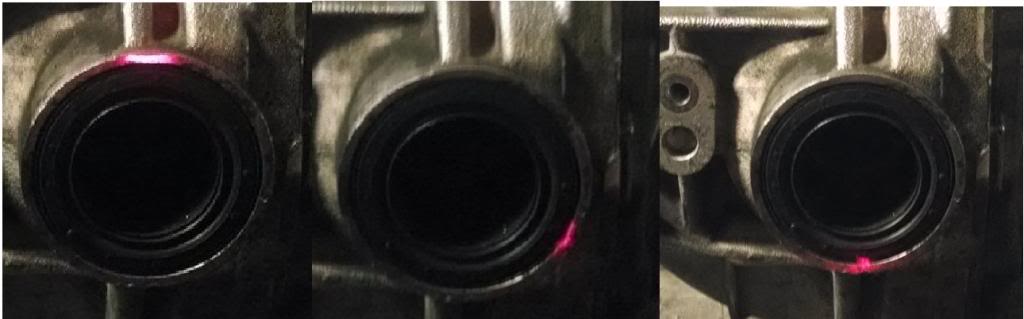
Well, I was bothered by not knowing if my center differential alignment was good so I found a laser flashlight, wrapped tape around it until it fit snugly in the splined area of the hub. I rotated the hub around and watched the laser encircle the opening for the axle shaft as shown in the picture sequence. Looks good to me.
Thread Starter
V8 Miata Follower
Joined: Jan 2014
Posts: 151
Likes: 16
From: Greenville, NC
LKQ had a 50% off sale on everything. Scored a 95 Mustang driveshaft for $9.99. Will have to have it shortened but both ends connect. Life is good!
Diff looks a little better, wire brush and drill did the trick.
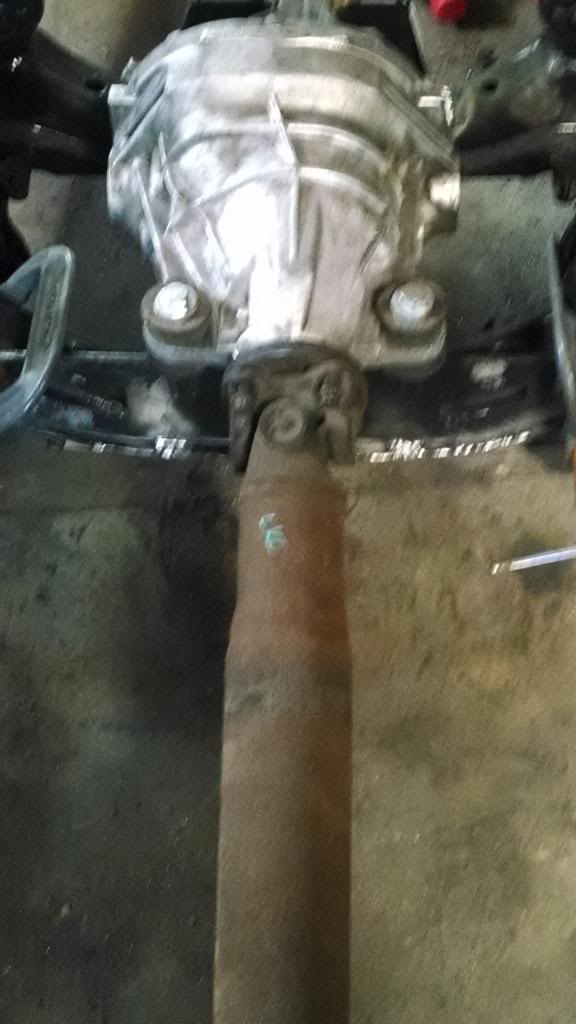
Diff looks a little better, wire brush and drill did the trick.
Thread Starter
V8 Miata Follower
Joined: Jan 2014
Posts: 151
Likes: 16
From: Greenville, NC
Getting tired of welding. Set my hair on fire last night but put it out before I made a bald spot. 
Got the subframe and diff installed. This was a Huge milestone for me. So much so, that I changed my signature from "Just Starting". Hooray and thanks for all you guys' help!
Got the subframe and diff installed. This was a Huge milestone for me. So much so, that I changed my signature from "Just Starting". Hooray and thanks for all you guys' help!

Thread Starter
V8 Miata Follower
Joined: Jan 2014
Posts: 151
Likes: 16
From: Greenville, NC
My Miata project had to take a back seat (has to be a pun there somewhere) to a car that I currently drive. Long story short, I hit a deer with my 05 Mustang GT. Since the car has 580 flywheel hp I decided it was more appropriate to do a GT-500 conversion on it instead of leaving it as a sleeper.
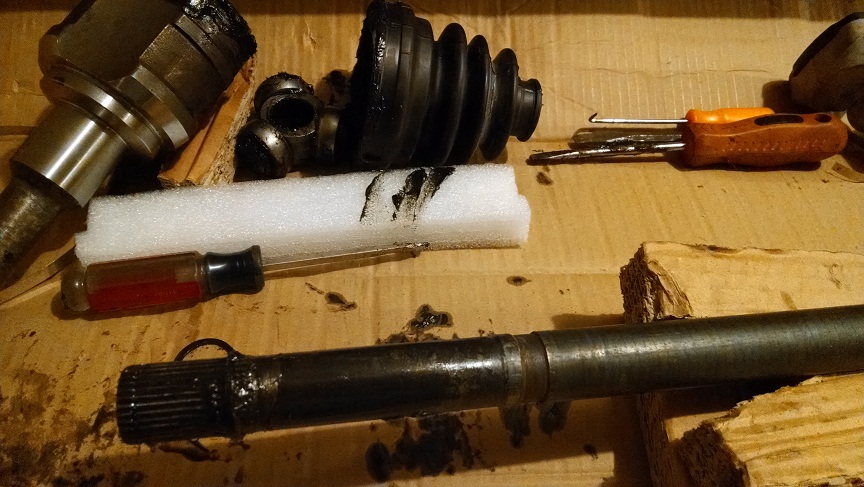
It's pretty much done now so I can get back to the Miata. I did make some progress on the Miata... Got the rear axles installed. The broached hubs and 7.5 half shaft combination appears to be a good way to go.
[IMG]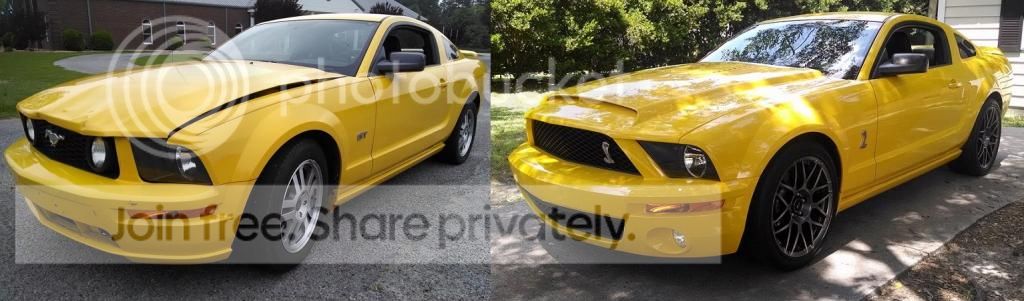 [/IMG]
It's pretty much done now so I can get back to the Miata. I did make some progress on the Miata... Got the rear axles installed. The broached hubs and 7.5 half shaft combination appears to be a good way to go.
[IMG]
 [/IMG]
Thread Starter
V8 Miata Follower
Joined: Jan 2014
Posts: 151
Likes: 16
From: Greenville, NC
No more distractions, I am back at. Got the engine pulled again and am replacing my new old school starter with a 1/2 off LKQ gear reduction starter from a 95 Mustang (v6). This will save a little weight and will be less likely to heat soak since it is smaller and further away from the header.
I would like to find some dirt cheap suspension upgrades. Is there a different model such as an RX7, MPV, Cavalier that has better anti roll bars? The ones on the car are tiny and my Challenge budget won't allow me to get the 'good stuff'.
I would like to find some dirt cheap suspension upgrades. Is there a different model such as an RX7, MPV, Cavalier that has better anti roll bars? The ones on the car are tiny and my Challenge budget won't allow me to get the 'good stuff'.
Jim Stainer
Joined: Jul 2011
Posts: 2,462
Likes: 62
From: Sunny SW Minnesota
Say what? You mean to tell me a guy that can fabricate an engine cradle can't whip up a couple of sway bars?
Just off the top of my head I'd take a look at what it would take to mount the front one in the back. It should be about the same width but I know the arms are a bit longer. If not the back one would be really easy to make because you don't have to clear turning wheels.
For the front my floor jack handle comes to mind. Have any dead jacks around? LOL well if not 4 feet of 1" round bar, a foot of 1 1/2" channel and a couple of good welds would get a new HD front one for about 10 bucks. I would think just cutting the bar at about a 15 degree angle would be enough the clear the wheels turning.
Last edited by charchri4; Aug 18, 2014 at 09:14 AM.
Thread Starter
V8 Miata Follower
Joined: Jan 2014
Posts: 151
Likes: 16
From: Greenville, NC
Thanks Jim. You have inspired me.
My Challenge budget is tough. I had some major clearance issues on the Left header where the exit is. Instead of spending money on _________ (headers, header kits, collectors, etc), I decided to hack up the extra header that I had laying around (the one that contacts the steering shaft). The good header's outlet was too short to change the angle so I did a little (major understatement) grafting.
Sorry about the brutally ugly welds, I really really need something other than a stick welder. All told, I think it is going to work great.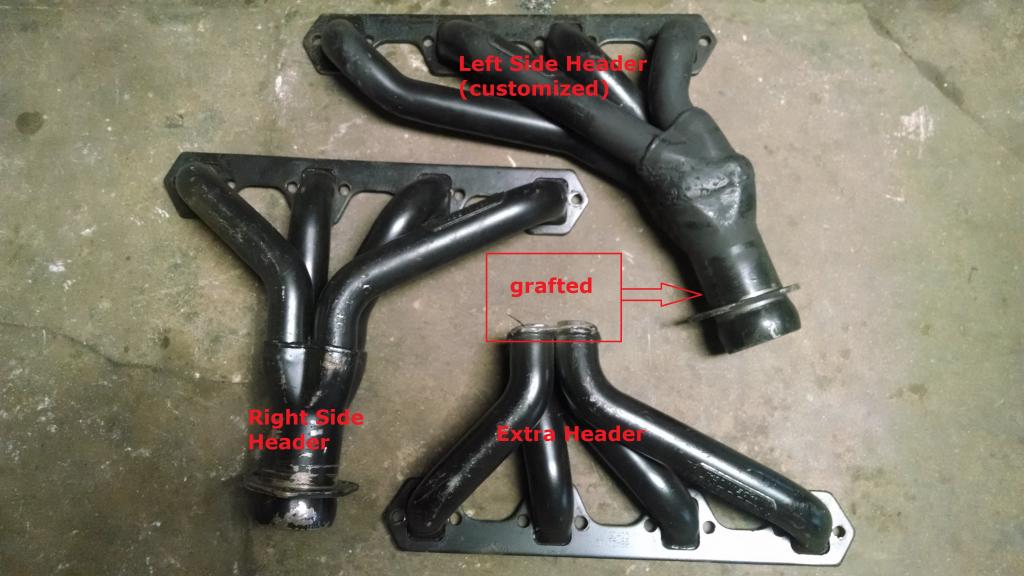


