
Fuel lines


Thread Starter
V8 Miata Noob
Joined: Nov 2013
Posts: 20
Likes: 0
Why don't people use the factory hard fuel lines? Most of the build threads I read people are using SS braided lines. I am thinking about using the factory hard lines and want to know if I am making a mistake. Thanks!
Thread Starter
V8 Miata Noob
Joined: Nov 2013
Posts: 20
Likes: 0
Not sure why it matters, but I am doing an LS1 swap. It seems everyone runs a new fuel line. The factory hard line with a Walbro255 is enough for 400whp (ask me how I know), so why run a SS braided line?

V8 Miata Enthusiast
Joined: Oct 2013
Posts: 421
Likes: 33
From: Colorado Springs, CO
A lot of cars being used for swaps are 15-20 years old. Old fuel lines can be rusty, and dirty on the inside. During the swap is a good time to change them. SS braided is a lot easier to work with than steel.
Besides, SS braided looks better.
Besides, SS braided looks better.
Thread Starter
V8 Miata Noob
Joined: Nov 2013
Posts: 20
Likes: 0
Bob,
Thanks for you input. If this were a northern car I would agree about the rust. Since it is a rust free southern car I am going to go ahead and use the factory hard line. SS to and from, but the main length will be covered by the factory line. Since it is a 95, I will actually replace the factory hard line with a factory hard line from a 99 so it has the locking ends for positive, leak free transition from hard line to SS braided line. I have several ideas that will make this build different from most, a build thread will be updated as I build. Unfortunately I will not begin until sometime this summer.
Thanks for you input. If this were a northern car I would agree about the rust. Since it is a rust free southern car I am going to go ahead and use the factory hard line. SS to and from, but the main length will be covered by the factory line. Since it is a 95, I will actually replace the factory hard line with a factory hard line from a 99 so it has the locking ends for positive, leak free transition from hard line to SS braided line. I have several ideas that will make this build different from most, a build thread will be updated as I build. Unfortunately I will not begin until sometime this summer.

V8 Miata Enthusiast
Joined: Oct 2013
Posts: 421
Likes: 33
From: Colorado Springs, CO
Bob,
Thanks for you input. If this were a northern car I would agree about the rust. Since it is a rust free southern car I am going to go ahead and use the factory hard line. SS to and from, but the main length will be covered by the factory line. Since it is a 95, I will actually replace the factory hard line with a factory hard line from a 99 so it has the locking ends for positive, leak free transition from hard line to SS braided line. I have several ideas that will make this build different from most, a build thread will be updated as I build. Unfortunately I will not begin until sometime this summer.
Thanks for you input. If this were a northern car I would agree about the rust. Since it is a rust free southern car I am going to go ahead and use the factory hard line. SS to and from, but the main length will be covered by the factory line. Since it is a 95, I will actually replace the factory hard line with a factory hard line from a 99 so it has the locking ends for positive, leak free transition from hard line to SS braided line. I have several ideas that will make this build different from most, a build thread will be updated as I build. Unfortunately I will not begin until sometime this summer.
Stock V8 GM cars use a plastic 3/8" line. 3/8" can easily handle 500HP NA or so. I would like to use that line for my build. It's relatively inexpensive, durable, easy to use, small external diameter, and - most importantly - very light weight.

Jim Stainer
Joined: Jul 2011
Posts: 2,462
Likes: 62
From: Sunny SW Minnesota
I will point out this is one of the hundreds of gotcha parts. That is all the little 20 dollar parts that you think are no big deal may as well do it while I am here, till you see the bottom line and the car says
 Gotcha!
Last edited by charchri4; Mar 21, 2014 at 05:18 PM.
V8 Miata Follower
Joined: Jan 2014
Posts: 143
Likes: 15
From: Innisfil, Ontario, Canada
has this caused an issue for anyone? has anyone used some sort of heatshield? I'm thinking the fuel is continuously flowing through those lines, it's not like the fuel sits in the line not moving while the car is on...
I suppose it could be an issue after you turn off the car and the header is still hot, then you start it back up 10 minutes later?
Jim Stainer
Joined: Jul 2011
Posts: 2,462
Likes: 62
From: Sunny SW Minnesota
I've read both Martins manual and FMs cover to cover many times and there is a lot of common sense stuff missing from both of them. View them as a guideline not as a manual and trust your judgment. It's your build not theirs!
Yes I wrapped my fuel lines and put a heat shield over them. I wrapped the headers too. Check out about half way down the page here:
Jim and Jenna build diary, Miata LS1 Conversion: Odds and ends and oops
BTW I also have a power steering cooler in the fuel return line to help with heat build up in the tank. No photos of that cuz I just did it last week...
Last edited by charchri4; Jul 9, 2014 at 12:00 PM.
V8 Miata Follower
Joined: Jan 2014
Posts: 143
Likes: 15
From: Innisfil, Ontario, Canada
Thanks Jim.
I've realised this about the manual, a huge amount of stuff missing, perhaps comon sense to someone that has done this type of work before, but not for me... Unfortunately I'm realising this now that i'm at the tail end of my project, and a bunch of this stuff should have been done before installing the engine.
anyway, i guess i'll have to do the best i can to get some sort of shielding in there.. with the engine and fuel lines already all connected..

V8 Miata Fanatic
Joined: Mar 2014
Posts: 636
Likes: 37
From: SW Ont.
Thanks Jim.
I've realised this about the manual, a huge amount of stuff missing, perhaps comon sense to someone that has done this type of work before, but not for me... Unfortunately I'm realising this now that i'm at the tail end of my project, and a bunch of this stuff should have been done before installing the engine.
anyway, i guess i'll have to do the best i can to get some sort of shielding in there.. with the engine and fuel lines already all connected..
I've realised this about the manual, a huge amount of stuff missing, perhaps comon sense to someone that has done this type of work before, but not for me... Unfortunately I'm realising this now that i'm at the tail end of my project, and a bunch of this stuff should have been done before installing the engine.
anyway, i guess i'll have to do the best i can to get some sort of shielding in there.. with the engine and fuel lines already all connected..
Hey, I'm in Ontario too...near Grand Bend.
Brad

V8 Miata Participant
Joined: Jun 2014
Posts: 262
Likes: 5
From: Moorhead, MN
Thanks for reminding me my Walbro 255lph is going to need replacement. 340 or 400lph. great. I like the Nylon braided fuel line you can snag of jegs, I ran a full set on my turbo setup, it works well, and the push connect to -an fittings work well for the stock connections.
Jim Stainer
Joined: Jul 2011
Posts: 2,462
Likes: 62
From: Sunny SW Minnesota
The Monster manual is much better than the FM one but I don't want to bad mouth either of these guys because I have a ton of respect for what they do for our community and I want to be careful here.
I think the FM manual is a very good guide for someone that has done it before and just needs to a list of steps. Like I have made pancakes a hundred times but still check the box for how much mix and milk to use. The other thing that got me in trouble is the FM manual is written to use all their components on a Corvette LS3 engine. So not only did the power steering kit not work on my LS1 but the instructions led me on a wild goose chase. The same goes with wiring, exhaust and everything else. If you use their components and just need basic guidance it's perfect.
If you are a GM first timer using a donor car by all means read the manual but also spend lots of quality time on swaptastic and the many excellent build threads around for guidance. Also I can't tell you how valuable the factory shop manuals for my donor has been. Sure 2/3rds of the Camaro books are useless but the other 1/3rd is priceless. Dito with the Miata manual and wiring diagrams.
If you are a Ford guy I'm going to say the same thing. The book is very good but should not be used as the only reference for sure. There are many excellent build threads that should be studied closely and many of the "manufactured kit" parts have been improved on in home shops.
The bottom line is even doing a ford with all monster components you have to remember the guys that wrote the book are not instructors they are fabricators that at the time they wrote the book probably did the job dozens of times. It's second hand for them and easy for them to leave things out that are obvious to them but not at all evident to a newbe. I can say with out a shadow of a doubt research and understanding is the most critical component to any successful build. I've probably spent a good 75 hours just combing through build threads looking for nuggets of wisdom and I always zero in on rework and if I would have known statements... The sites that meant the most to me are bookmarked on the side of my blog.
http://www.swaptastic.net/
http://www.mccullyracingmotors.com/i...les/builds.htm
http://forum.miata.net/vb/showthread.php?t=475835
https://www.v8miata.net/build-thread...-carolina-794/
http://miatav8.blogspot.com/
These guys are good too but hit the above first.
http://forum.miata.net/vb/showthread.php?t=353302
http://www.flyinmiata.com/projects/index.php
And if you really get board my blog is not really meant to be a technical guide but it is pretty funny most days!
http://jimsmiata.blogspot.com/
Last edited by charchri4; Jul 9, 2014 at 01:44 PM.
V8 Miata Follower
Joined: Jan 2014
Posts: 143
Likes: 15
From: Innisfil, Ontario, Canada
but to name a few things:
- clutch master pushrod was too long, creating "pump up"
- clutch slave pushrod was too long, completely de-adjusted, it still released clutch plate while installing bell housing due to this. And I did not own clutch alignment tool... had a fun lesson learning how a clutch works, and getting the clutch realigned without the tool
- main battery cable should have been run further to the top of the engine before installing everything else now there's no room to move it
- if using the air tubes behind the engine, you absolutely have to pound the firewall at the exact right spot otherwise the engine will pry right against the firewall
- very hard to find bolts where the head will still turn in the holes of the headers
-if going with 8.8, the hanger's holes are not centered... I measured by centering the holes and welded the bracket at the wrong place
- i had to put spacers on the water pump pulley otherwise it would rub against the new power steering belt
- even after doing everything i can to have the engine as low as possible, there's no way the hood will ever close, and i am using the stock intake.. i will need a custom hood
- the electrical instructions in the manual, as far as i'm concerned are wrong, or at least are inevitably misunderstood.. you have to study diagrams and figure it out yourself
- the radiator brackets have nothing from stopping the rad to move forward or backwards.. I fabricated extra pieces..
- it is next to impossible to fit the fans inside the radiator frame without A/C.. i had to cut them up quite a bit and stagger them, to finally make them fit.
-the stock miata fan relay, i am very concerned will not be strong enough to power those 2 fans...
- the shifter boot (more like rubber flap)provided with the kit is in my opinion not adequate..
- be prepared to spend ALOT of time getting that engine to sit right without rubbing
- You need a carbide bit to drill through the clutch fork, regular bit will not even scratch it
- unless buying a donor car, make sure you get all the radiator hoses, cut the alternator plugs to make sure you have them, they're not part of the harness, make sure you get the HEGO harness and it doesn't stay with the exhaust of the car, my engine came with the heater tube assembly removed so make sure you have it..
-put over 1500$ in your budget for unexpected random paint cans, cleaners, miscellaneous connectors for electrical, plumbing, nuts and bolts, random tools, random parts that you find need replacement while you're in there..
-on BOTH my axles half shafts, the retainer clip shattered inside the CV joint, so be prepared to completely disassemble the CV joint, clean it all up, and repack it with CV grease before getting into this. Another lesson for me on how CV joints work!
-the manual says to cut a coil off the old front spring, for the back, so I did� after doing this, the spring no longer stayed in the cup.. Would just slip off... Welded a little tab to act as a stopper...
-The miata Windshield washer fluid tank that you�re supposed to reuse ends up right in front of the throttle body� I melted it with a torch and pushed in the corner for the time being so my intake tubes can barely pass� until I spend money for a smaller tank
-and of course! The fuel lines are too close to the headers!!
That�s most of what I can think of at the top of my head� there�s a whole lot more that I can�t think of� but I will take the time to elaborate this much better once I�m done on Jason�s �General Swap Info-Fords� sticky.
Jim Stainer
Joined: Jul 2011
Posts: 2,462
Likes: 62
From: Sunny SW Minnesota
Damn right that needs a sticky ^^! Well done!
When you are ready PM me what you want to say and I'll put it in the blank posts at the top of the Ford info thread for you. And on behalf of all the future Ford builds THANK YOU!
When you are ready PM me what you want to say and I'll put it in the blank posts at the top of the Ford info thread for you. And on behalf of all the future Ford builds THANK YOU!
Last edited by charchri4; Jul 9, 2014 at 02:04 PM.
V8 Miata Follower
Joined: Jan 2014
Posts: 143
Likes: 15
From: Innisfil, Ontario, Canada
LOL! for sure Jim - also, I have videotaped the entire build and will edit a series of videos.. Will have about 1 hour total of video to watch.. Very helpful for someone thinking of getting into the project..
I wanted to add, even with the few things left out, if not of the monster v8 kit, I would not have managed this build. I was very satisfied with most of the components. However, I do find that a lot, could definitely have added info in the instructions, and would really help amateurs like me...
For example, I paid an extra almost 400$ for the power steering kit, which is worth it IMO, but it comes with 0 instructions... even a small sheet with a few pictures would have been nice. ALSO, pictures for each part in the part list.. it took a while before I knew what every part was…
So to sum it up – as Jim said earlier, use the manual as a guide rather than a manual. Think of the kit as saving you a whole lot of fabrication and design, not necessarily a fool proof step by step way into a v8 miata. The project will still be a challenge, and a testament to your ability to build something!

Administrator
Joined: Nov 2009
Posts: 1,120
Likes: 38
From: Allentown, PA
Everything else was right on the head. Don't cut the springs if you're using them. Better yet get an upgraded suspension.
-Jason
V8 Miata Follower
Joined: Jan 2014
Posts: 143
Likes: 15
From: Innisfil, Ontario, Canada
Jason - thank you, that information is GOLD for anyone doing a ford swap, specially the engine height. The manual does "suggest" you get the intake milled, but in reality, unless you're using a custom hood, you pretty much have to...
For the fans, it's too late, i already mounted them through the core using those nylon strips you can buy for it.. i'll keep an eye on it, if they look like they're eating through the core, i will re-fab something.
the boot, I may try that, i managed to create a make shift a boot, since i am using an after market shifter!
I'm in the process of modifying my fuel lines now, i will post pictures for this thread once i complete.
V8 Miata Follower
Joined: Jan 2014
Posts: 143
Likes: 15
From: Innisfil, Ontario, Canada
no lol - I still have the alternator and starter to wire which is no big deal, reroute fuel lines and brake lines, then fill all fluids and give her a go! - I thought i was almost there a week ago, when i decided to put the hood back on to make sure it would close before going to add coolant and things, in case it needed modification...
since then i rerouted the coolant return hoses to the rad, i shortened the thermostat housing so that the fill neck can sit lower, i lowered the tentioner pulley and modified a few things on the intake.. then realized after reading this thread i have to do something about these fuel lines sitting an inch away from the header..
since then i rerouted the coolant return hoses to the rad, i shortened the thermostat housing so that the fill neck can sit lower, i lowered the tentioner pulley and modified a few things on the intake.. then realized after reading this thread i have to do something about these fuel lines sitting an inch away from the header..
V8 Miata Follower
Joined: Jan 2014
Posts: 143
Likes: 15
From: Innisfil, Ontario, Canada
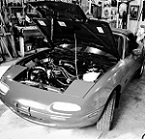
As promissed - here is how I rerouted my fuel lines - this is by far, not the prettiest ways to do it, but with the project already runing way over budjet I couldn't spend on stainless and AN connections... i bought some plain old metal line and a few peices of fuel injection hose.. all for about 20$ i was able to reroute the lines in a safe manner.
perhaps in the future i may upgrade to stainless for the bling factor..
I cut the original lines under the car, connected new ones which turn and head into the tunnel, once in the tunnel they turn and head towards the engine, i drill a few holes in the sheet metal left from the corners that we all cut out on the firewall, and go straight up into the engine bay... I created a few heatshields here and there for extra precaution.
In the engine bay:


under the car where they connect, and route under the small heat shield i made, this is the closest they ever get to any exhaust part, exhaust pipe is never as hot as the headers either!


with heat shield removed
here we see how they're routed inside the tunnel to stay away from that corner where the exhaust pipe comes under the car from the wheel well

perhaps in the future i may upgrade to stainless for the bling factor..
I cut the original lines under the car, connected new ones which turn and head into the tunnel, once in the tunnel they turn and head towards the engine, i drill a few holes in the sheet metal left from the corners that we all cut out on the firewall, and go straight up into the engine bay... I created a few heatshields here and there for extra precaution.
In the engine bay:
under the car where they connect, and route under the small heat shield i made, this is the closest they ever get to any exhaust part, exhaust pipe is never as hot as the headers either!
with heat shield removed
here we see how they're routed inside the tunnel to stay away from that corner where the exhaust pipe comes under the car from the wheel well
V8 Miata Follower
Joined: Jan 2014
Posts: 143
Likes: 15
From: Innisfil, Ontario, Canada
another point i missed, is i flaired all the ends of these metal fuel lines with a brake flaring tool, so the presurized hoses wouldn't pop off..
again, not as pretty as stainless, but for the time being i need to finish this project and i'm soo over budjet!! :S
again, not as pretty as stainless, but for the time being i need to finish this project and i'm soo over budjet!! :S
Administrator
Joined: Nov 2009
Posts: 1,120
Likes: 38
From: Allentown, PA
I used my stock hard lines but used PTFE-lined stainless braided to get from them to the fuel rails. I've read that the best thing to use s solid line. While stainless braided is strong, its still a hose, not a pipe. Pipes are stronger than hoses which is why the factory used them everywhere where flexing was not a concern.
A Ford build will most likely use a bleed-off return system with two lines as the original Mazda system did. Since fuel is always flowing heat is less of an issue than it would be in a GM system which I believe has the regulator back in the tank. I could see rerouting the lines in a GM build for this reason. In a Ford build as long as you are smart with the heat management and bend the lines back as far as you can in the corner of the bay away from the header you should be fine. I have the lines themselves wrapped in heat shield tape and the headers wrapped and then painted to keep them from rusting. I do get heat build up in the tank but its actually from the fuel heat soaking in the aftermarket aluminum fuel rails. The aftermarket rails were only used so that I could get away from using the Ford push-lock fuel connectors in favor of actual AN fittings (-6AN PTFE).
-Jason
V8 Miata Follower
Joined: Jan 2014
Posts: 143
Likes: 15
From: Innisfil, Ontario, Canada
I used my stock hard lines but used PTFE-lined stainless braided to get from them to the fuel rails. I've read that the best thing to use s solid line. While stainless braided is strong, its still a hose, not a pipe. Pipes are stronger than hoses which is why the factory used them everywhere where flexing was not a concern.
A Ford build will most likely use a bleed-off return system with two lines as the original Mazda system did. Since fuel is always flowing heat is less of an issue than it would be in a GM system which I believe has the regulator back in the tank. I could see rerouting the lines in a GM build for this reason. In a Ford build as long as you are smart with the heat management and bend the lines back as far as you can in the corner of the bay away from the header you should be fine. I have the lines themselves wrapped in heat shield tape and the headers wrapped and then painted to keep them from rusting. I do get heat build up in the tank but its actually from the fuel heat soaking in the aftermarket aluminum fuel rails. The aftermarket rails were only used so that I could get away from using the Ford push-lock fuel connectors in favor of actual AN fittings (-6AN PTFE).
-Jason
A Ford build will most likely use a bleed-off return system with two lines as the original Mazda system did. Since fuel is always flowing heat is less of an issue than it would be in a GM system which I believe has the regulator back in the tank. I could see rerouting the lines in a GM build for this reason. In a Ford build as long as you are smart with the heat management and bend the lines back as far as you can in the corner of the bay away from the header you should be fine. I have the lines themselves wrapped in heat shield tape and the headers wrapped and then painted to keep them from rusting. I do get heat build up in the tank but its actually from the fuel heat soaking in the aftermarket aluminum fuel rails. The aftermarket rails were only used so that I could get away from using the Ford push-lock fuel connectors in favor of actual AN fittings (-6AN PTFE).
-Jason
If anyone here knows if using the stock lines will work with some heat shield it's probably you after doing so many builds...
But when i did the modification to the firewall corners, I didn't know any better and pulled the lines as far away as possible for safety reasons since i was welding and grinding there.. due to this, they did not sit tight onto the wall anymore...
perhaps i could have re-bent-maneuvered them to sit tight again before the engine was installed, but again.. didn't know any better at the time!
so a bunch of spots they were literally passing 3/4 inch from the headers, and i knew that no matter what i did, i would be paranoid for the rest of this car's life if i didn't reroute them. so i did... and i feel good about it in this case... so... it's all about what makes you happy


Thread
Thread Starter
Forum
Replies
Last Post
rey
Ford V8 Discussion
13
Jun 24, 2014 01:54 PM
Currently Active Users Viewing This Thread: 1 (0 members and 1 guests)


