V8R sloooww build - 94 Miata - North Carolina


Thread Starter
V8 Miata Fanatic

Joined: Oct 2012
Posts: 550
Likes: 34
From: Fuquay Varina, NC
Just had to share a few pics after picking up my ceramic coated FM st/steel headers from Carolina Ceramic Coatings. This is a "titanium" exterior color - not that the color matters greatly since the Miata/ LS headers are fairly hard to see much further below the first bend as they exit the heads... But I'm mostly concerned about heat under the hood. This local outfit has a quick illustration page that shows how the ceramic coatings affect radiant heat at 1" above a hot exhaust pipe - pretty interesting quick read: Ceramic Heat Test, Carolina Ceramic Coating, Raleigh, NC
$200 seems very fair for the work performed to prep the headers and coat the inside and outside with 2 different materials.
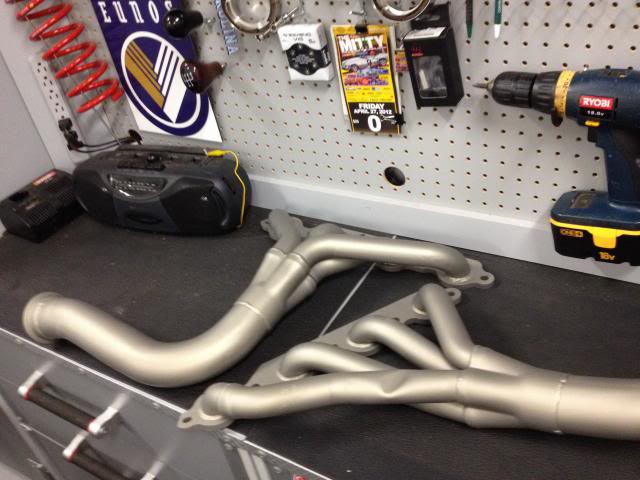
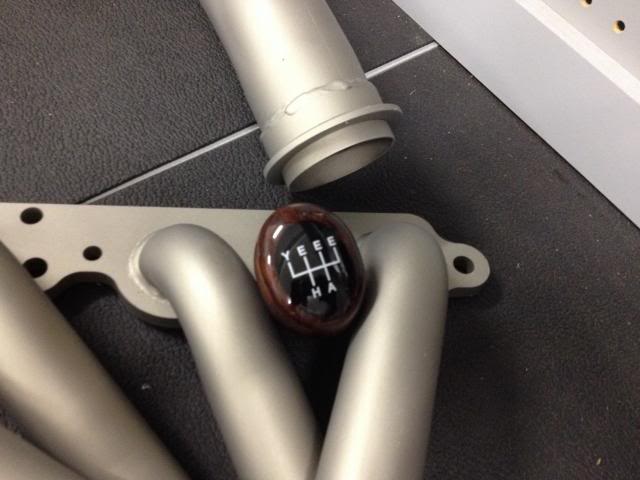
The flanges added to the headers and the YEEEHA shift **** are not Flyin Miata items.
$200 seems very fair for the work performed to prep the headers and coat the inside and outside with 2 different materials.
The flanges added to the headers and the YEEEHA shift **** are not Flyin Miata items.

V8 Miata Fan
Joined: Apr 2013
Posts: 31
Likes: 0
From: I hear Banjos - GA
OK... Not 100% certain that I've given myself enough room to plumb in the filter/ regulator below, but I've used every little inch of tubing that FM supplied me. I wish they didn't play it so close, but it's all on at the top. Decided to label the tank ports with supply & return while it was out - ya never know when that would come in handy I guess... Venting the tank is another strategy that I felt like I'm on my own to a large degree - I THINK the 2 valves in this fancy, shmancy tank vent piping are 1. Roll-over protection valve, and 2. One-way check valve. I'm not sure, so I'm going to use the 23.8879" length of 1/4" FM hose to tie into my just-ordered Land Rover charcoal canister from eBay. No purge valve - just a darn vent that, I guess, goes to the atmosphere any and all times of the day. My bud, Big T, (Tad), said he kept his simple on his FFR Cobra with its tiny 4.6L Cobra power plant...
Thread Starter
V8 Miata Fanatic
Joined: Oct 2012
Posts: 550
Likes: 34
From: Fuquay Varina, NC
SB5700 - For whatever reason, I cannot link this page on the iPad, but search eBay for this: Land Rover Discovery 2003 2004 Charcoal Air Filter SAI PHB102320 w/Hose This is the same canister that I have purchased, but not installed as of yet. It's approx 5" tall and 4" diameter - kinda small. Mine did not come with the hose as shown. I'm not an authority on the Mazda tank venting system... I left what I think are check valve and roll-over protection valves on top of the tank and was just going to plumb this in to see what happens... Wish I could be of more help.
Thread Starter
V8 Miata Fanatic
Joined: Oct 2012
Posts: 550
Likes: 34
From: Fuquay Varina, NC
Brief update - only had a few hours this wknd to play... What a shame too, because this really is the fun part putting it slowly back together. Oh well, save some fun for later I guess.
I raised the Mazda back up on jackstands so I could install brake lines. Took my time to get them adjusted, moved around, and flush as possible along the firewall and down the RH rear corner of the engine compartment. At the same time, I went ahead and installed the master cylinder and the Wilwood proportioning valve.
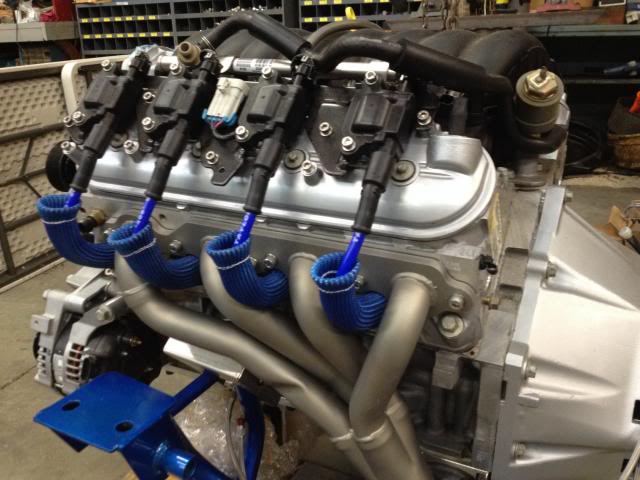
But before heading home tonite, there was enough time to install new NGK plugs, Taylor 409 wires, and torque down the headers. Just need oil filter, serpentine belt, and re-plumb the oil pressure sensor & sending unit...
I raised the Mazda back up on jackstands so I could install brake lines. Took my time to get them adjusted, moved around, and flush as possible along the firewall and down the RH rear corner of the engine compartment. At the same time, I went ahead and installed the master cylinder and the Wilwood proportioning valve.
But before heading home tonite, there was enough time to install new NGK plugs, Taylor 409 wires, and torque down the headers. Just need oil filter, serpentine belt, and re-plumb the oil pressure sensor & sending unit...
Thread Starter
V8 Miata Fanatic
Joined: Oct 2012
Posts: 550
Likes: 34
From: Fuquay Varina, NC
Time for belated update. And not that too terribly much has happened on the build lately - but every small step is hopefully in the right direction...
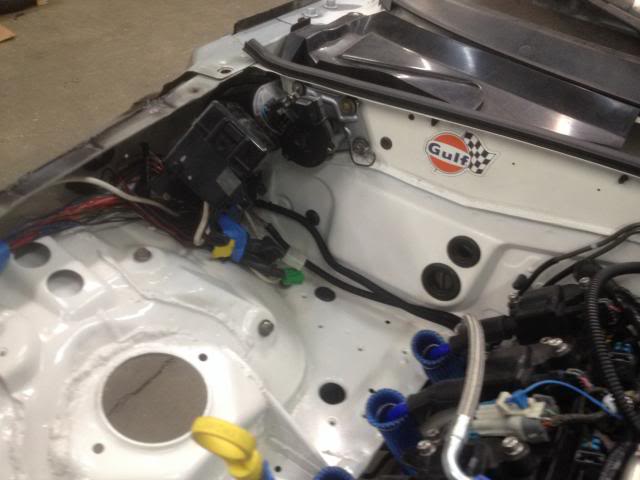
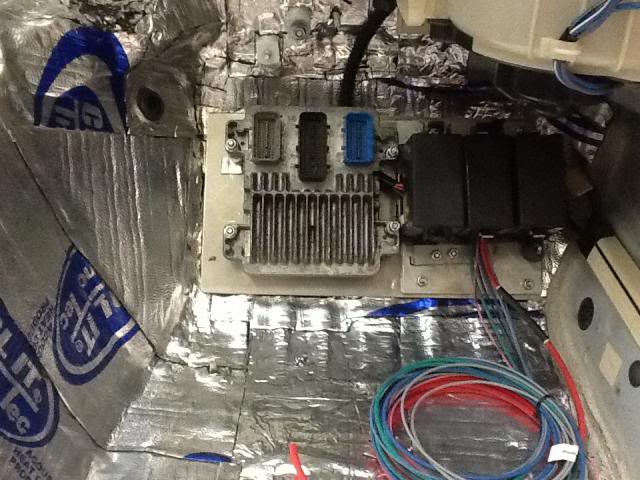
I secured the GM PCM and stand-alone fuse box on an aluminum sheet that's screwed into the false floor/ toe-board. I used some 1/2 phenolic spacers with rubber washers to give the PCM some breathing room while the fuse box is on a raised 1/8" alum plate (to compensate for the screw head underneath it). I'll fab up another false floor to keep little toes and big shoes off the electrical goods when I know it runs. Fuse Box may be slid up some more in the future if I can make room for it.
2" hole cut in firewall behind intake manifold towards the LH head and harness pulled through - after I drilled 6 small holes around the 2" hole for the Seals-It two-piece grommet. I then watched a YouTube video on how to pop in the 6 nutserts after I found a 15 yr-old complete kit in the shop that had never been opened! These are pretty neat - would have probably found more uses for it up to now had I known.
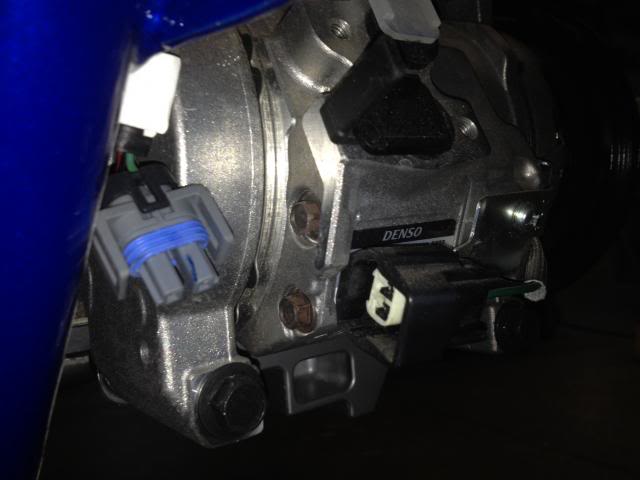
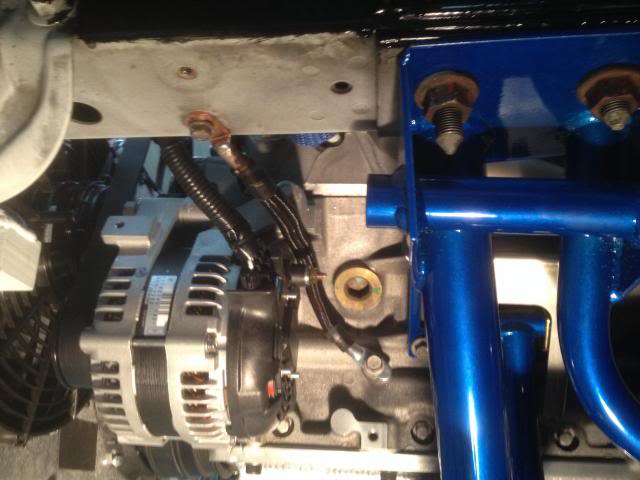
Good time yesterday when my Dad and I (HOPEFULLY) slid the 6.0L and the T56 into its resting place. We bolted the V8R subframe and transmission X member in quickly as all the holes lined up beautifully. Thanks V8R!!! After that, I gently tugged on the harness and hooked up most of the engine & tranny connectors and grounds with a few exceptions... I SHOULD have remembered to tell BP Automotive that I am using CTS-V accessories - not GTO. But, I was unaware that GM would use different connectors on similar V8 cars from the same year... No biggie - I'll get new pigtails and splice in the A/C comp and alternator.
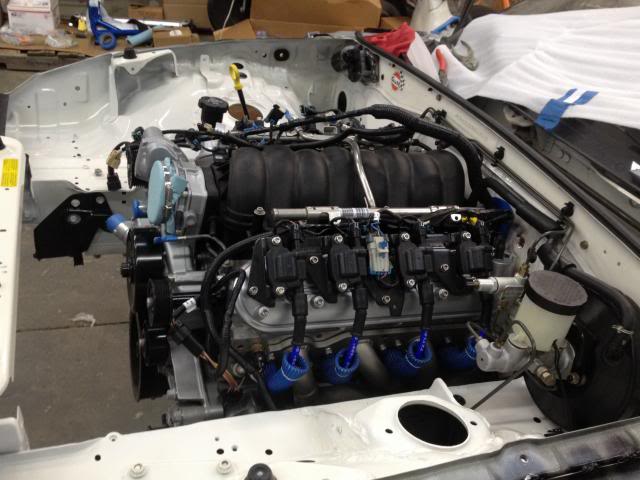
Here's an example with the A/C...
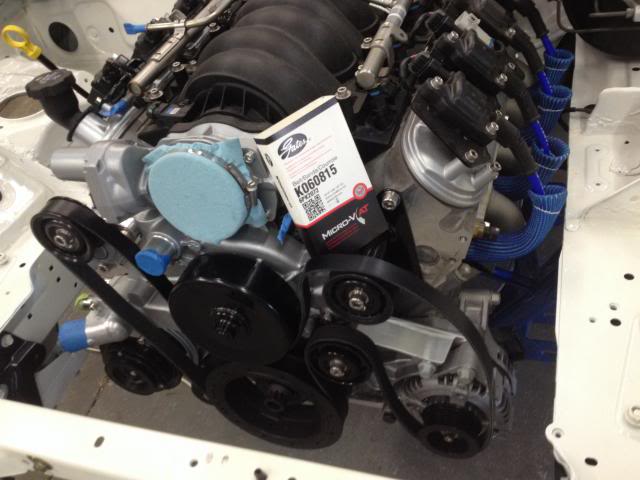
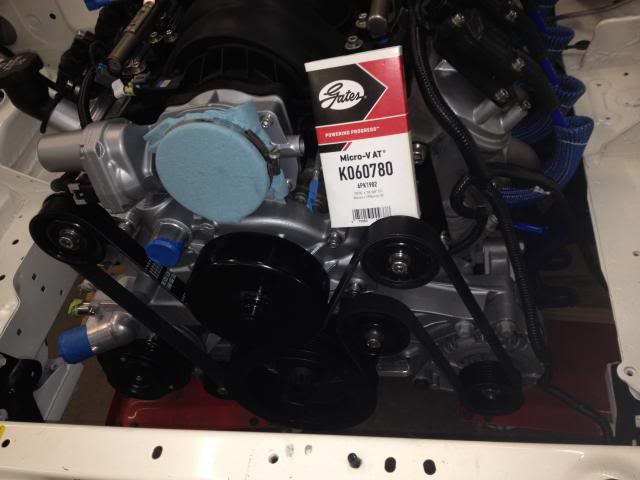
By the way... I learned the hard way that the standard 2006 CTS-V accy belt is too long with the V8R P/S delete pulley. It should have been obvious to me that this smaller diameter pulley would require shorter belt. 2 min Google search found that others use a Gates 78" belt with great success. This one is about 82" long. No biggie - just swap it at O'Reiley's.
I secured the GM PCM and stand-alone fuse box on an aluminum sheet that's screwed into the false floor/ toe-board. I used some 1/2 phenolic spacers with rubber washers to give the PCM some breathing room while the fuse box is on a raised 1/8" alum plate (to compensate for the screw head underneath it). I'll fab up another false floor to keep little toes and big shoes off the electrical goods when I know it runs. Fuse Box may be slid up some more in the future if I can make room for it.
2" hole cut in firewall behind intake manifold towards the LH head and harness pulled through - after I drilled 6 small holes around the 2" hole for the Seals-It two-piece grommet. I then watched a YouTube video on how to pop in the 6 nutserts after I found a 15 yr-old complete kit in the shop that had never been opened! These are pretty neat - would have probably found more uses for it up to now had I known.
Good time yesterday when my Dad and I (HOPEFULLY) slid the 6.0L and the T56 into its resting place. We bolted the V8R subframe and transmission X member in quickly as all the holes lined up beautifully. Thanks V8R!!! After that, I gently tugged on the harness and hooked up most of the engine & tranny connectors and grounds with a few exceptions... I SHOULD have remembered to tell BP Automotive that I am using CTS-V accessories - not GTO. But, I was unaware that GM would use different connectors on similar V8 cars from the same year... No biggie - I'll get new pigtails and splice in the A/C comp and alternator.
Here's an example with the A/C...
By the way... I learned the hard way that the standard 2006 CTS-V accy belt is too long with the V8R P/S delete pulley. It should have been obvious to me that this smaller diameter pulley would require shorter belt. 2 min Google search found that others use a Gates 78" belt with great success. This one is about 82" long. No biggie - just swap it at O'Reiley's.
Thread Starter
V8 Miata Fanatic
Joined: Oct 2012
Posts: 550
Likes: 34
From: Fuquay Varina, NC
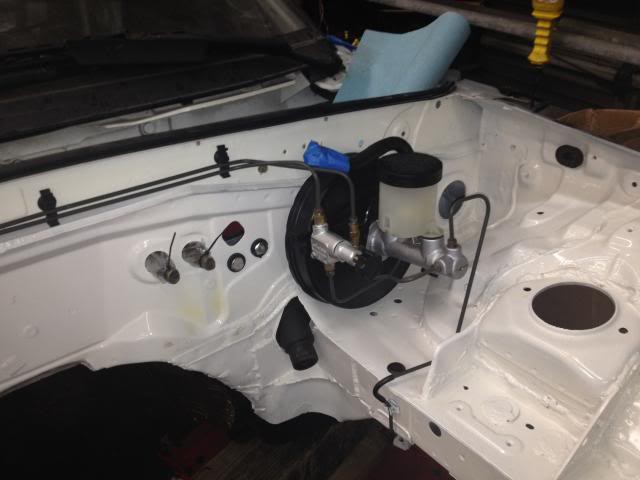
Clutch master cylinder installation today with no helpful hints from V8R or FM - at least my searches came up pretty sparse... Used Wilwood's advice and heated up the plastic reservoir before sliding it onto the alum body. I guess that expands the plastic and prevents you from cracking the thing if you tried to slide it into place cold. Anywho, I next dismantled the clip and plunger rod along with the 2 switches on the clutch assy. The small one was to de-activate the cruise control while the larger switch with bigger black & green wires is to interrupt the starting circuit. I'll save it just in case I should need it during or after the upcoming wiring diet... I put a small bolt in place of the small switch - should I need to adjust the limit of the clutch travel at full-release. Probably won't need it, but the small switch had the ability for such adjustment...
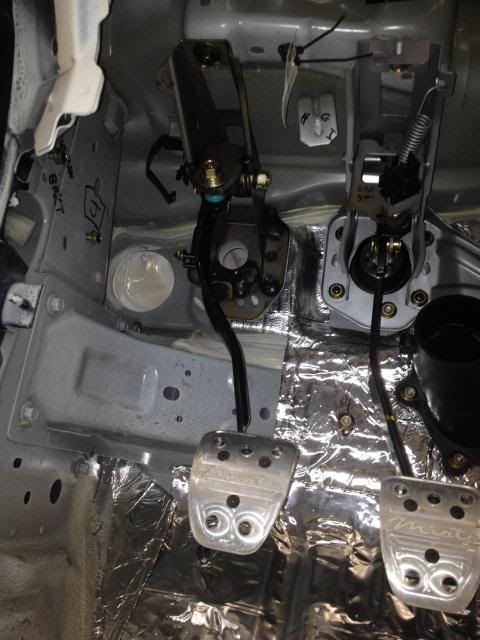
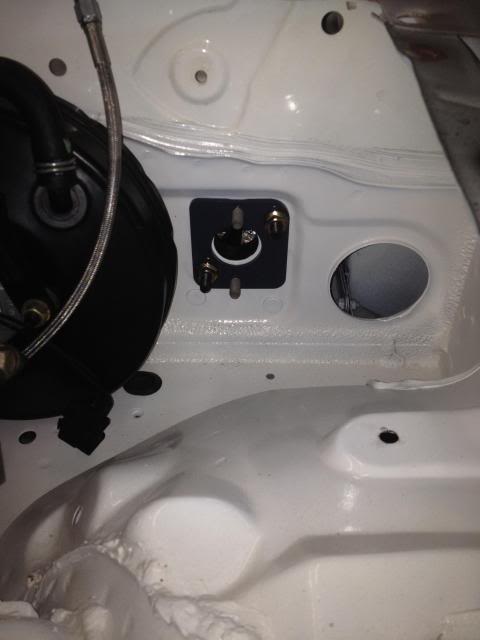
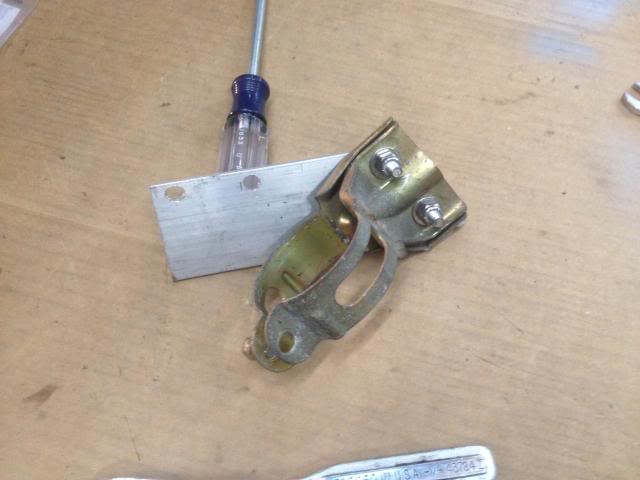
So, here's what you'll find out: the bore of the Wilwood master cylinder is slightly larger than the Mazda clutch master cylinder it replaces. This small adapter bracket has the correct hole size. Mark it and open it up with this dandy air-grinding tool.
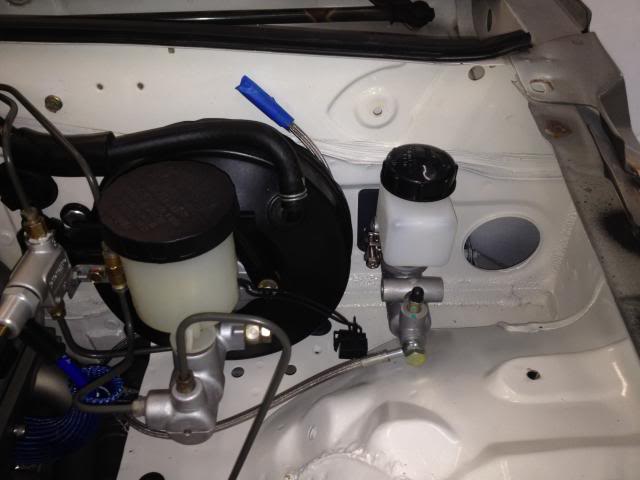
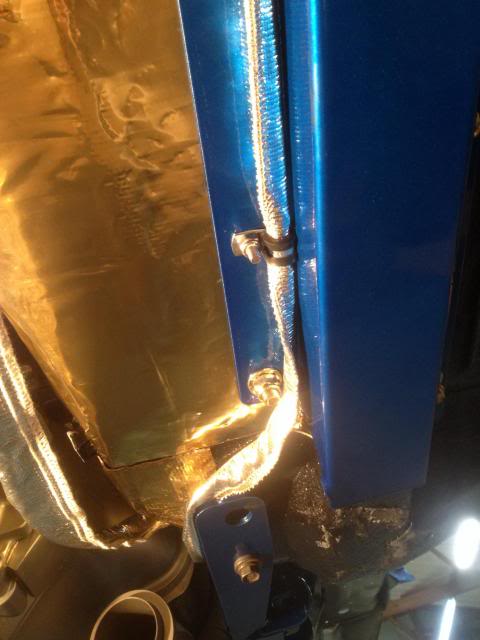
All finished up with nylon lock nuts in lieu of the standard hex nuts they sent. There's no room for a lock washer and I don't want this thing coming loose. V8R stainless steel hose to the slave cylinder is perfect length and I've slid some DEI thermal heat sheathing over it for protection from the headers. Looks good up close! PS- That's the bleeder line curled up behind the bake booster - I've wrapped the end in blue tape only to prevent a poss scratch...
So, here's what you'll find out: the bore of the Wilwood master cylinder is slightly larger than the Mazda clutch master cylinder it replaces. This small adapter bracket has the correct hole size. Mark it and open it up with this dandy air-grinding tool.
All finished up with nylon lock nuts in lieu of the standard hex nuts they sent. There's no room for a lock washer and I don't want this thing coming loose. V8R stainless steel hose to the slave cylinder is perfect length and I've slid some DEI thermal heat sheathing over it for protection from the headers. Looks good up close! PS- That's the bleeder line curled up behind the bake booster - I've wrapped the end in blue tape only to prevent a poss scratch...
Last edited by ToySnakePMC; Oct 27, 2013 at 10:22 PM.

V8 Miata Follower
Joined: Sep 2013
Posts: 102
Likes: 0
From: Upstate South Carolina
Toy,
I am really enjoying your build posts and pics. Although I don't plan on doing the build myself, I am learning a lot from your project. From the looks, I can only hope that when I am ready to buy that I can find something equal to your build..When you are finished, would like the opportunity to do a small road trip to look at the finished product.
I am really enjoying your build posts and pics. Although I don't plan on doing the build myself, I am learning a lot from your project. From the looks, I can only hope that when I am ready to buy that I can find something equal to your build..When you are finished, would like the opportunity to do a small road trip to look at the finished product.

Moderator

Joined: Nov 2009
Posts: 442
Likes: 1
From: Springfield IL
If you didn't already, make sure that ARP crank bolt has plenty of red loctite on it!!!! Mine didn't, and it backed off. I couldn't figure out the cause until a friend reached down and spun the bolt by hand..... His did the same thing and it threw the crank pulley off his Firehawk at the 1/8th mile at around 120mph haha.

Jim Stainer
Joined: Jul 2011
Posts: 2,462
Likes: 62
From: Sunny SW Minnesota
^^ that is something I wish I had known when I started. With the hard V8R motor mounts loctite is your best friend!
Still loving the build Pat and really appreciate you letting us tag along on your journey. Looking forward to the smokey burn out video!
Still loving the build Pat and really appreciate you letting us tag along on your journey. Looking forward to the smokey burn out video!
Moderator
Joined: Nov 2009
Posts: 442
Likes: 1
From: Springfield IL
Thread Starter
V8 Miata Fanatic
Joined: Oct 2012
Posts: 550
Likes: 34
From: Fuquay Varina, NC
"Old Chuck: Toy,
I am really enjoying your build posts and pics. Although I don't plan on doing the build myself, I am learning a lot from your project. From the looks, I can only hope that when I am ready to buy that I can find something equal to your build..When you are finished, would like the opportunity to do a small road trip to look at the finished product."
Thanks Chuck for the kind words. I hope it all comes together like I'm hoping for - and you are welcome to check it out sometime. Keep us informed on your search and what you're looking for.
Jim & Mike - I did put some red locktite gel (p10) - just hope it was enough. Yikes! Jim, I'm glad you're staying in touch. You have been having a blast with yours it seems!
Last edited by ToySnakePMC; Oct 21, 2020 at 07:09 PM.
Thread Starter
V8 Miata Fanatic
Joined: Oct 2012
Posts: 550
Likes: 34
From: Fuquay Varina, NC
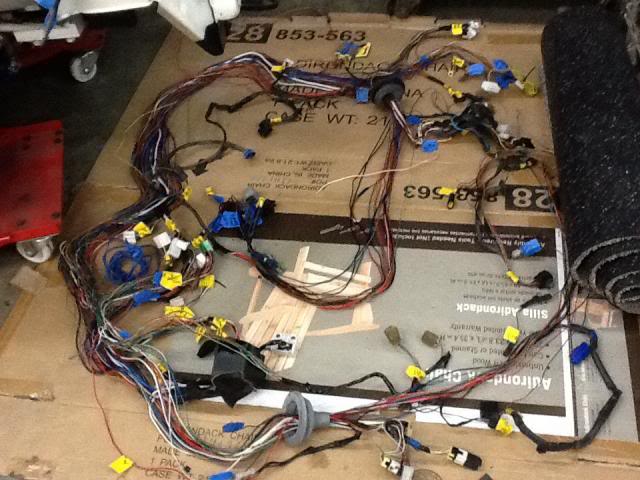
A Saturday evening update for the thread. Got to spend about 3.5 hrs in the shop this evening with a desire, believe it or not, to begin stripping apart the Mazda wiring harness. It's got to be relatively cleaned up with most of the tape and wrapping removed for easy wire identification and removal if needed.
First thing first -- install the shorter 78" serpentine belt for my configuration. Perfect fit. Gates part number in the photo:
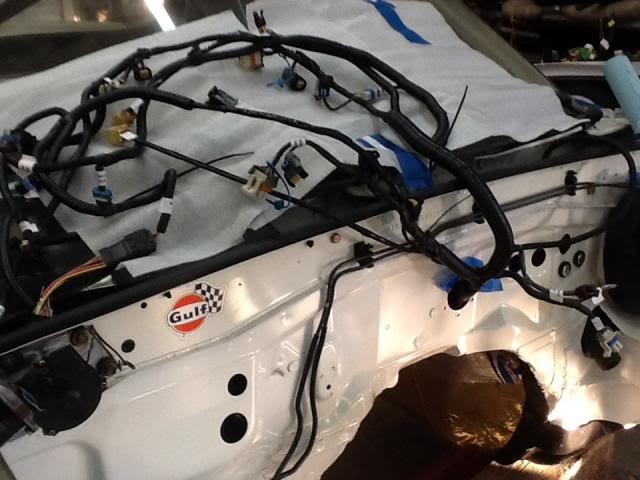
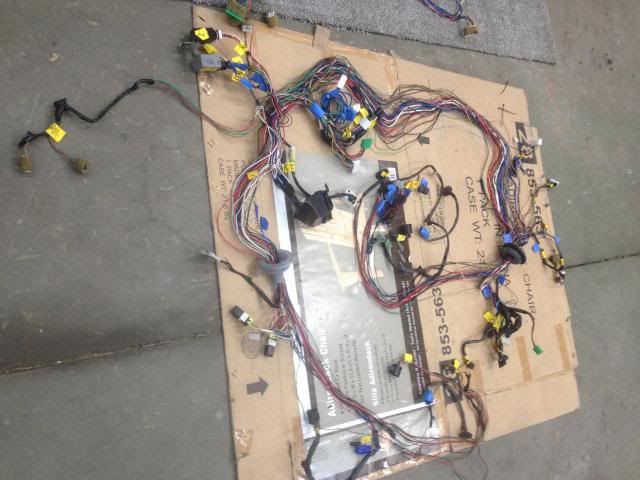
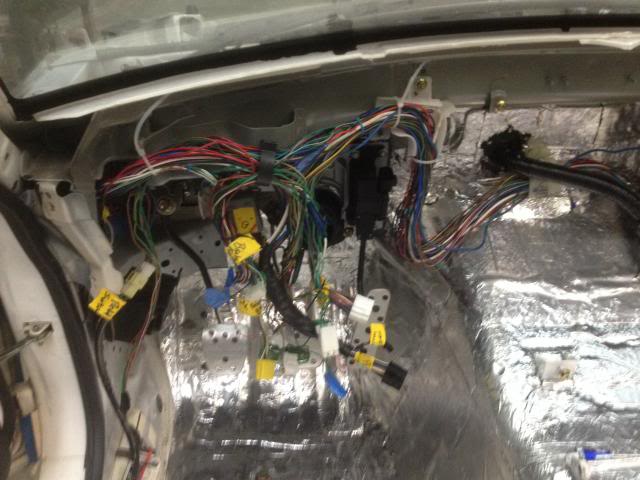
Nothing too dramatic going on here right now... My yellow ID tags (tape & Sharpie pen) have held on well for the last 11 months since it was removed from the chassis. It's kinda funny to see how I labeled some big connectors as "A", "B", etc -but did not research the ones I didn't know and label according to their real function. Oh well, I now have the '94 wiring diagrams, so I hope that the small mysteries will be solved quickly now. Here's a shot of in-progress as I unwrapped the bunches of sticky electrical tape. I started at the front of the LH engine bay harness and followed it around to the opposite side.
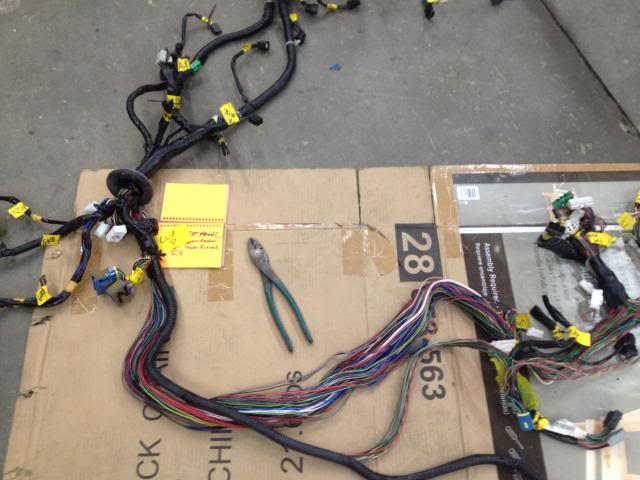
I think unwrapping it helps take some of the scare out of the wiring. I will have to take some time to understand the relays, what under hood fuses I will want to keep, etc.
Finally, here's what the main harness was relieved from tonite - lots of electrical tape. I also have just about the whole air bag wiring pulled to one side - as I had removed as much of that system a few years ago when I swapped to the '90 dash and Momo Indy vintage steering wheel.
First thing first -- install the shorter 78" serpentine belt for my configuration. Perfect fit. Gates part number in the photo:
Nothing too dramatic going on here right now... My yellow ID tags (tape & Sharpie pen) have held on well for the last 11 months since it was removed from the chassis. It's kinda funny to see how I labeled some big connectors as "A", "B", etc -but did not research the ones I didn't know and label according to their real function. Oh well, I now have the '94 wiring diagrams, so I hope that the small mysteries will be solved quickly now. Here's a shot of in-progress as I unwrapped the bunches of sticky electrical tape. I started at the front of the LH engine bay harness and followed it around to the opposite side.
I think unwrapping it helps take some of the scare out of the wiring. I will have to take some time to understand the relays, what under hood fuses I will want to keep, etc.
Finally, here's what the main harness was relieved from tonite - lots of electrical tape. I also have just about the whole air bag wiring pulled to one side - as I had removed as much of that system a few years ago when I swapped to the '90 dash and Momo Indy vintage steering wheel.
Last edited by ToySnakePMC; Nov 2, 2013 at 10:18 PM.
Thread Starter
V8 Miata Fanatic
Joined: Oct 2012
Posts: 550
Likes: 34
From: Fuquay Varina, NC
Hit the shop again today - got the first opportunity to study my 94 Mazda wiring diagrams and decide to begin plucking some wires out of here. My first target to go was the air bag system since it was disarmed a few yrs ago when I did the '90 dash swap and no air bags. The other wires that I got to tonite were all 1.8L related - such as mass airflow meter, cam position sensor, oxygen sensor, and various EGR connectors.
Just when forward progress was underway, it was time to push the car to the side of the shop and put the harness-in-progress under the nose of the MX5 to keep any stray feet from walking on those fragile connectors! Until next week...
Just when forward progress was underway, it was time to push the car to the side of the shop and put the harness-in-progress under the nose of the MX5 to keep any stray feet from walking on those fragile connectors! Until next week...
V8 Miata Follower
Joined: Sep 2013
Posts: 102
Likes: 0
From: Upstate South Carolina
Wiring always makes me nervous. Enjoying your posts. Kinda takes some of the scary out when I see your pics however, not sure I would attempt what you are doing but admire your tenacity.
Jim Stainer
Joined: Jul 2011
Posts: 2,462
Likes: 62
From: Sunny SW Minnesota
The problem is guys take a big picture approach to this. If you were going to wire in, say, a new horn for some reason how would you approach it? You would look at the Mazda schematic to find power and the switch wire, then run a wire from under the dash out to the grill and maybe even go all out and put a relay in the circuit. Would running 2 or 3 wires for that horn scare you or cause to be nervous? Of course not. You would jump in and get it done in an hour with no fear at all of it not working.
There is no difference in doing that horn to what are doing now as long as you think small. Just take it one wire at a time from start to finish of the circuit. Be sure that wire is right then forget about it and move on to the next one. You go one circuit at a time one system at a time only focused on that one wire and not looking at the rest of the project. It is hard to take that narrow view but it really helps keep it manageable. If can do that you don't even see the next wire to do and before you know it you are out of wires to follow!
Just like the rest of the conversion this is really not rocket science and if you do make a mistake you will find it right away when you turn the key. Besides if I can do it ANYONE can! Enjoy!
Last edited by charchri4; Nov 4, 2013 at 09:30 AM.

Jim Stainer
Joined: Jul 2011
Posts: 2,462
Likes: 62
From: Sunny SW Minnesota
You are right that dosn't help for sure. About 1/3 the male population is color blind to some degree and the fire department found mine. Blue green and purple all look about the same to me but that is not really a big problem to wire the car. Worse is telling the difference between a black with blue stripe wire and a blue with black stripe on the tiny wires. That tripped me up more than once!
The schematic, ohm meter and very bright LED flash light are your best friends in this!
The schematic, ohm meter and very bright LED flash light are your best friends in this!
Last edited by charchri4; Nov 4, 2013 at 09:41 AM.
Thread Starter
V8 Miata Fanatic
Joined: Oct 2012
Posts: 550
Likes: 34
From: Fuquay Varina, NC
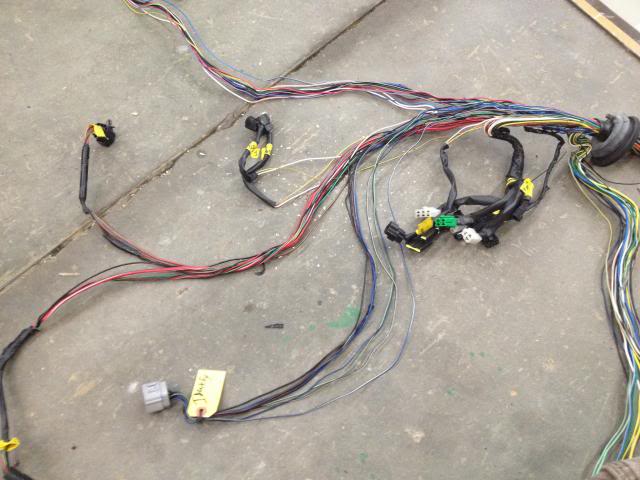
Just a couple of in-progress wiring diet photos today... These iPad pics are pretty poor, but I just wanted to report that I've made more progress today. It's slow going, but I confirmed my suspicion on M.net this week that the entire Mazda ECM would be discarded so I had more confidence removing items like the diagnostic link, cruise, fan wiring, etc.
Once I get the Mazda wiring diet completed and confirmed, I will write up a brief summary here so other LSx swap guys will have another small reference or source to look at in their searches.
Here's what I took out:
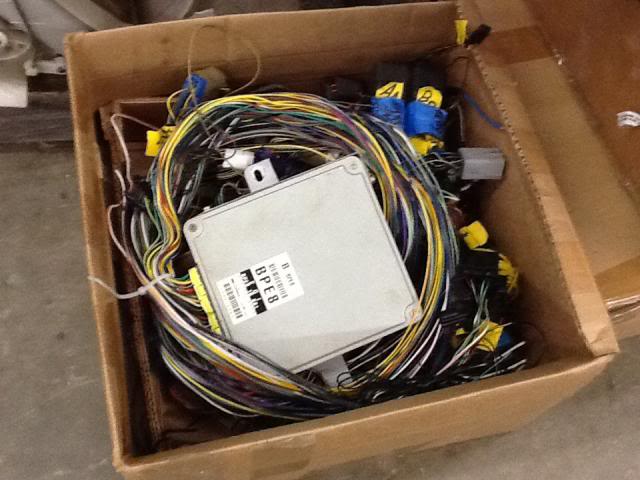
Here's what's currently left behind. What you don't see is that the Mazda wiring harness from the doors back is still intact in the car - I'm doing a little diet on the rear window defogger and power antenna wiring since none of that will ever return in the future to my MX5. This will all be re-wrapped AFTER the darn thing runs and starts...
Once I get the Mazda wiring diet completed and confirmed, I will write up a brief summary here so other LSx swap guys will have another small reference or source to look at in their searches.
Here's what I took out:
Here's what's currently left behind. What you don't see is that the Mazda wiring harness from the doors back is still intact in the car - I'm doing a little diet on the rear window defogger and power antenna wiring since none of that will ever return in the future to my MX5. This will all be re-wrapped AFTER the darn thing runs and starts...
Thread Starter
V8 Miata Fanatic
Joined: Oct 2012
Posts: 550
Likes: 34
From: Fuquay Varina, NC
I gotta say that I never thought I would enjoy this part of the build process as much as I am right now. If you've followed this thread, then you've heard me mention my apprehension here a time or two... But, it's been fun - yes fun - to study the 40+ pages of '94 Mazda wiring diagrams, match up the wire in question, and snip it out of existence if no longer needed. I'm NOT a wiring expert by any means, but it's not hard to take out the relays, plugs, and wiring that will have no use with the GM harness. There were just a few not-knowns or wiring circuits that I decided to keep for now, and they were either Mazda A/C related (high pressure switch wiring for instance) or something like Mazda oil pressure wiring. My gauges will be from Speedhut and grab their info from the '05 GTO PCM's can-bus data so I don't need any tach, speedo, coolant, etc wiring. I did tag and keep the fuel gauge wiring since it may be utilized - don't have the gauges here yet so not sure...
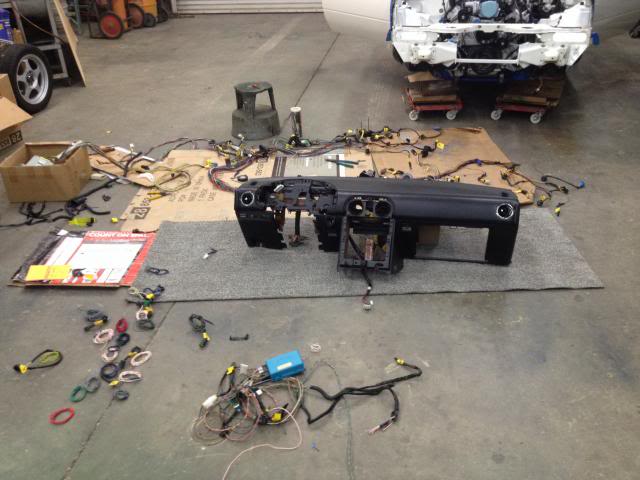
Getting started last weekend, I thought now was the right time to take apart the early dash, sand, prep, and paint the steel understructure as it left the factory 13 yrs ago in a bare state. Rust is everywhere...
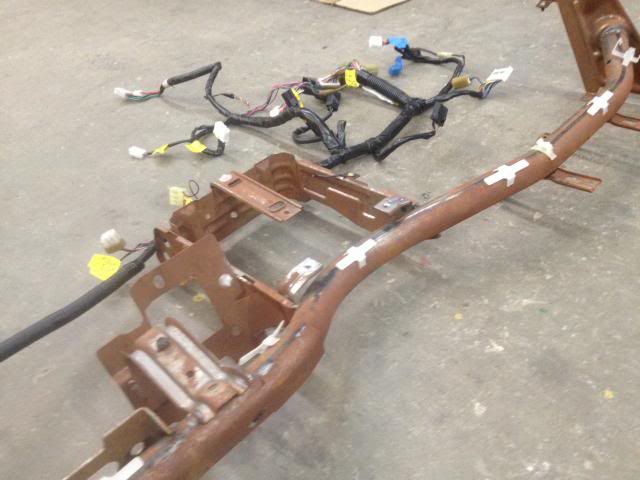
Primer and whatever paint I had on the shelf - this time it was some semi-gloss black - and this puppy is clean and ready to come back home.
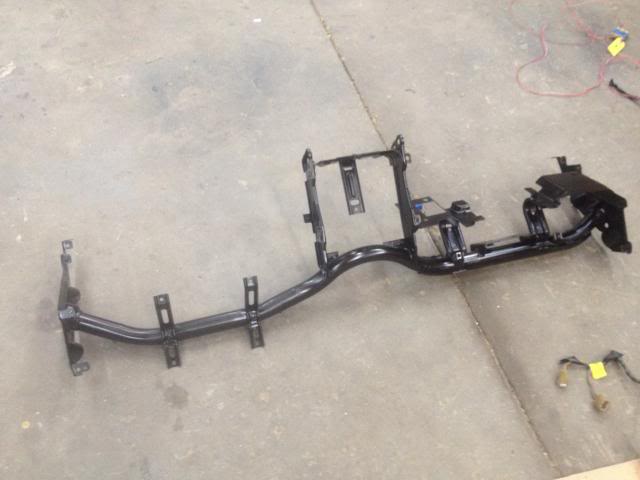
Getting started last weekend, I thought now was the right time to take apart the early dash, sand, prep, and paint the steel understructure as it left the factory 13 yrs ago in a bare state. Rust is everywhere...
Primer and whatever paint I had on the shelf - this time it was some semi-gloss black - and this puppy is clean and ready to come back home.
Thread Starter
V8 Miata Fanatic
Joined: Oct 2012
Posts: 550
Likes: 34
From: Fuquay Varina, NC
OK, back to the wiring diet... Dash harness has been severely wiped out. No Mazda cruise control, rear window defogger, 90% of the instrument panel wiring, buzzer $hit - all gone. Power mirrors and dash dimmer switch stayed however. Any cut wires (and many of these were T'eed together 12v or common grounds) were taped off and covered in heat shrink, but the harness will be left bare until after the LS2 fires up and everything is confirmed to be A-OK. Then, the harnesses get covered and put away properly. Tiny dash harness:
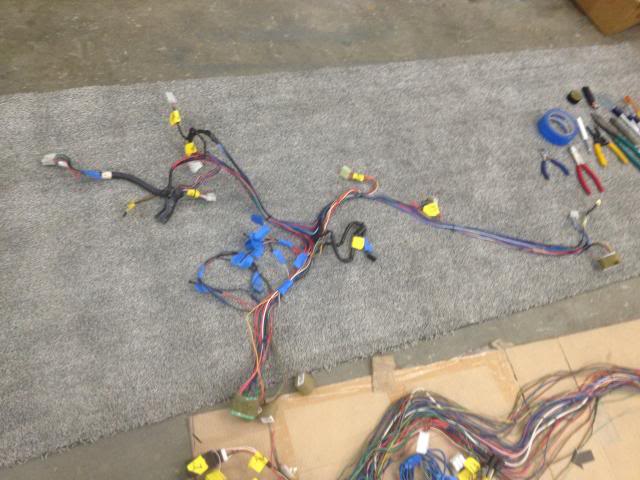
With the dash done - it was on to cleaning up the rest of the harness and Mazda fuse box. Non-critical stuff like headrest speaker wiring was pulled out, and important, useless stuff was also removed from places like the main fuse box. I traced out and cut out fuel injector fuse & relay, fan relay, and Air Bag relay wiring. In the fuse box, where wires were removed at the bottom - there is nothing above them. Lots of stuff are getting gone -- Hope this little Mazda still works like I want it to...
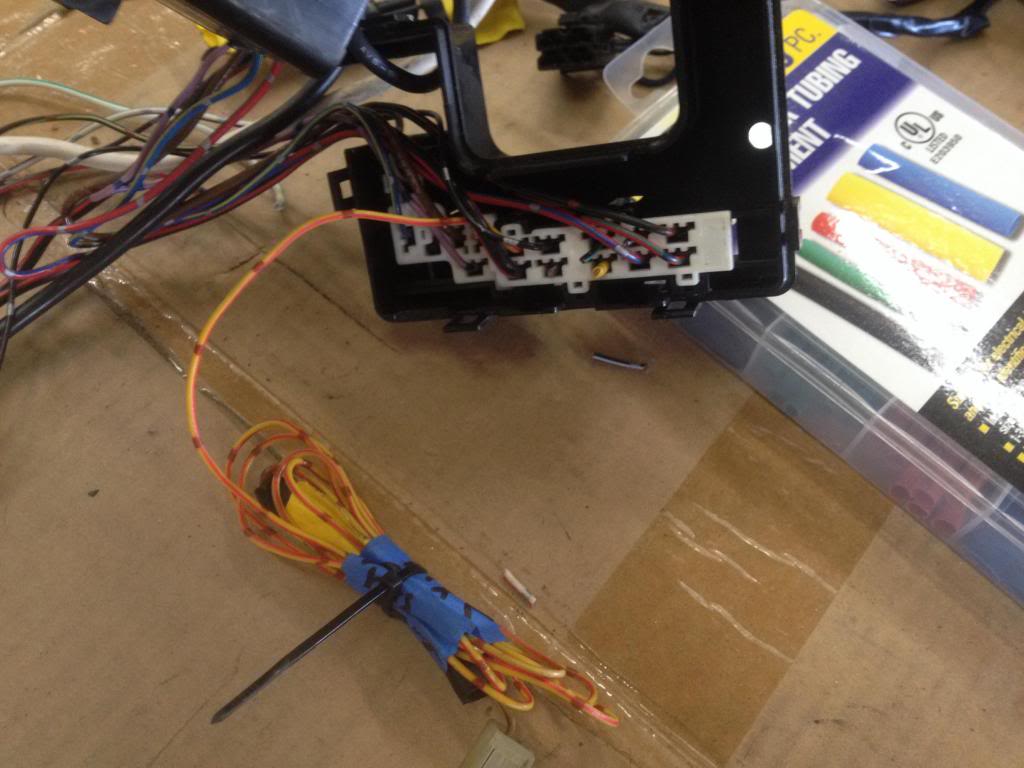
FYI, the orange wire shown here is the oil pressure wire that simply passes through the fuse box. Could've simply cut it, but it may prove helpful for this gauge or some other use in the future.
Harness is now, finally, a little thinner. Diet can be good and rewarding. I'll just tape it up enough and use some zip ties to keep it together for the early engine testing and initial start-up, and then wrap it when I'm satisfied everything is good.
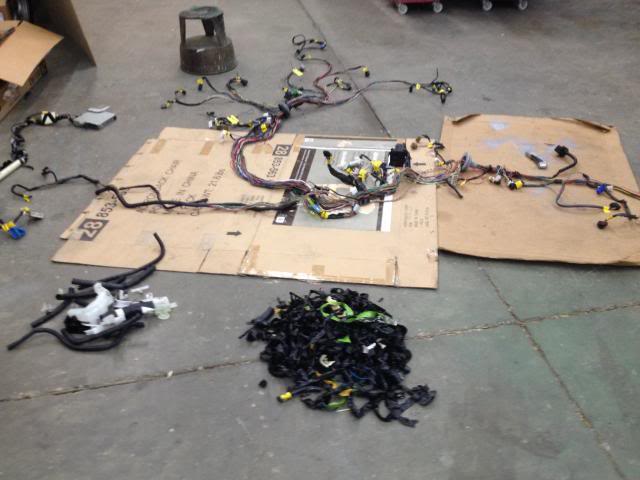
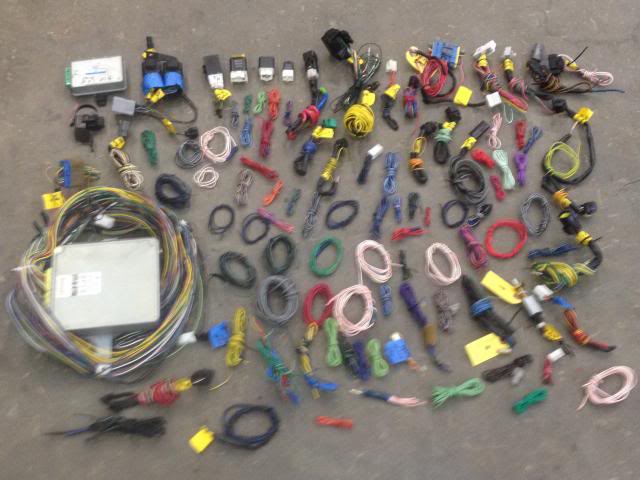
So, here's what is pulled out after a full diet. It's amazing to me how many wires I don't need for my V8 project. All chassis wiring is still left in tact - so it will be a fully functional street car...
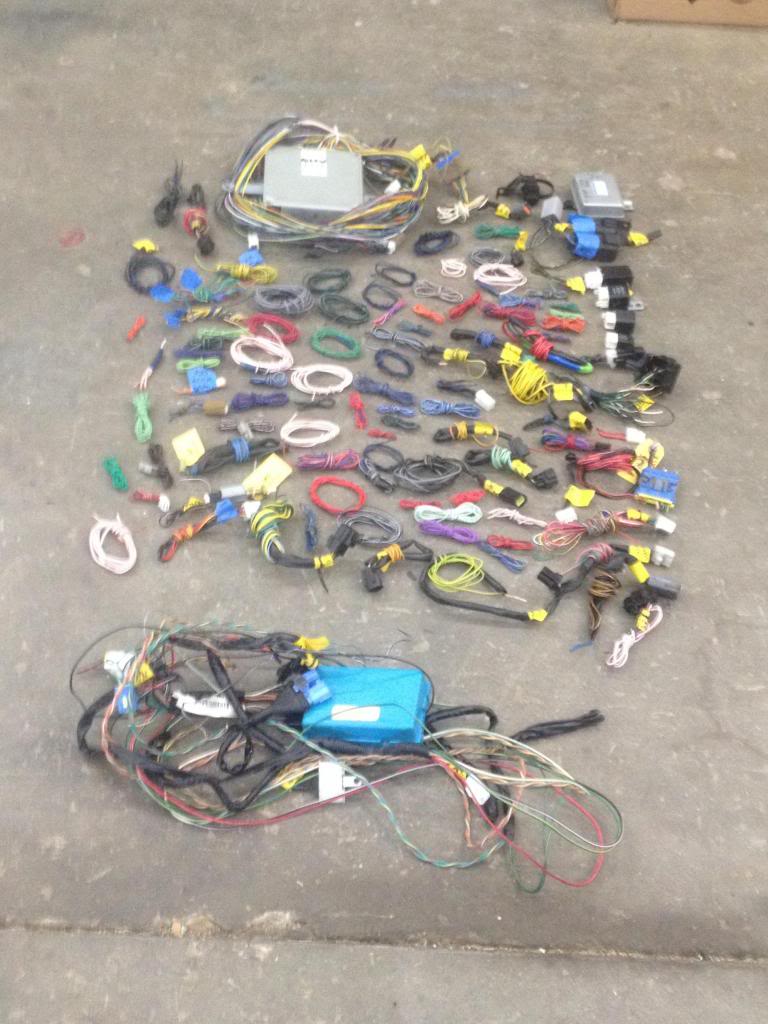
And here's a pic of the same pile from a different angle with the AirBag computer stuff also added to the mix. Pretty simple to do...
With the dash done - it was on to cleaning up the rest of the harness and Mazda fuse box. Non-critical stuff like headrest speaker wiring was pulled out, and important, useless stuff was also removed from places like the main fuse box. I traced out and cut out fuel injector fuse & relay, fan relay, and Air Bag relay wiring. In the fuse box, where wires were removed at the bottom - there is nothing above them. Lots of stuff are getting gone -- Hope this little Mazda still works like I want it to...
FYI, the orange wire shown here is the oil pressure wire that simply passes through the fuse box. Could've simply cut it, but it may prove helpful for this gauge or some other use in the future.
Harness is now, finally, a little thinner. Diet can be good and rewarding. I'll just tape it up enough and use some zip ties to keep it together for the early engine testing and initial start-up, and then wrap it when I'm satisfied everything is good.
So, here's what is pulled out after a full diet. It's amazing to me how many wires I don't need for my V8 project. All chassis wiring is still left in tact - so it will be a fully functional street car...
And here's a pic of the same pile from a different angle with the AirBag computer stuff also added to the mix. Pretty simple to do...
Last edited by ToySnakePMC; Nov 19, 2013 at 11:34 PM.
Thread Starter
V8 Miata Fanatic
Joined: Oct 2012
Posts: 550
Likes: 34
From: Fuquay Varina, NC
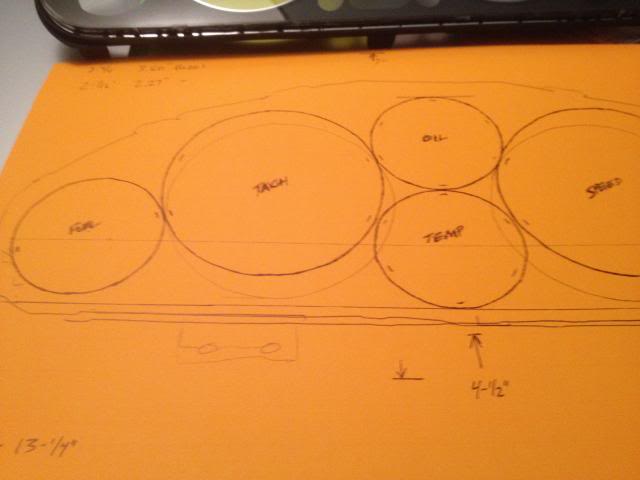
Quick tease of some Speedhut's can-bus compliant gauges for the Roadster. These will be installed in a 1/8" thick aluminum panel - that I can hopefully squeeze 5 guages into place - like the Mazda layout. I haven't measured anything as of yet, but these are 3-3/8" and 2-1/8" sizes - their smallest ones. When I wire 'em up, you'll see that they daisy-chain together with one wire feeding data to all the guages. Info comes from the GM data-link connector.
Illumination will be green, pointer will light up red - I've had plenty of other vehicles that have had red, orange, white, and blue factory gauge illumination - and I have always preferred green at night. With Speedhut, you pick out the font, the design of the scale or dashes, trim bezel, etc. I also made up my own V8R logo - something similar to what was used on the gauges in the black NC that V8Roadsters owns. (Saw it at an all FL Miata meet this past spring...)
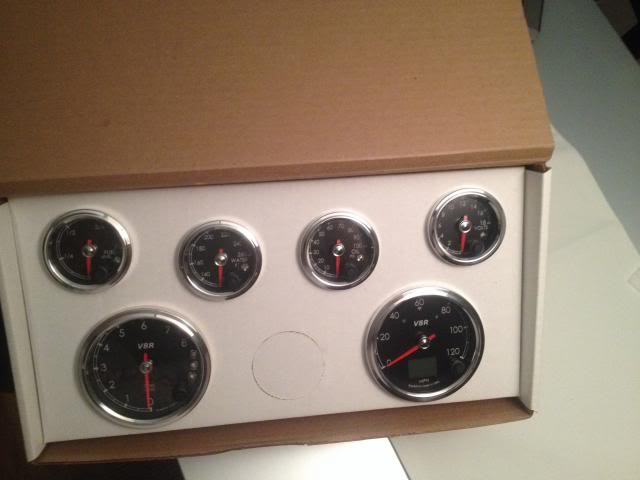
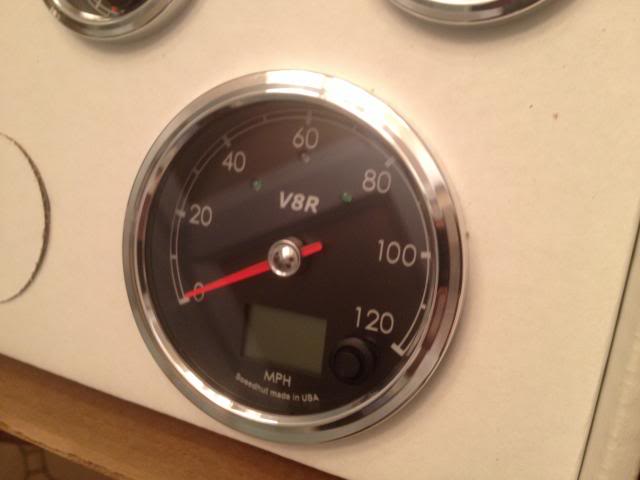
Almost forgot to mention that the turn signals and high beam indicators will also be in the speedo - as you can already see in the above pic. Now, I also will not need to figure out how to run my mechanical speedo on the '94 - since it will also get that data from the PCM. My tire size and rear axle ratio should already have been added during the re-flash and tuning from BP Automotive this past summer. I understand that Diagnostic codes can be displayed in the digital odometer. All the gauges have the option for low and high level custom alarms with LED light. Should be fun and rather easy to set up when the time comes.
Illumination will be green, pointer will light up red - I've had plenty of other vehicles that have had red, orange, white, and blue factory gauge illumination - and I have always preferred green at night. With Speedhut, you pick out the font, the design of the scale or dashes, trim bezel, etc. I also made up my own V8R logo - something similar to what was used on the gauges in the black NC that V8Roadsters owns. (Saw it at an all FL Miata meet this past spring...)
Almost forgot to mention that the turn signals and high beam indicators will also be in the speedo - as you can already see in the above pic. Now, I also will not need to figure out how to run my mechanical speedo on the '94 - since it will also get that data from the PCM. My tire size and rear axle ratio should already have been added during the re-flash and tuning from BP Automotive this past summer. I understand that Diagnostic codes can be displayed in the digital odometer. All the gauges have the option for low and high level custom alarms with LED light. Should be fun and rather easy to set up when the time comes.
Last edited by ToySnakePMC; Nov 24, 2013 at 09:43 AM.
Thread Starter
V8 Miata Fanatic
Joined: Oct 2012
Posts: 550
Likes: 34
From: Fuquay Varina, NC
Small update here... I spent a little time putting in the front A arm bushings and getting somewhat organized for the upcoming front suspension installation. I thought about going ahead and getting it back on "all fours" before this Thanksgiving weekend. ...Then I realized that would make wiring up the underhood fuse box and starter that much more difficult - so this is all on the back burner until later.
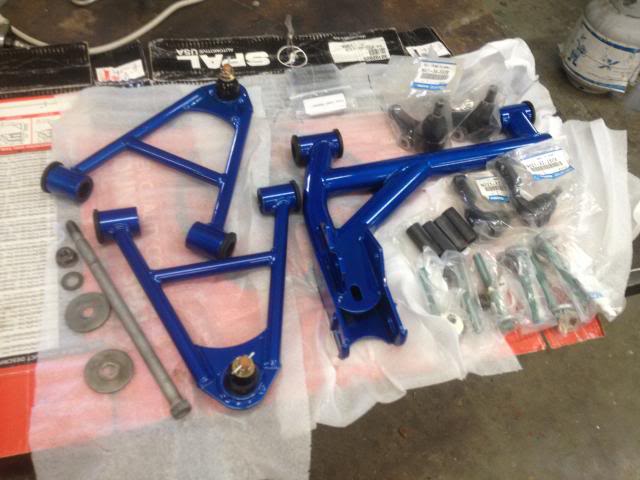
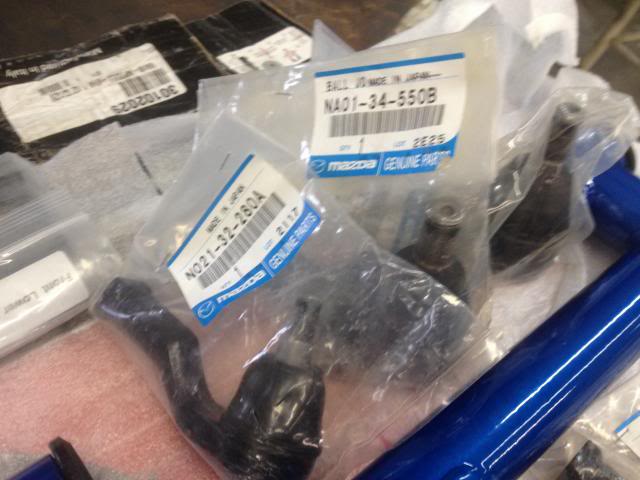
One of the many areas where "mission creep" has shown up is in the suspension. Once I went with new A arms, everything else seemed to need updating as well. These are R- Package tie rods and new lower ball joints to go with all new Mazda eccentric bolts. Need to now order new front hubs, perhaps... 20 yr old car - 90+K miles, I guess new $50 hubs may be appropriate.
Then it was back on to the gauges for some "figuring". Decided that IF I bump all the gauge bezels together I can get all 6 Speedhut gauges together. I won't have any idiot lights to contend with so it would just be a bundle of gauges in the Miata dash.
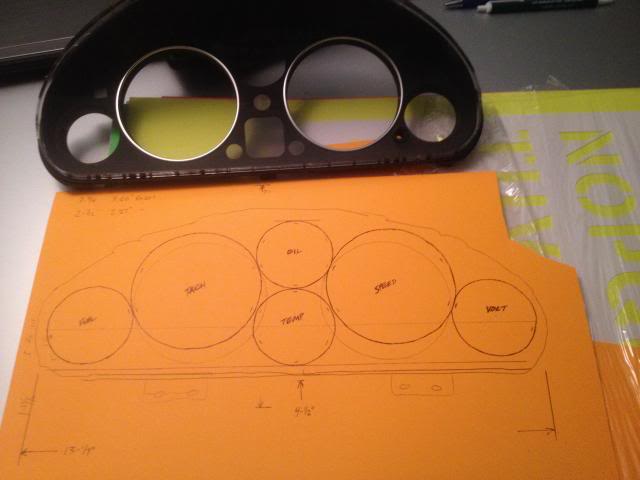
Here's an upclose pic on what I'm thinking... I still haven't fully determined that this is doable, but I like it more and more when I stare at my orange poster board!!
One of the many areas where "mission creep" has shown up is in the suspension. Once I went with new A arms, everything else seemed to need updating as well. These are R- Package tie rods and new lower ball joints to go with all new Mazda eccentric bolts. Need to now order new front hubs, perhaps... 20 yr old car - 90+K miles, I guess new $50 hubs may be appropriate.
Then it was back on to the gauges for some "figuring". Decided that IF I bump all the gauge bezels together I can get all 6 Speedhut gauges together. I won't have any idiot lights to contend with so it would just be a bundle of gauges in the Miata dash.
Here's an upclose pic on what I'm thinking... I still haven't fully determined that this is doable, but I like it more and more when I stare at my orange poster board!!
Last edited by ToySnakePMC; Nov 29, 2013 at 05:28 AM.
Thread Starter
V8 Miata Fanatic
Joined: Oct 2012
Posts: 550
Likes: 34
From: Fuquay Varina, NC
This is sort of a crazy time in the build - with a To-Do List that includes twenty or so various tasks. I feel like I could pick 5 or 6 and it wouldn't matter which one got done first - so that's good, but a bit overwhelming to some degree.
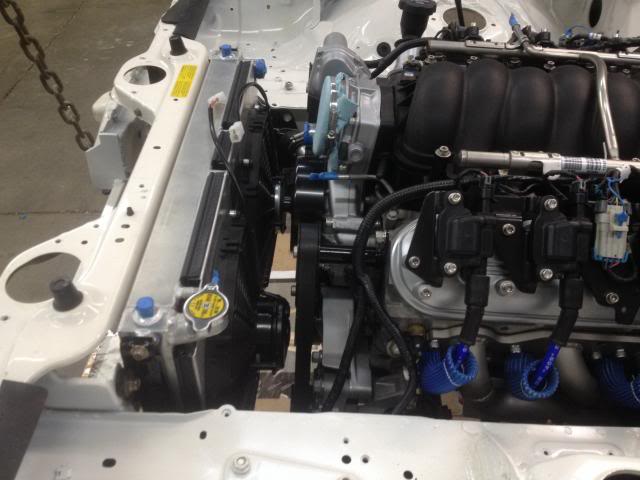
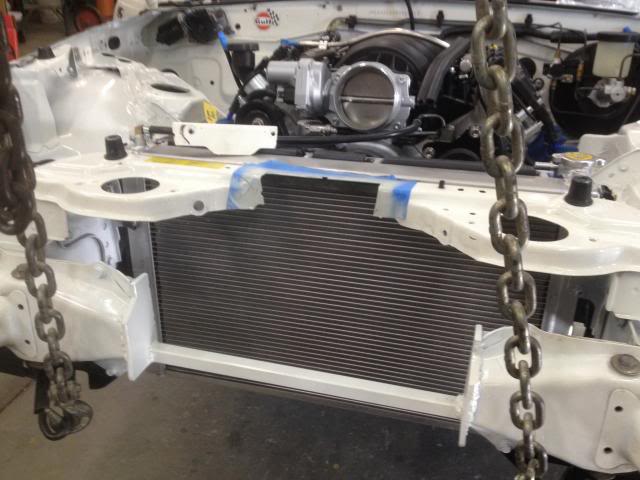
So switching gears on you, I'm back under the hood and under the car today. I first dropped the radiator back in for the final time, I hope. I needed it in for the upcoming fan wiring, at least that was the plan. But plans change, so I worked on the Z06 intake while I was standing here. I'm pleased with the fan-to-pulley clearance as this LH side is the tightest...
Intake will work - but it will take some more modifying as noted by Flyin Miata. Problem is they just don't show some good pics of NA's and exactly where to cut, trim, and secure the intake. Oh well, trim a little here and there - and expect to come back and trim some more I guess.
I laid down some blue tape and marked off where the initial cut will be on the core support. After test fitting the set-up, the intake now lays down CLOSE to the top of the radiator and nestles the lower filter-end into my earlier fabbed up front bumper support. So far, so good! Final determination will be when the hood is test-fitted to see if it's low enough. Used a file to clean up the cut and some old light gray paint since it'll be hidden below and trimmed out with rubber edging.
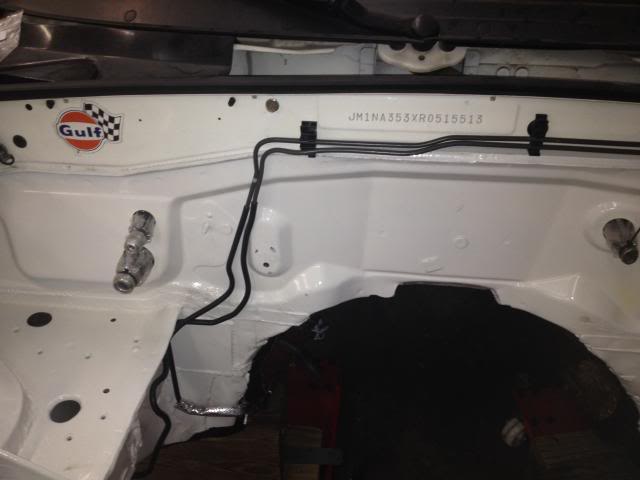
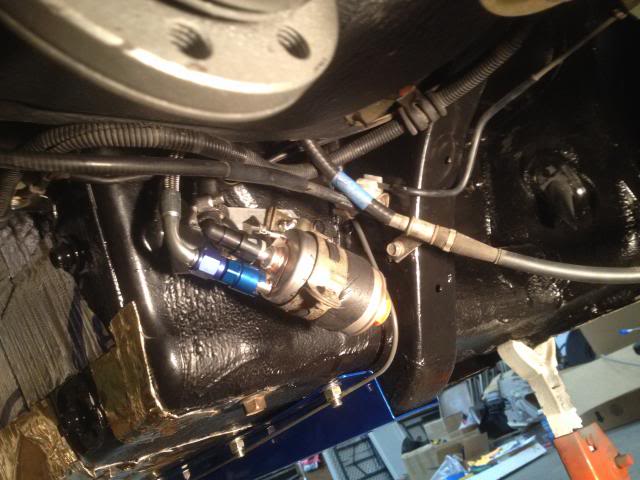
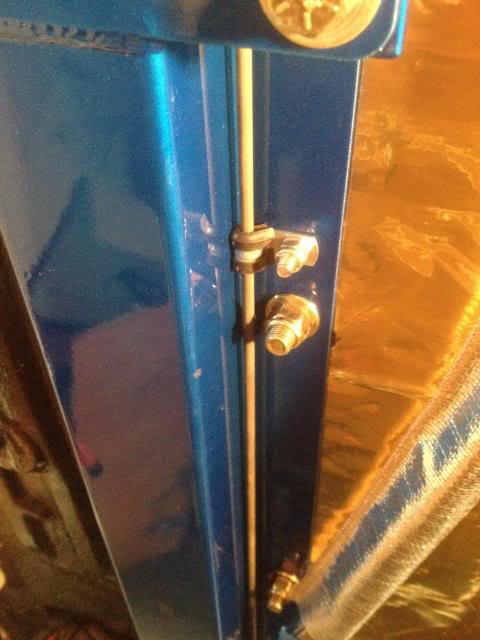
On to the @ss end of the car and relocate the fuel filter/ regulator a few more inches away from the future exhaust. It's currently sitting in the stock Mazda location. This bracket will allow me to slide it right 3" and tilt it approx 60 degrees. Well, I wanted 60 degrees, but that made the fittings rub against the edge of the gas tank. And that wasn't going to sit well with me so I drilled a 5th hole and reduced the angle somewhat...
Here's the end result. I need all the angle/ tilt I could assist the straight AN connector on the FM fuel line make the 90 degree turn before it runs along the frame rail. Other good stuff in this busy pic: Insulated line at the top is the approx 8 gauge wire going to the starter. The hose to the right with the blue tape near it's current end is the gas tank vent line (that will get addressed later), the rubber horizontal line is the insulated parking brake cable. The small horizontal wire below that is the ground cable coming off the battery that used to terminate on the powerplant frame. Then, the bare rear brake line near the bottom....
Ground secured on parking brake cable's center bracket and cable headed towards the starter is secured to the top of the tranny tunnel.
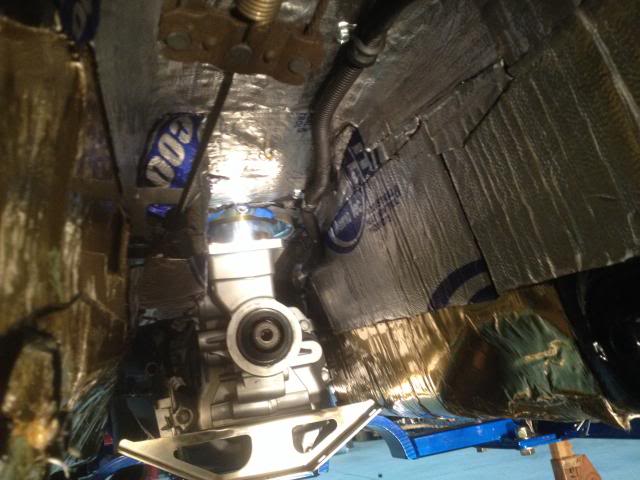
Welcome to the cavern below my Mazda! Looks kinda tall from here...
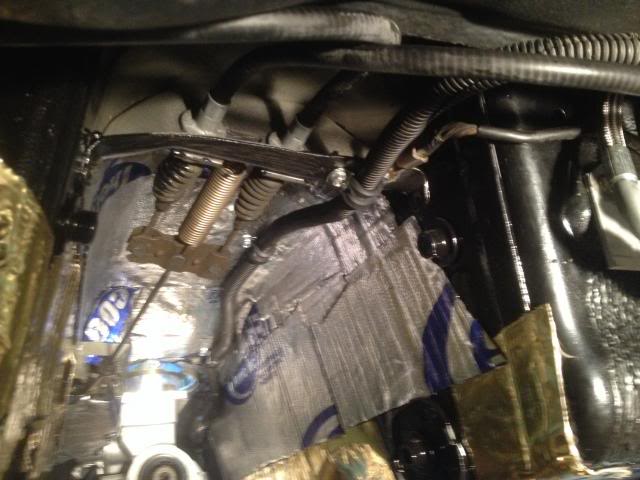
While down below, I went ahead and secured the brake line with stainless hardware and some heat barrier wrap. Fuel line will get the same - just didn't get around to it this week...
Brake line rear of the tranny support has no wrap - but the desired 3" single merge of my exhaust pipes will be over on the LH side of the driveshaft and away from the brake and fuel lines...
Next week should be finishing up the wiring to the LS2 starter and alternator and tie in the T56 reverse switch while I'm camped out under the car for another day or so!
So switching gears on you, I'm back under the hood and under the car today. I first dropped the radiator back in for the final time, I hope. I needed it in for the upcoming fan wiring, at least that was the plan. But plans change, so I worked on the Z06 intake while I was standing here. I'm pleased with the fan-to-pulley clearance as this LH side is the tightest...
Intake will work - but it will take some more modifying as noted by Flyin Miata. Problem is they just don't show some good pics of NA's and exactly where to cut, trim, and secure the intake. Oh well, trim a little here and there - and expect to come back and trim some more I guess.
I laid down some blue tape and marked off where the initial cut will be on the core support. After test fitting the set-up, the intake now lays down CLOSE to the top of the radiator and nestles the lower filter-end into my earlier fabbed up front bumper support. So far, so good! Final determination will be when the hood is test-fitted to see if it's low enough. Used a file to clean up the cut and some old light gray paint since it'll be hidden below and trimmed out with rubber edging.
On to the @ss end of the car and relocate the fuel filter/ regulator a few more inches away from the future exhaust. It's currently sitting in the stock Mazda location. This bracket will allow me to slide it right 3" and tilt it approx 60 degrees. Well, I wanted 60 degrees, but that made the fittings rub against the edge of the gas tank. And that wasn't going to sit well with me so I drilled a 5th hole and reduced the angle somewhat...
Here's the end result. I need all the angle/ tilt I could assist the straight AN connector on the FM fuel line make the 90 degree turn before it runs along the frame rail. Other good stuff in this busy pic: Insulated line at the top is the approx 8 gauge wire going to the starter. The hose to the right with the blue tape near it's current end is the gas tank vent line (that will get addressed later), the rubber horizontal line is the insulated parking brake cable. The small horizontal wire below that is the ground cable coming off the battery that used to terminate on the powerplant frame. Then, the bare rear brake line near the bottom....
Ground secured on parking brake cable's center bracket and cable headed towards the starter is secured to the top of the tranny tunnel.
Welcome to the cavern below my Mazda! Looks kinda tall from here...
While down below, I went ahead and secured the brake line with stainless hardware and some heat barrier wrap. Fuel line will get the same - just didn't get around to it this week...
Brake line rear of the tranny support has no wrap - but the desired 3" single merge of my exhaust pipes will be over on the LH side of the driveshaft and away from the brake and fuel lines...
Next week should be finishing up the wiring to the LS2 starter and alternator and tie in the T56 reverse switch while I'm camped out under the car for another day or so!
Last edited by ToySnakePMC; Dec 2, 2013 at 12:36 PM.
Thread Starter
V8 Miata Fanatic
Joined: Oct 2012
Posts: 550
Likes: 34
From: Fuquay Varina, NC
Poking along here... Work and other obligations have slowed the early December progress - but my slightly hazy crystal ball says that I will have more time around Christmas to pick up the pace... fingers crossed.
Today's lesson: Make sure you know the proper & simple method of installing a LSx oil pan gasket. I didn't a few months ago. With no oil added back to this take-out engine since the purchase, oil has somehow slipped out and left small spots where ever it was parked. Well, I had re-used the GTO gasket and not applied the 4 small dabs of RTV sealant where the block meets the ft & rr covers. No pics, but yesterday I wrestled the deep V8R pan and was able to get the old gasket out of there, CLEANED both surfaces, did the RTV thing, and slipped the new GM gasket in. She's torqued in and buttoned up; however, this took a few hours to re-do something that wasn't done right the first time. Dammmmn.
Now back to the regularly-scheduled build: Next, I temporarily installed the heater core so I could determine where and how much room I had between it and the firewall for GM and Mazda wiring. I also installed a new heater core - not taking chances with my '94 one failing after the dash is all back in... I don't like what I see with the Mazda heater piping coming through the firewall. It's in a tight spot and that thin (schedule 20?) copper piping looks like it would be in a severe bind with 3' of heater hose tugging on each outlet. I have a remedy for that - and will do a post on this after the wiring is further along.
LS2 needs a good ground. Bought a 4 gauge battery cable, found a good location on LH side of block and a nearby, unused bolt hole under the "frame". Cut it to fit, watched a YouTube on how to solder in a new end, cooked some 50-50 lead solder in the terminal and stabbed it with the new cable. That was fun! Wrapped the red cable with flexbraid and heat-shrink, and bolted it in after cleaning the ground connection down to bare metal.
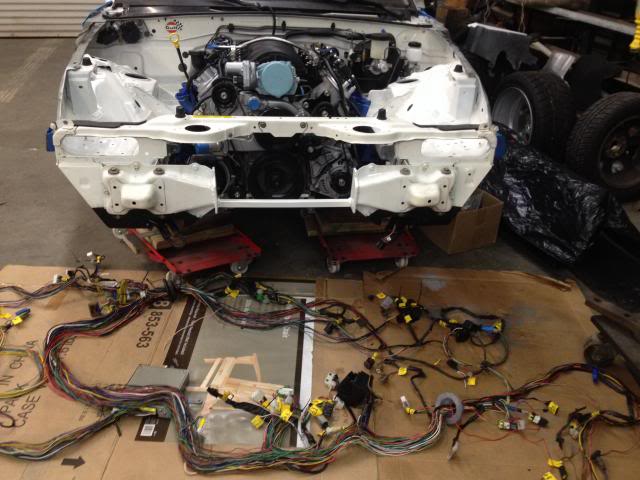
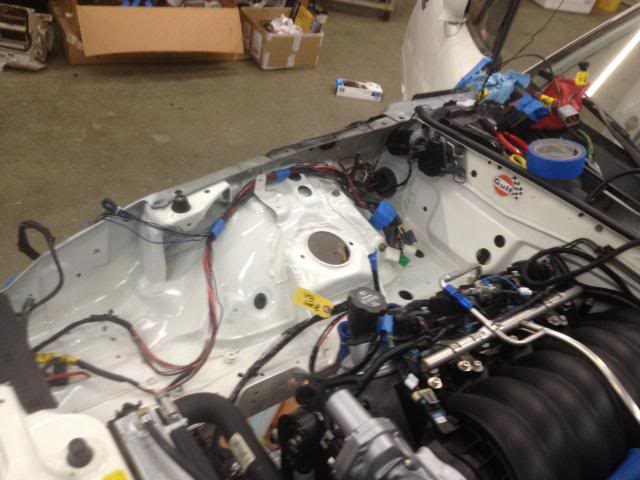
Time to lay in the Mazda main harness. This seems like the logical next step. It's unwrapped for now and for a good reason: I need to make sure it all works now that 1/2 of the original bundle sits in a box 5 feet away from the car... I also will be wiring in the GM alternator and starter so it can all be wrapped up & secured together as one happy family of wires.
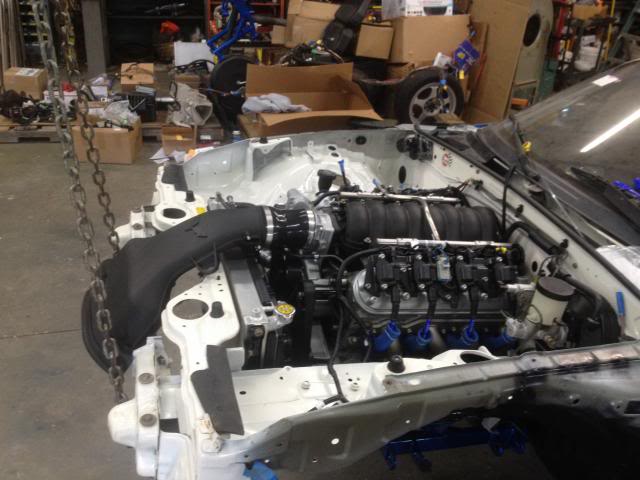
This gives you an interesting perspective on how the engine compartment is going to look... The headlamp assembly and coolant tank will go in here along with the Mazda fuse box and bracket - but not much else. Should be nice & tidy when done!
Today's lesson: Make sure you know the proper & simple method of installing a LSx oil pan gasket. I didn't a few months ago. With no oil added back to this take-out engine since the purchase, oil has somehow slipped out and left small spots where ever it was parked. Well, I had re-used the GTO gasket and not applied the 4 small dabs of RTV sealant where the block meets the ft & rr covers. No pics, but yesterday I wrestled the deep V8R pan and was able to get the old gasket out of there, CLEANED both surfaces, did the RTV thing, and slipped the new GM gasket in. She's torqued in and buttoned up; however, this took a few hours to re-do something that wasn't done right the first time. Dammmmn.
Now back to the regularly-scheduled build: Next, I temporarily installed the heater core so I could determine where and how much room I had between it and the firewall for GM and Mazda wiring. I also installed a new heater core - not taking chances with my '94 one failing after the dash is all back in... I don't like what I see with the Mazda heater piping coming through the firewall. It's in a tight spot and that thin (schedule 20?) copper piping looks like it would be in a severe bind with 3' of heater hose tugging on each outlet. I have a remedy for that - and will do a post on this after the wiring is further along.
LS2 needs a good ground. Bought a 4 gauge battery cable, found a good location on LH side of block and a nearby, unused bolt hole under the "frame". Cut it to fit, watched a YouTube on how to solder in a new end, cooked some 50-50 lead solder in the terminal and stabbed it with the new cable. That was fun! Wrapped the red cable with flexbraid and heat-shrink, and bolted it in after cleaning the ground connection down to bare metal.
Time to lay in the Mazda main harness. This seems like the logical next step. It's unwrapped for now and for a good reason: I need to make sure it all works now that 1/2 of the original bundle sits in a box 5 feet away from the car... I also will be wiring in the GM alternator and starter so it can all be wrapped up & secured together as one happy family of wires.
This gives you an interesting perspective on how the engine compartment is going to look... The headlamp assembly and coolant tank will go in here along with the Mazda fuse box and bracket - but not much else. Should be nice & tidy when done!
Last edited by ToySnakePMC; Dec 15, 2013 at 08:05 AM.
Thread Starter
V8 Miata Fanatic
Joined: Oct 2012
Posts: 550
Likes: 34
From: Fuquay Varina, NC
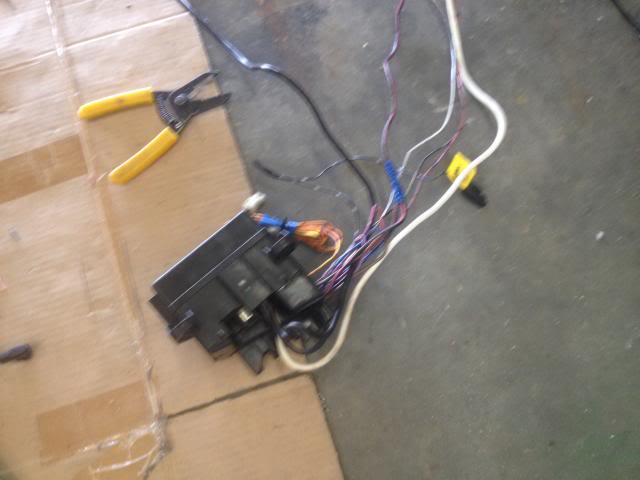
Did some add'l wiring yesterday - but most iPhone pics came out blurry. Have one photo of Mazda underhood fuse box dropped in. Fuse box and related wiring needed to go in now so I could run starter and alternator wiring. Had to extend the 8 gauge wiring to the alternator - and I'll soon share better pics of how I plan to run it around the radiator core support and up the LH compartment to the GM alternator. Starter wiring and T56 backup switch wiring were also connected up, wires wrapped with flexbraid and then added thermal heat barrier tape to starter wires that are fairly close to the headers. Stay tuned for more action this coming weekend :0