
Operation: I want Air Conditioning in my LS!


Jim Stainer
Joined: Jul 2011
Posts: 2,462
Likes: 62
From: Sunny SW Minnesota
LOL always glad to help!  Check out Shannons photos up there ^. F-body LS1 compressor and lines fit like an *** on a pot on mine too. I don't have my hard lines on mine now but they do come straight out the back and clear the headers fine. I'll get some shots and post them up for you this morning.
Check out Shannons photos up there ^. F-body LS1 compressor and lines fit like an *** on a pot on mine too. I don't have my hard lines on mine now but they do come straight out the back and clear the headers fine. I'll get some shots and post them up for you this morning.

Jim Stainer
Joined: Jul 2011
Posts: 2,462
Likes: 62
From: Sunny SW Minnesota
I know for sure 99 to 02 Firebird or Camaro will work and they are all the same. Not sure on 98 but probably the same. Nothing older as 98 was the first year of LS in the F bodies.
Ref Shannons is a 99 Firebird and mine is an 02 Camaro and I know nothing but the intake manifold and cam changed between those years.
Ref Shannons is a 99 Firebird and mine is an 02 Camaro and I know nothing but the intake manifold and cam changed between those years.
Jim Stainer
Joined: Jul 2011
Posts: 2,462
Likes: 62
From: Sunny SW Minnesota
I looked through my photos and don't have squat on how it fits really. Here is one in the air that shows the Fbody hoses with the Miata headers.
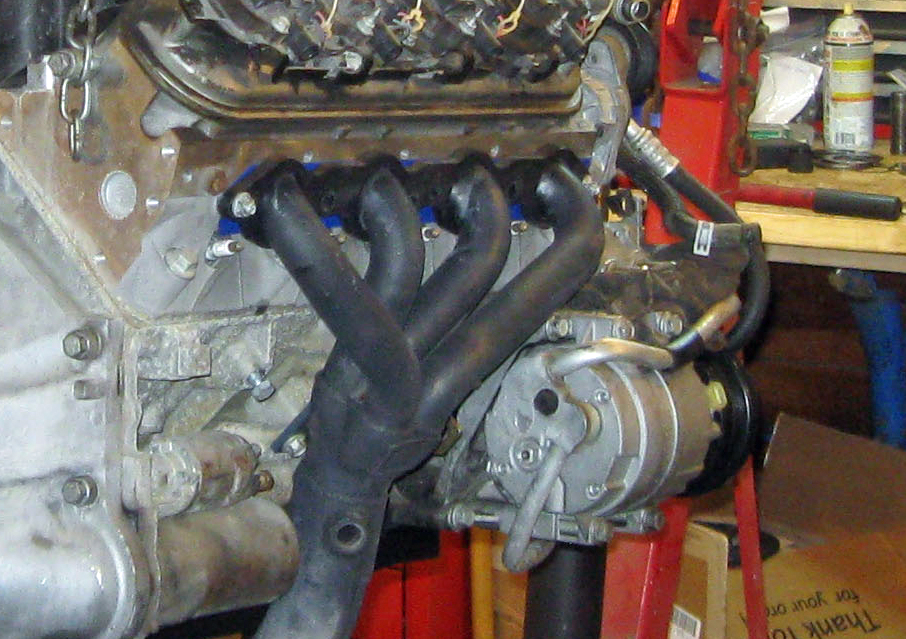
These are old Sanderson headers though so yours might look a bit different.
These are old Sanderson headers though so yours might look a bit different.
Jim Stainer
Joined: Jul 2011
Posts: 2,462
Likes: 62
From: Sunny SW Minnesota
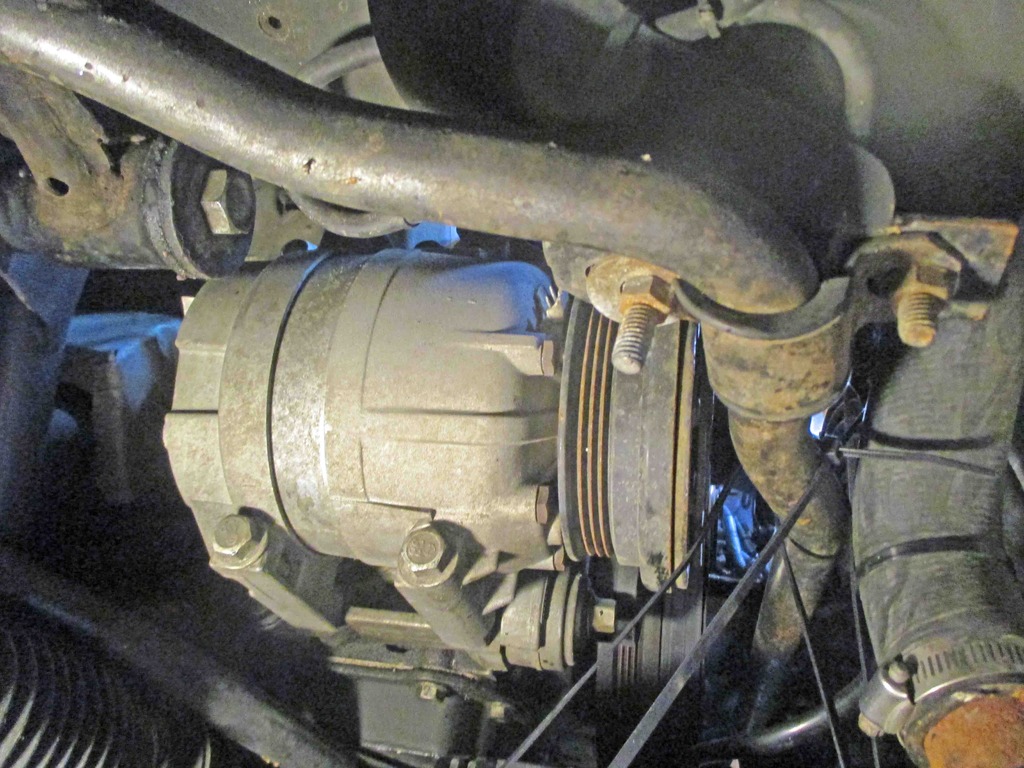
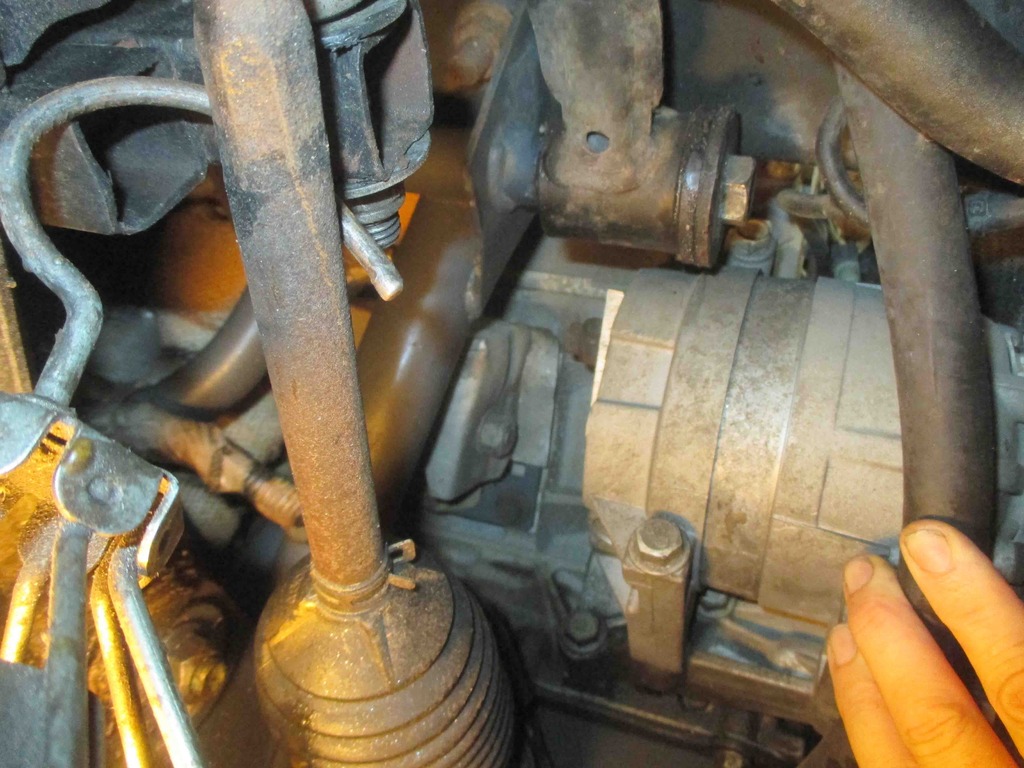
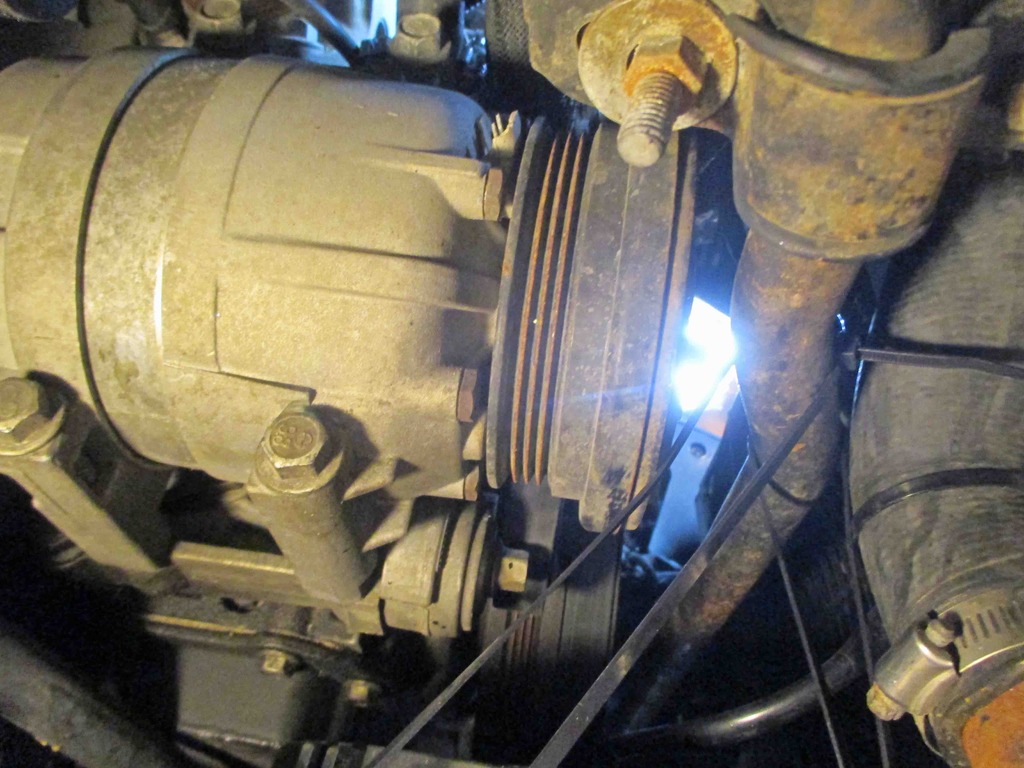
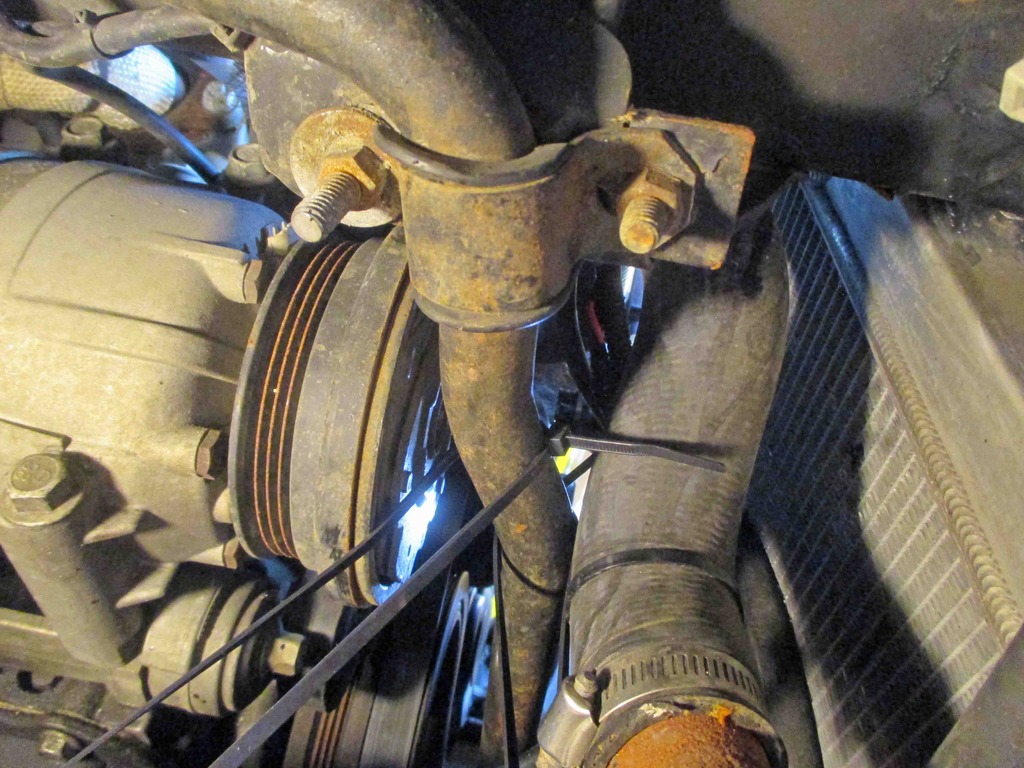
OK got some pix for you. Not sure why your radiator hose is in the way, it's the sway bar that is usually the issue. I took the hoses off this spring but you can see them in the prior post.
 [/URL]
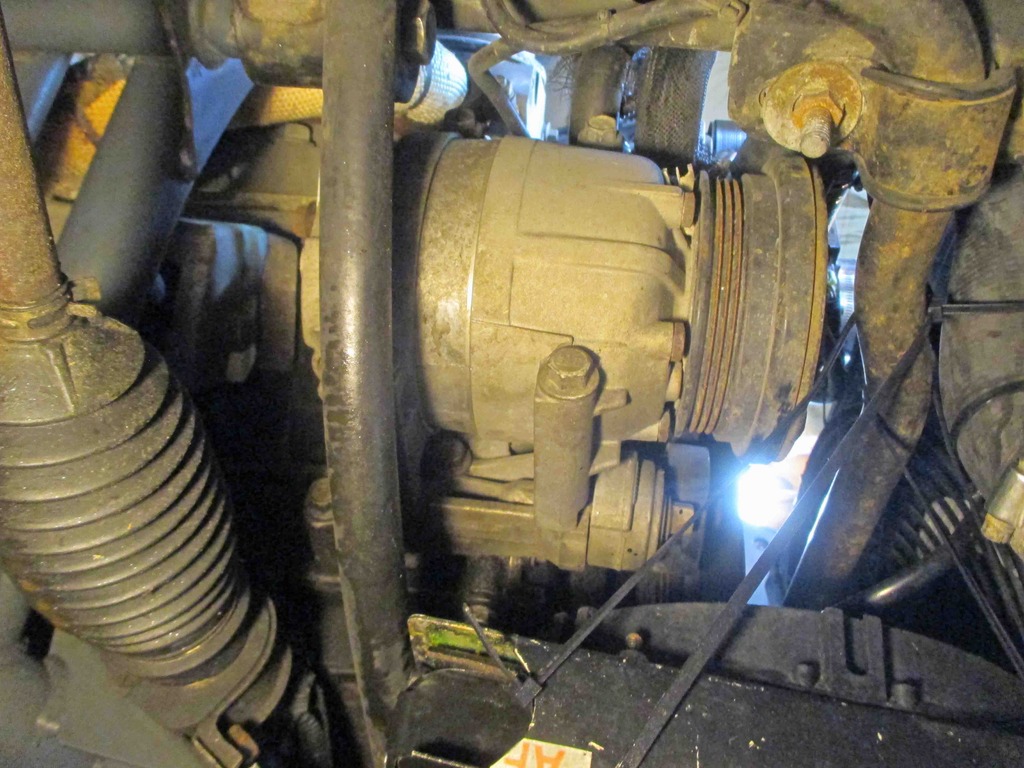 [/URL]
[/URL][/URL]


Thread Starter
V8 Miata Enthusiast
Joined: Apr 2012
Posts: 440
Likes: 67
From: Houston, Tx
I did not assemble this car, so not sure how the radiator is supposed to mount. Looks like the factory brackets were used. It is not very forward in the car, and could possibly be move about 2 inches forward if needed. I'm starting to evaluate the Sanden high mount AC kit with the Sanden mini ac compressor
Thread Starter
V8 Miata Enthusiast
Joined: Apr 2012
Posts: 440
Likes: 67
From: Houston, Tx
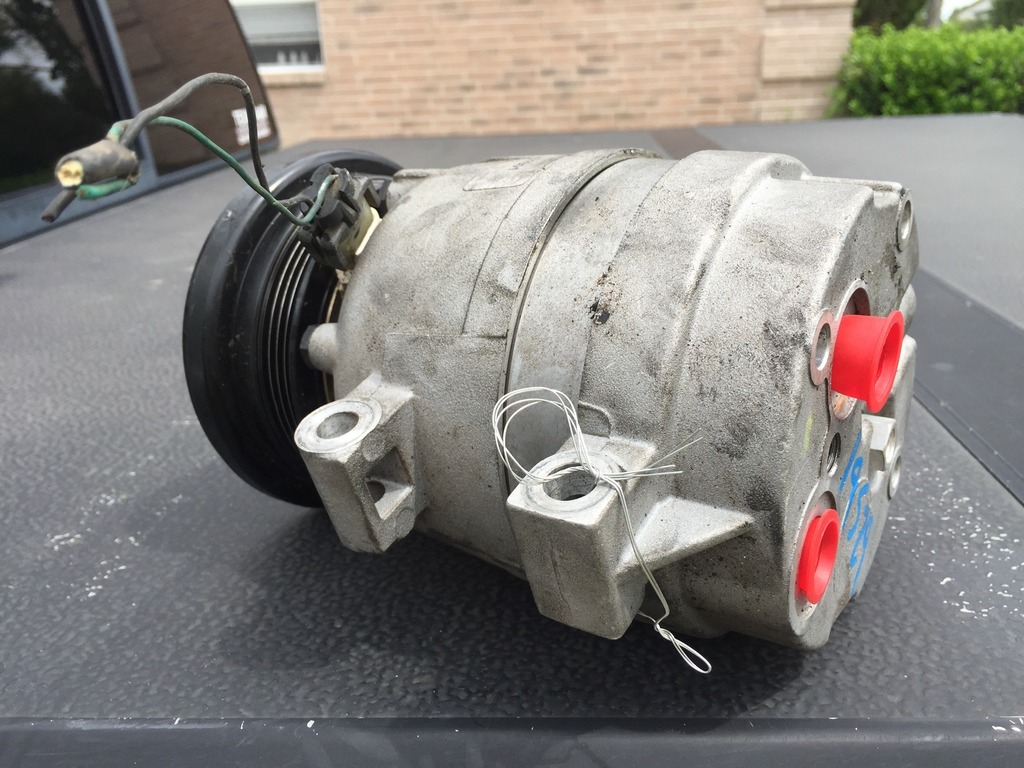
Well, just swapped the 2006 LS2 GTO compressor for a 2000 LS1 Camero compressor with fittings in the back.
Looks like I will go this route and try to relocate my radiator forward to clear the hose.
Now I need to determine if I want that adapter to have straight threaded fittings coming out, or the 90 degree bends like I ordered?

Looks like I will go this route and try to relocate my radiator forward to clear the hose.
Now I need to determine if I want that adapter to have straight threaded fittings coming out, or the 90 degree bends like I ordered?
Thread Starter
V8 Miata Enthusiast
Joined: Apr 2012
Posts: 440
Likes: 67
From: Houston, Tx
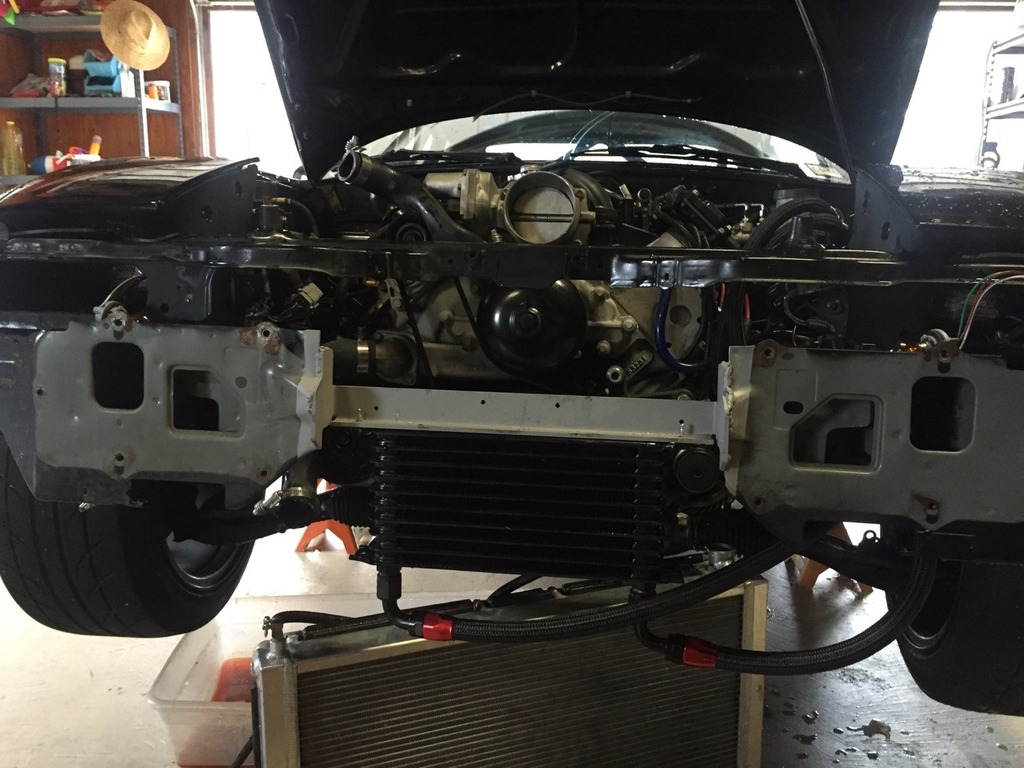
Installed the new F-Body compressor, and it still hits the radiator hose like the GTO compressor.
After seeing Jim's pictures, I'm wondering:
1. Is my radiator installed to far back, or
2. Is my engine installed too far forward?
+
I remember when I posted a picture of my oil psi switch, someone made a comment about how I was able to get that picture because on their car it was all up against the firewall.
Is the V8R subframe notched to allow the engine to be slide back and forward? With exhaust done, this may not be an option.
To move radiator forward, I will have to drop it about 1.5inches and cut away the front core support like I did on the 302 car to push it forward about 2 inches. Always something.

V8 Miata Fanatic

Joined: Oct 2012
Posts: 550
Likes: 34
From: Fuquay Varina, NC
Nope, never got it all put together. I do have the CTSV front drive accessories on my LS2 with the the compressor just sitting there, bolted against the block with the V8Roadsters adapter block bolted onto the rear of the compressor. Sorta got lazy and haven't worried about AC until now I guess...
In reading thru what Gunpilot is going through now, he and I have different set of clearances in that area under the hood. I believe I had to tilt my radiator forward at the bottom to make it more vertical than the original Mazda one was, but the top of my radiator is in regular location. ...if anybody can figure it out, GP can! (And Jim too!)
In reading thru what Gunpilot is going through now, he and I have different set of clearances in that area under the hood. I believe I had to tilt my radiator forward at the bottom to make it more vertical than the original Mazda one was, but the top of my radiator is in regular location. ...if anybody can figure it out, GP can! (And Jim too!)
Thread Starter
V8 Miata Enthusiast
Joined: Apr 2012
Posts: 440
Likes: 67
From: Houston, Tx
Decided I'm gonna drop the radiator down and forward like Jason did (and I followed) on our Ford builds. This should give me plenty of room. Found this website that had some good mounting ideas: Nathan's LS1 Miata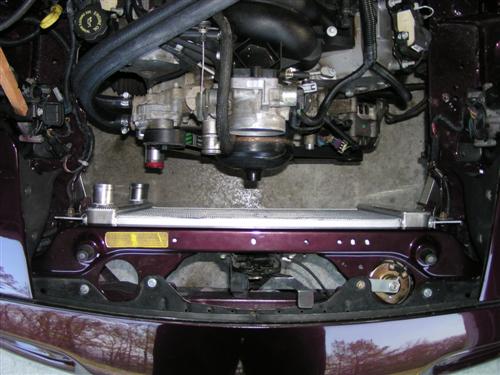

Thread Starter
V8 Miata Enthusiast
Joined: Apr 2012
Posts: 440
Likes: 67
From: Houston, Tx
Sometimes to go forward, you have to take a step (or 2) back. LOL
Got it mounted under the core support lip now. Used stock mounts reversed sides. Had to do some cutting and grinding, but seems to be solid. Still need a support on bottom, but at least radiator hose is off compressor. I will work on mounting up the condenser Saturday night. Once it is all mounted and sturdy, I will take it all out and paint everything.
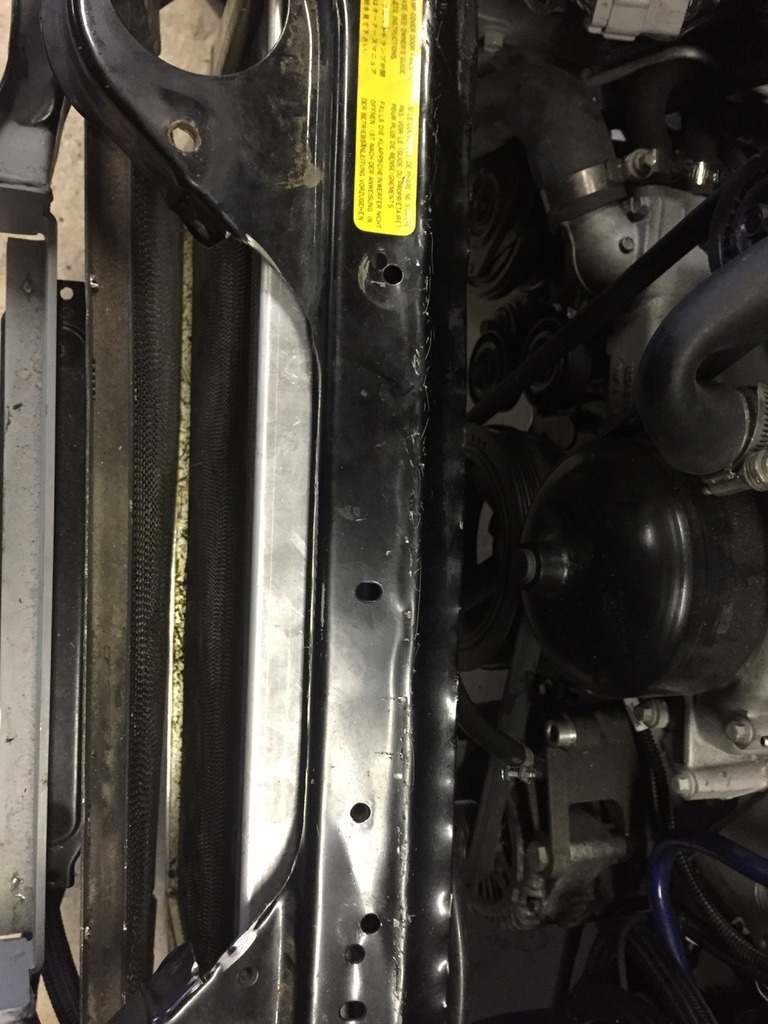

Got it mounted under the core support lip now. Used stock mounts reversed sides. Had to do some cutting and grinding, but seems to be solid. Still need a support on bottom, but at least radiator hose is off compressor. I will work on mounting up the condenser Saturday night. Once it is all mounted and sturdy, I will take it all out and paint everything.


Thread Starter
V8 Miata Enthusiast
Joined: Apr 2012
Posts: 440
Likes: 67
From: Houston, Tx
Holy crap batman! Think I'm a bit over whelmed here. Had the weekend to think about it.
So, I pulled out every AC line I ever hoarded in my garage. Laid them out to try and make this work without too much fab work. Think I have the condenser finally mounted to the radiator with some custom bracket work. Most of lines ran, and waiting for new AC compressor adapter in the mail today. Have a bit of time today to stare it down and make it work. Hopefully pictures to follow later this evening.
So, I pulled out every AC line I ever hoarded in my garage. Laid them out to try and make this work without too much fab work. Think I have the condenser finally mounted to the radiator with some custom bracket work. Most of lines ran, and waiting for new AC compressor adapter in the mail today. Have a bit of time today to stare it down and make it work. Hopefully pictures to follow later this evening.
Thread Starter
V8 Miata Enthusiast
Joined: Apr 2012
Posts: 440
Likes: 67
From: Houston, Tx
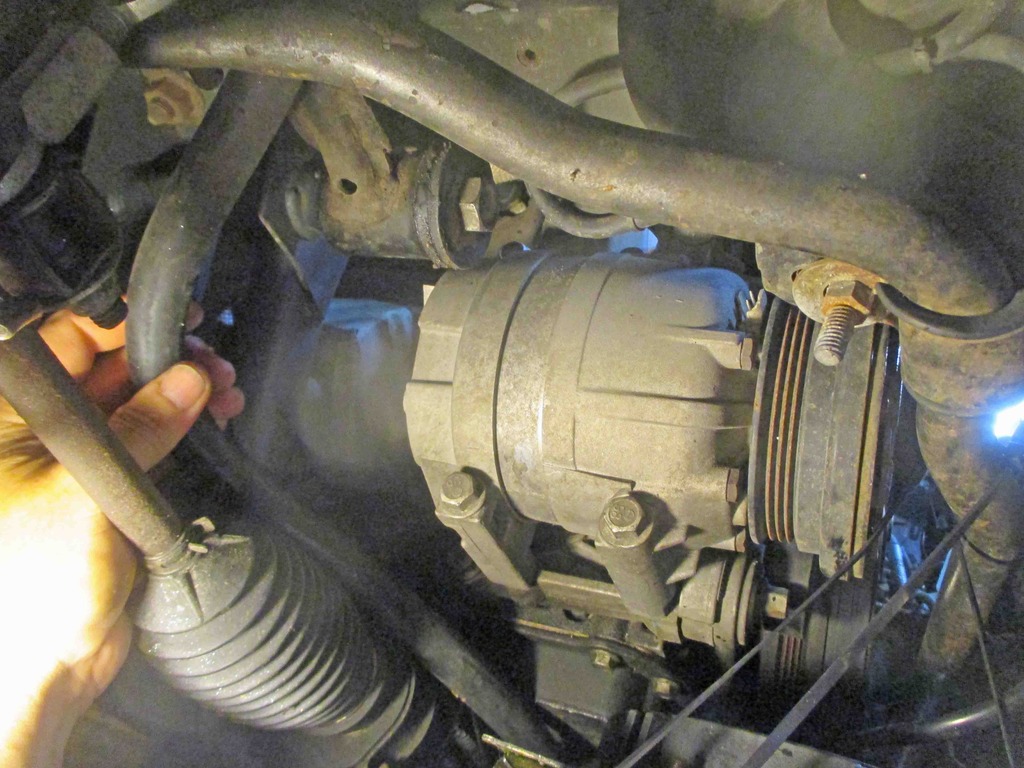
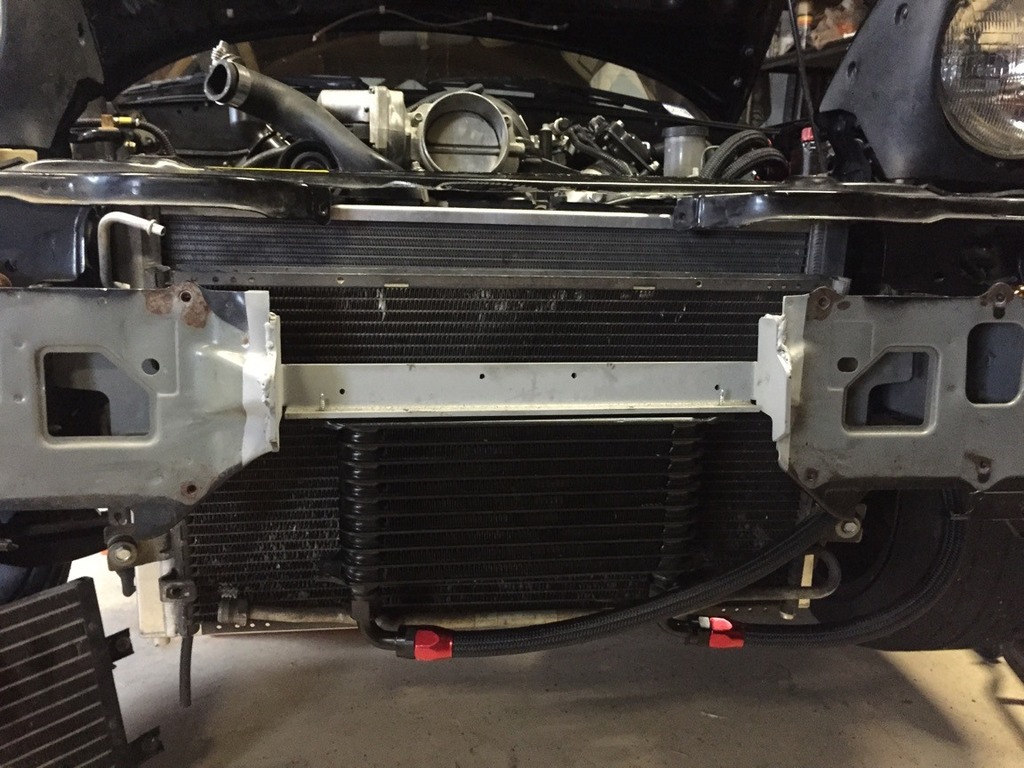
So close. Here is a picture of the brackets I made using some scrap aluminum and the stock radiator brackets:
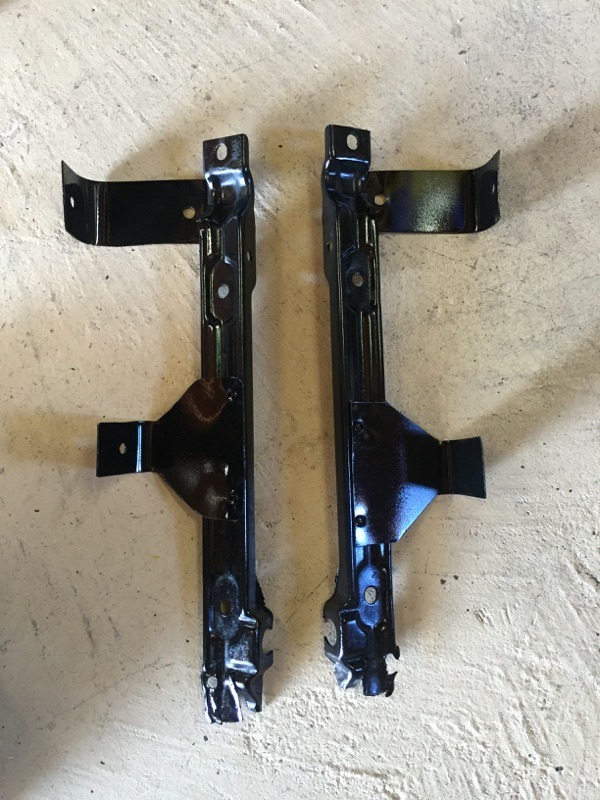
And assembled:
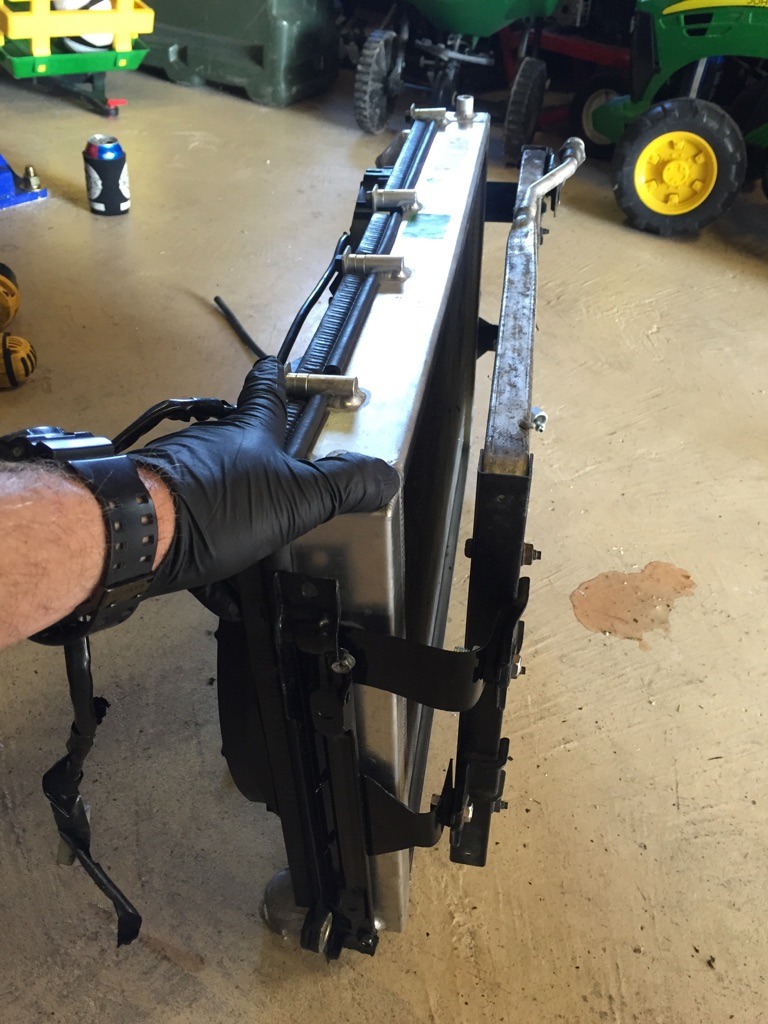

And installed:
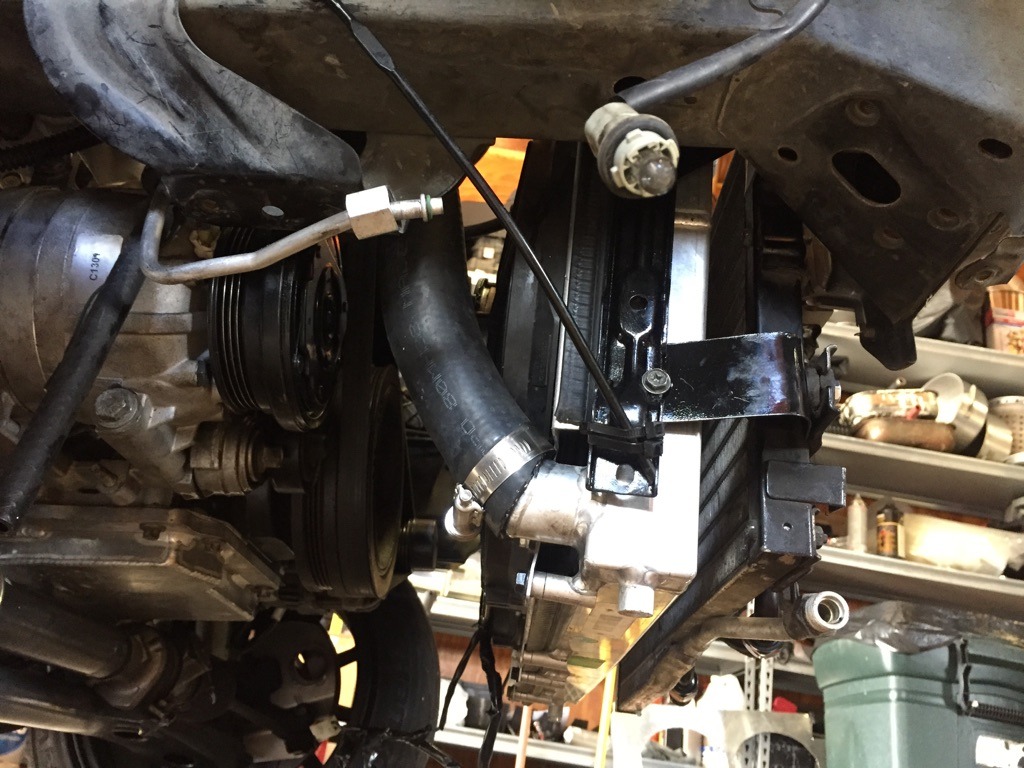
Need one spot weld on lower brace I made for radiator, and it should be good. New hose clears compressor. Now I am just waiting for the post man! lol.

And assembled:


And installed:

Need one spot weld on lower brace I made for radiator, and it should be good. New hose clears compressor. Now I am just waiting for the post man! lol.
Thread Starter
V8 Miata Enthusiast
Joined: Apr 2012
Posts: 440
Likes: 67
From: Houston, Tx
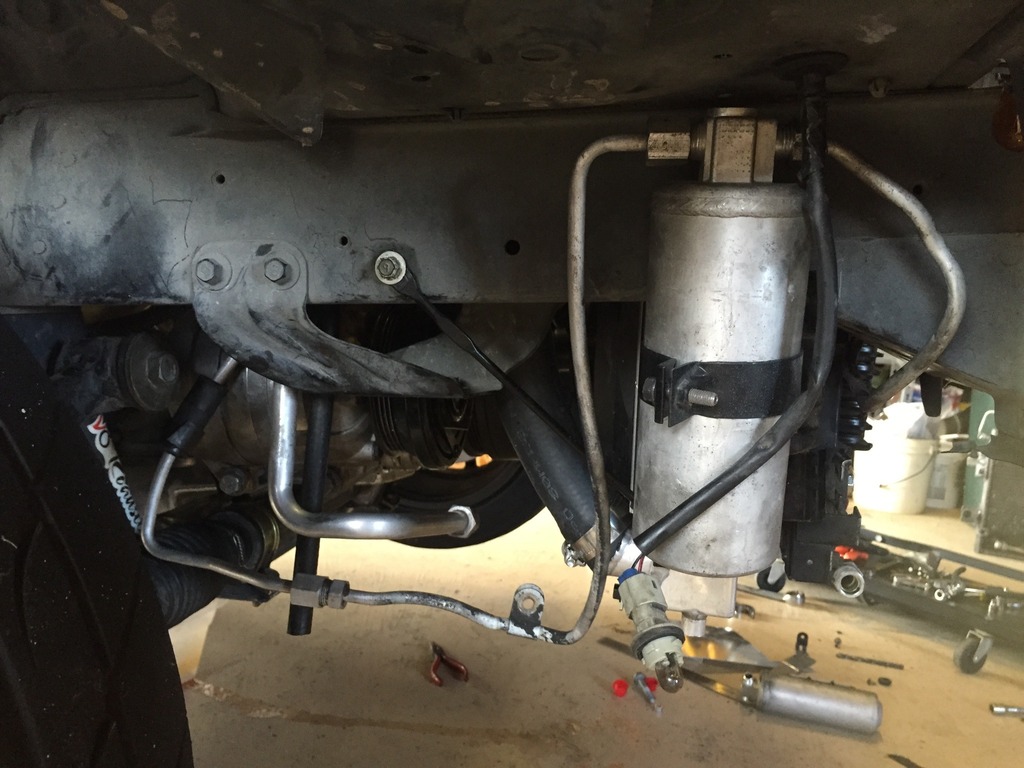
Drier mounted using old bracket off of condenser. Finally got my compressor adapter in and mounted. Funny thing is, Jason's Ford lines fit on ends, but were to long for my application. I need to figure out if having this 90 off the compressor is best, or have the connections come straight out will be better. The space is very tight, and just about any routing will end up near the headers.

Jim Stainer
Joined: Jul 2011
Posts: 2,462
Likes: 62
From: Sunny SW Minnesota
I was starting to wonder if you had a boss frog frame with a V8R sticker on it! I guess the radiator was just farther back then. Hope that all goes in there well for you.
So what are you using for lines there?
So what are you using for lines there?

V8 Miata Participant
Joined: Jul 2013
Posts: 314
Likes: 9
I may be wrong (probably), but I think the condenser should be a lot closer to the radiator than that. The air should have no choice but to go through the condenser. Unless you have some ducting that is going around it that isn't in place yet.
V8 Miata Participant
Joined: Nov 2014
Posts: 296
Likes: 12
From: Atlanta, Ga
I have mine spaced out a little too the same. I put one small fan on the front of the condenser pushing air into it to help out which comes on only when the A/C is on. I've learned that it is really important to have air flow through the condenser (like when at a stop light) other wise high pressure goes way way up really fast.
Thread Starter
V8 Miata Enthusiast
Joined: Apr 2012
Posts: 440
Likes: 67
From: Houston, Tx
I spaced mine because I had issues with radiator cooling in my 302 when they were stacked. Trying something different on the LS2. I plan on putting a shroud on top and the sides when I have the plumbing all worked out. I'll be taking the car to the AC shop this week to see if I can get some custom lines done.
Thread Starter
V8 Miata Enthusiast
Joined: Apr 2012
Posts: 440
Likes: 67
From: Houston, Tx
Took a bit to figure out how I wanted to do this, but have all parts on order. Here is what I'm using:
I have an LS2 motor with GTO accessories.
Using a 2000 Firebird compressor with connections on the rear of the compressor.
Using an adapter to turn up the compressor connection and turn them into threaded connections. One 3/4 and one 7/8.
Custom hoses will be:
Low side - M22 straight adapter to the evaporator, a number 10 hose with inline service port, 7/8 90 degree adapter to compressor
High side - M16 straight adapter , a number 6 hose with inline service port, a 90 degree M16 adapter to the dryer
Condenser - 3/4 90 degree adapter off of compressor with number 8 hose to a M20 straight adapter to the condenser.
All my adapter were from coldhose.com Once I have it all crimped and working, I can post links and part numbers.
I'm also going to put an inline pressure switch in the high side line. Ill be using a relay operated off the stock Miata button on AC controls to turn compressor on and off.
Last edited by Gunpilot; Oct 8, 2015 at 08:22 AM. Reason: wrong sizes on compressor adapter
Thread Starter
V8 Miata Enthusiast
Joined: Apr 2012
Posts: 440
Likes: 67
From: Houston, Tx
Got the parts in today:
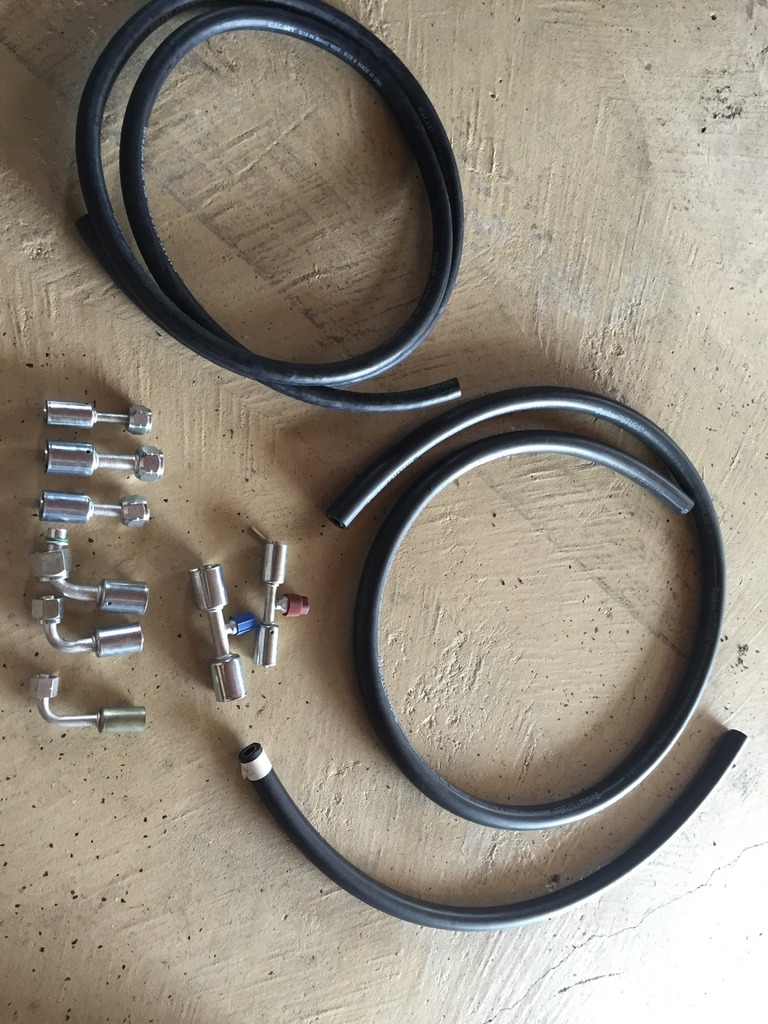
Once I have it installed and tested, I can definitely get some more sets fabbed up. Had to tackle some wiring issues today, but finally got the factory AC switch to activate the factory relays. Hopefully I will have time next week to get the lines done and installed. I think this will be a good solution as all lines will be soft and routed away from the headers.

Once I have it installed and tested, I can definitely get some more sets fabbed up. Had to tackle some wiring issues today, but finally got the factory AC switch to activate the factory relays. Hopefully I will have time next week to get the lines done and installed. I think this will be a good solution as all lines will be soft and routed away from the headers.


Thread Starter
V8 Miata Enthusiast
Joined: Apr 2012
Posts: 440
Likes: 67
From: Houston, Tx
For the wiring, I ran into issues since the PO had removed all the interior Miata harness that originally ran to the Miata ECM. I found some good stuff on Flyin Miata and followed this:
Cut the light green/black wire on A/C high pressure switch (on the aluminum A/C tube). Attach the switch side of the cut wire to the stripe side of a diode. Attach the other side of the diode to the blue/black trigger wire at the A/C clutch relay. Don’t crimp this side yet, see below. Now when you press the A/C button it triggers the AC clutch relay directly, and the diode is in-line to prevent back-feeding.
You must now run a jumper wire with another diode teed between the blue/white trigger wire at the condenser fan relay & the blue/black trigger wire at the AC clutch relay. Install the diode such that the stripe faces the clutch relay. You may now crimp the two that you were leaving for the T connection. Make sure to protect all diodes from shorting. Now the fan will come on with the clutch, but the clutch will not come on with the fan.
This is all under the hood at the factory relays. I have both my radiator fans running off the coolant switch and adding a separate fan for the condenser activated as stated in the instructions above.


