When you click on links to various merchants on this site and make a purchase, this can result in this site earning a commission. Affiliate programs and affiliations include, but are not limited to, the eBay Partner Network.
Edit:
Will need to redo the brake booster vacuum line to add a check valve.
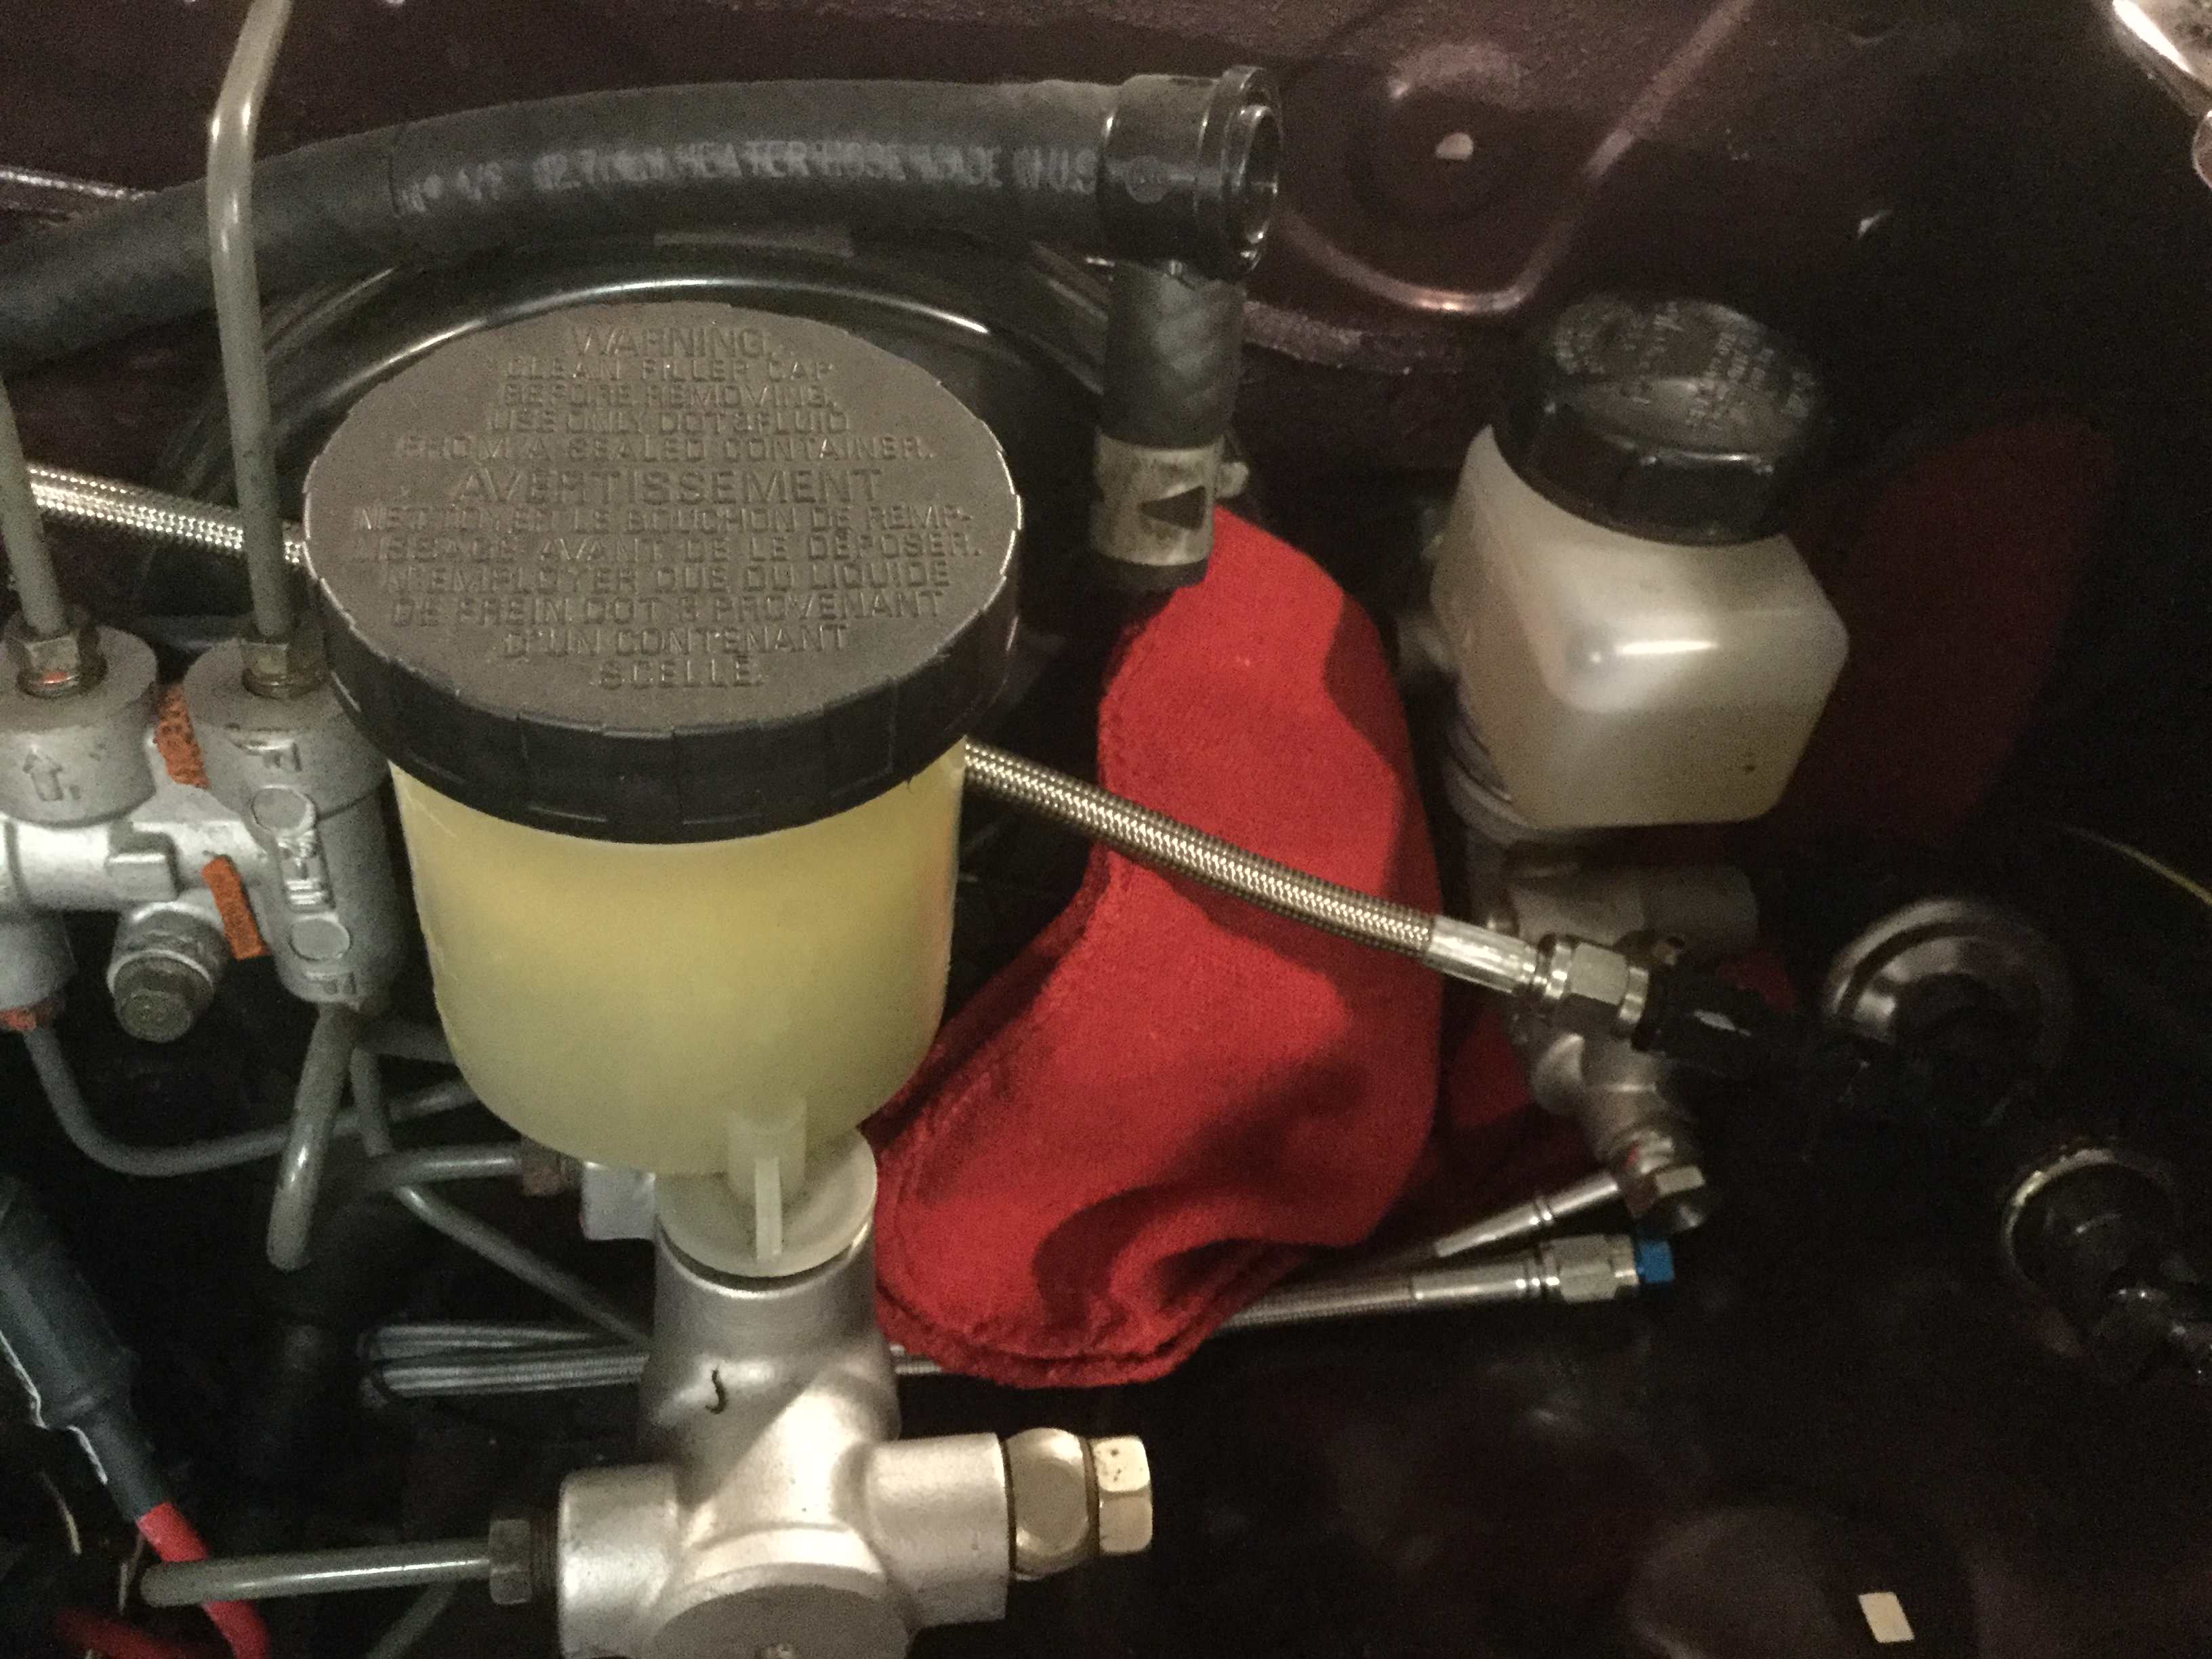
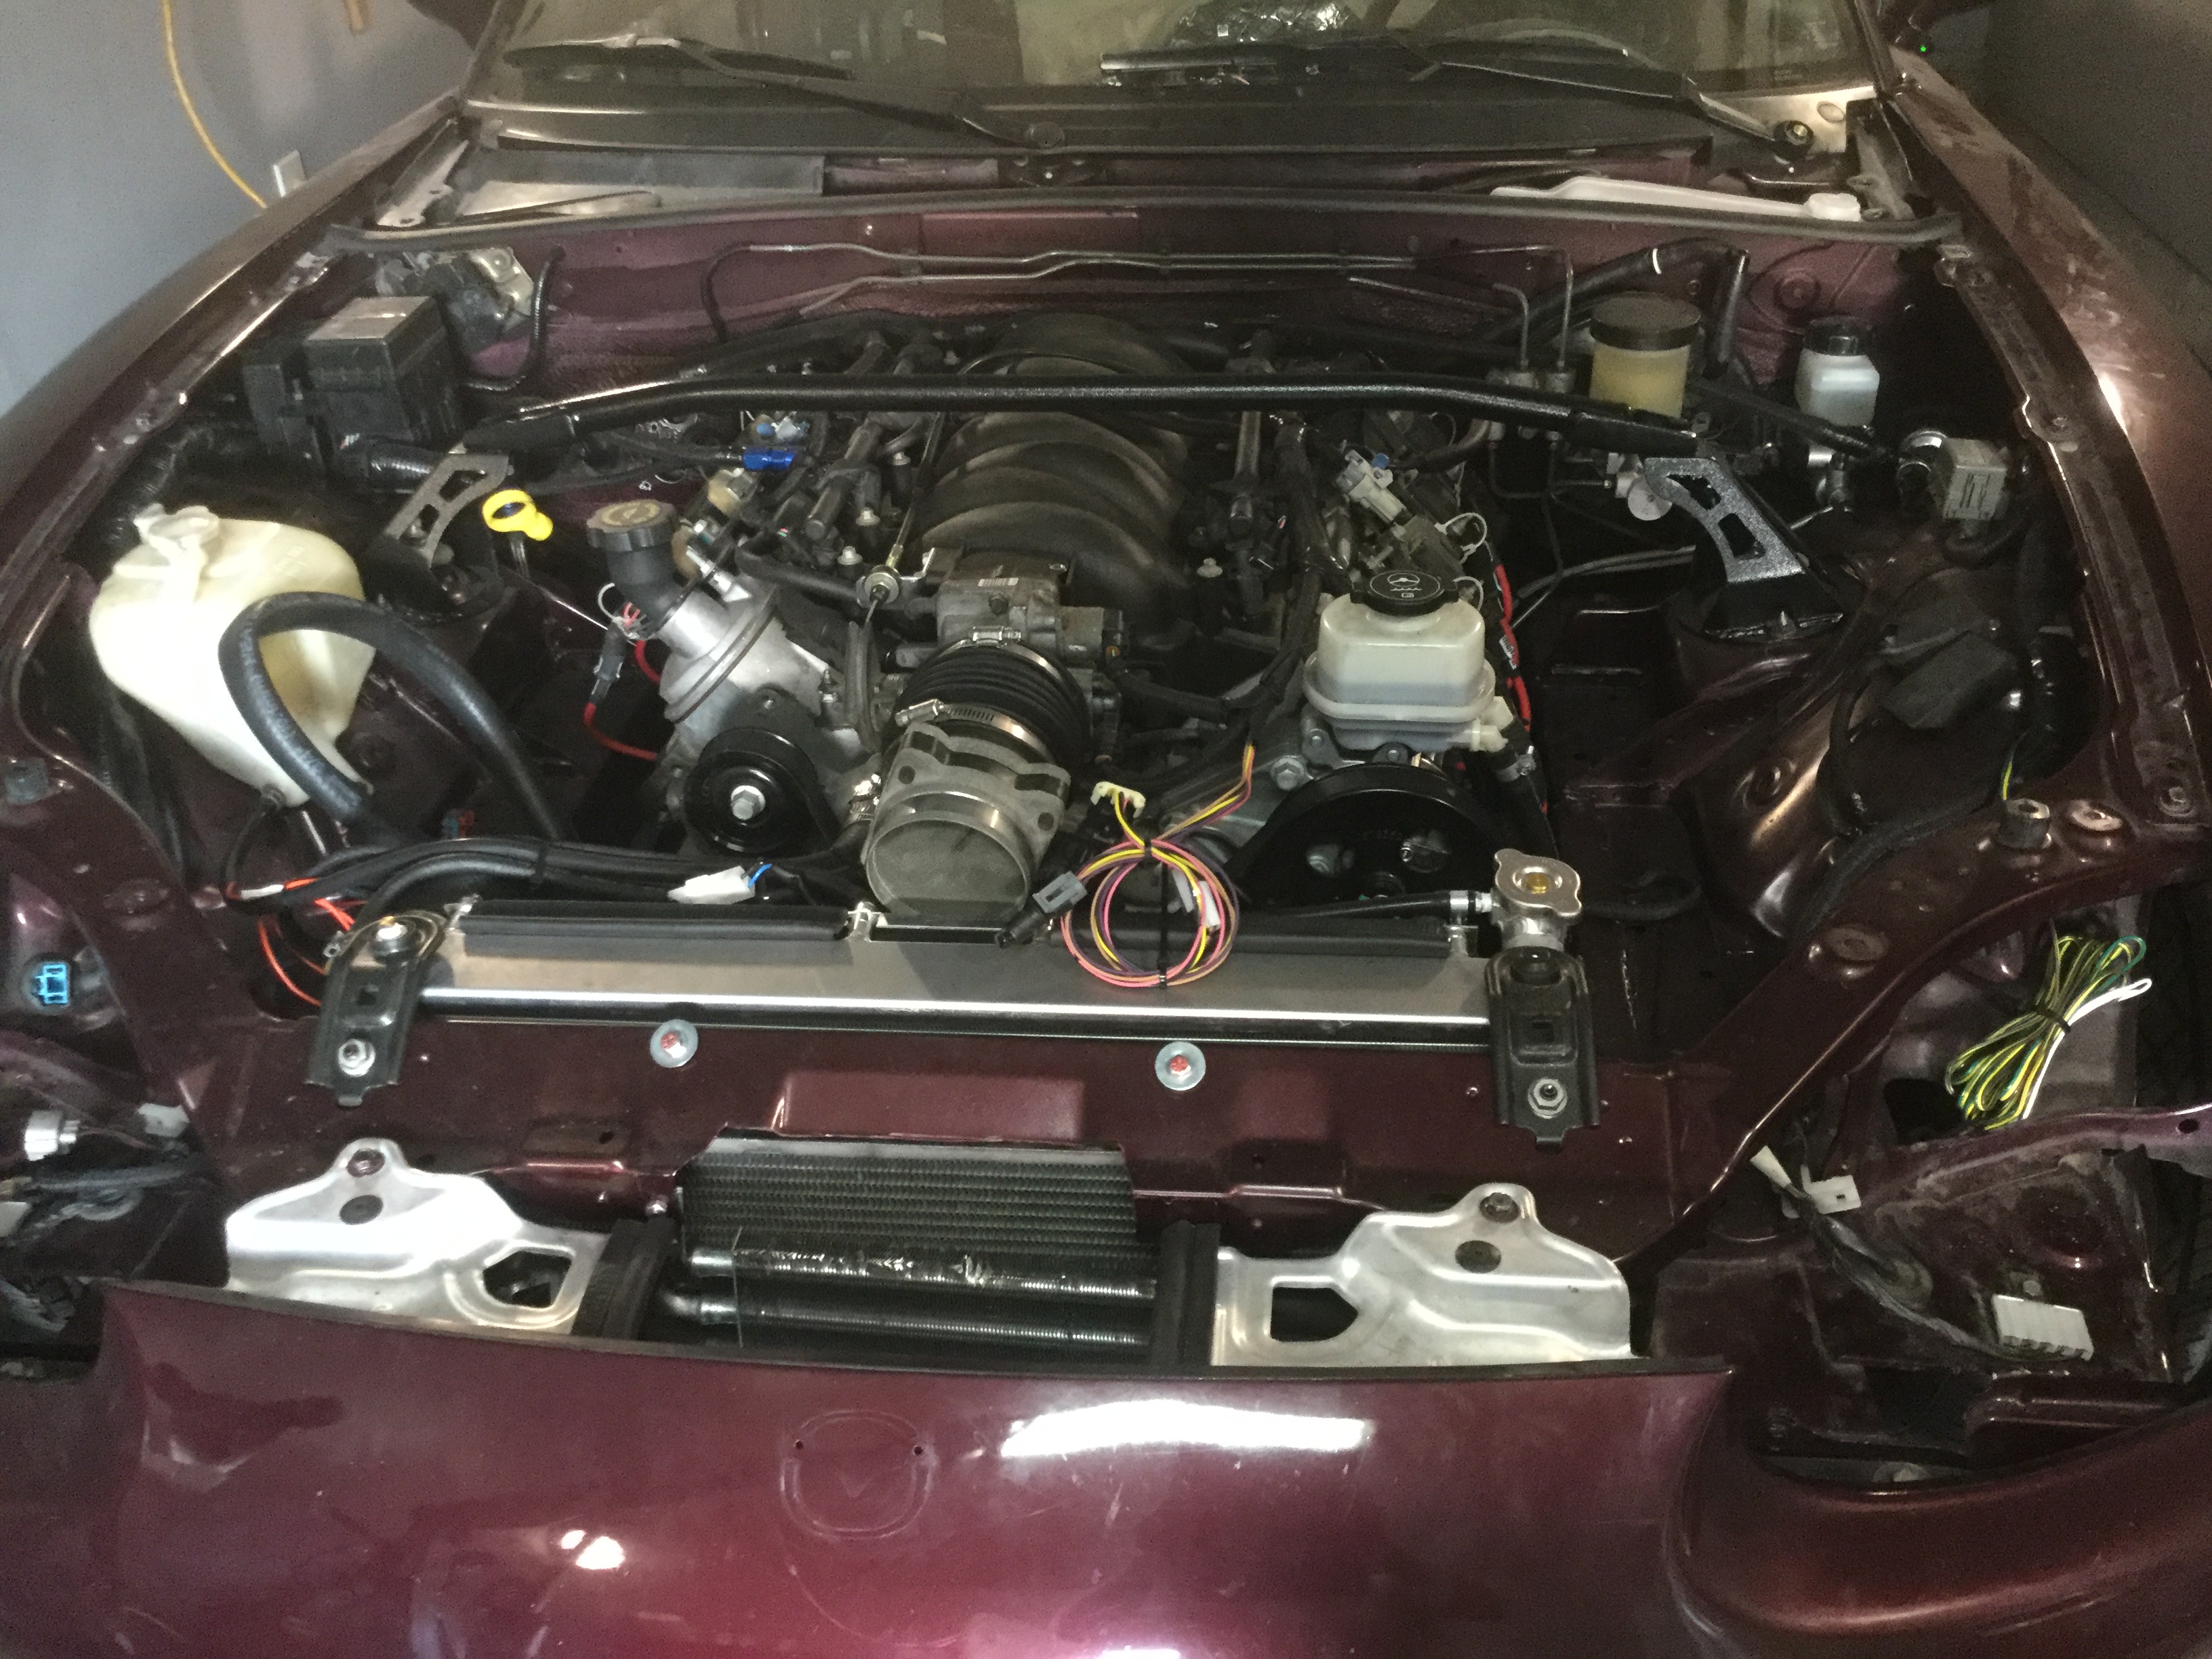
This is a picture of the area round the brake and clutch master cylinders in the engine compartment. A bit sloppy at the moment but it will get cleaned up in the next couple of days. I need to work up a clamp or bracket to attach the two oil pressure sensors shown on the right side of the picture to the fender so that they cannot bounce around while the car gets driven down the road.
You can also see my solution for mating the 1/2" engine vacuum hose to the 3/8" brake master cylinder vacuum unit. The 90 degree fitting in the top center of the picture came with either the Miata or the Camaro (can't remember which) but works beautifully to turn the corner and look factory. I did have to drill out the innards as it was originally a one way valve of some sort. The rag is just in there to flag to me that I still have work to do in that area to clean everything up and make it look as close to factory as I can reasonably get.
After the insight that Tbone passed on, I bought a few items to do the power brake master cylinder vacuum line in a different manner than I had originally planned. Hopefully everything is done properly now and still looks close to factory.
The (hopefully) correct piece consists of a brass 90 degree elbow that has 3/8" barbs on both ends, a check valve that has 3/8" barbs on both ends, and a 3/8" x 1/2" barbed reducing fitting. The black is where I painted the brass so it would fade away into the other black parts rather than standing out.
Edit #2;
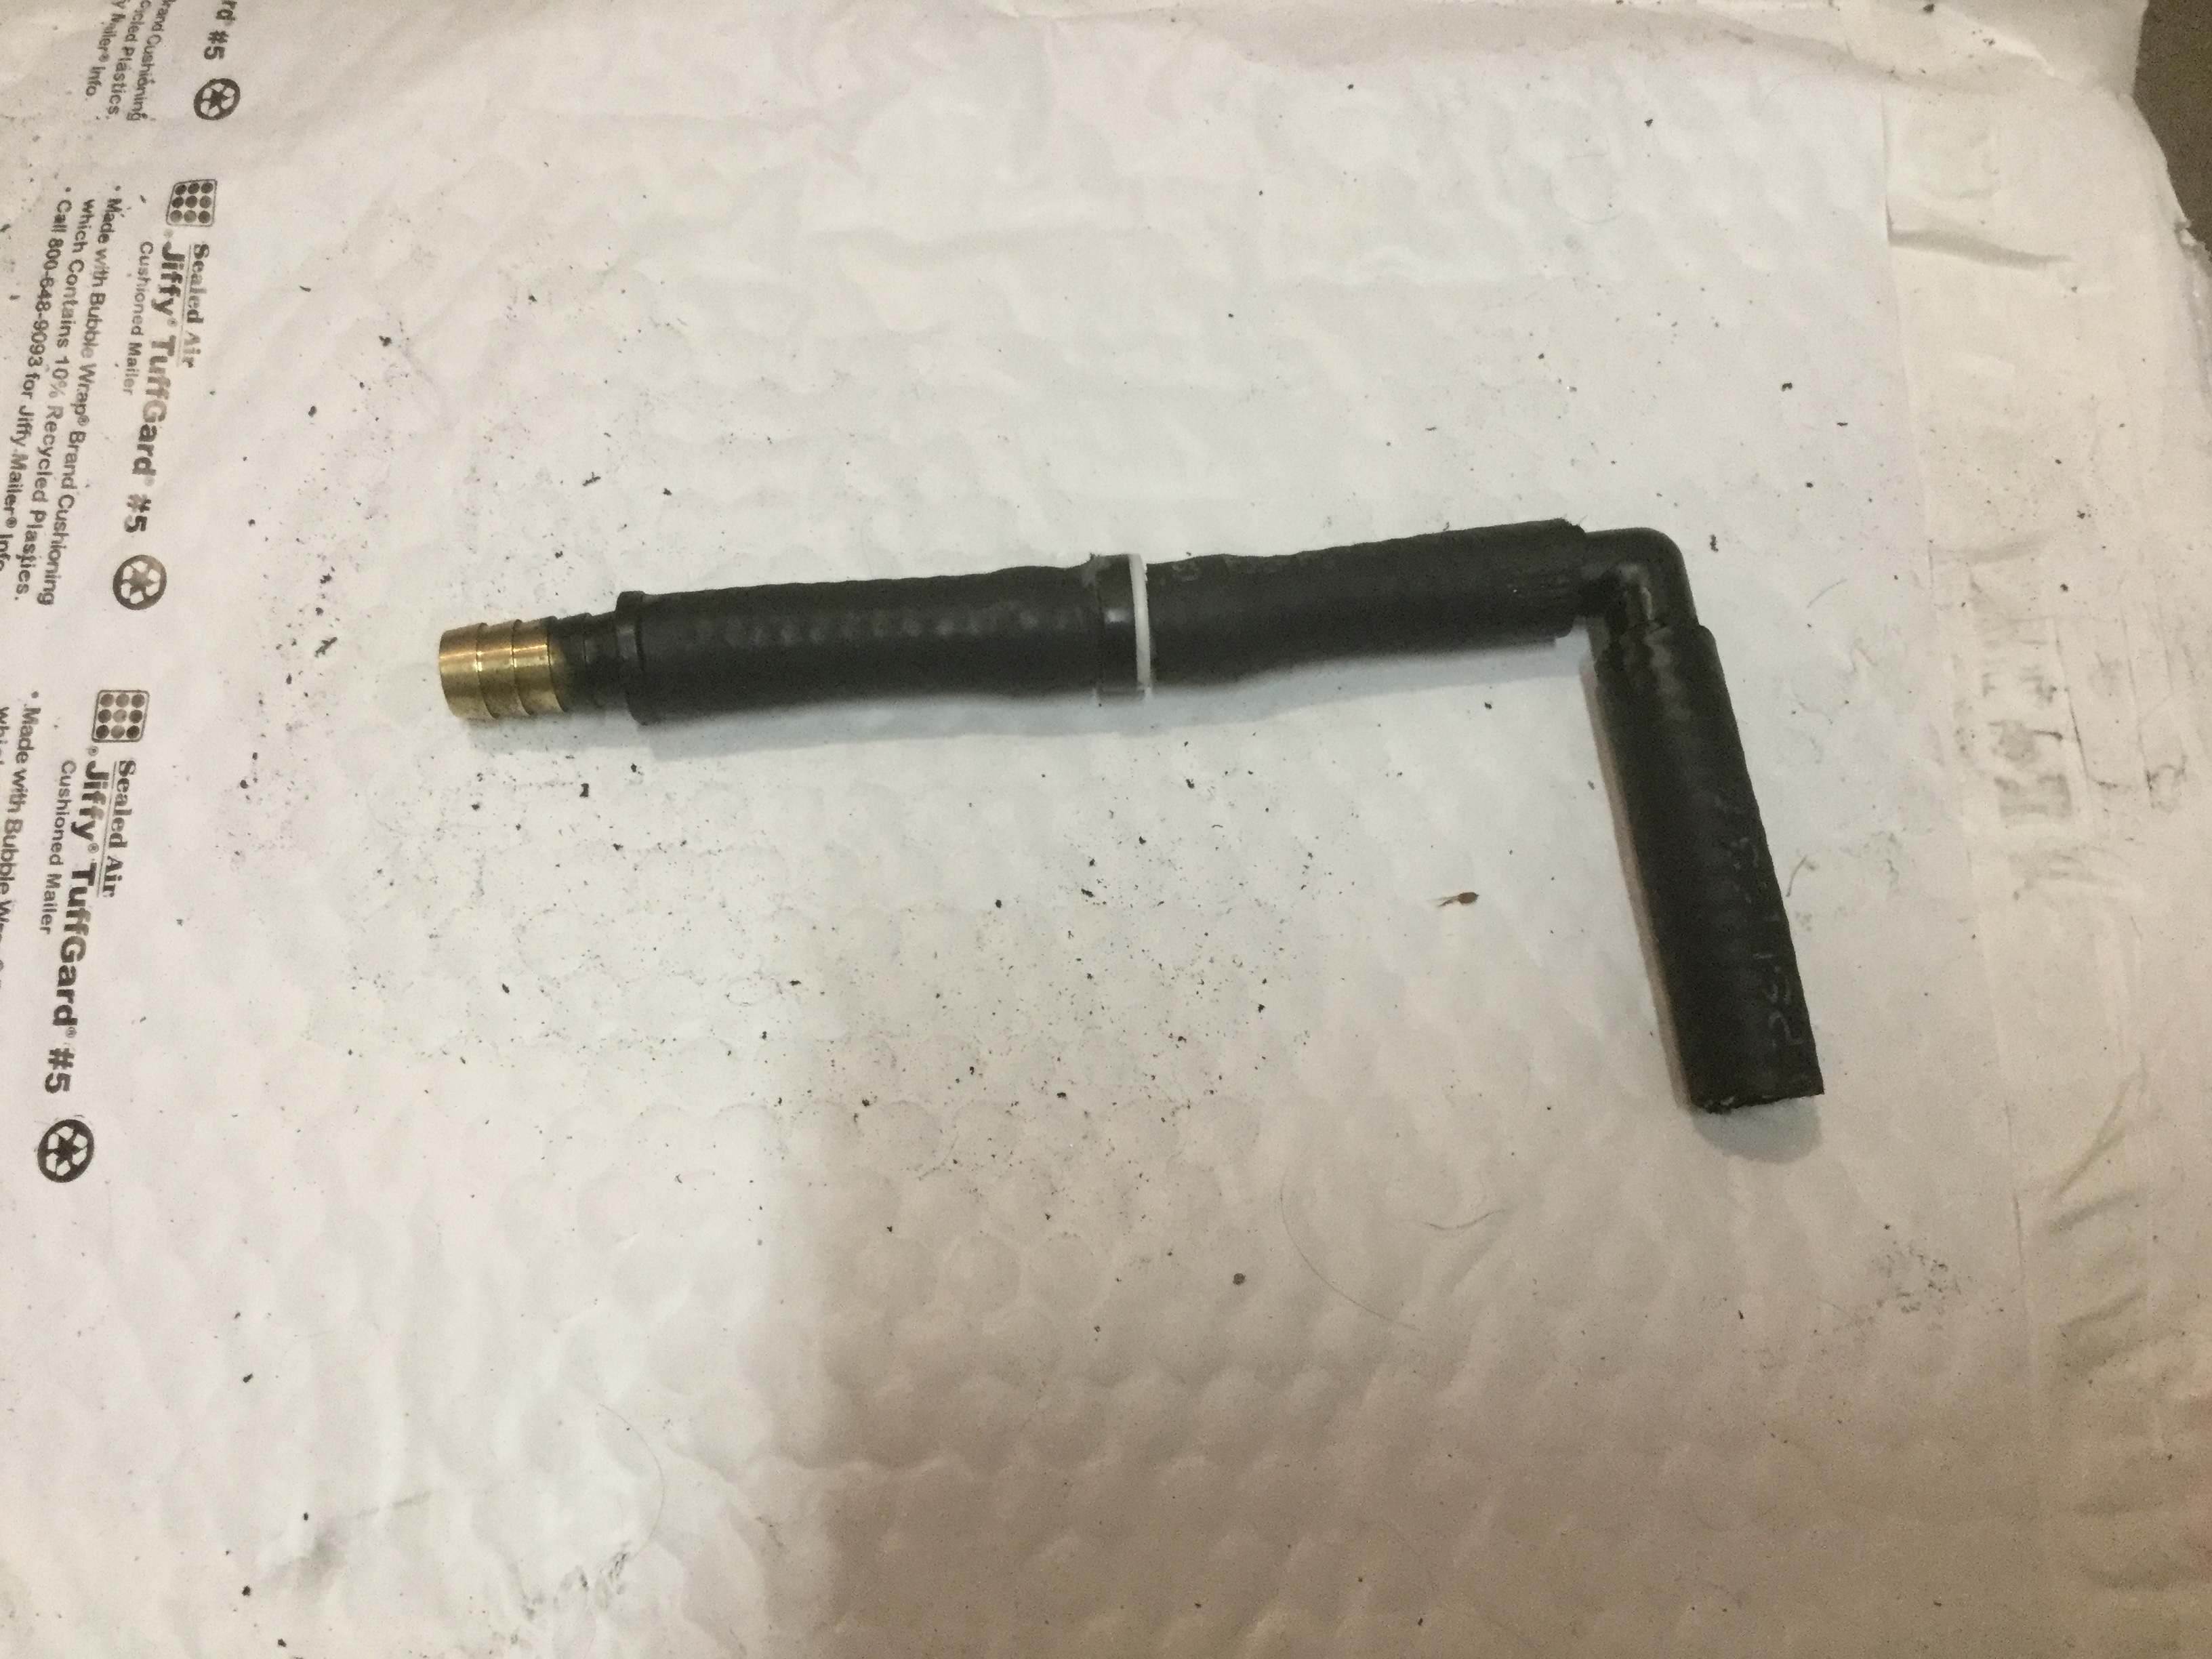
Decided I did not like the look of the brass 90 degree fitting so went to the auto parts store and looked thru a catalog they had of 3/8" hoses that are pre-bent.
Found one that looked about right and spent $24 to buy it.
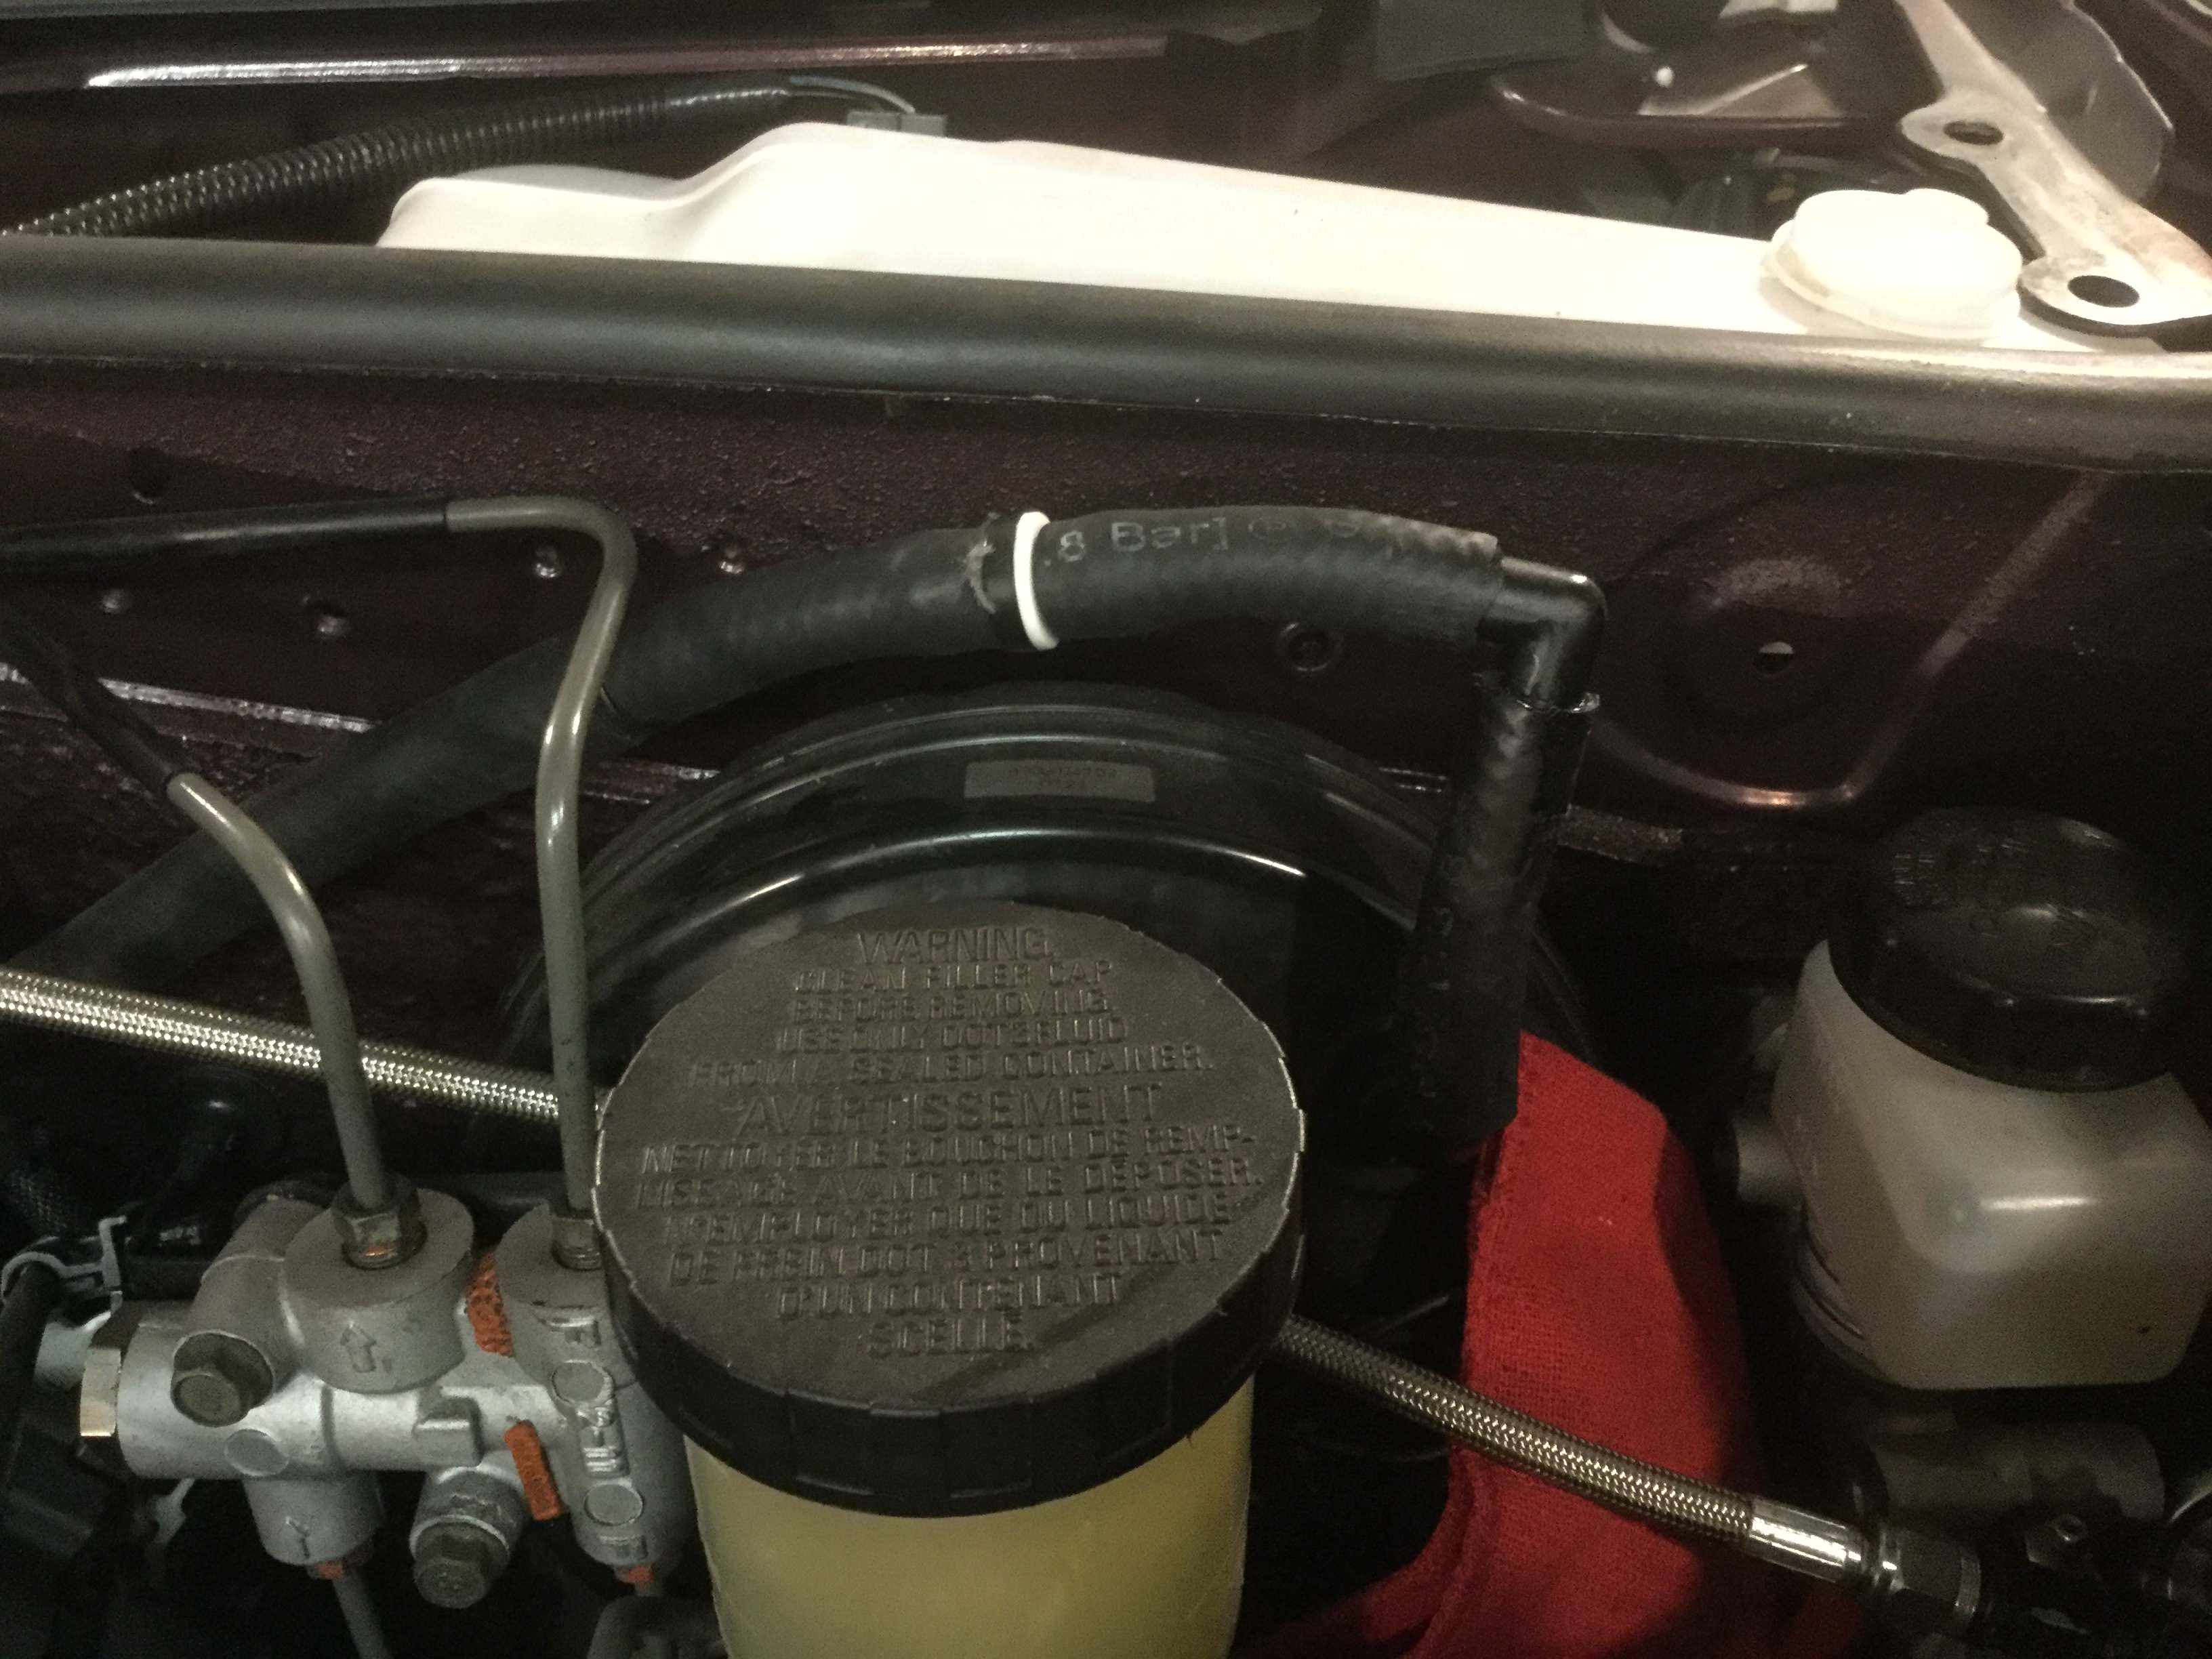
After moving the check valve and 3/8" to 7/16" adaptor as close to the engine as possible to hide them from sight the new hose was installed and fit great. The new hose came with some mesh protective cover on it for a really nice finished look.
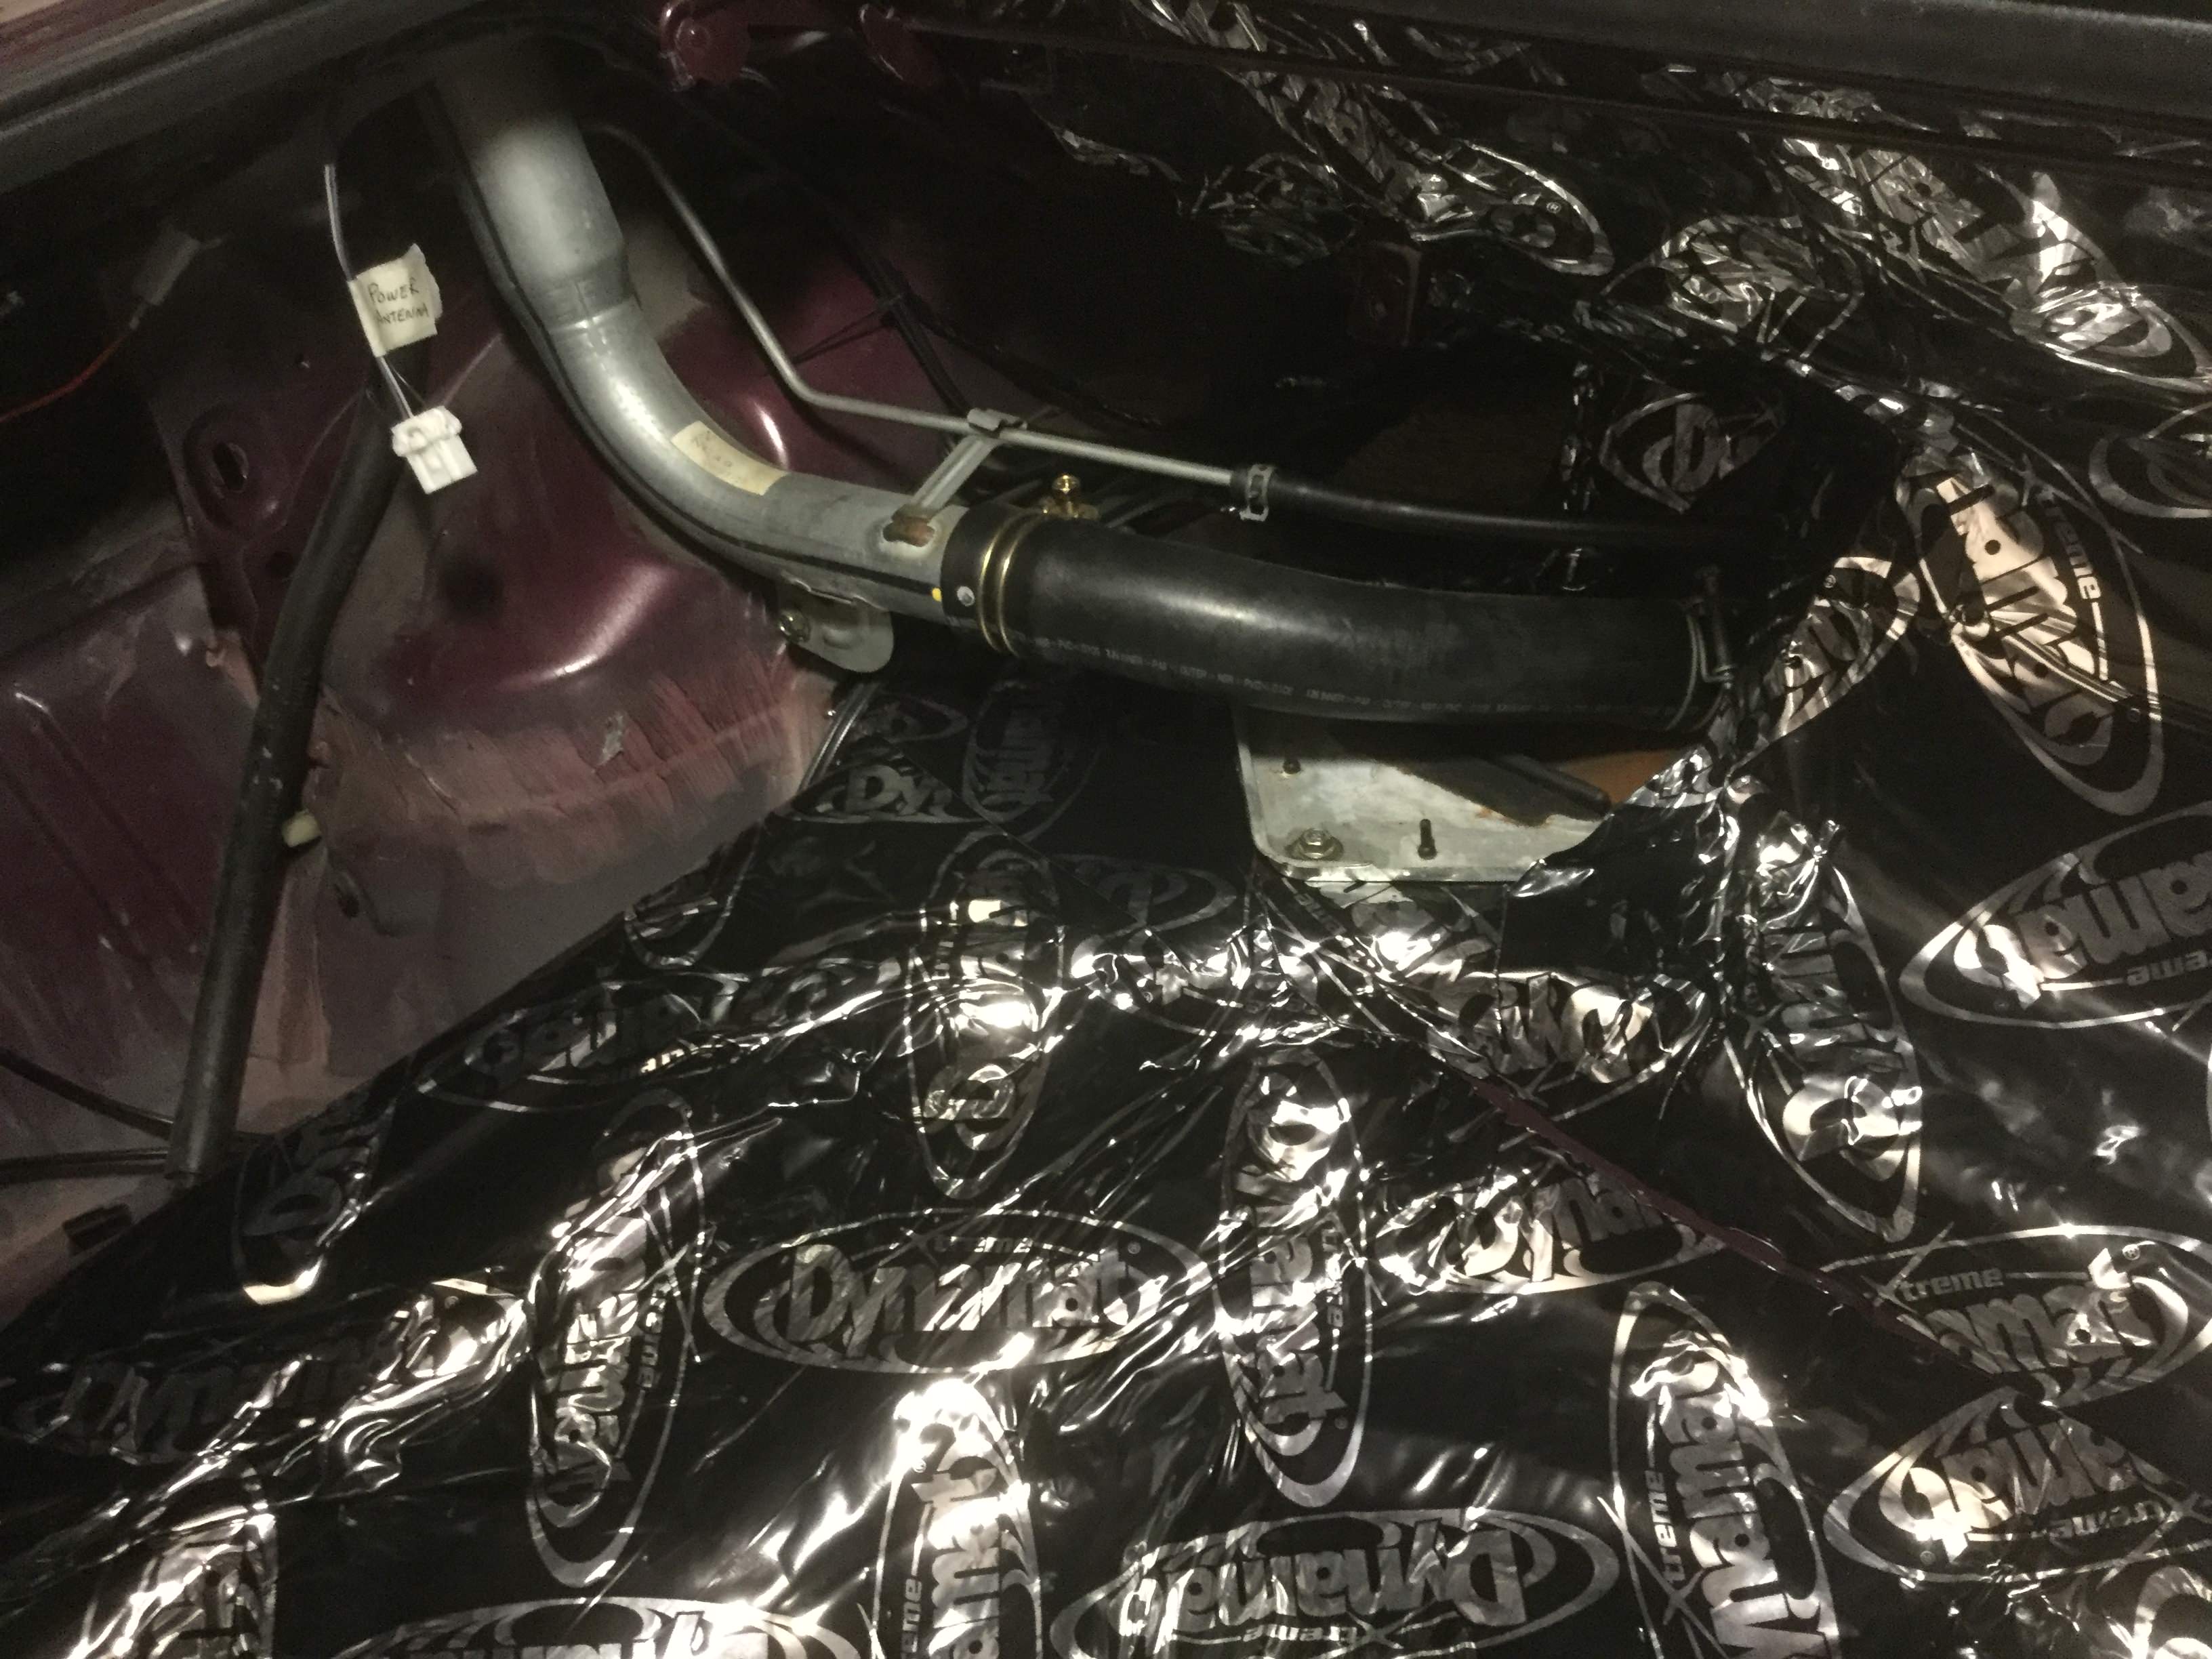
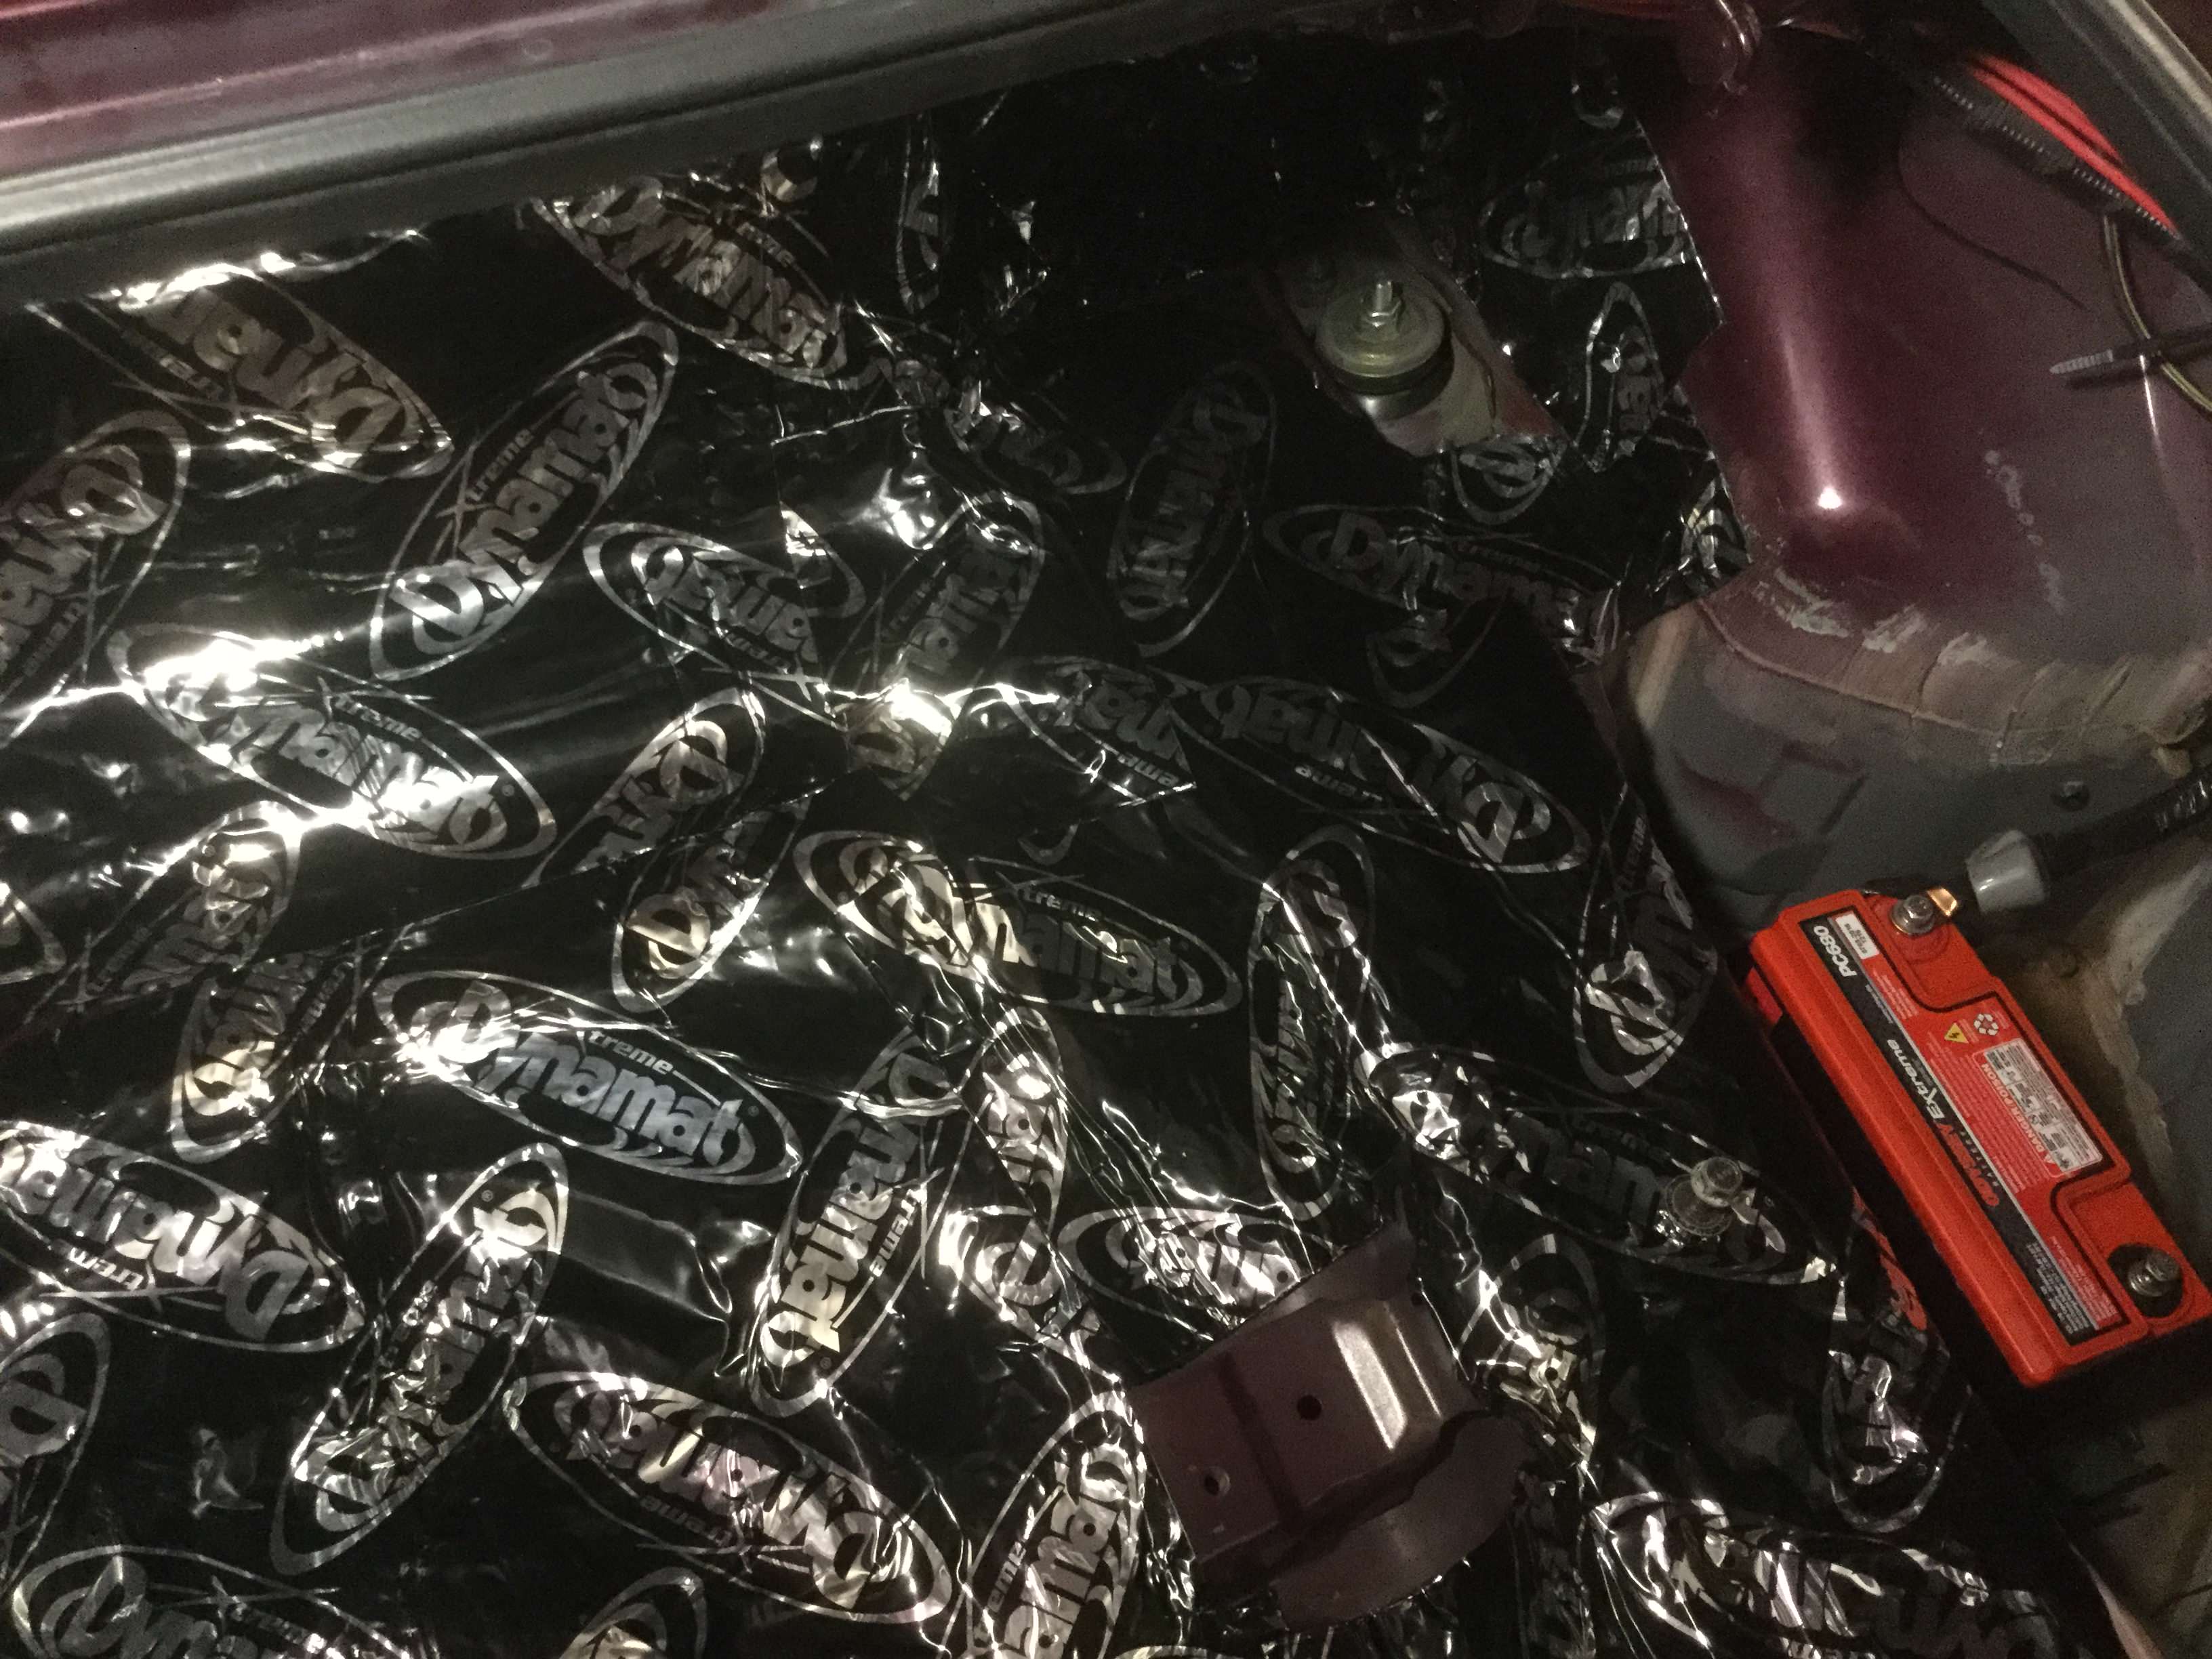
Another little project that has taken an evening so far is putting some sound insulating product where the sprayed on Lizard Skin was not applied. Some have used hardware store adhesive sheets of insulating product but after thinking it over and looking at the hardware store stuff, I decided to spend almost $200 and use Dynomat sheet sound deadening product.
Got the main areas of the trunk and the back portion of the passenger compartment where the soft top lays. Still need to do some of the small areas but about 90% of the area has been covered. This is the final thing to be installed before actually re-installing the interior of the car so it definitely gives me a feeling that progress is being made.
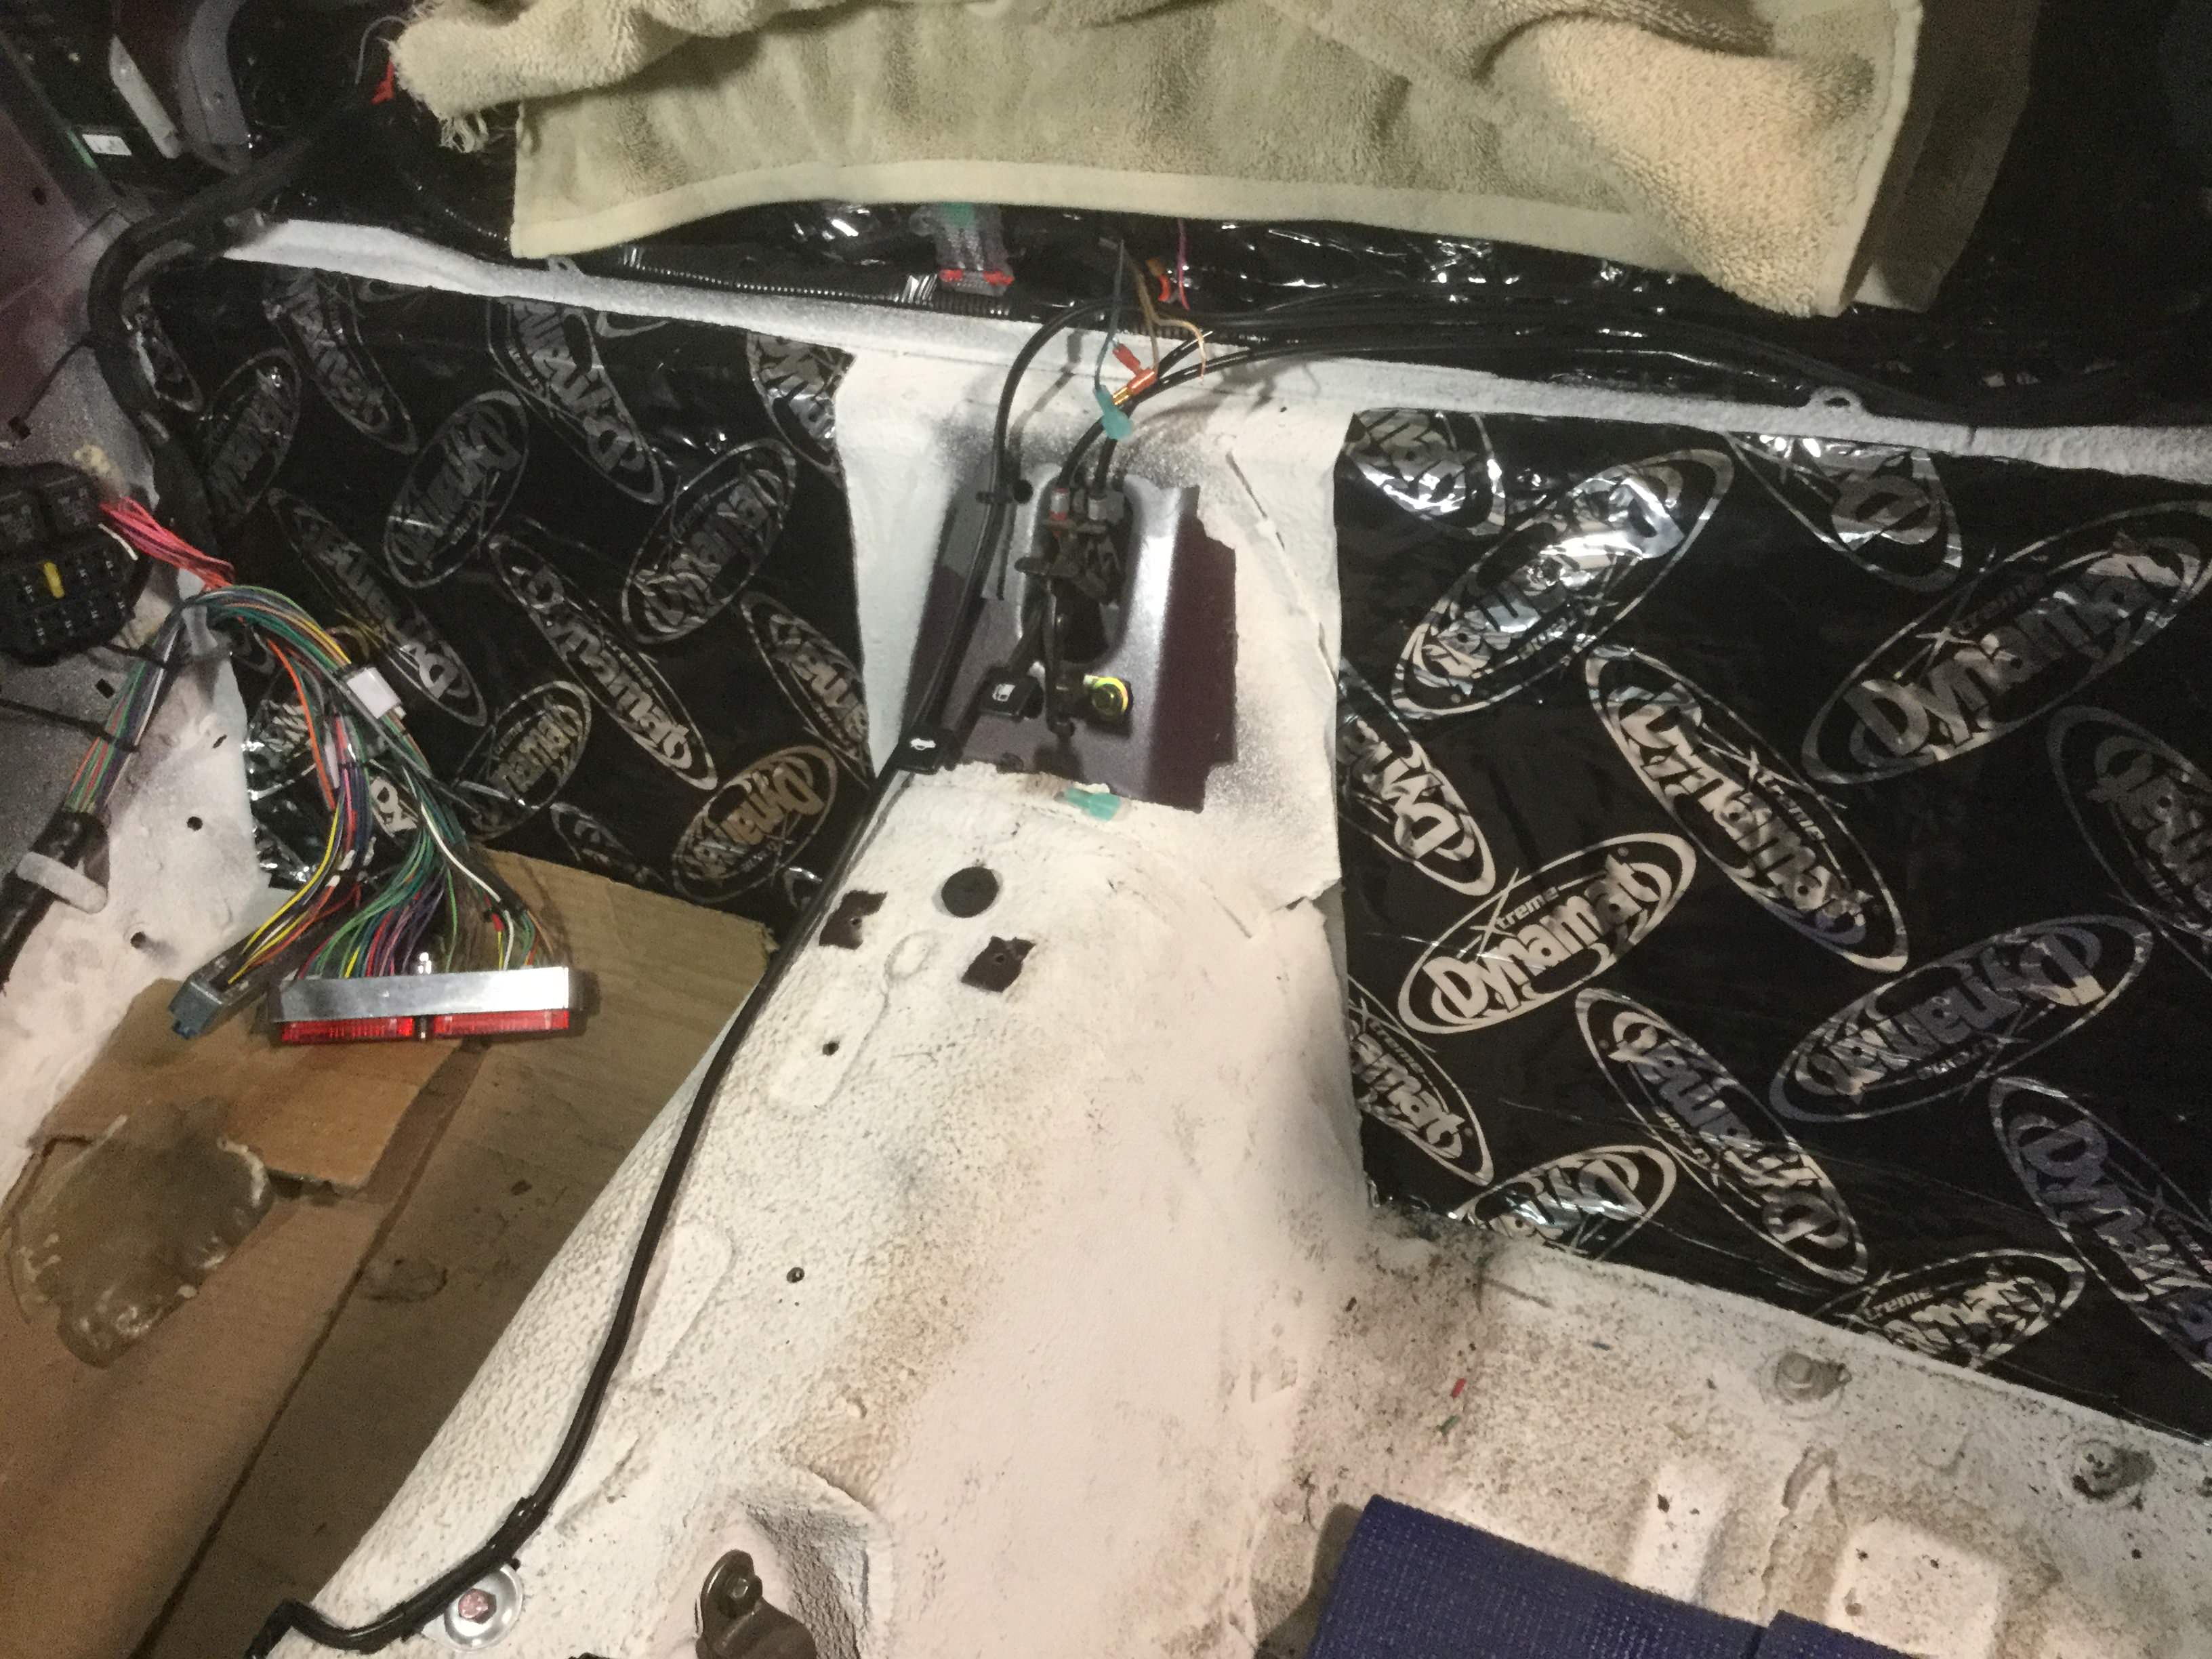
The area right behind the seats got covered in multiple coats of Lizard skin but I decided to put down some of the Dynomat just because I will have enough left to make it happen. The picture was taken after the two large pieces were installed but I should have enough to cover the smaller perimeter areas as well. Just have to see this evening.
My opinion is that it seems a whole lot of road noise comes thru that area while driving so I wanted to give that more sound deadening than other places. One additional item I will do is to put some loose fiberglass insulation into the areas between the trunk and passenger compartment that allow easy passage of road noise from the rear end of the car into the passenger compartment.
Edit: After driving the car for a while I can say that all the additional sound deadening has made a world or difference while driving the car. I can actually hear the radio and road noise is very minimal. I do hear a small amount of noise that is the fuel pump cycling but I feel the insulation reduced the background noise to no more than 1/4 of what it used to be.
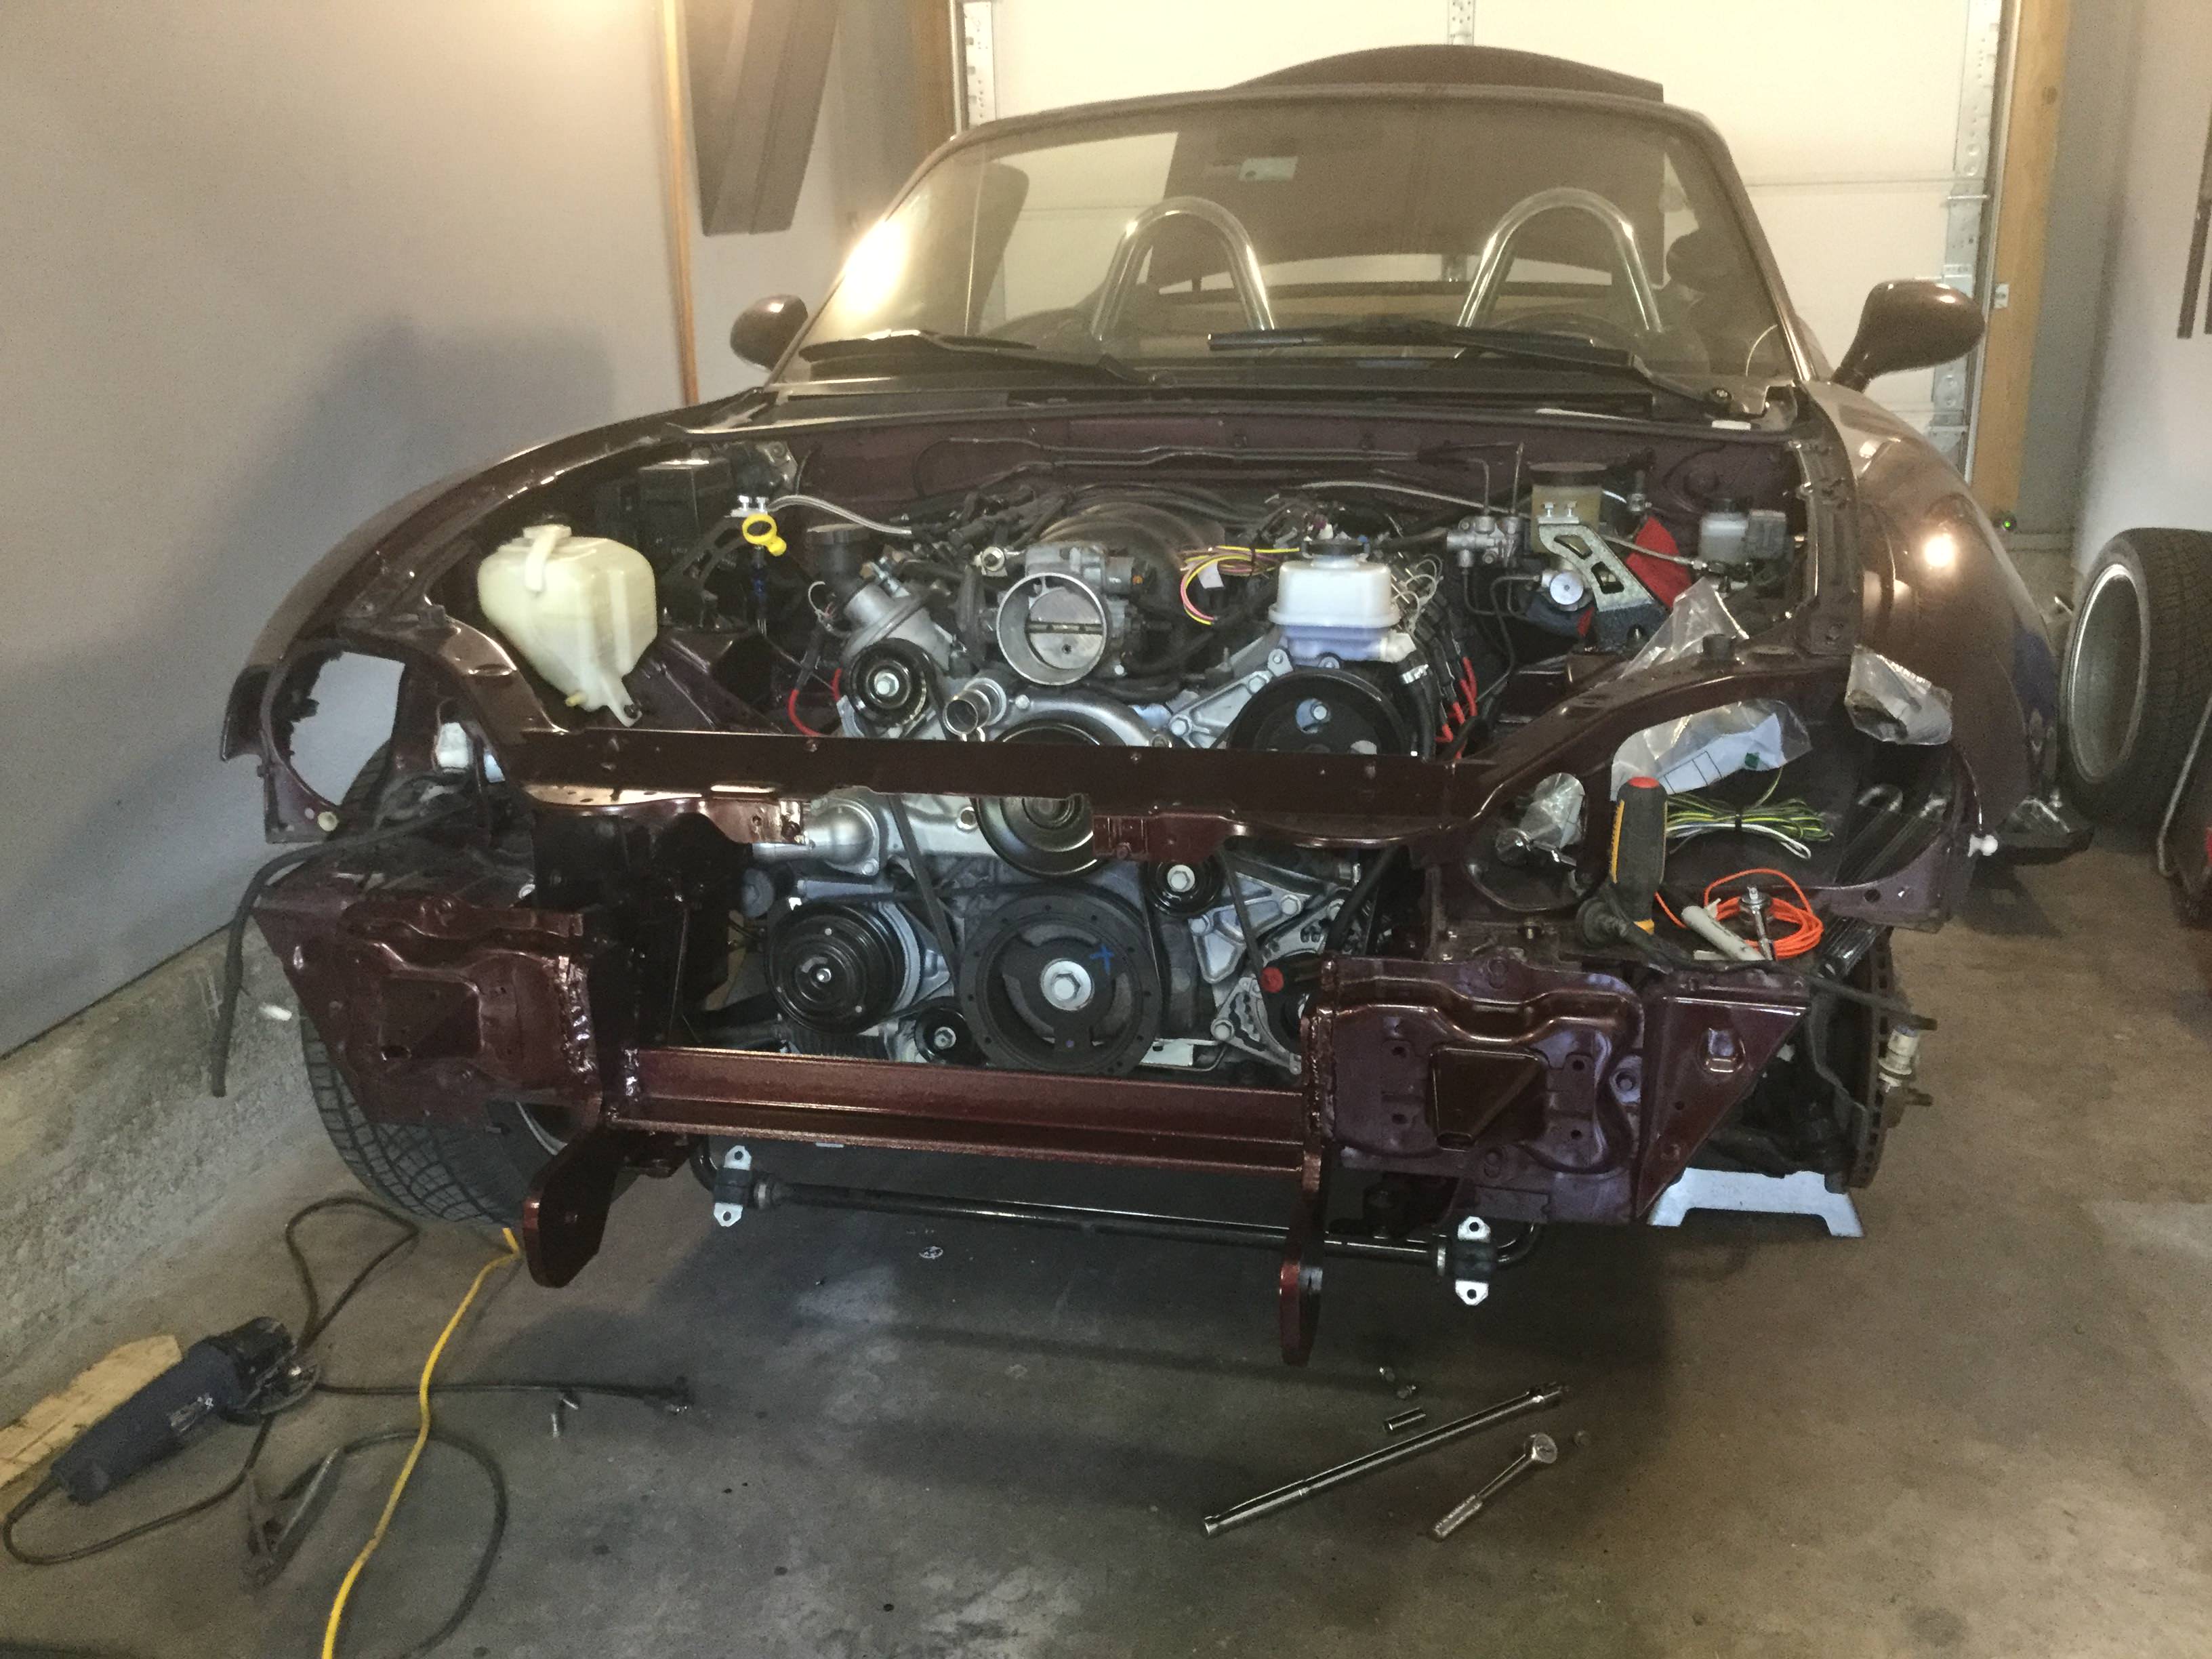
Most of the weekend projects were done on the front of the car.
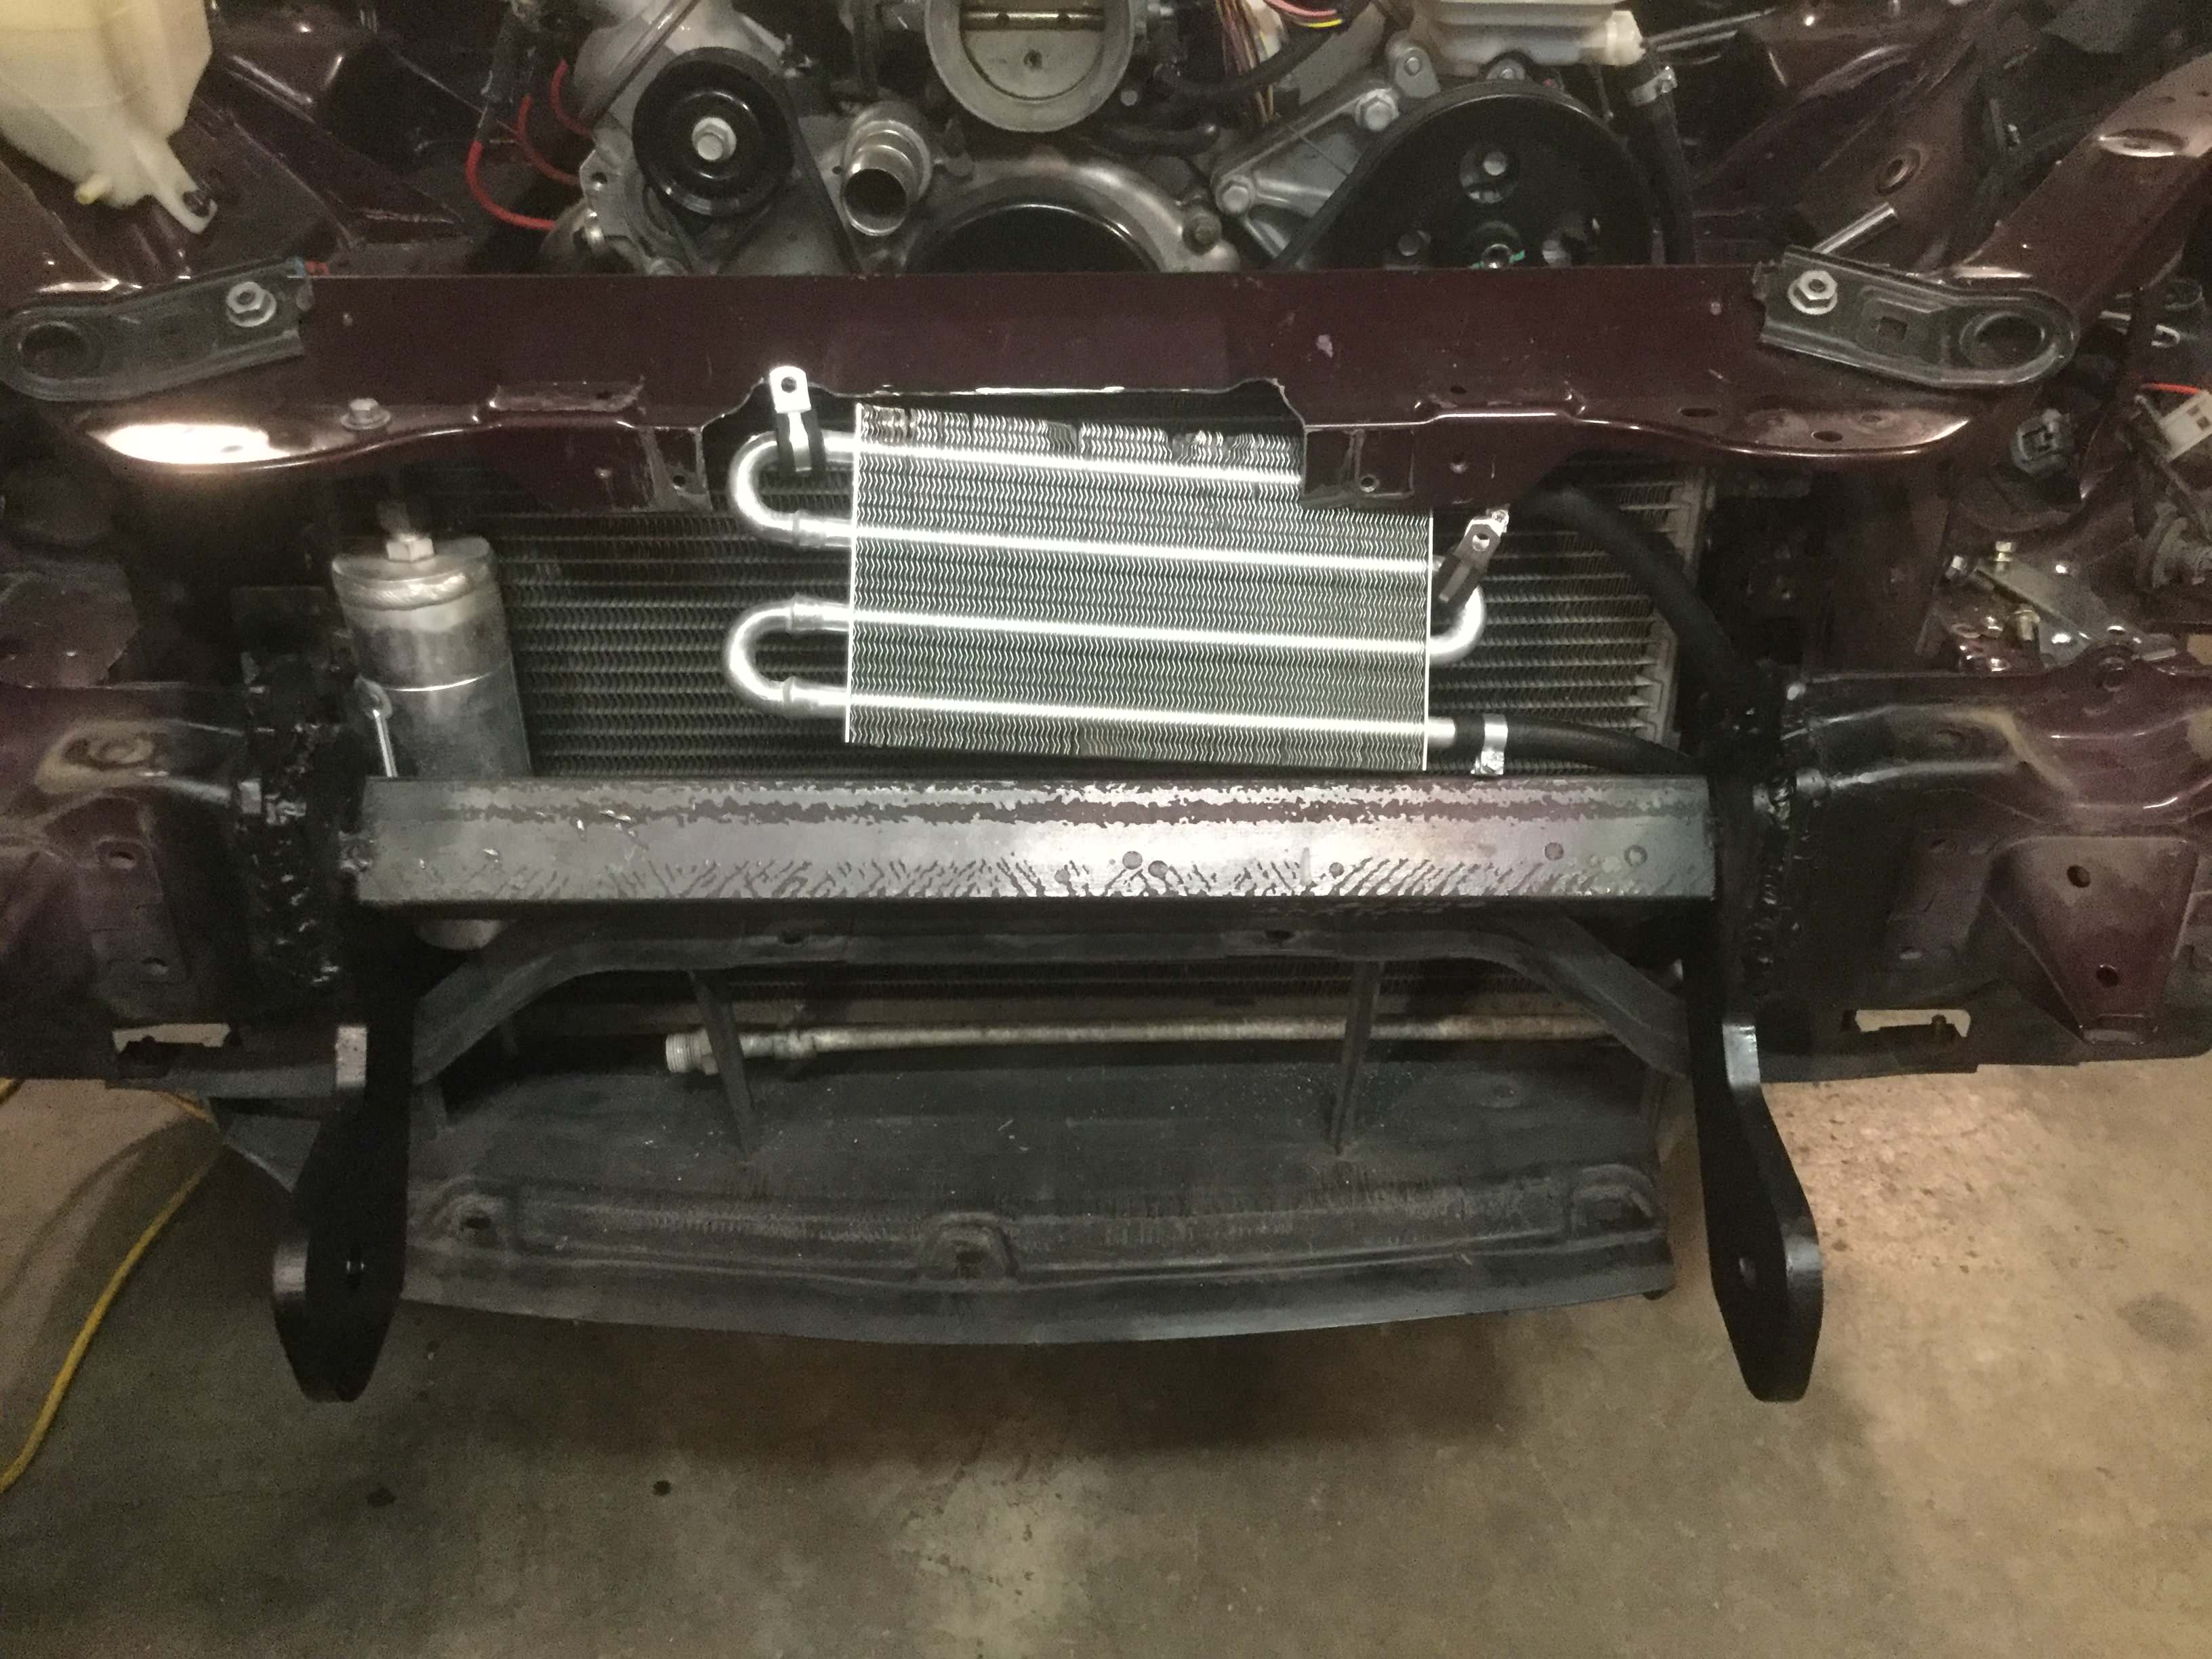
After receiving the Flyin Miata Radiator kit and cold air intake kit I was able to test fit everything and put the cross support angle where it will fit and (hopefully) work with the front plastic. If it interferes, the plastic will have to be trimmed because there is no other real estate the support can be located as best I can determine.
The radiator was test fit and mounted before the angle support was welded so that I could be sure everything was fitting well together. The Flyin Miata instructions say to take the radiator lower support brackets and move them forward so that the front hole in the front subframe bolts the rear hole of the brackets in place. Initially I tried that location but it did not work well. ended up temporarily clamping the radiator where it appears to need to go and then mark and drill new holes for the radiator support brackets. Once that was located the air conditioning condenser was placed in front of the radiator using the front support holes. I then placed the power steering cooler coil in front of that and mounted it to the front sheet metal that sits just in front of the radiator.
After all that was located and I was happy it all fit in harmony all the pieces were removed and I painted the front sheet metal with some rattle can paint to match the rest of the car.
This picture shows the first location of the support angle before I determined it would not fit properly.
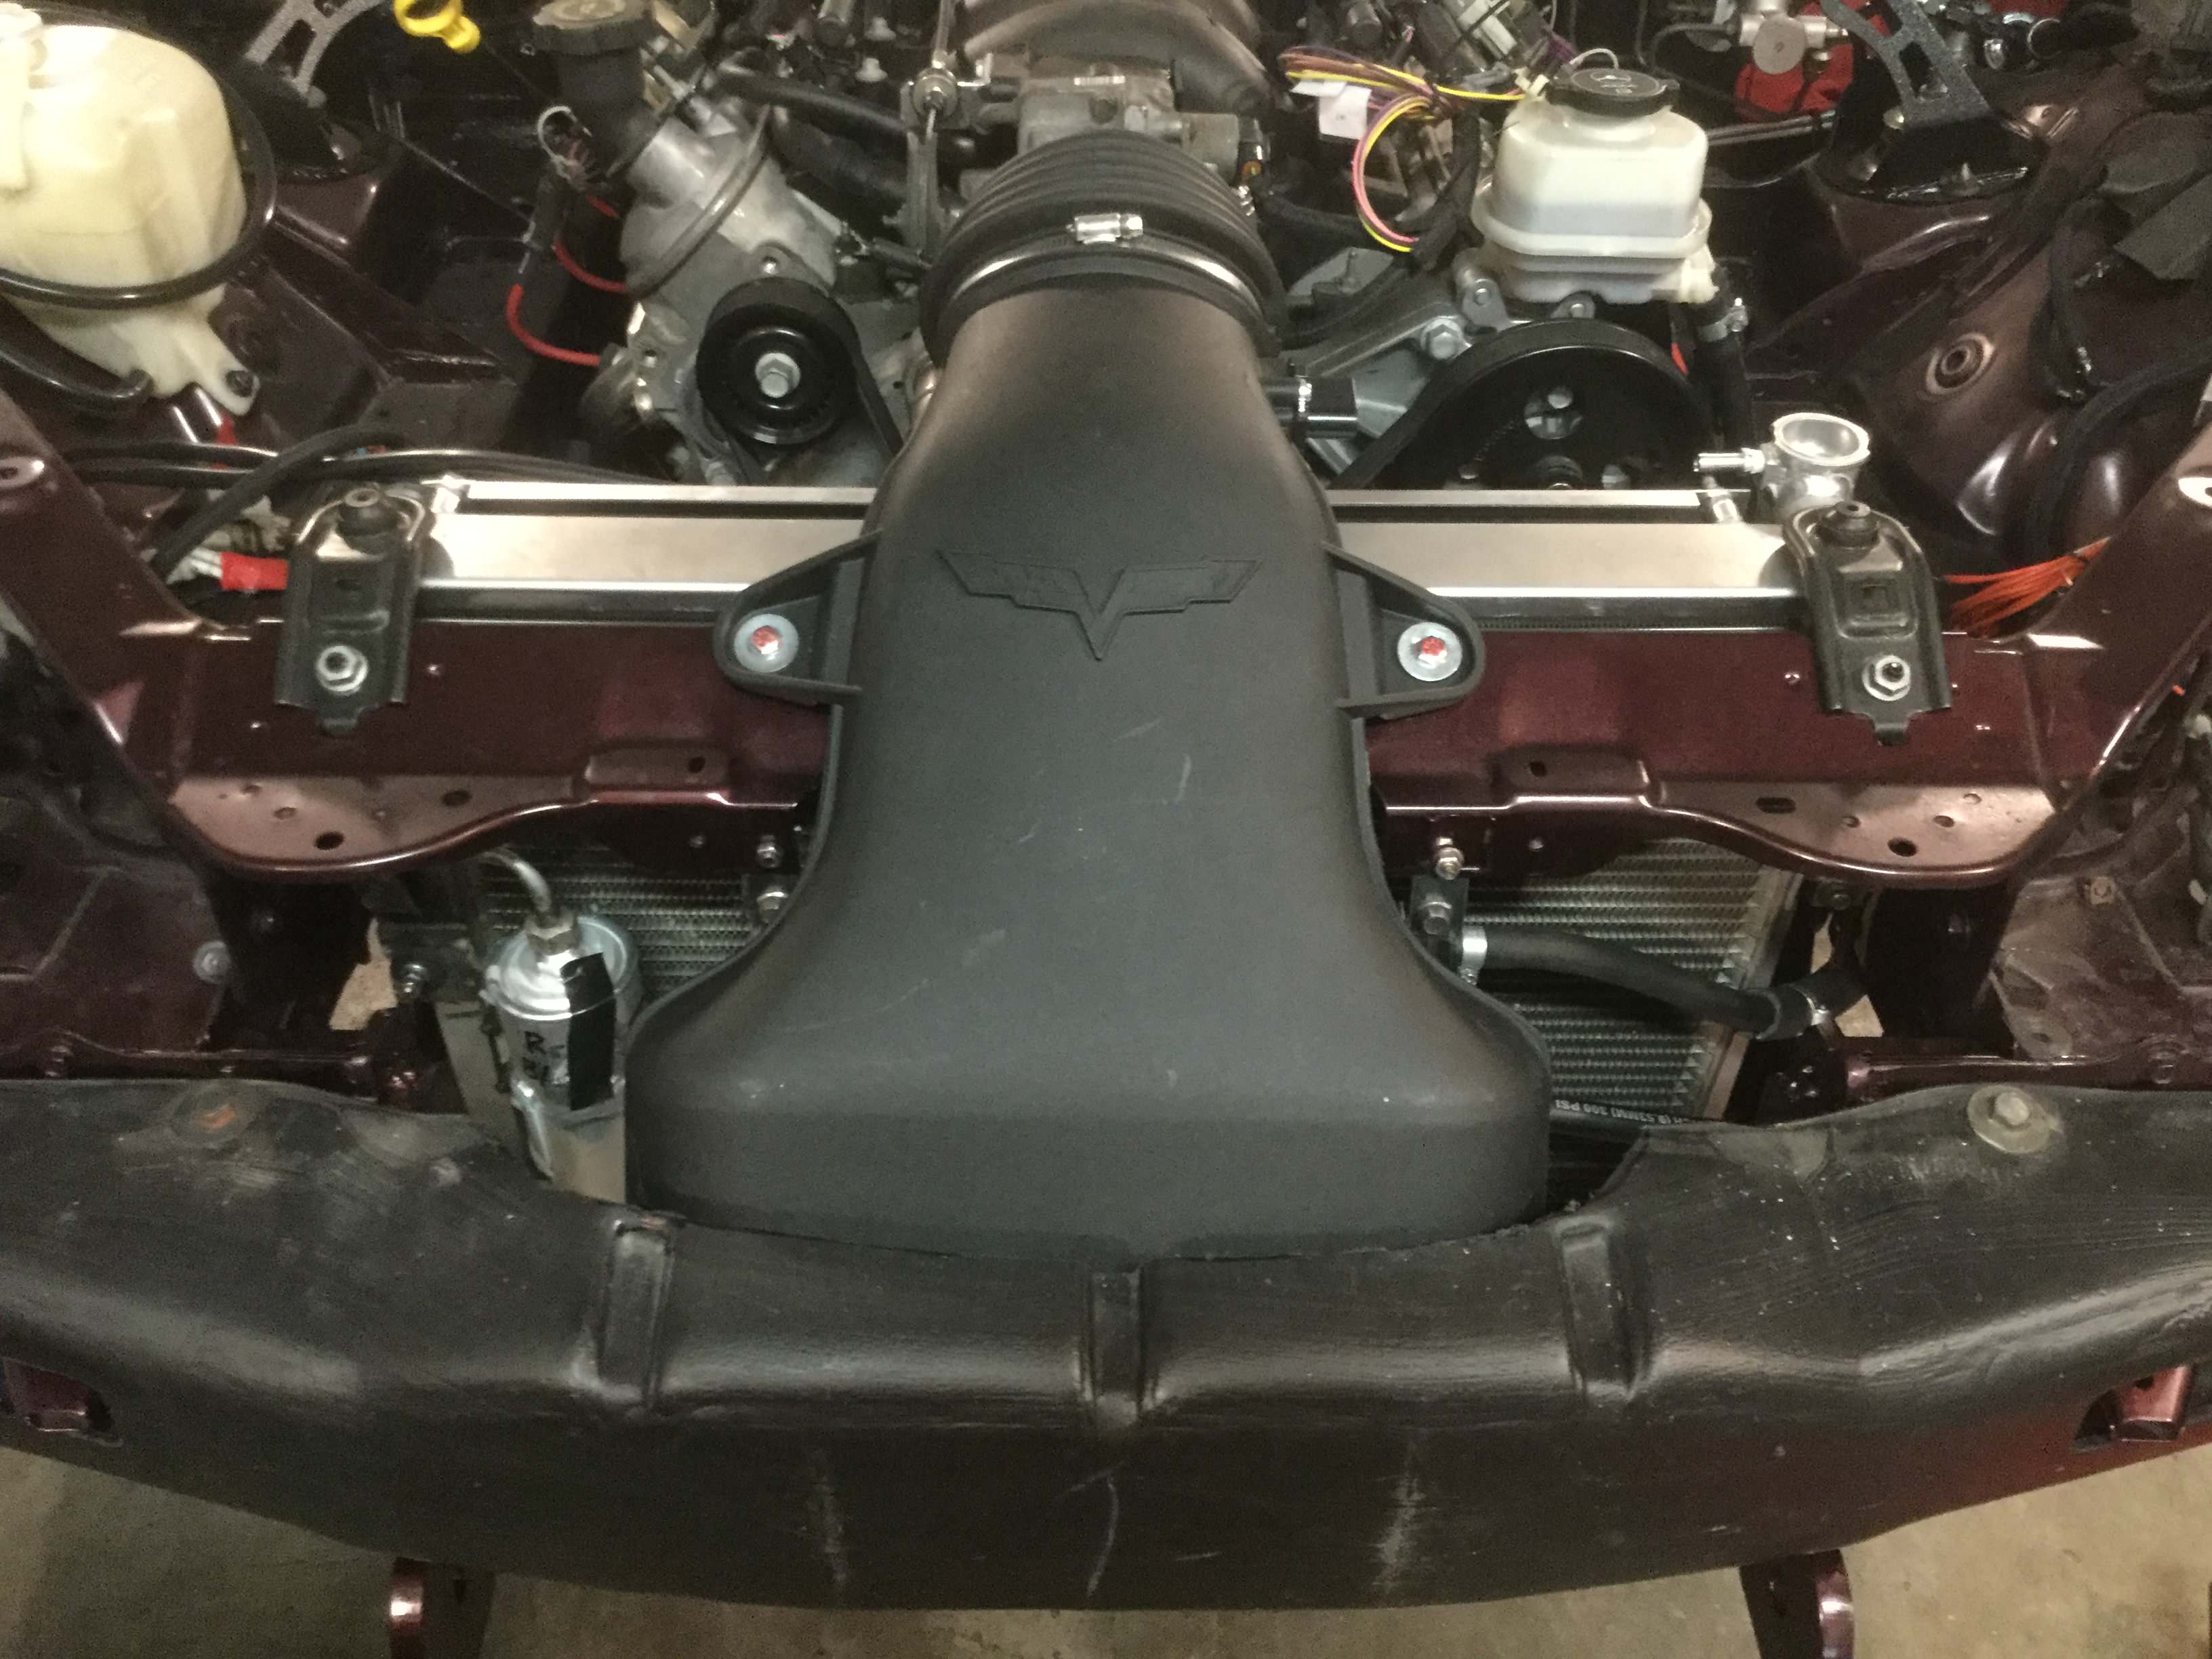
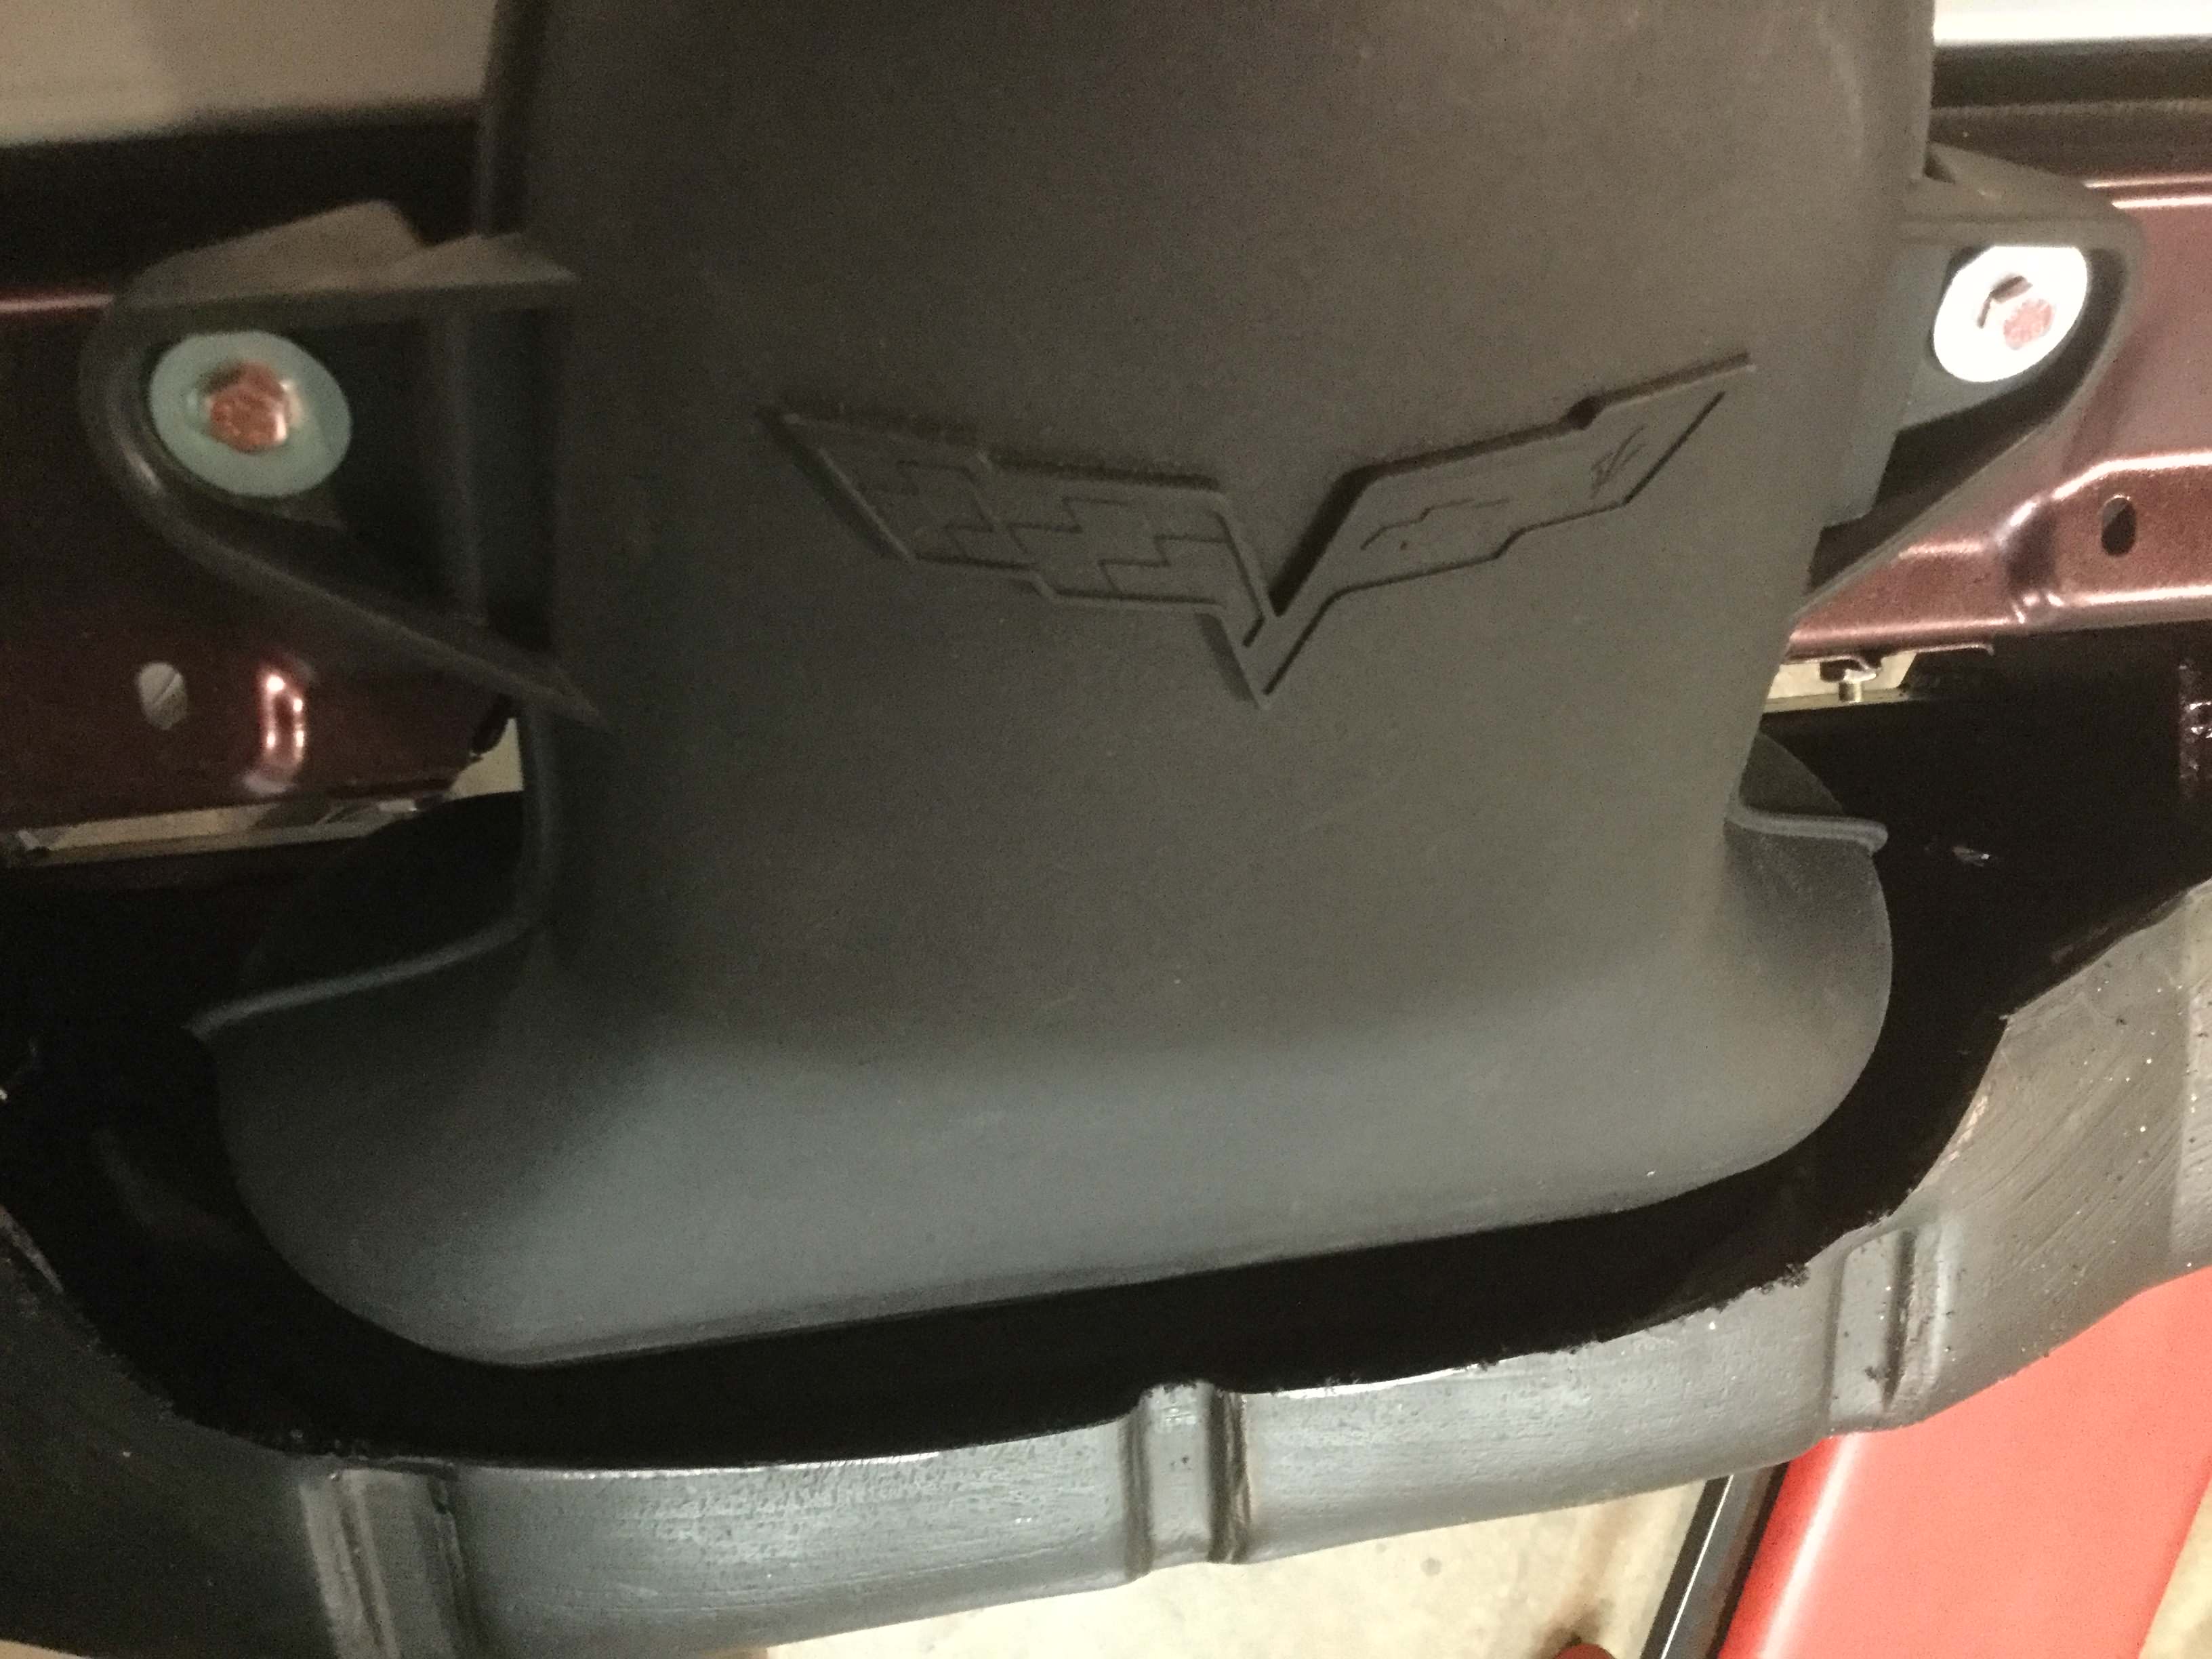
The other project I got mostly done over the weekend was mounting the cold air intake.
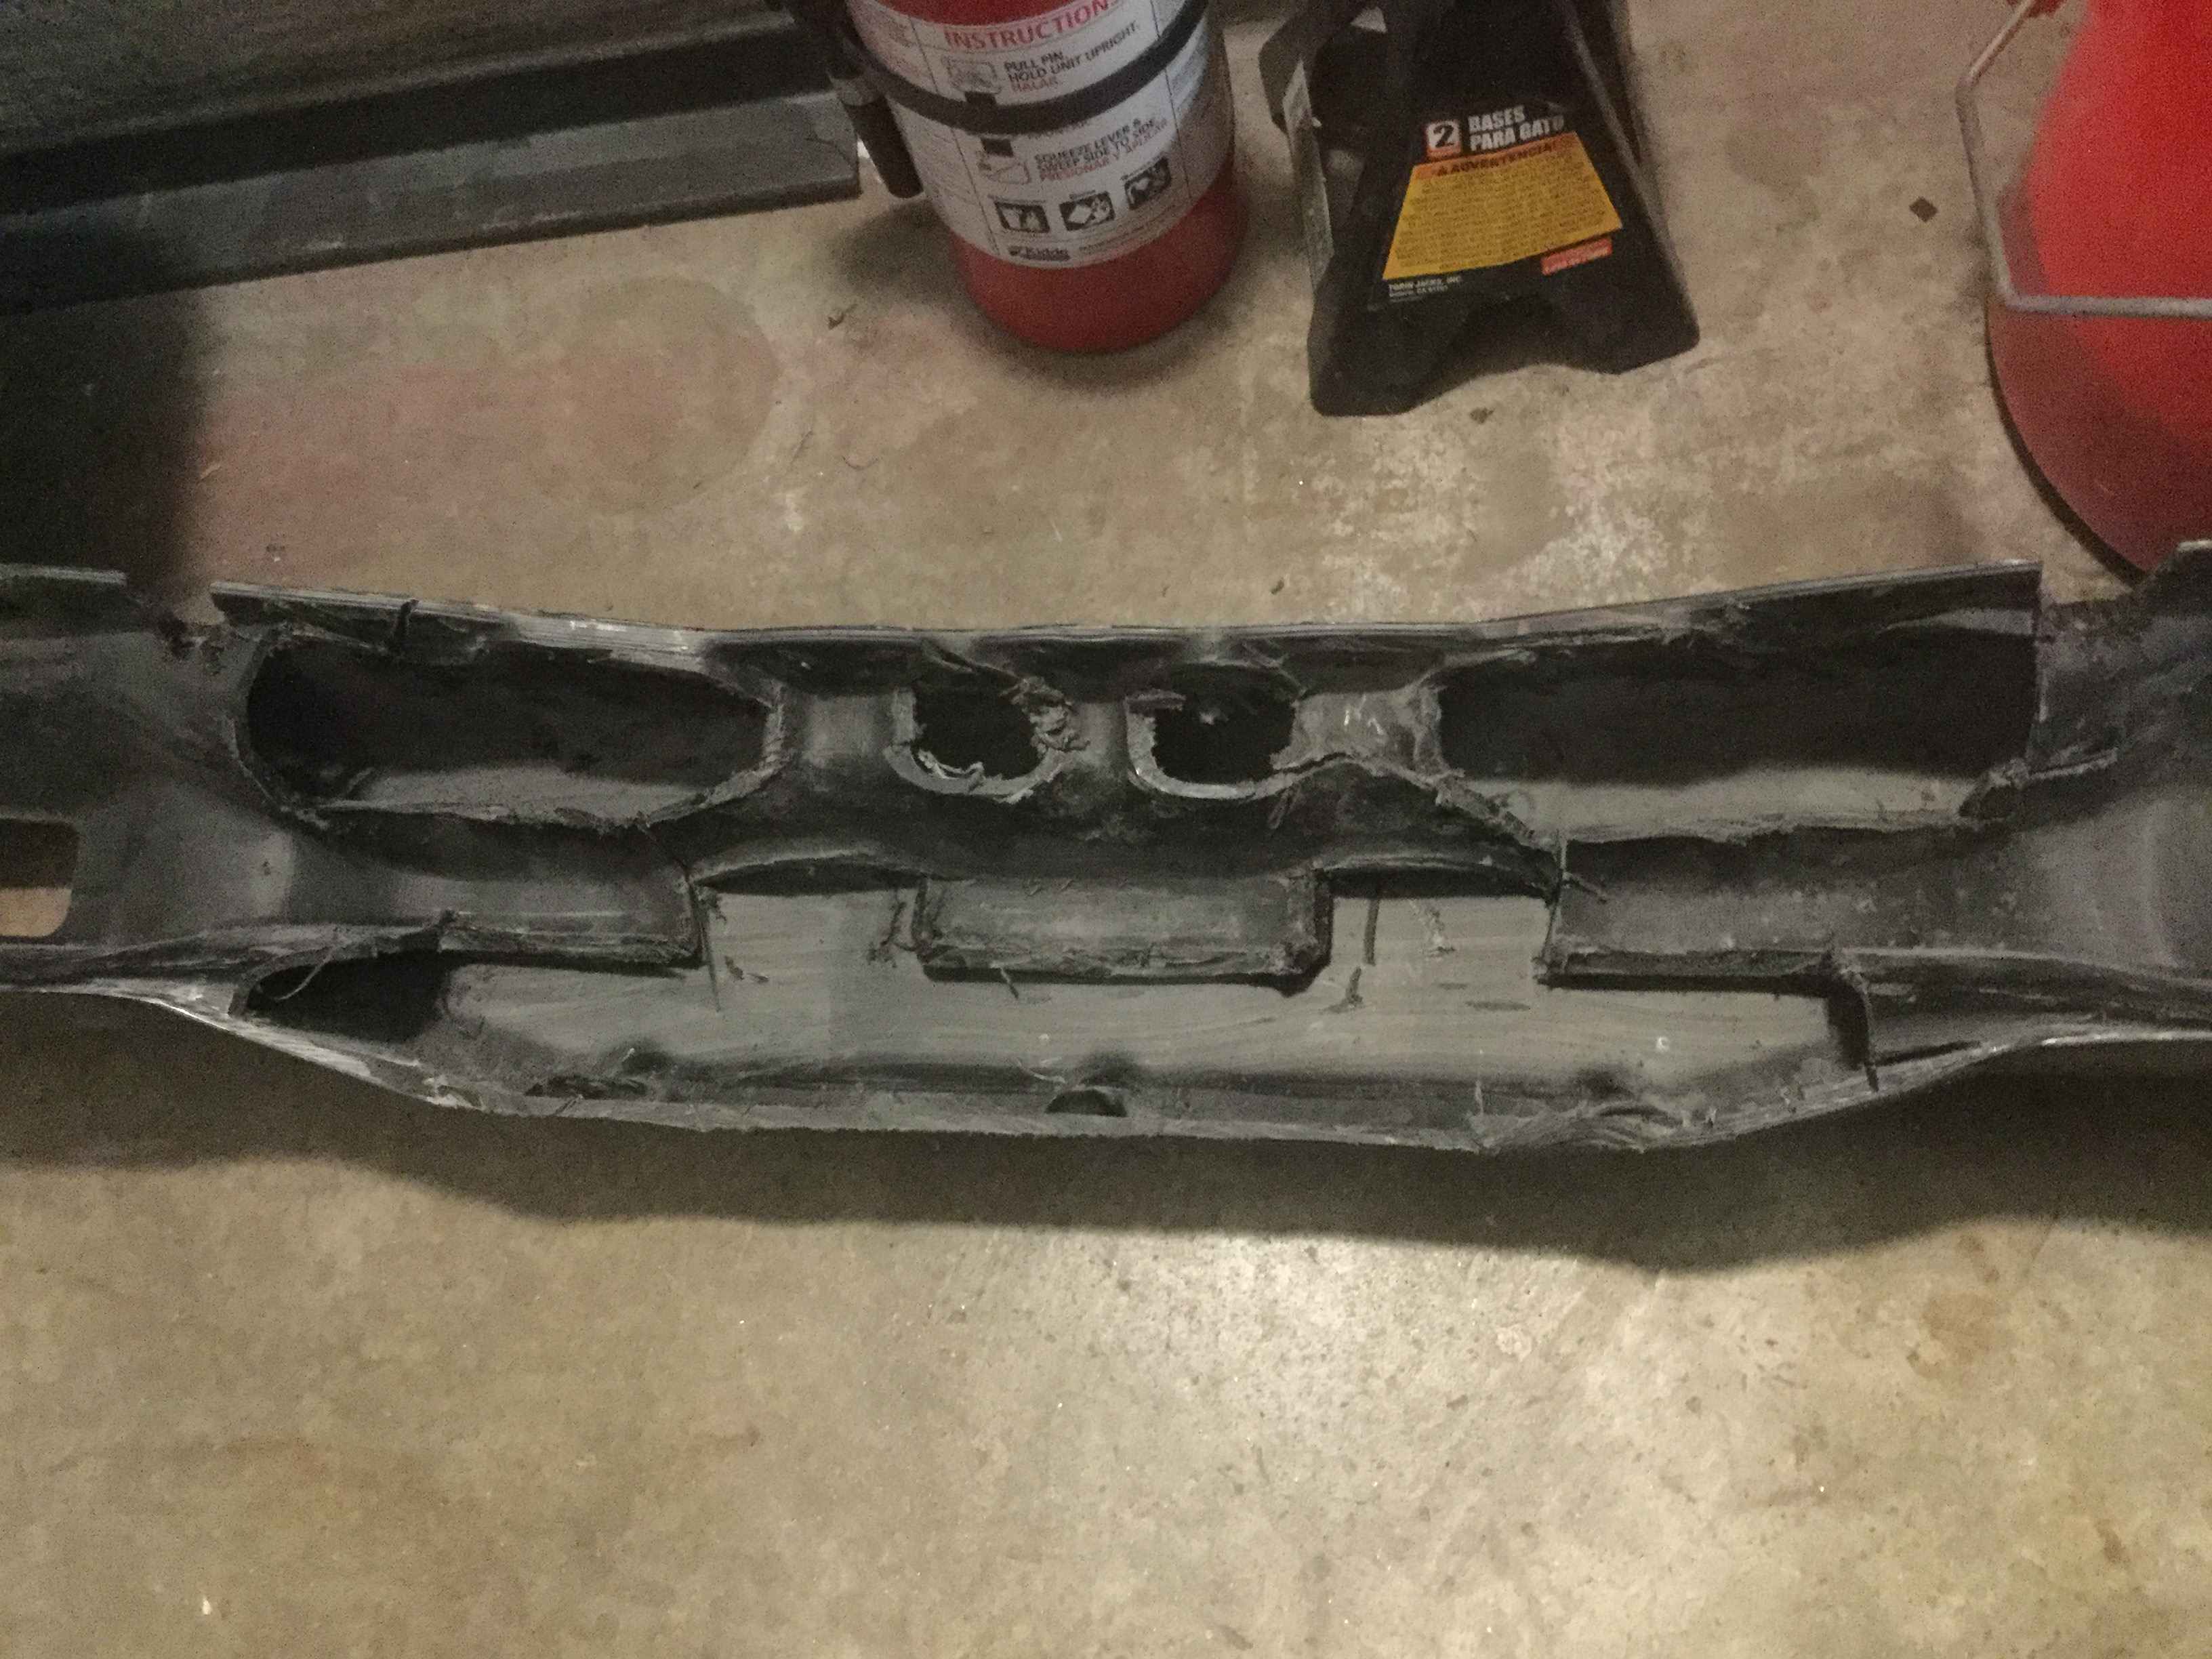
I asked on another thread how much of the plastic bumper needs to be trimmed but did not get a specific answer. What I found is that the whole inside of the bumper needs to be removed leaving just the outer shell. Not much strength in the plastic in case of a wreck but even less strength after removing the inner plastic.
The next picture has the bumper piece as well as the intake installed. Note that I marked about 1" away from the final position of the intake as this amount of clearance is necessary to be able to remove the intake without removing the bumper. Necessary for changing the air filter.
This picture shows a clearer shot of how much clearance I trimmed around the intake.
Once I get the radiator hoses and heater core installed I will be able to start the car and verify there is nothing leaking in the cooling system.
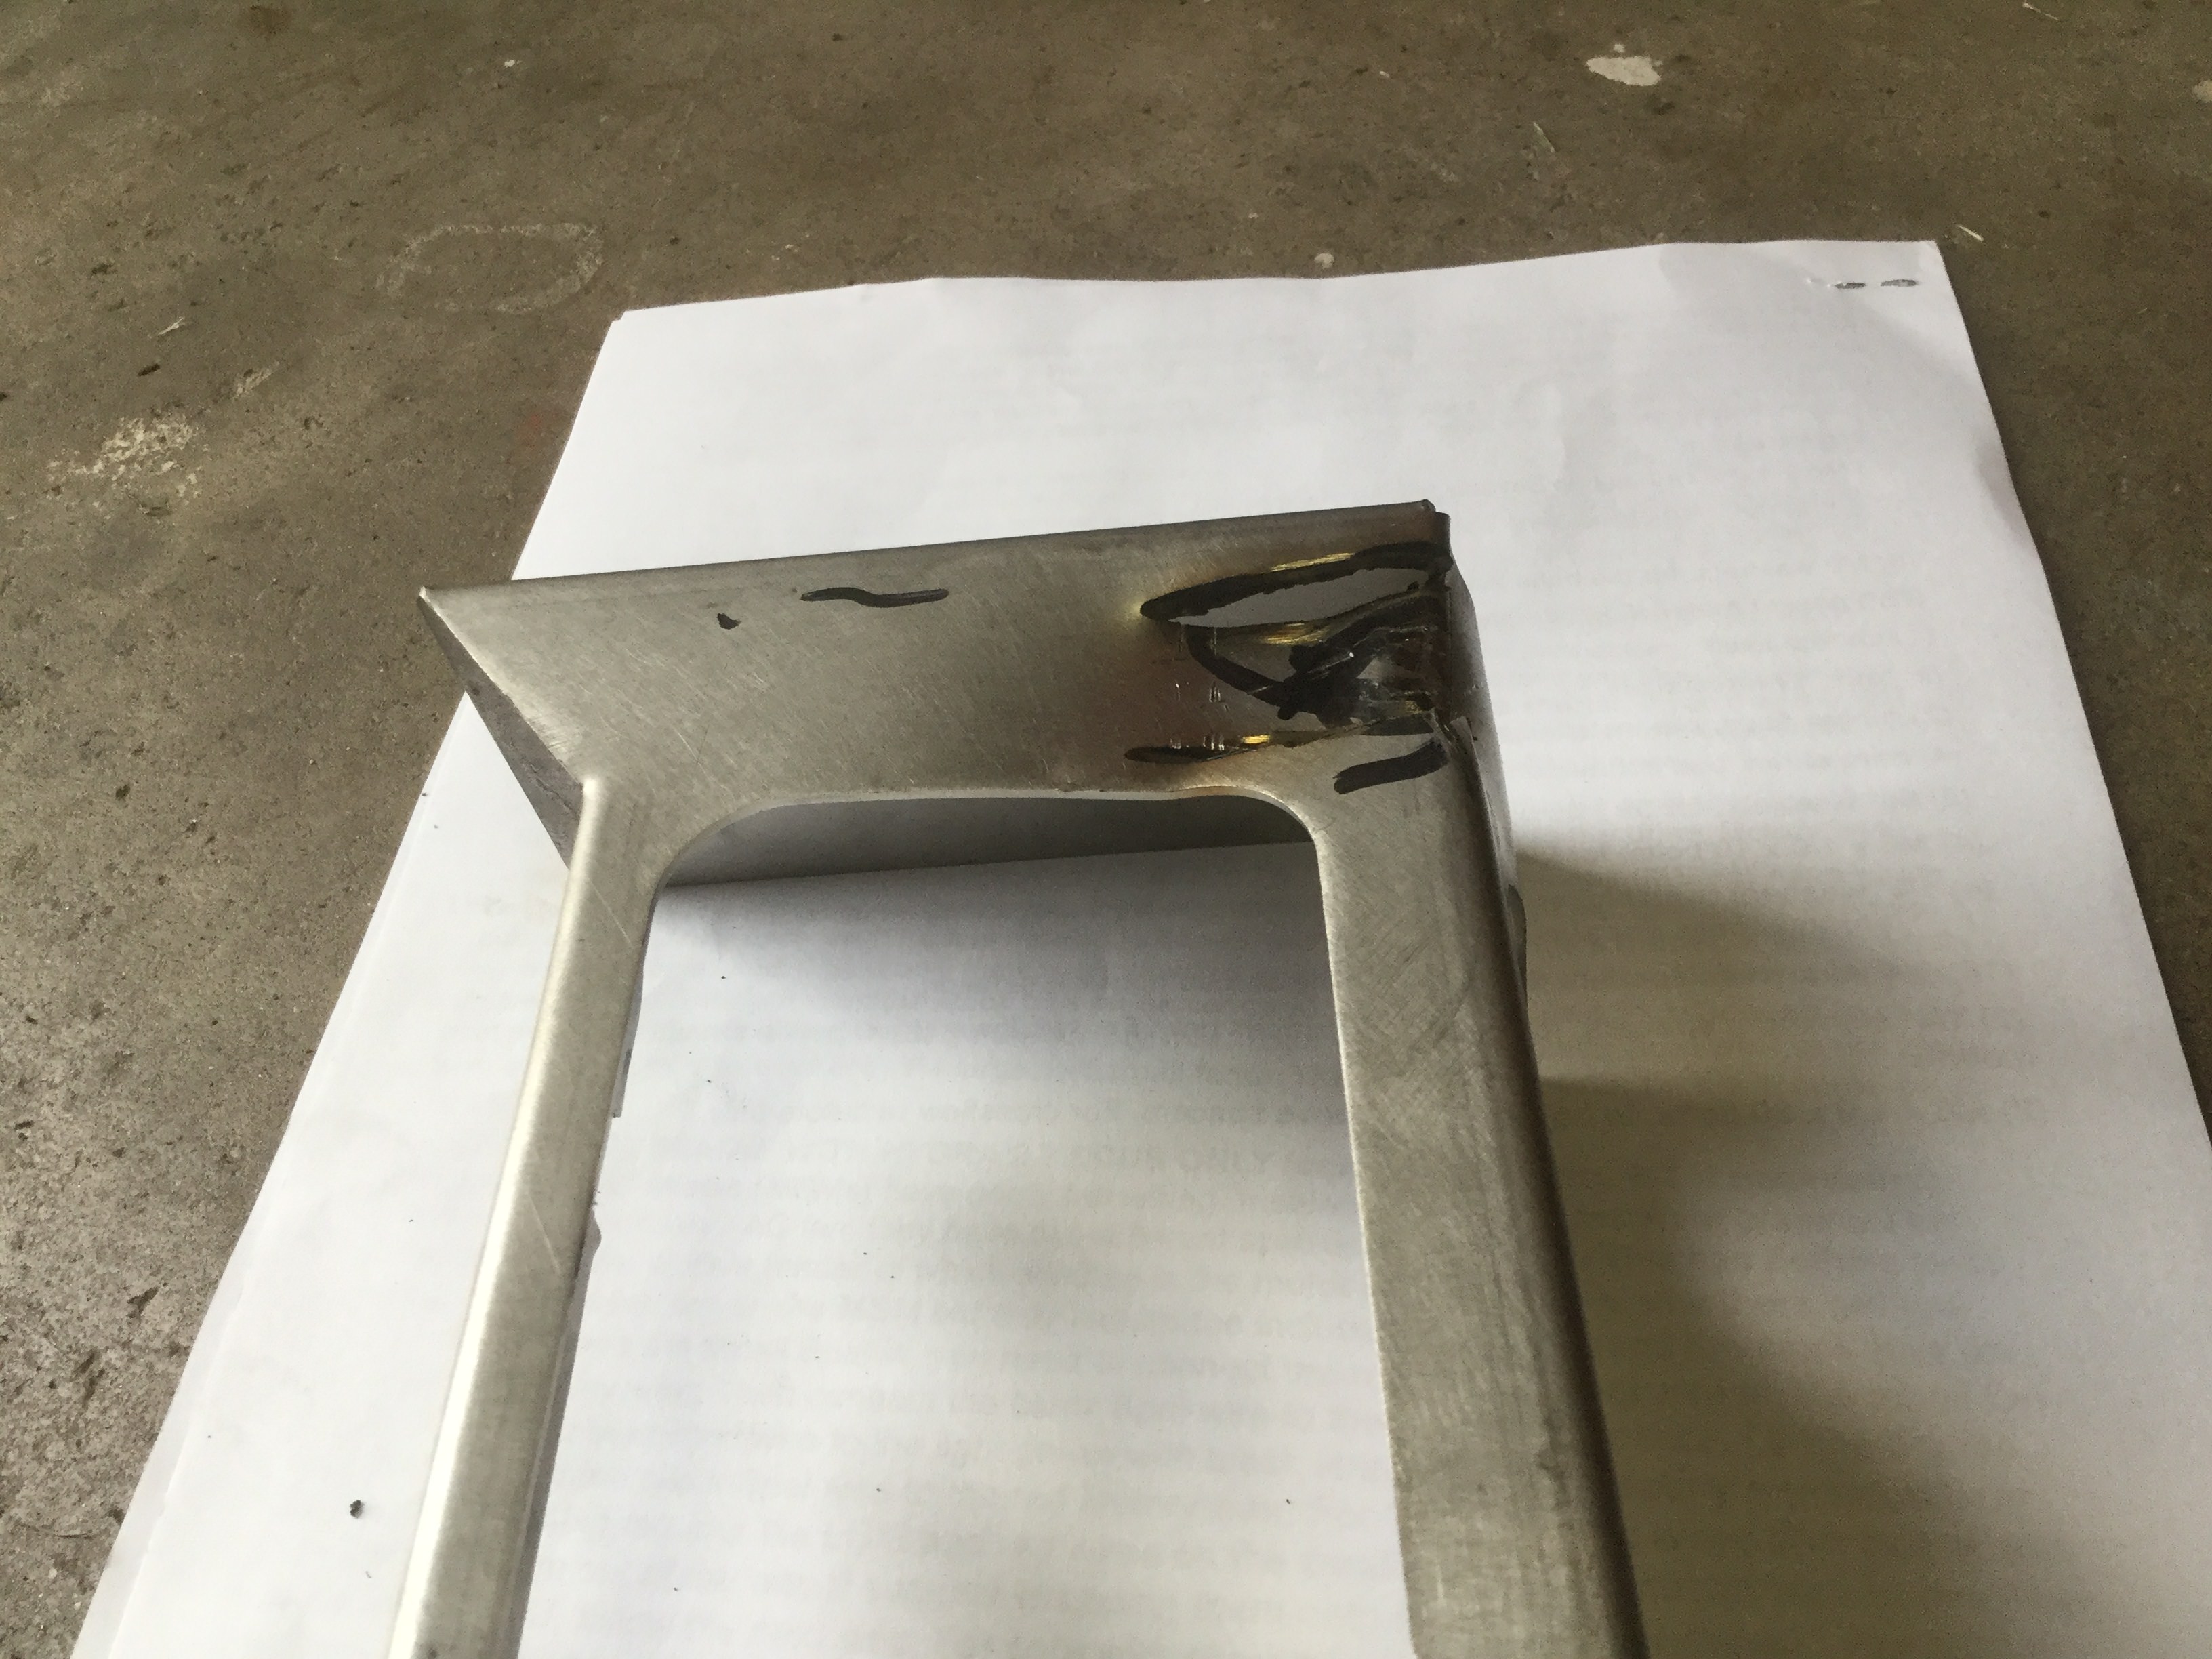
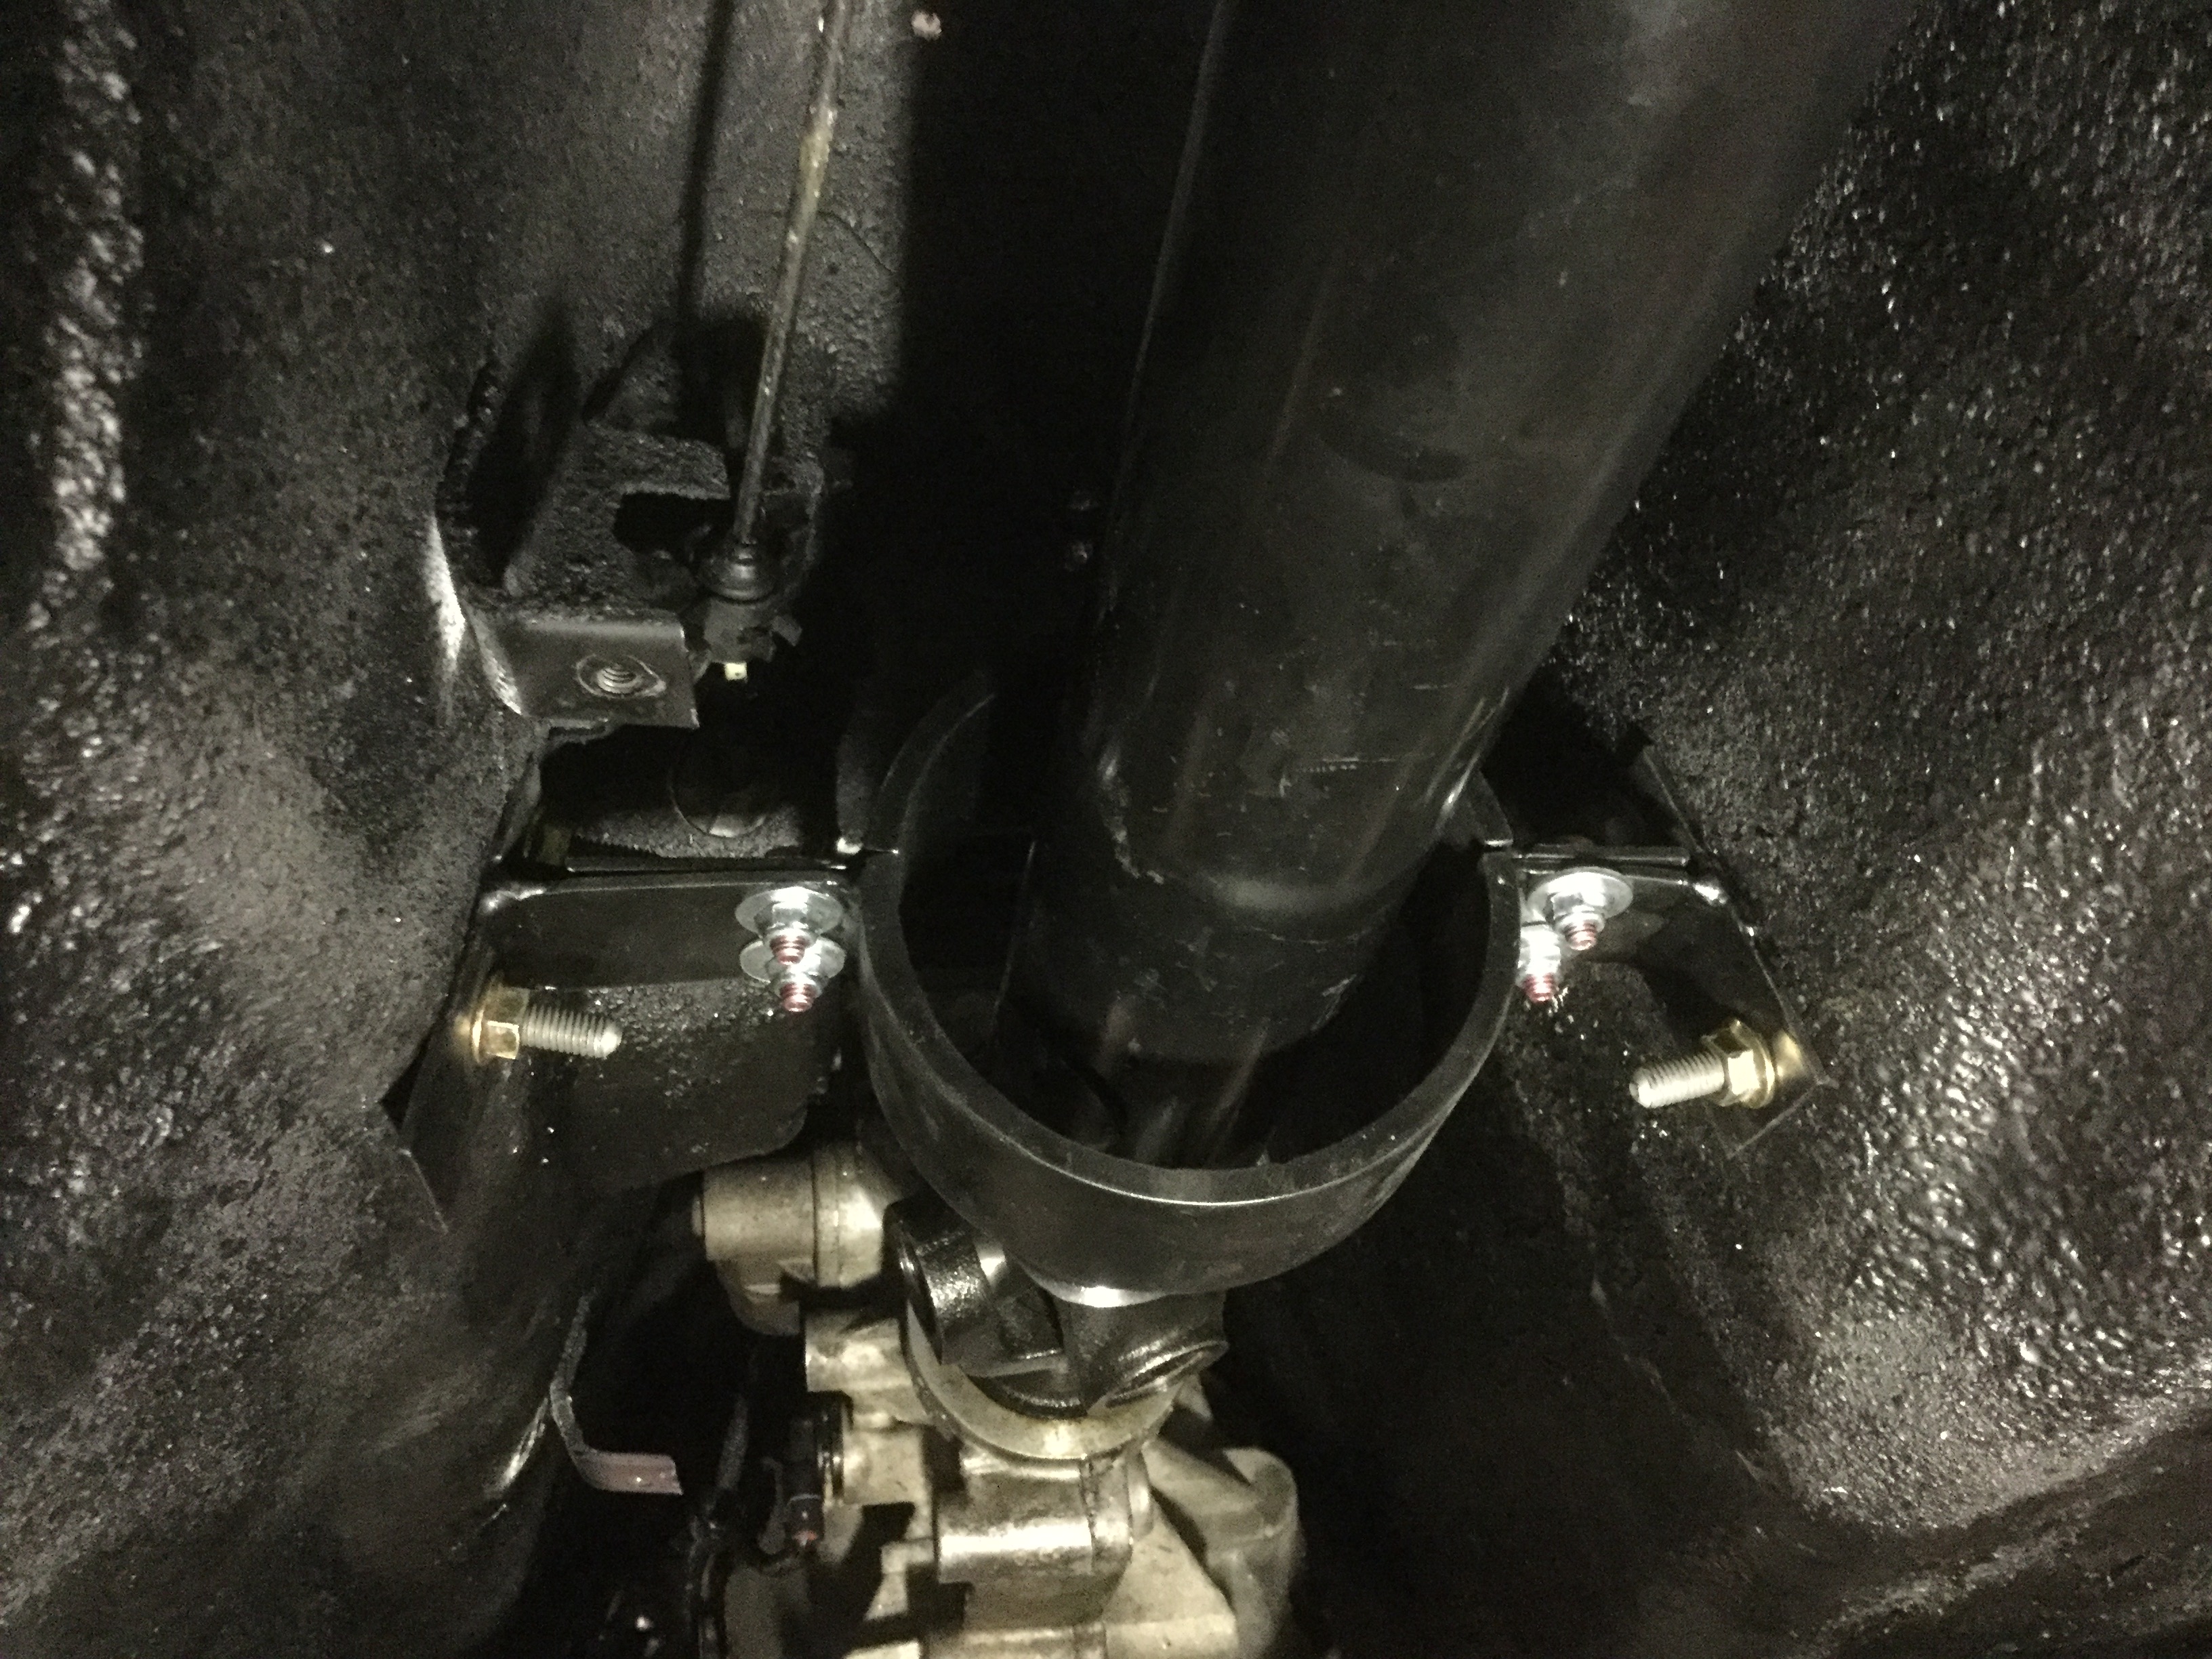
One project that ended up taking all evening was something that showed up when I installed the steering shaft onto the steering rack.
Every time you turn the wheel the shaft retainer bolt would hit against the motor mount heat shield. In case you don't know the exact area, it is on the driver's side where the header is real close to the motor mount. A heat shield must be installed to keep the header heat from melting the mount rubber.
Due to how far along the car assembly is I had to remove the shaft and driver's side header to remove the heat shield. If I had known in advance I could have modified the shield to gain the necessary clearance way back when the engine was first installed onto the front subframe. You can take a look at the picture to see the area I modified but the metal was cut enough to bend the offending area inwards so it can still act as a heat shield. Didn't need much. The picture shows the area but does not really show clearly how much to bend. I took a hammer and tried to recess the area about 1/8". Couldn't get a good picture of it installed.
Just one of those simple little things that it would be great to know about in advance.
For some reason it seems like a lot of the remaining projects take about 2 hours to complete. Just the right time to get it done in an evening after dinner.
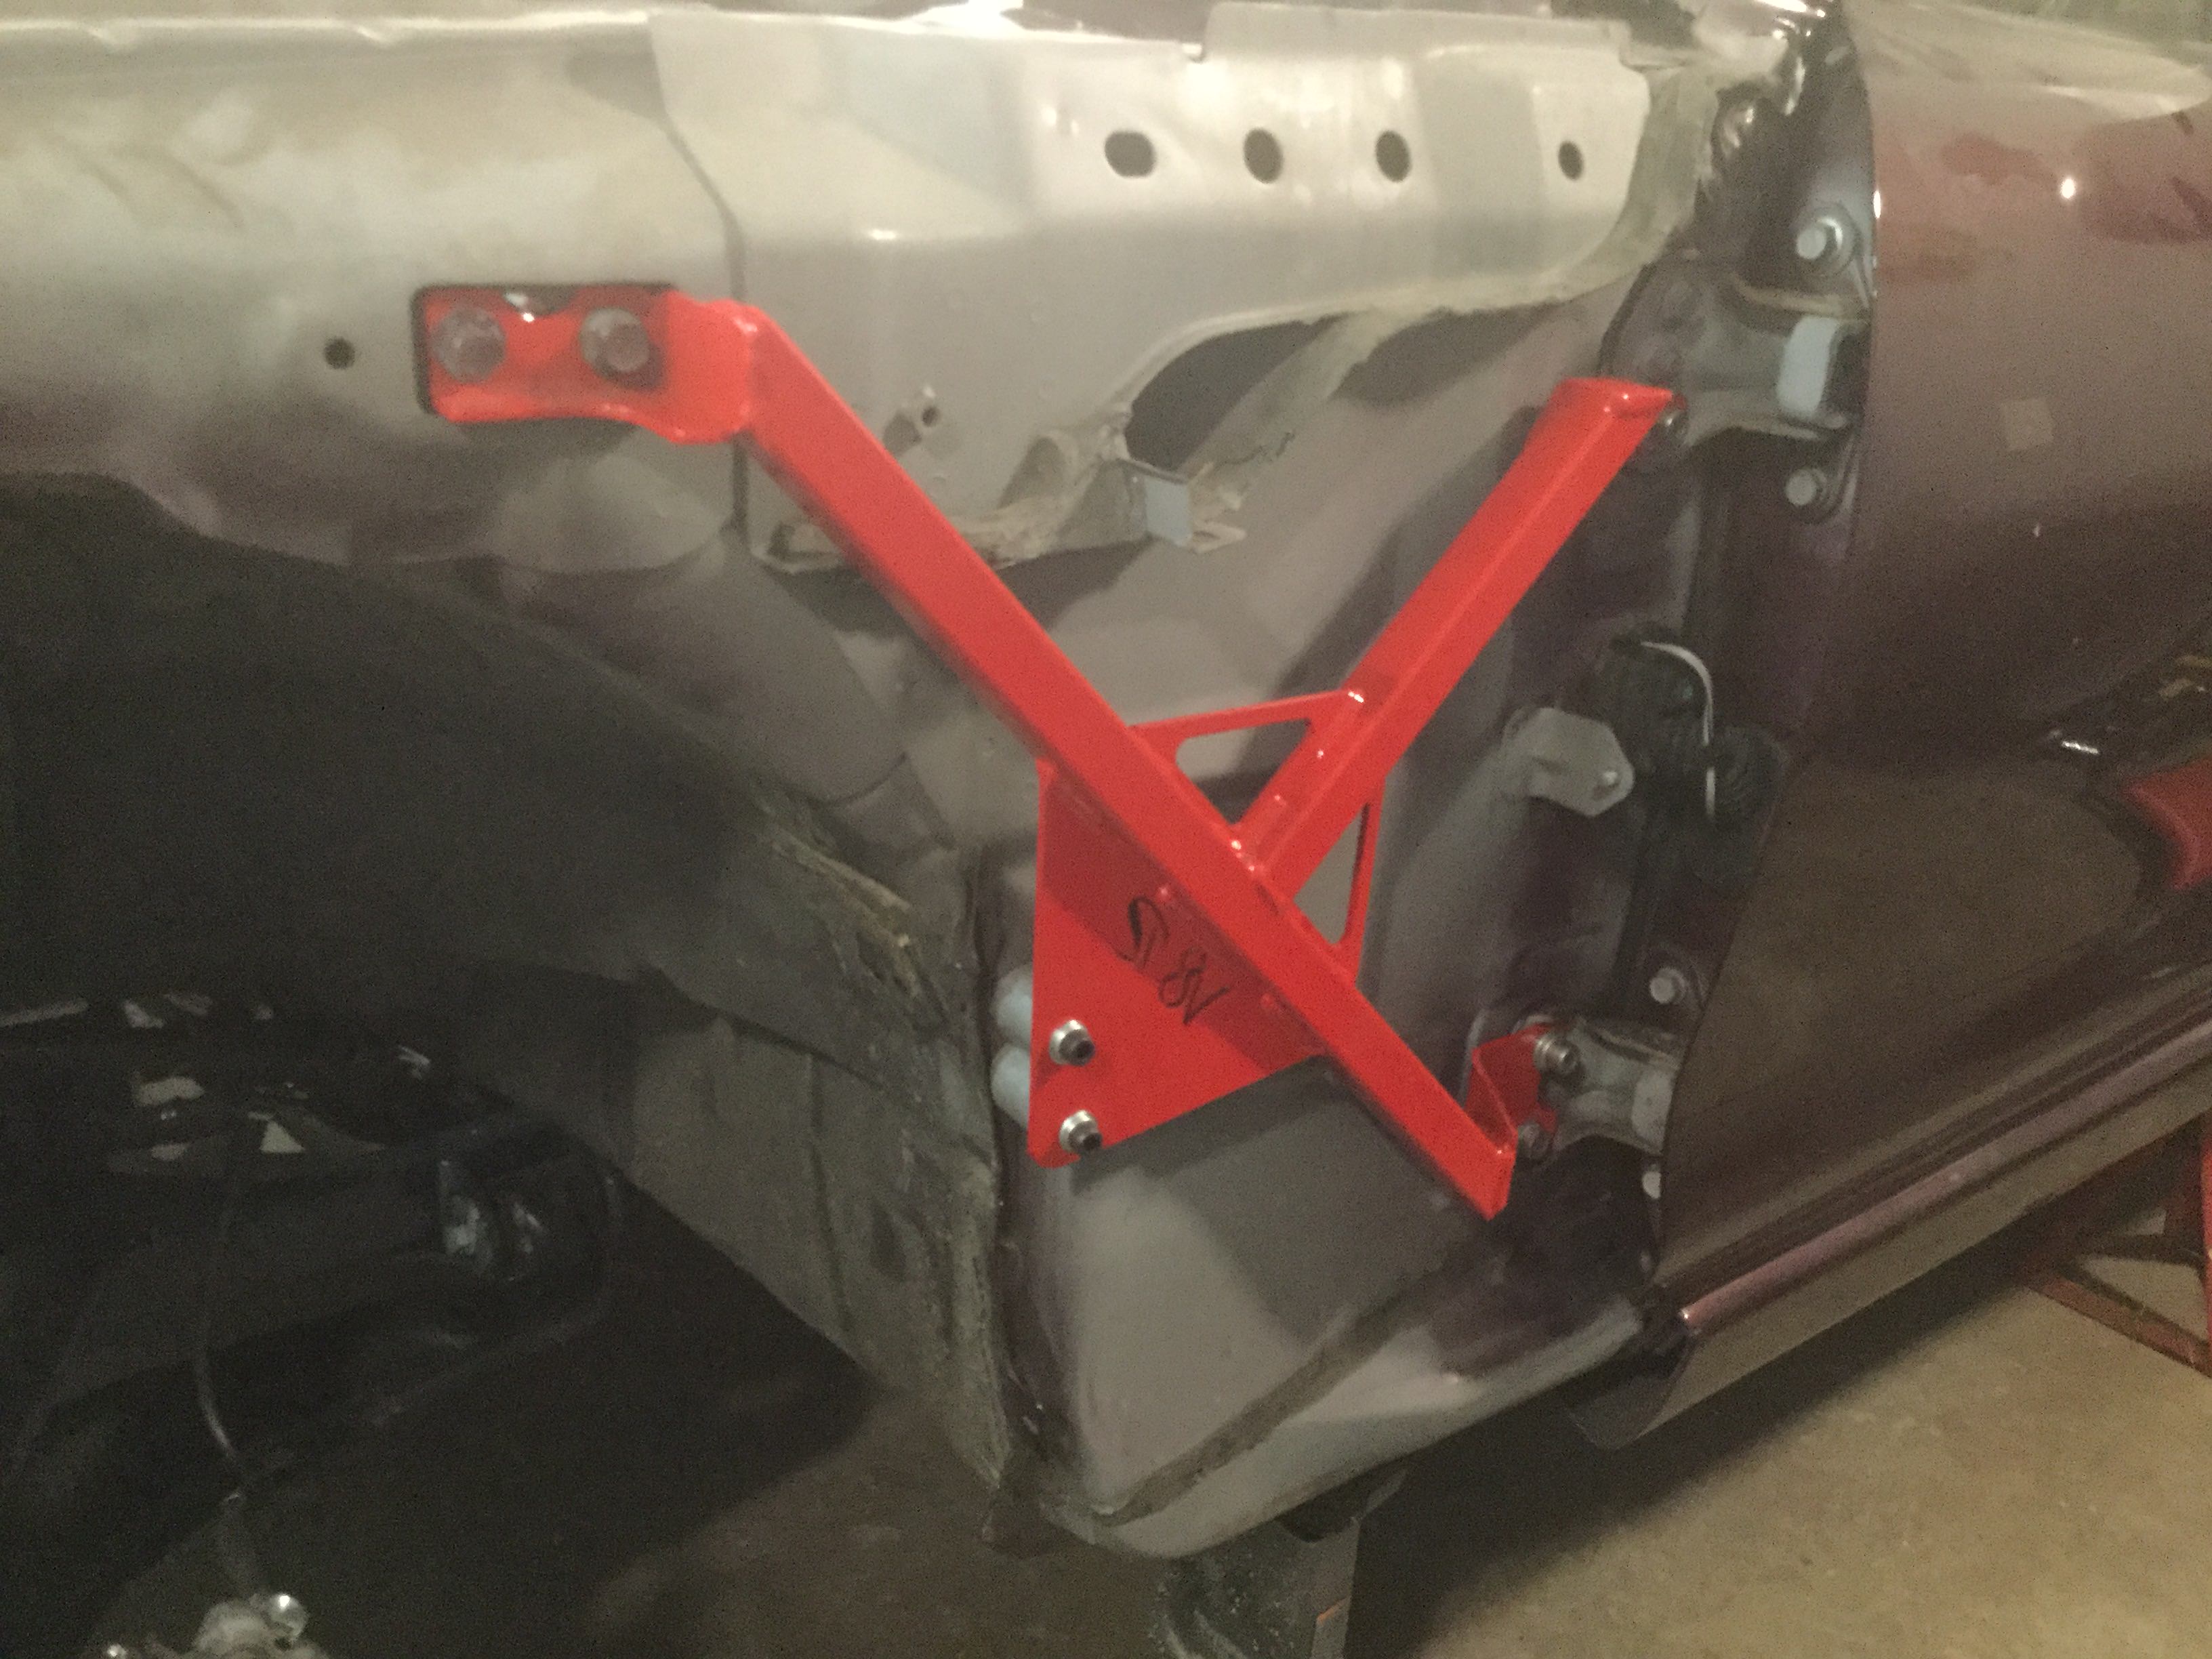
Did the install of the fender braces. Used V8 Roadster braces, which are a nice pretty orange color. No idea why since they will be hidden by the fender. One odd thing I noticed while installing the braces is that when the braces were fabricated the V8 R logo is reversed so that it reads mirrored from how it should look. Both sides are that way. Maybe I have a "unique" set of braces. Good thing they are hidden and nobody but me will ever know.
About a week after receiving the braces from V8 Roadster I received an e-mail that Flyin Miata has a newer design piece that looks to me to be more effective but I already got these so used them. They fit well but there were no installation instructions. Good thing YouTube is handy.
I did mark the location of the hinges before removing the lower bolts but a test shut of the door after putting the fender back on shows that the hinges moved slightly. Guess tonight's project is removing the fenders to get to the bolts that hold on the hinges so that I can tweak them a bit to get the door back to working smoothly and easily.
Edit: I tried to put stiffer door stops on the car as I have heard they stiffen up the car but when I tried them they simply would not work. My car seems to be plenty tight with the original stops so I guess the new ones will just get put into my pile of unused pieces.
When you open the door, you'll see the red braces peek out at you, reminding you they're there. You've been moving at a pretty fast pace lately - keep it up!
PJ, the more I look at the bright orange the more I am tempted to remove them and paint them a nice disappearing flat black or maybe gray to match the other underside paint.
The color just offends me.
If they were still new and unused in the box, I would send them back to V8 Roadsters and buy the newer Flyin Miata style.
Something I wanted to add that was installed on the car at about the same time as the fender braces is that I fabricated and installed a drive shaft loop. Nothing that is really necessary for a street driven car that will be putting out about 400 HP but it is just a little safety feature for my peace of mind. One time many years ago I was at the drag strip and saw a car that had a front u-joint failure shortly after launch and the memory has stayed with me. The idea is to keep the car from pogo sticking if the front u-joint fails while the car is travelling down the road.
After installing the loop I slightly trimmed the factory heat shield that goes in the same area and put it back in place but it is just too tough to get a good picture of the under side while the car is on jack stands.
Well, I worked on and off over the weekend and got the engine compartment 99% complete.
The final heater hoses need to be installed but I need to install the heater core into the passenger compartment, which cannot happen before the carpet gets installed. Can't install the carpet till I install a driveshaft loop because it will bolt thru the transmission tunnel with bolt heads inside the passenger compartment. That would have happened over the weekend but I had to return the borrowed welder. Just little things that stack onto each other.
The front clip got installed but it will have to be removed when I put the cold air intake in place for good. Can't install the cold air intake because I have to use the LS1 style MAF until I can get the car tuned.
Did have two little head scratchers that finally got squared away.
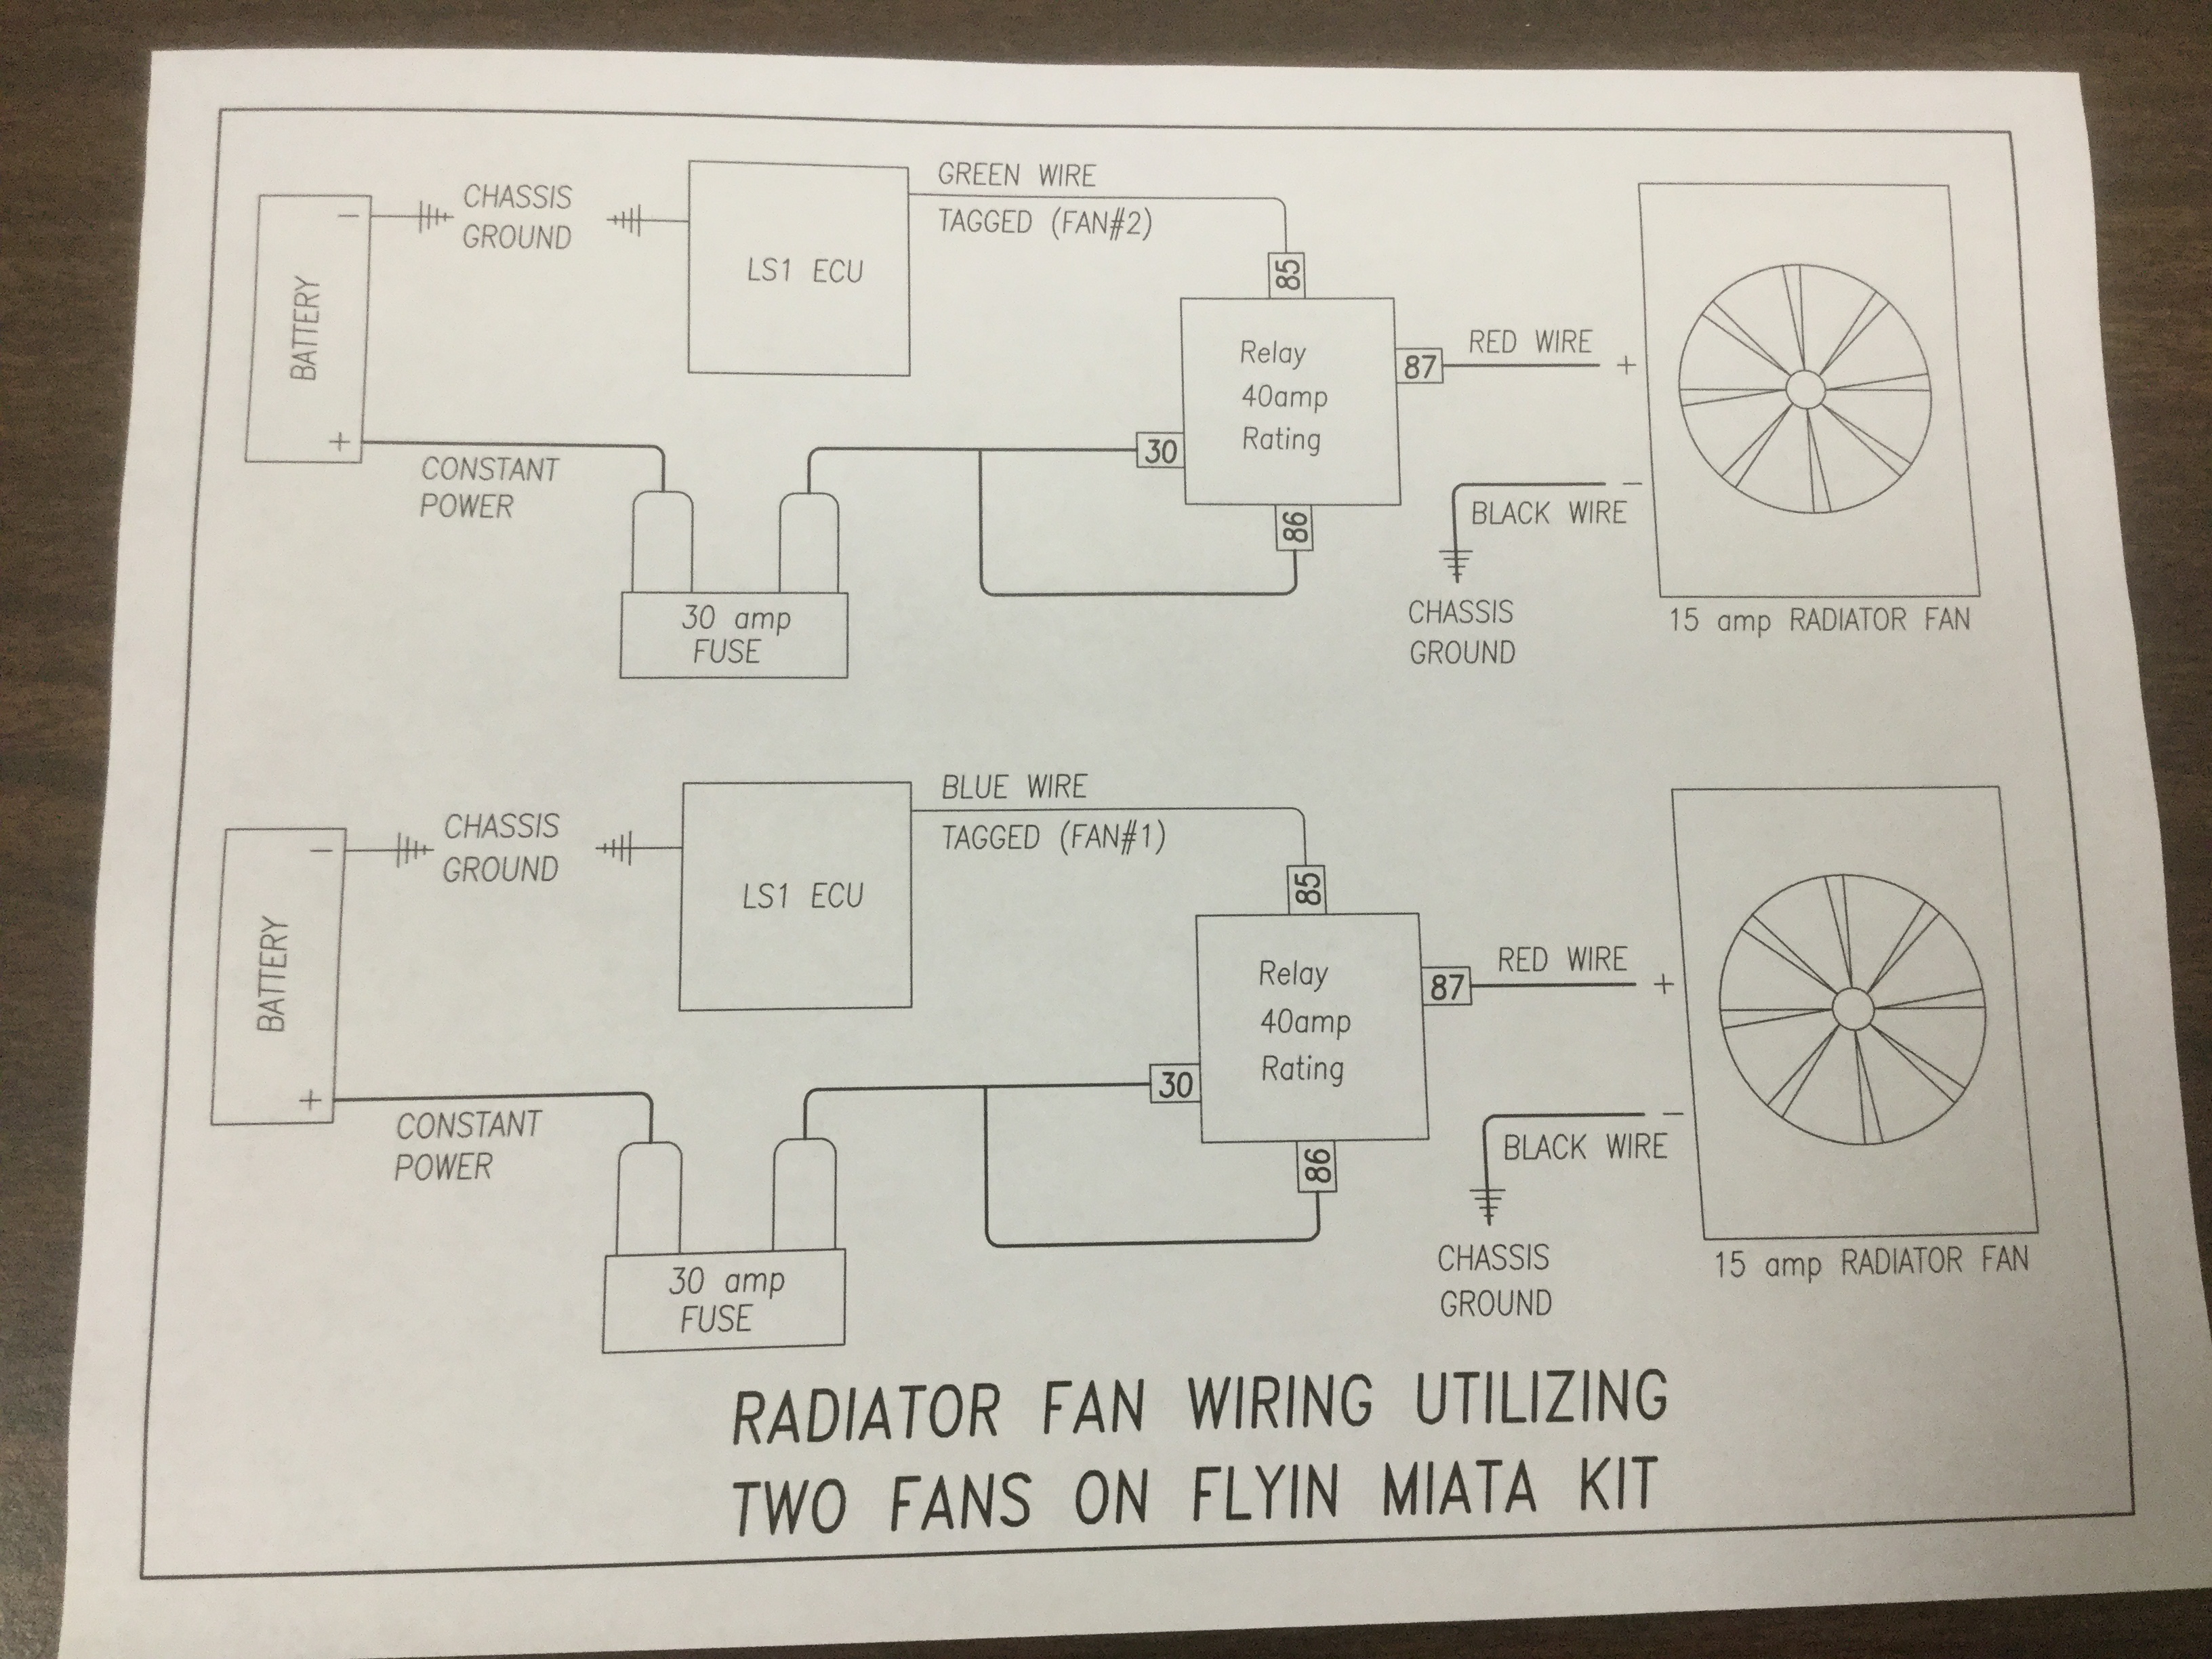
First time I wired up the fans I did it incorrectly because I thought the Camaro ECU sends a low voltage signal to trigger the fan to kick on.
WRONG.
After checking out a couple of other threads where the fans were connected up incorrectly and how they fixed the issue I found out that all the ECU wire does is to act as the ground to complete the circuit so I rewired the fan power as shown in this diagram. I am not an electrical person by any stretch of the imagination so I did my sketch in a nice simple style that I can understand with no abbreviations of wiggly lines.
I am not absolutely sure that the relays are necessary and perhaps the same thing could be accomplished by simply running constant power to the fan and connecting the black fan wire to the colored ECU wire but I worried that could expose the ECU to enough amperage to fry the computer and did not want to chance that. Somebody with better electrical knowledge could perhaps chime in and say for sure.
I also found out that after a few times kicking on the 20 amp fuse would blow so I switched them out for 30 amp fuses on the presumption that the spike in startup amperage was momentarily bumping over 20 amps.
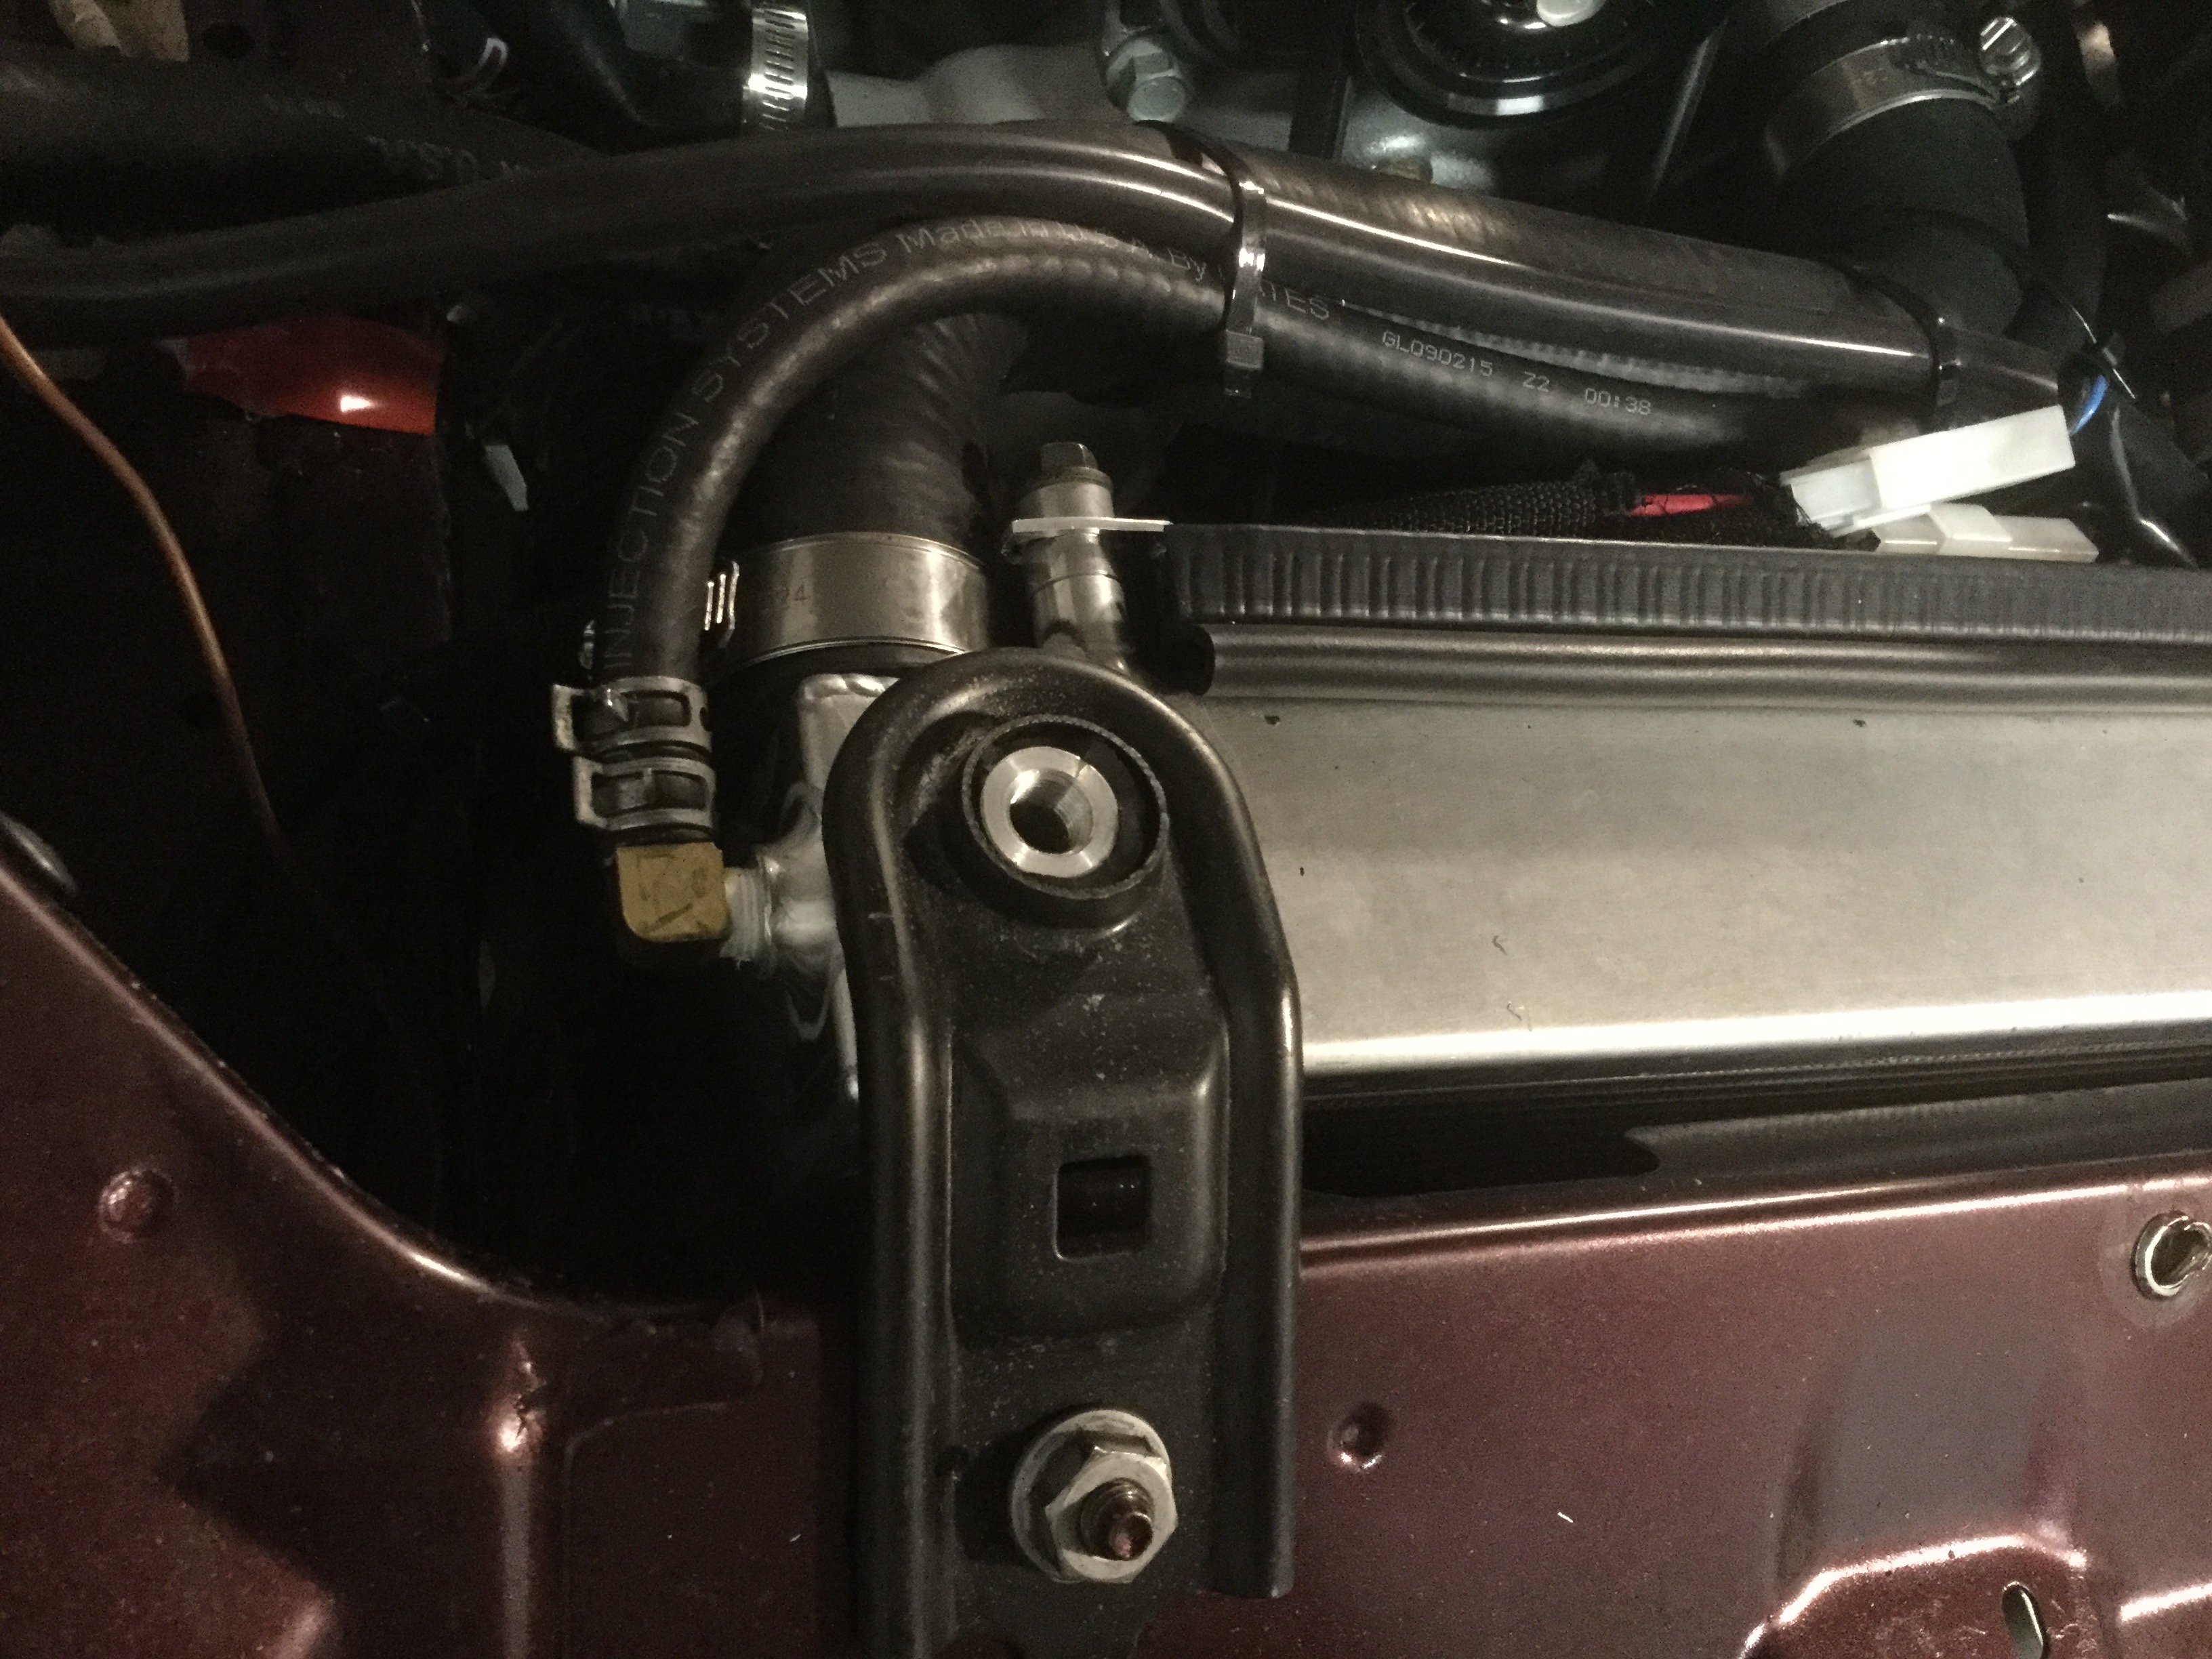
The Flyin Miata Radiator is supposed to have a 1/8" NPT tapped boss so that the cylinder head cooling passages can be vented back to the radiator.
I got the Radiator last week and transferred the rubber grommets from the old radiator and then test fit it to make sure everything was good before tossing the empty shipping box in the trash. While installing the radiator I looked all over it multiple times and just could not find the tapped hole. Gave up and drilled & tapped the boss next to the upper hose connection because I could put duct tape thru the opening to trap any aluminum shavings. Got it all together and ran the engine fro 10 minutes to make sure everything was working properly as the engine came up to temperature.
All good.
A bit later I noticed a few drops of liquid on the floor and decided it was radiator fluid. Ran it back to the upper hose and figured the upper hose must have some sort of tiny leak. NOPE. When I put the rubber grommets from the old radiator over the bosses, one covered up the tapped hole that I had been looking for. Ended up going to the Hardware store and got a brass 1/8" NPT threaded plug and plugged off the unused hole.
Actually prefer my location to the factory installed hole so plugged off the original hole.
In the picture you can see the open hole on top of the radiator and my tapped hole with the copper fitting on the left side. Trying to decide if I want to paint the brass black or leave it alone.
Well, the car is about 99% complete and assembled. Don't know that I will be doing any more pictures or posts unless I take a couple of the exhaust system installation. It will be a purchased Flyin Miata LS exhaust so there is nothing special unless there is some sort of problem. Getting the AC system up and working and a custom tune and alignment is the other things still to do but also nothing picture or post worthy.
There are a couple of things that stand out to me for people considering doing their own LS conversion into a (NB) Miata. On cutting the transmission tunnel, if I had it to do over I would probably cut out an 8" wide strip of tunnel where it meets the firewall and make a new sheet metal patch to weld in place rather than cutting and bending and welding the existing tunnel. It is the one area I feel the current method is a bit shade tree. The other thing that stands out is relocating the heater core tubing to he passenger side. My feeling is that a quality build should include that relocation because the heater hose running across the top of the engine just looks unprofessional, which is at odds with the rest of the LS upgrade to the Miata using Flyin Miata pieces.
Actually has me a bit bummed out because the whole process of planning and buying parts and building the car has been such an interesting and exciting thing to go thru. For some reason I have to have something mentally stimulating to keep me interested in getting up every morning and this project has given me 9 months of brain stimulation and learning new skills.
My wish some of the content in this thread will help others with their build in the future, just as other build threads have helped me to do this one. I want to thank everybody who took the time and trouble to do those threads as well as the people who have commented on my posts and kept me from (hopefully) making any glaring errors in this build.
The car should be good daily transportation for me in the future. The paint has a few rock chips and parking lot door dings and the interior shows a bit of wear so it is not a show quality car, which is what I prefer for a driver. On the plus side, I never found even a hint of rust on the car even during the modification process. The car must have been a garage queen that never saw rain until the original owner sold the car a couple of years ago. If I decide to do some upgrading to this car in the future, knowing that the car is solid and straight is a really great thing. It leaves me with a bit of a quandary. Even thought the car will be garaged, my intention is for it to be my daily driver but on the other hand it might be best to only drive it in good weather in order to save the car from rapid aging due to weather. The soft top has two stress cracks in the normal areas that see the most movement as the top goes up and down so it is due for a replacement in the near future and the leather seats are starting to get age cracks probably due to not getting regular leather treatment at some time over the last 17 years so they will need recovering before that gets out of hand. I am sure there will be a few other things that need changing or upgrading as I begin driving the car. The brakes are the normal Miata brakes so they might be upgraded to the Big Brake parts if I feel there is a need. Perhaps get rid of the cosmetic hoops and install a real live roll bar, particularly if I get the itch to autocross the car. Just have to see what the future holds.
Sorry Zaphod, I have no idea how to imbed a video. Plus, there will probably never be a video of it melting off the tires as I am an old guy that uses cars pretty conservatively. This will be my daily driver so I am not going to abuse it unless I take it to an autocross track or drag strip.
An update;
The car is assembled and running but still has a few things to clean up.
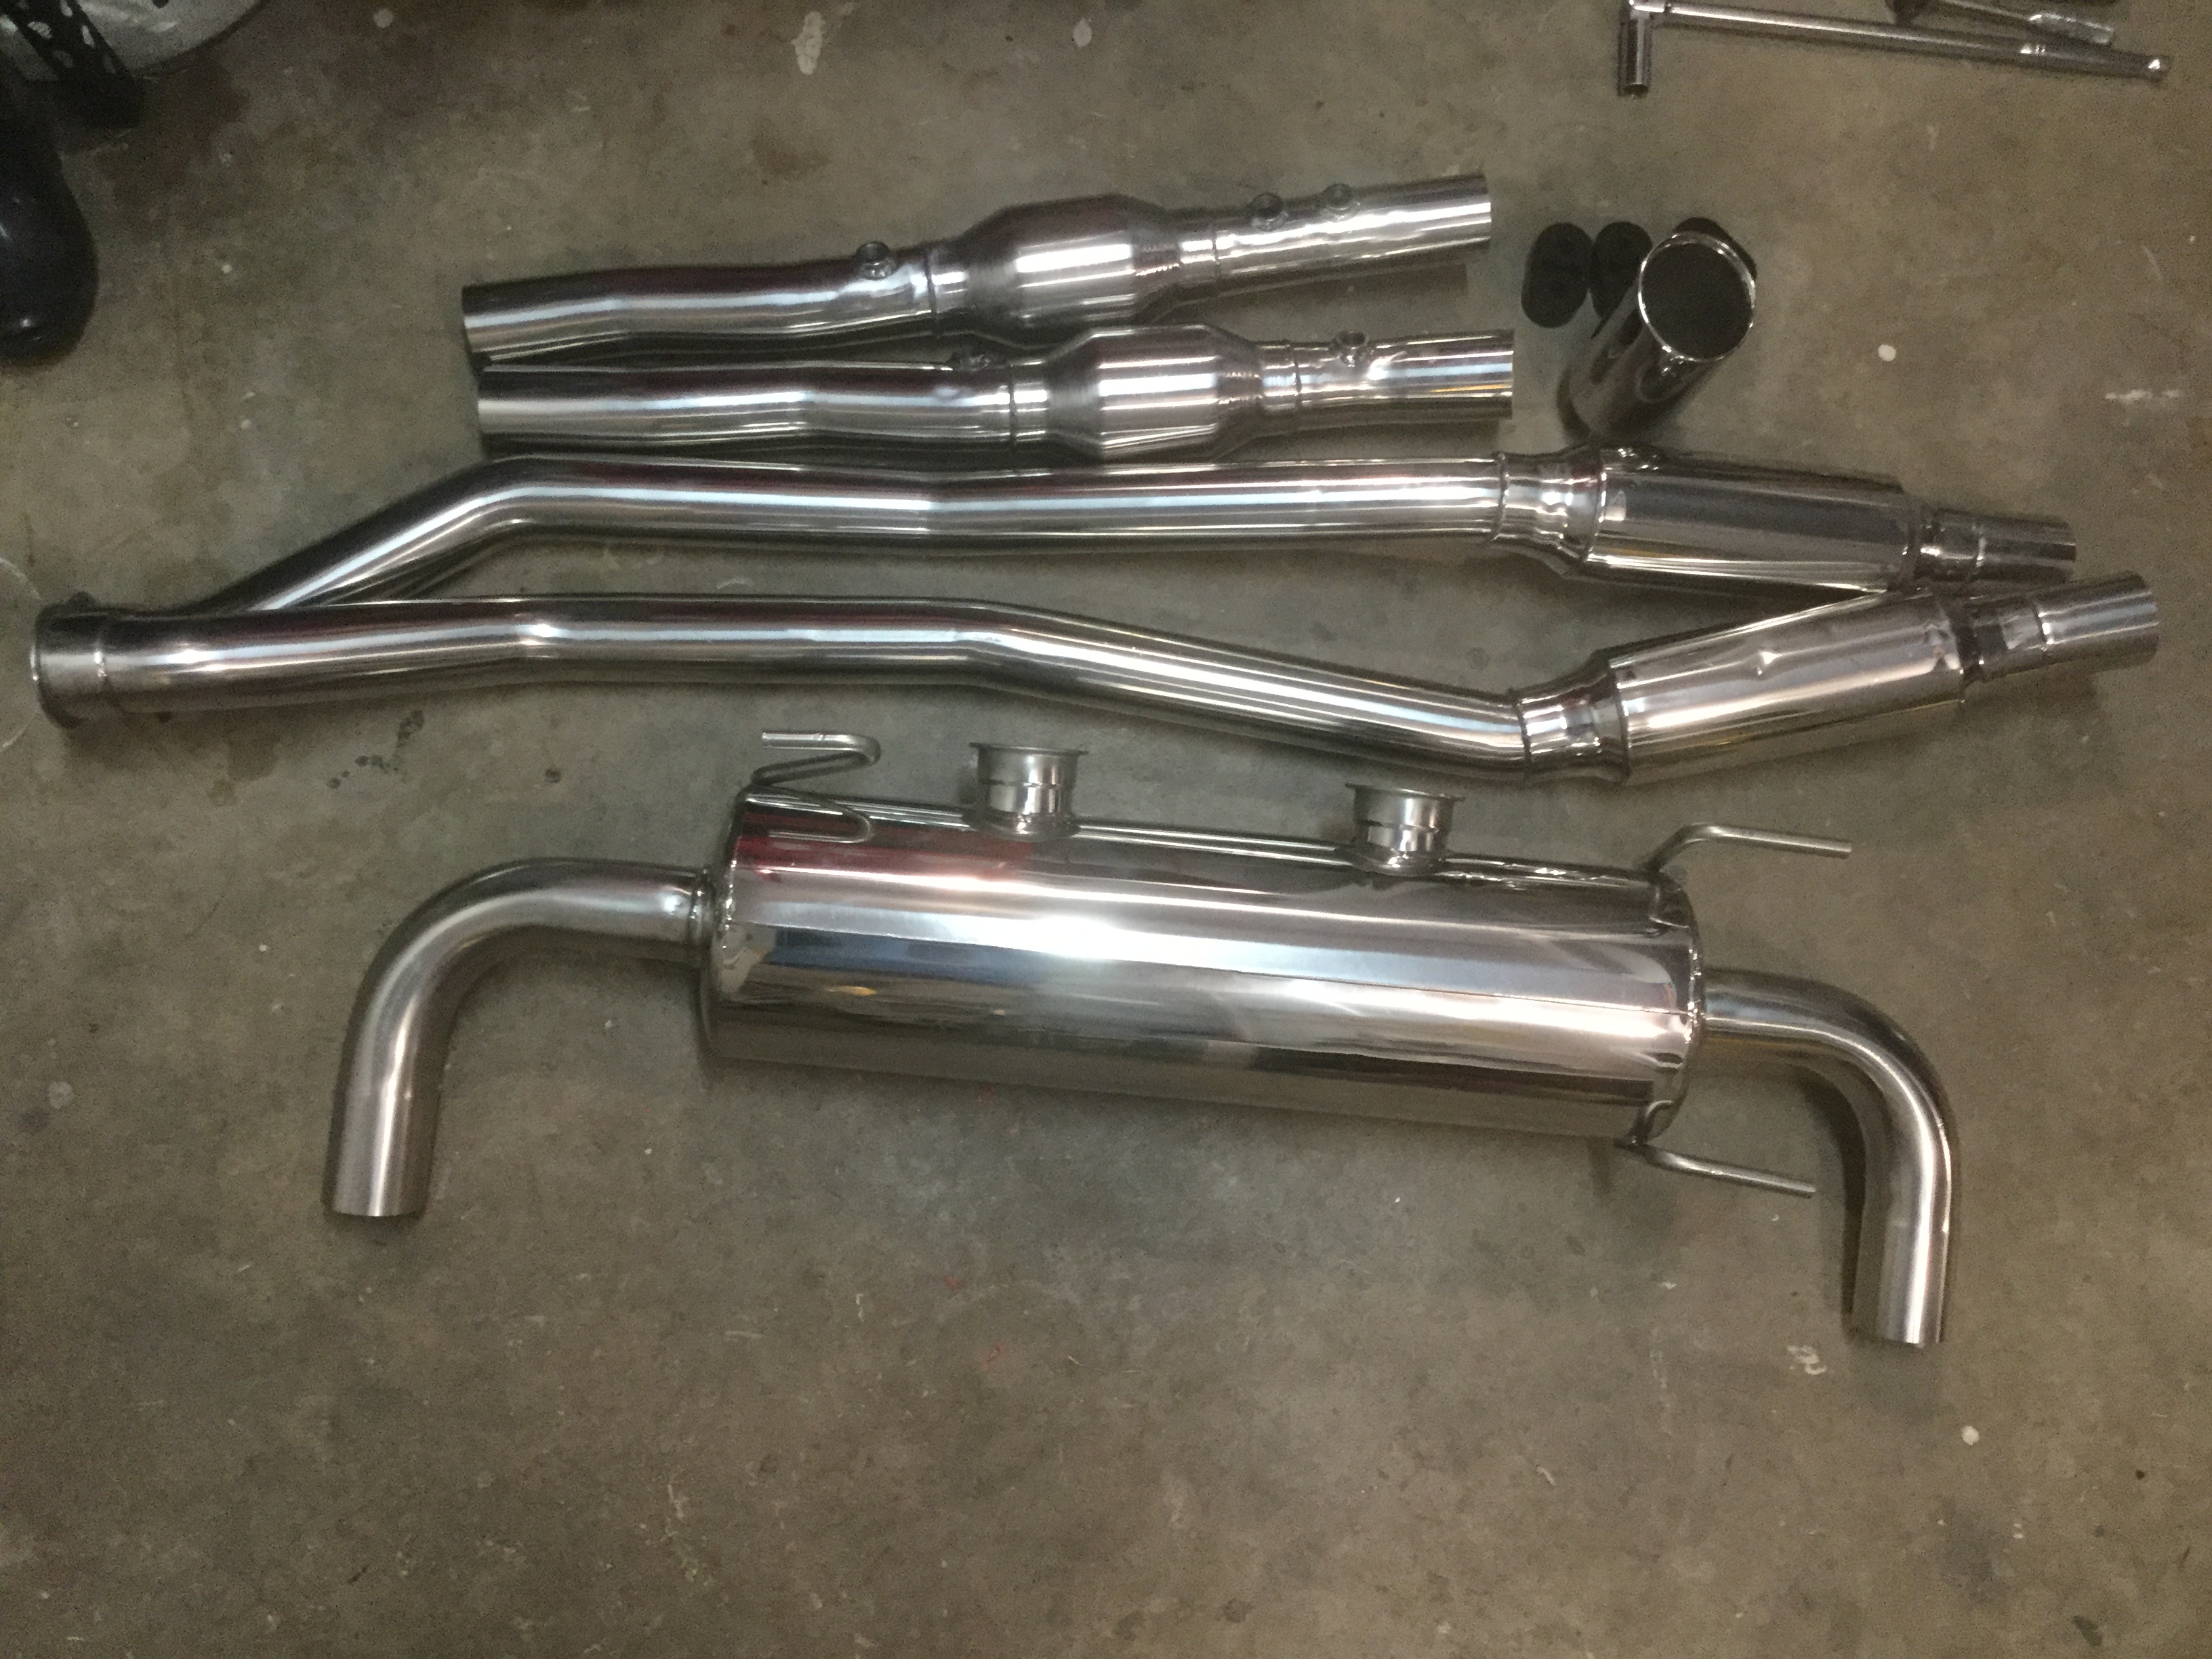
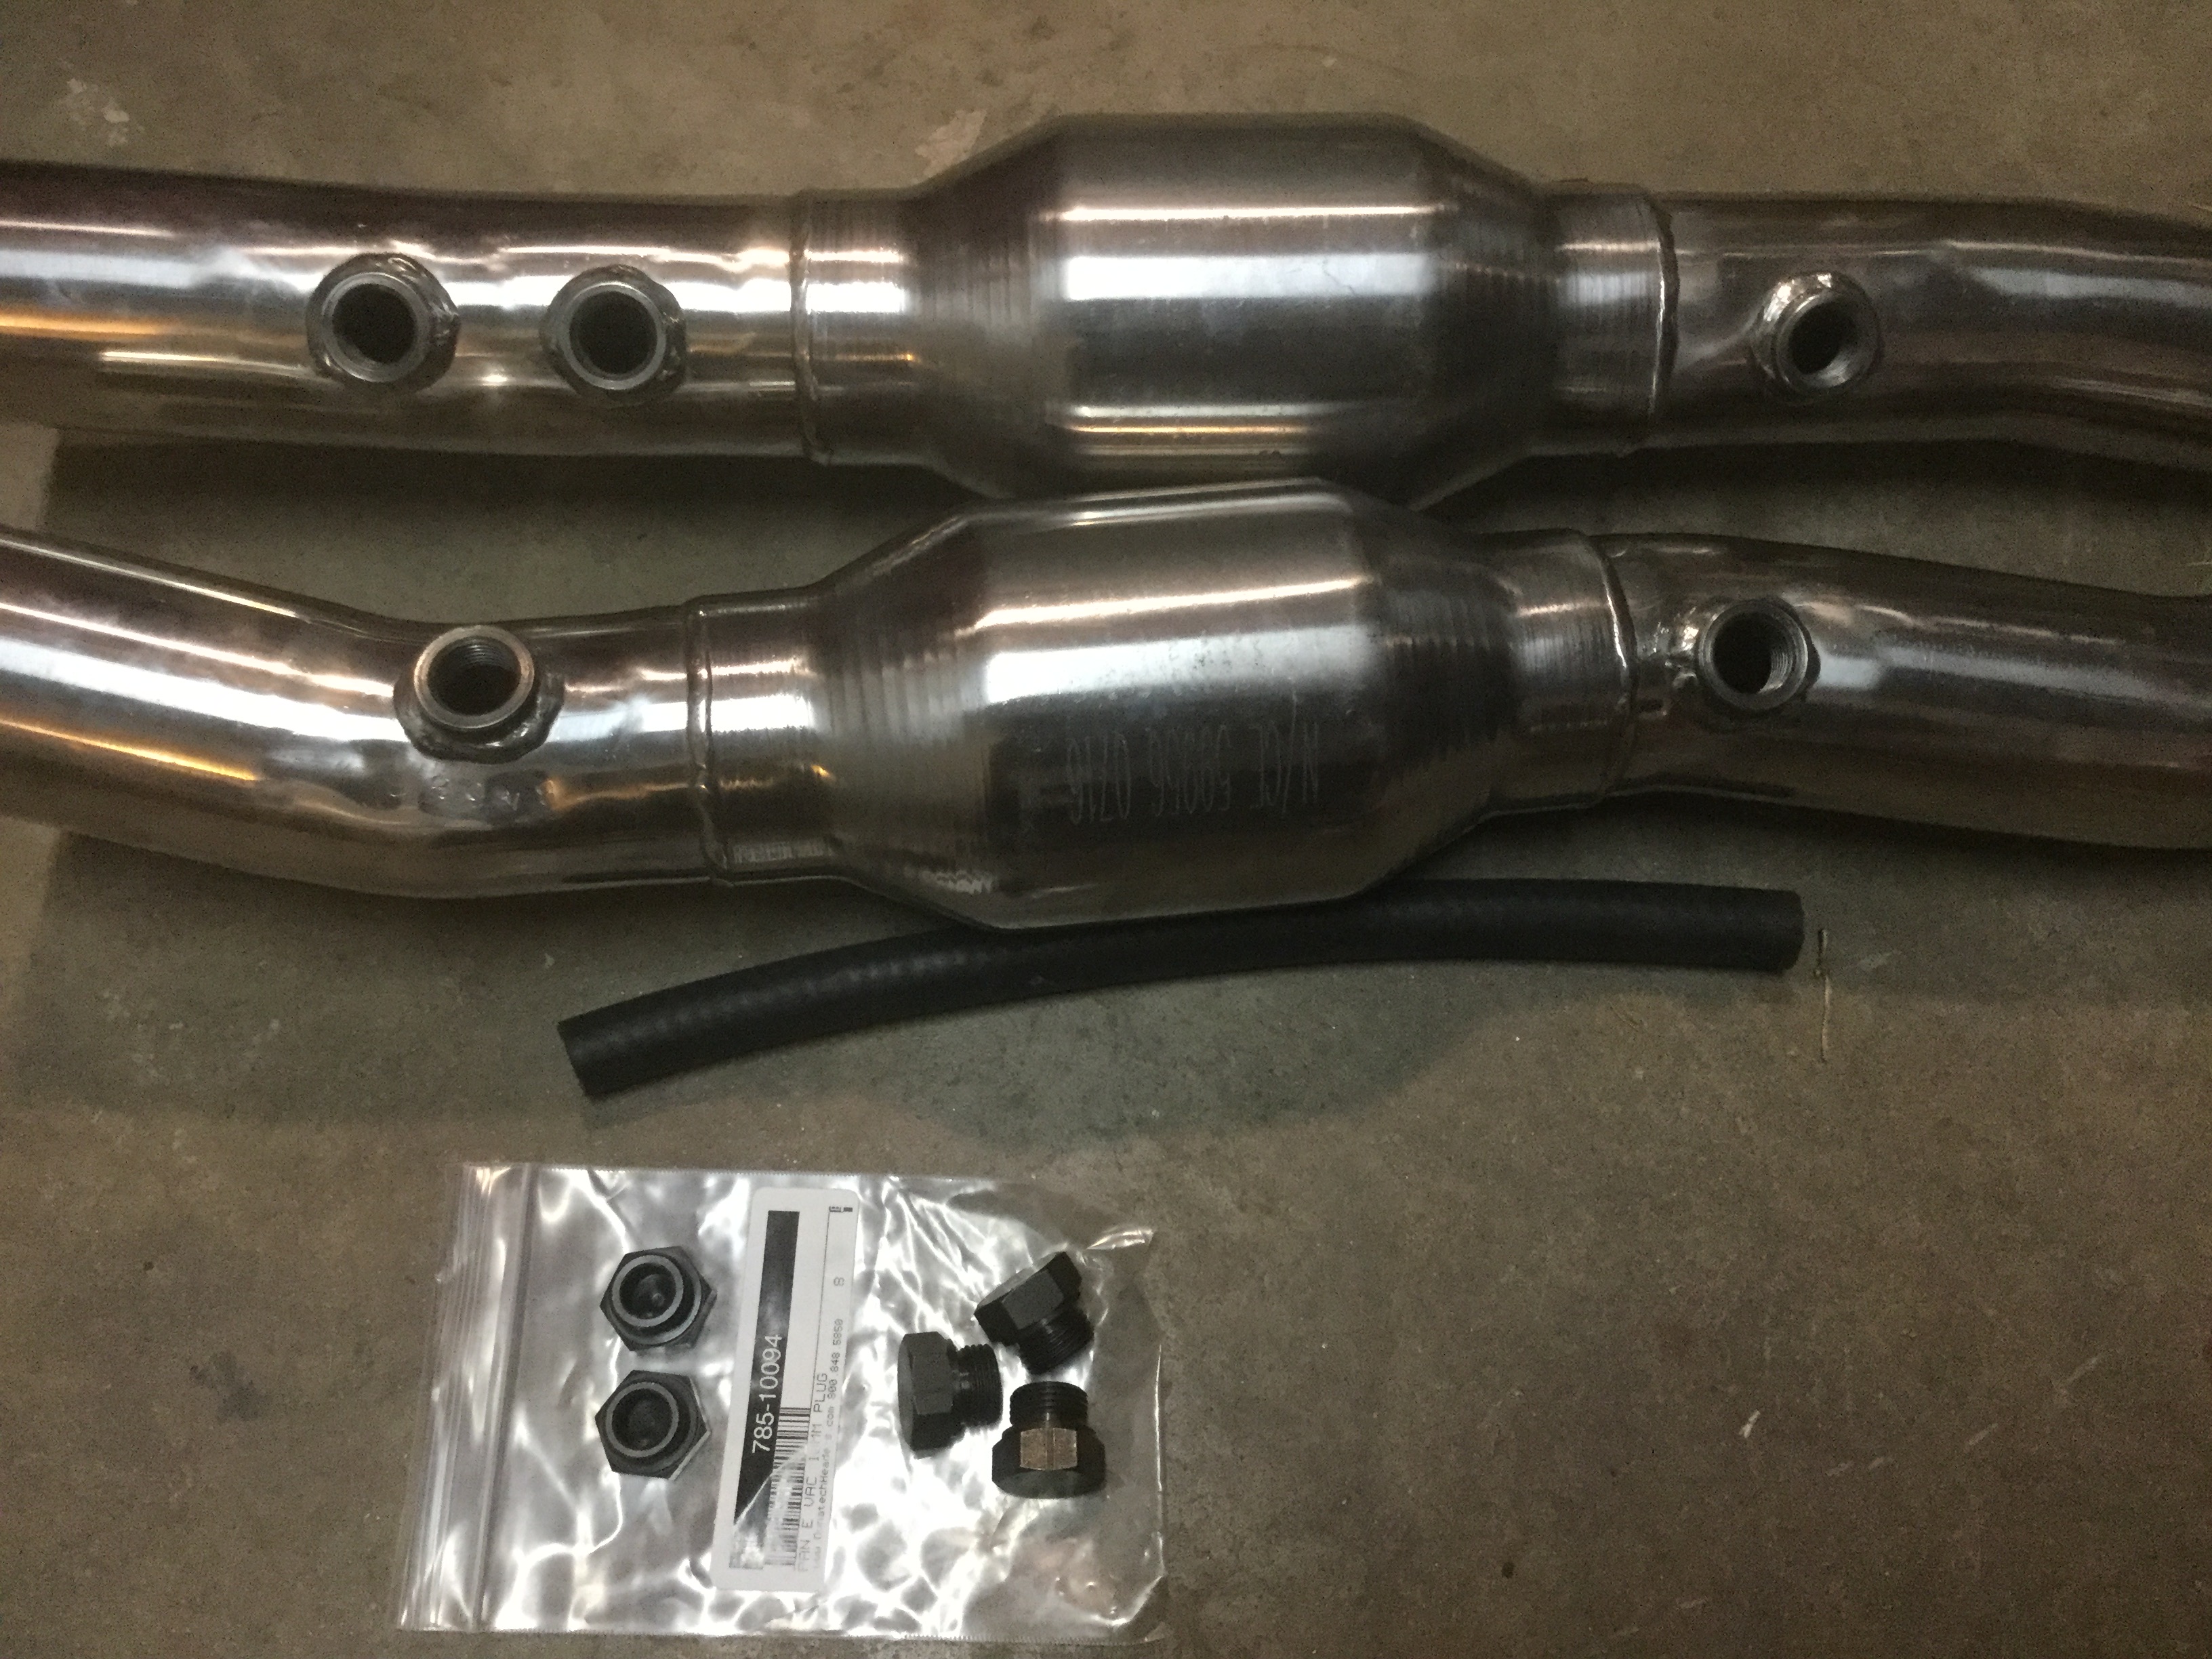
The exhaust system that was purchased from Flyin Miata is beautiful and shiny and actually looks like it belongs on a show car. WAY prettier than I was expecting. Only difficulty was that when it arrived some parts were missing and one corner of the box had ripped open. I contacted Flyin Miata and they are making it right and sending me replacements for the missing parts. Still waiting on the parts to arrive. In the mean time I went to the auto parts store and got $15 worth of stuff to allow me to temporarily mount the pipes that contain the catalytic converters and resonators (glass packs as far as I can tell). If I wanted a tough sounding street car I would run pipes out the back and leave off the actual muffler because it sounds really wicked. Since I want a nice quiet daily driver the muffler is a must. Also, since I will be running the muffler I don't want to take the car to be tuned until the muffler is mounted and working. Since the same place will be doing the alignment and the tune, the car is sitting in the garage and patiently waiting.
One thing about the exhaust kit is that there are a total of 5 Oxygen sensor bungs located near the catalytic converters. Since I welded bungs onto the headers none of the bungs are needed. No plugs come with the kit so I ordered some from JEGS to plug the unused bungs. Edit: the Flyin Miata kit actually contains 3 plugs but they were lost with the mounting brackets when the package broke open while in the hands of UPS.
After getting the exhaust installed and running the car for a while I am superbly happy with the fitment and sound. Just a nice rumble at idle and no drone when cruising along. I don't know how to post a sound clip or video but there is a video that Flyin Miata posted on youtube if you want to hear what the finished product sounds like.
A couple of other small items is that the speedometer is not reading anything from the Dakota box that is supplied as part of the instrumentation kit from Flyin Miata. Need to run down the wires and make sure I have the correct wires into the box because I suspect I have something connected wrong. Hopefully a simple fix but I am not messing with it till the car is up and running.
Early on I decided to go with oil pressure and volt gauge for the two accessory gauges mounted in the pillar gauge piece. Once I get the alternator to charging properly my feeling is that I should have gone with a water temperature gauge and will possibly change it out at a later time.
The other thing still on my list is to get the night lighting for the accessory gauges connected to the instrument lighting circuit. Haven't decided on the best place to splice in. If anybody has a suggestion I would like to hear about it.
One last item is that I need to remove the fenders to adjust the door hinges to fit properly so the doors will open and close smoothly. Both of them sagged just a bit when I installed the fender braces. Won't do that until I remove the front clip in anticipation of getting the car tuned and set up to run the LS7 MAF & IAT style sensor.
The hood has a set of latches from Flyin Miata (actually AeroCatch). They installed just like the Flyin Miata instructions and seem to work great. I installed them at an angle because they look good that way and mimic the look of the headlights.
Sorry Zaphod, I have no idea how to imbed a video. Plus, there will probably never be a video of it melting off the tires as I am an old guy that uses cars pretty conservatively. This will be my daily driver so I am not going to abuse it unless I take it to an autocross track or drag strip.
I've got a few years on me as well. As I mentioned in my own build thread, I'm building a 'cruiser' and not a race car myself, so I get your sentiment. However, I think doing at least 1 tire smoking burnout is a requirement when you put a V8 in Miata, isn't it?
As for the video, I think it's pretty simple if you can upload to YouTube. Just put the link in your message (there may be BBCode tags to surround it with, or it may just automatically recognize it).
I like the Aerocatch positioning as well. My OCD approves of the symmetry to the lamps.
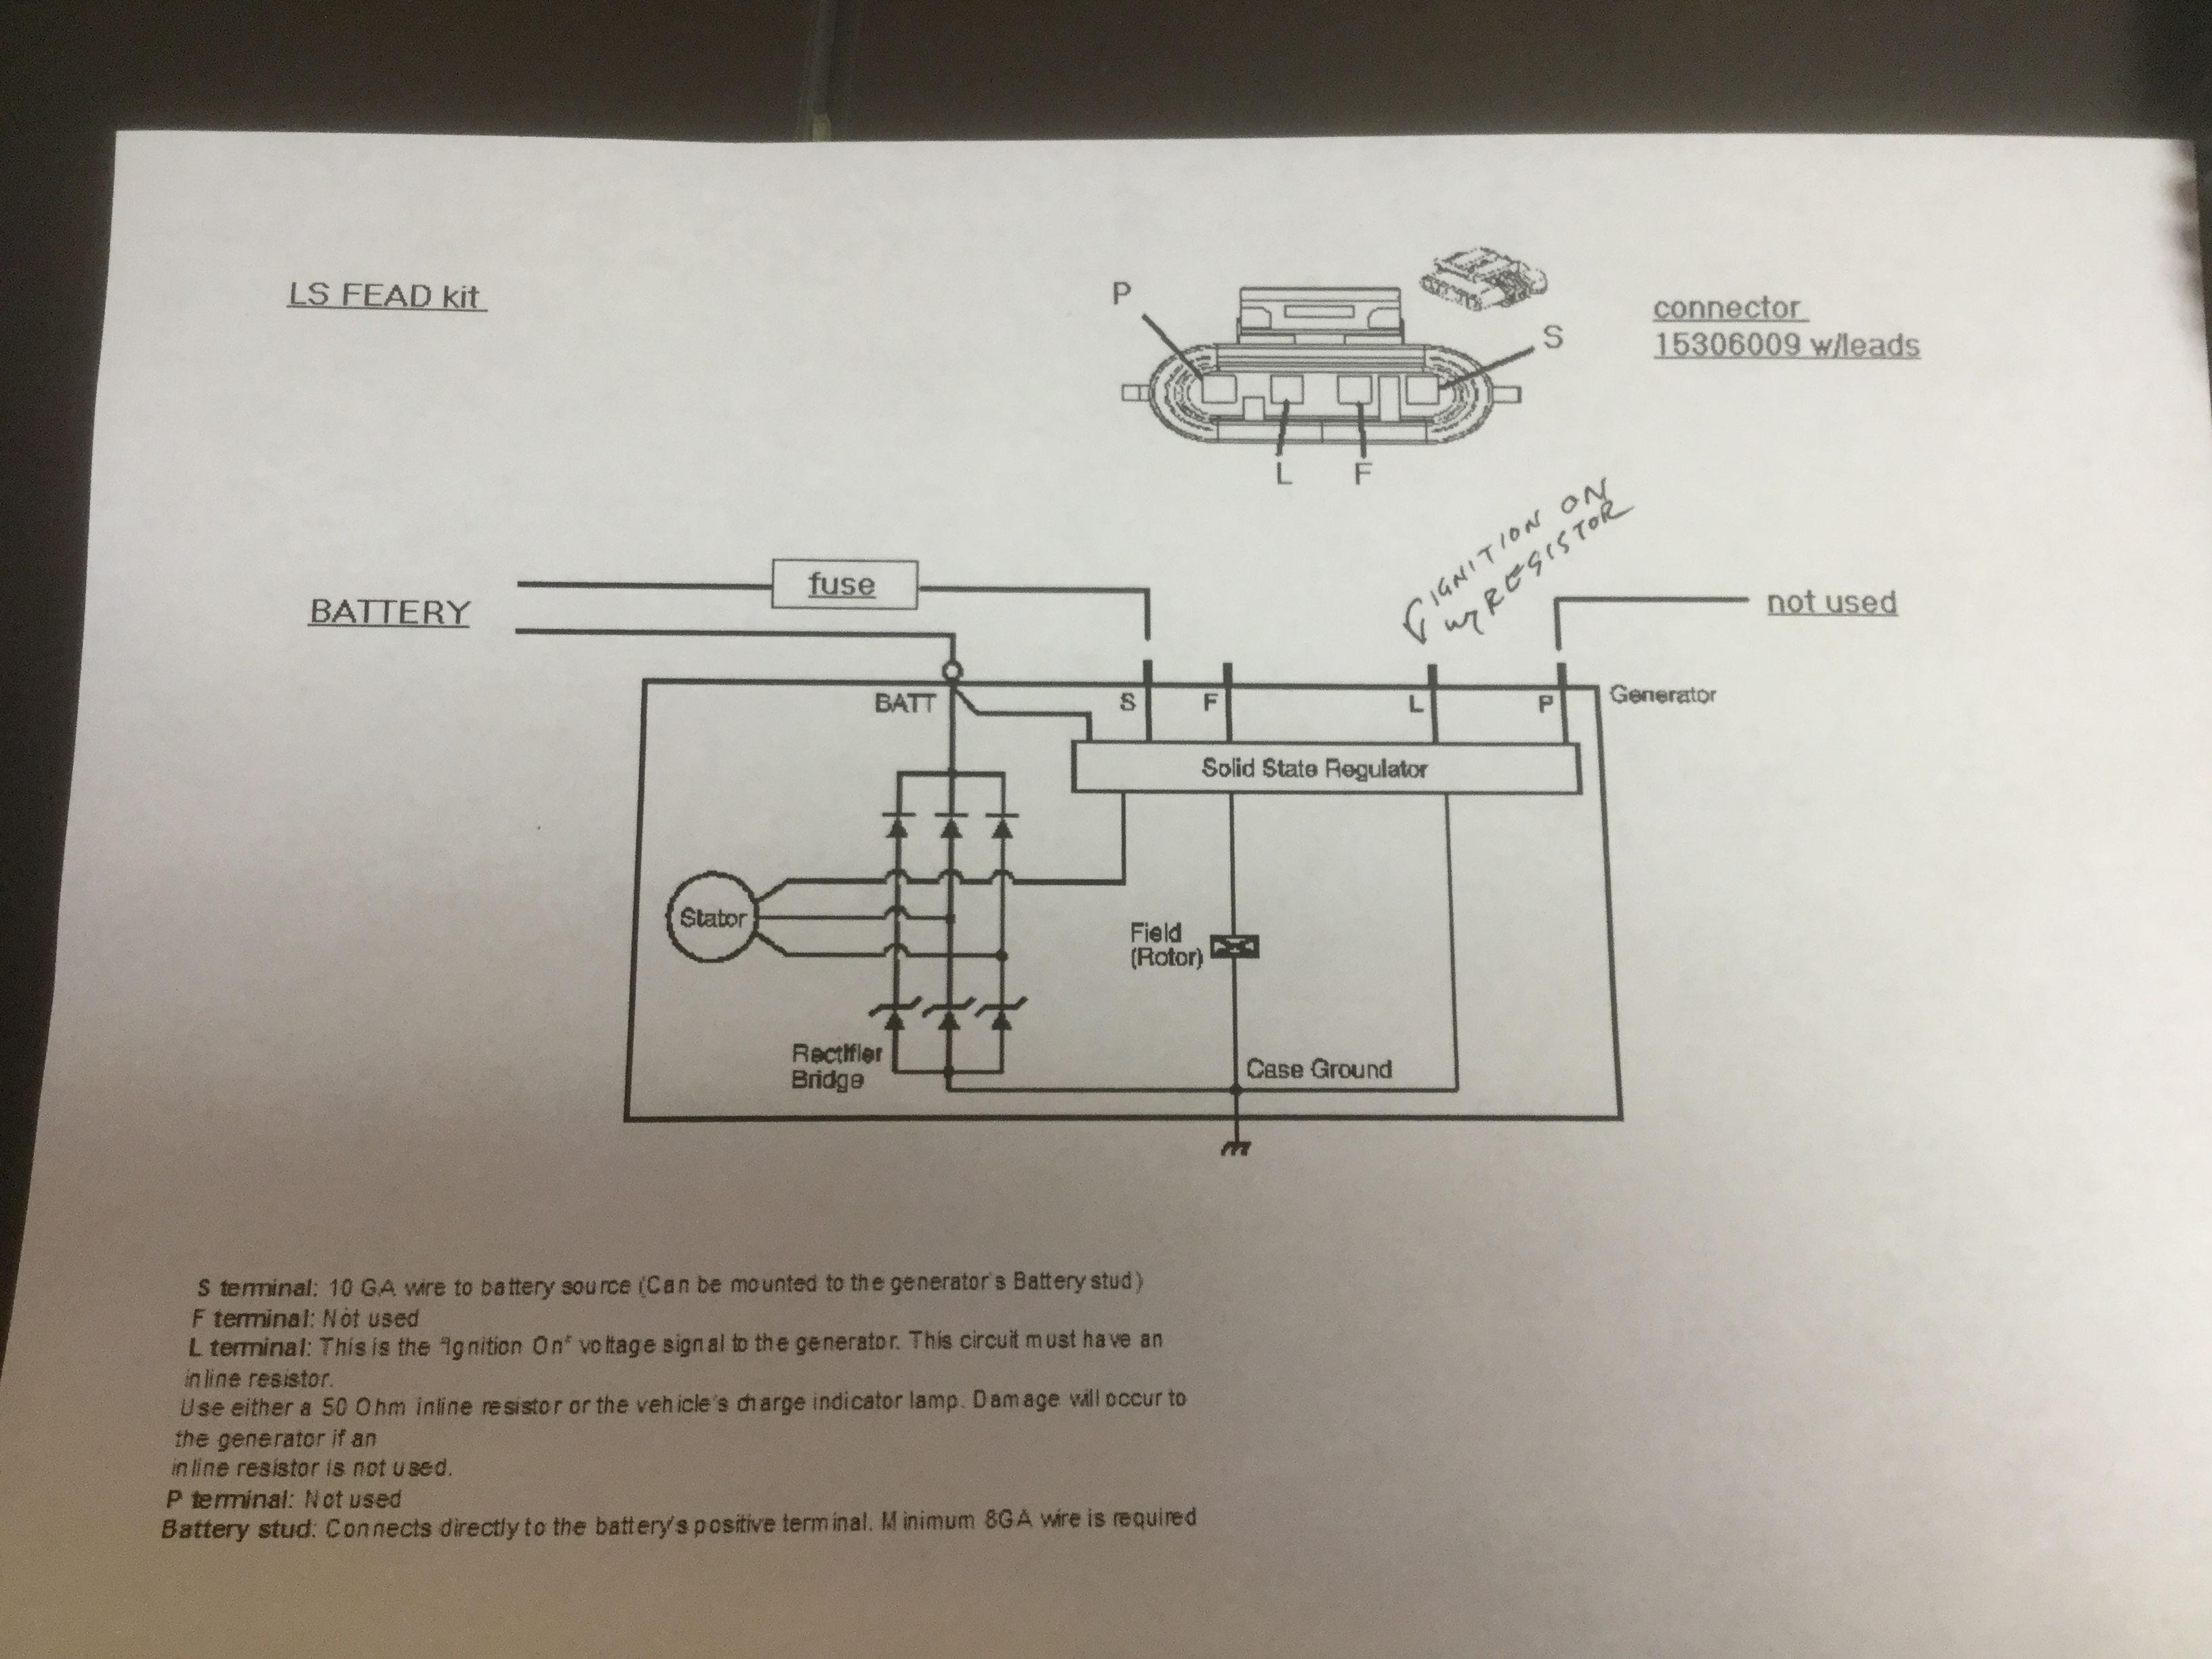
The one remaining problem I am trying to figure out has to do with the alternator.
This is absolutely a big problem with somebody trying to utilize the Chevy Performance Cadillac CTS-V style accessory drive kit with an LS1 engine and ECU.
The back story is that I installed the Chevy Performance engine accessory drive setup that is derived from the 2007 Cadillac CTS-V because it mounts the accessories 1" closer to the engine than the Z28 accessory drive mounts. This is the kit that Flyin Miata utilizes with their conversions. The problem comes in because Flyin Miata utilizes brand new LS3 crate engines which utilize computers that will control the 2007 alternator.
My engine and transmission is a 2000 model LS1 engine, which utilizes a different alternator control communication.
Bottom line is that the 2007 Alternator will not allow the 2000 ECU to tell it to charge.
The second issue is that the 2007 CTS-V alternator has a different mounting style than other alternators so I cannot simply switch to a compatible alternator.
Working on that problem with no luck so far. Contacted Chevrolet Performace but they were no help. This is the diagram they sent me of how the alternator connections work but I am dubious it is for the correct alternator as mine only has the two center pins even though it does utilize the four pin connector.
Contacted Summit Racing, which was where I purchased the accessory drive thru. No help there either. Contacted a person who posted some video's on YouTube where he switched out internals from various alternators but he was not able to help.
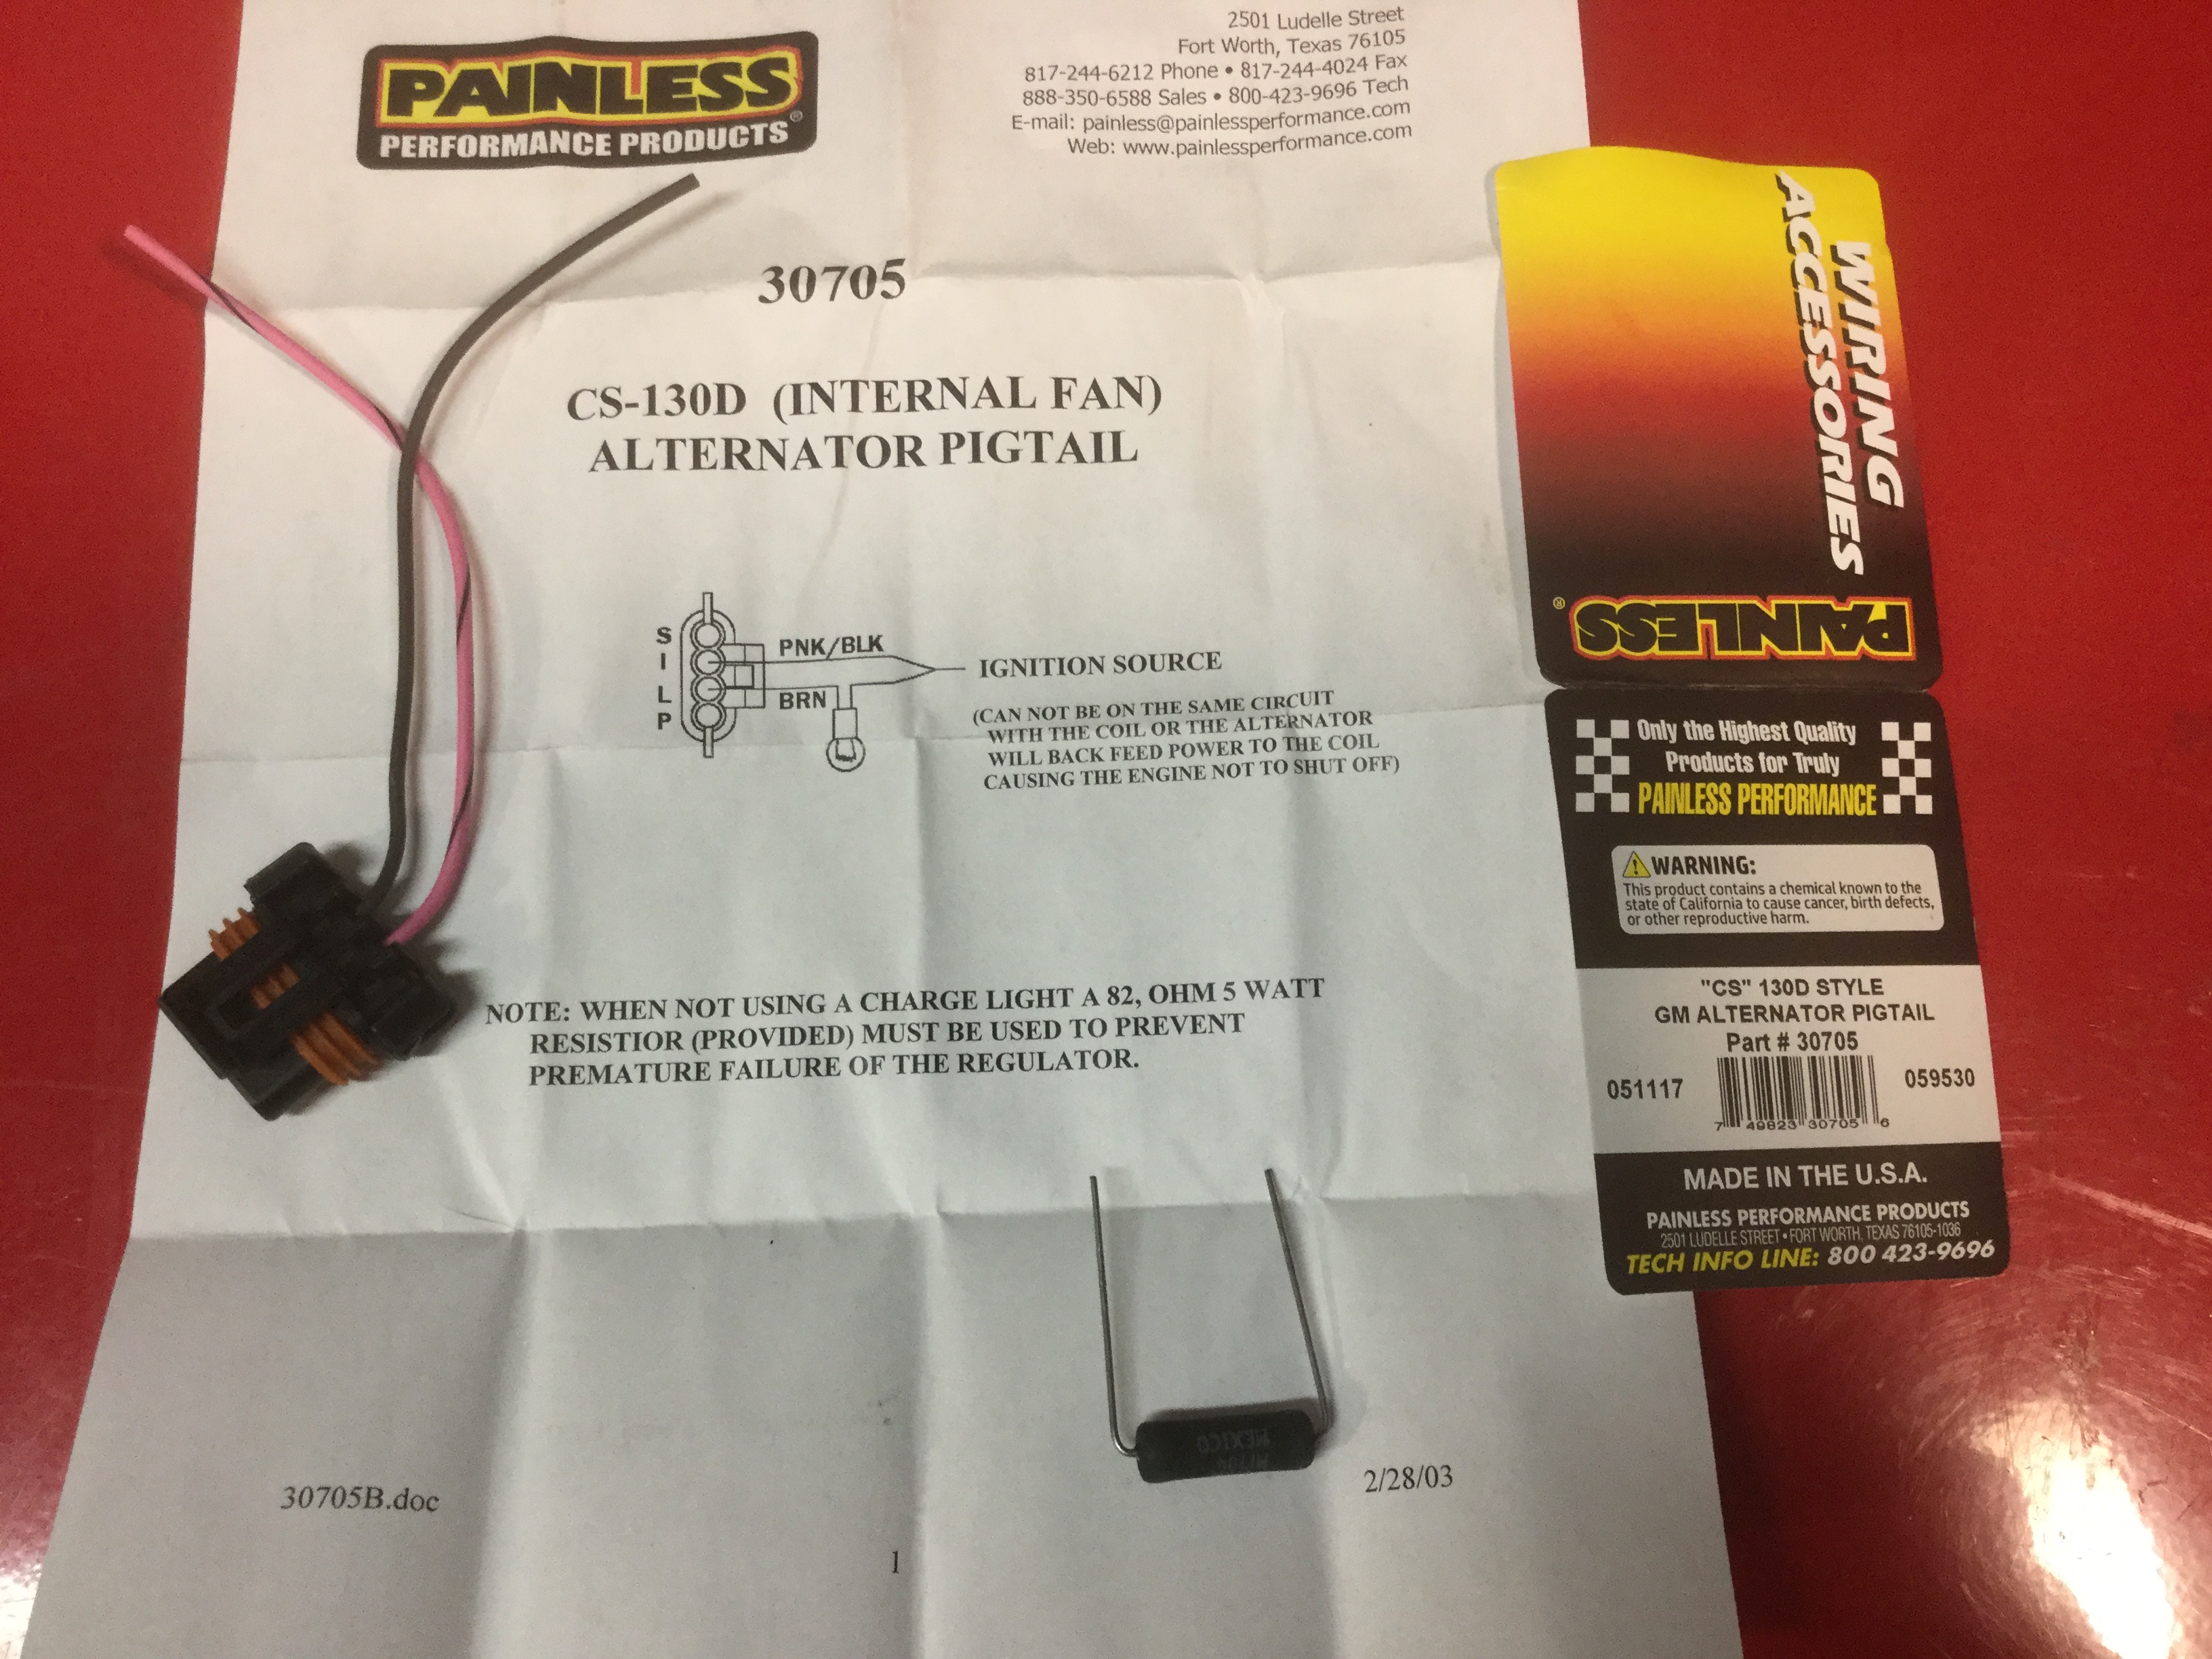
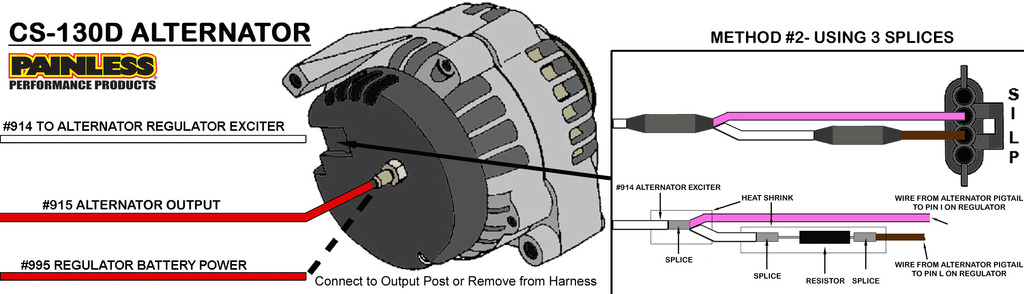
Contacted Painless Wiring since I bought a harness from them. They did not have a definite answer but suggested one of their alternator connector adaptor kits. Bought it and tried it as per the instructions. Did not work.
Removed the alternator and took it to the local auto parts store I have been utilizing for the swap and had them test it to make sure I had not fried the internals. It tested out fine.
Not sure where to go from here.
Edit: Got it it figured out and working. Perhaps not the only or even the best solution but it worked.
PJ posted and gave me a solution by looking at his build thread.
Amazon can be an amazing resource with a wide range of products on a single website.
They list an alternator bracket for an LS Corvette that mounts the alternator in the low position rather than up high where it is mounted from the factory.
I bought the bracket to help with that portion.
Next I called Summit back and explained that the accessory drive kit is listed as fitting an LS1 but the alternator is not compatible. They allowed me to return just the alternator for a refund on the cost of that one item. Next I went to the local auto parts store and bought a remanufactured alternator for a 2000 Z28 because I was not 100% sure the relocation kit was not specific to Corvette alternators and I did not want to waste a week or two via mail order swap out's if I got the incorrect piece. By getting the Camaro alternator I am assured that it will properly communicate with the engine ECU, which was the problem with the Cadillac alternator.
Got all the parts and did a test fit to check out alignment and fit.
NOTHING aligned.
When mounted the alternator wheel is out of alignment with the other wheels and sets too far away from the engine by about 1/8", which would definitely cause the belt to do bad things.
To fix that I ground 1/8" from each of the three spacers that determine how far away from the block the bracket installs.
In addition to that problem the alternator housing touches the front of the engine block and keeps the last mounting bolt from being installed.
The area of interference was a stiffening rib on the block so I ground the offending area by about 1/8" to give some clearance. A Corvette alternator could perhaps be smaller diameter but I don't know.
The third problem is that the idler wheel that mounts to the same bracket is out of alignment by about 1/2".
The bracket has a thicker pad machined in the bracket to give the correct placement of the idler wheel. I cut down the pad by 1/2" and tapped the threaded hole thru the rest of the bracket.
Everything lines up and seems to work just fine upon start up. One other thing I noticed is that with the Cadillac alternator and bracket the supplied belt was really tight to install. With the usable bracket installed the belt is almost too long. I will probably take it down to the local auto parts store and see if I can trade it for one that is about 3/4" shorter in order to gain back the ability of the tensioner to have some room to keep tension on the belt as it stretches and wears.
As I said, not a particularly elegant solution but the alternator is working correctly.
boB,
That is the same Painless Wiring kit that I tried.
No good so far.
My presumption is that where the Painless diagram lists #914 Alternator Exciter they mean the wire that comes from the ECU that is listed "Alternator".
Only other thing I know to try is to do separate wires (as the Chevy Performance diagram indicates) with one being constant battery feed and the other being switched battery power and completely ignore the ECU wire.
Will try that this evening.
Do you have any actual picture showing exactly how you connected the wires to make it work for you? Maybe I am misunderstanding the Painless Wiring diagram.
From what I recall a 2000 LS1 might actually need a voltage signal from the ECU. Since you have a newer ECU, there may still be a pinout on the ECU that provides the 5v signal. You could test a few available ones for a signal and then tap into that, or do the voltage regulator that I did.
Well, I have been driving the car for a bit and wanted to give an update.
The alignment got done on the car a few days ago. The Flyin Miata recommended alignment specification was followed and the car appears to be electronically aligned perfectly. I was given a printout that shows it to be spot on and the car drives excellent. No pulling or wandering. This tells me that the V8 Roadster front subframe piece was fabricated accurately and correctly.
The car still needs to get a custom tune but the tuner's chassis dyno is down for repairs and will not be up and running for a couple of weeks so I cannot give any actual confirmed numbers for HP or torque at this time but I expect it to be in the 325-350 HP range based on other dyno sessions that I did in the past with the 99 Firebird Formula I used to own.
Driving the car is an absolutely super stupendous exciting interesting experience.
I just can't think of enough positive things to say. The factory should have had (at the very least) a nice strong V6 option in the Miata. Dropping in the V8 has made the car a much nicer daily driver. Normal driving is so easy, where before just keeping up with normal traffic was a challenge.
The Flyin Miata stainless steel dual exhaust is a really high quality piece that has a V8 rumble but does not have the annoying drone and vibration and noise that most aftermarket exhausts seem to have. Quiet during normal low RPM driving but a nice throaty sound when you get on it a bit. It fits underneath the car nicely and does not hang down much below the frame rails.
For someone wanting a more robust sound you could take the Flyin Miata Exhaust system except delete the muffler and work up a pair of ends to exit the last few inches of the car to have something considerably louder, if that is your thing. The resonators look to me like nothing more than glass packs and it has that sort of sound. I ran the car for a couple of short drives that way before deciding that the muffler is something I absolutely want.
I have only tested the full throttle acceleration once while entering a highway via an ramp and I was doing a first gear roll rather than being from a dead stop. The tires were slightly losing traction thru first and second gear but it was still running nice and straight. No bad manners that I could tell. A bit stickier tire compound would help and I could see where a person had better show some maturity to drive the car on a regular basis. Nailing it in first or second gear while going around a corner would have the rear end breaking loose, no question about it. For my purpose of a good daily driver the all season 16" tires on the car will be just fine.
The factory T56 shifter was left attached to the transmission when I did the swap and I bought a Flyin Miata handle that puts the shifter **** in the same location and the factory **** and also uses the factory **** thread size. Since I am looking for a factory sleeper look that is what I want to go with. When shifting I can feel a very definite bump-bump as the transmission shifts from one gear to the next. Also, a good bit of effort is required to shift from gear to gear, not exactly what I feel is ideal. On my list for future upgrades is a shifter and a washer in the detent to make things a bit smoother.
Another upgrade I am debating has to do with the gauges.
All of the factory gauges are working, which is something I absolutely wanted to happen.
I did install a gauge pod onto the windshield pillar that holds two gauges. Originally I installed an oil pressure gauge and a voltage gauge. My reasoning was that the factory gauges are really nothing more than glorified idiot lights that do not give an accurate reading even though they are sweep gauges. Before doing the V8 swap I had the alternator give out and got no indication from the dash idiot light that anything was wrong so I decided a voltage gauge would complement the factory gauges.
Now that I have the alternator working well my opinion is that a water temperature gauge would be more useful than a voltage gauge so I ordered one to match.
I will either go with oil pressure and water temperature in my 2 gauge pod or order a 3 gauge pod from Moss Miata so that all three gauges will be available along with the factory gauges.
The only other upgrade still on my list is some high performance brake pads and a proper roll bar. The car currently had cosmetic dual Chromed hoops and I will feel safer with some actual roll over protection.
After some internal debate I decided the factory brakes will be fine for my purpose as I simply will not be driving this car to the potential of the 350 HP drivetrain. The car is a fun daily driver, nothing more. If that changes, I can always order and install the big brake package.
One thing I have contemplated is if I would have done anything different if I had it to do over again and there are a couple of things.
The first has to do with the Miata that I ended up buying. It is a 2000 SE in an odd purplish maroon color that I am not real fond of. The car is in excellent condition and completely rust free so it was perfect to do a swap as there were no secondary problems to fix, something I was absolutely set on when contemplating the swap. I searched for several months to come up with the cleanest possible 1999 to 2001 Miata and finally bought this one but if I had it to do over I would have kept looking until I found an equally clean Miata in a more desirable color.
The other thing was purchasing a used driveline (engine, transmission, rear differential) rather than purchasing new assemblies. It will probably take a few years before I decide if I did the right thing or not. If the driveline is reliable and trouble free then I ended up doing the right thing and saved myself a bunch of money. If something gives me trouble and I have to do a rebuild or replacement than I will know that I made a bad decision. Guess that is always the trade-off decision that has to be made when contemplating a swap of this sort.
My total cost so far was just a few hundred dollars over $20,000 including purchasing the car but will end up being right at $21,000 after the custom tuning is complete. Not bad for the fun factor this car brings to my daily drive to and from work.

 07-24-2017, 10:31 PM