
NB Miata with Ford 3V V8 4.6litre Modular Motor with Tremec 5 speed from a Mustang GT


Thread Starter
V8 Miata Fan
Joined: Oct 2011
Posts: 64
Likes: 2
From: Johannesburg - South Africa
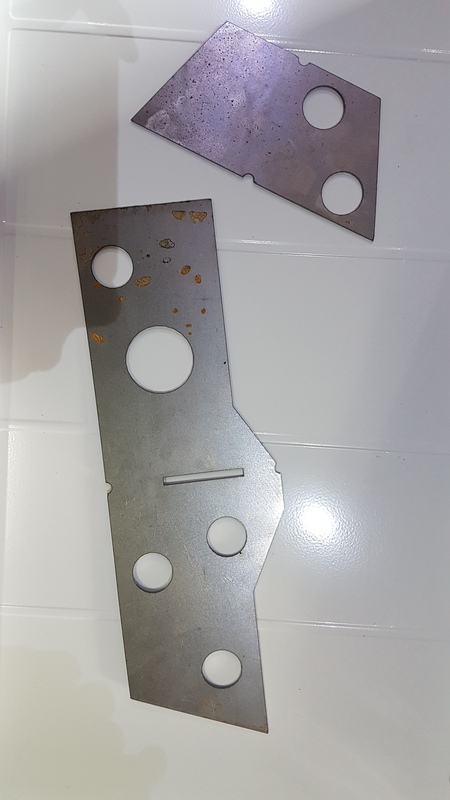
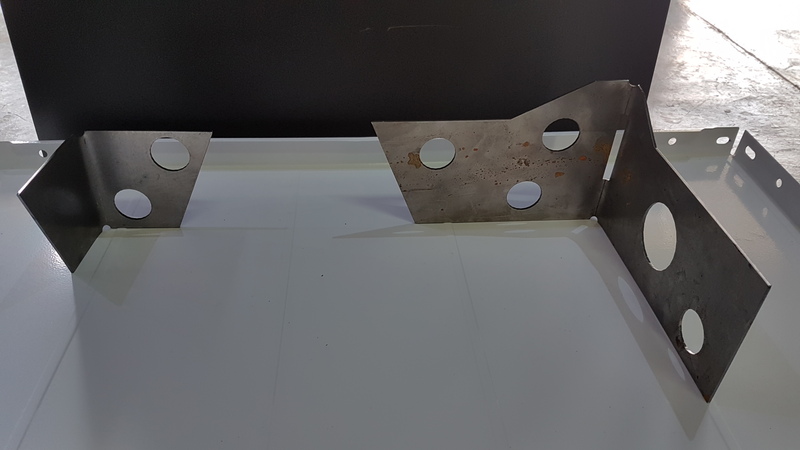
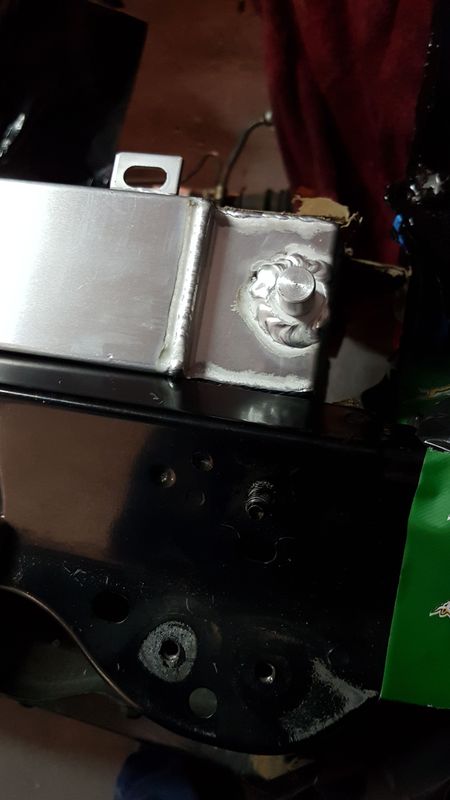
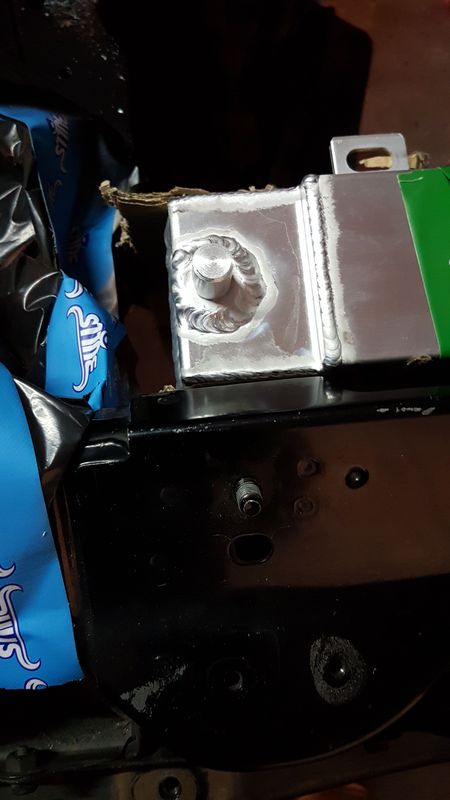
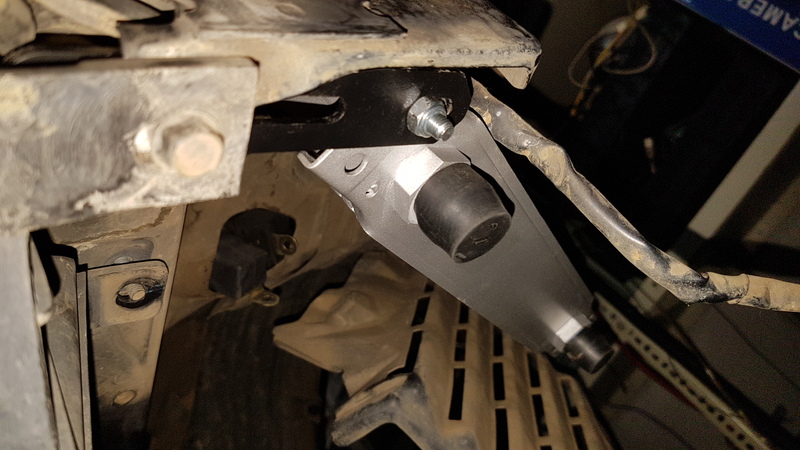
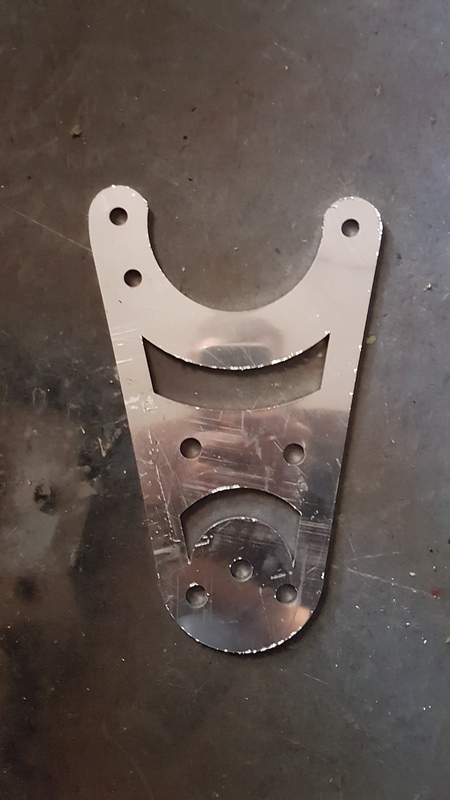
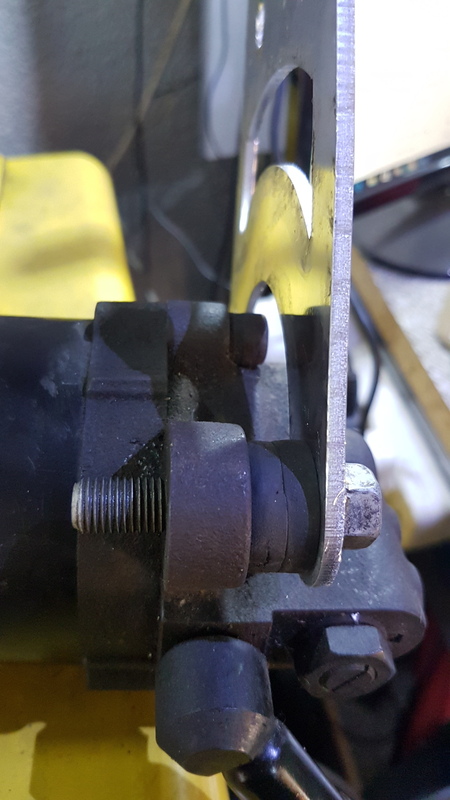
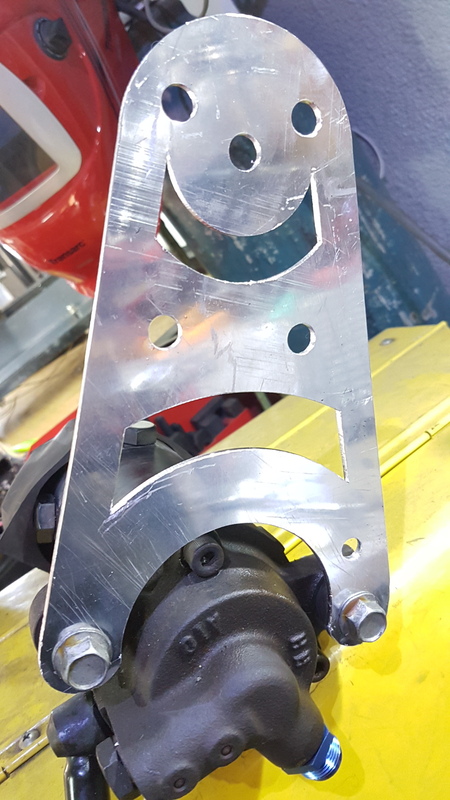
i got the new revised diff mount back
the previous one was way too high
this sets the diff nicely tucked into the subframe
and is relatively simple
here it is from flat pack to tack welded and this one will be welded to the top of the oem subframe - the bmw diff lower ally heatsink fins are level with the bottom of the subframe
more pics when its welded properly and triangulated
[IMG]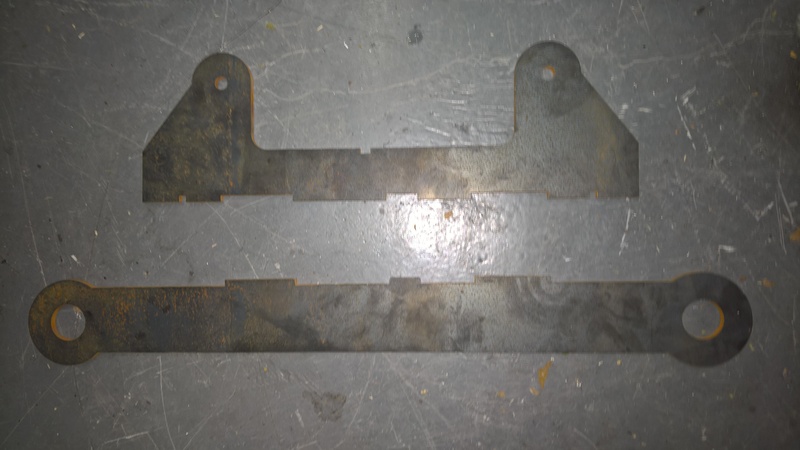 [/IMG]
[IMG]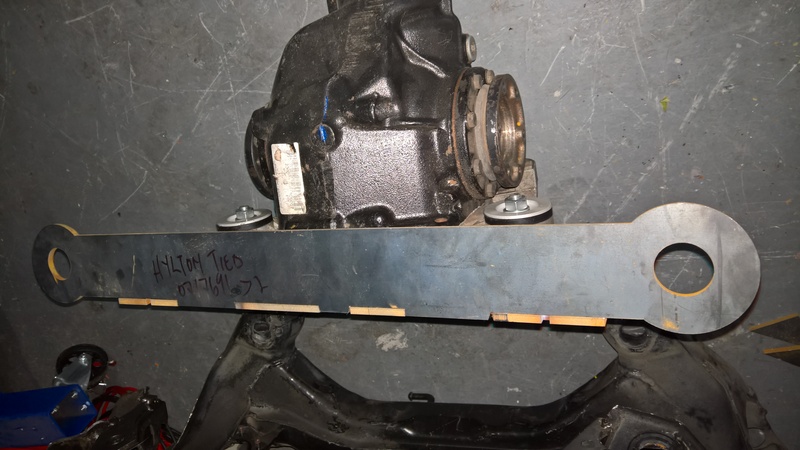 [/IMG]
[IMG]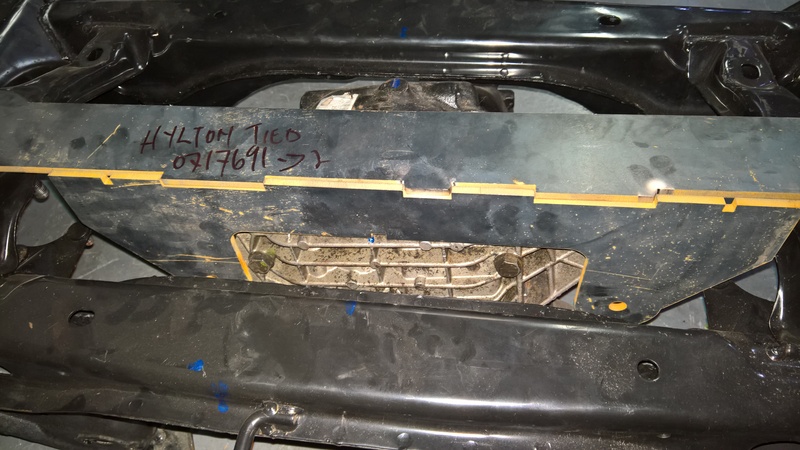 [/IMG]
[IMG]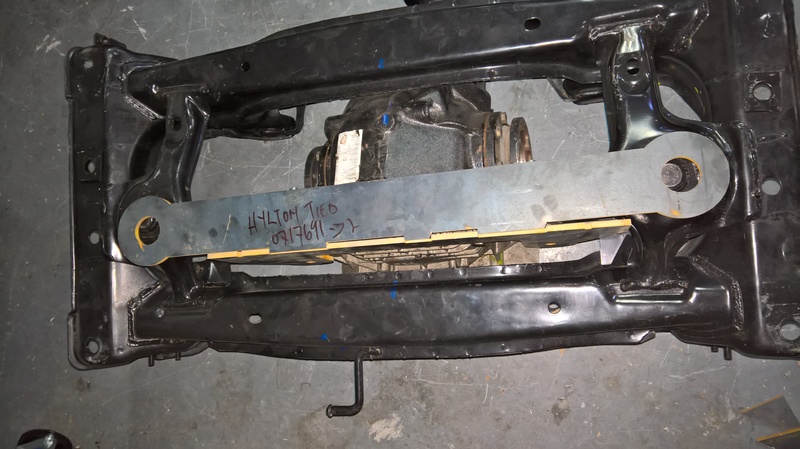 [/IMG]
[IMG]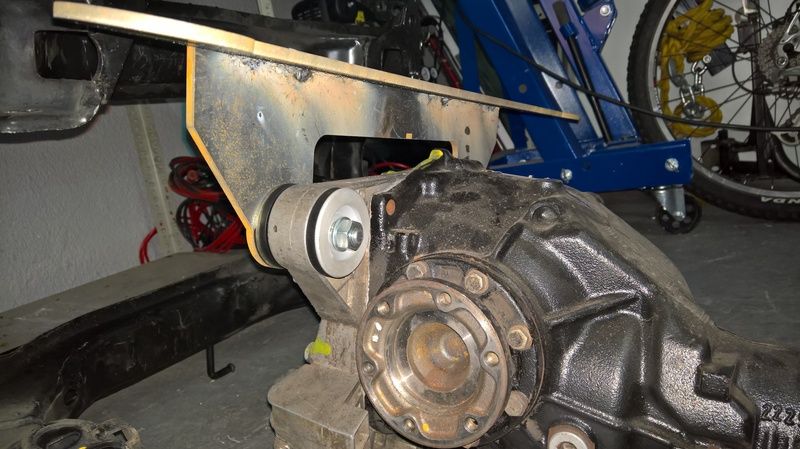 [/IMG]
the previous one was way too high
this sets the diff nicely tucked into the subframe
and is relatively simple
here it is from flat pack to tack welded and this one will be welded to the top of the oem subframe - the bmw diff lower ally heatsink fins are level with the bottom of the subframe
more pics when its welded properly and triangulated
[IMG]
 [/IMG]
[IMG]
 [/IMG]
[IMG]
 [/IMG]
[IMG]
 [/IMG]
[IMG]
 [/IMG]
Thread Starter
V8 Miata Fan
Joined: Oct 2011
Posts: 64
Likes: 2
From: Johannesburg - South Africa
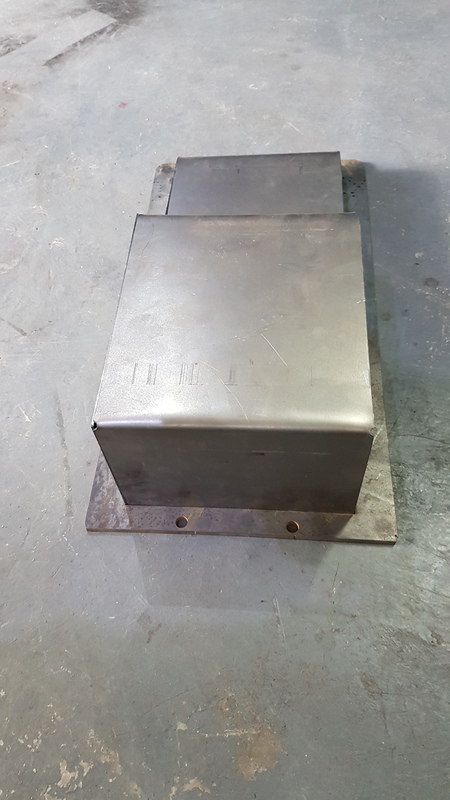
and heres the "new" sump
drawn up in cad and then folded for a few less welds and less leak chance
i got 2 cut
this is very much the prototype - my welding sucks and so does my no gas mig welder - it splatters everything
[IMG]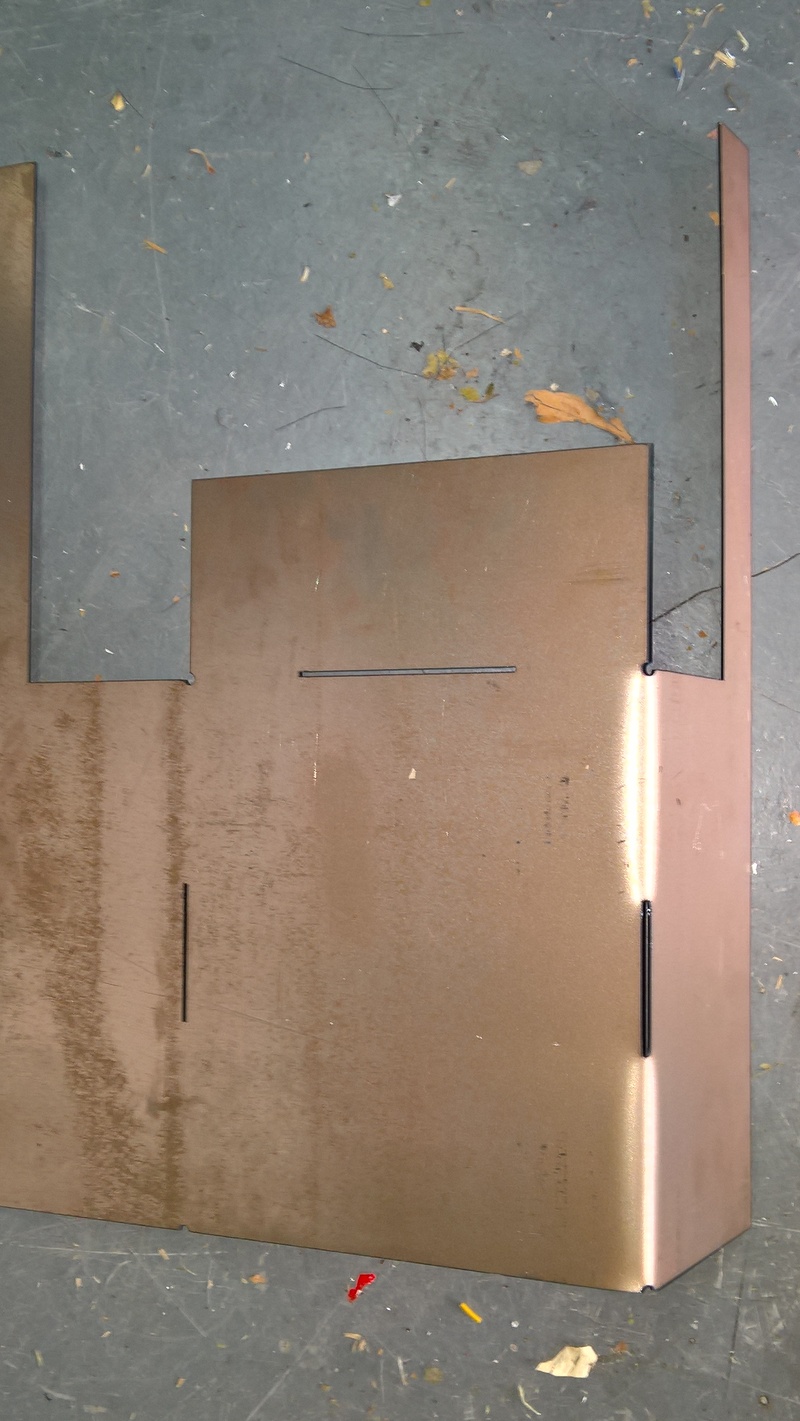 [/IMG]
[IMG]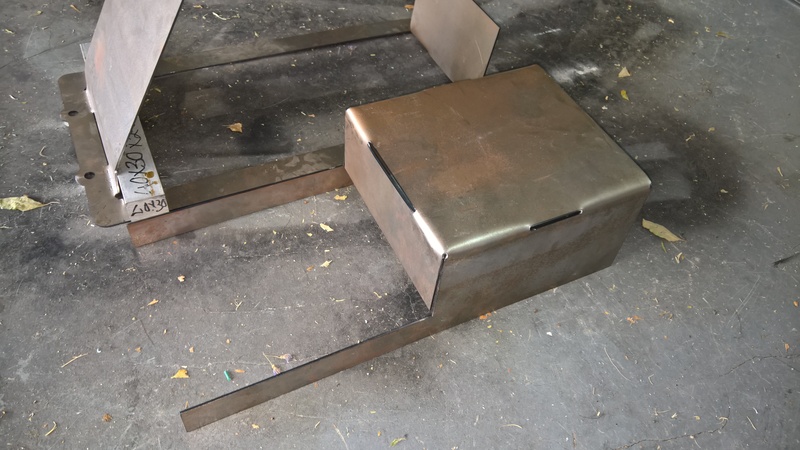 [/IMG]
[IMG]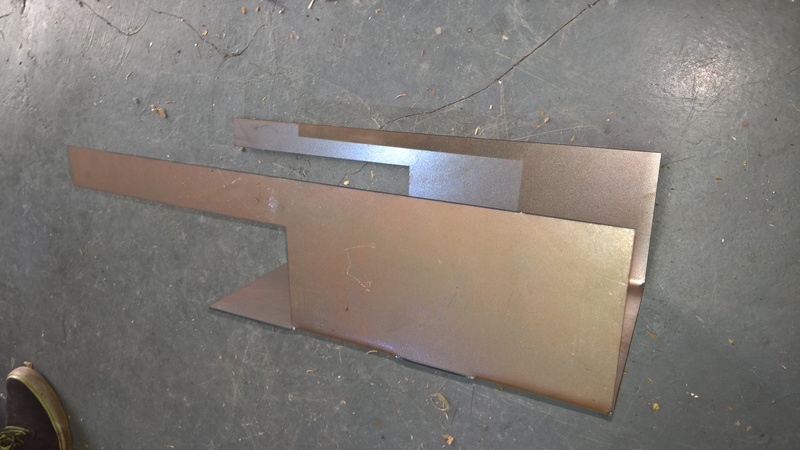 [/IMG]
[IMG]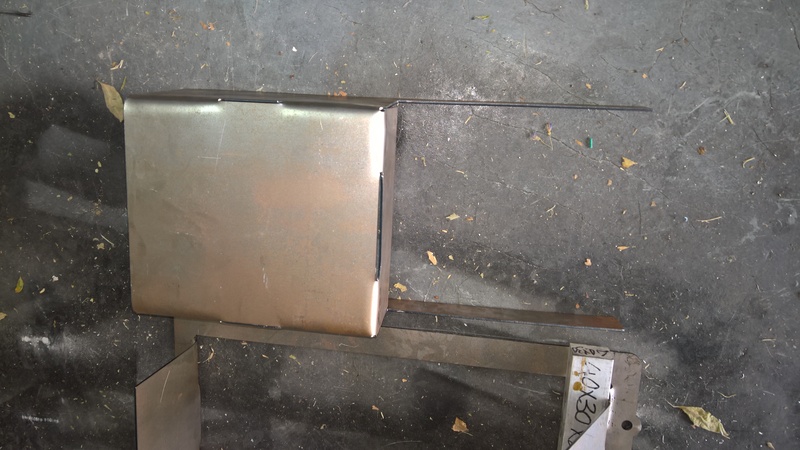 [/IMG]
[IMG]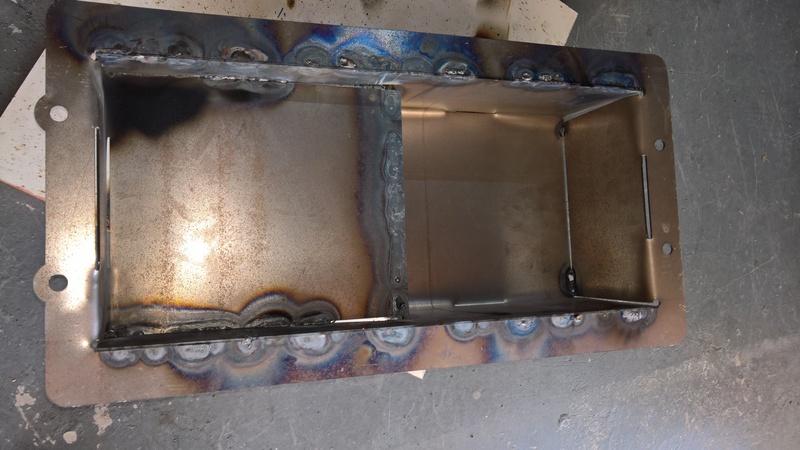 [/IMG]
[IMG]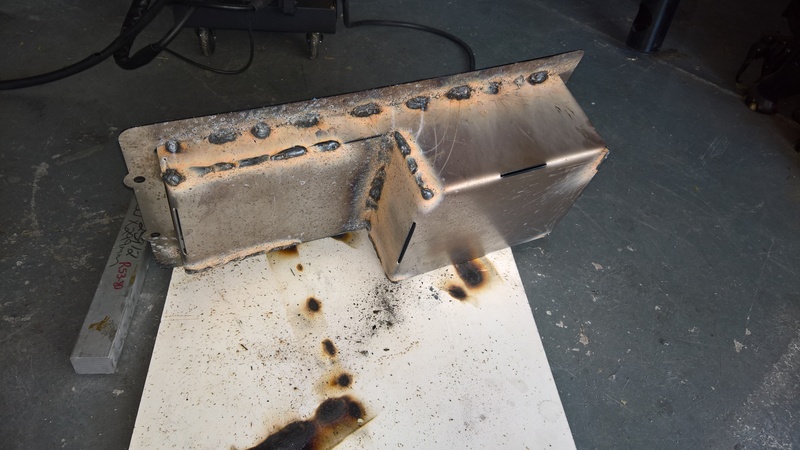 [/IMG]
drawn up in cad and then folded for a few less welds and less leak chance
i got 2 cut
this is very much the prototype - my welding sucks and so does my no gas mig welder - it splatters everything
[IMG]
 [/IMG]
[IMG]
 [/IMG]
[IMG]
 [/IMG]
[IMG]
 [/IMG]
[IMG]
 [/IMG]
[IMG]
 [/IMG]
Thread Starter
V8 Miata Fan
Joined: Oct 2011
Posts: 64
Likes: 2
From: Johannesburg - South Africa
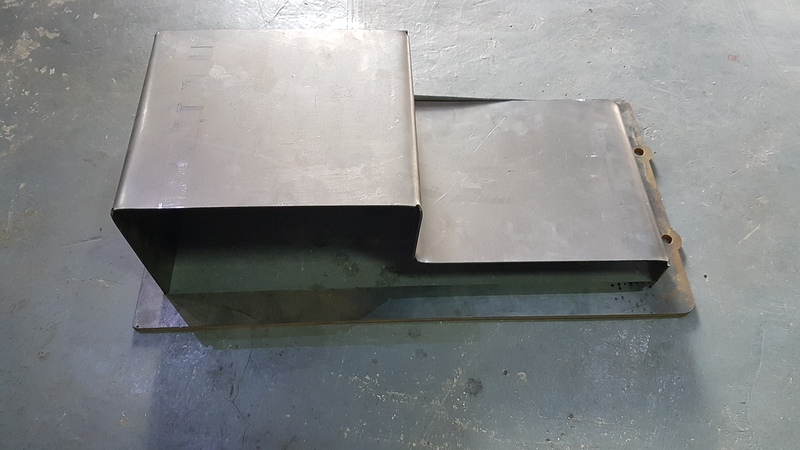
Ok so I gave up on that sump and gasless mig wire welder - all that thing does is make splatter......
So here is a new design one and i been busy on a lot of other parts of the build
thicker flange, less welds to join parts together - so far for the sump which has been the most problematic to get "right" has been done 3x.......but its still cost way less than a bought one - currently all in for the 3 sumps less than 30 dollars
Honestly I shoulda stuck with the oem sump - it would of worked just fine and saved a bunch of frustration and back tracking - but i chopped it up......


Last edited by 3barboost; May 29, 2016 at 12:46 PM.
Thread Starter
V8 Miata Fan
Joined: Oct 2011
Posts: 64
Likes: 2
From: Johannesburg - South Africa
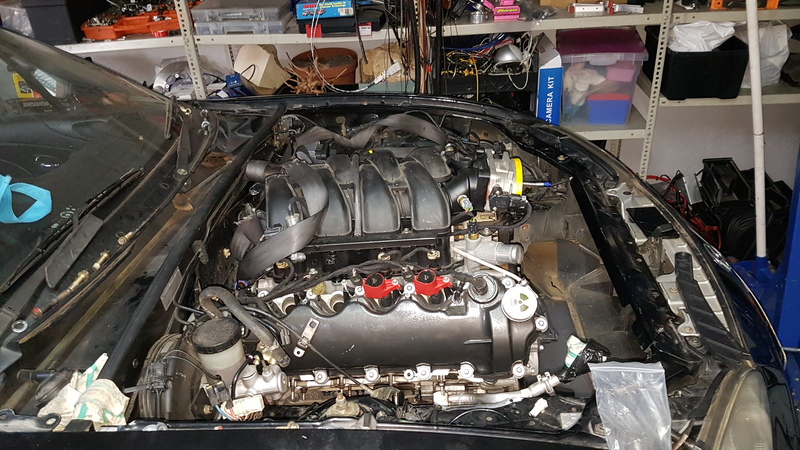
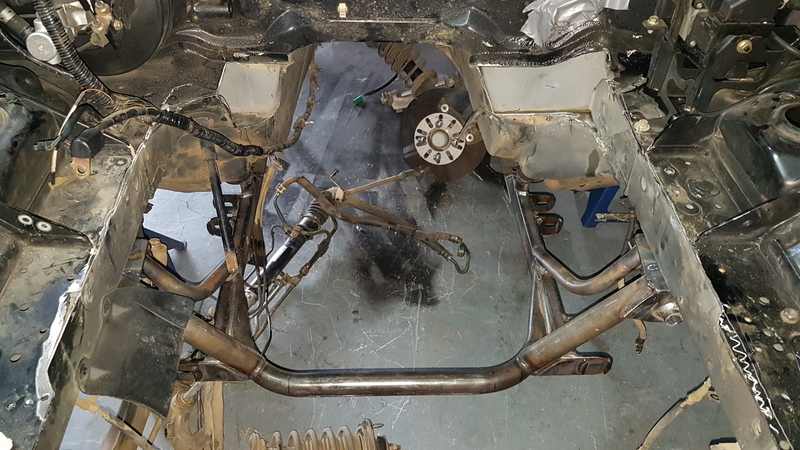
so the good news is the engine is in and the mounts are welded to the sub frame
I made up some plates to fit to the engine blocks mounting points and overlaid a sbc engine mount on to that - I got a set of mounts from heidts for a sbc
if i had to do it again - i would get the v8 roadsters frame with ls mounts and get a set of engine mounts for an ls - it would be way way easier and foolproof
heres a few pics - which shows its perfectly possilbe to fit a mod motor into a miata - its not too wide - its not too long i have the mod motor front pulley 25 mm further forward than the 4cyl that was in there - if my car was lhd or auto I could get the motor back far enough to run the swaybar in the oem position - my car being rhd presents a challenge with the clutch master completing for space with the cam cover - i didnt have the budget to do a pedal box to put the clutch master in a different location - I am happy with the result so far - the height is another story though that front facing throttle body is high and will need a creative amount of work on the bonnet - I am all eyes for ideas on what to do - perhaps relocate the alternator ? and remove the cmrc plates under the manifold that will drop the intake by the thickness of the cmrc plates - anyway here are some pics
the mustang tremec box fits snugly up into the tunnel with lots of space
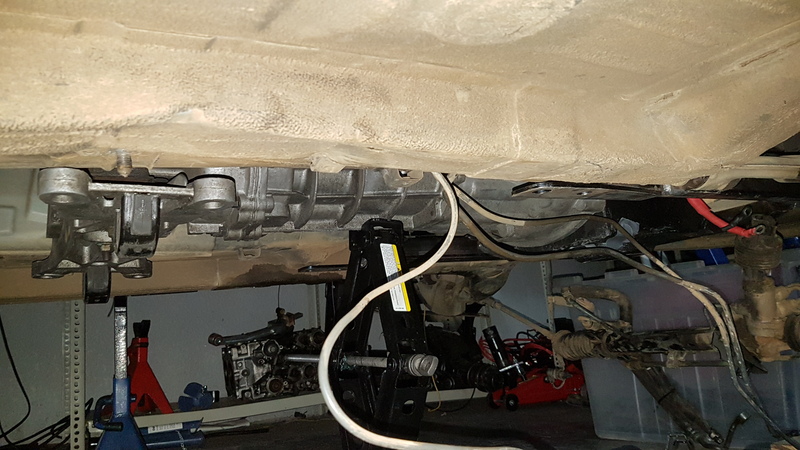
this is take from the side showing nothing hanging below the frame rails
heres a few pics of the clearance around the gearbox in the tunnel
luckily the mustang tremec box has an external shifter that is really easy to lengthen or shorten - I need to remove about 10cm from the mechanism to have the shifter pop up in the mazda location
I made up some plates to fit to the engine blocks mounting points and overlaid a sbc engine mount on to that - I got a set of mounts from heidts for a sbc
if i had to do it again - i would get the v8 roadsters frame with ls mounts and get a set of engine mounts for an ls - it would be way way easier and foolproof
heres a few pics - which shows its perfectly possilbe to fit a mod motor into a miata - its not too wide - its not too long i have the mod motor front pulley 25 mm further forward than the 4cyl that was in there - if my car was lhd or auto I could get the motor back far enough to run the swaybar in the oem position - my car being rhd presents a challenge with the clutch master completing for space with the cam cover - i didnt have the budget to do a pedal box to put the clutch master in a different location - I am happy with the result so far - the height is another story though that front facing throttle body is high and will need a creative amount of work on the bonnet - I am all eyes for ideas on what to do - perhaps relocate the alternator ? and remove the cmrc plates under the manifold that will drop the intake by the thickness of the cmrc plates - anyway here are some pics


the mustang tremec box fits snugly up into the tunnel with lots of space

this is take from the side showing nothing hanging below the frame rails

heres a few pics of the clearance around the gearbox in the tunnel


luckily the mustang tremec box has an external shifter that is really easy to lengthen or shorten - I need to remove about 10cm from the mechanism to have the shifter pop up in the mazda location
Thread Starter
V8 Miata Fan
Joined: Oct 2011
Posts: 64
Likes: 2
From: Johannesburg - South Africa
here are a few more pics of the clearance around the engine - particularly from above
this is looking directly down on the left hand side of the car - I removed the frame rails lip - will weld a piece over it soon
then this is from the right hand side again looking straight down
and then at the rear where the clutch master sits for me
the clearance to the cam cover
this is looking directly down on the left hand side of the car - I removed the frame rails lip - will weld a piece over it soon

then this is from the right hand side again looking straight down

and then at the rear where the clutch master sits for me
the clearance to the cam cover

Thread Starter
V8 Miata Fan
Joined: Oct 2011
Posts: 64
Likes: 2
From: Johannesburg - South Africa
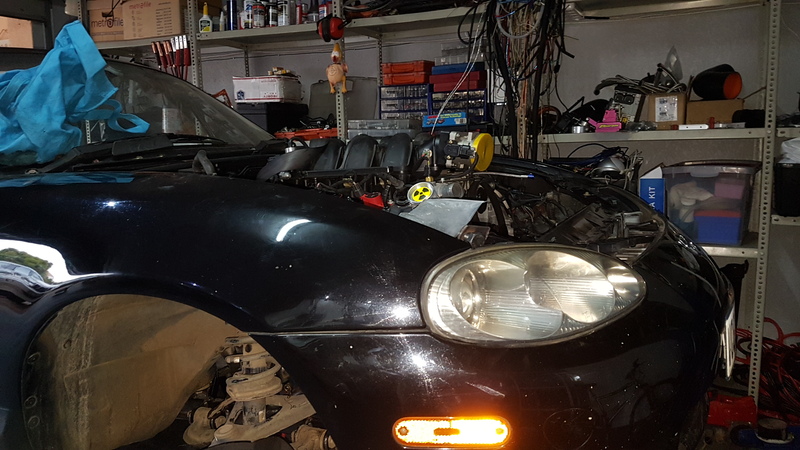
heres a view looking from the front of the car down the frame rail / motor looking towards the firewall
the headers for the right hand side are going to be a nightmare
the steering column, the aircon compressor, the starter motor and the engine mount all compete for space - on a left hand drive car it would be a cake walk

the headers for the right hand side are going to be a nightmare
the steering column, the aircon compressor, the starter motor and the engine mount all compete for space - on a left hand drive car it would be a cake walk


Thread Starter
V8 Miata Fan
Joined: Oct 2011
Posts: 64
Likes: 2
From: Johannesburg - South Africa
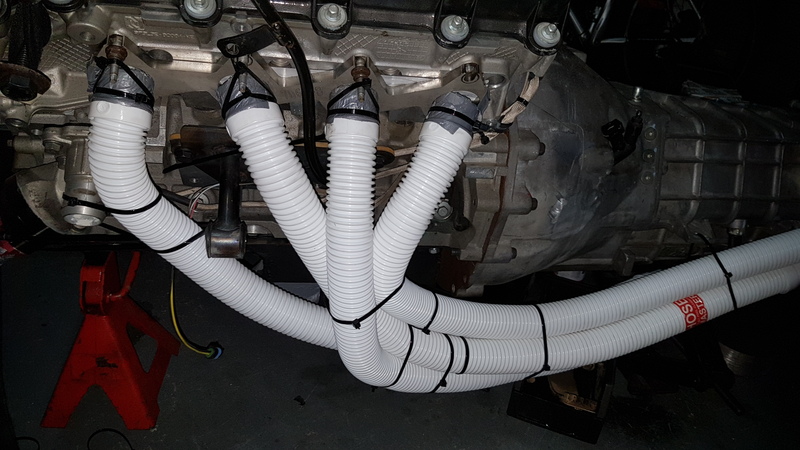
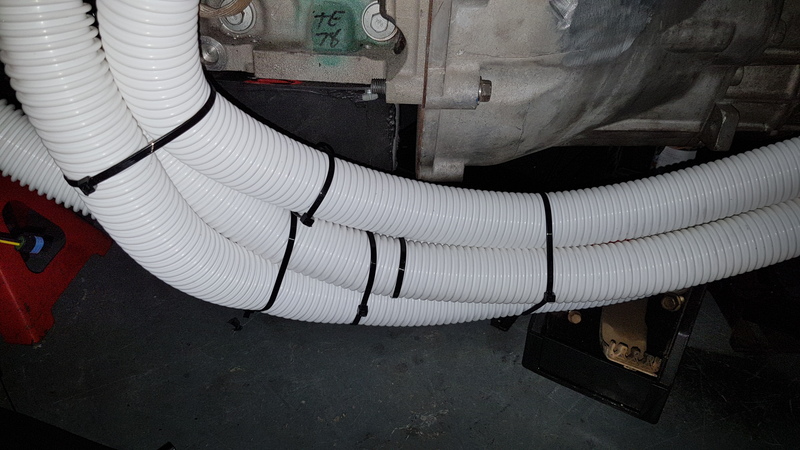
My last build i removed the power steering and it was a bear - this one needed power steering - i lucked into a MR2 electric power steering pump as a trade for 2 EGT sensors - can I say score
so the MR2 pump will live in the boot close to the battery and a few lines to the front and bingo power steering !
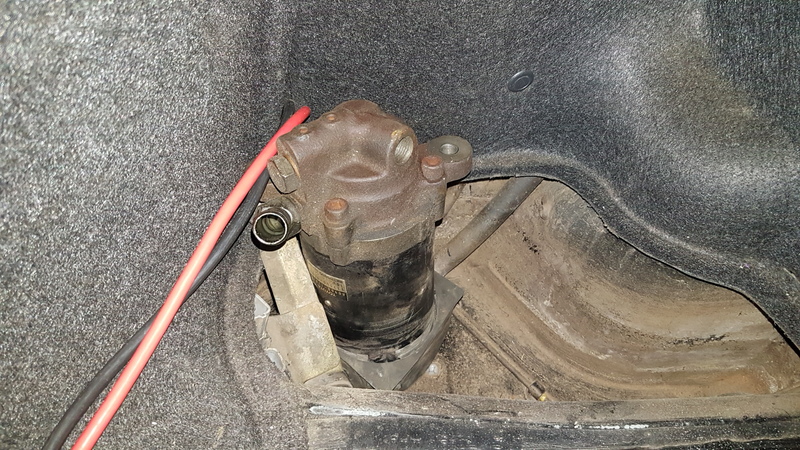
I am not sure if i will hook up everything i got from the mr2 - i have the toyota ecus and such just missing the steering angle sensor - I am sure I can run and output from the MS3 pro to it to control it via pwm


Thread Starter
V8 Miata Fan
Joined: Oct 2011
Posts: 64
Likes: 2
From: Johannesburg - South Africa
here are the engine bay mods
around the steering column
I drew up some filler plates for the areas cut out
the steering column one will need a redoing but the passenger side is perfect
around the steering column


I drew up some filler plates for the areas cut out
the steering column one will need a redoing but the passenger side is perfect


Thread Starter
V8 Miata Fan
Joined: Oct 2011
Posts: 64
Likes: 2
From: Johannesburg - South Africa
then pleaseany ideas on keeping abs or ditching it ?
all feedback welcomed - anyone who ditched it and regretted it ? looking for some opinions and thoughts on it
at present I have the v8 roadsters wilwood kit for the front and the oem brakes for the rear
all feedback welcomed - anyone who ditched it and regretted it ? looking for some opinions and thoughts on it
at present I have the v8 roadsters wilwood kit for the front and the oem brakes for the rear
V8 Miata Participant
Joined: Nov 2014
Posts: 296
Likes: 12
From: Atlanta, Ga
Good timing on the updates! I was wondering how this was going.
I have a 5.0 Coyote sitting on an engine stand in my garage just begging to be dropped into a Miata. My basic measuring says no way! The headers look to be very challenging.
Looking forward to updates!
I have a 5.0 Coyote sitting on an engine stand in my garage just begging to be dropped into a Miata. My basic measuring says no way! The headers look to be very challenging.
Looking forward to updates!
Thread Starter
V8 Miata Fan
Joined: Oct 2011
Posts: 64
Likes: 2
From: Johannesburg - South Africa
I think I used the coyote measurements for some of my mockups and calcs
the coyote motor is much shorter in height so i think it will be an easy fit
headers for one the drivers side with aircon and starter motor and engine mount are going to be a trick - the other side (your driver side is childs play in comparison)
you can also mount the motor further back as your clutch master wont want to occupy the same space as the cam cover
treat it like an ls swap - even use ls mounts and you will be good to go

V8 Miata Participant
Joined: Nov 2014
Posts: 296
Likes: 12
From: Atlanta, Ga
I looked at this in more detail with the Coyote 5.0. There could be a problem with the brake booster/valve cover/head with the left hand drive model as opposed to your clutch master cylinder. My only other concerns are the center line of crankshaft to the bottom of oil pan is over an inch taller than the push rod 302 (oil pan will be hanging too low?) and the headers...
Thread Starter
V8 Miata Fan
Joined: Oct 2011
Posts: 64
Likes: 2
From: Johannesburg - South Africa
Thread Starter
V8 Miata Fan
Joined: Oct 2011
Posts: 64
Likes: 2
From: Johannesburg - South Africa
I looked at this in more detail with the Coyote 5.0. There could be a problem with the brake booster/valve cover/head with the left hand drive model as opposed to your clutch master cylinder. My only other concerns are the center line of crankshaft to the bottom of oil pan is over an inch taller than the push rod 302 (oil pan will be hanging too low?) and the headers...
I think the coyote cam covers / valve covers are a bit smaller than the ridiculous 3v mod motor I have - I have plenty clearance around the brake booster and since its the middle pedal for both of us i am sure it will be ok (I will do a top down pic of where the brake master actually ends up and where that is in relation to the head, maybe the left hand drive is more to the engine bay - as to depth I have done 3 sumps to get the sump inline with the gearbox depth and then for the sump - bottom most part of the gearbox bellhousing and steering rack to be inline (I am still on the original pickup of the 3v motor - I just removed the massively long standoff it mounts to and shortened that) - will put up a pic at some stage 0 my sump floor is 5mm above the bottom most part of the bellhousing and it is barely lower than the subframe - will grab a pic soon and share it
I also spaced the subframe down 8mm
If anyone wants the cad files of the subframe spacers, sump flange, engine mount dimensions just drop me a line / pm
My biggest challenge is the height the plastic intake sits at and how to reduce that - i can remove the cmrc butterfly housing but then the manifold hits the alternator and i cant get that down far enough to mount the intake
so i need a really teeny alternator to sidemount or do I reverse the intake manifold and pick up air from the wiper cowl area ? I was hoping for a LS1 style corvette intake setup
the coyote has much less height to it
Thread Starter
V8 Miata Fan
Joined: Oct 2011
Posts: 64
Likes: 2
From: Johannesburg - South Africa
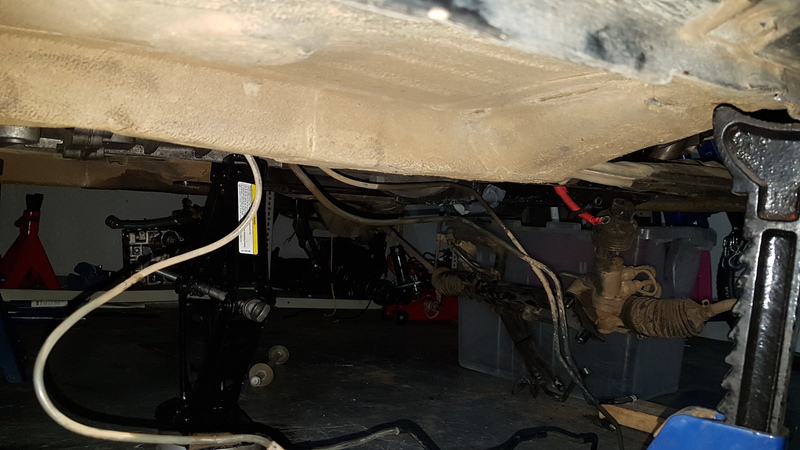
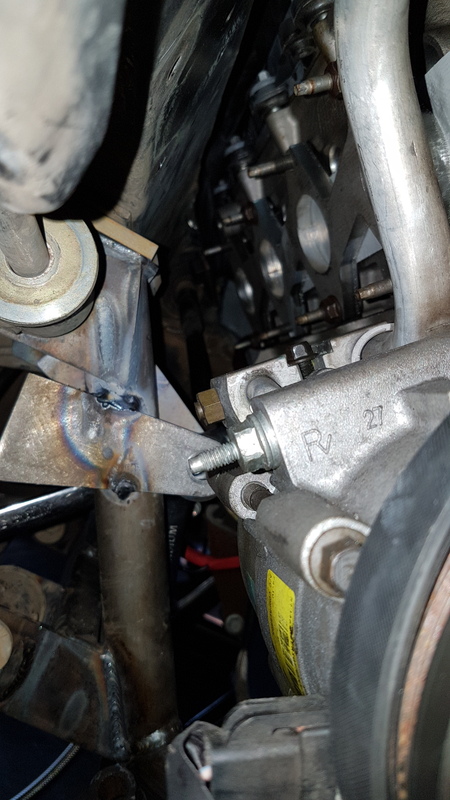
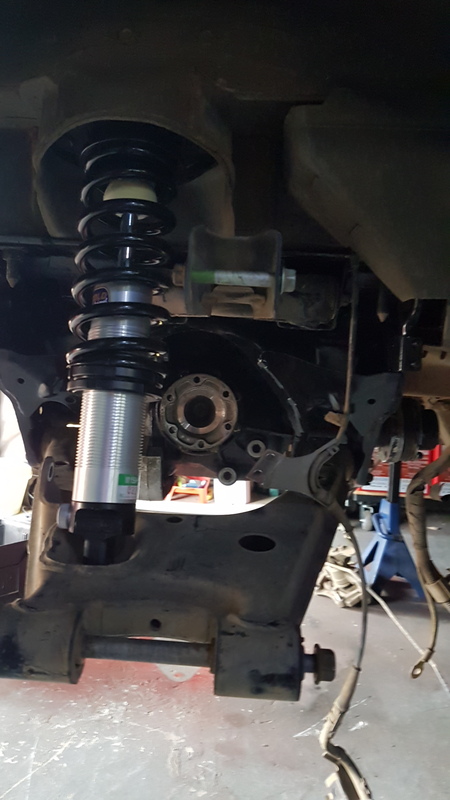
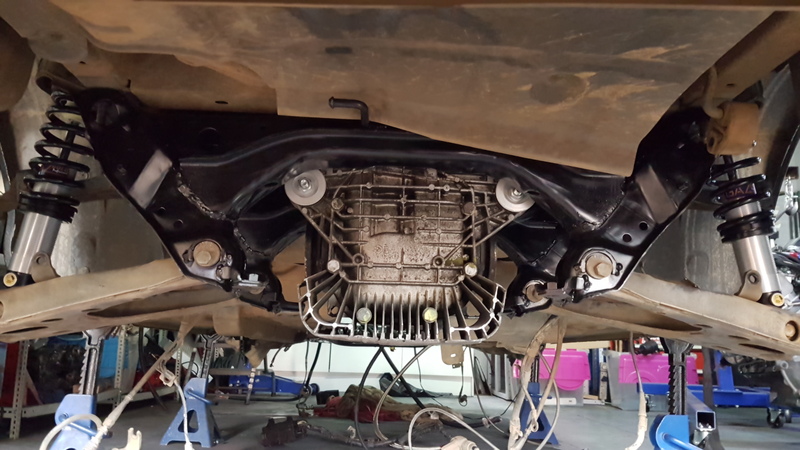
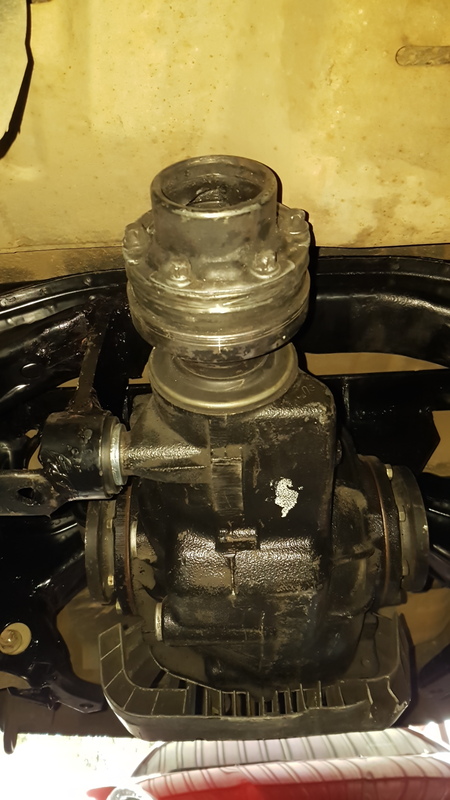
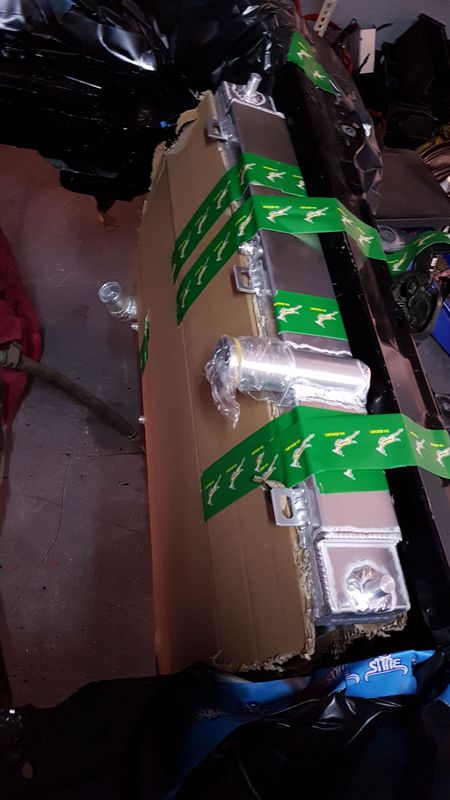
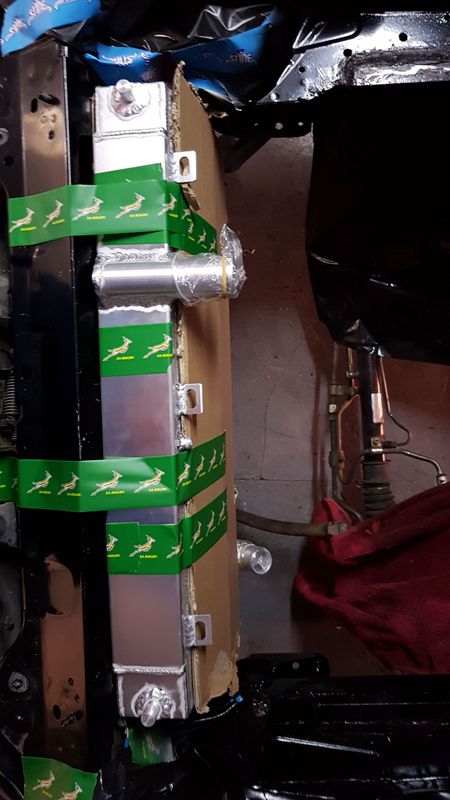
so i have finished the diff and its mounts all done and bolted in - feels sturdy for sure
here are some pics
looking from the gearbox end to the diff
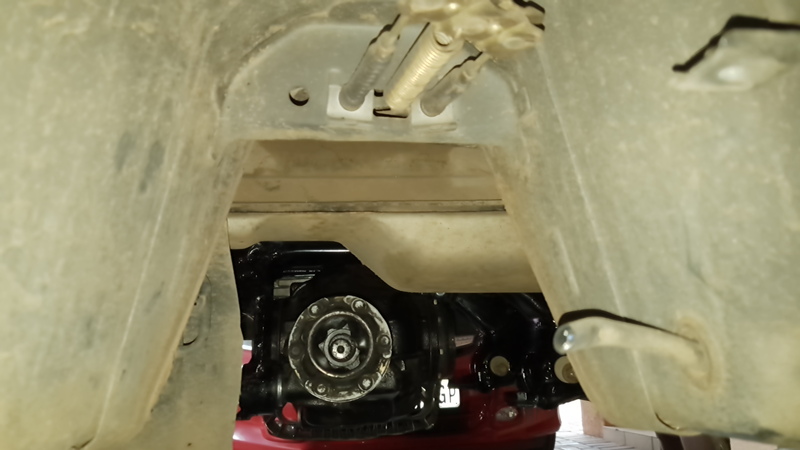
I think I will get a prop shaft made up with a cv on each end
heres a few other views of the M3 diff in the car - will probably clean up the aluminium heat sink fins that are bit damaged before the car is on the road
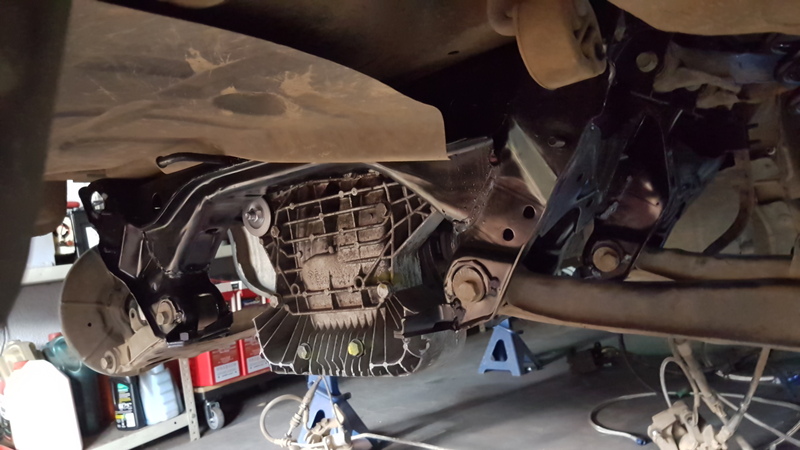


the good news with this setup is I somehow lucked in and my sideshafts length is within 1mm on each side i was worried i wouldnt be able to keep it centred but i am happy with a 1mm deviation
my sideshafts are being made - the biggest outer cvs i could get for the rears - I think you call them protege outers, custom shaft and a porsche 930 inner to mate to the m3 flange - they are done in en30b steel and heat treated to rockwell 48
driveshaft shop quoted me over 1k usd for a setup like this - probably stronger outer joints - dss price excludes shipping to me which was also well over 1k usd excle the tax and import duty - I am quite happy I have done all the cvs and shafts all in for less than 500 usd
here are some pics
looking from the gearbox end to the diff

I think I will get a prop shaft made up with a cv on each end
heres a few other views of the M3 diff in the car - will probably clean up the aluminium heat sink fins that are bit damaged before the car is on the road


the good news with this setup is I somehow lucked in and my sideshafts length is within 1mm on each side i was worried i wouldnt be able to keep it centred but i am happy with a 1mm deviation
my sideshafts are being made - the biggest outer cvs i could get for the rears - I think you call them protege outers, custom shaft and a porsche 930 inner to mate to the m3 flange - they are done in en30b steel and heat treated to rockwell 48
driveshaft shop quoted me over 1k usd for a setup like this - probably stronger outer joints - dss price excludes shipping to me which was also well over 1k usd excle the tax and import duty - I am quite happy I have done all the cvs and shafts all in for less than 500 usd
Thread Starter
V8 Miata Fan
Joined: Oct 2011
Posts: 64
Likes: 2
From: Johannesburg - South Africa
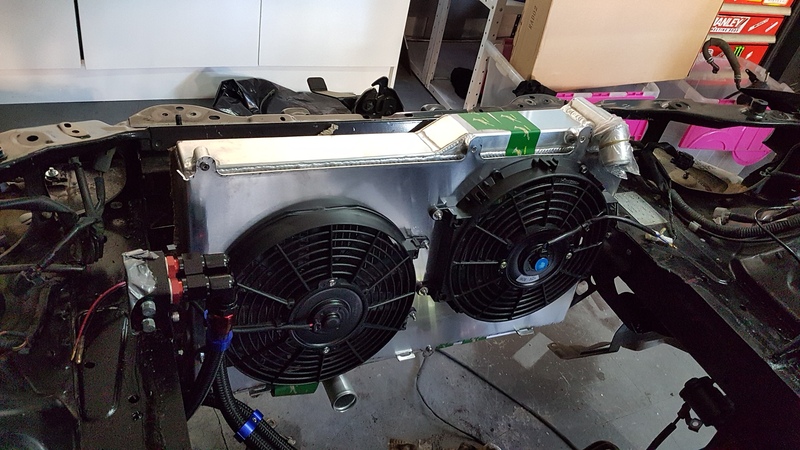
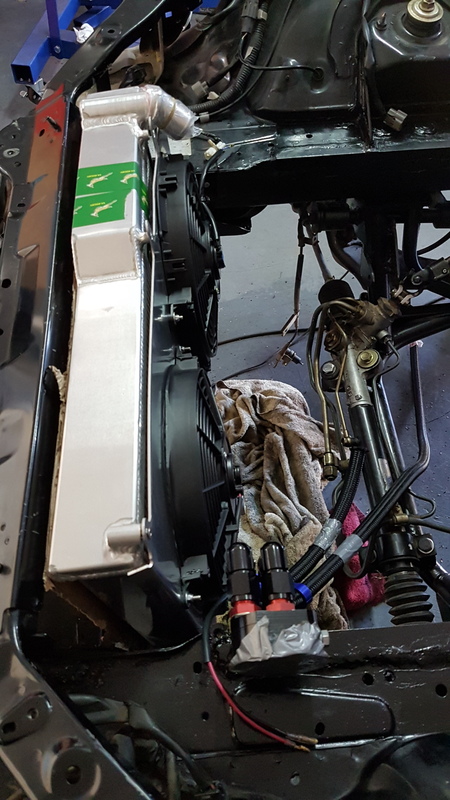
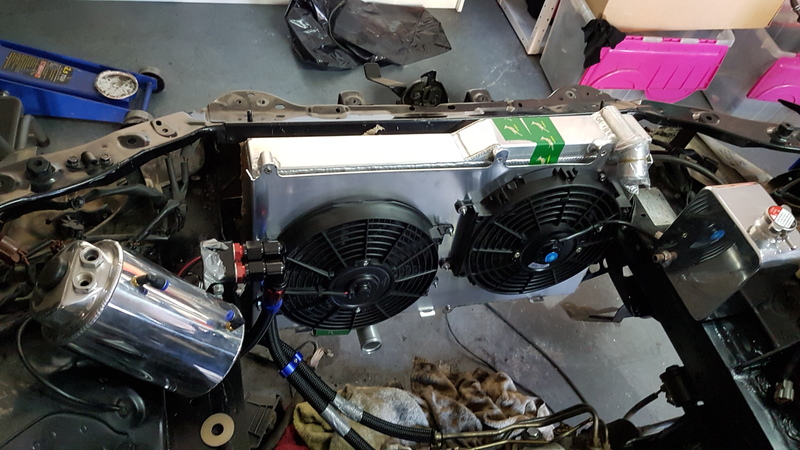
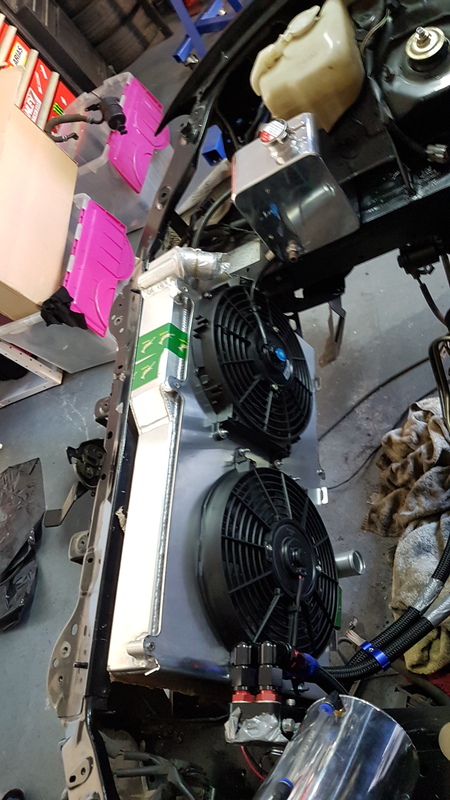
i was looking for a radiator and found a Rx 7 radiator at our local chinese speed shop - thinking that if it could cool a rotary then this v8 will be within capabilites
the rx7 radiator is thick almost 55mm !
it fits into the oem NB Miata mounts lower radiator mounts
the piping is in the right place for the mod motor
cost was less than 160 usd
i moved the aircon condensor forward on its mounts - literally moved it further forward into the nose cavity and then put the radiator in its place so i have only moved backwards about 15mm for this thick radiator
whats not to like - any feedback welcomed - please say
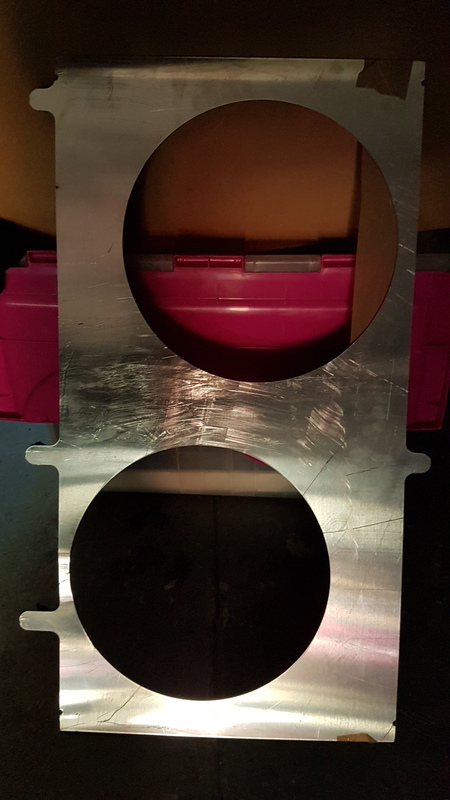
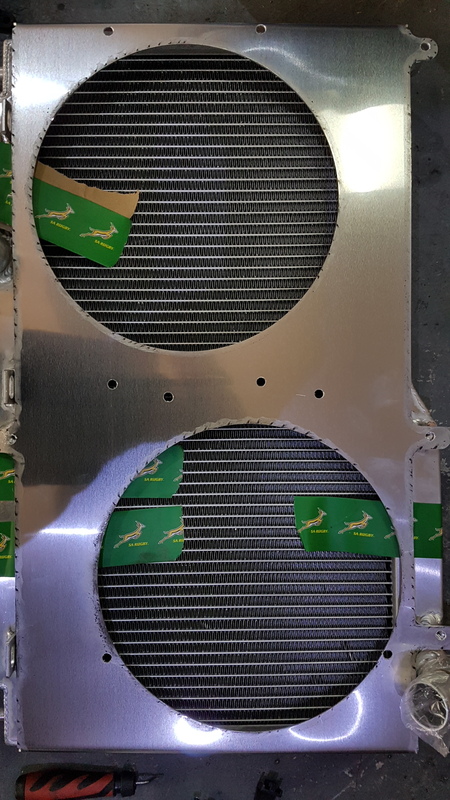
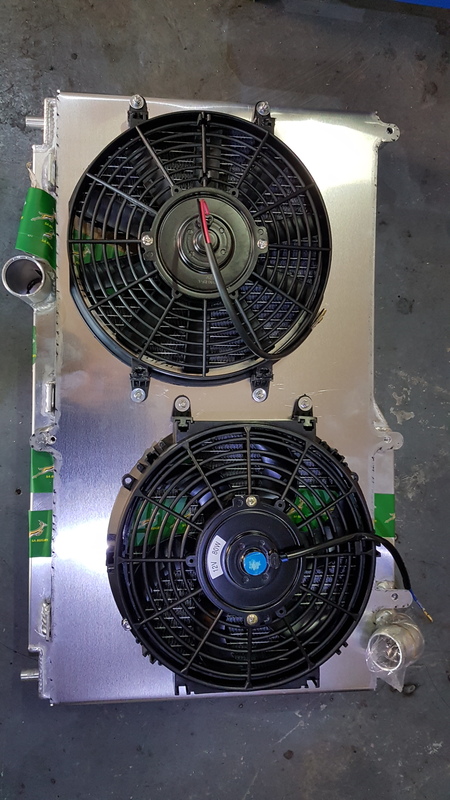
I made a shroud for it and two 10 inch fans - was hoping i could do a 14 inch and a 10 inch but that wasnt going to fit
here are some of the aircon condensor being mounted forward on its own oem mounts just bolted from the other side works like a charm, so the condensor is under the lip of the front slam panel
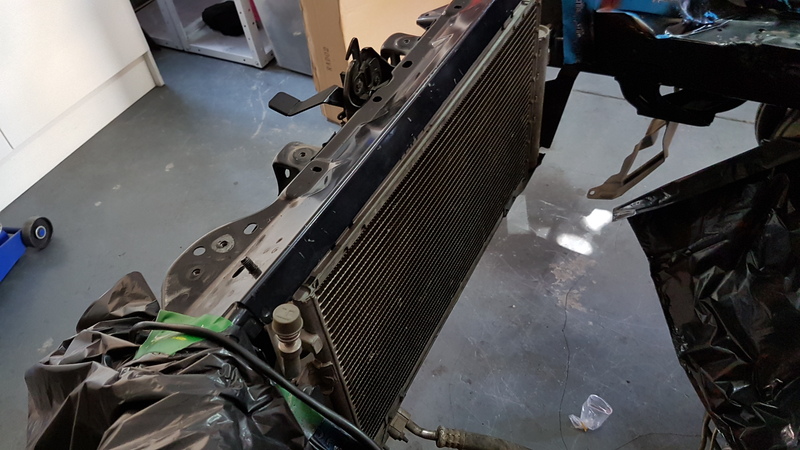

whats funny is that the rx7 radiator could also be mounted upside and the oem miata top radiator mounts would hold it in place - the rx 7 radiator doesnt have a filler cap so would work both ways - just a lower support brace
heres the upside down radiator - may help someone and i think its the best and lowest cost solution for myself but it may help someone else out
the rx7 radiator is thick almost 55mm !
it fits into the oem NB Miata mounts lower radiator mounts
the piping is in the right place for the mod motor
cost was less than 160 usd
i moved the aircon condensor forward on its mounts - literally moved it further forward into the nose cavity and then put the radiator in its place so i have only moved backwards about 15mm for this thick radiator
whats not to like - any feedback welcomed - please say
I made a shroud for it and two 10 inch fans - was hoping i could do a 14 inch and a 10 inch but that wasnt going to fit


here are some of the aircon condensor being mounted forward on its own oem mounts just bolted from the other side works like a charm, so the condensor is under the lip of the front slam panel


whats funny is that the rx7 radiator could also be mounted upside and the oem miata top radiator mounts would hold it in place - the rx 7 radiator doesnt have a filler cap so would work both ways - just a lower support brace
heres the upside down radiator - may help someone and i think its the best and lowest cost solution for myself but it may help someone else out


Last edited by 3barboost; Aug 20, 2016 at 12:21 PM.
Thread Starter
V8 Miata Fan
Joined: Oct 2011
Posts: 64
Likes: 2
From: Johannesburg - South Africa
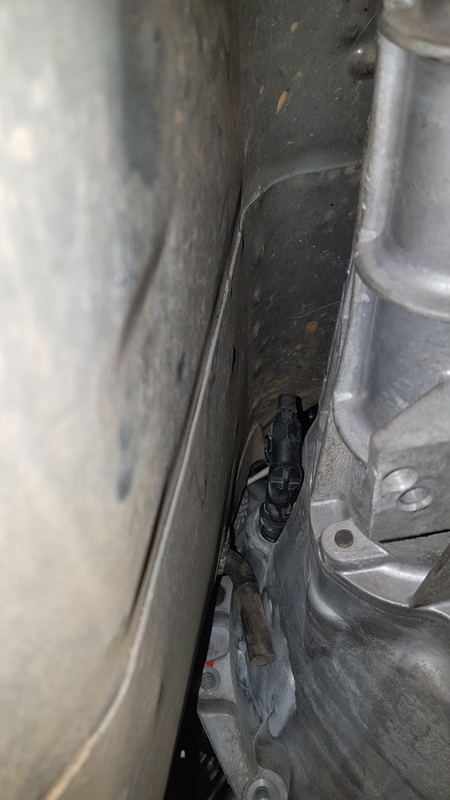
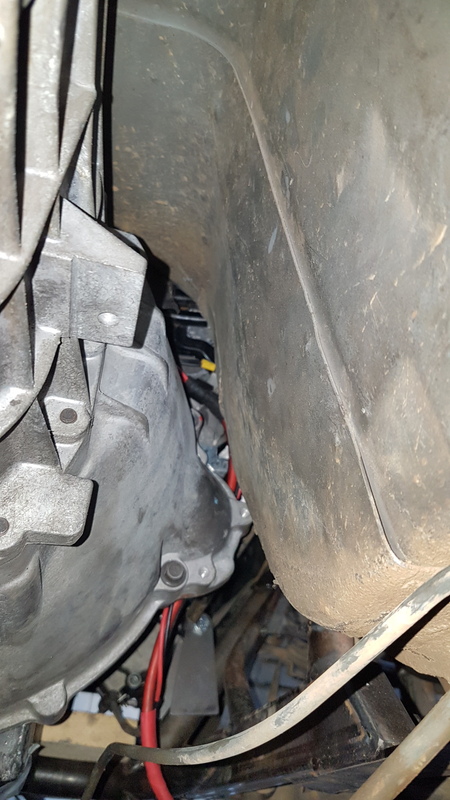
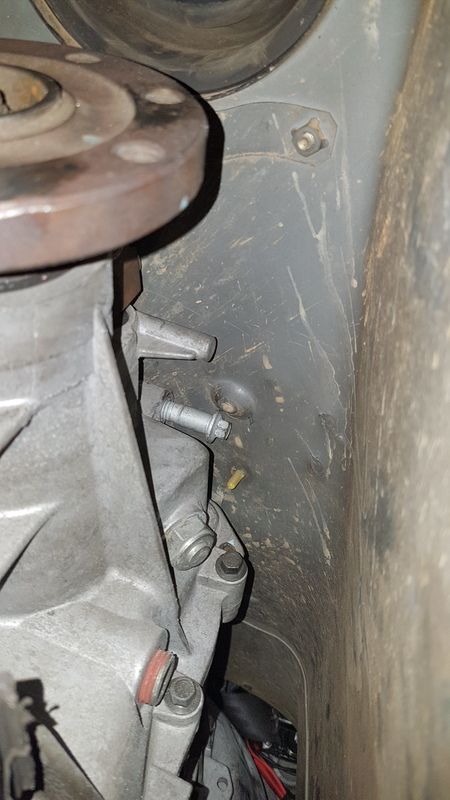
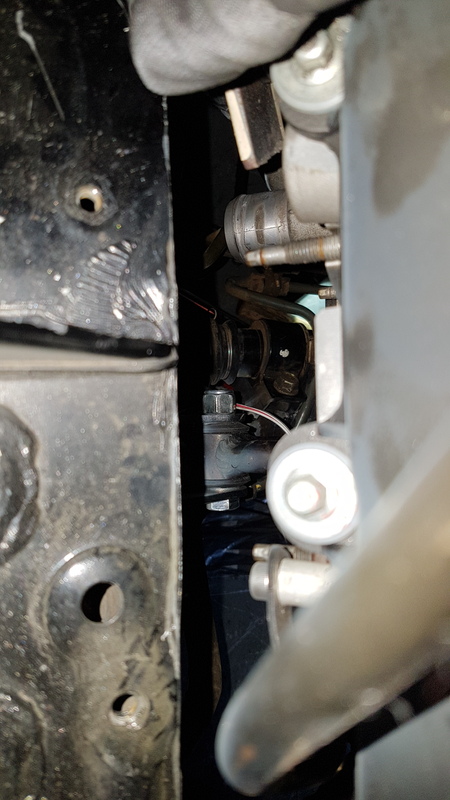
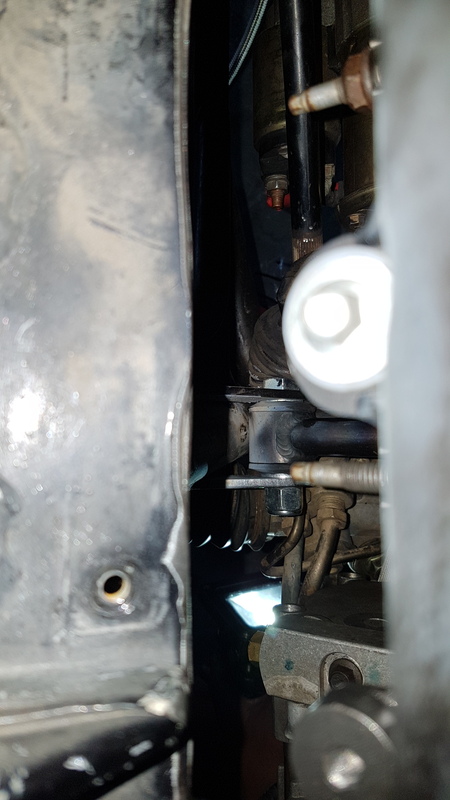
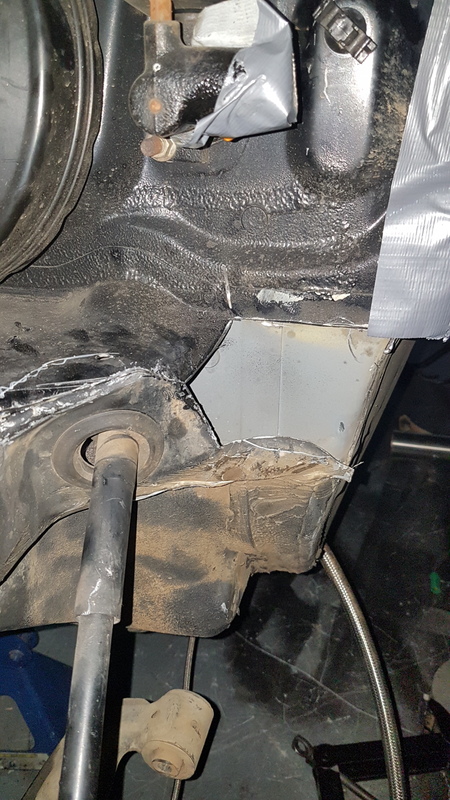
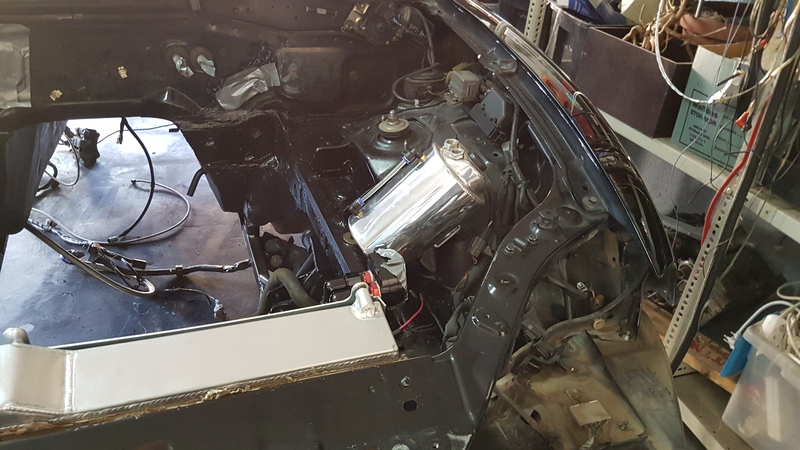
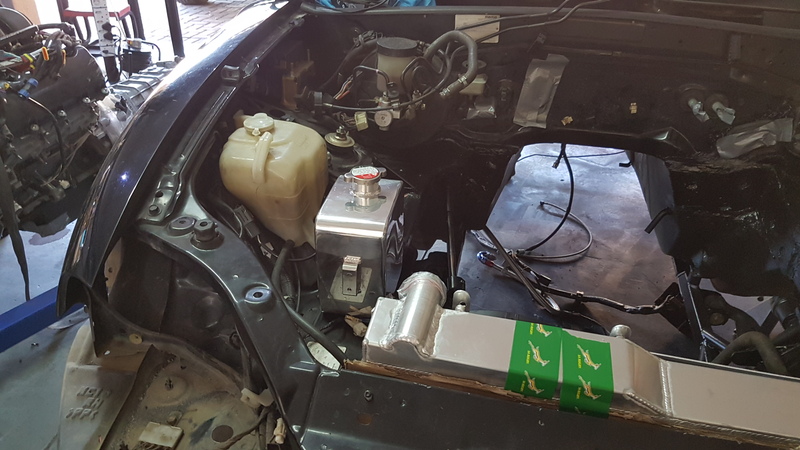
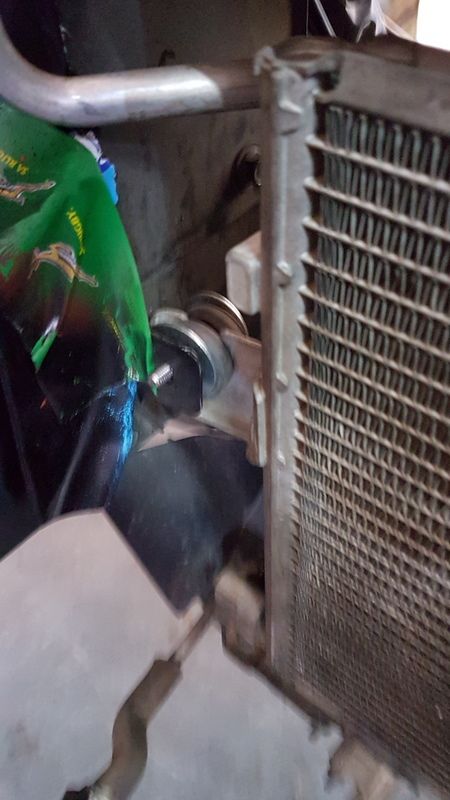
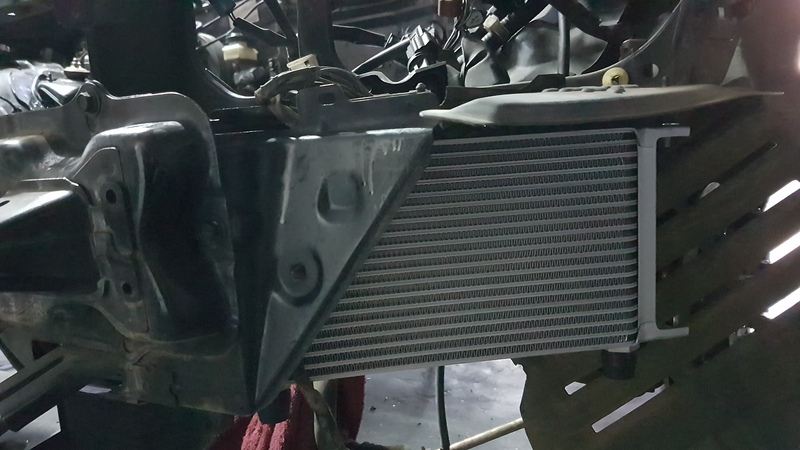
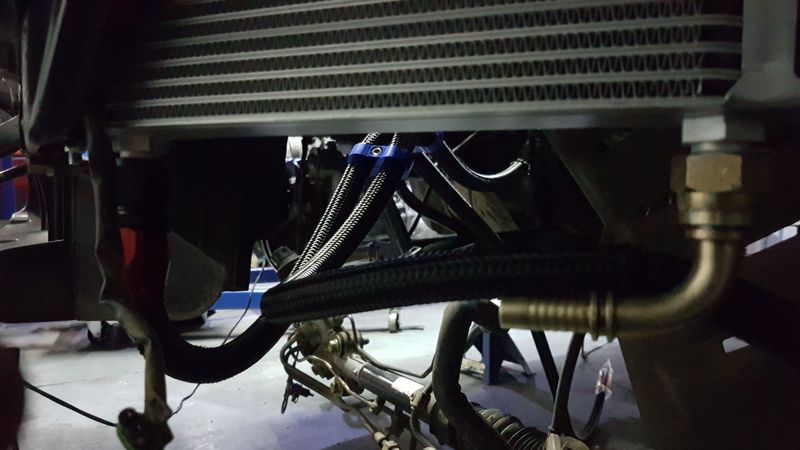
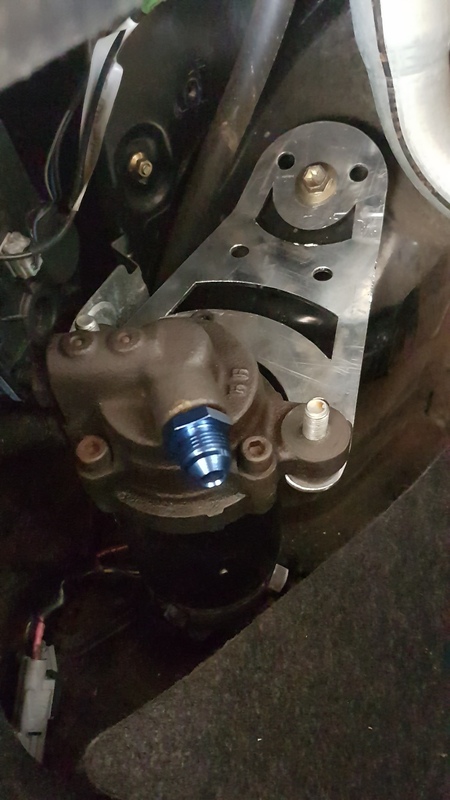
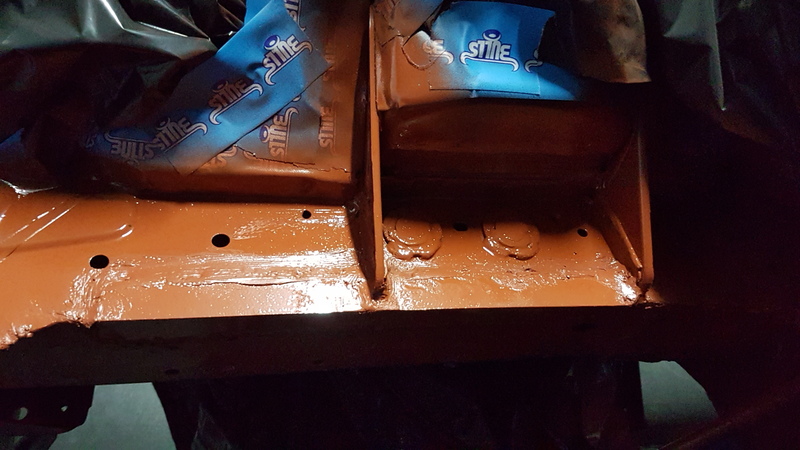
i got the oil cooler in as well
with a filter relocation kit as the oem filter location would of been almost impossible to get to once in - caught between steering rack / anti roll bar and radiator coolant hoses
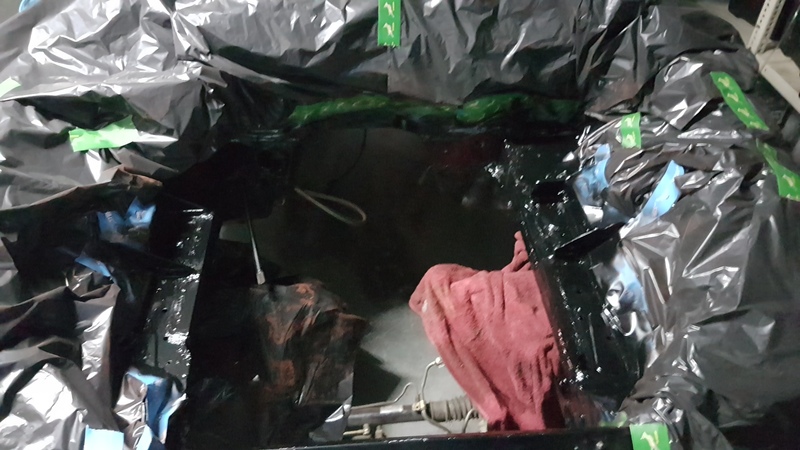
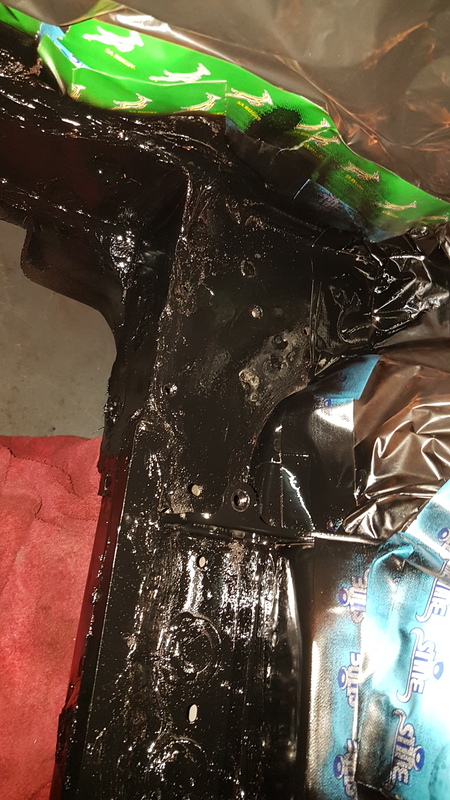
i welded a small plate to the frame rail for the filter relocation while i was cutting and finishing that area off - the seam sealer and flash on the camera make it look worse than what it is it looks pretty good to me in the flesh - what you think ?
with a filter relocation kit as the oem filter location would of been almost impossible to get to once in - caught between steering rack / anti roll bar and radiator coolant hoses
i welded a small plate to the frame rail for the filter relocation while i was cutting and finishing that area off - the seam sealer and flash on the camera make it look worse than what it is it looks pretty good to me in the flesh - what you think ?


Thread Starter
V8 Miata Fan
Joined: Oct 2011
Posts: 64
Likes: 2
From: Johannesburg - South Africa
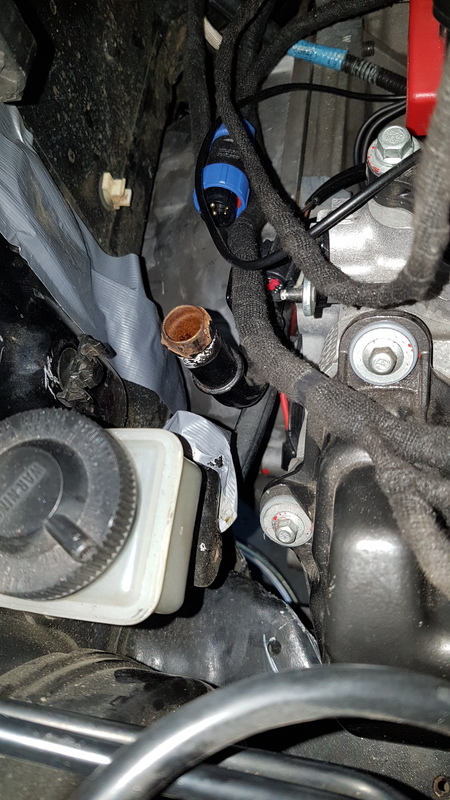
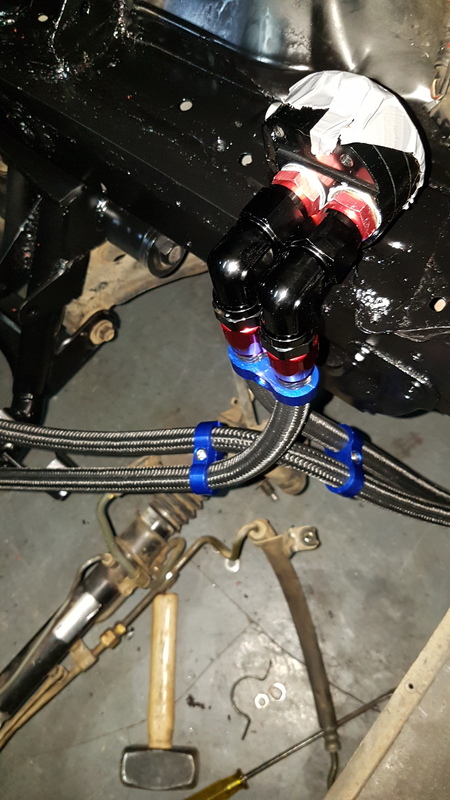
the electric power steering pump from an mr2 is now mounted in the boot, i drew up a mount had it laser cut and fitted, the pump also has a mount that goes to the base - through the hole in the lower boot area - the oem for me had a plastic box and set of jumper cables and gloves in it - paaah who needs that
now to get hydraulic lines and the remote reservoir figured out


now to get hydraulic lines and the remote reservoir figured out


Thread Starter
V8 Miata Fan
Joined: Oct 2011
Posts: 64
Likes: 2
From: Johannesburg - South Africa
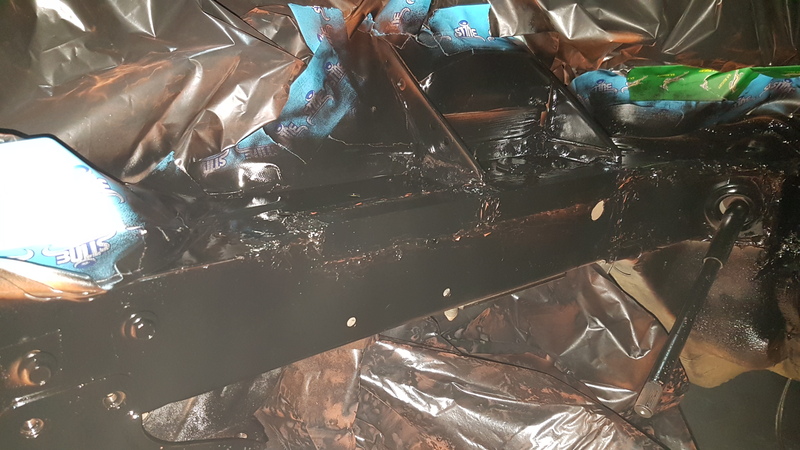
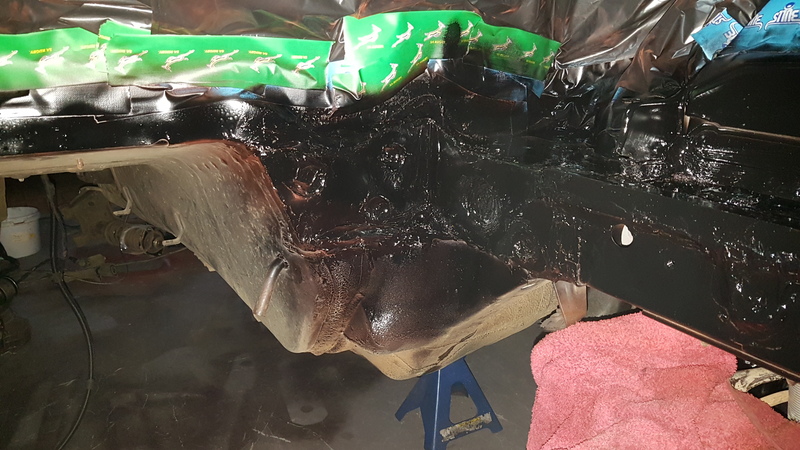
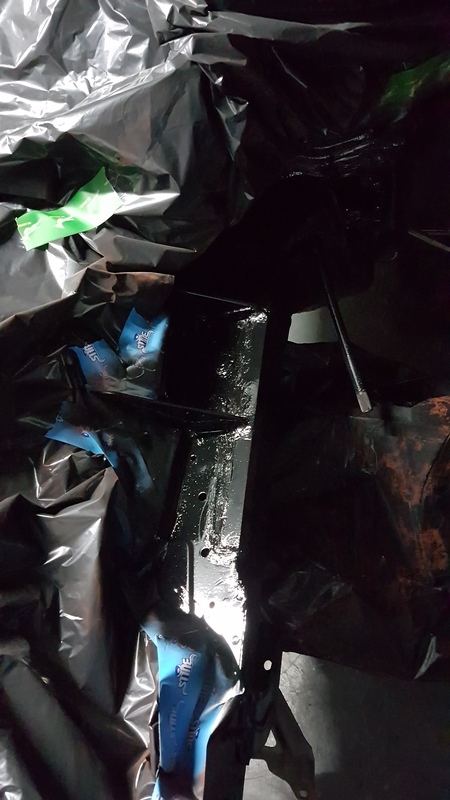
this is a bit out of sequence as i forgot i took these pics
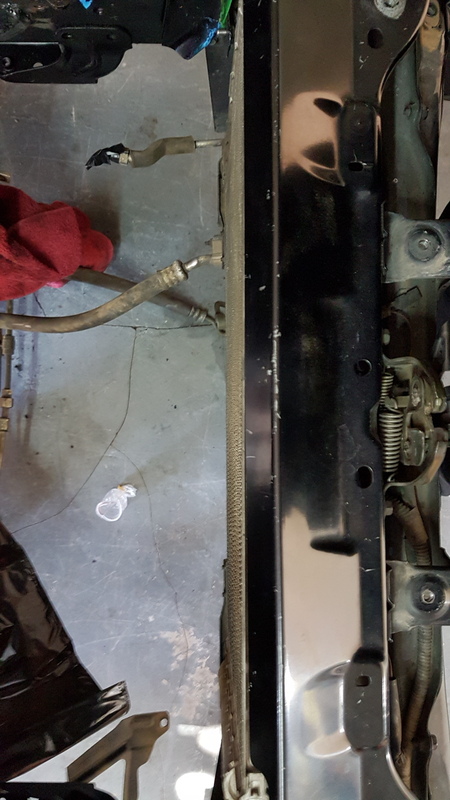
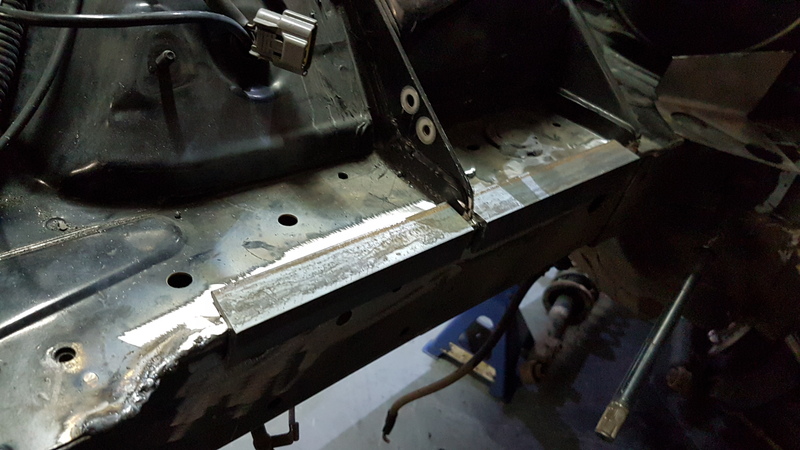
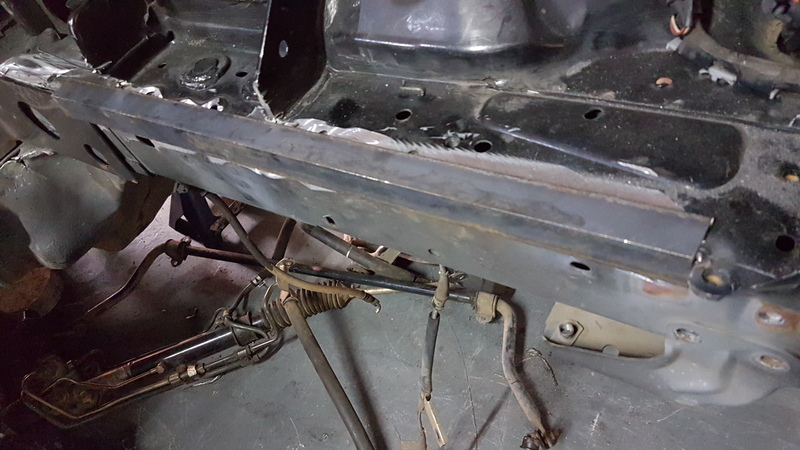
i obviously cut that little lip off the frame rails for an extra bit of space but i had to steal some space back for re inforcement
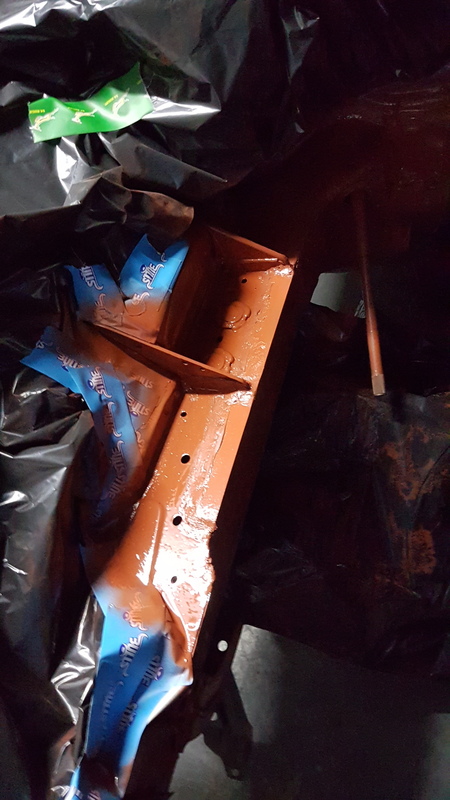
i took some angle iron and welded that to both sides of the frame rails - losing about 3mm of the space i won in the first place and then once they were welded in i seam sealed it and then painted
but i didnt know some sealers you cant paint...........
lucky me for getting that wrong - espescially with my choice of primer colour - talk about a F$$^$##%^^ up
wire wheeled the non paintable seam sealer out and replaced with paintable
way too much time lost and frustration on this - worse hiccup of the build so far
some pics of the mess
before the seam sealer and paint - the test fit of components
i obviously cut that little lip off the frame rails for an extra bit of space but i had to steal some space back for re inforcement
i took some angle iron and welded that to both sides of the frame rails - losing about 3mm of the space i won in the first place and then once they were welded in i seam sealed it and then painted
but i didnt know some sealers you cant paint...........
lucky me for getting that wrong - espescially with my choice of primer colour - talk about a F$$^$##%^^ up
wire wheeled the non paintable seam sealer out and replaced with paintable
way too much time lost and frustration on this - worse hiccup of the build so far
some pics of the mess
before the seam sealer and paint - the test fit of components


Thread Starter
V8 Miata Fan
Joined: Oct 2011
Posts: 64
Likes: 2
From: Johannesburg - South Africa
this is the big puzzler for this build
one side will be relatively easy the other relatively impossible
and i want long tubes......
this is going to be a headache
i tried a few things
pool pipe hoping to make a template easy enough - was planning on filling them with expanding foam in the hope of them making it to an exhaust guy
naah wasnt the easy way, wasnt going to work
I chickened out and found a set of headers on ebay for an ls1 and 4 days later they were in my hands for going halfway across the world i am impressed and the shipping wasnt expensive - shhh dont tell the seller
I figured if i can do one side for minimal effort - cut ls1 flange off and then weld to my mod motor flange and dent a few tubes its well worth it
the left hand side for me is literally that easy
the drivers side is another story
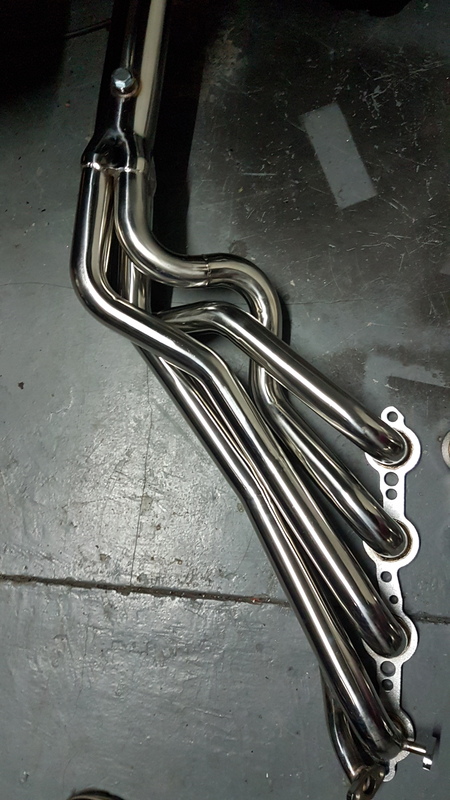
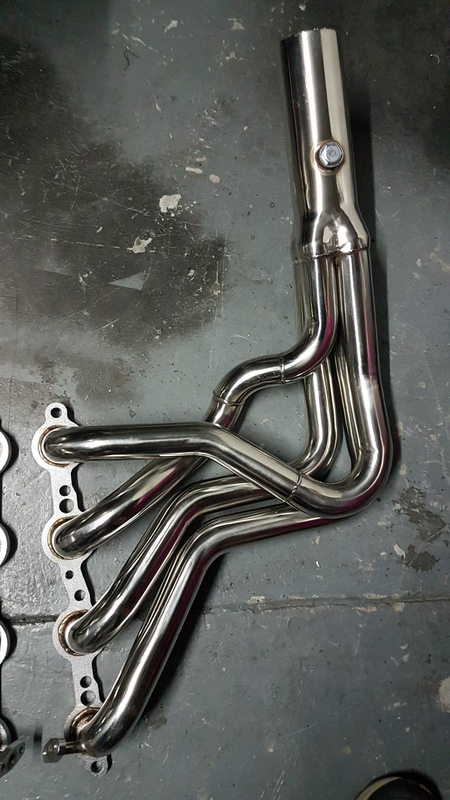
will hit these up as next big milestone and get them on the motor and in the car
one side will be relatively easy the other relatively impossible
and i want long tubes......
this is going to be a headache
i tried a few things
pool pipe hoping to make a template easy enough - was planning on filling them with expanding foam in the hope of them making it to an exhaust guy


naah wasnt the easy way, wasnt going to work
I chickened out and found a set of headers on ebay for an ls1 and 4 days later they were in my hands for going halfway across the world i am impressed and the shipping wasnt expensive - shhh dont tell the seller
I figured if i can do one side for minimal effort - cut ls1 flange off and then weld to my mod motor flange and dent a few tubes its well worth it
the left hand side for me is literally that easy
the drivers side is another story


will hit these up as next big milestone and get them on the motor and in the car
Thread Starter
V8 Miata Fan
Joined: Oct 2011
Posts: 64
Likes: 2
From: Johannesburg - South Africa
well -been quiet for a while.....
the motor was in - all mounted - all wired - all hooked up - all firing
then i tried to fit the bonnet - not gona happen.........
got all frustrated and yanked the modular motor out - there aint no way the hood is going to fit properly unless the hood ends up like a whale with a massive forehead - all the engines height is literally at the alternator
i tried to figure out throttle bodies, reversing the manifold - what else could be done to drop the motor down
I always knew it would be a challenge due to the height of the motor
so out goes the modular v8 in its place a toyota v12 - just as long as the modular 8 and literally 20cm shorter in height
stay tuned for next motor swap.........


