91 Monster Miata - 302 carb - t5or6
 03-11-2015, 02:59 PM
#201
V8 Miata Participant

Thread Starter

Hey Greg
Supporting the fans and condenser with separate brackets is a good idea though the method in the manual has worked in the past without problems. I have just changed to 10" puller fans in the kit. They pull harder than the Tripac fans and clear the water pump. I would be happy to exchange them if you would like.
The condenser should always be in front oh the radiator. I relocate the new dryer off to the side of the radiator in the dead space in front of the ps wheel. Lots of room there.
Hope this helps
Martin
 03-11-2015, 03:38 PM
#202
V8 Miata Participant
Thread Starter
Almost a week late on this update, but here we go.
Btw, while working on the miata, I started the autox season in my DD. What a blast.

Last weekend, I got the radiator/condenser/fan assembly finalized and temporarily installed.
I ordered a kit from Vintage Air. Here is the condenser.

I ordered a kit from vintage air because it had the lines and the dryer included. But what I didn't realize until I unpacked the box is that it also had much more.

I actually went to the shop to fabricate brackets that would be welded to the MonsterMiata radiator bracket that would support the condenser in front of it. But to my surprise, this kit came with brackets. So my plans changed. I modified the brackets to mount the condenser directly to the radiator. Mounted top and bottom.
Here is the condenser with the brackets. You can see how much of the bracket at the top of this picture (actually the bottom bracket) need to be removed.

Mounted the fans using a kit I got off of ebay. Plastic tabs you push through the radiator along with pads and springs. Four per fan. The lip that I bent up on the back edge of the core support looked horrible and really wasn't doing anything, so I trimmed it off.


Above, you can see the two screws I have running into the front of the radiator at the top. Not sure if that is how I will leave it, but it is pretty stable. The top and the bottom is also padded with rubber weather stripping so even without the screws, it is squeezed in there pretty good.
The dryer is mounted in front of the condenser. Just wanted to see if the provided bracket would allow this smaller dryer to fit and it does, barely. I massaged the provided lines to feed back into the engine bay properly.


Now I have decided to get the body taken care of. Mainly because of the mess I know it is going to make. So I have spent the last week accumulating what I think I need to do the body work. First on the list is the rear fender flares. But before that, I'm going to build a little plastic room to contain all the dust I will be making. I don't want that crap all over my shop.
Add another 5 hours to the clock
My Time: 138 hours
Friends & Family: 6 hours
Paid labor: $0 (this number does not include the mods made by Monster Miata)
Btw, while working on the miata, I started the autox season in my DD. What a blast.
Last weekend, I got the radiator/condenser/fan assembly finalized and temporarily installed.
I ordered a kit from Vintage Air. Here is the condenser.
I ordered a kit from vintage air because it had the lines and the dryer included. But what I didn't realize until I unpacked the box is that it also had much more.
I actually went to the shop to fabricate brackets that would be welded to the MonsterMiata radiator bracket that would support the condenser in front of it. But to my surprise, this kit came with brackets. So my plans changed. I modified the brackets to mount the condenser directly to the radiator. Mounted top and bottom.
Here is the condenser with the brackets. You can see how much of the bracket at the top of this picture (actually the bottom bracket) need to be removed.
Mounted the fans using a kit I got off of ebay. Plastic tabs you push through the radiator along with pads and springs. Four per fan. The lip that I bent up on the back edge of the core support looked horrible and really wasn't doing anything, so I trimmed it off.
Above, you can see the two screws I have running into the front of the radiator at the top. Not sure if that is how I will leave it, but it is pretty stable. The top and the bottom is also padded with rubber weather stripping so even without the screws, it is squeezed in there pretty good.
The dryer is mounted in front of the condenser. Just wanted to see if the provided bracket would allow this smaller dryer to fit and it does, barely. I massaged the provided lines to feed back into the engine bay properly.
Now I have decided to get the body taken care of. Mainly because of the mess I know it is going to make. So I have spent the last week accumulating what I think I need to do the body work. First on the list is the rear fender flares. But before that, I'm going to build a little plastic room to contain all the dust I will be making. I don't want that crap all over my shop.
Add another 5 hours to the clock
My Time: 138 hours
Friends & Family: 6 hours
Paid labor: $0 (this number does not include the mods made by Monster Miata)
Last edited by WolfGT; 11-30-2017 at 12:42 PM.
 03-11-2015, 03:54 PM
#204
V8 Miata Participant
Thread Starter
The stock condenser (like the rest of the car) was quite neglected. It was beat up and I wasn't about to put that nasty POS next to that beautiful radiator (and with the new nose going on the car, the condenser will be clearly visible). I also really didn't trust it. It worked, but looking like it did, I just didn't trust it.
04-26-2015, 04:23 PM
#205
V8 Miata Participant
Thread Starter
Spent a little bit of time yesterday working on the car. I can't tell you how nice it was having some time to spend in the shop. Hopefully I will get some more time on a regular basis in the next couple weeks.
I spent some time preparing to mount the rear fender flares. I figured I should do any cutting/welding before I mount the new fiberglass to avoid potential damage. So I mocked the driver side up to see how much of the stock fender I want to cut away (so I can tuck the wheels up in the new flares). This is the marks I made.

The outer mark is where the new flare makes contact with the body when mounted, the outer mark is approximately where the wheel well currently is. So that is where I cut.
This is the initial cut.

Then I completed the cutting and this is the cutoff.

Then I made a series of relief cuts along the wheel well material so I can flatten them out.

And here it is flattened out somewhat.

I think what I'm going to do is weld the existing wheel well tabs to the body after flattening out. Then cut off the extra (because they are not long enough to reach the new flare, so something else will have to be made). Then mount the new flare and extend the wheel to reach the flare.
I want to have all the rear end components before I mount the flares to make sure all the lines match. I'm waiting on the new SickSpeed retro rear finish panel. Then I will mount it all up and begin the body work back there. For now, I am going to get the front all mounted up. So I had to get the passenger door on.

Bolted right up. No issues. So next time I will get to work on fitting the front fenders, bumper and hood to make sure everything fits like it is supposed to.
Add another 3 hours to the clock
My Time: 141 hours
Friends & Family: 6 hours
Paid labor: $0 (this number does not include the mods made by Monster Miata)
I spent some time preparing to mount the rear fender flares. I figured I should do any cutting/welding before I mount the new fiberglass to avoid potential damage. So I mocked the driver side up to see how much of the stock fender I want to cut away (so I can tuck the wheels up in the new flares). This is the marks I made.
The outer mark is where the new flare makes contact with the body when mounted, the outer mark is approximately where the wheel well currently is. So that is where I cut.
This is the initial cut.
Then I completed the cutting and this is the cutoff.
Then I made a series of relief cuts along the wheel well material so I can flatten them out.
And here it is flattened out somewhat.
I think what I'm going to do is weld the existing wheel well tabs to the body after flattening out. Then cut off the extra (because they are not long enough to reach the new flare, so something else will have to be made). Then mount the new flare and extend the wheel to reach the flare.
I want to have all the rear end components before I mount the flares to make sure all the lines match. I'm waiting on the new SickSpeed retro rear finish panel. Then I will mount it all up and begin the body work back there. For now, I am going to get the front all mounted up. So I had to get the passenger door on.
Bolted right up. No issues. So next time I will get to work on fitting the front fenders, bumper and hood to make sure everything fits like it is supposed to.
Add another 3 hours to the clock
My Time: 141 hours
Friends & Family: 6 hours
Paid labor: $0 (this number does not include the mods made by Monster Miata)
Last edited by WolfGT; 11-30-2017 at 12:43 PM.
 05-11-2015, 07:57 PM
#208
V8 Miata Participant
Thread Starter
Was able to do some work on the car yesterday and today. A couple hours each day. Yesterday, I cut the passenger wheel well to match the driver and started to weld. Then today, I finished the welding and cut the extra metal off. Cleaned it all up and shot some primer on to protect it. Here are a couple shots showing the finished product. (I did not grind down clean because this will be hidden and I will be adding some wheel well extensions after the flares are on).


Then I took some self tapping sheet metal screws and fitted the flares (only 3 screws per side for mockup). And taped the bumper in place.


Next visit to the shop will be a long one. I will finally get these panels bonded to the car and fit the front end (fenders, hood and front bumper). It will finally look like a car once again.
A correction to something I posted earlier. The rear finish panel that is on the way is a GarageVary retro setup with LED lights.
And FYI for everyone. A confirmation of something someone pointed out months and months ago about fiberglass panels needing months to properly cure was absolutely correct. The front fenders now have very small cracks (nothing serious). But if I would have been in a huge hurry and took this straight to the body shop and had it worked and painted, THEN it cracked .... well, that would have sucked.
Add another 4 hours to the clock
My Time: 146 hours
Friends & Family: 6 hours
Paid labor: $0 (this number does not include the mods made by Monster Miata)
Then I took some self tapping sheet metal screws and fitted the flares (only 3 screws per side for mockup). And taped the bumper in place.
Next visit to the shop will be a long one. I will finally get these panels bonded to the car and fit the front end (fenders, hood and front bumper). It will finally look like a car once again.
A correction to something I posted earlier. The rear finish panel that is on the way is a GarageVary retro setup with LED lights.
And FYI for everyone. A confirmation of something someone pointed out months and months ago about fiberglass panels needing months to properly cure was absolutely correct. The front fenders now have very small cracks (nothing serious). But if I would have been in a huge hurry and took this straight to the body shop and had it worked and painted, THEN it cracked .... well, that would have sucked.
Add another 4 hours to the clock
My Time: 146 hours
Friends & Family: 6 hours
Paid labor: $0 (this number does not include the mods made by Monster Miata)
Last edited by WolfGT; 11-30-2017 at 12:45 PM.
05-18-2015, 05:11 PM
#209
V8 Miata Participant
Thread Starter
Yesterday was a nerve racking but ultimately very exciting day. First, the nerve racking part. It was time to install the rear fender flares. That meant using adhesive that I have never used before. I have basically never done any bodywork before. So I have never dealt with something that required adding a hardener. So the first batch I mixed up for the passenger side, I didn't make enough and then had to rush to mix some more before the first batch went hard. But what I didn't know was that I didn't add nearly enough hardener, because the driver side actually hardened before the passenger.
I roughed up the surface of the car with 80 grit and then drilled a large amount of holes in the new fender (the fiberglass piece being added). Then mixed the adhesive and put it on the back of the fender. Then lined it up and screwed it in place with a bunch of self tappers. Wiped up everything that oozed out and done deal.
Here is a shot of the driver side with a wheel mocked up in position.

The reason I put the wheel in there was to see how much tire would fit under the new fender. The tire measures almost 9 1/4" from sidewall to sidewall as seen here (it's actually a little more than the picture shows, I must not have been lined up well for the picture).

This is how much is left on the outer edge (about 3/4").

And under the car, this is what is left between the inside of the tire and the body.

Another 1 1/2". So if I wanted to trim some of the lip on the fender and fill it up, I could pull off 10 - 11" wides all day long (maybe even 12's). I'll play with it some more later. That was a small piece of the exciting part of the day.
This is the really exciting part. I spent the rest of the time putting the front fenders and nose on. I even pulled the hood out of the box and layed it in place. And I am very pleased with the look. I think it is amazing and can't wait to get it together.


I thought it was going to look tough, but this is beyond my expectation. It's going to take a lot of panel fitment and tweaking to make it all fit right, but I'm staying optimistic.
What ya think?
Add another 3 hours to the clock
My Time: 149 hours
Friends & Family: 6 hours
Paid labor: $0 (this number does not include the mods made by Monster Miata)
I roughed up the surface of the car with 80 grit and then drilled a large amount of holes in the new fender (the fiberglass piece being added). Then mixed the adhesive and put it on the back of the fender. Then lined it up and screwed it in place with a bunch of self tappers. Wiped up everything that oozed out and done deal.
Here is a shot of the driver side with a wheel mocked up in position.
The reason I put the wheel in there was to see how much tire would fit under the new fender. The tire measures almost 9 1/4" from sidewall to sidewall as seen here (it's actually a little more than the picture shows, I must not have been lined up well for the picture).
This is how much is left on the outer edge (about 3/4").
And under the car, this is what is left between the inside of the tire and the body.
Another 1 1/2". So if I wanted to trim some of the lip on the fender and fill it up, I could pull off 10 - 11" wides all day long (maybe even 12's). I'll play with it some more later. That was a small piece of the exciting part of the day.
This is the really exciting part. I spent the rest of the time putting the front fenders and nose on. I even pulled the hood out of the box and layed it in place. And I am very pleased with the look. I think it is amazing and can't wait to get it together.
I thought it was going to look tough, but this is beyond my expectation. It's going to take a lot of panel fitment and tweaking to make it all fit right, but I'm staying optimistic.
What ya think?
Add another 3 hours to the clock
My Time: 149 hours
Friends & Family: 6 hours
Paid labor: $0 (this number does not include the mods made by Monster Miata)
Last edited by WolfGT; 11-30-2017 at 12:46 PM.
 06-05-2015, 08:13 AM
#211
V8 Miata Participant
Thread Starter
Thanks jr. Taking a lot longer than originally planned, but as everyone knows, life gets in the way. But I'll be back in the shop tonight and tomorrow. I also got good news today in email. My Garage Vary tail lights were shipped.  Not sure how long it takes for something like that to get here from Japan, but we'll see.
Now if only KG Works would send me the new Gauge Cluster, I would be a happy man (ordered Feb 2nd). I knew it was going to take a while. Not a surprise.
So tonight I get to go see how the panel bonding worked. I haven't been back in the shop since I put them on. Hopefully everything is good and I can move forward with fitting the rest of the panels.
Not sure how long it takes for something like that to get here from Japan, but we'll see.Now if only KG Works would send me the new Gauge Cluster, I would be a happy man (ordered Feb 2nd). I knew it was going to take a while. Not a surprise.
So tonight I get to go see how the panel bonding worked. I haven't been back in the shop since I put them on. Hopefully everything is good and I can move forward with fitting the rest of the panels.
 06-10-2015, 08:40 AM
#214
V8 Miata Participant
Thread Starter
Been meaning to update the thread this week but haven't gotten the chance. I was at the shop on Saturday for about 4 hours. It's time to get all the panels fitted so I can do some body work. First i pulled all the screws holding the rear flares on during the bonding. Man that adhesive is strong. Those panels are on there for good. I noticed an issue on the passenger side that I will document later when I get around to addressing it. Has to do with the fitment of the panel itself.
I want to get the entire front end in place and aligned and I figure the best place to start is the hood (I could be wrong on that, but my thought process was that it has 4 points to align with, each hinge and each headlight.) After that , the fenders and nose would be manipulated around it. But we'll see how that works out. I pulled all the panels off. Installed the headlights and dropped the hood in place. Wow, not even close. The driver side headlight is way out of place. Then I started to get worried that my placement of the front clip was off and the car was not square. I pulled everything and measured. It all looked good. So after looking everything over, I think the brackets on the driver side headlight was tweaked during whatever fender bender the car was in. So I slotted the holes to get it in the right spot. This took a while but this is what I came up with. Not perfect, but really close for this stage.


And a quick note. The hood came with new adjustable bumper things for the front. Shown here.

They have a rectangular clip which requires a rectangular hole. The stock hole is round.

A triangular file turns that round hole into this.

And then time for the driver fender. It's fighting me (but I assume every corner of every panel is going to fight me). I've got it pretty close, but I think the door may be a little toed out and that is causing a problem. Ran out of time, but here is where I ended.


I will be at it tomorrow night and one big day this weekend. Hoping to get all the panels fitted. But there are some brackets (tabs on the panels) that are not quite right. If I need to modify them/reinforce them with fiberglass, that is really going to slow me down. We'll see.
Add another 4 hours to the clock
My Time: 153 hours
Friends & Family: 6 hours
Paid labor: $0 (this number does not include the mods made by Monster Miata)
I want to get the entire front end in place and aligned and I figure the best place to start is the hood (I could be wrong on that, but my thought process was that it has 4 points to align with, each hinge and each headlight.) After that , the fenders and nose would be manipulated around it. But we'll see how that works out. I pulled all the panels off. Installed the headlights and dropped the hood in place. Wow, not even close. The driver side headlight is way out of place. Then I started to get worried that my placement of the front clip was off and the car was not square. I pulled everything and measured. It all looked good. So after looking everything over, I think the brackets on the driver side headlight was tweaked during whatever fender bender the car was in. So I slotted the holes to get it in the right spot. This took a while but this is what I came up with. Not perfect, but really close for this stage.
And a quick note. The hood came with new adjustable bumper things for the front. Shown here.
They have a rectangular clip which requires a rectangular hole. The stock hole is round.
A triangular file turns that round hole into this.
And then time for the driver fender. It's fighting me (but I assume every corner of every panel is going to fight me). I've got it pretty close, but I think the door may be a little toed out and that is causing a problem. Ran out of time, but here is where I ended.
I will be at it tomorrow night and one big day this weekend. Hoping to get all the panels fitted. But there are some brackets (tabs on the panels) that are not quite right. If I need to modify them/reinforce them with fiberglass, that is really going to slow me down. We'll see.
Add another 4 hours to the clock
My Time: 153 hours
Friends & Family: 6 hours
Paid labor: $0 (this number does not include the mods made by Monster Miata)
Last edited by WolfGT; 11-30-2017 at 12:48 PM.
06-10-2015, 09:48 AM
#215
V8 Miata Participant
Thread Starter
And guess what special package just showed up from Japan!!?

The new tail light kit (finish panel with tail lights). I opened it very anxious to take a look, but it is packaged so nicely, I don't want to open it all the way because I have to take it two hours back to Charlotte. So to avoid any chance of damage, I will wait to open the bubble wrap.

I'm really glad it's here. Now I can mount the rear bumper and trunk lid firmly. I think that only leaves the mirrors and the fuel door to figure out.
The new tail light kit (finish panel with tail lights). I opened it very anxious to take a look, but it is packaged so nicely, I don't want to open it all the way because I have to take it two hours back to Charlotte. So to avoid any chance of damage, I will wait to open the bubble wrap.
I'm really glad it's here. Now I can mount the rear bumper and trunk lid firmly. I think that only leaves the mirrors and the fuel door to figure out.
Last edited by WolfGT; 11-30-2017 at 12:48 PM.
06-10-2015, 04:58 PM
#216
V8 Miata Participant
Thread Starter
Well, the fianc� is busy tonight so I came over to the shop to see the goodies.


I love it. But all the instructions are in japanese. I guess I'll have to do some searching. I would think rev9 would have some in English.
I love it. But all the instructions are in japanese. I guess I'll have to do some searching. I would think rev9 would have some in English.
Last edited by WolfGT; 11-30-2017 at 12:49 PM.
07-06-2015, 09:29 AM
#217
V8 Miata Participant
Thread Starter
Did some work over the last couple weeks. No pictures this time. I spent all the time getting the front end to fit properly. Talk about a puzzle. I had to remove some of the mounting brackets and then weld them back on in slightly different positions to make everything work right. So now on the next trip to the shop I will be finally mounting all the panels and then on to some of the small projects. I still need to install the little support bars that brace the bottoms of the bumpers. Then I will be working on getting the headlights to sit right in the openings. Then install the aerocatch latches for the hood. At the pace I'm going, I should have all the panels mounted and ready for body work in about a month.
Add another 5 hours to the clock
My Time: 158 hours
Friends & Family: 6 hours
Paid labor: $0 (this number does not include the mods made by Monster Miata)
Add another 5 hours to the clock
My Time: 158 hours
Friends & Family: 6 hours
Paid labor: $0 (this number does not include the mods made by Monster Miata)
07-22-2015, 03:13 PM
#218
V8 Miata Participant
Thread Starter
YAY! It arrived! I ordered this back on February 2nd. It is now July 22nd and it showed up today. That is about 5.5 months. Actually, about what I was expecting.
What a beautiful piece!
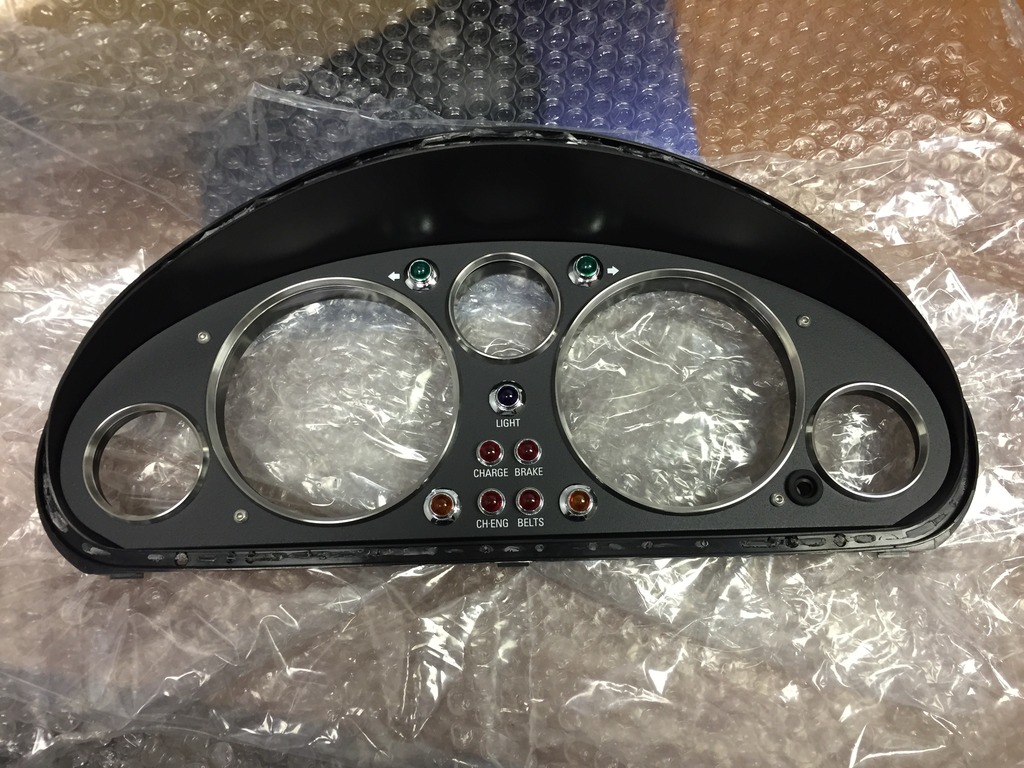
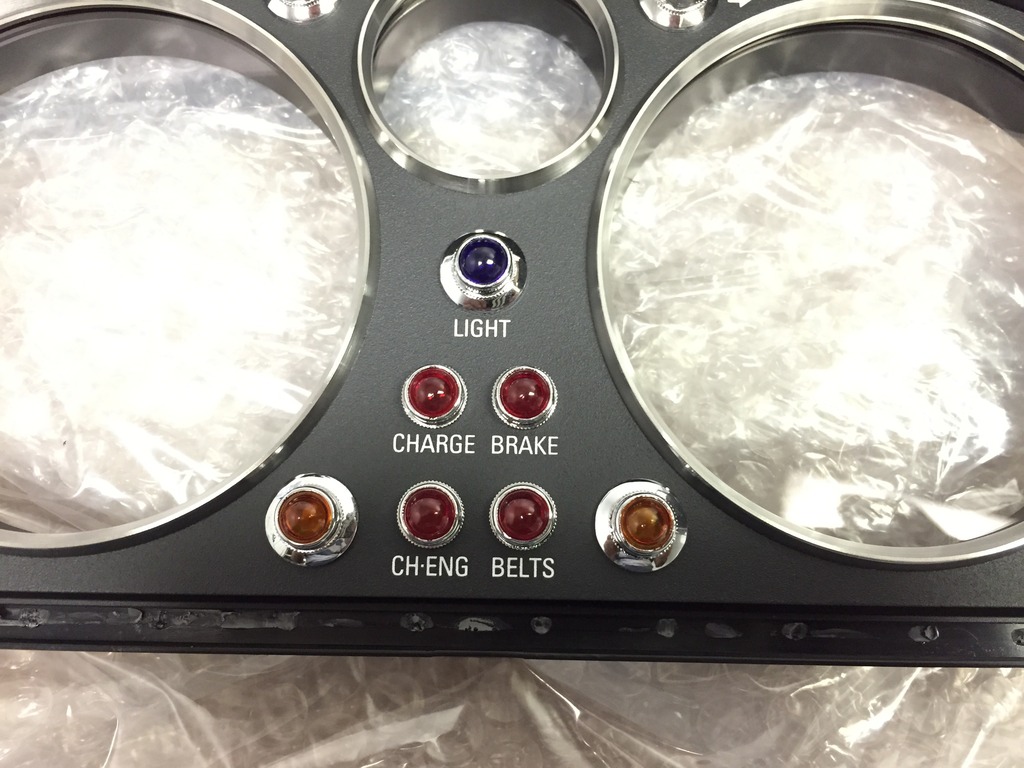
What a beautiful piece!

 07-24-2015, 09:28 AM
#221
V8 Miata Participant
Thread Starter
I have been gathering parts and materials over the last couple weeks to begin work on the body again. I need to add material to a couple of the mounting tabs on the Monster front fenders. I've never done fiberglass before, so that will be fun. Work has been crazy lately so time at the shop has been limited. Slow and steady I guess.
07-25-2015, 09:00 AM
#222
V8 Miata Zealot

Be careful adding fiberglass to an already cured fiberglass part. Doing that same thing caused distortions/waves in my hood about 6 months after it was painted. Now you can see where all of the supports were glassed in. It was perfect when first painted. You may want to try some epoxy or panel bond.
07-25-2015, 08:09 PM
#223
V8 Miata Participant
Thread Starter
Be careful adding fiberglass to an already cured fiberglass part. Doing that same thing caused distortions/waves in my hood about 6 months after it was painted. Now you can see where all of the supports were glassed in. It was perfect when first painted. You may want to try some epoxy or panel bond.
The rear fenders will be all filler and adhesive.
08-02-2015, 02:39 PM
#224
V8 Miata Participant
Thread Starter
Time to begin my fiberglass journey. I picked up some fiberglass mat, resin (with hardener) from Summit Racing. Both evercoat products.
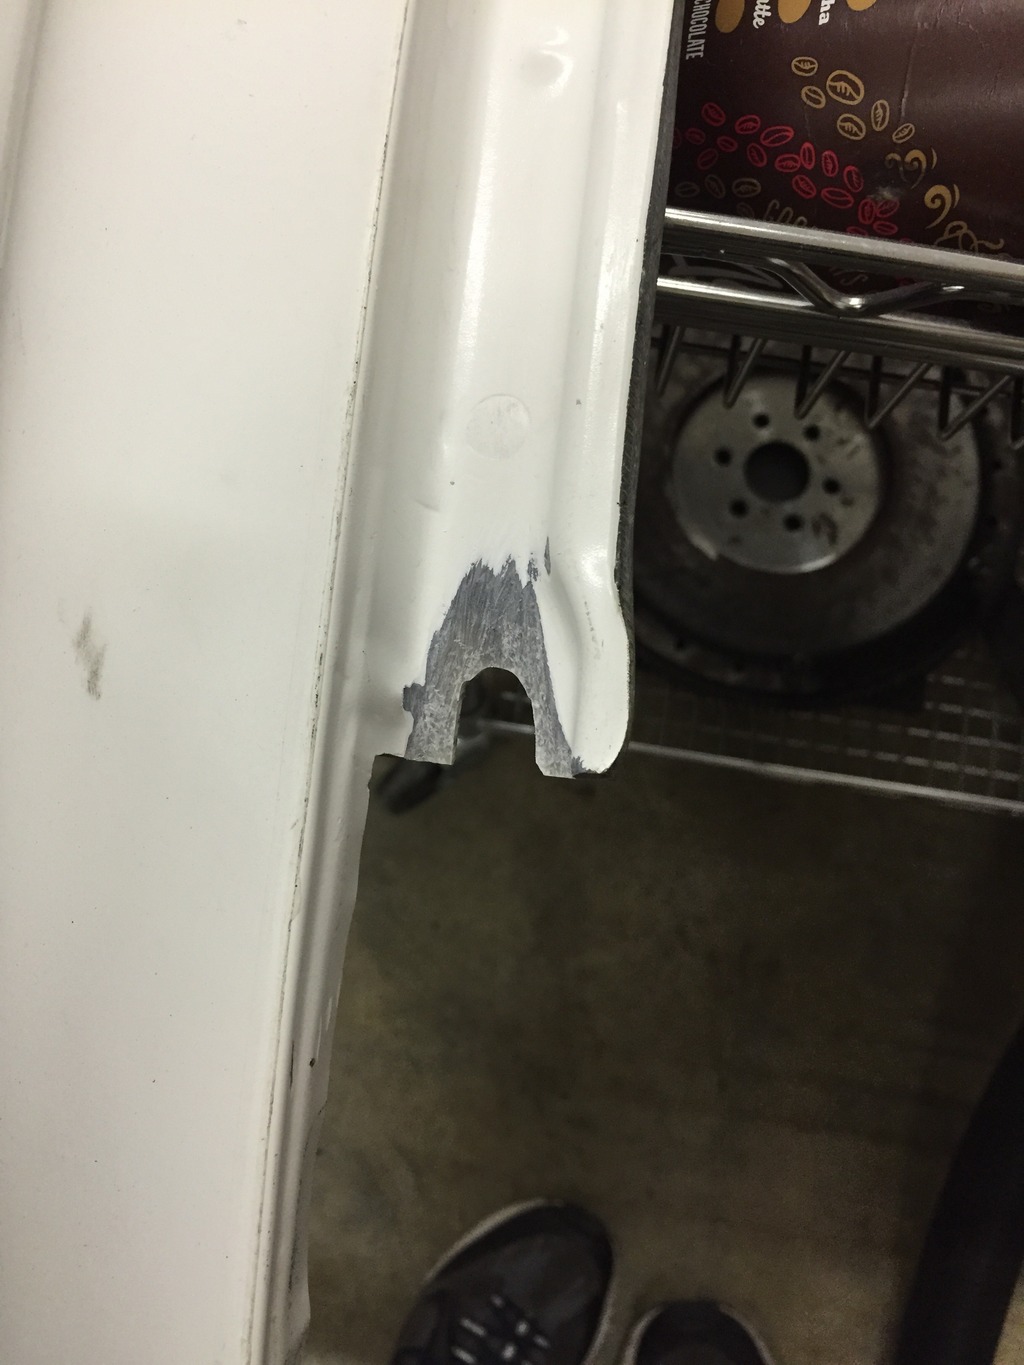
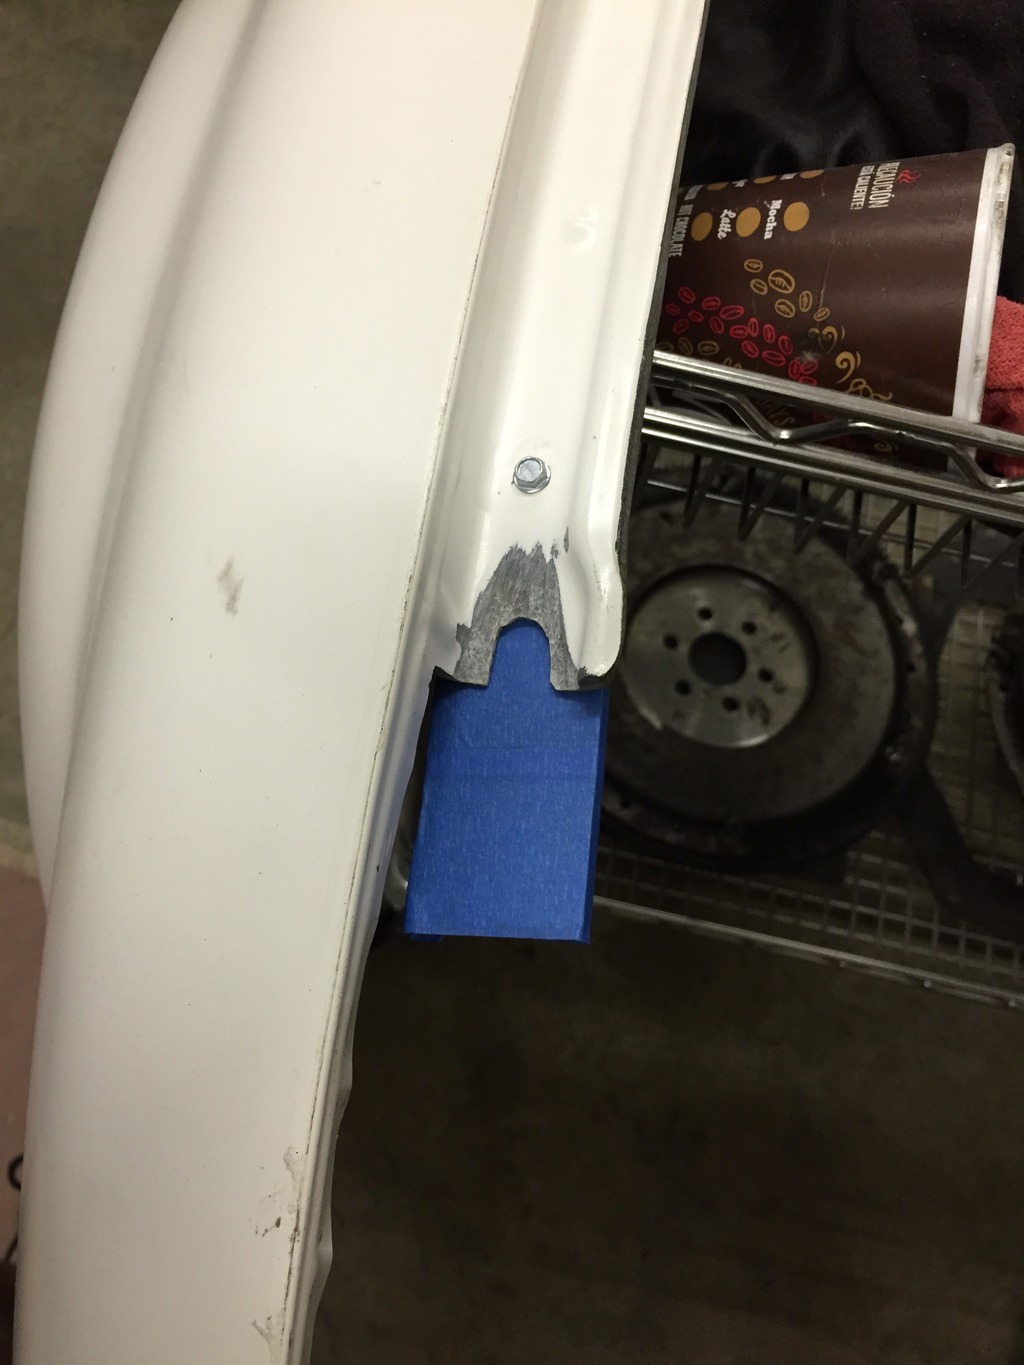
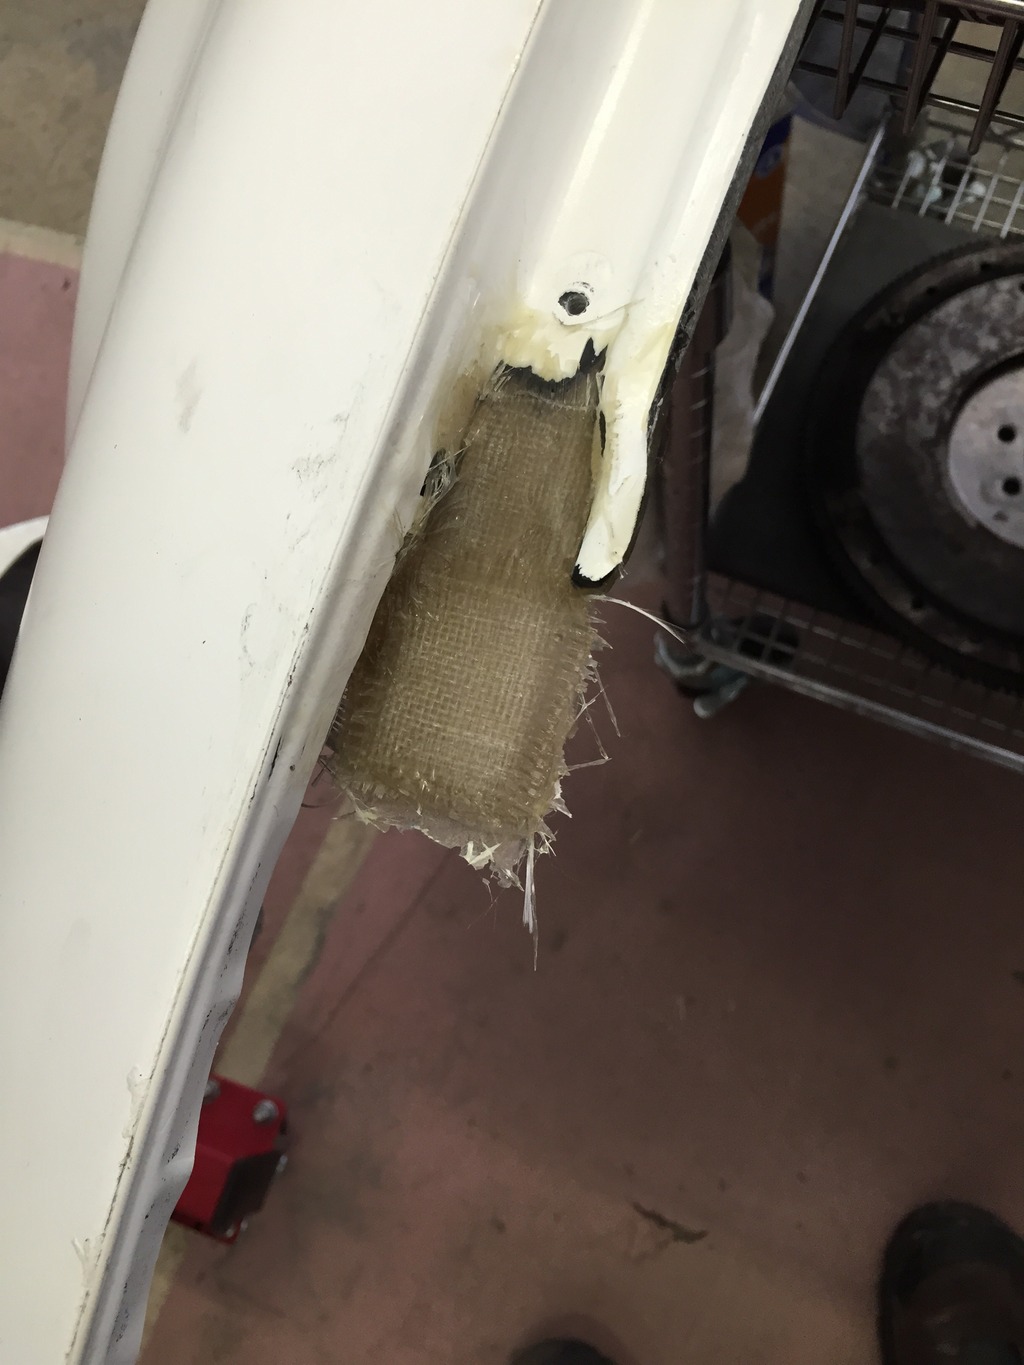
What I need to accomplish is to add material to the tab area of the Monster Miata front fenders. To be honest, this is not totally necessary. But I am a bit of a perfectionist and just having the edge of a bolt catching the fender is not something I will accept. Here is an example.
Sorry, I didn't take a picture before I started prepping. But the bolt is not all the way in that notch, it is out on the edge. So I want to add about an inch and a half to that drip edge and then smooth and redrill. This picture shows me removing the gel coat and tapering the edge. I did this with a cutting wheel.
Then I took a large paint stick and cut a piece off of it to create a support for the new material. Used a self tapper to attach.
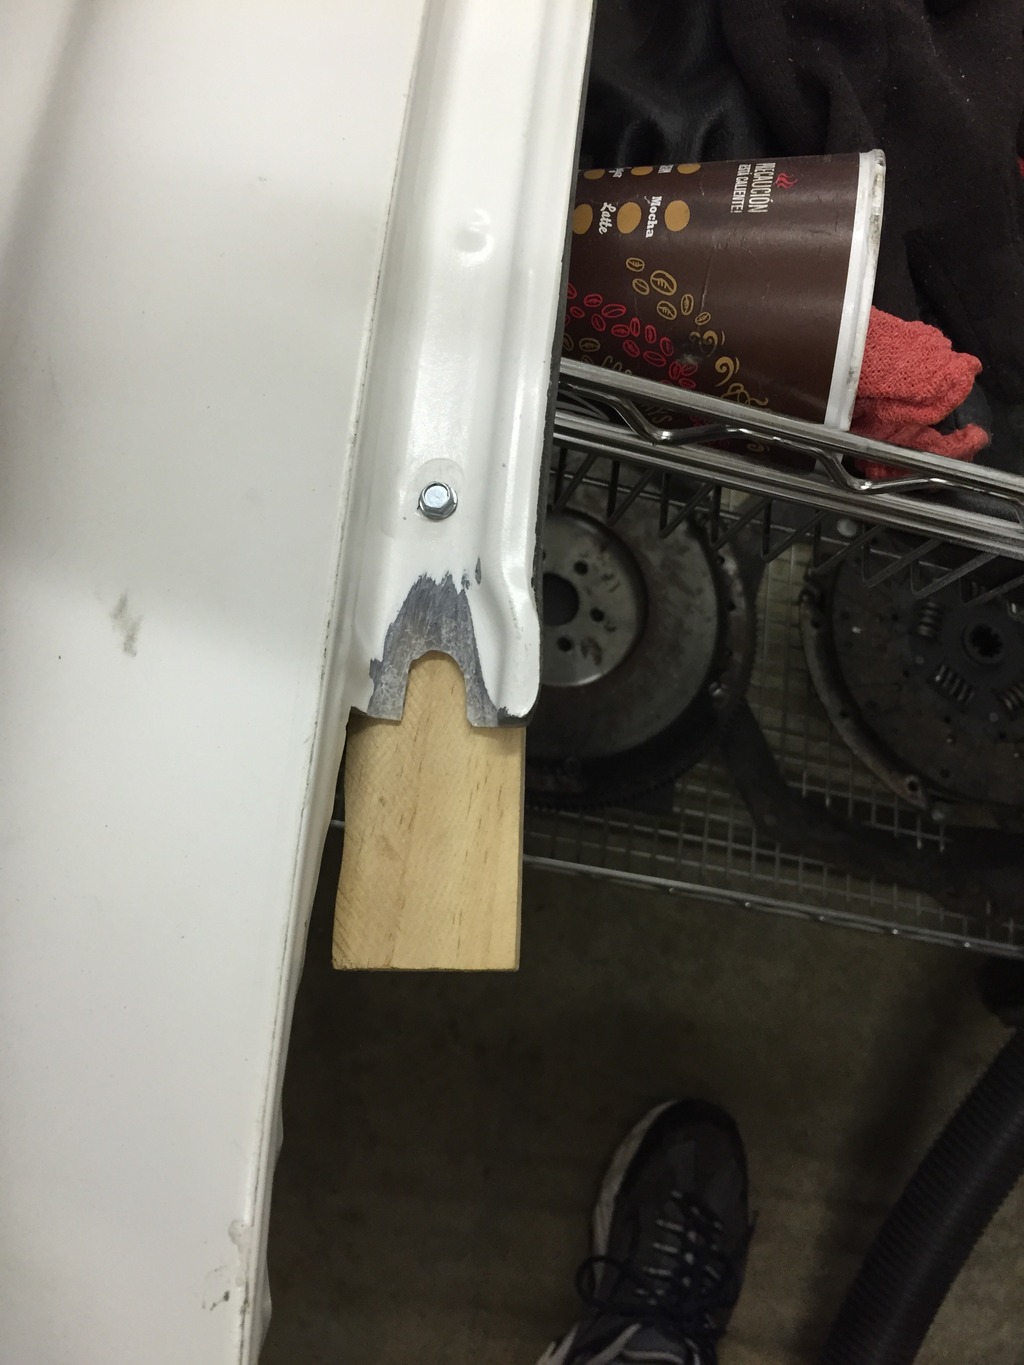
I then covered the wood in painters tape. The resin instructions say wax paper, but didn't have any handy. If this test doesn't work well, I will bring some to the shop next trip.
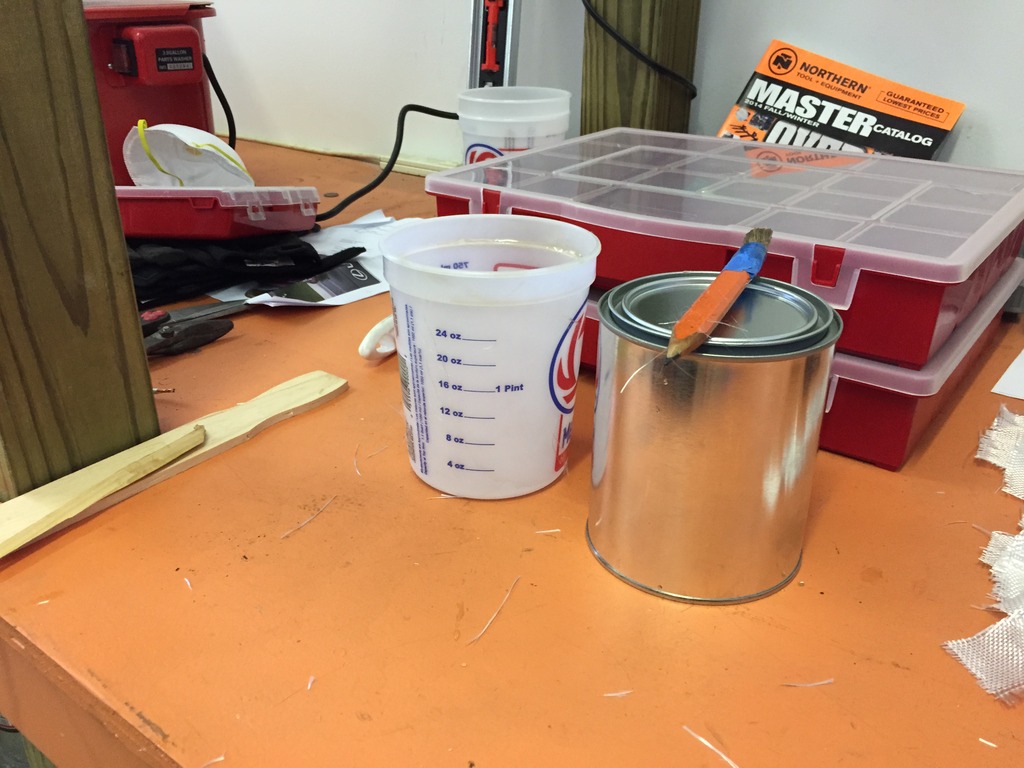
Then the fun begins. I have read that my time working with this will be limited so I wanted to prep as much as possible. The issue that I had was I was not sure how many layers of fiberglass mat I would need to get the thickness/strength that I want. I figured 3 or 4. So I cut 4 long pieces and a couple short pieces. I bought a couple paint mixing cups so I could mix the resin and in an effort to be ready, I bought a small metal paint can to put the excess in after I was done.
Here are is the mixing cup and metal can.
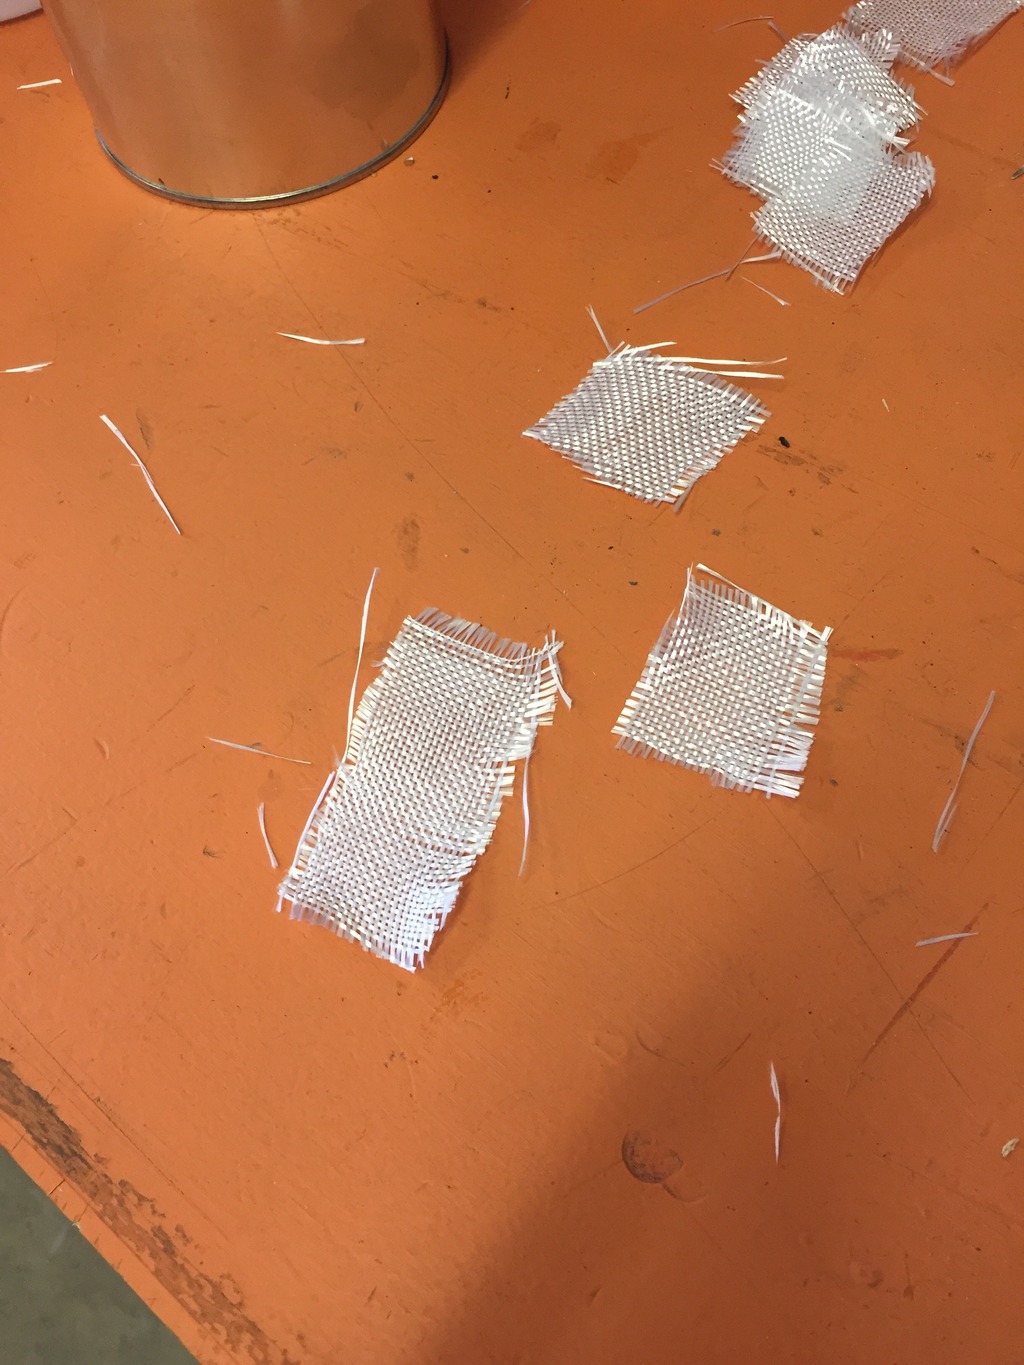
And an example of some of the pieces I cut.
The first test I took an old paint brush and used it to spread the resin. In the picture with the metal can above you can see that I used the bristles that I cut off the paint brush to create a brush for the second round. Worked well. So here we go. The mixing cup has a mark for 4 oz. I knew that was going to be too much for my test, but it was a good place to start. 4oz of resin meant 48 drops of hardener. Mixed it up and go to work. Put the 4 pieces of mat on and quickly realized it wasn't enough. Quickly cut more and was able to work my way through my issue. I ended up with the 4 original long pieces and 6 half pieces to thicken the new piece. Here it is just after completion.
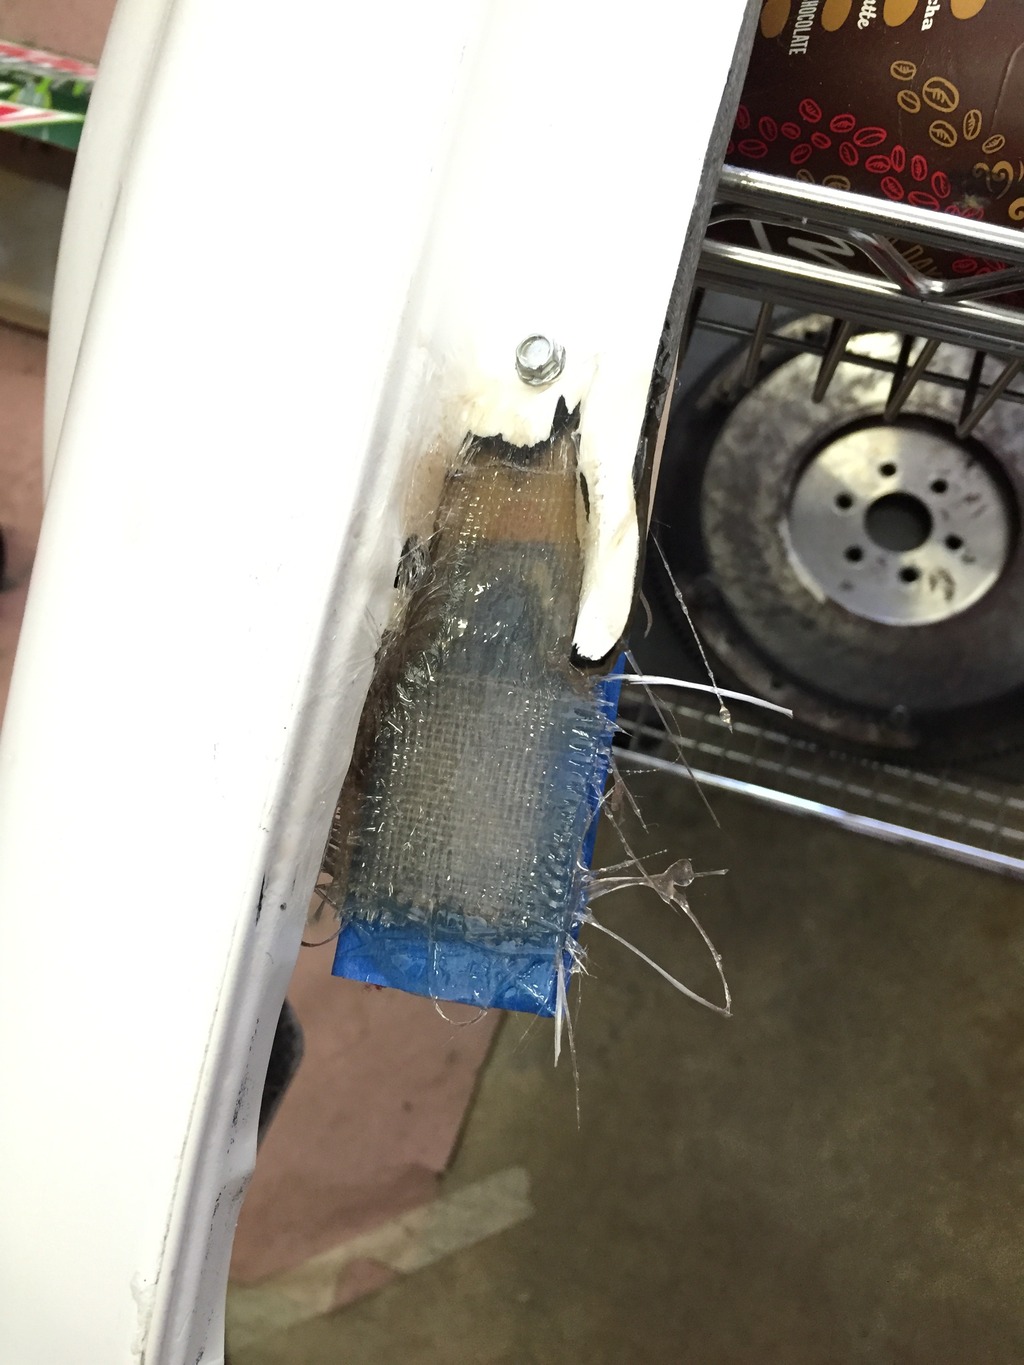
Yeh, kind of sloppy, but for my first time, not bad. And this is what it looks like today (the next day). I pulled the support off and actually the blue tape did well. It didn't stick and I was able to reuse my support piece.
I'm happy with it. I think it will cut down and clean up well. So I setup to do the other 3 tabs. I did them all at once. Worked out well. Now I'm going to leave them to harden and then I will flip the pieces to run at least 2 or 3 pieces on the back side to make sure the new addition is truly part of the tab. Then cut them down, redrill, and prime. Now while it cures, I am going to move to the back and do a little prep work.
What I need to accomplish is to add material to the tab area of the Monster Miata front fenders. To be honest, this is not totally necessary. But I am a bit of a perfectionist and just having the edge of a bolt catching the fender is not something I will accept. Here is an example.
Sorry, I didn't take a picture before I started prepping. But the bolt is not all the way in that notch, it is out on the edge. So I want to add about an inch and a half to that drip edge and then smooth and redrill. This picture shows me removing the gel coat and tapering the edge. I did this with a cutting wheel.

Then I took a large paint stick and cut a piece off of it to create a support for the new material. Used a self tapper to attach.

I then covered the wood in painters tape. The resin instructions say wax paper, but didn't have any handy. If this test doesn't work well, I will bring some to the shop next trip.

Then the fun begins. I have read that my time working with this will be limited so I wanted to prep as much as possible. The issue that I had was I was not sure how many layers of fiberglass mat I would need to get the thickness/strength that I want. I figured 3 or 4. So I cut 4 long pieces and a couple short pieces. I bought a couple paint mixing cups so I could mix the resin and in an effort to be ready, I bought a small metal paint can to put the excess in after I was done.
Here are is the mixing cup and metal can.

And an example of some of the pieces I cut.

The first test I took an old paint brush and used it to spread the resin. In the picture with the metal can above you can see that I used the bristles that I cut off the paint brush to create a brush for the second round. Worked well. So here we go. The mixing cup has a mark for 4 oz. I knew that was going to be too much for my test, but it was a good place to start. 4oz of resin meant 48 drops of hardener. Mixed it up and go to work. Put the 4 pieces of mat on and quickly realized it wasn't enough. Quickly cut more and was able to work my way through my issue. I ended up with the 4 original long pieces and 6 half pieces to thicken the new piece. Here it is just after completion.

Yeh, kind of sloppy, but for my first time, not bad. And this is what it looks like today (the next day). I pulled the support off and actually the blue tape did well. It didn't stick and I was able to reuse my support piece.

I'm happy with it. I think it will cut down and clean up well. So I setup to do the other 3 tabs. I did them all at once. Worked out well. Now I'm going to leave them to harden and then I will flip the pieces to run at least 2 or 3 pieces on the back side to make sure the new addition is truly part of the tab. Then cut them down, redrill, and prime. Now while it cures, I am going to move to the back and do a little prep work.


