pj_mcgarvey's - LS1/T56 NB build thread

 03-28-2017, 08:59 PM
#151
V8 Miata Enthusiast
Thread Starter

Alternator:
The large thick wire (8 gauge?) goes from the main lug of the alternator directly to the positive battery terminal.
The small harness connector on the top of the alternator has a single red wire (single wire on my 98 LS1, might be more than one wire on other engines) that needs a 5v constant input that energizes the alternator and makes it charger battery. On some later LS engines, the signal comes from a pin on the PCM. Since my car doesn't have this PCM signal or a 5v source, I found someone that referenced this part 'Axxess Interface AFDI-5V Ford 12V to 5V Step Down' doing the job . I wired it in and now the alternator charges the system. Per the Flyin Miata instructions this red wire can also be wired to the alternator light on the Miata dash so you will get a warning if there is a charging problem. My question is whether this will work on my engine, since the alternator signal doesn't come from the PCM as on other LS engines.
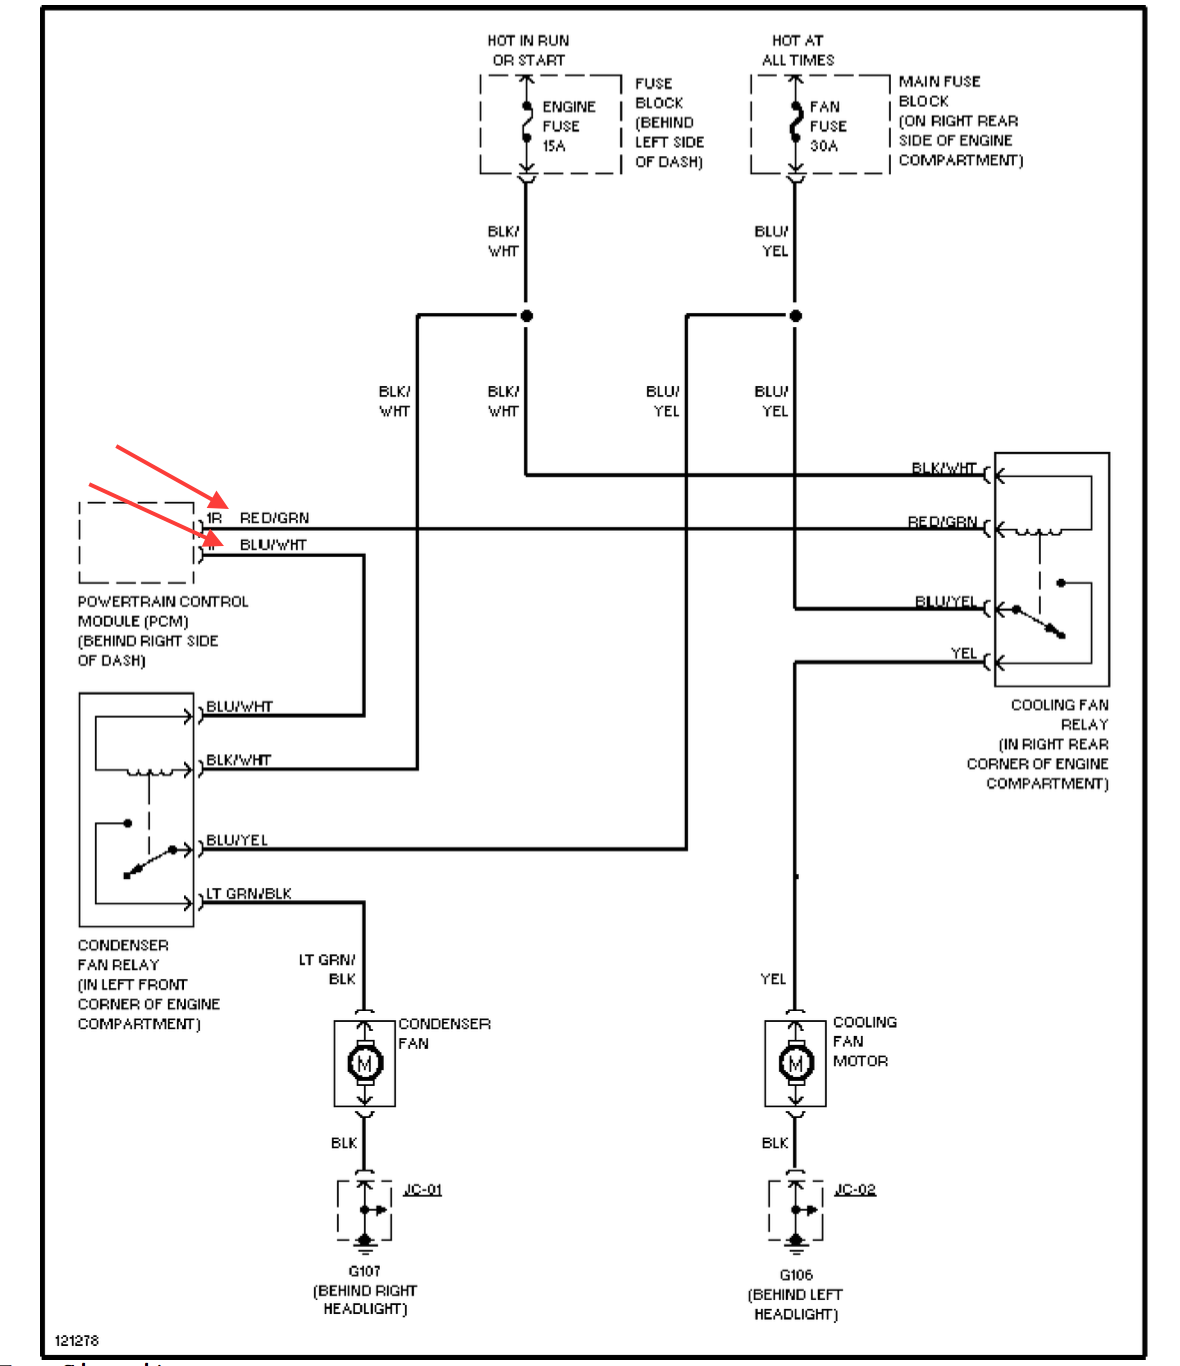
Radiator Fans:
The oem Miata fans are dual fans, one is engine cooling and one is for the A/C condenser. They run off a 30A circuit/fuse at the main fuse box, so the wiring should be able to handle it. Each of the Spal slim fans I got from Flyin Miata are rated for less than 15A each. https://webstore.spalusa.com/content...01522_SPEC.pdf So the same 30A capacity from the main fuse box (labelled FAN) should be sufficient.
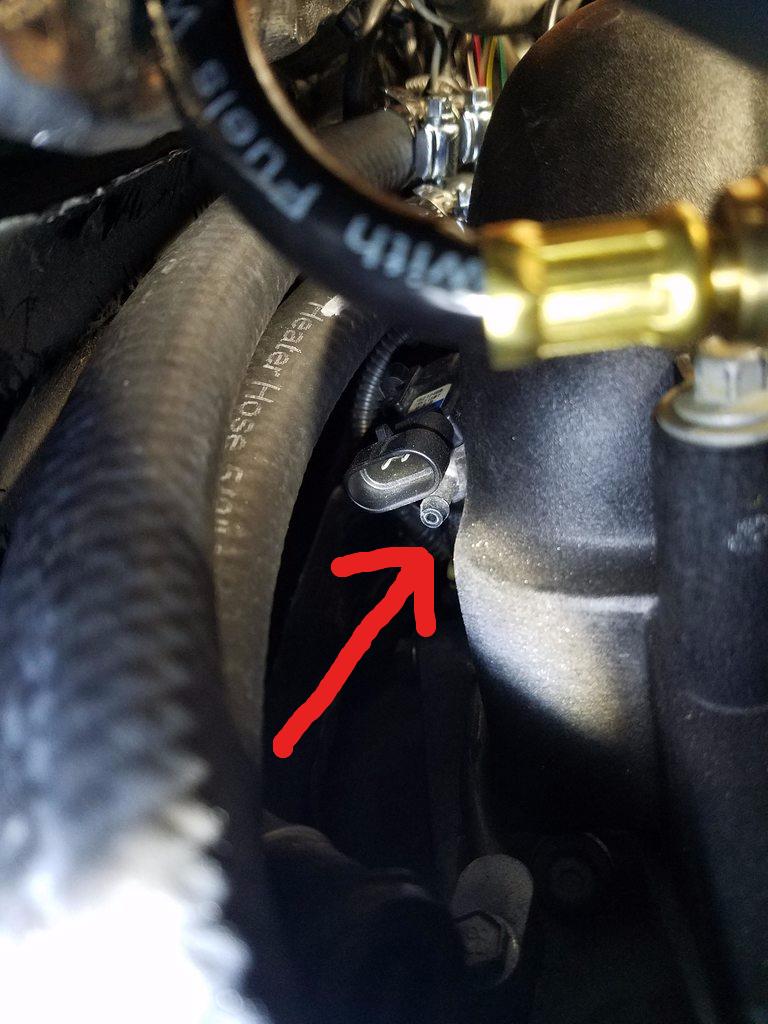
I used the PCM fan relay trigger wires instead of the Miata wires. The wires coming from the Miata PCM shown with arrows in the pic below would be the two you are looking for. Just snip these off at each relay and connect the PCM fan trigger wires to them. This is all I had to do.
O2 Sensors:
One thing I didn’t see mentioned at all in other guides was how to power the O2 sensors. This should be straight forward as you can use the existing harness connectors. The two O2 signal wires will already route back to the PCM. The pink wire will need to run to a switched hot wire for sensor power and black can run to a ground connection.
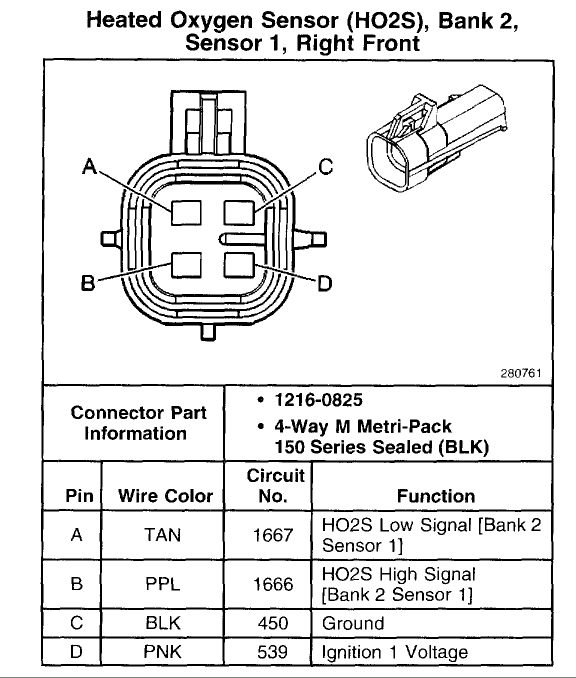
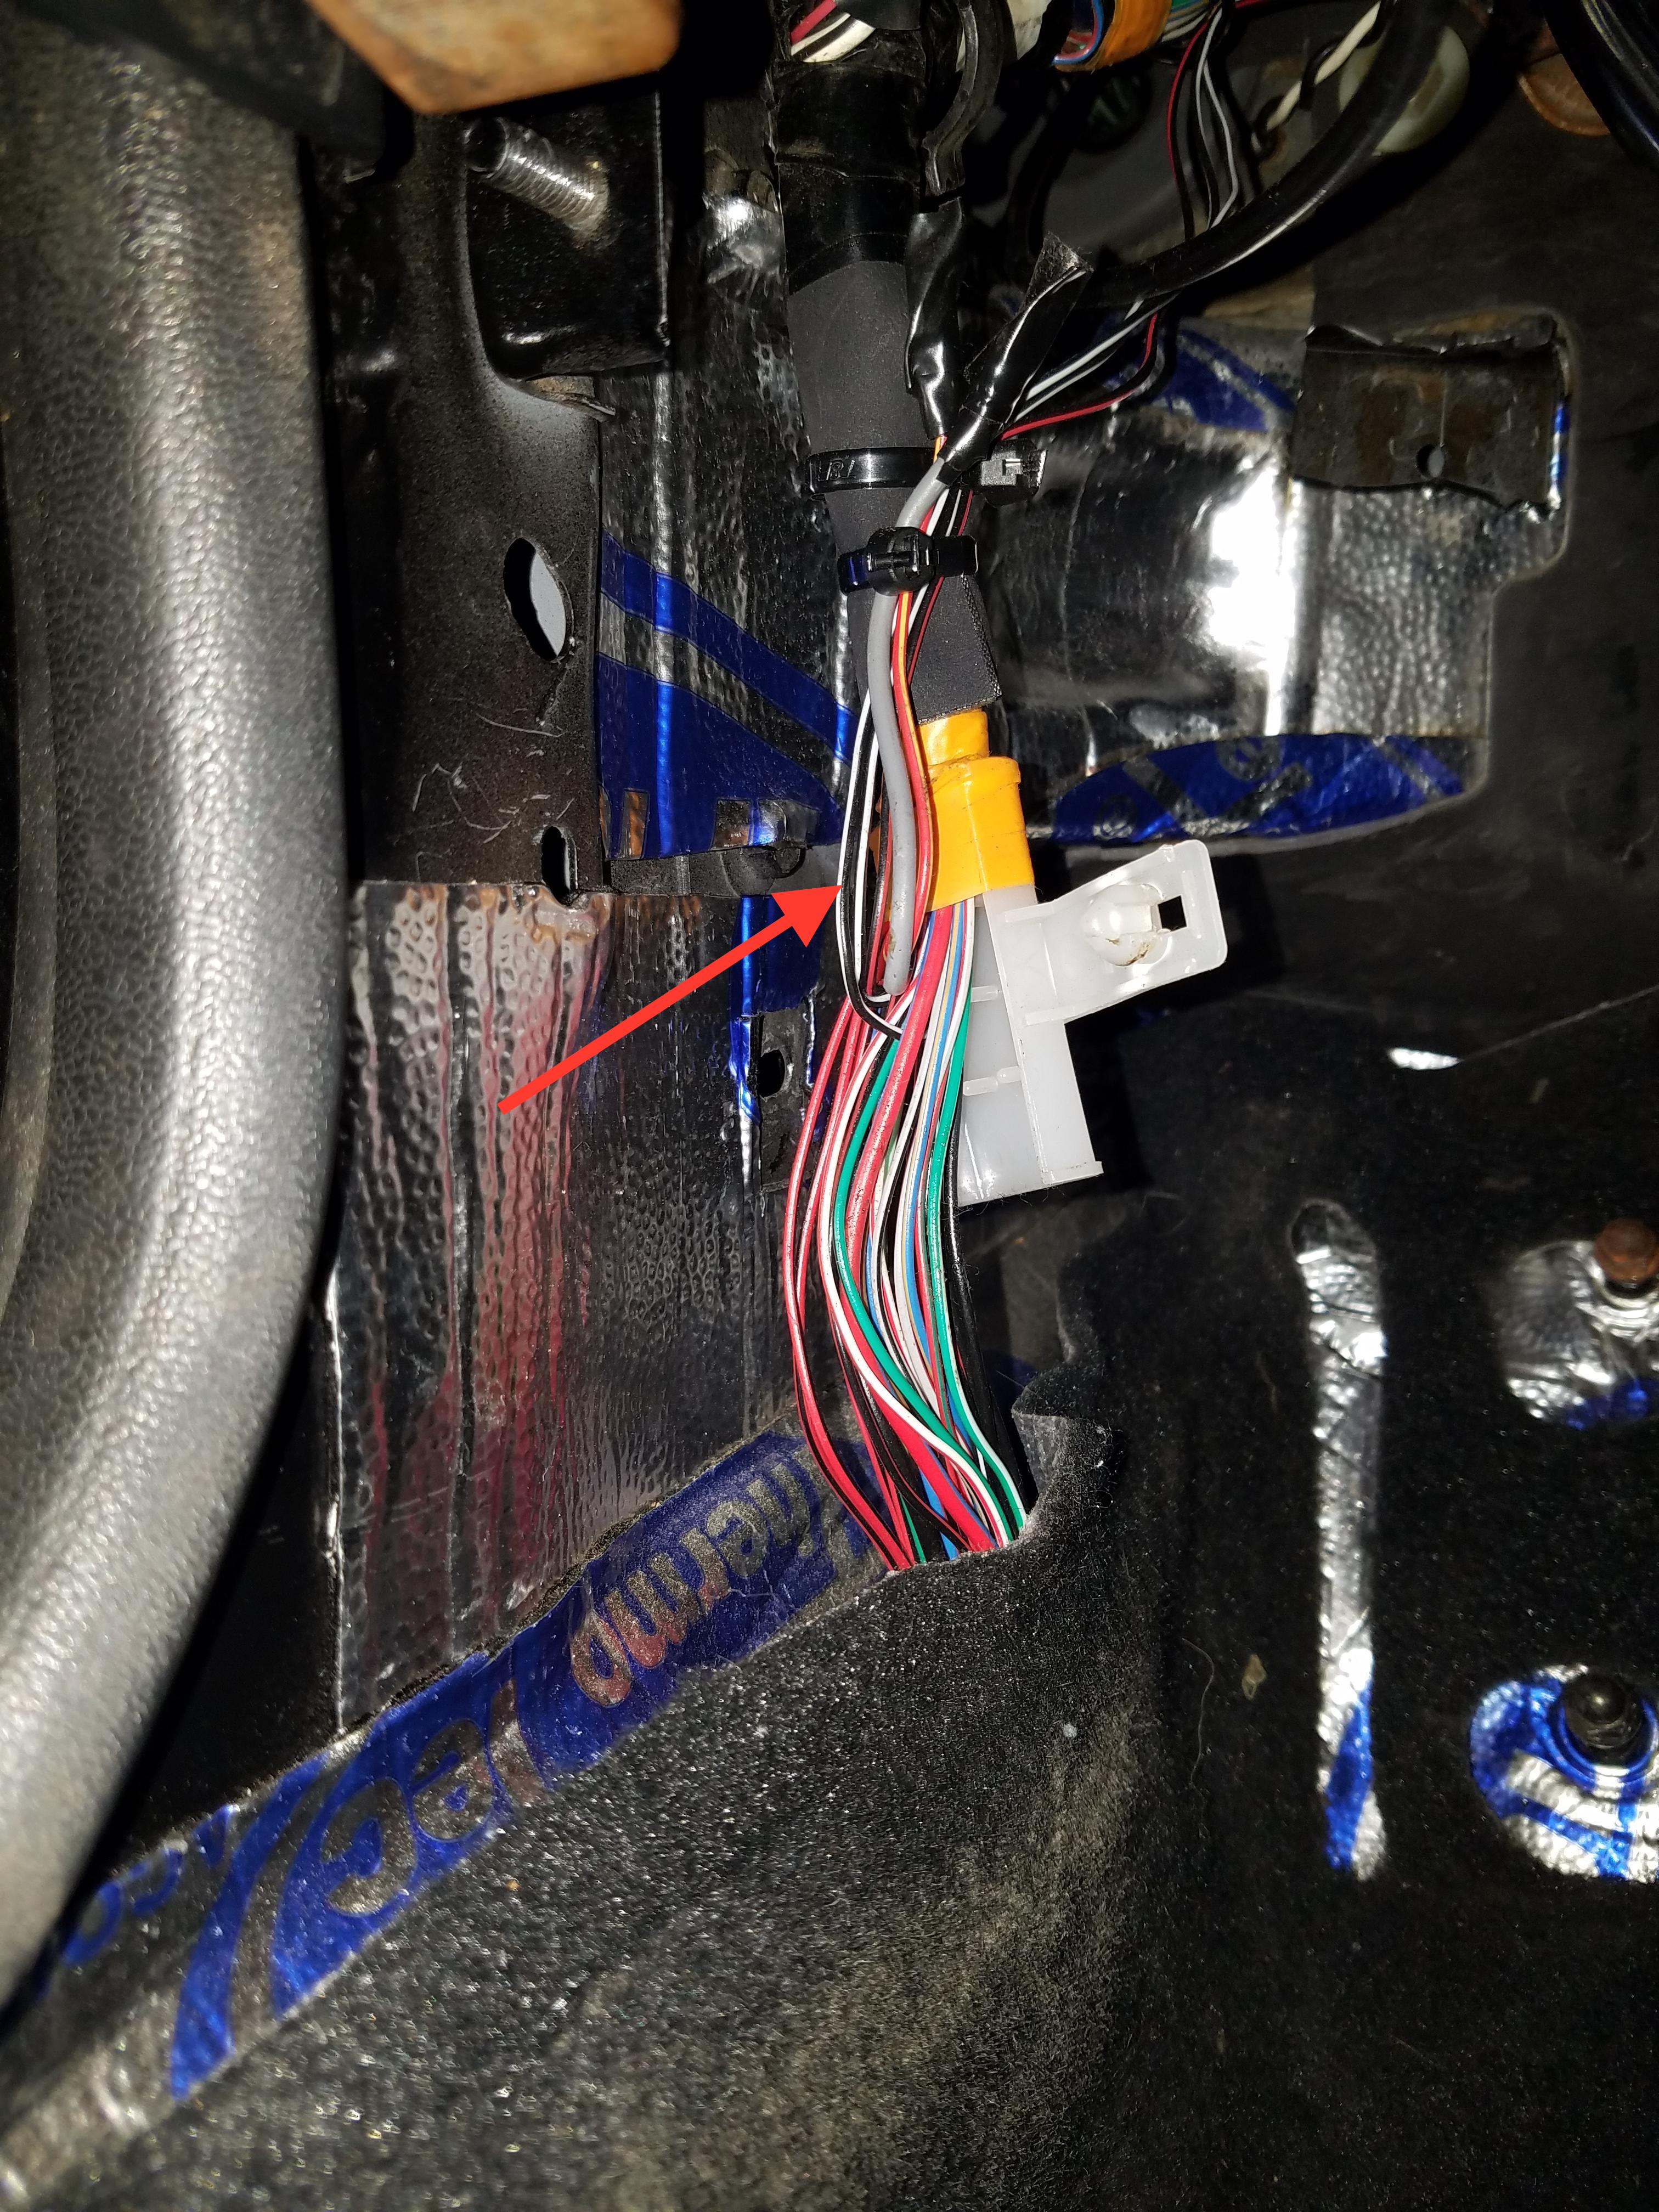
These two black/white wires near the driver’s left foot can be used to power both front sensors using existing powered/fused wiring.
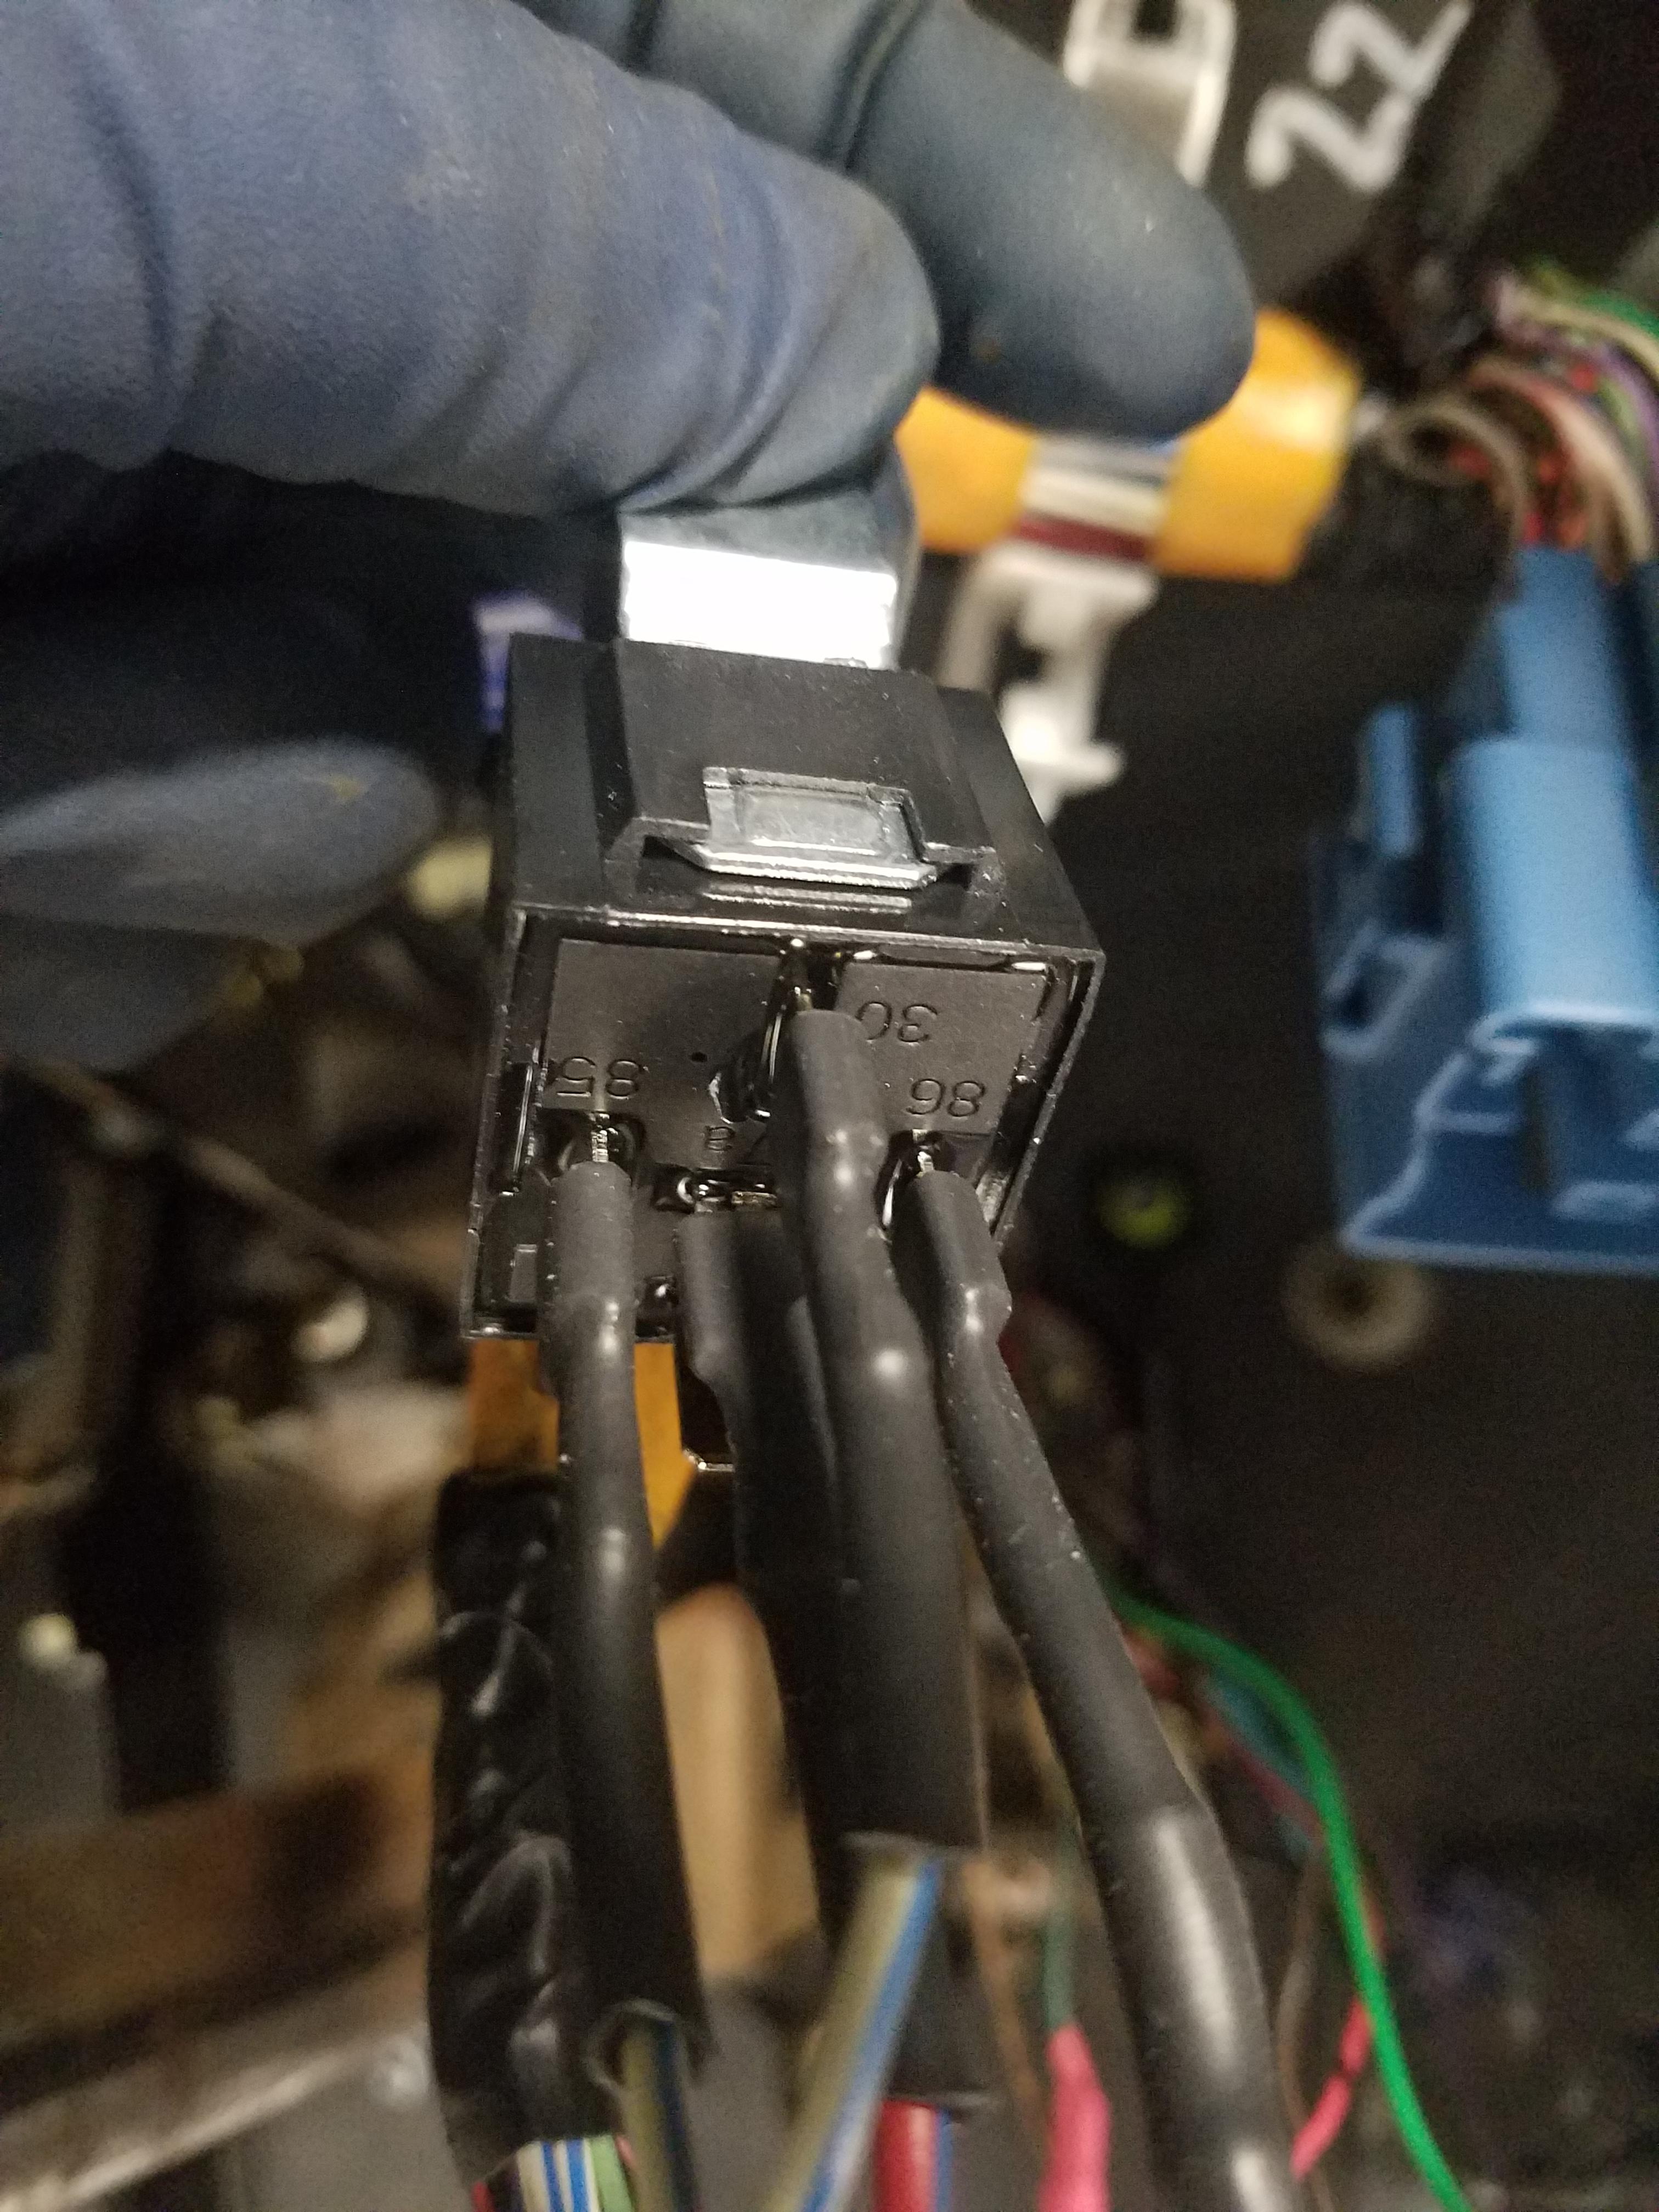
Fuel Pump Relay:
Unfortunately the small welding fire I had early in the build took out the fuel pump relay and some other relays. Since the Miata relay is a $60 piece, I decided against replacing it and reusing it for the build - which I think would be totally acceptable if you do. I used a new relay I had bought for the build and just depinned the spade terminals from the connector and put heat shrink wrap around the bare metal connections.
The LS1 PCM has a Green wire that goes to position 85 on the relay to trigger the power to the fuel pump. The fuel pump is fed power by the Red/Green 10 gauge wire that runs from the relay along the driver’s side frame rail and to the tank through a large white connector behind the driver.
Far as I can tell, none of this needs to be touched. Maybe a super duper fuel pump or dual pumps or whatever might demand some beefier wiring. You just need to swap the Miata relay trigger wire (lime green) with the LS trigger wire (green).
If your ECU is connected and powered up, you should see 12 volts at the green trigger wire when the key is turned to on (not start or run). Run your green wire to the relay location which comes off the main wire bundle inside the car underneath the windshield.
Here is a diagram from the FSM for my car showing the relay and wiring and where to tie in the PCM wire.
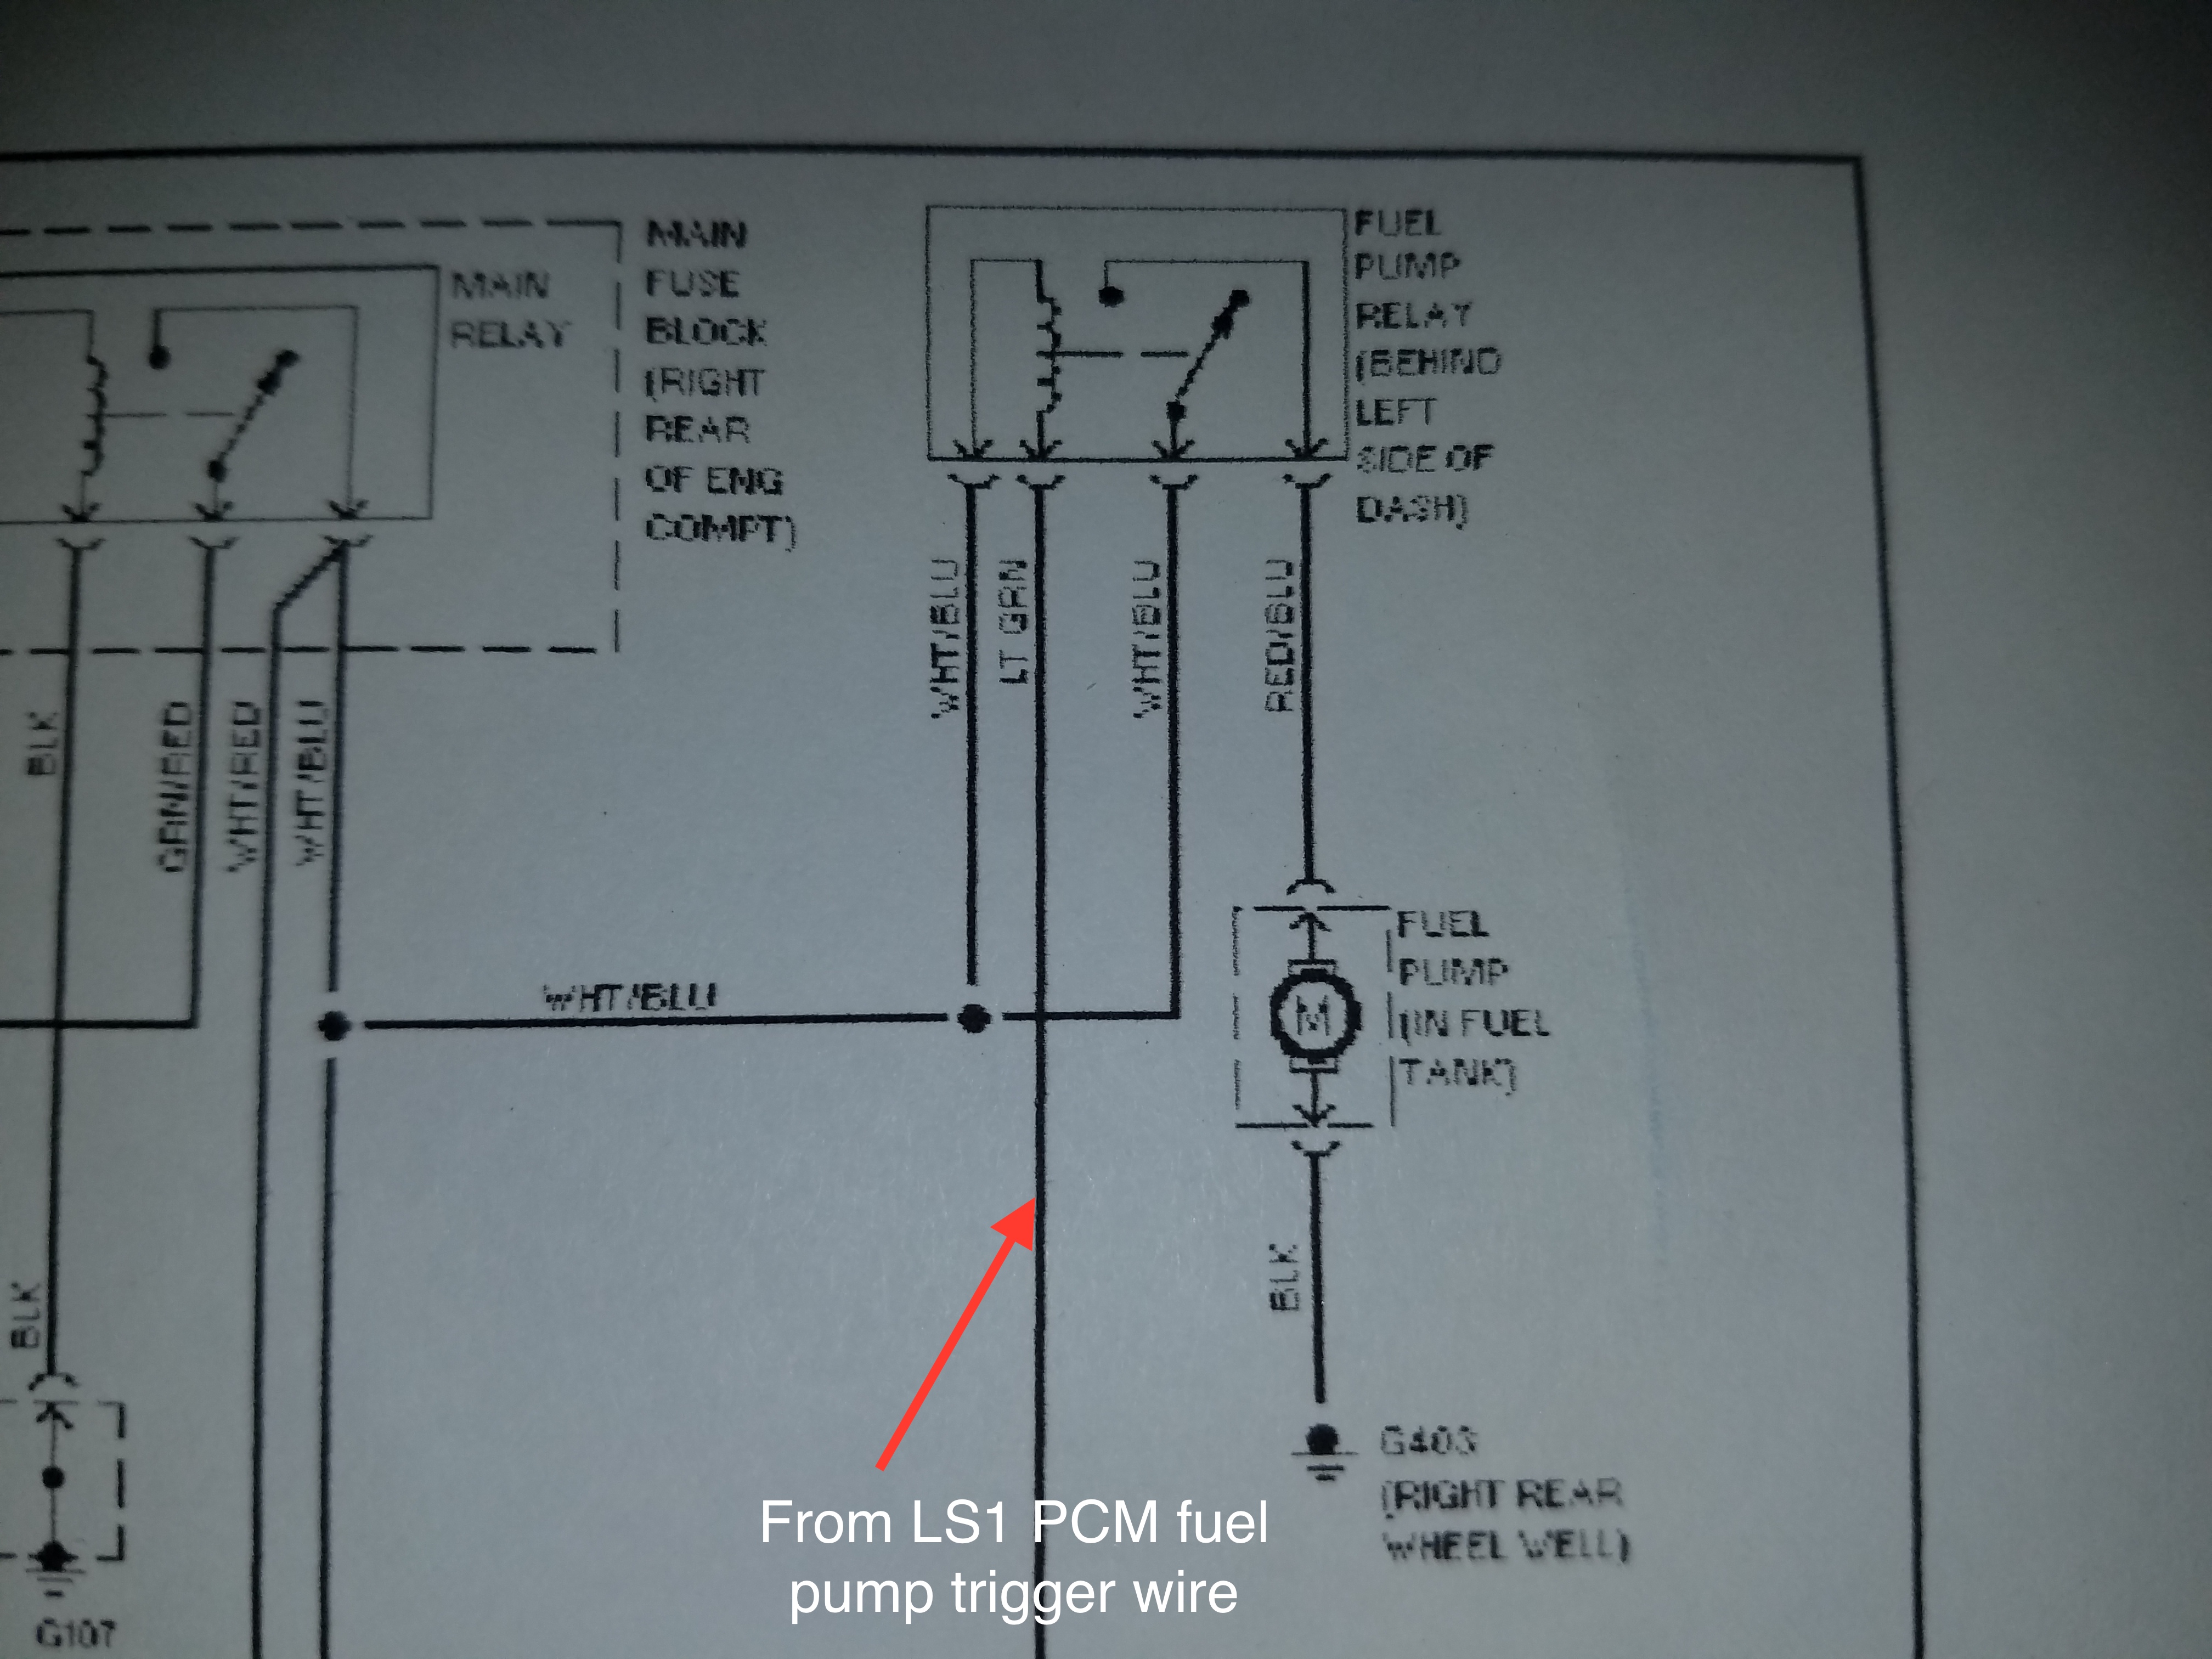
The White/Blue thicker wires provide 12v power during key ON. The Light green wire is the relay “trigger” wire for the Miata. The Red/Blue wire sends power to the fuel pump when the relay is triggered. Cut the lime green Miata wire on the relay terminal and tape the wire back as this won’t be needed. Reuse the spade terminal with a couple inches of wire and use a good crimp connector to connect the green LS wire to the terminal.
When you turn the key to the first position, you should hear the pump kick on and cycle. Make sure your fuel connections are tight before you do this or you’ll have a fuel mess. If you don’t, check fuses and for power at the relay connection, and power at the fuel tank connection (red/blue wire).
I lost my relay in the small welding fire so I just replaced it with a standard relay rated for the same power
OBD port:
See my earlier post for how I hooked up the OBD port
https://www.v8miata.net/general-moto...ge6/#post22843
The large thick wire (8 gauge?) goes from the main lug of the alternator directly to the positive battery terminal.
The small harness connector on the top of the alternator has a single red wire (single wire on my 98 LS1, might be more than one wire on other engines) that needs a 5v constant input that energizes the alternator and makes it charger battery. On some later LS engines, the signal comes from a pin on the PCM. Since my car doesn't have this PCM signal or a 5v source, I found someone that referenced this part 'Axxess Interface AFDI-5V Ford 12V to 5V Step Down' doing the job . I wired it in and now the alternator charges the system. Per the Flyin Miata instructions this red wire can also be wired to the alternator light on the Miata dash so you will get a warning if there is a charging problem. My question is whether this will work on my engine, since the alternator signal doesn't come from the PCM as on other LS engines.
Radiator Fans:
The oem Miata fans are dual fans, one is engine cooling and one is for the A/C condenser. They run off a 30A circuit/fuse at the main fuse box, so the wiring should be able to handle it. Each of the Spal slim fans I got from Flyin Miata are rated for less than 15A each. https://webstore.spalusa.com/content...01522_SPEC.pdf So the same 30A capacity from the main fuse box (labelled FAN) should be sufficient.
I used the PCM fan relay trigger wires instead of the Miata wires. The wires coming from the Miata PCM shown with arrows in the pic below would be the two you are looking for. Just snip these off at each relay and connect the PCM fan trigger wires to them. This is all I had to do.
O2 Sensors:
One thing I didn’t see mentioned at all in other guides was how to power the O2 sensors. This should be straight forward as you can use the existing harness connectors. The two O2 signal wires will already route back to the PCM. The pink wire will need to run to a switched hot wire for sensor power and black can run to a ground connection.
These two black/white wires near the driver’s left foot can be used to power both front sensors using existing powered/fused wiring.
Fuel Pump Relay:
Unfortunately the small welding fire I had early in the build took out the fuel pump relay and some other relays. Since the Miata relay is a $60 piece, I decided against replacing it and reusing it for the build - which I think would be totally acceptable if you do. I used a new relay I had bought for the build and just depinned the spade terminals from the connector and put heat shrink wrap around the bare metal connections.
The LS1 PCM has a Green wire that goes to position 85 on the relay to trigger the power to the fuel pump. The fuel pump is fed power by the Red/Green 10 gauge wire that runs from the relay along the driver’s side frame rail and to the tank through a large white connector behind the driver.
Far as I can tell, none of this needs to be touched. Maybe a super duper fuel pump or dual pumps or whatever might demand some beefier wiring. You just need to swap the Miata relay trigger wire (lime green) with the LS trigger wire (green).
If your ECU is connected and powered up, you should see 12 volts at the green trigger wire when the key is turned to on (not start or run). Run your green wire to the relay location which comes off the main wire bundle inside the car underneath the windshield.
Here is a diagram from the FSM for my car showing the relay and wiring and where to tie in the PCM wire.
The White/Blue thicker wires provide 12v power during key ON. The Light green wire is the relay “trigger” wire for the Miata. The Red/Blue wire sends power to the fuel pump when the relay is triggered. Cut the lime green Miata wire on the relay terminal and tape the wire back as this won’t be needed. Reuse the spade terminal with a couple inches of wire and use a good crimp connector to connect the green LS wire to the terminal.
When you turn the key to the first position, you should hear the pump kick on and cycle. Make sure your fuel connections are tight before you do this or you’ll have a fuel mess. If you don’t, check fuses and for power at the relay connection, and power at the fuel tank connection (red/blue wire).
I lost my relay in the small welding fire so I just replaced it with a standard relay rated for the same power
OBD port:
See my earlier post for how I hooked up the OBD port
https://www.v8miata.net/general-moto...ge6/#post22843
Last edited by pj_mcgarvey; 08-09-2017 at 08:22 PM.
 03-28-2017, 09:21 PM
#152
V8 Miata Fan

Perfect, just what i am looking for. Although the na has slightly different wiring for the fuel pump, it also has a violet wire from the pcm. I think I will just wire up a relay like you did.
Great write ups and pictures.
I have a 2000 ecu do you know which pin has the reverse lock out on it?
Great write ups and pictures.
I have a 2000 ecu do you know which pin has the reverse lock out on it?
03-28-2017, 09:48 PM
#153
V8 Miata Enthusiast
Thread Starter
That said I don't know which pin it is.
03-29-2017, 05:36 PM
#154

https://www.hptuners.com/forum/showt...der-tachometer
The following users liked this post:
BGordon (04-02-2017)
03-29-2017, 07:24 PM
#155
V8 Miata Enthusiast
Thread Starter
yep, well it's a good thing my PCM programmer (Brendan @ LT1Swap.com) got back to me about that very thing when I emailed him about two weeks ago...
oh wait! He didn't email me back. LOL

oh wait! He didn't email me back. LOL
04-03-2017, 09:19 PM
#157
V8 Miata Enthusiast
Thread Starter
Installed the longer springs, which add about 3" of length.
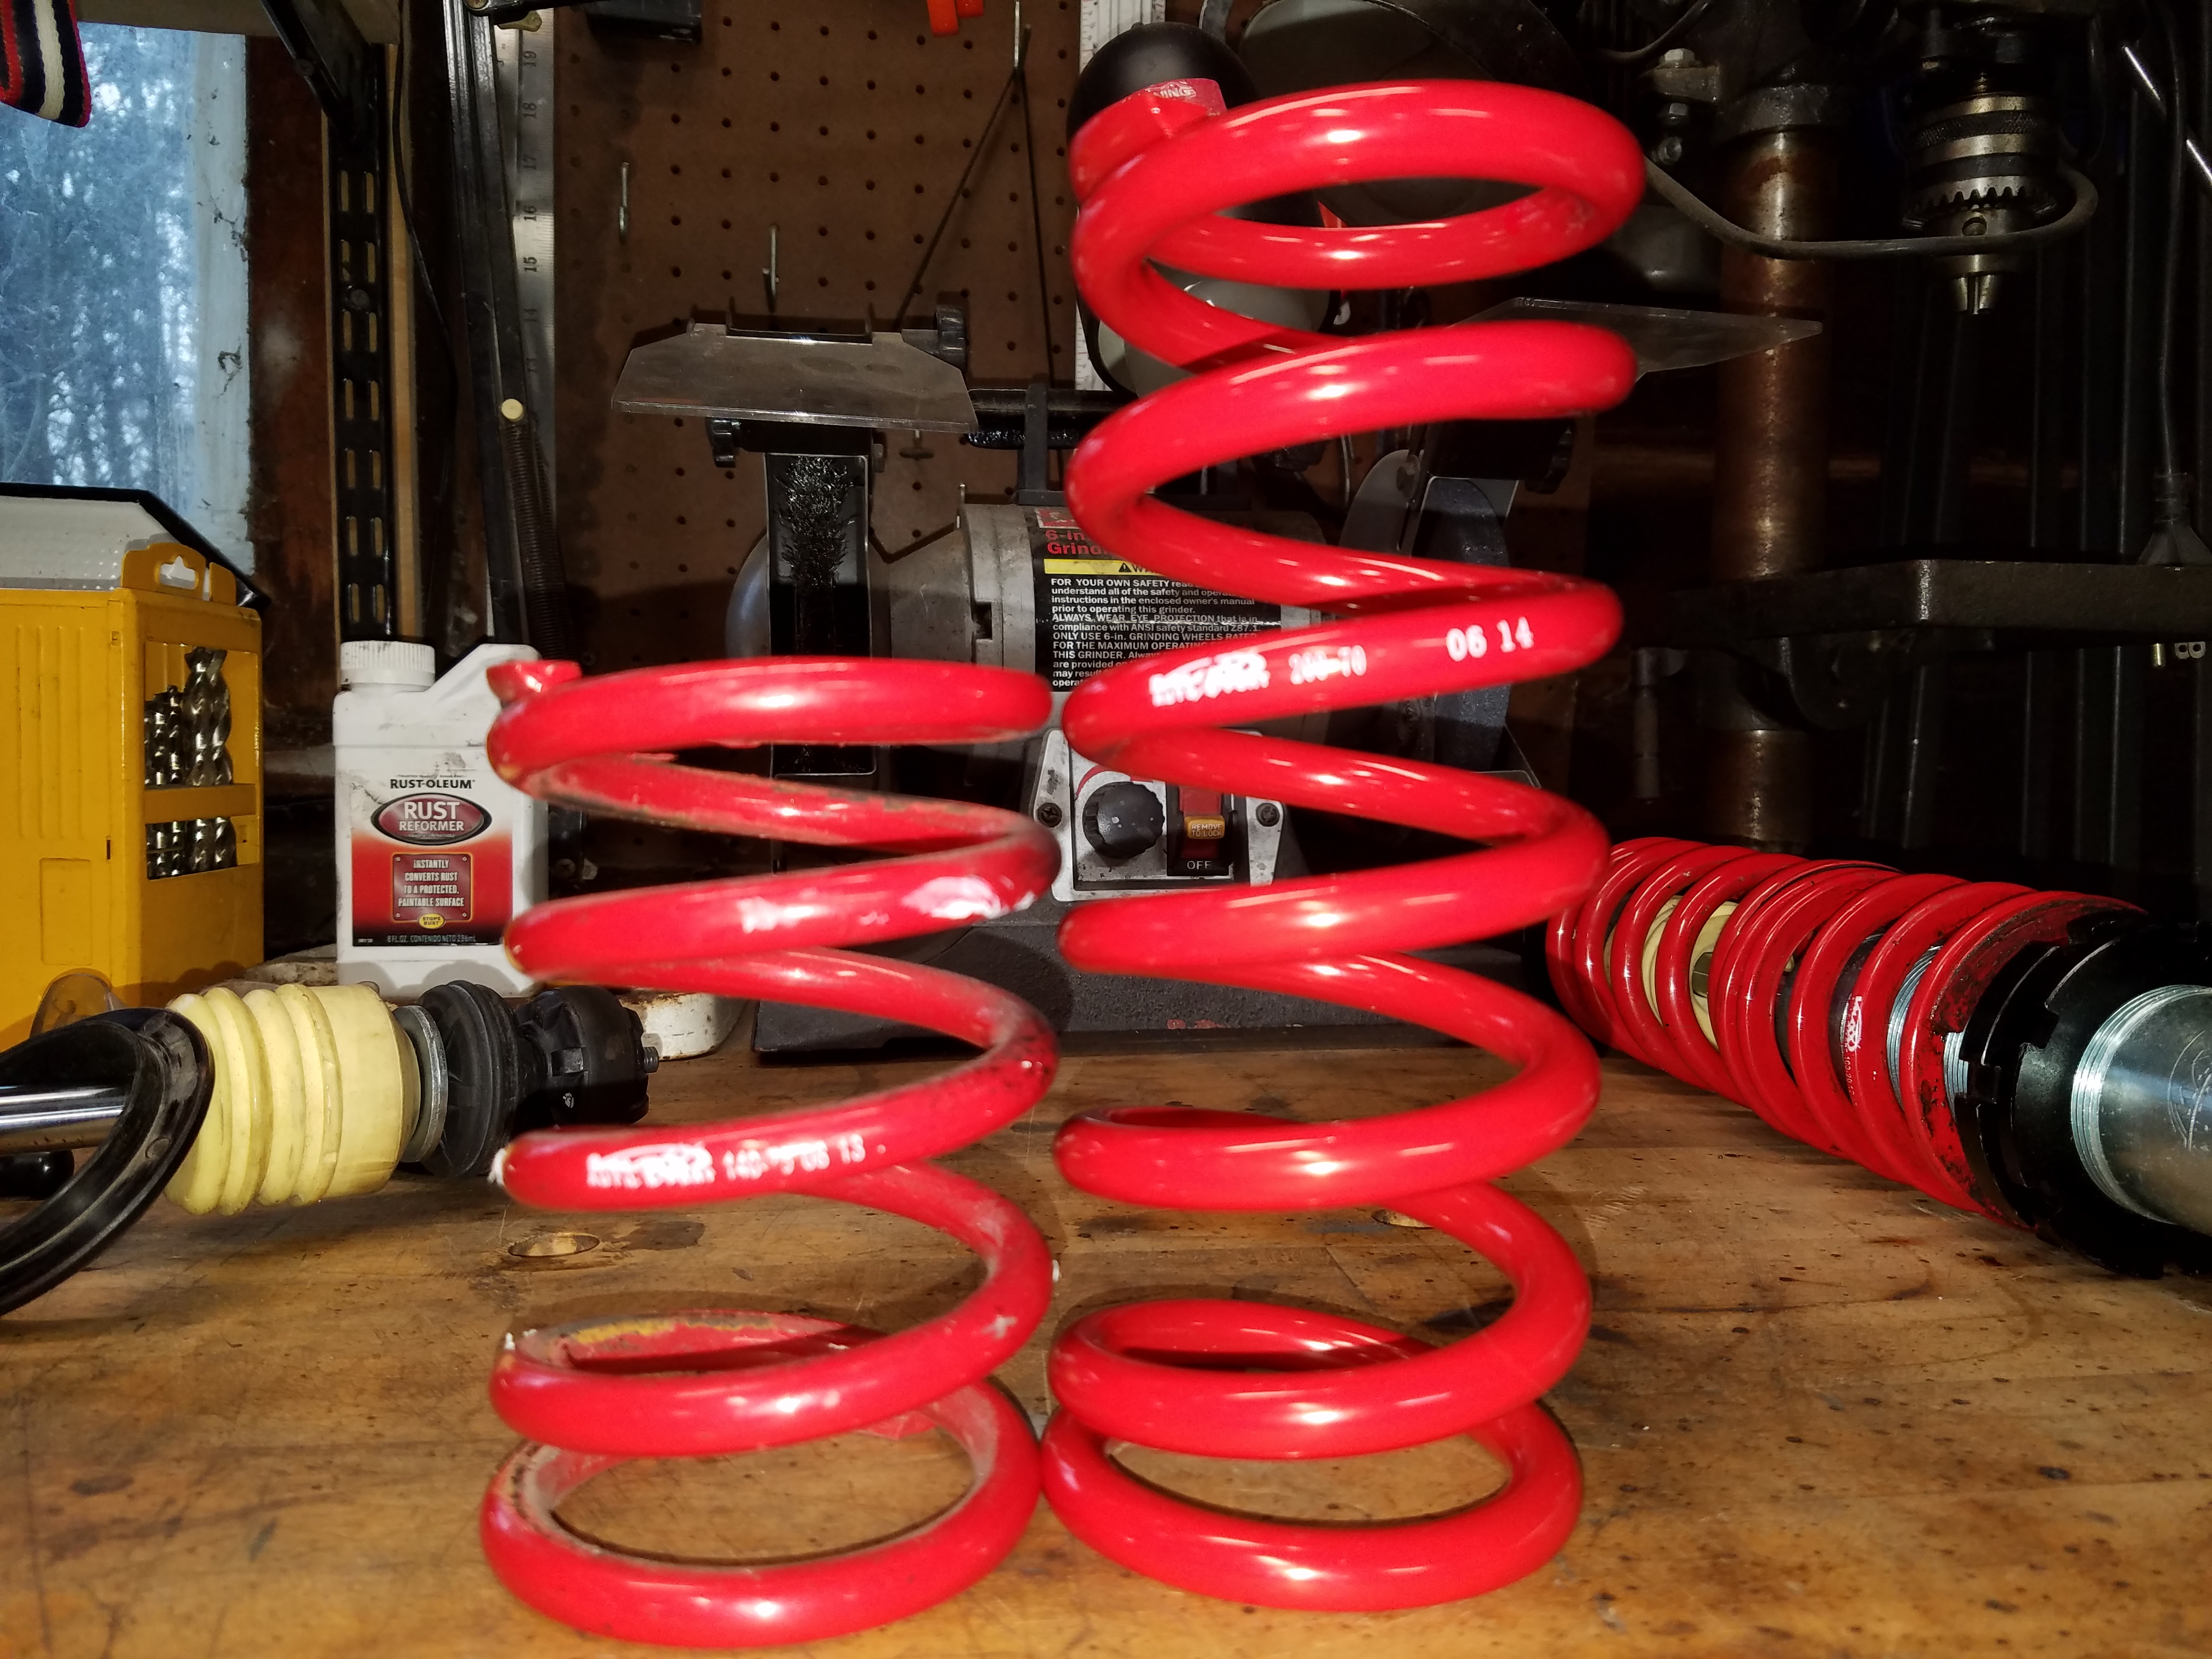
Comparing the shorter springs from each side, I could see there was about 1/4" of sagging on one of the springs.
Set my ride height to something that looked appropriate front to back, going for slightly more (1/4") in the back. Ride height from the bottom of the pinch welds was about 5-3/8" in the front and 5-1/2" in the back.
The exhaust system hangs down a bit lower than I'd like from about the middle of the car to the back, so I want to be conscious of not dragging on the ground over speed bumps, road dips, driveways, etc.
With the manual tensioner I was able to move back to the oem thermostat housing rotated towards the radiator. So I don't think I'll have a use for the adjustable thermostat housing - in case anyone is interested.
CTS-V Turn One power steering pump is installed and seems to be working great. https://www.turnone-steering.com/col...lac-cts-v-pump
Found a nice set of instructions on installation, including the bolt sizes I needed to install it
https://www.chevrolet.com/content/da...m-19155066.pdf
I needed to purchase a reservoir, bracket and short hose. The mounting brackets are not sold anymore new, but ebay had a great deal on one that looks very much new.
21997868 - Reservoir Hose - $12.47
21997866 - Reservoir - $49.12 (includes cap)
Since Turn One rebuilds the pump and removes the metal tube that takes fluid from the reservoir and into the pump, they can't reinstall it exactly as it was (they warned me of this). I could either rotate the pressed-in metal tube and risk creating a leak, or realign the reservoir - which I did.
I had to basically use longer bolts to space the reservoir away from the pump until the plastic outlet on the reservoir lined up with the tube on the pump.
I had some issues early with bleeding out the air from the pump, it was making alot of noise, and the fluid was foaming up. I turned the wheel back and forth a few times with the engine running, but eventually left it overnight and the next day it was ok, no noise or air in the lines.
04-03-2017, 10:01 PM
#158
V8 Miata Enthusiast
Thread Starter
After reinstalling the tstat and draining the coolant, I still had issues getting all the coolant back into the engine, that I took out of it, maybe 1/2 gallon worth. Hmm. After having the tried some other methods, I tried backfilling the engine through the steam port. It was slow filling but it took all of the remaining coolant I had drained out, and there didn't see to be any issues as the engine warmed up.
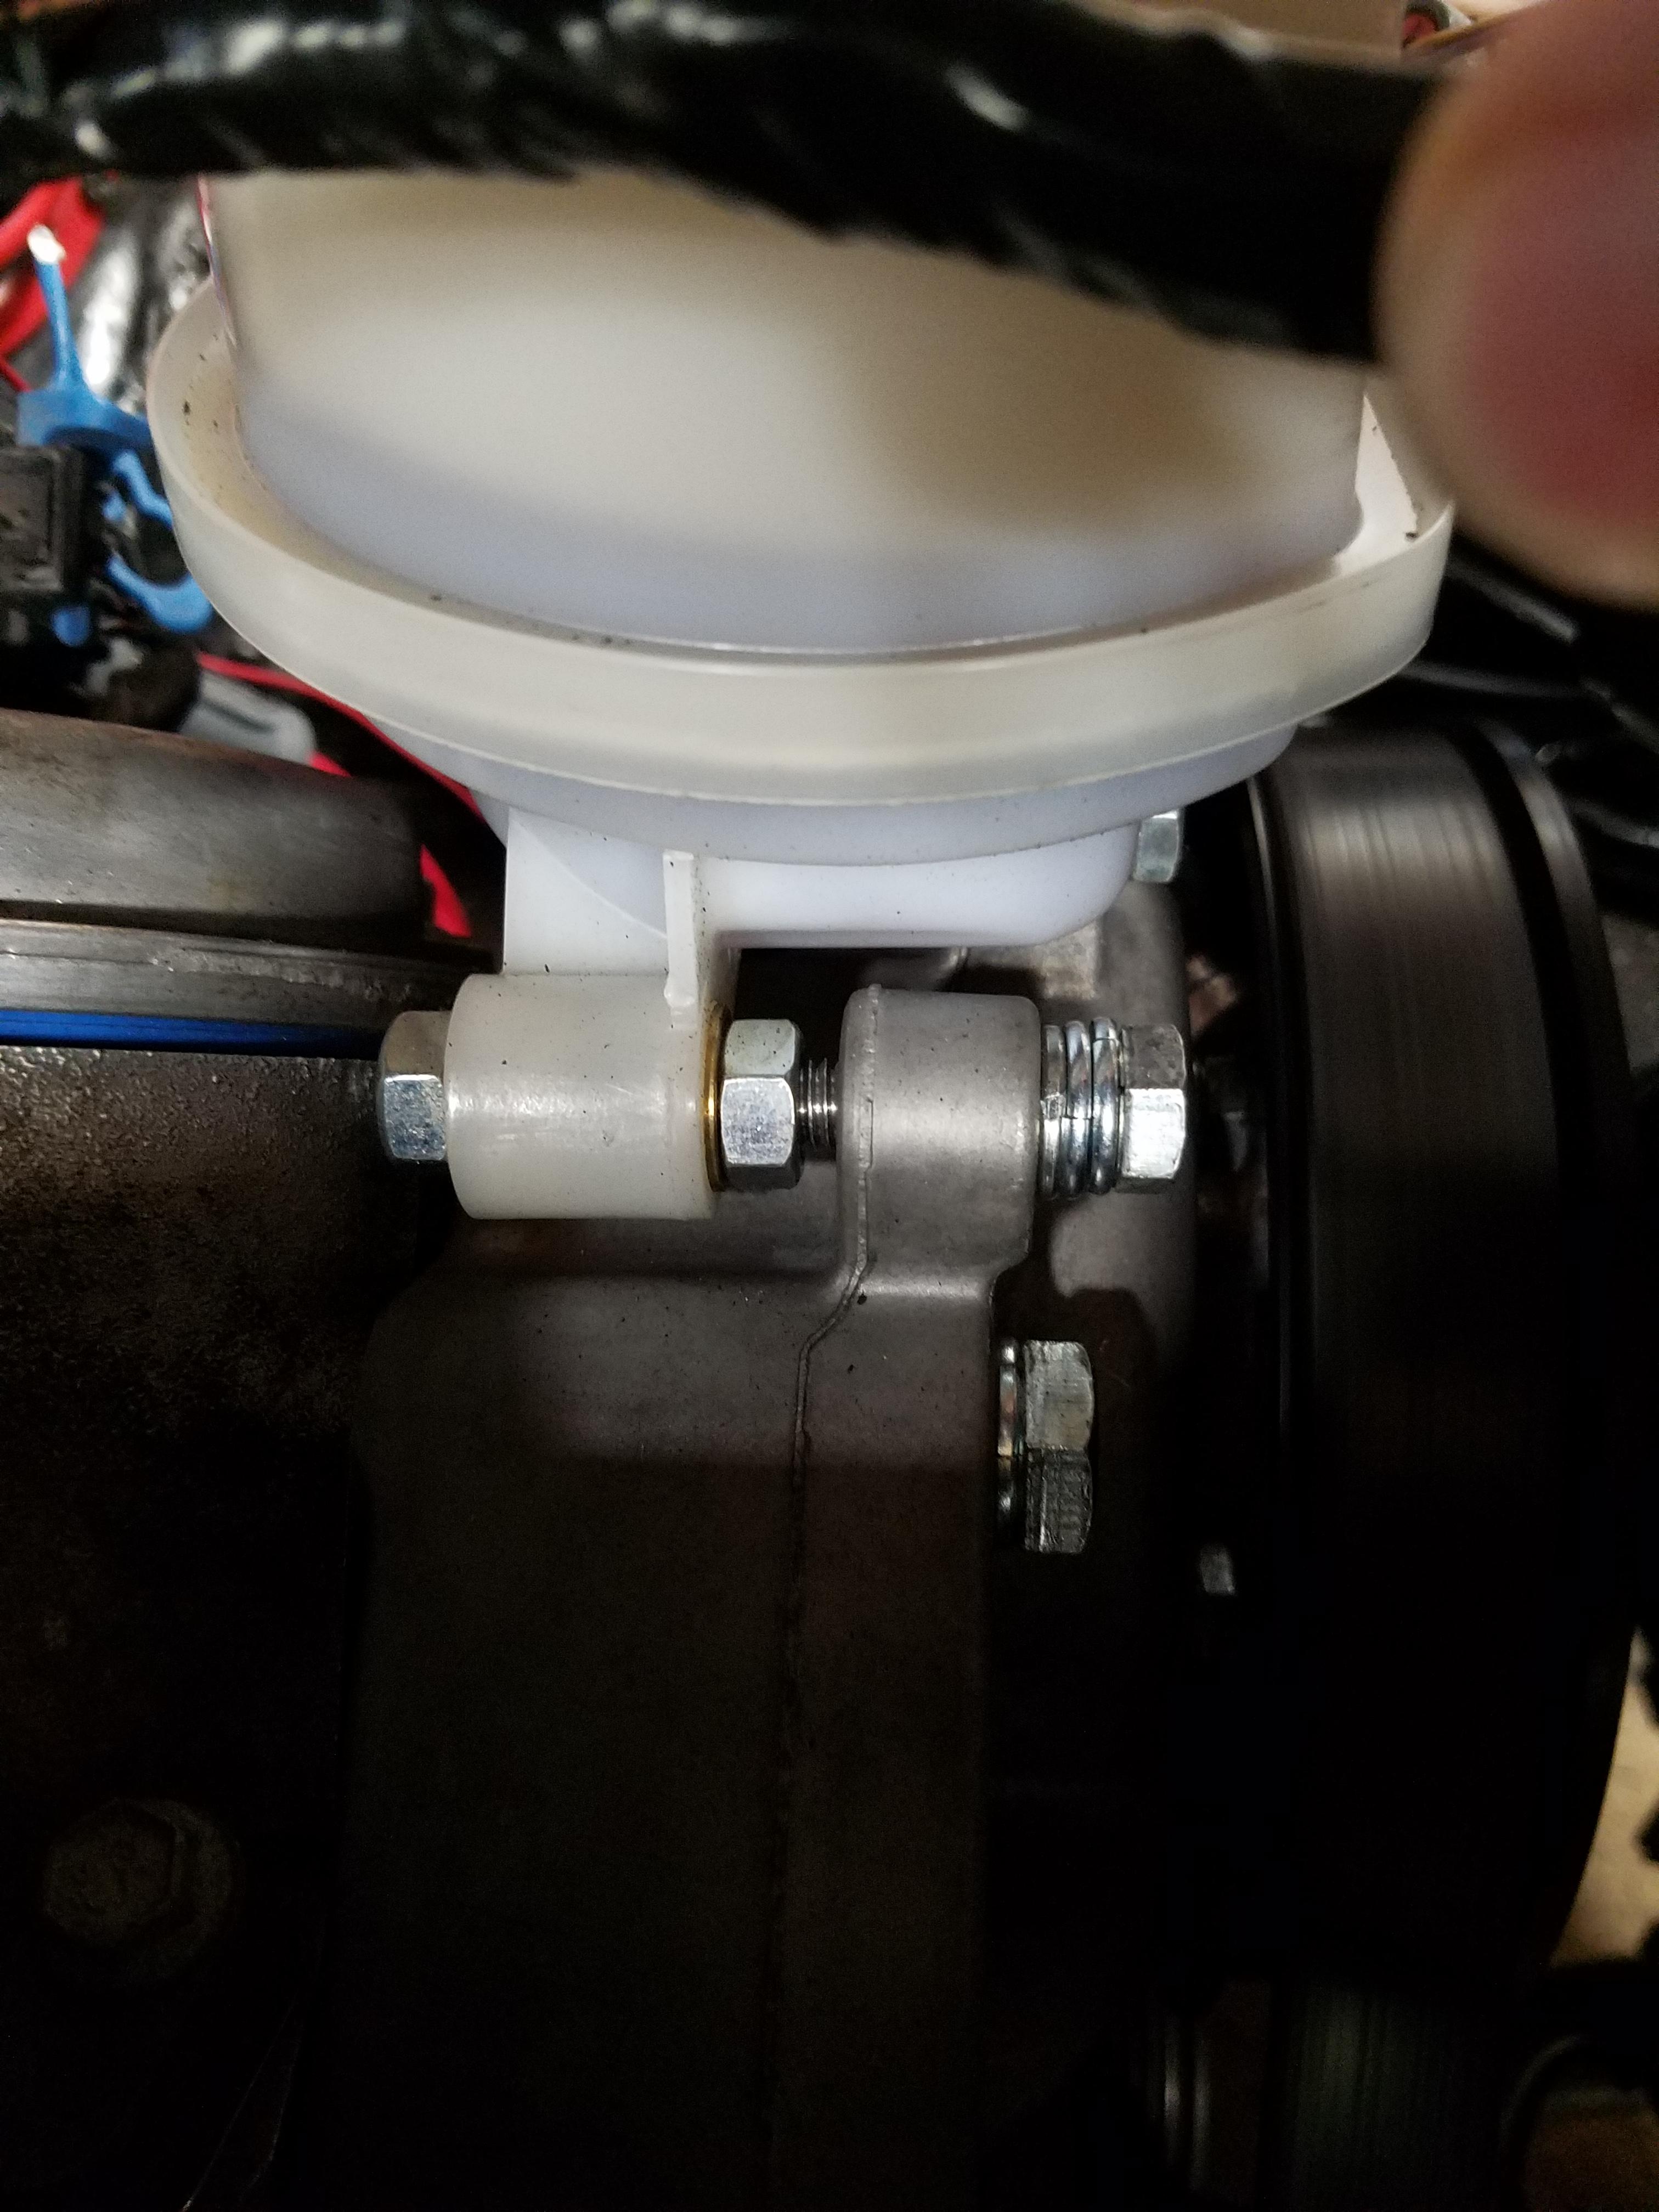
I also had to look into the belt jumping a tooth issue. With the new ps pump installed, all the pulleys lined up except for the alternator. If you recall I reused the FBody alternator (the only accessory left from the original engine) and the relocation bracket from ICT Billet LS Corvette - Billet Alternator Bracket Low Mount - Brackets - LS
Turns out the alternator pulley was about 1/8" further from the engine that the other pulleys. As the belt from the alternator pulley feeds into the crank pulley, and the width between two v-belt grooves is about 1/8", I decided this must be the reason. I shortened the aluminum mounting standoffs by 1/8" and reinstalled. I've had no problems with the belt jumping since then.
At this point I thought I was ready for a test drive. Everything seemed to go fine, clutch, transmission, etc. was all working great, but the car was VERY loud in the cabin, somewhere between a droning or booming sound at around 2000 rpm - I'm assuming from the exhaust. I didn't get much over 4000. I'm really hoping this will not be the character of the car or else something will need to be done. I don't really want to add more mufflers or redo the exhaust. The car seemed very drivable off idle, but also didn't seem to be making any power as it got up into the revs. I also noticed some hesitation when on/off the throttle but I was keeping it conservative. So back to the drawing board - I left it for the next day.
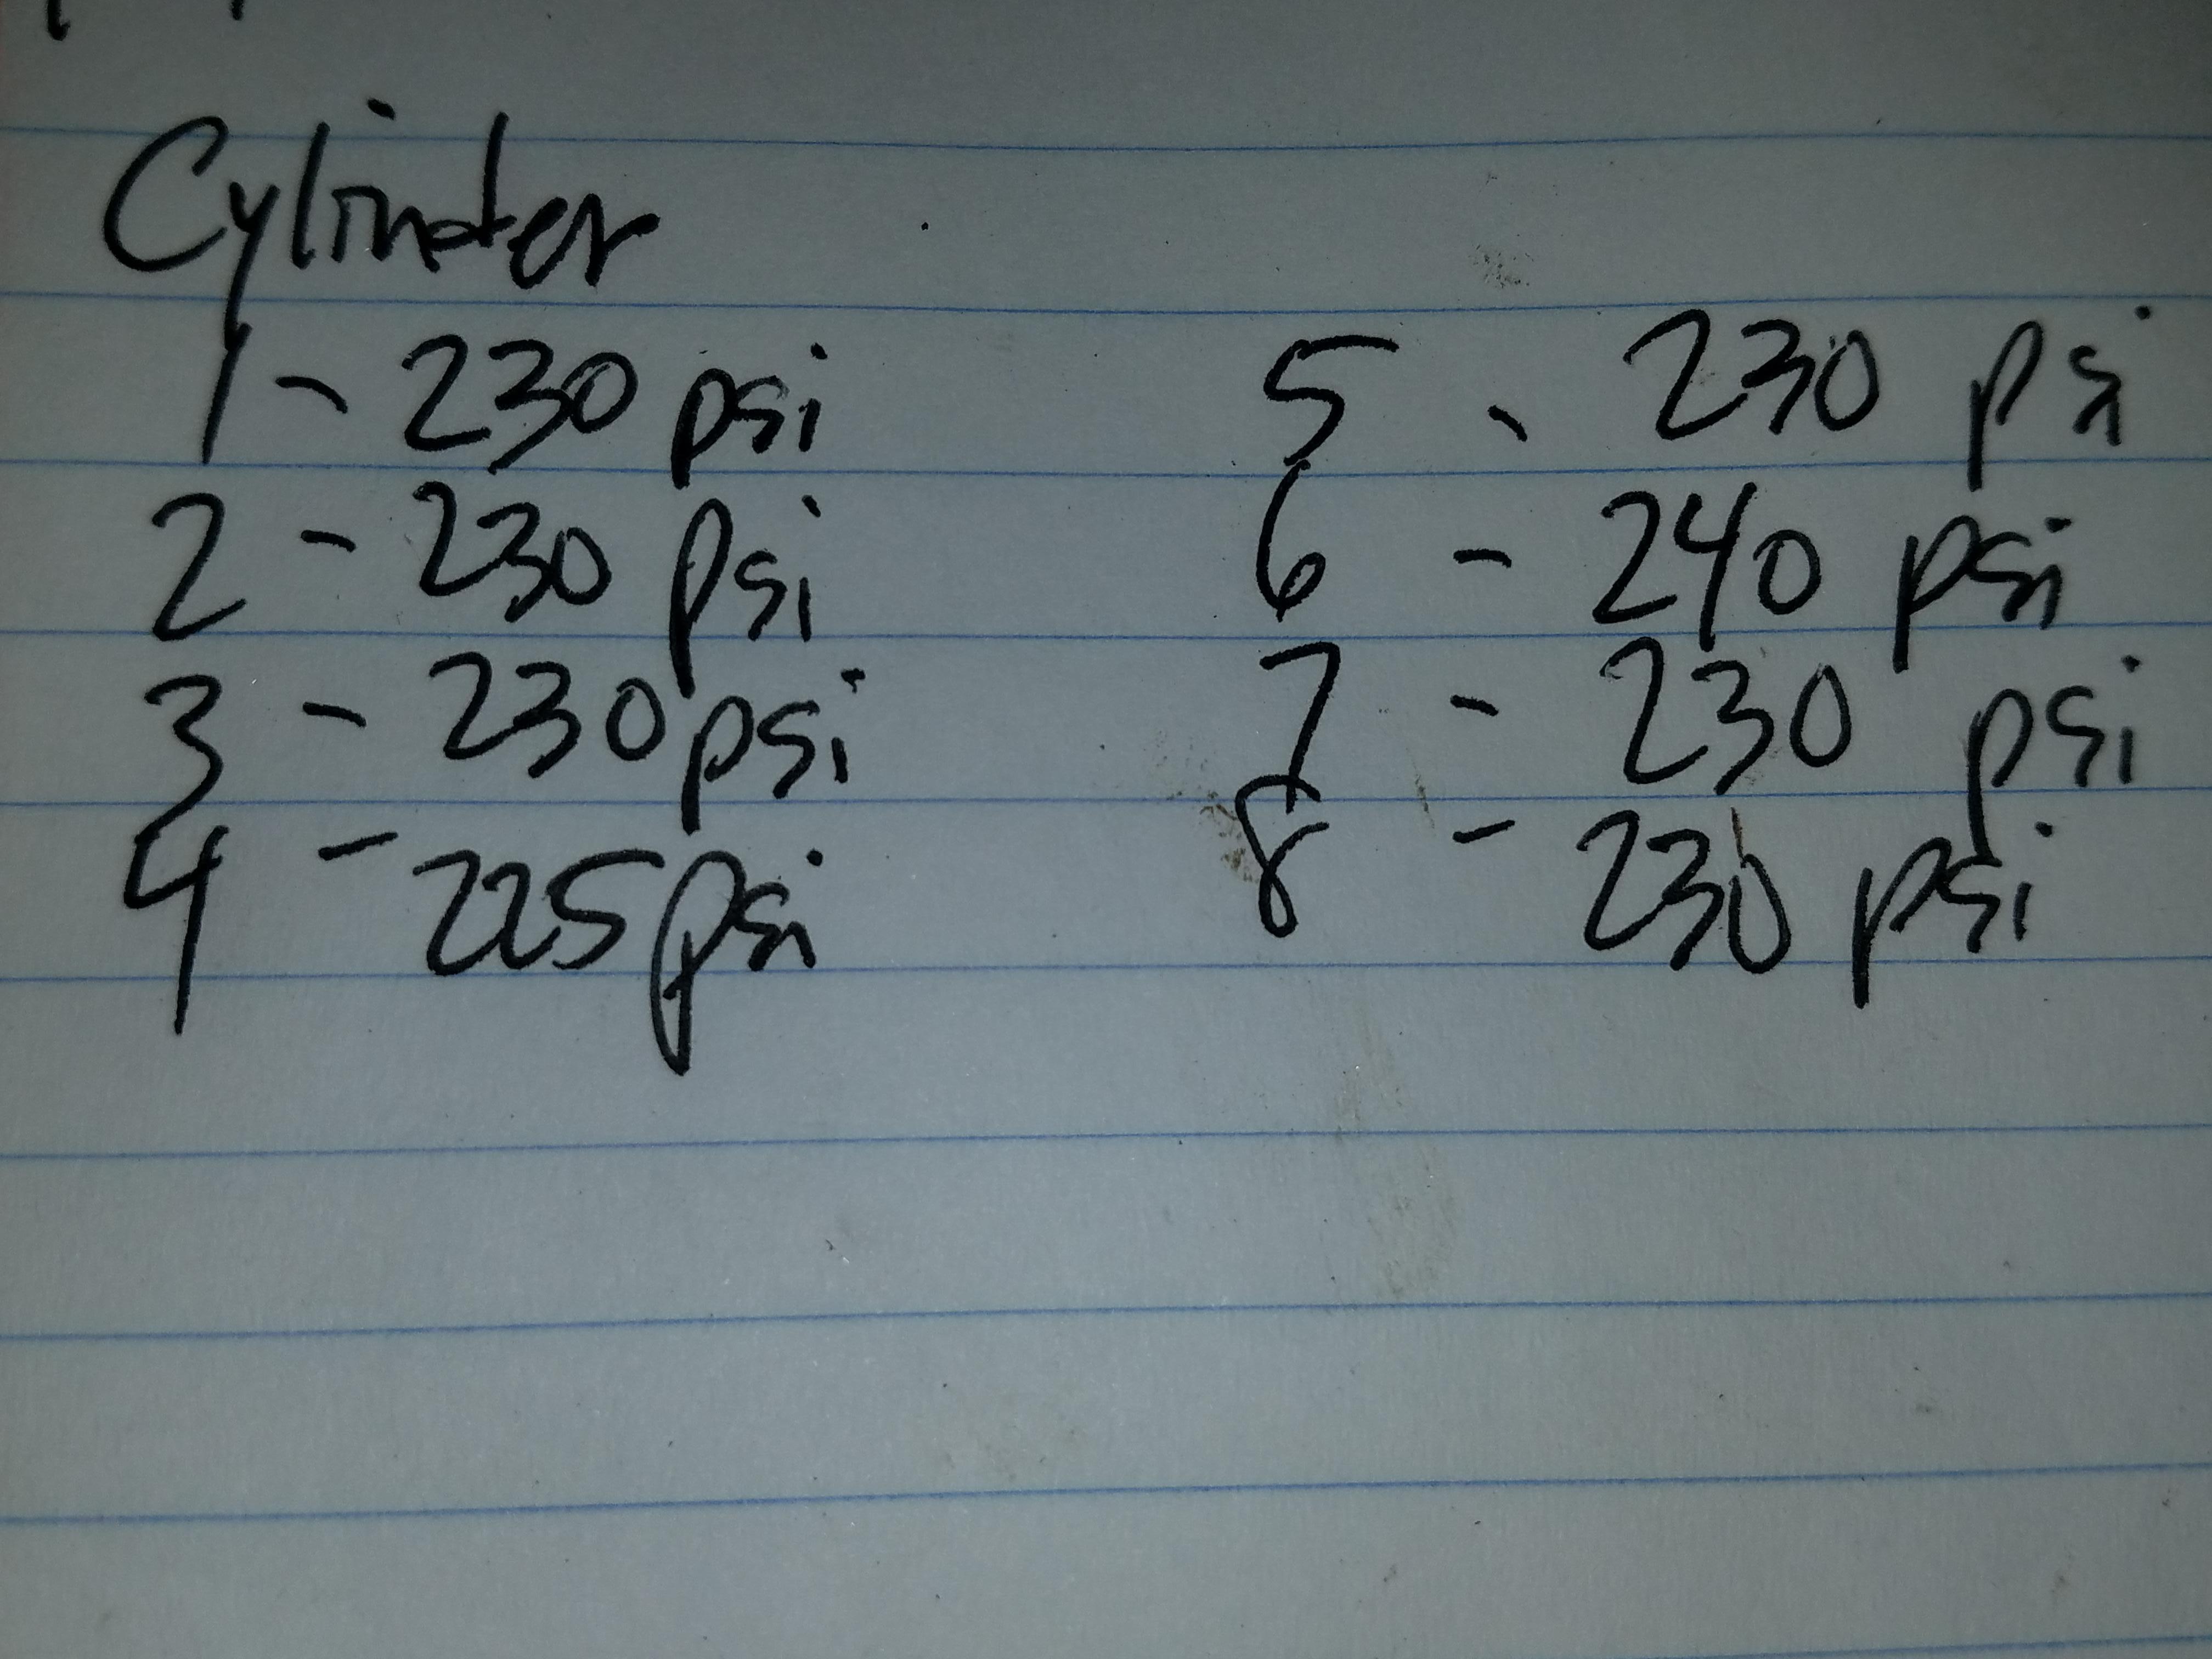
Tonight I decided to pull the plugs and do a compression test. I have some very good news to report that the engine seems to be very healthy with excellent compression numbers across all cylinders. Well that's encouraging.
All the plugs looked good, but after some reading decided to re-gap them from 0.055" to 0.045". I also think the #7 spark plug wire was not seated very well. I reinstalled and started the engine and it seemed to run fine at idle. I will be taking a look at the MAF sensor next, do a cleaning on it (again) and see if there are any tests I can run against it. I will try to do some OBD logging as well on my next test drive. I also only have a few gallons of low octane gas so will try to do a fillup with 93 in case it doesn't like the 89 I have in it now.
I also had to look into the belt jumping a tooth issue. With the new ps pump installed, all the pulleys lined up except for the alternator. If you recall I reused the FBody alternator (the only accessory left from the original engine) and the relocation bracket from ICT Billet LS Corvette - Billet Alternator Bracket Low Mount - Brackets - LS
Turns out the alternator pulley was about 1/8" further from the engine that the other pulleys. As the belt from the alternator pulley feeds into the crank pulley, and the width between two v-belt grooves is about 1/8", I decided this must be the reason. I shortened the aluminum mounting standoffs by 1/8" and reinstalled. I've had no problems with the belt jumping since then.
At this point I thought I was ready for a test drive. Everything seemed to go fine, clutch, transmission, etc. was all working great, but the car was VERY loud in the cabin, somewhere between a droning or booming sound at around 2000 rpm - I'm assuming from the exhaust. I didn't get much over 4000. I'm really hoping this will not be the character of the car or else something will need to be done. I don't really want to add more mufflers or redo the exhaust. The car seemed very drivable off idle, but also didn't seem to be making any power as it got up into the revs. I also noticed some hesitation when on/off the throttle but I was keeping it conservative. So back to the drawing board - I left it for the next day.
Tonight I decided to pull the plugs and do a compression test. I have some very good news to report that the engine seems to be very healthy with excellent compression numbers across all cylinders. Well that's encouraging.
All the plugs looked good, but after some reading decided to re-gap them from 0.055" to 0.045". I also think the #7 spark plug wire was not seated very well. I reinstalled and started the engine and it seemed to run fine at idle. I will be taking a look at the MAF sensor next, do a cleaning on it (again) and see if there are any tests I can run against it. I will try to do some OBD logging as well on my next test drive. I also only have a few gallons of low octane gas so will try to do a fillup with 93 in case it doesn't like the 89 I have in it now.
04-08-2017, 08:30 PM
#159
V8 Miata Enthusiast
Thread Starter
Went for another test drive tonight, was fine for a mile or two until I got to the gas station. Sounds healthy but not as 'eager' as I would expect. Filled the tank with 93 octane. When I started the car and pulled out the engine definitely had a 'miss' to it but cleared itself up in the next couple hundred yards. Figured something ain't right. Ran a bit rough and made it the next mile home til I parked it.
Check engine light code was Bank 2 sensor 1, so I def. think I need to look at that more seriously. The car is definitely down on power, so my thoughts are something more serious that an o2 sensor CEL. I had the o2 sensor unplugged before and there wasn't much difference. So I'm thinking the ignition system is not working all that well. Going to do some testing on coil packs, spark and fuel. Though I'm not exactly sure how to do that right now. Open to ideas on what to check.
Check engine light code was Bank 2 sensor 1, so I def. think I need to look at that more seriously. The car is definitely down on power, so my thoughts are something more serious that an o2 sensor CEL. I had the o2 sensor unplugged before and there wasn't much difference. So I'm thinking the ignition system is not working all that well. Going to do some testing on coil packs, spark and fuel. Though I'm not exactly sure how to do that right now. Open to ideas on what to check.
04-10-2017, 07:04 PM
#160
V8 Miata Enthusiast
Thread Starter
Spent some more time troubleshooting tonight and didn't take long to realize that I had a bad ground which was feeding both o2 sensors. I swear I checked grounds before... anyway now I'm free of any CELs and the car is running better.
It's satisfying when you close all the open tabs in your browser as you frantically search for ideas on what your issue is. One more thing crossed off the list.
Still think I'm down on power though. Short term Fuel Trims are .8 - 3.1 right now, and Long term trims are 12 - 16, after a 15 min drive in this lovely weather (80F). So if after a few more test drives it doesn't seem to improve I'll be taking it in for a tune. Those of you who've done the swap, did things improve over time? Is a tune pretty much the only way to get the car to "wake up"?
I unplugged the reverse lockout switch b/c it seemed like I was able to grab reverse in a previous test drive. I didn't actually de-clutch since when I grabbed it I got some grinding noises. So something may not be right with the VSS lockout which should not let me engage reverse over 5mph I think.
The T56 is just magical. Little notchy, but a perfect match for the engine and the power it will make. The clutch engagement also seems to be perfect, not too much effort, good modulation, seems to be holding the power. No burnouts yet, but we'll get there.
With the big wheels/tires the car seems to track down the road just perfect. No rubbing I can detect (over the loud exhaust) or any alignment issues. I will get a proper alignment when the car goes in for inspection so it's road legal, titled, etc.
My only real concern at this point is the volume level of the exhaust inside the car. Between 2000-3000 rpm seems to be a heavy drone. I can't detect if it's driveline related or just the exhaust. This is mostly when i'm on the throttle. Below 2000 or above 3000 seems bearable.
Going to do some research, but I'm interested in hearing from those reading (I know you're out there) on what the best solution is to fixing drone from a V8. A couple resonators before the mufflers? I like the sound of the exhaust on throttle (when it's not droning) and on throttle lift. I'll need to have someone do a driveby with the car so I can hear what it sounds like outside the car.
04-11-2017, 06:00 AM
#161
V8 Miata Prot�g�


I'd definitely recommend getting a tune done. Make sure everything is in order first though because you will be running the card hard during tuning and you don't want any issues then. As far as exhaust, I can't say as I don't have a top and I also have like 24" of exhaust after the collectors. Lol. 12" resonators, then like 12"of pipe with a turn down.
04-11-2017, 02:15 PM
#162
V8 Miata Follower

Sorry about the issues you are having! But those compression numbers sure are promising! You'll get it figured out!
Ive been having some minor issues myself. Im overdue for an update, and uploading pics now to hopefully fill everyone in today or tomorrow.
Also getting the GoPro charged up for some more sweet videos haha.
Ive been having some minor issues myself. Im overdue for an update, and uploading pics now to hopefully fill everyone in today or tomorrow.
Also getting the GoPro charged up for some more sweet videos haha.
04-17-2017, 01:43 PM
#163
V8 Miata Enthusiast

 04-17-2017, 03:34 PM
#164
V8 Miata Enthusiast
Thread Starter
I've used this stuff for other projects, seems great, though I've seen where it heats can begin to reduce the adhesive qualities so I tend to use zip ties to keep it on whatever I'm protecting.
That said: DEI 010412 Reflect-A-Cool Heat Reflective Adhesive Backed Sheets
That said: DEI 010412 Reflect-A-Cool Heat Reflective Adhesive Backed Sheets
04-20-2017, 08:18 PM
#165
V8 Miata Enthusiast
Thread Starter
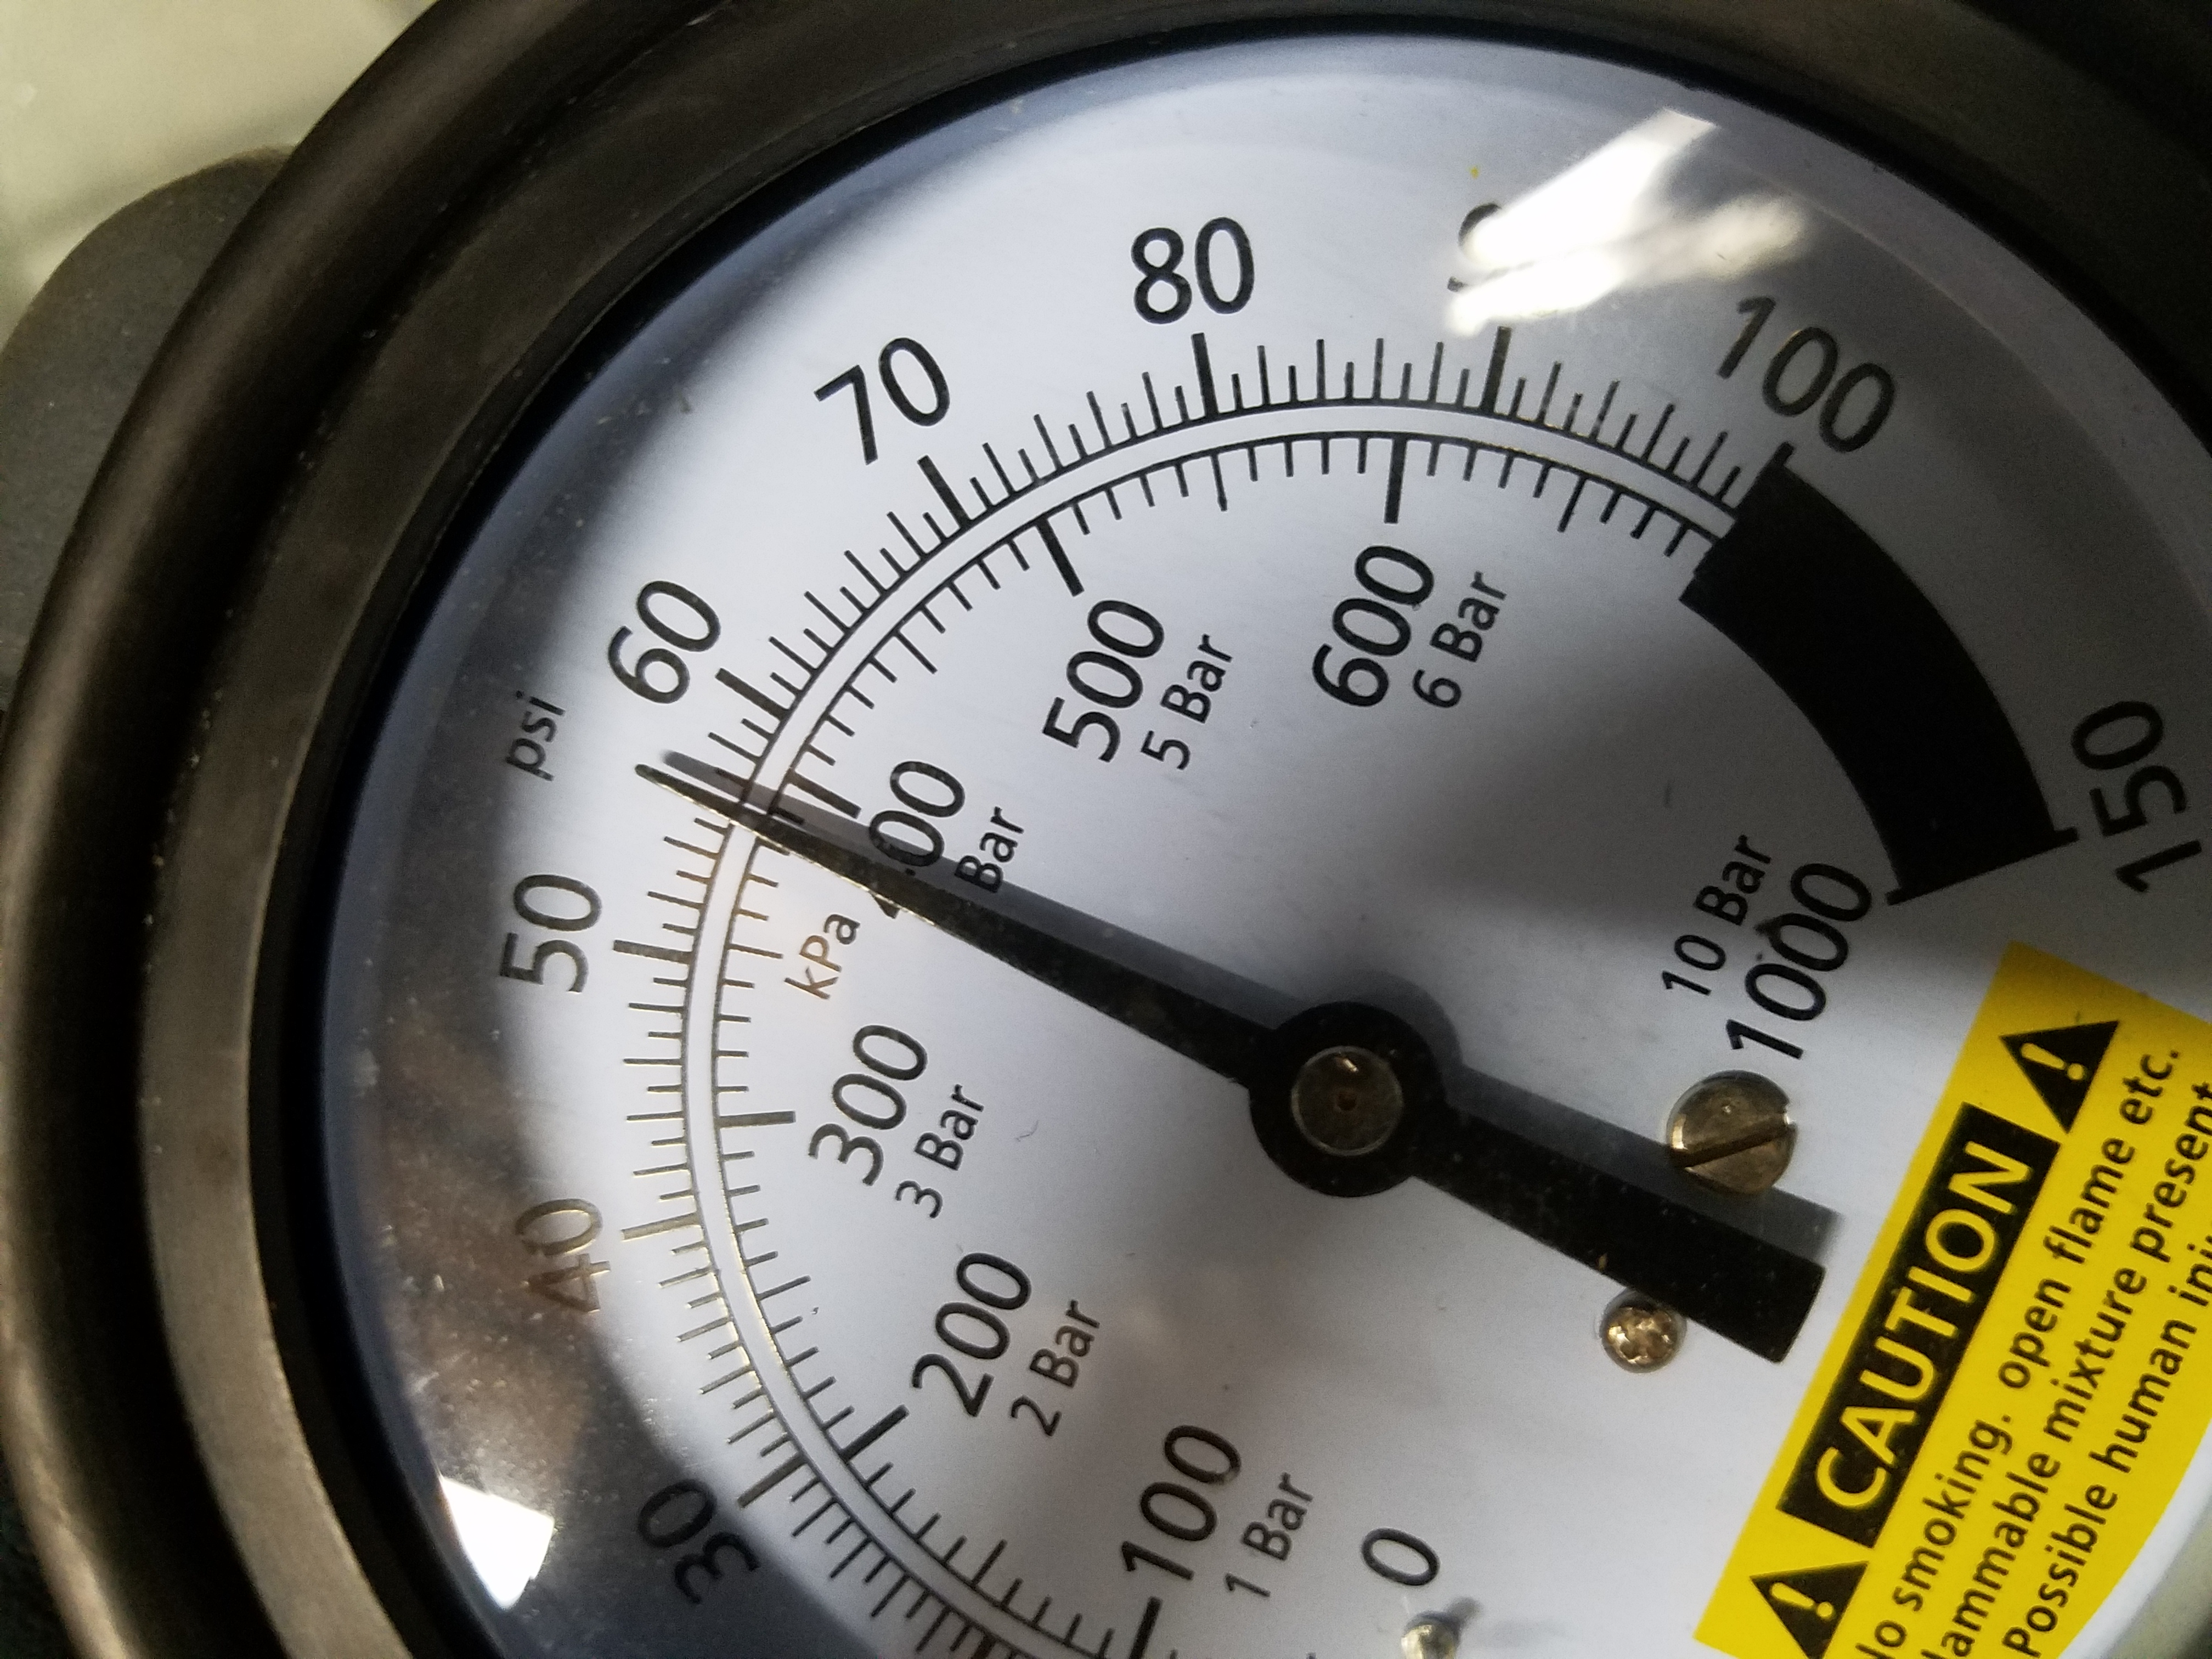
In pursuit of my performance issues I checked fuel pressure, which turned out to be fine. Rock steady and within the range per the FSM - 380-410 kPa (55-60 psi)
A spark tester hooked up to each cylinder also showed no issues.
Checking out my OBD scanner again, my long term fuel trims were pretty high, up to 25 after my second long test drive.
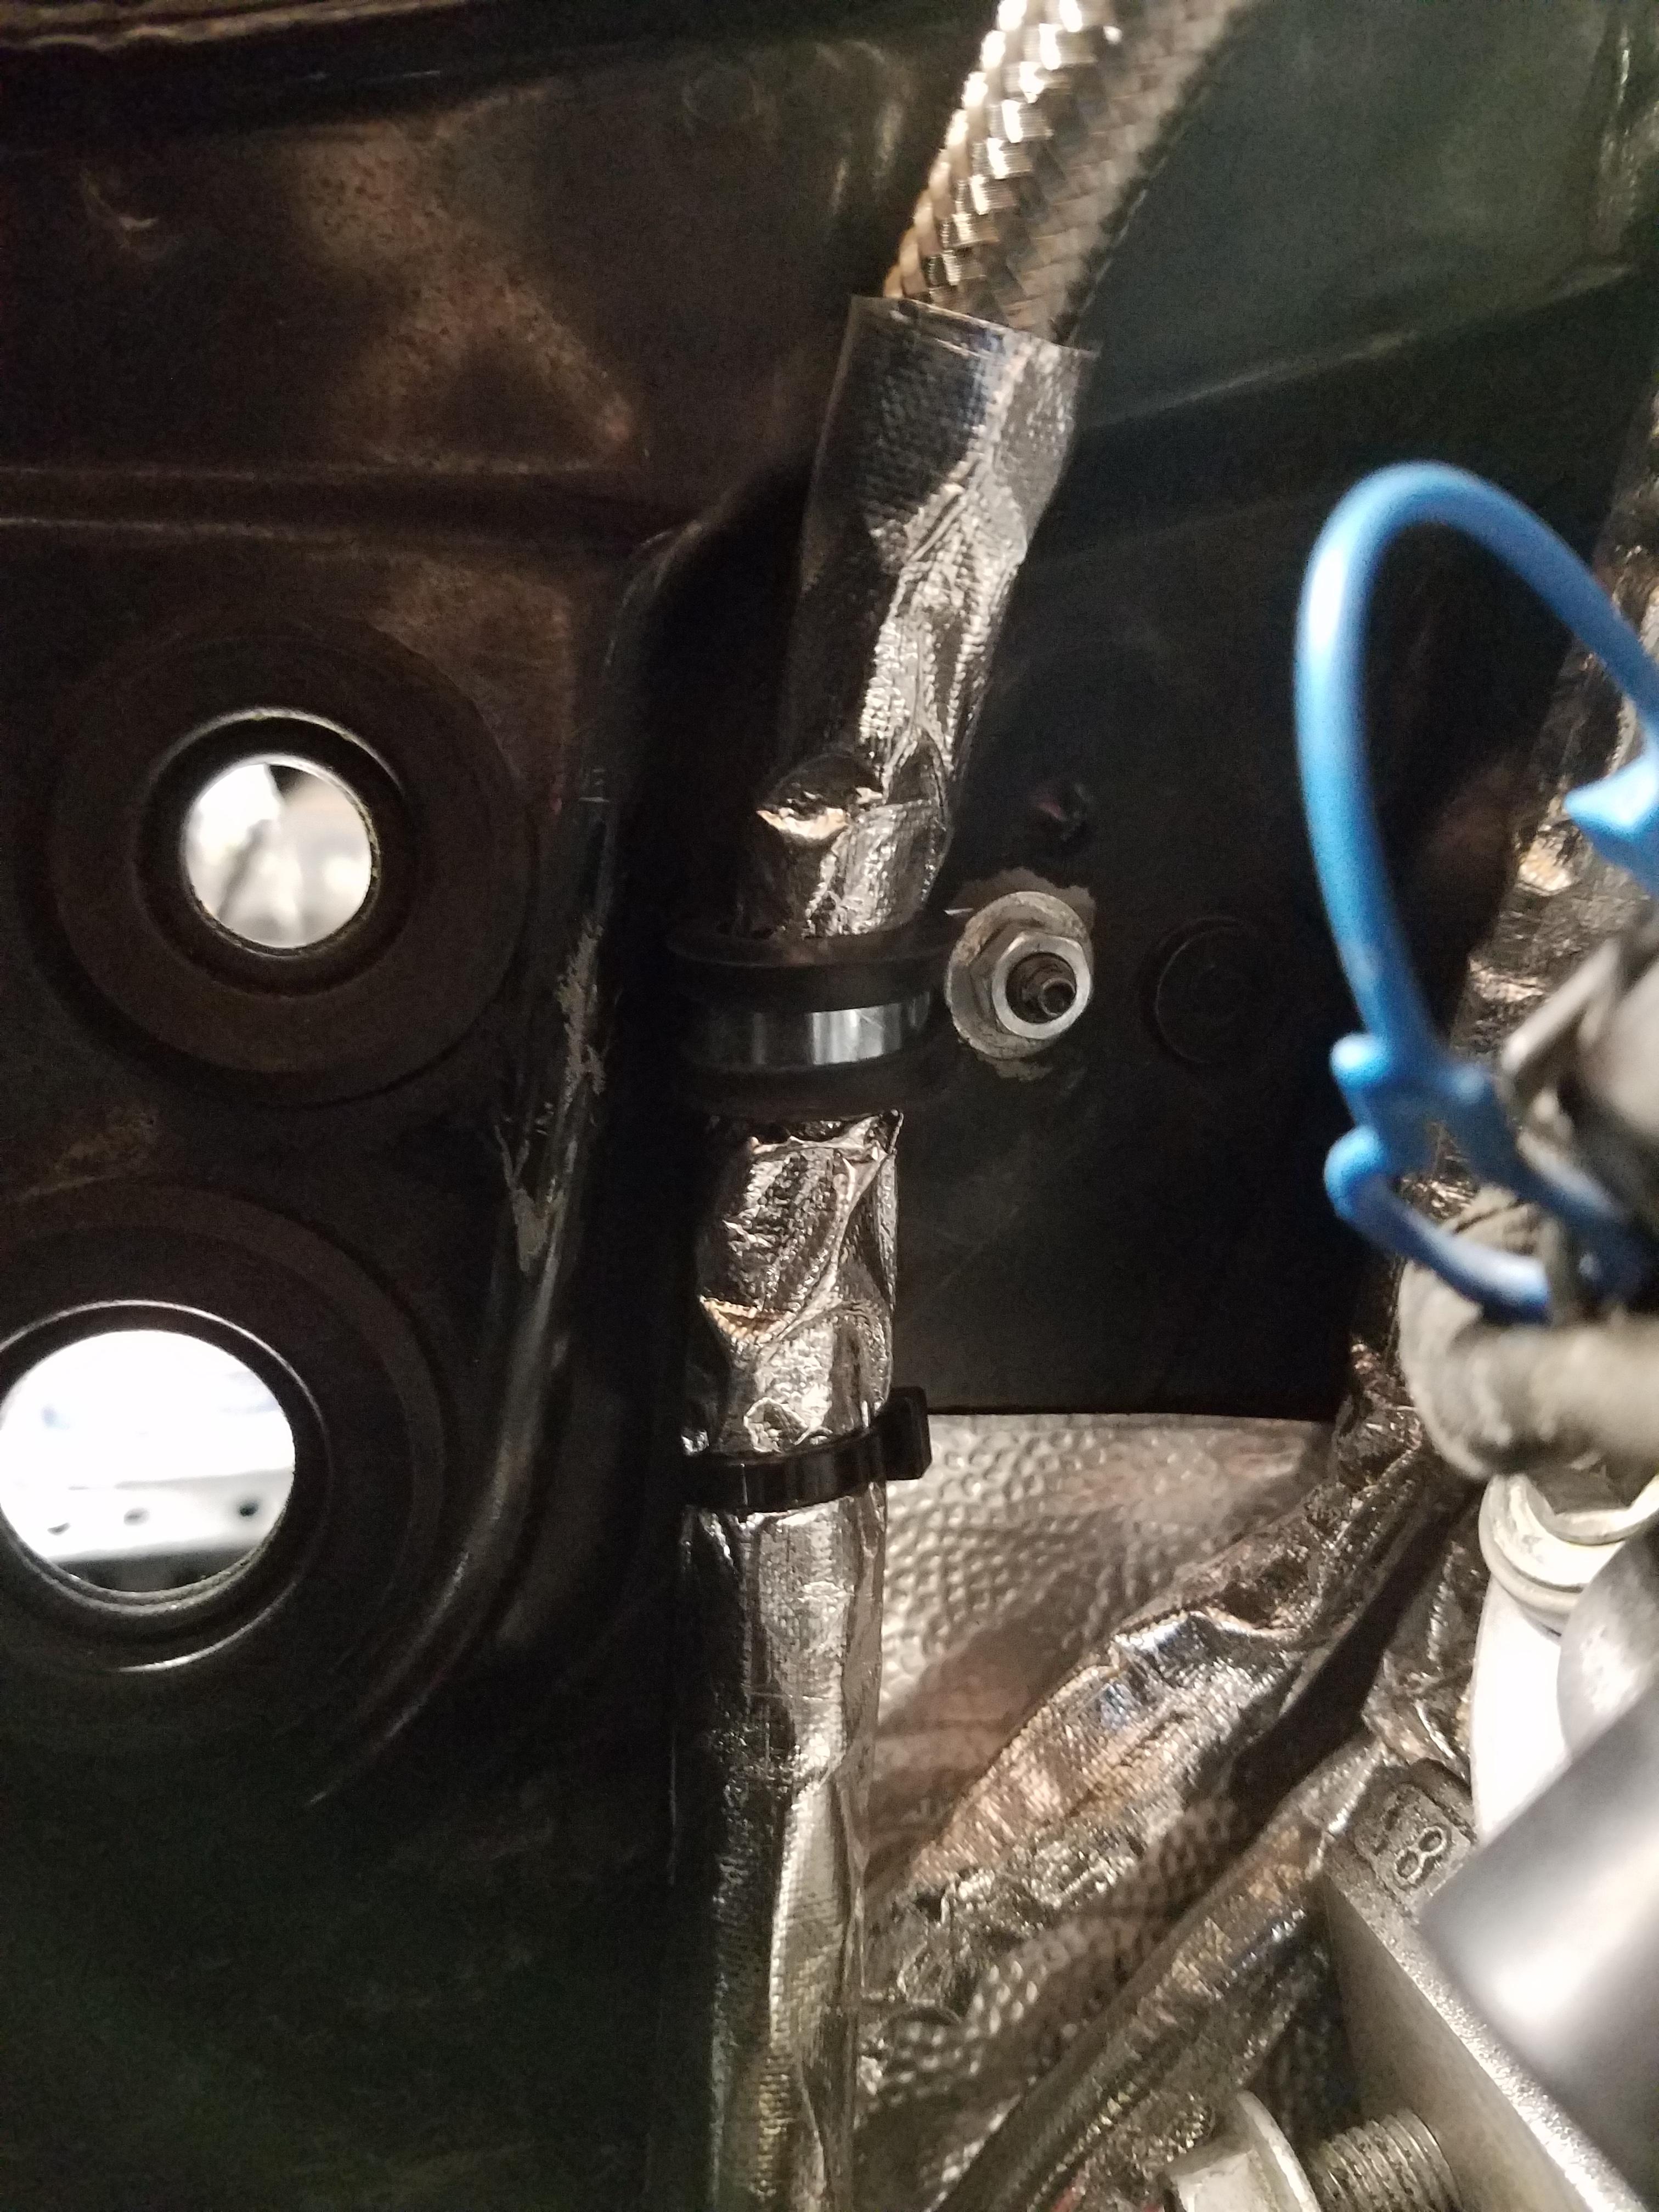
I decided to search a bit for some vacuum leaks. I had not considered these before b/c the car didn�t have the symptoms of what I associated with vac leaks, stumbling, stalling, poor running. With some of the other stuff out of the way, I took a look around the engine and realized I had some pretty weak looking vacuum caps I had thrown on there when I first bought the engine.
Which one of these caps is not like the others?
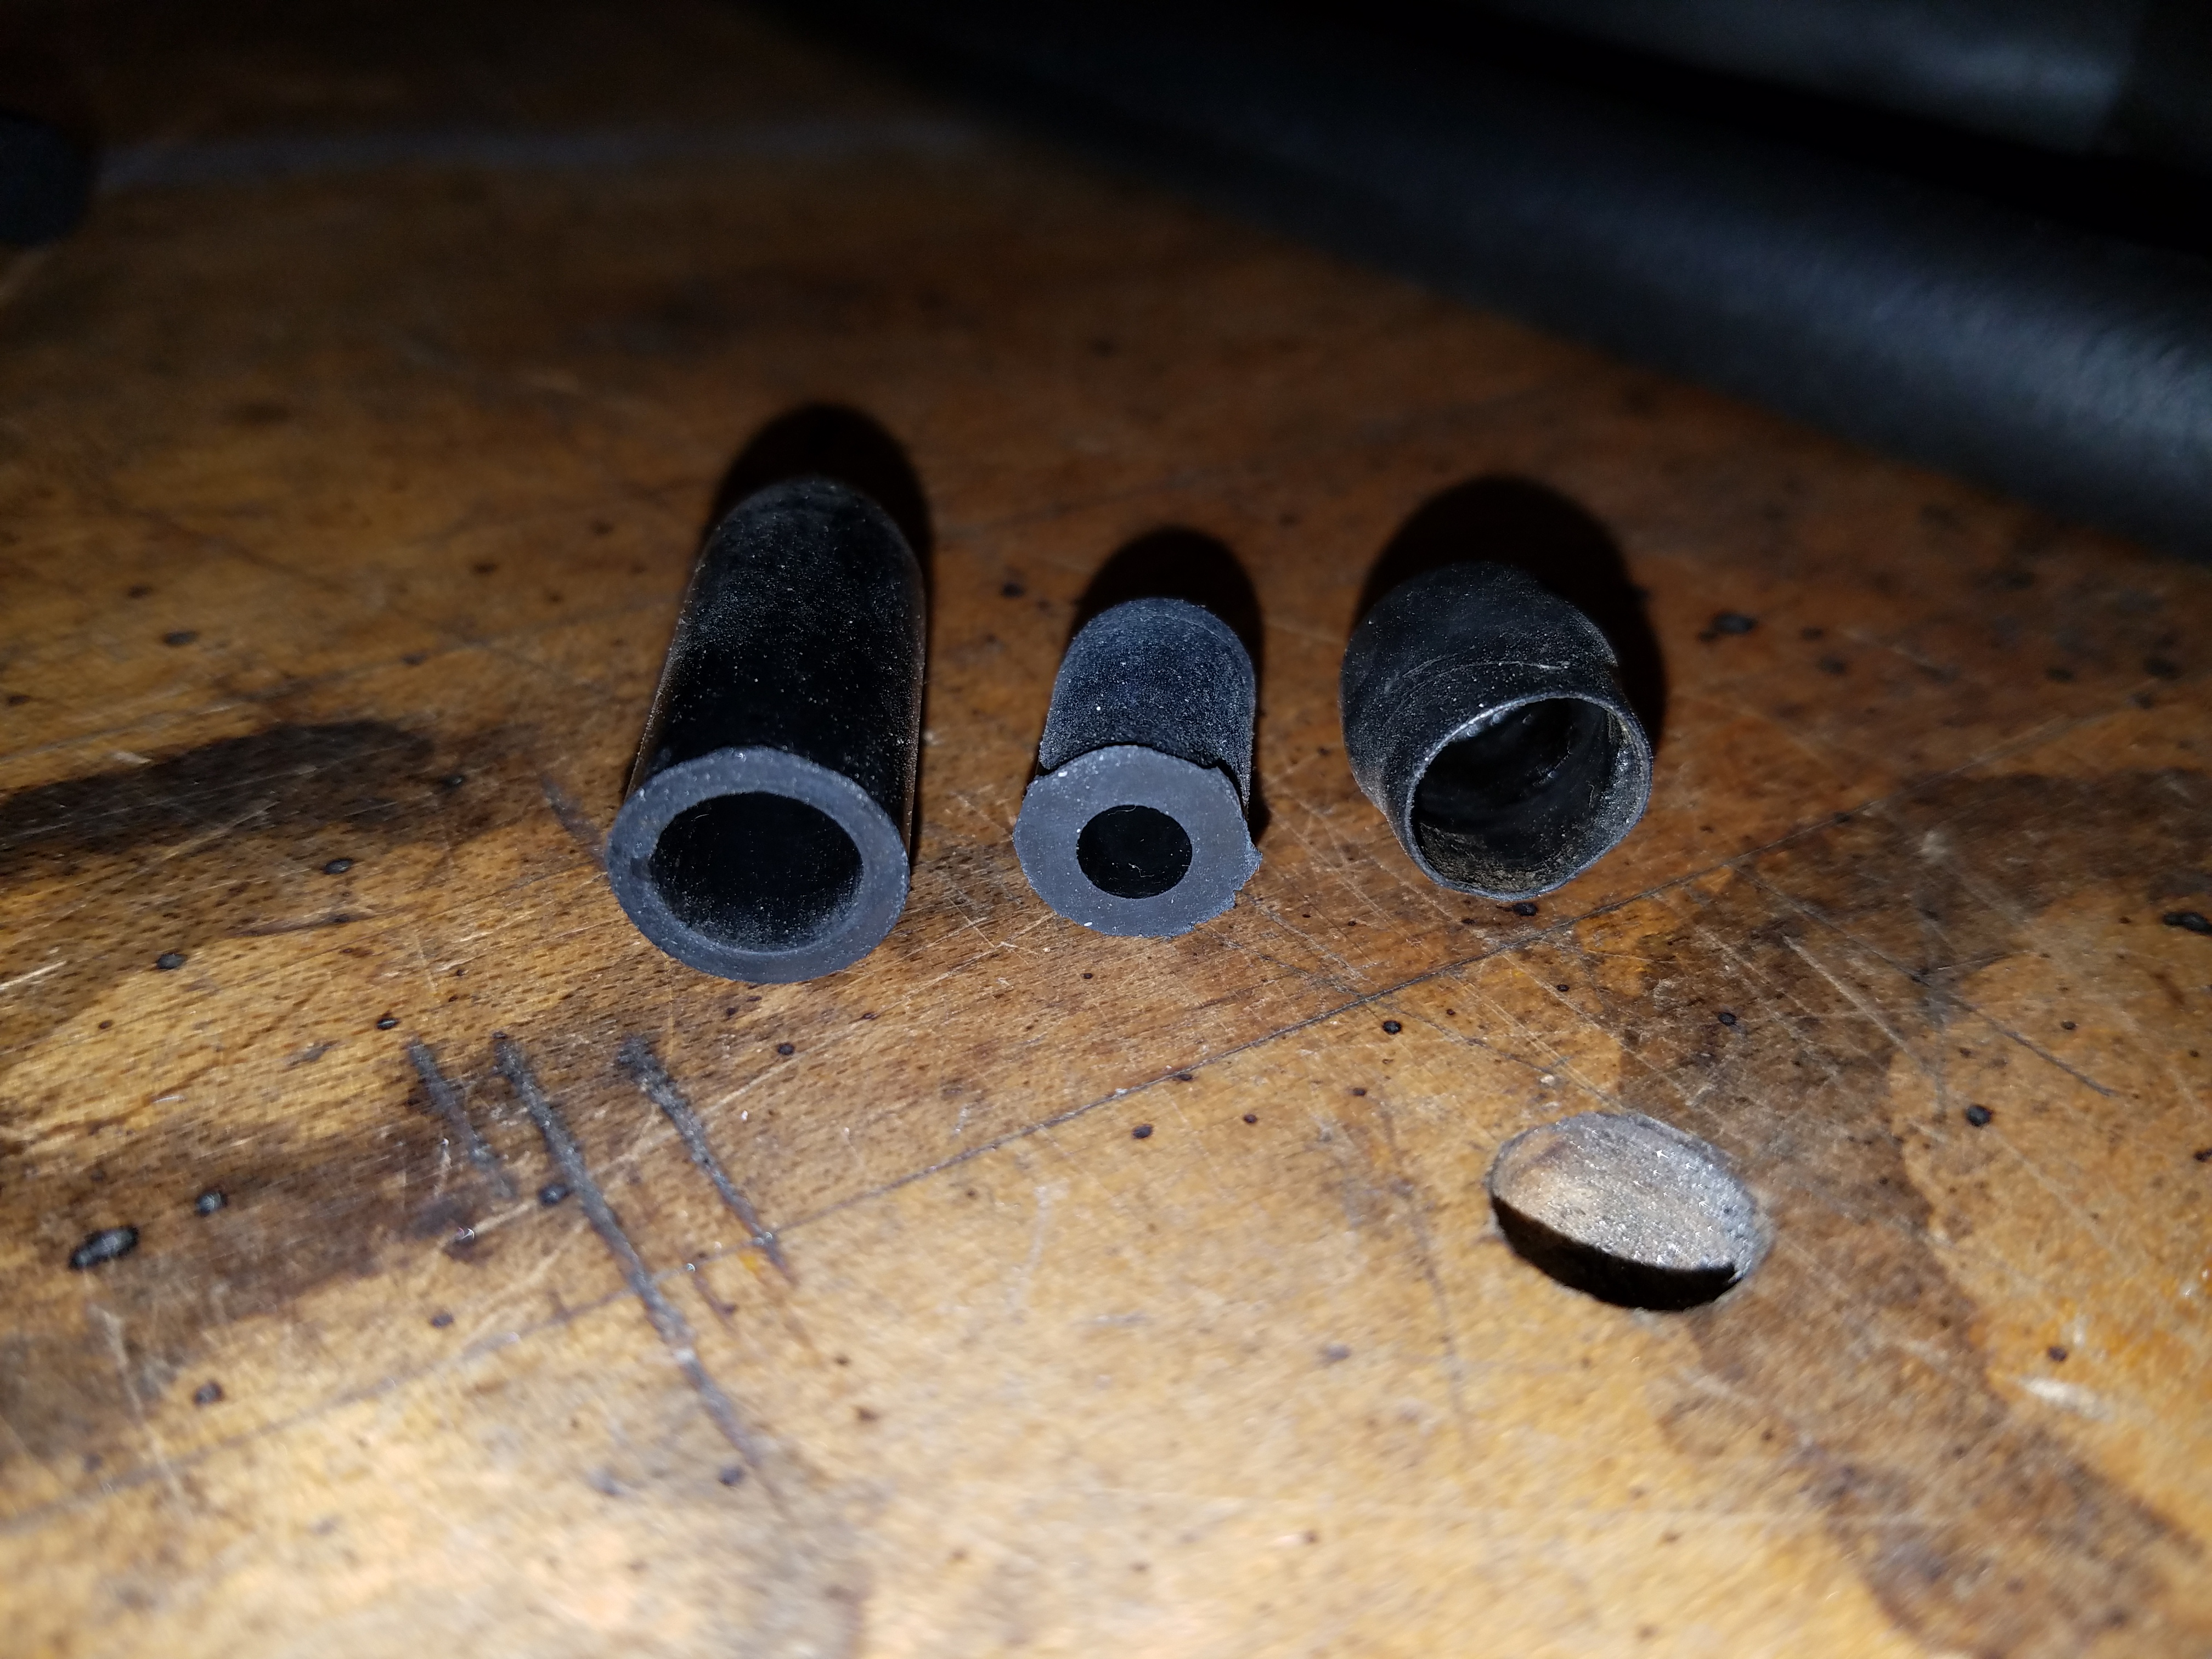
Yeah, the thin walled one on the far right was on a few of my openings. So I replaced them with the newer ones I had bought as part of a kit. I also reinstalled the valve cover crossover hose I had tossed into a box after I got the engine.
Took a few minutes before I found a port on the back of the intake, hidden under the MAP sensor and harness. An easy one to miss for sure.
After capping that one off I looked over the rest of the engine and didn�t find anything else. With the engine cold, I will probably also try to use some carb cleaner and spray around the intake ports and fuel injectors to see if there are some leaks there. Some have had issue with intake gaskets not sealing very well when you install the intake. It might be b/c of the way the intake gasket are at a slight angle to the heads as they get torqued down.
Some add'l test drives haven't really helped. I picked up a Bluetooth OBD port adapter so I can do some data logging on my phone and see if anything jumps out.
In the meantime I need to address the exhaust volume issues and oil leak.
A spark tester hooked up to each cylinder also showed no issues.
Checking out my OBD scanner again, my long term fuel trims were pretty high, up to 25 after my second long test drive.
I decided to search a bit for some vacuum leaks. I had not considered these before b/c the car didn�t have the symptoms of what I associated with vac leaks, stumbling, stalling, poor running. With some of the other stuff out of the way, I took a look around the engine and realized I had some pretty weak looking vacuum caps I had thrown on there when I first bought the engine.
Which one of these caps is not like the others?
Yeah, the thin walled one on the far right was on a few of my openings. So I replaced them with the newer ones I had bought as part of a kit. I also reinstalled the valve cover crossover hose I had tossed into a box after I got the engine.
Took a few minutes before I found a port on the back of the intake, hidden under the MAP sensor and harness. An easy one to miss for sure.
After capping that one off I looked over the rest of the engine and didn�t find anything else. With the engine cold, I will probably also try to use some carb cleaner and spray around the intake ports and fuel injectors to see if there are some leaks there. Some have had issue with intake gaskets not sealing very well when you install the intake. It might be b/c of the way the intake gasket are at a slight angle to the heads as they get torqued down.
Some add'l test drives haven't really helped. I picked up a Bluetooth OBD port adapter so I can do some data logging on my phone and see if anything jumps out.
In the meantime I need to address the exhaust volume issues and oil leak.
04-20-2017, 08:31 PM
#166
V8 Miata Enthusiast
Thread Starter
I have a feeling that my oil leak is from the rear main seal. I just don't think that the volume of oil is coming from the oil pan gasket which is new. I replaced the rear main seal, but I didn't replace the rear cover gasket or align the seal so I have all new gaskets coming to me and an alignment tool to reinstall. Not looking forward to removing the trans and doing all this again, but I don't think I have a choice.
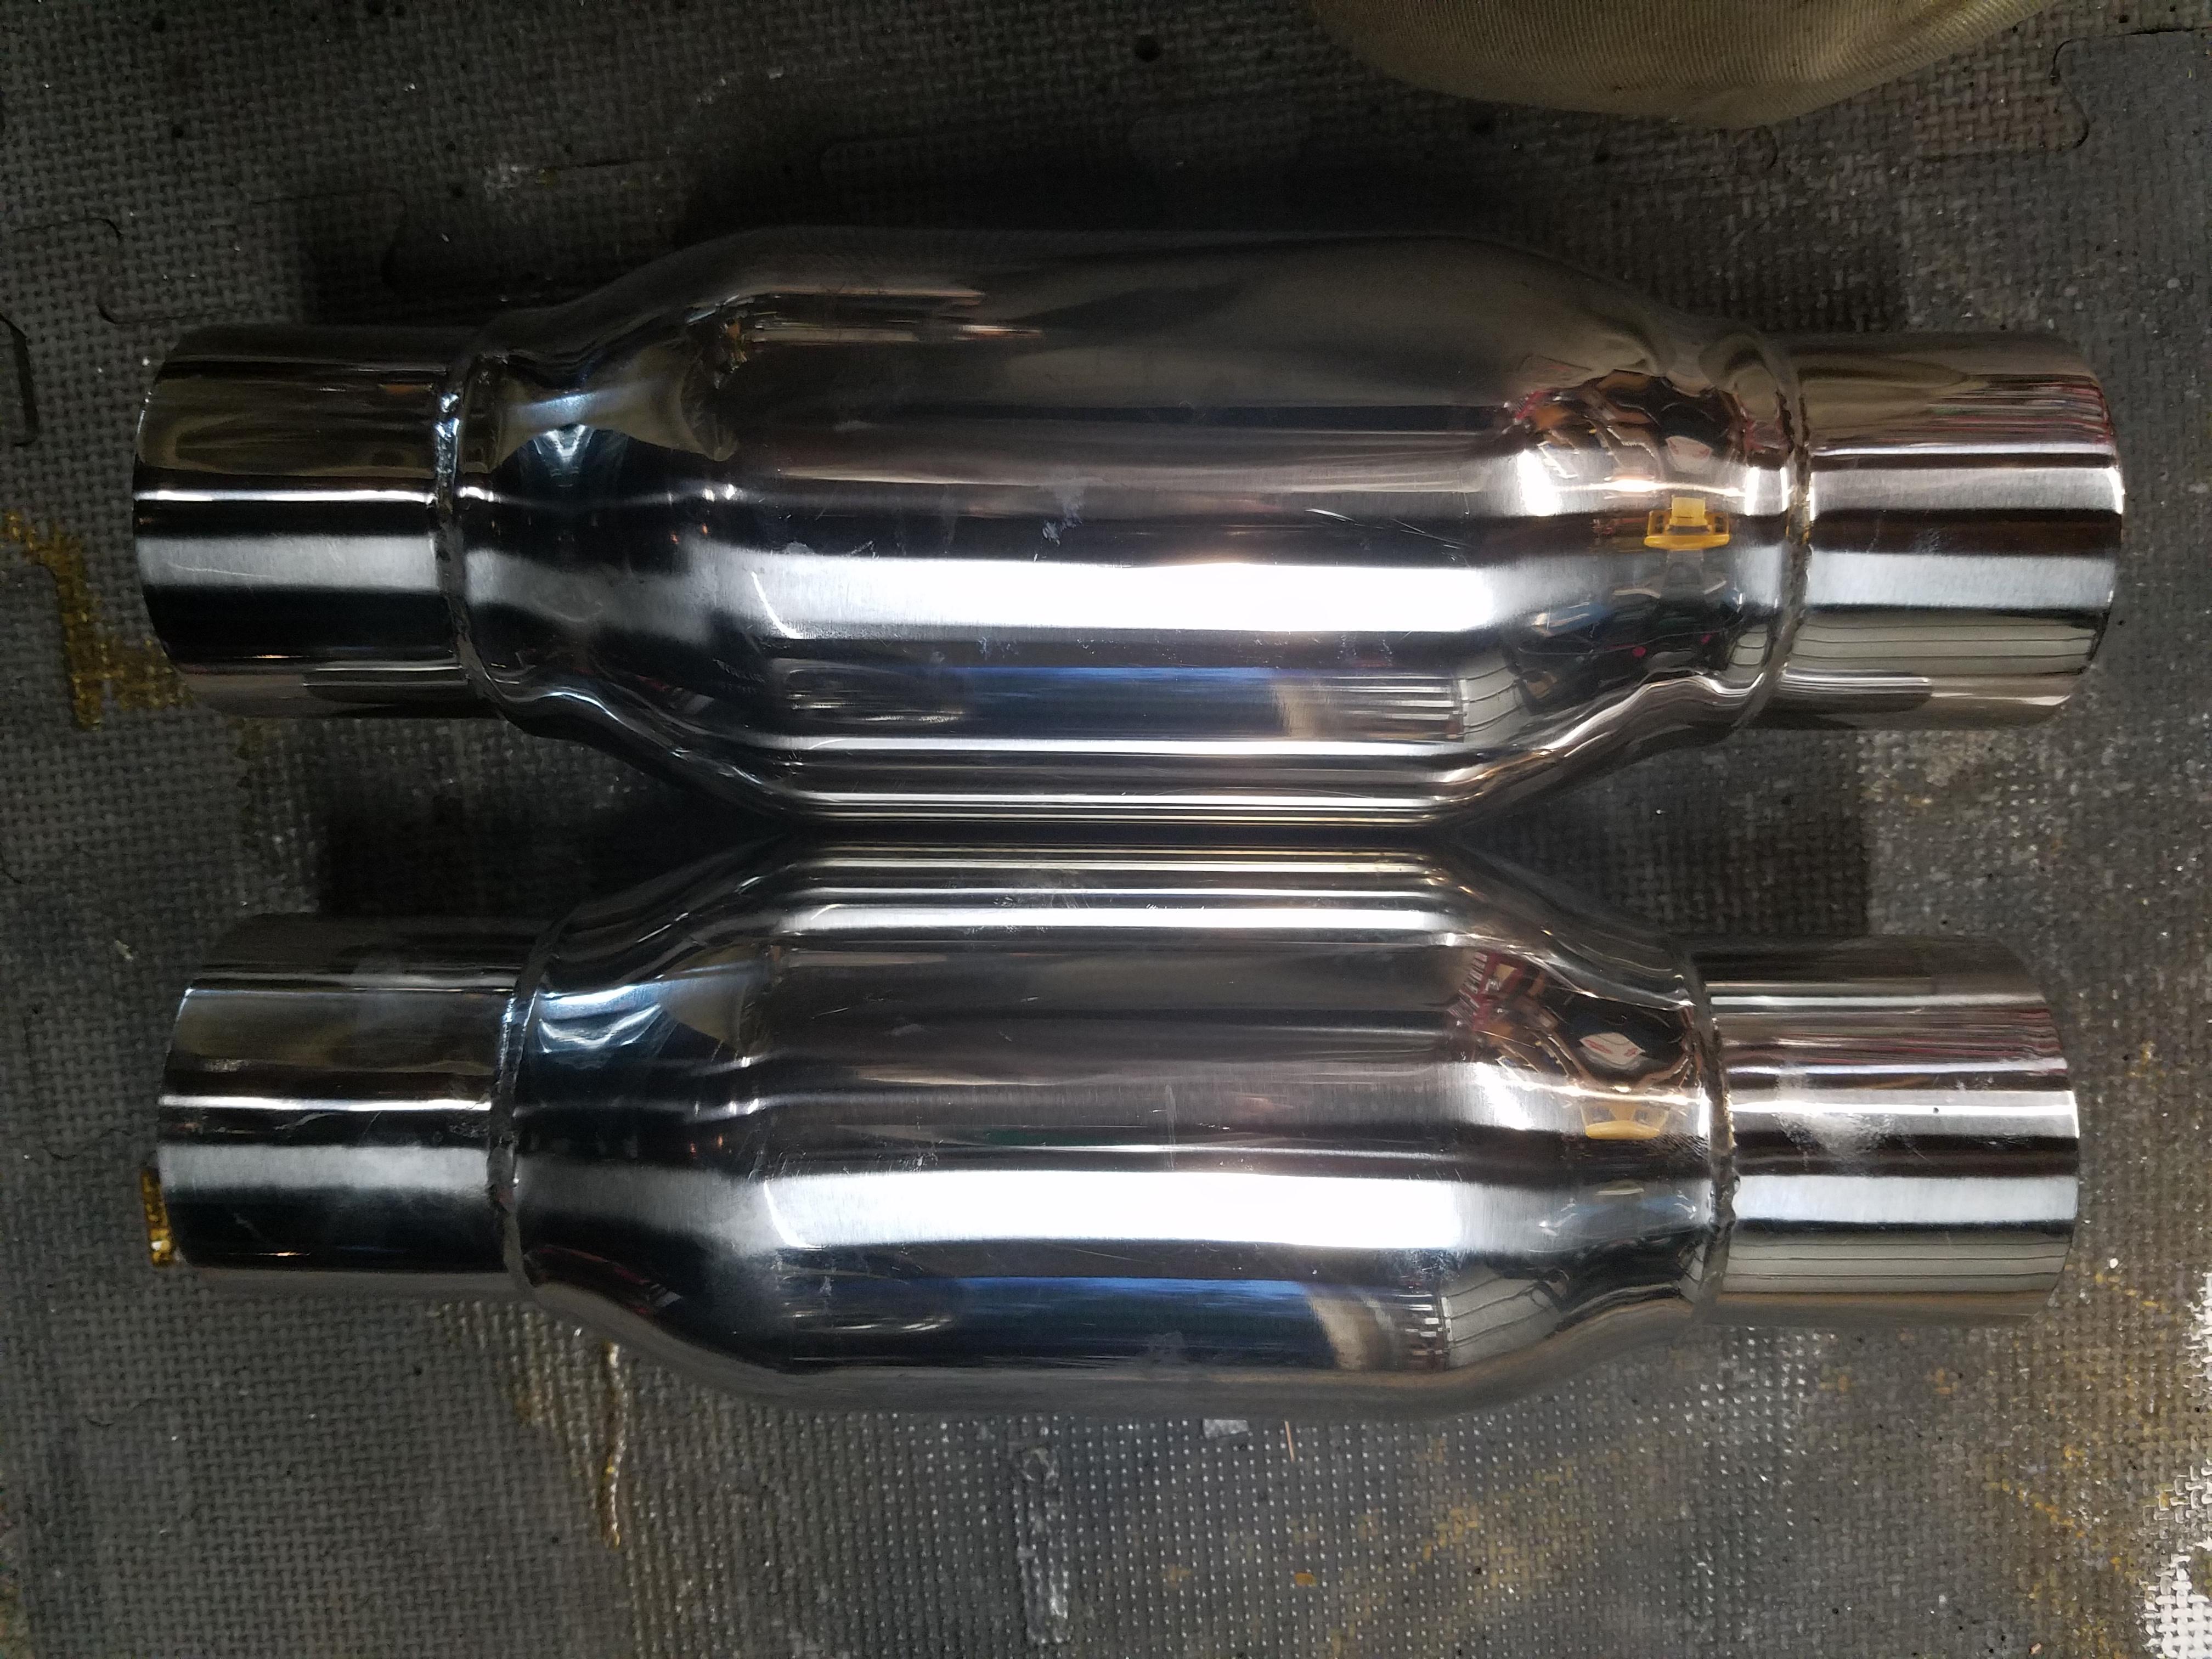
In an effort to reduce the exhaust volume, I picked out some 2.5" resonators from Vibrant
In order to do the exhaust right and make square, clean cuts quickly I picked up a new toy
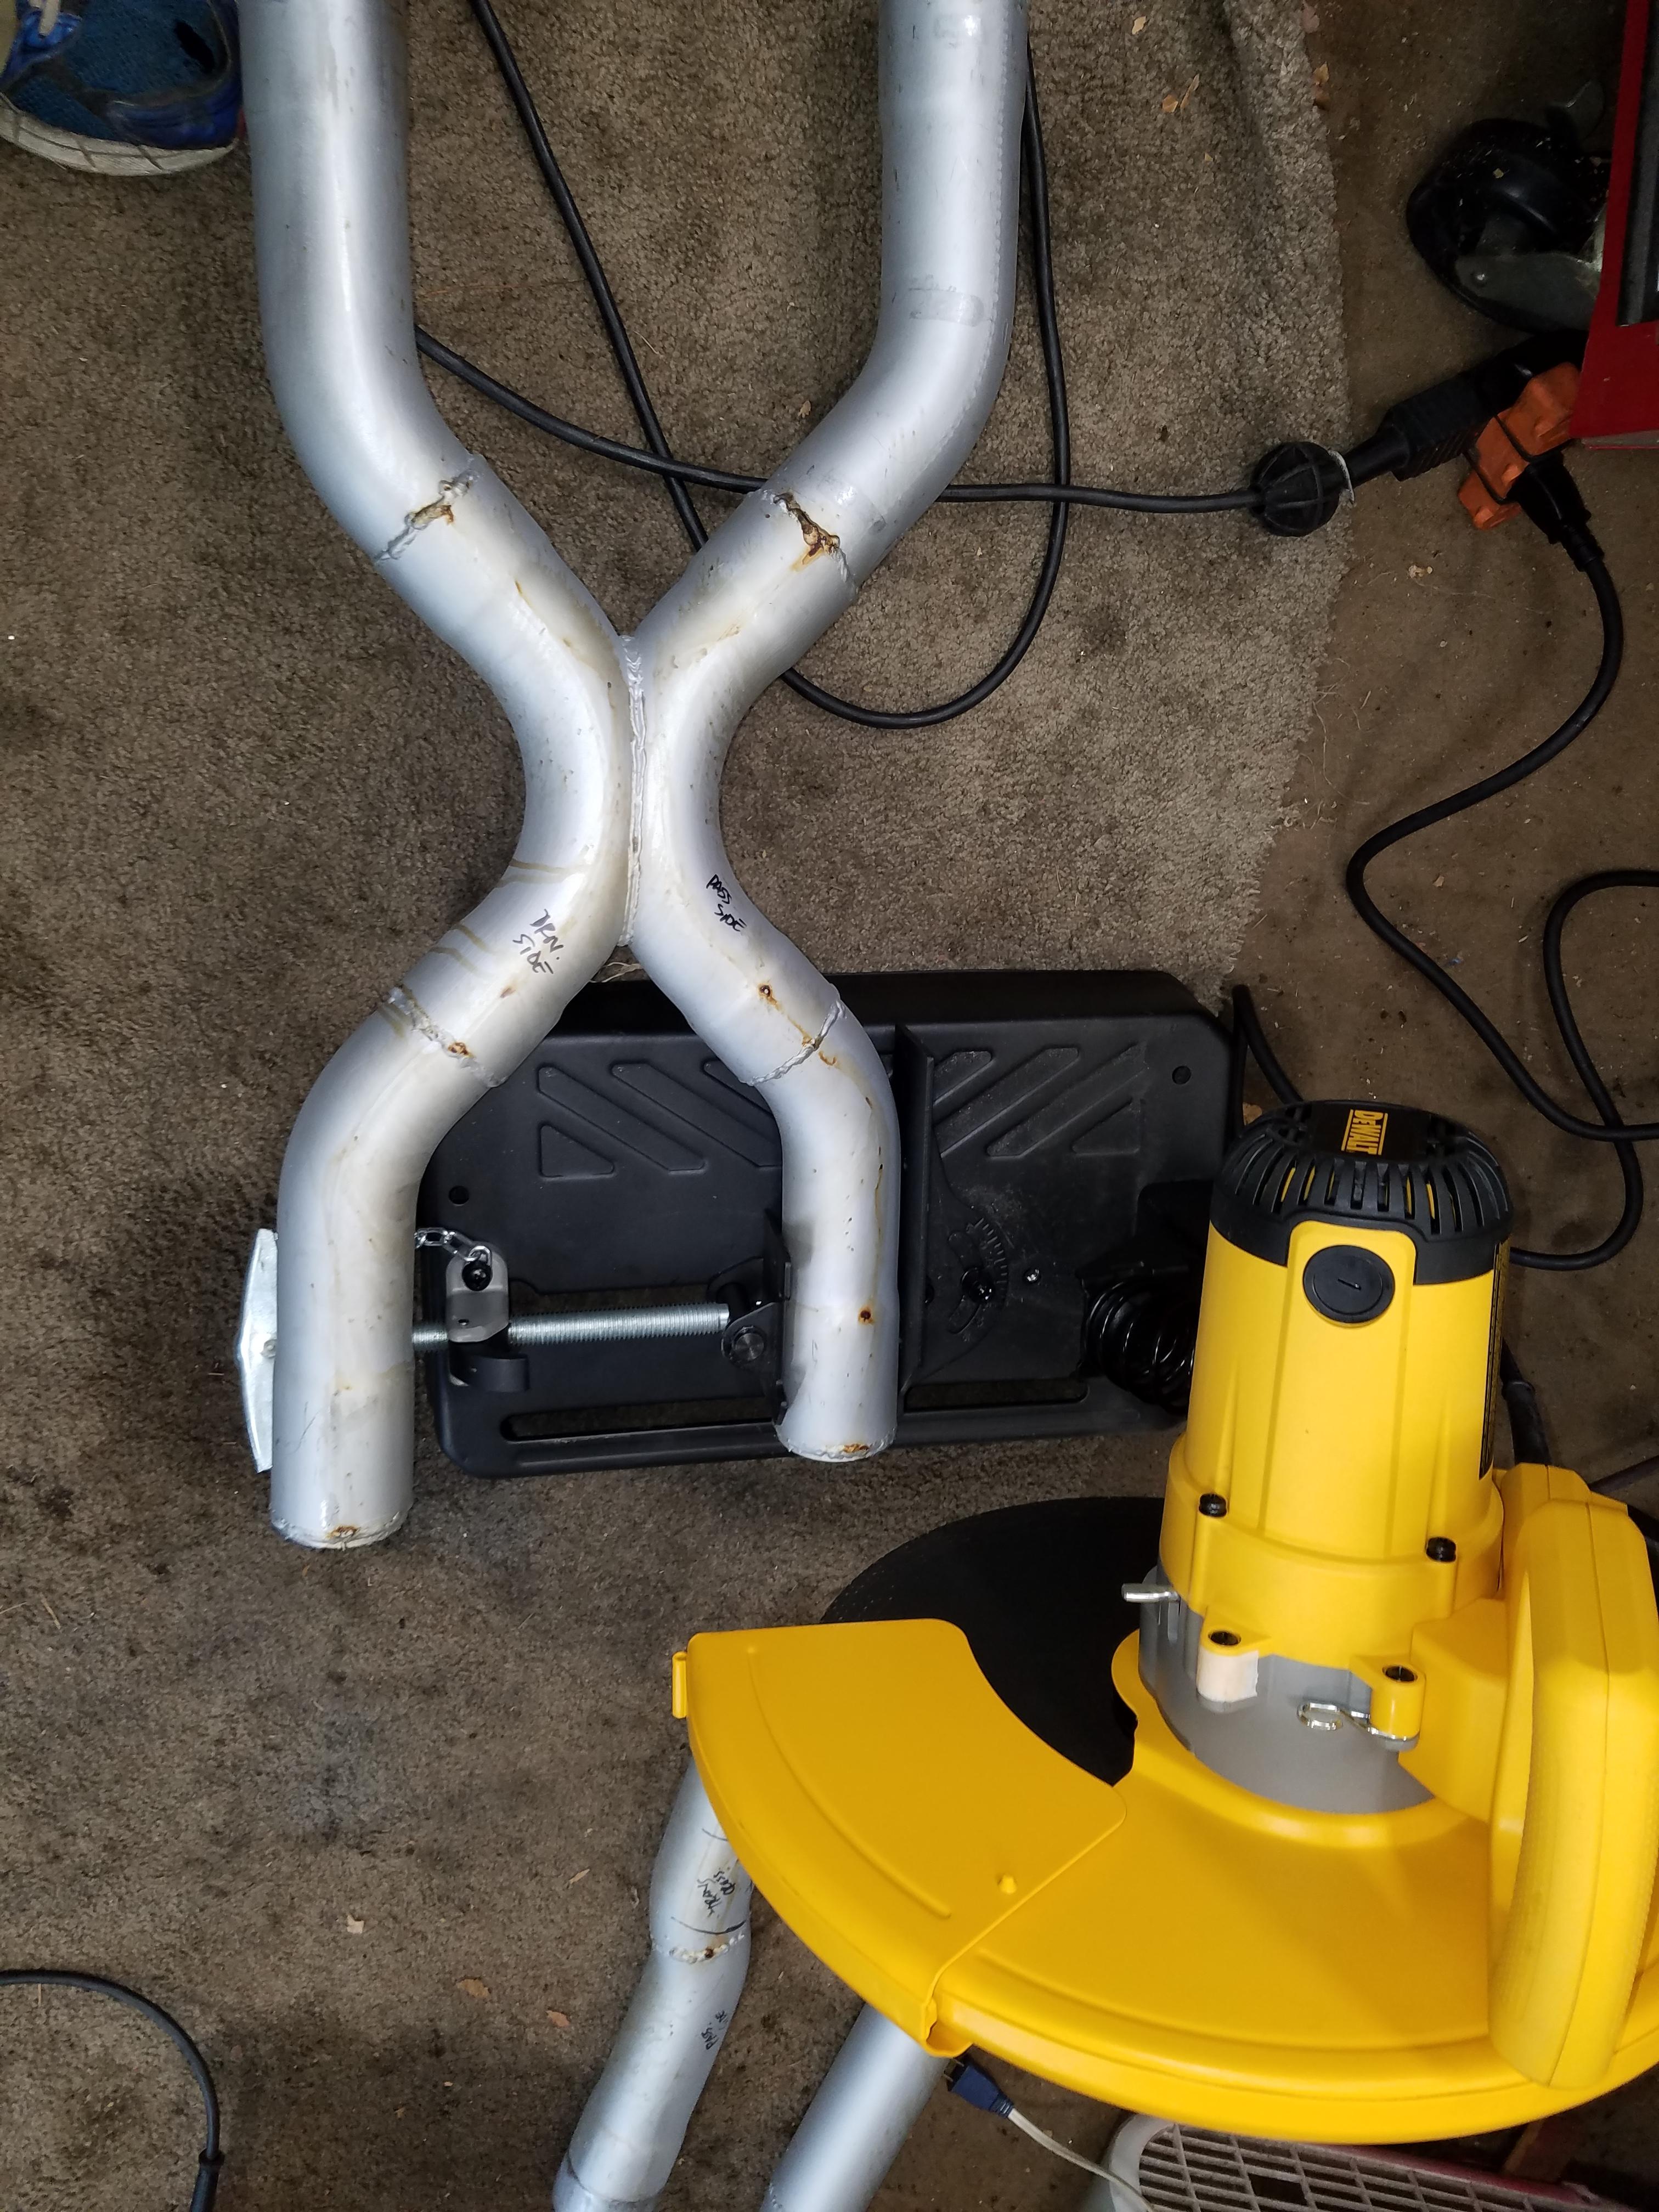
My justification is that with a different cutting blade I'll be able use this to cut pavers for a walkway project I'm planning to do this summer.
I took my x-pipe section and made it a bit narrower so that it will fit up in the 9-10" width of the Miata tunnel.
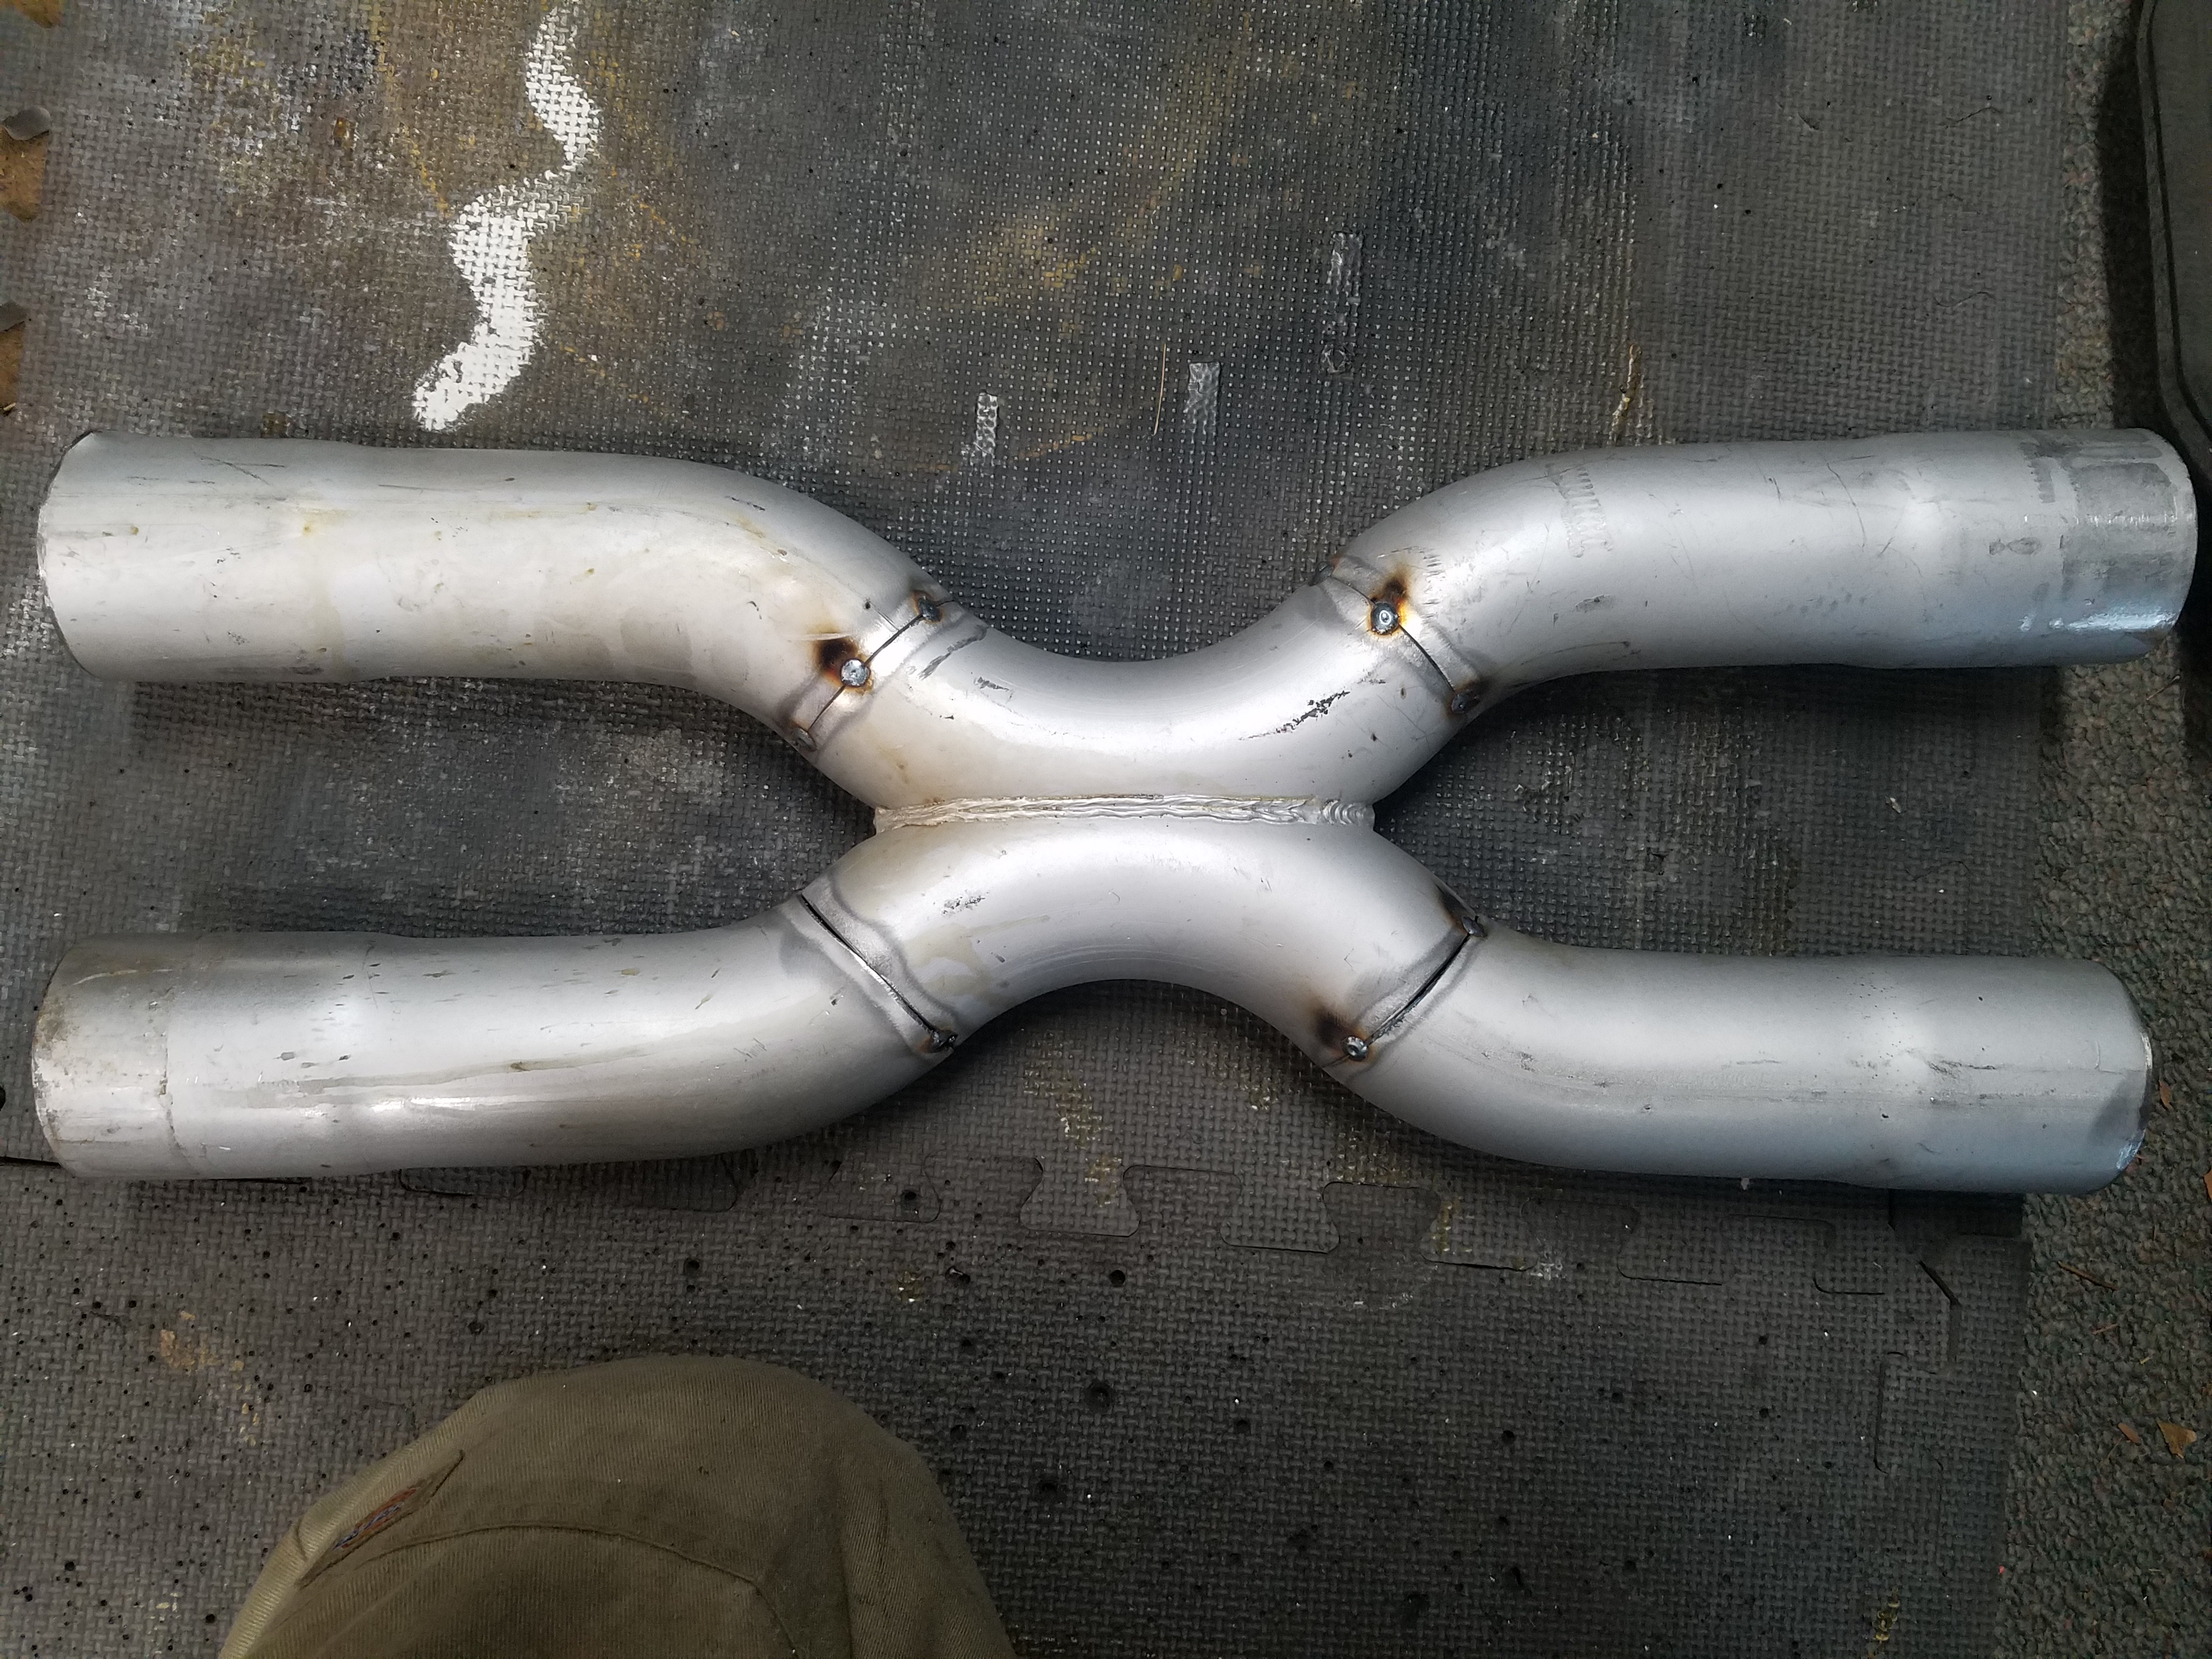
Luckily I had some leftover bends from my DIY exhaust kit and made some tubes that will "tuck" the exhaust up into the tunnel after it passes beneath the trans crossover brace.
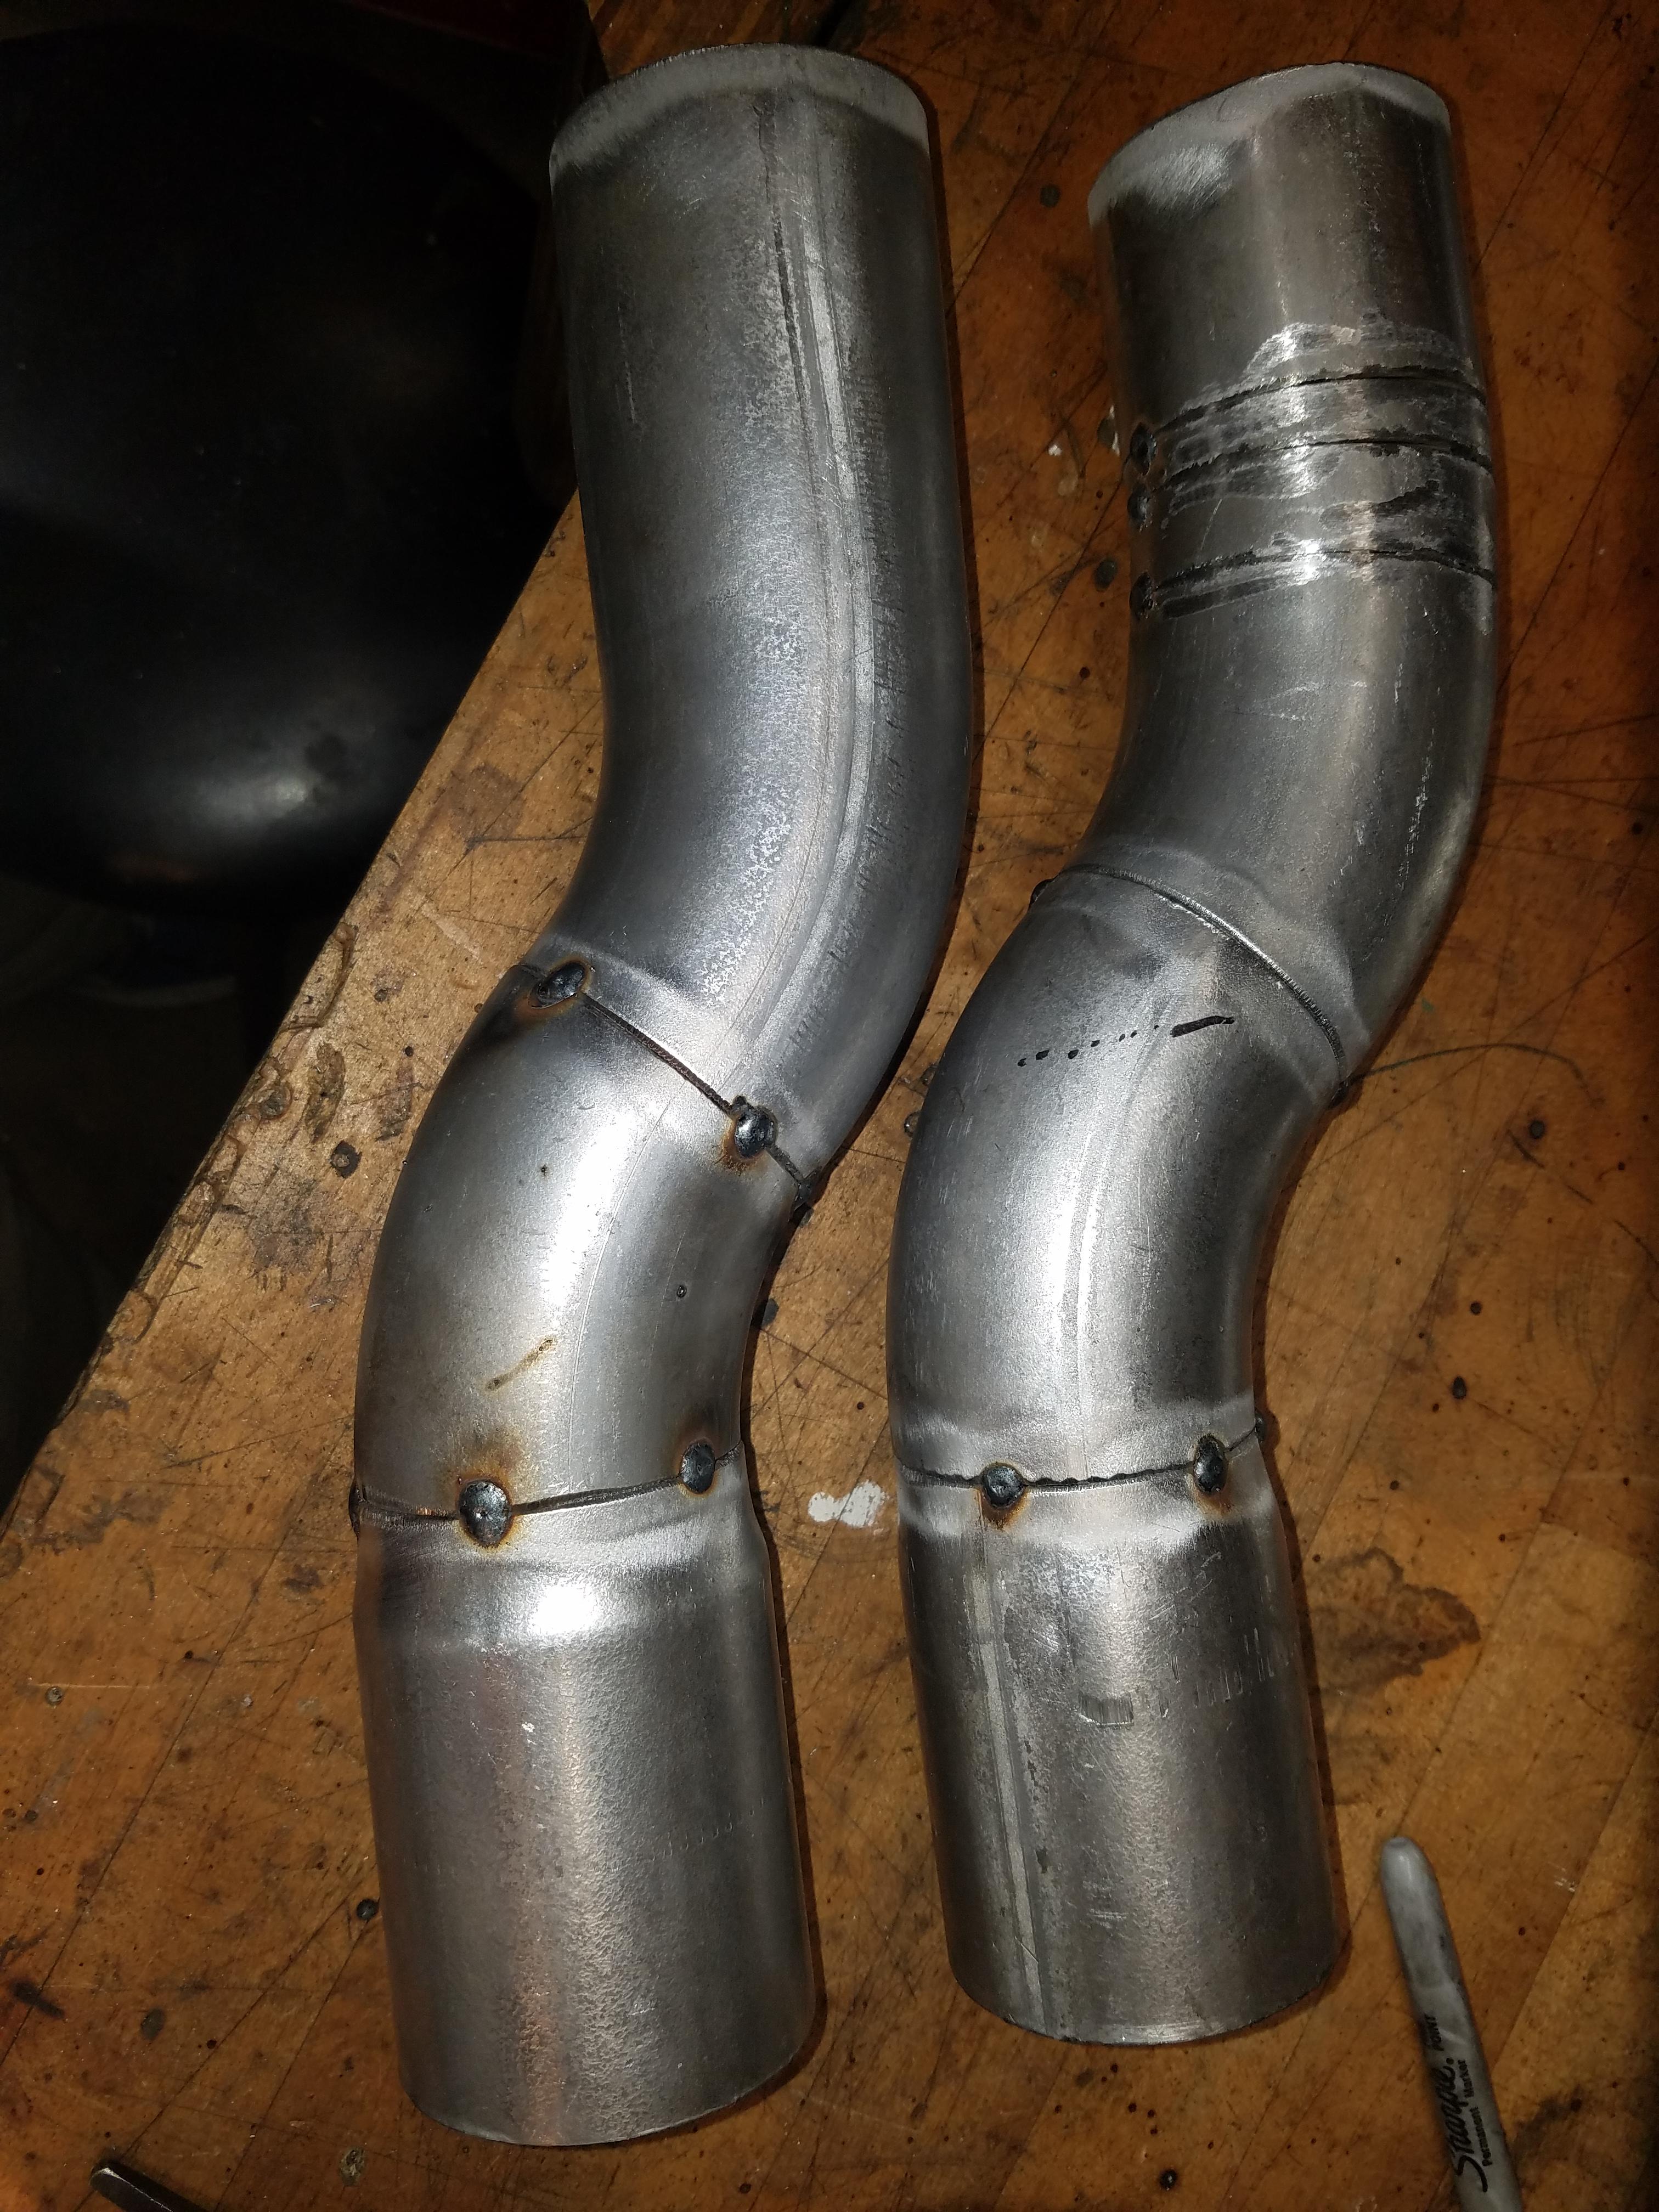
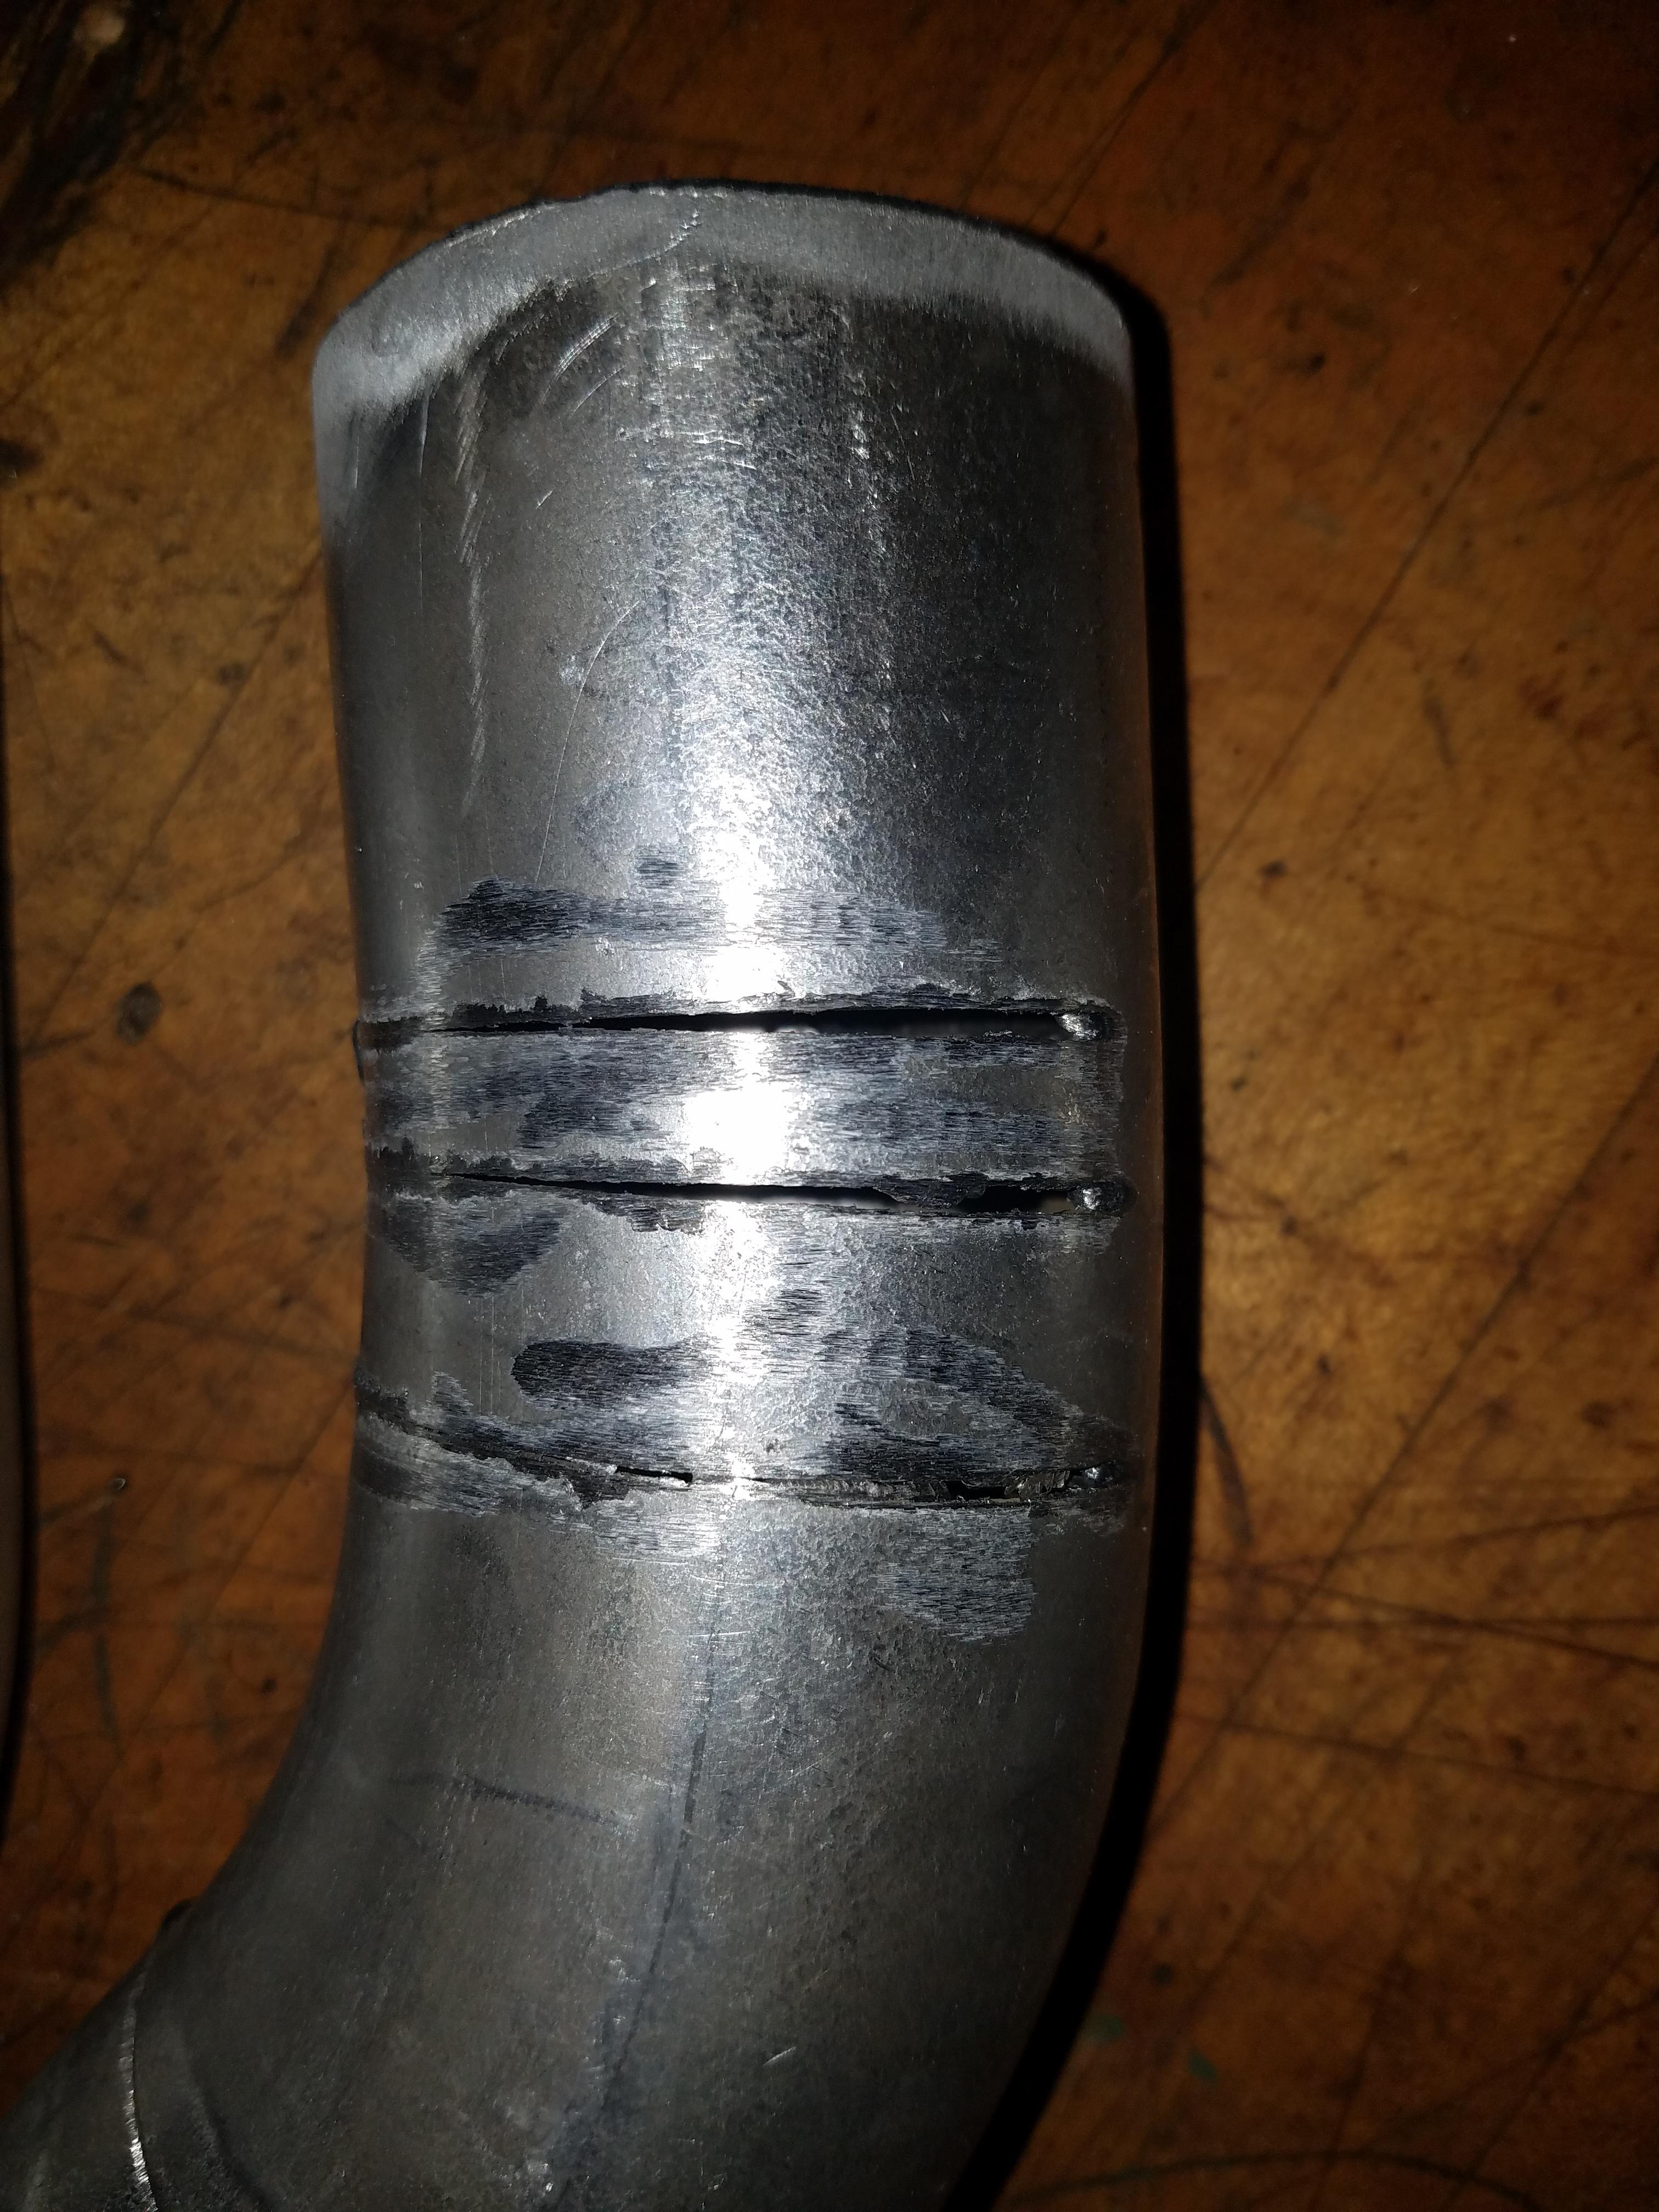
With my saw I was able to quickly make some slices into the tube and then bend it a bit to change the angle of the tube a few degrees.
Hoping to wrap up the exhaust work this weekend, do a final fit up and weld and then remove it all so I can drop the trans.
In an effort to reduce the exhaust volume, I picked out some 2.5" resonators from Vibrant
In order to do the exhaust right and make square, clean cuts quickly I picked up a new toy
My justification is that with a different cutting blade I'll be able use this to cut pavers for a walkway project I'm planning to do this summer.
I took my x-pipe section and made it a bit narrower so that it will fit up in the 9-10" width of the Miata tunnel.
Luckily I had some leftover bends from my DIY exhaust kit and made some tubes that will "tuck" the exhaust up into the tunnel after it passes beneath the trans crossover brace.
With my saw I was able to quickly make some slices into the tube and then bend it a bit to change the angle of the tube a few degrees.
Hoping to wrap up the exhaust work this weekend, do a final fit up and weld and then remove it all so I can drop the trans.
04-21-2017, 06:30 AM
#168
V8 Miata Enthusiast
Thread Starter
The GMPartsDirect.com story is that I tried for two weeks to contact them about returning an item. I'd say about 6 emails, multiple attempts to call and get someone to answer, voice mails, then I started calling the Flow Chevrolet dealership/sister company to talk to a live person and have them run messages over, then found some contact people and email addresses in their Sales Dept and emailed them - finally a response. I sent the item back yesterday though I'm still holding my breath they don't screw that up too. I'd just pass on them if you're trying to save a buck on parts.
 04-21-2017, 03:00 PM
#170
V8 Miata Enthusiast
Thread Starter
Someone else on the forum also shared with me today his difficulty in getting them to respond.
I was told to contact this guy for help, and he was slow to respond but did eventually get back to me to apologize:
Luke Bishop
Parts Manager
(336) 760-7046 x400
If you don't hear back, then do like I did and blast an email to the Parts people below. Their email addresses are there and someone responded and fixed the issue within the hour:
Flow Chevrolet Buick GMC of Winston Salem | New Buick, Chevrolet, GMC dealership in Winston Salem, NC 27103
04-25-2017, 01:25 PM
#171
V8 Miata Enthusiast
PJ, thanks for the information and the help.
I followed the link and sent an e-mail to about 5 of the most important looking people at the dealership and attached the history where I requested a return authorization several times over the last 2 weeks.
4 hours later I have a UPS return label.
It is sure good to know somebody who can help.
I followed the link and sent an e-mail to about 5 of the most important looking people at the dealership and attached the history where I requested a return authorization several times over the last 2 weeks.
4 hours later I have a UPS return label.
It is sure good to know somebody who can help.
04-25-2017, 06:07 PM
#173
V8 Miata Prot�g�
I have those same resonators from vibrant. I have a3"-2.5" adapter and then those then some turn downs. Sounds great, but it's pretty loud and the turndowns are awful because of the amount or dust and dirt they blow up, but overall, I'm impressed with the amount they quieted the car down
04-25-2017, 08:59 PM
#174
V8 Miata Enthusiast
Thread Starter
Thanks, (literally) glad to hear it. Hoping them and Flowmaster mufflers are enough, I'd hate to have to swap out the mufflers for something else as well. I think drone and reducing the volume are what I'm after. Haven't found anyone that hasn't had a good experience with some resonators in their system.
05-07-2017, 09:00 AM
#175
V8 Miata Enthusiast
Thread Starter
Still slugging along (or so it seems).
I pulled trans and clutch/flywheel to get a good look at where some oil might be coming from. I forgot how much fun it is to do all of this on your back. I can't really tell what was leaking but I can only assume it was the rear main seal, despite the seal being new. Oil had dropped out of the seal, ended up in the bellhousing and seems to have been flung around a bit by the spinning flywheel. So evidence of oil was everywhere but could only come from a couple places: rear main, rear cover or rear of oil pan. I replaced the rear cover gasket, rear main seal and oil pan seal. So it better work.
I purchased a new seal installation tool -
The tool helps to align the cover evenly around the rear of the crankshaft, you torque down the rear cover, and then install the rear main seal by using the tool to tap the seal off of the plastic piece and directly onto the crank evenly. All of this went according to plan. It's possible when I installed the new seal with the engine out I did not do this correctly. The rear cover seal was a bit worn looking, so maybe it was letting out some oil. Anyway, I hope I don't have to do this again.
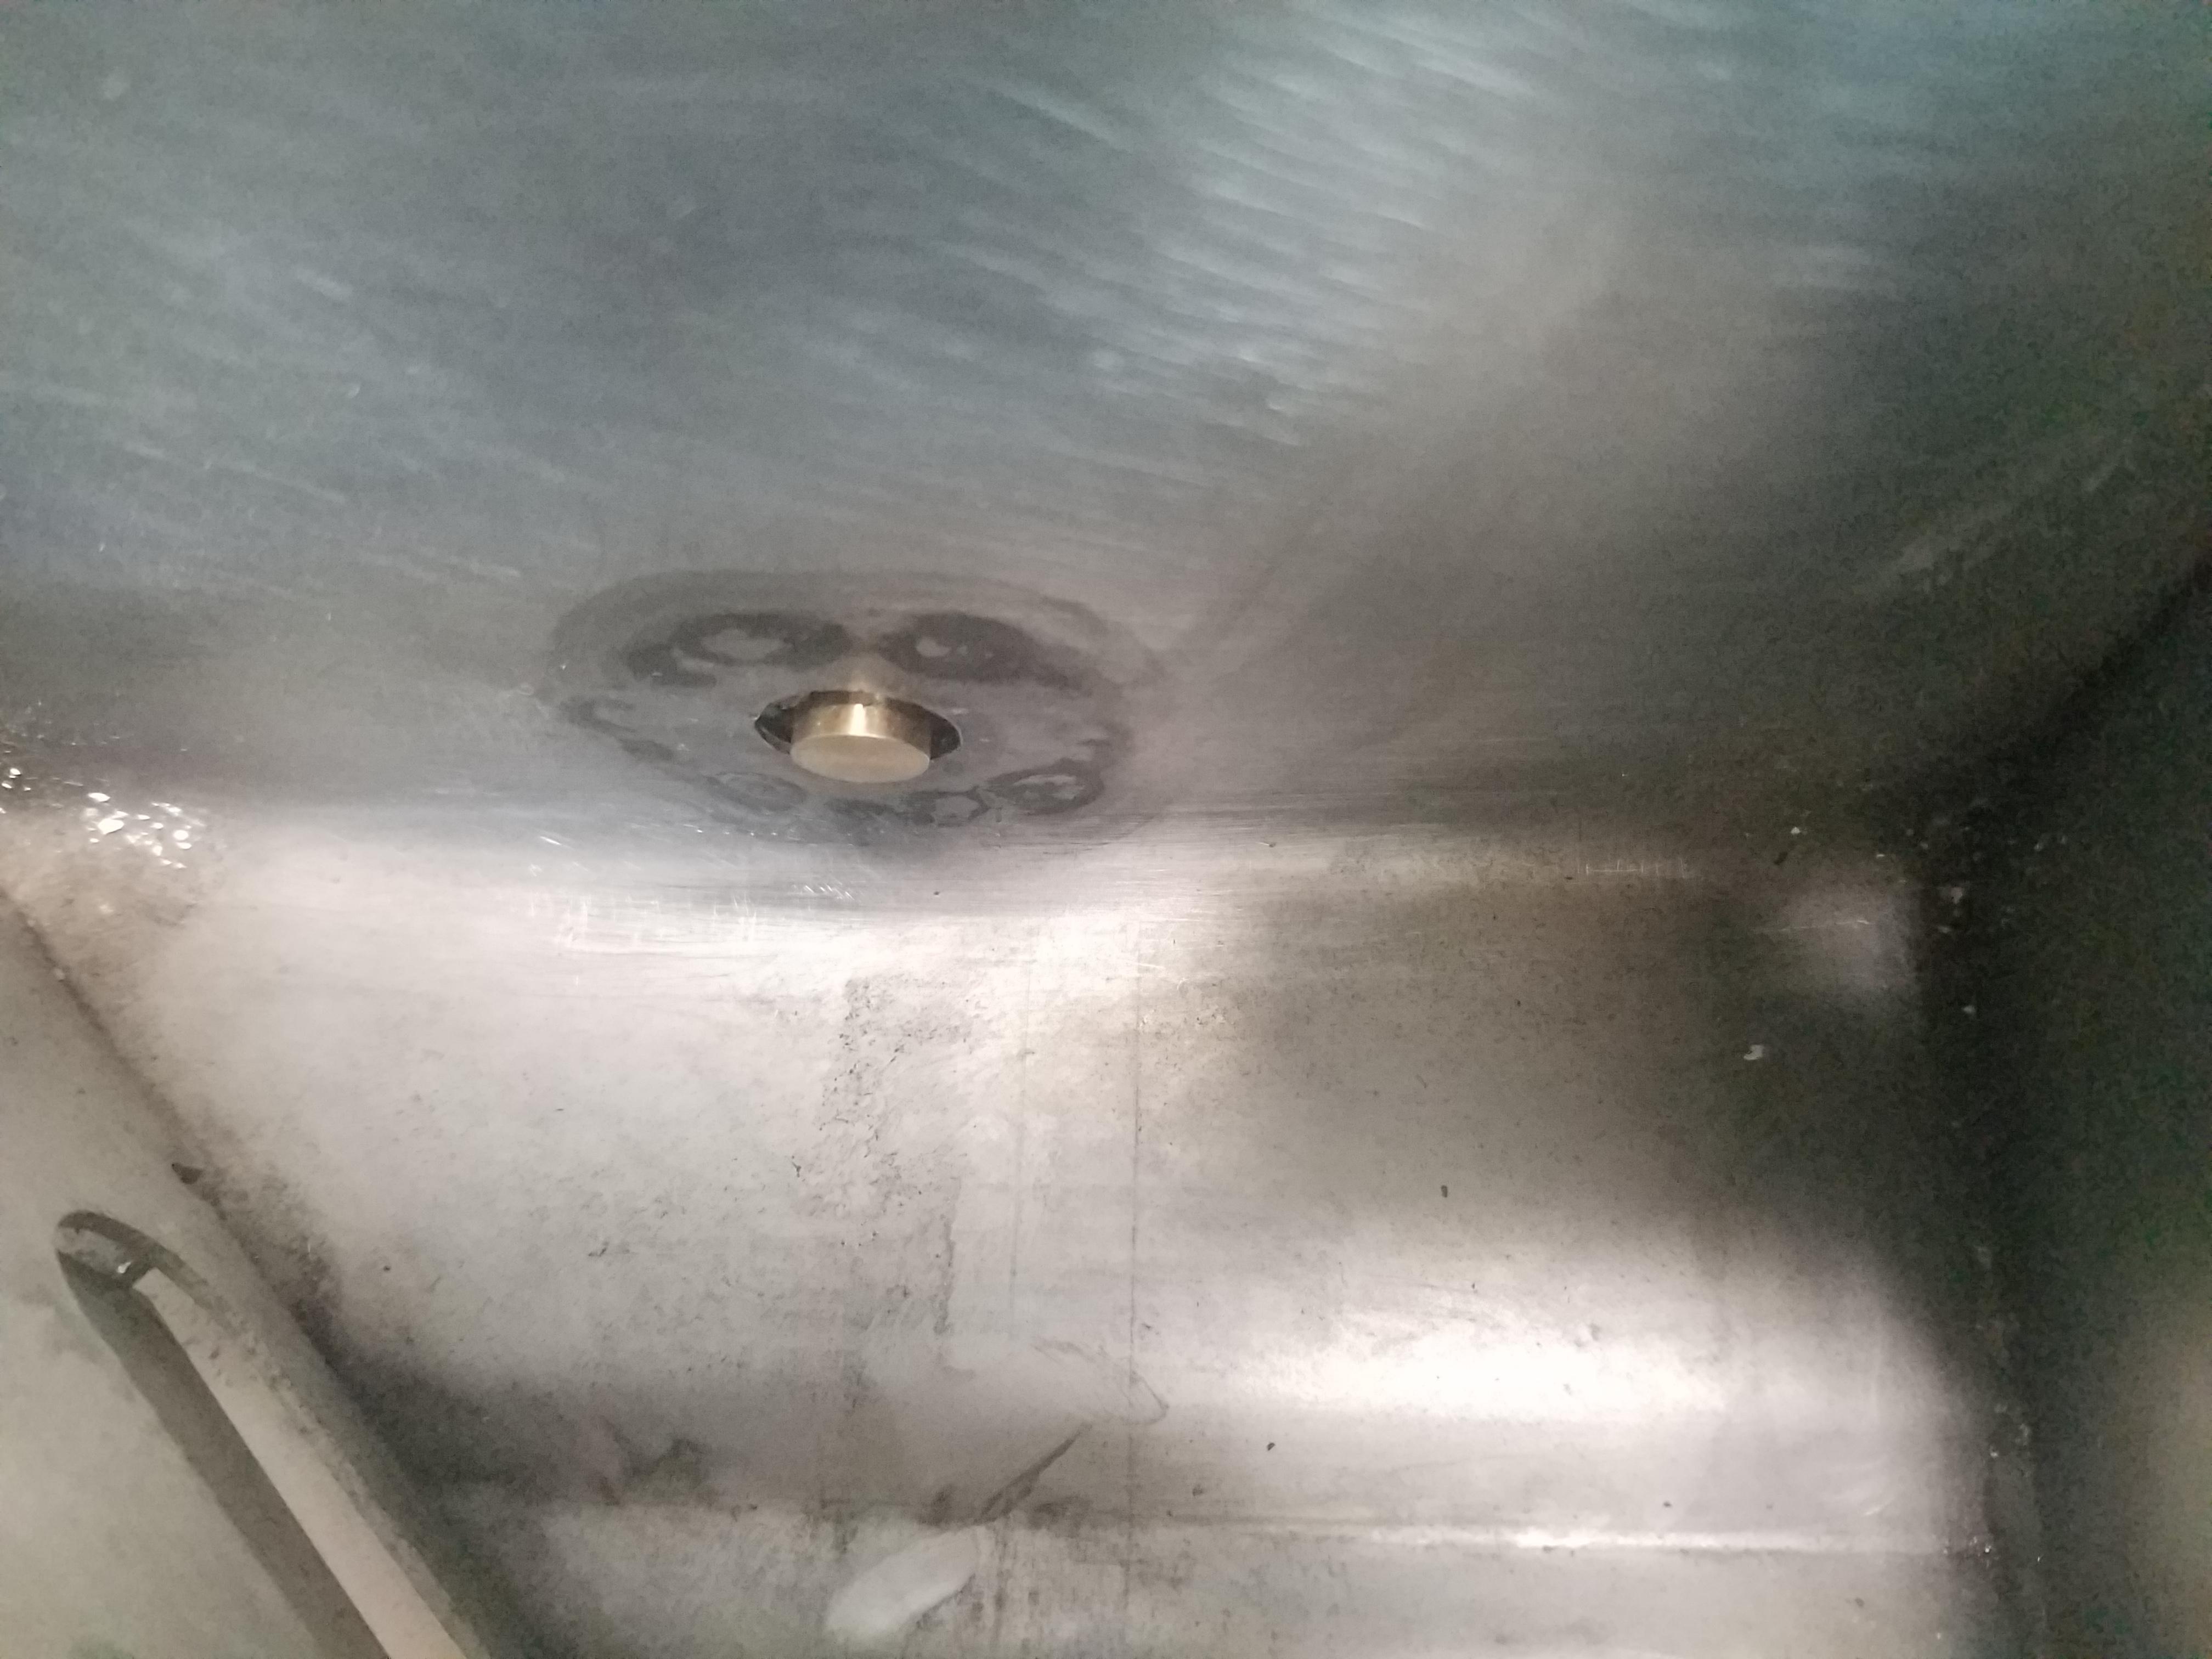
With the oil pan out I installed a bung and oil temp sensor. I had the temp sensor from the old Miata engine, installed in the oil drain plug location. So I just had to buy a properly threaded nut to use as a bung, and weld it in.
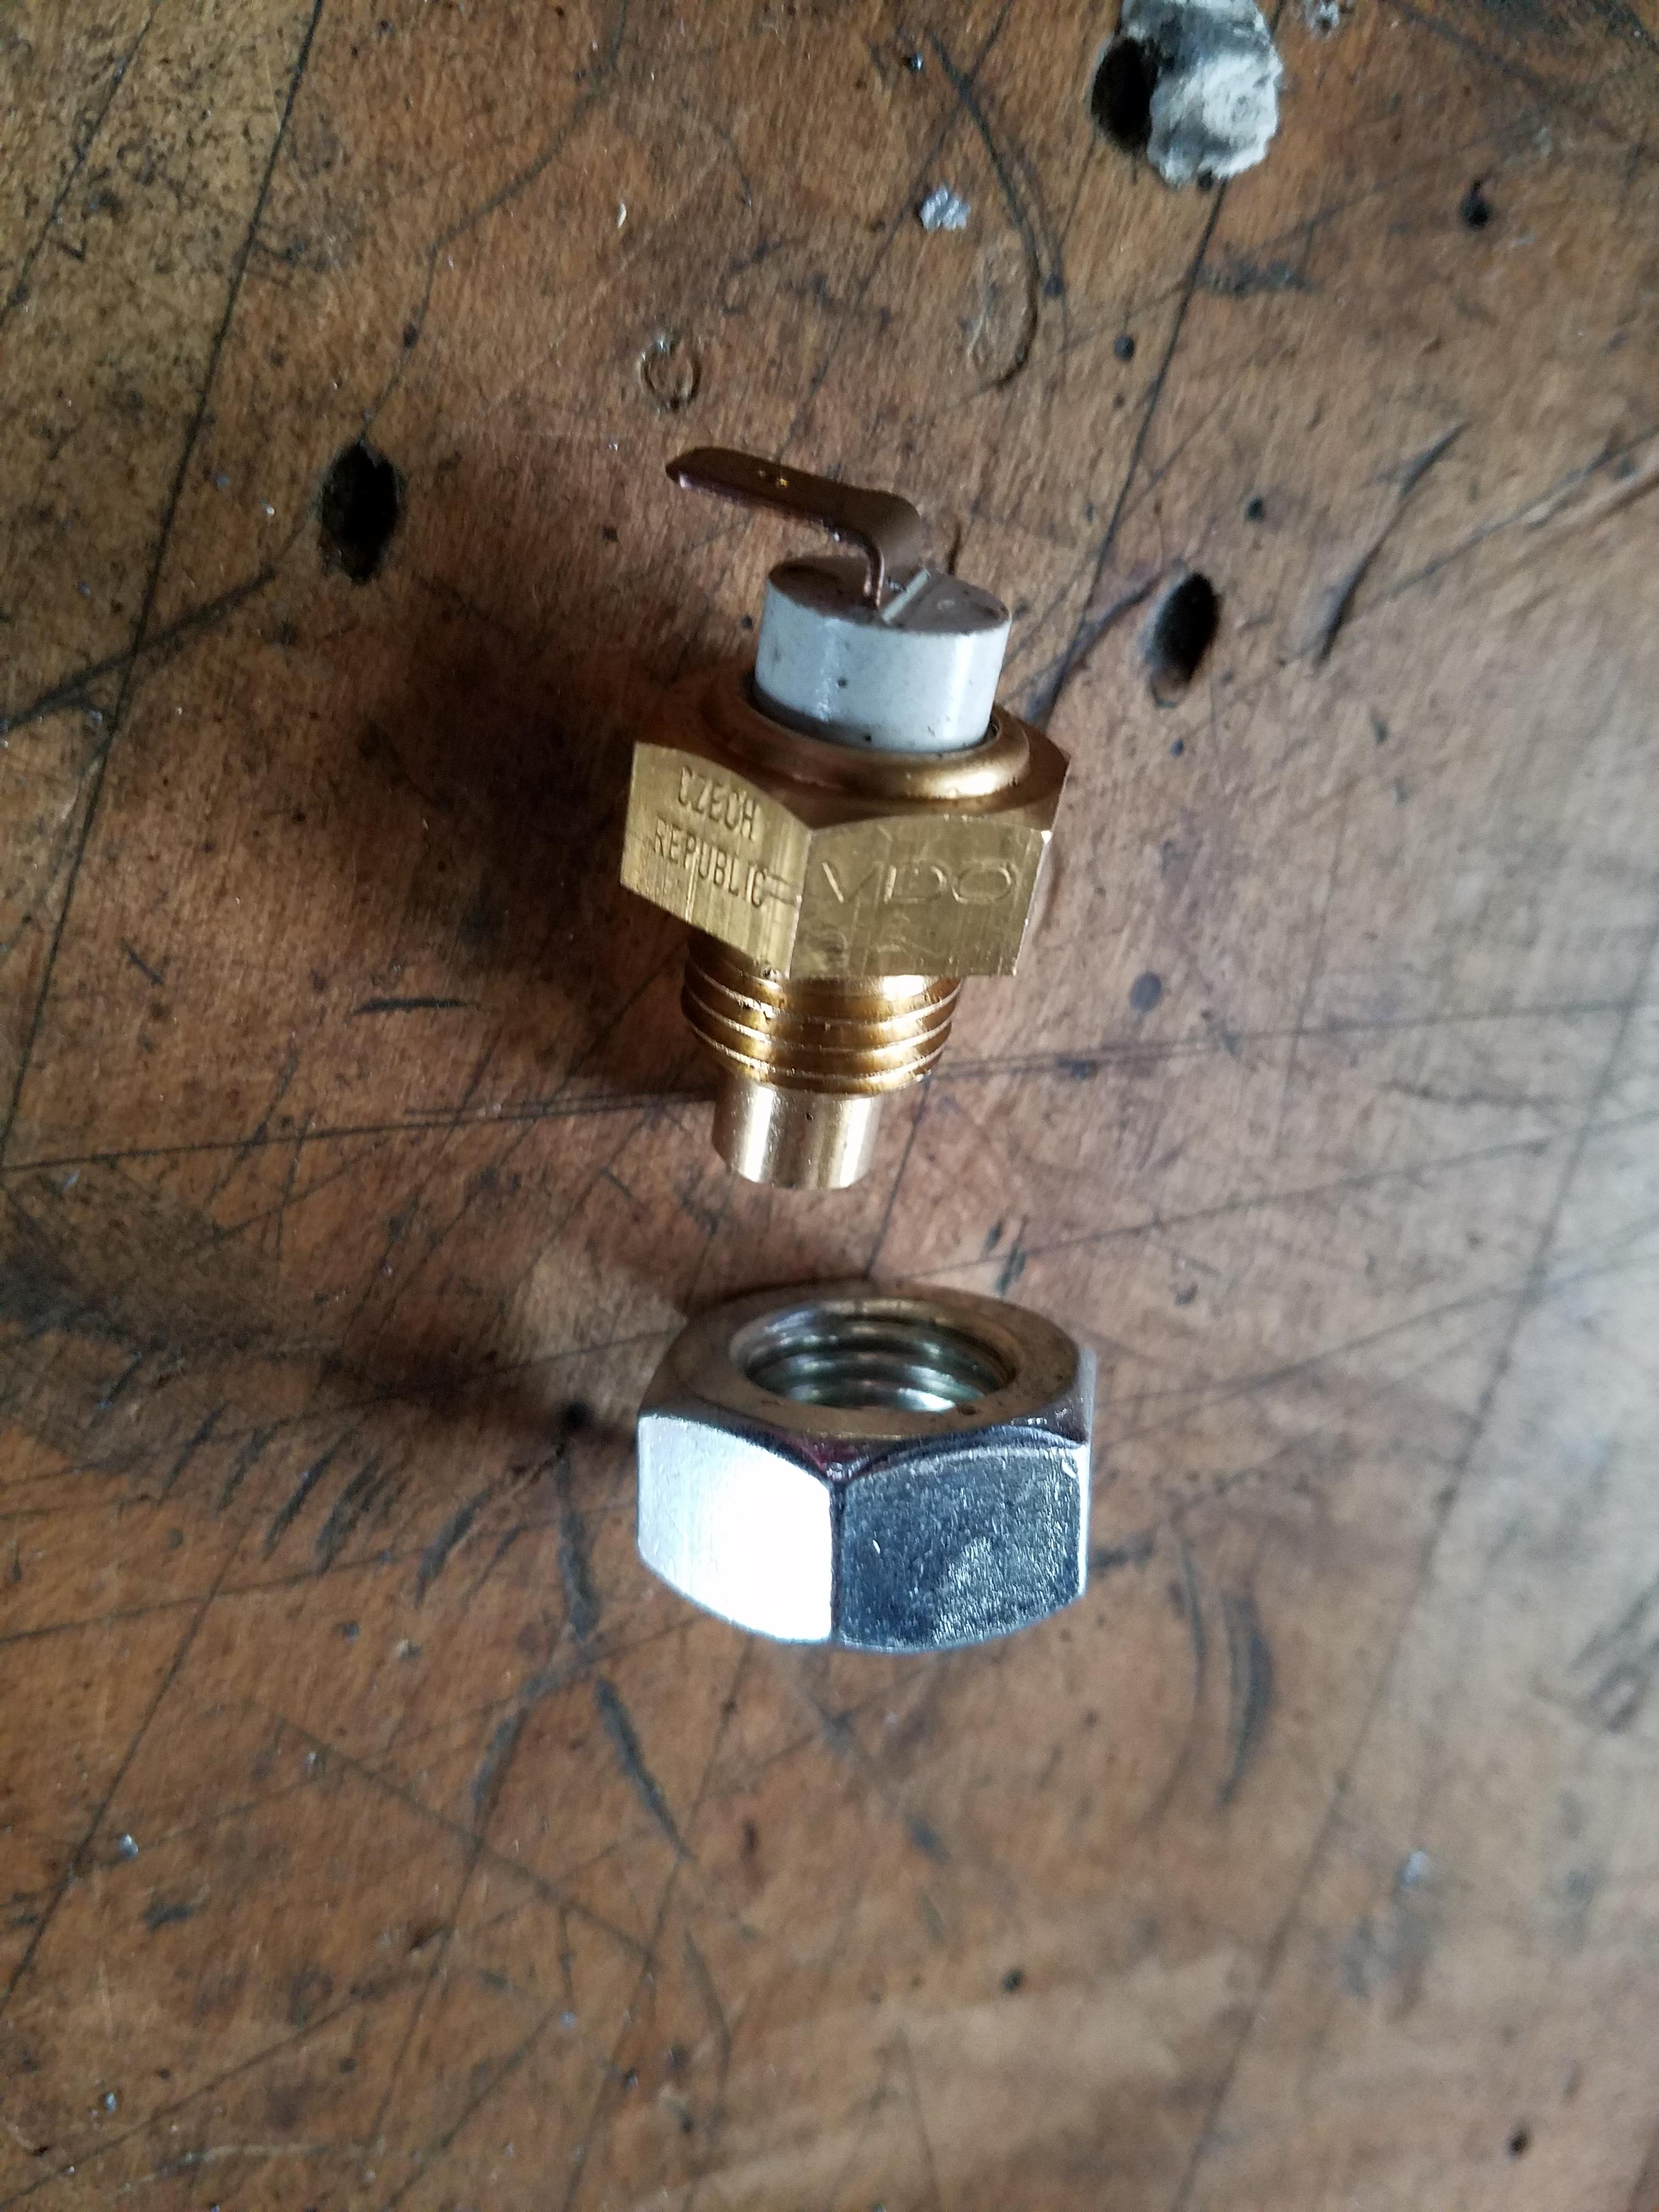
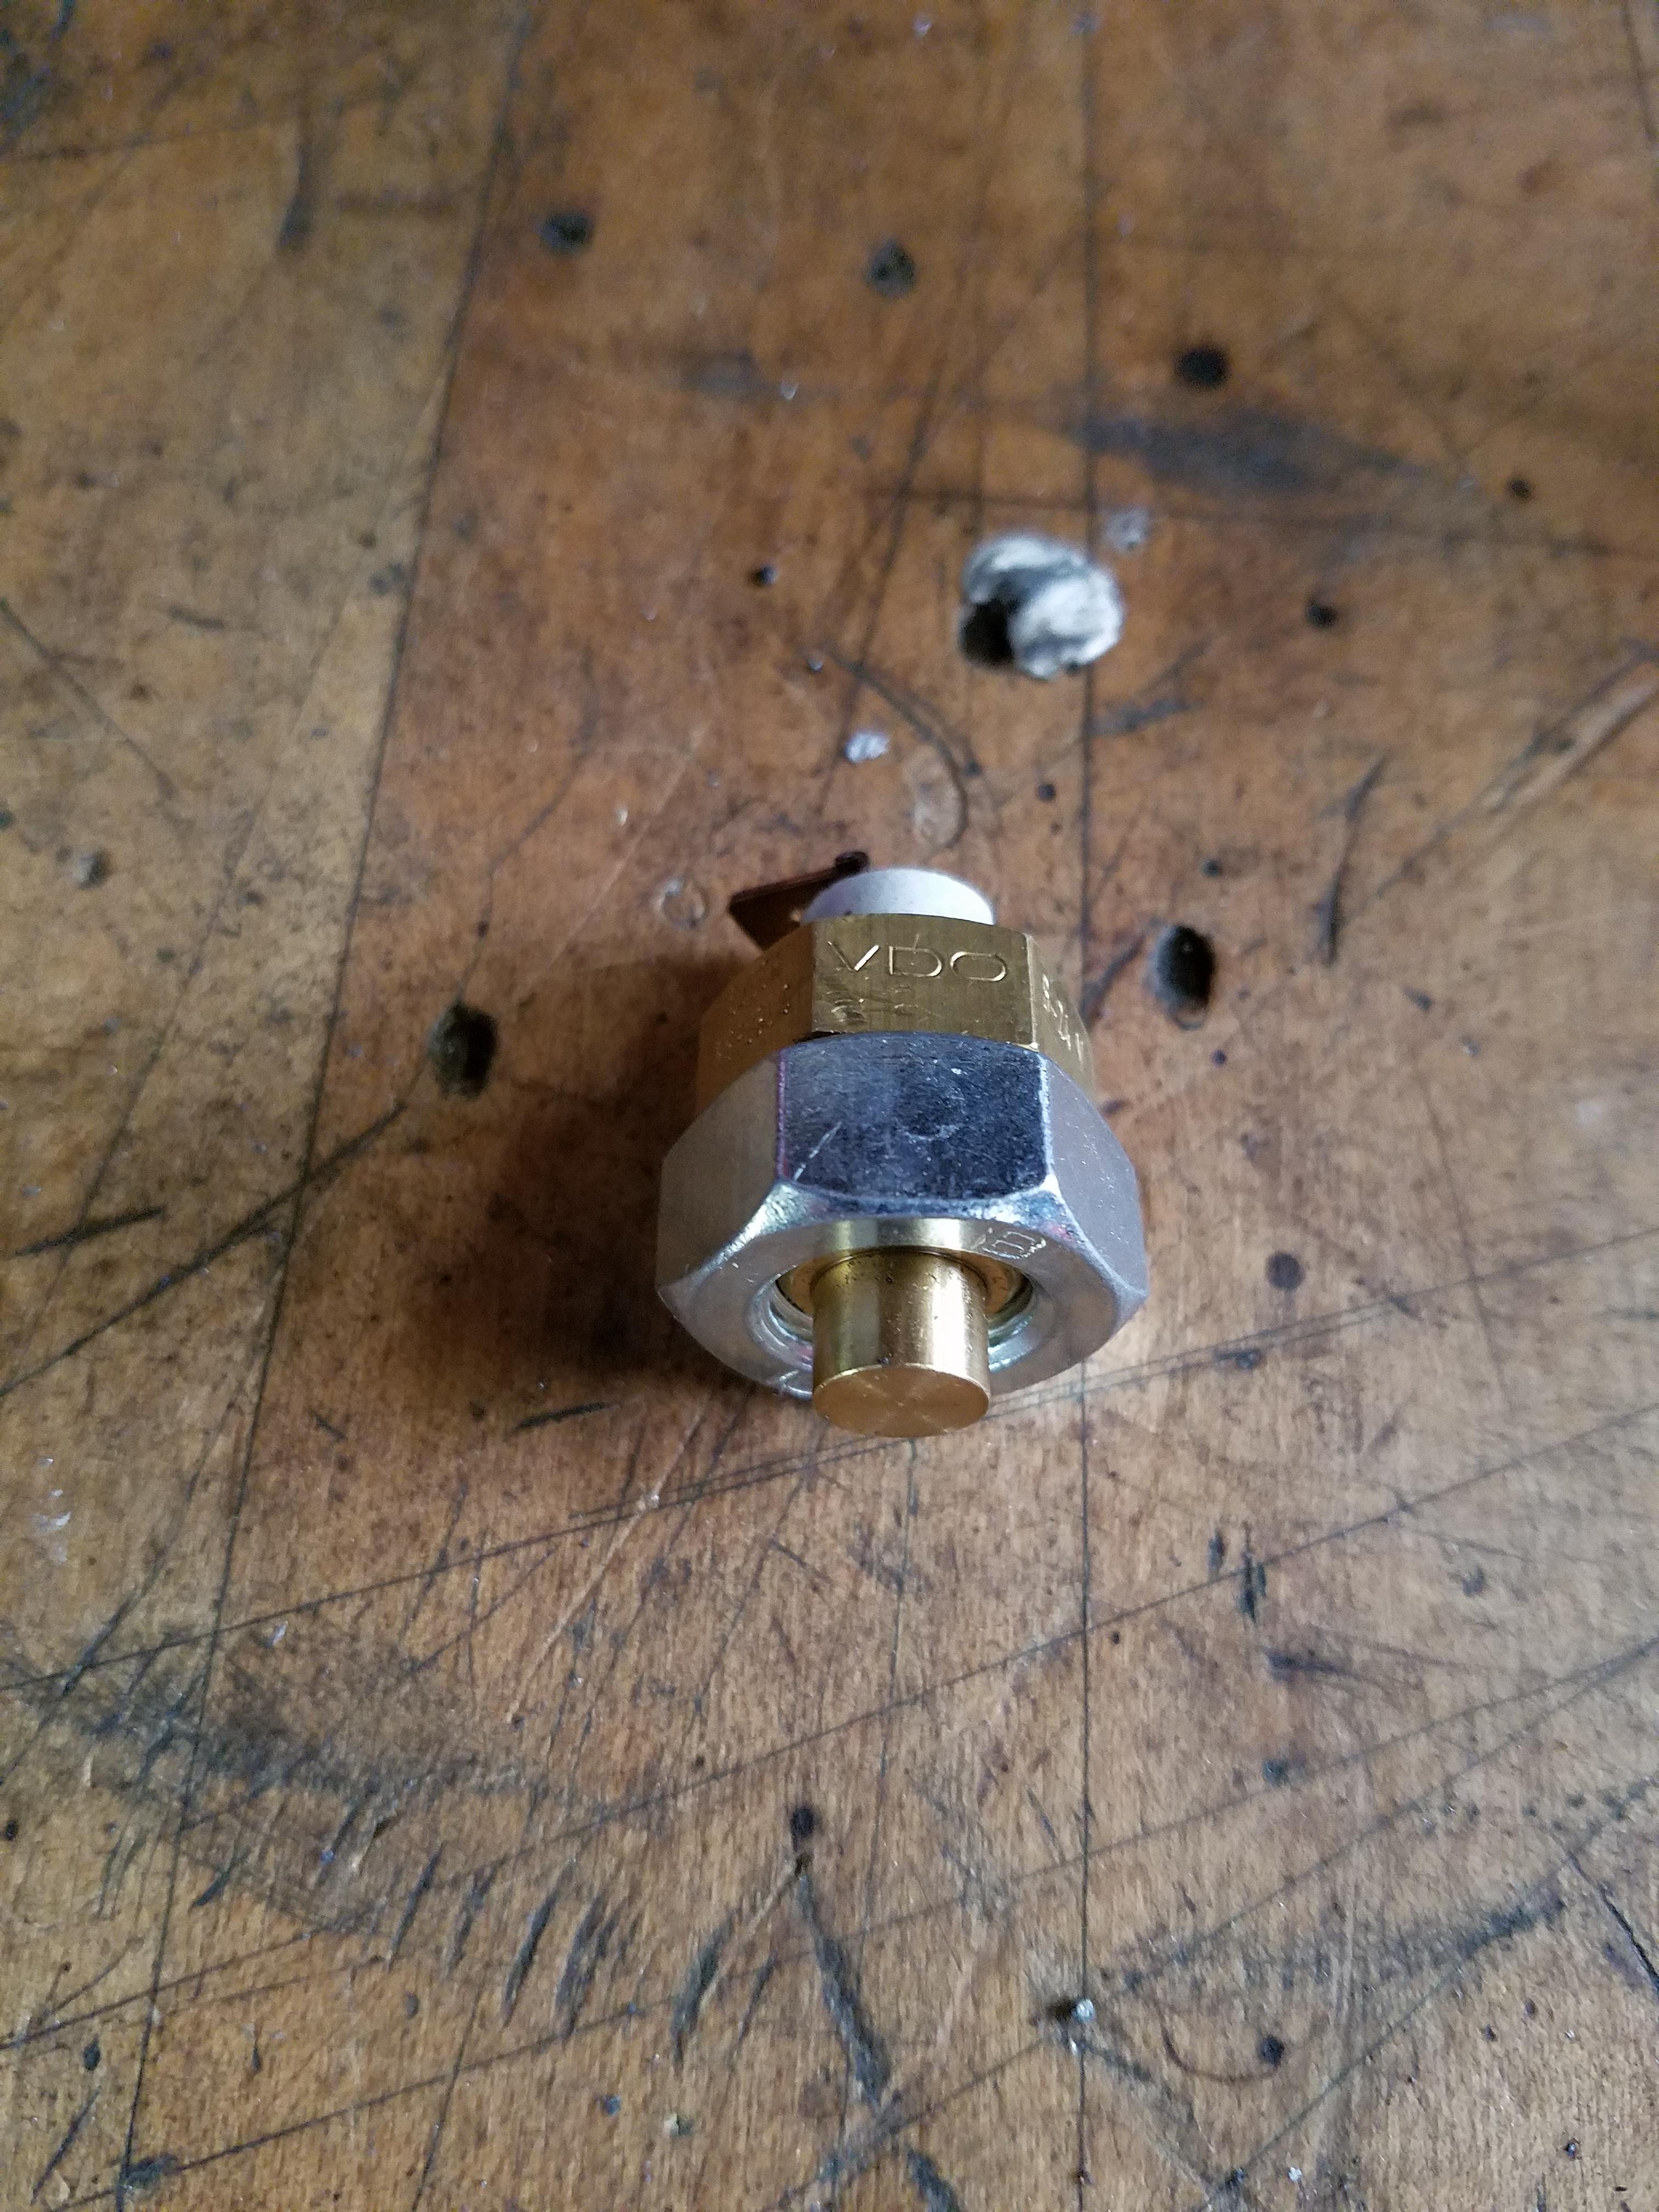
Welded the nut/bung in a location on the same side as the oil drain plug so it wouldn't come too close to the exhaust header, and would allow wiring to come up the driver's side of the car and into the cabin.
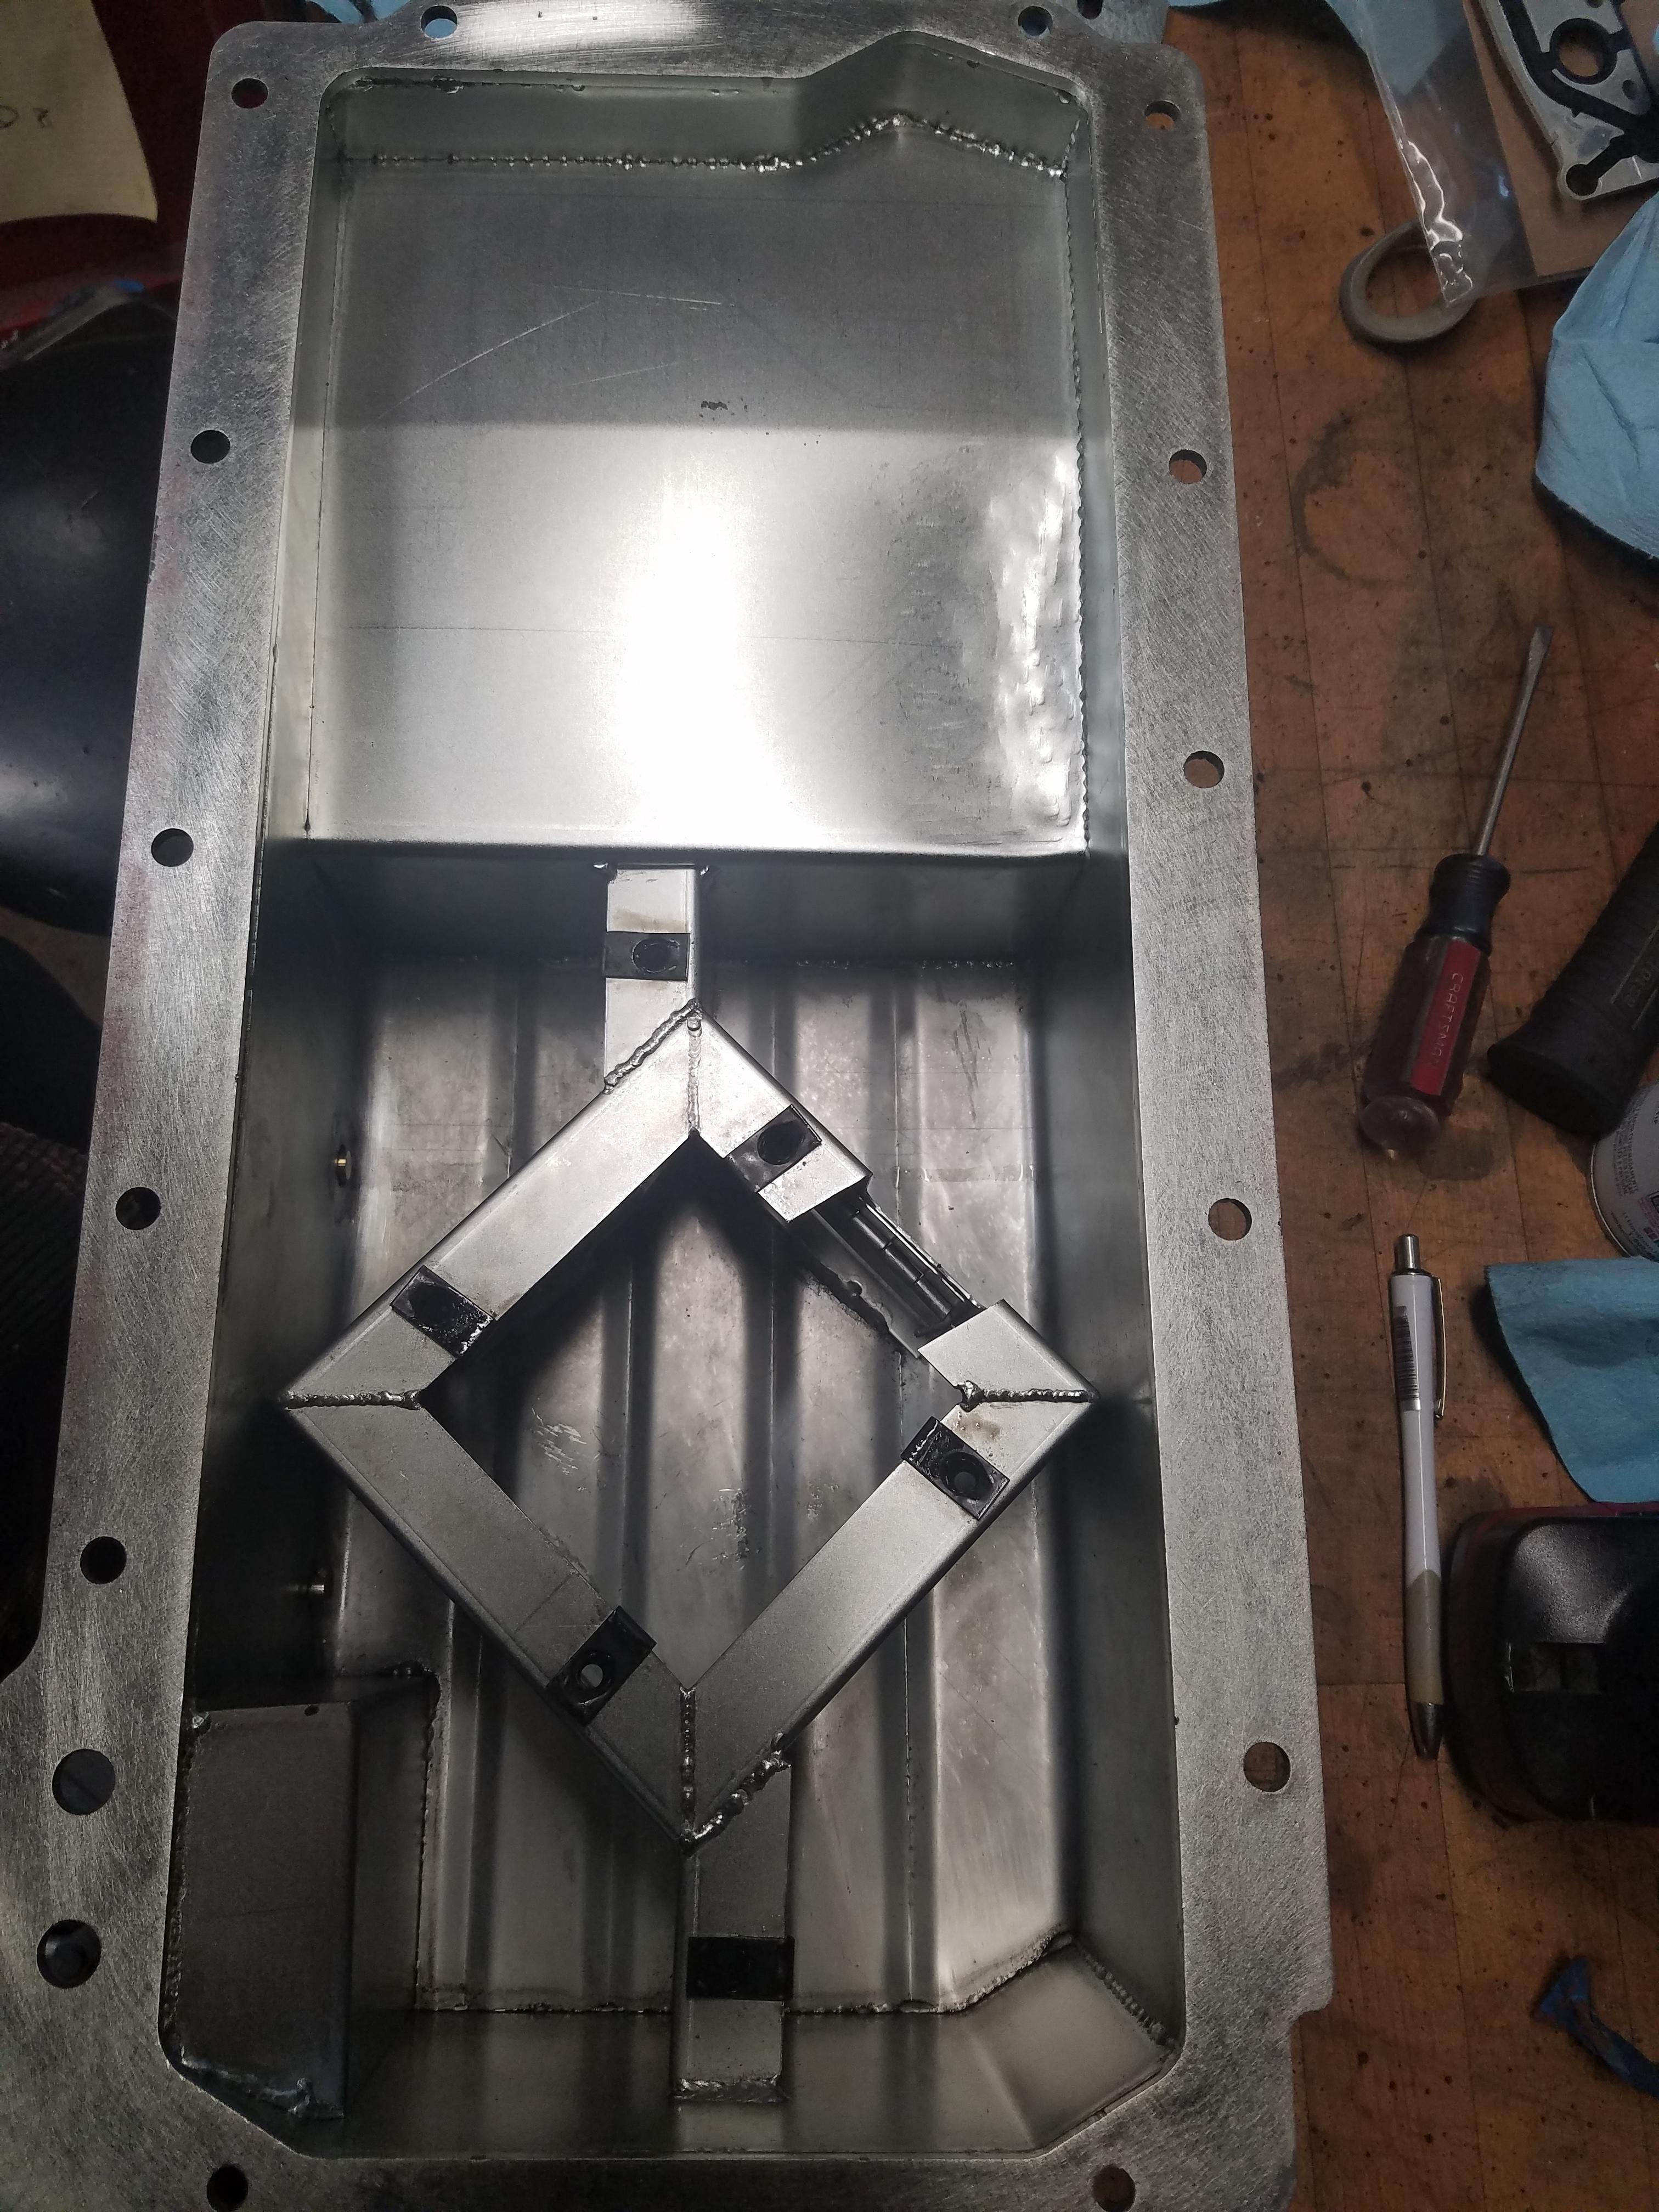
Here's what the baffle system looks like on the FM oil pan with the cover removed
Bung and sensor from the outside.
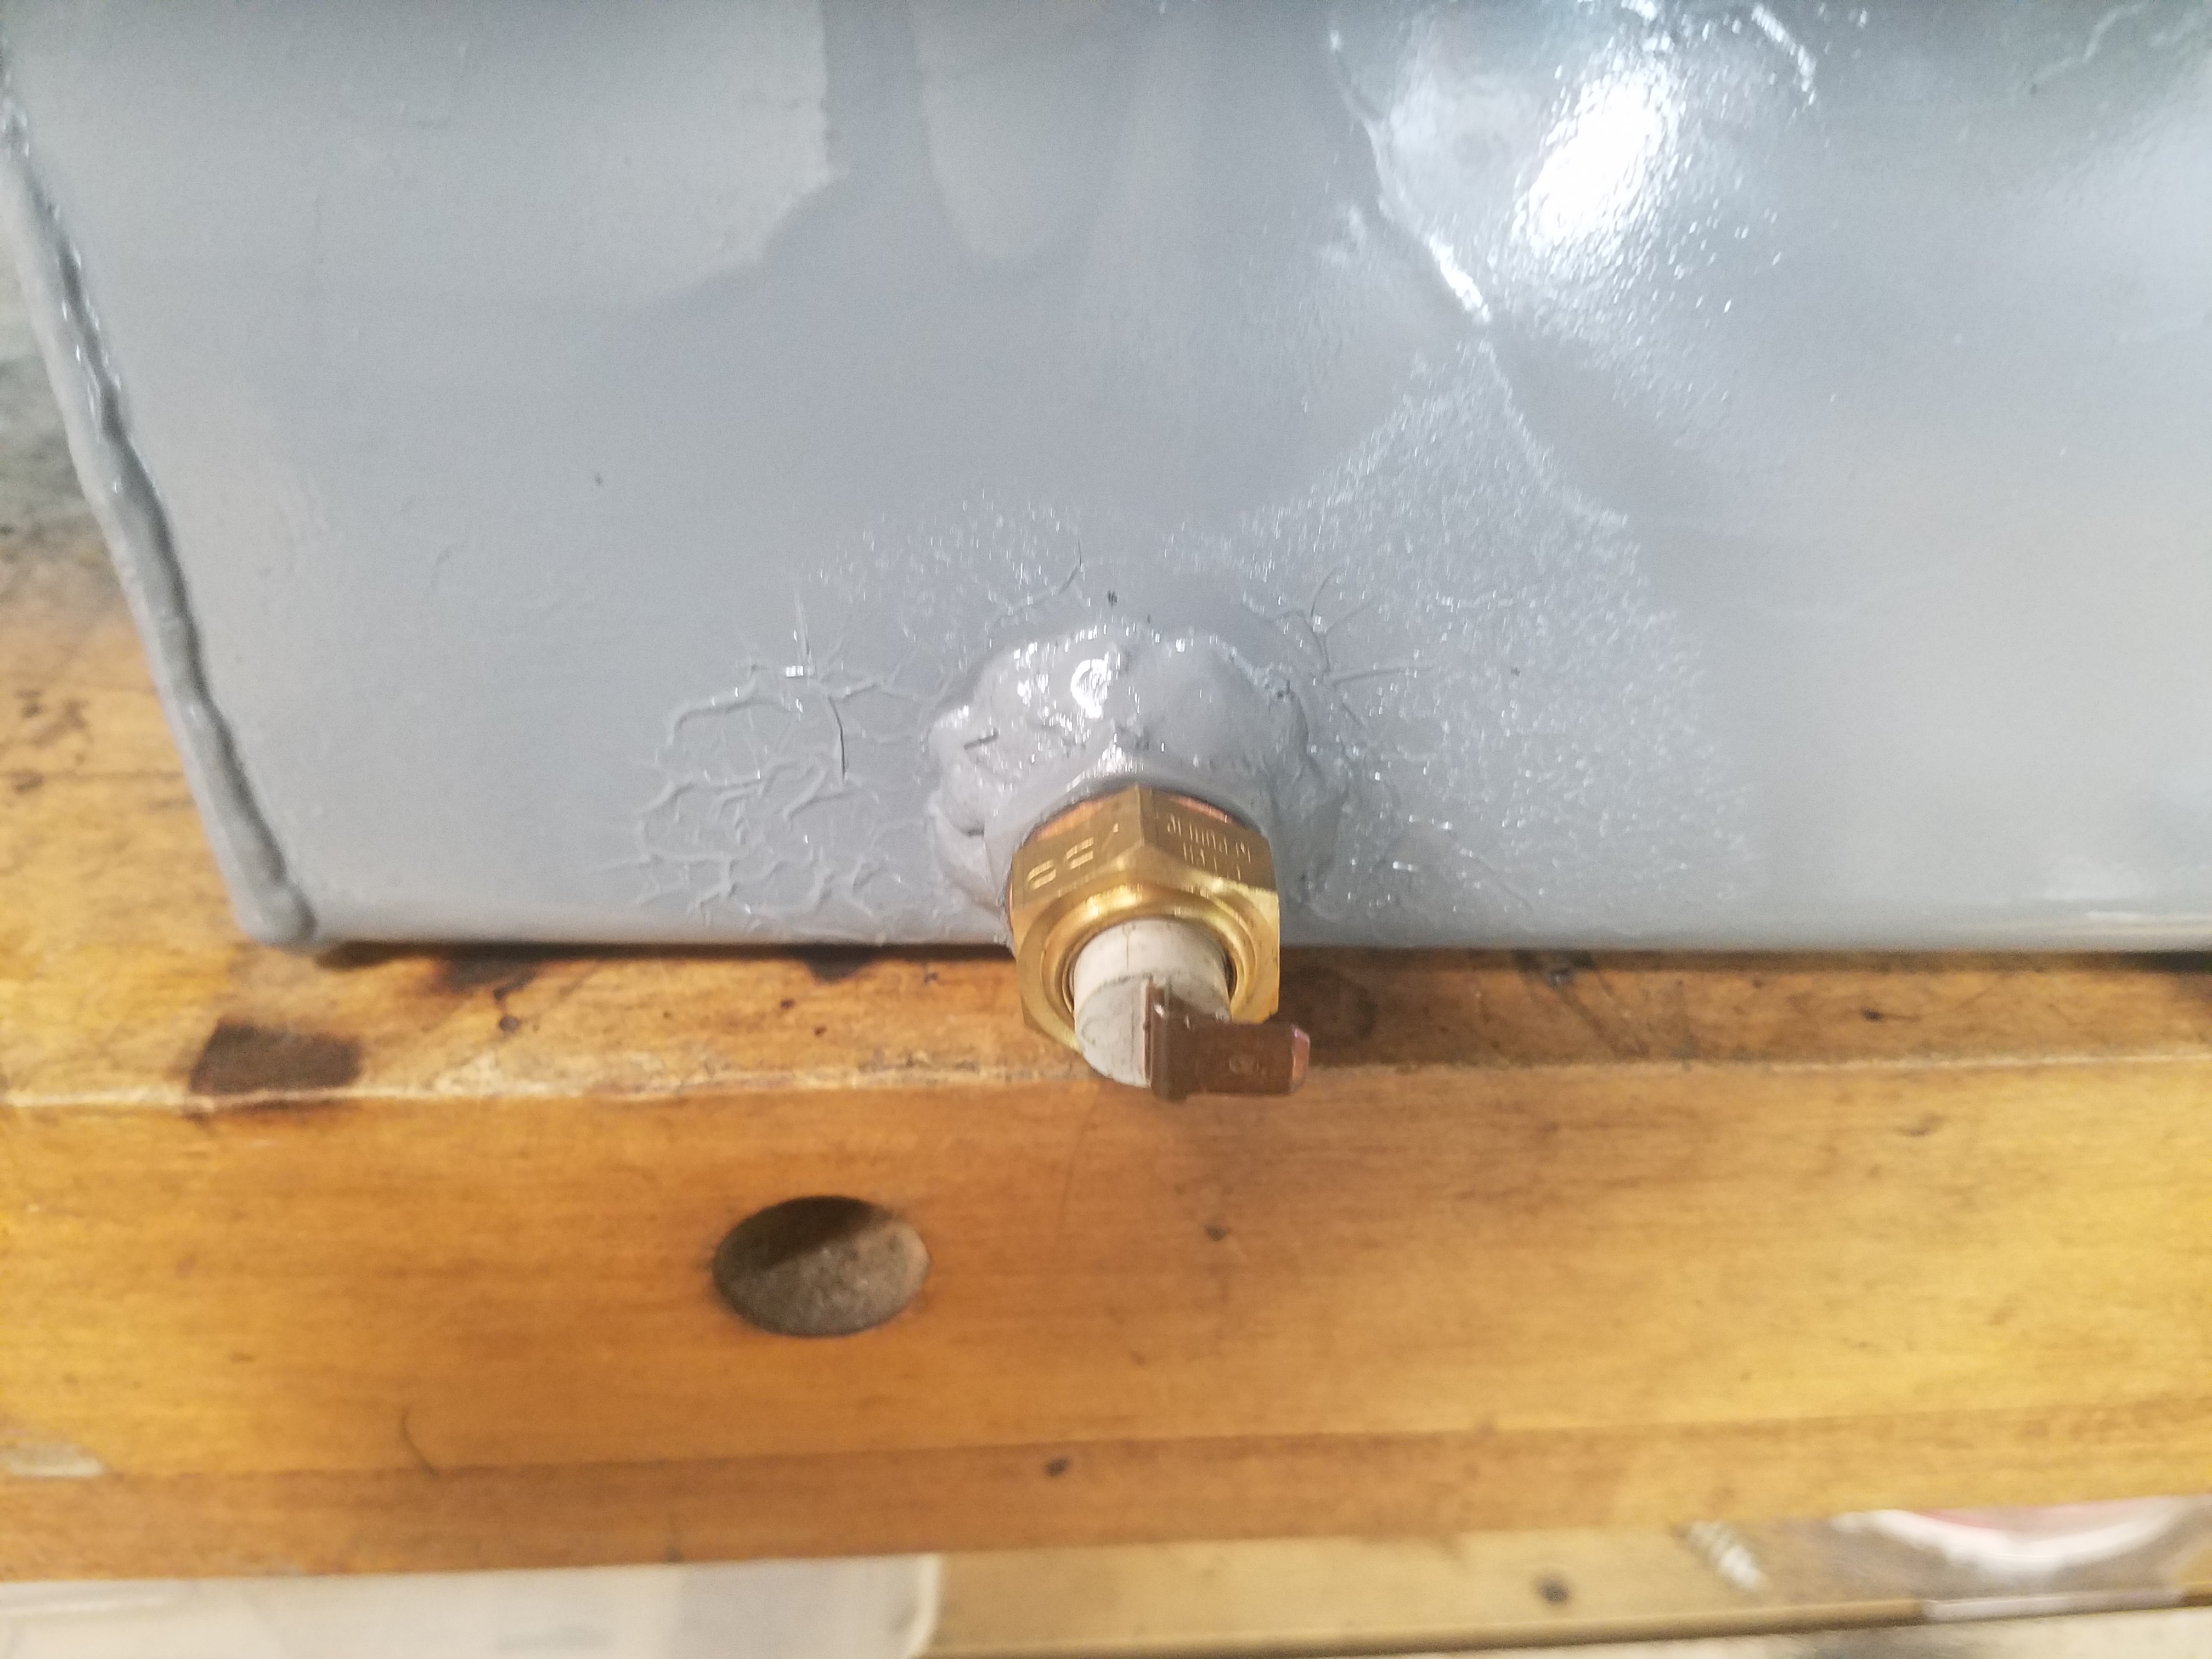
From the inside
The sensor will go into a simple VDO oil pressure gauge that I used in the Miata previously.
I also took a look at the rear CV boots to make sure nothing was amiss there, as WCW's posts report he had some problems with Driveshaft Shops axle boots coming loose. I did find one of the clamps looked a little tweaked, but the boots and clamps were very tight. This little dent may have been something I did during install. I tapped the clamp with a hammer to even it out and will just make a note to keep an eye on it.

I pulled trans and clutch/flywheel to get a good look at where some oil might be coming from. I forgot how much fun it is to do all of this on your back. I can't really tell what was leaking but I can only assume it was the rear main seal, despite the seal being new. Oil had dropped out of the seal, ended up in the bellhousing and seems to have been flung around a bit by the spinning flywheel. So evidence of oil was everywhere but could only come from a couple places: rear main, rear cover or rear of oil pan. I replaced the rear cover gasket, rear main seal and oil pan seal. So it better work.
I purchased a new seal installation tool -
The tool helps to align the cover evenly around the rear of the crankshaft, you torque down the rear cover, and then install the rear main seal by using the tool to tap the seal off of the plastic piece and directly onto the crank evenly. All of this went according to plan. It's possible when I installed the new seal with the engine out I did not do this correctly. The rear cover seal was a bit worn looking, so maybe it was letting out some oil. Anyway, I hope I don't have to do this again.
With the oil pan out I installed a bung and oil temp sensor. I had the temp sensor from the old Miata engine, installed in the oil drain plug location. So I just had to buy a properly threaded nut to use as a bung, and weld it in.
Welded the nut/bung in a location on the same side as the oil drain plug so it wouldn't come too close to the exhaust header, and would allow wiring to come up the driver's side of the car and into the cabin.
Here's what the baffle system looks like on the FM oil pan with the cover removed
Bung and sensor from the outside.
From the inside
The sensor will go into a simple VDO oil pressure gauge that I used in the Miata previously.
I also took a look at the rear CV boots to make sure nothing was amiss there, as WCW's posts report he had some problems with Driveshaft Shops axle boots coming loose. I did find one of the clamps looked a little tweaked, but the boots and clamps were very tight. This little dent may have been something I did during install. I tapped the clamp with a hammer to even it out and will just make a note to keep an eye on it.


