pj_mcgarvey's - LS1/T56 NB build thread

 10-04-2016, 09:14 PM
#26
V8 Miata Enthusiast
Thread Starter

I've had some free time this week to get alot done. I'm about done with the seam welding, though I think it needs a bit of cleanup in some areas. Not a surprise but the seam sealer has made it frustrating to get good clean welds in tight areas w/out contamination and crappy welds.
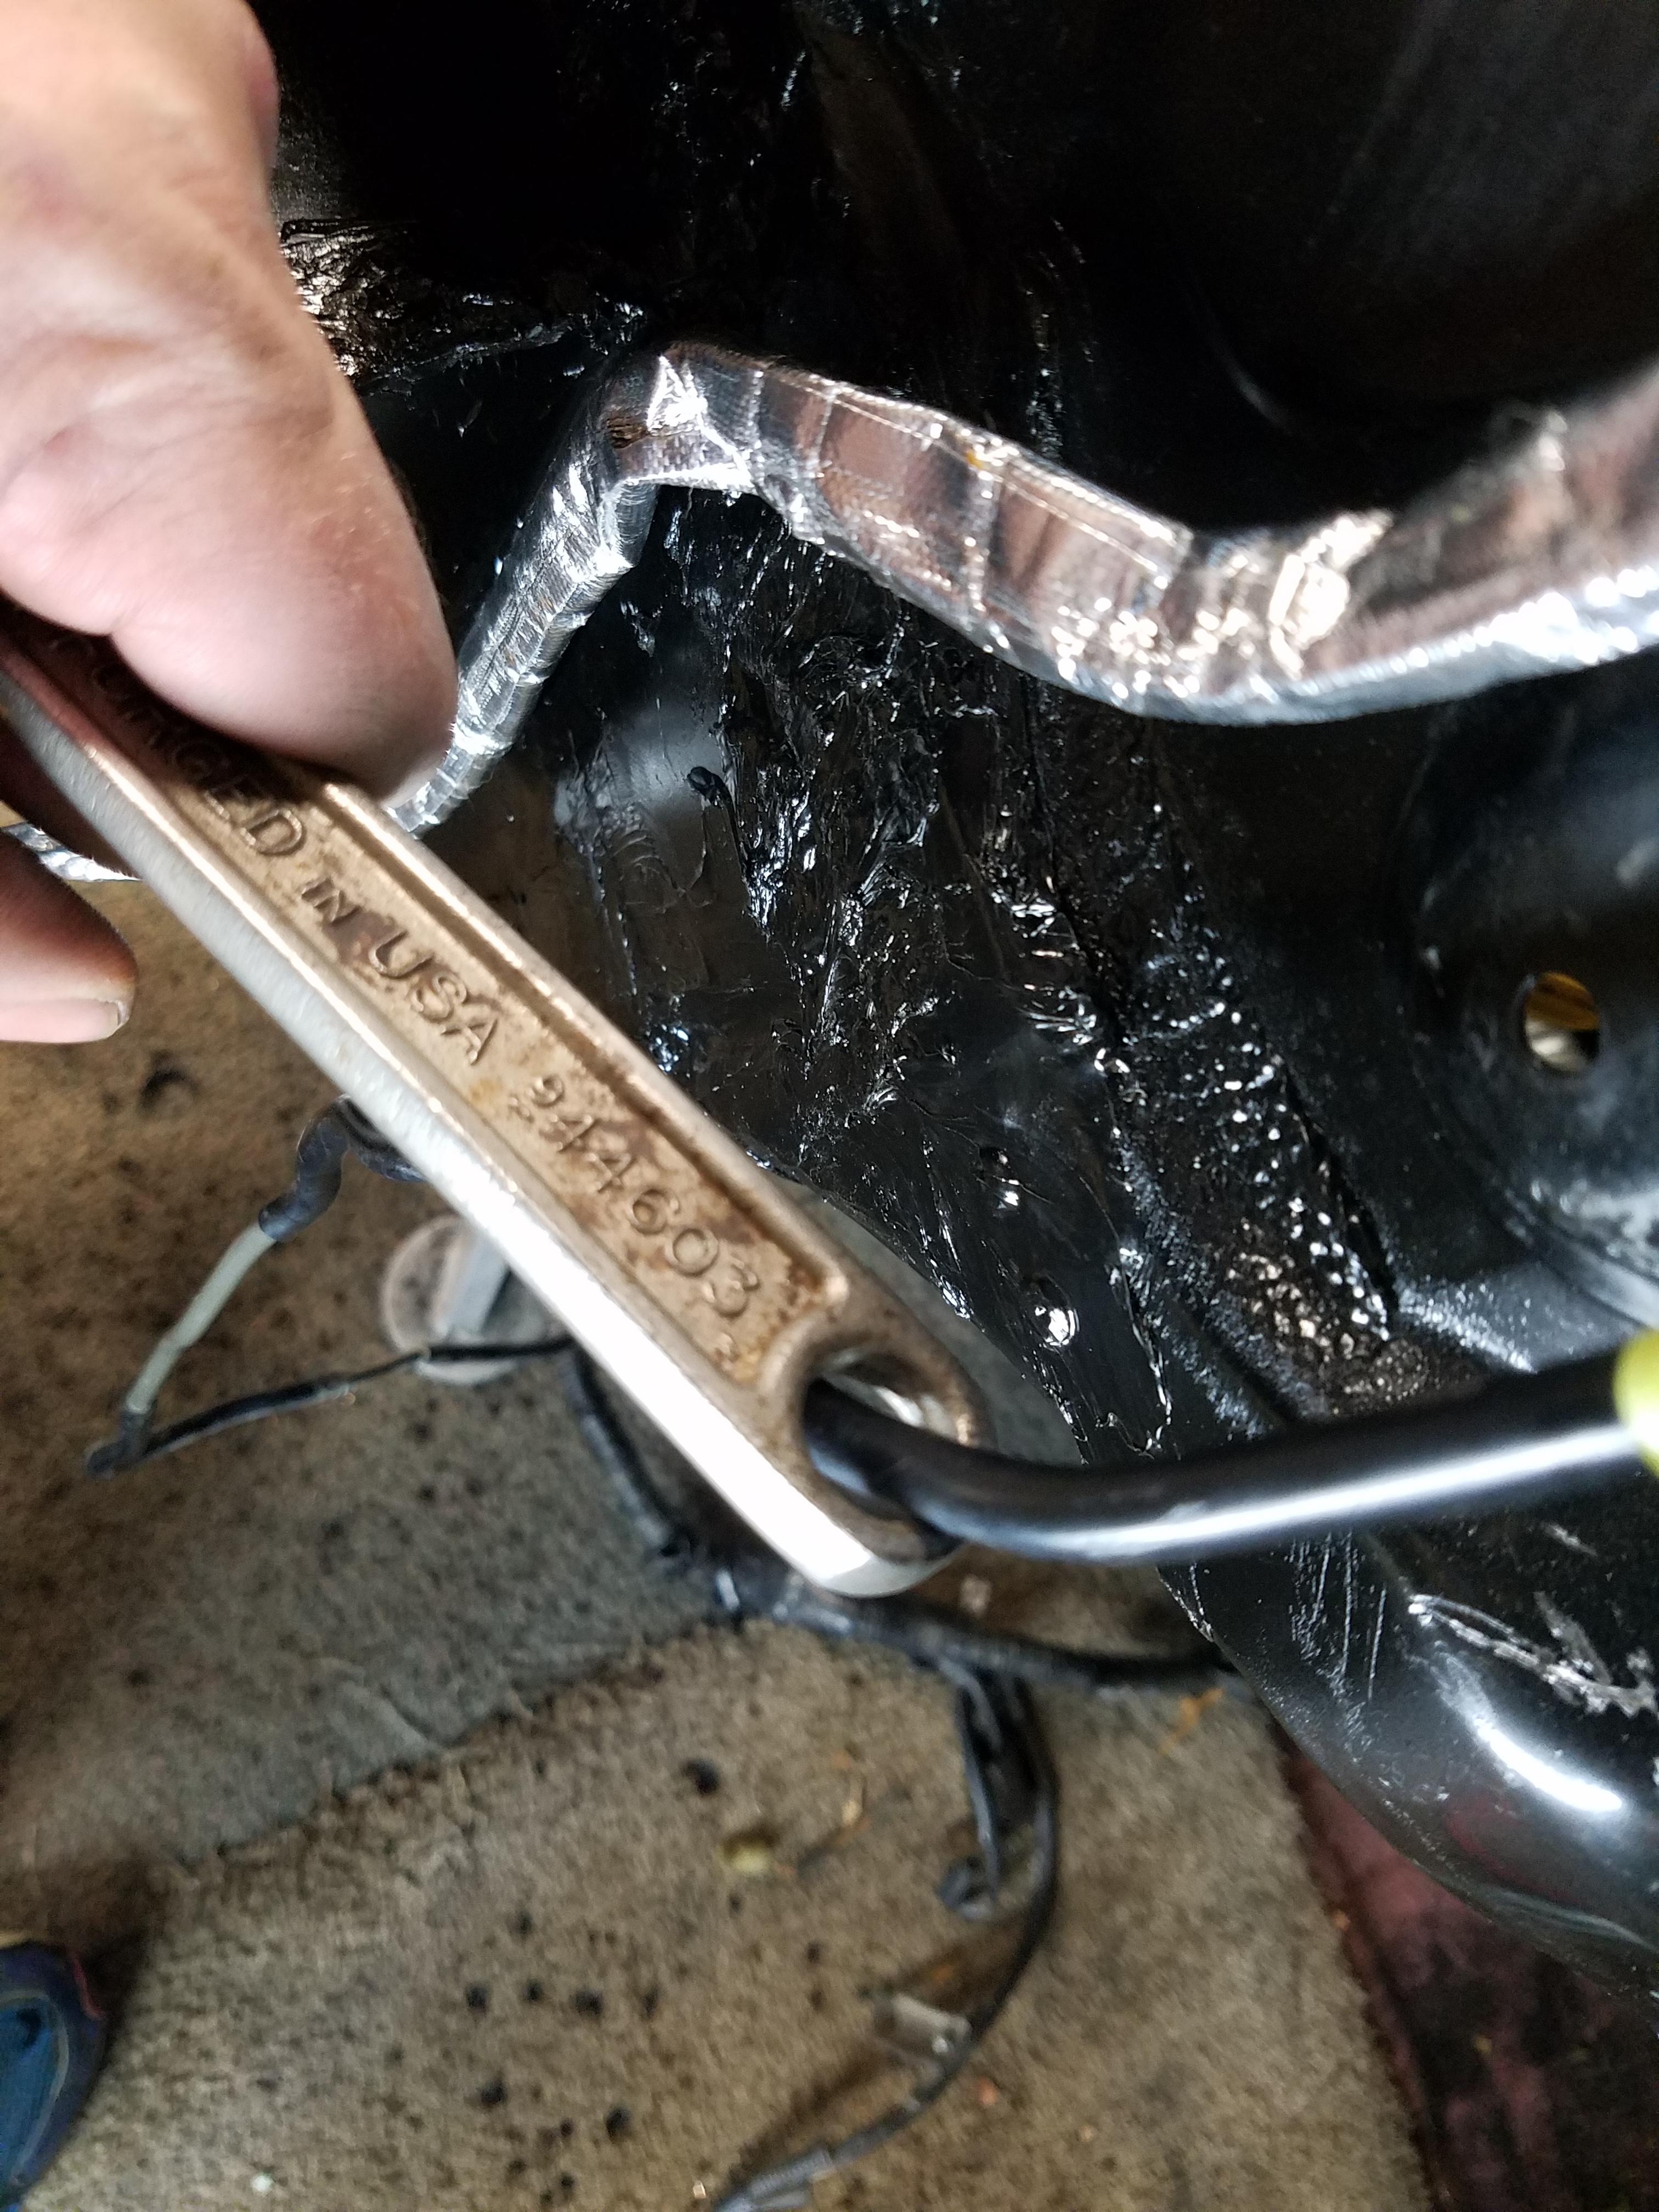
After a few hours of that I decided to turn to the tunnel itself. I still had the driver's side interior tunnel gusset to go and ran out of working spot welder removers. These Harbor Freight jobbers did OK at first Spot Weld Cutter - 3/8" Spot Weld Cutter Drill Bit but if you overwork them or snag on a piece of steel the wrong way - the teeth shatter. Once one tooth goes, the rest are not far behind. I think I went through about 4 and the fifth one is still intact.
So I turned to Amazon for something different. I didn't get to work this set over too much, but it did a quick, clean and effortless job. These are not going to crack like the HF cutters, and don't seem to jump out of their place like the HF set. Bonus: they are made in USA. Just follow the directions and start slow to let the centering drill bit take a set, and then you can push on it. The centering bit is spring loaded, and just gets out of the way to let the spot weld cutter do its job.
Once the gussets are removed I could make a cut where the tunnel meets the firewall. I followed the FM instructions here. Then hammer back the tunnel til it matches the measurements in the instructions.
Then you can start to fold the firewall back over the tunnel portion. The measurements I took seemed to indicate that you can just fold the firewall back along the seam - on an NB Miata, and in my pictures, this is where the bare metal meets the undercoated part.
Happy with the measurements I wasted not time in bolting up the V8 Roadsters subframe.
Quick story on this one - I found this subframe kit on Craigslist back in December 2015 - when this build was just a twinkle in my eye (lol). I had setup a Craigslist search for LS V8 swap related parts, and this one came into my Inbox at 11:30p one night as I was heading off to bed. Sent the seller a quick email. The following day I met the guy just across the bridge from Philadelphia to New Jersey at a State Police barracks and took delivery. $1000 cash - which is about half what you pay for these new, subframe, rails, motor mounts, trans brace, bolts, etc... It was at that point I knew I had to do this swap.
Last edited by pj_mcgarvey; 03-29-2017 at 08:04 PM.
 10-04-2016, 09:36 PM
#27
V8 Miata Enthusiast
Thread Starter
Last night I was able to fit up the engine. I had some issue getting the motor mounts to line up with motor mount points on the subframe. The motor mounts are upside down I realized later, but you can see how far off one side is from bolting in. The driver's side motor mount bolt is already fitted.
So what's going on here? Not sure.. I did some research on different motor mounts for the LS, and it seems I have what others are using - Energy Suspension brand. The steel plates that bolt to the engine block seem to be sorta DIY - not sure if they are the FM or V8R pieces. I lifted the engine up, removed everything, flipped the mounting plates over, installed the motor mounts the correct way and installed some washers as spacers until I had the right spacing. I ended up with 3 washers on each side of the engine and the alignment was spot on.
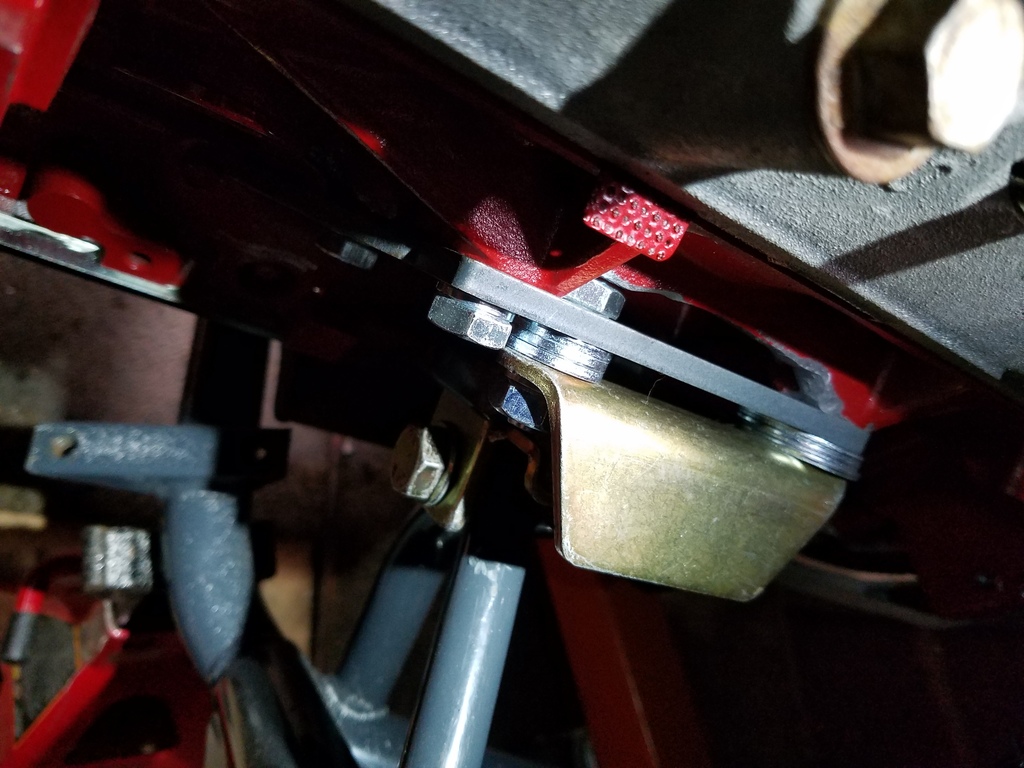
Not sure if others think this is a good long term solution? Should I tack weld the washers together so they don't move around too much?
I'm also not very happy that I had to grind a bit of the block where the bolts connect the motor mount to the mounting plate. I'll clean up these areas to smooth them out and not create any stress risers and then repaint.
All in all a good night as the motor sits nicely in the bay. No clearance issues below, or near the tunnel.
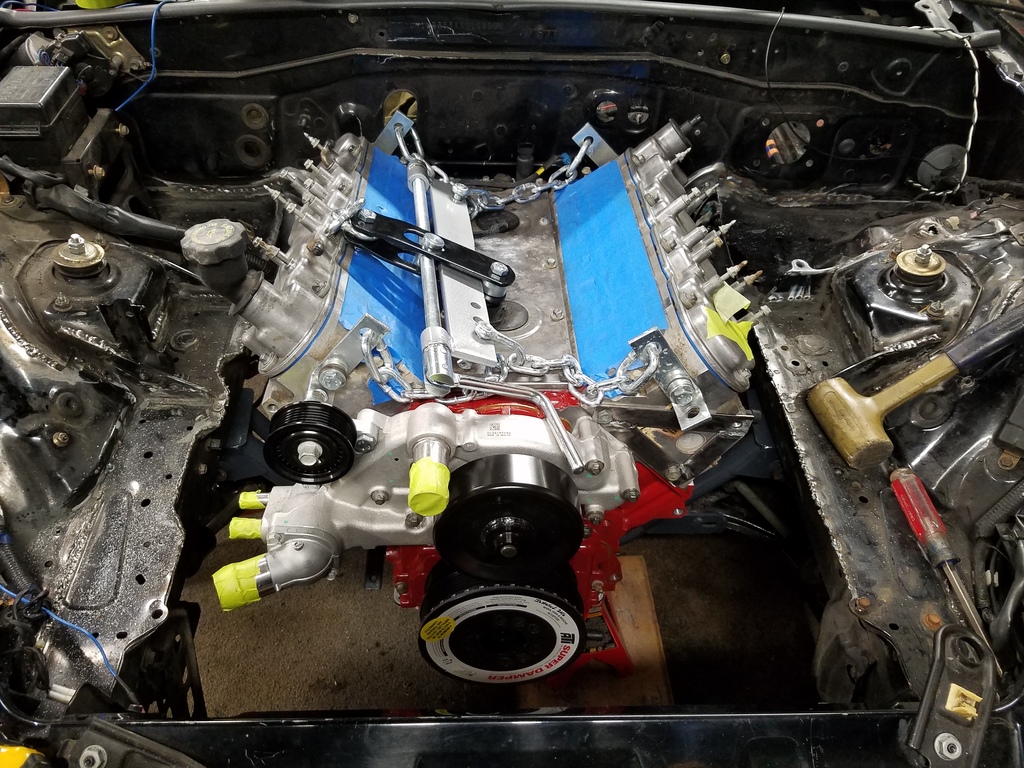
Motor came back out and will wait in the wings while I finish welding the tunnel.
So what's going on here? Not sure.. I did some research on different motor mounts for the LS, and it seems I have what others are using - Energy Suspension brand. The steel plates that bolt to the engine block seem to be sorta DIY - not sure if they are the FM or V8R pieces. I lifted the engine up, removed everything, flipped the mounting plates over, installed the motor mounts the correct way and installed some washers as spacers until I had the right spacing. I ended up with 3 washers on each side of the engine and the alignment was spot on.
Not sure if others think this is a good long term solution? Should I tack weld the washers together so they don't move around too much?
I'm also not very happy that I had to grind a bit of the block where the bolts connect the motor mount to the mounting plate. I'll clean up these areas to smooth them out and not create any stress risers and then repaint.
All in all a good night as the motor sits nicely in the bay. No clearance issues below, or near the tunnel.
Motor came back out and will wait in the wings while I finish welding the tunnel.
Last edited by pj_mcgarvey; 10-05-2016 at 08:49 AM.
10-04-2016, 09:57 PM
#28
V8 Miata Enthusiast
Thread Starter
Earlier in the week I also took delivery of my T56. I had been looking around on Craigslist and ebay but never really saw much. My goal was to stay around the $2k mark, and find one that had evidence of a recent rebuild - or a cheap core I could send to Tick Performance and have rebuilt.
So as you may know, the T56 is getting to be a rare commodity. I discovered some time ago that LS1Tech.com is a great resource for buying and selling parts. I would highly recommend anyone to sign up for an account and just start searching - you will be sure to find something.
I got in touch with a guy who was selling a LT style T56 (same gears as LS style, but from an earlier Camaro). He is a drag racer and rebuilds his own transmissions. He'd rebuilt this with the Tick Stage 2 kit Tick Performance Level 2 Upgraded T56 Rebuild (600RWTQ) for 93-02 Camaro & Firebird - Tick Performance, Inc.. He also cleans and blasts the case as well so it should look almost new.
He was selling for about the price of the Tick Stage 2 rebuild by itself - which sounded like a great deal. Only issue is that I would need to source the parts to make the T56 an LS engine compatible trans. This means changing what's called the "front plate" which is the plate/cover on the trans where the input shaft mounts and where the bellhousing bolts to. I would also need an LS style input shaft - which protrudes from the trans and takes the power from the engine.
I called around and found out that T56 parts are "like gold" as many places described. There didn't seem to be much of a used market for these parts either. I did find some good deals on new parts on ebay and Amazon on these parts. So it drove up the price of the whole trans a bit, but I'm getting new parts and the seller said he would put them all together for me at no charge. He sent me the rebuilt trans and the old LT style T56 front plate and input shaft, which I have posted for sale on LS1Tech and Craigslist.
Around the time the T56 was on its way to me, I found a killer deal on a shifter on LS1Tech.com. This B&M shifter was $100 shipped - it sells new for $237 - https://www.amazon.com/45052-Precisi.../dp/B000CIKC7G. The guy had also tapped it for a plug that you can remove and use to fill the trans with fluid - probably easier than finagling a hose to fill it. I got the shifter in its original box, with all the hardware and looking like it was in new shape. Couldn't wait to mount it up and test it out.
I also ordered up a set of Flyin Miata V8 headers which should arrive Monday. At this point I'm figuring I'll be doing my own exhaust.
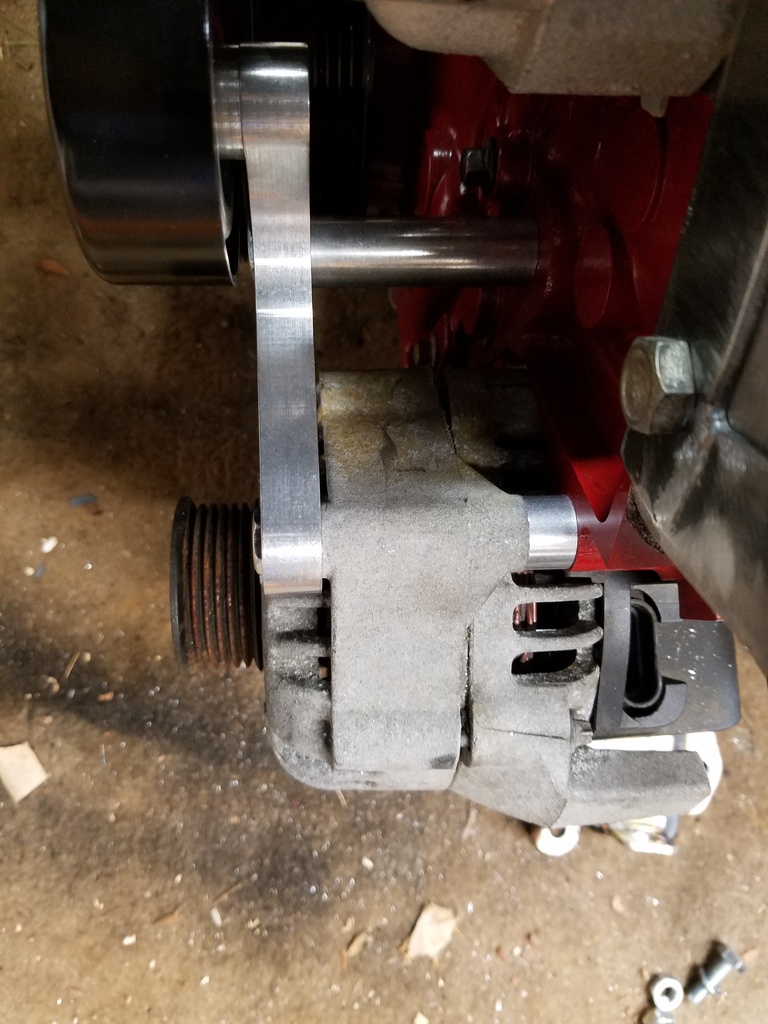
Also decided to go with a cast aluminum alternator mounting kit that should work with my Corvette style damper. I'll still need to figure out a DIY solution to the power steering pump, but I'm confident I can make that work.
So as you may know, the T56 is getting to be a rare commodity. I discovered some time ago that LS1Tech.com is a great resource for buying and selling parts. I would highly recommend anyone to sign up for an account and just start searching - you will be sure to find something.
I got in touch with a guy who was selling a LT style T56 (same gears as LS style, but from an earlier Camaro). He is a drag racer and rebuilds his own transmissions. He'd rebuilt this with the Tick Stage 2 kit Tick Performance Level 2 Upgraded T56 Rebuild (600RWTQ) for 93-02 Camaro & Firebird - Tick Performance, Inc.. He also cleans and blasts the case as well so it should look almost new.
He was selling for about the price of the Tick Stage 2 rebuild by itself - which sounded like a great deal. Only issue is that I would need to source the parts to make the T56 an LS engine compatible trans. This means changing what's called the "front plate" which is the plate/cover on the trans where the input shaft mounts and where the bellhousing bolts to. I would also need an LS style input shaft - which protrudes from the trans and takes the power from the engine.
I called around and found out that T56 parts are "like gold" as many places described. There didn't seem to be much of a used market for these parts either. I did find some good deals on new parts on ebay and Amazon on these parts. So it drove up the price of the whole trans a bit, but I'm getting new parts and the seller said he would put them all together for me at no charge. He sent me the rebuilt trans and the old LT style T56 front plate and input shaft, which I have posted for sale on LS1Tech and Craigslist.
Around the time the T56 was on its way to me, I found a killer deal on a shifter on LS1Tech.com. This B&M shifter was $100 shipped - it sells new for $237 - https://www.amazon.com/45052-Precisi.../dp/B000CIKC7G. The guy had also tapped it for a plug that you can remove and use to fill the trans with fluid - probably easier than finagling a hose to fill it. I got the shifter in its original box, with all the hardware and looking like it was in new shape. Couldn't wait to mount it up and test it out.
I also ordered up a set of Flyin Miata V8 headers which should arrive Monday. At this point I'm figuring I'll be doing my own exhaust.
Also decided to go with a cast aluminum alternator mounting kit that should work with my Corvette style damper. I'll still need to figure out a DIY solution to the power steering pump, but I'm confident I can make that work.
Last edited by pj_mcgarvey; 10-05-2016 at 09:07 AM.
10-05-2016, 09:11 AM
#30
V8 Miata Enthusiast
Thread Starter
I'm going to give up on trying to link to Google photos. They appear to work when I first post them, but it seems that embedding pics is not supported, and Google catches on to their images being embedded and blocks them.
So I tried Photobucket and that seemed to work at first, but appears to be a complete **** show as I was getting upload timeouts and now the album won't refresh with the new pics. So that will be a work in progress.
Sorry, hate to make this about the images. Hopefully they work now one way or another.
So I tried Photobucket and that seemed to work at first, but appears to be a complete **** show
as I was getting upload timeouts and now the album won't refresh with the new pics. So that will be a work in progress. Sorry, hate to make this about the images. Hopefully they work now one way or another.
10-05-2016, 11:52 AM
#31
V8 Miata Habitu�

Hello pj_mcgarvey
Seam sealer defiantly is a pain in the A$$. If you have an oxy / acetylene set up you can light up an Carbon rich flame and heat up the seam you want to weld. Once the seam sealer starts to drip / burn just trigger the oxygen lever and blow the sticky goo out of the seam. This leaves a bit of carbon behind but no problems welding that up. Be a bit diligent and don't pour the heat to things, just enough to get the seam sealer melting / burning and use the oxygen to blast out the goo. I then use a small wire brush and some lacquer thinner to clean stubborn parts.
everything will weld up like a charm as the carbon left behind doesn't affect the weld quality. Give it a try, I think you will be surprised.
Just a thought that worked well for me on many a previous Mustang Drag Car builds.
Dean0
10-06-2016, 01:31 PM
#32
V8 Miata Follower

nice job sorting out the photos. The washers on the engine mounts kind of concerns me. I wonder if they are the correct mounts? Thanks for the tip on the seam sealer removal.
10-06-2016, 02:37 PM
#33
V8 Miata Enthusiast
Thread Starter
I felt the same way, so I looked into a bit and took some measurements. I don't think they are the correct mounts - and b/c I bought the subframe kit 2nd hand, I'm on my own. I did find what I think is the proper mount from Summit Racing, and they should arrive tomorrow. I have the next 4 days off so I'll be posting a number of updates this weekend.
Last edited by pj_mcgarvey; 10-06-2016 at 03:14 PM.

 10-12-2016, 04:36 PM
#35
V8 Miata Enthusiast
Thread Starter
I wish I had thought of some other solutions, rather than rush into trying to get the engine mounted up. Grinding down the bolt head might weaken it. Some kits have a recessed screw head to clear the block in the right place.
10-12-2016, 10:01 PM
#36
V8 Miata Enthusiast
Thread Starter
The motor mount situation didn't really improve with ordering new mounts from Summit.
https://www.summitracing.com/parts/ENS-3-1148G
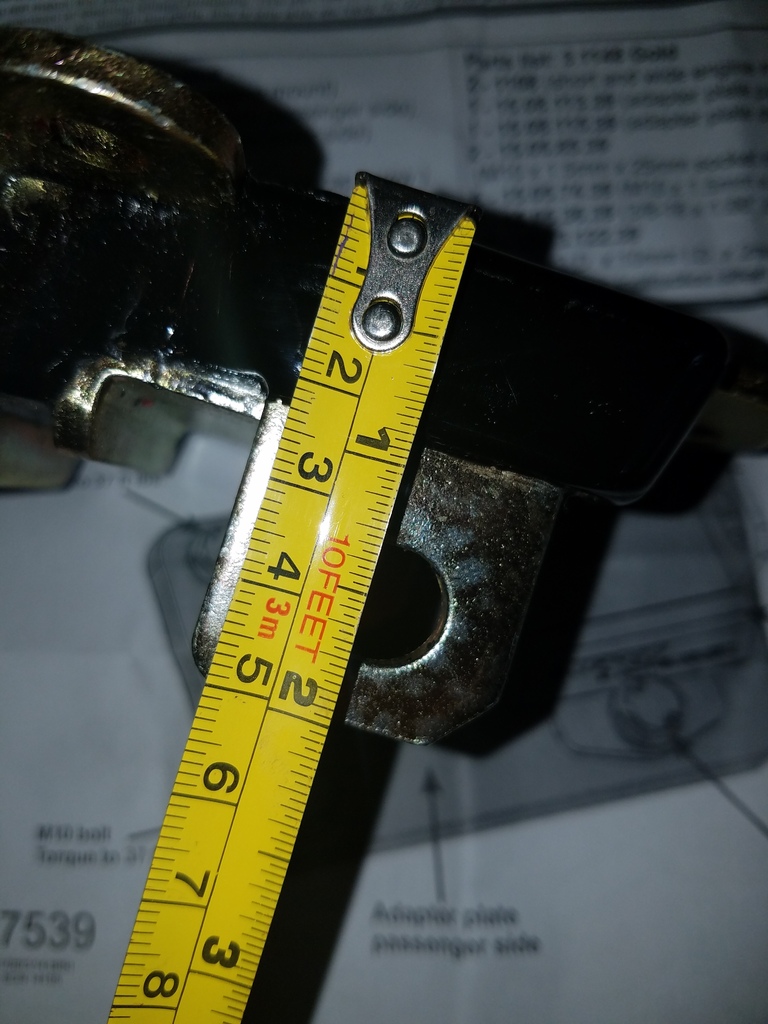
Based on the info provided on the mounts I ordered, they should have had a 1-3/4" spacing from the mounting side to the center of the bolt hole. The web site shows it as well
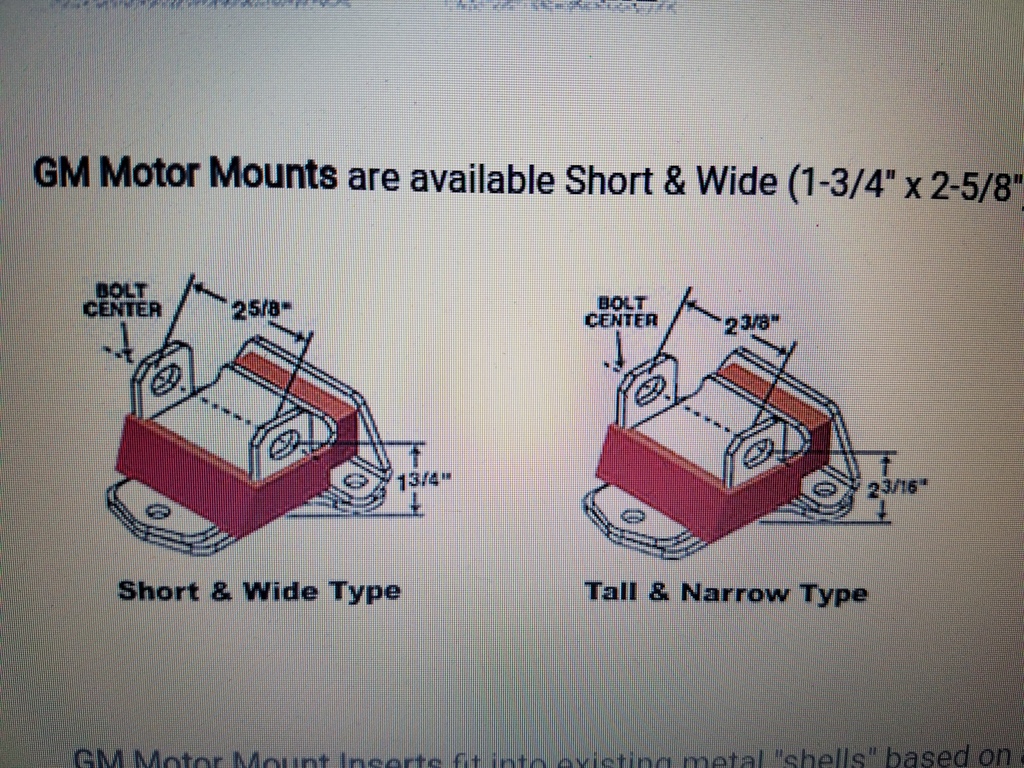
and I called the Summit tech line to confirm before I ordered and talked to someone who confirmed these are the GM OEM measurements for mounts going back years. When I got the mounts however, it was a different story. I specifically asked if the measurements were from the back of the mount, which I was told "Yes". However if you factor in the backing plate being about 1/4" thick (pretty beefy) it could add up to 1.75". So great, but not what I needed.
So the measurements were not correct, but the mounts I think were also missing something. The back of the mount has a bump in it, which is supposed to fit into a gap in the mounting plate. The mounting plate included with the kit did not have any gaps, it was just a solid plate. I'm thinking something is really missing here. The mounting plate that I got with my kit has a few of these gaps that line up with this bump in the mount. The mount part numbers on what I already had and the ones I got from Summit were the same.
You can see the 1/8" or so bump in the back of the mount
You'll see in these instructions, that the same bump is there, but it says that the preload plate "must be used". So where is it on the mounts I ordered?
https://static.summitracing.com/glob.../ens-17247.pdf
Enough about that, I have some mounts to get working. I decided to move forward with modifying the mounts I had with some spacers. I took the 3 washers and tacked them together to start
Then I tacked some bolts where the motor mount will attach to the backing plate. This will just make it easier to bolt up as I'll just need to thread on the nut and tighten it.
No pics, but I welded in the spacers to the backing plate so they won't move around. Cleaned it up and painted it. I will post some pics later of this setup.
https://www.summitracing.com/parts/ENS-3-1148G
Based on the info provided on the mounts I ordered, they should have had a 1-3/4" spacing from the mounting side to the center of the bolt hole. The web site shows it as well
and I called the Summit tech line to confirm before I ordered and talked to someone who confirmed these are the GM OEM measurements for mounts going back years. When I got the mounts however, it was a different story. I specifically asked if the measurements were from the back of the mount, which I was told "Yes". However if you factor in the backing plate being about 1/4" thick (pretty beefy) it could add up to 1.75". So great, but not what I needed.
So the measurements were not correct, but the mounts I think were also missing something. The back of the mount has a bump in it, which is supposed to fit into a gap in the mounting plate. The mounting plate included with the kit did not have any gaps, it was just a solid plate. I'm thinking something is really missing here. The mounting plate that I got with my kit has a few of these gaps that line up with this bump in the mount. The mount part numbers on what I already had and the ones I got from Summit were the same.
You can see the 1/8" or so bump in the back of the mount
You'll see in these instructions, that the same bump is there, but it says that the preload plate "must be used". So where is it on the mounts I ordered?
https://static.summitracing.com/glob.../ens-17247.pdf
Enough about that, I have some mounts to get working. I decided to move forward with modifying the mounts I had with some spacers. I took the 3 washers and tacked them together to start
Then I tacked some bolts where the motor mount will attach to the backing plate. This will just make it easier to bolt up as I'll just need to thread on the nut and tighten it.
No pics, but I welded in the spacers to the backing plate so they won't move around. Cleaned it up and painted it. I will post some pics later of this setup.
Last edited by pj_mcgarvey; 10-13-2016 at 08:56 AM.
10-12-2016, 10:36 PM
#37
V8 Miata Enthusiast
Thread Starter
I decided to drop the idea of a DIY alternator bracket. Once I figured I'd need to get the spacing correct, and then work in the belt pulley as part of it, I wasn't sure if it made sense to fab it up myself and make it sturdy enough to not flex, etc. I looked around online and found an affordable bracket kit that was designed for the Corvette crank pulley spacing.
This kit could be found on ebay and Amazon from ICT Billet: https://www.amazon.com/gp/product/B01601ODQY
Here it is installed. perfect fit and alignment, and saves a bit of weight and improves the looks a bit.
With that problem solved, I started some work on the power steering bracket. That is just about complete so I'll post finished pics later.
I also decided to bolt up the starter I had purchased. This particular start is new and shiny, as you can see, but also about an inch shorter than the stock FBody starter, and will fit with the Flyin Miata headers.
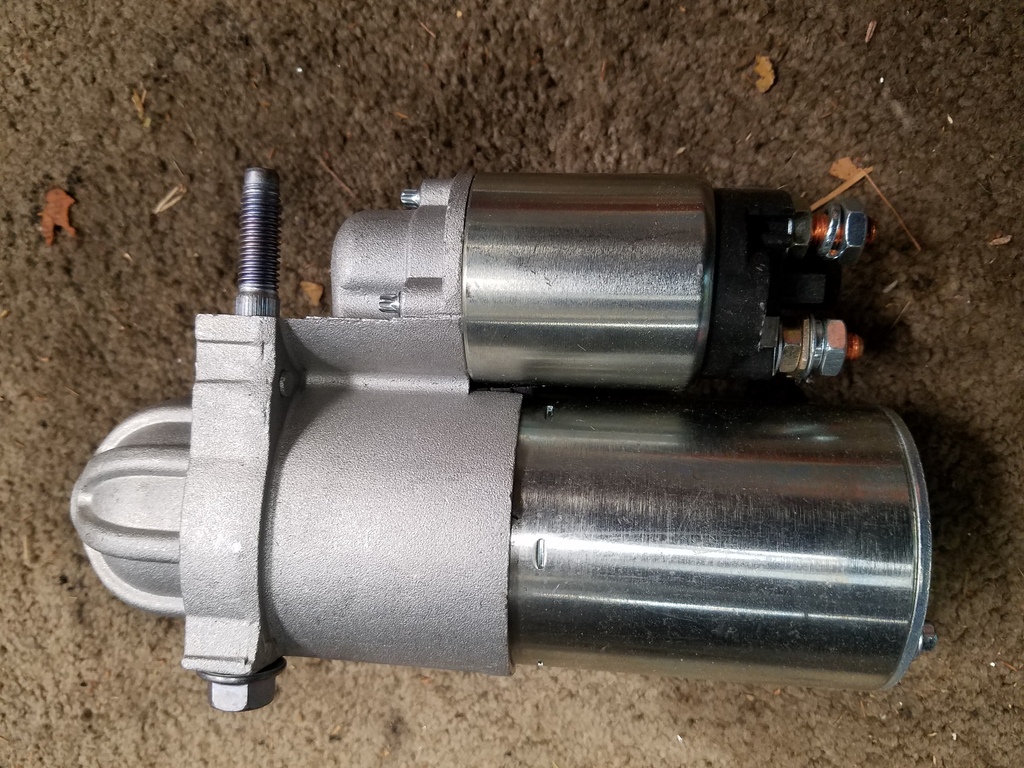
This starter was dirt cheap from Amazon, and is technically a truck starter. This was a hot tip I picked up on these forums I think some time ago
https://www.amazon.com/gp/product/B0094JHBNM
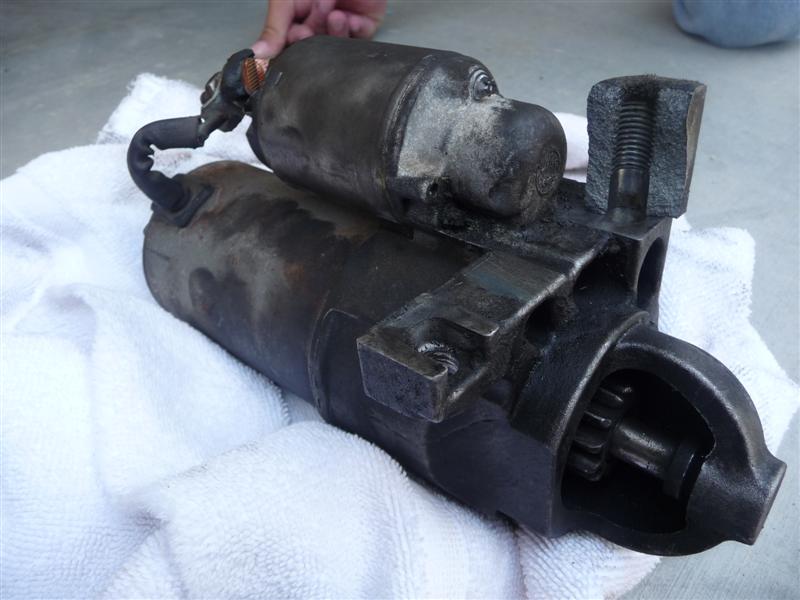
The truck starter, and maybe other new LS starters are also stronger where the mounting bolt passes through. On the FBody starter there has been proven to be a weak spot where there is less metal where the bolt passes through. This part can break off, or it can take a piece of the block with it. NOT GOOD.
Here's a pic I linked from a post on LS1Tech where you can see the broken piece of the block attached to the starter.
My FBody starter and new hotness side by side:
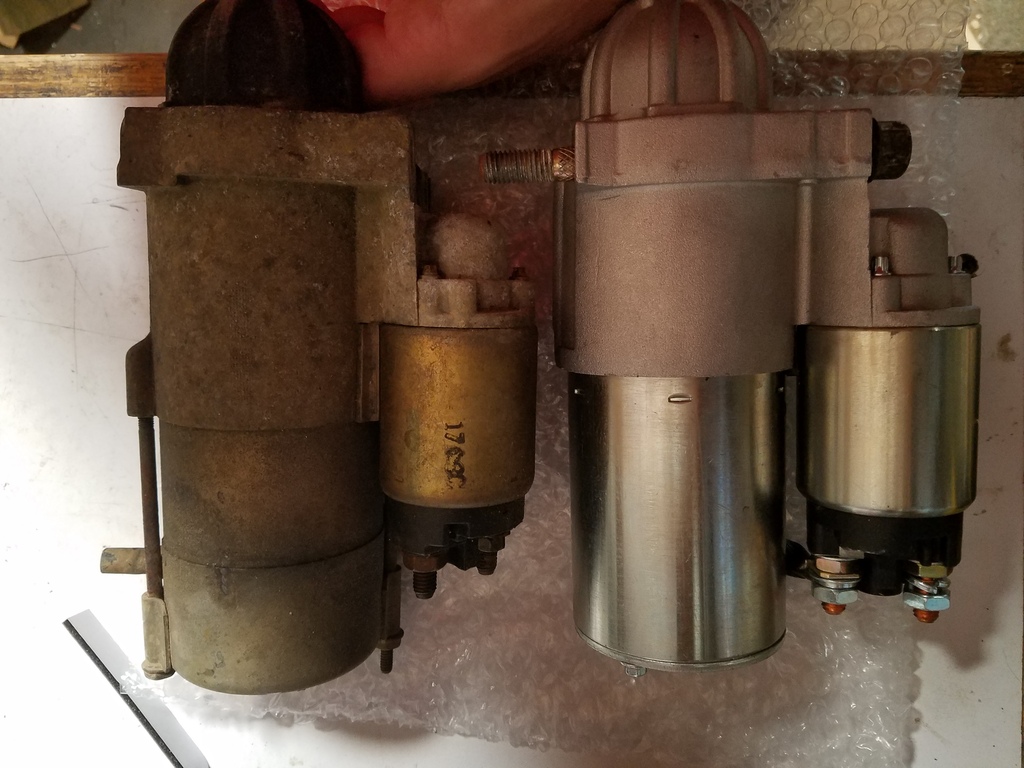
You can see the weaker side of the FBody starter (on right, bottom).
So you'll need a longer bolt as well:
https://www.amazon.com/gp/product/B005OV3RTG
No pics of it mounted up, but I'm also waiting for a cover plate for the bottom of the trans to hid the gap where the Fbody stock oil pan would have covered up. I may need to remove the starter again and then reinstall. I will also make a heat shield out of some leftover stuff I have.
This kit could be found on ebay and Amazon from ICT Billet: https://www.amazon.com/gp/product/B01601ODQY
Here it is installed. perfect fit and alignment, and saves a bit of weight and improves the looks a bit.
With that problem solved, I started some work on the power steering bracket. That is just about complete so I'll post finished pics later.
I also decided to bolt up the starter I had purchased. This particular start is new and shiny, as you can see, but also about an inch shorter than the stock FBody starter, and will fit with the Flyin Miata headers.
This starter was dirt cheap from Amazon, and is technically a truck starter. This was a hot tip I picked up on these forums I think some time ago
https://www.amazon.com/gp/product/B0094JHBNM
The truck starter, and maybe other new LS starters are also stronger where the mounting bolt passes through. On the FBody starter there has been proven to be a weak spot where there is less metal where the bolt passes through. This part can break off, or it can take a piece of the block with it. NOT GOOD.
Here's a pic I linked from a post on LS1Tech where you can see the broken piece of the block attached to the starter.
My FBody starter and new hotness side by side:
You can see the weaker side of the FBody starter (on right, bottom).
So you'll need a longer bolt as well:
https://www.amazon.com/gp/product/B005OV3RTG
No pics of it mounted up, but I'm also waiting for a cover plate for the bottom of the trans to hid the gap where the Fbody stock oil pan would have covered up. I may need to remove the starter again and then reinstall. I will also make a heat shield out of some leftover stuff I have.
10-12-2016, 10:52 PM
#38
V8 Miata Enthusiast
Thread Starter
Work on the tunnel is progressing, and very tedious and tiring. I was not happy with how the cuts I made to remove the gussets looked. I decided to make up some patch panels to tie everything together. I had welded in the Flyin Miata provided thick brackets to replace the removed gussets. On top of those, the patch panels were tacked in.
These will need some more work to finish, but I was having trouble with my tack welds burning through the 20 gauge sheet metal I had laying around. I'm using .030 wire on my MIG welder, and so I might pick up a small roll of .025 wire from Home Depot this week so I can better control the heat I'm putting into the panel. I also need to pick up some more metal cutting and grinding discs for my Dewalt grinder. I quickly burned through the ones I had been using.
Last thing was a quick mod I made to my welding helmet. Working in the engine bay I can never seem to get light where I need it so I can see what the heck I'm welding.
When this doesn't work I've taken to holding an LED flashlight with my left hand, and making some quick tacks with my right hand. What's cool is the LED flashlights don't set off the welding helmet auto dimming feature the way an incandescent or fluorescent light does.
Last edited by pj_mcgarvey; 10-13-2016 at 09:03 AM.
10-13-2016, 09:12 AM
#39
V8 Miata Enthusiast
Thread Starter
Curious what others have done about the T56 reverse lockout feature. This is something I just recently realized, but want to think about as I get closer to putting in the T56.
The lockout feature is supposed to prevent you from grabbing reverse while the car is in motion. This can apparently happen if you are shifting from 6th to 5th. If you push the lever too far over the right, it can engage reverse. Sounds crazy, but apparently it can happen. Let your imagination do the rest.
Solutions seem to be:
- Leave the engine lockout solenoid disconnected and just muscle it into reverse when needed.
- Remove lockout spring so you there is no resistance to putting it in reverse when you need, but would allow the lever to go in reverse at any speed.
- Wire the solenoid into the brake light switch so it's energized when you step on the brake pedal, such as when you are putting it into reverse to back the car up. Seems reasonable, but then I thought what about if you are heel/toe downshifting? You might have the brake on and be downshifting into 5th at the same time. Since my car will see some track work, I thought this wasn't a good idea. I'm sure it has worked just fine for others.
- Wire the solenoid into the ECU/PCM so it reads the VSS (vehicle speed) sensor. Not looked into this much, but would be the most OEM solution. Not going to rule this one out yet.
- Wire in a timer http://www.accutach.com/t56-reverse-...-lockout-timer to open the solenoid long enough to engage reverse. Would bypass needing to wire into the ECU. Maybe good if you don't have the LS ECU in your particular build, but do have a T56.
- Wire in a push button or switch on the dash so you can hold it down to open the lockout feature.
Curious what others are doing/have done.
Last edited by pj_mcgarvey; 10-13-2016 at 12:55 PM.
The following users liked this post:
Flavaquero (10-13-2016)
10-13-2016, 09:16 AM
#40
V8 Miata Enthusiast
Thread Starter
The other thing I need to think about soon is ECU/PCM. I know there are some things I will need to have done to it before I can make the engine start.
I'm looking for opinions on who to send the ECU to,
and
What features did you guys enable/disable? One specific thing would be the O2 sensors. I think I want to run two of them, one for each bank, which would mean removing the two that are normally after the cat.
Did you just weld in a o2 sensor bung into the exhaust after the headers?
The following users liked this post:
Flavaquero (10-13-2016)
10-13-2016, 10:59 AM
#41
V8 Miata Follower

Curious what others have done about the T56 reverse lockout feature. This is something I just recently realized, but want to think about as I get closer to putting in the T56.
The lockout feature is supposed to prevent you from grabbing reverse while the car is in motion. This can apparently happen if you are shifting from 6th to 5th. If you push the lever too far over the right, it can engage reverse. Sounds crazy, but apparently it can happen. Let your imagination do the rest.
Solutions seem to be:
- Leave the engine lockout solenoid disconnected and just muscle it into reverse when needed.
- Remove lockout spring so you there is no resistance to putting it in reverse when you need, but would allow the lever to go in reverse at any speed.
- Wire the solenoid into the brake light switch so it's energized when you step on the brake pedal, such as when you are putting it into reverse to back the car up. Seems reasonable, but then I thought what about if you are heel/toe downshifting? You might have the brake on and be downshifting into 5th at the same time. Since my car will see some track work, I thought this wasn't a good idea. I'm sure it has worked just fine for others.
- Wire the solenoid into the ECU/PCM so it reads the VSS (vehicle speed) sensor. Not looked into this much, but would be the most OEM solution. Not going to rule this one out yet.
- Wire in a timer http://www.accutach.com/t56-reverse-...-lockout-timer to open the solenoid long enough to engage reverse. Would bypass needing to wire into the ECU. Maybe good if you don't have the LS ECU in your particular build, but do have a T56.
Curious what others are doing/have done.
10-13-2016, 12:35 PM
#42
V8 Miata Follower

Curious what others have done about the T56 reverse lockout feature. This is something I just recently realized, but want to think about as I get closer to putting in the T56.
The lockout feature is supposed to prevent you from grabbing reverse while the car is in motion. This can apparently happen if you are shifting from 6th to 5th. If you push the lever too far over the right, it can engage reverse. Sounds crazy, but apparently it can happen. Let your imagination do the rest.
Solutions seem to be:
- Leave the engine lockout solenoid disconnected and just muscle it into reverse when needed.
- Remove lockout spring so you there is no resistance to putting it in reverse when you need, but would allow the lever to go in reverse at any speed.
- Wire the solenoid into the brake light switch so it's energized when you step on the brake pedal, such as when you are putting it into reverse to back the car up. Seems reasonable, but then I thought what about if you are heel/toe downshifting? You might have the brake on and be downshifting into 5th at the same time. Since my car will see some track work, I thought this wasn't a good idea. I'm sure it has worked just fine for others.
- Wire the solenoid into the ECU/PCM so it reads the VSS (vehicle speed) sensor. Not looked into this much, but would be the most OEM solution. Not going to rule this one out yet.
- Wire in a timer http://www.accutach.com/t56-reverse-...-lockout-timer to open the solenoid long enough to engage reverse. Would bypass needing to wire into the ECU. Maybe good if you don't have the LS ECU in your particular build, but do have a T56.
Curious what others are doing/have done.
The lockout feature is supposed to prevent you from grabbing reverse while the car is in motion. This can apparently happen if you are shifting from 6th to 5th. If you push the lever too far over the right, it can engage reverse. Sounds crazy, but apparently it can happen. Let your imagination do the rest.
Solutions seem to be:
- Leave the engine lockout solenoid disconnected and just muscle it into reverse when needed.
- Remove lockout spring so you there is no resistance to putting it in reverse when you need, but would allow the lever to go in reverse at any speed.
- Wire the solenoid into the brake light switch so it's energized when you step on the brake pedal, such as when you are putting it into reverse to back the car up. Seems reasonable, but then I thought what about if you are heel/toe downshifting? You might have the brake on and be downshifting into 5th at the same time. Since my car will see some track work, I thought this wasn't a good idea. I'm sure it has worked just fine for others.
- Wire the solenoid into the ECU/PCM so it reads the VSS (vehicle speed) sensor. Not looked into this much, but would be the most OEM solution. Not going to rule this one out yet.
- Wire in a timer http://www.accutach.com/t56-reverse-...-lockout-timer to open the solenoid long enough to engage reverse. Would bypass needing to wire into the ECU. Maybe good if you don't have the LS ECU in your particular build, but do have a T56.
Curious what others are doing/have done.
But another option is to instead wire it to a manual push button or switch. ie: A/C switch, cruise control on switch. Or even just a custom one placed inconspicuously. Just a thought!
10-13-2016, 12:53 PM
#43
V8 Miata Enthusiast
Thread Starter
I was planning on just wiring to the brakelight as well. The reverse on the T56 takes a fair bit of force to get it over that far, I wouldnt be too concerned with a reverse miss-shift.
But another option is to instead wire it to a manual push button or switch. ie: A/C switch, cruise control on switch. Or even just a custom one placed inconspicuously. Just a thought!
But another option is to instead wire it to a manual push button or switch. ie: A/C switch, cruise control on switch. Or even just a custom one placed inconspicuously. Just a thought!
10-13-2016, 03:30 PM
#44
V8 Miata Enthusiast
Thread Starter
A friend used this service for his LS (non Miata) swap. $75 seems reasonable, and his list of changes seems complete and detailed.
Programming Services
So here are the items he needs and my responses:
>>>Remove VATS
>>>Remove oil level sensor
4.8/5.3/6.0 LS Engines: Is your fuel rail a returnless type, (using corvette regulator) or does it have a vacuum referenced fuel pressure regulator?
>>>Returnless fuel rail using Corvette regulator
4.8/5.3/6.0 LS Engines: Is your throttle electronic? (DBW - Drive By Wire) or is it mechanical (DBC - Drive By Cable)
>>>DBC
Transmission Type & Year: I can disable automatic trans diagnostics if you wish to use a TH350, TH400, 700R4 ect. Please read on below for info about the Vehicle Speed Sensor (VSS) Also please let me know if you will run a MANUAL transmission, this is to ensure proper idle control.
>>>Manual/T56 (LT style, 96 Camaro)
Rear Axle Ratio: see info below for 'Tire Size or Height'
>>>3.27
Tire Size or Height When using electronic transmission, this info is only needed if you need a calibrated speed sensor signal output to run a stock type speedometer. I can program the PCM in most cases to output the proper speed signal to use the stock speedometer in 88+ GM Trucks, Jeeps, etc, about anything with electronic speedo from factory. Most of the aftermarket speedometers are programmable, and the output from the PCM does not need to be exact.
>>>225/50-15 - will be using Dakota Digital
Remove Emissions? (this includes EGR, AIR Injection, EVAP System, Rear Oxygen Sensors on 1996+) You may choose to keep EGR but remove the rest. Let me know and I can keep what you want. Typically If you say remove emissions, I remove them all. Keep in mind, I only disable the diagnostic test the PCM performs on these components. If you keep them hooked up, they will still function, with exception to EGR. EGR operation changes ignition timing, so If I disable it, it will not function at all.)
>>>Remove all emissions, only keep two oxygen sensors
Remove Computer Controlled A/C? (this is to delete the computer controlled a/c functions. If you have aftermarket A/C unit, or using original A/C wiring from you're vehicle, you do not need the computer controlled A/C. If you wish to use computer controlled A/C, all sensors, switches, etc from the vehicle the engine came out of will have to be used. Also, you do not need an A/C idle up, the engine will detect the load on the engine and adjust idle controller to maintain idle speed.)
>>>Car will not have A/C initially, may add it later. How should I handle this if I add it later?
Is this an Engine Swap, or original Engine/Vehicle. (some things I disable in the computer has to do with the PCM communication with other devices in the original vehicle. If PCM is staying in original vehicle, its important I know this.)
>>>Engine swap into a 99 Miata. Any suggestions?
Mass Air Flow Sensors (MAF can be removed from most vehicles if required, however I recommend using it if at all possible to improve drivability) LT1 vehicles had two different size mass airflow sensors. The Caprice and Camaro units are different size. Also 98-02 Camaro/Trans Am LS1 used a 3 wire sensor. Truck 4.8,5.3,6.0 all used a 5 wire sensor. Yet there is also a difference between Truck and VAN 4.8,5.3,6.0's. So if picking parts from different applications, keep this in mind, and LET ME KNOW, programming is different for each type of mass airflow sensor.
>>>Will be keeping OEM MAF from 98 Camaro (LS1)
Cooling Fan Controls I typically enable cooling fan control with basic on/off points based on stock engine thermostat temps. It will not hurt a thing to have the control there, but not used. If you use a lower then stock thermostat, let me know and I will adjust the temperatures accordingly.
>>>Using stock thermostat, keep stock temps
VSS - If using a non electronic trans, You should KEEP a vehicle speed sensor regardless of what transmission type you use. The PCM needs to know if vehicle is moving. Without the speed sensor, you can suffer from reduced fuel economy, reduced power, and idle problems. There are a few options for speed sensors on the transmissions with cable drive output. View this link at Dakota Digital website. I have used Dakota Digital SEN-4160 with good success. This is a 8000 pulse per mile sensor, that will allow cable speedometer hookup. (SEN-4160 WILL NOT WORK WITH DRIVE BY WIRE CRUISE CONTROL, You must retro-fit a higher pulse sensor if you wish to use cruise control with drive by wire.) I can program most any PCM to accept any # of speed pulses. (1996, 1997 Black Box Vortec PCM will not accept 8000 pulse input) Also check out V8 conversion manuals, parts for V8 S10, Datzun Z, Jaguar, Chevy TPI & TBI, Colorado, Astro Van V8, Volvo 200 & 700 for other speed sensor options. (Must output a SINE wave signal, or A/C Voltage)
>>>Keep VSS
10-13-2016, 03:54 PM
#45
V8 Miata Fanatic

I used him too just to get my basic working like VATS and removal of two of the O2 sensors, etc.
Honestly he did everything I needed, but he was not a great communicator, and looking back I wish I would have just put that money toward an HP tuners setup. Oh well, you live and you learn. I don't do much tuning on my car, but I'd love to be able to watch some additional parameters on my car, trend some more data.
Honestly he did everything I needed, but he was not a great communicator, and looking back I wish I would have just put that money toward an HP tuners setup. Oh well, you live and you learn. I don't do much tuning on my car, but I'd love to be able to watch some additional parameters on my car, trend some more data.
 10-25-2016, 03:39 PM
#47
V8 Miata Enthusiast
Thread Starter
Continuing the fun from last time. My 41 year old body is starting to take a toll from the fast pace I think I've set. I didn't realize how much contorting, and gyrations it would take for me to finish all of the seam welding and tunnel mods. Also wondering if the repeated exposure to the welding arc (I'm using a welding helmet of course!) is creating some "welding fatigue".
Anyway, I need to head off on a short business trip which also gave my back some time to recover. Back at it again with the white vans:
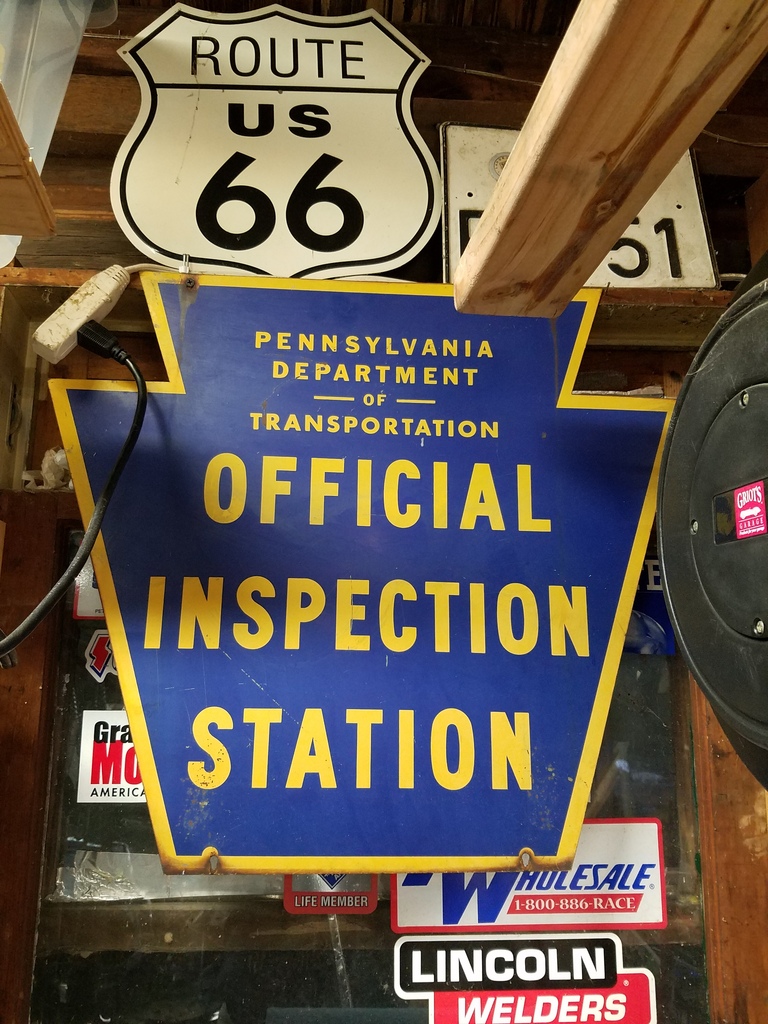
I thought that with all the time I was spending in the garage lately I'd open up a full time inspection shop. I will be sole owner, head mechanic, trash guy, sales dept, and the top repeat customer... lol. I'd been watching these on ebay for awhile but finally decided to just bid on one
Got the spacer plate from FM that will block off the opening at the bottom of the trans where the Fbody oil pan used to go.
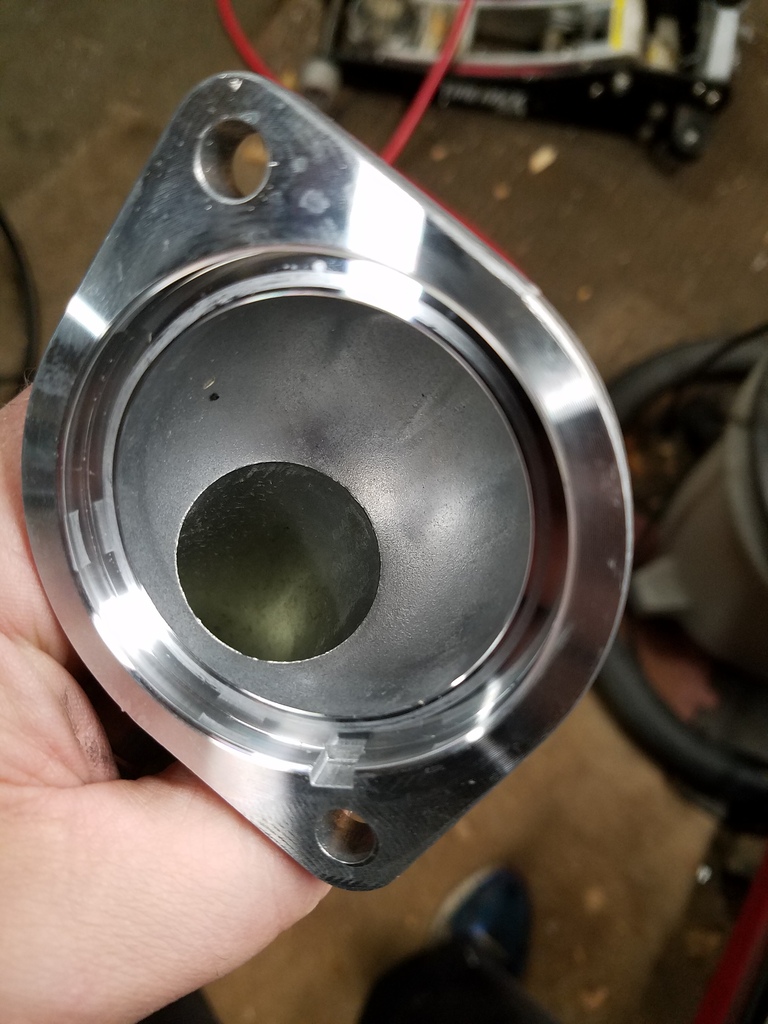
Flipped the water pump outlet towards the engine so it wouldn't cause any issues during the reinstall, and b/c it will be pointing that way. Noticed the lack of any attempt to ease coolant flow
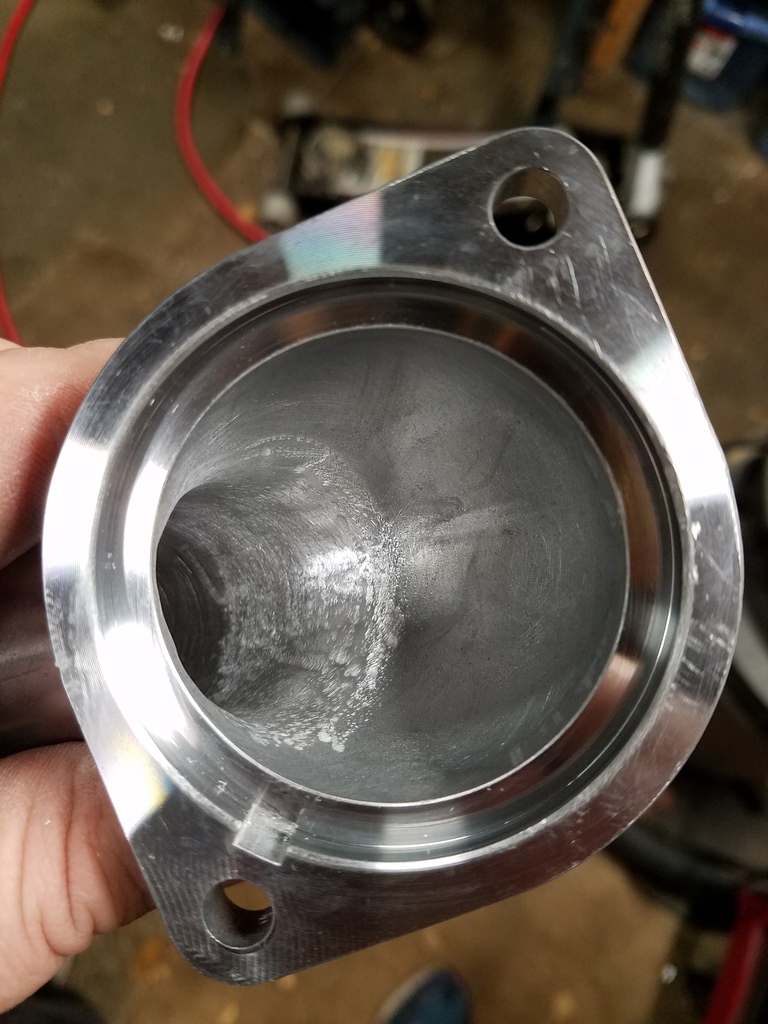
Few minutes with a grinder
Applied some seam sealer to the engine bay. Went a little heavier on the spots around the tunnel where it was cut open and may also get more dirt/moisture.
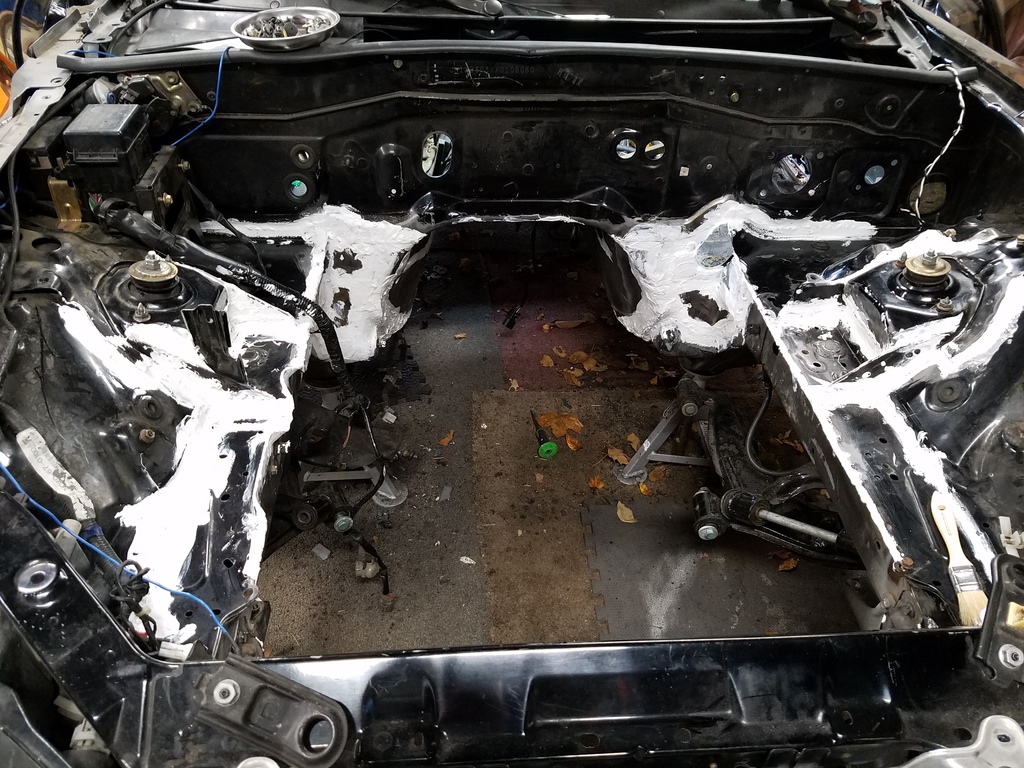
Used this seam sealer: https://smile.amazon.com/gp/product/B007Q0ZQGK
Hold a moment while I wait for PhotoBucket of Junk to allow me to function again...
Anyway, I need to head off on a short business trip which also gave my back some time to recover. Back at it again with the white vans:
I thought that with all the time I was spending in the garage lately I'd open up a full time inspection shop. I will be sole owner, head mechanic, trash guy, sales dept, and the top repeat customer... lol. I'd been watching these on ebay for awhile but finally decided to just bid on one
Got the spacer plate from FM that will block off the opening at the bottom of the trans where the Fbody oil pan used to go.
Flipped the water pump outlet towards the engine so it wouldn't cause any issues during the reinstall, and b/c it will be pointing that way. Noticed the lack of any attempt to ease coolant flow
Few minutes with a grinder
Applied some seam sealer to the engine bay. Went a little heavier on the spots around the tunnel where it was cut open and may also get more dirt/moisture.
Used this seam sealer: https://smile.amazon.com/gp/product/B007Q0ZQGK
Hold a moment while I wait for PhotoBucket of Junk to allow me to function again...
10-25-2016, 03:57 PM
#48
V8 Miata Follower
Holy seam-sealer batman!
Also...... damnnnnnnnnnnnnn Daniel!
Did you do a test fit with engine/subframe, header etc before you finished up everything on the tunnel/firewall?? I know thats come back to bite some people in the *** later on. Gas pedal clearance on the drivers side, passengerside head to firewall clearance, and clearance of bellhousing bolts to trans tunnel are all important to look at.
Otherwise great job! You are moving at a pace that makes my 26yr old self feel slow!
10-25-2016, 04:18 PM
#49
V8 Miata Enthusiast
Thread Starter
Got some matching spray paint from AutomotiveTouchup.com so I could cover the seam sealer, I hope one rattle can will be enough. I used about one tube of seam sealer for what you saw above. I have another that will be used for the interior of the car which is almost done.
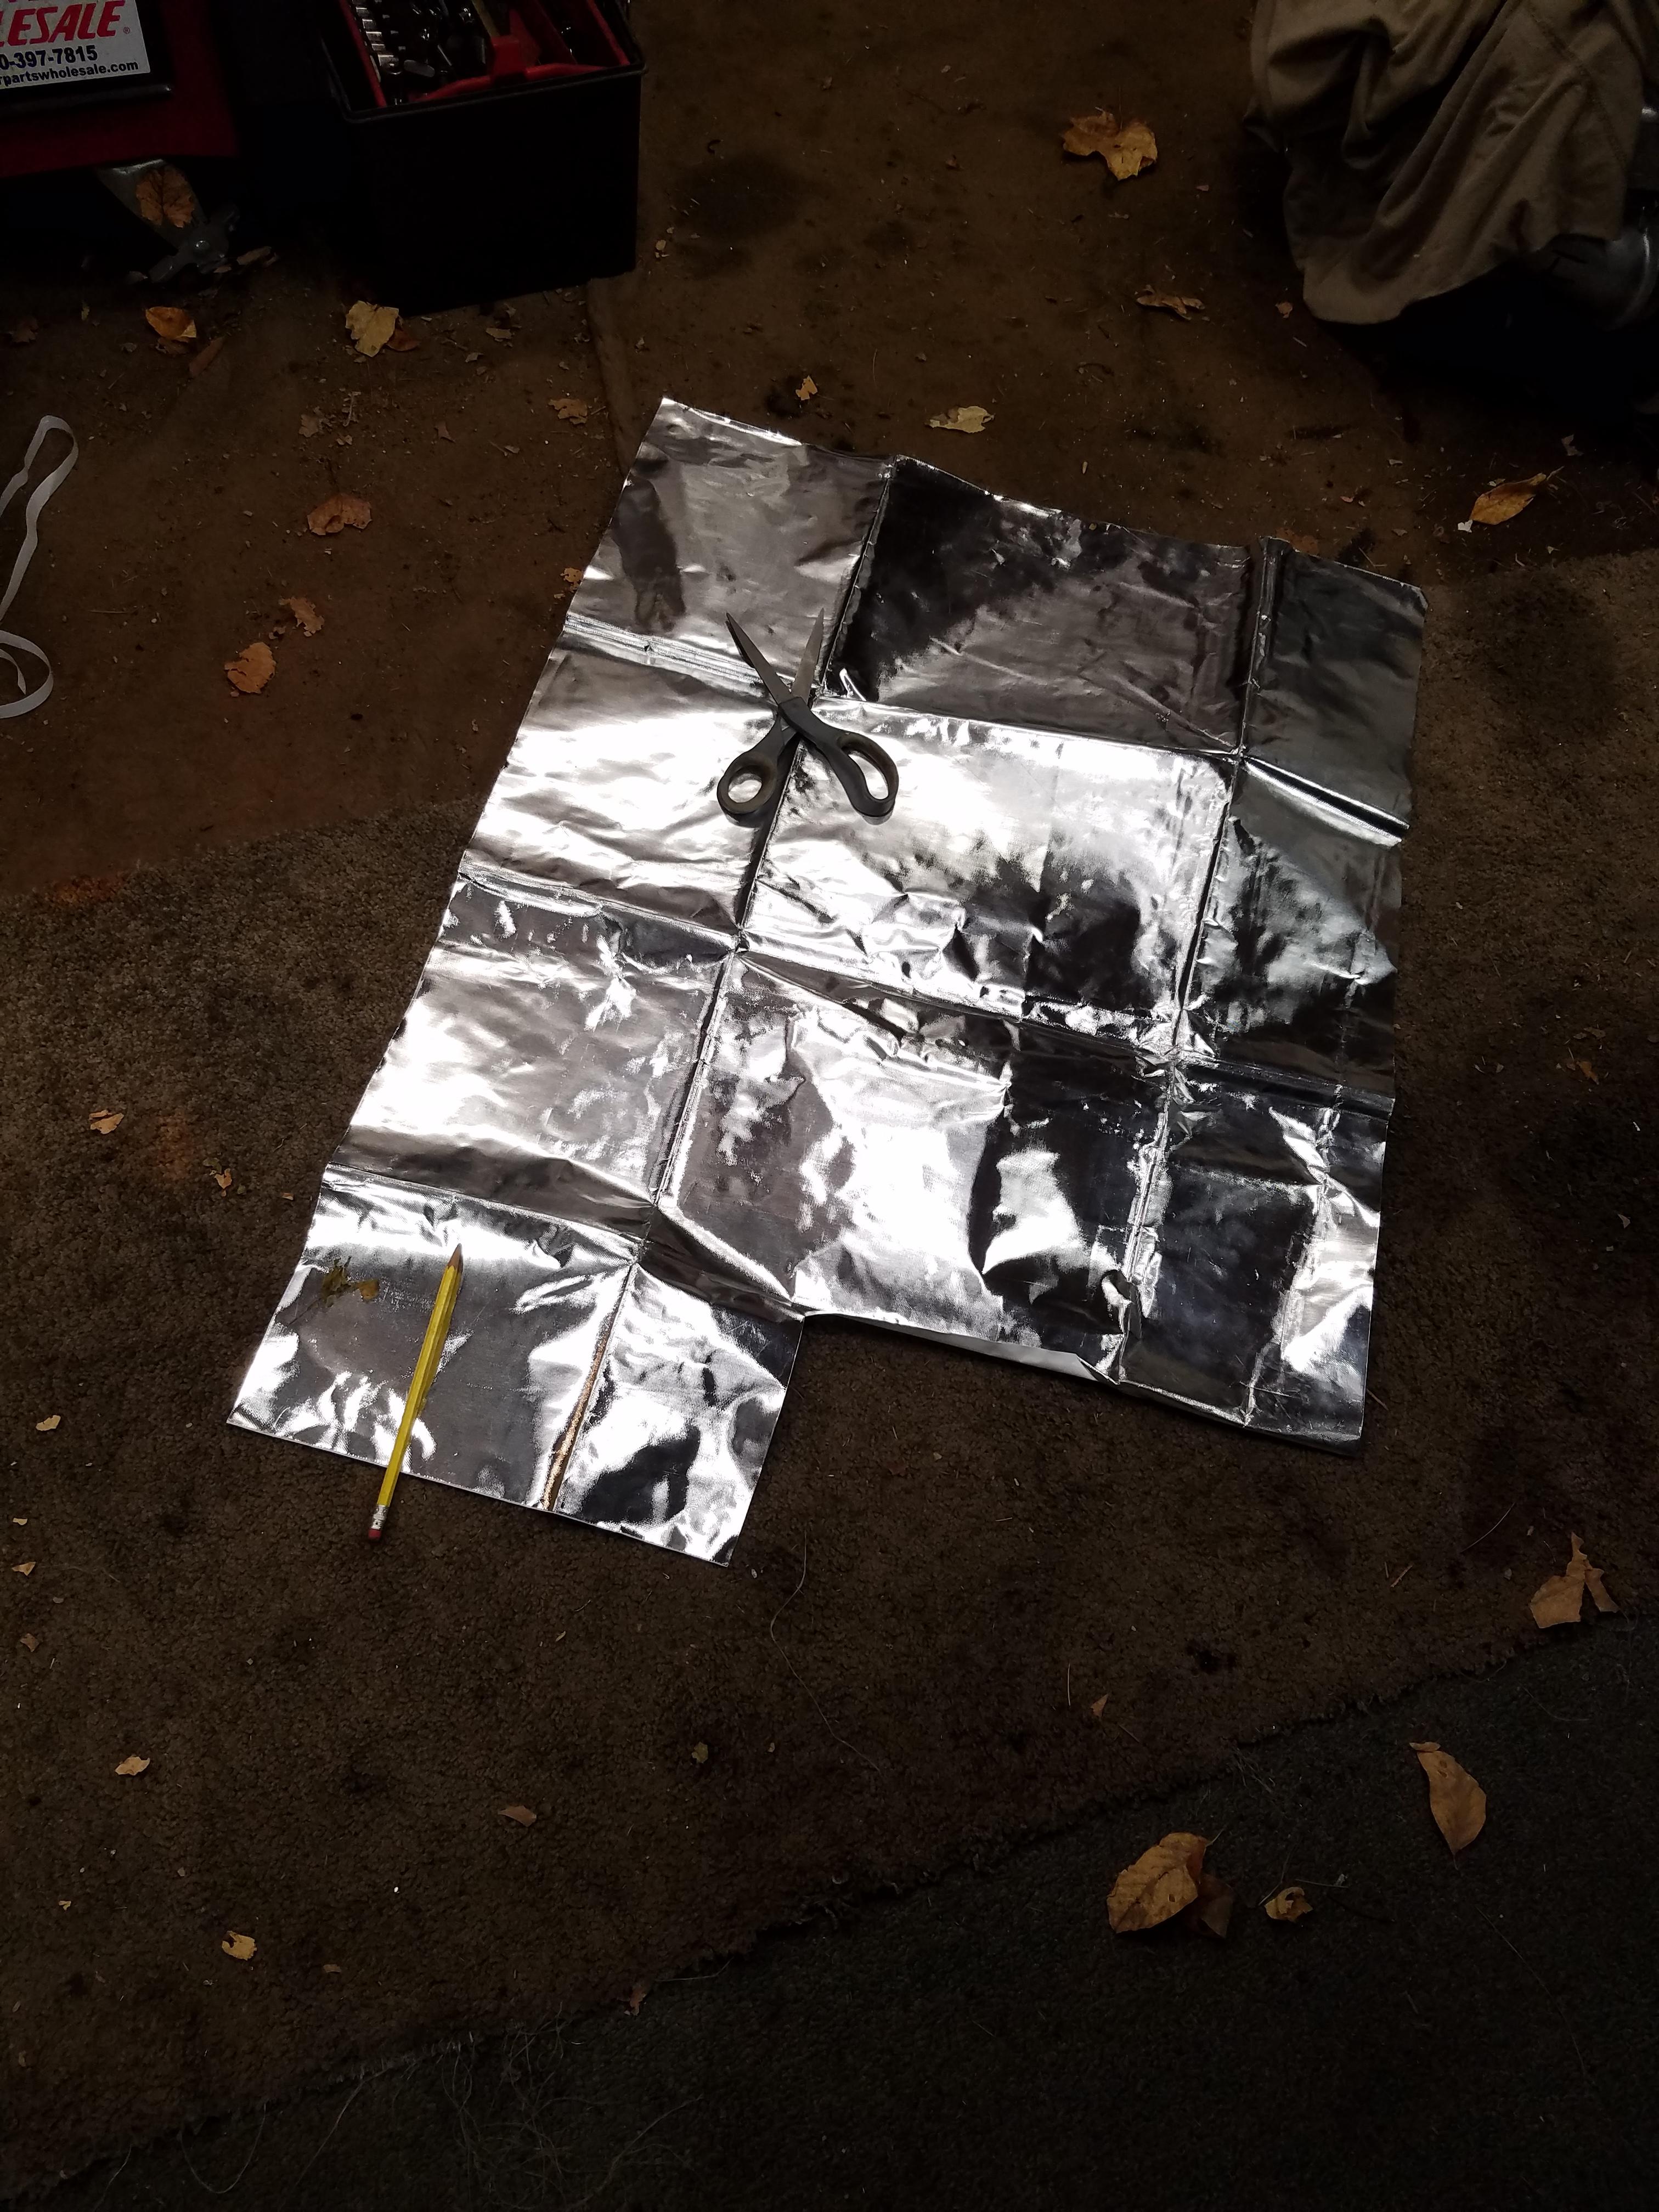
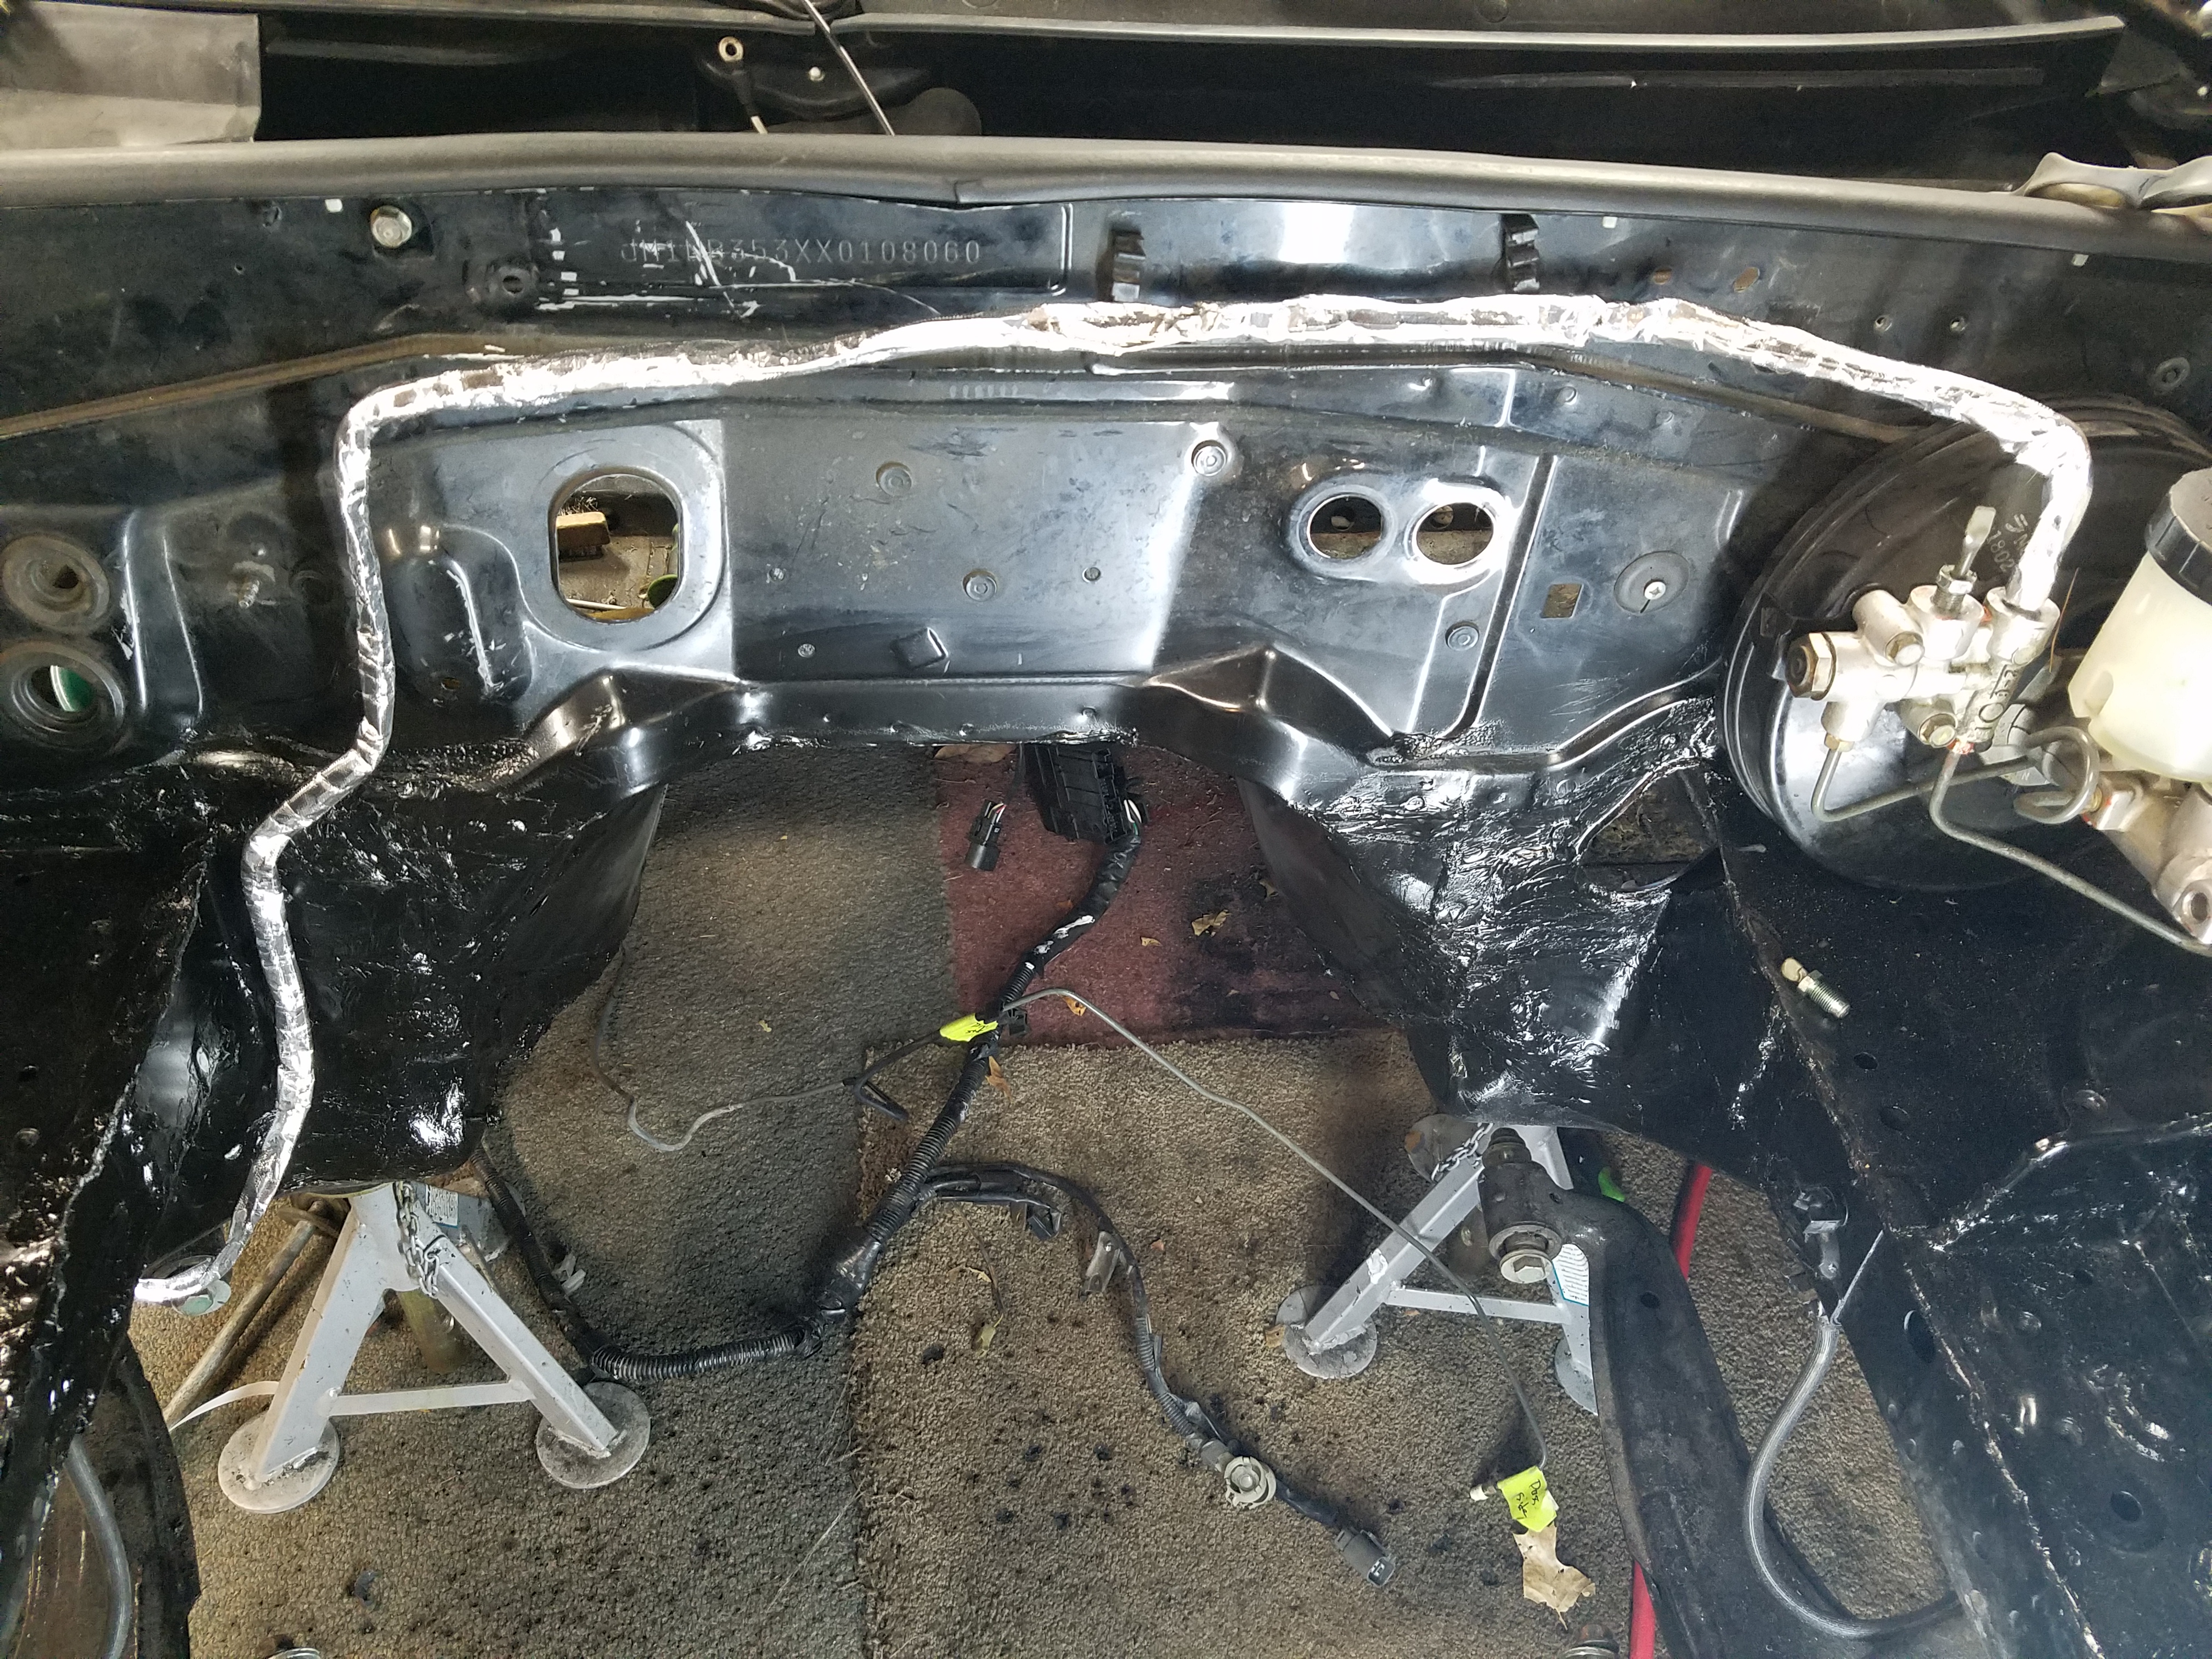
Next step was to begin installing the brake lines and master cylinder/booster. You will probably have a much harder time getting these installed once the engine is installed. I decided to do some DIY heat shielding using some heat shield wrap I had from other projects.
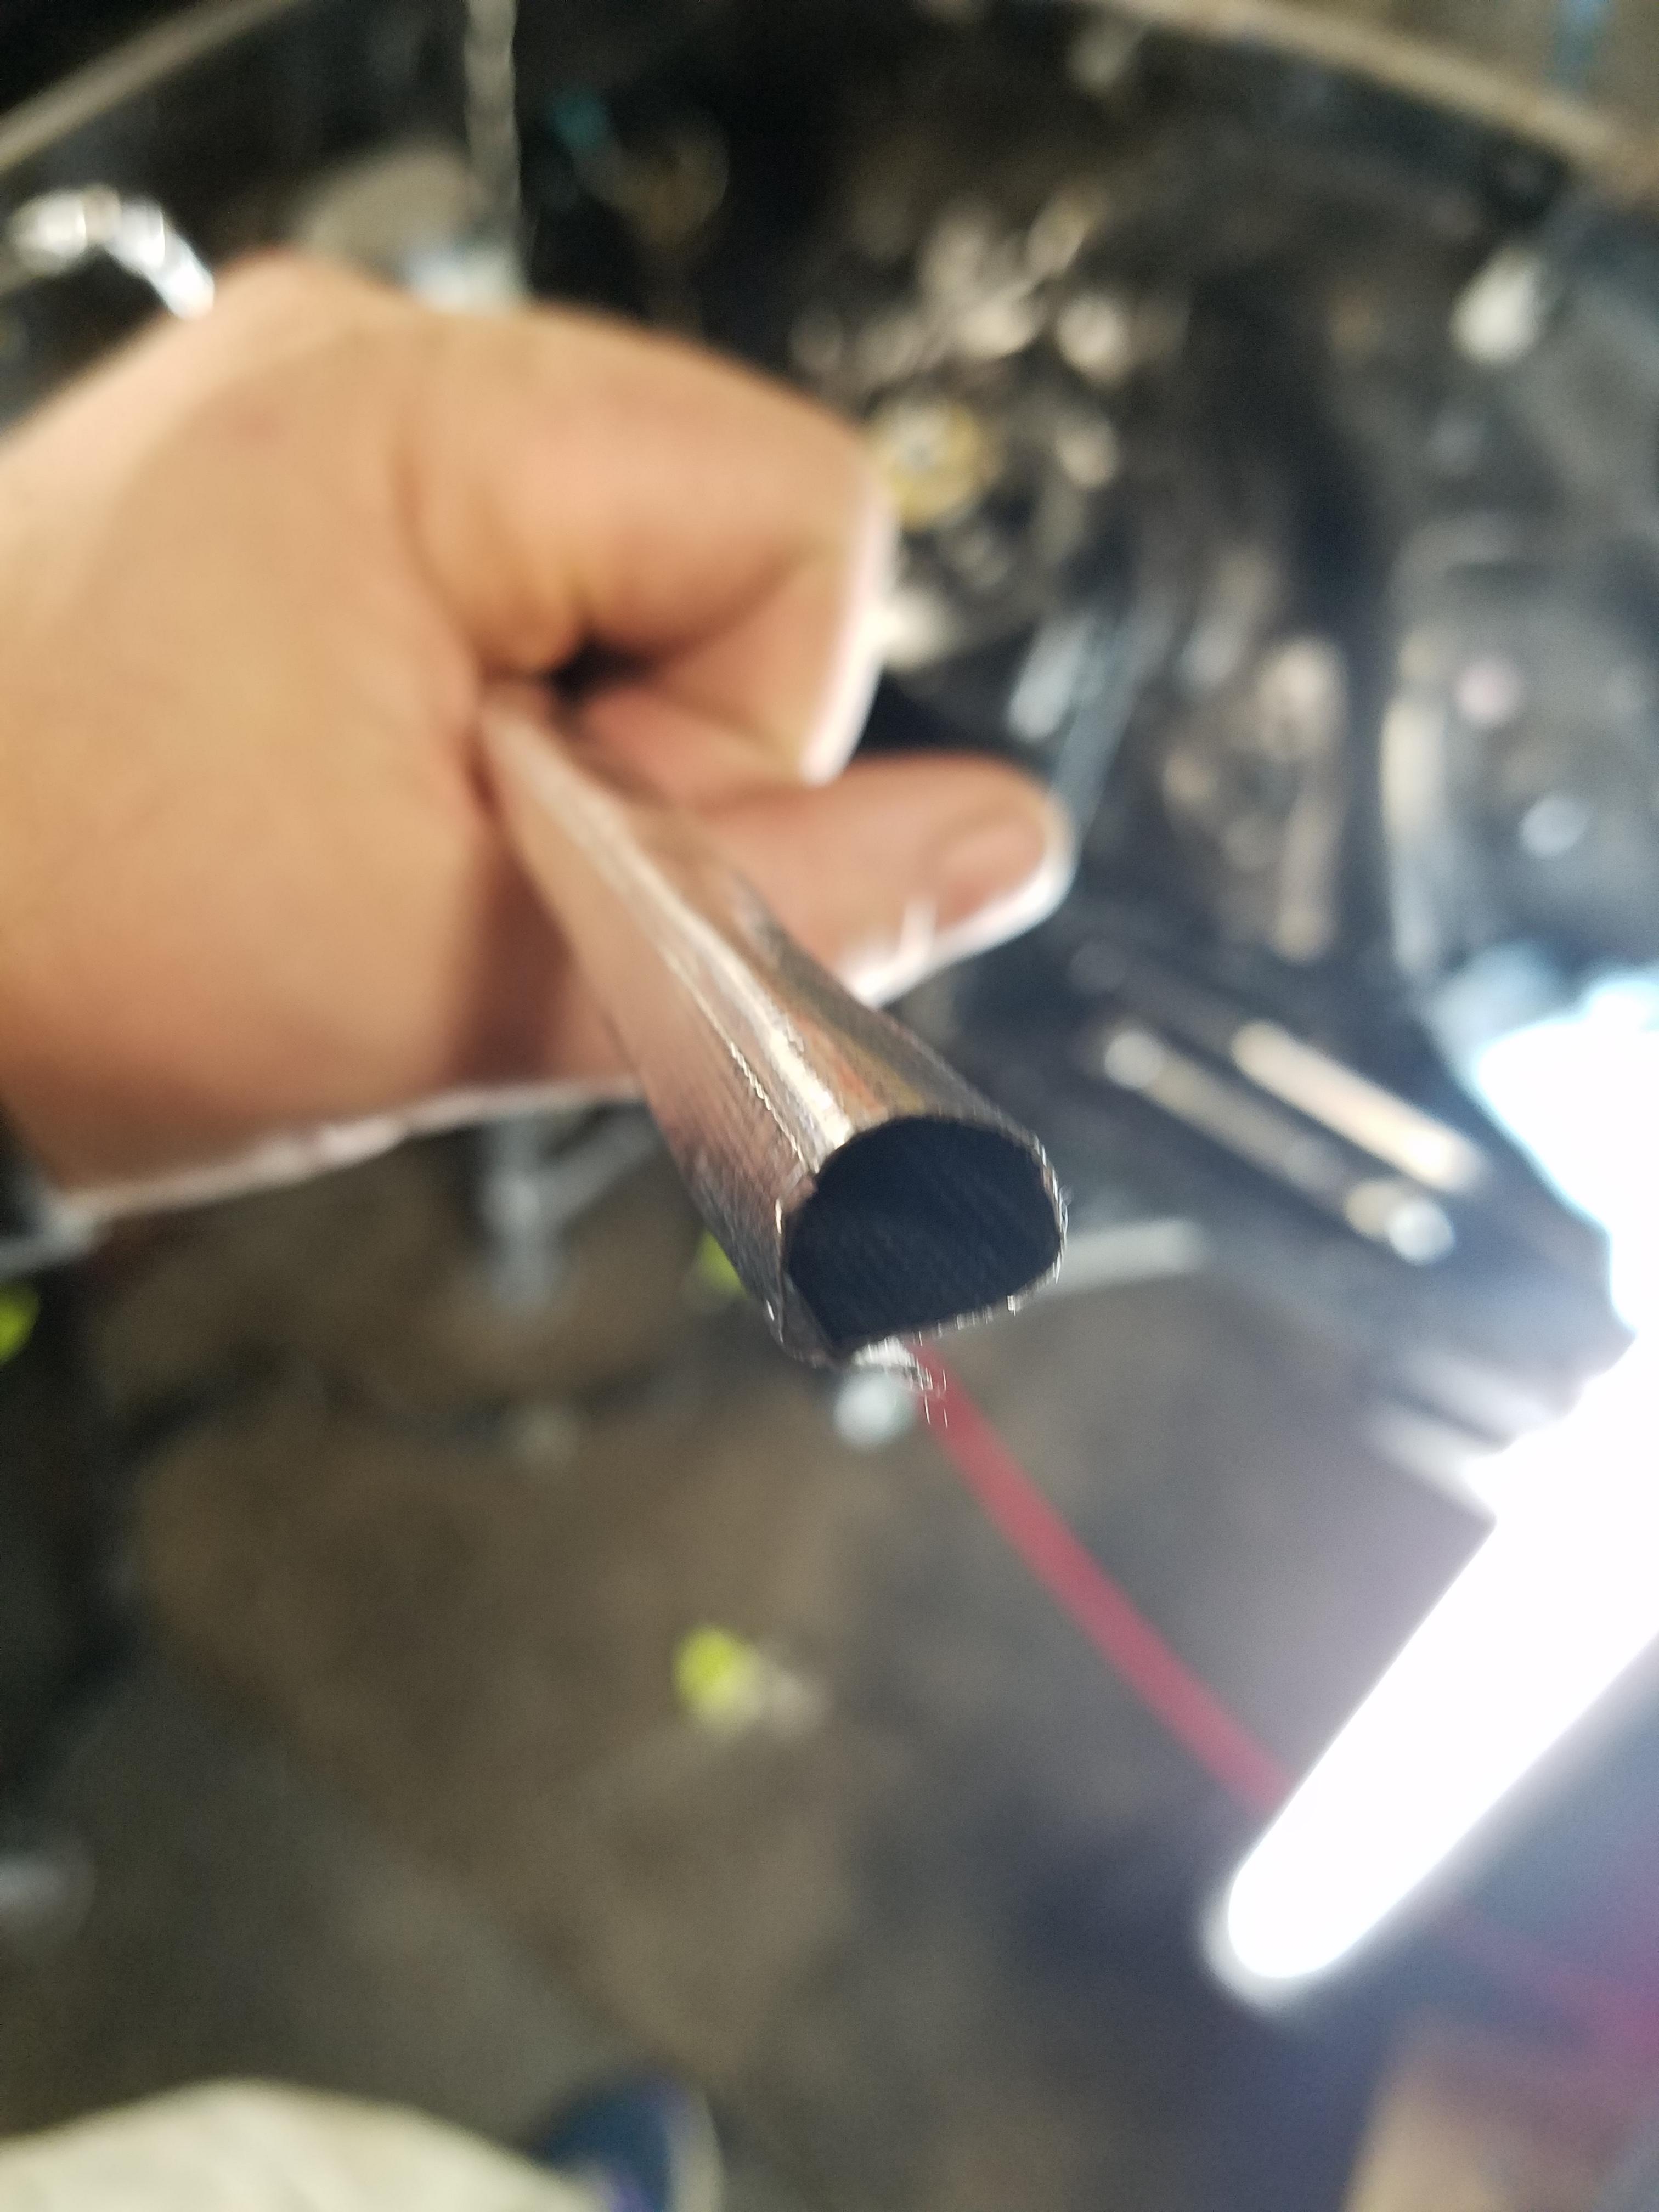
Routed the lines like so, after doing some bending and tweaking. You'll need to straighten the line as it comes down on the passenger side and try to keep it tight to the firewall and frame rail.
I used the other end of an adjustable wrench to apply leverage to the right spot on the line and bend it back straight. You can also do this bare hands, but it gets tiring.
The driver's side line just needed a small bit of bending to stay tight to the frame rail. On the passenger side, as I got the bends closer to the connection to the flexible rubber line, I approximated how much line I needed and just cut it off and reflared it. That's assuming you have the tool to do this, which I already did. You could also work in reverse and screw the line into the pass. side connection and with that holding still, continue to bend the line where you need to and just "use up" the extra line up along the firewall and not have to make any cuts.
Next step was to begin installing the brake lines and master cylinder/booster. You will probably have a much harder time getting these installed once the engine is installed. I decided to do some DIY heat shielding using some heat shield wrap I had from other projects.
Routed the lines like so, after doing some bending and tweaking. You'll need to straighten the line as it comes down on the passenger side and try to keep it tight to the firewall and frame rail.
I used the other end of an adjustable wrench to apply leverage to the right spot on the line and bend it back straight. You can also do this bare hands, but it gets tiring.
The driver's side line just needed a small bit of bending to stay tight to the frame rail. On the passenger side, as I got the bends closer to the connection to the flexible rubber line, I approximated how much line I needed and just cut it off and reflared it. That's assuming you have the tool to do this, which I already did. You could also work in reverse and screw the line into the pass. side connection and with that holding still, continue to bend the line where you need to and just "use up" the extra line up along the firewall and not have to make any cuts.
10-25-2016, 04:28 PM
#50
V8 Miata Enthusiast
Thread Starter
So in the last couple weeks, disaster struck a little bit (but it will be all better!). As I was welding the tunnel closed, and generating lots of hot metal and sparks, apparently one of them got inside the cabin - probably through the gaps I was welding shut. A small fire started. I'd gotten accustomed to putting out small fires on the dry leaves that were now covering the floor of my garage, and spazzing out as bits of hot metal "marbles" got into my shoes and pants... but this one caused some damage.
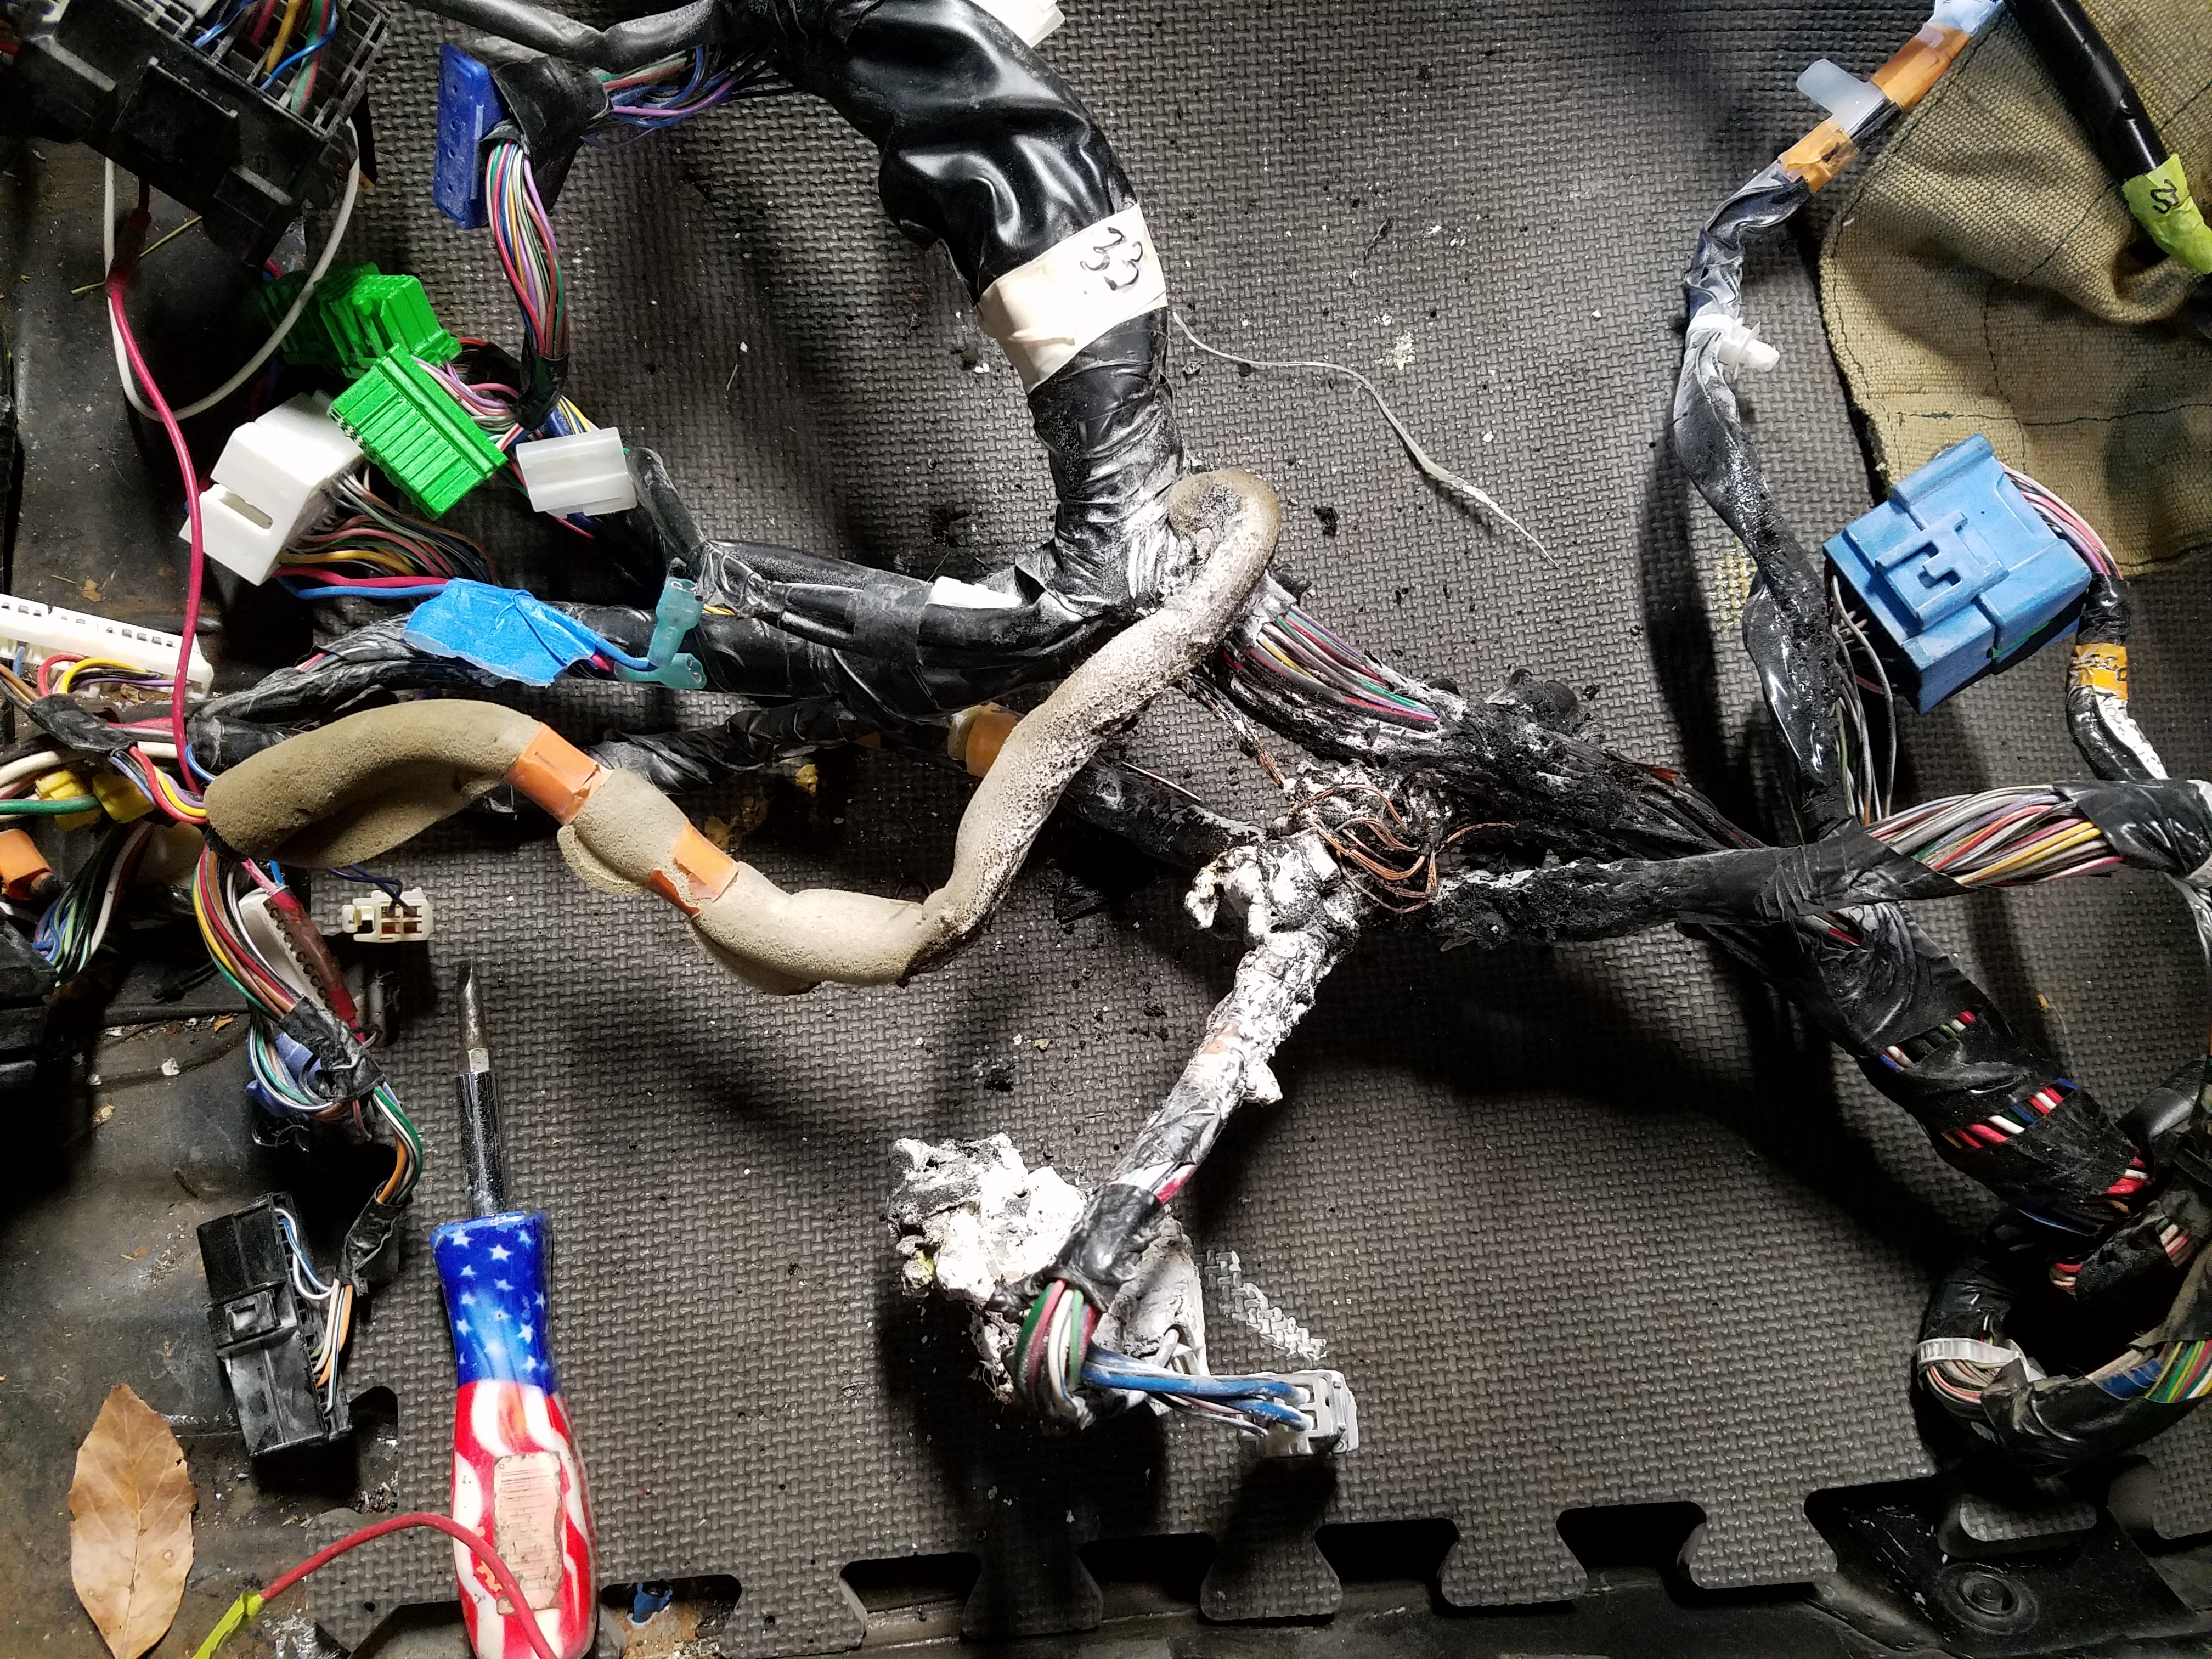
I never fully removed the engine harness, just pulled it away from the inside of the firewall. Figured I'd cut some corners. So I think the fuzzy insulation on the floor of the cabin ignited it but the plastic wire insulation and some connections are what was really burning. The flames were about 18" high as I grabbed my fire extinguisher and gave it a couple shots.
Damn.
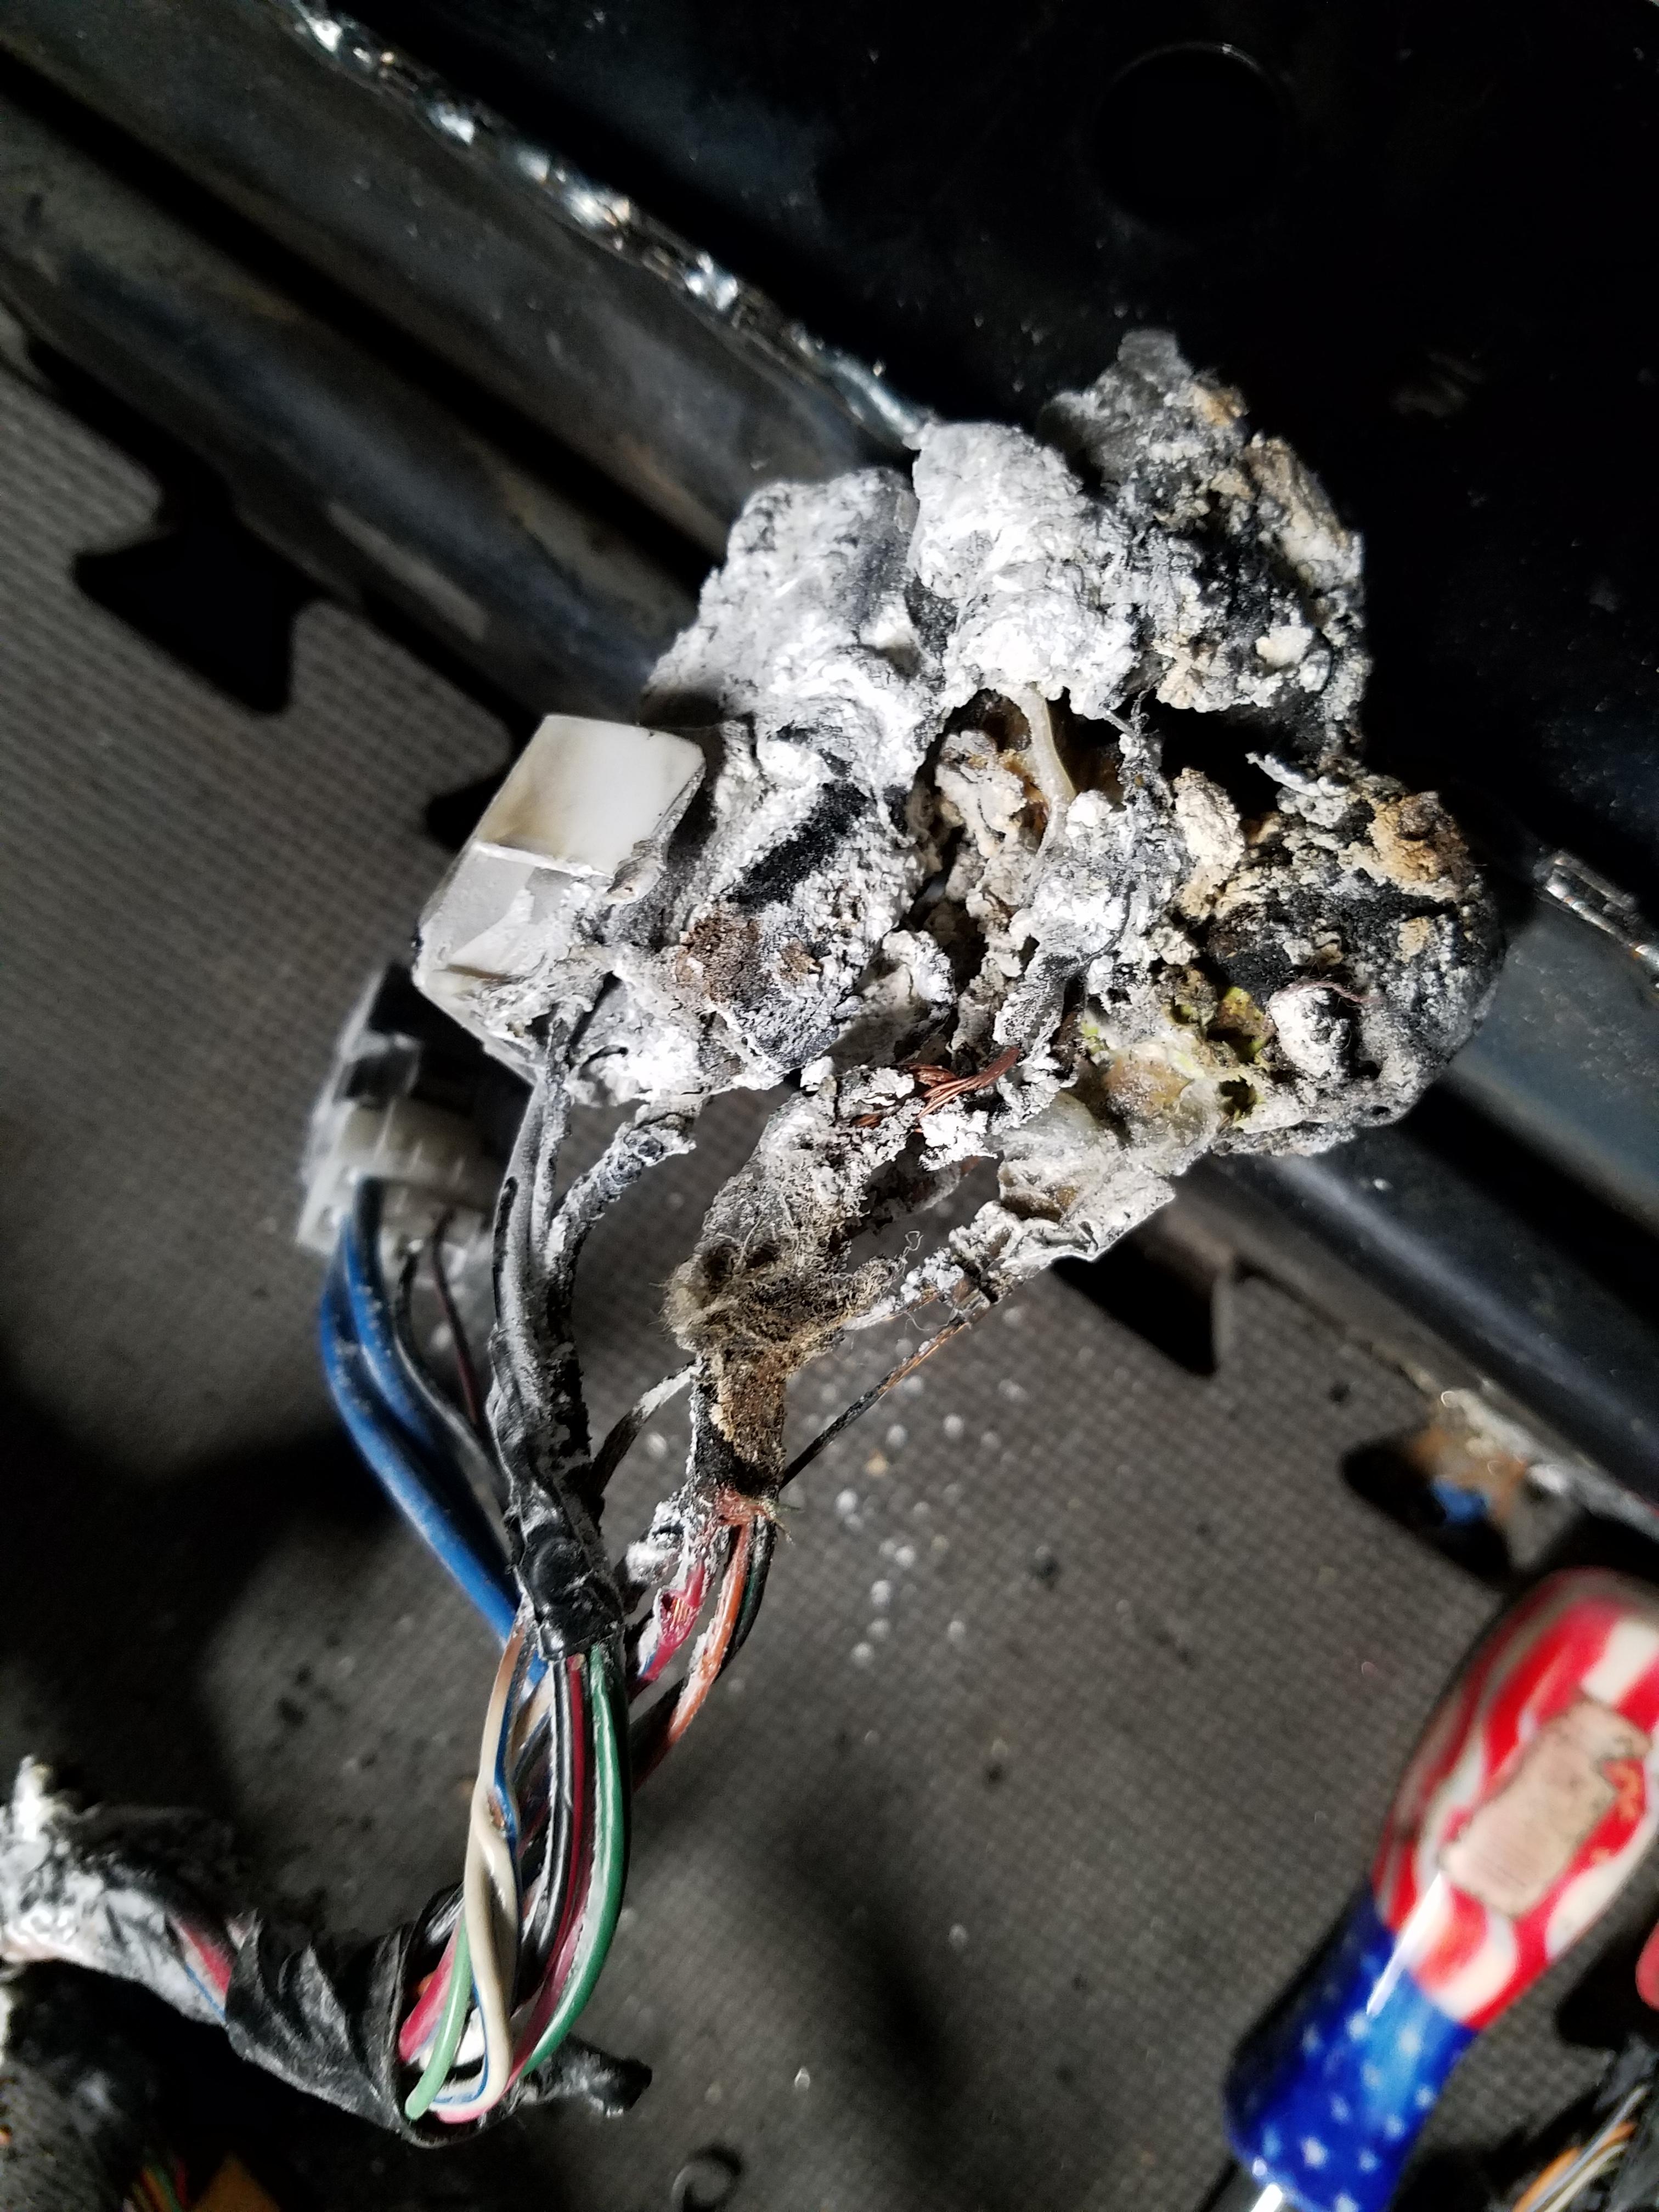
So right in the middle of the harness, it's all cooked. Could have been worse of course, and I was glad there wasn't more damage. Also glad I put my extinguisher mounted up on the pillar that separates my garage doors - and not in a cabinet or drawer somewhere. 15 years it sat there and was never used.
Luckily there is plenty of harnesses on ebay for my year car so I've already got one to replace that's in even better condition. I'll just transfer over the markings on where it will mount back to the car, and reconnect any wires I had added for my gauges, etc. No big deal, but a lesson learned.
I never fully removed the engine harness, just pulled it away from the inside of the firewall. Figured I'd cut some corners. So I think the fuzzy insulation on the floor of the cabin ignited it but the plastic wire insulation and some connections are what was really burning. The flames were about 18" high as I grabbed my fire extinguisher and gave it a couple shots.
Damn.
So right in the middle of the harness, it's all cooked. Could have been worse of course, and I was glad there wasn't more damage. Also glad I put my extinguisher mounted up on the pillar that separates my garage doors - and not in a cabinet or drawer somewhere. 15 years it sat there and was never used.
Luckily there is plenty of harnesses on ebay for my year car so I've already got one to replace that's in even better condition. I'll just transfer over the markings on where it will mount back to the car, and reconnect any wires I had added for my gauges, etc. No big deal, but a lesson learned.


