Deal of a century LS2 sleeper project
 05-25-2015, 01:45 PM
#51
V8 Miata Habitu�

If your transmission has the 2.97 low gear, the 3.23 differential ratio is a great match for any cam that will run along reasonably smoothly (without surging) at, say, 1500 - 1700 rpm or above in low gear. Meaning, unless your cam profile is very aggressive, it will likely still be quite tolerable in slow speed, heavy traffic. You will also have a little better luck putting power to the ground in 1st gear, and the .62 sixth gear (double overdrive) ratio is still practical for interstate cruising. So if you have the 2.97 low box, I would bet you will like the 3.23 better than the 3.73.
As long as the cam isn't too radical, some people might still prefer the 3.23 even with the 2.66 low gearbox. With the substantial power you are making, it would allow you to stand on it in low gear in a lot more situations and still maintain some semblance of traction. Biggest downside to this scenario is, with 24 inch tires the .50 sixth (double overdrive) ratio in this box is going to make you wait until almost 80 mph to drop into sixth...assuming you need to maintain 1800 rpm for smoothness. That still isn't too bad, as the .74 fifth gear ratio allows 75 mph cruising at about 2500 rpm, which isn't too noisy and probably pretty efficient with your "performance oriented" cam.
The biggest thing you have going for you in swapping to the 3.23 rear is the excellent GM electronic engine controls. They allow you to have lower rpm smoothness with a modified engine much better than the older tech, factory control systems we blue oval boys have from the 80's and '90's.
 05-25-2015, 03:52 PM
#52
V8 Miata Enthusiast
Thread Starter

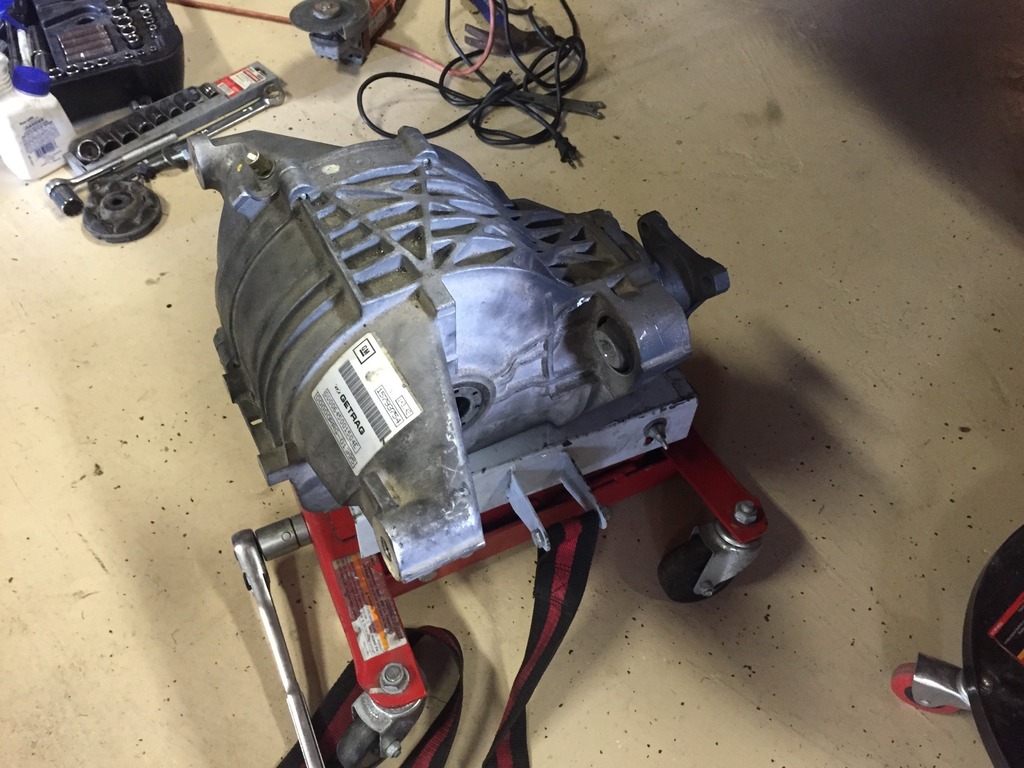
Well, just pulled the diff and the problem was quickly apparent. Step one, drain fluid......WHAT FLUID!! Turns out PO had this put together at a shop, and they never serviced the diff! Only 2 drops of gear oil cam out when I drained it. Surprised it lasted this long. Also, turns out this is a 3:42 ratio. I will pick up used 2011 Auto diff tomorrow and plug it in. Only down side is I had to chop my new exhaust to drop the diff. All part of the fun.
 05-25-2015, 04:24 PM
#53
V8 Miata Prot�g�


Wow, what a bummer. At least you were able to source a replacement cheap and fast enough. I've been looking for a traclok 8.8 for almost as long as I've had the car.
05-26-2015, 02:18 PM
#54
V8 Miata Enthusiast
Thread Starter
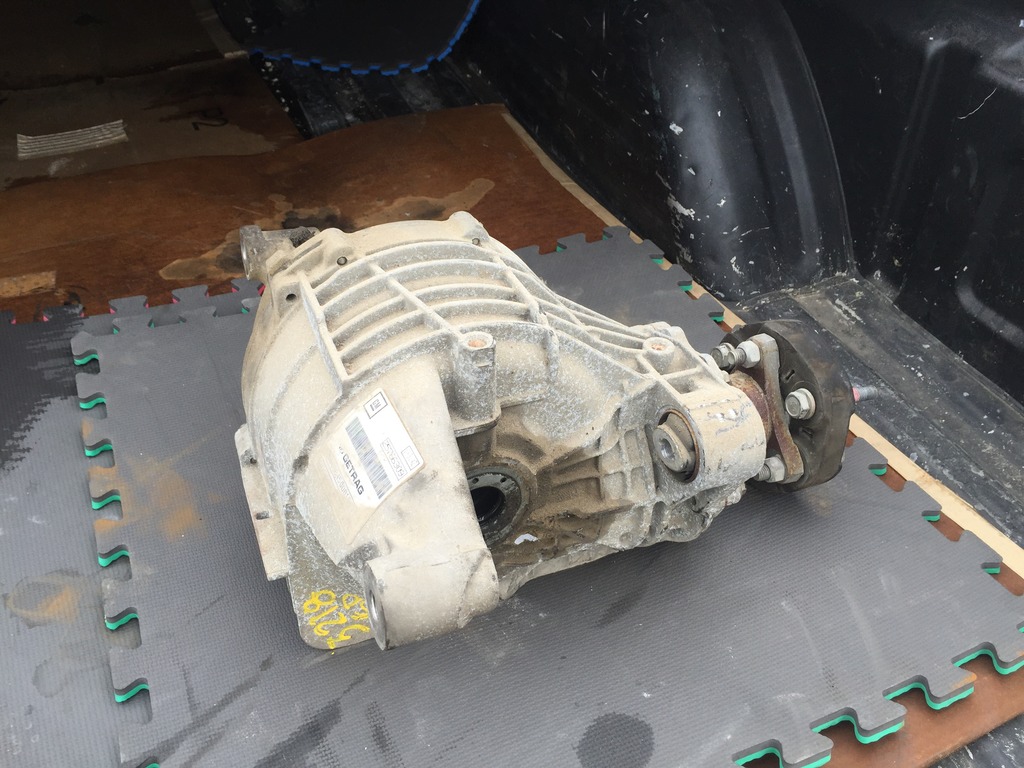
Went and looked at the $100 diff, and it was not the same axle type. I'm in a rush to get car ready for track day on Thursday, so I picked one up at a local parts house out of a STS. Same ratio as I had for $350. I'll slap it in, FILL it, run it, drain and refill. Should be done tonight.

 07-04-2015, 09:11 AM
#56
V8 Miata Enthusiast
Thread Starter
After a long week of working with these pigs:
It is time to get busy working on my LS Gunship! I think I have everything I need.

It is time to get busy working on my LS Gunship! I think I have everything I need.

The following 3 users liked this post by Gunpilot:
 07-05-2015, 09:40 PM
#59
V8 Miata Enthusiast
Thread Starter
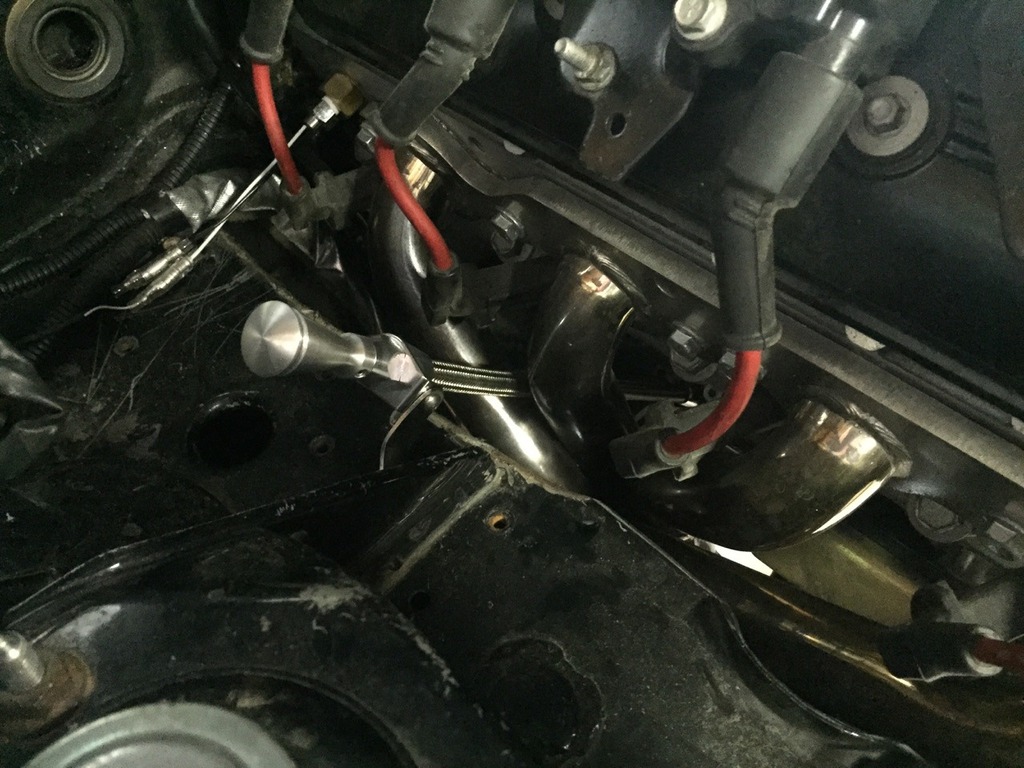
I know what you mean. It seems like the parts you order never seem to fit like you thought they would. Had to stop and switch to vodka. Wait till the speed shop opens tomorrow. The lines for the relocator hung down too low. Have to find some 90 degree elbows to turn the line quicker. Last thing I want is the street to wear a hole in my oil lines. Oil cooler is mounted and looks good. Just have to finish all the plumbing.
07-08-2015, 05:38 PM
#60
V8 Miata Noob

Just for your reference I have a 99 Corvette coupe with 2.66 MN6 tranny and standard 3.42 diff. Rear tires are ~26", 456/398 at the wheels... Just my opinion but it seems in a light car with ~24" tires a 3.23 would be great gear choice, the 2.73 would likely work fine as well given the V8's TQ low in the RPM's. The ratios on the MN6 tranny are tighter spaced than the 2.97 MN12 tranny, however the MN12 helps the Vette get off the line better with 3.42 diff (stock C5 ZO6 setup). Just my $.02
07-08-2015, 06:47 PM
#61
V8 Miata Enthusiast
Thread Starter
Got a bit done. Had to source connections to convert pipe fittings to AN. Damn that crap is expensive!
First had to add a oil dipstick to my block since GTO had it in the pan. Drilled thru the freeze plug and used a screw to pull it out.
New dipstick
Oil Cooler mounted
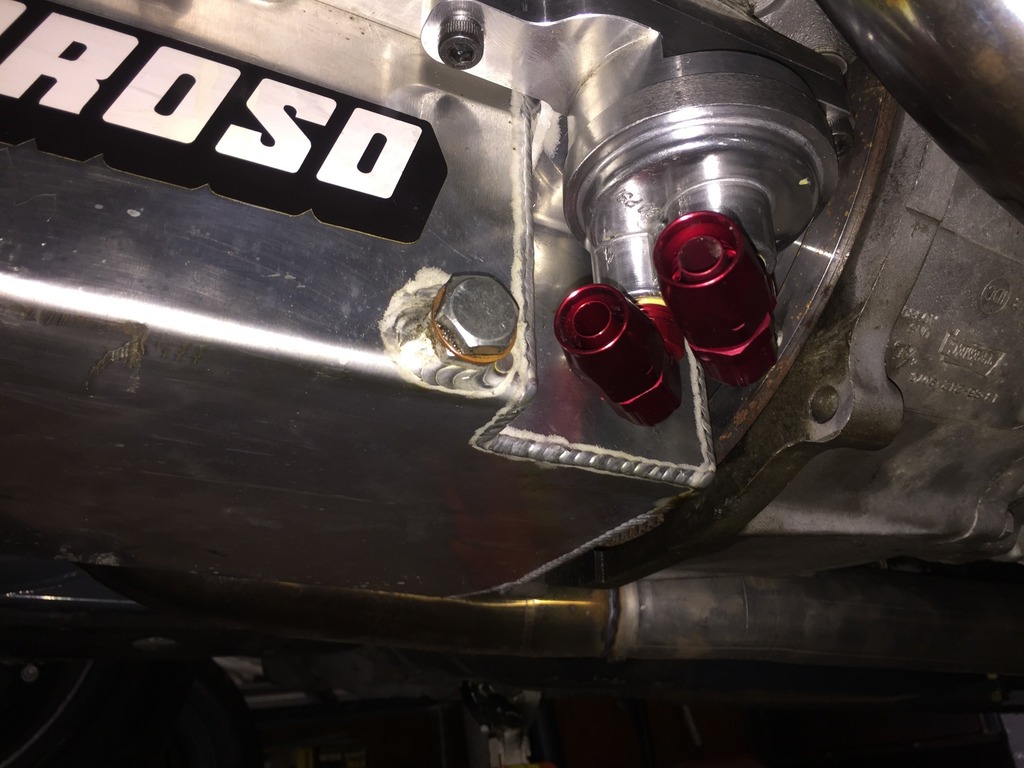
Adapter added to Moroso oil pan with 90 degree AN swivel adapters:
I will hopefully have time tonight to run all the hoses.
First had to add a oil dipstick to my block since GTO had it in the pan. Drilled thru the freeze plug and used a screw to pull it out.

New dipstick

Oil Cooler mounted

Adapter added to Moroso oil pan with 90 degree AN swivel adapters:

I will hopefully have time tonight to run all the hoses.
07-08-2015, 10:32 PM
#62
V8 Miata Enthusiast
Thread Starter
Got all lines ran. I will work on gauges and priming the lines this weekend. To avoid the headers, I took the oil pan lines up through the fender.
Here are the lines coming off the pan that run up to the remote oil filter:
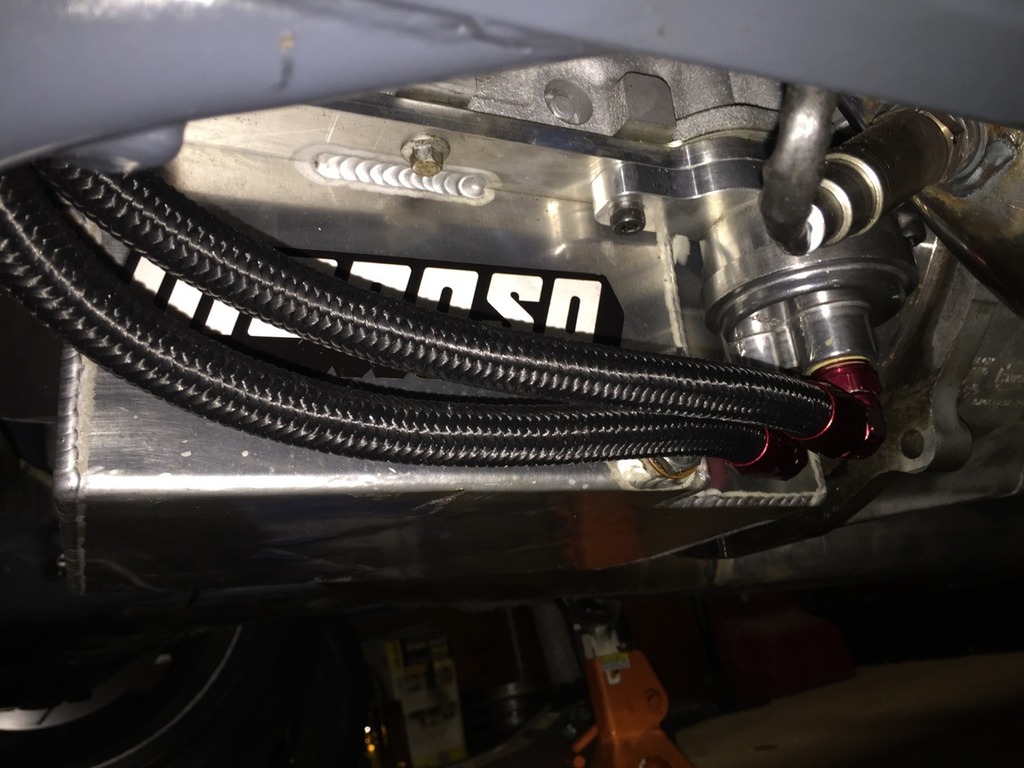
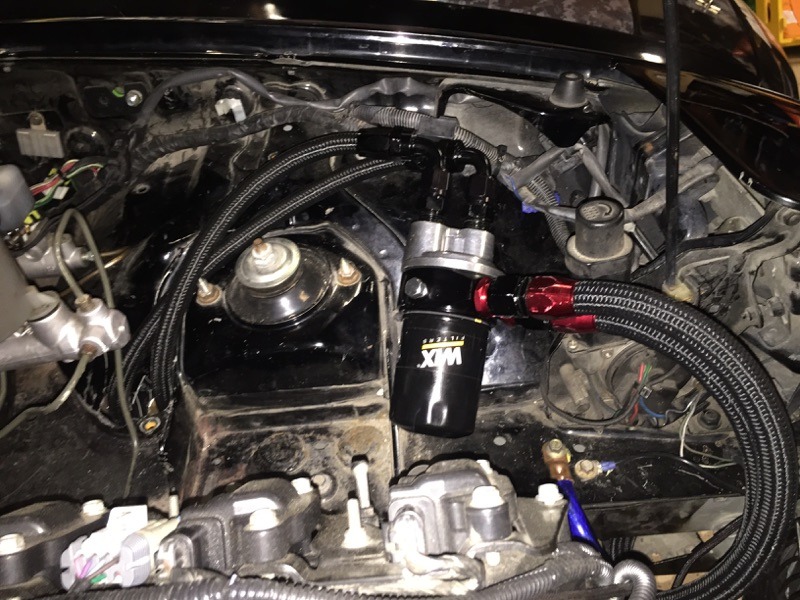
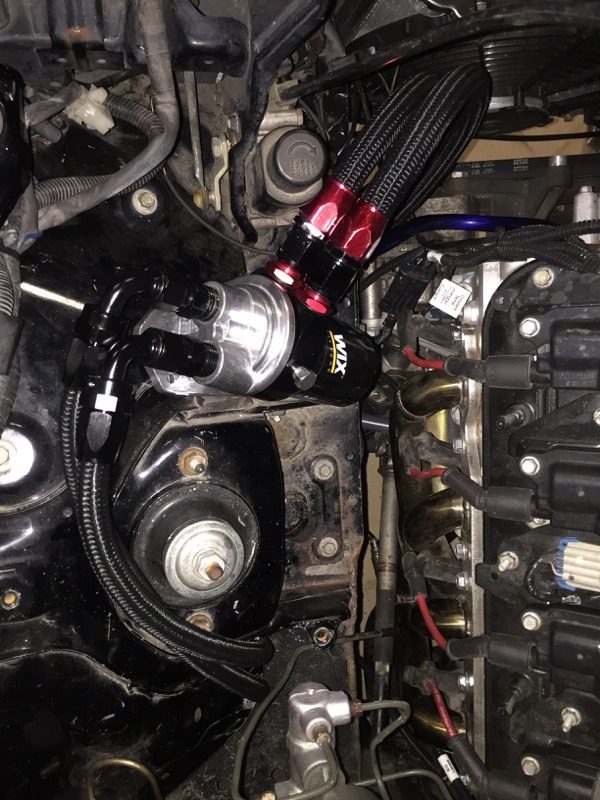
Here are 2 shots of the remote oil filter with the oil cooler sandwich plate in it. The cooler plate has 2 ports to add sensors to, and that is where I will be locating my oil temperature gauge:
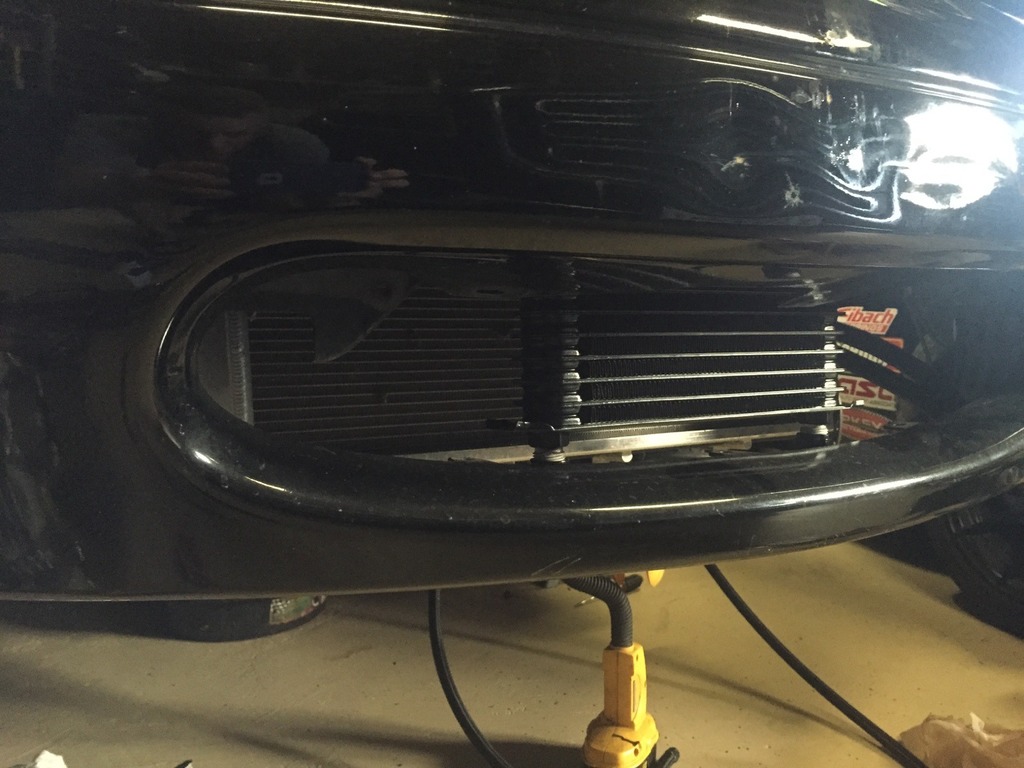
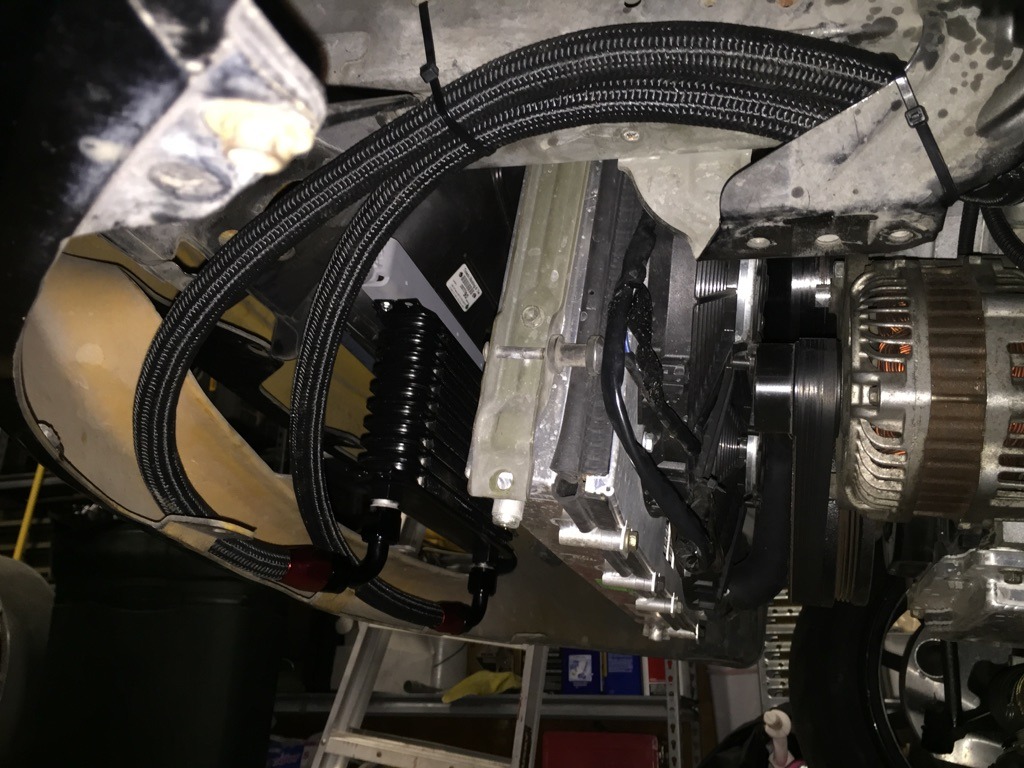
Here is a shot of the new oil cooler:
Once it is all installed and functional, I will go back in and detail the inside fenders. They got pretty dirty with all the WD40 and drilling.
Here are the lines coming off the pan that run up to the remote oil filter:

Here are 2 shots of the remote oil filter with the oil cooler sandwich plate in it. The cooler plate has 2 ports to add sensors to, and that is where I will be locating my oil temperature gauge:


Here is a shot of the new oil cooler:

Once it is all installed and functional, I will go back in and detail the inside fenders. They got pretty dirty with all the WD40 and drilling.
The following 2 users liked this post by Gunpilot:
charchri4 (07-08-2015),
jrmotorsports55 (07-09-2015)
07-09-2015, 06:57 AM
#63
V8 Miata Zealot

Nice. Be sure to use some good cushion clamps to secure the oil lines in stead of the zip ties.JEGS Cushion Clamps - Stainless Steel - Free Shipping on All Orders @ JEGS
07-09-2015, 08:09 AM
#65
V8 Miata Enthusiast
Thread Starter
Yeah, zip ties were to keep lines in place so I could cut good measurements. I'll definitely be adding some better clamps. I really need to find a rubber grommet to add where the lined pass thru the fender. I filed down the metal really good, but there is still possibility of lines getting cut.
I'll post final material list once I know it works. Engine bay is so crowded, I would have liked for filter to mount on firewall on passenger side, but lines would have been long and harder to run with those headers. I plan on upgrading to the long tubes and wanted to keep as much space as possible.
I'll post final material list once I know it works. Engine bay is so crowded, I would have liked for filter to mount on firewall on passenger side, but lines would have been long and harder to run with those headers. I plan on upgrading to the long tubes and wanted to keep as much space as possible.
 07-09-2015, 01:32 PM
#67
V8 Miata Enthusiast
Thread Starter
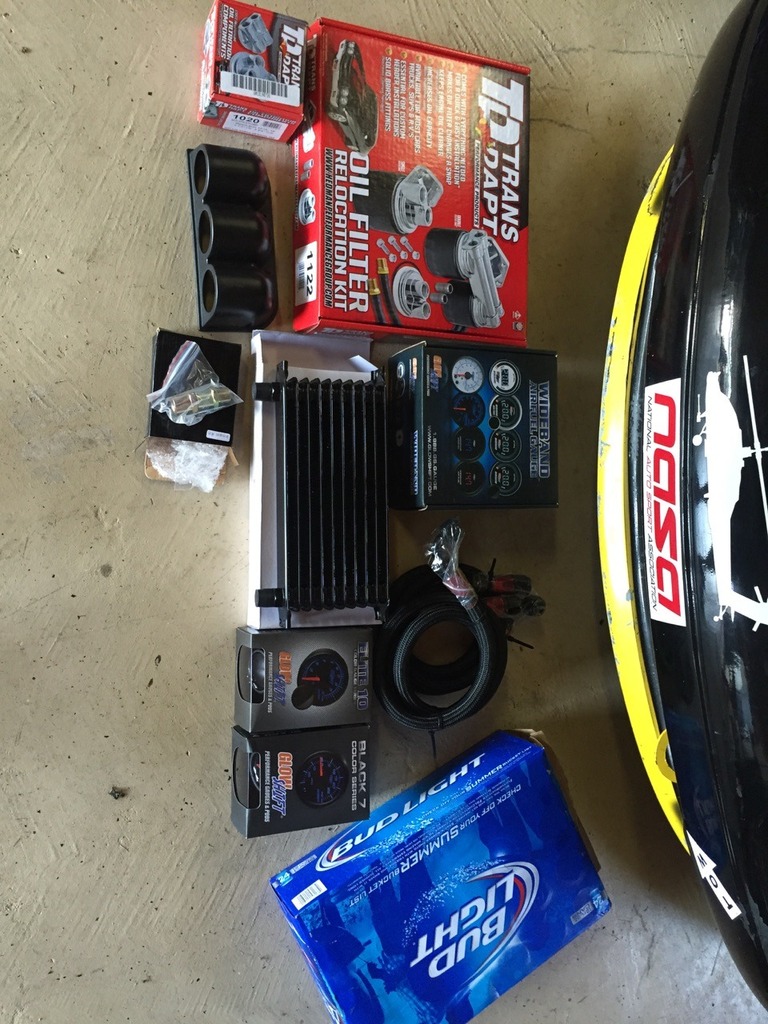
Here is a quick parts reference for my oil octopus. LOL
Oil Cooler (Ebay)- Oil Cooler
Oil Filter Re-locator (JEGS)-
Oil Filer Kit
• Filter Flange Inside Diameter: 3-3/16"
• Filter Flange Outside Diameter: 3-7/16"
Turns out, this adapter was too large for the Moroso pan. Make sure you measure your filter diameter. I had to re-order a separate adapter to fit. I also removed the rubber lines (which were too short) and straight brass nipples to replace with nylon braided AN lines and fittings. In retrospect, I would not order this kit. I would instead piece the kit together to make what you want.
AN Fittings were purchased locally at a speed shop. Basically, this is what was needed:
2 – 90 degree � pipe to AN swivels (for adapter on the pan for clearance issues). By the way, these were $41 EACH! OUCH.
2- � pipe to AN straights (convert filter holder to AN)
2- � AN curved 90 swivel (turn the lines on top of filter holder)
8 foot size 8 black braided nylon line
This is the new adapter I bought (JEGS)-
Adapter
• Inside Diameter: 2-1/2"
• Outside Diameter: 2-3/4"
Pay attention to oil filter thread pitch on motor you are using. This may effect final filter type you can use. Somewhere in the madness of parts, I ended up with a 21x1.5 pitch nipple like the Miata uses. I am running a WIX filter from a Mazda Millennium now. Part # 51356. Larger than the Miata and the one I had on the LS.
All my gauges are Glow Shift:
Oil Pressure – Oil Pressure
Oil Temperature-Oil Temp
Air//Fuel - Air/Fuel
The following users liked this post:
Underdog (07-10-2015)
09-05-2015, 07:20 PM
#68
V8 Miata Enthusiast
Thread Starter
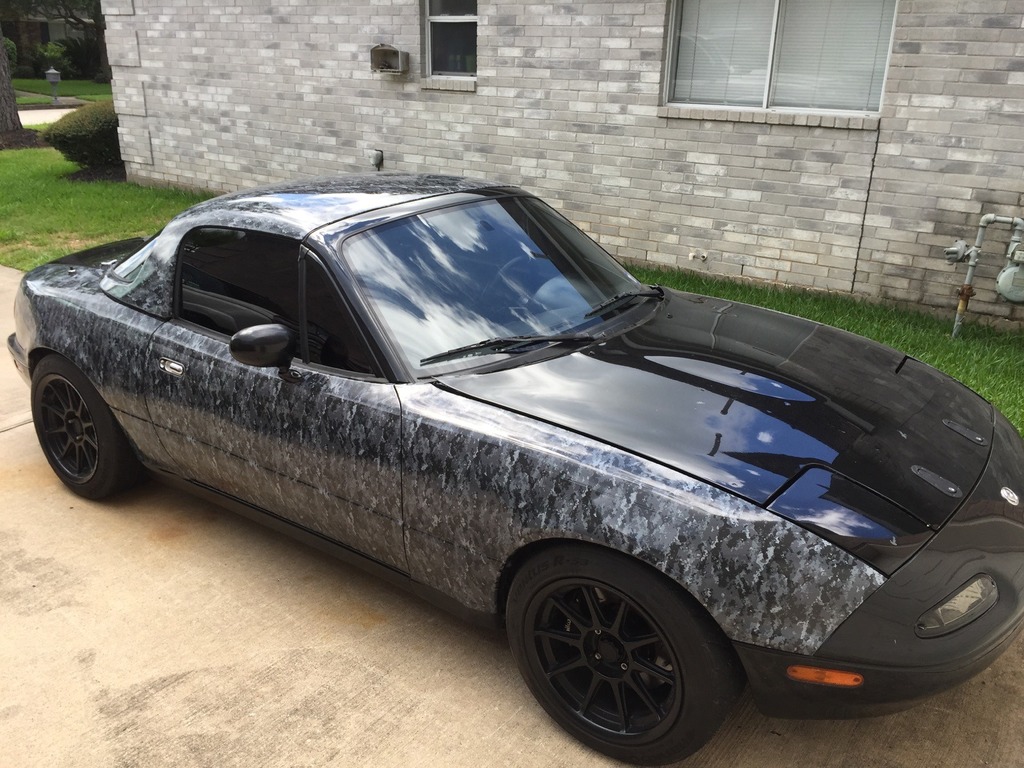
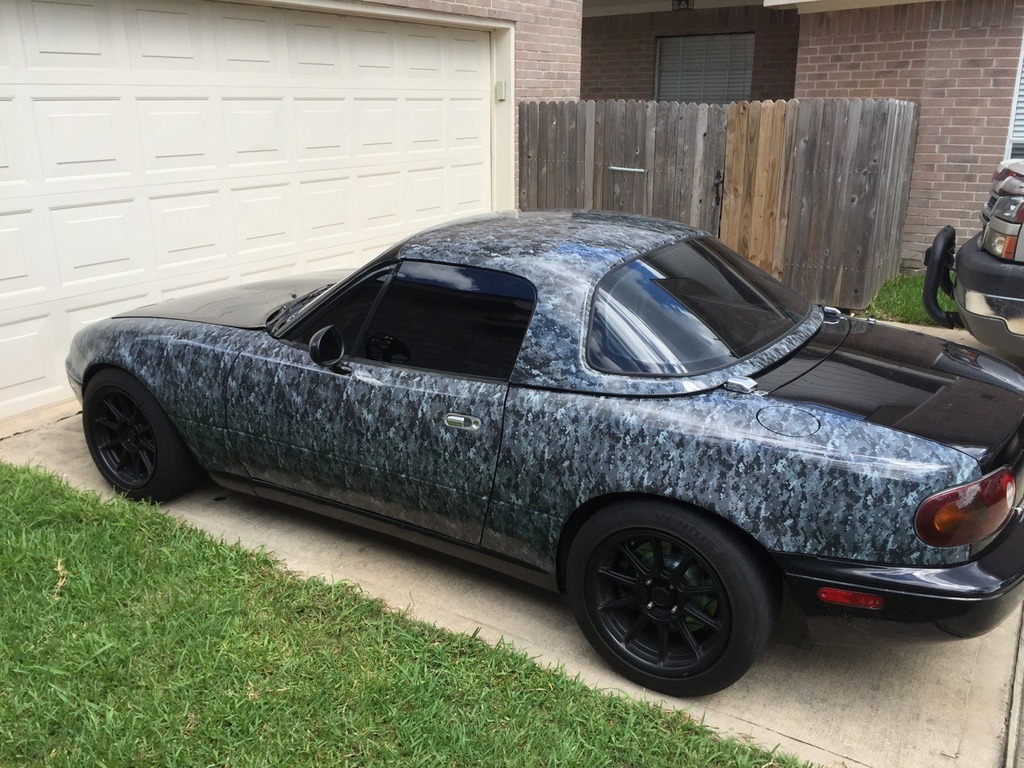
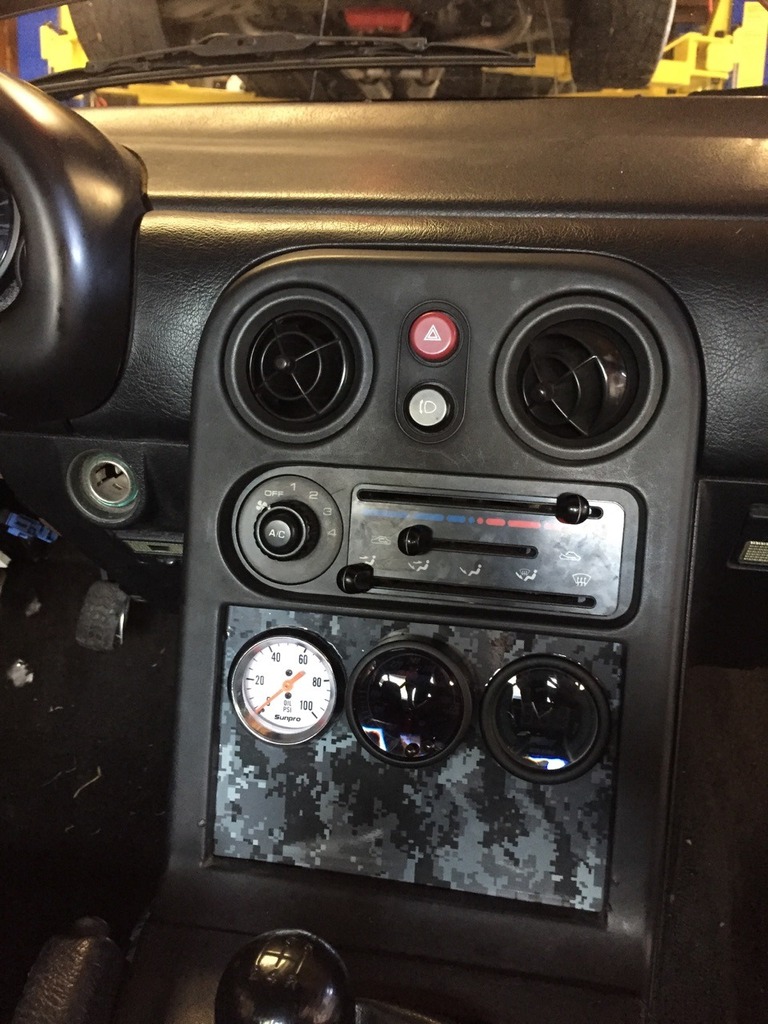
Got the car wrapped. Went with just the sides and top with black digital camo. I plan on adding a subdued black stripe with stars cut out over the hood and trunk. Also completed the gauges with same vinyl wrap. The gauges are a wet oil PSI, Oil temp, and digital air/fuel. Oil psi is white because I used it from another project to save $$.


The following users liked this post:
SupaDupaSteve (09-06-2015)
10-13-2015, 08:33 PM
#71
V8 Miata Enthusiast
Thread Starter
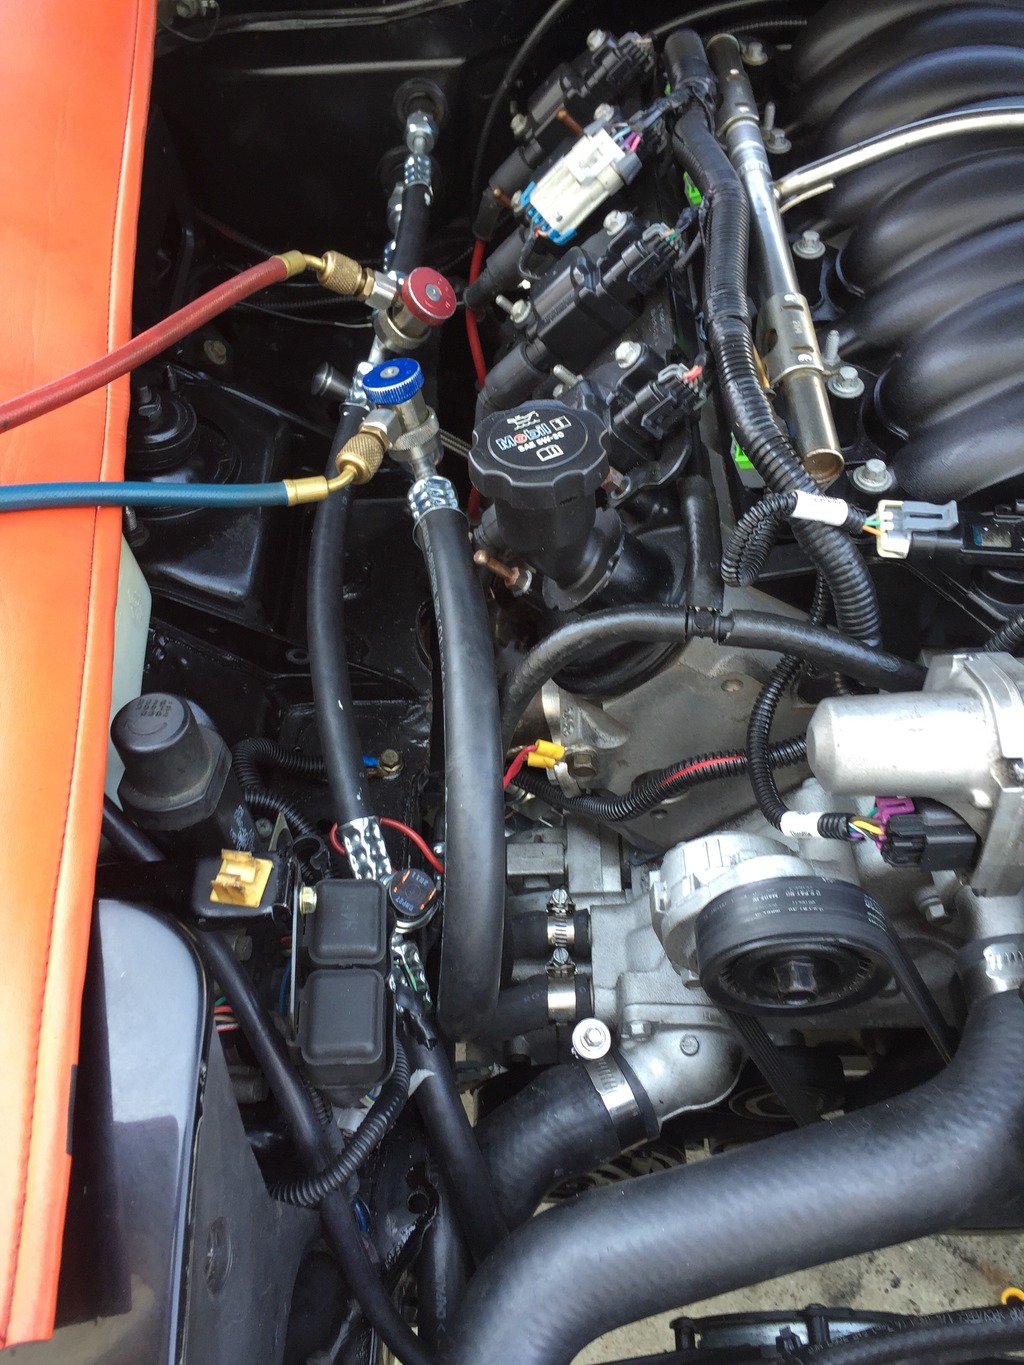
If you did not get a chance to read my AC build thread in the interior mod thread...I HAVE AC! Miata components under the dash. Firebird compressor. Full custom lines build by me. Wired it up to work with Miata controls and a high pressure safety switch.


 10-18-2015, 06:07 PM
#72
V8 Miata Enthusiast
Thread Starter
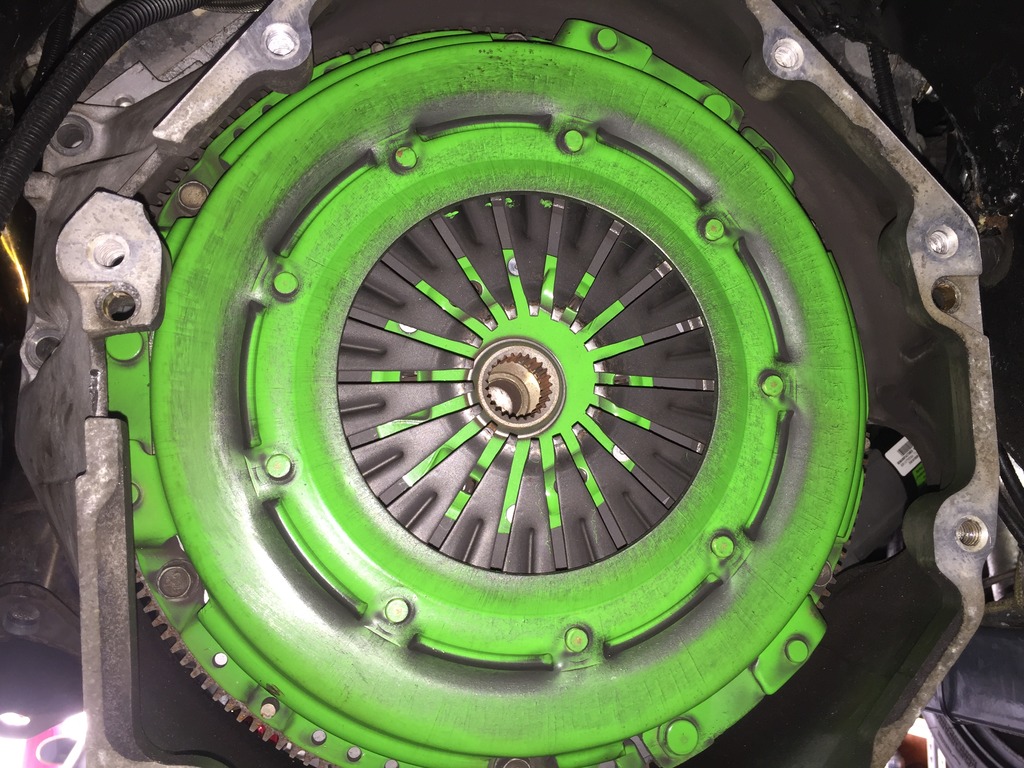
I've been hearing a strange noise sometimes when I begin to let out the clutch. Since I'm going to run in the Texas Mile next weekend, I figured I would solve the issue. Dropped the transmission to change the clutch release bearing and add a remote bleeder.
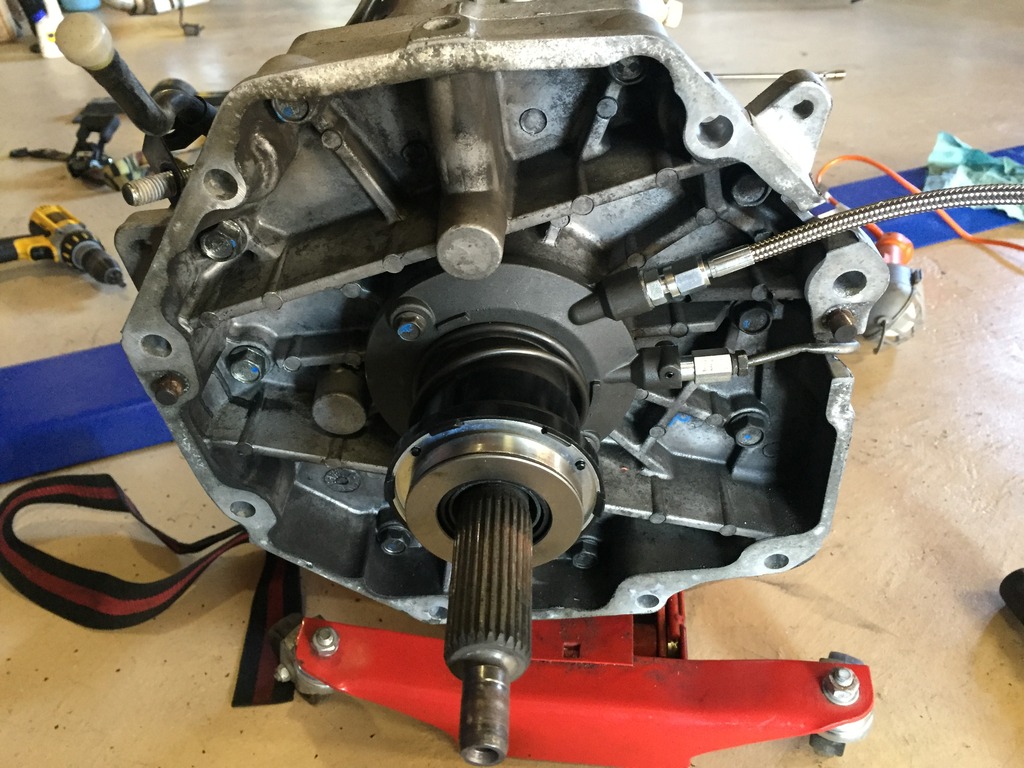
Since the running gear was installed when I bought it, never seen in here before. It was bonus to see a Monster clutch assembly and flywheel in there.

Since the running gear was installed when I bought it, never seen in here before. It was bonus to see a Monster clutch assembly and flywheel in there.
 10-19-2015, 01:56 PM
#73
V8 Miata Enthusiast
Thread Starter
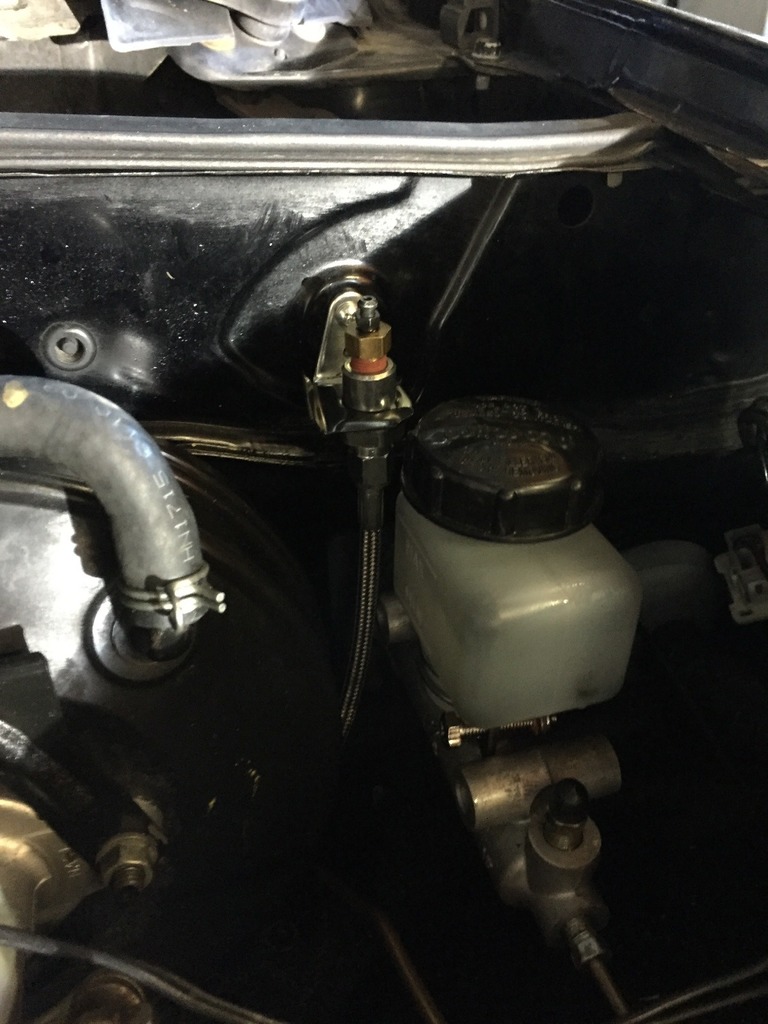
Got the clutch release bearing done, remote bleeder installed, and everything back in. Boy its nice to have a lift. Test drive checks out. That remote bleeder is pretty nice. I used some brake clips to mount it to the firewall next to the master cylinder. Used a vacuum pump to pull the fluid from the master cylinder thru the release bearing and to the bleeder screw. Worked like a champ.

 10-19-2015, 08:28 PM
#75
V8 Miata Enthusiast
Thread Starter
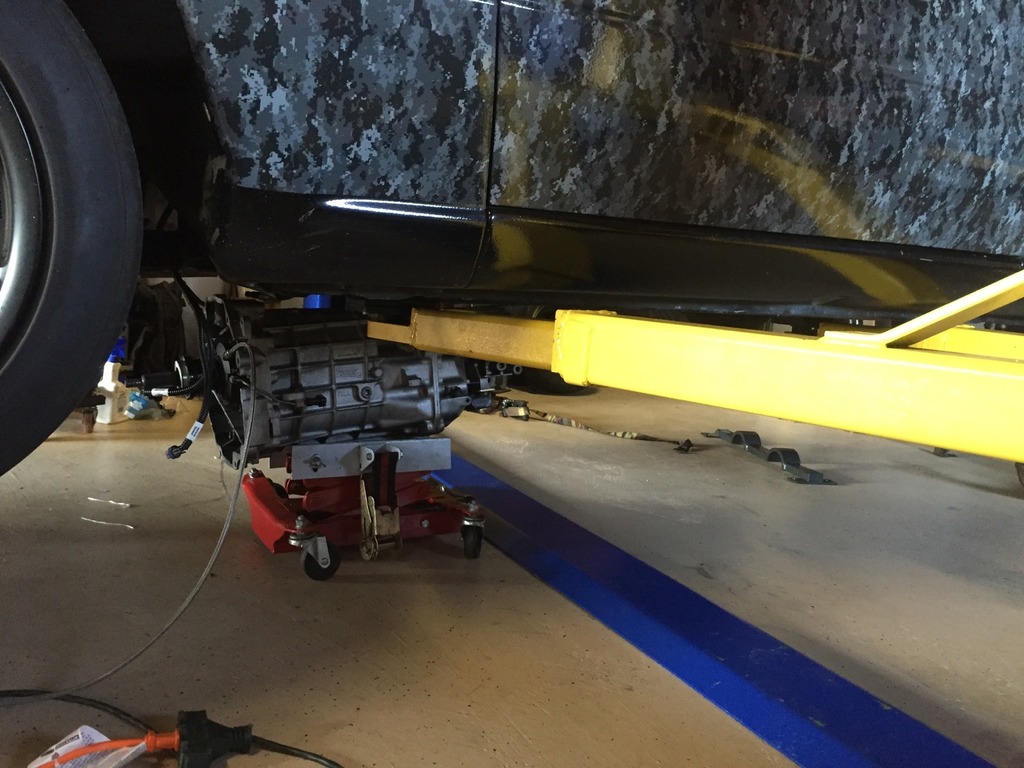
First time I did this task. Did some research and everyone said separate at the bellhousing, so that's what I did. 8 bolts and done. The top one was done by feel and I let the tranny hang low to give me a better angle. It was was a bear to break free, but a little help from a mallet helped. I guess it is common for the guide pins to rust a bit and make it hard to slide out. Going in was a breeze.
All done by myself in my garage. Having right tools like a 3 foot extension helps.
All done by myself in my garage. Having right tools like a 3 foot extension helps.


