Adams LS1 NB Build
 04-29-2016, 01:48 PM
#1
V8 Miata Follower
Thread Starter

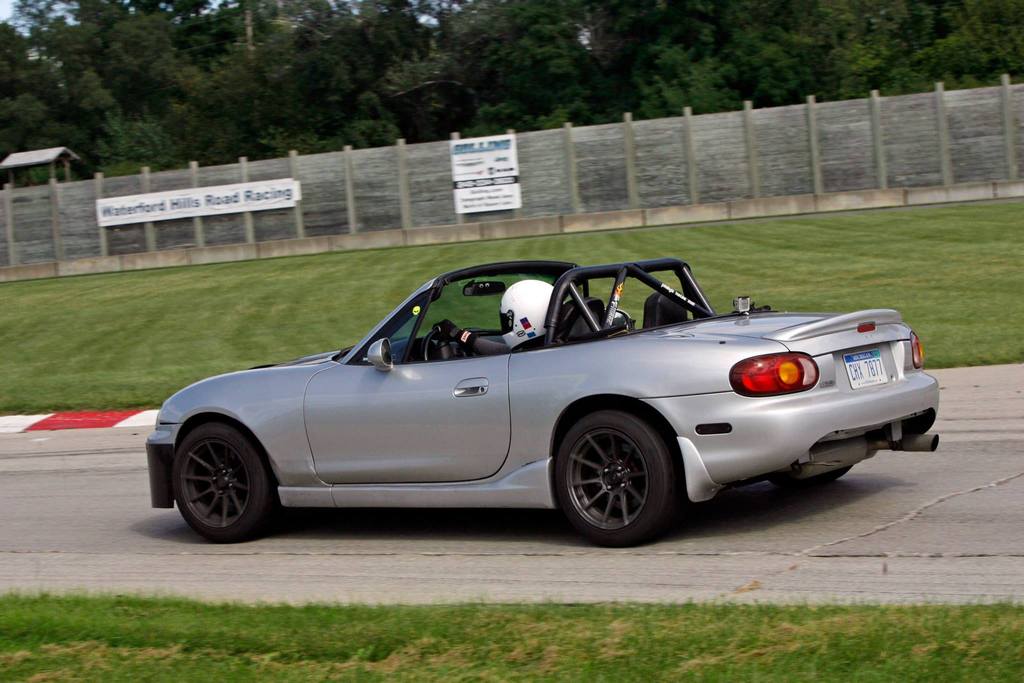
Pick 2 out of 3, cost, performance, reliability. This build will be focused on 100% reliability. Performance will obviously be there with an LS1 swap, and I'm willing to put in the costs to make it happen. Luckily I have plenty of fabrication skills, so I may be able to come in at a lower cost than the average off-the-shelf build. I'm a Test & Development Engineer so sensors, numbers, data, and good general engineering practice are of high priority.
Engine:
Driveline:
Engine Management/Gauges:
Current chassis modifications:
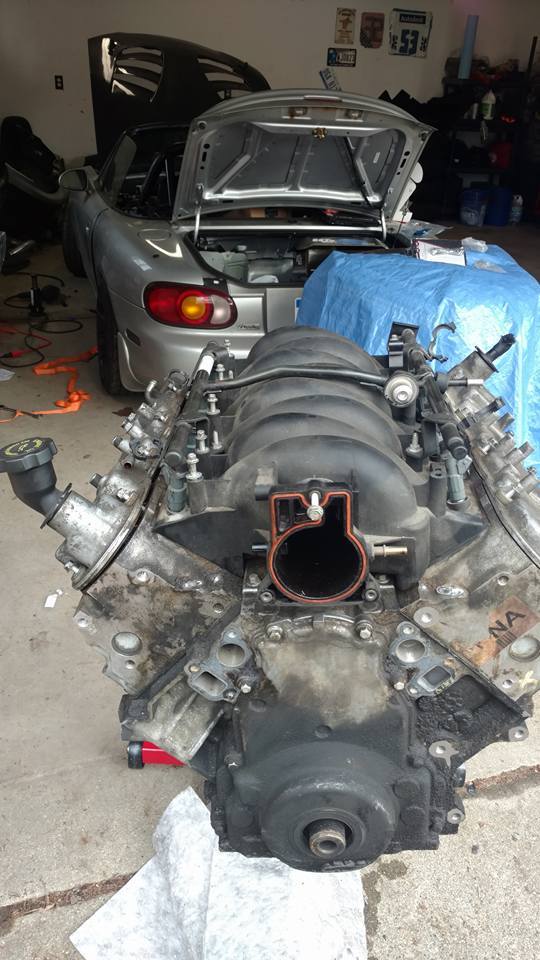
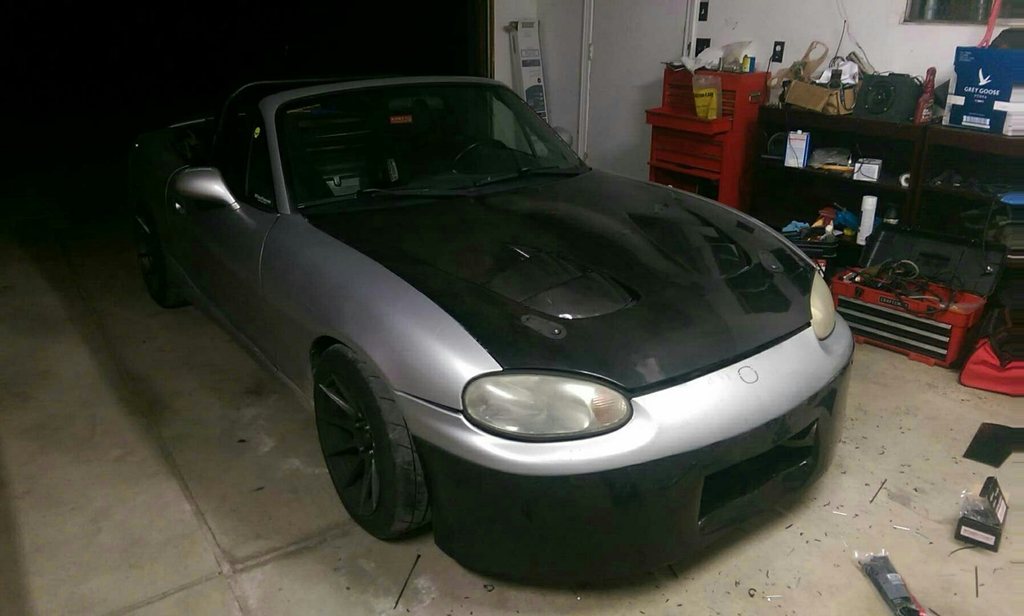
I've got quite a bit of parts already and will try to get as much ready this season as possible. This includes plumbing the fuel pump and lines, getting the BF frame rails bolted up, getting my spare rear subframe ready with the driveline kit, getting the long block together and ready to drop in, and preparing as much wiring as I can. The main visual thing that will change from the pictures below is the carbon hood will be painted to match the body.
Engine:
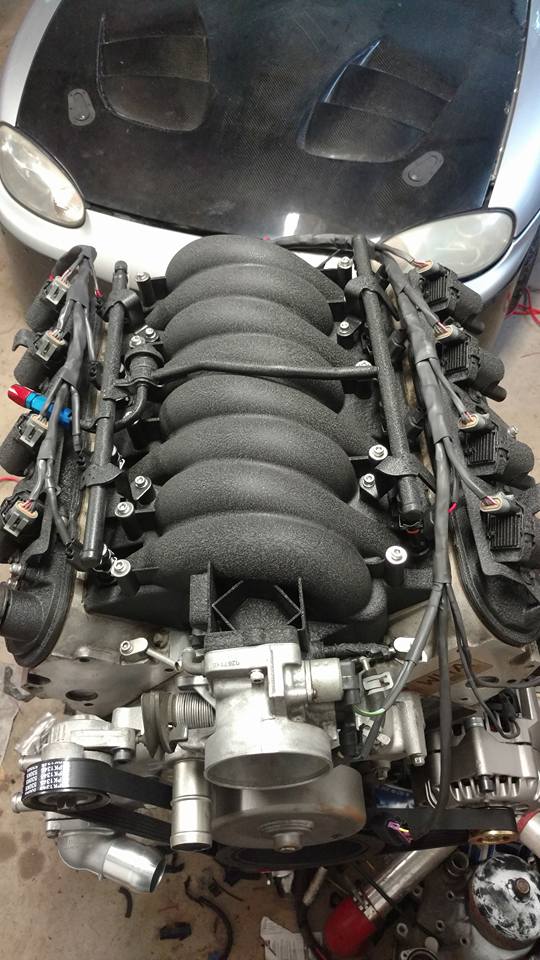
- LS1 from a '98 Camaro
- V8r subframe
- Tick Street Heat Stage 2 V2 cam with a custom 110+3 grind (231/235 0.625"/0.605")
- Patriot 8501 Xtreme valve springs
- Comp cam trunnion upgrade
- Ported oil pump
- FM oil pan
- Remote filter with oil cooler
- V8r long tube headers
- 2.5" X-pipe, Summit glasspacks, Magnaflow 11226 mufflers
- DW300, Corvette filter/regulator
- LS6 intake
- Ported 806 heads
- Some form of 500-600cc EV14 injectors
Driveline:
- T56
- Cheap second hand BF transmission mount to modify for V8r positioning
- Getrag G80 3.42
- V8r stage 2 driveline kit
Engine Management/Gauges:
- MS3+MS3x
- Dual Innovate MTX-L's
- Racepak IQ3s display
- Radio delete tablet for full Tunerstudio
- Flex fuel sensor for full blended 93-E85
- Dual VSS input for traction control with 0-5V potentiometer for TC setting
Current chassis modifications:
- Revalved MSM Bilsteins, 550/400 springs, FCM bump stops, custom extended top hats
- 15" Kirkey Road Race Intermediate
- HDHCHTDDM2 roll bar
- A bunch of other stuff that doesn't really matter
I've got quite a bit of parts already and will try to get as much ready this season as possible. This includes plumbing the fuel pump and lines, getting the BF frame rails bolted up, getting my spare rear subframe ready with the driveline kit, getting the long block together and ready to drop in, and preparing as much wiring as I can. The main visual thing that will change from the pictures below is the carbon hood will be painted to match the body.


 04-29-2016, 10:16 PM
#2
V8 Miata Prot�g�


Nice! Did you know innovate makes a wideband specifically for multi bank engine configurations, 2 sensors onto one gauge but it has 2 readouts so you can monitor each bank
04-30-2016, 06:58 AM
#3
V8 Miata Follower
Thread Starter
I did not know that, cool! Though, I already have one MTX-L, and the DLG-1 looks to be exactly twice the price. It would be nice to have one gauge, but I'm not even using the gauge, so it's not a bid deal. I have the gauge mounted in the glove box only to check the calibration with Megasquirt every now and then, but I read my AFR's off the Racepak.
05-17-2016, 06:04 PM
#4
V8 Miata Follower
Thread Starter
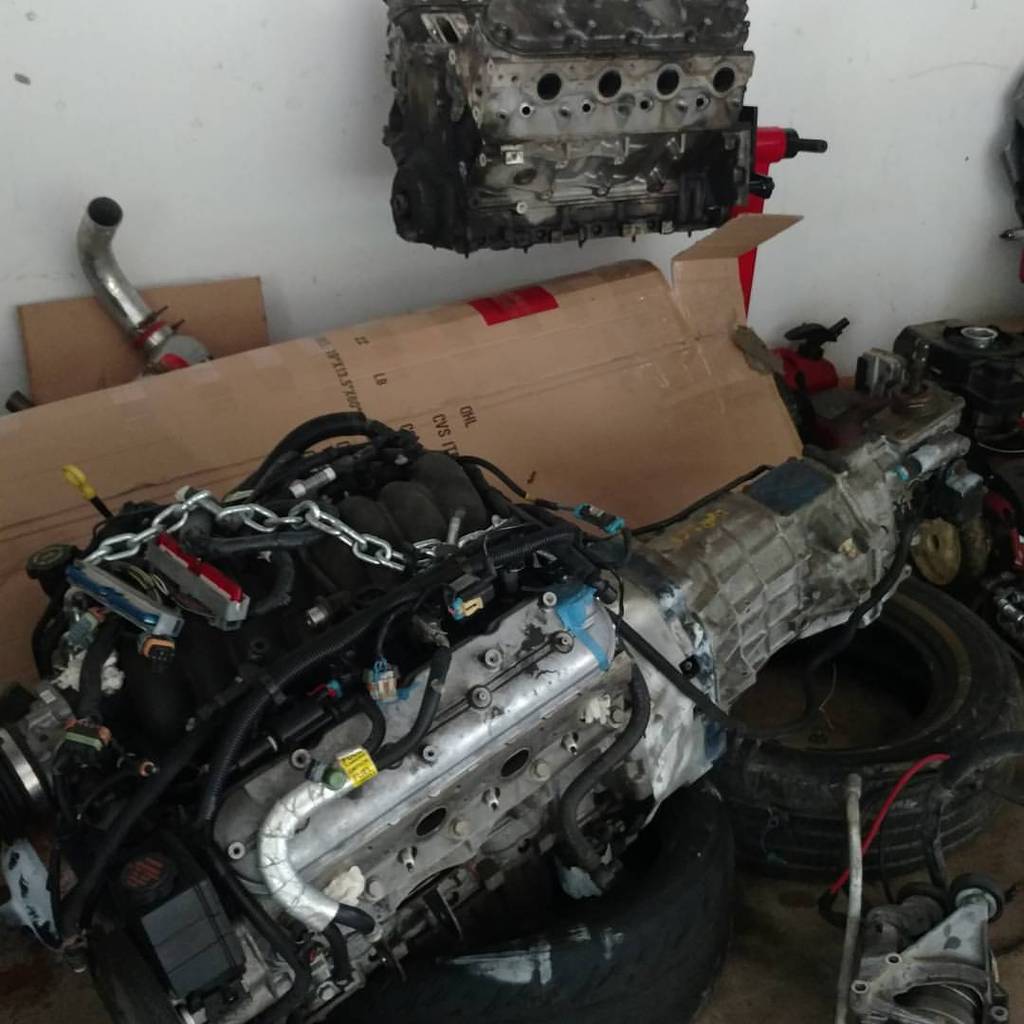
A co-worker of mine abandoned his E36 M3 LS1 swap, and my other co-worker wanted the chassis. Ended up picking up the full 99-00 Firebird LS1+T56 dropout! This is much nicer not having to piece together all the fasteners and sensors like I would've had to do with the long block.
 05-18-2016, 11:45 AM
#6
V8 Miata Follower
Thread Starter
All I know is it had around 80k miles, but I'm not sure why it was originally pulled from the donor vehicle. It's very clean though, and looks entirely unmolested. There's no sign of any bolt being removed and the harness is in perfect factory form. There's hint of slight oil weeping from the front cover seal, but no actual drips. I have a whole engine gasket kit already so the rear main, cover seals, etc will all be done. I got it for $2800 including E36 engine mounts and T56 crossmember. It's got all accessories including A/C and PS which I will sell.
05-18-2016, 11:51 AM
#7
V8 Miata Fanatic

Sounds like a good deal to me. Interestingly enough, the T-56's are getting to be more desireable finds then the engines themselves. Did you friend ever hear it run? I personally took a big risk buying mine having never heard it run. I did get to see pics of the car it came from, and I saw the odometer reading, but I didn't hear mine until a year after I bought it. Now, when I pulled the valve covers and timing cover, the inside was spotless so I had a little ease on my mind after that.
05-18-2016, 11:59 AM
#8
V8 Miata Follower
Thread Starter
Yeah he did have confirmation that it ran when he bought it, which was a couple years ago. I'm sure he knows the history of where it came from, I'll have to ask him if I ever see him not swamped with work (he's one of the head engineers on Cadillac Racing). I didn't have much of a chance to talk to him, my other co-worker and I just grabbed the keys to his hanger and pulled the motor without him.
I figure my other long block has pretty good bores, so if for some reason this one doesn't prove to be healthy when I tear into it, I can mix and match parts. Unfortunately the heads will have to come off since I'll feel much better having LS7 lifters in there with the large-ish cam. I think I'm actually going to use the 806 heads from my other long block, rather than these 853's. Both are equally shitty as a stock casting, and I like the look of perimeter bolt valve covers. Both will net the same result once ported.
I figure my other long block has pretty good bores, so if for some reason this one doesn't prove to be healthy when I tear into it, I can mix and match parts. Unfortunately the heads will have to come off since I'll feel much better having LS7 lifters in there with the large-ish cam. I think I'm actually going to use the 806 heads from my other long block, rather than these 853's. Both are equally shitty as a stock casting, and I like the look of perimeter bolt valve covers. Both will net the same result once ported.
05-18-2016, 08:34 PM
#9
V8 Miata Prot�g�
Yeah he did have confirmation that it ran when he bought it, which was a couple years ago. I'm sure he knows the history of where it came from, I'll have to ask him if I ever see him not swamped with work (he's one of the head engineers on Cadillac Racing). I didn't have much of a chance to talk to him, my other co-worker and I just grabbed the keys to his hanger and pulled the motor without him.
I figure my other long block has pretty good bores, so if for some reason this one doesn't prove to be healthy when I tear into it, I can mix and match parts. Unfortunately the heads will have to come off since I'll feel much better having LS7 lifters in there with the large-ish cam. I think I'm actually going to use the 806 heads from my other long block, rather than these 853's. Both are equally shitty as a stock casting, and I like the look of perimeter bolt valve covers. Both will net the same result once ported.
I figure my other long block has pretty good bores, so if for some reason this one doesn't prove to be healthy when I tear into it, I can mix and match parts. Unfortunately the heads will have to come off since I'll feel much better having LS7 lifters in there with the large-ish cam. I think I'm actually going to use the 806 heads from my other long block, rather than these 853's. Both are equally shitty as a stock casting, and I like the look of perimeter bolt valve covers. Both will net the same result once ported.
05-18-2016, 08:41 PM
#10
V8 Miata Follower
Thread Starter
Thanks, seems worth the upgrade for sure. Looking into it more, some people have great experiences with LS7 lifters, and some say they are just good and reliable for mild cams and stock RPM limits. Do those Morel lifters fit with the LS7 lifter trays? I don't see any special Morel trays and it seems people use them with stock trays, just wanted to be sure.
05-19-2016, 08:12 PM
#11
V8 Miata Prot�g�
yes they are drop in, compatible with trays. Or if you want to spend more money you can. lol
the 5290 are stock roller size like the 5315 but with linkbar and the 5206 are .50 bigger roller that brings it to .750 which are good for aggressive cams, then there the 5294 which has a massive .842 roller for really aggressive cams and high rpms.
Personally I went with the 5315 after talking to a couple guys at Texas speed. My cam isn't quite as aggressive as yours though.
2010+ Camaro SS V8 Lifters
07-17-2016, 09:16 PM
#12
V8 Miata Follower
Thread Starter
Finally have some actual progress to share. I've put way too many hours into my engine harness, but it'll be worth it in the end. Every splice or connection is heat shrunk with glue inside, then the whole harness is heat shrunk. I'm sure it's not necessary to shrink the whole harness, but I like the added security of some strain relief throughout the harness, and I just absolutely love how clean it is. If I find Raychem boots that fit all the connectors, I may have the motivation and funds at some point to fully strain relieve the harness, but I don't see it being necessary for this, and it's a lot of added cost.
I guess I also never updated here that I got my 60lb EV14's in, LS6 intake manifold, D585 coils, and wrinkle black painted everything. I also picked up an LS7 intake that I'll also wrinkle black probably.
I also made the choice to upgrade to MS3pro. MS3+MS3x doesn't have the amount of high frequency inputs I need to run MAF, VSS1, and VSS2, as well as all the other digital inputs (flex fuel, all the switches, etc). I also want to mount the ECU on the firewall, and the MS3pro is necessary for this. I'll be maxing out the analog inputs with dual wideband, TC rotary pot, fuel pressure sensor, and map sensor.
I'm still working on getting the accessories buttoned up. I need to make a mount for the alternator. I'm thinking of changing the tensioner to an idler that's closer to the water pump to get better belt wrap, then use rod ends on the alternator to make it pivot for a tensioner. But with that, I don't like that the moment of the belt tension is reacted by one bolt, and the bolt going through the rod end is only preventing rotation. I have heard of a few people running the belt like I have now with no issue, and I can't turn the water pump with my hand at all. I doubt the water pump would have much more resistance than that.

 07-19-2016, 03:15 PM
#14
V8 Miata Follower
Thread Starter
I bought it second hand off of someone on miataturbo.net. I believe it's a Carbon Miata hood. I would not recommend it in the slightest bit. It's fitment is pretty terrible. It's a full 0.5" too narrow, and it doesn't mate up to the headlights well at all.
The following users liked this post:
boileropp (07-19-2016)
08-31-2016, 08:34 PM
#15
V8 Miata Follower
Thread Starter
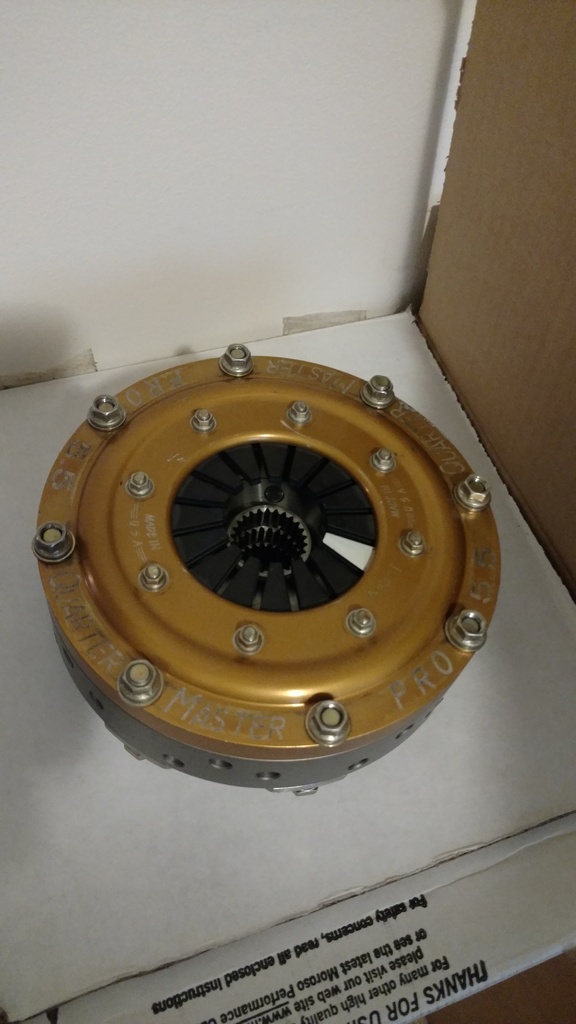
This may be quite over board, but we'll see. I picked up a Quartermaster Pro 5.5 triple disc clutch for pretty cheap! This thing is crazy light, 13.5 lbs including clutch and flywheel but not including the auto flex plate it bolts to. It's brand new and I have a rebuild kit for it. It is a metallic clutch, so that will be interesting, but it sounds like I have a connection to get organic discs for it if need be. I certainly don't need the 900 ft-lb rating of the clutch, I'm more so interested in the low moment of inertia. I chose the triple disc solely to have more distributed heat capacity, which is my main concern of driving a 5.5" clutch on the street.
 09-10-2016, 08:43 PM
#16
V8 Miata Follower
Thread Starter
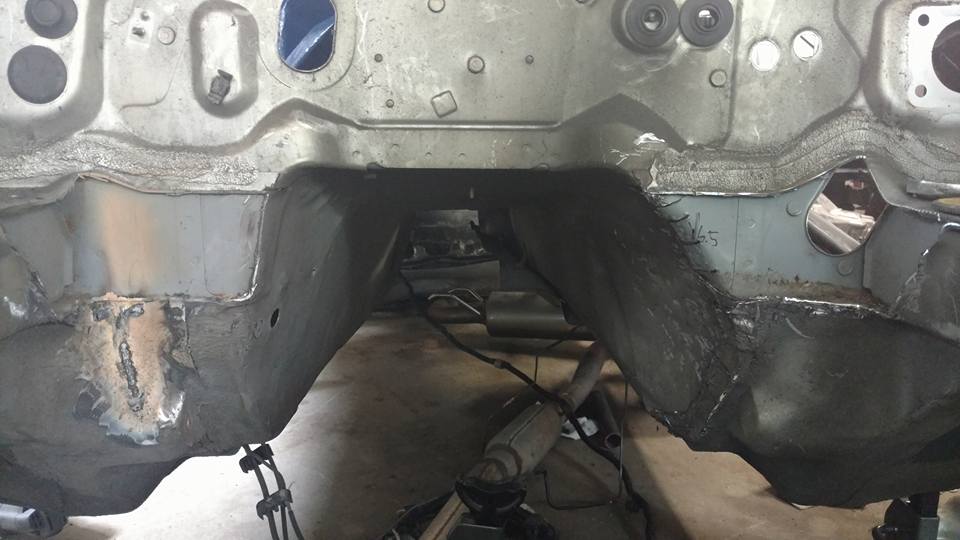
I've got the engine bay ready for a test fit, and it sounds like the subframe still has a week or more until I get it.
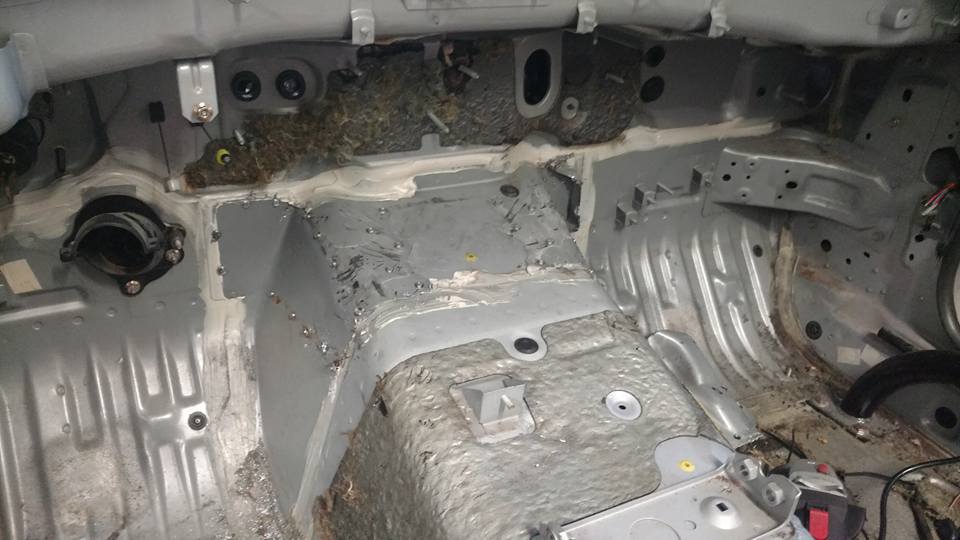
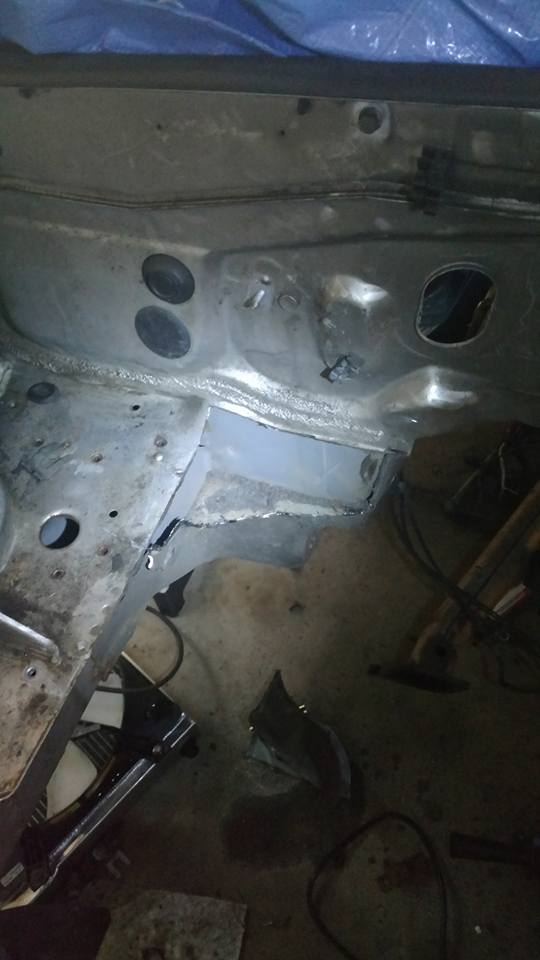
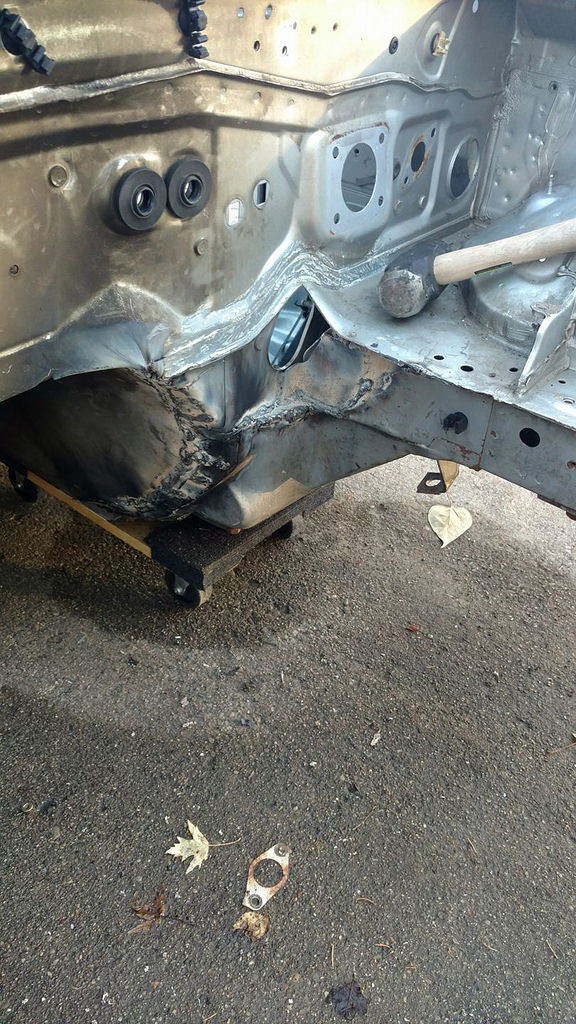
Here's a good shot to show the before and after of trans tunnel modifications.


Here's a good shot to show the before and after of trans tunnel modifications.


 11-11-2016, 09:00 PM
#19
V8 Miata Follower
Thread Starter
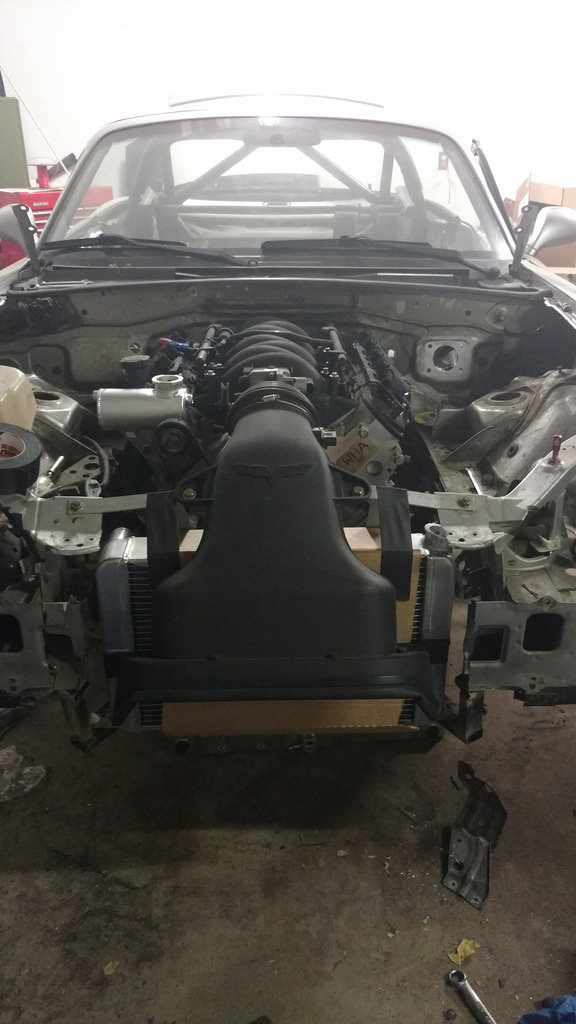
I had a few weeks of being busy and such, but I'm back to making progress. I'm trying to get everything mounted in the engine bay so I can pull the motor, weld everything up, and paint the bay.
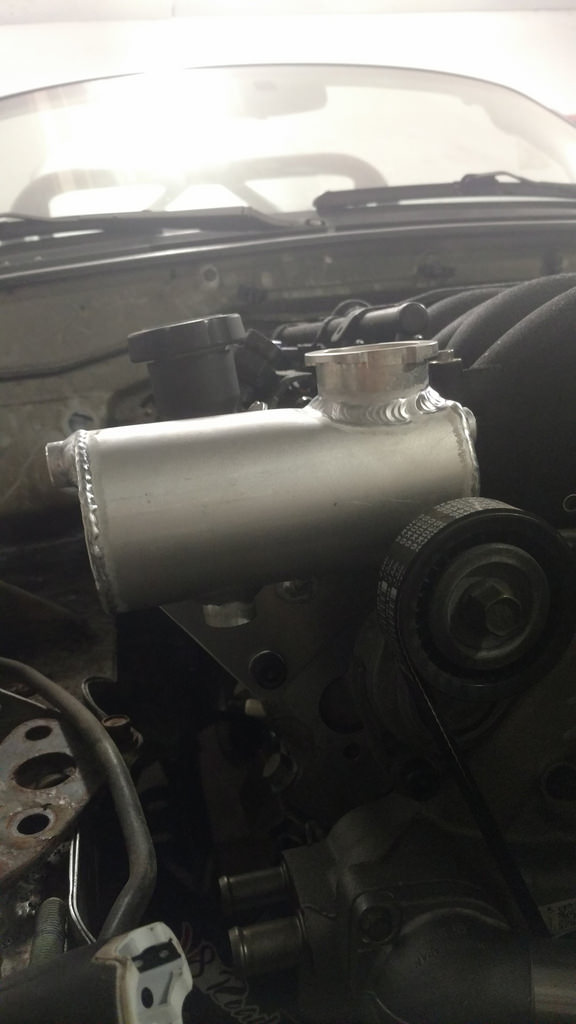
I picked up a Howe expansion tank and welded a bracket to fit it to the front of the head. Since I'm not keeping heat, I'll just run the bottom of the tank to one of the heater core outlets on the water pump. Then I'll use the factory coolant overflow tank, and will probably paint that.
IMG_20161111_210207005 by Adam Watson, on Flickr
Then I picked up a Griffin Scirocco radiator off summit. It's small (22"x13"x3"), but it doens't look too small in person when comparing to the stock radiator. I wanted a small one to package as tightly to the LS7 intake as possible while maintaning ground clearance, and leaving room for a powerful fan. I got an early 90's Taurus fan, which is one hell of a fan. It's the perfect width for the radiator, but a little tall, but I'll deal with that with some aluminum sheet to cover the gaps. It was $85 brand new, and is a 2 speed fan. 2500 cfm on low and 4500 cfm on high. It uses a hell of a lot of current (~40 amps on high!), so I'm going to PWM it with Megasquirt. That will allow me to get some good control over maintaining the fan speed necessary to cool the motor, rather than just full fan speed until thermostat temp, then nothing until the coolant warms up again. This will save a lot of electrical power. I've got the lower mounts tacked and mostly welded, and the upper will be very simple.
IMG_20161111_210154216 by Adam Watson, on Flickr
11-12-2016, 09:02 PM
#20
V8 Miata Follower
Thread Starter
I pulled the motor out, got it out of the garage to pressure wash the engine bay, and weld up the transmission tunnel. Hopefully I'll get around to seam sealing the bay tomorrow so I can prepare for paint.
I took some dimensions off the radio area, so I can make a panel to package everything neatly. I won't have a radio, HVAC, or airbag controls anymore, so I have the whole panel to work with. I'll have a dual boot tablet (windows or android), switch panel with main power, starting button, and fuel pump cutoff, wideband, traction control ****, USB bulkheads for Megasquirt and Racepak connection, and a USB power supply.
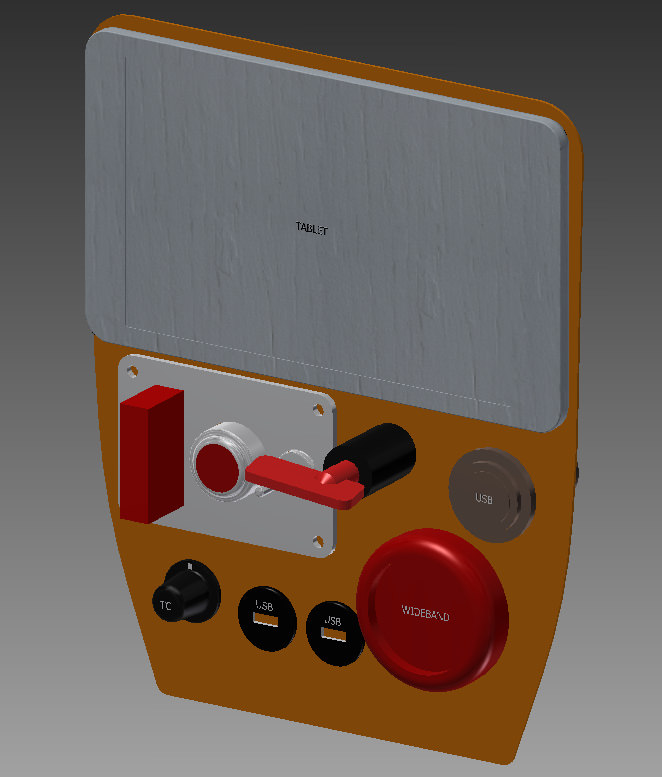 Dash Panel CAD by Adam Watson, on Flickr
I took some dimensions off the radio area, so I can make a panel to package everything neatly. I won't have a radio, HVAC, or airbag controls anymore, so I have the whole panel to work with. I'll have a dual boot tablet (windows or android), switch panel with main power, starting button, and fuel pump cutoff, wideband, traction control ****, USB bulkheads for Megasquirt and Racepak connection, and a USB power supply.
Dash Panel CAD by Adam Watson, on Flickr
Last edited by acedeuce802; 11-13-2016 at 07:00 PM.
11-13-2016, 06:01 PM
#21
V8 Miata Follower
Thread Starter
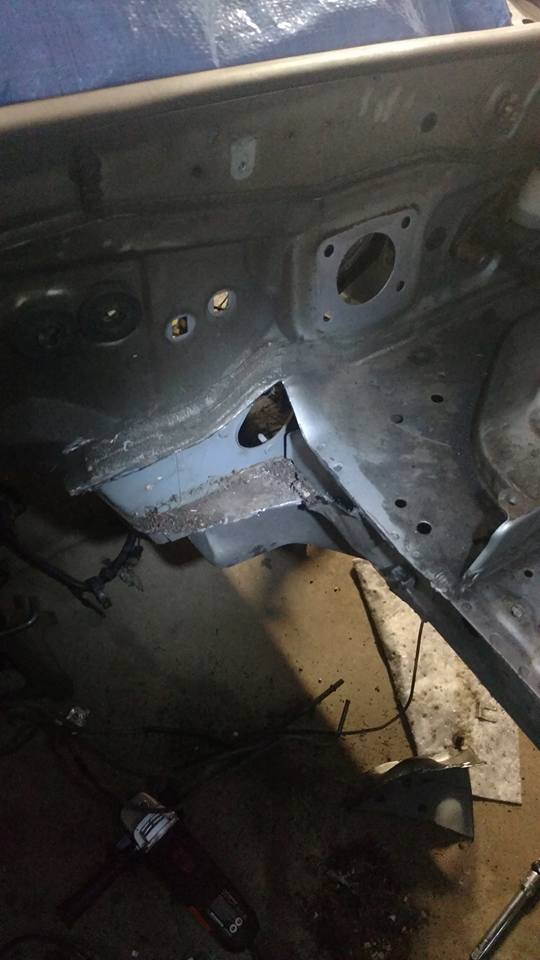
Here's some of the work on the transmission tunnel. I still need to weld back up the gussets on the interior, but I ran out of welding wire right as I finished the engine bay side. This was done with a Harbor Freight 110V flux core that was converted to DC electrode negative. I was using Lincoln wire until I ran out, then tried the Harbor Freight wire that I took out once I got the welder. Surprisingly the HF wire seemed to weld better. It ran better beads and had less spatter. I'm still getting used to the whole wire feed welder, I've primarily TIG'd up until now.
 15000609_10154830642463115_325344414800891114_o by Adam Watson, on Flickr
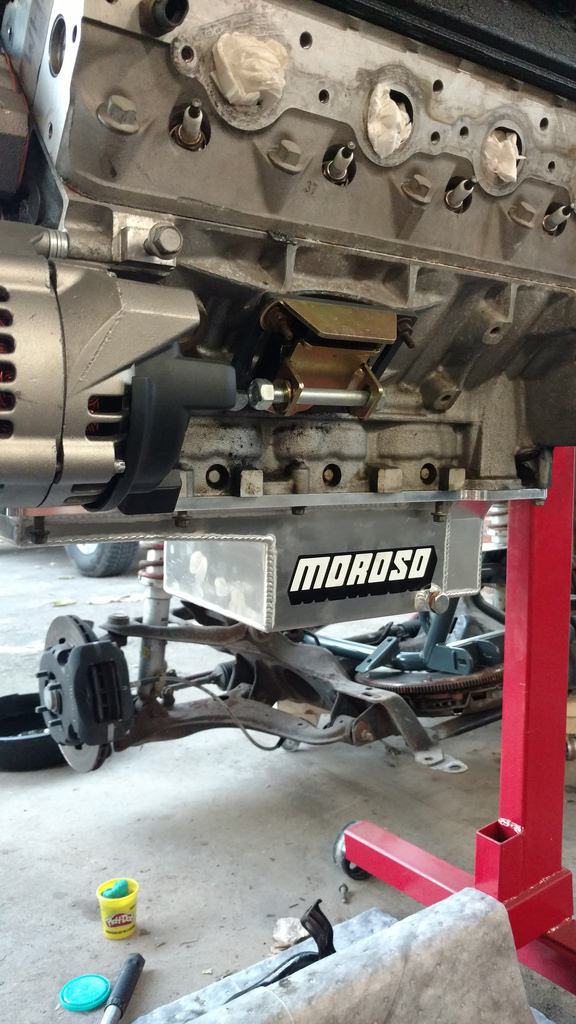
Now that the engine is back on the stand, I got the oil pan pretty much done. I just need to pick up a new gasket tomorrow. I checked the oil pan to pickup clearance, and dialed it in with a washer. The pickup is at a slight angle, and the low side of the pickup measured to 0.160", the high side measured 0.190" and therefore the middle was 0.175" without a gasket. The oil pan gasket measures to 0.110" so that makes the range of clearances 0.270"-0.300". The spec is 0.250"-0.375" so I think I'm good.
 IMG_20161113_170630722 by Adam Watson, on Flickr
15000609_10154830642463115_325344414800891114_o by Adam Watson, on FlickrNow that the engine is back on the stand, I got the oil pan pretty much done. I just need to pick up a new gasket tomorrow. I checked the oil pan to pickup clearance, and dialed it in with a washer. The pickup is at a slight angle, and the low side of the pickup measured to 0.160", the high side measured 0.190" and therefore the middle was 0.175" without a gasket. The oil pan gasket measures to 0.110" so that makes the range of clearances 0.270"-0.300". The spec is 0.250"-0.375" so I think I'm good.
IMG_20161113_170630722 by Adam Watson, on Flickr
Last edited by acedeuce802; 11-13-2016 at 07:00 PM.
12-04-2016, 10:20 PM
#22
V8 Miata Follower
Thread Starter
Current updates are mostly receiving parts. I've been pretty busy with work, traveling, holidays, etc, but I took advantage of Black Friday and picked up some wicked cool parts.
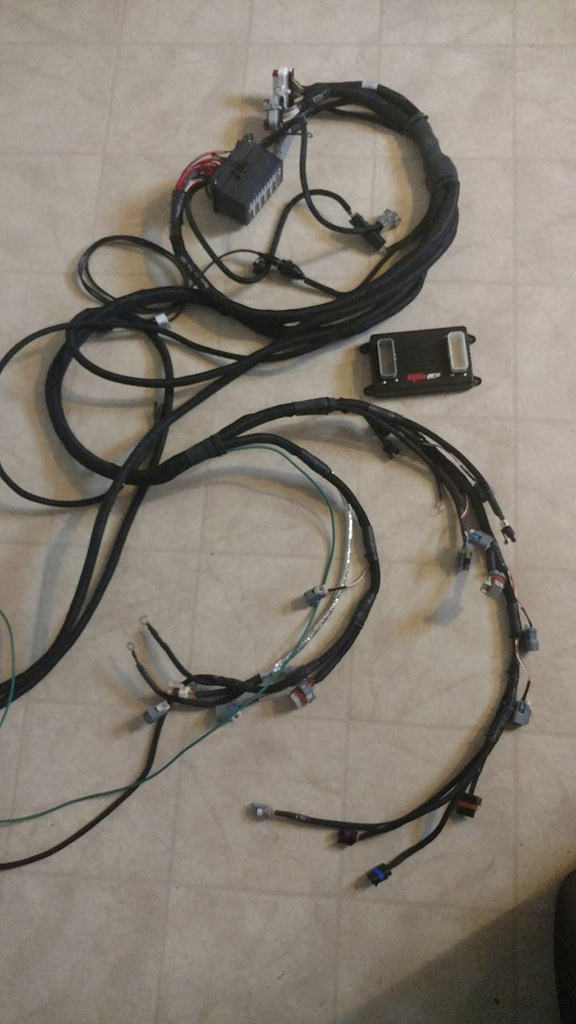
First up is an MS3pro with LSx plug and play harness. I already had a good portion of my engine harness done, but I got scared of making my own harness from scratch. I made a few mistakes on a friends MS3x, which was easy to correct with a through-hole PCB and patch harness, but if I screwed anything up with a fully heat-shrunk harness to the MS3pro, I'd be SOL. So I took the safe route and picked up the plug and play harness. It's nice because it also has a nice fuse box with it, so you really just need power and ground for the engine to run. A lot of people are questioning my choice to go standalone, so here are the main reasons. I like to tinker, so I like to do my own tuning, and I've been using Megasquirt and Tunerstudio for 4 years now. So I feel a lot more comfortable with that rather than learning HPT. MS3pro also has a lot of really nice features that make it above and beyond the old Megasquirts, so it's not like I'm running an ECU that's "worse" than the stock ECU. I also get features such as flex fuel, traction control, push-button start, PWM outputs, etc. I'll be posting up my control box in the near future, I'm using a jbperf CAN-EGT+, which is an expansion board with 4 EGT inputs, 4 ADC's, a bunch of PWM inputs and outputs, serial wideband connection, and I'm going to be mounting both this board, the MS3pro, and 2 14point7 SLC-OEM wideband controllers in a single project box. So it'll basically be a plastic enclosure with 3 35-pin ampseal connectors (2 for MS3pro, and 1 for all the jumpers I'll run from the expansion board and wideband controllers).
 15252748_10154876695933115_23731628287024646_o by Adam Watson, on Flickr
Next up are a set of V8r Kooks long tube headers. These really are beautiful. It's almost a shame to sandblast them and coat them, but I believe that's the route I want to take. I haven't 100% figured out what the rest of the exhaust is going to be, but I know it will be an x-pipe and dual magnaflows. I've been talking to a few exhaust guru's, and it sounds like it may be worth running 3" piping past the x-pipe, since the headers don't have a diameter reduction close enough to the collector to make it worth reducing to 2.5" immediately after the header. The current plan is to run slip joints with springs right from the headers, then another set of slip joints before the mufflers, unless anyone has a good argument against that.
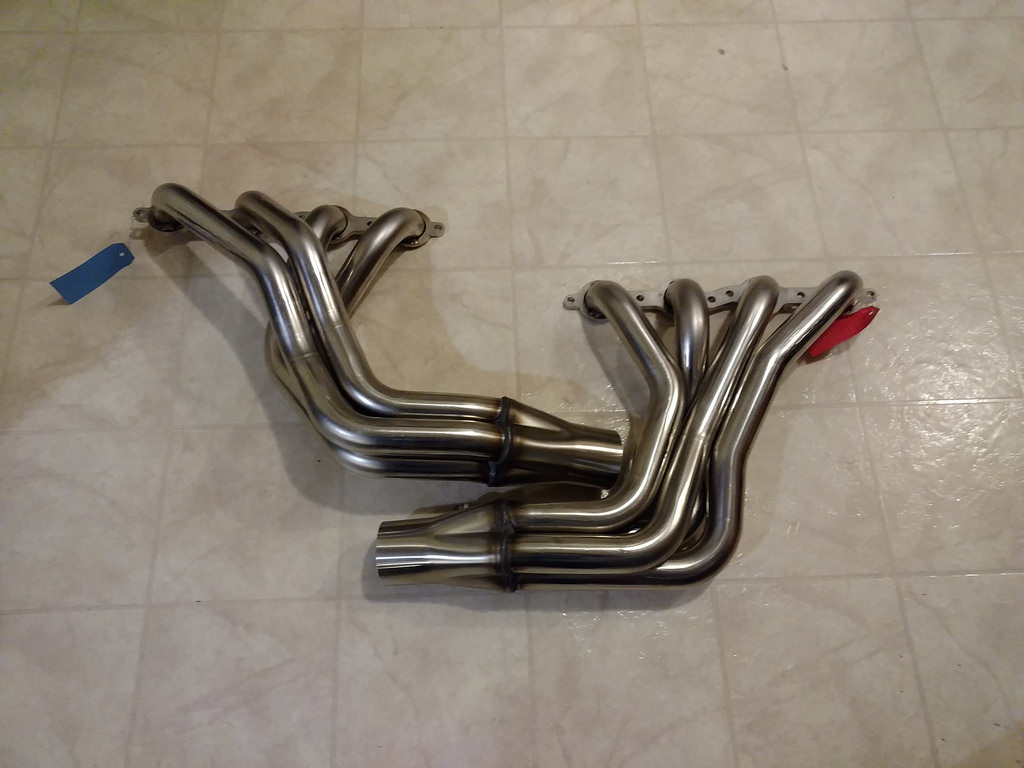 IMG_20161204_223214 by Adam Watson, on Flickr
First up is an MS3pro with LSx plug and play harness. I already had a good portion of my engine harness done, but I got scared of making my own harness from scratch. I made a few mistakes on a friends MS3x, which was easy to correct with a through-hole PCB and patch harness, but if I screwed anything up with a fully heat-shrunk harness to the MS3pro, I'd be SOL. So I took the safe route and picked up the plug and play harness. It's nice because it also has a nice fuse box with it, so you really just need power and ground for the engine to run. A lot of people are questioning my choice to go standalone, so here are the main reasons. I like to tinker, so I like to do my own tuning, and I've been using Megasquirt and Tunerstudio for 4 years now. So I feel a lot more comfortable with that rather than learning HPT. MS3pro also has a lot of really nice features that make it above and beyond the old Megasquirts, so it's not like I'm running an ECU that's "worse" than the stock ECU. I also get features such as flex fuel, traction control, push-button start, PWM outputs, etc. I'll be posting up my control box in the near future, I'm using a jbperf CAN-EGT+, which is an expansion board with 4 EGT inputs, 4 ADC's, a bunch of PWM inputs and outputs, serial wideband connection, and I'm going to be mounting both this board, the MS3pro, and 2 14point7 SLC-OEM wideband controllers in a single project box. So it'll basically be a plastic enclosure with 3 35-pin ampseal connectors (2 for MS3pro, and 1 for all the jumpers I'll run from the expansion board and wideband controllers).
15252748_10154876695933115_23731628287024646_o by Adam Watson, on FlickrNext up are a set of V8r Kooks long tube headers. These really are beautiful. It's almost a shame to sandblast them and coat them, but I believe that's the route I want to take. I haven't 100% figured out what the rest of the exhaust is going to be, but I know it will be an x-pipe and dual magnaflows. I've been talking to a few exhaust guru's, and it sounds like it may be worth running 3" piping past the x-pipe, since the headers don't have a diameter reduction close enough to the collector to make it worth reducing to 2.5" immediately after the header. The current plan is to run slip joints with springs right from the headers, then another set of slip joints before the mufflers, unless anyone has a good argument against that.
IMG_20161204_223214 by Adam Watson, on Flickr
12-06-2016, 09:16 PM
#23
V8 Miata Follower
Thread Starter
Pretty much finished up my wiring diagram. *I downloaded the wiring diagram for my year, deleted the pages that I'm eliminating from the car, then pasted each diagram in a big photoshop file. *Then I erased all wires I didn't need, and rearranged the power circuit, since I'm replacing the stock fuse box with a Bussmann fuse/relay box. *Having a full wiring diagram will be super nice when starting wiring, and when trying to modify things in the future. *I will then make closer snapshots of each subsystem, label all connections that go off the page, and print them out to make a wiring book for the car. *You can't see much detail from this picture, I may post the detailed pictures if I clean up the diagram a little.
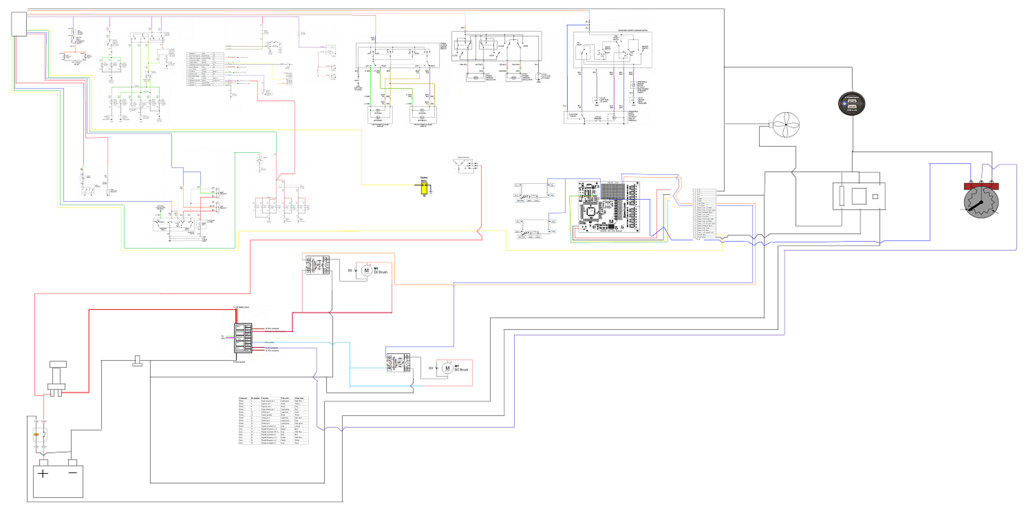 Wiring Diagram Screen Cap by Adam Watson, on Flickr
Wiring Diagram Screen Cap by Adam Watson, on Flickr
01-14-2017, 04:00 PM
#24
V8 Miata Follower
Thread Starter
I've been way too busy to get any real progress done. It's also hard to have the motivation to work out in the cold.. Just sharing a little adapter I made today. I'm starting to get the clutch setup together, and with that I needed a small diameter throw-out bearing. This is an AP Racing TOB. I never thought I'd have AP Racing parts on my car, but it's nice to have the hookup at work for nice parts!
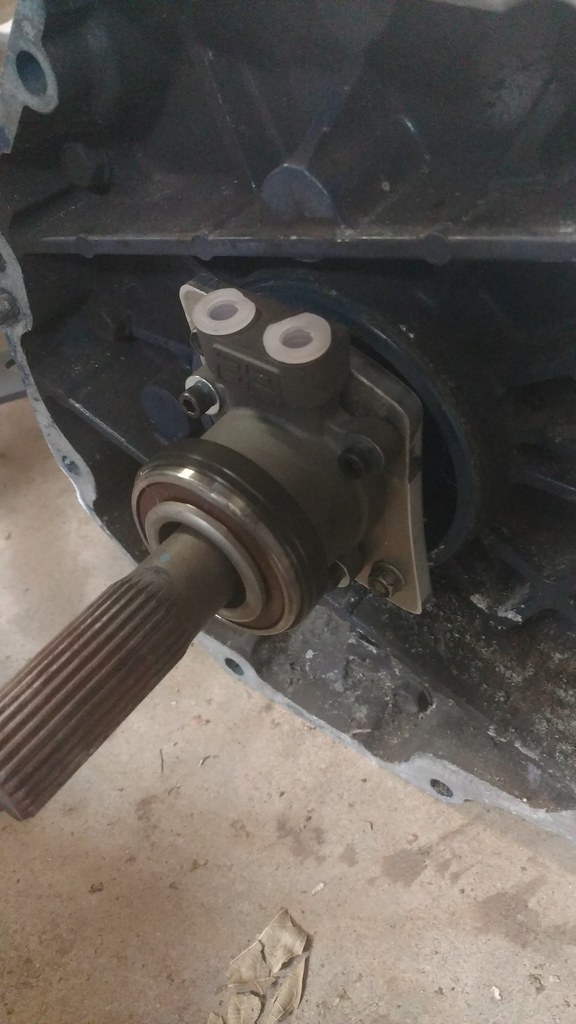 IMG_20170114_154343520 by Adam Watson, on Flickr
IMG_20170114_154343520 by Adam Watson, on Flickr
01-24-2017, 08:45 PM
#25
V8 Miata Follower
Thread Starter
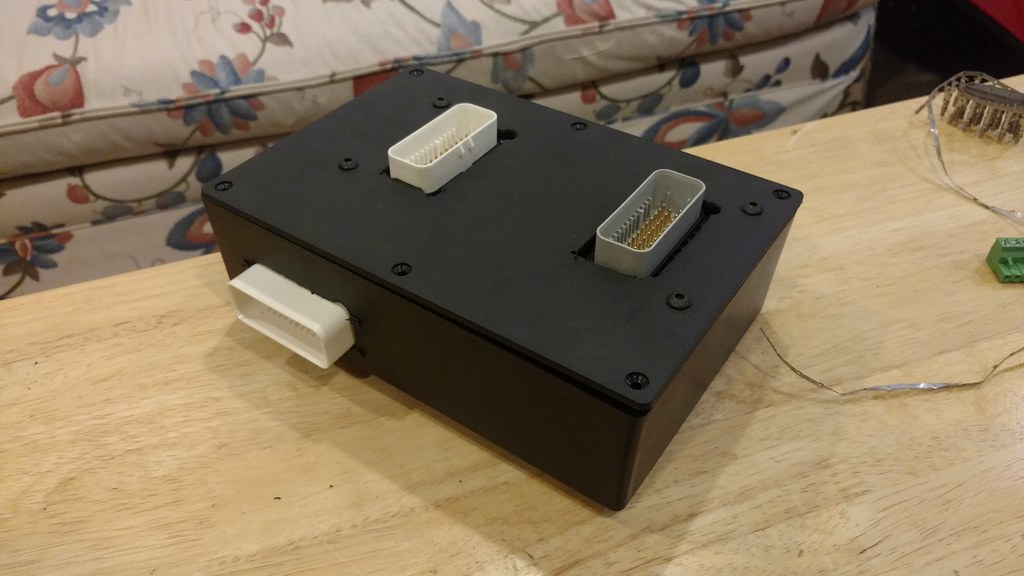
Finishing up my ECU/controls box, then I should be full speed ahead with wiring! I'll most likely redo the enclosure on a mill, because my cuts look like crap. Or maybe it doesn't matter that there's gaps everywhere and I can just jam some caulk in it (haha). I flange mounted the MS3pro on the lid so I had a lot of packaging space underneath.
 IMG_20170124_211246500 by Adam Watson, on Flickr
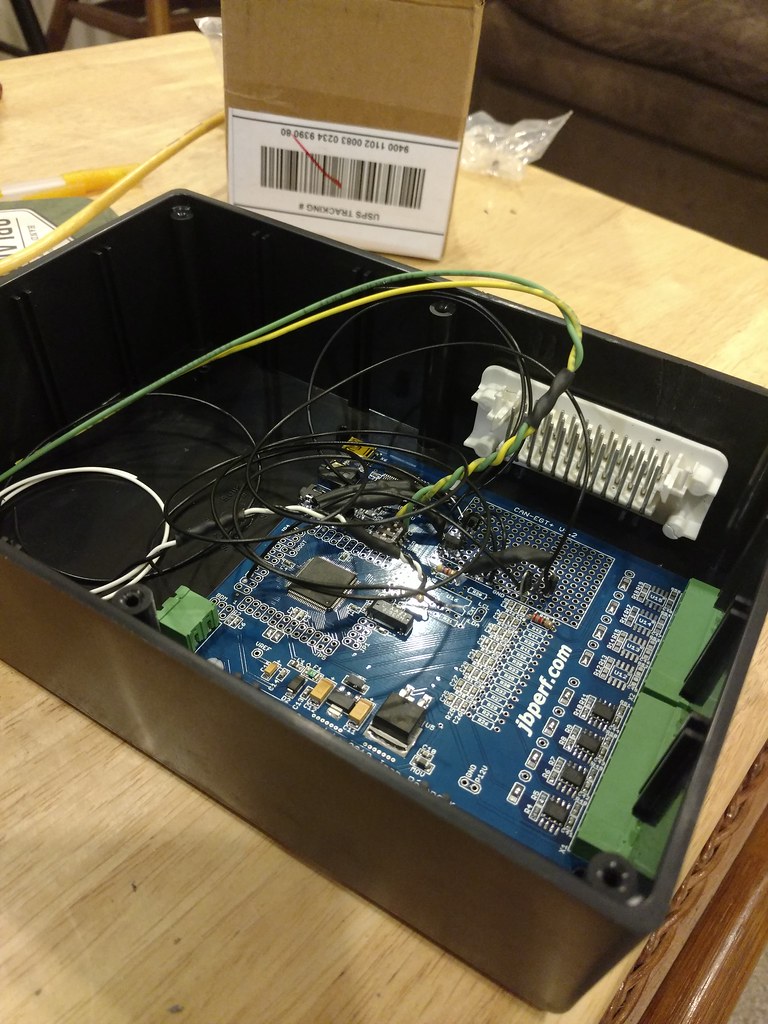
Mounted on the bottom (blue board) is a JBPerf CAN-EGT+. This is a spin-off of the I/O Extender, but doesn't have any of the expansion ports populated except for the ADC ports. You can select how many you want populated with EGT conditioning circuits, and how many you want left open for analog inputs (total of 8). I chose 4 EGT and 4 analog inputs. I should say thermocouple inputs rather than EGT, I'll be using two for cylinder 7 and 8 EGT, one for oil temperature, and one for diff temperature. Two or three ADC's will be used for an accelerometer (not sure if I need Z-axis yet), and one will be used for fuel input. I have a 220 ohm resistor pulled up to 5V to create a voltage divider. If I don't use the Z-axis accel, I'm not sure what I will use but I'm sure I'll find something down the road.
All circuits that are not the ADC's will need conditioning, as they are going straight to the CPU pins. I have 3 circuits built. Two of them are transistor circuits to power a solid state relay for PWM control of DC motors. This will be to vary the speed of my cooling fan and fuel pump. It sketches me out a little bit to be running both of those critical components off of an expansion board that talks over CAN bus, so I will have switches that if the PWM signal is lost, I can trigger the solid state relay to ground and have 100% duty cycle. The main reason for PWM'ing these is power consumption. The fuel pump draws 13 amps (DW300) and the cooling fan can draw up to 40 (Ford Taurus fan). If I don't need 4500 CFM of air, then I can vary the speed and also limit current draw. The third circuit is an activate low input. Basically it's circuit protection for a ground input switch. I'll be using this for datalog input, because I ran out of digital inputs on the MS3pro (I've got a lot of controls!).
In this picture, the green connectors on the right side are the ADC inputs, and the rest is pretty impossible to see what's going on from this picture. The white connector above the CAN-EGT+ is an Ampseal connector that's really intended for mounting to an ECU, but I am using it as a bulkhead connector. This will be used to pass signals and power from the widebands and CAN-EGT+ board to the wiring harness. The wideband controllers will package to the side of the CAN-EGT+. The 14point7 SLC OEM wideband controllers communicate with the CAN-EGT+ over I2C, which is a form of digital communication. This will guarantee no voltage offsets. It's also cheap, $90 with sensor, each.
More info on this board can be found here: jbperf.com ? View topic - CAN-EGT+
This board uses the same CPU as the I/O Extender, so the documentation (that is non existent for the CAN-EGT+) follows this: I/O Extender Board v1.0 for M2/Extra and MS3
Just note that the only things that come out of the box are ADC's, I2C, CAN, and serial comm (for Innovate wideband), and anything else that the I/O Extender is capable of will need conditioning.
 2017-01-24_09-16-15 by Adam Watson, on Flickr
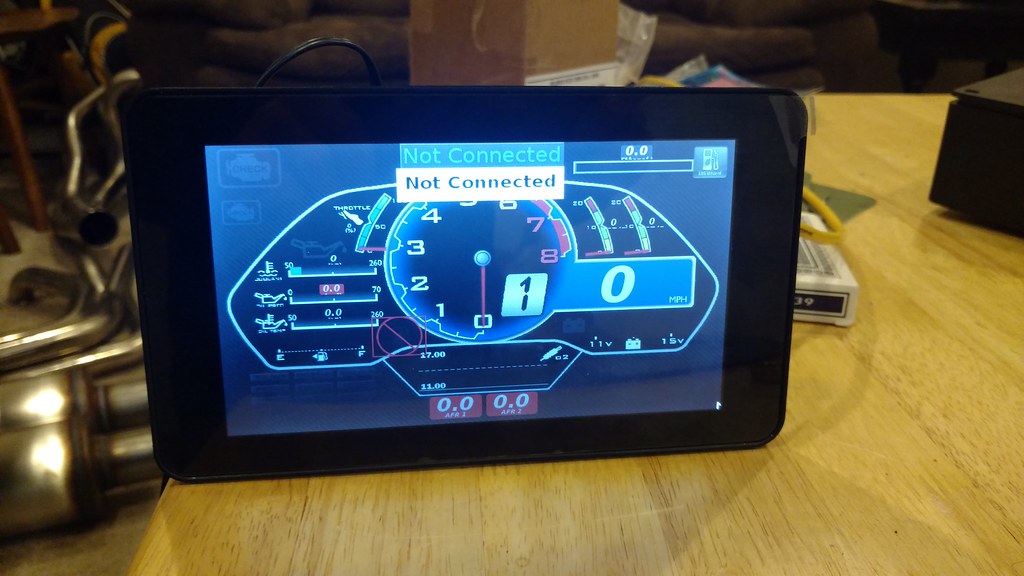
Finally, I've got my Raspberry Pi 3 assembled and ready to mount. I bought a dash off of Welcome to Tuner Studio Dashboards! - TunerStudio Dashboards. I'll be powering it from a 3A 12V-5V regulator. I'll be managing shut down using a switch that sends a signal to a GPIO pin to command shutdown. I replaced my Racepak with this, for unlimited customization of the dash and tuning on the fly.
 IMG_20170124_211428621 by Adam Watson, on Flickr
IMG_20170124_211246500 by Adam Watson, on FlickrMounted on the bottom (blue board) is a JBPerf CAN-EGT+. This is a spin-off of the I/O Extender, but doesn't have any of the expansion ports populated except for the ADC ports. You can select how many you want populated with EGT conditioning circuits, and how many you want left open for analog inputs (total of 8). I chose 4 EGT and 4 analog inputs. I should say thermocouple inputs rather than EGT, I'll be using two for cylinder 7 and 8 EGT, one for oil temperature, and one for diff temperature. Two or three ADC's will be used for an accelerometer (not sure if I need Z-axis yet), and one will be used for fuel input. I have a 220 ohm resistor pulled up to 5V to create a voltage divider. If I don't use the Z-axis accel, I'm not sure what I will use but I'm sure I'll find something down the road.
All circuits that are not the ADC's will need conditioning, as they are going straight to the CPU pins. I have 3 circuits built. Two of them are transistor circuits to power a solid state relay for PWM control of DC motors. This will be to vary the speed of my cooling fan and fuel pump. It sketches me out a little bit to be running both of those critical components off of an expansion board that talks over CAN bus, so I will have switches that if the PWM signal is lost, I can trigger the solid state relay to ground and have 100% duty cycle. The main reason for PWM'ing these is power consumption. The fuel pump draws 13 amps (DW300) and the cooling fan can draw up to 40 (Ford Taurus fan). If I don't need 4500 CFM of air, then I can vary the speed and also limit current draw. The third circuit is an activate low input. Basically it's circuit protection for a ground input switch. I'll be using this for datalog input, because I ran out of digital inputs on the MS3pro (I've got a lot of controls!).
In this picture, the green connectors on the right side are the ADC inputs, and the rest is pretty impossible to see what's going on from this picture. The white connector above the CAN-EGT+ is an Ampseal connector that's really intended for mounting to an ECU, but I am using it as a bulkhead connector. This will be used to pass signals and power from the widebands and CAN-EGT+ board to the wiring harness. The wideband controllers will package to the side of the CAN-EGT+. The 14point7 SLC OEM wideband controllers communicate with the CAN-EGT+ over I2C, which is a form of digital communication. This will guarantee no voltage offsets. It's also cheap, $90 with sensor, each.
More info on this board can be found here: jbperf.com ? View topic - CAN-EGT+
This board uses the same CPU as the I/O Extender, so the documentation (that is non existent for the CAN-EGT+) follows this: I/O Extender Board v1.0 for M2/Extra and MS3
Just note that the only things that come out of the box are ADC's, I2C, CAN, and serial comm (for Innovate wideband), and anything else that the I/O Extender is capable of will need conditioning.
2017-01-24_09-16-15 by Adam Watson, on FlickrFinally, I've got my Raspberry Pi 3 assembled and ready to mount. I bought a dash off of Welcome to Tuner Studio Dashboards! - TunerStudio Dashboards. I'll be powering it from a 3A 12V-5V regulator. I'll be managing shut down using a switch that sends a signal to a GPIO pin to command shutdown. I replaced my Racepak with this, for unlimited customization of the dash and tuning on the fly.
IMG_20170124_211428621 by Adam Watson, on Flickr
The following users liked this post:
SupaDupaSteve (01-24-2017)


