99 10ae ls1

 03-21-2016, 09:03 AM
#126
V8 Miata Fanatic
Thread Starter

Update time:
It's been quite some time since my last big update, and as I set here and reflect on what I have done since then, I realize more and more that the pictures here will be much more exciting, most of the work I have competed as of recently is just little tid bits that had to be nailed down. Off we go....
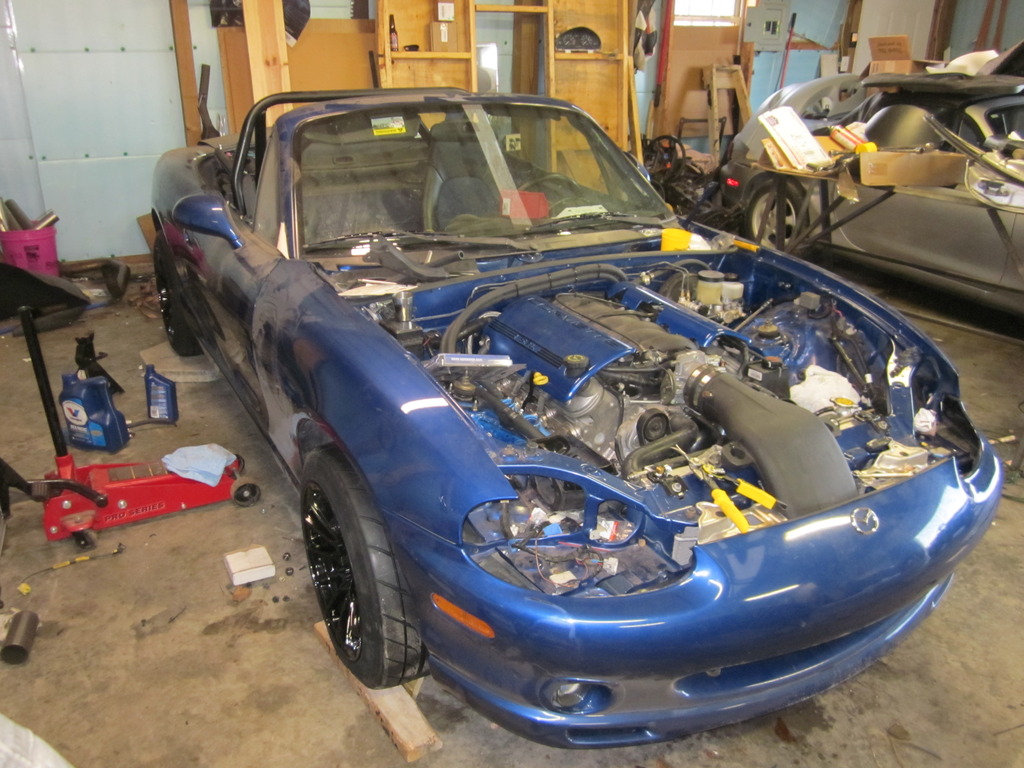
As I had noted in the past, I had to opportunity to canabalize some FM VMaxx's that were on my last parts car. One of them was bent, so I saved the tinder springs and collars for my own build. Installed them as you can see here:
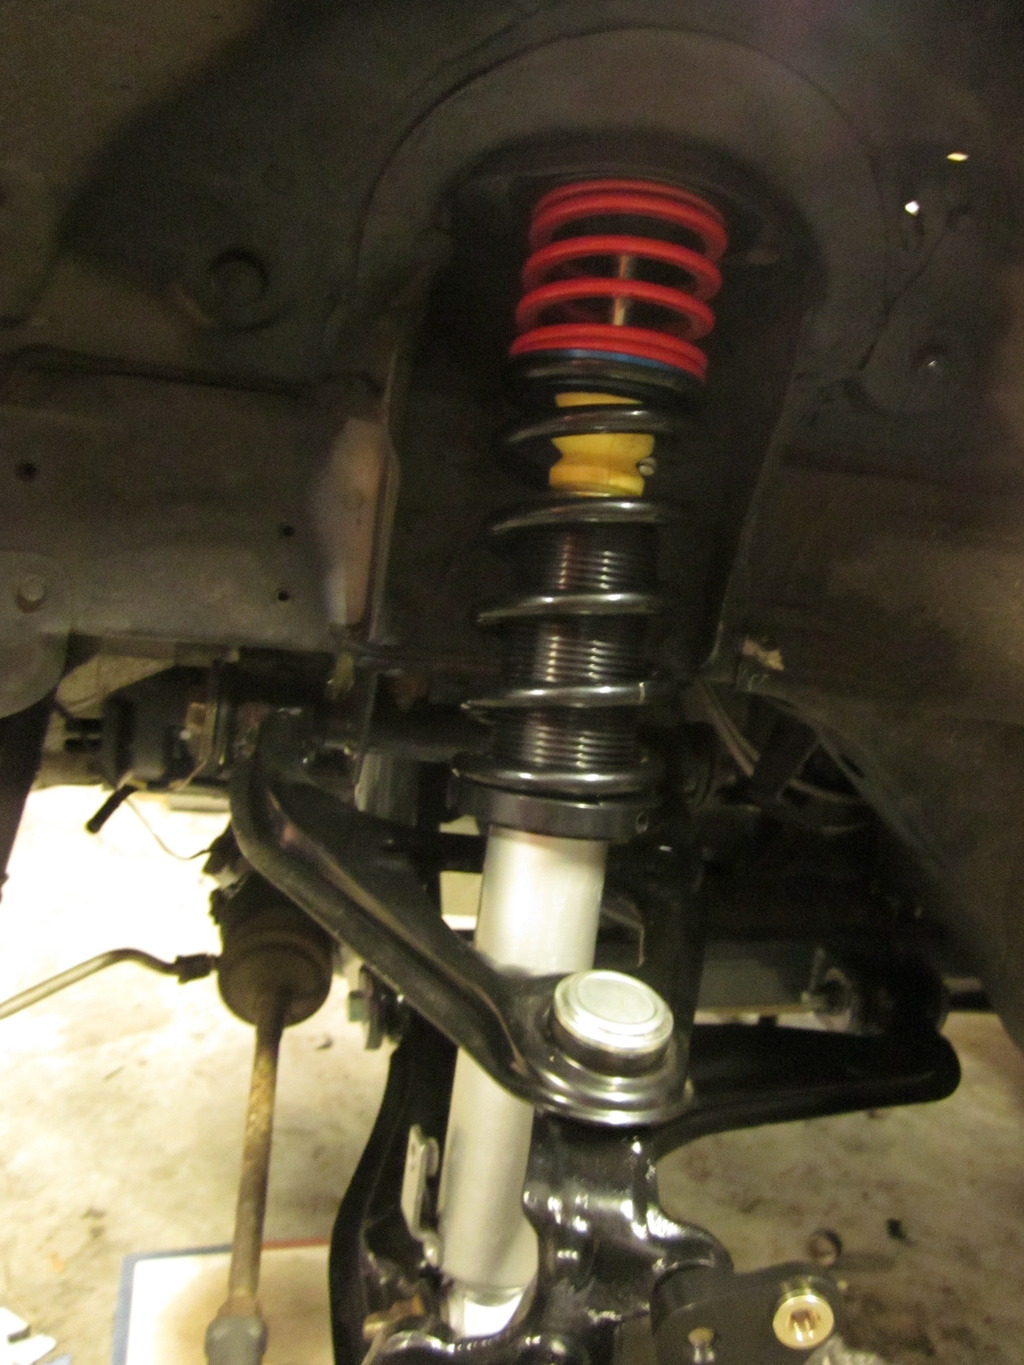
I still really like the idea of a tinder spring, but what this suspension novice overlooked was the fact that I bought 7" coils for my DIY coilover setup, which were planned to be run alone. Once I finally got the tires in and on the wheels i put them on the car and put her on the ground. As some others have stated, the tinder springs immediately compressed completely which I was ok with, however my big problem is that the car had at least 3" of distance between the top of the tire and the fender, looked like I was ready to go off roading.
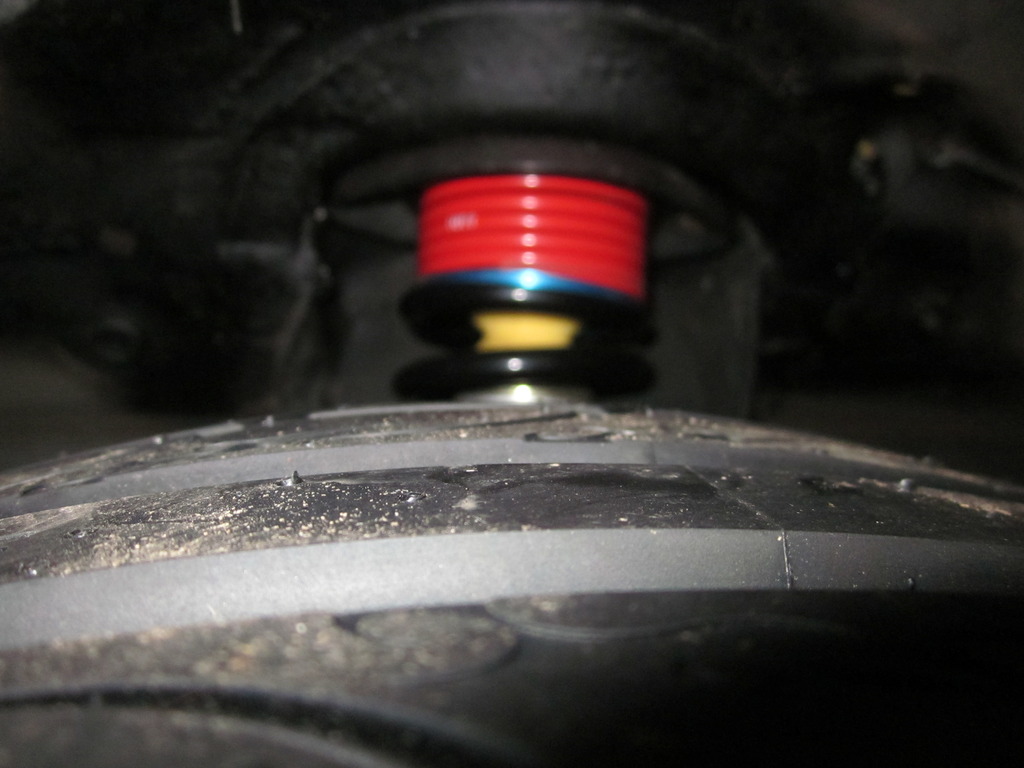
In the end I removed the tinder springs and all is well in the world. I was nervous about coil droop from my own bits of looking, but after reading around I am now confident this setup will work fine for me.
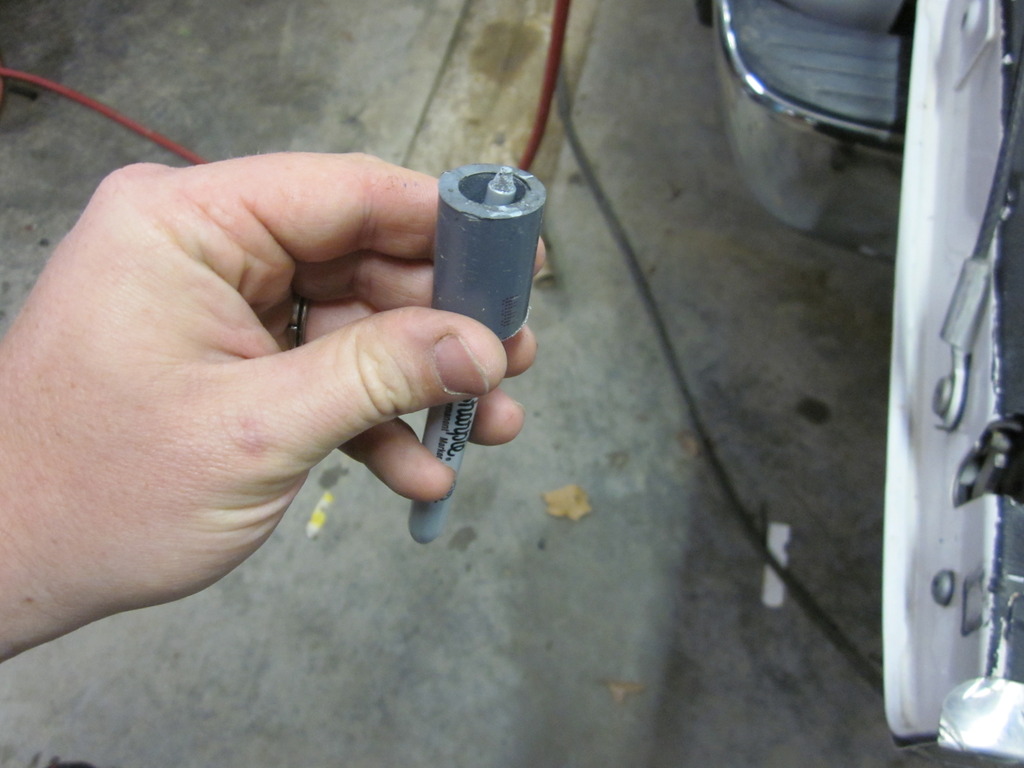
One of the things I have been trying to do is keep my engine bay clean and empty. For instance, I put the computer in the passenger airbag location, I will not run and winshield washer fluid bottle, and I also will hide my coolant overflow resevoir. I picked up this little jem from Summit racing for 16.97, it is a overflow res. for racing applications.
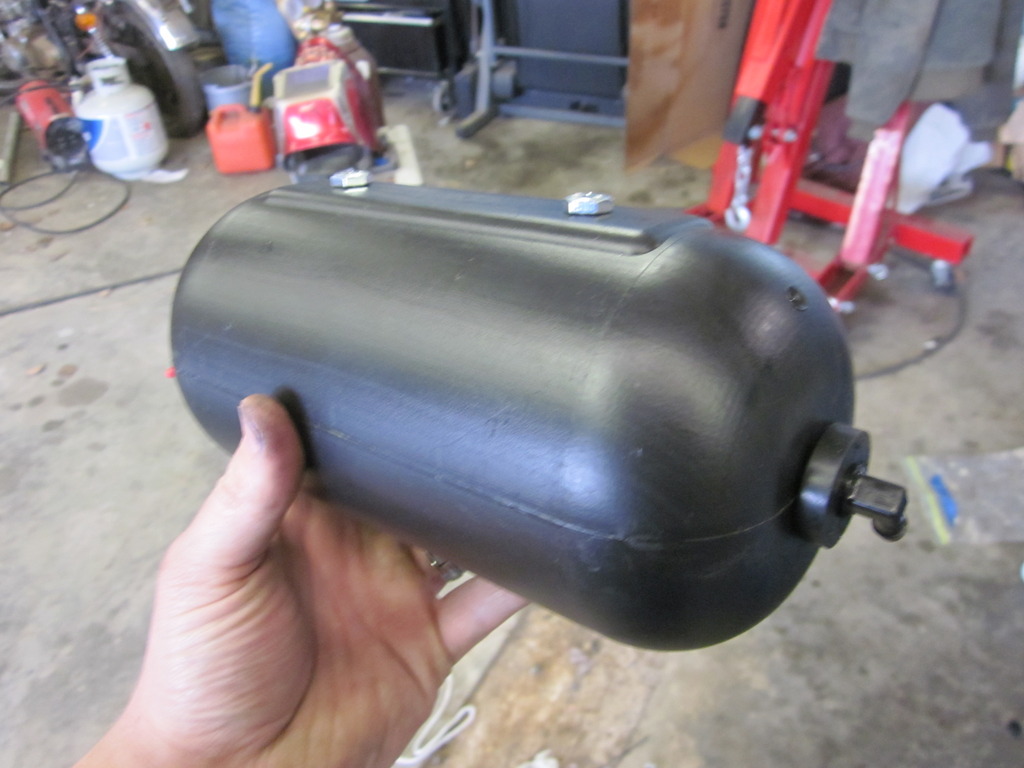
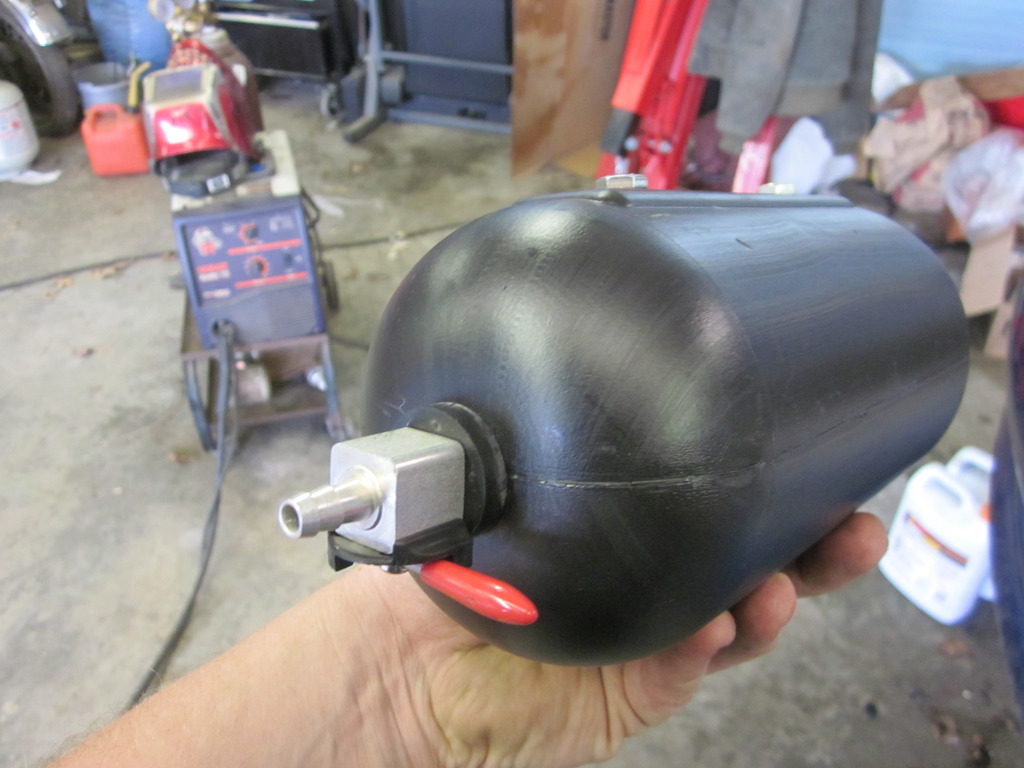
its a nice little piece, seems to be tough as nails. I got it because it was small enough that I knew I could probably hide it without much trouble. The only thing I changed is I added a dip tube that will go to the bottom of the bottle to pick up fluid in the case that it is actually used. After doing a good amount of looking, I decided to mount it just below the drivers headlight.
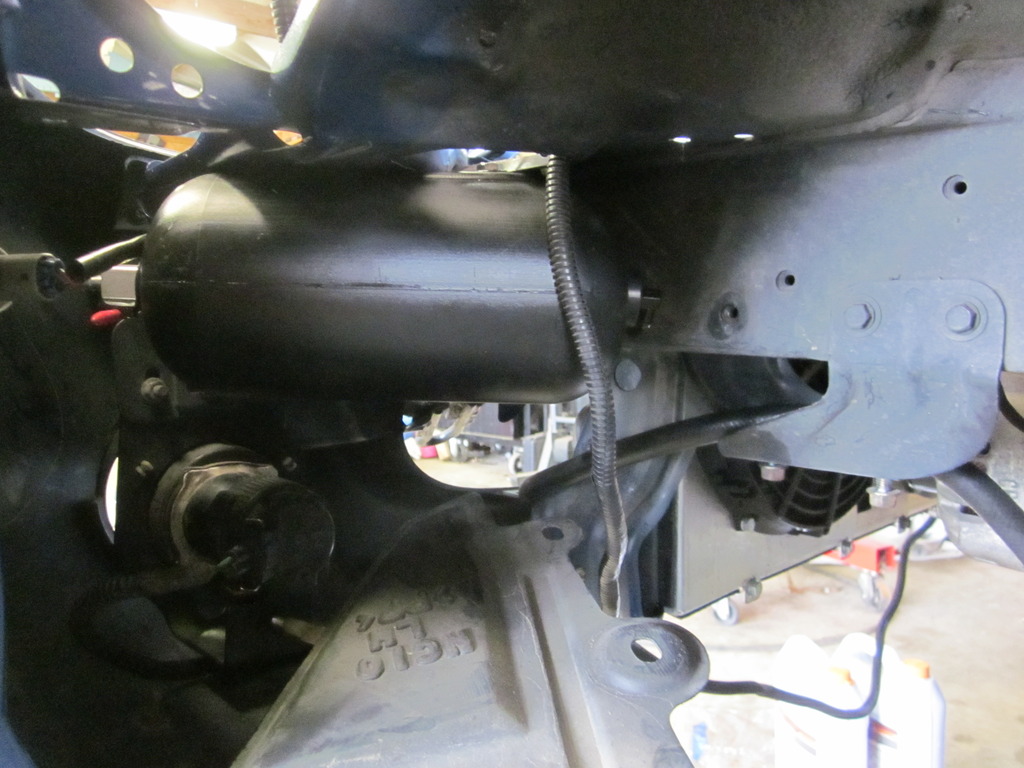
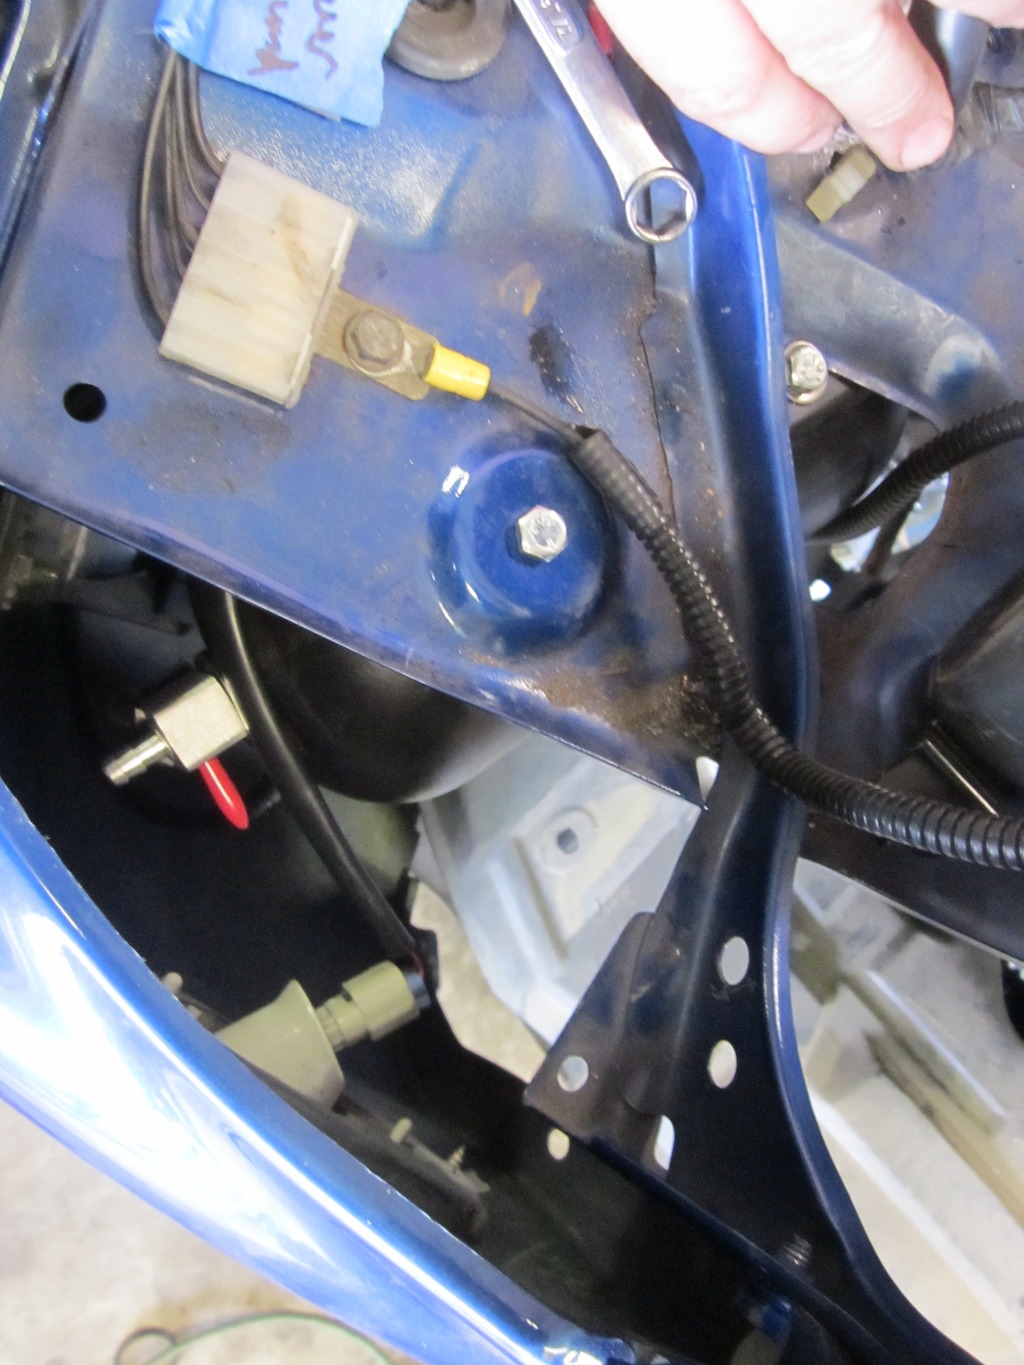
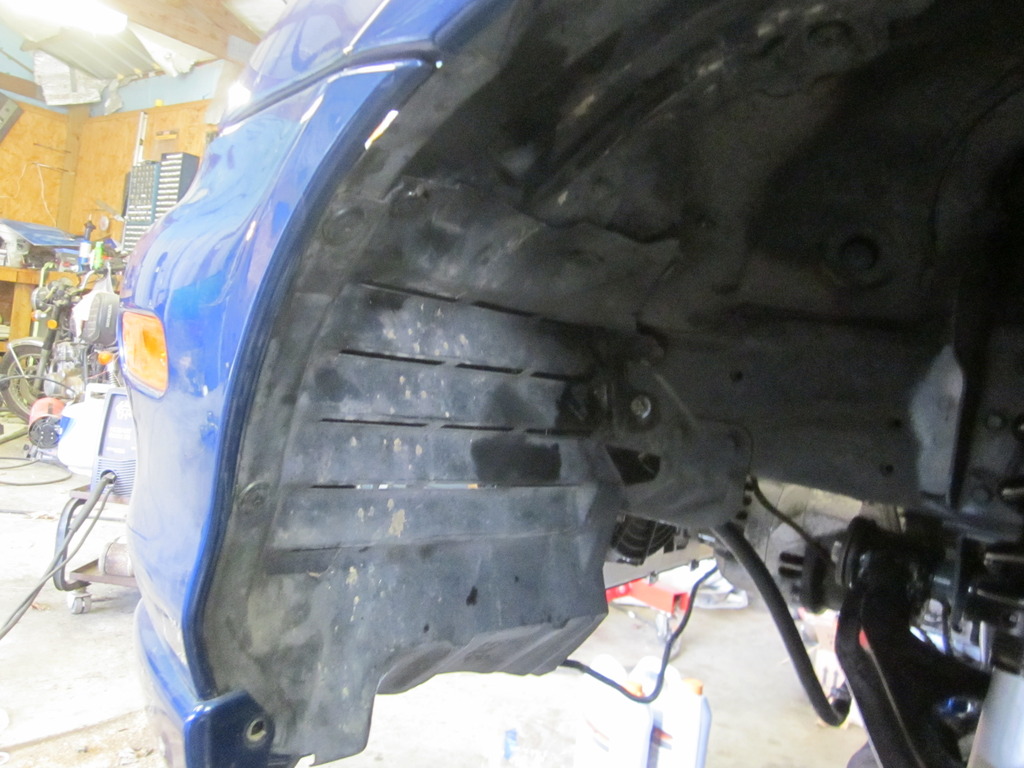
worked great, just had to do a small amount of fender liner trimming but you will never even see that. Installed the rest of the fender liner and boy look at that, or I guess, don't look at that! It comes standard with 1/4 fittings, ready to hook your lines up. Much better with one less white/yellowish container under there:
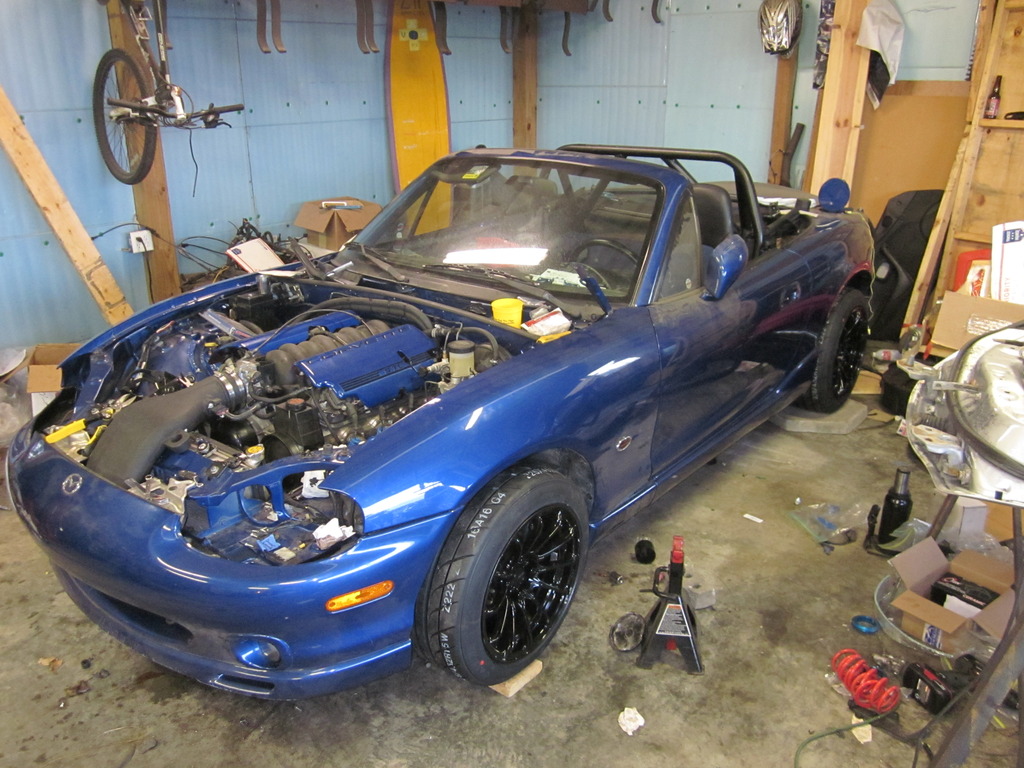
Took the car for an alignment last friday, ran well enough to get on the trailer and into the shop. Good lord this thing is an attention MAGNET! When I pulled it in the shop, the world basically set still, in the shop, and in the customer waiting room. Before I took it though, I had to get the headlights/hood on, wasn't going to have it go to anywhere without them. I baked the headlights open in the wifes oven, which she was suprisingly ok with, and I removed the amber lense/painted the bezels black. I personally thing they turned out fantastic. I also installed my aerocatch latches which was a bit nerve racking, but here we are.
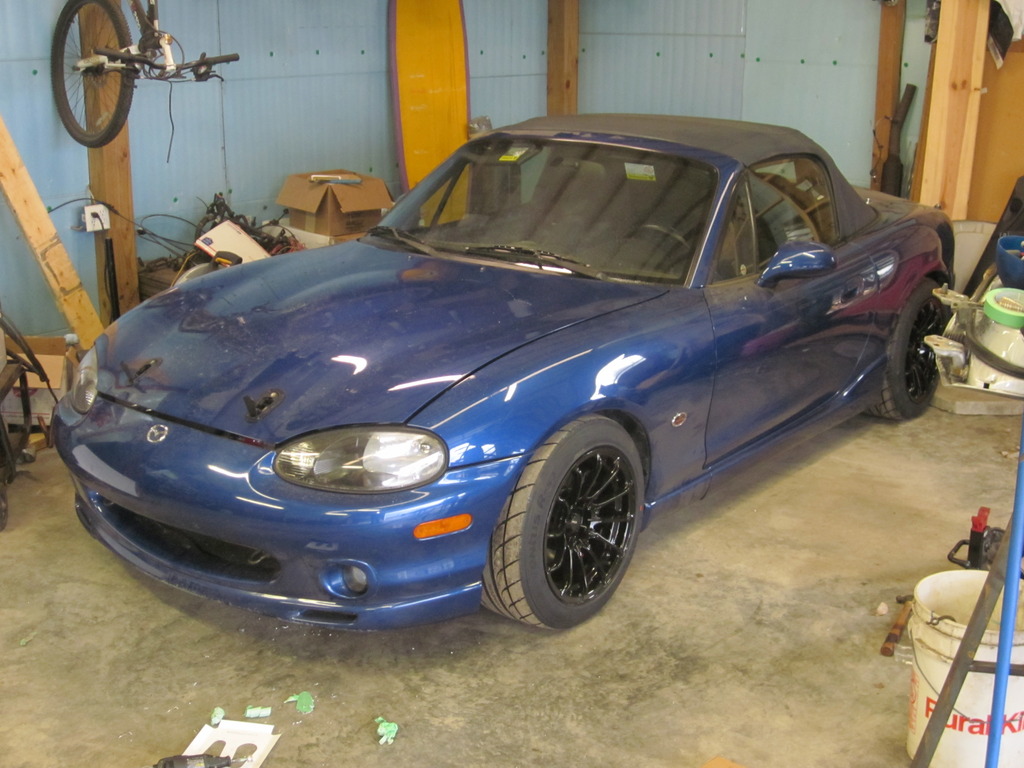
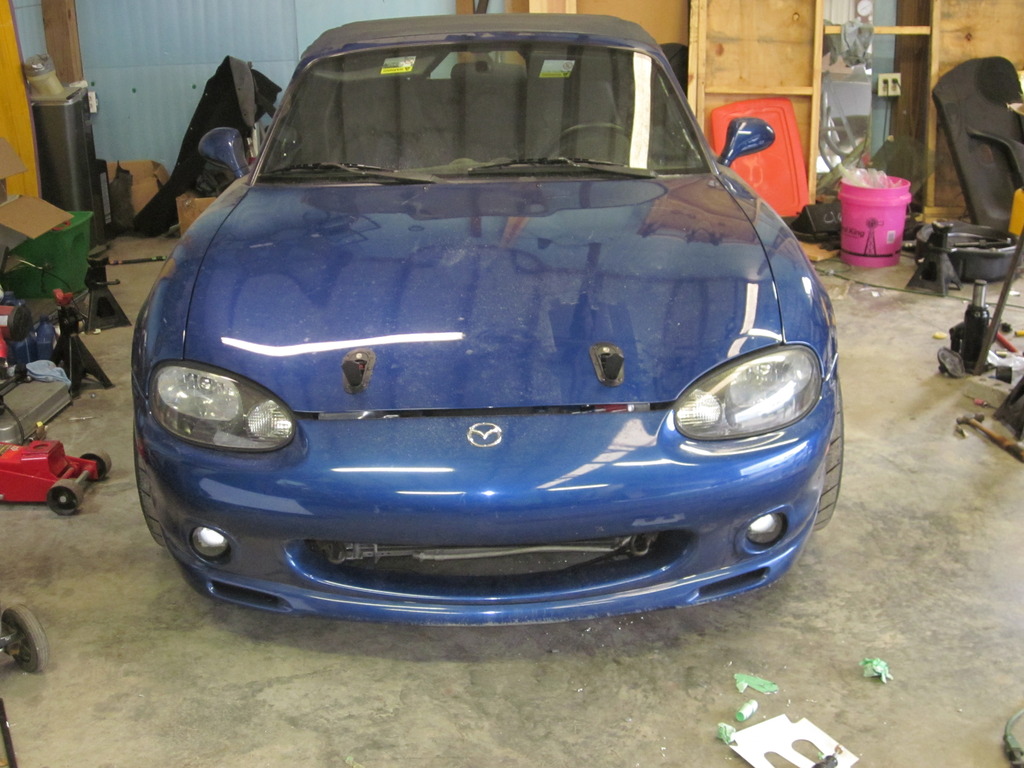
Not completely finished with them but I am close. I had them on loosely, but well enough to keep the hood down on the trailer. I actually took the pins back out and they are getting powdercoated black at the top, along with a handful of other small things. I'll take the bumper back off and install them when they come back, along with a trimmed up air duct for the mouth.
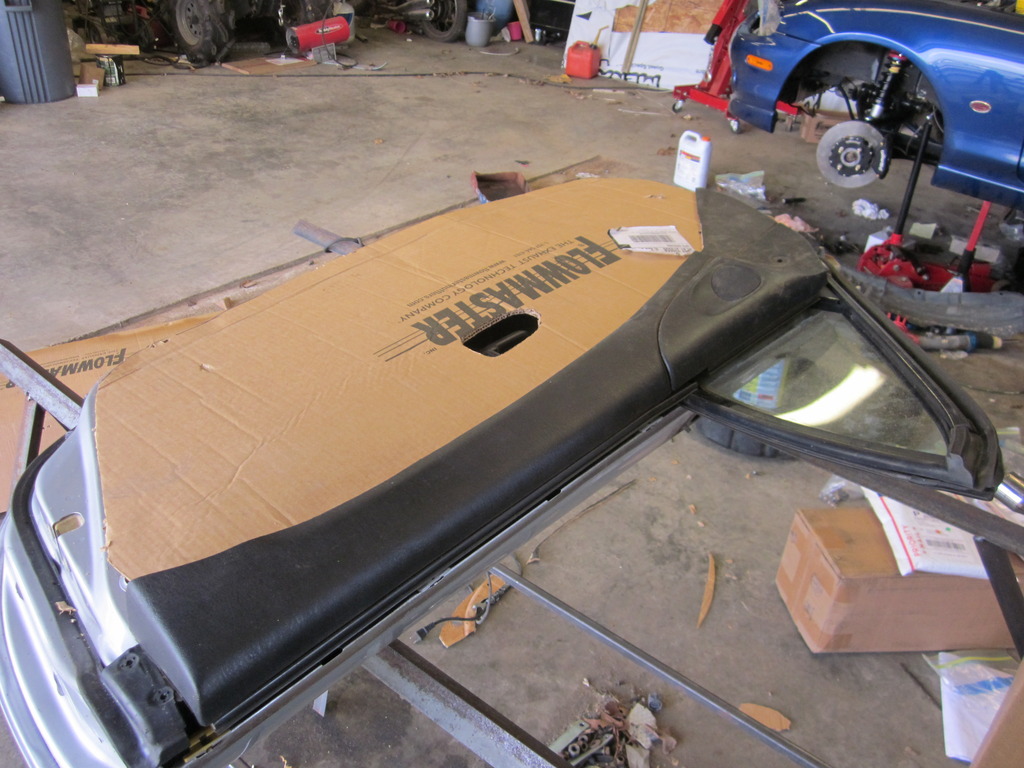
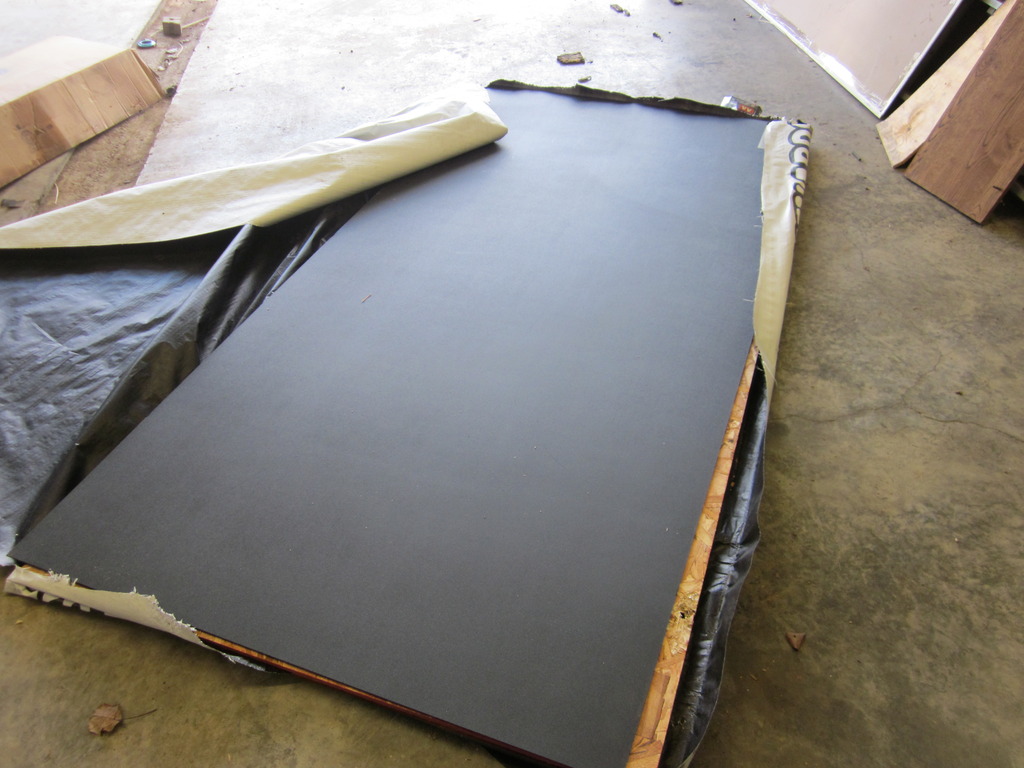
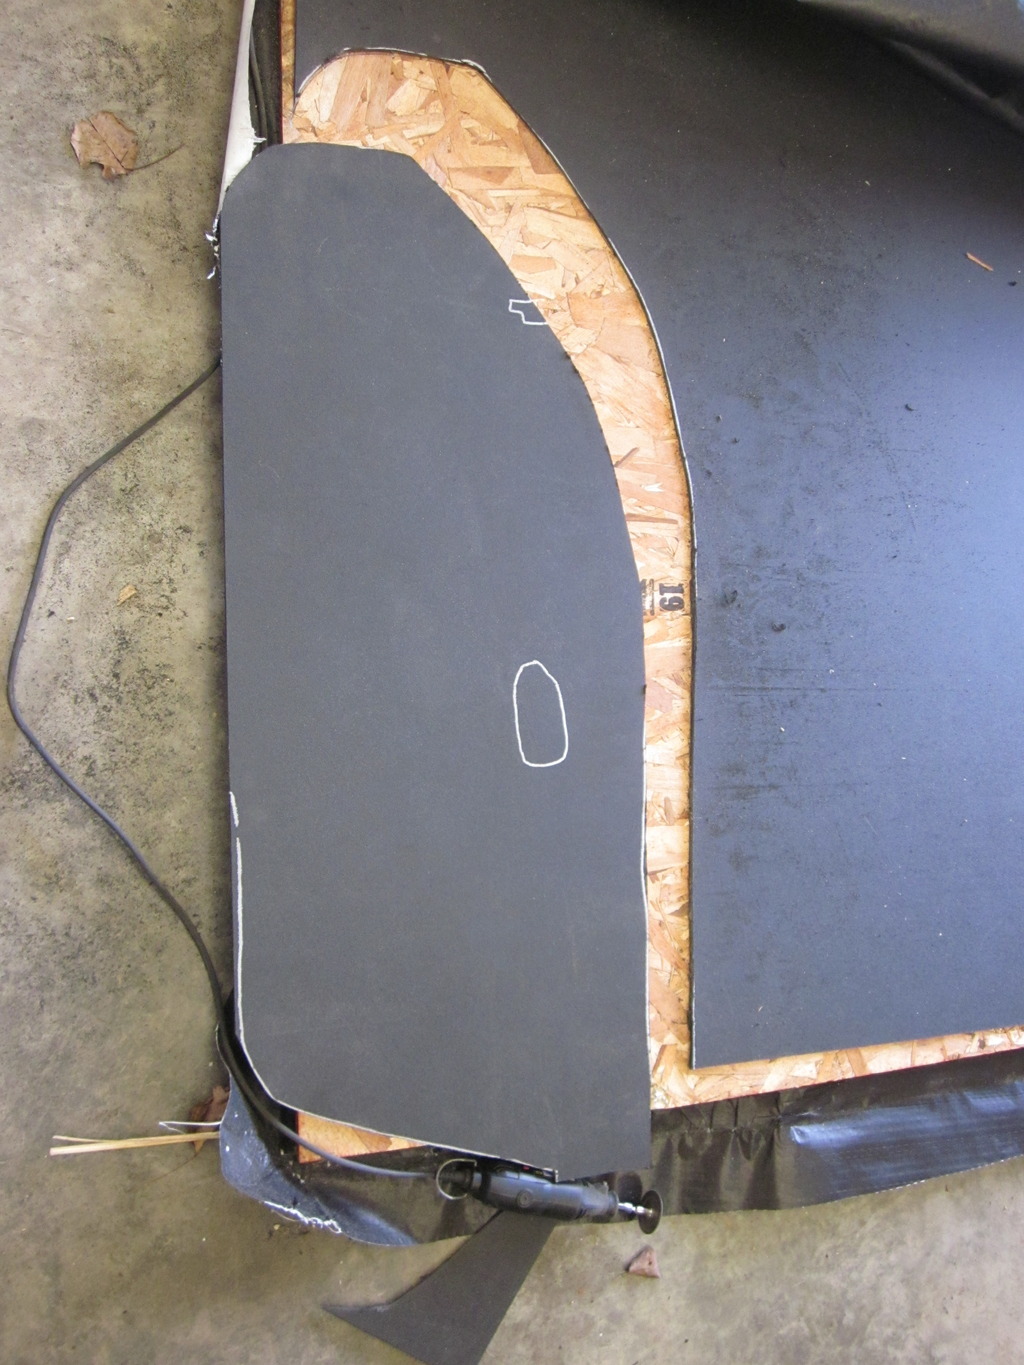
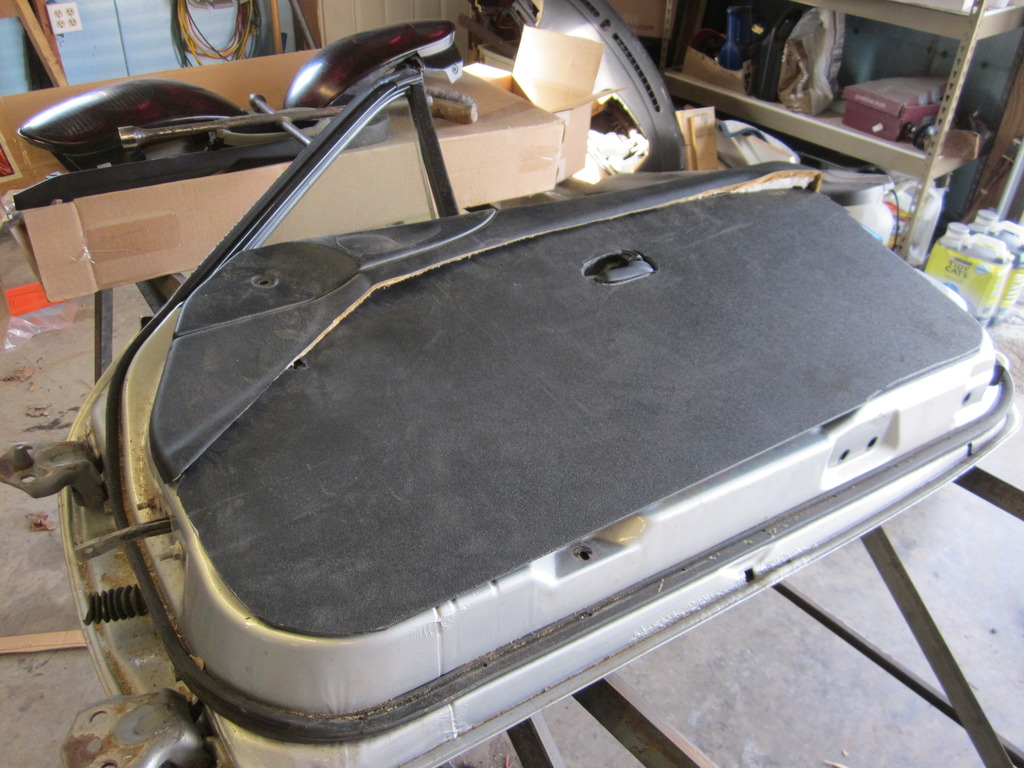
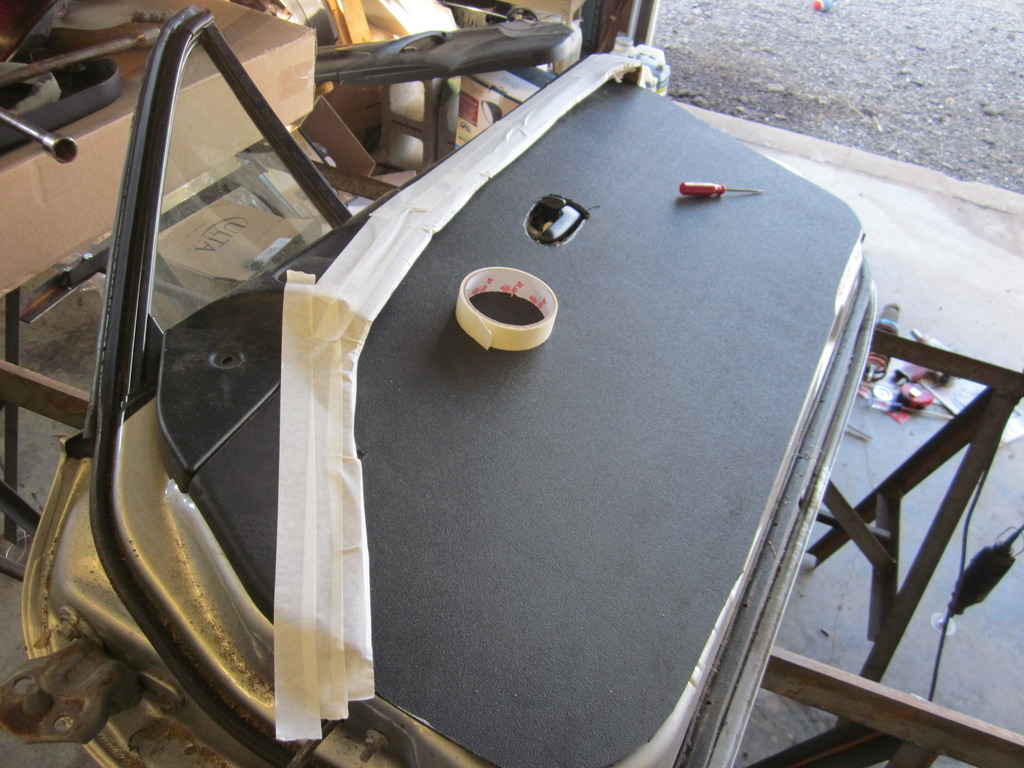
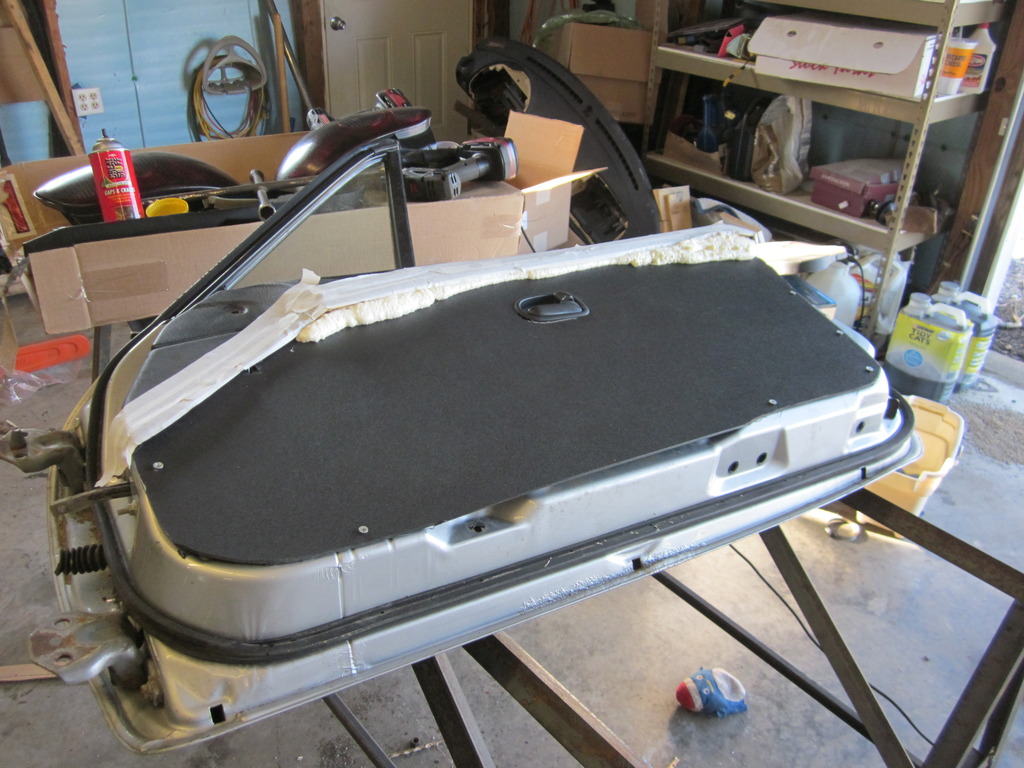
I also started on some door cards, if you remember correctly I built in some door bars and as such I am putting together a set of cards. Since I had a few sets of door panels laying around and a spare NB door, I figured I would try these and if they didn't work out I'd try something else. I like the look of the ones build with NA tops, but I like the look of the NB tops better so I thought I would give those a try first. Bought a sheet of HPDE plastic, 1/8" thick from Menards. It was special order since they only keep 1/4" in stock, but in the end the 4'x8' sheet, and two pieces of MDF/particle board that they used to pack it with only cost me $46, so that was good. I will have a fair amount of excess, some of which I will use to build a splitter for the front. Pictures tell most of the story here. I cut the NB panels to my liking, made a cardboard template for the rest, trimmed, cut, etc. I used spray foam insulation to make up the gap and trimmed it. I also decided to drill my own holes, instead of trying to make the factory ones work for me. It just seem much easier to get everything lined up that way. Still a work in progress, more to come on those.

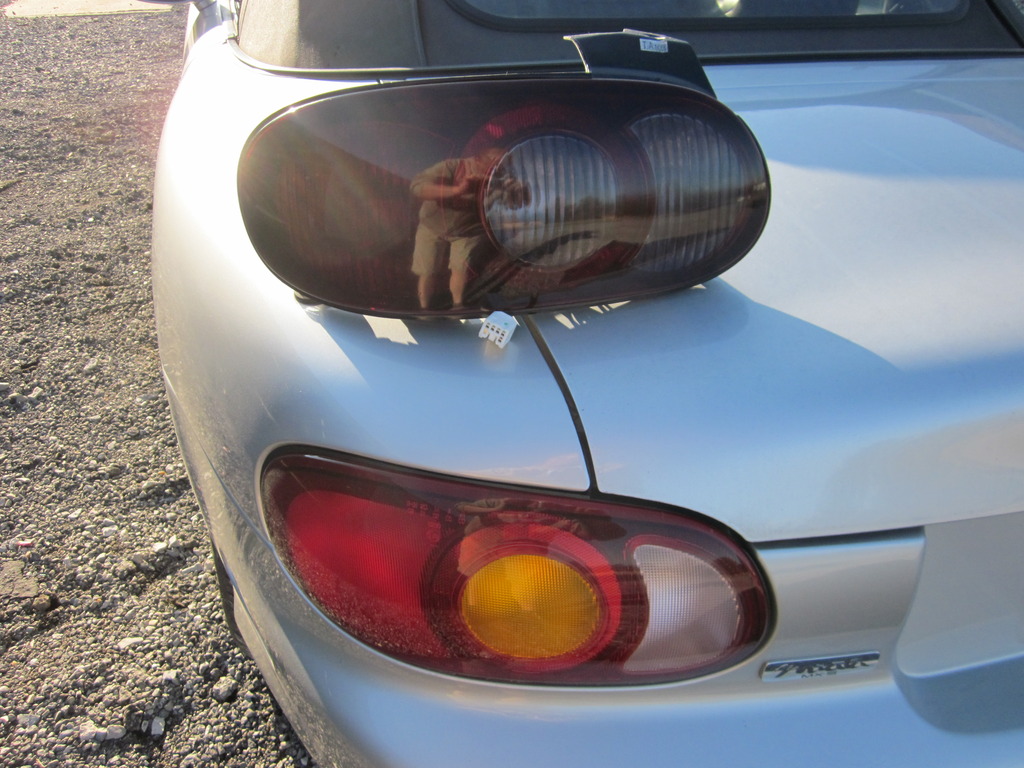
Finally, I tinted the tails that I got from my mother in law's miata. I was planning on buying a set of 01-05 tail lights and she just said I should trade mine for the ones on her 02. She can't tell the difference, so thats what I did. This is definitely more show than go, but I am going for an all black/blue look on this car. I sprayed a light coat of nightshades on here and wet sanded with 2000, then buffed them up. I think they look great, especially on the car which sadly I don't have a picture of.
Like I said at the beginning of this post, many more little things were accomplished since my last update, but in a lot of cases they were taking things back out and repairing problems I had found, like one gauge light that was not working. I also bought two more parts miatas, both in running condition.
Thats about all for now. I will be calling this morning to make my tuning appointment, so hopefully the next update you see will have that event on it.
It's been quite some time since my last big update, and as I set here and reflect on what I have done since then, I realize more and more that the pictures here will be much more exciting, most of the work I have competed as of recently is just little tid bits that had to be nailed down. Off we go....
As I had noted in the past, I had to opportunity to canabalize some FM VMaxx's that were on my last parts car. One of them was bent, so I saved the tinder springs and collars for my own build. Installed them as you can see here:

I still really like the idea of a tinder spring, but what this suspension novice overlooked was the fact that I bought 7" coils for my DIY coilover setup, which were planned to be run alone. Once I finally got the tires in and on the wheels i put them on the car and put her on the ground. As some others have stated, the tinder springs immediately compressed completely which I was ok with, however my big problem is that the car had at least 3" of distance between the top of the tire and the fender, looked like I was ready to go off roading.


In the end I removed the tinder springs and all is well in the world. I was nervous about coil droop from my own bits of looking, but after reading around I am now confident this setup will work fine for me.
One of the things I have been trying to do is keep my engine bay clean and empty. For instance, I put the computer in the passenger airbag location, I will not run and winshield washer fluid bottle, and I also will hide my coolant overflow resevoir. I picked up this little jem from Summit racing for 16.97, it is a overflow res. for racing applications.


its a nice little piece, seems to be tough as nails. I got it because it was small enough that I knew I could probably hide it without much trouble. The only thing I changed is I added a dip tube that will go to the bottom of the bottle to pick up fluid in the case that it is actually used. After doing a good amount of looking, I decided to mount it just below the drivers headlight.


worked great, just had to do a small amount of fender liner trimming but you will never even see that. Installed the rest of the fender liner and boy look at that, or I guess, don't look at that! It comes standard with 1/4 fittings, ready to hook your lines up. Much better with one less white/yellowish container under there:

Took the car for an alignment last friday, ran well enough to get on the trailer and into the shop. Good lord this thing is an attention MAGNET! When I pulled it in the shop, the world basically set still, in the shop, and in the customer waiting room. Before I took it though, I had to get the headlights/hood on, wasn't going to have it go to anywhere without them. I baked the headlights open in the wifes oven, which she was suprisingly ok with, and I removed the amber lense/painted the bezels black. I personally thing they turned out fantastic. I also installed my aerocatch latches which was a bit nerve racking, but here we are.


Not completely finished with them but I am close. I had them on loosely, but well enough to keep the hood down on the trailer. I actually took the pins back out and they are getting powdercoated black at the top, along with a handful of other small things. I'll take the bumper back off and install them when they come back, along with a trimmed up air duct for the mouth.
I also started on some door cards, if you remember correctly I built in some door bars and as such I am putting together a set of cards. Since I had a few sets of door panels laying around and a spare NB door, I figured I would try these and if they didn't work out I'd try something else. I like the look of the ones build with NA tops, but I like the look of the NB tops better so I thought I would give those a try first. Bought a sheet of HPDE plastic, 1/8" thick from Menards. It was special order since they only keep 1/4" in stock, but in the end the 4'x8' sheet, and two pieces of MDF/particle board that they used to pack it with only cost me $46, so that was good. I will have a fair amount of excess, some of which I will use to build a splitter for the front. Pictures tell most of the story here. I cut the NB panels to my liking, made a cardboard template for the rest, trimmed, cut, etc. I used spray foam insulation to make up the gap and trimmed it. I also decided to drill my own holes, instead of trying to make the factory ones work for me. It just seem much easier to get everything lined up that way. Still a work in progress, more to come on those.


Finally, I tinted the tails that I got from my mother in law's miata. I was planning on buying a set of 01-05 tail lights and she just said I should trade mine for the ones on her 02. She can't tell the difference, so thats what I did. This is definitely more show than go, but I am going for an all black/blue look on this car. I sprayed a light coat of nightshades on here and wet sanded with 2000, then buffed them up. I think they look great, especially on the car which sadly I don't have a picture of.

Like I said at the beginning of this post, many more little things were accomplished since my last update, but in a lot of cases they were taking things back out and repairing problems I had found, like one gauge light that was not working. I also bought two more parts miatas, both in running condition.


Thats about all for now. I will be calling this morning to make my tuning appointment, so hopefully the next update you see will have that event on it.
 04-04-2016, 10:12 AM
#128
V8 Miata Fanatic
Thread Starter
Well, After a long drawn out debacle I finally have an appointment to get my car tuned. As it turns out, spring is tuning season for all the guys getting ready to race this year.....who would have thought......
As I am getting it prepared to go, I learned something new.....I have been fighting back and forth with my obdII scanner, as it wouldn't connect to the computer. I had power, and two grounds like I was supposed to, and I had connected the Serial Buss 2 line from the GM computer to the port, all should have been well right? I thought so, but it woudn't connect. I ended up pulling the dash out of the car again reluctantly, and I made a temp obdII port for testing purposes. As I was looking up some stuff for an 02 camaro, I noticed that it is pinned different than a miata is. Power and grounds were in the same spot, but the data connector wasn't. Low and behold, I moved the pin on the miata plug, and sure enough it connected just fine.....How did I miss this detail, and the better question, why isn't the data connection pin standard on all vehicles?
I don't know, but whatever the case is my scanner can see the car now, which means the tuner will be able to see the car!! Dropping it off thursday, he is busy so it may end up being a couple days before I get it back, but I can't wait!!!
04-06-2016, 09:07 AM
#129
V8 Miata Fanatic
Thread Starter
Got my AC lines all made up and tried to get them sucked down last night......sucked on it for two hours (good grief my lips were sore... ) and closed off my valving.....bled luck a stuck hog. Went back to atmospheric on the low pressure side in just a couple minutes. I have a couple spots that were tough to get tightened, so I'll probably work on them and try again. Anyone have any tips on located inleakage at connections?
) and closed off my valving.....bled luck a stuck hog. Went back to atmospheric on the low pressure side in just a couple minutes. I have a couple spots that were tough to get tightened, so I'll probably work on them and try again. Anyone have any tips on located inleakage at connections?
04-06-2016, 04:47 PM
#130
Slow moving fast project


I usually have to add tracer dye and re-charge the system to locate any leaks. Probably not practical in this scenario. It would be nice to be able to rig up a nitrogen smoke tester. I have used this method several times for finding fine induction leaks.
Unfortunately neither of these methods is easy in the home garage.
Unfortunately neither of these methods is easy in the home garage.
04-15-2016, 07:23 AM
#131
V8 Miata Fanatic
Thread Starter
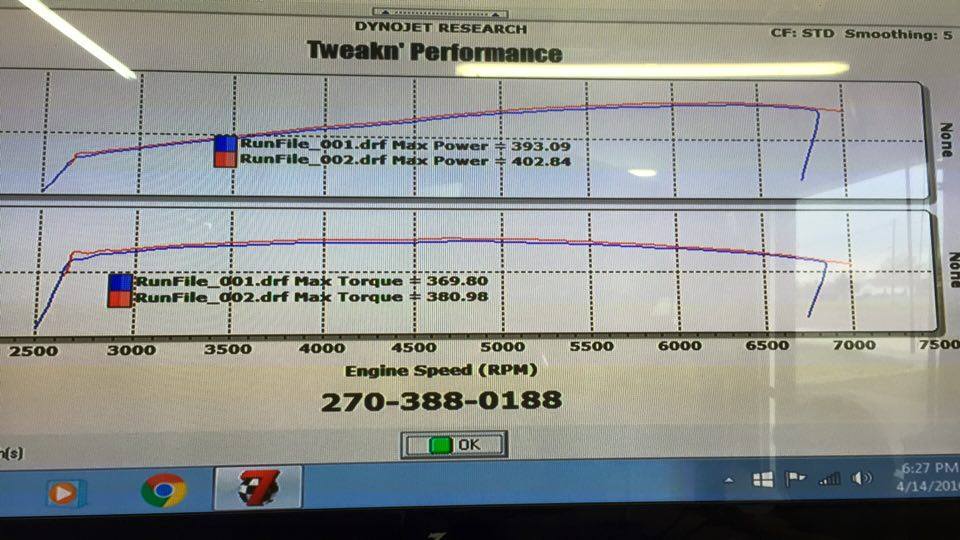
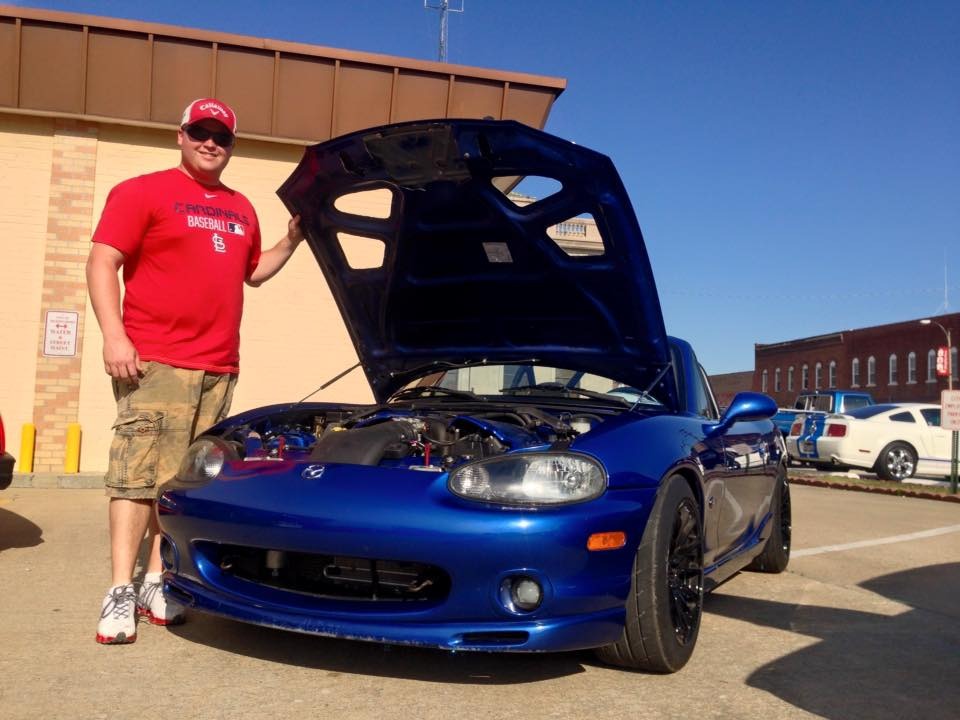
Tuner sent me this picture today....not to bad at all for a couple baseline runs. I do have a problem though, my fans are not kicking on......He probably won't be able to tune it much if he can't keep it cool, so I'll have to go get it, fix it, then take it back.

 04-15-2016, 01:04 PM
#133
Slow moving fast project
There is nothing more frustrating than problems on the dyno and having to reschedule. Sorry about that misfortune. Fortunately your car set a nice baseline to work with. The next tune should be exciting.
04-15-2016, 03:44 PM
#134
V8 Miata Fanatic
Thread Starter
Well, he was able to use some fans keep it cool enough to call it good. I told him not to push it really hard, so 405 is going to probably be the final number. I am very happy with it.

The following users liked this post:
SupaDupaSteve (04-15-2016)
04-19-2016, 07:40 AM
#135
V8 Miata Fanatic
Thread Starter
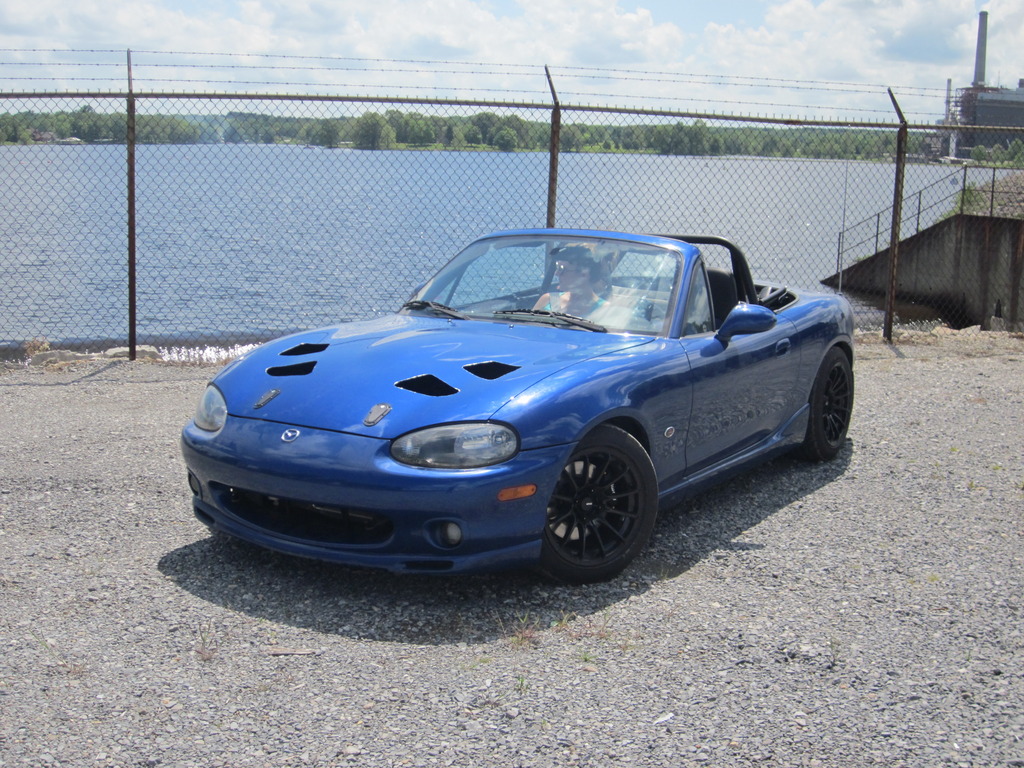
Well, I went and picked the car up yesterday. I will probably end up taking it back sometime once I get the fans worked out so he can log some drive time and maybe work on the idle/driveability, but for now it is completely safe and driveable. I took it down the road just a short ways a couple times to see it go through the gears, man it felt good to actually drive the car. Remember I brought my shell home on a cart, so this was the first real drive of any sort. First impressions were actually very favorable. No doubt about it if you stomp it in first, second, or third then you can forget about holding onto the road, but when I tried a little controlled throttle the car felt like an absolute rocket.
Just my first impressions....I will have a dyno video, and some more seat time to speak of soon.
Just my first impressions....I will have a dyno video, and some more seat time to speak of soon.
 04-27-2016, 06:56 AM
#137
V8 Miata Follower

RS3's, If it was going to be a few more weeks before I was ready to get her out I would have canceled my order and got the new Maxxis VR-1's, but these are already here, and they are pretty well proven at this point. I ordered them two months ago now, tirerack finally has them in again.
 04-28-2016, 08:23 PM
#140
V8 Miata Participant

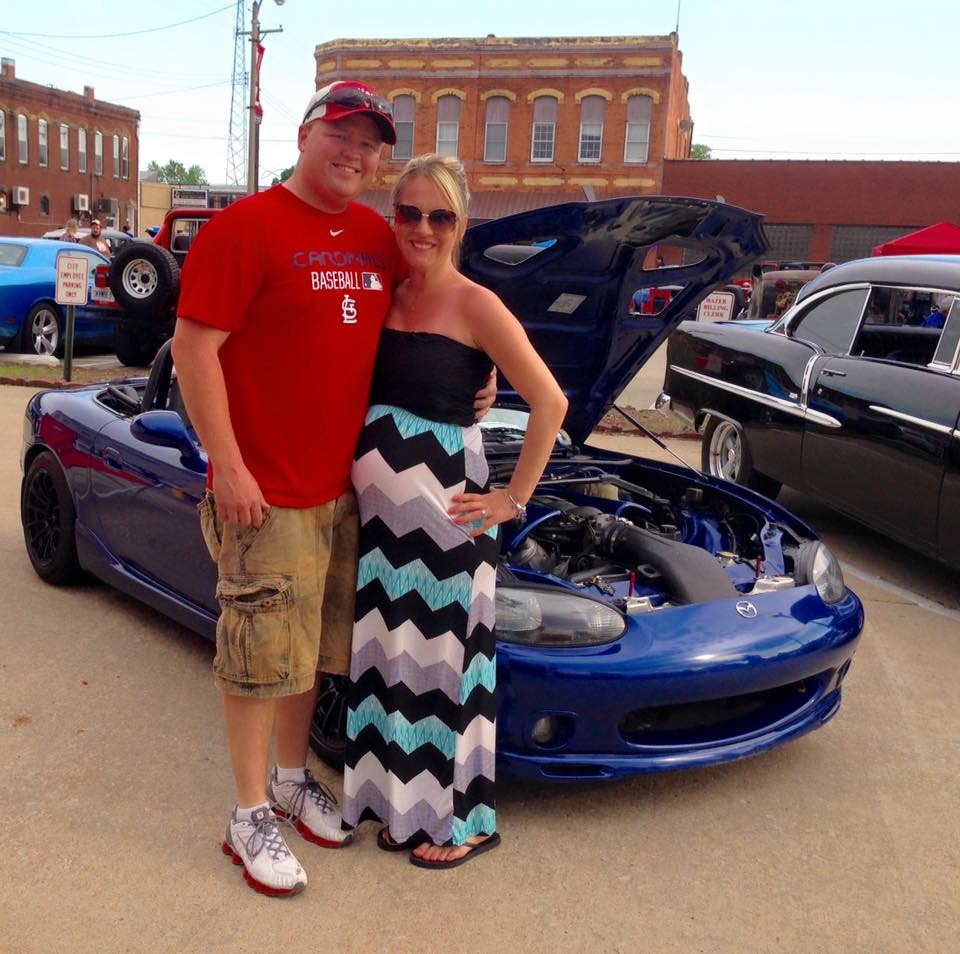
I hate to see limited editions get chopped up but in this case you actually saved one from being scrapped. Very nice work and the car is going to be a blast for you and your wife. 405 to the wheels is a great amount of fun! Enjoy it well.... many smiles and safe miles to you
The following users liked this post:
charchri4 (05-15-2016)
04-29-2016, 03:17 PM
#141
V8 Miata Fanatic
Thread Starter
I hate to see limited editions get chopped up but in this case you actually saved one from being scrapped. Very nice work and the car is going to be a blast for you and your wife. 405 to the wheels is a great amount of fun! Enjoy it well.... many smiles and safe miles to you
05-02-2016, 11:26 AM
#142
V8 Miata Fanatic
Thread Starter
Update time:
Been a little while since my last update, last real one at least. I graduate from grad school in two weeks, and I've been parting two other miatas, and working on my car....busy but I love it!
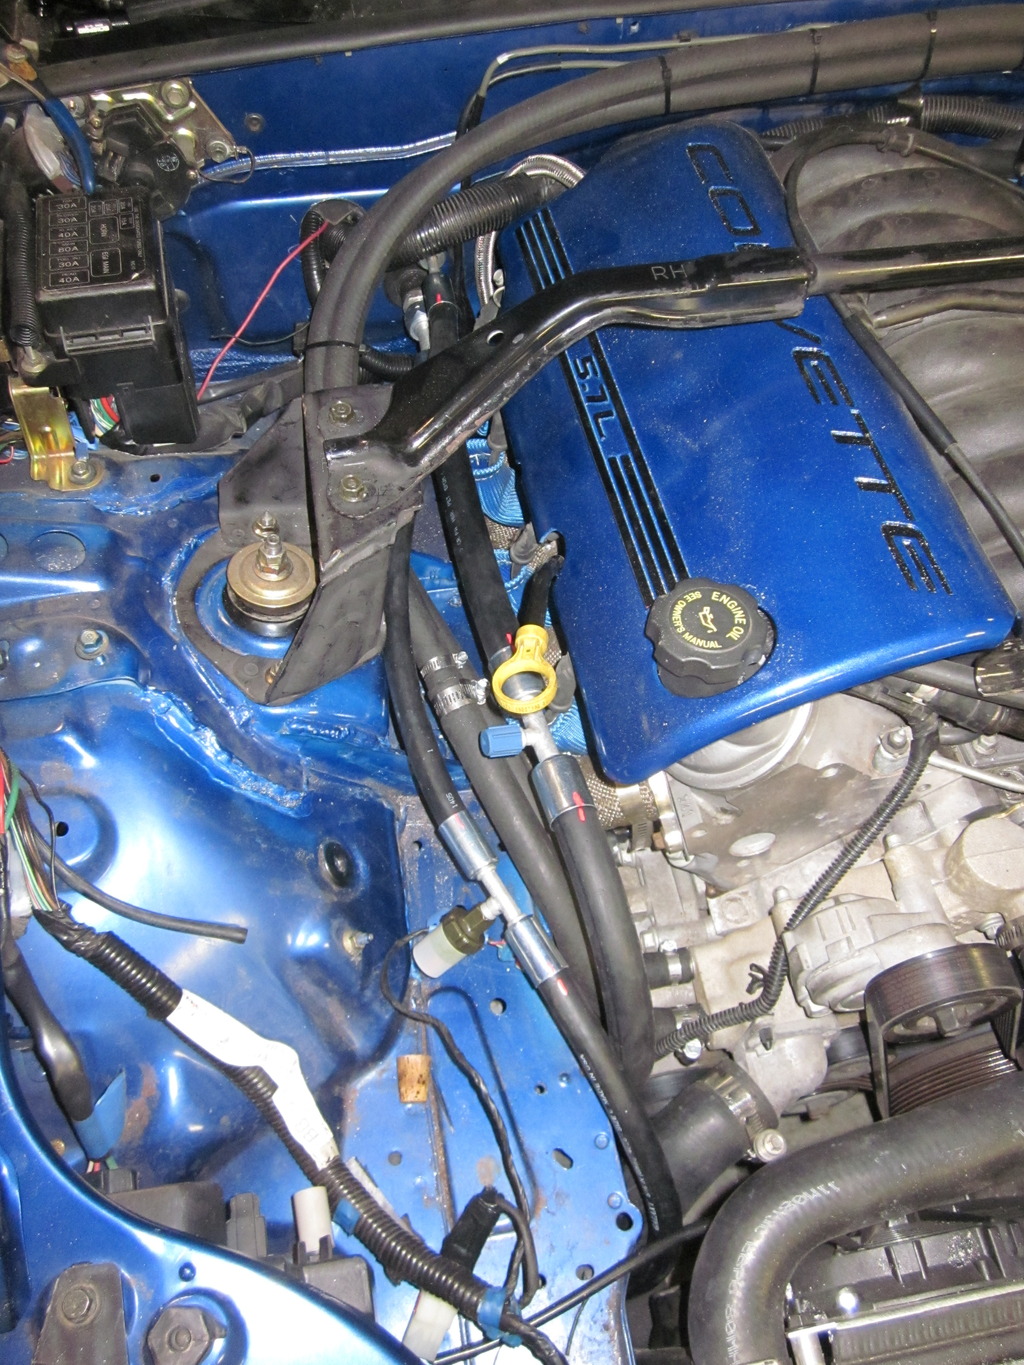
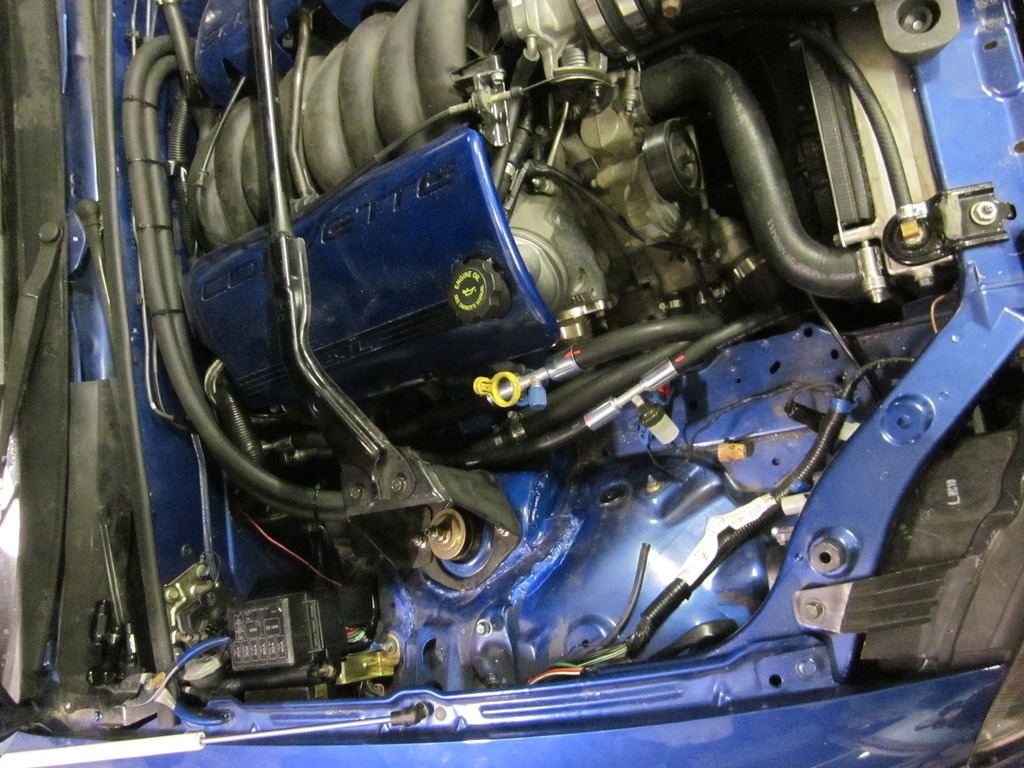
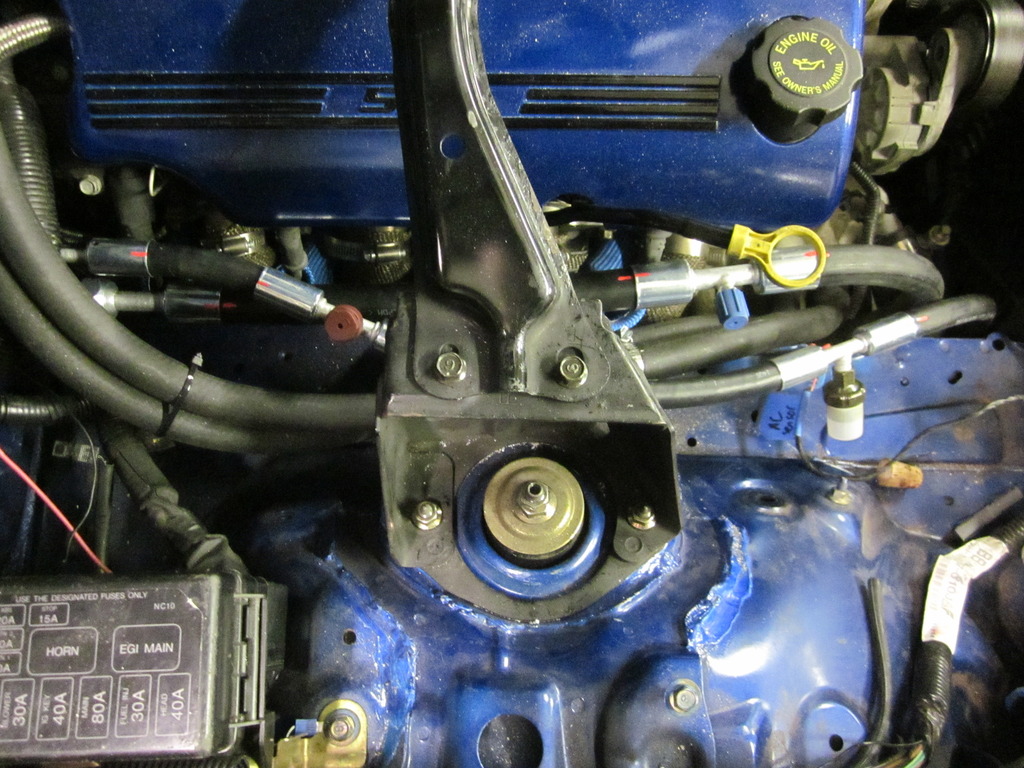
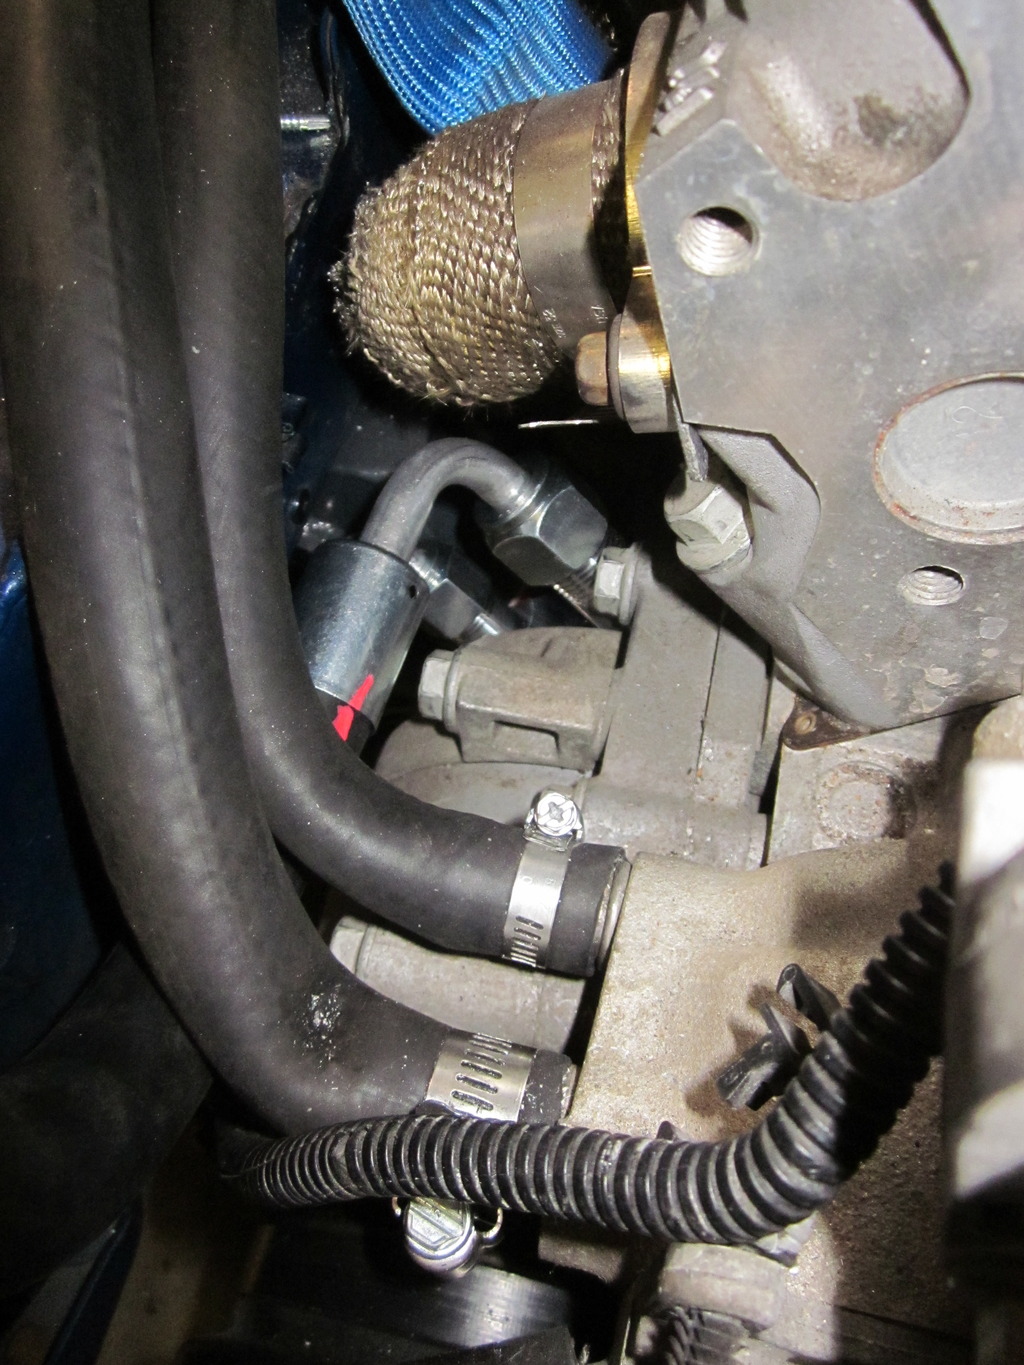
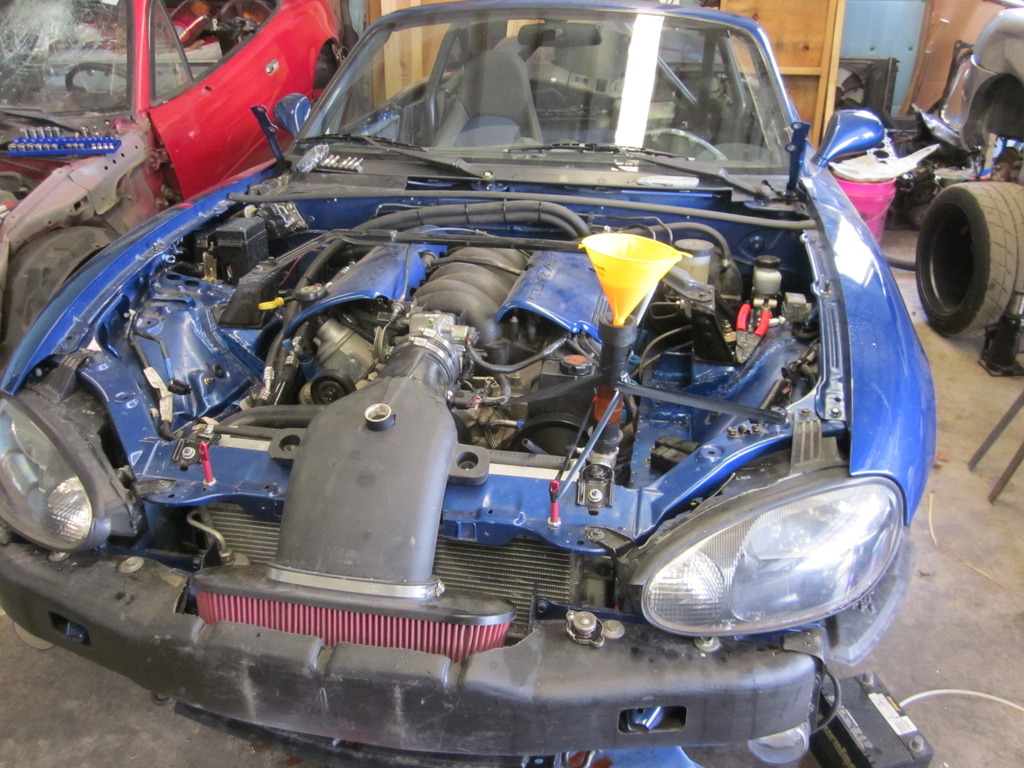
I pretty well had my car together at the last update. Working on handful of small things trying to get it ready to get tuned. I had it completely driveable so I was trying to get the AC set up in place. I used all of the coldhose parts reccomended here by gunpilot in his thread:
https://www.v8miata.net/interior-mod...ng-my-ls-2536/
There is a lot of good info in there. I have not messed with AC much before, so this is once again something new for me. I bought all the stuff and had a local shop crimp the fittings for me. They warned me that their tool was a different brand and "may" not work, but I think that is just a formality, the crimping tools look identical on the internet. Anyway, I got all my lines marked, crimped, plumbed, and I tried to suck it down but it leaked....haven't really tried to find the leak source yet, but I will get to it. One thing that helped me was to draw the whole thing out so I could see the function. Here is what I drew up, I also wrote part numbers and descriptions to help myself when assembling everything:
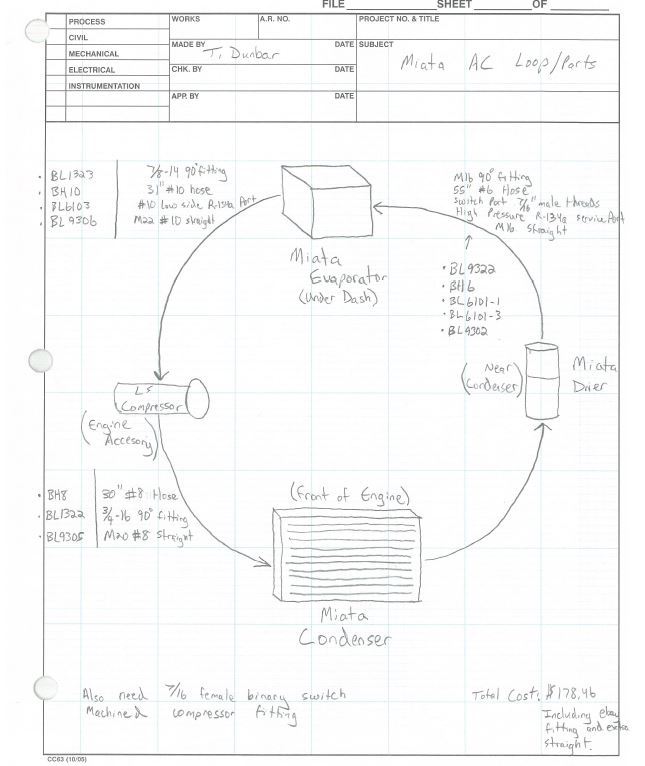
You can see in my pictures I used a red paint marker to identify where all my fittings belonged.
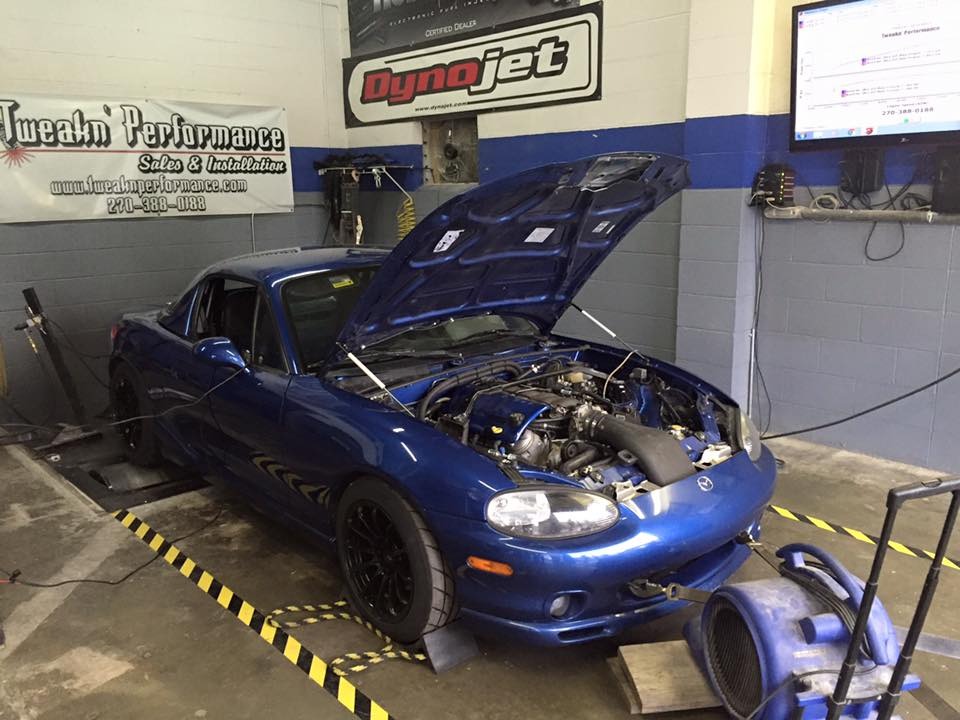
From there the car went to the dyno. I ended up taking it to a shop in Eddyville Ky, called Tweakin Performance. I had been searching all over the midwest area to find someone who could tune it for me. I found a couple that I liked, but they couldn't get me in for a while. This guy actually took the time to speak with me, explain his entire process, really made me feel comfortable. He was very honest, and said that he had all the software and dyno equipment needed, but he didn't have the experience he needed to feel comfortable tuning customer cars, so he is partnered with PCM of North Carolina. He logs the data, and they write the tunes. Anyway, I am very happy with the service I recieved, and the car runs great. He was not able to get it perfect because I ran into a big problem....fans didn't turn on.....I will be taking it back at a later date to get some more run time logged and hopefully get it lined out perfect. Until then she runs pretty good as is. Here is the dyno video, enjoy!
When I got her back, I learned a lot about how important it is to have your cooling system lined out. I got her down from the trailer, and wanted to take a quick spin just to say I had. I got about a mile down the road and she was getting hot, so I turned around. I had figured that there would be plenty of air moving with the car in motion so it wouldn't get hot, but it still did.....Uh oh, what have I done! I actually ended up leaving it at the end of my road for an hour or so to cool off, I was very nervous. I had planned on cutting hood vents in it, but I just hadn't got around to it at the time. I also hadn't installed the duct piece that goes behind the mouth of the front bumper. So here is what I learned......
-Under your hood is basically like a big bubble of air. If you don't have anywhere for the air to come in and out of properly, air will just go around it. This is a big problem when you are trying to cool that small block.
-Make sure you mouth duct is in place. This forces air into the radiator when you are going down the road. If you think about it, between the power steering cooler, AC condenser, and the radiator, air is essentially hitting a wall right there with limited paths to go through. If you don't direct air through it, take it from me that it won't go through.
-Make sure you give the air somewhere to go after passing through the radiator. Some of it will go back out the bottom, but there have been multiple studies done that show a dramatic pressure differential between the inside and outside of the hood, thus good vent placement on the hood is key! There is a lot of good information on Jim Stainers (Charchi4) blog, which has his info and a really good technical read using a nissan maxima. Also, GoKart (forum member) has a good write up on his vent install on his miata. His thread details different locations, and pressure points on an NB miata hood. I expect it will be similar on an NA. He is also a really good guy, I hit him up to see where he got his vent material from and he actually sold me the rest of his material for a great price, thanks bud! Both of those pages are linked here:
Jim and Jenna build diary, Miata LS1 Conversion: LS1 V8 Miata Cooling and Hood Venting 101
DIY Hood Vent - MX-5 Miata Forum
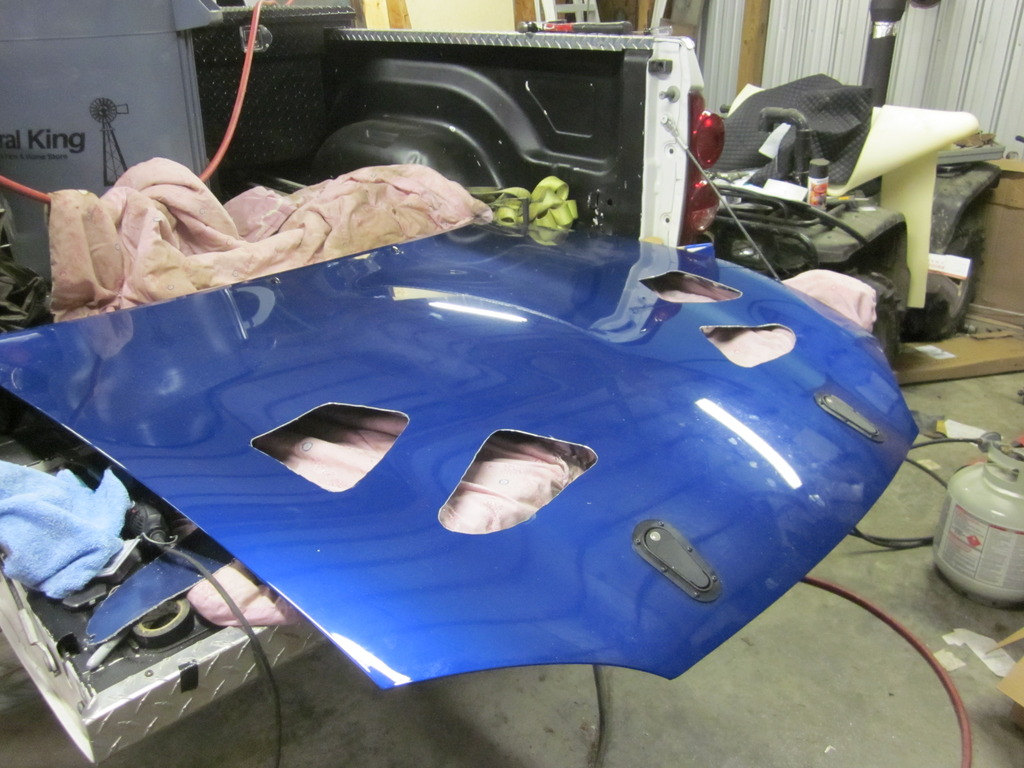
And here are some pictures of my cutting. I havne't got the vent material in yet, I cut it and sent it off for powdercoating. My cars theme is black and blue, so I am having them coated black. Here you see I used a marker, inside a bit of 3/4" sch 80 pvc. This gave me a nice uniform distance from the hood structure. I used a little electric tape to make it fit tight, not shown here.
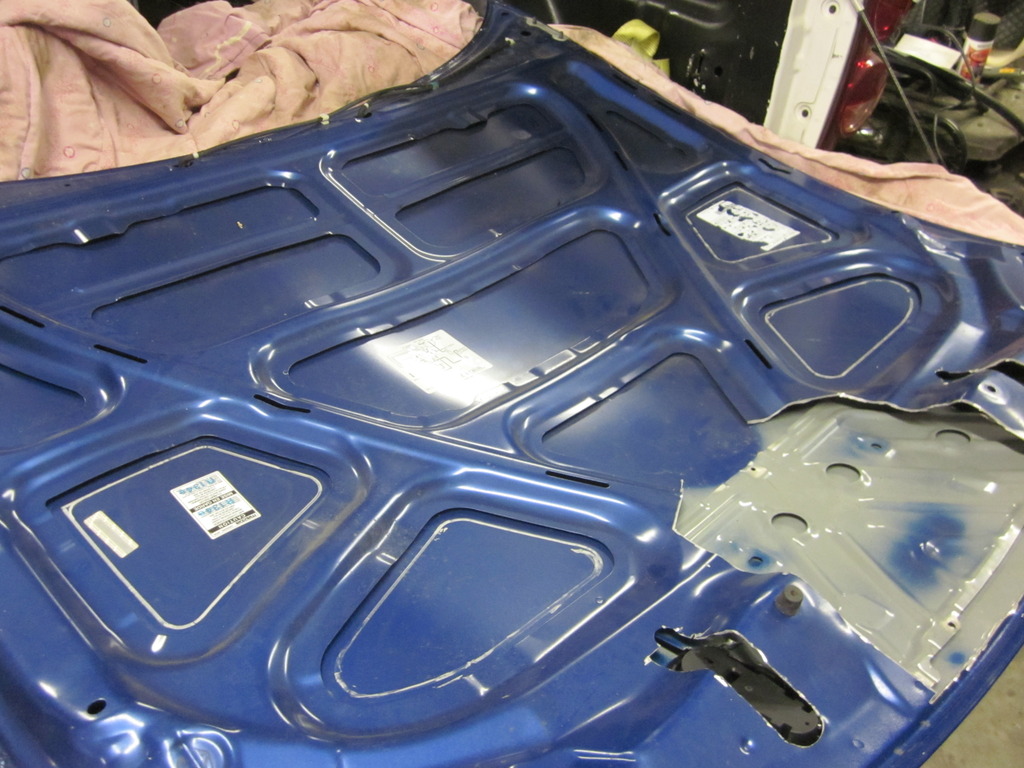
I then used a high speed rotary cutter with a cutting bit and cut them out. Not saying I am completely happy with that choice, but It worked pretty well, and I think they look great! Like GoKart, I used the cut out pieces and made templates for the mesh material.
-Finally, Make sure your fans are working. I hadn't been able to run my car long enough untuned to get it hot enough for the fans to kick on, and sadly they did not once it got to the tuner. Long story short, I rewired the miata relays to use the LS ECM signal like you would the fuel pump signal. Bad thing is I made it wrong by doing that. Both GM and Mazda cooling fan relays use a switched ground to activate....once I got that lined out they come on and work exactly as designed. Good deal.
Been a little while since my last update, last real one at least. I graduate from grad school in two weeks, and I've been parting two other miatas, and working on my car....busy but I love it!
I pretty well had my car together at the last update. Working on handful of small things trying to get it ready to get tuned. I had it completely driveable so I was trying to get the AC set up in place. I used all of the coldhose parts reccomended here by gunpilot in his thread:
https://www.v8miata.net/interior-mod...ng-my-ls-2536/
There is a lot of good info in there. I have not messed with AC much before, so this is once again something new for me. I bought all the stuff and had a local shop crimp the fittings for me. They warned me that their tool was a different brand and "may" not work, but I think that is just a formality, the crimping tools look identical on the internet. Anyway, I got all my lines marked, crimped, plumbed, and I tried to suck it down but it leaked....haven't really tried to find the leak source yet, but I will get to it. One thing that helped me was to draw the whole thing out so I could see the function. Here is what I drew up, I also wrote part numbers and descriptions to help myself when assembling everything:

You can see in my pictures I used a red paint marker to identify where all my fittings belonged.


From there the car went to the dyno. I ended up taking it to a shop in Eddyville Ky, called Tweakin Performance. I had been searching all over the midwest area to find someone who could tune it for me. I found a couple that I liked, but they couldn't get me in for a while. This guy actually took the time to speak with me, explain his entire process, really made me feel comfortable. He was very honest, and said that he had all the software and dyno equipment needed, but he didn't have the experience he needed to feel comfortable tuning customer cars, so he is partnered with PCM of North Carolina. He logs the data, and they write the tunes. Anyway, I am very happy with the service I recieved, and the car runs great. He was not able to get it perfect because I ran into a big problem....fans didn't turn on.....I will be taking it back at a later date to get some more run time logged and hopefully get it lined out perfect. Until then she runs pretty good as is. Here is the dyno video, enjoy!
When I got her back, I learned a lot about how important it is to have your cooling system lined out. I got her down from the trailer, and wanted to take a quick spin just to say I had. I got about a mile down the road and she was getting hot, so I turned around. I had figured that there would be plenty of air moving with the car in motion so it wouldn't get hot, but it still did.....Uh oh, what have I done! I actually ended up leaving it at the end of my road for an hour or so to cool off, I was very nervous. I had planned on cutting hood vents in it, but I just hadn't got around to it at the time. I also hadn't installed the duct piece that goes behind the mouth of the front bumper. So here is what I learned......
-Under your hood is basically like a big bubble of air. If you don't have anywhere for the air to come in and out of properly, air will just go around it. This is a big problem when you are trying to cool that small block.
-Make sure you mouth duct is in place. This forces air into the radiator when you are going down the road. If you think about it, between the power steering cooler, AC condenser, and the radiator, air is essentially hitting a wall right there with limited paths to go through. If you don't direct air through it, take it from me that it won't go through.
-Make sure you give the air somewhere to go after passing through the radiator. Some of it will go back out the bottom, but there have been multiple studies done that show a dramatic pressure differential between the inside and outside of the hood, thus good vent placement on the hood is key! There is a lot of good information on Jim Stainers (Charchi4) blog, which has his info and a really good technical read using a nissan maxima. Also, GoKart (forum member) has a good write up on his vent install on his miata. His thread details different locations, and pressure points on an NB miata hood. I expect it will be similar on an NA. He is also a really good guy, I hit him up to see where he got his vent material from and he actually sold me the rest of his material for a great price, thanks bud! Both of those pages are linked here:
Jim and Jenna build diary, Miata LS1 Conversion: LS1 V8 Miata Cooling and Hood Venting 101
DIY Hood Vent - MX-5 Miata Forum
And here are some pictures of my cutting. I havne't got the vent material in yet, I cut it and sent it off for powdercoating. My cars theme is black and blue, so I am having them coated black. Here you see I used a marker, inside a bit of 3/4" sch 80 pvc. This gave me a nice uniform distance from the hood structure. I used a little electric tape to make it fit tight, not shown here.


I then used a high speed rotary cutter with a cutting bit and cut them out. Not saying I am completely happy with that choice, but It worked pretty well, and I think they look great! Like GoKart, I used the cut out pieces and made templates for the mesh material.


-Finally, Make sure your fans are working. I hadn't been able to run my car long enough untuned to get it hot enough for the fans to kick on, and sadly they did not once it got to the tuner. Long story short, I rewired the miata relays to use the LS ECM signal like you would the fuel pump signal. Bad thing is I made it wrong by doing that. Both GM and Mazda cooling fan relays use a switched ground to activate....once I got that lined out they come on and work exactly as designed. Good deal.
05-02-2016, 11:26 AM
#143
V8 Miata Fanatic
Thread Starter
One other thing I had been concerned with was that I still had air in my cooling system. I have learned a lot from Jim but I really just didn't want to put a valve in my heater core lines (no offense Jim). I had been reading about different ways to clear air from a system, and I ended up coming up with my own method which I think worked really well. Some tools use a vacuum source to suck out all air in the system, similar to your AC system. I have a mityvac vacuum gun I use for brake/clutch bleeding. I also have a hydrocarbon tester that tests your cooling system for hydrocarbons(Headgasket issues). So I went to the hardware store and picked up a couple small ball valves and a T fitting. I set them up with one leg of the T going to my vacuum gun, one leg going to a jug of coolant, and one leg going to the radiator cap(I used my connector for the hydrocarbon tester here because it has a rubber cone that seals to the radiator cap. I then pulled vacuum on the system until the coolant got to the valve, and closed it off. Then I pulled a deep vacuum on the car side. The whole time I did it I could see air bubbling out of the connector. At the point where I couldn't pull anymore, all my hoses were collapsed, I opened up the valve that connected to the coolant jug, which pulled all kinds of additional coolant into the system. After doing this a couple times, I am confident that my system is air free. I went ahead and ran it with my connector in place and a little coolant in it, no more bubbles or overheating at all!! Hell yes! Don't mind my bit of rigging here:
After that, what was I going to do? You better believe I went to drive it! Put about twenty miles on her with a pregnant co-pilot who said I can't "speed up fast". Car ran great, no scary noises, grinding, etc. I do rub somewhere when I go all the way to the right steering lock, but not the left. I will get that taken care of. I also was able to dial in my speedometer with the Dakota Digital box. Flyin miatas site still used the SGI-5C unit, which is what a bunch of people have used. Obviously they work, but I figured that I would try the newest model, the SGI-5E. It looked a bit cumbersome to me with the calibrating on the 5C, and maybe its not, but let me tell you about what I had to do to my 5E........hit one button until it was right....thats it....No multiple switches to manipulate, no issues whatsoever. I wired the box the same as the 5C is, and used one button to dial it down to match my GPS. Highly recommended.
Dakota Digital SGI-5E Universal Speedometer Signal Interfaces SGI-5E - Free Shipping on Orders Over $99 at Summit Racing
More to come!

After that, what was I going to do? You better believe I went to drive it! Put about twenty miles on her with a pregnant co-pilot who said I can't "speed up fast". Car ran great, no scary noises, grinding, etc. I do rub somewhere when I go all the way to the right steering lock, but not the left. I will get that taken care of. I also was able to dial in my speedometer with the Dakota Digital box. Flyin miatas site still used the SGI-5C unit, which is what a bunch of people have used. Obviously they work, but I figured that I would try the newest model, the SGI-5E. It looked a bit cumbersome to me with the calibrating on the 5C, and maybe its not, but let me tell you about what I had to do to my 5E........hit one button until it was right....thats it....No multiple switches to manipulate, no issues whatsoever. I wired the box the same as the 5C is, and used one button to dial it down to match my GPS. Highly recommended.
Dakota Digital SGI-5E Universal Speedometer Signal Interfaces SGI-5E - Free Shipping on Orders Over $99 at Summit Racing

More to come!
05-02-2016, 08:49 PM
#144
V8 Miata Prot�g�

The way you did your coolant is how I do everything at work. I have a tool called an "air lift" and it draws the entire cooling system to a vacuum and then you suck in the coolant. Works beautifully every time, even on cars like porsche where they've got radiators up front with long coolant hoses under the car.
also, glad to hear that particular model DD works well, it's also the one I ended up getting by mistake but if it's better that makes my life easier.
also, glad to hear that particular model DD works well, it's also the one I ended up getting by mistake but if it's better that makes my life easier.
05-03-2016, 08:01 AM
#145
V8 Miata Fanatic
Thread Starter
I can't really speak to how well the old Dakota Digital box works, but looking at the directions it seems like the initial setup is a little tough. This one wired up the exact same way, and was so easy to dial in, a caveman could do it!
Last edited by stng_96; 02-08-2017 at 08:18 AM.
The following users liked this post:
charchri4 (05-15-2016)
05-06-2016, 02:01 AM
#147
V8 Miata Participant
I'm glad you got your cooling system straightened out.
On my last build I drilled and taped the top of the water pump in the flat of the casting by the T-stat. It looks like that is where they put the hose on the truck style pump. Anyway, I routed the steam vent from the front of the engine to there and installed a brass T. The steam vent went into the T from the side and I used a brass valve off the top. When it was time to burp the system I would park the car nose up and fill the Rad, then open the T and add some more until I could see fluid there. Never had an issue. For giggles I opened the valve a crack when the engine was warming up but never got air so I figured it worked.
On my last build I drilled and taped the top of the water pump in the flat of the casting by the T-stat. It looks like that is where they put the hose on the truck style pump. Anyway, I routed the steam vent from the front of the engine to there and installed a brass T. The steam vent went into the T from the side and I used a brass valve off the top. When it was time to burp the system I would park the car nose up and fill the Rad, then open the T and add some more until I could see fluid there. Never had an issue. For giggles I opened the valve a crack when the engine was warming up but never got air so I figured it worked.
05-09-2016, 07:45 AM
#148
V8 Miata Fanatic
Thread Starter
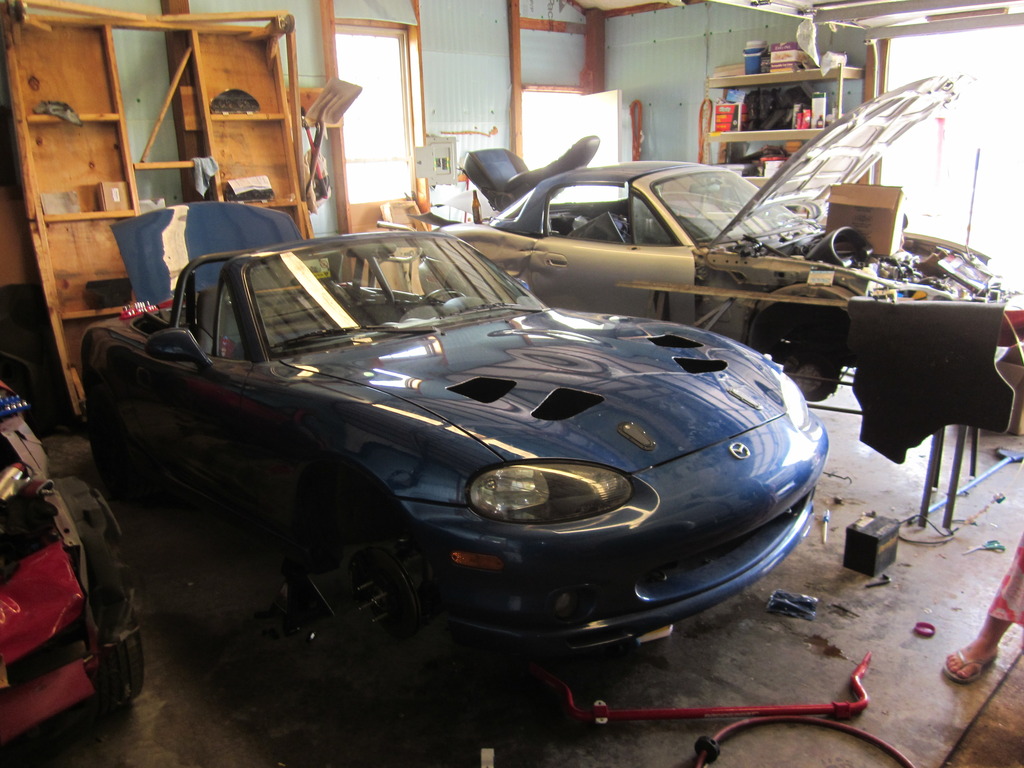
Took the car to its first show this weekend, weather was great and I had heard this was as pretty decent sized cruise in, so why not. In the process we got to put about 150 miles on it so I was able to actually shake it down and see what I still needed to work on. My notes are as follows:
-Car is surpisingly well planted on the RS3's if you can manage it. If you just want to stomp it then forget it, but bottom line it is manageable.
-I have a little bit of wheel hop when I shift to second on hard pulls, but I didn't have a rear sway bar in place. I will put that on and see if it changes things.
-The 450/300 spring combo is excellent, car handles great, but still does not beat the hell out of you.
-The exhaust is loud if I really open it up, but its not bad at all for cruising. At about 60 I have a fair amount of drone, but it starts goes away not much higher than that.
-You haven't seen any more door panel updates because I got the first one together....3 seperate times, and have not been satisfied. I will keep working on it, but for now I trimmed a slot out of the stock panels and put them in. Looks great when the door is closed, not so much when open.
-Car made 18 mpgs in 110 miles, mostly cruising in town, with 4 hard launches to around 100.
-There is a little interferance from somewhere in the DD speedo box. If you rev the car while setting still the Speedo will jump, and sometimes it will jump setting at a light. It always goes away completely when you start moving, but it is there none the less.
At the end of the day, this car is so much fun its scary. Definitely worth all the blood, sweat, and tears. Here are a couple pics from the show:


The following users liked this post:
charchri4 (05-15-2016)
 05-13-2016, 05:48 PM
#150
V8 Miata Fanatic

Congratulations!! Glad you can start putting some miles on the V8Roadster! Hood vents look great. I just added mine this winter, but can tell a difference when driving in city stop n go traffic. Your car is almost as beautiful as your bride!
I'm at Deals Gap, NC this weekend (got here an hour ago) and I think we need a V8Miata gathering here in the fall. ...Just saying.
I'm at Deals Gap, NC this weekend (got here an hour ago) and I think we need a V8Miata gathering here in the fall. ...Just saying.
The following users liked this post:
charchri4 (05-15-2016)


