99 10ae ls1


 We need to know what's going on.
 12-31-2015, 02:06 PM
#78
V8 Miata Fanatic
Thread Starter

I know, I've been terrible about updating on my it. I will get around to it this weekend hopefully. I've been out of school for winter break, and have been trying to spend time in the garage as opposed to on the computer.
01-04-2016, 11:07 AM
#79
V8 Miata Fanatic
Thread Starter
Ok, update time...Pat!
This update has been a while coming, as I said before I have been trying to turn wrenches instead of punch keys here lately. What you are going to realize after this update is that I am a really slow mechanic, too bad I'm not getting paid hourly for this job...
First of all since my last update, I have picked up a couple more toys to hopefully resell for additional funding for the miata. My best friend was driving his 09 G8 GT over Thanksgiving and it got away from him coming around a corner. A traffic light control box ended its life, but luckily my friend walked away without a scratch. The car still runs and drives, but took a pretty good hit right in front of the passenger rear wheel. It has the L76 engine, and I believe that I can get a fair amount for it.
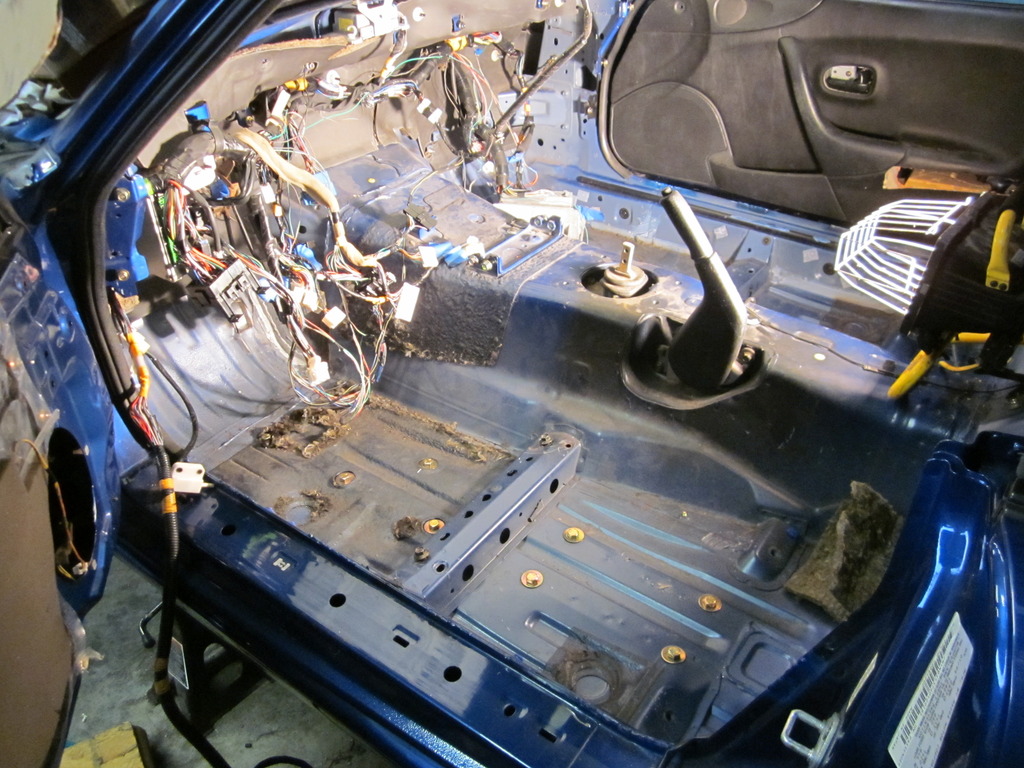
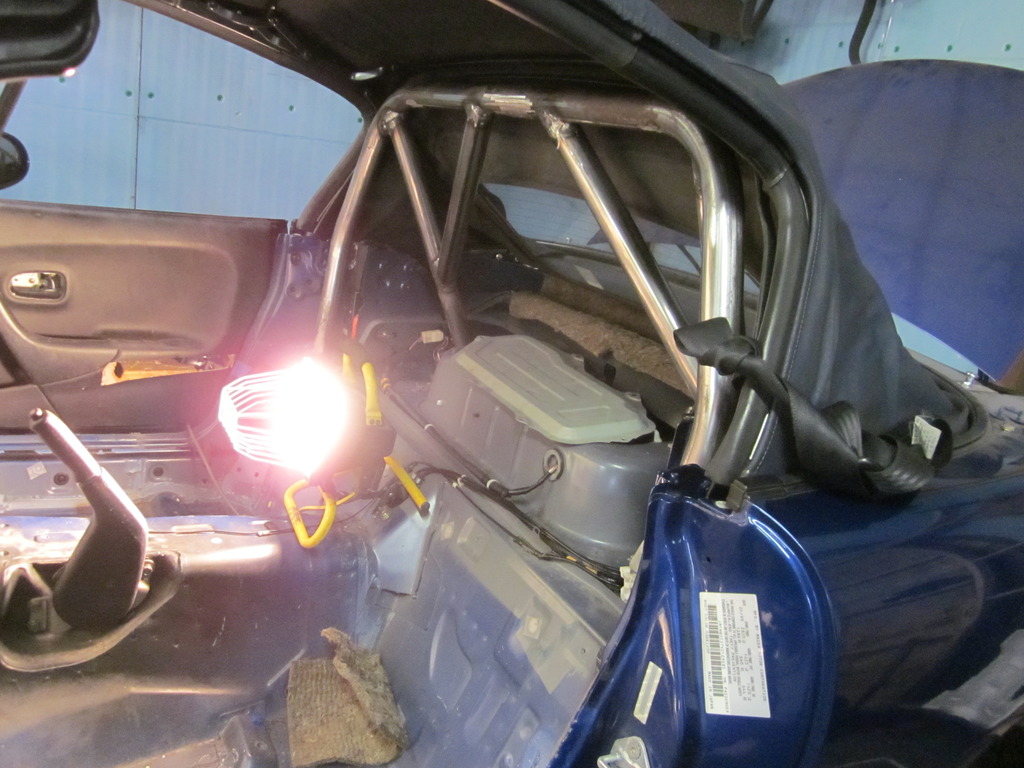
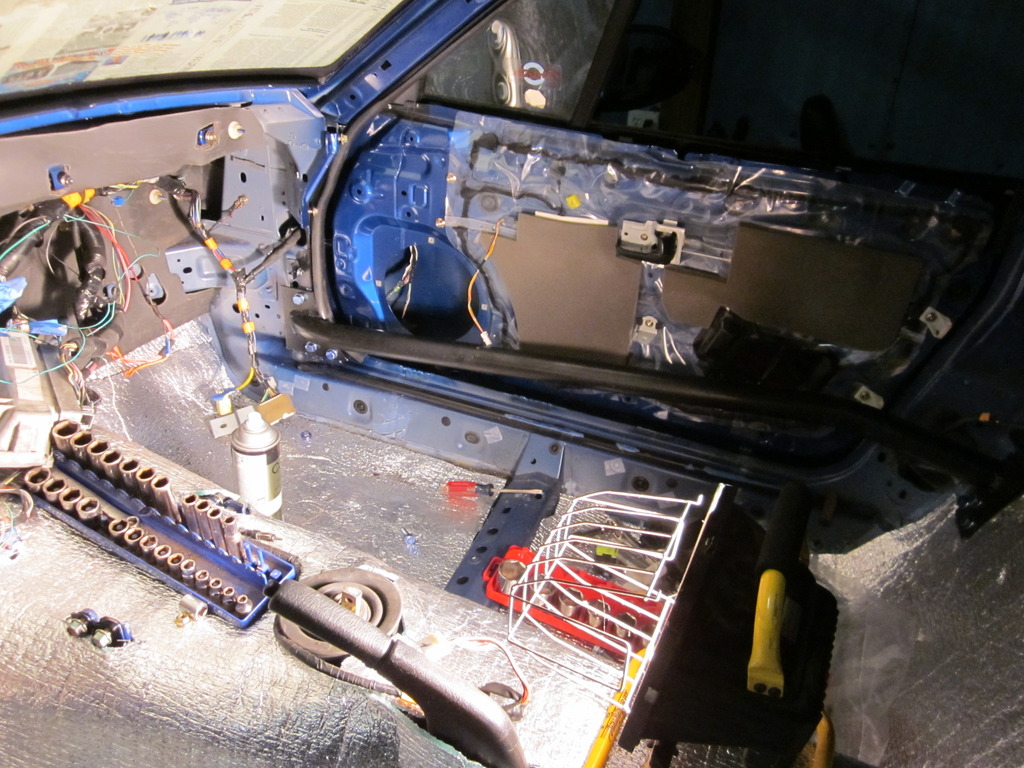
There has been quite a bit of progress made on small items that pictures don't do much for, like the pedal assembly, 90 degree cobra reverse switch, wiring cleanup, etc. What I have noticed more here lately is that I am more frequently running into portions of the project that must be completed before another portion is started. For example, I knew I had to have my cage finished before I put the interior in. I got the interior all cleaned up, and I finished up my cage. I spent a little time test fitting door panels with my door bars, and trimming as you can see in the first picture, but I decided I didn't like that look so cards it will be.
Here is the final fabbed cage before paint. In case you don't remember I bought one of the rhoades race car DIY kits, cost me 300 to my door on sale, and I had to trim/weld it. Jim has said in another thread and I will re-iterate, this cage was a great value if you enjoy doing all of your own(or most in this case) work. If not, or if you are like me and second guess yourself a lot, then it might not be as good. That being said, now that I have done one, I could crank out the second in half the time!
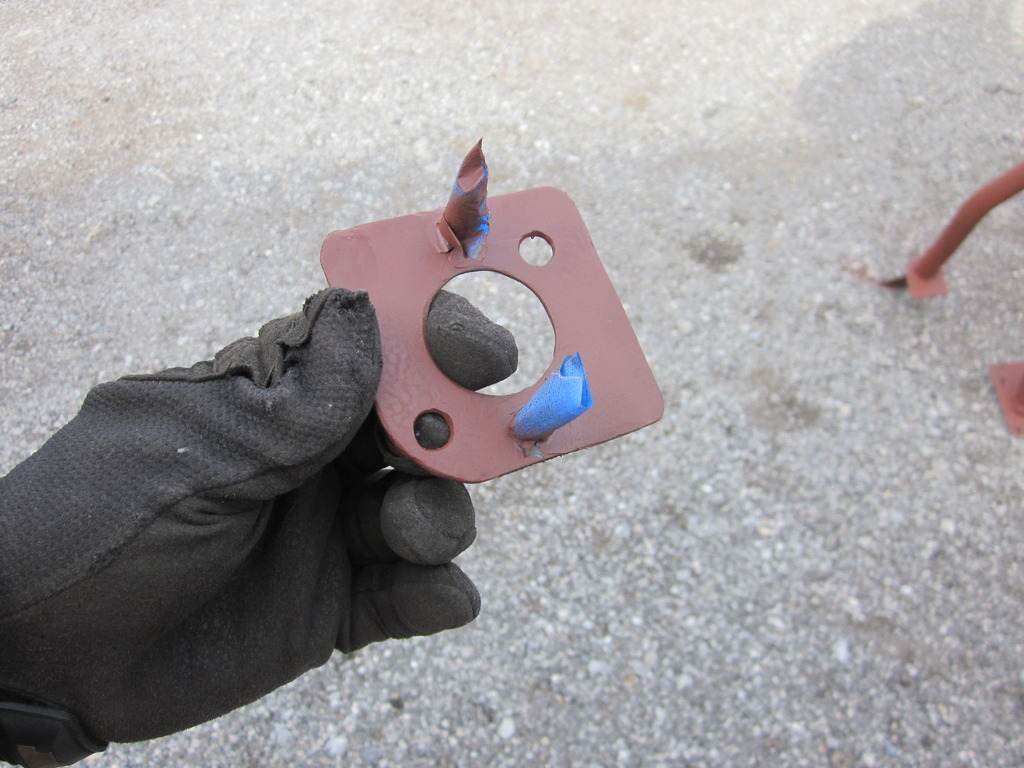
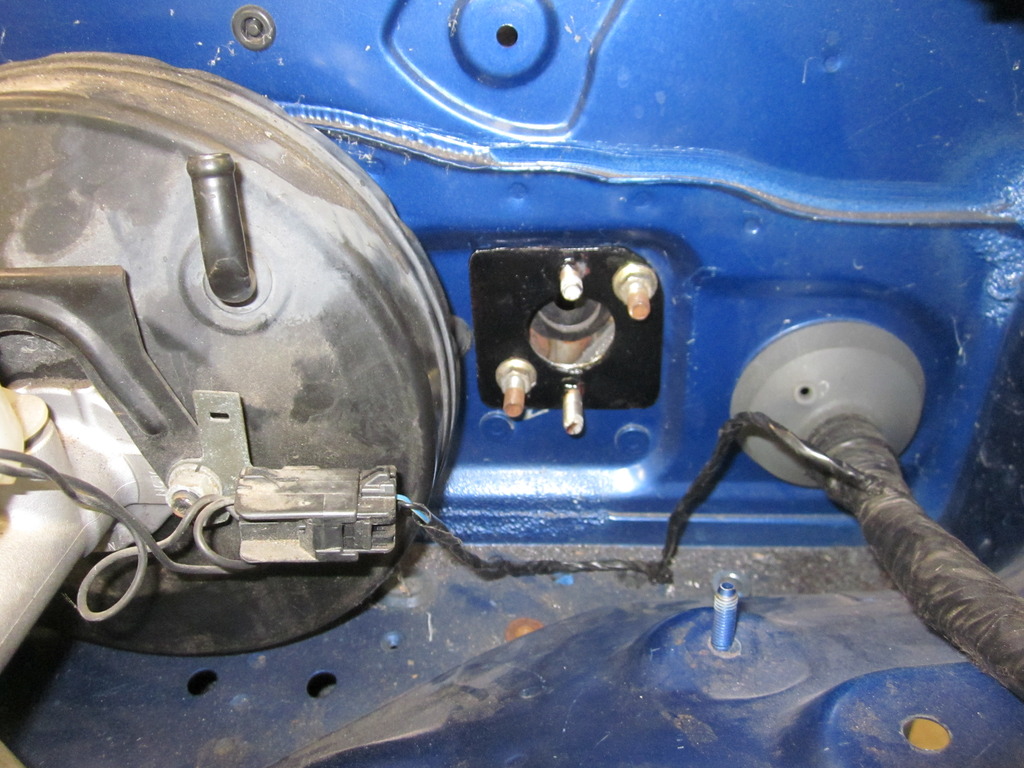
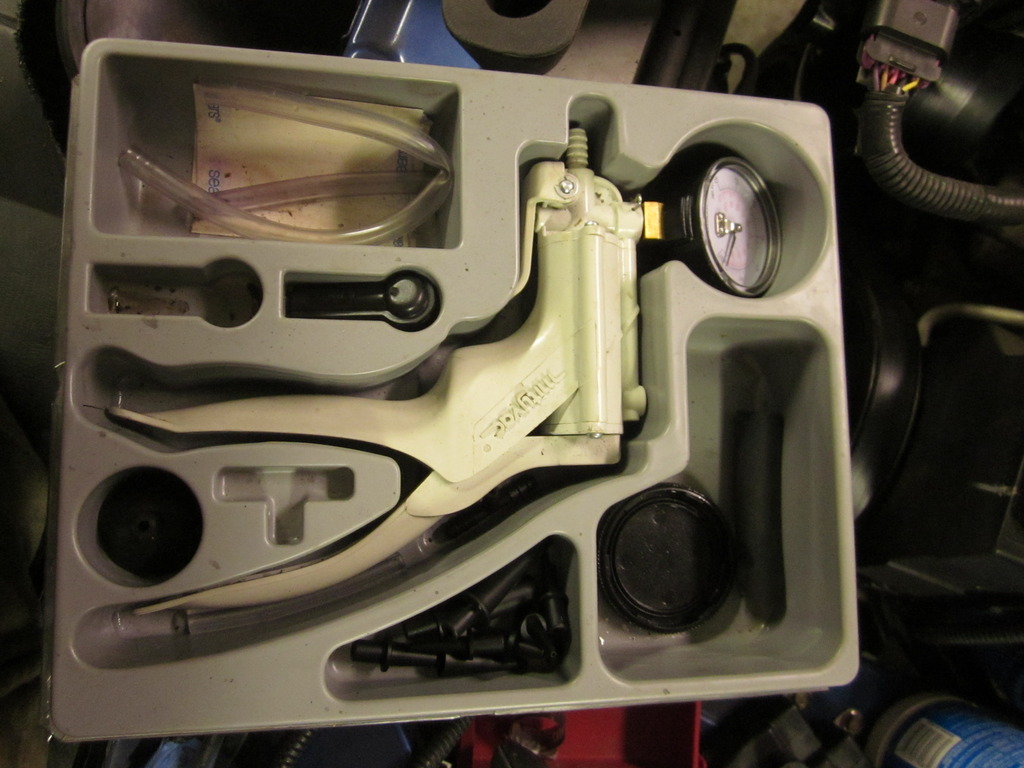
Next I moved to installing the clutch master cylinder and pedal assembly. If you read a couple posts back you will see that I bought all of my own stuff instead of the V8R kit, and can pleasantly report I would do that again in a heartbeat. I did have to make my own adapter bracket for the master cylinder, but that was no big deal. I just cut out a piece of 1/8" plate, shaped it to fit in location, and you can figure the rest. One thing that did not go swimmingly was the MC fitment through the factory hole. On V8R's website, the picture they have of the kit has a 7/8" master cylinder, and other reading I had done elsewhere said that this would be suitable. Problem is that it was a little bit too big for the factory hole, but it was nothing a little dremel action couldn't take care of. Got it all done and installed now, along with the brake pedal as well.
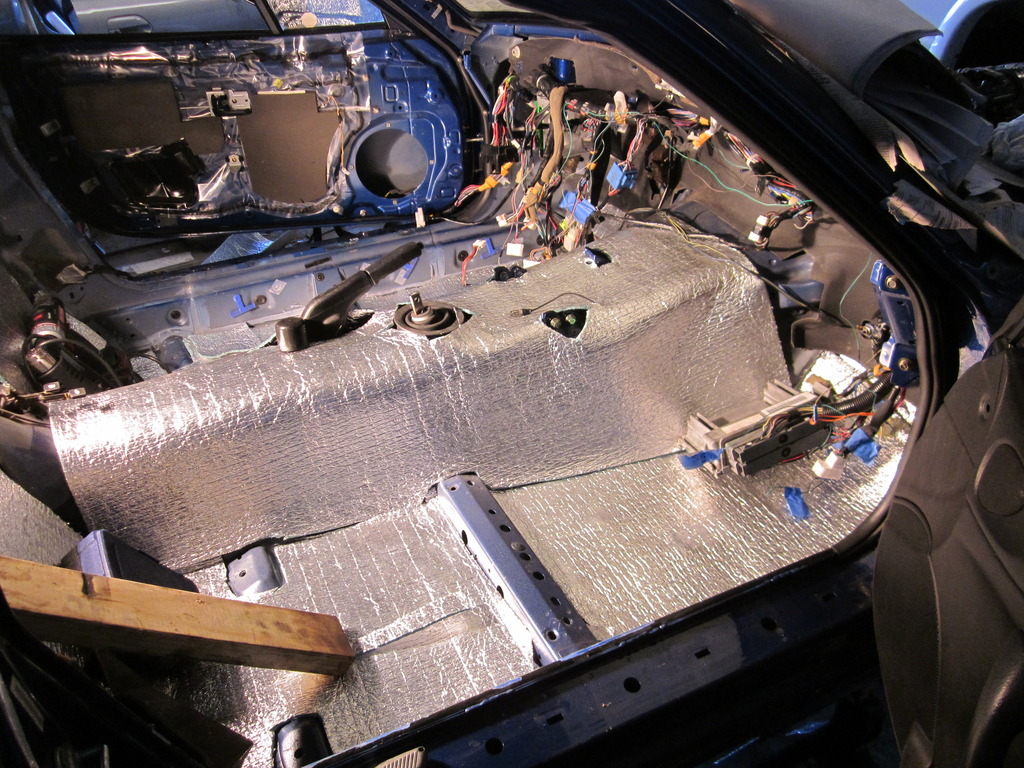
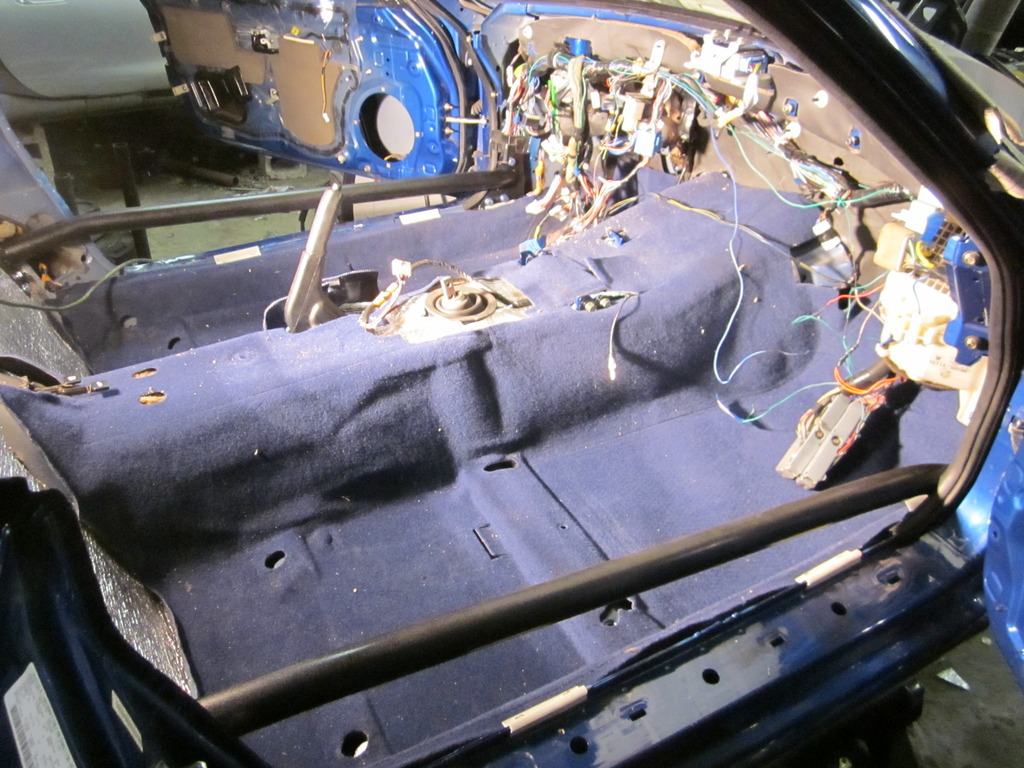
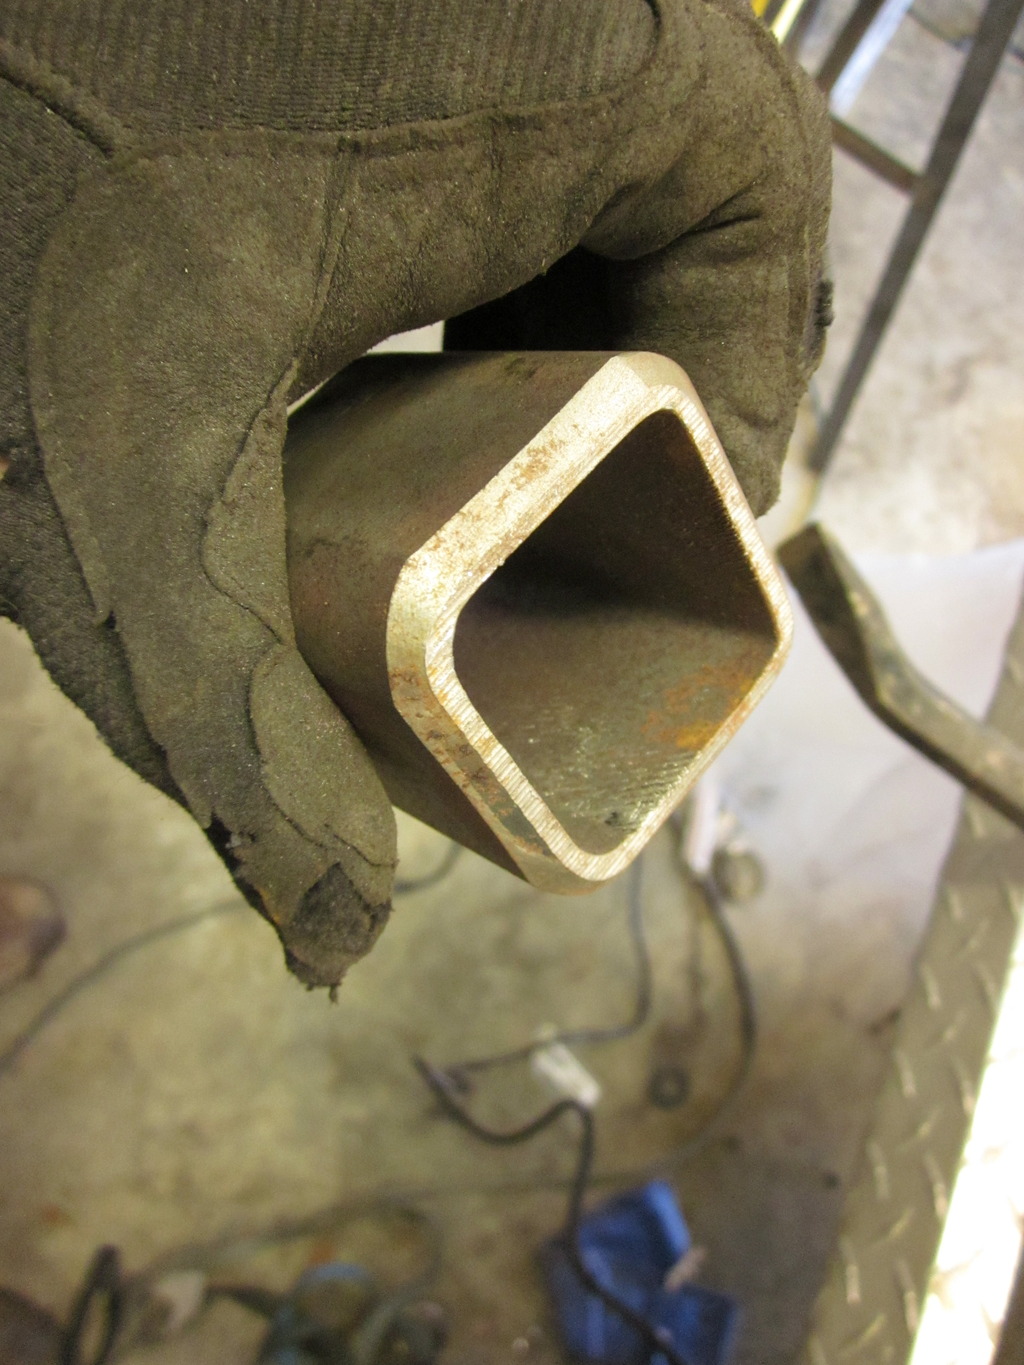
From there it was another time where I set with a beer in hand scratching my head and test fitting for a while, mostly over the door bars. I had my buddy that has a nice tube bender put a couple 15 degree bends in the end of my bars, but was still fighting them. Once my cup ran dry I decided that I did not want to mess with door bars getting in my door panels way, and possibly limiting leg room so I tossed those them out and put in the insulation throughout the floor and rear bulkhead.
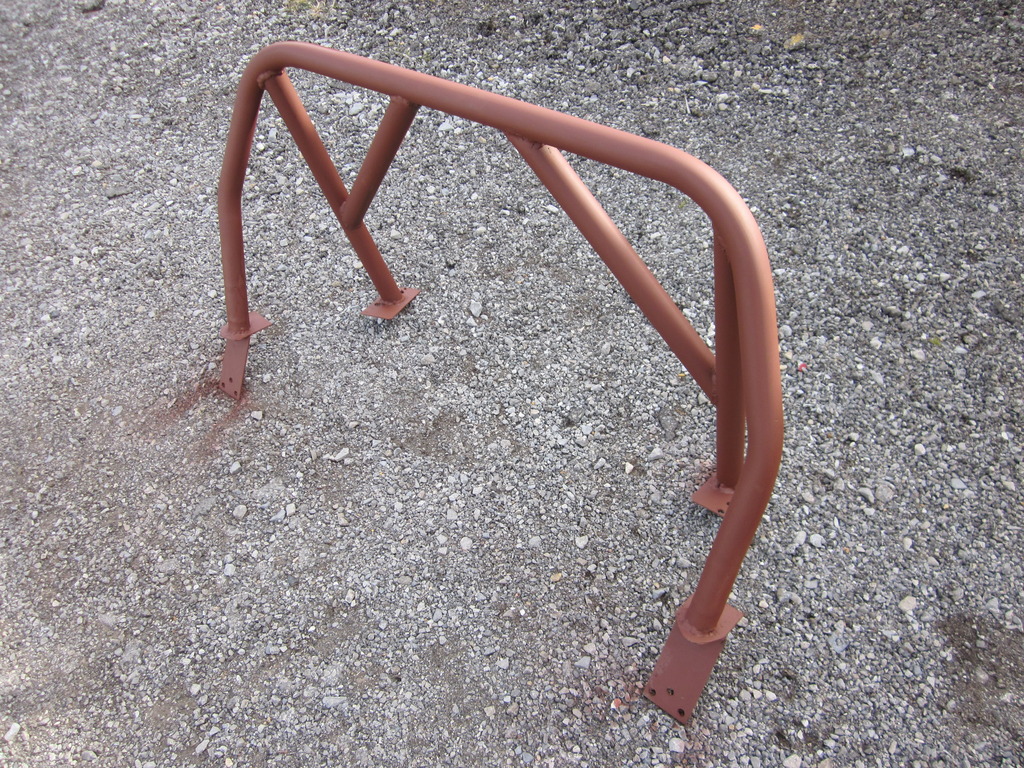
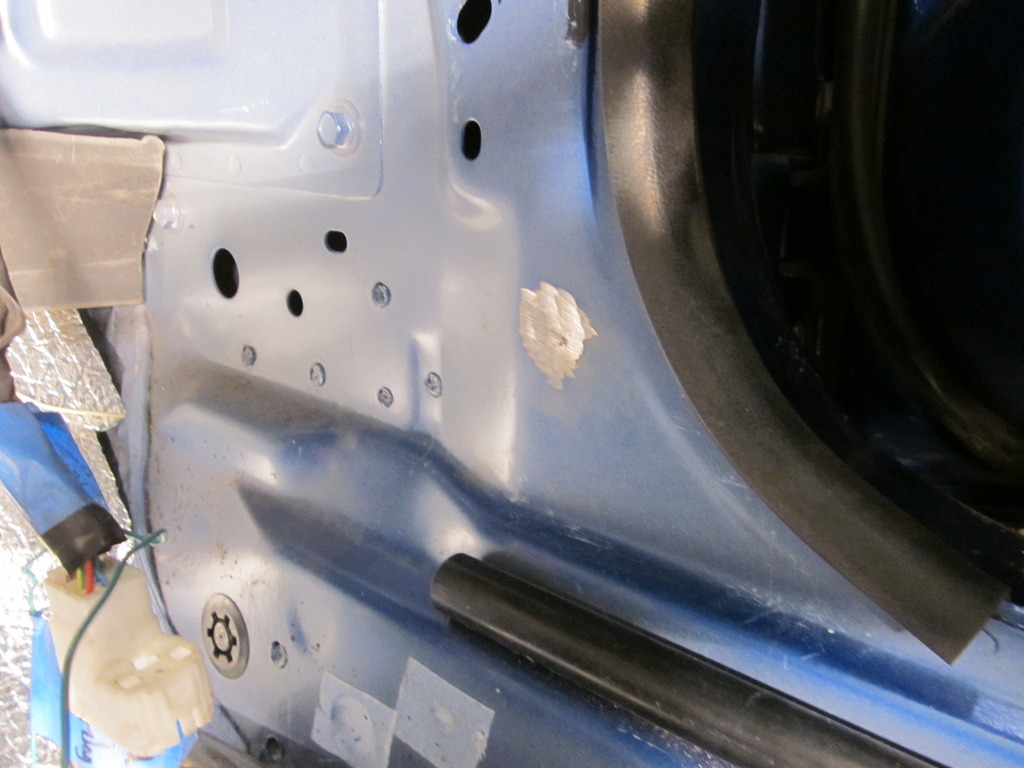
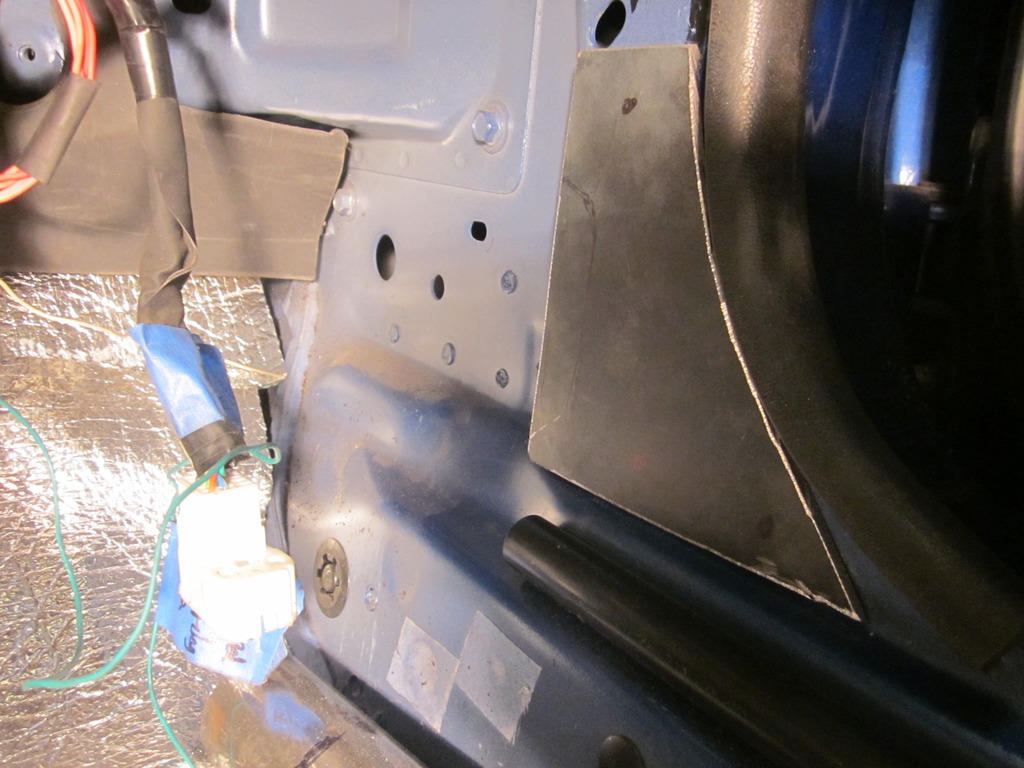
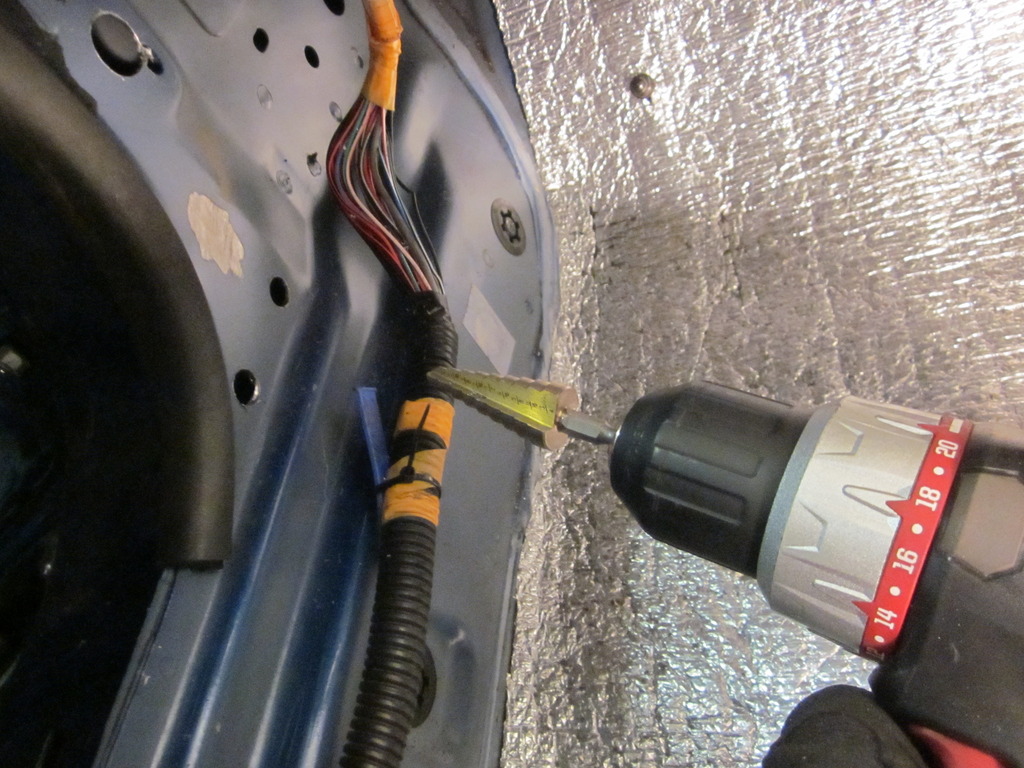
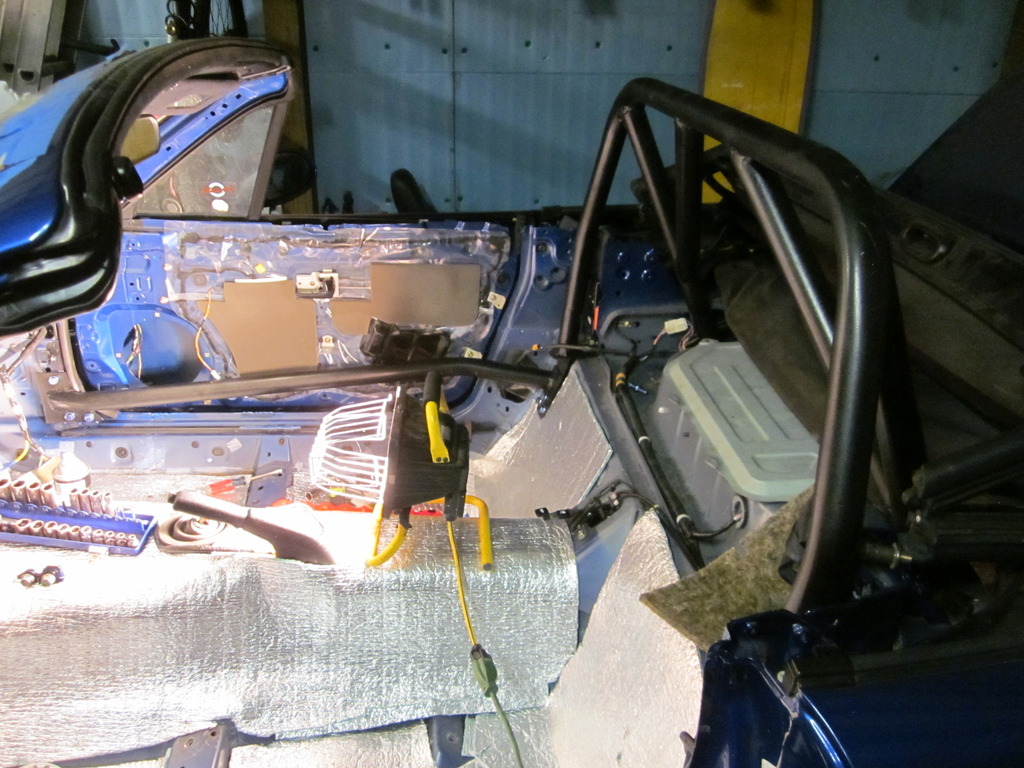
That was the end for that night, and I'll chalk that one up to temporary insanity because it would be foolish to not put the door bars in. So the next day I regrouped and went to work. I'm not sure how the fabworx bars mount, but I had always though that location is best for mounting, so I went to work with my own style mounts. There is a little bit of a tack weld at this location I had to smooth off, but other then that they were good to go.
I made a template, cut the 1/8" plate to fit, then trimmed as necessary.
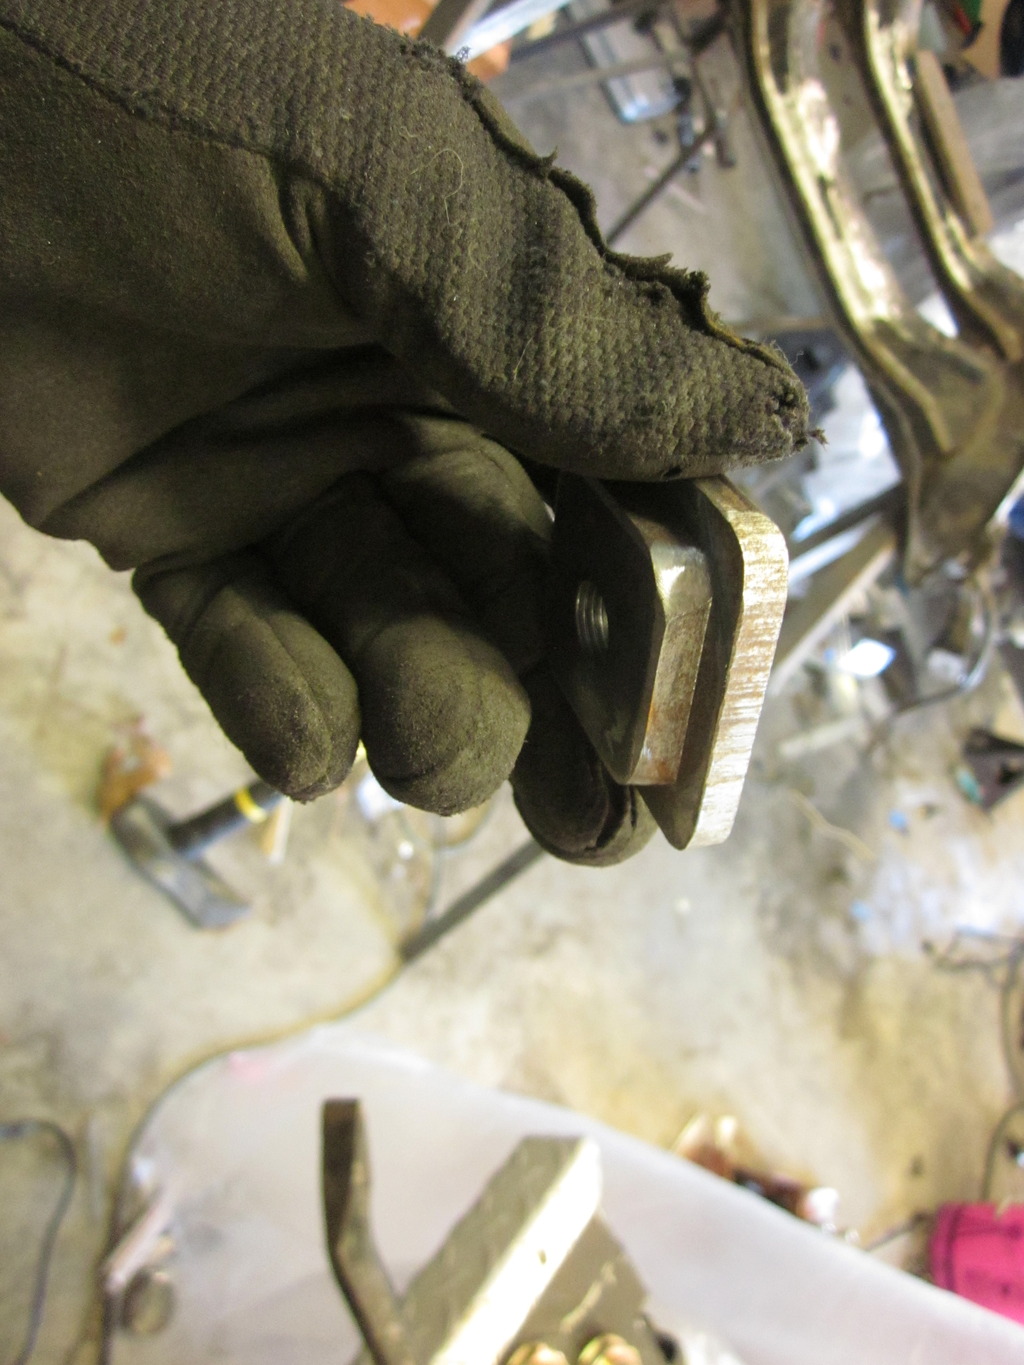
Next I located the holes in the plate. Don't mind the blue hardware, my local farm store coats all hardware in a dye color to identify it, then sells it by the pound. (Blue=Grade 8) Once my holes were in I welded the nuts to the plate on the back side, and ground them near smooth on the sides to fit it some oversized holes.
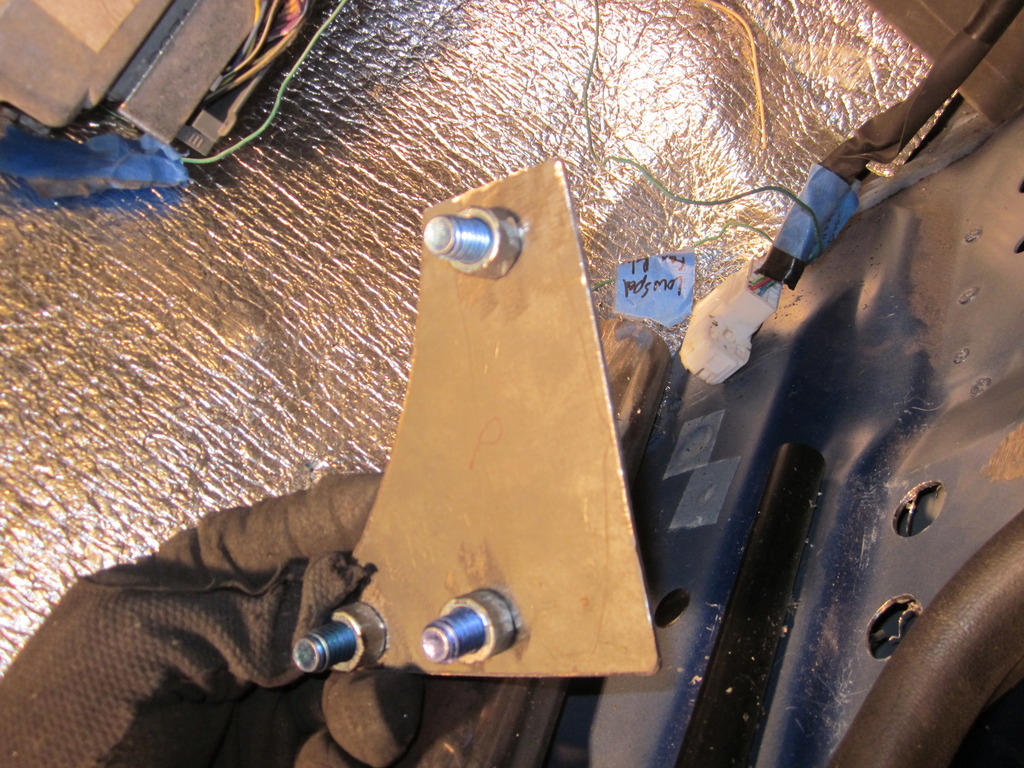
Drilled oversized holes in the car at the same location, if you've never used one of these unibits, you should. They are pricey, but make life much much easier.
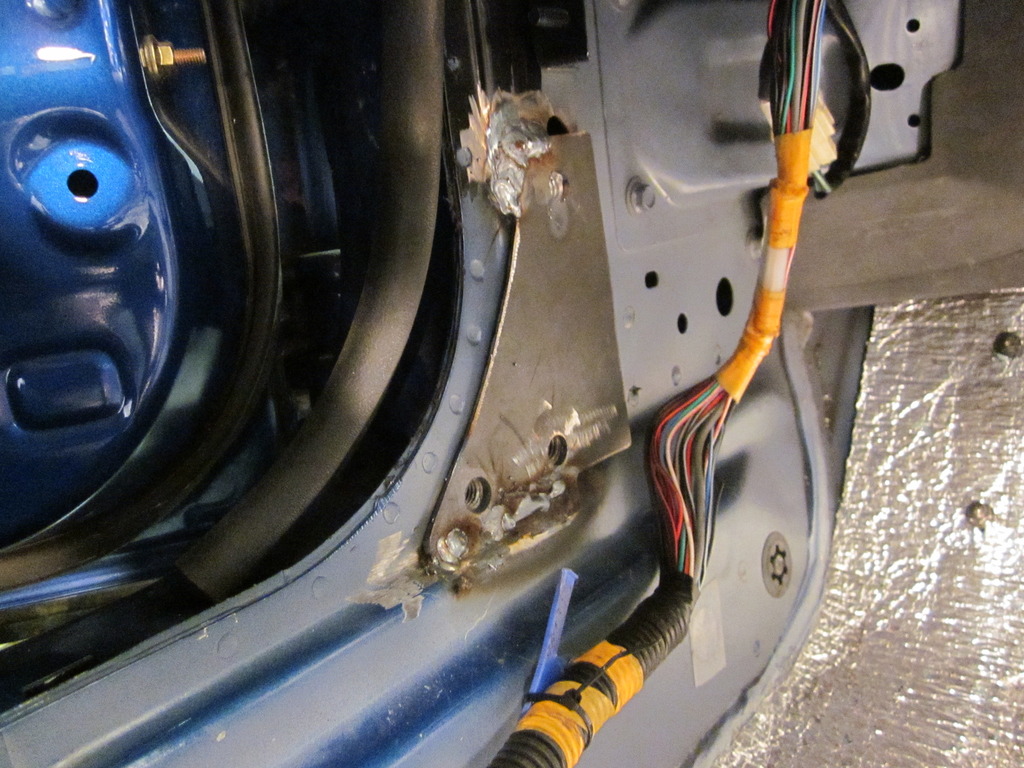
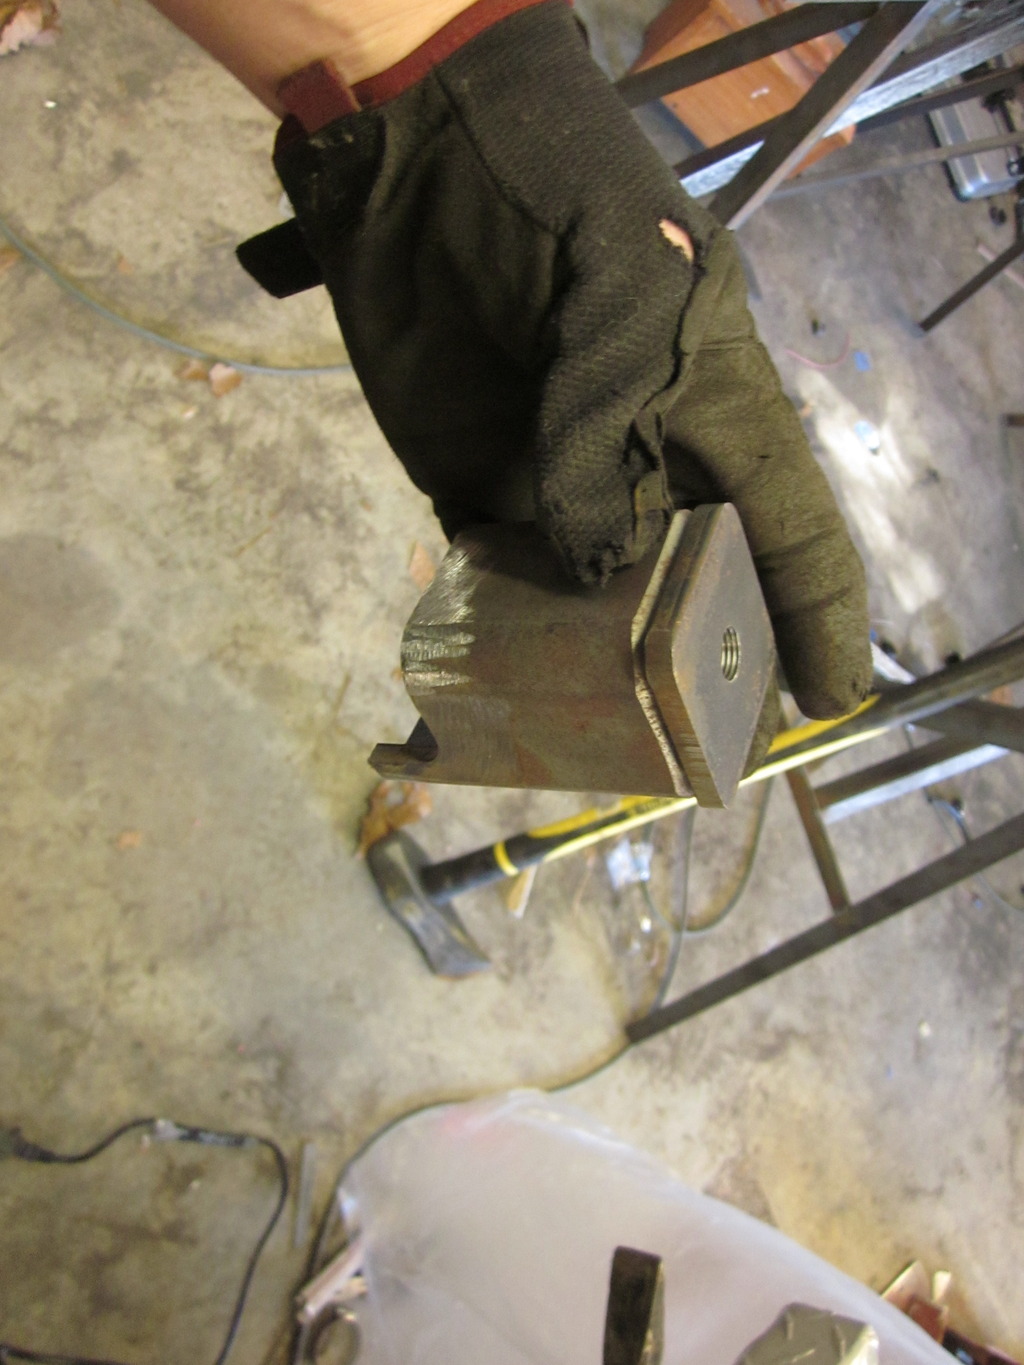
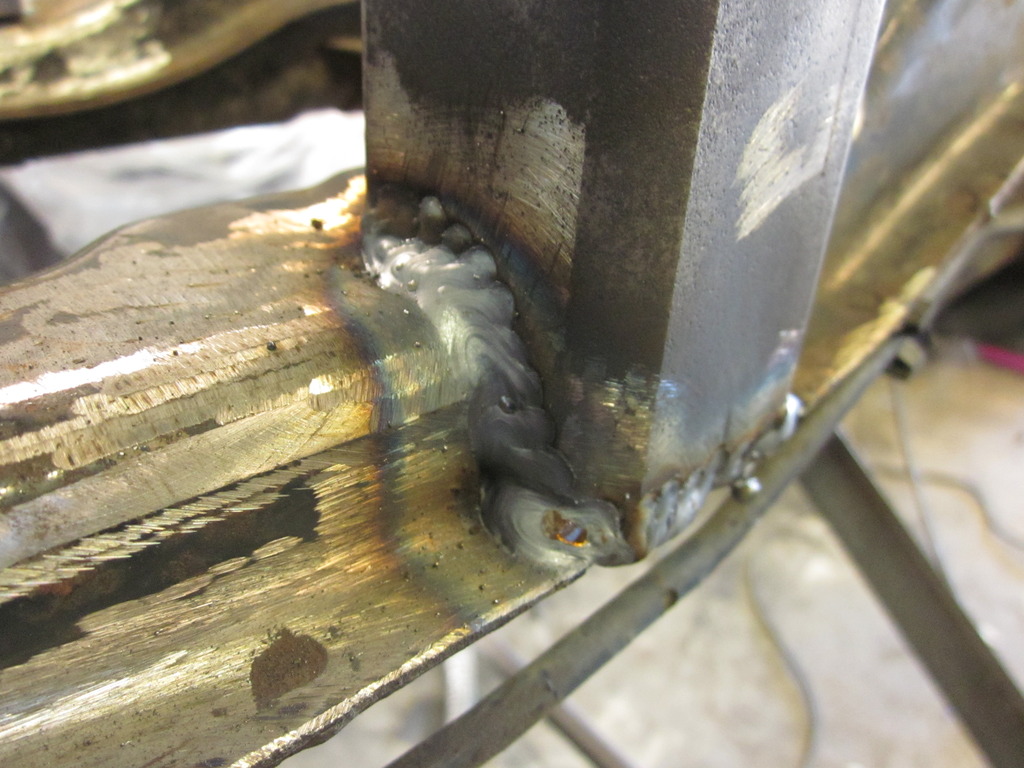
Now the plate can be welded on and you have mounting locations for the door bar itself. I swear the welds here are not as bad as the picture makes them look.
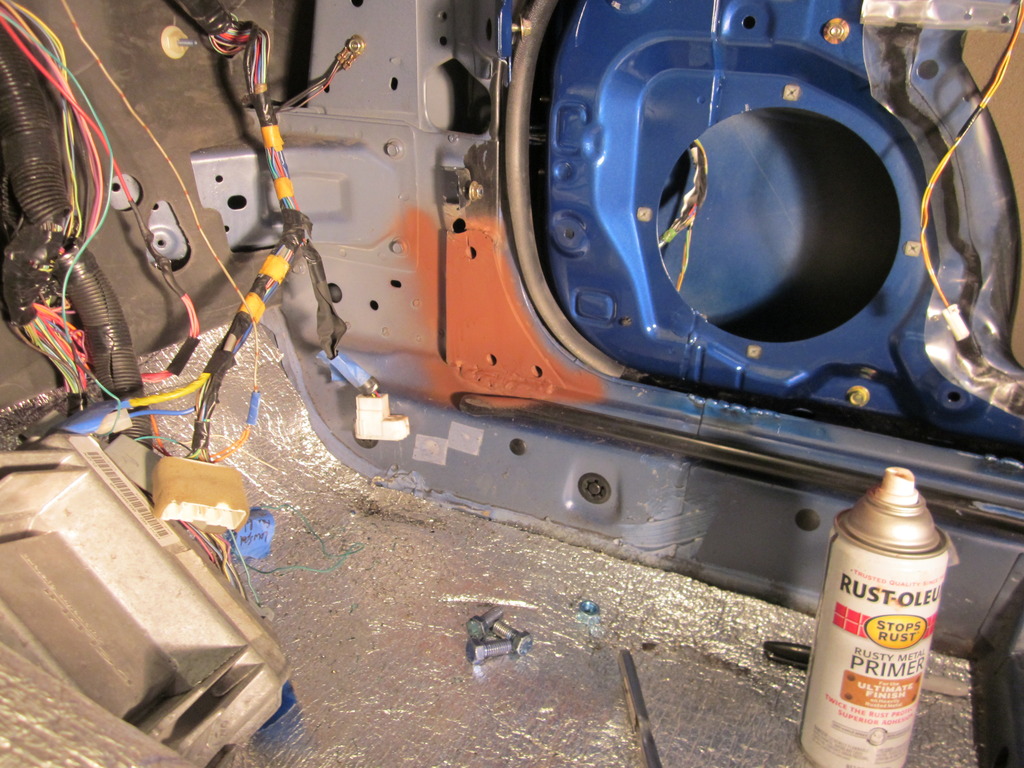
Prime it and paint it!
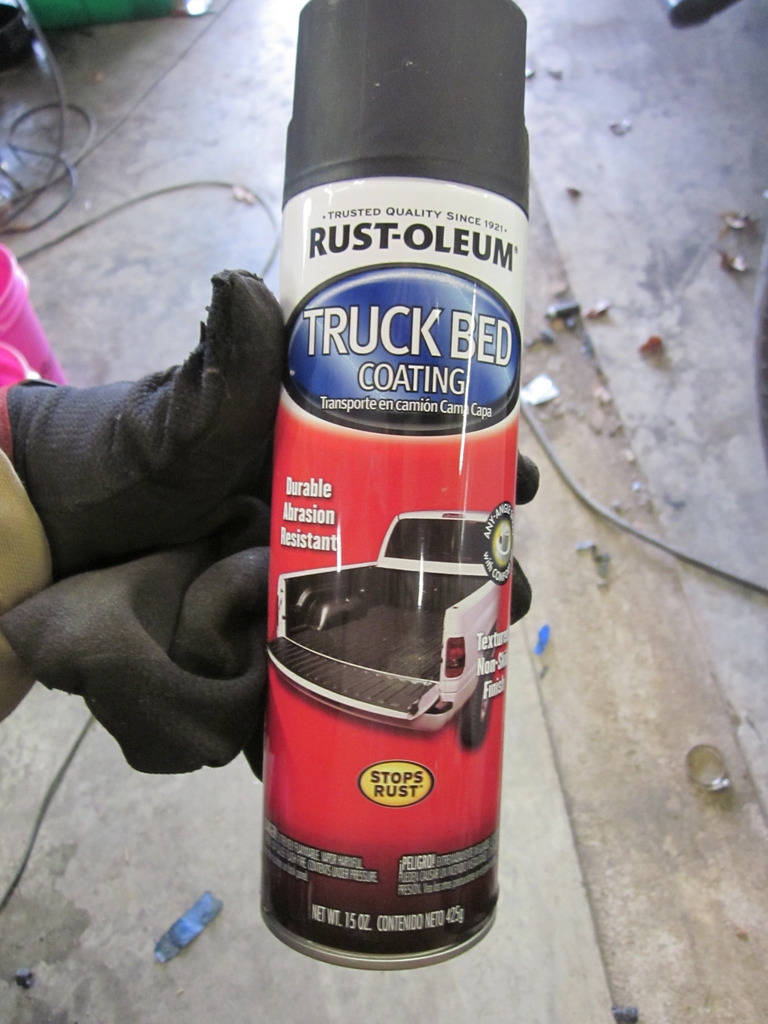
Now make a second plate the same size and hole locations, should be easy since you already made the others right? I didn't take pictures here, but at this point I put the seats in, and honestly I just field fit from there. I made a mounting plate for the back side that I welded the bar to, and located using the same holes that mount the main hoop of the cage. Had to have my buddy put in a couple more dramatic bends at the other side of the tubes, then I just chopped them off where the bend started, welded in, primed and painted the whole thing. I thought I would try rustoleum bed liner coating on them, since it is supposed to be tough and durable, we will see.
Heres my finished product, I know this doesn't mean as much to a lot of people who buy bolt in ready to go cages or think that I am a fool for putting my safety in the hands of my own welding capabilities. It is a big deal to me though, and I am very happy with how it turned out.
Obviously if I had it to do again, I would have waited on the insulation, because even though I was careful, i did cut it up a little bit. No big deal though.
Now I could put back in my nice blue carpet pieces, little wrinkled from setting for six months, but it looks like it will flatten out just fine.
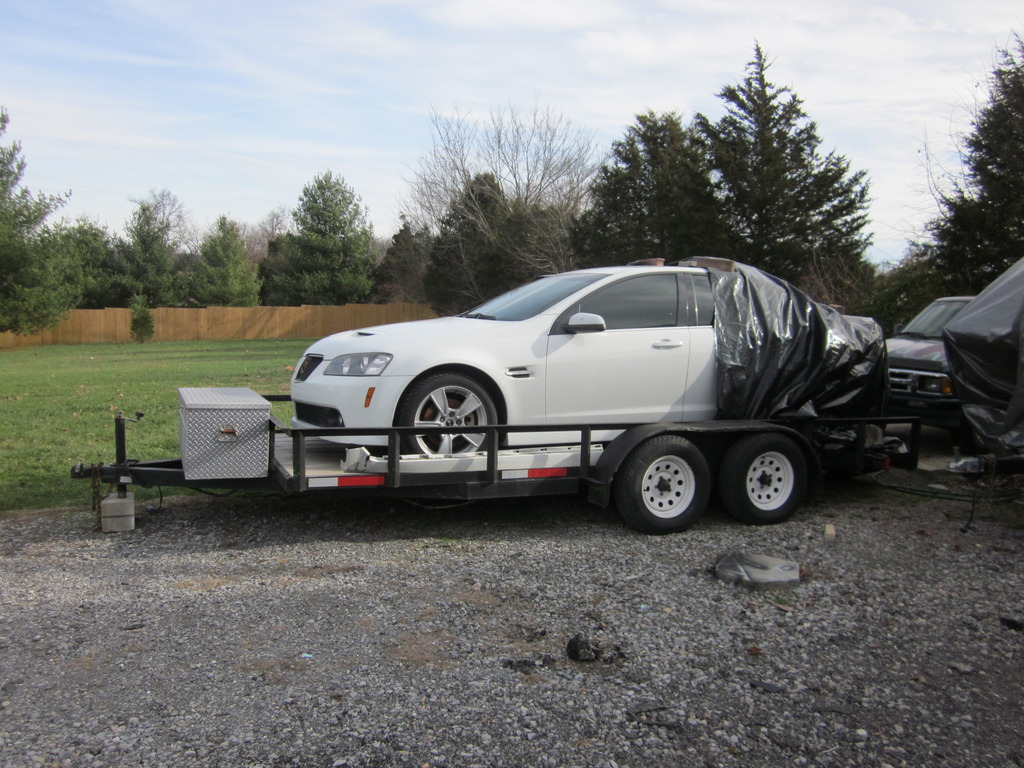
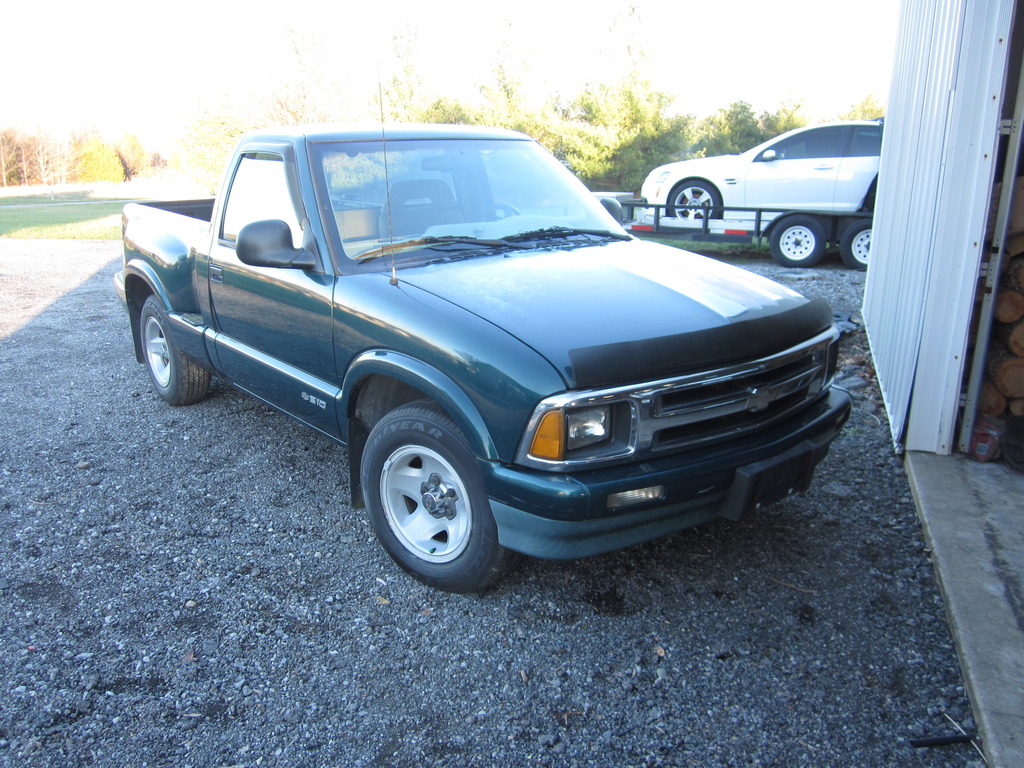
During this whole time I was also working on my second resell vehicle seen here. Bought it from a neighbor not running after having set for a little while for $250, runs like a top now.
This update has been a while coming, as I said before I have been trying to turn wrenches instead of punch keys here lately. What you are going to realize after this update is that I am a really slow mechanic, too bad I'm not getting paid hourly for this job...
First of all since my last update, I have picked up a couple more toys to hopefully resell for additional funding for the miata. My best friend was driving his 09 G8 GT over Thanksgiving and it got away from him coming around a corner. A traffic light control box ended its life, but luckily my friend walked away without a scratch. The car still runs and drives, but took a pretty good hit right in front of the passenger rear wheel. It has the L76 engine, and I believe that I can get a fair amount for it.

There has been quite a bit of progress made on small items that pictures don't do much for, like the pedal assembly, 90 degree cobra reverse switch, wiring cleanup, etc. What I have noticed more here lately is that I am more frequently running into portions of the project that must be completed before another portion is started. For example, I knew I had to have my cage finished before I put the interior in. I got the interior all cleaned up, and I finished up my cage. I spent a little time test fitting door panels with my door bars, and trimming as you can see in the first picture, but I decided I didn't like that look so cards it will be.

Here is the final fabbed cage before paint. In case you don't remember I bought one of the rhoades race car DIY kits, cost me 300 to my door on sale, and I had to trim/weld it. Jim has said in another thread and I will re-iterate, this cage was a great value if you enjoy doing all of your own(or most in this case) work. If not, or if you are like me and second guess yourself a lot, then it might not be as good. That being said, now that I have done one, I could crank out the second in half the time!


Next I moved to installing the clutch master cylinder and pedal assembly. If you read a couple posts back you will see that I bought all of my own stuff instead of the V8R kit, and can pleasantly report I would do that again in a heartbeat. I did have to make my own adapter bracket for the master cylinder, but that was no big deal. I just cut out a piece of 1/8" plate, shaped it to fit in location, and you can figure the rest. One thing that did not go swimmingly was the MC fitment through the factory hole. On V8R's website, the picture they have of the kit has a 7/8" master cylinder, and other reading I had done elsewhere said that this would be suitable. Problem is that it was a little bit too big for the factory hole, but it was nothing a little dremel action couldn't take care of. Got it all done and installed now, along with the brake pedal as well.


From there it was another time where I set with a beer in hand scratching my head and test fitting for a while, mostly over the door bars. I had my buddy that has a nice tube bender put a couple 15 degree bends in the end of my bars, but was still fighting them. Once my cup ran dry I decided that I did not want to mess with door bars getting in my door panels way, and possibly limiting leg room so I tossed those them out and put in the insulation throughout the floor and rear bulkhead.


That was the end for that night, and I'll chalk that one up to temporary insanity because it would be foolish to not put the door bars in. So the next day I regrouped and went to work. I'm not sure how the fabworx bars mount, but I had always though that location is best for mounting, so I went to work with my own style mounts. There is a little bit of a tack weld at this location I had to smooth off, but other then that they were good to go.

I made a template, cut the 1/8" plate to fit, then trimmed as necessary.

Next I located the holes in the plate. Don't mind the blue hardware, my local farm store coats all hardware in a dye color to identify it, then sells it by the pound. (Blue=Grade 8) Once my holes were in I welded the nuts to the plate on the back side, and ground them near smooth on the sides to fit it some oversized holes.

Drilled oversized holes in the car at the same location, if you've never used one of these unibits, you should. They are pricey, but make life much much easier.

Now the plate can be welded on and you have mounting locations for the door bar itself. I swear the welds here are not as bad as the picture makes them look.

Prime it and paint it!

Now make a second plate the same size and hole locations, should be easy since you already made the others right? I didn't take pictures here, but at this point I put the seats in, and honestly I just field fit from there. I made a mounting plate for the back side that I welded the bar to, and located using the same holes that mount the main hoop of the cage. Had to have my buddy put in a couple more dramatic bends at the other side of the tubes, then I just chopped them off where the bend started, welded in, primed and painted the whole thing. I thought I would try rustoleum bed liner coating on them, since it is supposed to be tough and durable, we will see.

Heres my finished product, I know this doesn't mean as much to a lot of people who buy bolt in ready to go cages or think that I am a fool for putting my safety in the hands of my own welding capabilities. It is a big deal to me though, and I am very happy with how it turned out.


Obviously if I had it to do again, I would have waited on the insulation, because even though I was careful, i did cut it up a little bit. No big deal though.
Now I could put back in my nice blue carpet pieces, little wrinkled from setting for six months, but it looks like it will flatten out just fine.

During this whole time I was also working on my second resell vehicle seen here. Bought it from a neighbor not running after having set for a little while for $250, runs like a top now.

Last edited by stng_96; 01-04-2016 at 03:07 PM.
01-04-2016, 11:08 AM
#80
V8 Miata Fanatic
Thread Starter
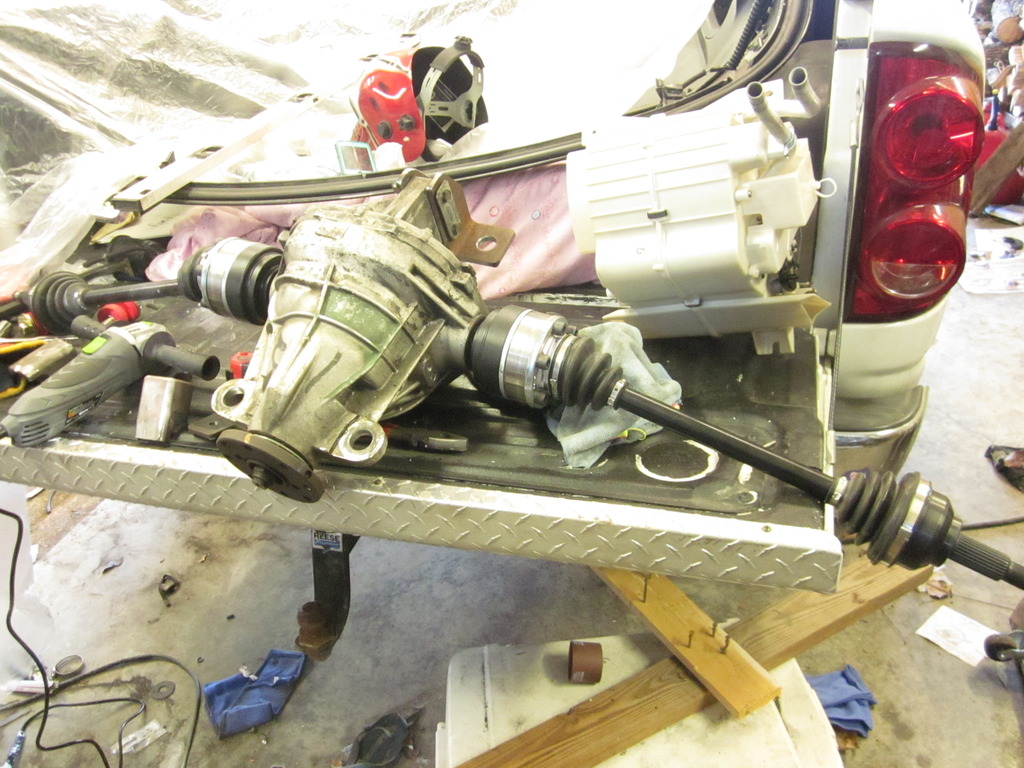
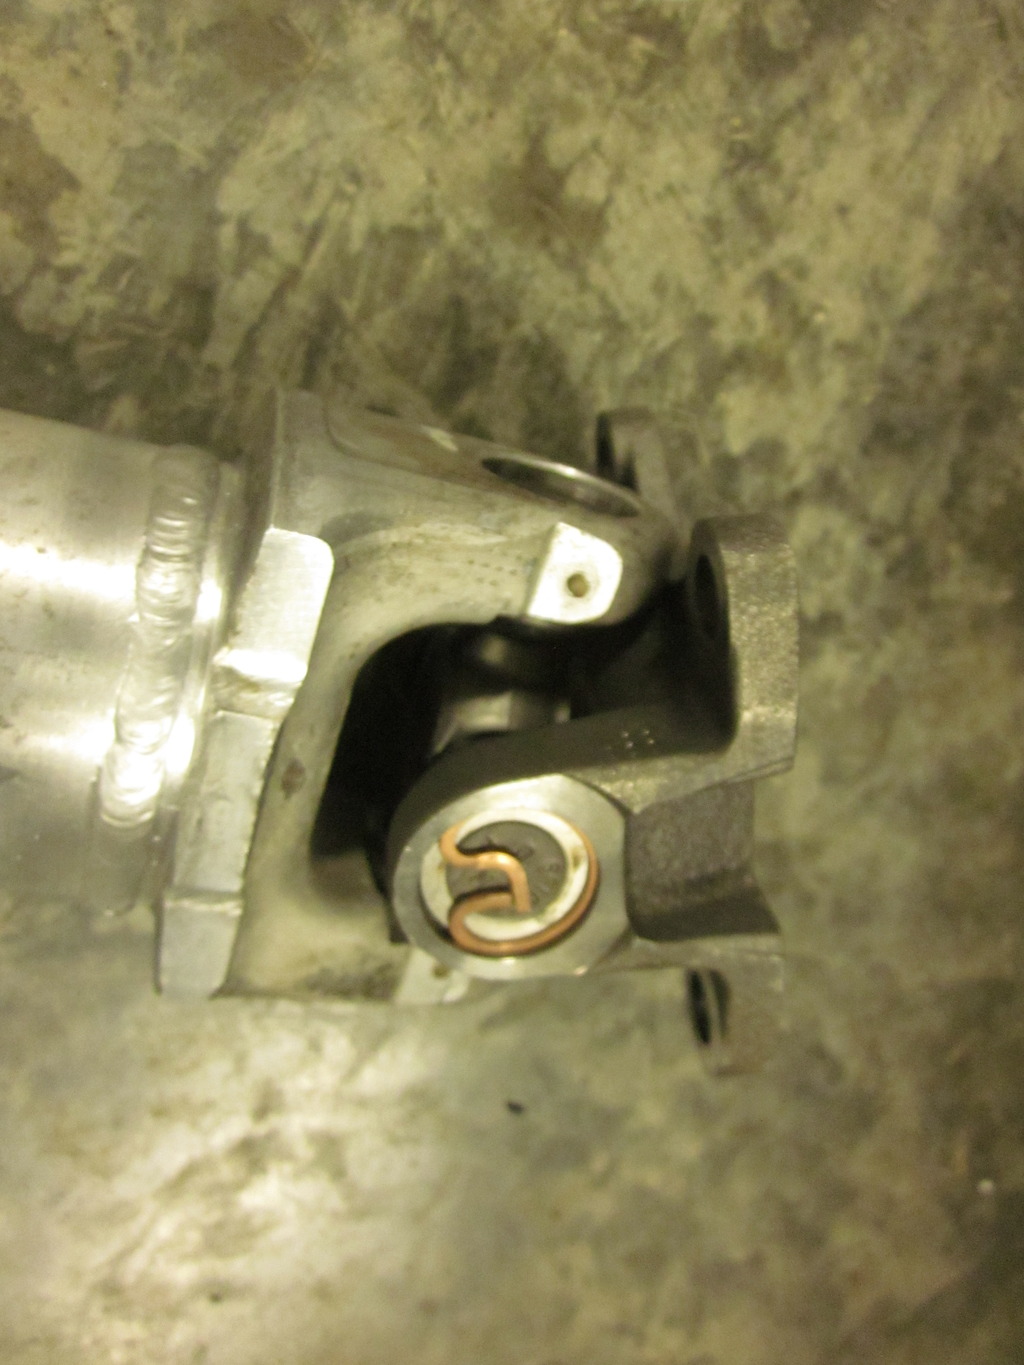
After that I have decided to move back outside of the car for a while, needed to get my differential mounted so that I could measure for my driveshaft. Obviously it won't be much different than any of yours, but I still need to do it.
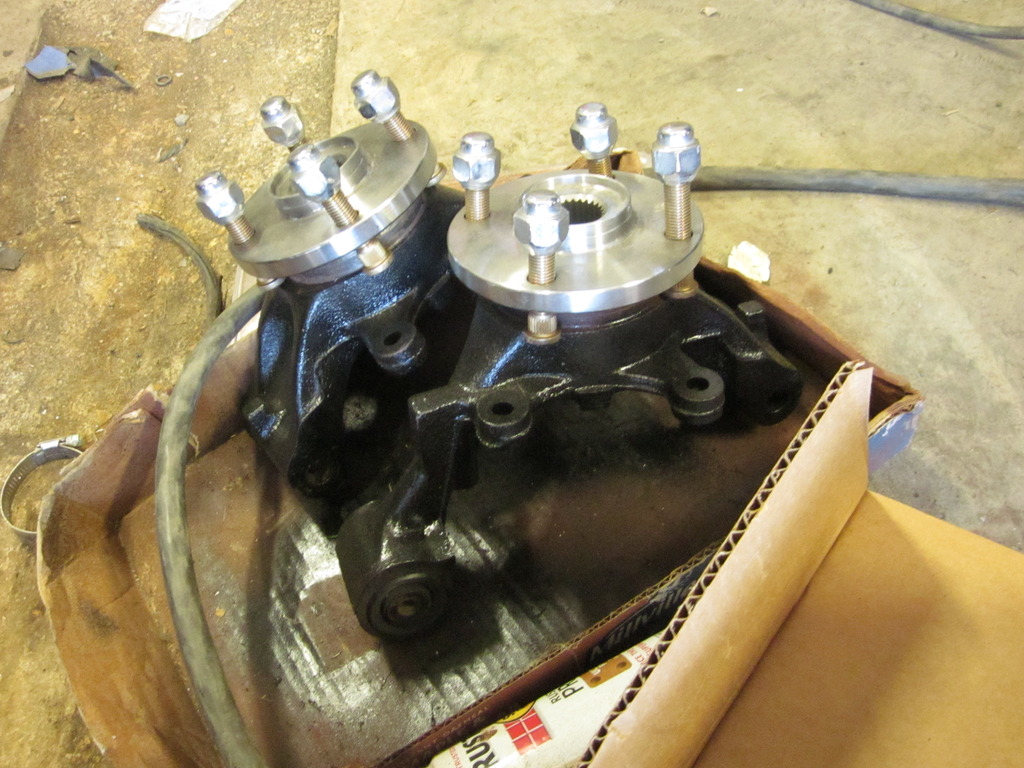
If you recall, I ordered axles from THM who sources them from the DSS. I was supposed to get 31 spline bolt in inner stubs for my cobra rear, but they came with 28's, and it was a 3 week mess getting them to me. Fast forward, I have them now, so I will get to work on the diff. They came with custom hubs, and new axles studs, so I first cleaned up the housings and installed new bearings and the hubs.
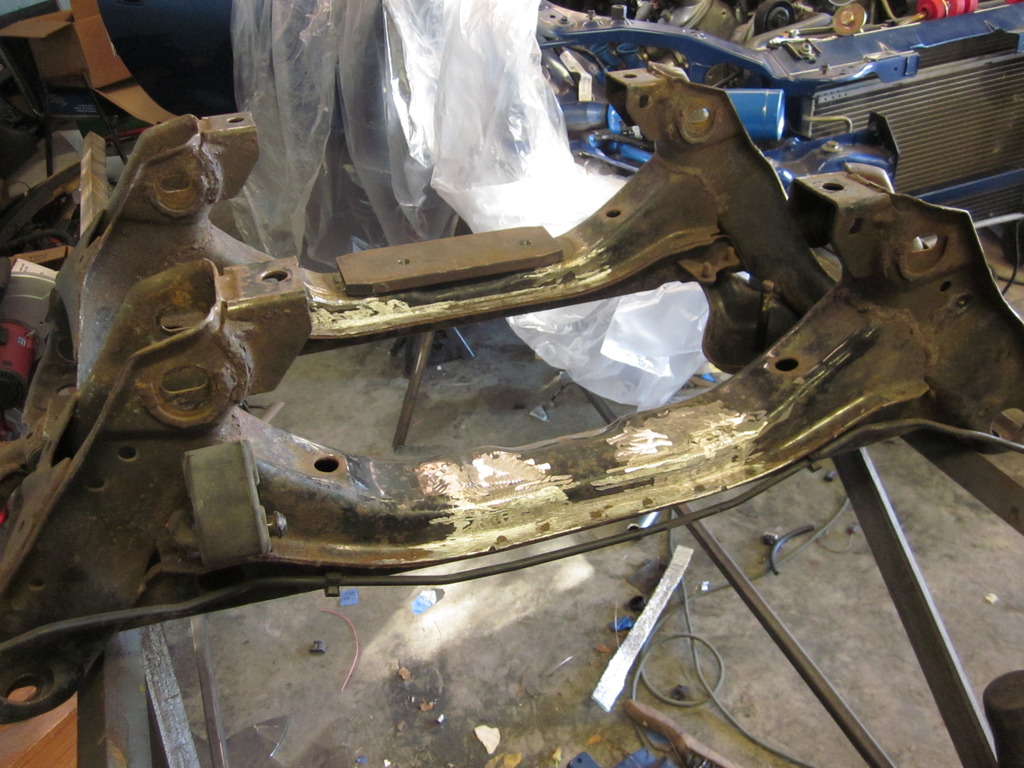
To mount the diff I am using Mike Moninger's design as a guide, with a few changes of my own. The rear "L" shape pieces are just about the same. The mounting plate below it I used a 1/2" plate instead, and I threaded the holes into the plate instead of welding nuts on the back side. I left off the bottom washers that came with the poly bushings to compensate for the additional plate thickness. Mike's site is a great resource for a lot of things miata.
MiataV8 Conversion: Rear subframe

Got the correct bolts for the rear mounts from a junkyard Cougar.
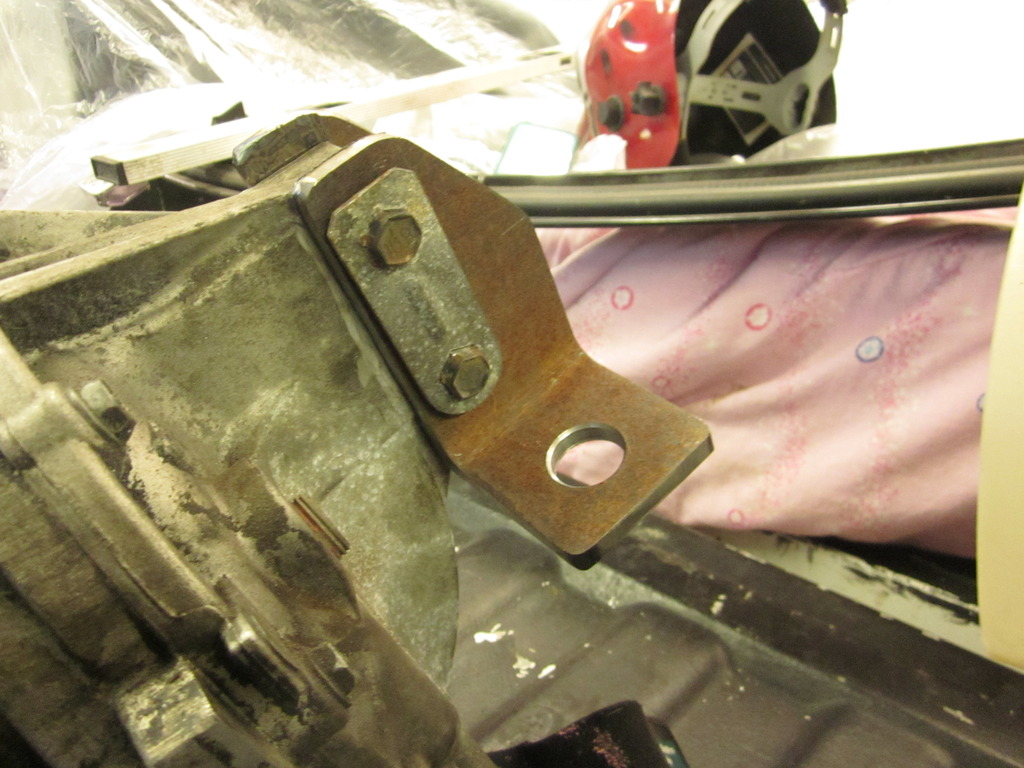
My front "pedestal" mounts are built to the same dimensions that mike specifies, but the top plate I did different. I used a piece of half inch and machined it to fit inside the square tube. The total overall height comes to right at the same location as Mike's, but it gives a good strong connection to weld together, and I once again threaded the connection into the plate.
I also welded a piece of 3/16" plate on the back plate mount sides for some added support.
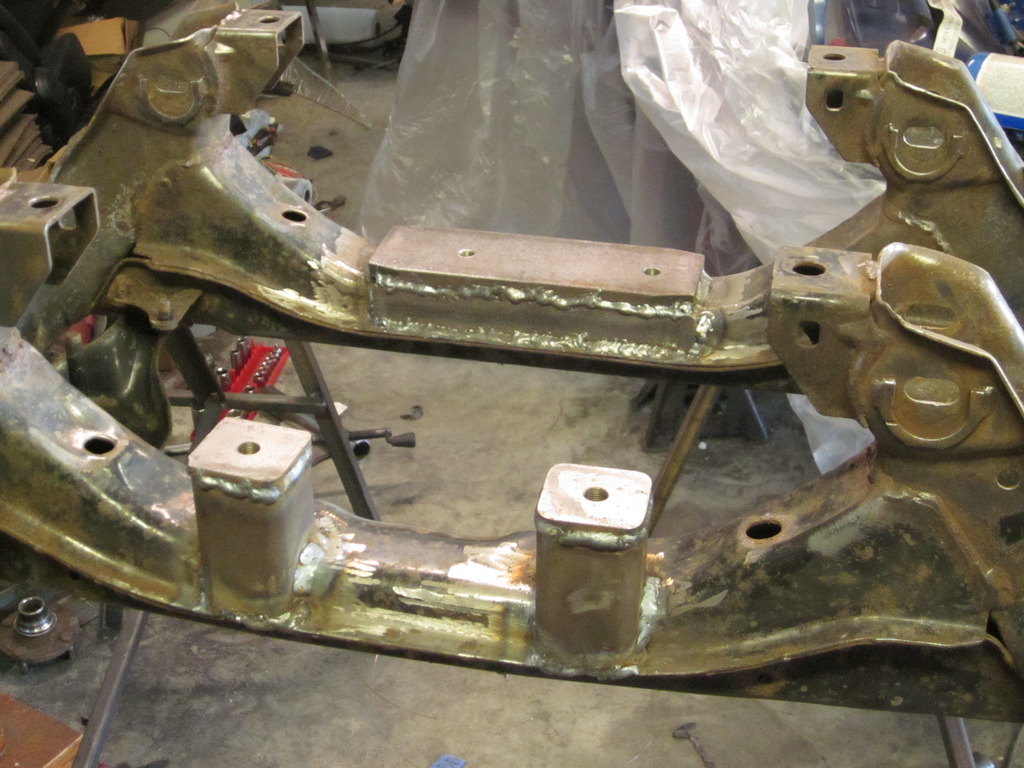
Cleaned up and primed/painted.
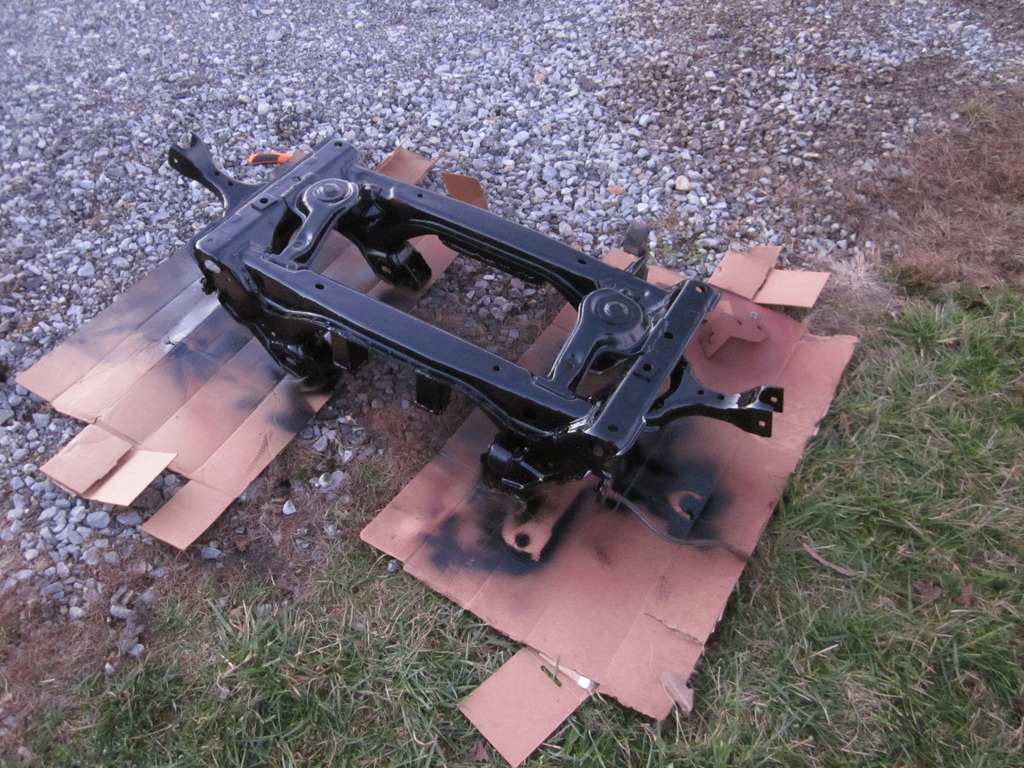
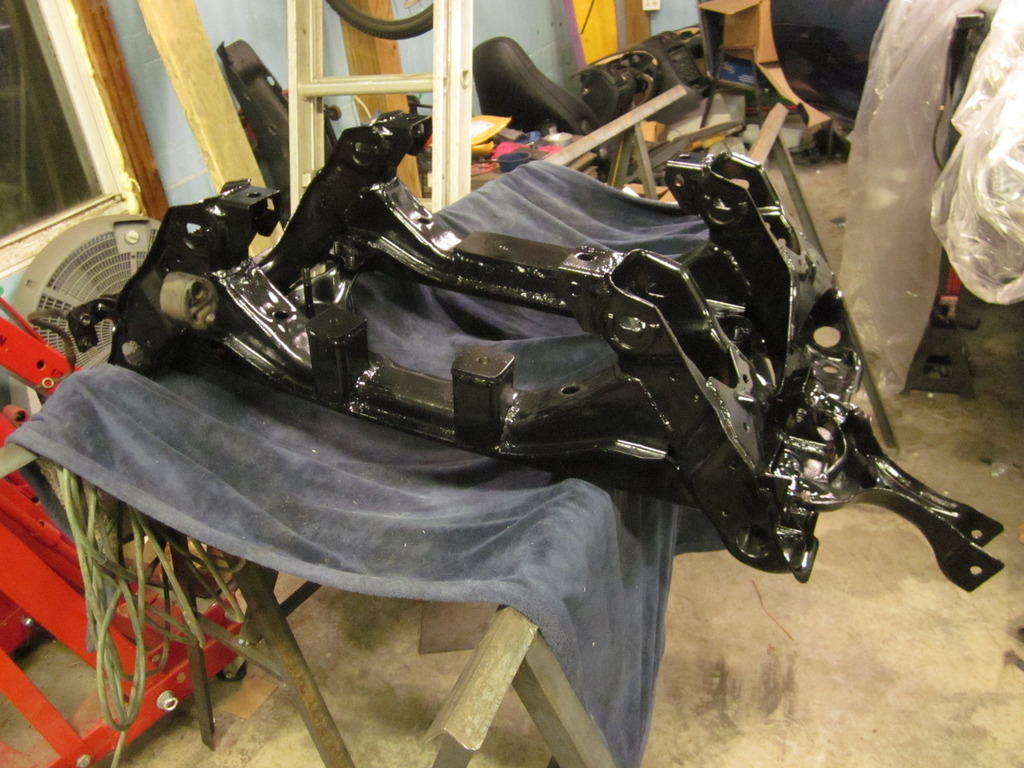
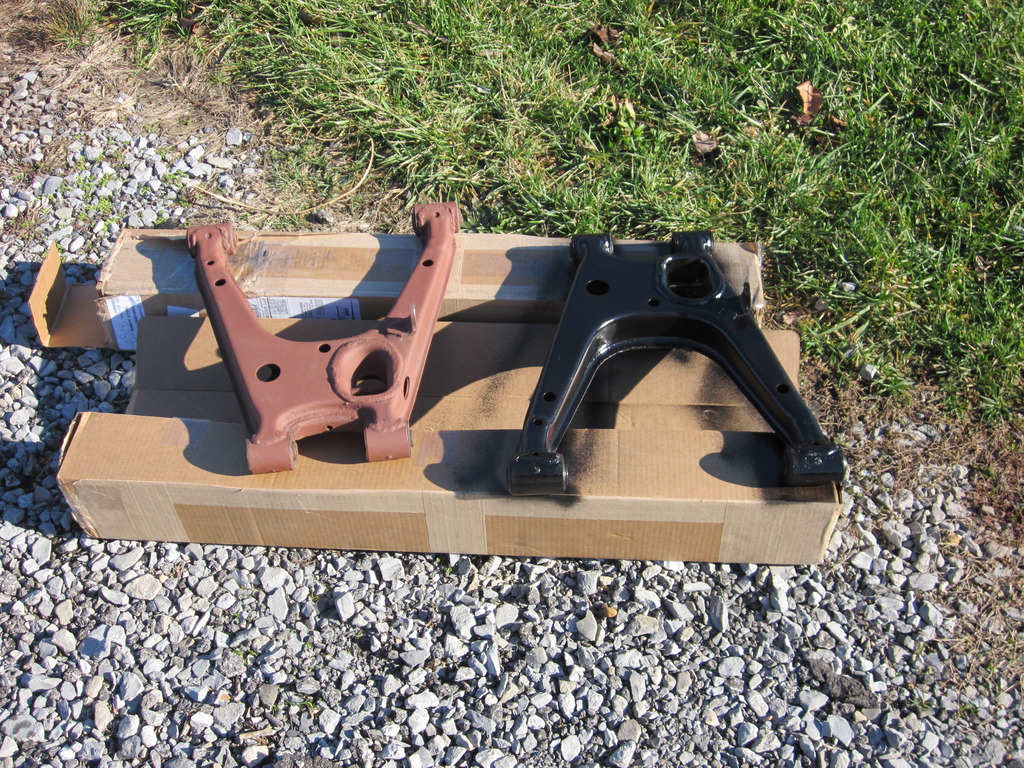
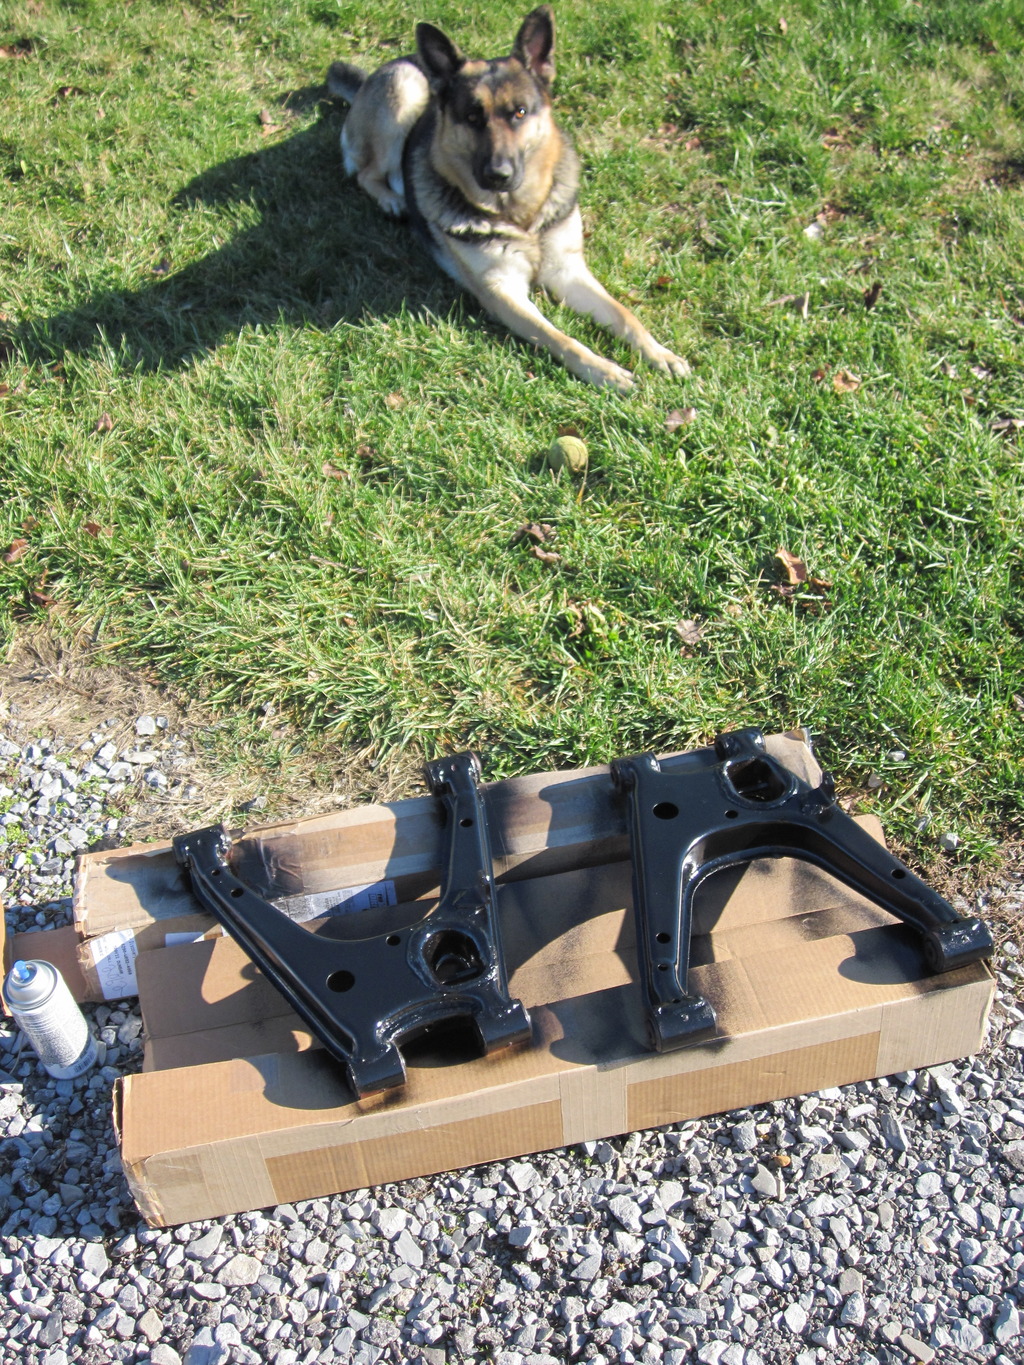
Also got the control arms cleaned up and painted. I used rustoleum heavy rust primer on all this, then I put on duplicolor engine block high heat enamel. I feel like it works great, goes on thick and sets up very tough. And my helper approves.
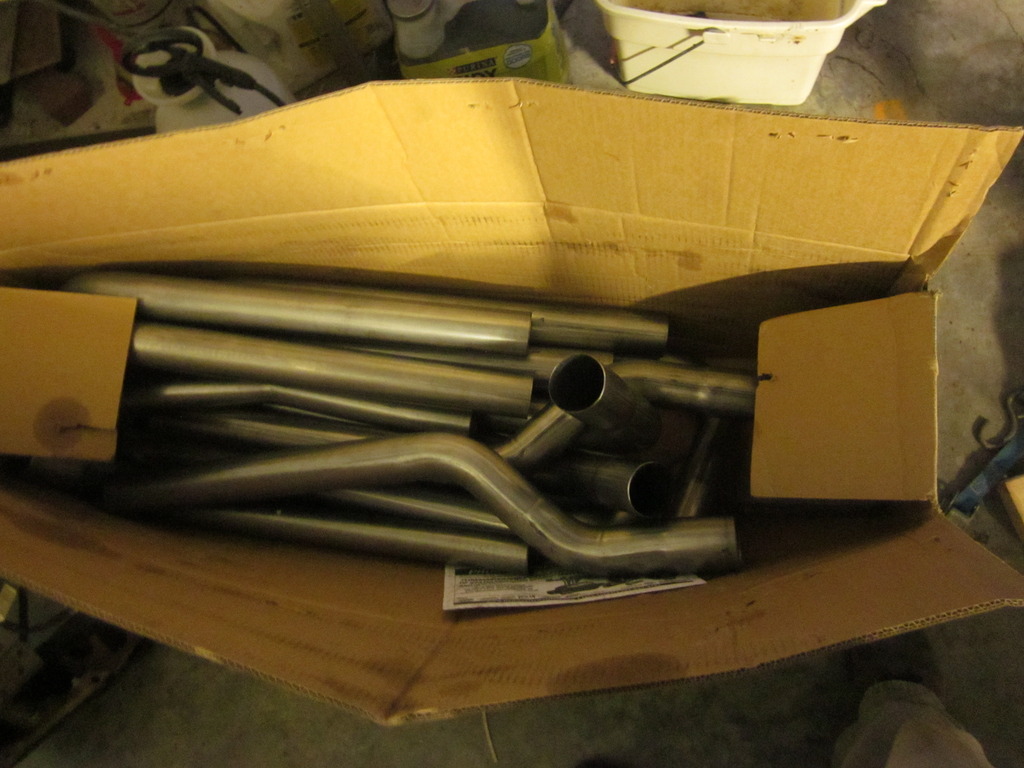
Didn't actually do any work with this, but I got some other parts for the car. I had been planning on using one of the stainless u-fit kits, and while I was keeping an eye peeled I got one of the Flowmaster kits for 300 to my door, so it showed up a couple weeks ago. Very nice stuff, looking forward to working with it.
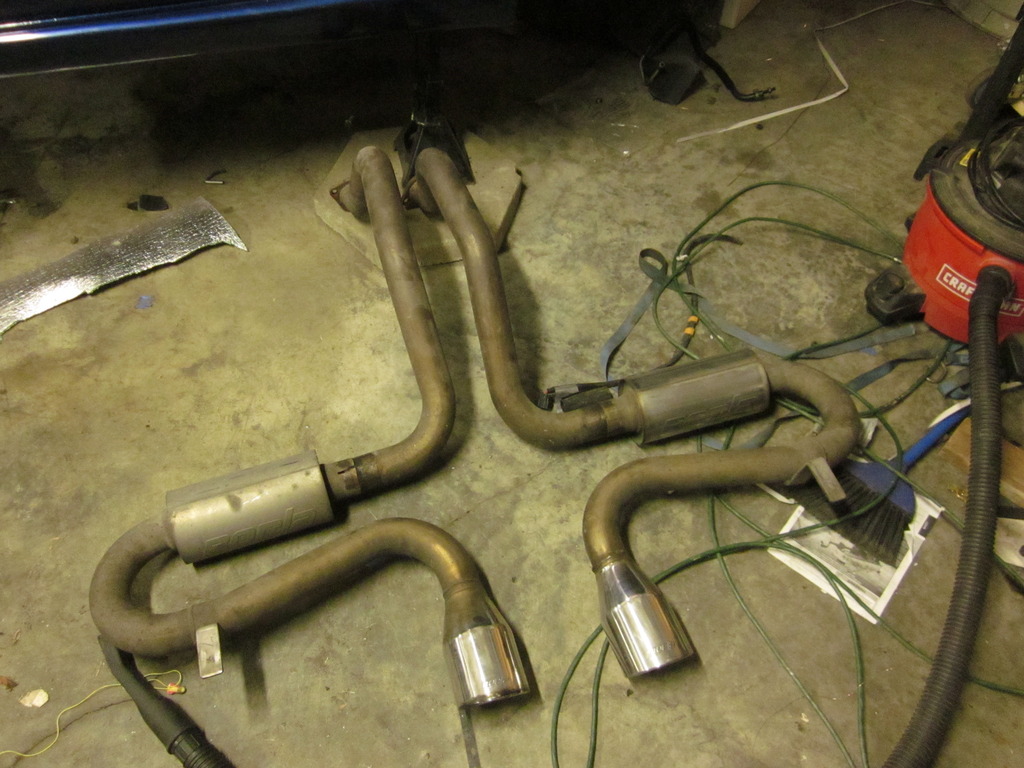
Only thing that could have changed my decision was this....about two days after the kit showed up, someone local to me listed a partout of a C5 vette. I called them up and sure enough, it had a Borla catback on it, and given the layout of vette exhaust, I am sure I can make this work nicely. It's a little dirty in the pic, but its all SS, and if nothing else the mufflers are pretty pricey new. I gave just under 300 for it, I figure worst case I can resell.
Now lets get back to suspension. First and foremost, if you don't support my path on this portion, thats fine, but keep negative opinions to yourself. I am very open and welcome constructive criticism, but I have taken a little bit of lip over this next part like I am cutting corners, and I don't see it that way. It's awful easy to be a expert mechanic from the other side of a computer screen, but I know what I am doing....There, rant over
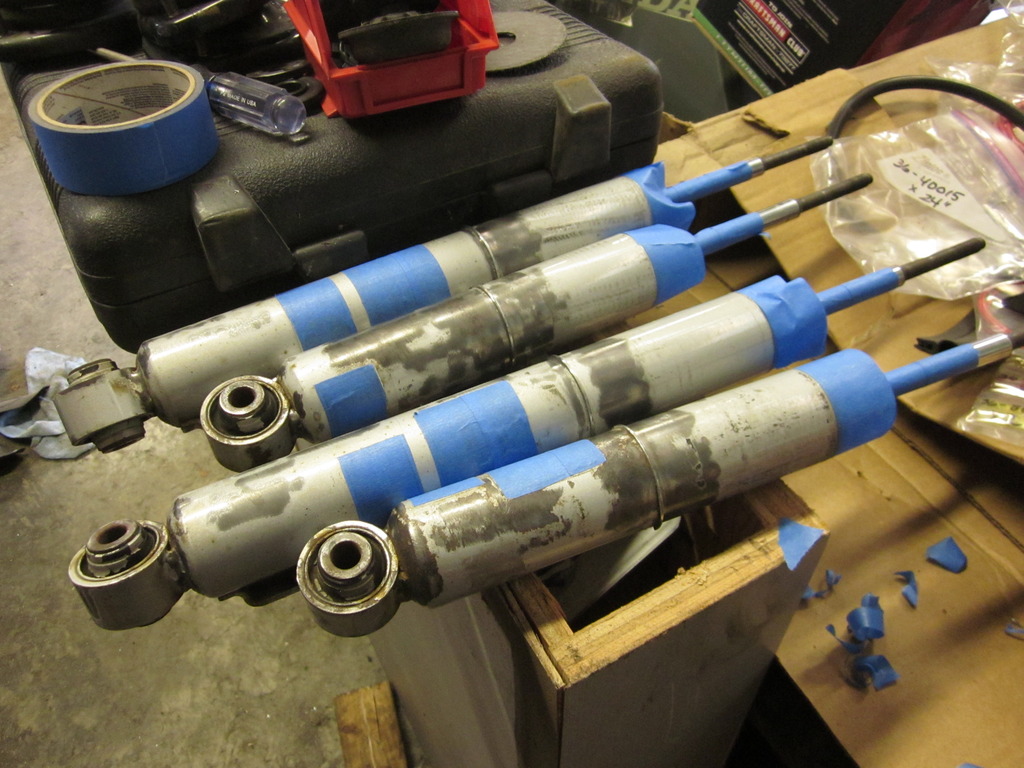
For those of you that read on other miata forums like clubroadster and miata.net, you have probably seen something about DIY bilstein Coilovers. I really liked this idea, and I see it as a great solution to save some cash now, that will be very effective for now, and I can improve upon later.
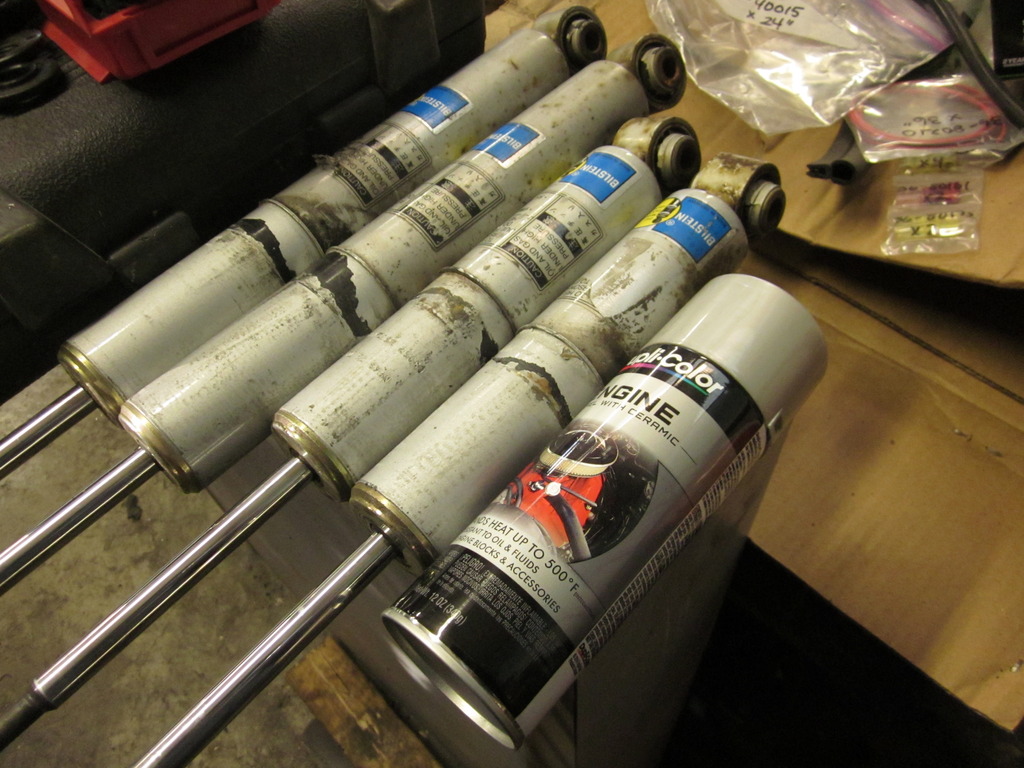
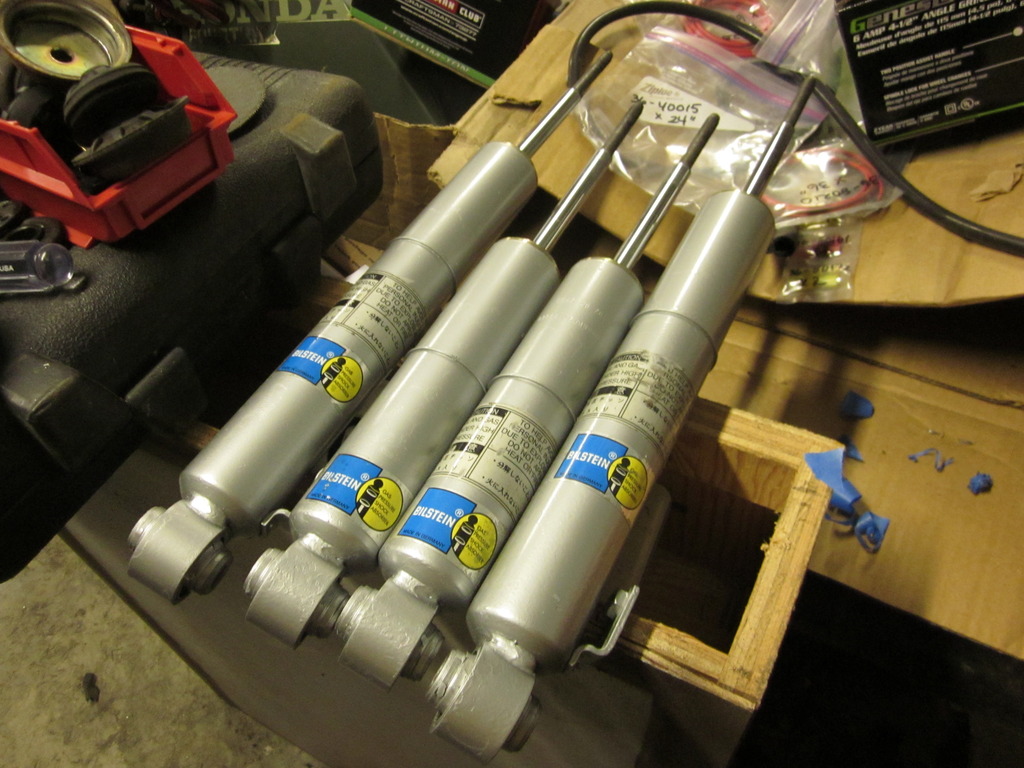
I bought some complete bilstein strut assemblies from a 2004 MSM. I also have the set from my 10AE, but given some research I decided the MSM's would be better.
I started by diassembling the struts, and cleaning them up. I tried to save the original bilstein labels as best as I could, I only couldn't save one sticker.

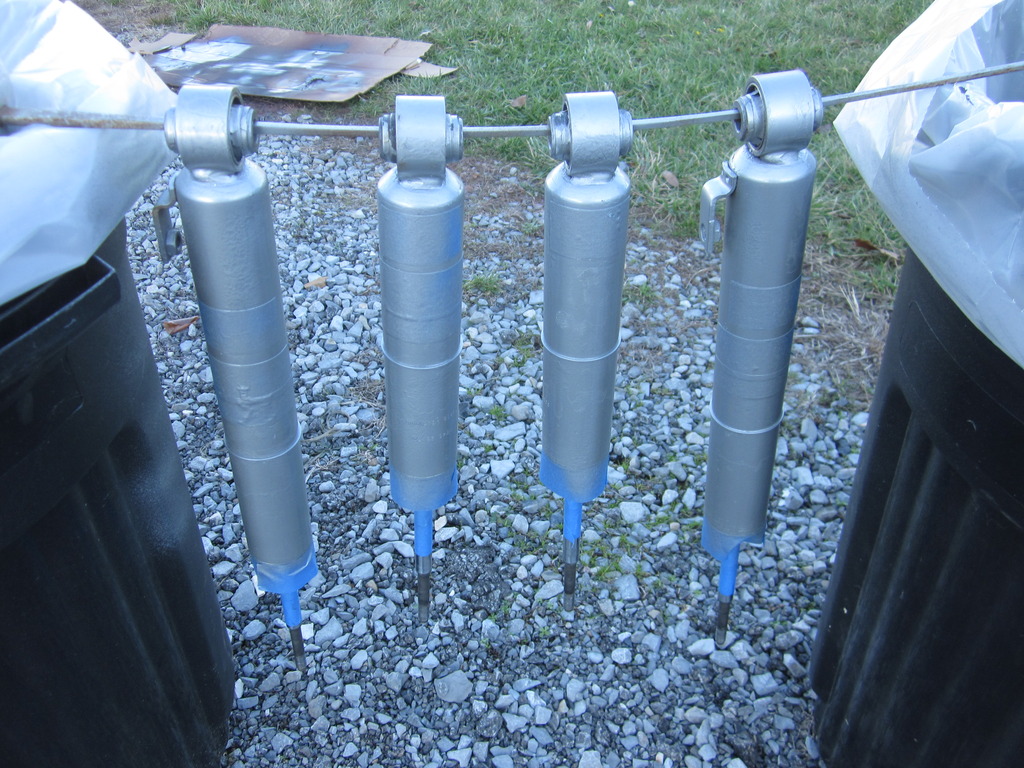
I think they look good, much better than before
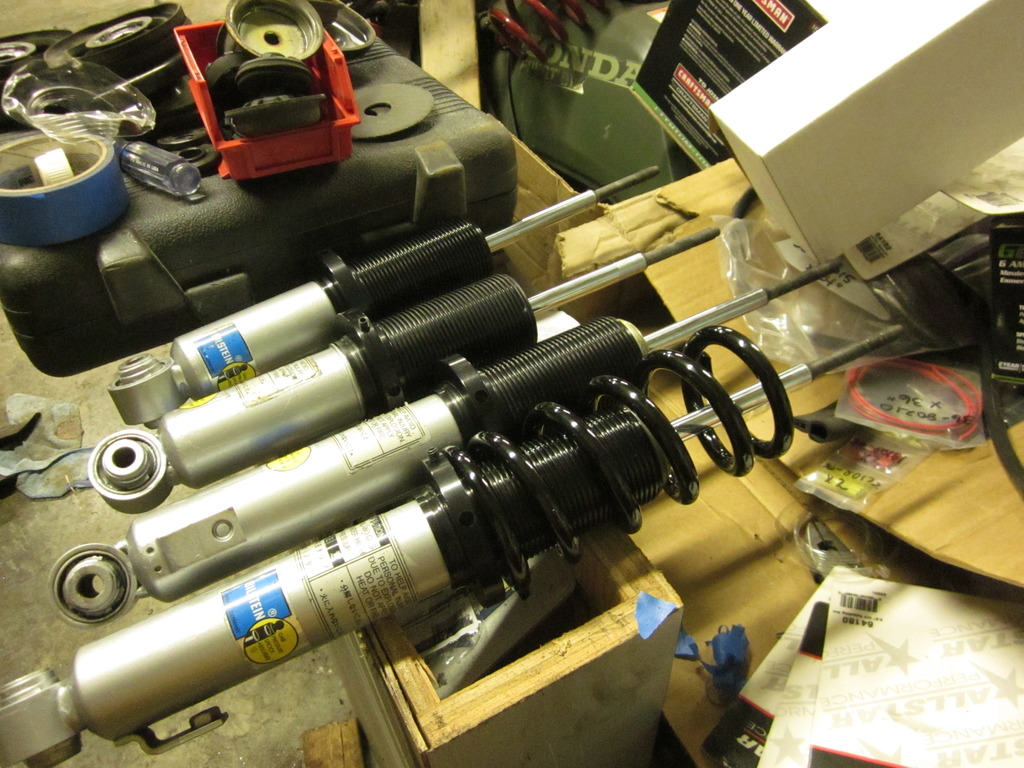
Started assembly with allstar sleeves/collars, integra bump stops, and 450/300 springs front/rear respectively. At this point I ran out of time.
If you haven't heard of this project, look here....When all said and done, I will have $497 in this setup, and I can sell the MSM springs to recoup some of that.
Budget Bilstein Ballers - ClubRoadster.net
The Better Bilstein Ebay Coilover Thread - Miata Turbo Forum -Boost cars, acquire cats.
That concludes this most recent update, Hope everyone had a good holiday season.
If you recall, I ordered axles from THM who sources them from the DSS. I was supposed to get 31 spline bolt in inner stubs for my cobra rear, but they came with 28's, and it was a 3 week mess getting them to me. Fast forward, I have them now, so I will get to work on the diff. They came with custom hubs, and new axles studs, so I first cleaned up the housings and installed new bearings and the hubs.

To mount the diff I am using Mike Moninger's design as a guide, with a few changes of my own. The rear "L" shape pieces are just about the same. The mounting plate below it I used a 1/2" plate instead, and I threaded the holes into the plate instead of welding nuts on the back side. I left off the bottom washers that came with the poly bushings to compensate for the additional plate thickness. Mike's site is a great resource for a lot of things miata.
MiataV8 Conversion: Rear subframe

Got the correct bolts for the rear mounts from a junkyard Cougar.


My front "pedestal" mounts are built to the same dimensions that mike specifies, but the top plate I did different. I used a piece of half inch and machined it to fit inside the square tube. The total overall height comes to right at the same location as Mike's, but it gives a good strong connection to weld together, and I once again threaded the connection into the plate.


I also welded a piece of 3/16" plate on the back plate mount sides for some added support.

Cleaned up and primed/painted.


Also got the control arms cleaned up and painted. I used rustoleum heavy rust primer on all this, then I put on duplicolor engine block high heat enamel. I feel like it works great, goes on thick and sets up very tough. And my helper approves.


Didn't actually do any work with this, but I got some other parts for the car. I had been planning on using one of the stainless u-fit kits, and while I was keeping an eye peeled I got one of the Flowmaster kits for 300 to my door, so it showed up a couple weeks ago. Very nice stuff, looking forward to working with it.

Only thing that could have changed my decision was this....about two days after the kit showed up, someone local to me listed a partout of a C5 vette. I called them up and sure enough, it had a Borla catback on it, and given the layout of vette exhaust, I am sure I can make this work nicely. It's a little dirty in the pic, but its all SS, and if nothing else the mufflers are pretty pricey new. I gave just under 300 for it, I figure worst case I can resell.

Now lets get back to suspension. First and foremost, if you don't support my path on this portion, thats fine, but keep negative opinions to yourself. I am very open and welcome constructive criticism, but I have taken a little bit of lip over this next part like I am cutting corners, and I don't see it that way. It's awful easy to be a expert mechanic from the other side of a computer screen, but I know what I am doing....There, rant over
For those of you that read on other miata forums like clubroadster and miata.net, you have probably seen something about DIY bilstein Coilovers. I really liked this idea, and I see it as a great solution to save some cash now, that will be very effective for now, and I can improve upon later.
I bought some complete bilstein strut assemblies from a 2004 MSM. I also have the set from my 10AE, but given some research I decided the MSM's would be better.
I started by diassembling the struts, and cleaning them up. I tried to save the original bilstein labels as best as I could, I only couldn't save one sticker.


I think they look good, much better than before

Started assembly with allstar sleeves/collars, integra bump stops, and 450/300 springs front/rear respectively. At this point I ran out of time.

If you haven't heard of this project, look here....When all said and done, I will have $497 in this setup, and I can sell the MSM springs to recoup some of that.
Budget Bilstein Ballers - ClubRoadster.net
The Better Bilstein Ebay Coilover Thread - Miata Turbo Forum -Boost cars, acquire cats.
That concludes this most recent update, Hope everyone had a good holiday season.
The following users liked this post:
cvx_20 (01-04-2016)
 01-07-2016, 11:11 PM
#82
V8 Miata Fanatic


Just so much to love with this build - and just on this page alone, we have awesome door bars with well thought out front mounting points, serious DIY rear diff mount, and creative exhaust and alternative shock solutions! No haters watching this thread, you can believe that..!
Oh, and toss in a few new side projects at the same time... Unreal.
Carry on.
Oh, and toss in a few new side projects at the same time... Unreal.
Carry on.
The following users liked this post:
charchri4 (01-08-2016)
 01-13-2016, 08:09 AM
#84
V8 Miata Fanatic
Thread Starter
I think you guys are a little bit too nice, I assure you there are plenty of moments in the barn when I am like....

I can't seem to locate my camera right now but I have still been working. Rear is now in, measured for driveshaft and waiting to hear back on it. Dash is in, dakota digital box is wired, also sold that little S10 last weekend. I had 560 in it, sold it for 2500, Hello parts!
I can't seem to locate my camera right now but I have still been working. Rear is now in, measured for driveshaft and waiting to hear back on it. Dash is in, dakota digital box is wired, also sold that little S10 last weekend. I had 560 in it, sold it for 2500, Hello parts!
01-26-2016, 11:54 AM
#85
V8 Miata Fanatic
Thread Starter
Time for another update....As I said in my last post, I managed to temporarily locate my camera in a location that I could not remember for a short period of time, but I have found it now....in my coat pocket....
So with that being said, there is a small jump in time here that I don't have many pictures for....sorry!
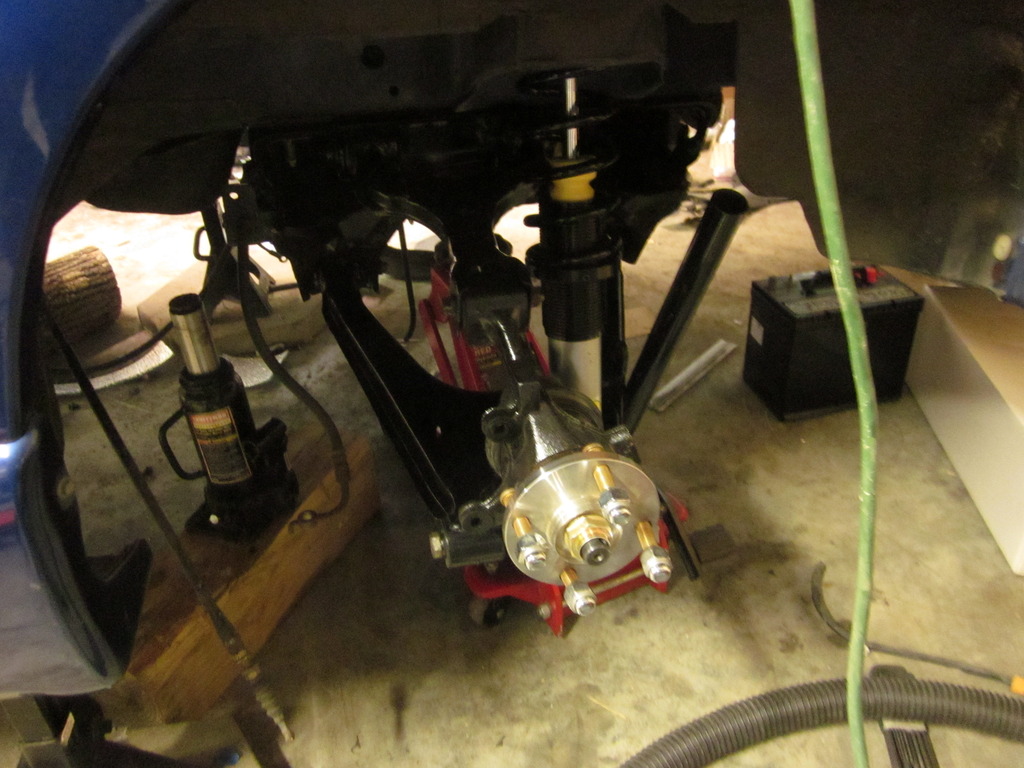
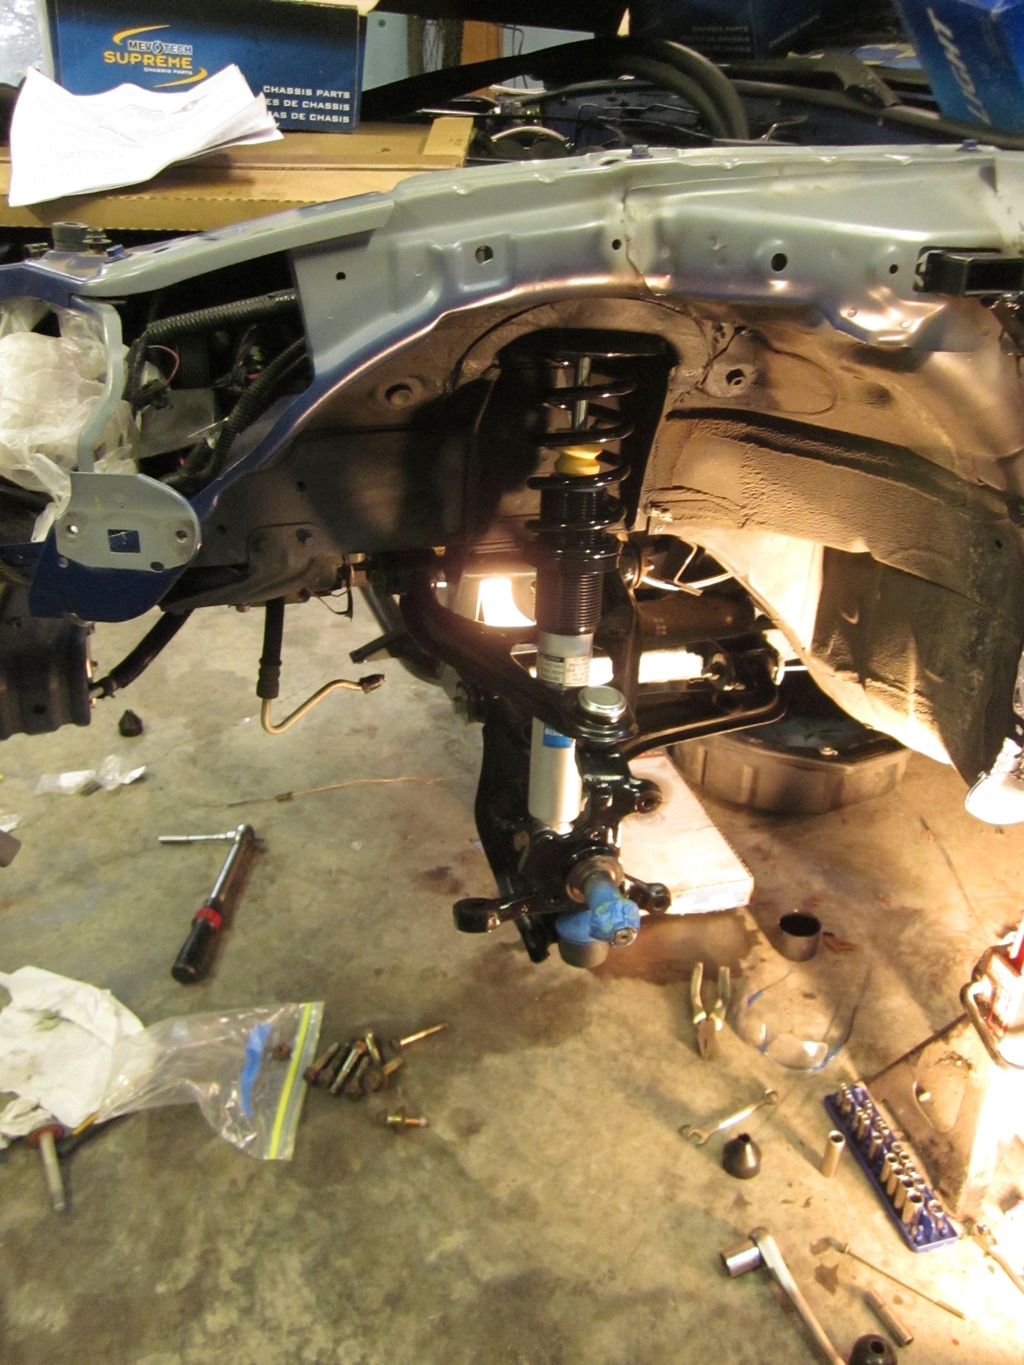
First of all, I finished my coilover construction, and got them installed. I put the rear end in with my dads help..man that baby is heavy. As I set and thought about it, I realized that it was literally the only help I have had on this whole build as far as right at the car. I had a buddy bend some tubing for me, but thats it.
I had been holding off on putting the front suspension together until I got a slight oil leak fixed, so I had to do that. First of all, Since the stock bolts are not long enough, I had put in some longer bolts with standard hex head to hold the oil filter adapter on the FM pan...bad idea as I was not able to get the correct toque on them, because socket wouldn't fit. I replaced them with cap head bolts, and all is well. Second, I attempted to re-use the stock pan gasket since it technically is reusable and looked ok....also a bad idea.... Oh well, Got a new fel-pro gasket in there and she appears to be leak free. I know some people say that you cannot change the oil pan gasket with the engine in the car, I am here to prove otherwise. Now, in their defense you cannot do this with the steering rack in place, but I assure you the gasket can be changed without pulling the motor.
I also took this as an opportunity to check my clearance between the pan and pickup. When I assembled it, my eyeball gauge said that I had plenty of room so I didn't, but then I got to reading about some of you guys having less room then you thought, so it made me nervous. Well as it turns out, my eyeball gauge was properly calibrated the day I looked, because I had PLENTY of clearance. I put 3/8 of clay on there to check, and only just barely had an indention.
That was all camera free, from their I went to put the front suspension together. It is mostly all still hanging loose until I get everything together, but it is on there none the less.

I was planning on just running some good pads on my stock brakes and upgrading them later, but as always I keep an ear to the ground for a good deal. Last week, I came across a deal on mx5forum and I picked up a BNIB Wilwood BBK front setup, and a FM little big brake kit for the rear. Basically its the BBK for the front, with proportioning valve, and the bracket to make my rear calipers work on a sport rear rotor for the rear. Should be plenty of stopping power. Hopefully it will come in the mail today.
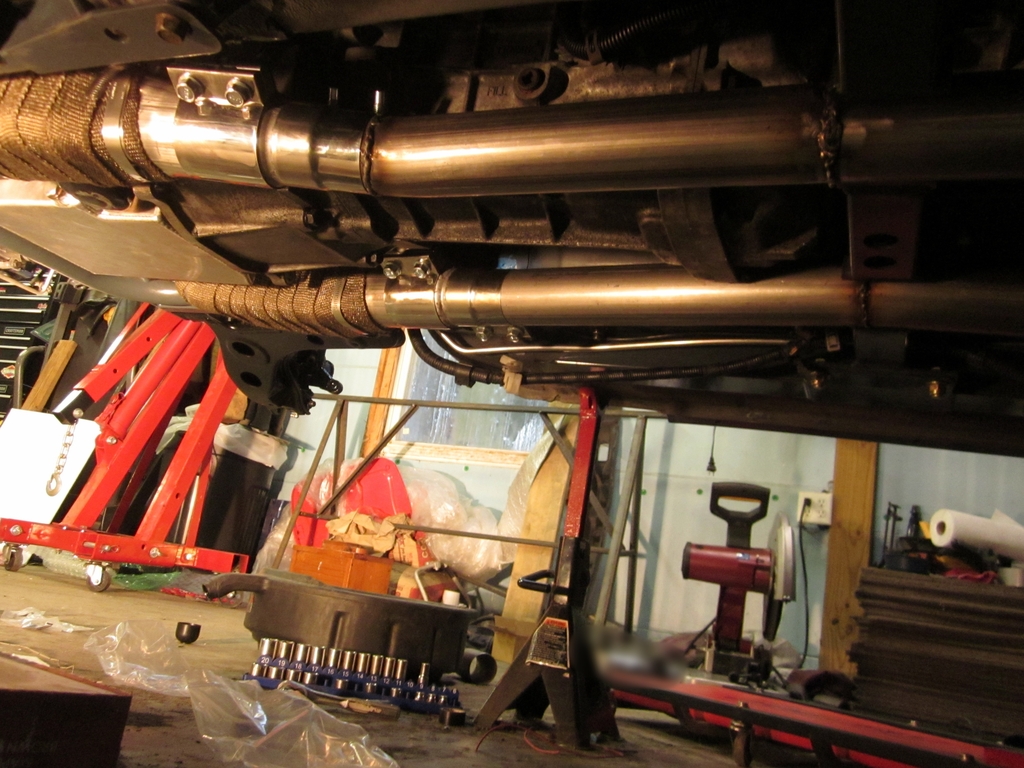
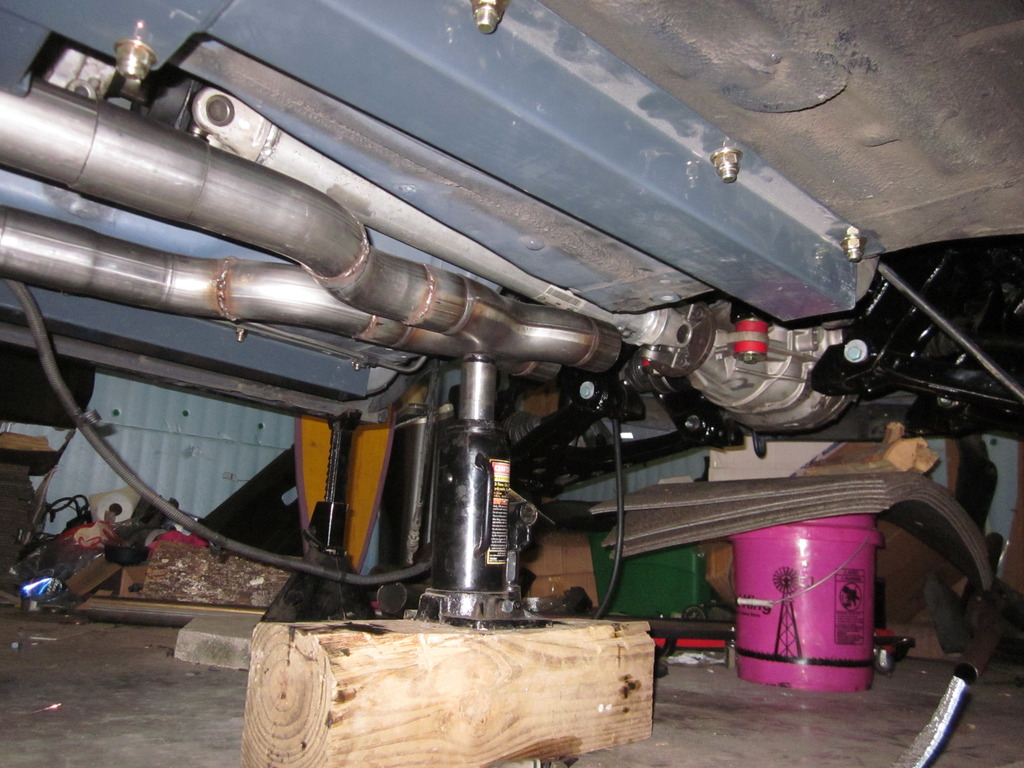
Next I got started on the exhaust. As previously mentioned, I by accident probably have enough exhaust parts to do this whole setup twice. I have a stainless 2.5" U-fit kit from flowmaster, a stainless borla catback from a C5, a nice stainless X-pipe, and some other misc. I bought some nice bandclamps and reducers to mate to the Longtubes. I really didn't want to weld to them as pretty as they are! As of now I am basically back to the x-pipe location right behind the trans mount, but I stopped until I get my driveshaft in.
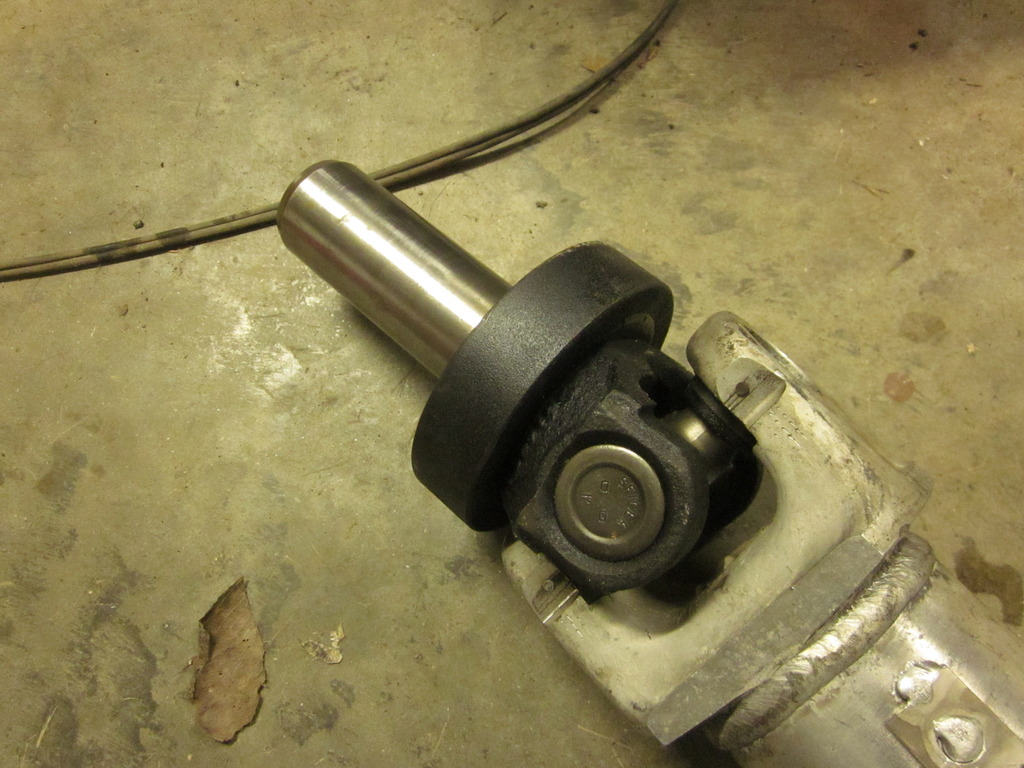
On the subject of a driveshaft.....I shopped around and got the typical 450-500 price tag from places like V8R and Driveshaftshop.com. A local guy offered to build me a new steel one for "about 200", but he sounded about one tooth shy of deliverance so I steered away. After hitting up a couple guys on here for measurements on their driveshafts(to compare to my own), Jim(charchi4) suggested I look into the guy who built his shaft. My cobra rear once again was making things a little uneasy for some shops because it has a larger pinion flange. Well I went ahead and called Jim's shop:
Driveline Service Sioux Falls SD, 57104 ? Manta.com
Owner was a really nice guy, and long story short, he used the measurements I had taken, and for $196 he shortened the camaro aluminum shaft I already had, put in new u-joints, a new rear section and yoke. With shipping will cost around $235 total, so thats a great savings! Jim has it in his possession as of this post, but will send it soon and I'll post some pictures.
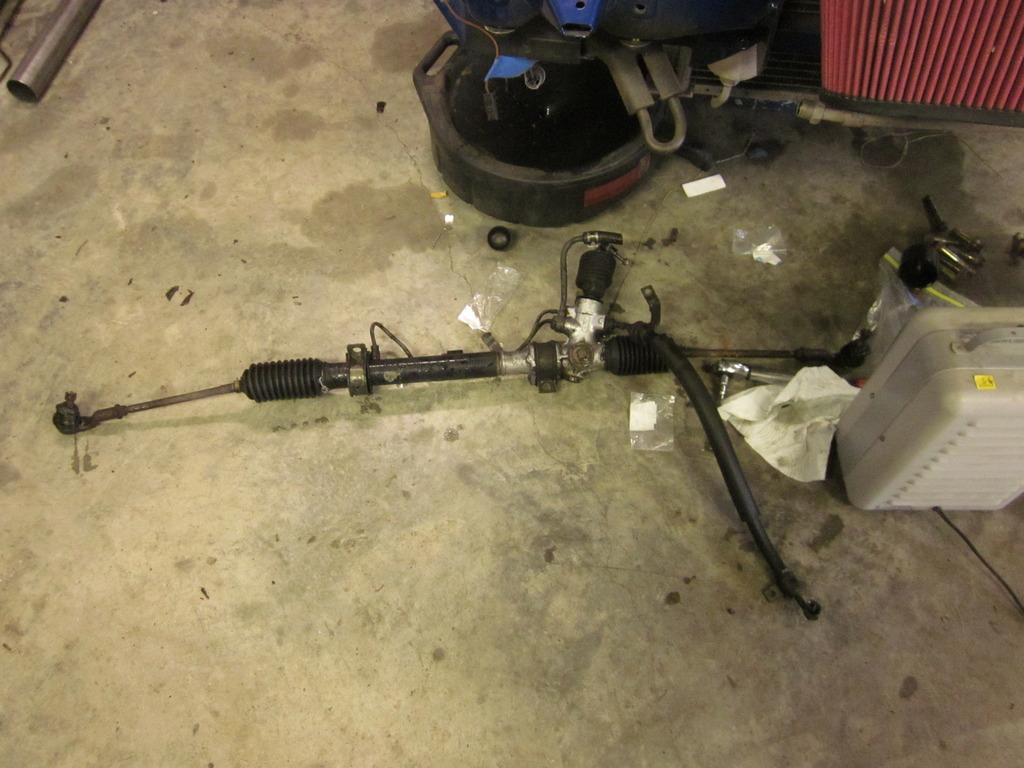
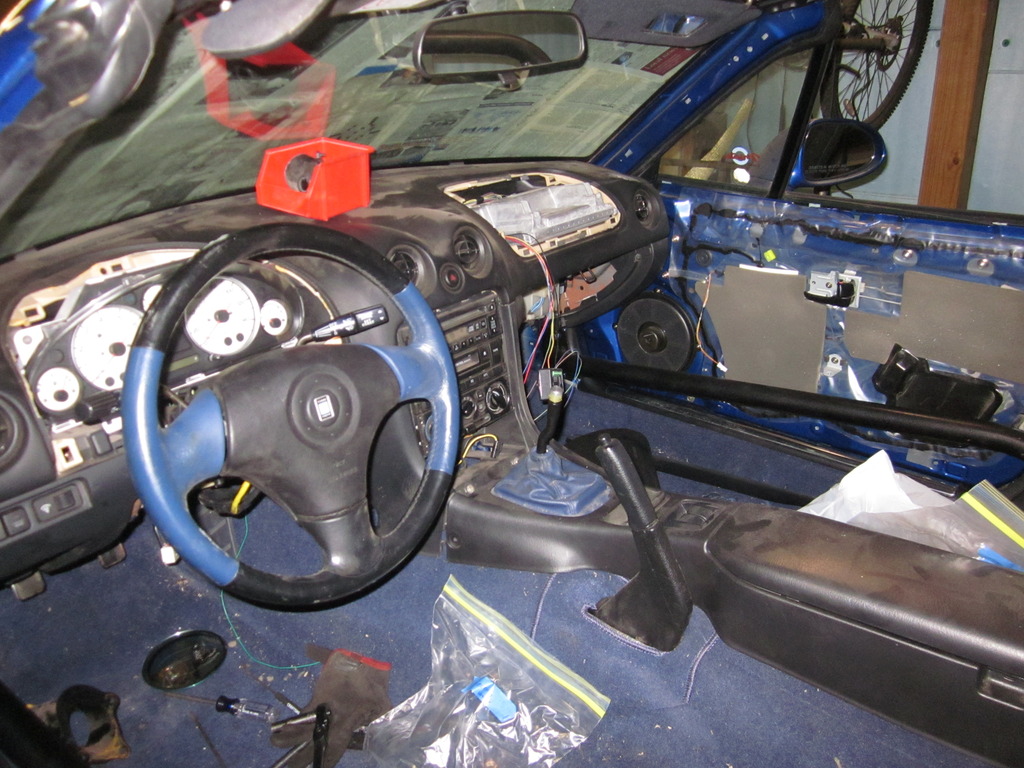
Now if you watch the classifieds section, you know that my silver NB parts car is now gone, and I have a 91 BRG on the table now. Once again if you remember from earlier posts, my V8R subframe actually came from a NA build that didn't happen, and the only difference is the way the steering rack mounts. Went ahead and got the NA rack cleaned up and installed in my car. I will be putting in new tie rods before I am done, but I wanted to get this in so I could get he steering column in.
And that is just what I did, I put back in the steering column, wheel, airbag, etc from there.
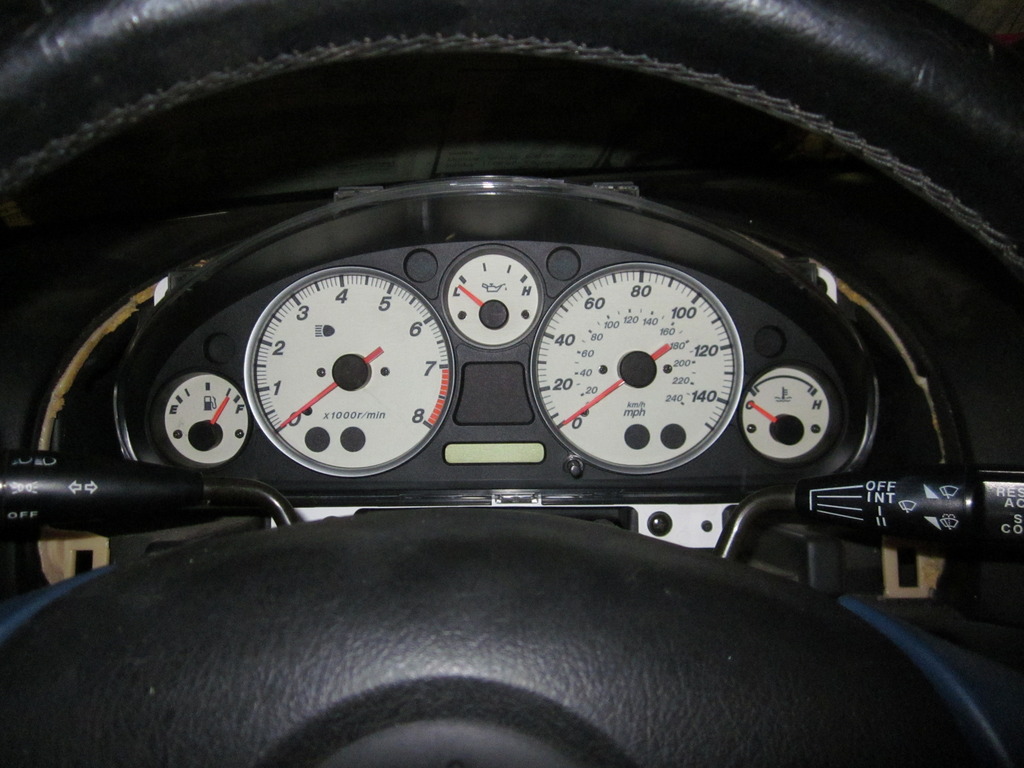
At first I was planning on using the standard gauges that came with the car, and I was looking for a cluster that had similar miles on it to my engine. I really just didn't want to use a white face cluster because they are orange when they are lit up, and I knew that my radio/HVAC stuff was green. Not a big deal, but I have a decent eye for detail and it would have bothered me. Well in reading about the clusters a bit, I figured out that the light for the gauges is provided by bulbs with a colored sleeve over them. Great news for me, because I picked up a white cluster from an 03, with 20k miles on it(close to my engines 17k), and I switched all the bulbs with one of my other clusters. I haven't had it turned on yet, but it should match just fine now with my radio.
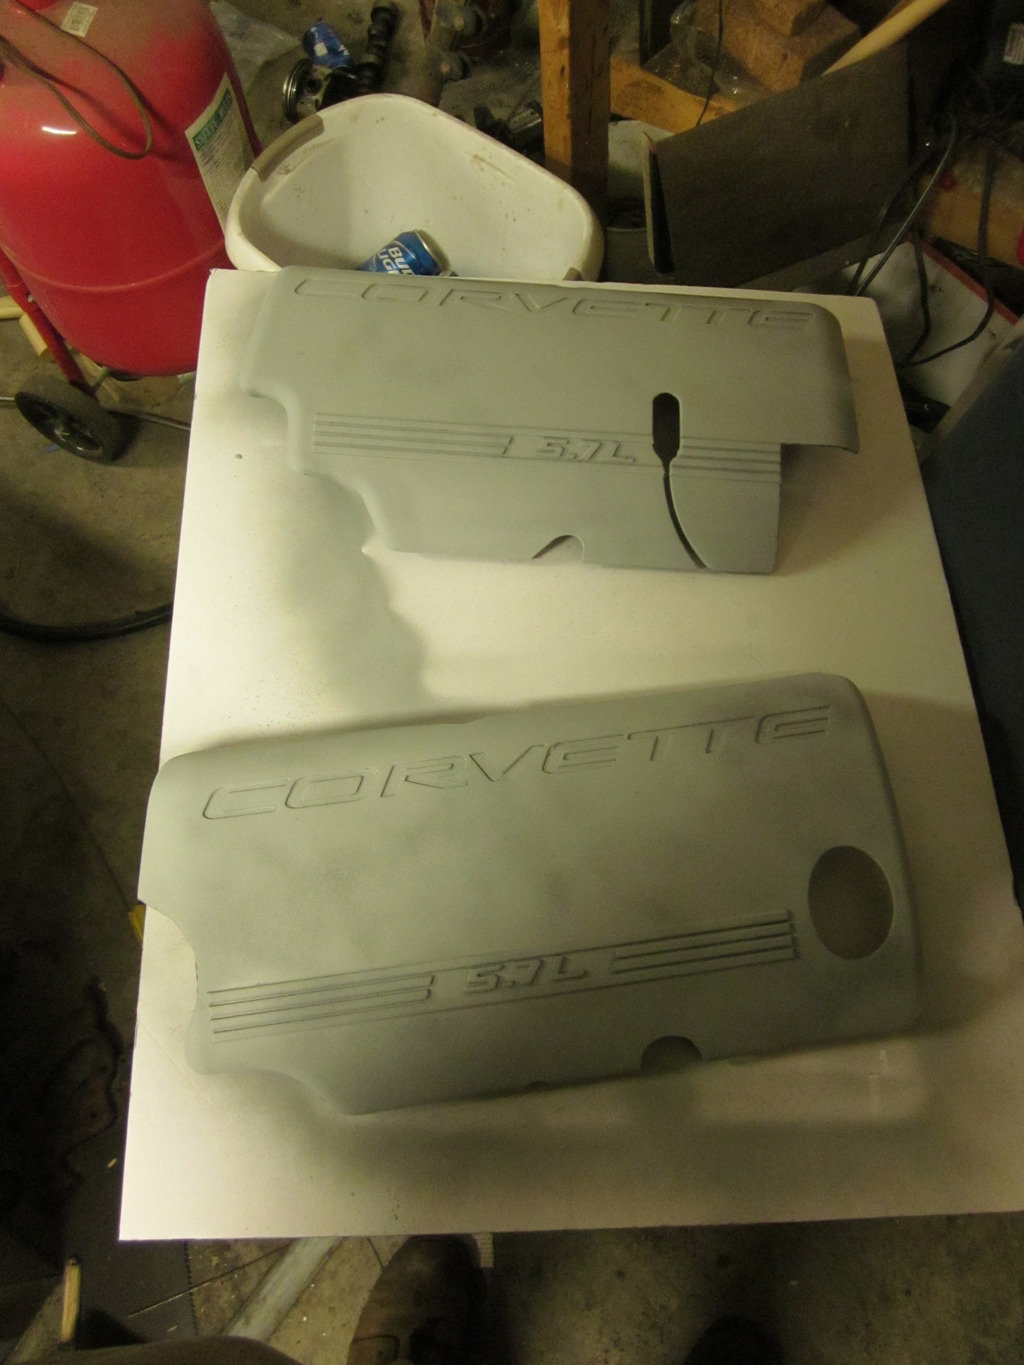
I also finally got started on my FRC's. I was really torn for some time about leaving the custom airbrush job on the set that I bought
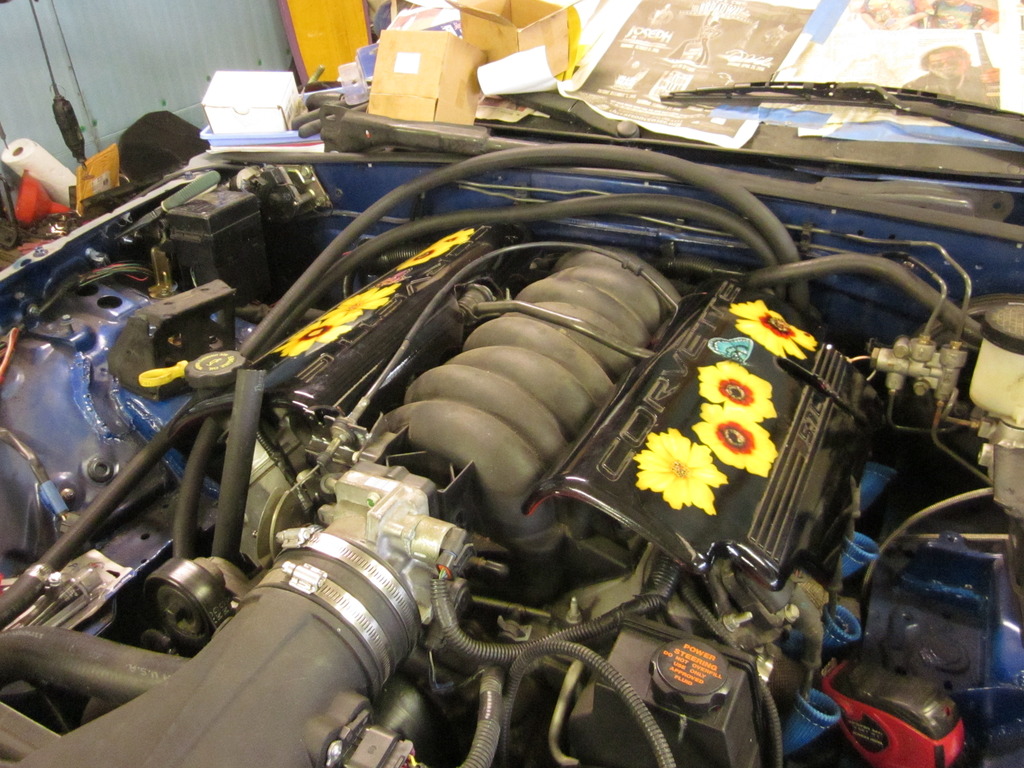
Took a fair amount of trimming but I got them in there. My plan is to paint them to match my body color, since I already have some color matched paint that I used under the hood. Here is the start of taping them off.
Obviously this is more fashion than function, but I really like what these do for the look of the engine bay.
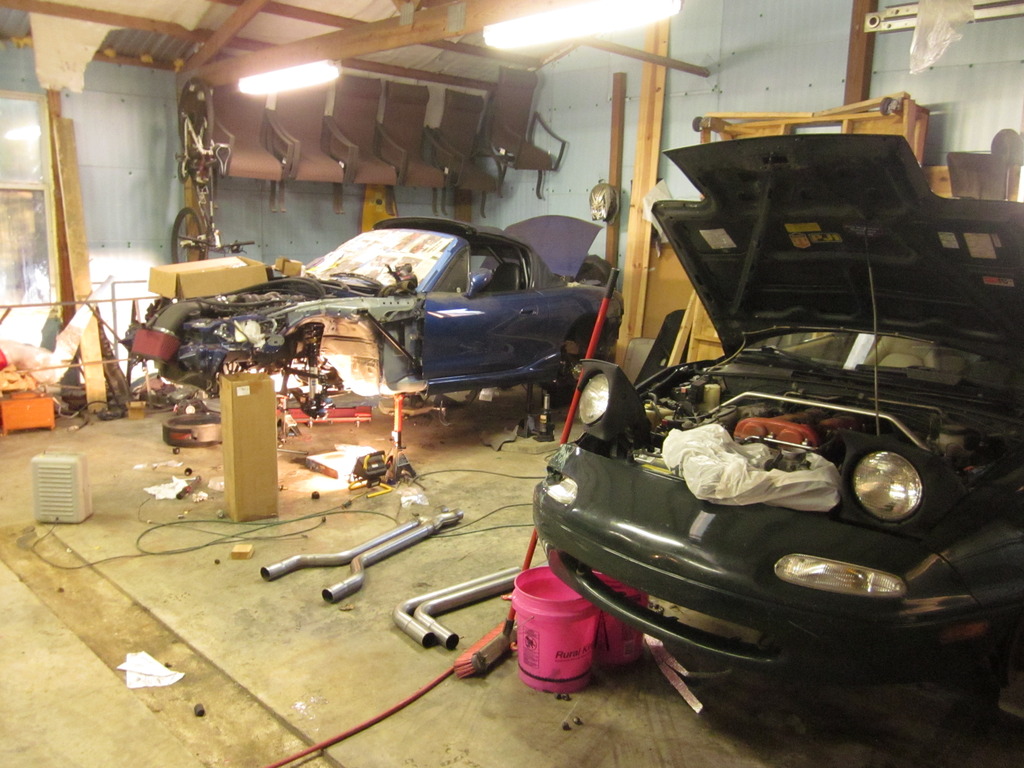
Thats about it for this update....This pile of parts of getting dangerously close to looking like a car....
So with that being said, there is a small jump in time here that I don't have many pictures for....sorry!
First of all, I finished my coilover construction, and got them installed. I put the rear end in with my dads help..man that baby is heavy. As I set and thought about it, I realized that it was literally the only help I have had on this whole build as far as right at the car. I had a buddy bend some tubing for me, but thats it.

I had been holding off on putting the front suspension together until I got a slight oil leak fixed, so I had to do that. First of all, Since the stock bolts are not long enough, I had put in some longer bolts with standard hex head to hold the oil filter adapter on the FM pan...bad idea as I was not able to get the correct toque on them, because socket wouldn't fit. I replaced them with cap head bolts, and all is well. Second, I attempted to re-use the stock pan gasket since it technically is reusable and looked ok....also a bad idea.... Oh well, Got a new fel-pro gasket in there and she appears to be leak free. I know some people say that you cannot change the oil pan gasket with the engine in the car, I am here to prove otherwise. Now, in their defense you cannot do this with the steering rack in place, but I assure you the gasket can be changed without pulling the motor.
I also took this as an opportunity to check my clearance between the pan and pickup. When I assembled it, my eyeball gauge said that I had plenty of room so I didn't, but then I got to reading about some of you guys having less room then you thought, so it made me nervous. Well as it turns out, my eyeball gauge was properly calibrated the day I looked, because I had PLENTY of clearance. I put 3/8 of clay on there to check, and only just barely had an indention.
That was all camera free, from their I went to put the front suspension together. It is mostly all still hanging loose until I get everything together, but it is on there none the less.


I was planning on just running some good pads on my stock brakes and upgrading them later, but as always I keep an ear to the ground for a good deal. Last week, I came across a deal on mx5forum and I picked up a BNIB Wilwood BBK front setup, and a FM little big brake kit for the rear. Basically its the BBK for the front, with proportioning valve, and the bracket to make my rear calipers work on a sport rear rotor for the rear. Should be plenty of stopping power. Hopefully it will come in the mail today.
Next I got started on the exhaust. As previously mentioned, I by accident probably have enough exhaust parts to do this whole setup twice. I have a stainless 2.5" U-fit kit from flowmaster, a stainless borla catback from a C5, a nice stainless X-pipe, and some other misc. I bought some nice bandclamps and reducers to mate to the Longtubes. I really didn't want to weld to them as pretty as they are! As of now I am basically back to the x-pipe location right behind the trans mount, but I stopped until I get my driveshaft in.

On the subject of a driveshaft.....I shopped around and got the typical 450-500 price tag from places like V8R and Driveshaftshop.com. A local guy offered to build me a new steel one for "about 200", but he sounded about one tooth shy of deliverance so I steered away. After hitting up a couple guys on here for measurements on their driveshafts(to compare to my own), Jim(charchi4) suggested I look into the guy who built his shaft. My cobra rear once again was making things a little uneasy for some shops because it has a larger pinion flange. Well I went ahead and called Jim's shop:
Driveline Service Sioux Falls SD, 57104 ? Manta.com
Owner was a really nice guy, and long story short, he used the measurements I had taken, and for $196 he shortened the camaro aluminum shaft I already had, put in new u-joints, a new rear section and yoke. With shipping will cost around $235 total, so thats a great savings! Jim has it in his possession as of this post, but will send it soon and I'll post some pictures.
Now if you watch the classifieds section, you know that my silver NB parts car is now gone, and I have a 91 BRG on the table now. Once again if you remember from earlier posts, my V8R subframe actually came from a NA build that didn't happen, and the only difference is the way the steering rack mounts. Went ahead and got the NA rack cleaned up and installed in my car. I will be putting in new tie rods before I am done, but I wanted to get this in so I could get he steering column in.


And that is just what I did, I put back in the steering column, wheel, airbag, etc from there.

At first I was planning on using the standard gauges that came with the car, and I was looking for a cluster that had similar miles on it to my engine. I really just didn't want to use a white face cluster because they are orange when they are lit up, and I knew that my radio/HVAC stuff was green. Not a big deal, but I have a decent eye for detail and it would have bothered me. Well in reading about the clusters a bit, I figured out that the light for the gauges is provided by bulbs with a colored sleeve over them. Great news for me, because I picked up a white cluster from an 03, with 20k miles on it(close to my engines 17k), and I switched all the bulbs with one of my other clusters. I haven't had it turned on yet, but it should match just fine now with my radio.

I also finally got started on my FRC's. I was really torn for some time about leaving the custom airbrush job on the set that I bought

Took a fair amount of trimming but I got them in there. My plan is to paint them to match my body color, since I already have some color matched paint that I used under the hood. Here is the start of taping them off.

Obviously this is more fashion than function, but I really like what these do for the look of the engine bay.
Thats about it for this update....This pile of parts of getting dangerously close to looking like a car....
01-26-2016, 01:27 PM
#86
V8 Miata Fanatic
Thread Starter
POWER STEERING
EDIT 3/10/16
Before buying PS parts, review my later posts. Long story short, I ended up using two 16x1.5mm to -6an fittings
As I have done with a few other systems, I am going to put this all here for people who come behind me and want to add power steering for less than the kit price. FM Price=$160+shipping, my total price is $92.69 shipped, and thats with a brand new universal cooler, that is not included with FM's kit. The only thing I don't have here is a crush washer for the 20x1.5mm fitting, but I didn't put that on here because I have those laying around! The one thing the FM kit will be nice for is that they have the 20x1.5mm to -6an fitting, I could only find one in Australia, so I had to buy a bigger AN size, and reduce it down.
Parts were all bought from JEGS.COM
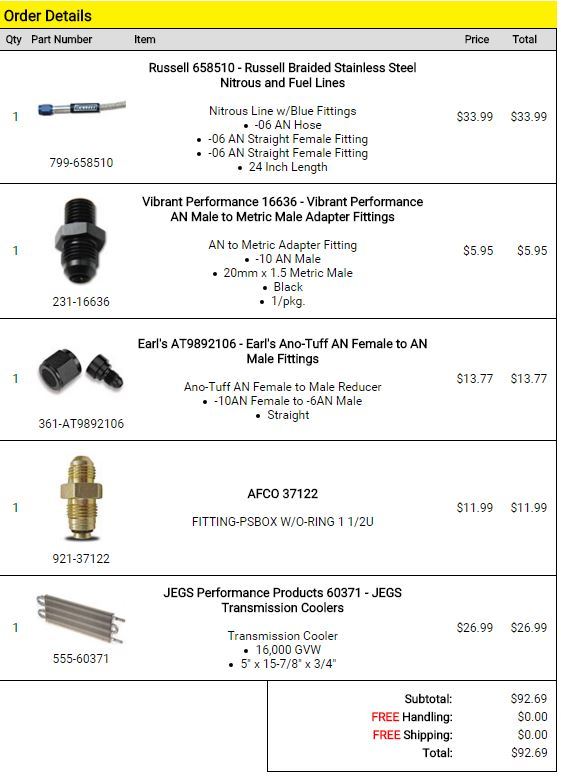
Hope this helps others thinking about this part of the project!!
Last edited by stng_96; 03-10-2016 at 09:04 AM.
The following users liked this post:
Flavaquero (01-26-2016)
01-26-2016, 01:49 PM
#87

POWER STEERING
As I have done with a few other systems, I am going to put this all here for people who come behind me and want to add power steering for less than the kit price. FM Price=$160+shipping, my total price is $92.69 shipped, and thats with a brand new universal cooler, that is not included with FM's kit. The only thing I don't have here is a crush washer for the 20x1.5mm fitting, but I didn't put that on here because I have those laying around! The one thing the FM kit will be nice for is that they have the 20x1.5mm to -6an fitting, I could only find one in Australia, so I had to buy a bigger AN size, and reduce it down.
Parts were all bought from JEGS.COM
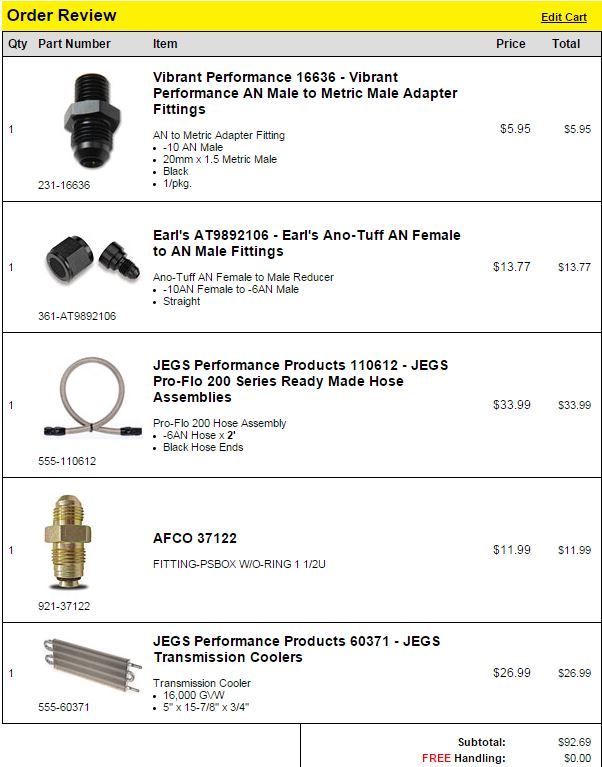
Hope this helps others thinking about this part of the project!!
01-26-2016, 02:04 PM
#88
V8 Miata Fanatic
Thread Starter
Your first question:
The AFCO fitting is actually the 16x1.5 to -6an fitting. It is poorly labeled on the jegs site, but I found it on summit, then just bought it on Jegs since I got the other stuff there. So you are correct, its just poorly labeled here, my apologies.
Your second question:
It does not specify exactly what pressure it is rated for, but straight from the JEG's description:
These reliable assemblies feature JEGS Pro-Flo 200 Hose that consists of stainless steel inner braid, seamless nitrile inner tube, and high-tensile stainless steel outer shell to resist abrasion and high pressure/temperature. Developed to be compatible with all synthetic lubricants, fuel, oil, coolant, and alcohol/methanol to meet strict racing specifications (NHRA accepted).
I feel confident that it will be fine. Do you have reason to think otherwise?
01-26-2016, 02:28 PM
#89
Your first question:
The AFCO fitting is actually the 16x1.5 to -6an fitting. It is poorly labeled on the jegs site, but I found it on summit, then just bought it on Jegs since I got the other stuff there. So you are correct, its just poorly labeled here, my apologies.
Your second question:
It does not specify exactly what pressure it is rated for, but straight from the JEG's description:
These reliable assemblies feature JEGS Pro-Flo 200 Hose that consists of stainless steel inner braid, seamless nitrile inner tube, and high-tensile stainless steel outer shell to resist abrasion and high pressure/temperature. Developed to be compatible with all synthetic lubricants, fuel, oil, coolant, and alcohol/methanol to meet strict racing specifications (NHRA accepted).
I feel confident that it will be fine. Do you have reason to think otherwise?
The AFCO fitting is actually the 16x1.5 to -6an fitting. It is poorly labeled on the jegs site, but I found it on summit, then just bought it on Jegs since I got the other stuff there. So you are correct, its just poorly labeled here, my apologies.
Your second question:
It does not specify exactly what pressure it is rated for, but straight from the JEG's description:
These reliable assemblies feature JEGS Pro-Flo 200 Hose that consists of stainless steel inner braid, seamless nitrile inner tube, and high-tensile stainless steel outer shell to resist abrasion and high pressure/temperature. Developed to be compatible with all synthetic lubricants, fuel, oil, coolant, and alcohol/methanol to meet strict racing specifications (NHRA accepted).
I feel confident that it will be fine. Do you have reason to think otherwise?
The following users liked this post:
stng_96 (01-26-2016)
01-26-2016, 03:50 PM
#90
V8 Miata Fanatic
Thread Starter
M20x1.5 is for the outlet of the GM pump as far as I know. I am going off the Flyin miata power steering package, and word of mouth from other guys here.
As far as the hose, I called and spoke with a tech rep at Jegs, he couldn't tell me the exact pressure rating, but he said they had recommended it for power steering in the past.
With that being said, I need to express my appreciation for the info. You managed to shake my confidence enough to look around, and I now agree with you and have gone to a hose I think you will approve of. The only I don't like...it doesn't come with black fittings. It was even the same price! Thanks alot!
Please see my original Power steering post for updated info
 01-27-2016, 10:50 AM
#93
Well I can tell you from experience a power steering hose failure is a messy thing. The reason why I question the pump side fitting is looking at the stock replacement hose. This is a hose for a 2002 ls1 Firebird. https://www.rockauto.com/catalog/mor...nid=492&jpid=2 End 1 shows 16mm that should be the pump side. End 2 shows 18mm that should be the GM steering box so you can ignore that. maybe I am missing something. But I do want to commend you on the thread. You are putting alot of good information in here.
01-27-2016, 11:44 PM
#95
V8 Miata Fanatic
Great updates and pics... now that you located the AWOL camera! Suspension, new brake kit, new driveshaft, and all are going to help finish this swap out nicely, for sure.
I had to chuckle when I read about the leaky oil pan gasket:
"I know some people say that you cannot change the oil pan gasket with the engine in the car, I am here to prove otherwise. Now, in their defense you cannot do this with the steering rack in place, but I assure you the gasket can be changed without pulling the motor."
I had to go through the same event as my first attempt (without clear thinking, I guess) was to re-use the 19K mile oil pan gasket on my V8R pan. It leaked... But was able to thread the old one out and get that new one back into place. I also had forgotten to put the 4 dabs of gasket sealer where the block and other engine parts come together. Swapping that gasket out was some hard work that day!!!
01-28-2016, 06:56 AM
#96
V8 Miata Fanatic
Thread Starter
I guess I should have been more clear when I made that statement. I was able to change the gasket, but completely pulling the pan will not be possible without removing the engine.
On another note, I have been spending some more money these past couple days. If anyone is in the market for brake pads, rockauto has a bunch of closeout pads on sale right now. Obviously I've got Wilwood pads for my front, but for the rear I bought two sets of ceramic pads, for 24 dollars shipped to my door.
Also, I went ahead and put my money down for a new set of RS-3's. The rep at Tirerack said they should be in March 10th, and will get to me ASAP. Normally on this type of thing I would wait and watch for a set, but I didn't want to have the car all ready to go and have to leave it on stands waiting for shoes to get here. This way since I already ordered them, I will be on the first group to get a set when they come in. I figure I should be finishing the car up right about that same time.
02-02-2016, 10:07 AM
#97
V8 Miata Fanatic
Thread Starter
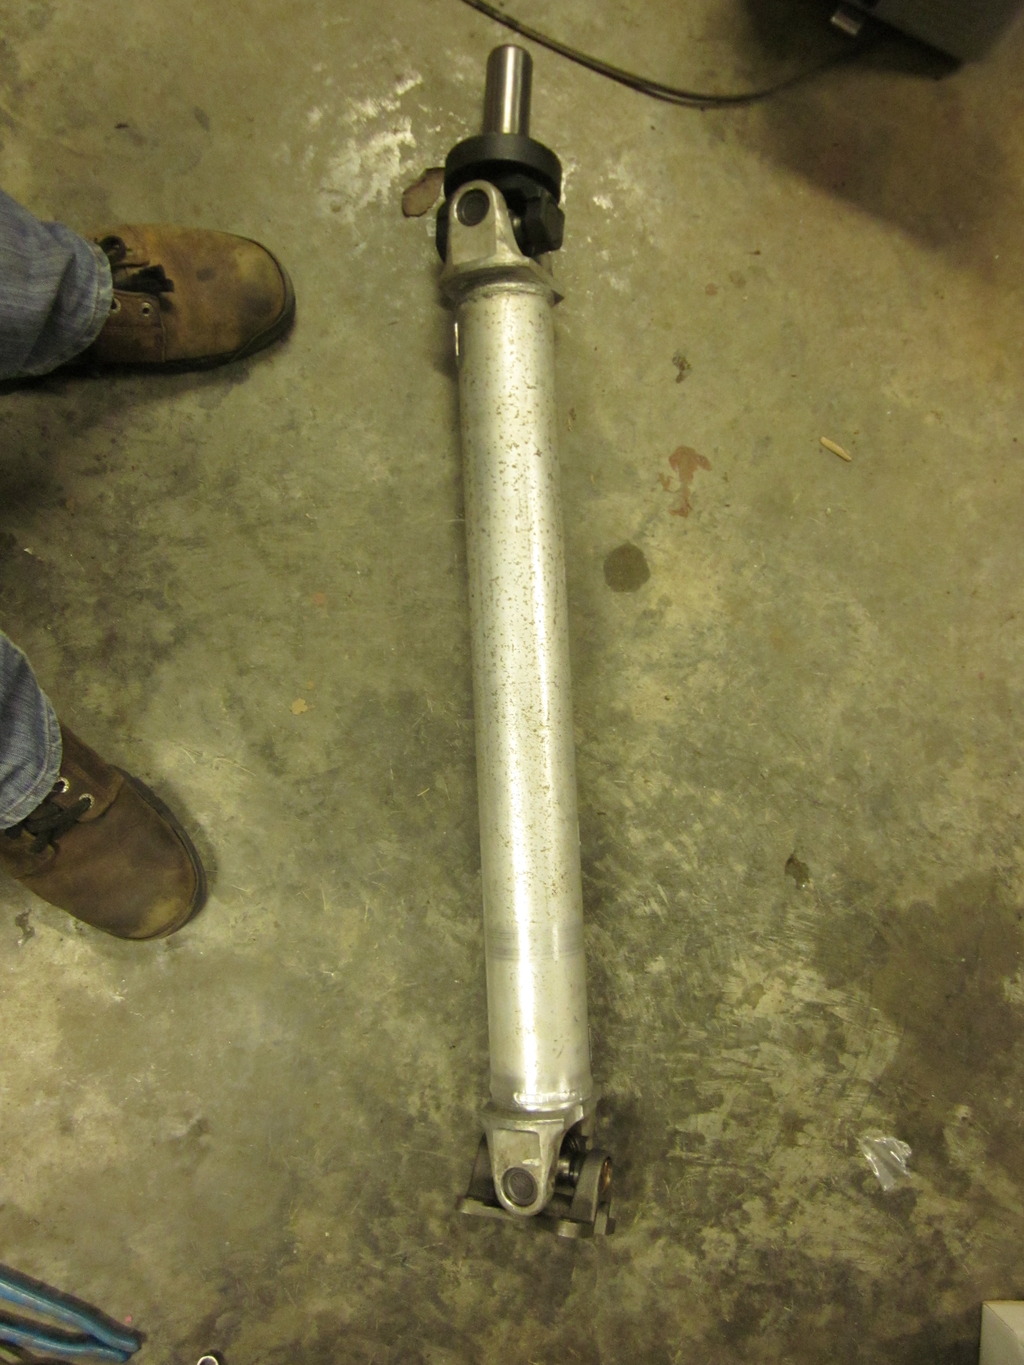
Well, another big thamks has to go out to Jim on this one. Got my driveshaft in the mail the other day and it fit beautifully. I was very nervous about it since this is the last thing on the car that really depends on my measurements, but it turned out perfect.
Also spent a lot of time working on my exhaust, I don't know how some of you guys do this so quick, because boy am I slow!! I basically got to just before the rear end, and I need my hangers so I had to stop for now. This is one of the first times in my whole build that I really am waiting on parts.....Oh well. On another note, I think the C5 system is going to fit nicely!
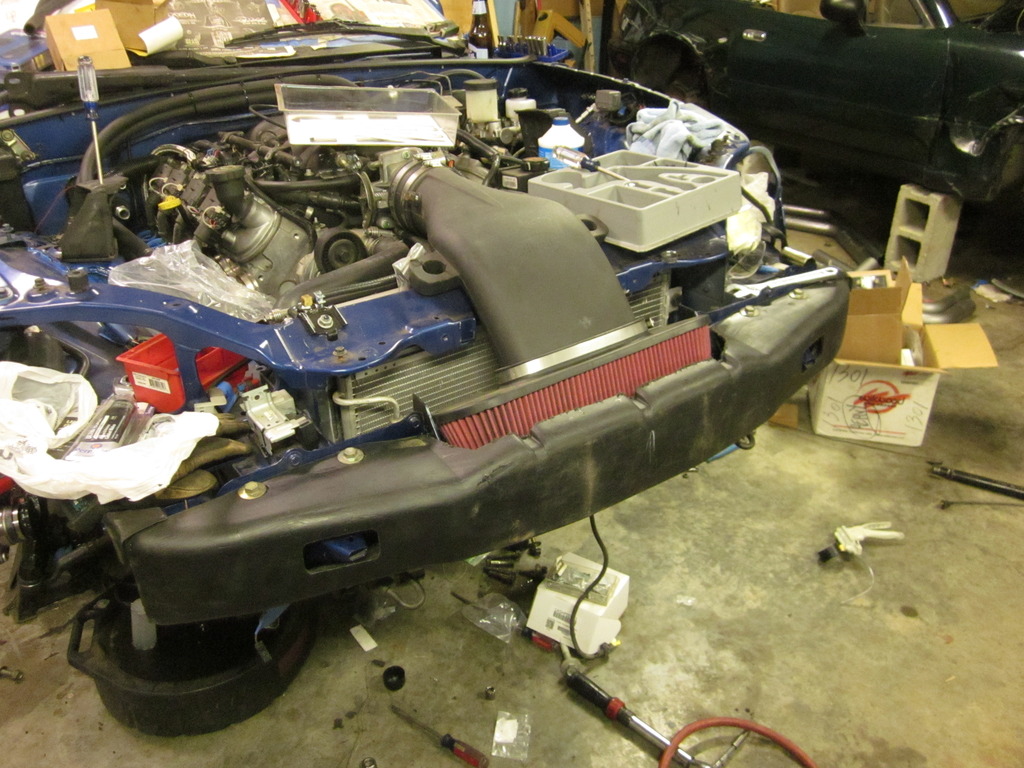
Trimmed up my bumper support to fit around my filter, should fit nicely:
I still don't have my brakes installed because I am waiting on the ARP wheel studs for the front, and I need to paint the rear calipers, but I did go ahead and bleed my clutch setup. In a previous life I worked on a lot of antique honda and suzuki sport bikes, so I had bought a vacuum gun for pulling fluid into new systems. Between that and my speed bleeder, bleeding my clutch was a dream.
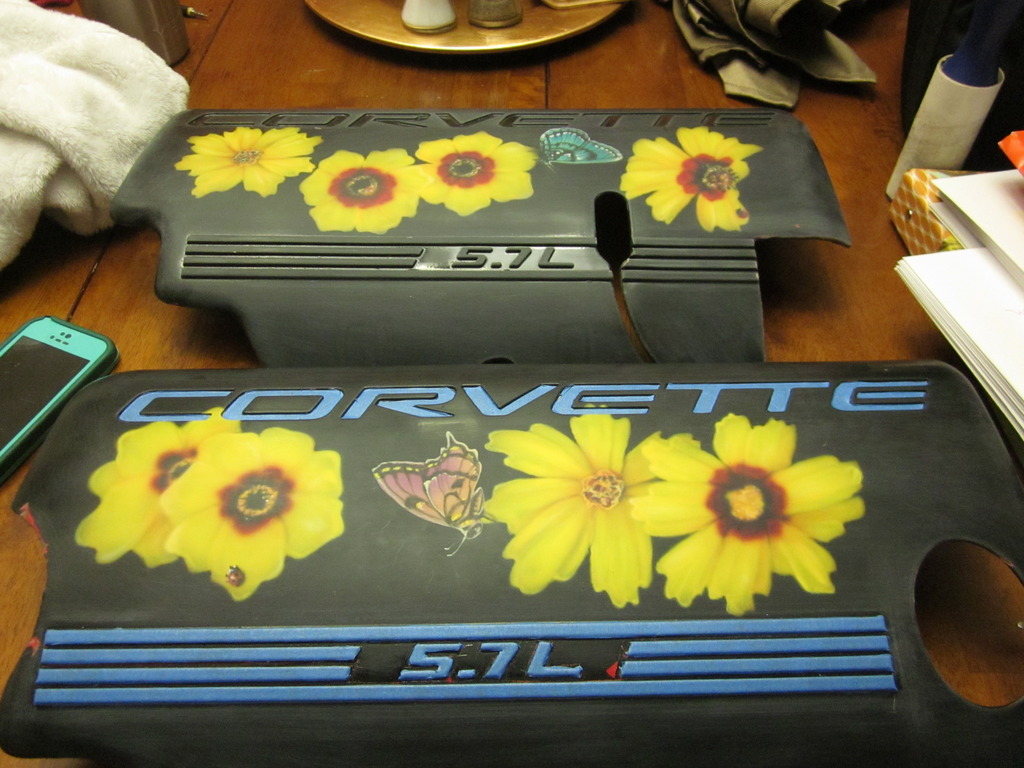
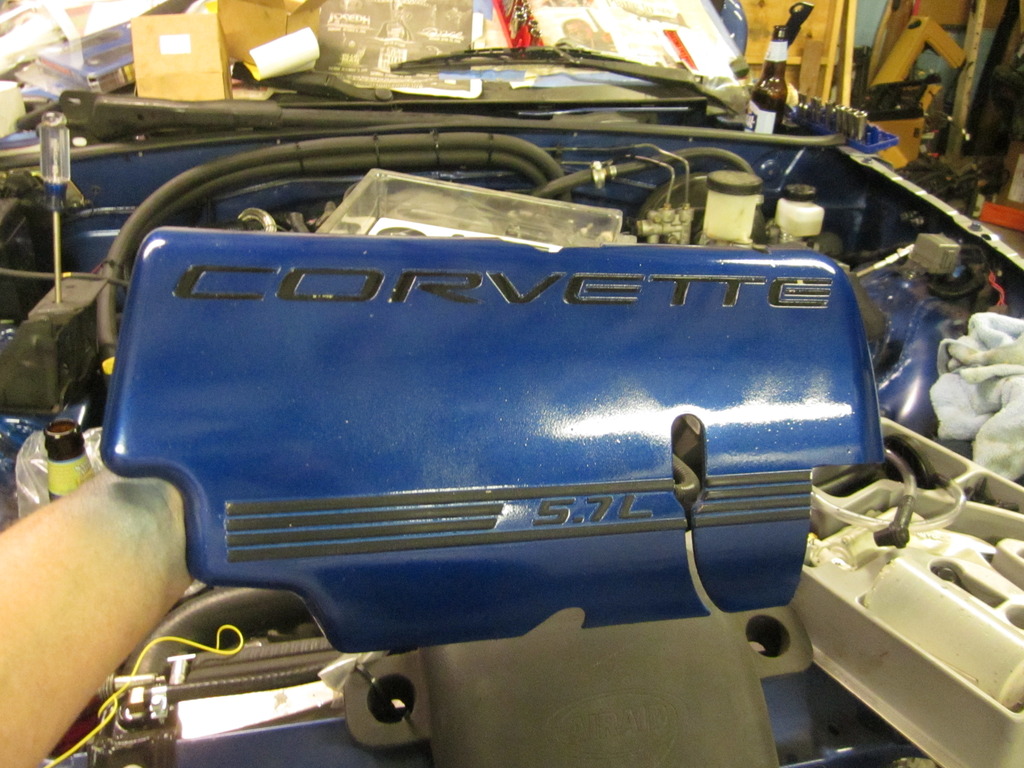
Also in the background of the other work going on here, I have been working on my fuel rail covers, they are not completely done yet, but they are coming around very nicely if I do say so myself. My process was rough them up with a SOS pad, medium grit. I didn't really have to have them be glass smooth, so I just did this grit. Since they were already mostly black, I taped off what I wanted to stay black as shown in a previous update. From there I sprayed them with Duplicolor adhesion promoter, which acts as a primer, and a binding agent to help the paint stick better to plastic parts. I also hit them with a basic automotive primer, because I was worried the color would show bad over the black/flowers that were there before. Here they are in primer.
And here they are with color and tape removed. I have not cleared them in this picture, but it gives you a good idea of what is coming. My plan is to touch up any areas where the black isn't perfect, then clear over them and do some buffing, I think they will look really good.
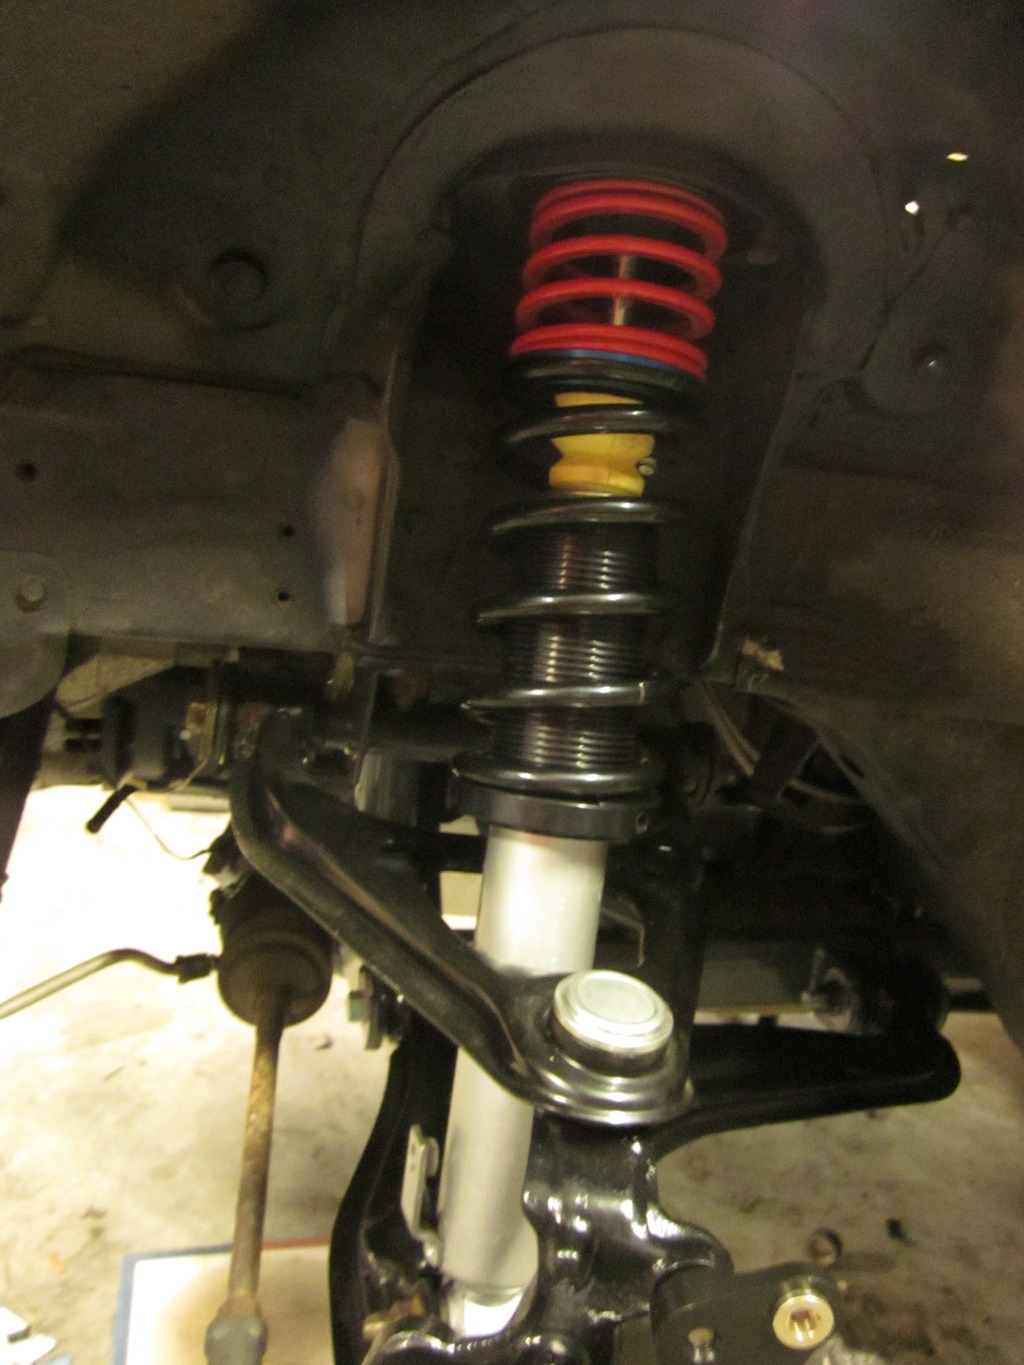
Also, my newest parts car came with some V-maxx coilovers that first I was excited about because I could sell for a decent amount, but upon further inspection I found they were in poor condition, and one was bent. I decided to canibalize them a little bit, and I took the tender springs and collars off and put them on my coilover setup. I had been worried about the droop I was seeing on my setup, obviously I could have just tightened them down more, but I figure this wont hurt anything, any opinions? Please note in this picture, my collar is adjusted all the way down, but is fully engaged in the sleeve.
Thats about all the updates for now, Im sure there is other stuff, I'll get to it later though I guess.


Also spent a lot of time working on my exhaust, I don't know how some of you guys do this so quick, because boy am I slow!! I basically got to just before the rear end, and I need my hangers so I had to stop for now. This is one of the first times in my whole build that I really am waiting on parts.....Oh well. On another note, I think the C5 system is going to fit nicely!

Trimmed up my bumper support to fit around my filter, should fit nicely:

I still don't have my brakes installed because I am waiting on the ARP wheel studs for the front, and I need to paint the rear calipers, but I did go ahead and bleed my clutch setup. In a previous life I worked on a lot of antique honda and suzuki sport bikes, so I had bought a vacuum gun for pulling fluid into new systems. Between that and my speed bleeder, bleeding my clutch was a dream.

Also in the background of the other work going on here, I have been working on my fuel rail covers, they are not completely done yet, but they are coming around very nicely if I do say so myself. My process was rough them up with a SOS pad, medium grit. I didn't really have to have them be glass smooth, so I just did this grit. Since they were already mostly black, I taped off what I wanted to stay black as shown in a previous update. From there I sprayed them with Duplicolor adhesion promoter, which acts as a primer, and a binding agent to help the paint stick better to plastic parts. I also hit them with a basic automotive primer, because I was worried the color would show bad over the black/flowers that were there before. Here they are in primer.

And here they are with color and tape removed. I have not cleared them in this picture, but it gives you a good idea of what is coming. My plan is to touch up any areas where the black isn't perfect, then clear over them and do some buffing, I think they will look really good.

Also, my newest parts car came with some V-maxx coilovers that first I was excited about because I could sell for a decent amount, but upon further inspection I found they were in poor condition, and one was bent. I decided to canibalize them a little bit, and I took the tender springs and collars off and put them on my coilover setup. I had been worried about the droop I was seeing on my setup, obviously I could have just tightened them down more, but I figure this wont hurt anything, any opinions? Please note in this picture, my collar is adjusted all the way down, but is fully engaged in the sleeve.

Thats about all the updates for now, Im sure there is other stuff, I'll get to it later though I guess.
02-04-2016, 11:16 AM
#99
V8 Miata Fanatic
Thread Starter
So I have been busy this week and haven't worked on the car much, but last night I did got out and mess with the fitting going to the miata rack. I can say that the pressure side is the 16x1.5mm size fitting. It did require the inverted flare, however the fitting I ordered didn't fit quite as nice as I wanted it to, so I ended up grinding some off the end, and I used a large drill bit to flare it the way I wanted to. Fit great after that, I will mess with the pressure side of the pump soon and let you guys know.


