1990 LS Build
 12-17-2015, 02:03 PM
#51
V8 Miata Follower
Thread Starter


 12-18-2015, 08:08 AM
#54
 12-18-2015, 09:58 AM
#55
Jim Stainer

+1 to both the above! Don't look at in terms of the whole system like that because all it does is fry you. I know the feeling well! You have to drill down and focus on one wire at a time and only one at a time. With that approach if you can follow one wire and tell colors apart there is nothing too it.
Print out the ECM connector plugs from the manual then take them one at a time making sure each wire goes where it should. There is only about 120 wires and nearly all of them are in the engine harness that you don't even touch. Check them off your list as you go and it's not that hard.
If you don't have this go here and about half way down the page check out the wiring harness instructions. Nathan's LS1 Miata
And I'm sure you have our very own excellent guide from Travis but going to post again anyway. https://www.v8miata.net/general-moto...ge2/#post17949
Oh and be careful of this:
Mazda is dumb enough to put blue with a black stripe and black with a blue stripe wires in the same harness and they are damn hard to tell apart.
If you get stuck call Travis. When I built mine Shannon was building his at the same time and we talked almost daily which really helped.
It's looking really good and trust me on this one by the time you are 150 miles into the break in when you hit that key you'll have long since forgotten or cared about wiring!
Last edited by charchri4; 12-18-2015 at 04:24 PM.
12-19-2015, 02:01 PM
#56
V8 Miata Follower
Thread Starter
Hey guys – I appreciate the kind words. I needed it this morning staring at this Miata harness.
But - I think you’re overestimating my abilities of wiring.
I honestly started by removing the air bag wiring, and successfully removed that. Second, I identified all of the obvious 1.6L wiring (coils, throttle body wiring, etc) and removed all of them.
I am currently stuck. I have the entire Miata harness torn apart. I have identified some of what I need to keep (headlight/turn signals, windshield washer, etc.) that are not controlled by the Miata ECU, but there are areas that I have no idea what to do.
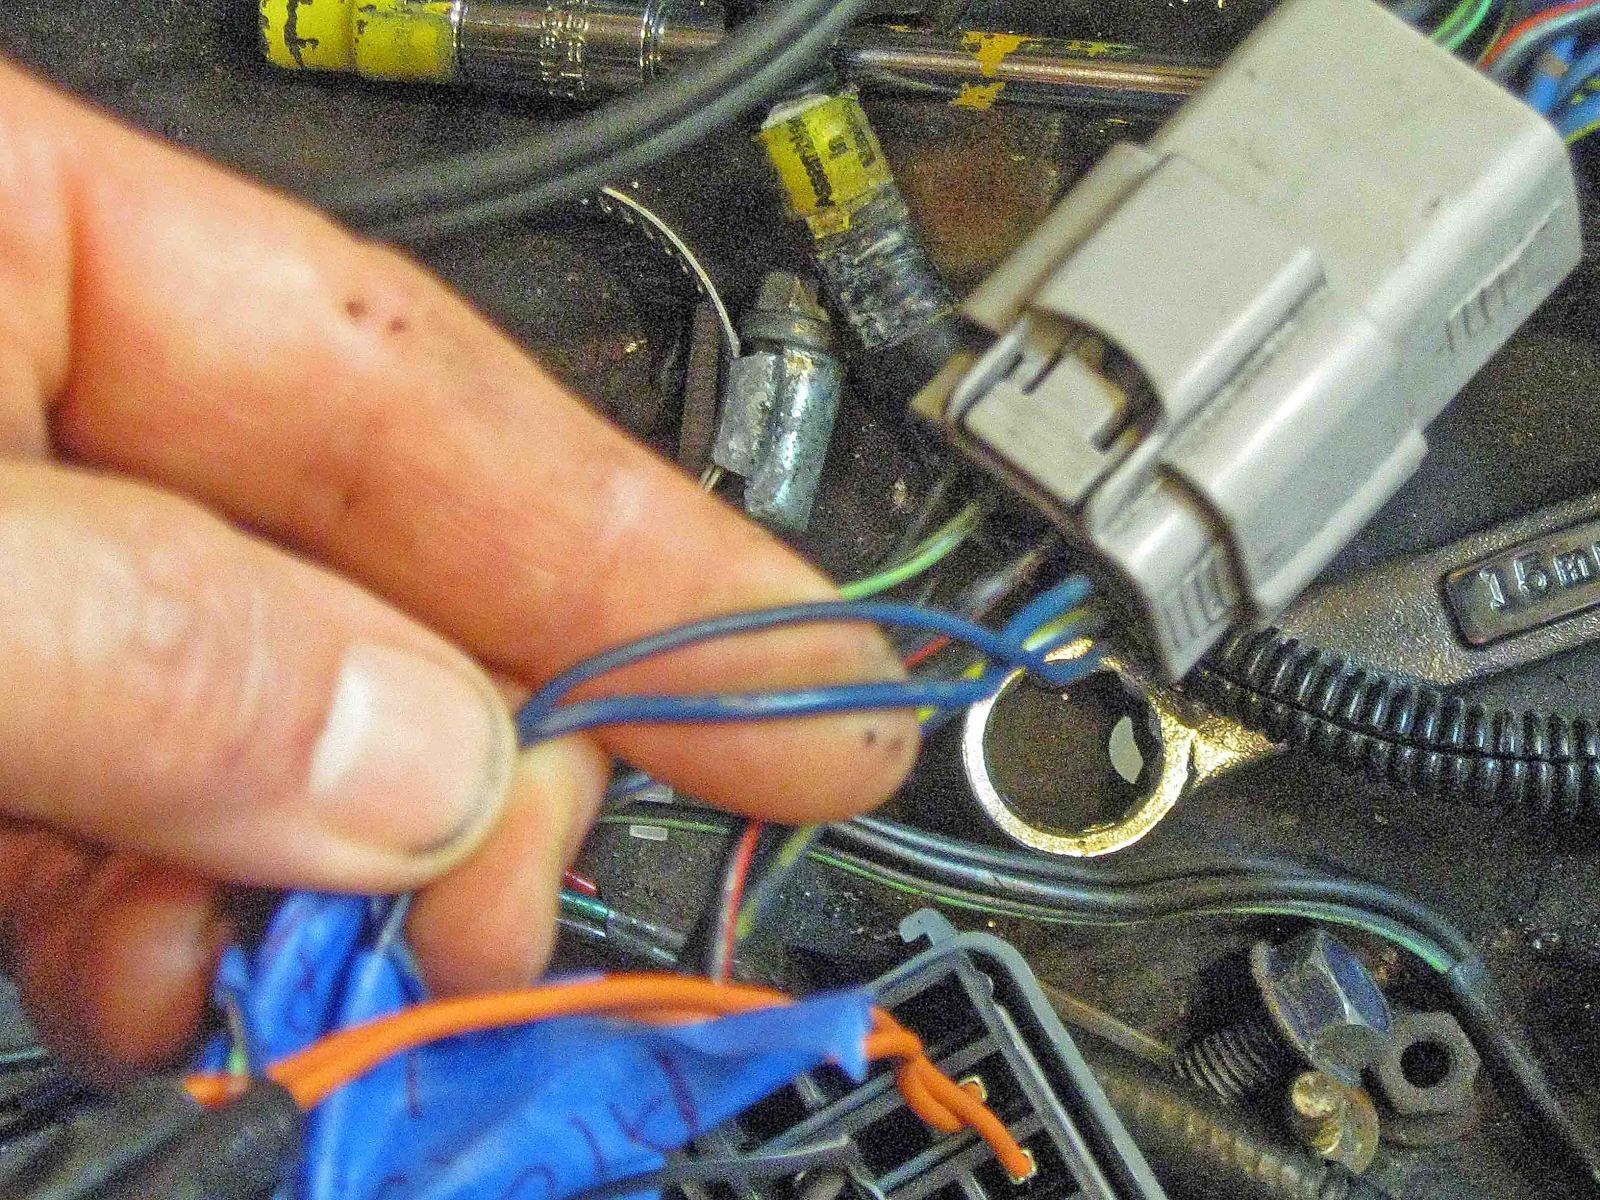
The Miata ECU has 2 connectors with connections A-V on connector 1 and A-Z on connector 2.
Connector #1:
A: BLU-RED – Room Fuse – What do I do with this one?
B: WHT-RED – Removed
C: VIO – ST Sign Fuse and Circuit Opening Relay – What do I do with this one?
D: WHT-GRN – To Diagnostic Connector – Removed
E: YEL-BLK – To Check Engine Indicator on Instrument Cluster. Splice into GM Check Engine Wire?
F: WHT-YEL – To Diagnostic Indicator – Removed
G: BRN-YEL – To Igniter – Removed
H: BRN – To Igniter – Removed
I: N/A
J: BLU-BLK – To A/C Relay - What do I do with this one? I plan to run A/C.
K: LT GRN-YEL : To Diagnostic Indicator – Removed
L: N/A
M: N/A
N: RED – To Throttle Sensor - Removed
O: GRN – Stop Light Switch? - What do I do with this one?
P: BLU-YEL – Power Steering Pressure Switch?? What do I do with this one? I plan to run P/S.
R: BLK-GRN – Cooling Fan Relay – What do I do with this one?
S: BLU-ORG – Heater Control Unit - What do I do with this one?
T: N/A
U: RED-BLK: Tail Fuse - What do I do with this one?
V: BRN-WHT: Clutch SW - What do I do with this one?
Connector #2 seems like it can be removed completely. I’ve gone through and removed those wires.
But - I think you’re overestimating my abilities of wiring.
I honestly started by removing the air bag wiring, and successfully removed that. Second, I identified all of the obvious 1.6L wiring (coils, throttle body wiring, etc) and removed all of them.
I am currently stuck. I have the entire Miata harness torn apart. I have identified some of what I need to keep (headlight/turn signals, windshield washer, etc.) that are not controlled by the Miata ECU, but there are areas that I have no idea what to do.
The Miata ECU has 2 connectors with connections A-V on connector 1 and A-Z on connector 2.
Connector #1:
A: BLU-RED – Room Fuse – What do I do with this one?
B: WHT-RED – Removed
C: VIO – ST Sign Fuse and Circuit Opening Relay – What do I do with this one?
D: WHT-GRN – To Diagnostic Connector – Removed
E: YEL-BLK – To Check Engine Indicator on Instrument Cluster. Splice into GM Check Engine Wire?
F: WHT-YEL – To Diagnostic Indicator – Removed
G: BRN-YEL – To Igniter – Removed
H: BRN – To Igniter – Removed
I: N/A
J: BLU-BLK – To A/C Relay - What do I do with this one? I plan to run A/C.
K: LT GRN-YEL : To Diagnostic Indicator – Removed
L: N/A
M: N/A
N: RED – To Throttle Sensor - Removed
O: GRN – Stop Light Switch? - What do I do with this one?
P: BLU-YEL – Power Steering Pressure Switch?? What do I do with this one? I plan to run P/S.
R: BLK-GRN – Cooling Fan Relay – What do I do with this one?
S: BLU-ORG – Heater Control Unit - What do I do with this one?
T: N/A
U: RED-BLK: Tail Fuse - What do I do with this one?
V: BRN-WHT: Clutch SW - What do I do with this one?
Connector #2 seems like it can be removed completely. I’ve gone through and removed those wires.
Last edited by ordonez1307; 12-21-2015 at 08:06 AM.
01-05-2016, 01:16 PM
#57
V8 Miata Follower
Thread Starter
1/5/16 Update:
Didn't get much done over the holidays, but got back to it last weekend.
Also, just placed the order for my clutch. Maryland Speed had $125.00 off and free shipping for all Monster clutches.
Monster Clutches Level 2 -
Tick Speed Bleeder
Flywheel Type: Lightweight (18lbs)
Package Type: Premium - Includes 4th Gen F-Body Slave
I also ordered the brake master cylinder out of a the 1996 Explorer from Rockauto.
And all of my fuel line stuff. I'm a copy cat and went with itsallrigged's and stng96's setups.
1x - Ridgid 41162 377 Flare Tool
1x - OTC 6515 3-in-1 180 Degree Heavy Duty Tubing Bender
1x - Wix 33737 Complete In-Line Fuel Filter
1x - Walbro GSS342-400-791 With Install Kit
1x - Allstar Performance 304 Stainless Steel Fuel Line 3/8" x 20' Coil 48322 - ALL48322
1x - Russell 610025 - Russell AN ProClassic II Hose End Fittings - Black
1x - Russell 610165 - Russell AN ProClassic II Hose End Fittings - Black
6x - Earl's AT581906 - Earl's Ano-Tuff Hard-Line AN Tube Sleeves & Nuts
6x - Earls AT581806ERL -6 AN Ano-Tuff Tube Nut, Anodized Aluminum, Pair
4' - Spectre 29404 - Spectre SSteel-Flex Hose
3x - LS1/LT1 EFI Fuel Line Fitting, -6 AN Male to 3/8 Inch Female, Black- 61744123
2x - LS1/LT1 EFI Fuel Line Fitting, -6 AN Male to 5/16 Inch Female, Black- 61744113
1x - Earls 981506ERL Blue Anodized -6 AN Male Union
1x - AN6 to 3/8 Inch Push-On for EFI - 61764940
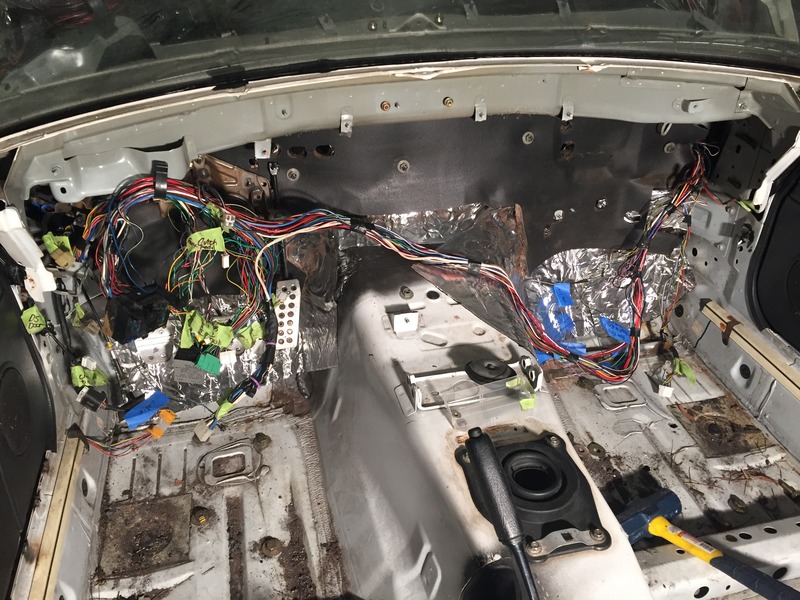
As for actual progress... I got the Miata harness back in the car. Still lots of questions and I hope it's right. Also, the pedals are mounted.
And got the clutch MC, vacuum booster, fuse box, and washer fluid bottles back in.
Didn't get much done over the holidays, but got back to it last weekend.
Also, just placed the order for my clutch. Maryland Speed had $125.00 off and free shipping for all Monster clutches.
Monster Clutches Level 2 -
Tick Speed Bleeder
Flywheel Type: Lightweight (18lbs)
Package Type: Premium - Includes 4th Gen F-Body Slave
I also ordered the brake master cylinder out of a the 1996 Explorer from Rockauto.
And all of my fuel line stuff. I'm a copy cat and went with itsallrigged's and stng96's setups.
1x - Ridgid 41162 377 Flare Tool
1x - OTC 6515 3-in-1 180 Degree Heavy Duty Tubing Bender
1x - Wix 33737 Complete In-Line Fuel Filter
1x - Walbro GSS342-400-791 With Install Kit
1x - Allstar Performance 304 Stainless Steel Fuel Line 3/8" x 20' Coil 48322 - ALL48322
1x - Russell 610025 - Russell AN ProClassic II Hose End Fittings - Black
1x - Russell 610165 - Russell AN ProClassic II Hose End Fittings - Black
6x - Earl's AT581906 - Earl's Ano-Tuff Hard-Line AN Tube Sleeves & Nuts
6x - Earls AT581806ERL -6 AN Ano-Tuff Tube Nut, Anodized Aluminum, Pair
4' - Spectre 29404 - Spectre SSteel-Flex Hose
3x - LS1/LT1 EFI Fuel Line Fitting, -6 AN Male to 3/8 Inch Female, Black- 61744123
2x - LS1/LT1 EFI Fuel Line Fitting, -6 AN Male to 5/16 Inch Female, Black- 61744113
1x - Earls 981506ERL Blue Anodized -6 AN Male Union
1x - AN6 to 3/8 Inch Push-On for EFI - 61764940
As for actual progress... I got the Miata harness back in the car. Still lots of questions and I hope it's right. Also, the pedals are mounted.

And got the clutch MC, vacuum booster, fuse box, and washer fluid bottles back in.

Last edited by ordonez1307; 01-05-2016 at 01:39 PM.
01-14-2016, 12:17 PM
#58
V8 Miata Follower
Thread Starter
1/14/16 Update:
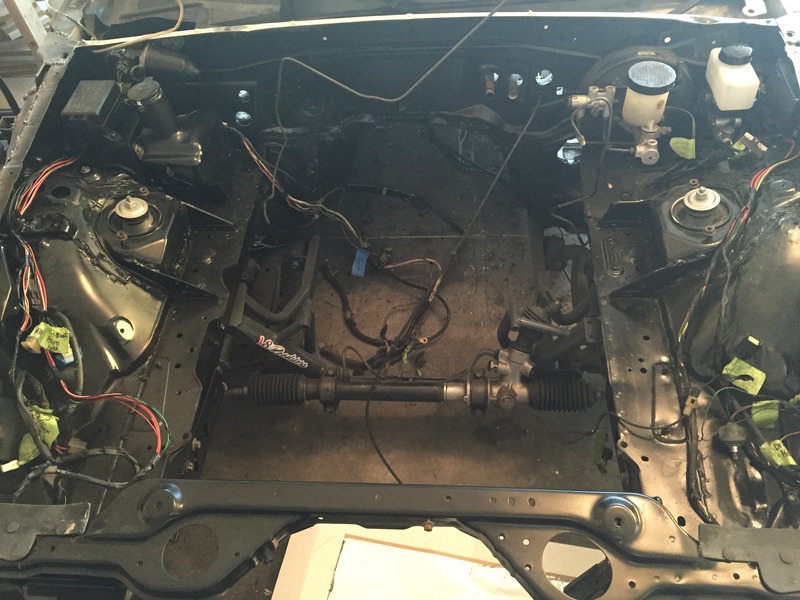
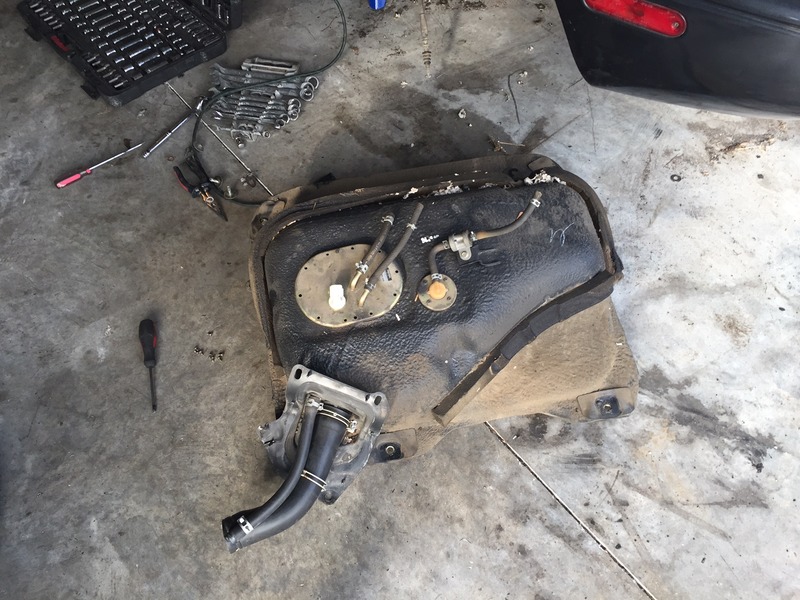
Dropped the Rear End and Fuel Tank this weekend.
I also just ordered the Wilwood 11.75" Brake Upgrade for the fronts with Hawk HPS pads, 2004 Miata "Sport" brakes on the rear with HPS pads, proportioning valve, 1996 Ford Explorer Master Cylinder, and stainless steel brake lines.
Dropped the Rear End and Fuel Tank this weekend.


I also just ordered the Wilwood 11.75" Brake Upgrade for the fronts with Hawk HPS pads, 2004 Miata "Sport" brakes on the rear with HPS pads, proportioning valve, 1996 Ford Explorer Master Cylinder, and stainless steel brake lines.
Last edited by ordonez1307; 01-14-2016 at 01:25 PM.
01-14-2016, 01:05 PM
#59
V8 Miata Fanatic

So I hadn't looked at this in a while, but I assume you got your wiring all figured out? Looking back the wiring was not near as bad as what I thought it was going to be, but in case you haven't finished I'll offer this tid-bit.
My advice would be leave things in place until you know you don't need them. For example, you asked about the cooling fan relays, I rewired the miata relays so the GM PCM would signal them to turn the fans on. I figured that the mazda wiring was already there, why not use it.
My advice would be leave things in place until you know you don't need them. For example, you asked about the cooling fan relays, I rewired the miata relays so the GM PCM would signal them to turn the fans on. I figured that the mazda wiring was already there, why not use it.
The following users liked this post:
charchri4 (01-18-2016)
01-18-2016, 11:41 AM
#60
Jim Stainer
Been a while since I have been here too how is it going? Seriously if you are still stuck PM me or better yet Travis as he just went through it and it's fresh in his mind.
The Miata ECU has 2 connectors with connections A-V on connector 1 and A-Z on connector 2.
Connector #1:
A: BLU-RED � Room Fuse � What do I do with this one? If that is the keyed B+ I am thinking of I used that one to run my aux power panel and Dakota Digital box
B: WHT-RED � Removed
C: VIO � ST Sign Fuse and Circuit Opening Relay � What do I do with this one? I can't remember off the top of my head what that is which means I probably just taped it up and abandoned it
D: WHT-GRN � To Diagnostic Connector � Removed
E: YEL-BLK � To Check Engine Indicator on Instrument Cluster. Splice into GM Check Engine Wire?Yes you run your check engine light from the GM computer there
F: WHT-YEL � To Diagnostic Indicator � Removed
G: BRN-YEL � To Igniter � Removed
H: BRN � To Igniter � Removed
I: N/A
J: BLU-BLK � To A/C Relay - What do I do with this one? I plan to run A/C. That one you have to put a relay in because GM switches their AC ground side and Mazda does it hot but still you use it to trigger the AC from the GM computer
K: LT GRN-YEL : To Diagnostic Indicator � Removed
L: N/A
M: N/A
N: RED � To Throttle Sensor - Removed
O: GRN � Stop Light Switch? - What do I do with this one? I used it for my after market cruise control if it's the one I'm thinking of
P: BLU-YEL � Power Steering Pressure Switch?? What do I do with this one? I plan to run P/S.Abandon it
R: BLK-GRN � Cooling Fan Relay � What do I do with this one? Run it to the right pin of the GM computer cooling fan low to run your fans
S: BLU-ORG � Heater Control Unit - What do I do with this one? Doesn't ring a bell so I probably abandoned it
T: N/A
U: RED-BLK: Tail Fuse - What do I do with this one? That is one of many in the circuit and should be OK to remove
V: BRN-WHT: Clutch SW - What do I do with this one? Clutch to start cut out is the same in the V8 as stock and is used to you have to have the clutch depressed for the engine to turn over. That is a Mazda system that shouldn't be impacted with the swap as I recall
That is all off the top of my head from 3 years ago so I may be a little off but not by much.
04-11-2016, 02:56 PM
#61
V8 Miata Follower
Thread Starter
Way too long between updates:
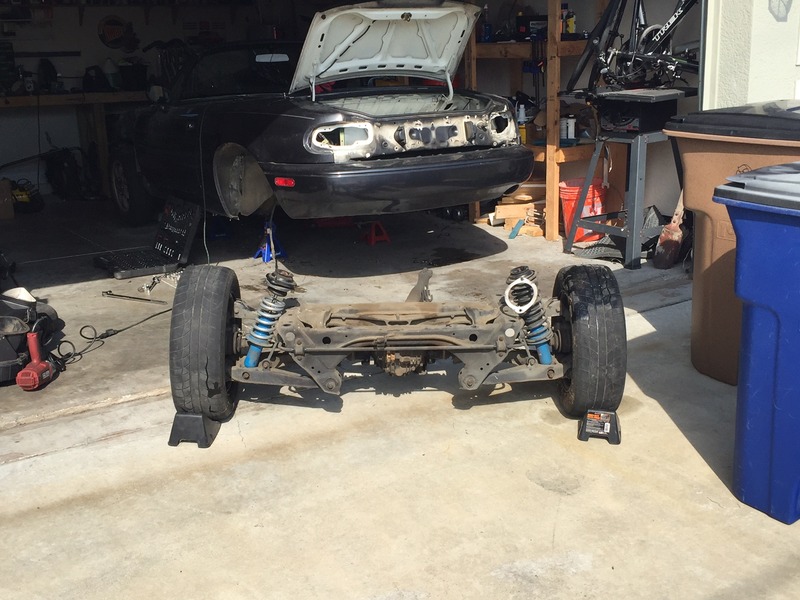
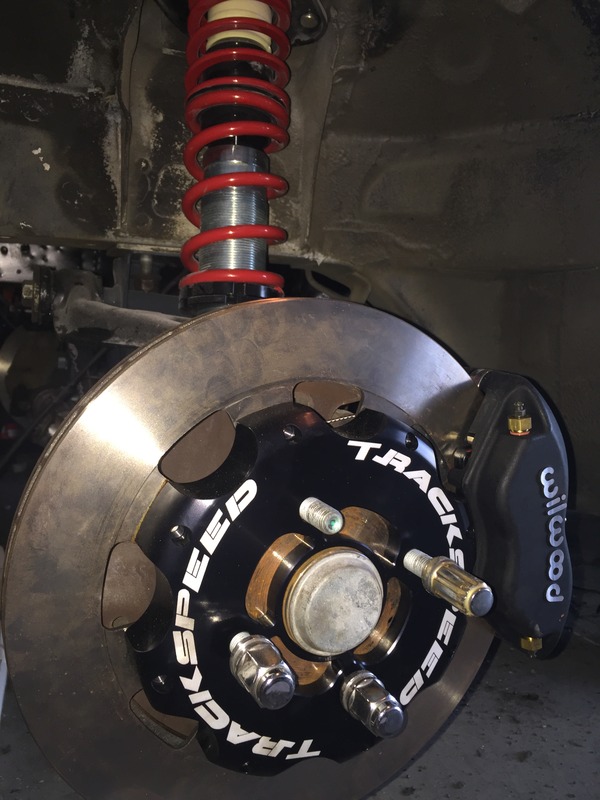
Got the Flyin' Miata Coilover front suspension and Wilwood/Trackspeed BBK together with some help from Django:
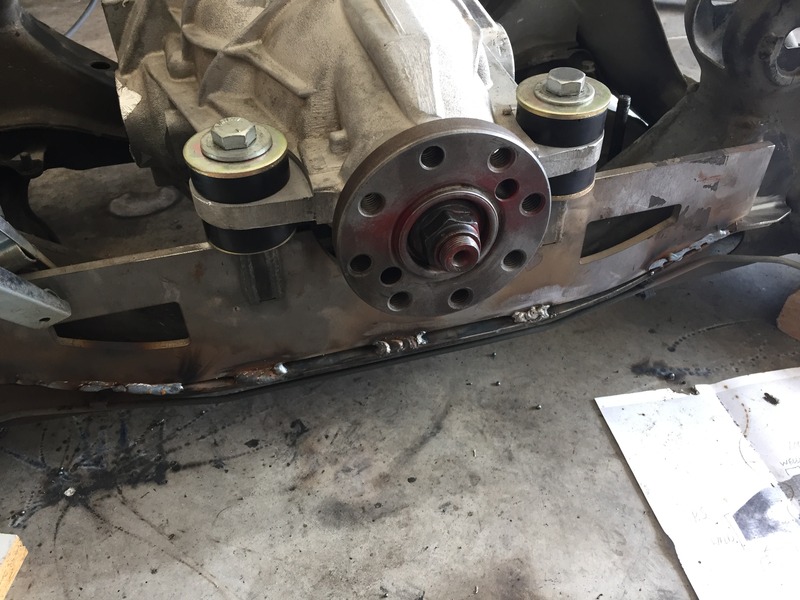
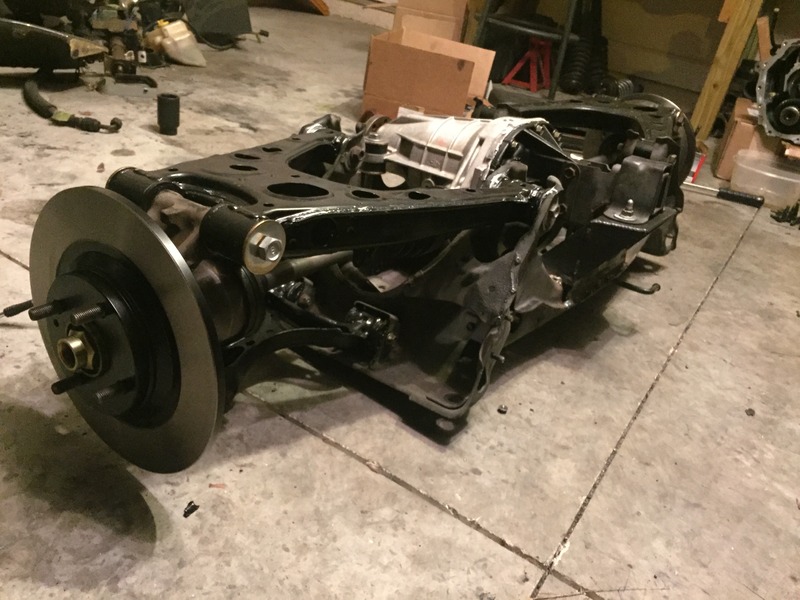
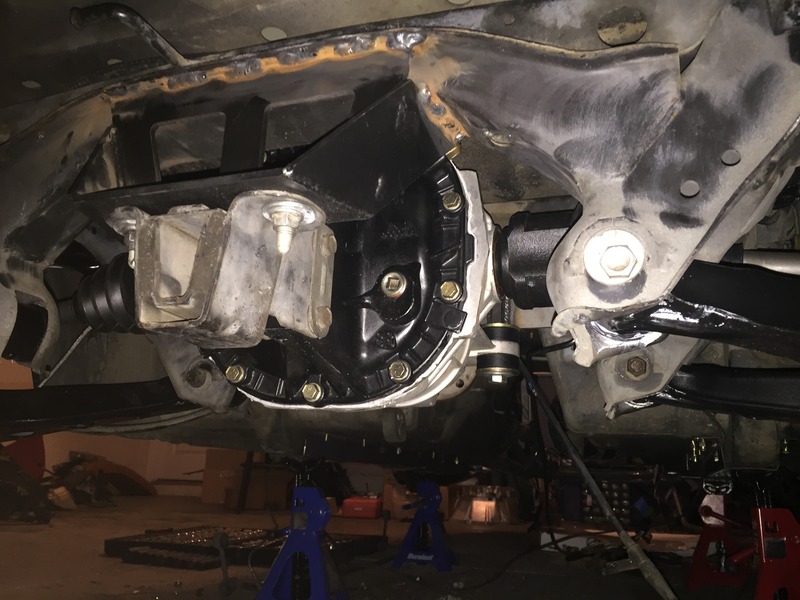
And started mounting everything to the rear end. Poly bushings, new wheel bearings, Martin's mounting kit, Super Coupe Bushings, and a Lincoln 8.8 LSD w/ 3.27's:
Got the Flyin' Miata Coilover front suspension and Wilwood/Trackspeed BBK together with some help from Django:


And started mounting everything to the rear end. Poly bushings, new wheel bearings, Martin's mounting kit, Super Coupe Bushings, and a Lincoln 8.8 LSD w/ 3.27's:

 04-13-2016, 10:23 AM
#62
V8 Miata Fanatic


Alright! Glad to see your updates and pics. Front rotor is almost too pretty to cover up with wheels & tires.
I went back through your thread, and may be missed this ---But which 8.8 diff kit are you using? Looks good and definitely not V8R kit... I like it though.
I went back through your thread, and may be missed this ---But which 8.8 diff kit are you using? Looks good and definitely not V8R kit... I like it though.
04-14-2016, 02:18 PM
#63
V8 Miata Follower
Thread Starter
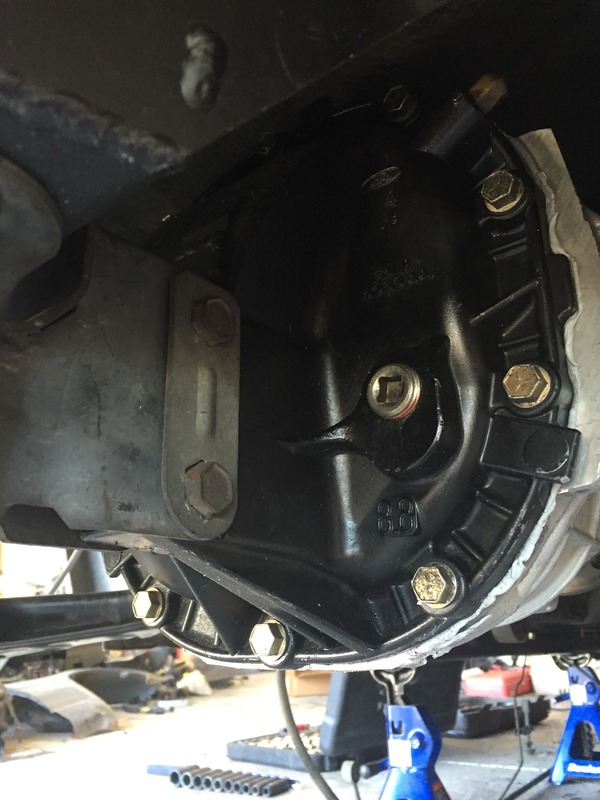
The rear end kit is Martin's 8.8 kit. I'm not sure if he has revised it from before, but you're right. It looks very different from the V8R kit.
04-17-2016, 08:10 AM
#64
V8 Miata Follower
Thread Starter
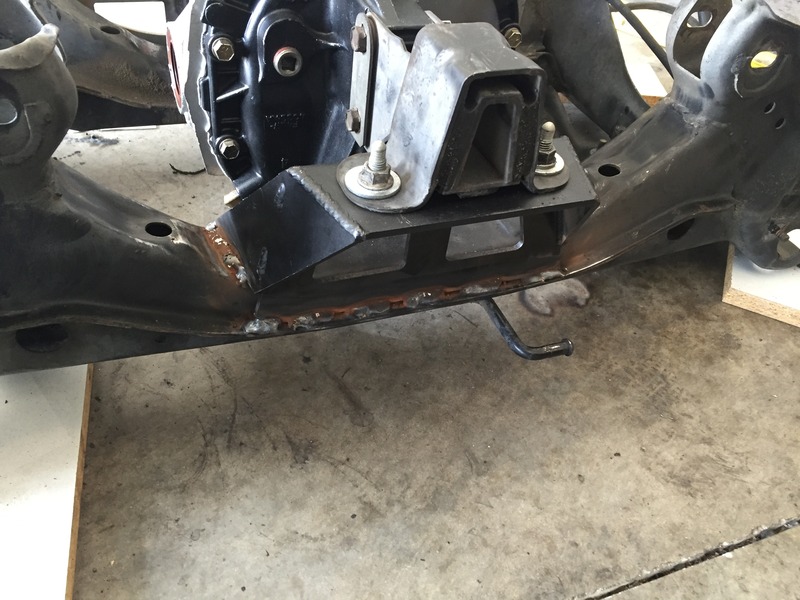
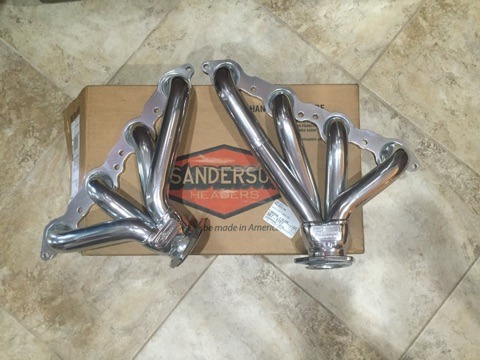
4/17/16 Update:
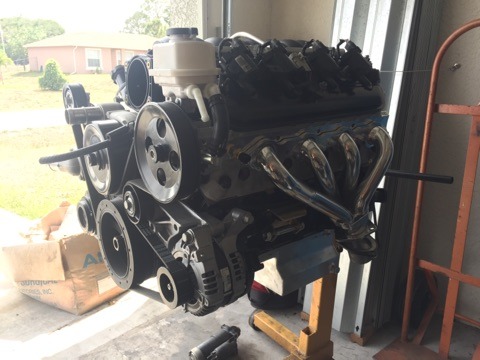
Got the Sanderson Headers today:
And mounted them up:
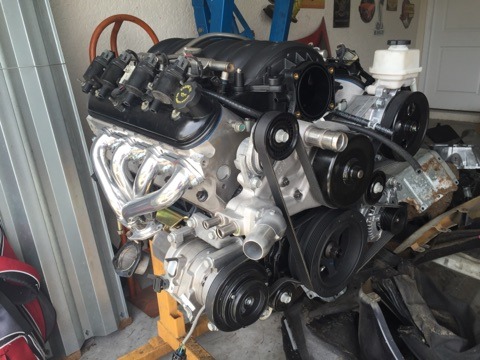
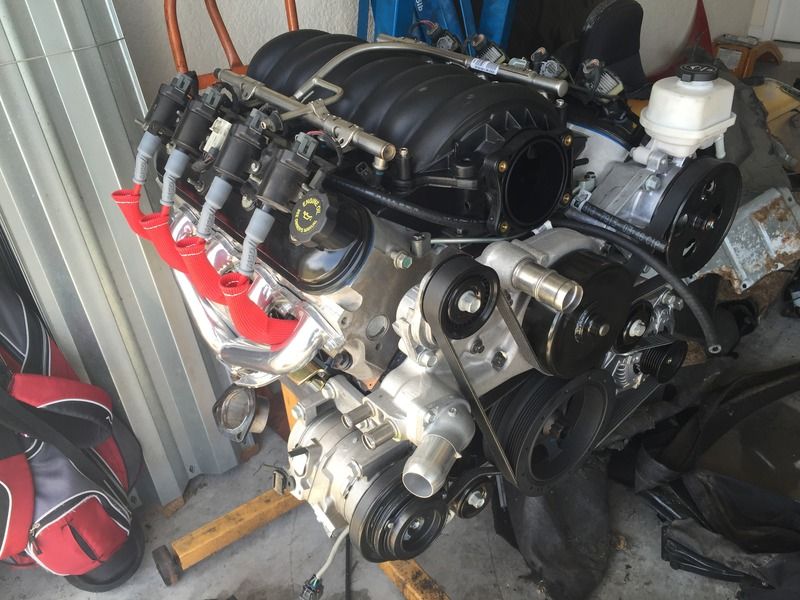
I also got the steam tubes routed, and the LS2 intake manifold/fuel lines/injectors mounted up.
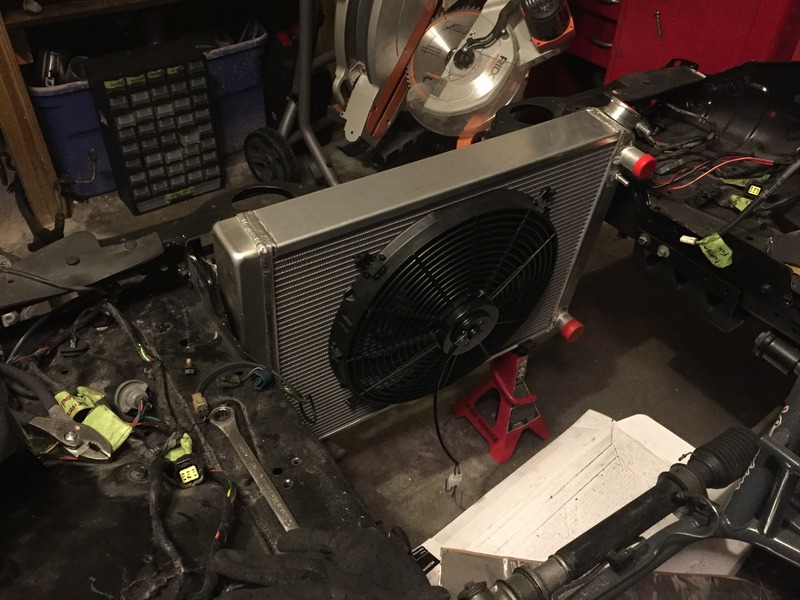
Playing with the radiator mounting this weekend. I'll post some pics up of that when I get a little further along.
Small update from last night:
Installed the NGK TR-55's, and the MSD 8.5mm plug wires and boot protectors:

I've also got the fuel lines half-together, a half-built rear end, a torn apart wiring harness, a dirty garage.... ha... I guess no one said all of this was easy.
Got the Sanderson Headers today:

And mounted them up:


I also got the steam tubes routed, and the LS2 intake manifold/fuel lines/injectors mounted up.
Playing with the radiator mounting this weekend. I'll post some pics up of that when I get a little further along.
Small update from last night:
Installed the NGK TR-55's, and the MSD 8.5mm plug wires and boot protectors:


I've also got the fuel lines half-together, a half-built rear end, a torn apart wiring harness, a dirty garage.... ha... I guess no one said all of this was easy.
Last edited by ordonez1307; 04-18-2016 at 09:51 AM.
04-17-2016, 09:24 AM
#65
V8 Miata Participant

You may need to dimple the tube to clear the steering shaft to the box. The alternative is to lengthen the box side of the steering knuckle by 2-3". It moves the joint outward without getting into bind and buys you some real estate for the shaft. I did that on my Exocet. The shaft is splined to adjust the length.
As for the radiator. If you are thinking hood pins, you can cut the rad support and replace the section the is curved in toward the engine with angle iron. I was able to get the rad 3" forward and 1 1/2" down on my LS Miata by doing that.
PM me if you want pics of that Mod.
As for the radiator. If you are thinking hood pins, you can cut the rad support and replace the section the is curved in toward the engine with angle iron. I was able to get the rad 3" forward and 1 1/2" down on my LS Miata by doing that.
PM me if you want pics of that Mod.
04-18-2016, 09:19 AM
#66
V8 Miata Follower
Thread Starter
You may need to dimple the tube to clear the steering shaft to the box. The alternative is to lengthen the box side of the steering knuckle by 2-3". It moves the joint outward without getting into bind and buys you some real estate for the shaft. I did that on my Exocet. The shaft is splined to adjust the length.
As for the radiator. If you are thinking hood pins, you can cut the rad support and replace the section the is curved in toward the engine with angle iron. I was able to get the rad 3" forward and 1 1/2" down on my LS Miata by doing that.
PM me if you want pics of that Mod.
As for the radiator. If you are thinking hood pins, you can cut the rad support and replace the section the is curved in toward the engine with angle iron. I was able to get the rad 3" forward and 1 1/2" down on my LS Miata by doing that.
PM me if you want pics of that Mod.
04-20-2016, 07:12 AM
#67
V8 Miata Follower
Thread Starter
Got the axles in and put most of the rear end together tonight. Put the SS brake lines on there, and will be painting up the calipers to put the rear brakes together.


 04-25-2016, 08:59 AM
#69
V8 Miata Follower
Thread Starter
4/25/16 Update:
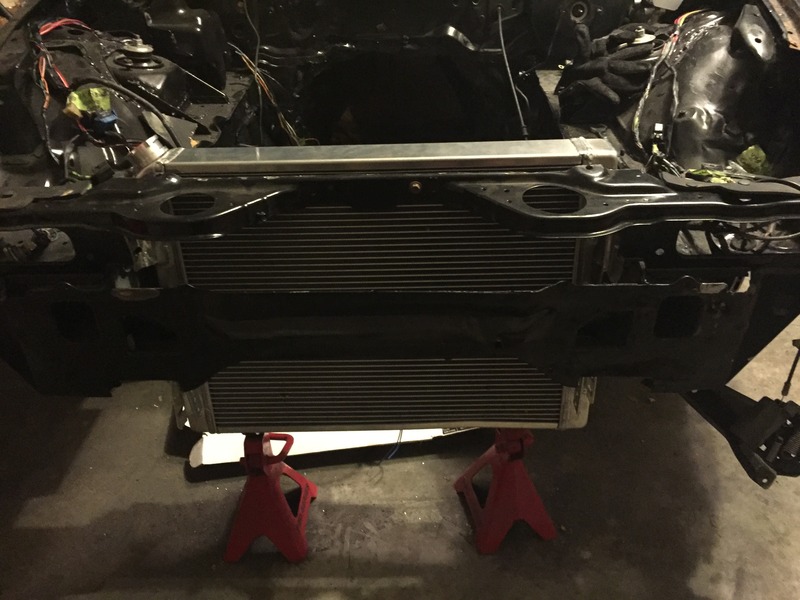
Got the radiator 99% mounted. I want to leave a little adjustment for when the hood/AC/motor/sway bar are all there.
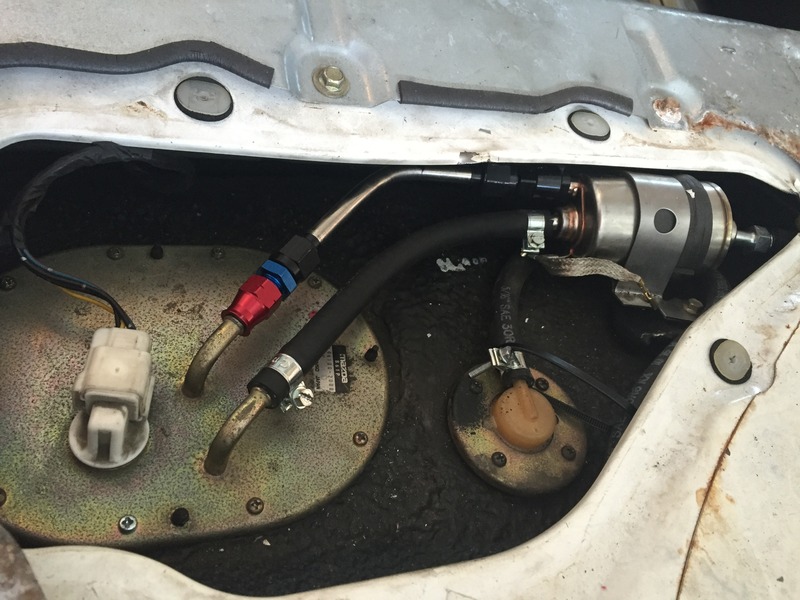
Got the hard fuel lines completed up to the bay, where it transitions to braided:
And got the rear end back in it:
Overall it was a very productive weekend.
I guess the next step for me is to put the clutch/bellhousing on the back of the motor and drop it in.
Still waiting on the V8R oil pan, though. So I'll get as far as I can.
Got the radiator 99% mounted. I want to leave a little adjustment for when the hood/AC/motor/sway bar are all there.


Got the hard fuel lines completed up to the bay, where it transitions to braided:

And got the rear end back in it:


Overall it was a very productive weekend.
I guess the next step for me is to put the clutch/bellhousing on the back of the motor and drop it in.
Still waiting on the V8R oil pan, though. So I'll get as far as I can.
04-28-2016, 08:43 PM
#71
V8 Miata Participant
Sorry it took so long to find these... the car is in NOLA now.
The steering shaft was close to the header and they came with a dimple across the collector above the flange. You will know where if you need to.
With the rad I cut the support straight across and used the bumper cover bolts as a guide. Drilled through the angle iron and also added a couple bolts on the ends parallel to the rad. Drilled a couple holes for bolts to pass through the stock rubber mounts and was done. You can also cut off the factory lower hooks and tack them in place to fit. That was a 3 1/2" Griffin Radiator so it was overkill.
As for the steering knuckle, cutting off the splined part close to the clamp and adding in a piece of proper tubing is all you need to do. I added 2" to it and could have gone more. It moves the bottom of the shaft away from the engine without putting the knuckle in bind. I have had no problems with it on either car.
05-05-2016, 10:09 AM
#72
V8 Miata Follower
Thread Starter
5/5/16 Update:
The V8R Oil Pan came in. So I'm going to be mounting it up this weekend.
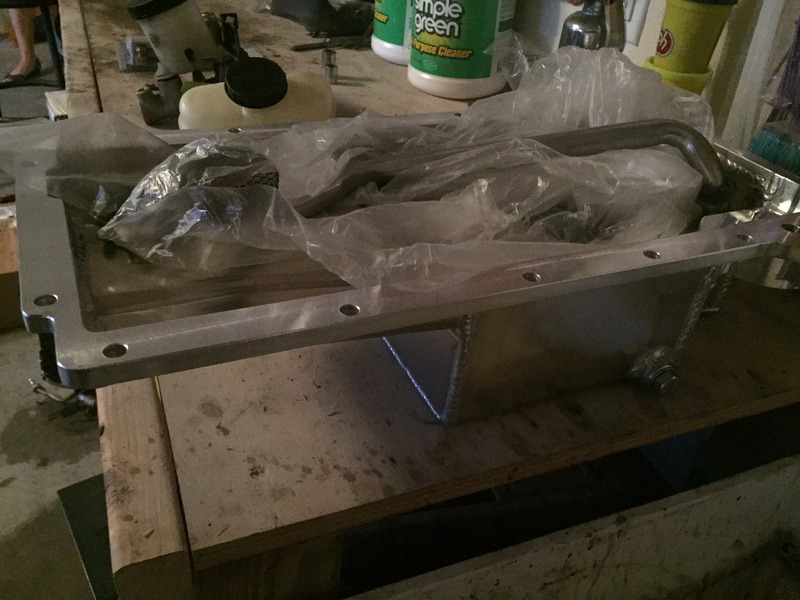
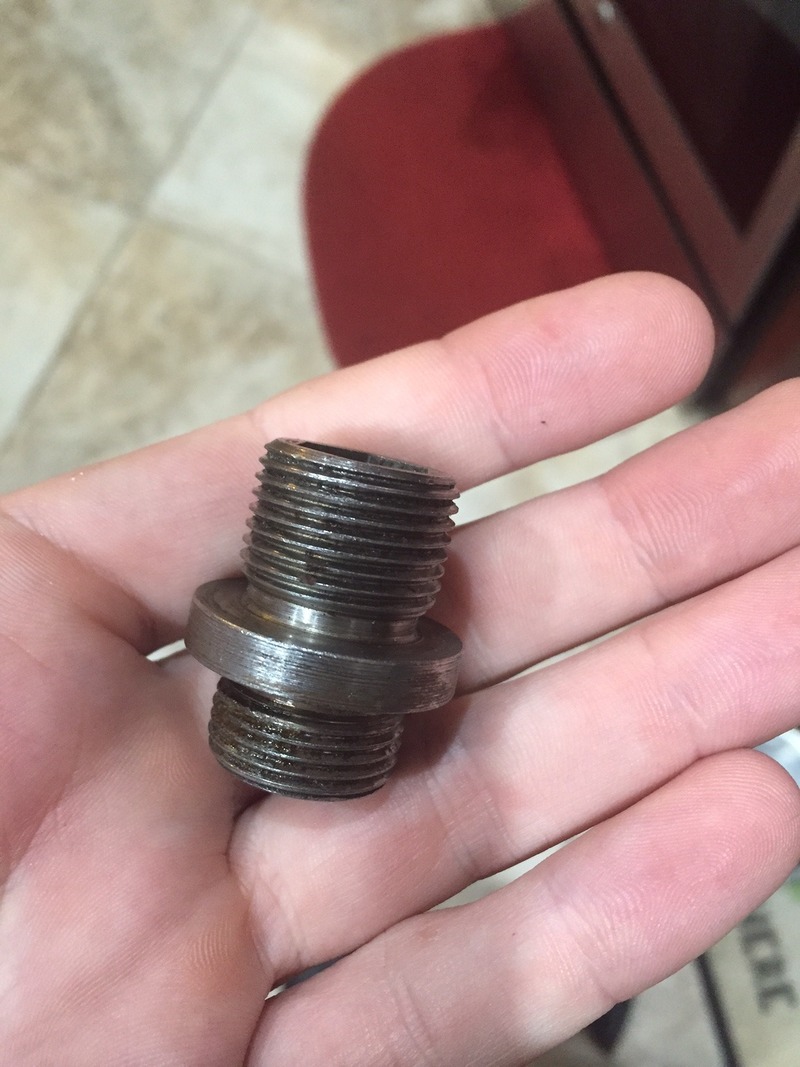
Can someone tell me what this is? It came in the oil pan box from V8R.
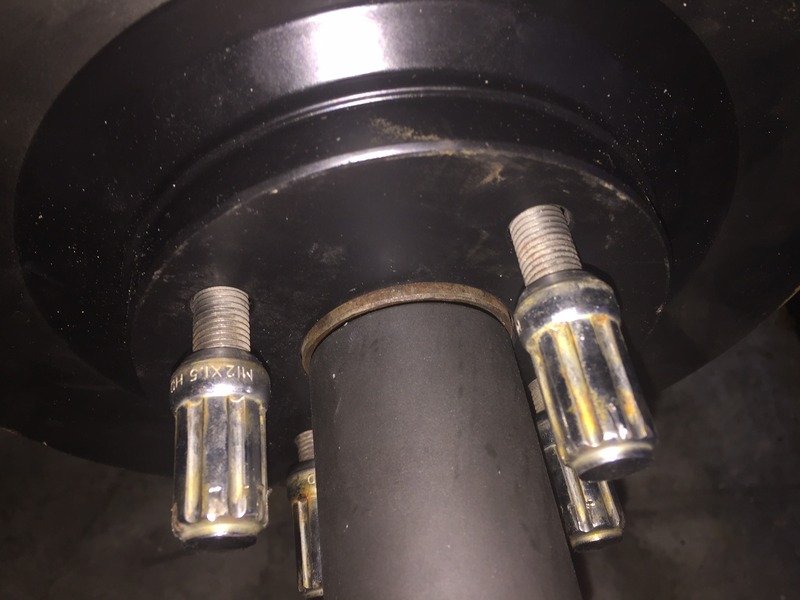
Currently working on the rear brakes/suspension.
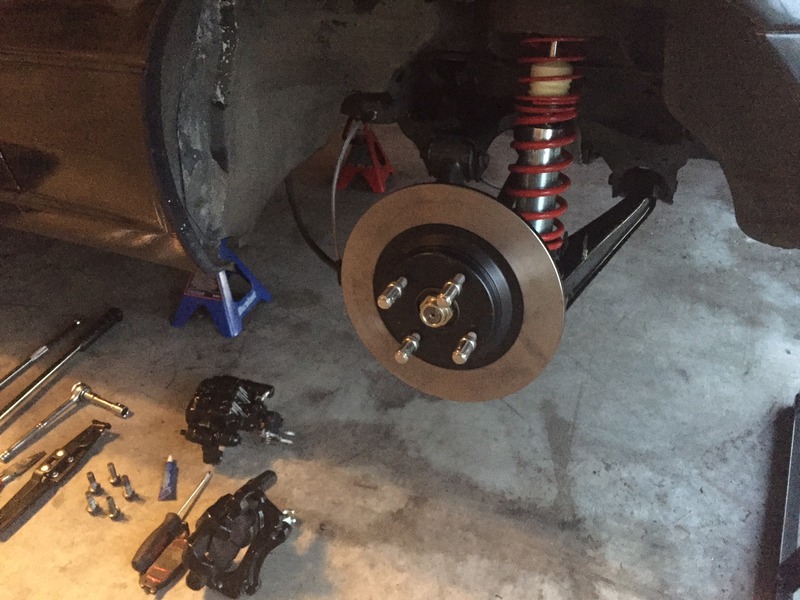
But ended up halted until I can find a 36MM axle socket that will fit inside of the miata hub. Anyone else have this problem? The socket is too big to fit inside of the hub to tighten it. It's tough to photograph what I'm saying.
The V8R Oil Pan came in. So I'm going to be mounting it up this weekend.

Can someone tell me what this is? It came in the oil pan box from V8R.

Currently working on the rear brakes/suspension.

But ended up halted until I can find a 36MM axle socket that will fit inside of the miata hub. Anyone else have this problem? The socket is too big to fit inside of the hub to tighten it. It's tough to photograph what I'm saying.

 05-06-2016, 01:51 AM
#75
V8 Miata Participant
I agree... Craftsman makes large sockets that are non-impact that will fit. That said, either go easy with your gun or get a swamp pipe to toss over the handle of your longest breaker bar and do it by hand.


