When you click on links to various merchants on this site and make a purchase, this can result in this site earning a commission. Affiliate programs and affiliations include, but are not limited to, the eBay Partner Network.
I thought I would start my build thread with a build spec so that everyone gets a taste of what my end goal or strategy is for the car and that in turn will influence what the build will be..
Intended purpose: Weekend cruiser, weekend away car for me and the wife
Must have attributes: Easy to drive, reliable and comfortable and very very fast!
Spec Sheet: 2001 NB Series 2, 425hp 331 Ford Stroker, T5z, 7.5 diff 3.27 gears
OK...First things first...I don't have a car yet...LOL...yes that's right I am starting the build off with the engine build. Once I get the drivetrain and the front and rear subframes built...I will buy a car and swap them over.
The spec sheet for my little 331 is as follows:
So the build spec sheet is as follows..
STD Ford Roller Block
bore, hone, line hone, deck machining - 4.030
ARP Studs Main and Heads (80 ft/lbs main and head torque)
SCAT CAST Steel Crank 9000 series (28oz)
SCAT Rods 5.4 inch I Beams
King Bearings (1.8 thou main clearance and 1.5 thou conrod clearance)
Crank End float 6-8 thou
Camshaft end float 4-6 thou
Mahle Pistons PowerPack flat tops Twisted Wedge valve cutouts (10:1) (These were selected for their light weight, great quality and small piston to bore clearances...much better than many other brands...)
mellings 86 oil pump and ARP pump drive
Custom FTI Ed Curtis Camshaft (...operating range effective 2250-6250rpm..max HP is about 6000 rpm)
Trickflow 1.72 Roller rockers (TFS guide plates and moly pushrods)
Ford Racing Roller Lifters - High performance type
Rollmaster timing set
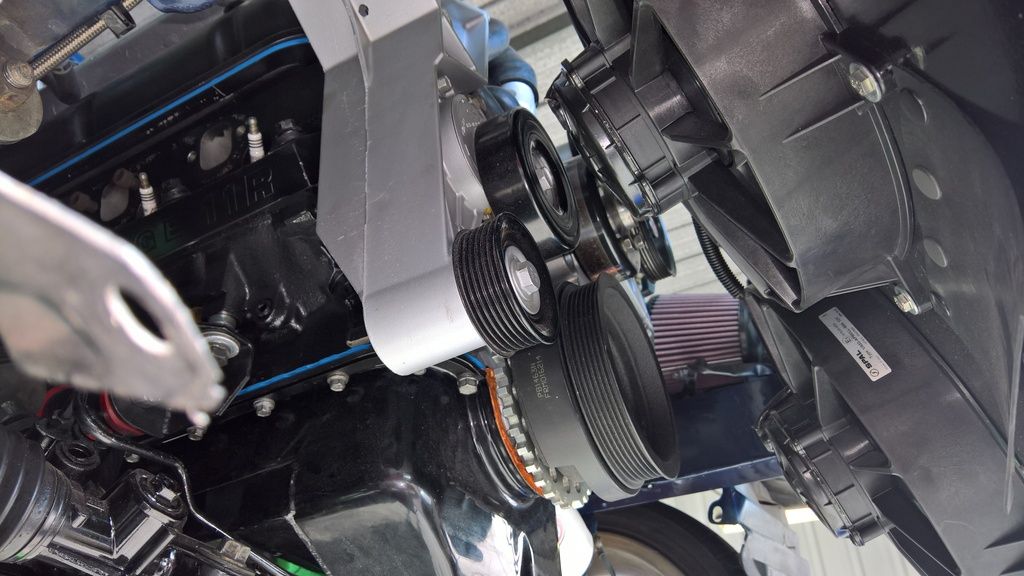
New front cover and water pump (GMB OEM water pump)
Trickflow 190cc 11R twisted wedge heads
Trickflow TFS R Intake
80-85mm throttle Body
39 lb ford racing injectors
90mm ford lighning maf
Aeromotive Adjustable Fuel Regulator
Motorcraft Coils
Bougicord OEM leads
Trickflow Rocker covers cast aluminium (required to clear roller rockers)
Gaskets all Felpro Performance range (head gaskets are cometic/trickflow MLS)
That's it for the spec sheet...I will post up pictures as I get started on the build...parts are in transit from Summit racing...
Its great to be here...and I can't wait to see this thing finished...but there will be many headaches before then I am sure!!
I can't actually believe that it has been 2 years since I opened up this post..but it has.
Over the last 24 months I have been slowly amassing my plans, parts and wits to begin the rebuild and rebirth of my 2001 NB Miata/MX5.
This is where I am at:
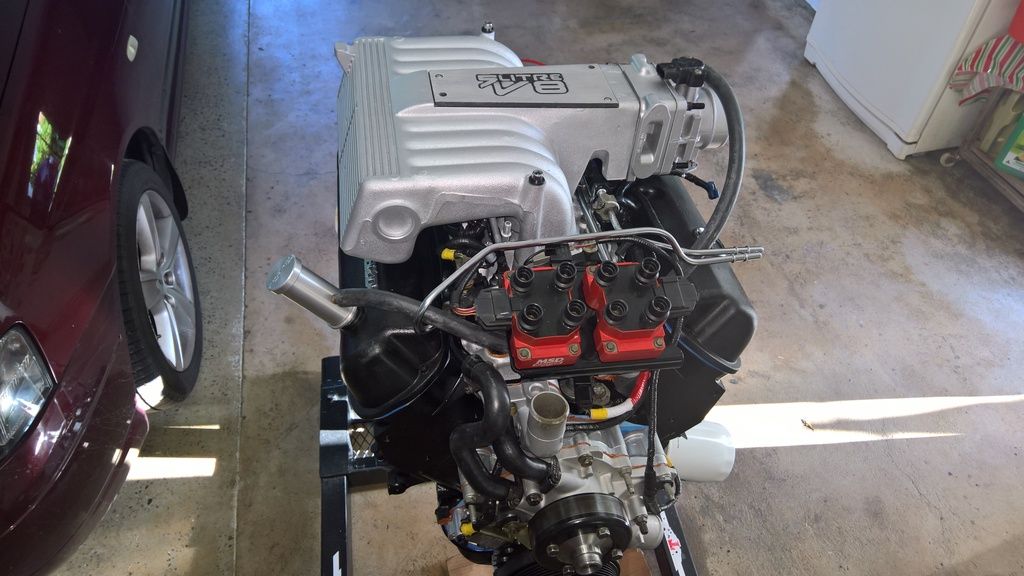
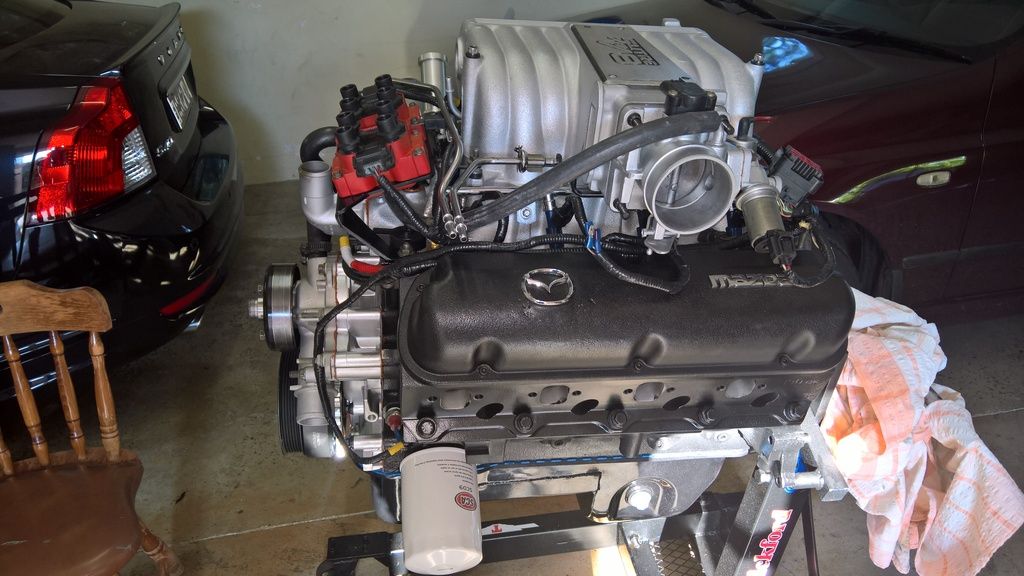
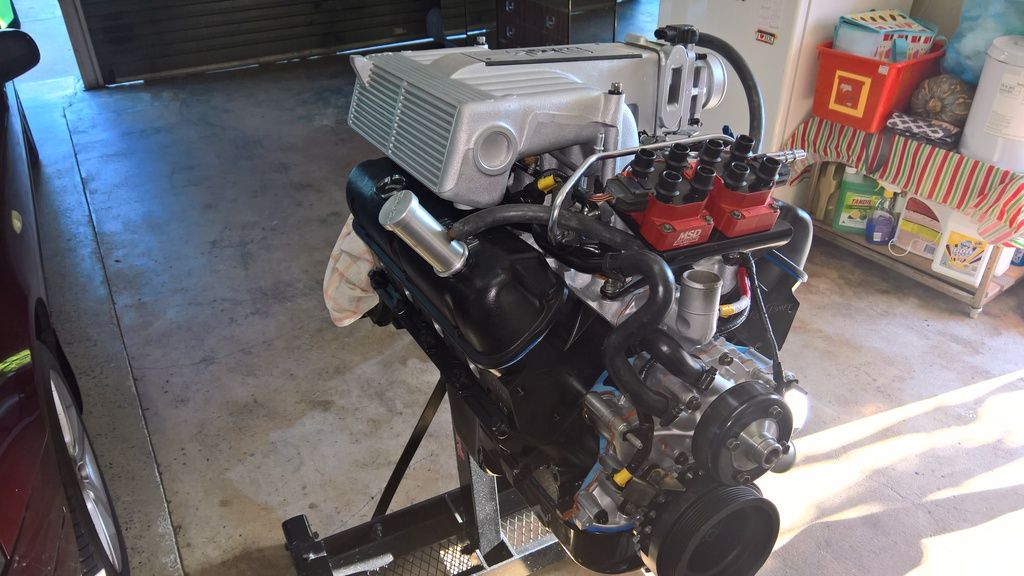
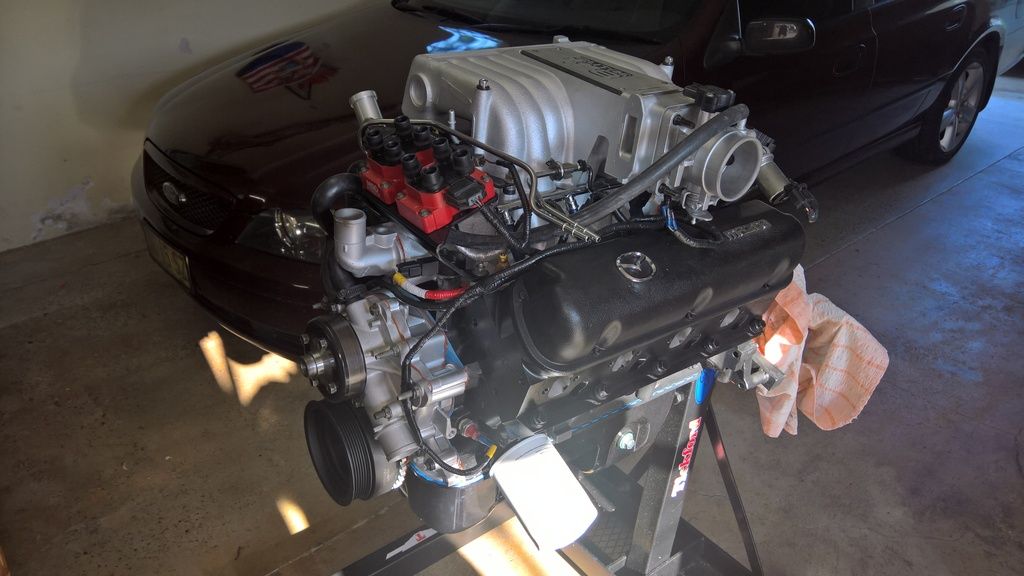
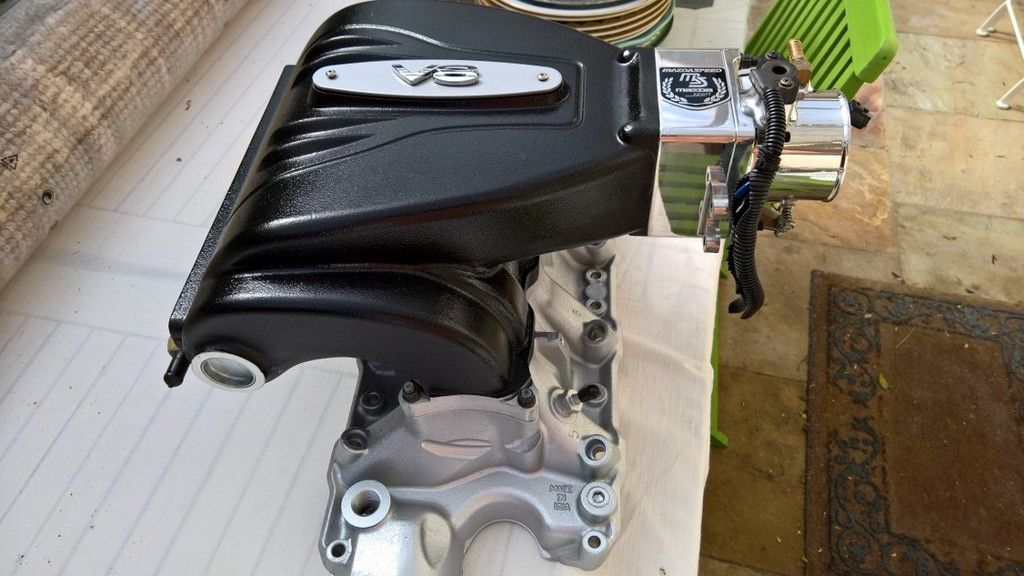
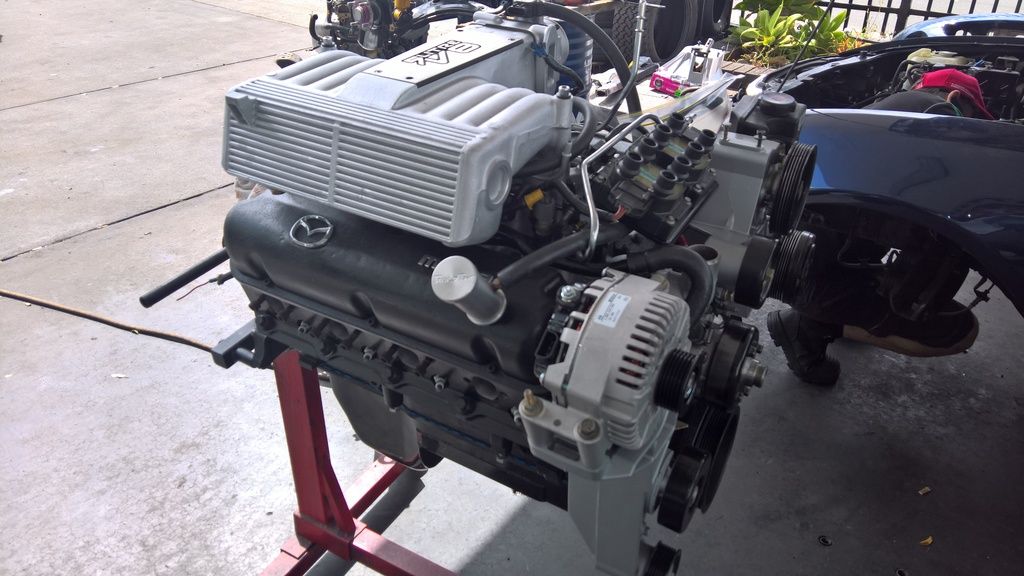
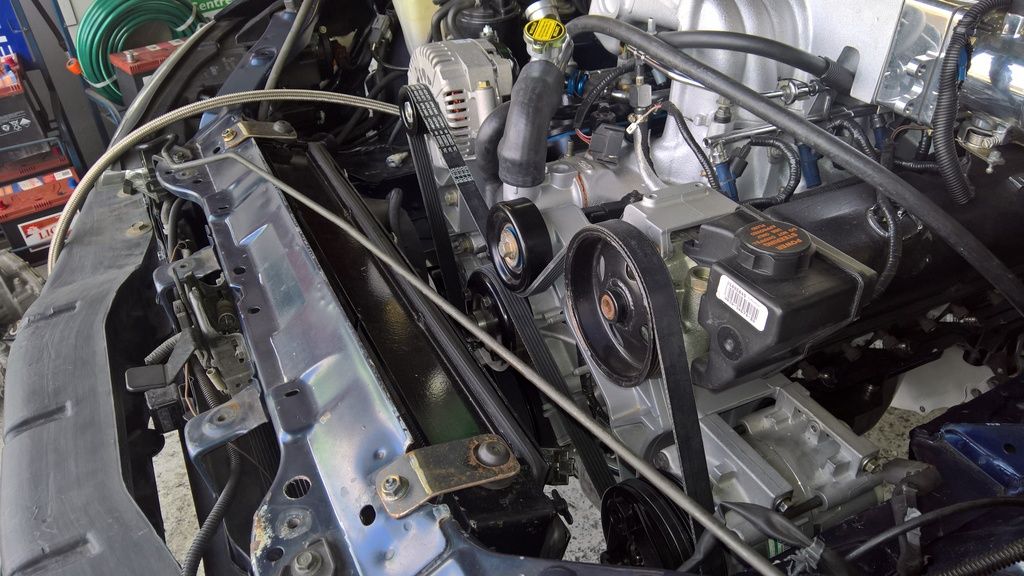
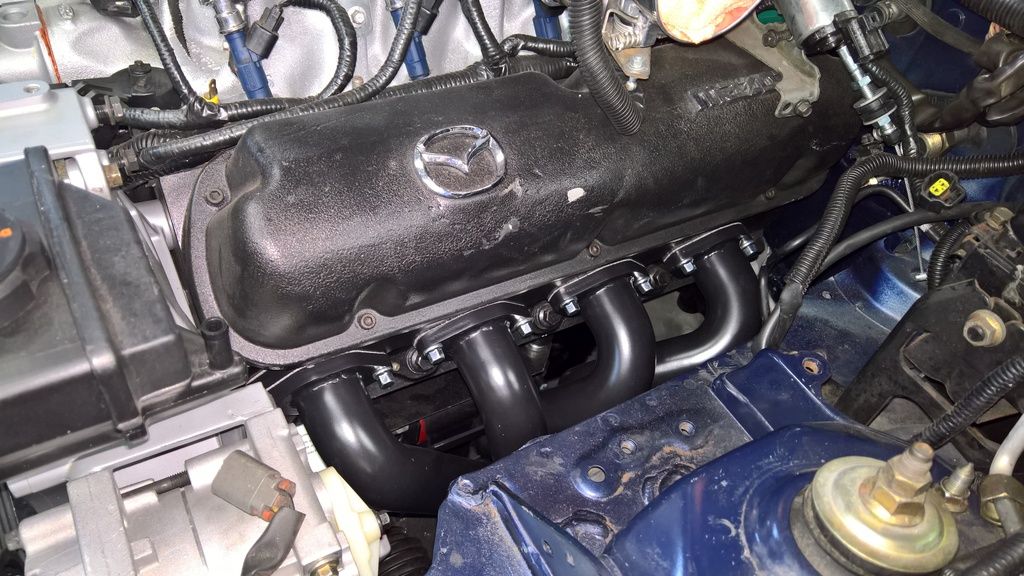
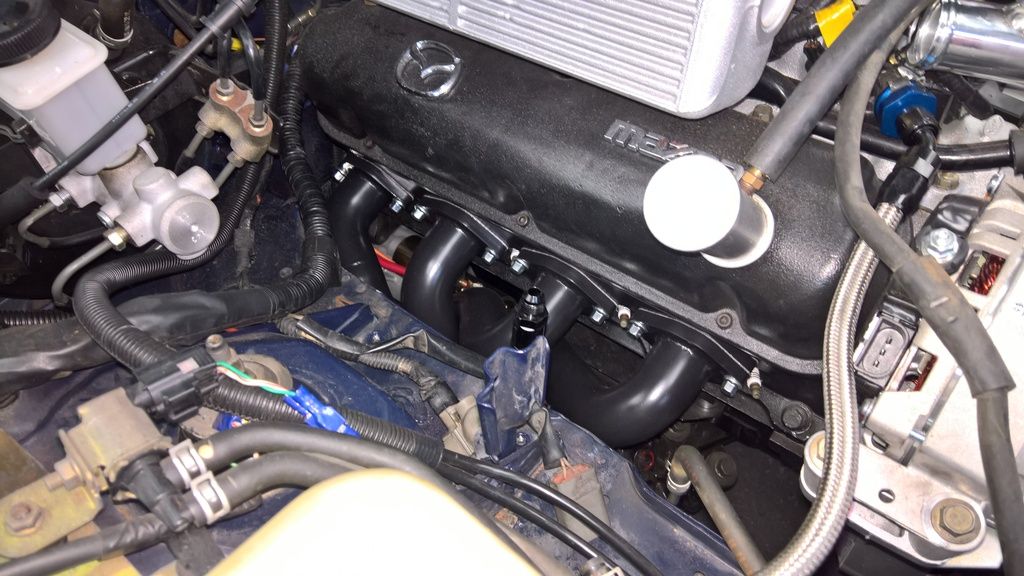
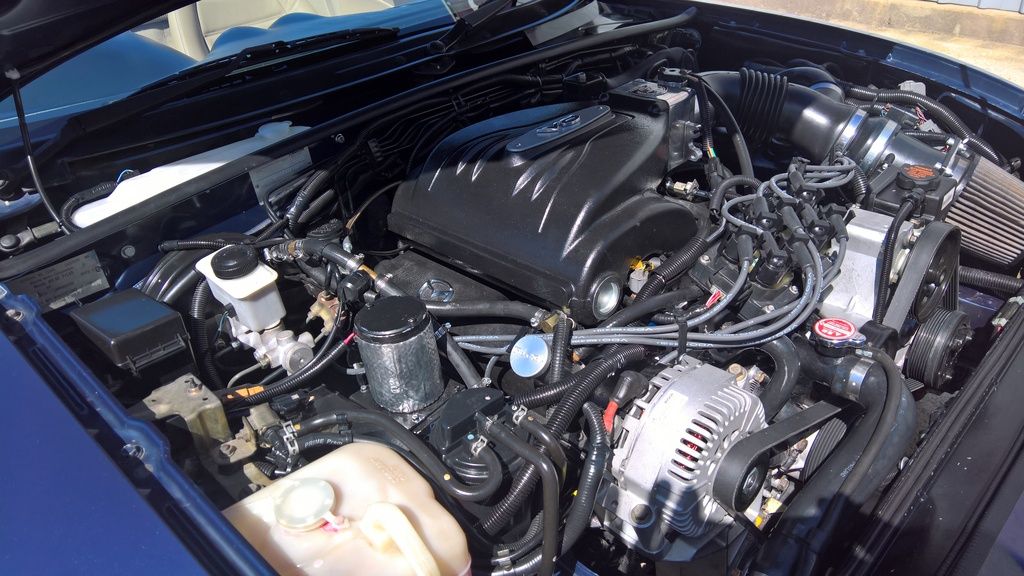
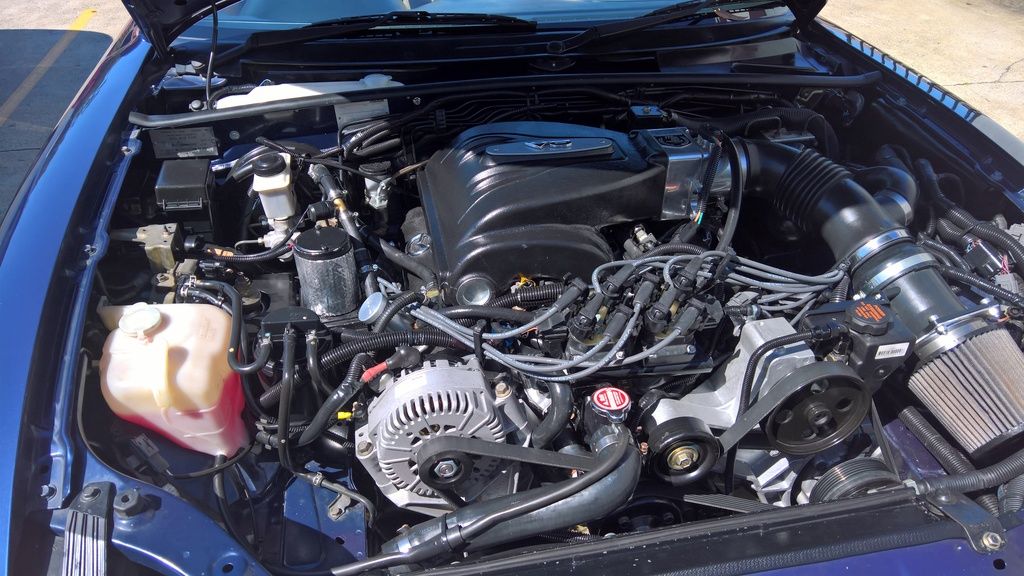
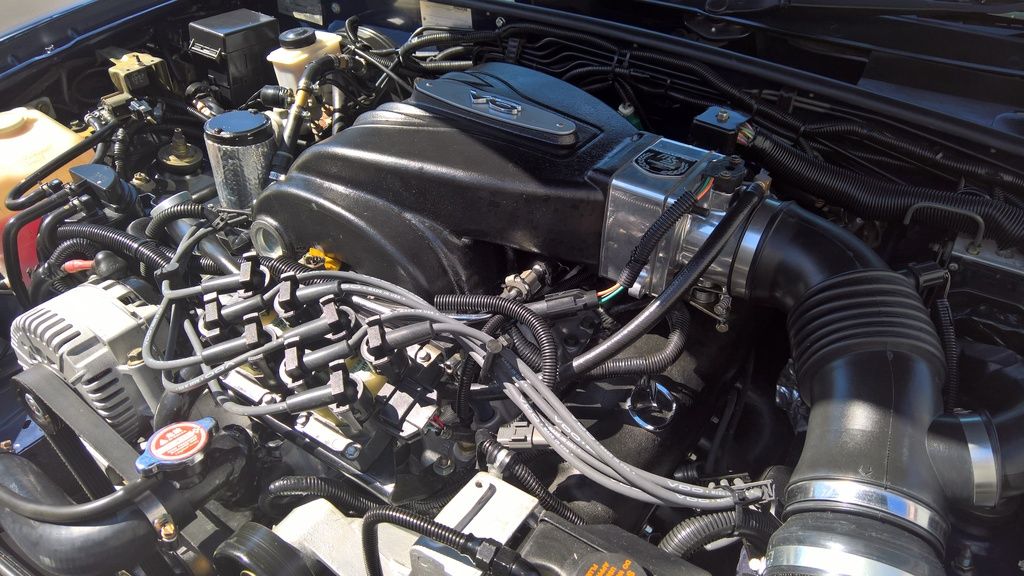
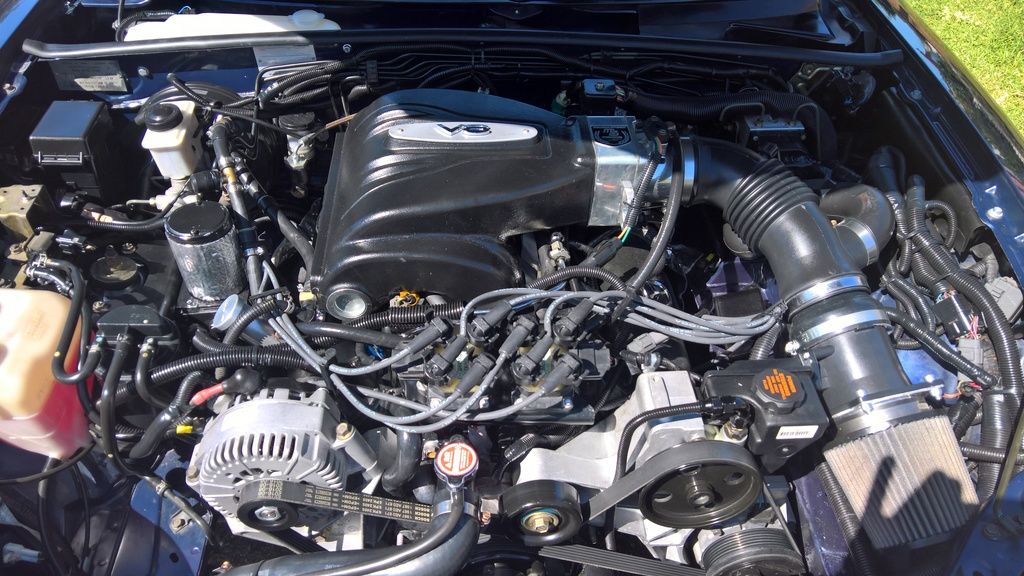
1) Engine is built and ready - 331 Stroker 425HP. Utilising factory 2000 Ford Explorer brackets for power steering and Air con.
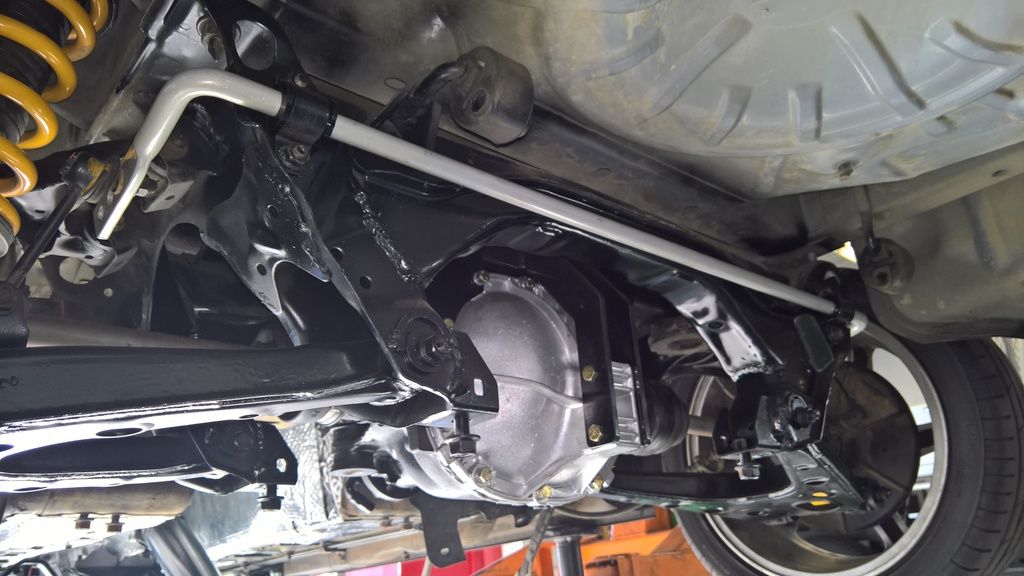
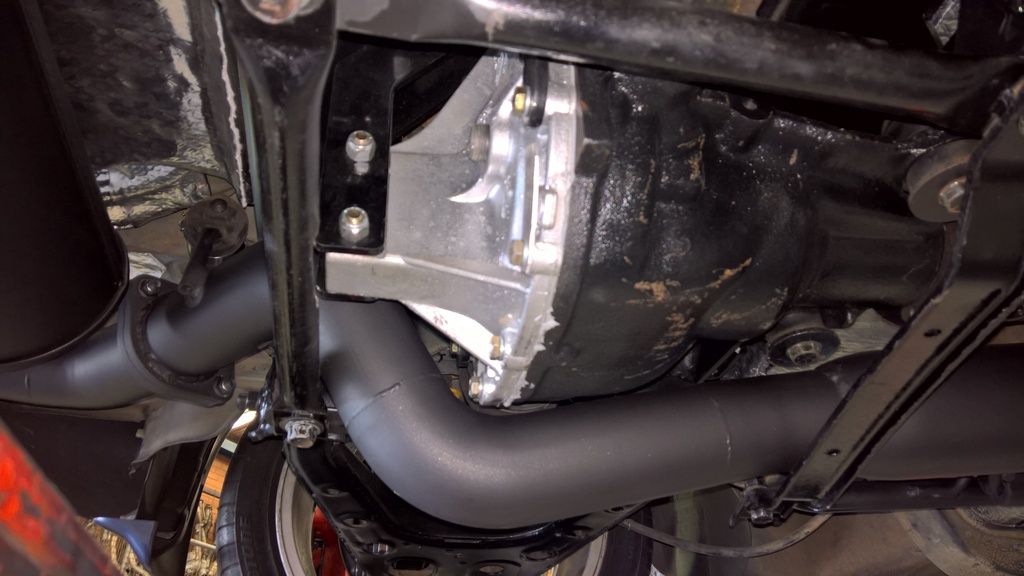
2) Drivetrain is ready (new T5z, new tailshaft, Ford 7.5 with 3.27 and Eaton TruTrac)
3) Custom radiator is ready (brass construction 56mm, 27 x 18 inch with two spall 11 inch 1620 cfm fans)
4) EECV Wiring loom and all sensor plugs and wiring is in and ready with new Ford EECV only relay bank (EECV successfully flashed with SCT handset and is ready...it is wired alongside Mazda ECU for now.)
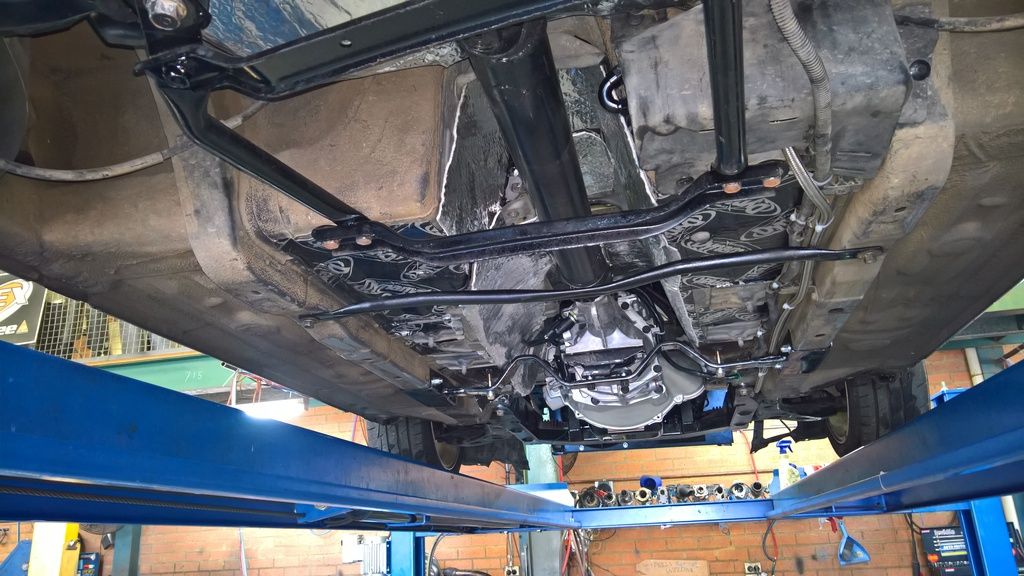
5) New custom Monster Miata front subframe for RHD is ready.
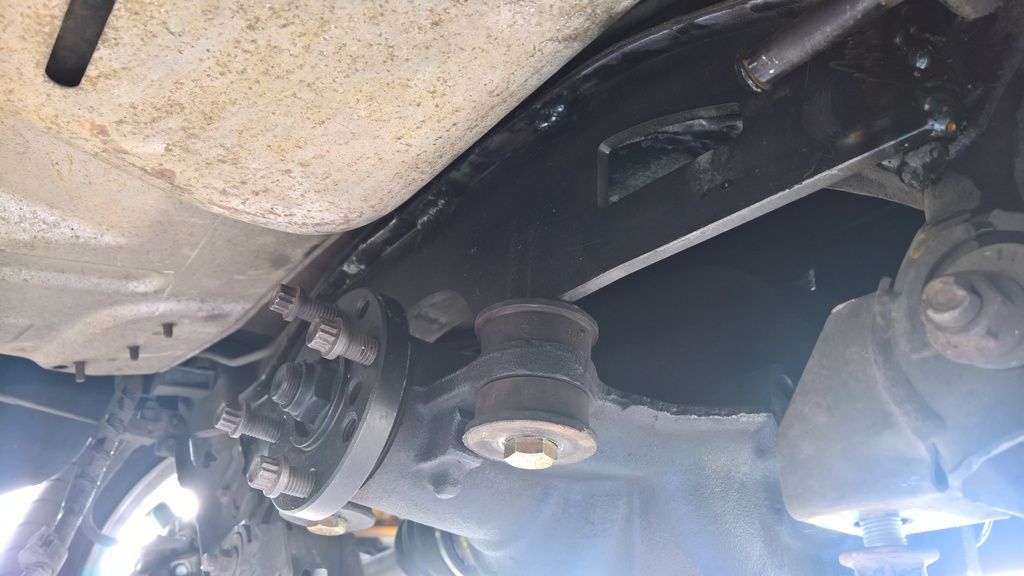
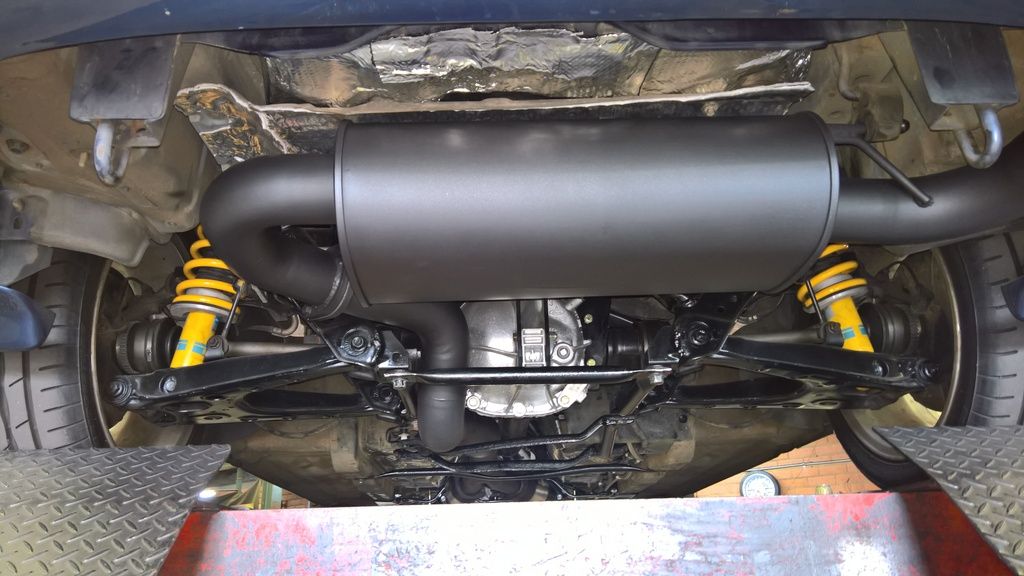
6) Custom valved Bilstein shock absorbers and 550 lb Front and 350 lb rear springs are in and ready. No coil overs . All bushes upgraded with stiffer rubbers from IL Motorsport.
7) Baer brake kit upgrade 12 in rotors up front with Mustang Cobra 2 piston PBR caliper, standard Sport brakes rear (yellow stuff pads), 929 Mazda master cylinder upgraded..stops well...
8) Front fender cowl/braces added from Garage Star
All other small bits are ready too..Monster miata kit is the source for the other small things...
I will be adding some photos as I go through the change over from 1.8L
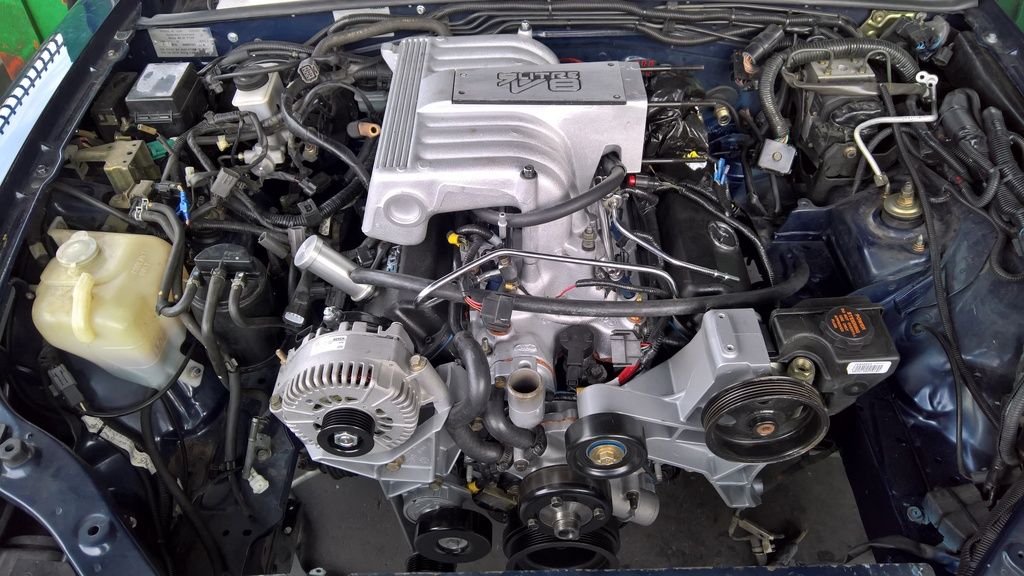
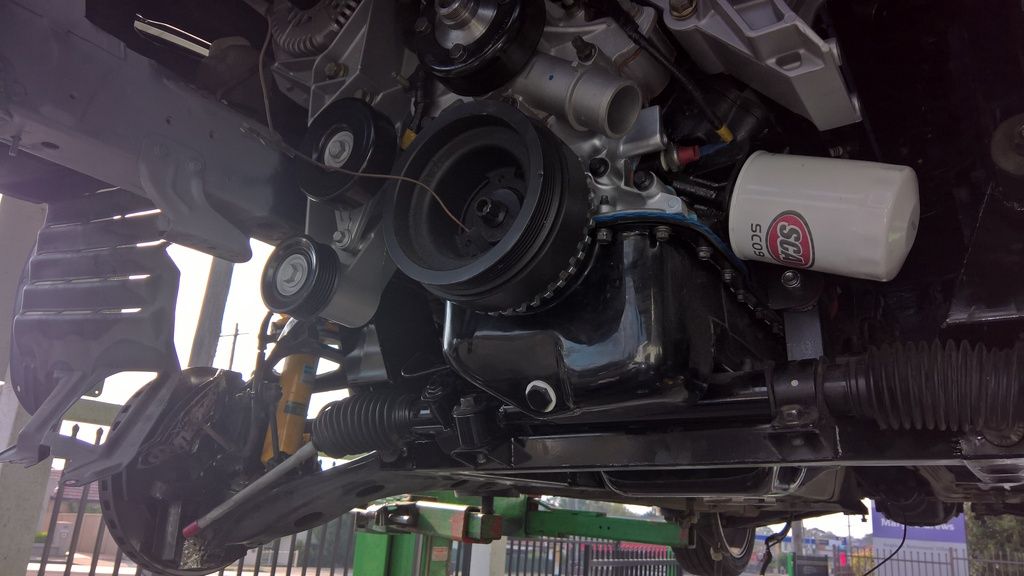
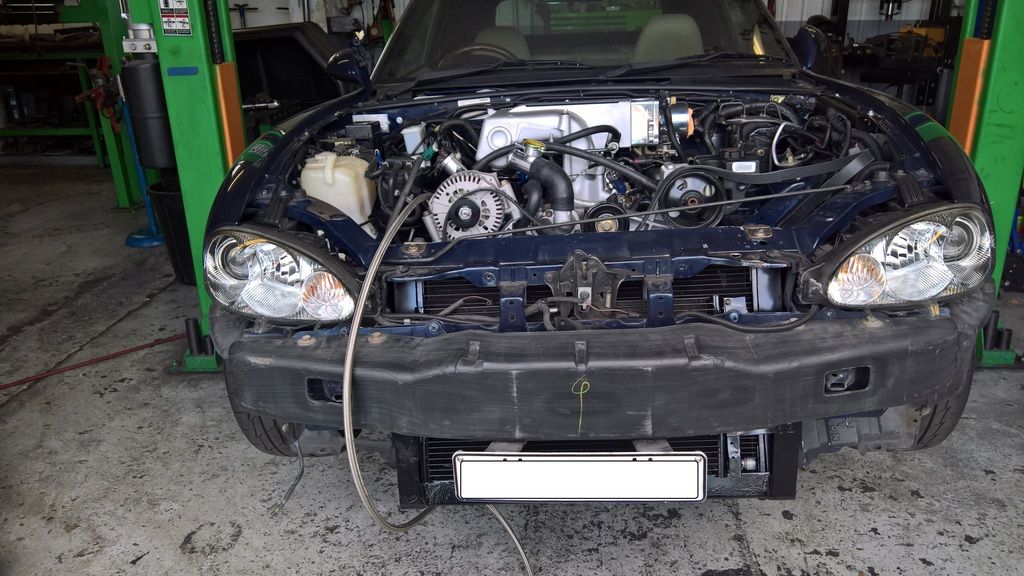
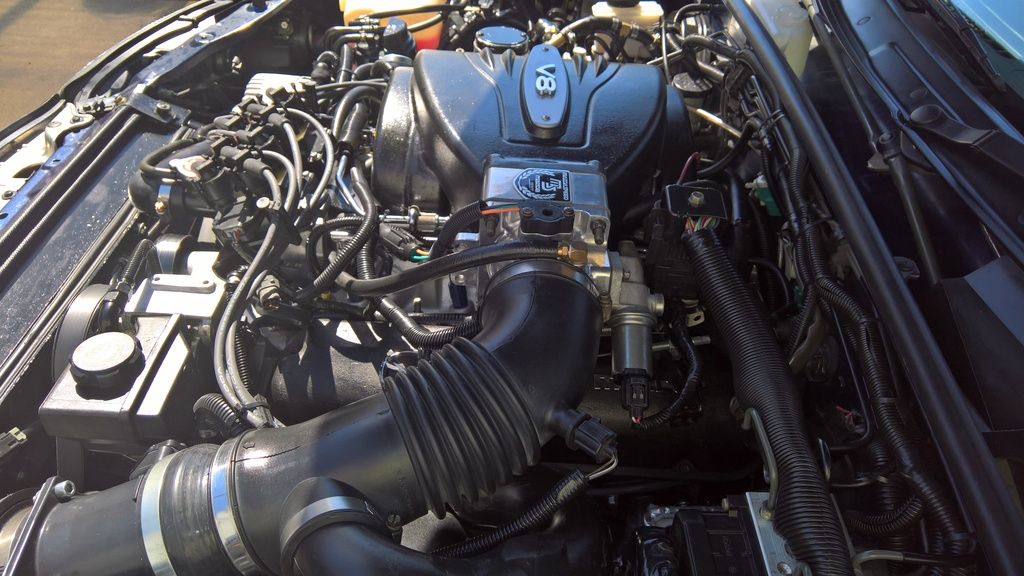
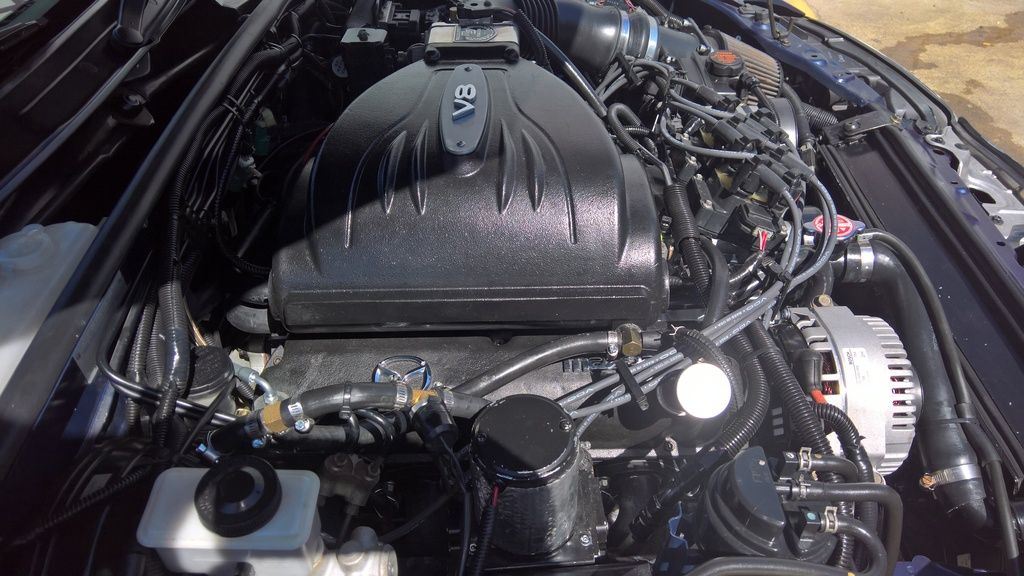
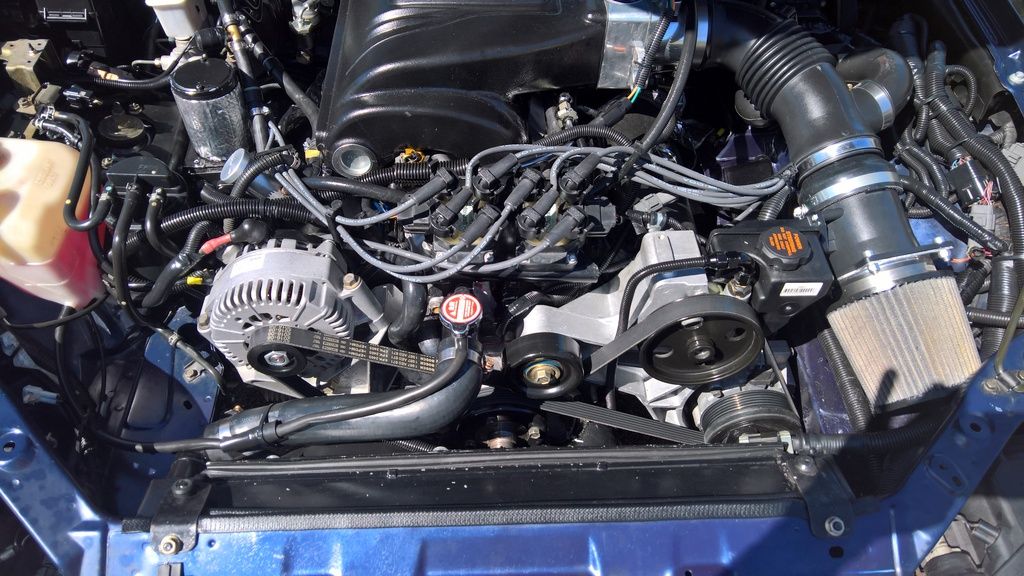
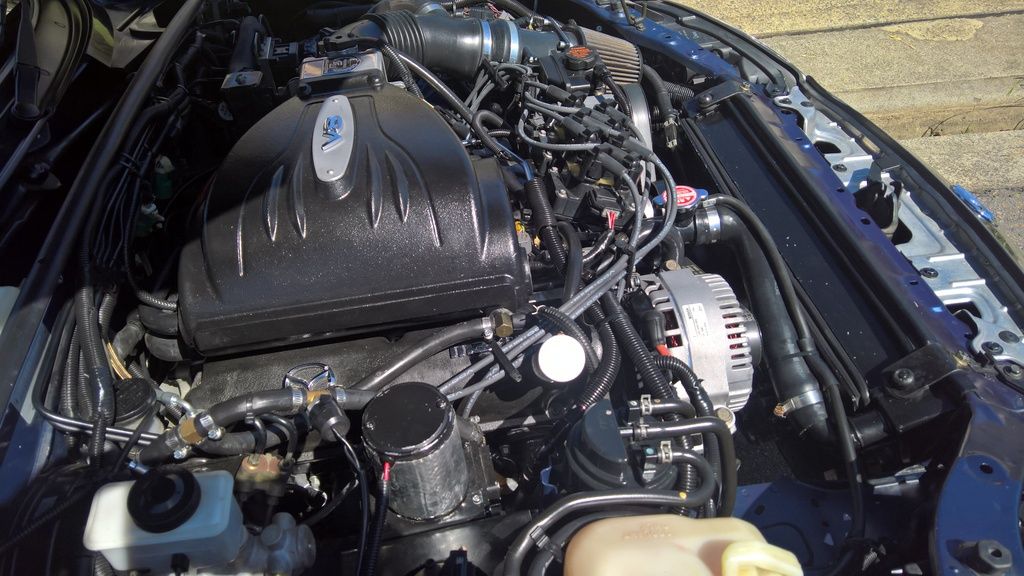
Here are some pictures of the engine as it is today. It is using the factory explorer induction at the moment for the initial vehicle inspection/registration/compliance so it can be registered as a V8.
Enjoy the pics and I will keep posting as things unfold...
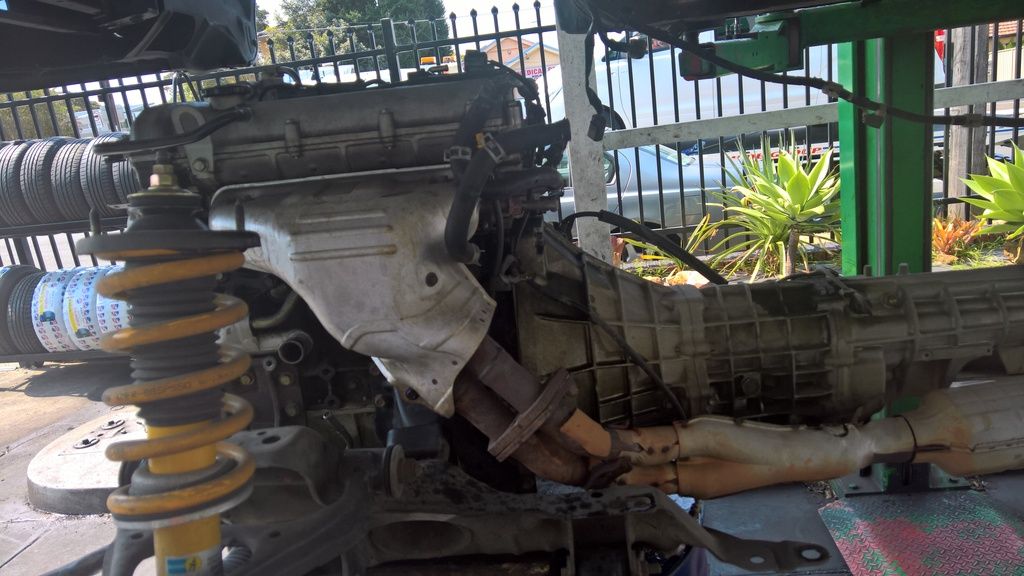
I have begun the process of stripping the car down and starting the cutting, welding and other relevant preparation. I dropped the entire front subframe out with the gearbox and torque bar attached. Whole setup was on the floor within 3 hours.
With a good hoist and the right tools (rattle gun) it is easy to do...
Things I have done:
1) Dropped out everything from the engine bay and marked up the gusset removal
2) Assembled the A arms and struts to my custom subframe awaiting the engine
3) Engine gets bolted in tomorrow I hope
I will post up some more pics of when we get deeper and dirtier into the build...
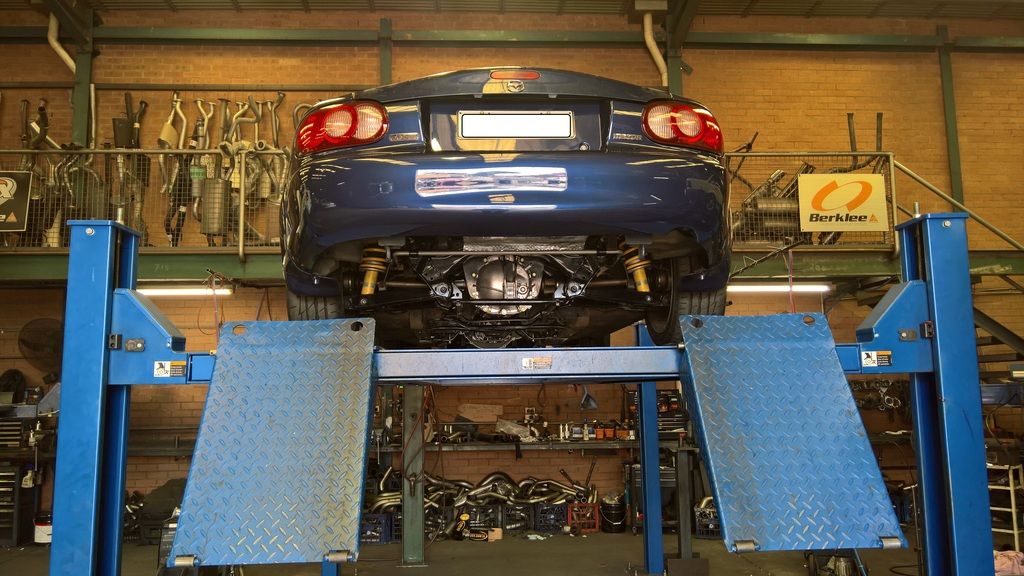
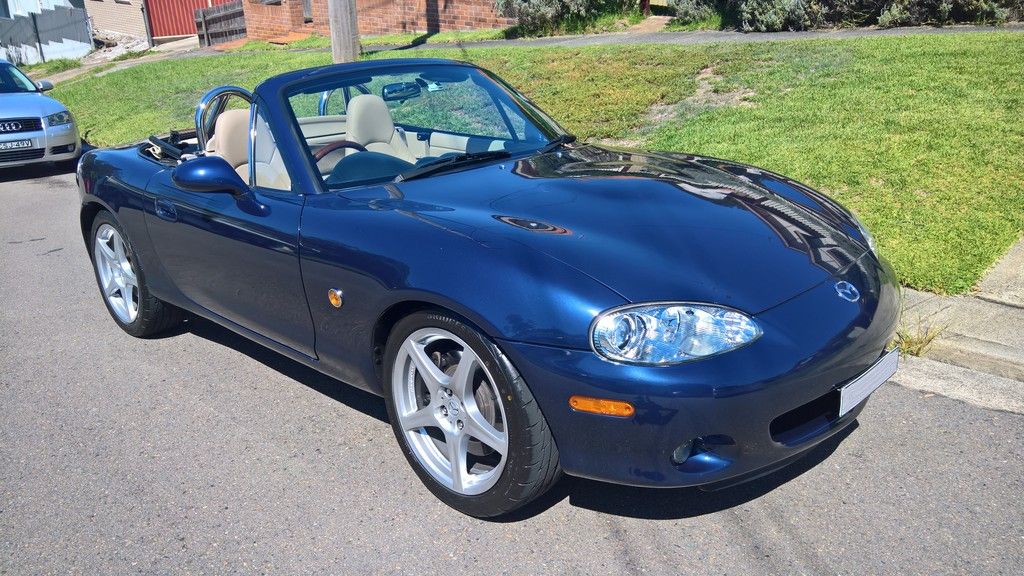
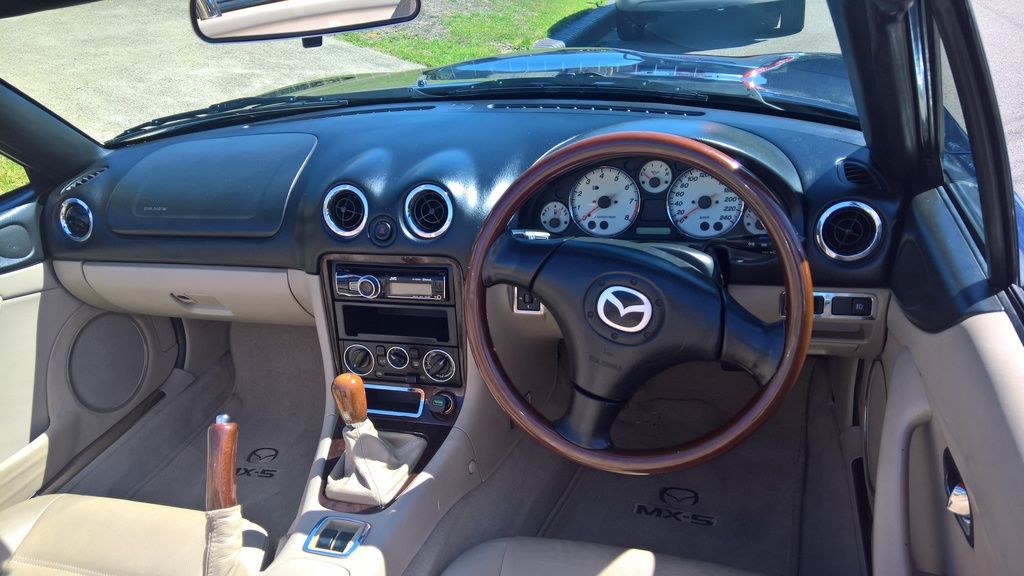
The Miata I have is a late 2000 NB (Series 2) Miata. My reasons for selecting this car were that it had new paint and a very clean interior that was the not so common beige colour. The drivetrain had covered 130,000 miles and although it was running well it was getting close to the end of its good useable life. So for me it was an ideal candidate for tearing it all apart, good body and interior with an expendable drivetrain!
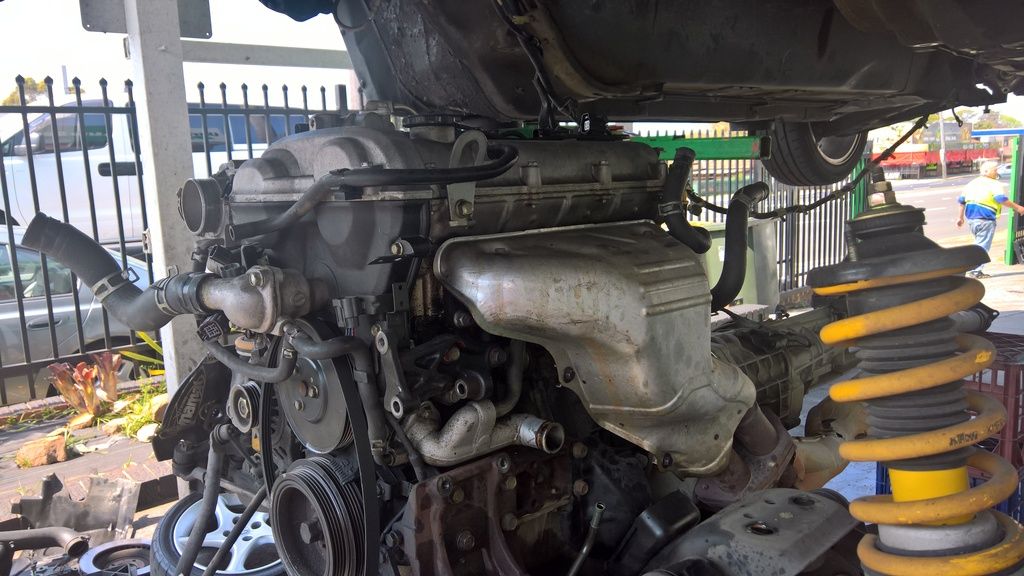
So after I got out the old drivetrain I got started on the modifications and the install.
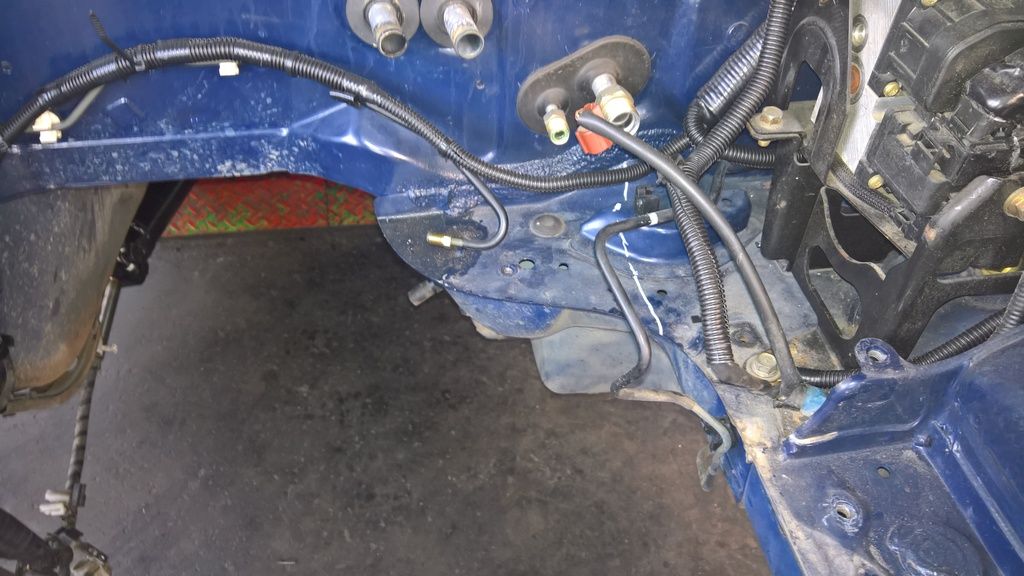
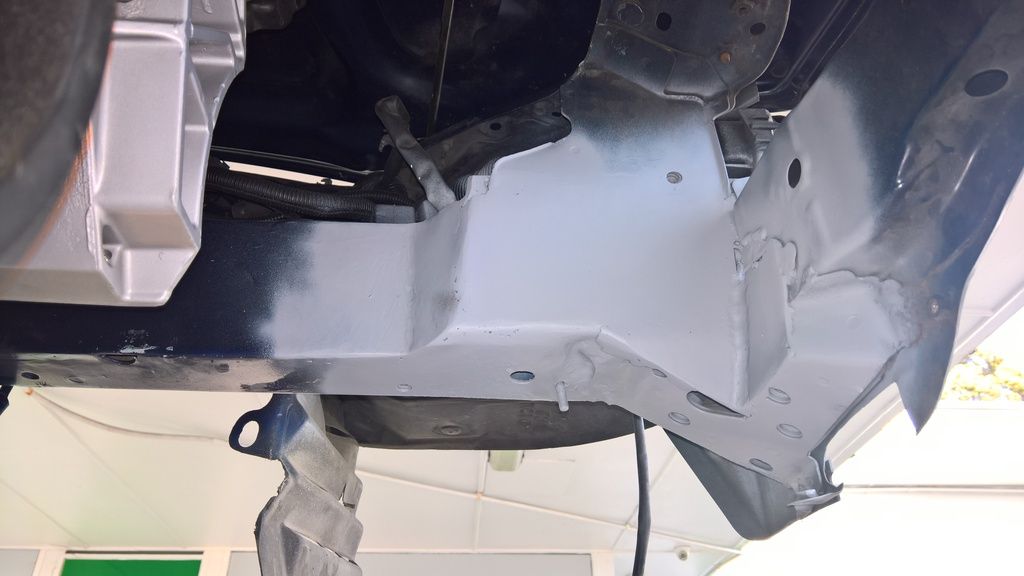
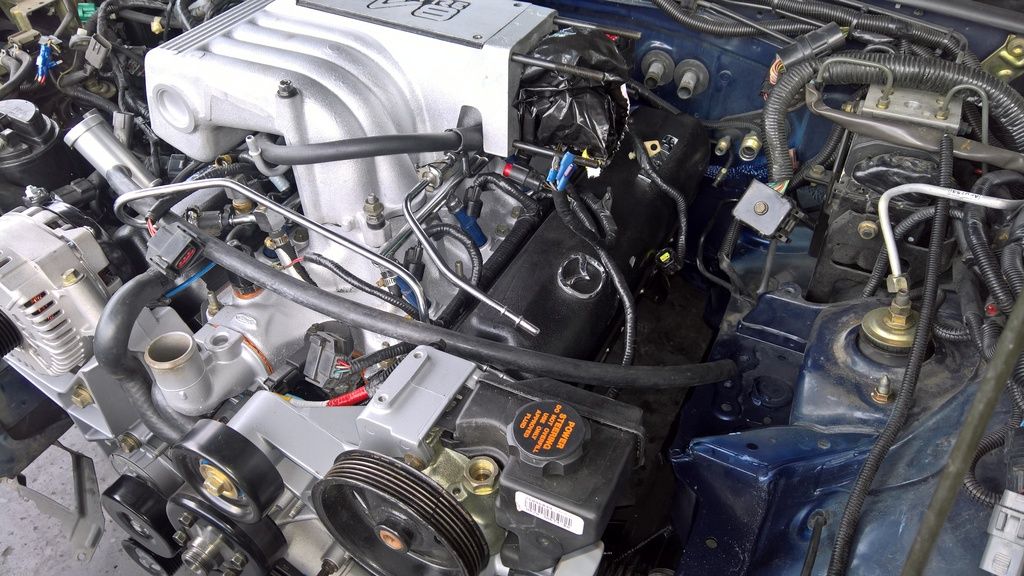
The main modifications were the usual engine bay cutouts and as I was using the ford explorer 5.0l accessory brackets I also notched the frame rail to retain all of the oem setup. This was important for me as I was not using the EEC4 and A9L setup but rather the EEC5 and twin coil pack setup. This was necessary for emissions and compliance purposes.
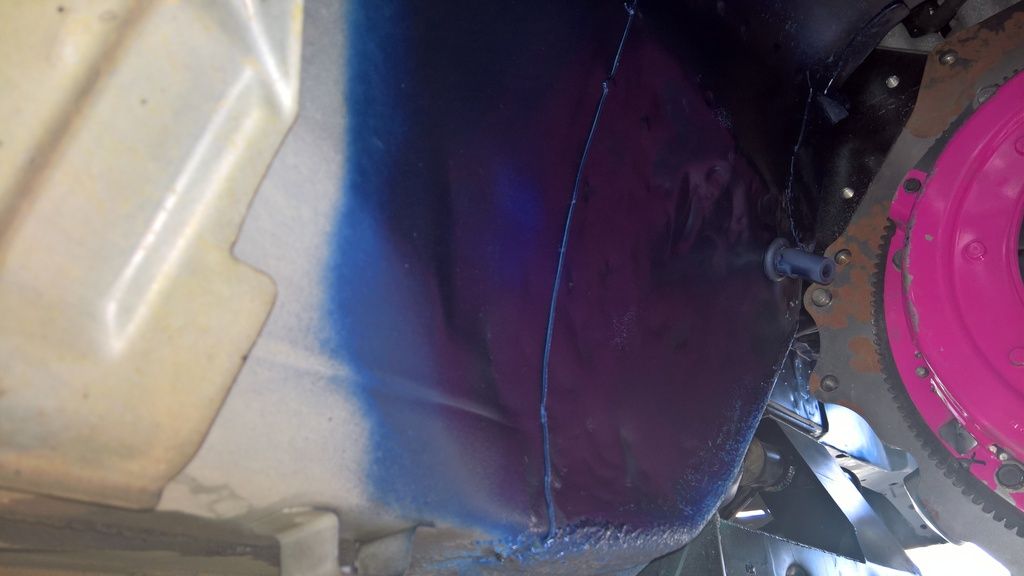
Below are some pics of the mods and build. they are all self explanatory...
Marking the Cutouts (I made my own blanking plates)
Frame rail notch
Tunnel Clearance
Diff Plate Welded
Engine Waiting to go in
Engine in!
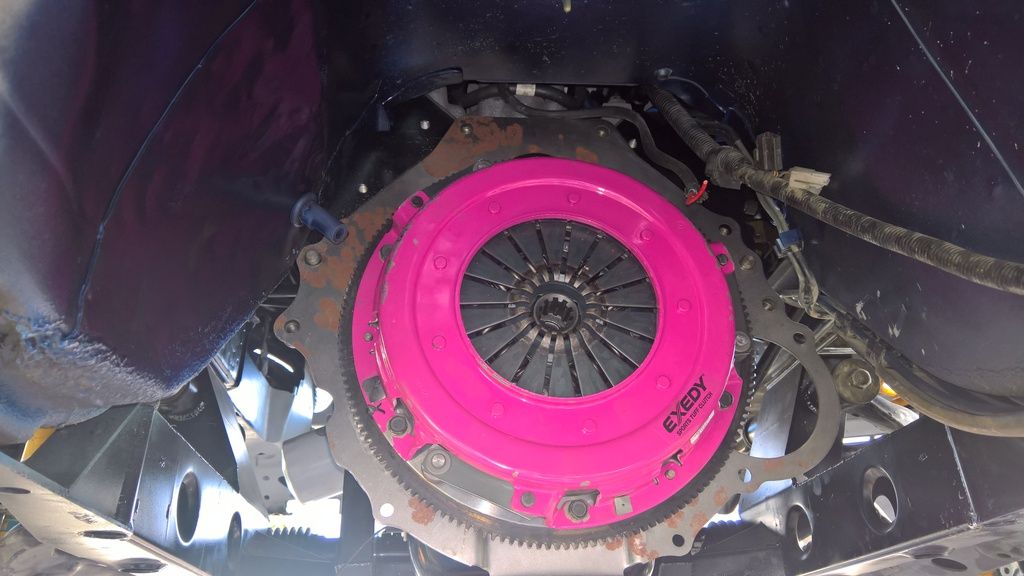
Clutch In (EXEDY Heavy Duty Clutch)
Transmission In (T5z Ford Racing)
Slave and Fork
Shifter hole
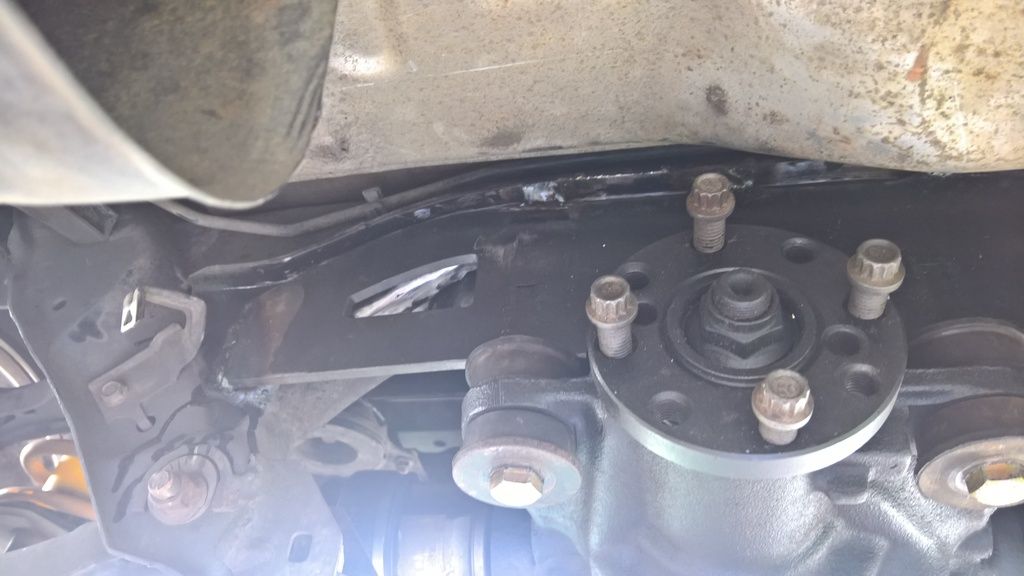
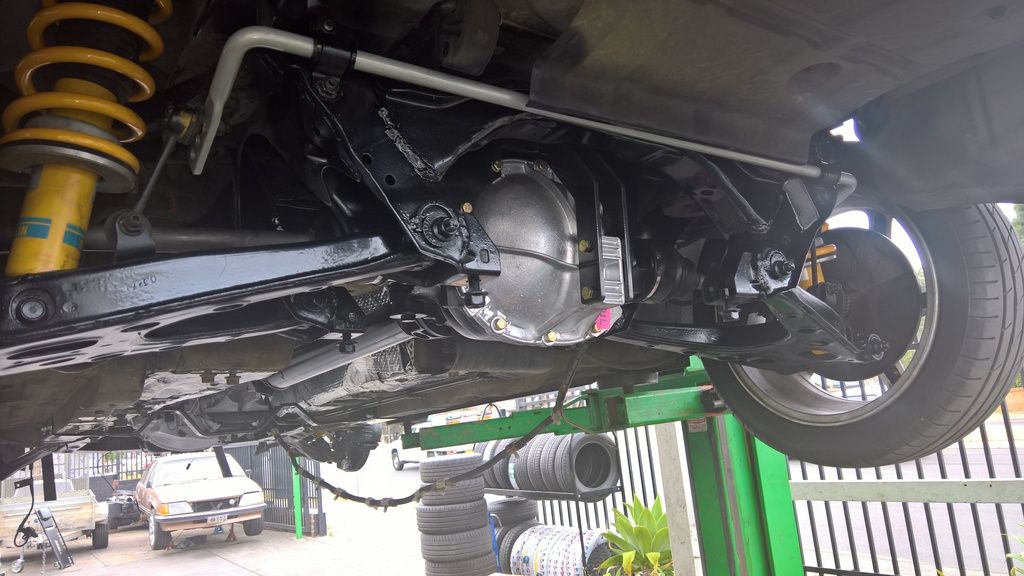
Diff In
Tailshaft In
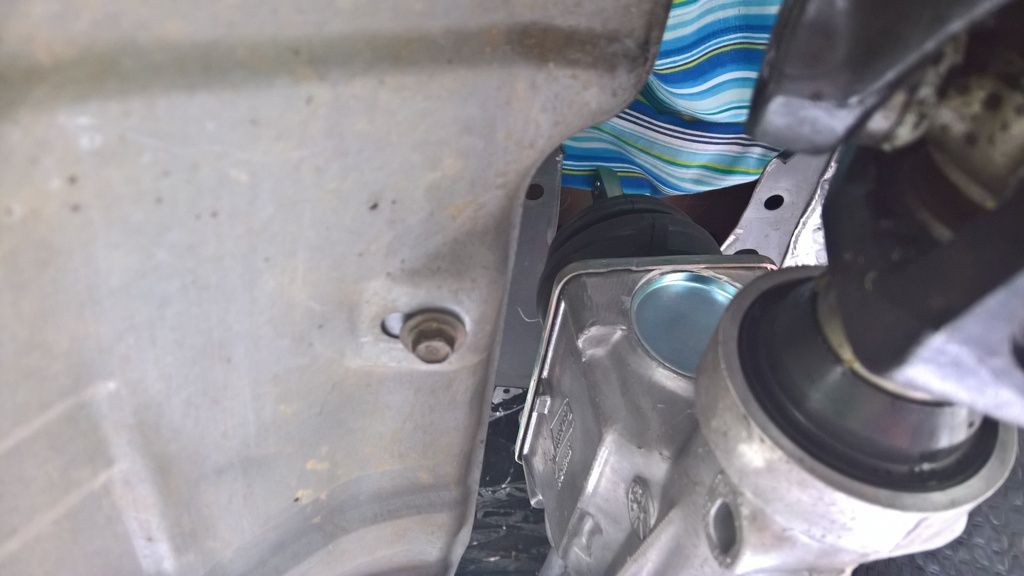
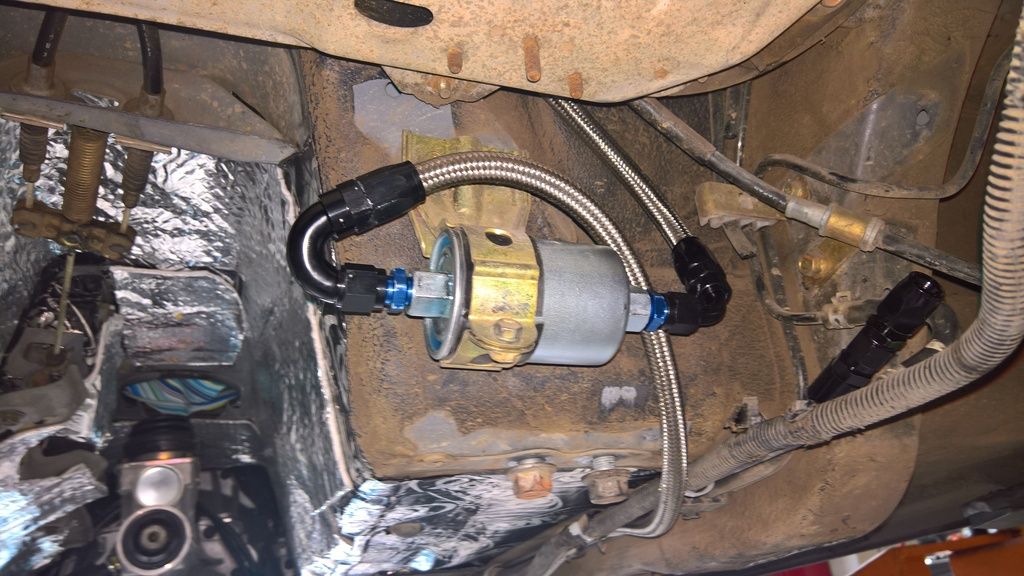
Upgraded Fuel Filter and fittings ( Used AN6 Steel Braid for supply and factory hard tube for return)
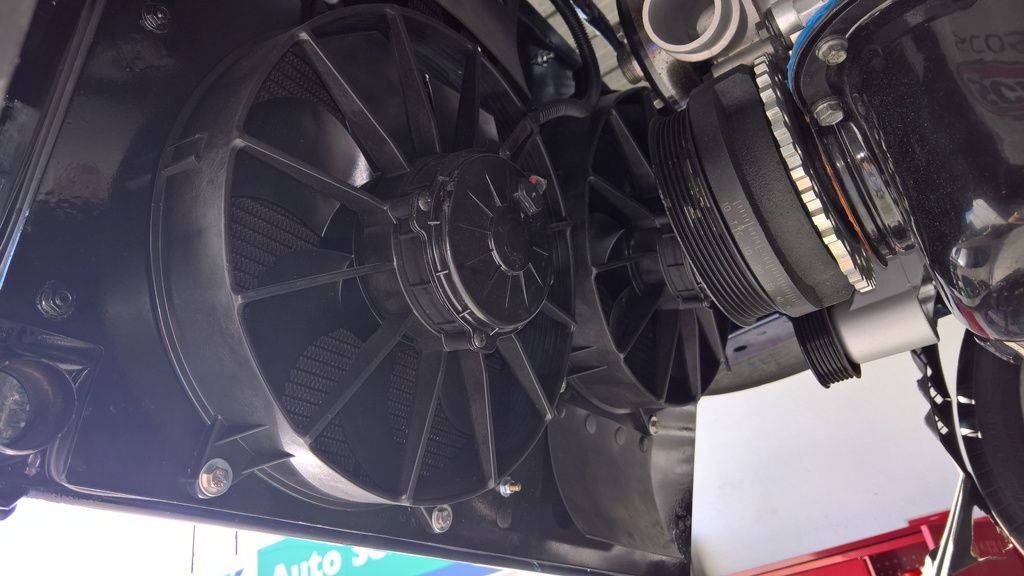
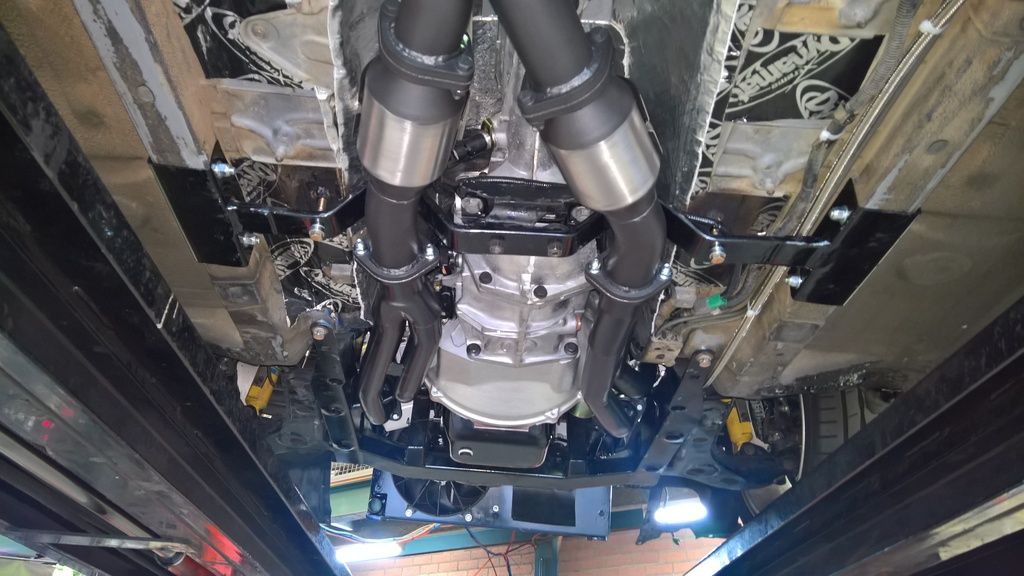
Fan and Radiator Setup (Custom radiator and SPAL Fans setup has 3200cfm total airflow (FM V8 setup is 2700cfm by comparison). Most powerful SPAL fans available that are 11 inch. Radiator is 26.8 in H x 18 W x 2 in core thickness, brass construction. Shroud is my own design.
Front Shot showing Martins custom RHD subframe
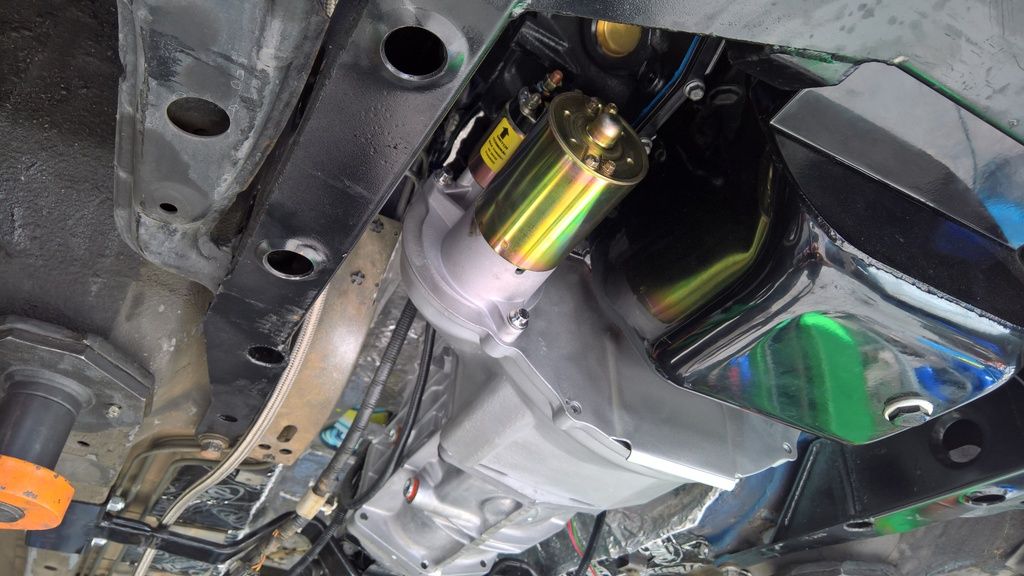
Ford Racing High Torque Starter
Upgraded Rear Sway bar
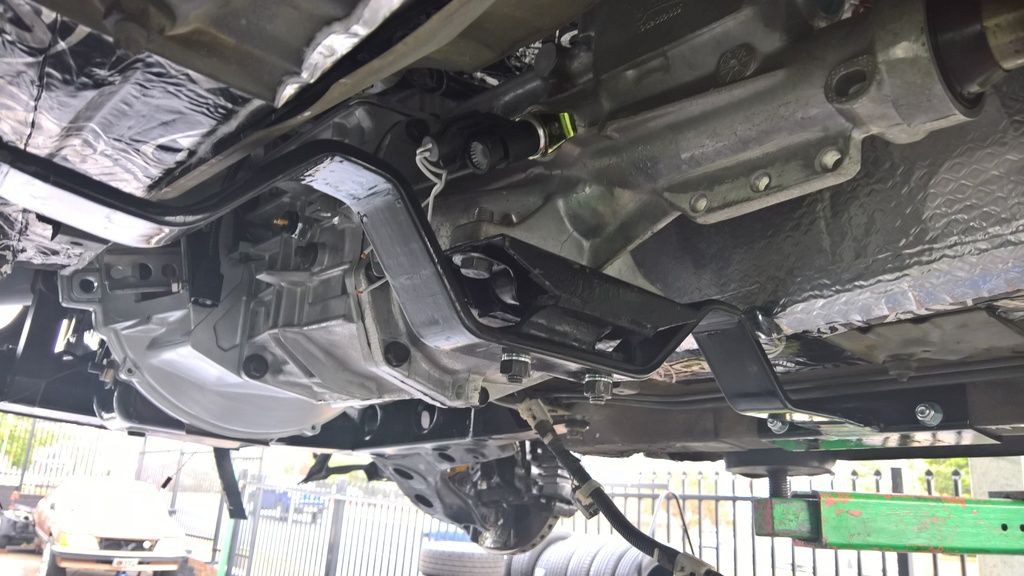
Transmission mount modification to stop transmission bounce (better alternative to drilling car floor and just as effective, zero bounce now)
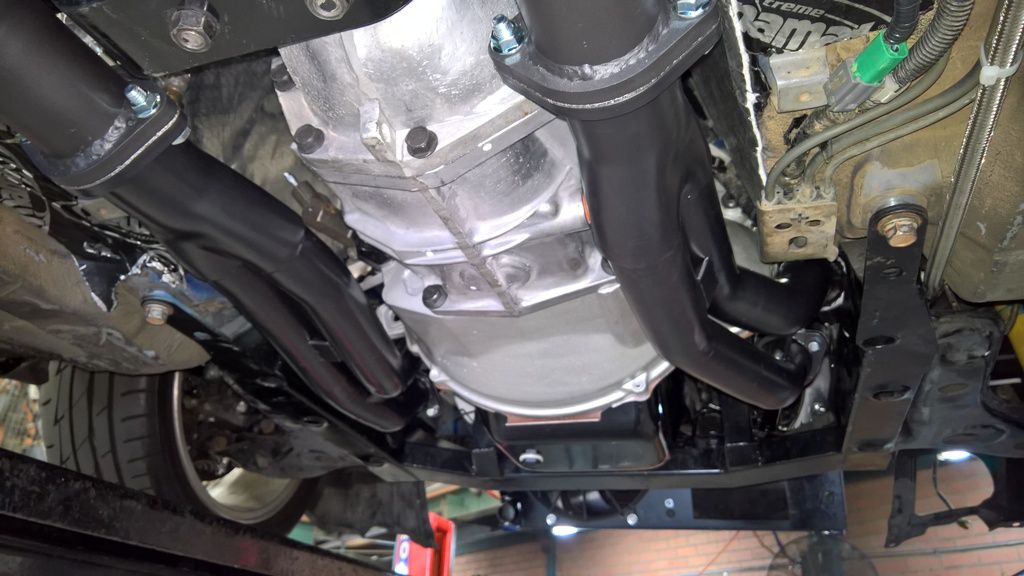
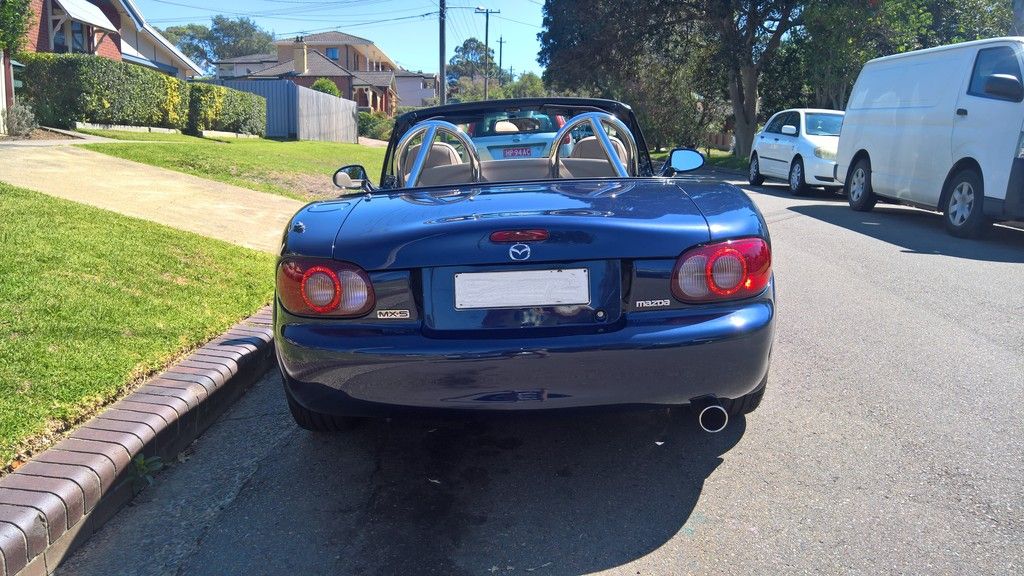
Well the exhaust was completed and I must say I was very happy with the result. It is a custom 3 piece header (yes three pieces!) that forms a long tube Tri Y design, then the rear is 2 into 1 with a single three inch outlet. It was not an easy job for the exhaust shop as the starter motor, steering, brake lines and fuel lines are all on the same side! But they did great work and I have lots of clearance everywhere as a result. Enjoy the Pics
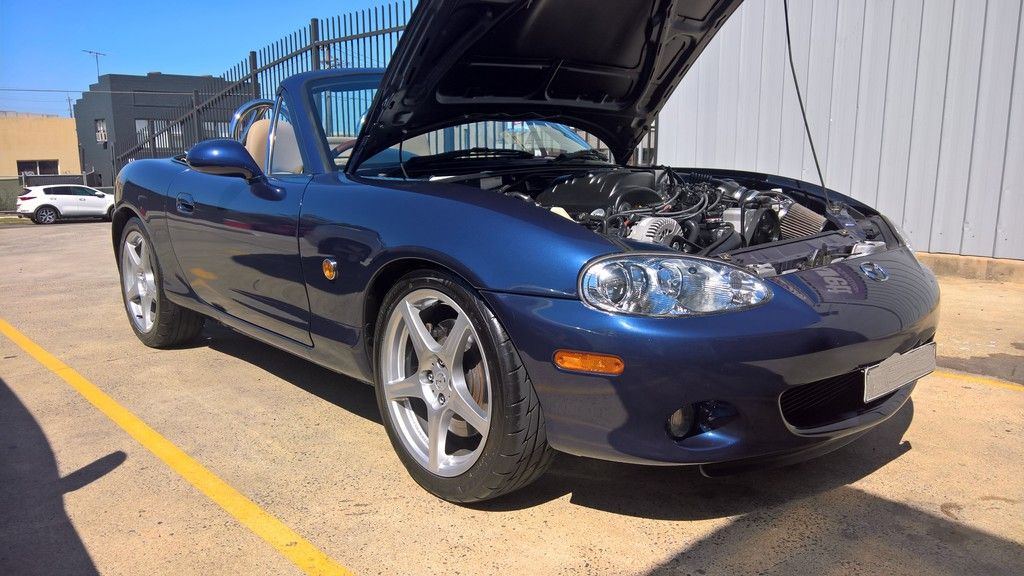
i have not started her up yet. Hopefully within a week or two. I am aiming to have it completed by new year. After I give her a serious wash to get 4 months of dust off, i will post up some decent shots. 😊
Ok I can now safely put some notes together for everyone as my build is now finished (well almost!) and I have driven the car for 3000 kms and can advise that everything is looking pretty good
Driving the car is so much fun and everyone who sees it or hears it loves it...always a good feeling!
I have also been able to finally dyno the car and get it running properly. The car made 250 KW or 340 hp at the wheels. This is very good number (and torque curve!) for a car that has a cam with only 215 deg @ 50 thou duration. This is a special Ed Curtis cam so it does great power without the duration, i could have made more power with a larger cam but that would make it less civil as a daily driver.
Some things that I learned along the way that may help everyone who is going through the build or wants to do it.
1) I used the explorer brackets and accessories with an EECV system (twin coil pack) and it worked great. I needed to notch the frame rail slightly for the air con compressor to clear, but its is in a non critical area and i also reinforced the internal core of that area with some upright ribbing (see pics)
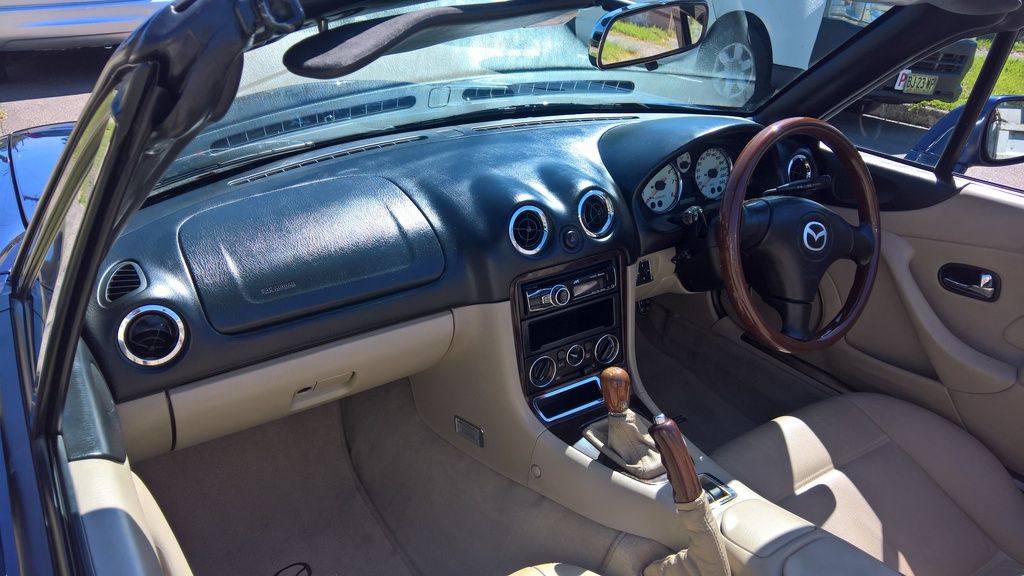
2) The Dakota digital Universal Speedometer and Tacho interfaces make setting up the gauges a breeze. The Speedo interface does the speedo and the VSS signal and the tacho makes easy work of getting an absolutely accurate tacho signal without cluster modifications and mucking around (just a word of caution on the NB the tacho signal wire in the cluster plug is GREEN/ORANGE and is located ADJACENT to the GREEN/RED wire (VSS OUTPUT for ECU). Why that is important is that after 17 years of colour fade, the GREEN/ORANGE wire looks GREEN/YELLOW and the GREEN/RED Wire looks GREEN/ORANGE...My tacho didn't work initially and I had no idea why...you can work out the rest ). The Ford EECIV and EECV VSS input needs a 5 volt 8000ppm square wave so setup the Dakota boxes accordingly. The Mazda NB speedometer needs a 8000ppm input from a 2 speed signal wire generator so use the Ford 2 wire version from a 2000 year Mustang it plugs straight in to the original Mazda NB 2 wire harness. Also the Mazda cluster outputs a 4000 ppm 5V square wave to feed the Mazda ECU VSS. Use the Dakota box to intercept the speedo signal and (orange wire on cluster Plug 2) and then feed the corrected signal back, in addition he Dakota box can then also send out the correct VSS signal to the EEC. I spent a bit of time finding the above info on the correct PPM and waveform outputs so you can have it easy, for a correctly calibrated VSS signal...stops that damn stalling when pulling up to intersection and you drop it in neutral !
3) Custom exhaust was amazing and negated the need for the headers to go around chassis and back in....if you can afford it, do it...
4) Make sure you use a proper shifter in your T5z. I used the power tower from Pro 5.0. It is heaps better than the std ford racing shifter
5) 2 sheets of Dynomat (stuck back to back with the upper sheet being larger with sticky overhand to put it down, makes a great shifter hole cover and sealer...and its easy to shape and remove. The rubber tube in martins kit is not worth using.
6) Make sure the throttle travel is 100%, I had to bend my throttle rod a little to get the last few % of opening.
7) Use as many new parts as possible (TPS, MAF, Spark plug wires, can synchroniser, plugs, etc)..if you don't they will come back to bite you...my MAF and TPS bit me...and they were less than 20K miles old.
8) Single 3 inch exhaust sounds and performs amazing...also negates the need to have a hole cut in the bumper, but it makes the routing near the diff a little tight.
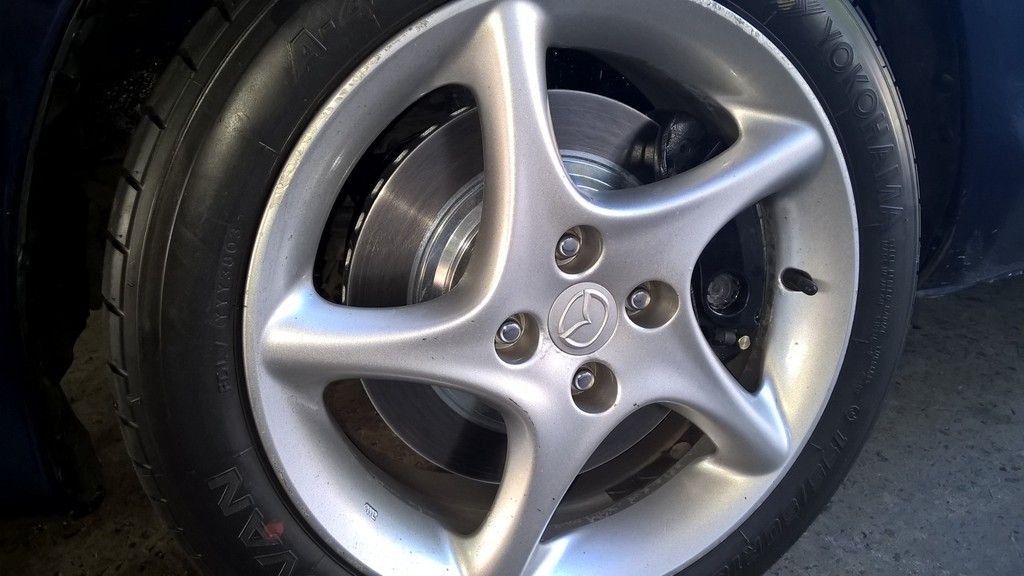
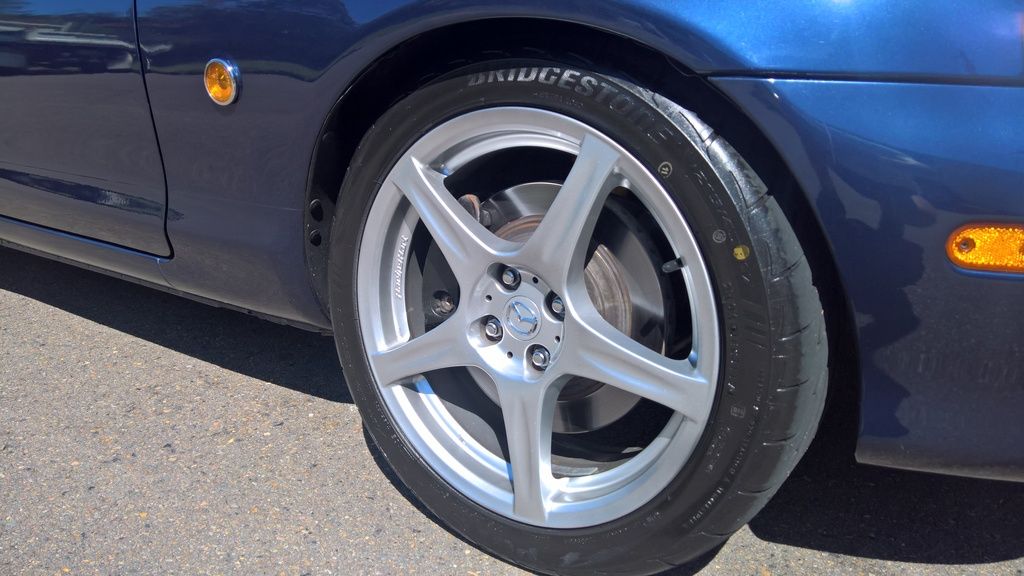
9) I used the Mazda SE Wheels 17 x 7 with 215/45 rubber. Car looks good and wheel spin is dramatically reduced when compared with 15 or 16 in wheels. The car just sticks and goes with full throttle.
10) I had Martin work some magic on my CVs to retain the NB ABS sensor and ring in the std position...makes for plug and plat and negates the need to move sensors or do other stuff
11) Make sure that you use ARP thread sealer or something good to do the head bolt thread sealing. You don't want a leak.
12) Don't mess around with cooling system setup, get the best stuff your money can buy
13) Be prepared for hood clearance issues if you use EFI and are using GT40 style intakes and or TFS R intakes. I needed to make a custom bubble that looks almost stock in appearance. I needed an extra 1/2 inch (even with a 10mm dropped front subframe)
14) Upgrade the suspension for sure. I used 550 in front and 350 in rear springs is what I used with bilsteins and custom valving. I also added a 26mm front sway bar with adjustable links (custom made to clear front pulley) and a 16mm rear adjustable sway bar set to hard setting.
15) Upgrade the fuel line with AN fittings and braided hose for the supply side and use the standard hard line for the return (makes for a cleaner install with only 1 line being required to be added)
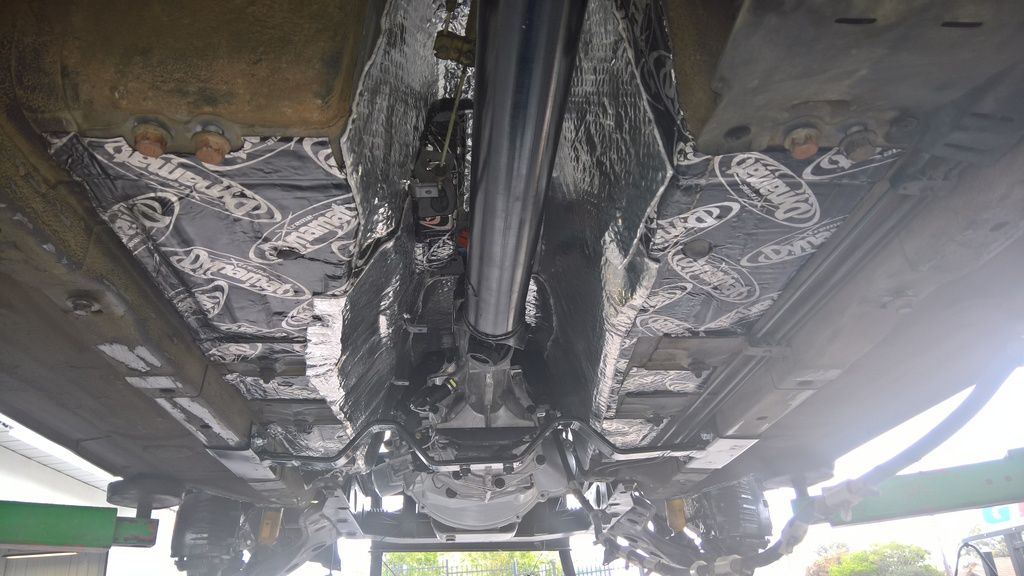
16) Heat shield and sound proof everything that you can. These cars make noises OEM and with a thumping v8 everything is accentuated. So mute it if you like a more OEM experience. The heat shield is a must as the cars floor gets a LOT of heat.
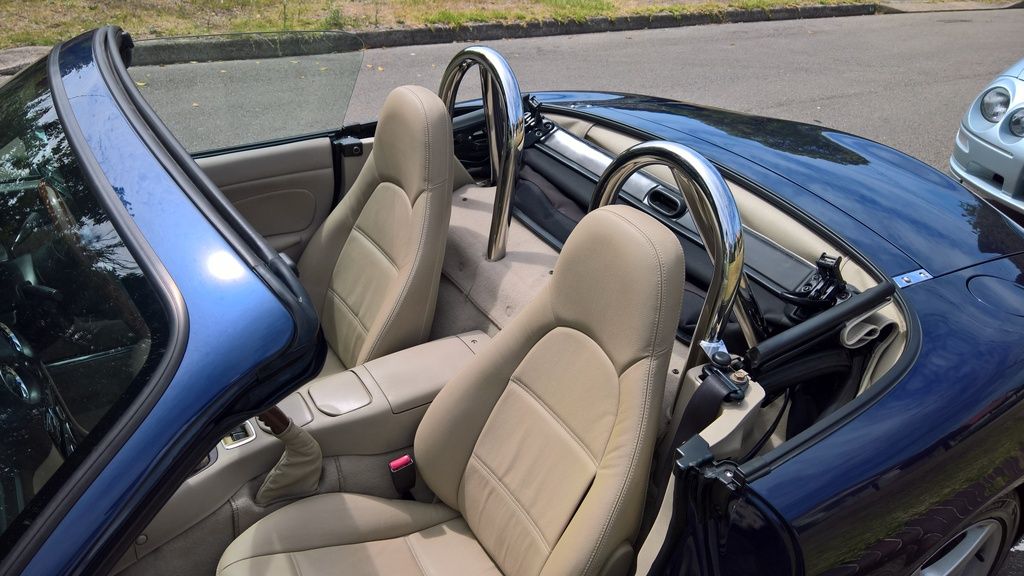
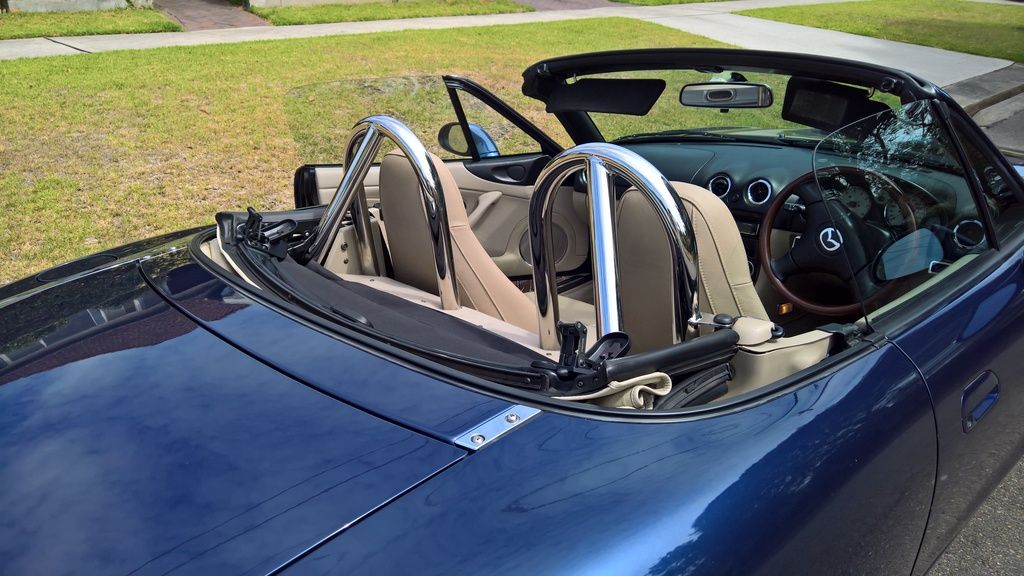
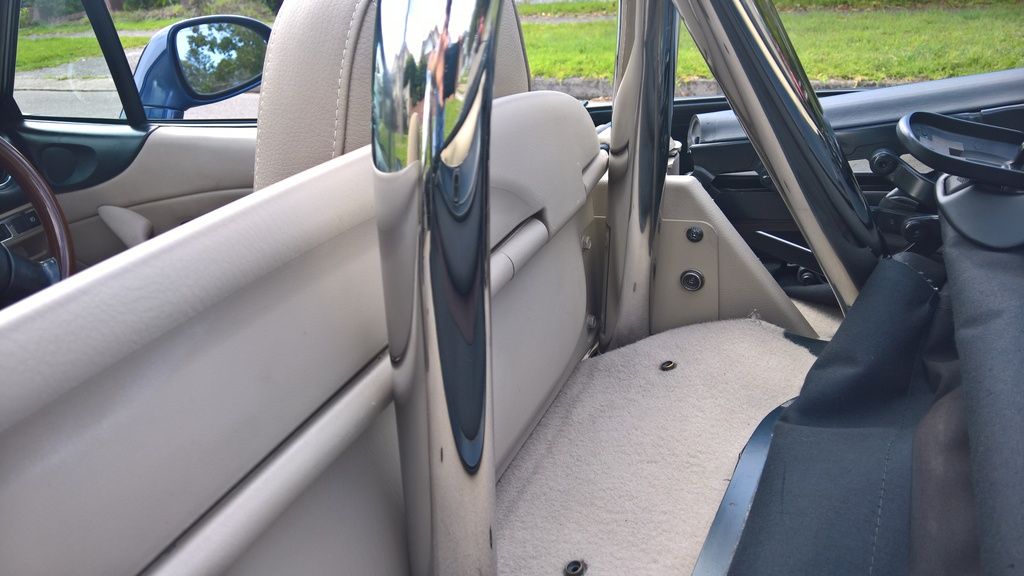
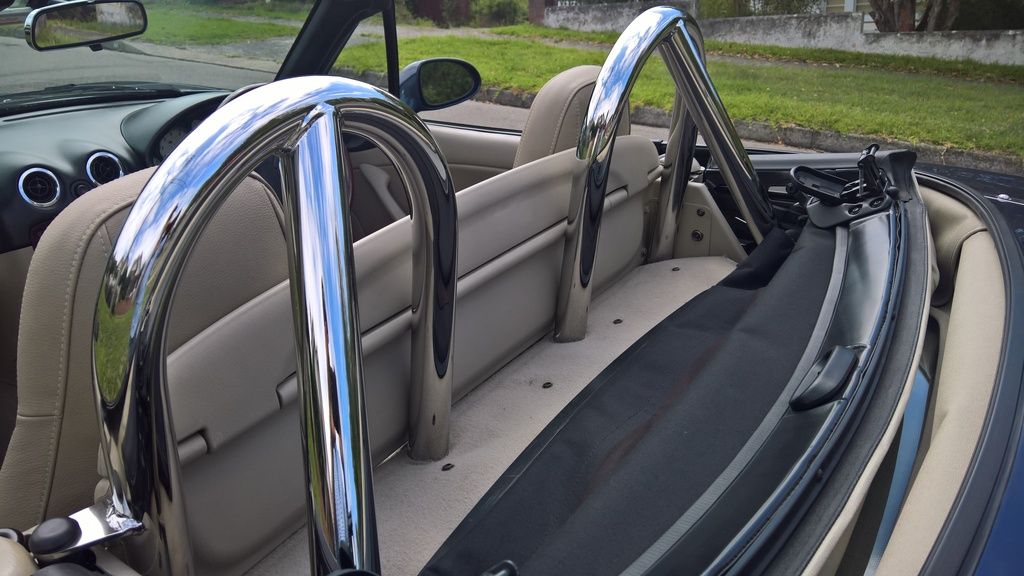
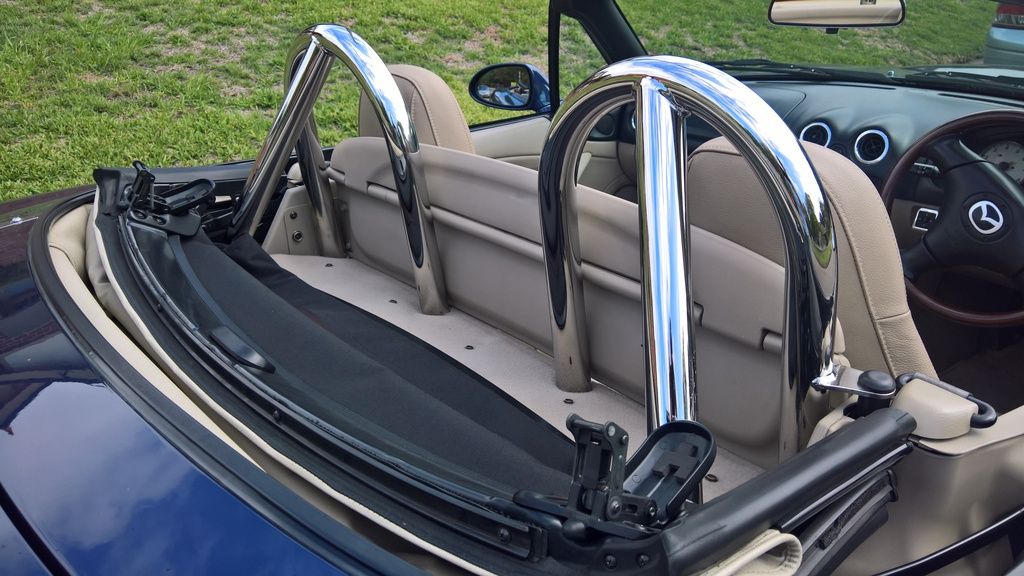
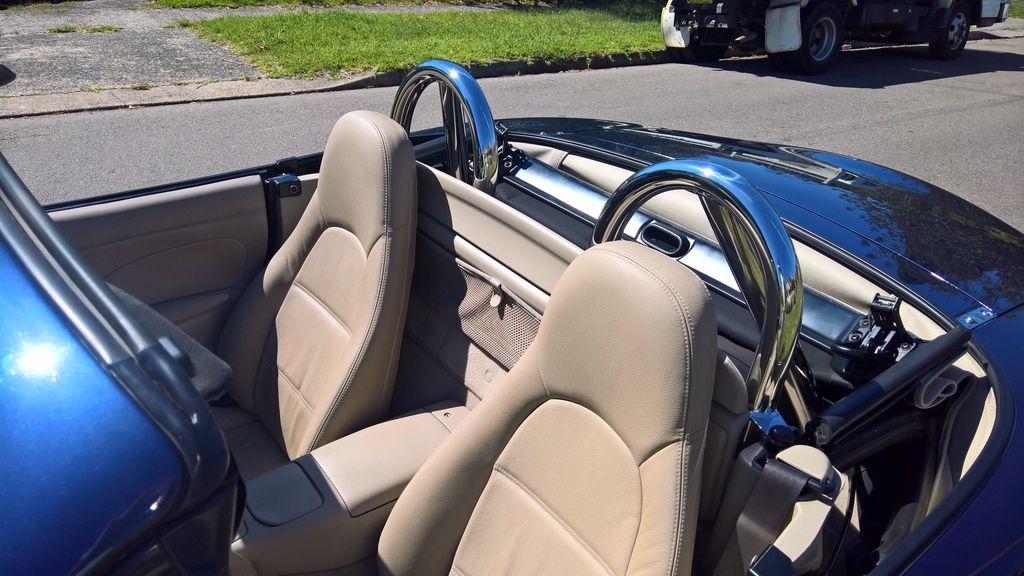
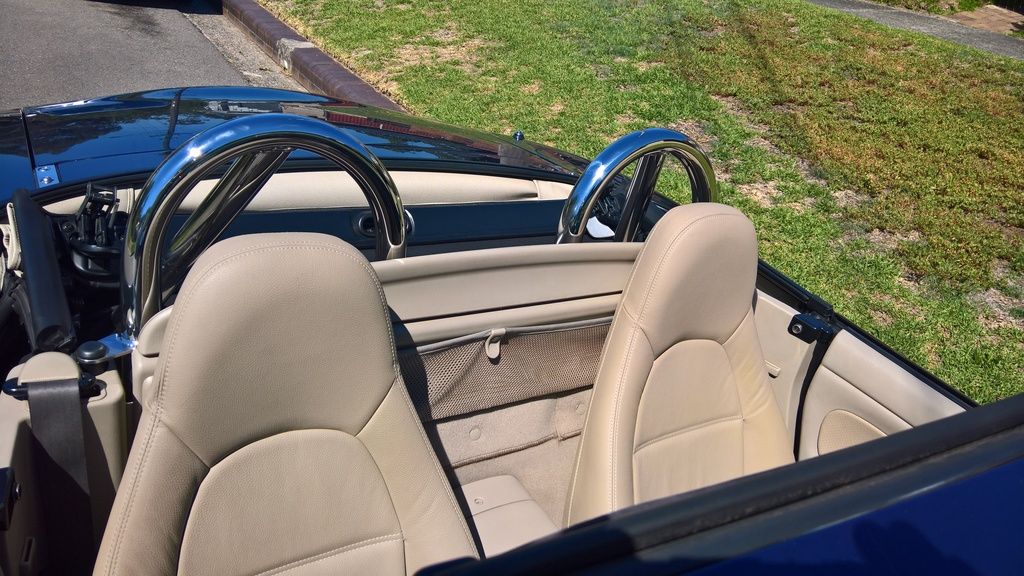
17) The addition of a Hard Dog Deuce roll bar was great...Much better chassis rigidity, it acted like a bigger rear sway bar...and i feel much safer too.
18) Run separate Fuel pump, EEC, Starter, Ignition, Fan(s) , and Air con relays and fuses. Don't rely on the Mazda stuff. It is harder to do it this way but you will have a better setup in my opinion. Jumping wires as per Martins manual and the like is not the greatest way to wire...its quick but not super robust for me.
19) I ran 2 additional 4 gauge cables to power all of the new electrics on the conversion. I did not want to overload the existing wiring in any way.
20) Make sure that you run heavy gauge Grounding cables . Motor to Chassis subframe and then subframe to body. try and ground everything to a common point. You don't want stray grounds causing havoc with the electrics. I ran the 4 gauge form battery tot he front then split into 4 8 gauge wires that then grounded to car body, engine and motor.
21) I used a small form factor 850cca LiFe battery. Cranks over really easily, I am not sure if the Mazda MX5 style 400CCA type batteries would cut it for very long.
22) Put heat shield on your starter solenoid and motor to prolong its life. It gets hot there.
23) Use heat shielding on the brake lines, fuel lines and electric cables etc otherwise they will melt. PLEASE double check all cables and wires are tied securely so they are not touching exhausts and or pinched in a bad spot.
24) Get good brakes all round as you will need them . NB Sport brakes are perfect for the rear, I suggest upgrading the front to an aftermarket kit of sorts...many to choose from, I used the Baer kit
25) A custom subframe is a good idea for any build as it will afford you a lot more room in the underside to service the car and fit a proper long tube exhaust system. I love my custom subframe that Martin made..its a work of art..makes installation and servicing as easy as a std car.
26) Clutch adjustment was simple enough. Martins kit makes it easy. Out of the box my car could not change gear so we needed to turn the threaded rod until the clutch disengaged. Then it was fine. Flyin Miata have a great instruction set for adjusting the clutch, follow it for any build. In a nutshell you back the adjusting rod and the clutch switch right out and then you adjust the main rod for zero lash, then tighten it up. Bleed and enjoy. Others have struggled in this area, but mine worked easily..also use a new clutch slave cylinder !!
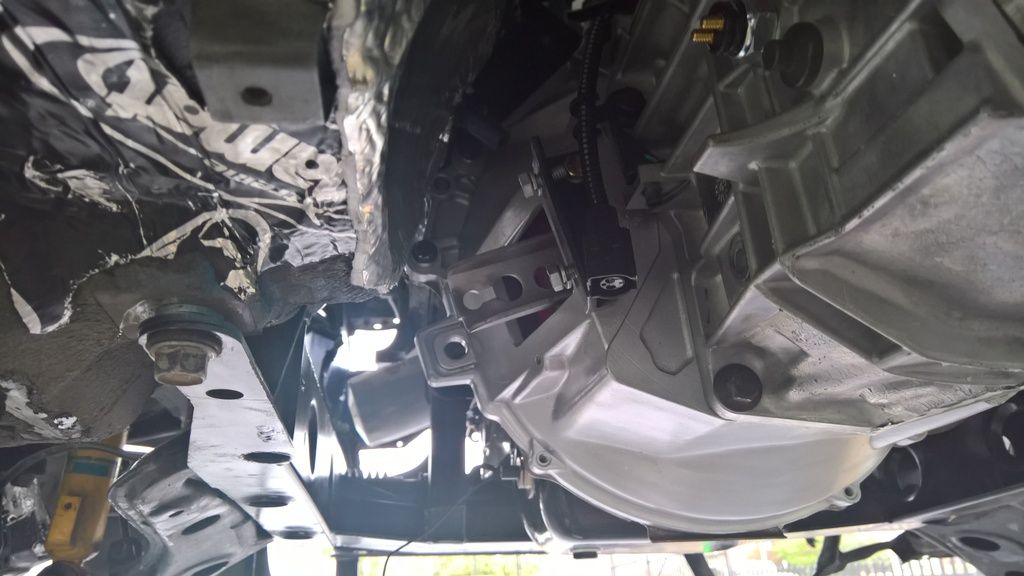
27) Make a brace for the slave cylinder mounting point and brace it to the T5 case...must do. Mine turned out great see pics..
28) Keep everything clean and neat and if you have doubts on how to do best do something check out what the factory OEM cars did for things like fuel lines, clearances, rubber grommets, mounting brackets, heat shields etc. etc. A lot can be learned by reutilising OEM stuff from other cars or models.
29) Vinyl sprays and car detailing products can be used to restore plastics and rubbers for a small cost. keep an eye on the details and the finished product will come up beautifully!!
30) The Factory Wind shield CAN be installed with the Hard Dog Roll bar. It just needs two brackets made up. I made some myself from Stainless steel angle..they look OEM when painted in the trim color. I will post up pics...the wind is greatly reduced at highway speeds.
Hope that helps...I will post up some pics of the car when it stops raining and I can wash it...in the meantime here are a couple of pics of the roll bar
That's it for now. I will upload some pics another day!!
Absolutely beautiful work on your Miata.
I really enjoy reading threads where care and attention to detail is so obvious.
Your summary of lessons learned is great for anybody doing a V8 conversion to follow but I have to say that the Australian accent does not come thru.
Some of the details on an LS build differ slightly but it still gives a solid line of reasoning and points anybody interested in the right direction.
A few questions for you ;
How difficult is it being in Australia and working with companies in the USA?
Also I am wondering on how you decided on the specific drivetrain components you utilized as the transmission and differential you utilize have a reputation for being less robust than the output of your engine would seem to require?
The 3" exhaust has me doing a bit of head scratching as a quick calculation says that dual 2 1/4" should flow better than a single 3".
Maybe my numbers are off but I get 6.49 sq. inches of area for a single 2 7/8" inside diameter but 7 sq. inches (3.5 x 2) for dual 2 1/8" inside diameter exhaust pipes.
Is there some secret or method to your madness or am I missing something?
The look of the Hard Dog deuce roll bar fits the look of the Miata much better than the more effective standard style roll bars.
Perhaps I will go with that style for mine.
Only difficulty is that it is not SCCA approved for track use here in the USA.
Hi BG,
Thank you for the kind words and encouragement it is greatly appreciated ��
Now in response to your well thought out questions...
1. I have been dealing with US based companies for about 20 years or more. I have found it so easy to deal with them on almost all levels. For this project the companies i used who were all amazing were..Monster Miata, Bethania Garage, RockAuto and Summit Racing. Plus a few other random eBay suppliers. All were terrific and delivered goods to spec and in time. Pricing was good too...shipping was terribly expensive but in the end a plug and play setup with proven parts makes the job much easier.
2. I selected the T5z because it was light, small and cost effective. It is weaker than a T56 but in a Miata I have sone things on my side. There is less weight than a full size mustang so there is less strain on the box. Secondly the car will wheelspin before it overloads the gearbox components. So when you combine these two things you have a kind of safety valve. The gearbox will absorb the full torque brunt when the car is heavy and the tyres are very sticky. In this case the car under hard power launches will kill the gearbox at some point. But for me in a daily driver street car which is light and wheelspins when pushed, it is a much better proposition. Also I know how to drive a car sympathetically enough to avoid damage. You have to try quite hard to kill a T5z in a Miata if it's a new gearbox. Shifting nice and smooth under power is an important skill that everyone needs to hone ��
For the diff, I chose the 7.5 to avoid exhaust and CV clearance issues. I know it is weaker but for street duties it will hold up just fine.Martin recommended it...so I went with that. It was all pretty much plug and play ��
In relation to the engine power being too high for the box, that is technically true. But again the above elements of weight, wheelspin and sympathy work together to ensure that the box does NOT bear the full brunt of the engine torque and therefore I don't leave metal all over the road ��
3) There is some method to my madness (well most of the time!). With the exhaust I agree that duals have more internal cross sectional area and technically can flow more gas. However this additional area is only of benefit if the engine requires it. On a street car in order to flood a single 3 inch pipe it needs to flow over 750cfm of flow, this will exceed the intake cfm flow of my 331 stroker at 6200rpm which is about 580-600cfm. In addition increasing cross sectional area too far introduces resonance or droning in the exhaust at low speeds (I personally hate this a lot..lol). Also exhaust diameter is most critical at the engine end and it becomes less critical as you move rearward. My car has twin 2.5 in pipes until just before the diff, where it moves to a single 3 in. I have used 2 into 1 single 3 inch pipes on a few of my V8 cars and they work quite well for sub 500HP street riven applications. With exhausts it is always good to be a bit on the small side than the large side, it will sound better and wont vibrate or resonate as much. Any advantage of a larger exhaust is only seen if the original pipe size was very restrictive.
From my experiences having a 3 in single pipe configuration is on par with a dual system (2.25 or 2.5) for normal power levels (sub 500HP). Obviously if we are making over 600hp and revving to 7500 rpm then the dynamics of the requirements change and a larger exhaust may be required. My car spends 95% of its life sub 3500 rpm as a daily driver so its no where as critical as a high revving race car pulling full power all day.
On an emotional level, I love the more mellow and deeper note of a single pipe myself...and in my car there is zero drone or exhaust resonance, which for me was very very important as i drive my car for 2 hours a day. So I needed a more OEM style experience.
Yes I agree that the deuce hard dog bar looks great. It fits very well too...its a decent job to install (read - I cut my hands to shreds and cursed for a full day) but well worth it. �� Plus I can use the wind shield...i will upload photos of how I did it. Yes regrettably its not SCAA approved....but if you are not racing then you can run it
Thanks for taking the time to put down the considered questions...always great to share ideas and thoughts on stuff like this
If I may ask, what is the name of the product you used in the tunnel as a heat shield ? I see the dyno mat on the underside of the floor pans but cannot make out the product in the tunnel. I was thinking of using dyno mat thru out but am unsure if it is an effective heat shield or more of a sound deadener.
If I may ask, what is the name of the product you used in the tunnel as a heat shield ? I see the dyno mat on the underside of the floor pans but cannot make out the product in the tunnel. I was thinking of using dyno mat thru out but am unsure if it is an effective heat shield or more of a sound deadener.
Thanks in advance
Hi Hotwheels,
YEs you are correct Dynomat is not technically a heat shield. Dynomat Extreme is probably best described as a sound proofing that can be used in the engine bay as well as under the car. It will take heat but not exhaust level heat. So you need to keep it away from direct exhaust heat with the heat shield.
The way i did it was to use Dynomat extreme for the tunnel area first (make sure you clean the metal from dirt and grease). Then on top of that I used a peel and stick fibreglass backed aluminium heat shield that worked really well. You can buy it from Sound Deadener - Car Builders - Sound Deadener Heat Insulation Car heat Shields or from ebay.com.au.
I used it everywhere I could, the area in the tunnel and especially right near the seat belt buckles as this takes in a lot of heat. Even after the shielding it still gets a tiny bit warm...but its a long way from being burning hot like before !
The last thing I did was use a spray can sound deadener to get to all those impossible places where dynomat does not work. A spray can works fantastically well and gives the whole undercarriage a nice deep black look. Do all of the above and you will be happy with the result
3) There is some method to my madness (well most of the time!). With the exhaust I agree that duals have more internal cross sectional area and technically can flow more gas. However this additional area is only of benefit if the engine requires it. On a street car in order to flood a single 3 inch pipe it needs to flow over 750cfm of flow, this will exceed the intake cfm flow of my 331 stroker at 6200rpm which is about 580-600cfm. In addition increasing cross sectional area too far introduces resonance or droning in the exhaust at low speeds (I personally hate this a lot..lol). Also exhaust diameter is most critical at the engine end and it becomes less critical as you move rearward. My car has twin 2.5 in pipes until just before the diff, where it moves to a single 3 in. I have used 2 into 1 single 3 inch pipes on a few of my V8 cars and they work quite well for sub 500HP street riven applications. With exhausts it is always good to be a bit on the small side than the large side, it will sound better and wont vibrate or resonate as much. Any advantage of a larger exhaust is only seen if the original pipe size was very restrictive.
Here are some pictures of my Deuce Roll Bar install with the addition of the Mazda Factory Wind Deflector. Many have stated that the wind deflector cannot be refitted with a roll bar but that is not exactly true. What you need to do is make two new brackets to slightly extend the position of the wind deflector so it sots in front of the roll bar.
I used some 2mm stainless steel angle to make them. I made a cardboard template first and then a few trial fits to get the right hole positions and angles.
I am really wrapped with the outcome as they look factory fitted once they got painted in the trim color.
As far as performance goes, the wind is dramatically reduced over 40MPH. Without the deflector the wind was terrible at around 60-70MPH. Now with the windows up and the top down it is great and one can easily have a conversation with only a very small amount of wind coming into the cabin.
Wow, beautiful build. I’m going to be redoing a few bits on my car this year and will be using a few of your ideas.
You say you braced the clutch slave. Any pics of that? I have my doubts that it really needs to be braced, but it couldn’t hurt.
Will be adding more heat shield even though I did the entire interior with heatmat.
Surprised you had hood clearance issue even after shimming the subframe. Does this Martin subframe make the engine sit higher than his LH drive models?
On your headlamp housings, are those some sort of aftermarket units?
They look to be something other than factory and one thing I am looking for with my car is something better at night.
Thanks Brad,
I must say that your build helped me so much in planning for mine. Your pics and notes were invaluable to me (as were many others) and as such I am happy to be able to give you and anyone else something back through my experiences.
I will take a pic of the Clutch Slave support, which worked our really well to be honest. Yes you definitely do need to support it as the bell housing does flex slightly when the clutch is depressed. Someone had put a video up ( i think Gabriel ??) of his clutch action and I think you can see it there. It is not much but its there.
Yes heat shield, heat shield and more heat shield is the name of the game for sure. Best is to put it underneath and on the firewall if you can. I did not do my firewall as I still had all the stuff on it as I did not strip the entire car down, so all the brakes and wires were still on it. Which makes it hard to get a nice 1 piece finish on the heat shield.
I was little disappointed with the hood clearance to be honest as I thought I would get by with it. But with my setup there was no way for the hood to close. The reasons for this are as follows.
1) I have a stroker engine, therefore the pan needs to be deeper by at least 0.25 inches. Why that is important is that a deeper pan interferes with the steering rack sooner
2) I have a very tall intake manifold (TFS R) which is 11 inches tall std., By comparison this is 0.25 taller than the GT40 manifold and likely at least 0.5 in taller than the style of manifold on your engine. The GT40 and older 5.0L manifold choke the engines potential (especially a stroker) so I could not run it.
So the added 0.75 in height stack makes all the difference to hood clearance. The main point of interference is the TPS switch, the manifold funnily fits in easily under the power bulge. But as the Throttle body sits to one side it gets to a lower point on the bulge..or just off the edge of it as in my case.
To combat it I did the following:
1) I dropped the subframe by 10 mm (not a fan of doing this but had no choice) I used the special tie rods to combat the bump steer issue (if it ever arose
2) I milled my intake by 4mm for some extra space (still not enough)
3) Removed the hood bracing across the power bulge
3) I also had my bonnet modified slightly to get me an extra 1/4 inch by enlarging the "power bulge" slightly. It is subtle so you may have missed it. Which is the whole idea!
So now the hood closes but there is only 3mm clearance...it touches slightly so I will need to do some more trimming on the TPS screws so it clears by an extra mm or two...
Martins Subframe does not make the engine sit higher, its just a bad combination of the above that takes away that precious 1/2 inch that is afforded to everyone who use a 5 litre engine with a shallower oil pan and a lower profile intake.
But it fits now so I am happy
The Fan shroud is an interesting one as it is nothing more than a single flat sheet of 3mm Aluminium (in hindsight 6mm would have been better..will explain later) with two massive holes holes cut out of it for the fans. I mounted the fans to the shroud.
Now as I had a custom radiator I had 6 mounting studs brazed to my end tanks. I then used a 10mm hollow tube spacer to space the shroud away form the radiator mounting surface to allow the fans to pull air from the corners of the radiator core as well and not just the core area directly in front of the fans (this helps a lot in pulling air flow across the entire core evenly). I also put an insulator fibre washer under the spacer so that the tanks don't get wear marks over time form metal to metal contact.
So what I then did, was use self adhesive weatherseal (from a hardware store) and I ran it all along the outer edges of the radiator (looping around the hose outlets). I then did the same on the radiator mounting surface of the shroud.
The shroud has 6 holes drilled into it to allow the radiator studs to pass through. I also drilled some large holes in the "blank" corners of the shrould where the fan blades were not covering and I set them up as air bypass vents. I used 1.5mm Rubber and some "xmas tree" plugs to secure the flaps in place. The bypass flaps allow slightly more air flow at speed by allowing it through the shroud and they theoretically close by suction when the fans are operating. See pics above for details.
I then mounted the radiator in the car first, then I put the shroud on by passing the 6 studs on the radiator through the shround and squashing the two weatherseals together in a "sandwich" (see pics above). I then used 6 nuts and washers to secure it in place..
The shroud worked beautifully but the SPAL fans I used were massive and heavy and as a result the shroud "flexes" so I used some rubber "feet" (same as those founds on the radiator supports on the factory Miata radiator) on the inside of the shroud to support it right in the middle between the fans. (see radiator pics above)
If you need more details let me know but the pictures above show it pretty well..I hope
On your headlamp housings, are those some sort of aftermarket units?
They look to be something other than factory and one thing I am looking for with my car is something better at night.
Hi BG,
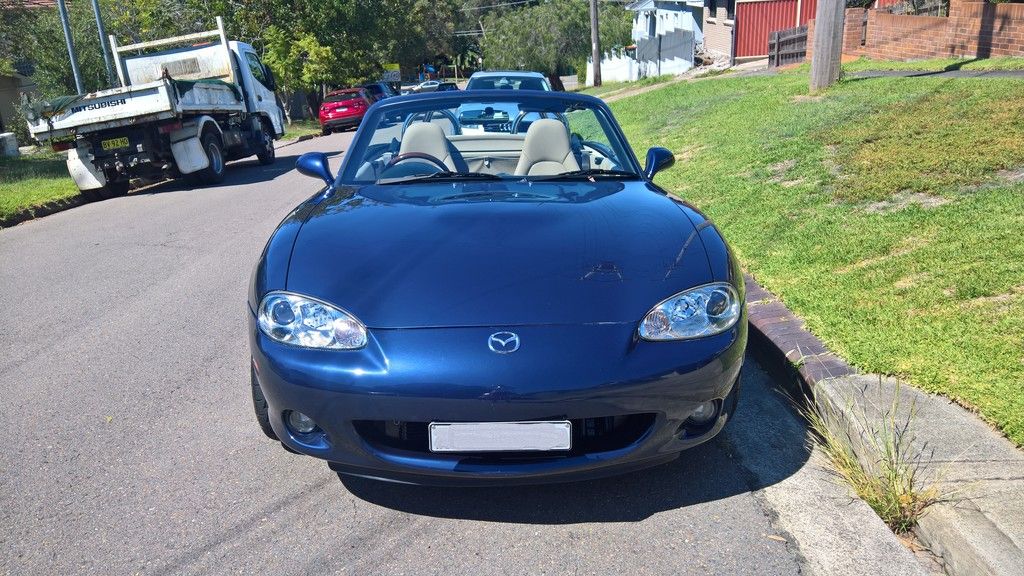
The headlamp housings are actually factory OEM Mazda Miata NB Series 2!!!
There was a change by Mazda in the headlamps design to better units with three separate sections in late 2000. The original 1999-2000(early) NB lamps were like a single large lamp (like yours!). These units are a plug and play affair but they may be pricey if new from Mazda, mine were!
My original lamps were the same type but they had turned yellow so I invested in a new set. They make a world of difference in looks and performance!
Wow, beautiful build. I’m going to be redoing a few bits on my car this year and will be using a few of your ideas.
You say you braced the clutch slave. Any pics of that? I have my doubts that it really needs to be braced, but it couldn’t hurt.
Will be adding more heat shield even though I did the entire interior with heatmat.
Surprised you had hood clearance issue even after shimming the subframe. Does this Martin subframe make the engine sit higher than his LH drive models?
And need details how you did the fan shroud.
Hi Brad,
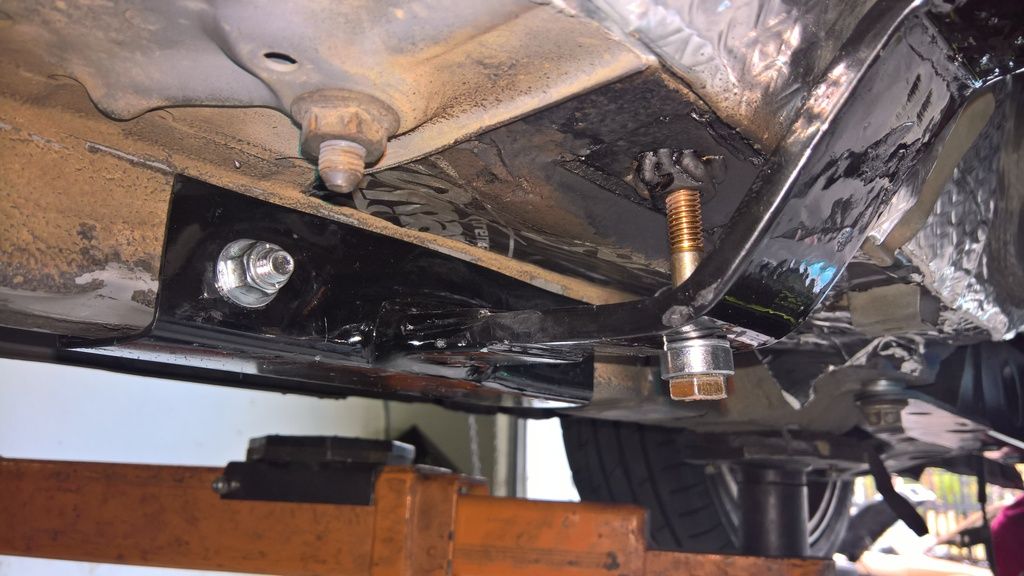
Here are the pics of the slave cylinder brace...and they are very average (so sorry!) as I didn't have access to a hoist. But it is pretty easy to see it once you know how it is made up.
Essentially the brace is made up from steel square tube.
We then welded up a mounting tab at the tailshaft end of the brace to mount up to the transmission casing ab that protrudes out from the T5z casing (it has a hole drilled through it). This tab is near the reverse switch.
What we did at the bellhousing end is we made another tab and welded it to the brace. We then welded the that tab to Martins slave cylinder bracket. We welded it in between the two mounting bolts on the underside of the bracket.
So as you mount the slave bracket/brace assembly you tighten the two bolts in the bellhousing and you then secure the rear with a bolt, washers and nut.
The finish is very neat and its super strong, no flex or movement
 08-18-2015, 09:48 AM