91 Monster Miata - 302 carb - t5or6
 08-03-2015, 09:55 AM
#226
V8 Miata Participant

Thread Starter

Ah, good information. I was thinking the only place local would be a body shop supply house of some sort and didn't feel like hunting one down. I'll have to stop in and do some price comparisons. Unfortunately, with work and a small vacation coming up, I won't be back at the shop much over the next couple weeks.
 09-17-2015, 04:29 PM
#227
V8 Miata Participant
Thread Starter
OK, let�s try this again. I typed this entire post last weekend and the site logged me off and lost it all. I got so pissed I wasn�t in the mood to type it again.
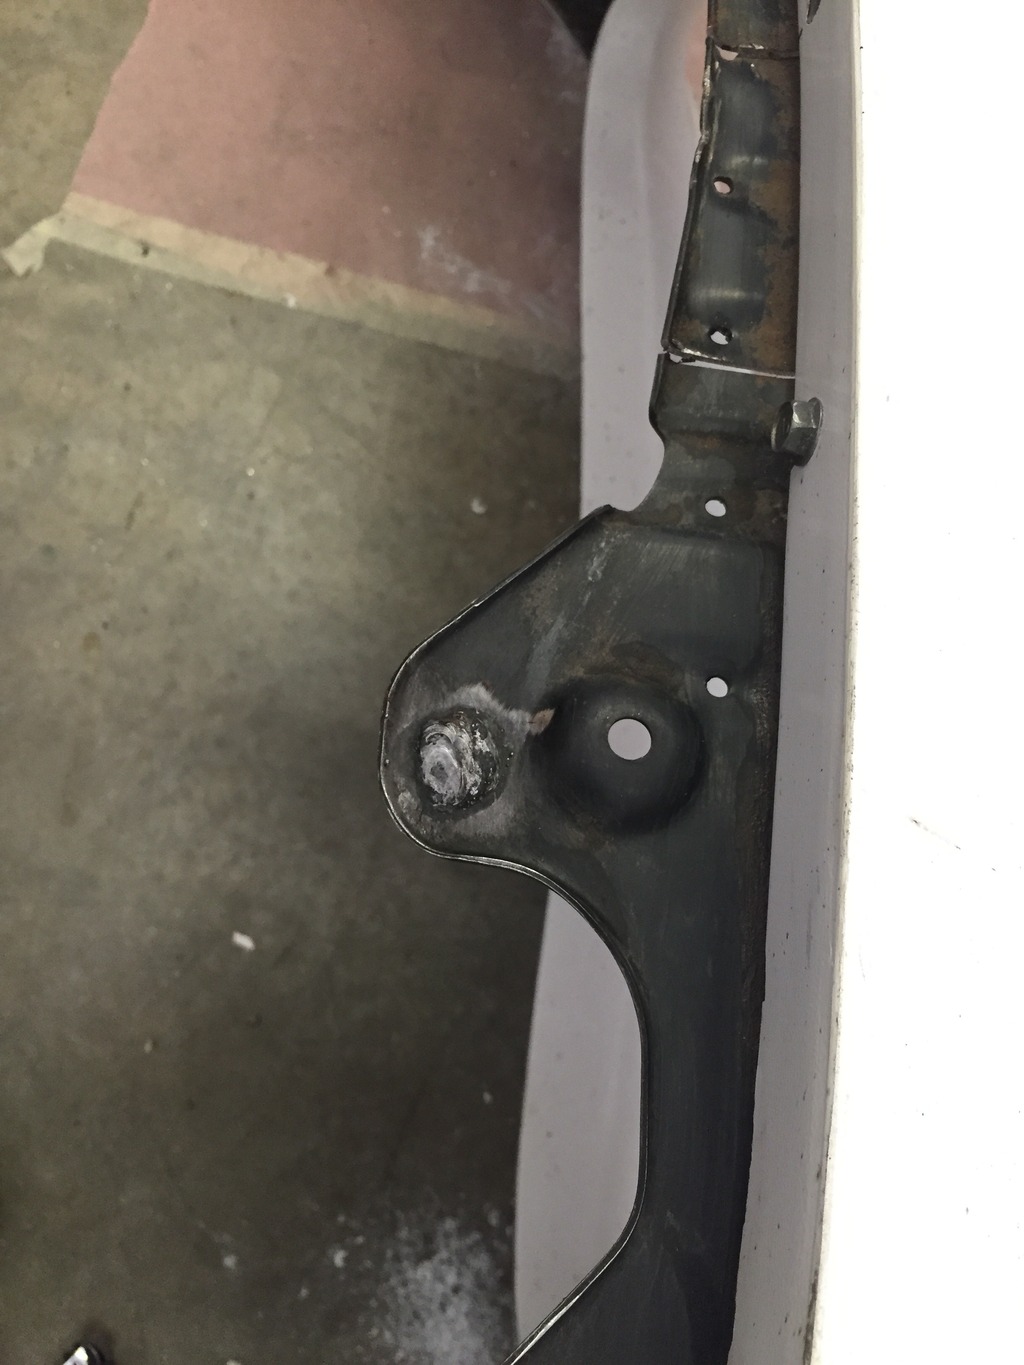
So, last weekend I went over on Friday night and test fitted the front fenders to determine what parts of the tabs needed more material. Ground them down and added the material to the bottom side so there would be enough material to mount flat after the final grinding. Left them to cure until Sunday.
Went back on Sunday and began the finishing of the tabs. Ground the bottoms flat so they would sit like they are supposed to, Redrilled the holes. Trimmed so they looked good and here ya go.

I think when I hit them with some primer, they will blend right in.
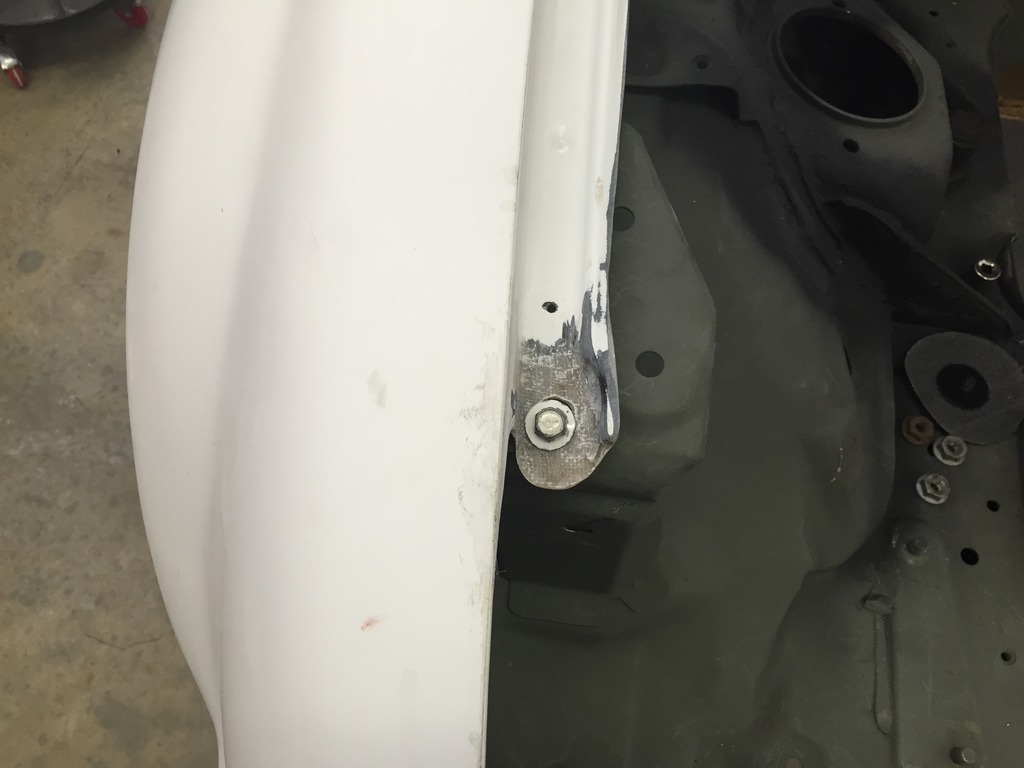
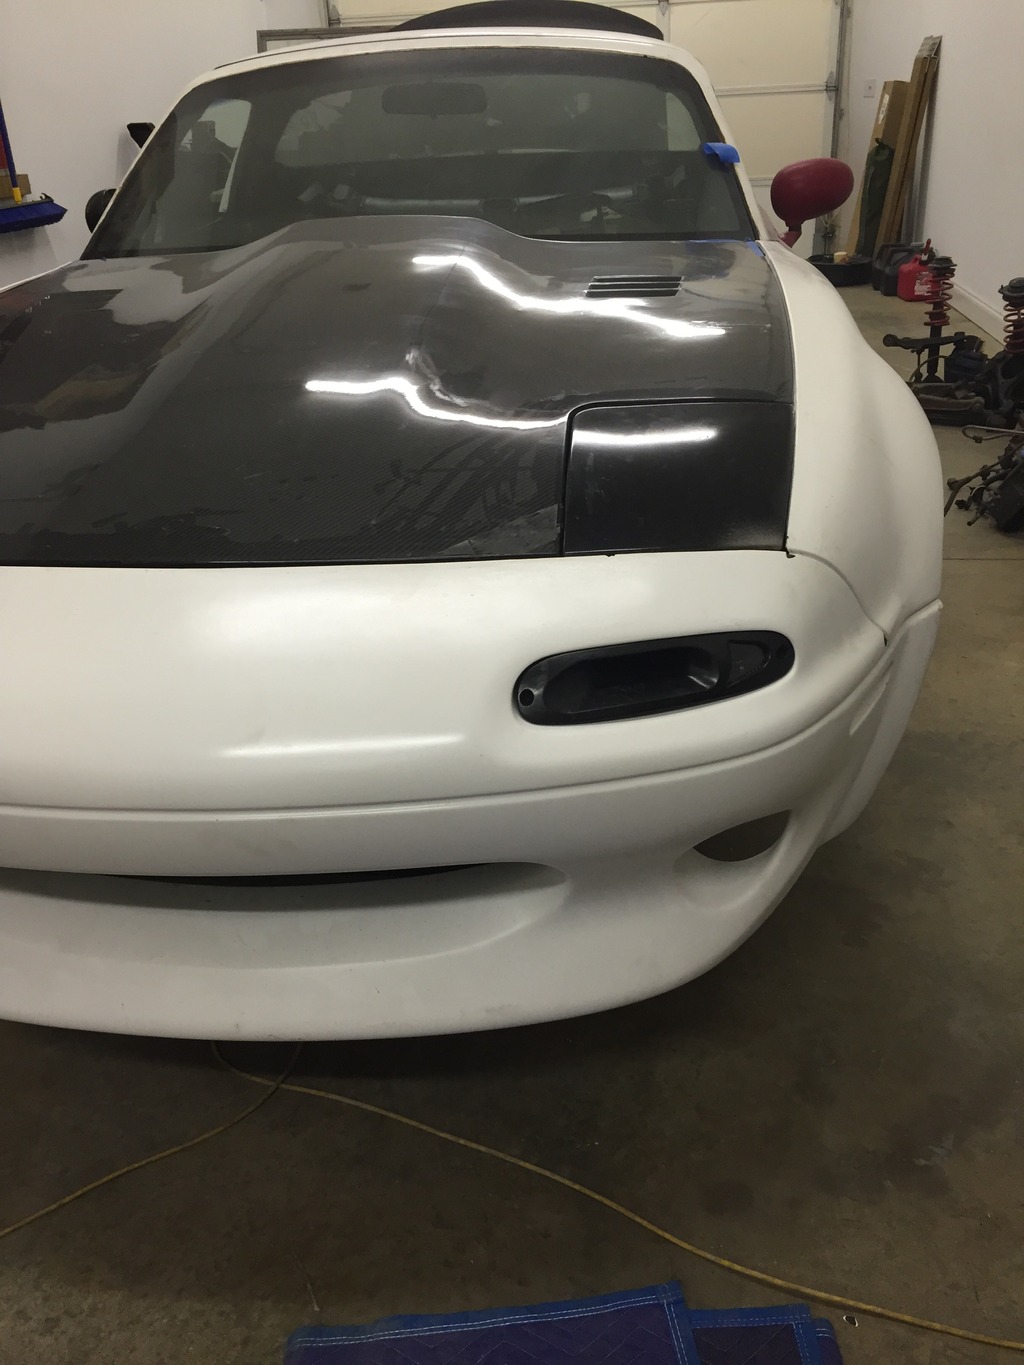
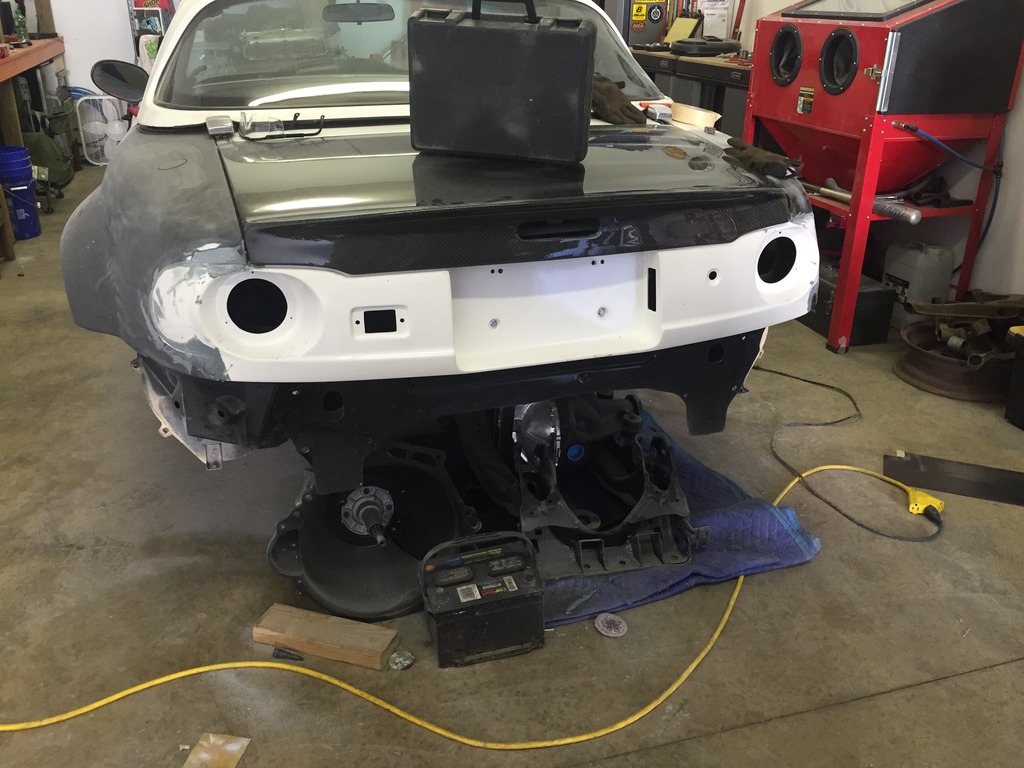
Time to get the front bumper mounted. This got tricky because the new piece is much thicker than the stock piece. So when the mounting bracket was inserted, nothing lined up. Here it is with the bracket installed after some cutting and grinding.

Then when I tried to install it, none of the holes were even close (because the thickness of the piece pushed the entire bracket back). So instead of just slotting the holes or something like that, I welded them up and redrilled.
And after some grinding, I put it in place to mark the holes from the bottom.
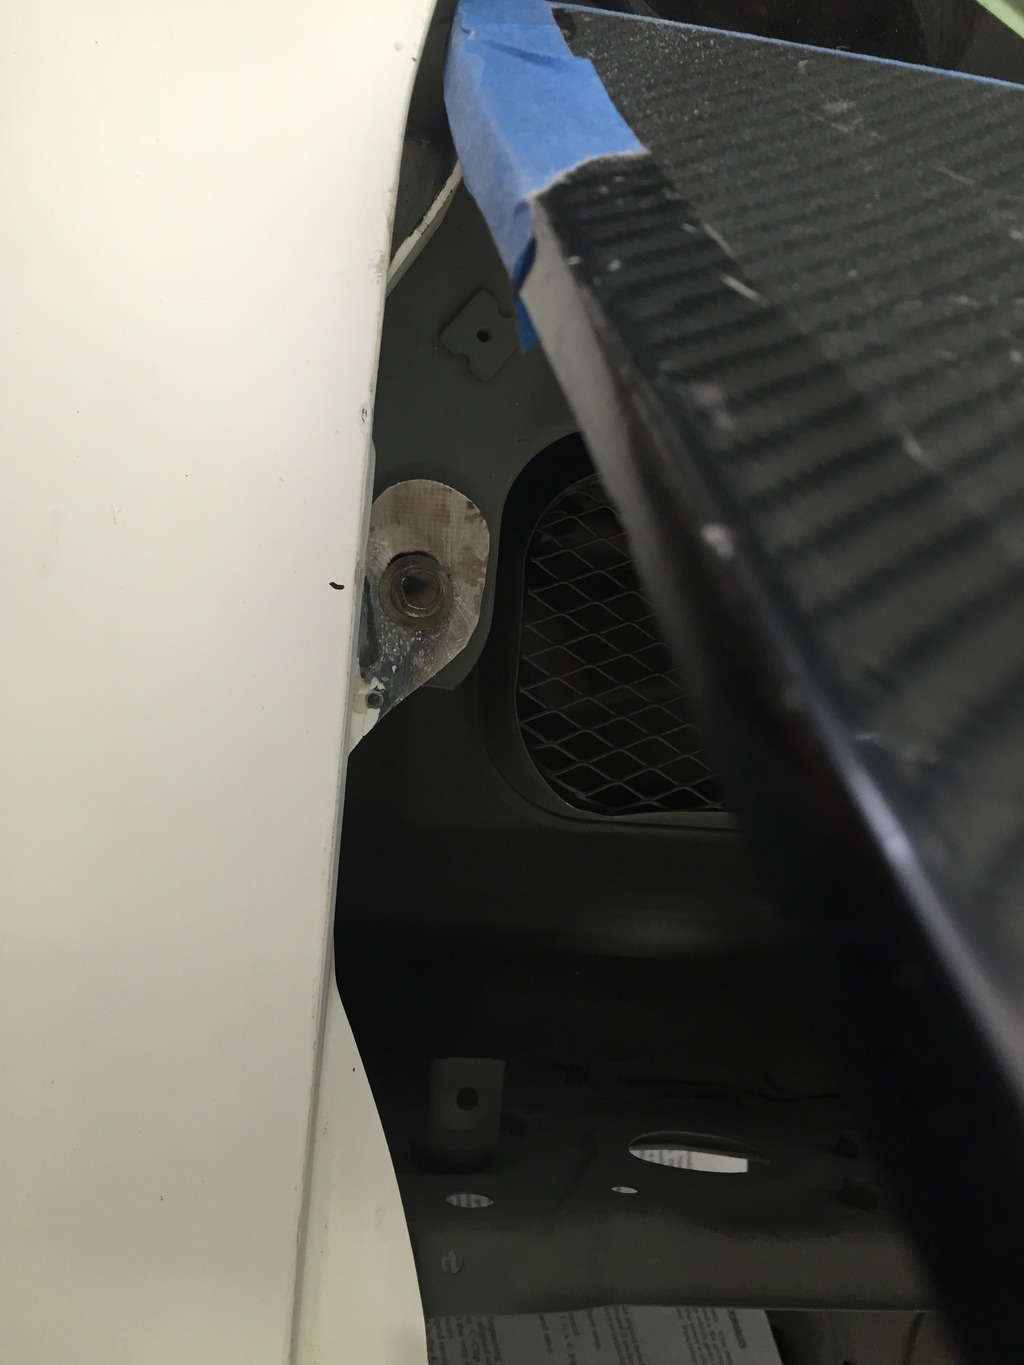
The reason I did this is because this part of the car is front and center when the hood is open. Since the engine is the highlight of this car, I assume the hood will be open a lot. So I plan on doing something special there in the front. More on that later.
Once that was done, I did some adjusting on the hood and here is the result so far.
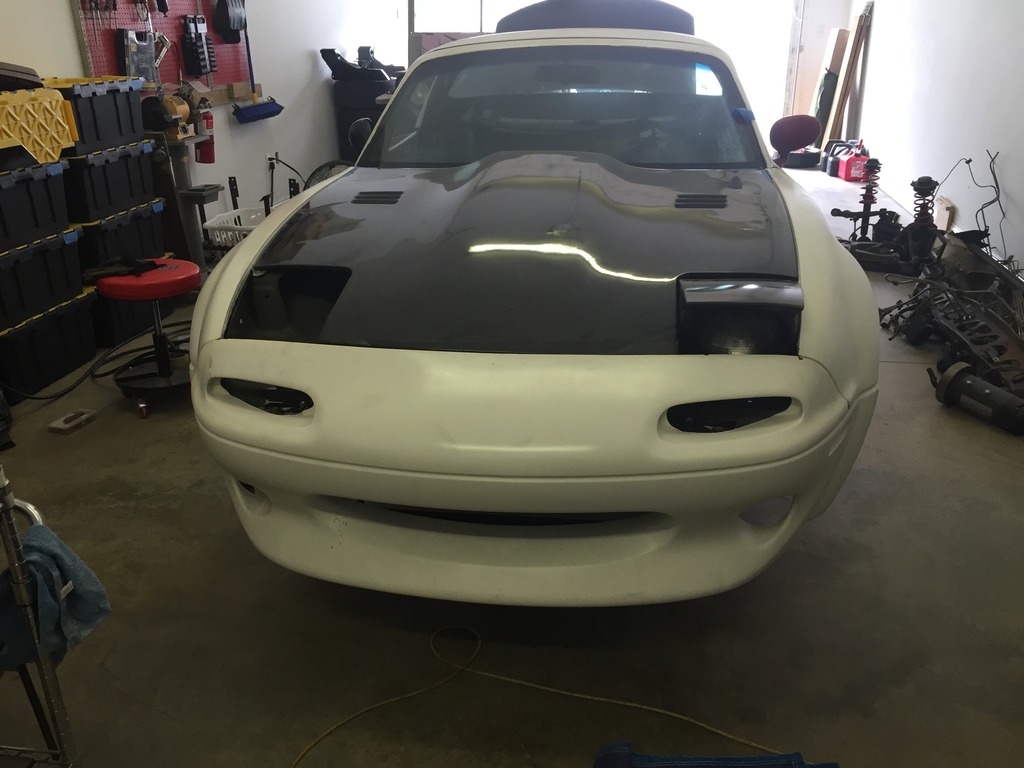
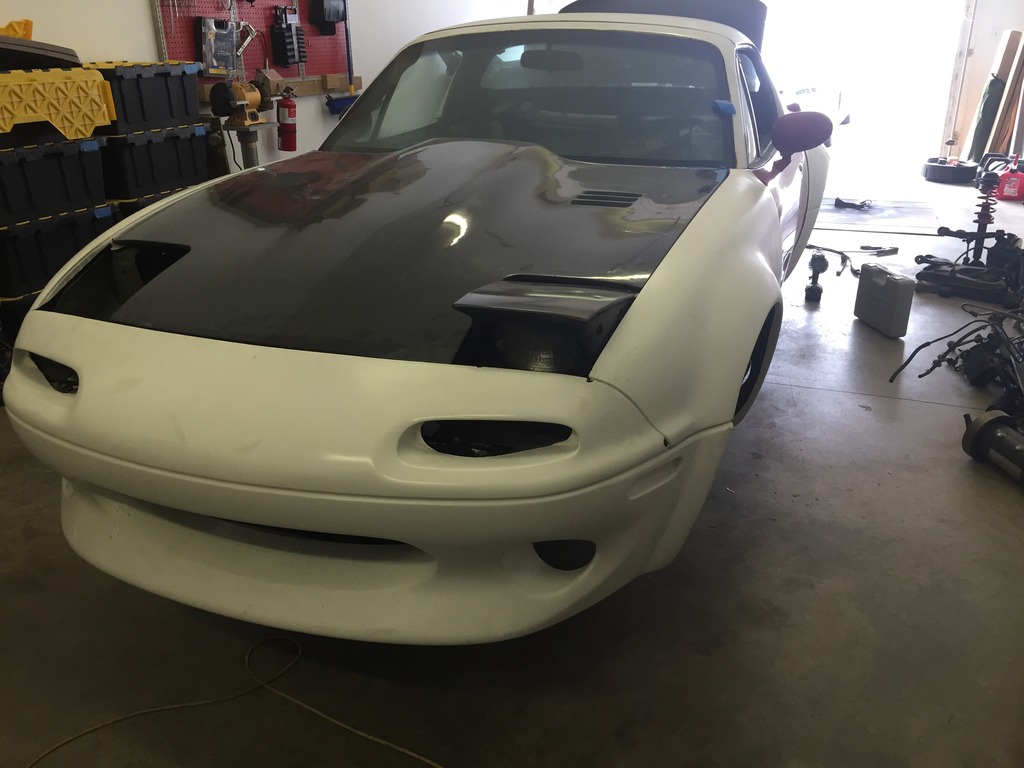
And I really wanted to see what the vent/signal lights look like now that they have a firm place to sit.

I have decided to keep the stock control arms. At the moment I can�t justify the extra 2 grand. So I went ahead and removed the bushings from one of them, blasted it and primed it just to see the result. Not bad. I�ll take pictures later.
I�m really nervous about cutting into that pretty hood, but I really want to install the aerocatches. I need to get this done so I can get that hood in a fixed position.
Next on the list �. I have decided to permanently install the rear facia and body work it in. So that is this weekend, at least the mounting and adhering part.
I will be back in the shop on Saturday.
I forgot to add time for the last trip.
Add another 4 hours to the clock for that one.
This last time.
Add another 5 hours to the clock for that one.
My Time: 167 hours
Friends & Family: 6 hours
Paid labor: $0 (this number does not include the mods made by Monster Miata)
So, last weekend I went over on Friday night and test fitted the front fenders to determine what parts of the tabs needed more material. Ground them down and added the material to the bottom side so there would be enough material to mount flat after the final grinding. Left them to cure until Sunday.
Went back on Sunday and began the finishing of the tabs. Ground the bottoms flat so they would sit like they are supposed to, Redrilled the holes. Trimmed so they looked good and here ya go.


I think when I hit them with some primer, they will blend right in.
Time to get the front bumper mounted. This got tricky because the new piece is much thicker than the stock piece. So when the mounting bracket was inserted, nothing lined up. Here it is with the bracket installed after some cutting and grinding.

Then when I tried to install it, none of the holes were even close (because the thickness of the piece pushed the entire bracket back). So instead of just slotting the holes or something like that, I welded them up and redrilled.

And after some grinding, I put it in place to mark the holes from the bottom.

The reason I did this is because this part of the car is front and center when the hood is open. Since the engine is the highlight of this car, I assume the hood will be open a lot. So I plan on doing something special there in the front. More on that later.
Once that was done, I did some adjusting on the hood and here is the result so far.


And I really wanted to see what the vent/signal lights look like now that they have a firm place to sit.


I have decided to keep the stock control arms. At the moment I can�t justify the extra 2 grand. So I went ahead and removed the bushings from one of them, blasted it and primed it just to see the result. Not bad. I�ll take pictures later.
I�m really nervous about cutting into that pretty hood, but I really want to install the aerocatches. I need to get this done so I can get that hood in a fixed position.
Next on the list �. I have decided to permanently install the rear facia and body work it in. So that is this weekend, at least the mounting and adhering part.
I will be back in the shop on Saturday.
I forgot to add time for the last trip.
Add another 4 hours to the clock for that one.
This last time.
Add another 5 hours to the clock for that one.
My Time: 167 hours
Friends & Family: 6 hours
Paid labor: $0 (this number does not include the mods made by Monster Miata)
The following users liked this post:
charchri4 (09-18-2015)
09-21-2015, 12:55 PM
#228
V8 Miata Participant
Thread Starter
On Saturday:
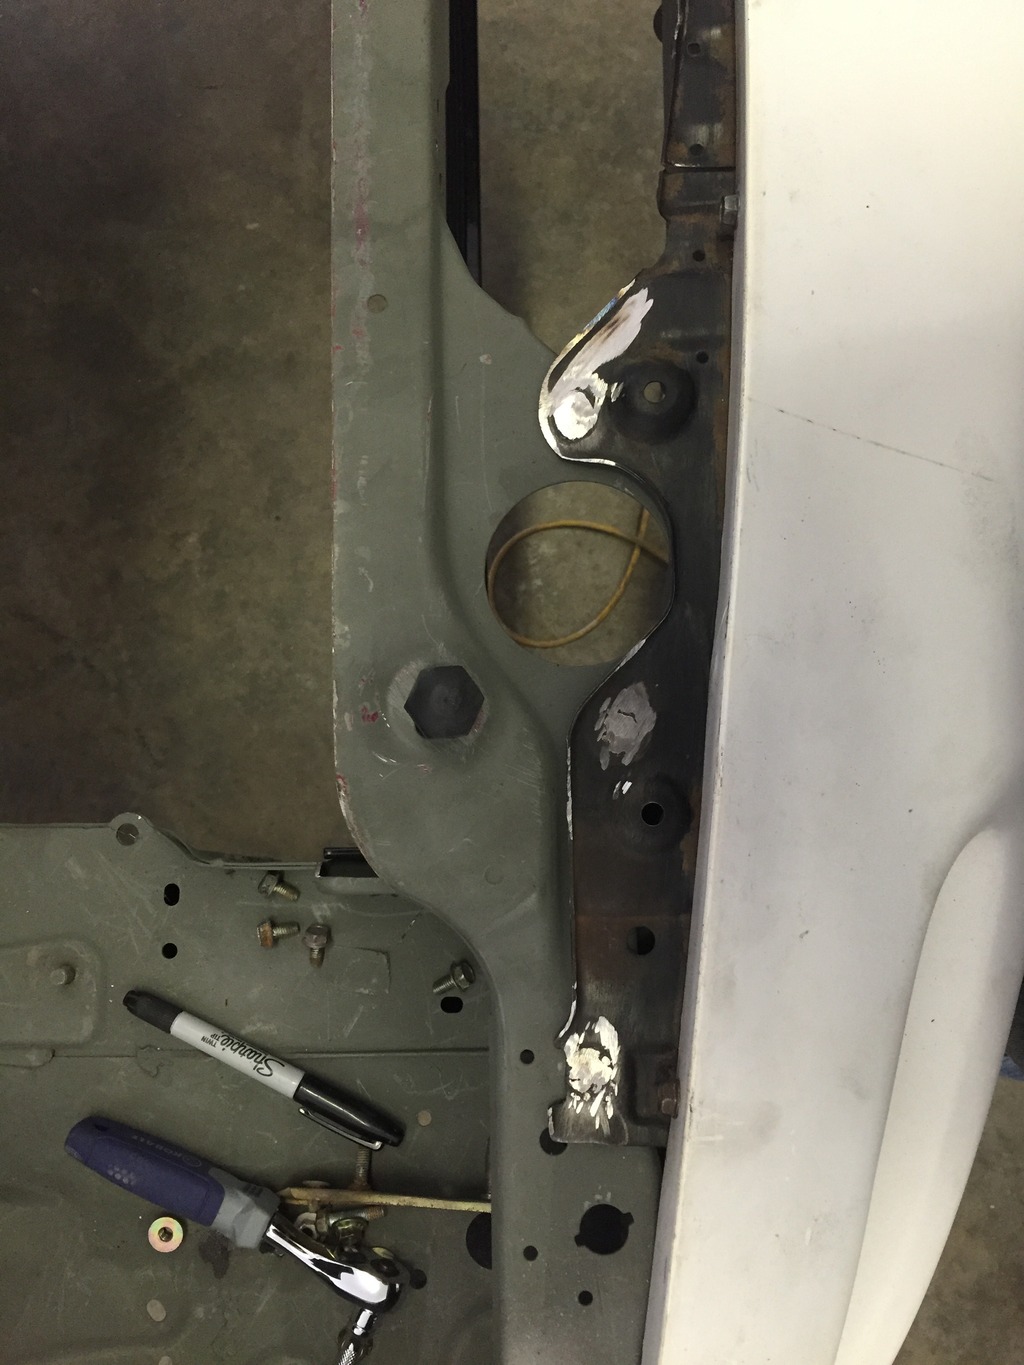
Since the bottom rear corners of the front fenders do not have enough material to reach the stock mounting holes, I installed some nutserts to mount to. That completed the mounting of the front fenders. Then I installed the rubber gasket along the hood side of the nose. I broke 3 phillips bits doing 9 screws. Pissed me off. I will get to do some work this weekend, but the following weekend is the big one. I will be able to spend a couple full days in the shop. I plan to do bodywork. Hopefully make a huge mess and end up with something to hit with primer.
Add another 3 hours to the clock for that one.
My Time: 170 hours
Friends & Family: 6 hours
Paid labor: $0 (this number does not include the mods made by Monster Miata)
09-21-2015, 03:02 PM
#229
V8 Miata Follower

That panel and light kit looks awesome. Car is looking great!


 09-22-2015, 02:02 PM
#230
V8 Miata Participant
Thread Starter
Thanks Jack. It's slow going. I'm trying to get prepared for the Oct 3rd and 4th weekend. I will be able to spend a ton of time working on it (fiance will be at a Girl Scout trip). So it will be a good 20 hours in the shop. Wanting to do some body work. This weekend I plan to get the rear bumper mounted right (just got in a new bracket. Then install the new fuel filler cap so I can body work it the following weekend. I may even go ahead and mount that rear panel so it is ready for filler too. I'm going to permanently bond it like the rear flares and then body work it in so it look more like it belongs.
09-27-2015, 03:40 PM
#231
V8 Miata Habitu�

Regarding the hood latches, you might be interested in these for your aerocatch units: Password:JDM AeroCatch� Plus Flush Mounting Plates (Universal) | Password JDM
This thread is quite an education. Glad to see you've made it so far & really enjoy the diy.
*I'm a little jealous of that hood. Well, more than a little
This thread is quite an education. Glad to see you've made it so far & really enjoy the diy.
*I'm a little jealous of that hood. Well, more than a little
09-28-2015, 04:55 PM
#232
V8 Miata Participant
Thread Starter
Regarding the hood latches, you might be interested in these for your aerocatch units: Password:JDM AeroCatch� Plus Flush Mounting Plates (Universal) | Password JDM
This thread is quite an education. Glad to see you've made it so far & really enjoy the diy.
*I'm a little jealous of that hood. Well, more than a little
This thread is quite an education. Glad to see you've made it so far & really enjoy the diy.
*I'm a little jealous of that hood. Well, more than a little
On to the update.
This last weekend I got to go to the shop a couple times. My goal was to prepare for this coming marathon weekend. My initial goals were to get the rear finish panel mounted and to get the new gas cap installed. Neither of which I accomplished. But, I am happy with the progress.
The first obstacle was to get the rear bumper mounted. I just got in a new mounting bracket for it and got to work. I need to drill all new holes in the bracket because of course the new bumper is not the same as the stock one. Got it mounted and used 5 out of the 11 plastic clips to hold it in place. A new set of clips are on the way.
This is what the rear end looked like after the bumper was installed. You can see the new rear panel on the floor.

Since the instructions for this from Garage Vary are in japaneze, I was left to try to figure this out myself. Some searching came up with a post on Revlimiter.com of the installation, but the kit must have been modified since then because mine is a little different. His had bolts and nuts and mine had captured nuts in the panel itself. So it made it a little confusing. But after fitting and removing 4 or 5 times, I think I got it figured out.
This is what the outside looks like. The bolts come from the inside out into the captured nuts. There is a gasket that will go between this piece and the car but the ones that came off the car were junk so I am waiting on new ones.

And the inside portion has a nice bucket that would normally accept the back portion of the light.

I say normally, because the kit I got has the LED conversion. So what you see above is really just to seal up the trunk and give us a way to route wires. I didn't like the way the pieces looked. Basically transparent. So I hit them with some black primer and then two coats of flat black paint.

Hopefully my gaskets will come in before I head back on Wednesday night. I doubt it. We will decide what to do if it doesn't show. I may have to just use a sealant. Because once these parts go on, they will not be coming off. I will be permanently attaching the Garage Vary piece to the car and body working it in. At this point is when I stepped back and realized that the car will be painted a dark color, most likely green (with carbon fiber racing stripe showing through) and the current car is obviously white. If I leave the rear of this shell white and mount the finish panel permanently, you will be able to see little glimpses of the underlying white shell at different angles and that is a no go. So, I sanded the rear down, hit it with black primer. It was still drying when I left. I will hit it with a couple coats of gloss black before mounting the panel.

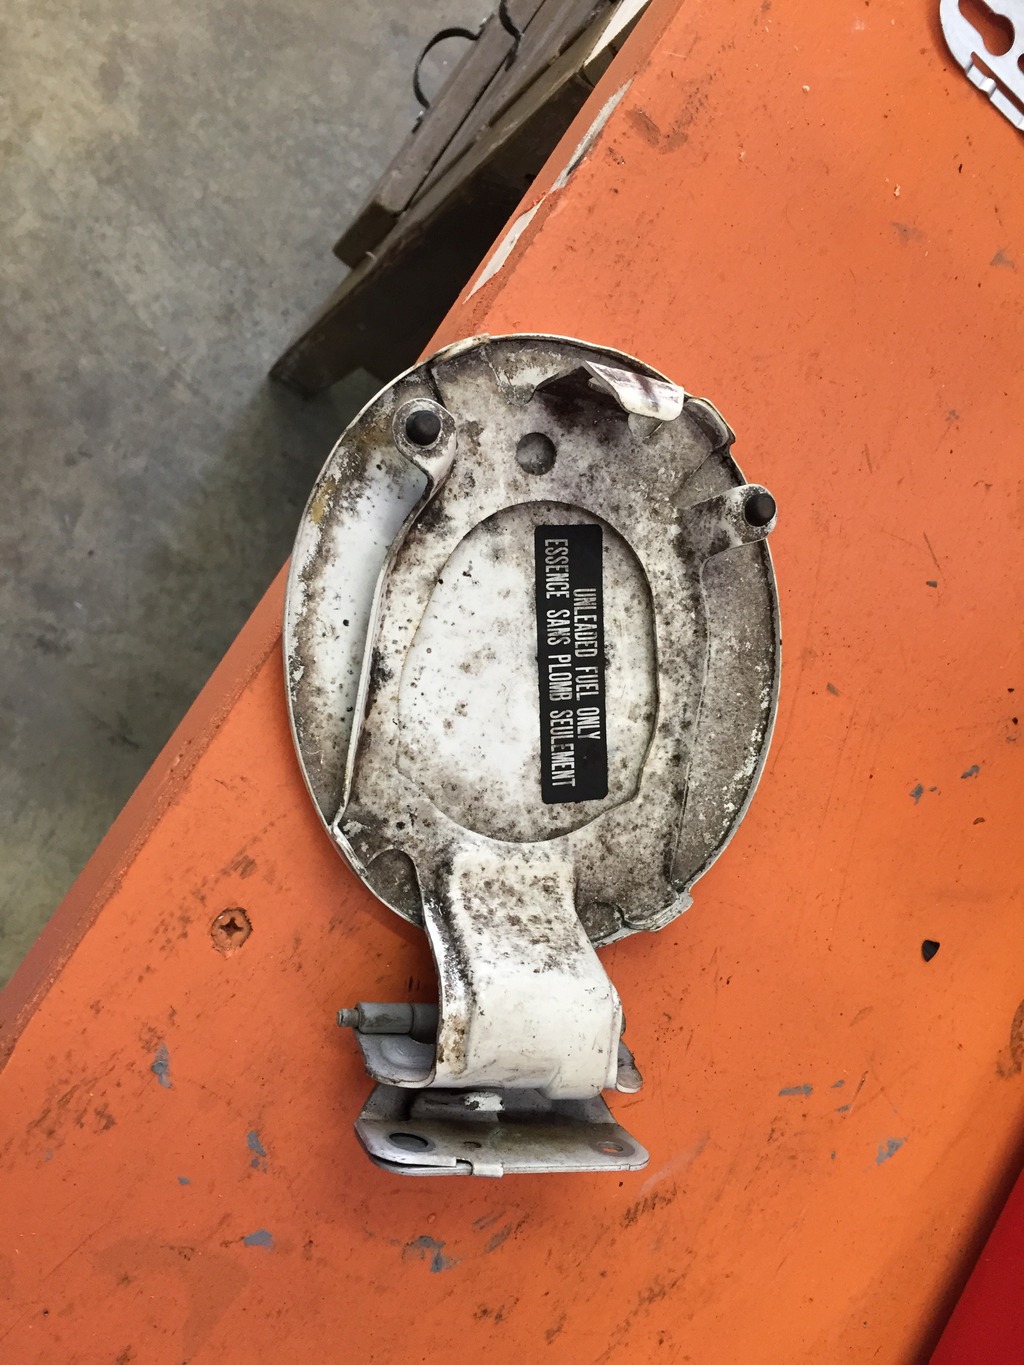
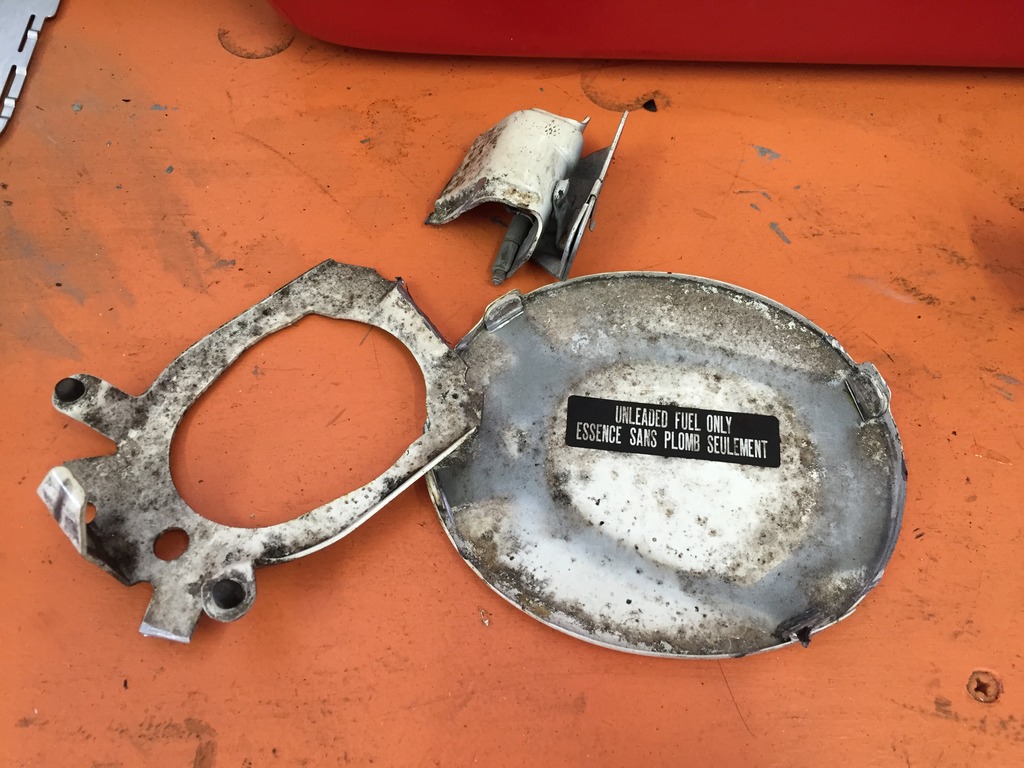
That project is on hold waiting for paint to dry. So on to the one piece of custom work I have bounced around on. I really wanted to do something with the fuel door. I don't like the stock door. I originally wanted to do a cobra style aluminum fuel lid but after hunting and hunting, I decided that it was just going to be too bulky and I wanted it to be sleek and smooth. So, I get to do some custom work.
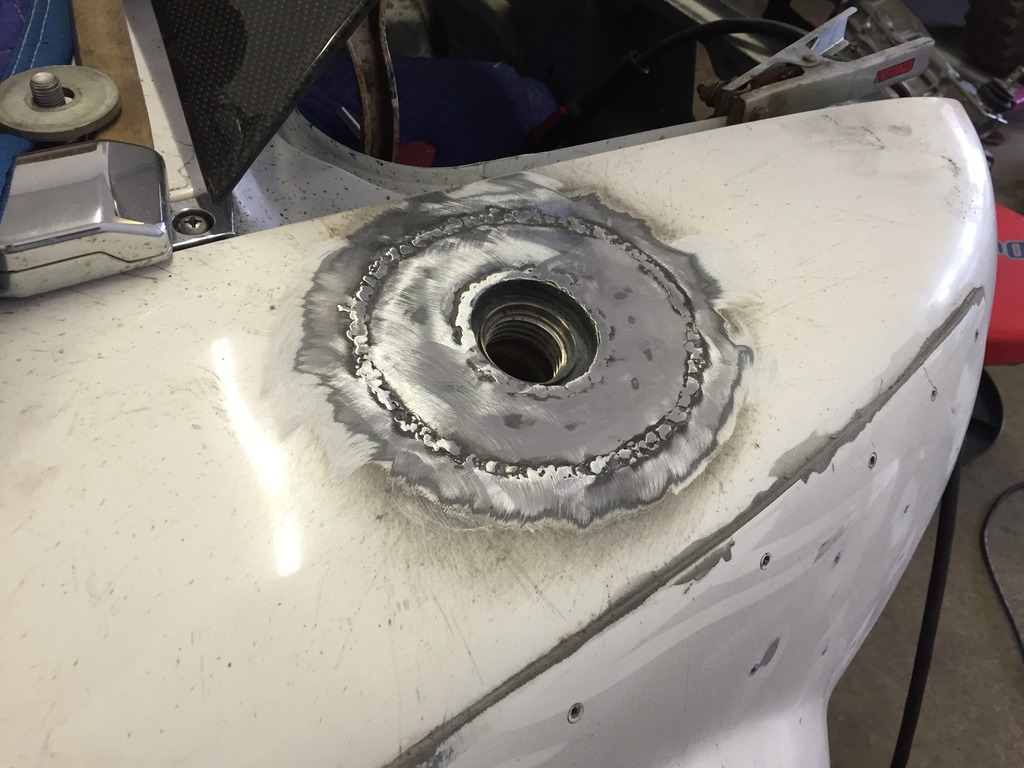
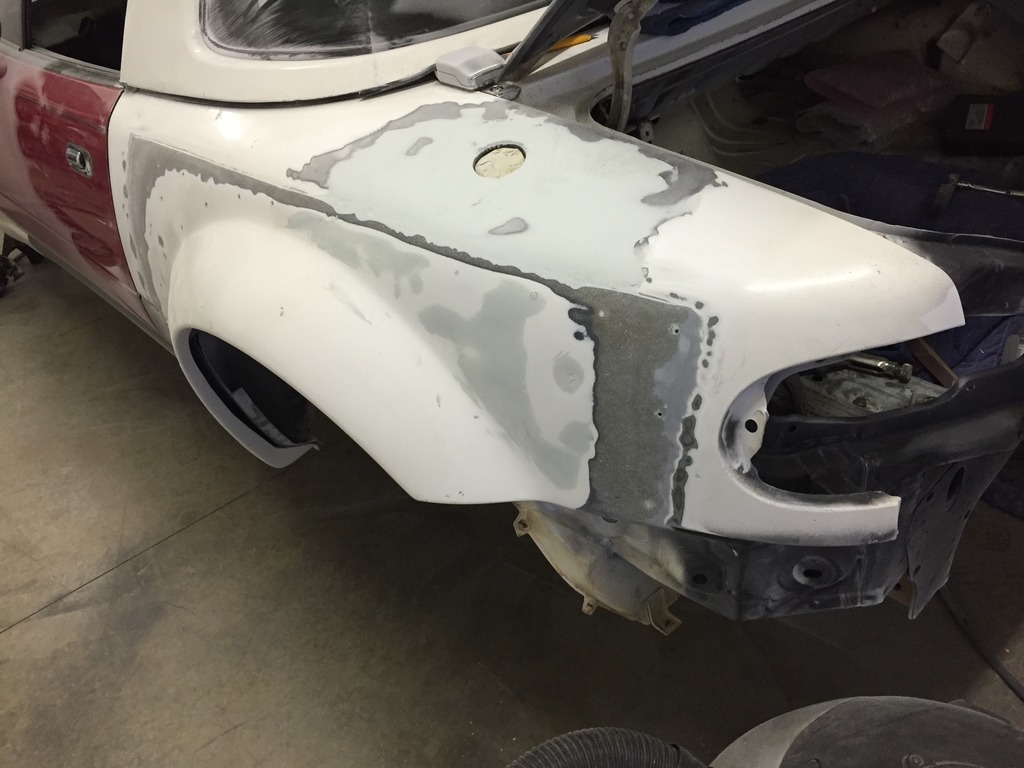
Here is the gas cap I will be putting in. It's a motorcycle flush mount cap. It sits flush and to open it, you push down and do a quarter turn and it pops up. Then you can grab it and unscrew it. Here it is in the flush position.

And the up position ready to be unscrewed.

For anyone interested, here is the part information.

To be continued next post.
09-28-2015, 05:18 PM
#233
V8 Miata Participant
Thread Starter
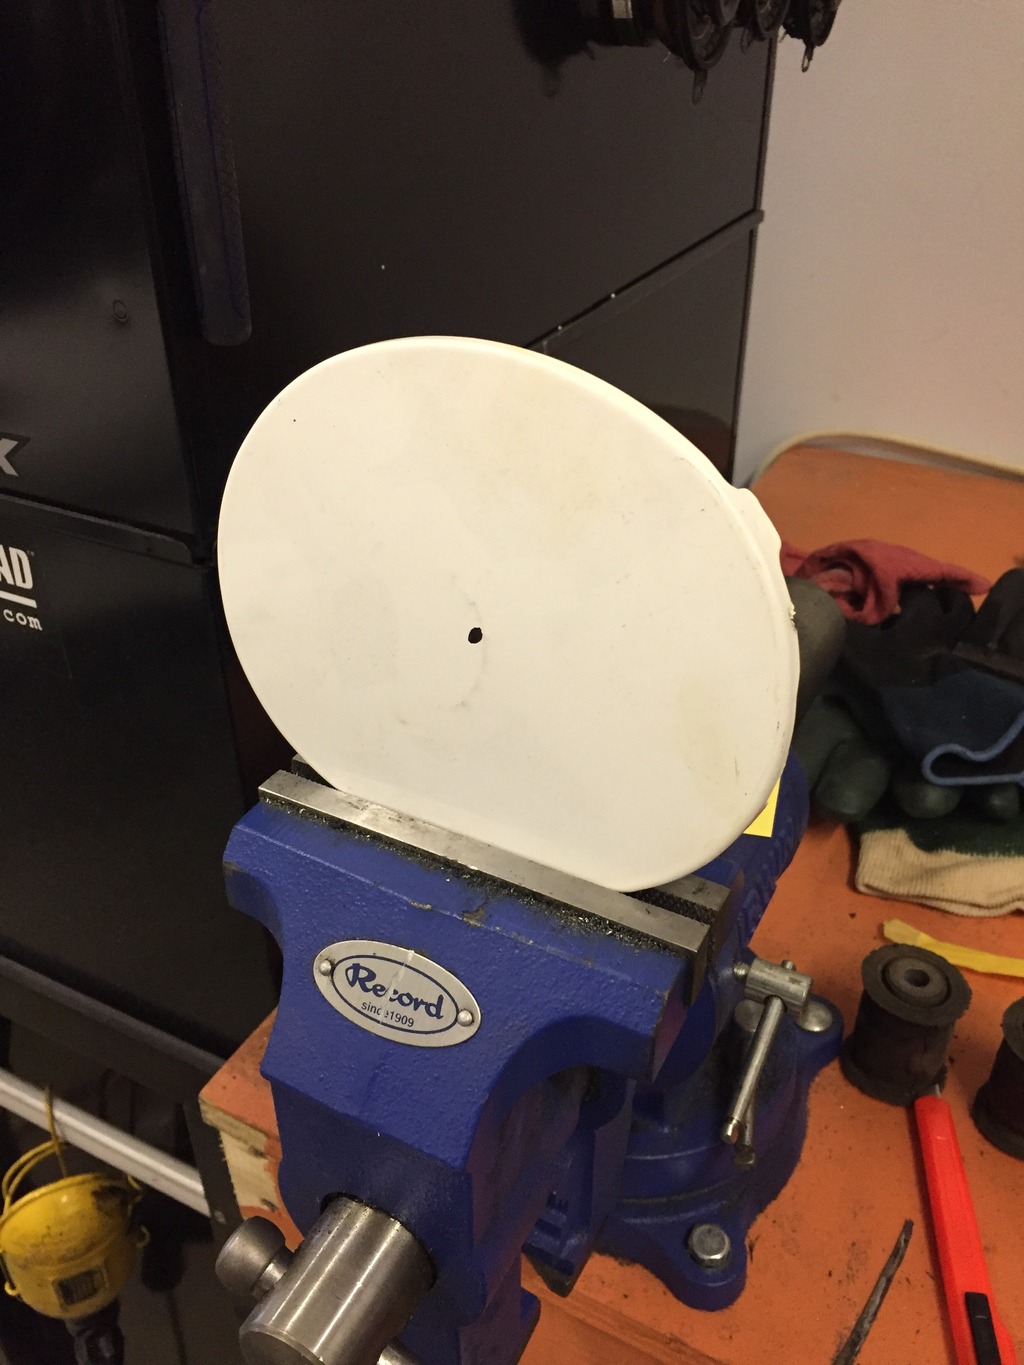
Now, I get to do the fun stuff. I'm going to put the gas cap in the middle of the existing fuel door. I have already .... crap, as I was typing this, I realized I didn't post pics of the work I did to the existing fuel door.
So, a while back when I was working on the tabs for the front fenders, I took a little bit and cut the inner structure off the fuel door.
Here she is in stock form.
And after being put on a diet.
After some cleaning and then grinding, it will be ready to weld in to close up the fender around the new opening. OK, back to our regularly scheduled um, post.
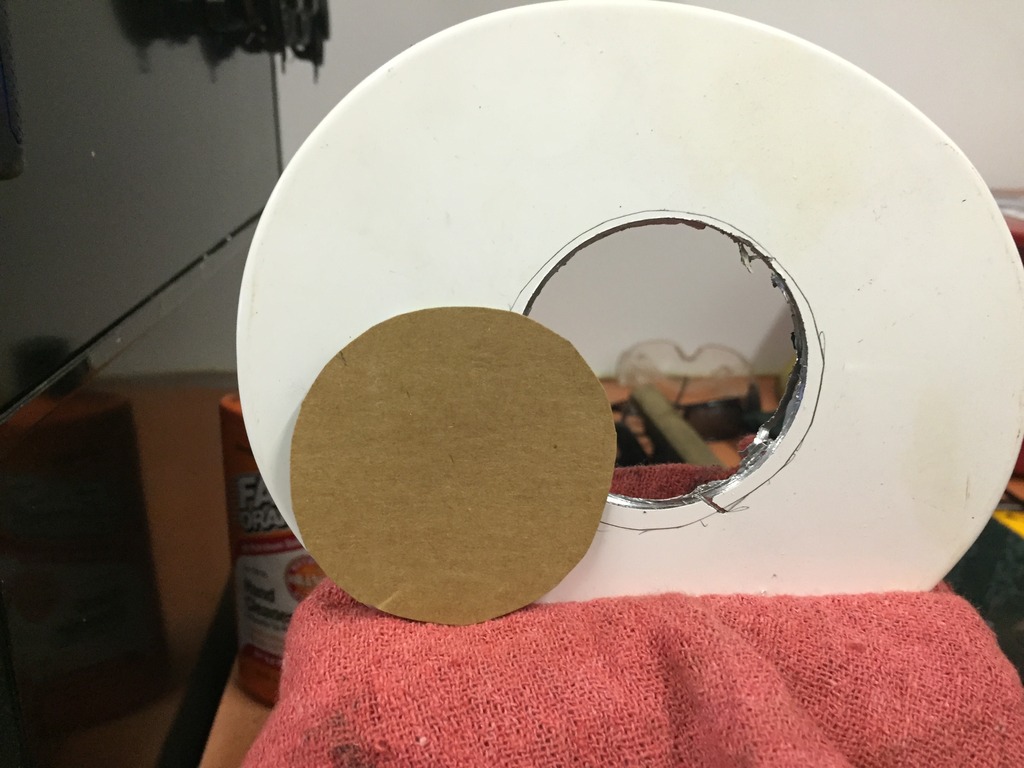
Marked the approximate center of the door.
I didn't have a 2 3/8" hole saw so I got as close as I could.
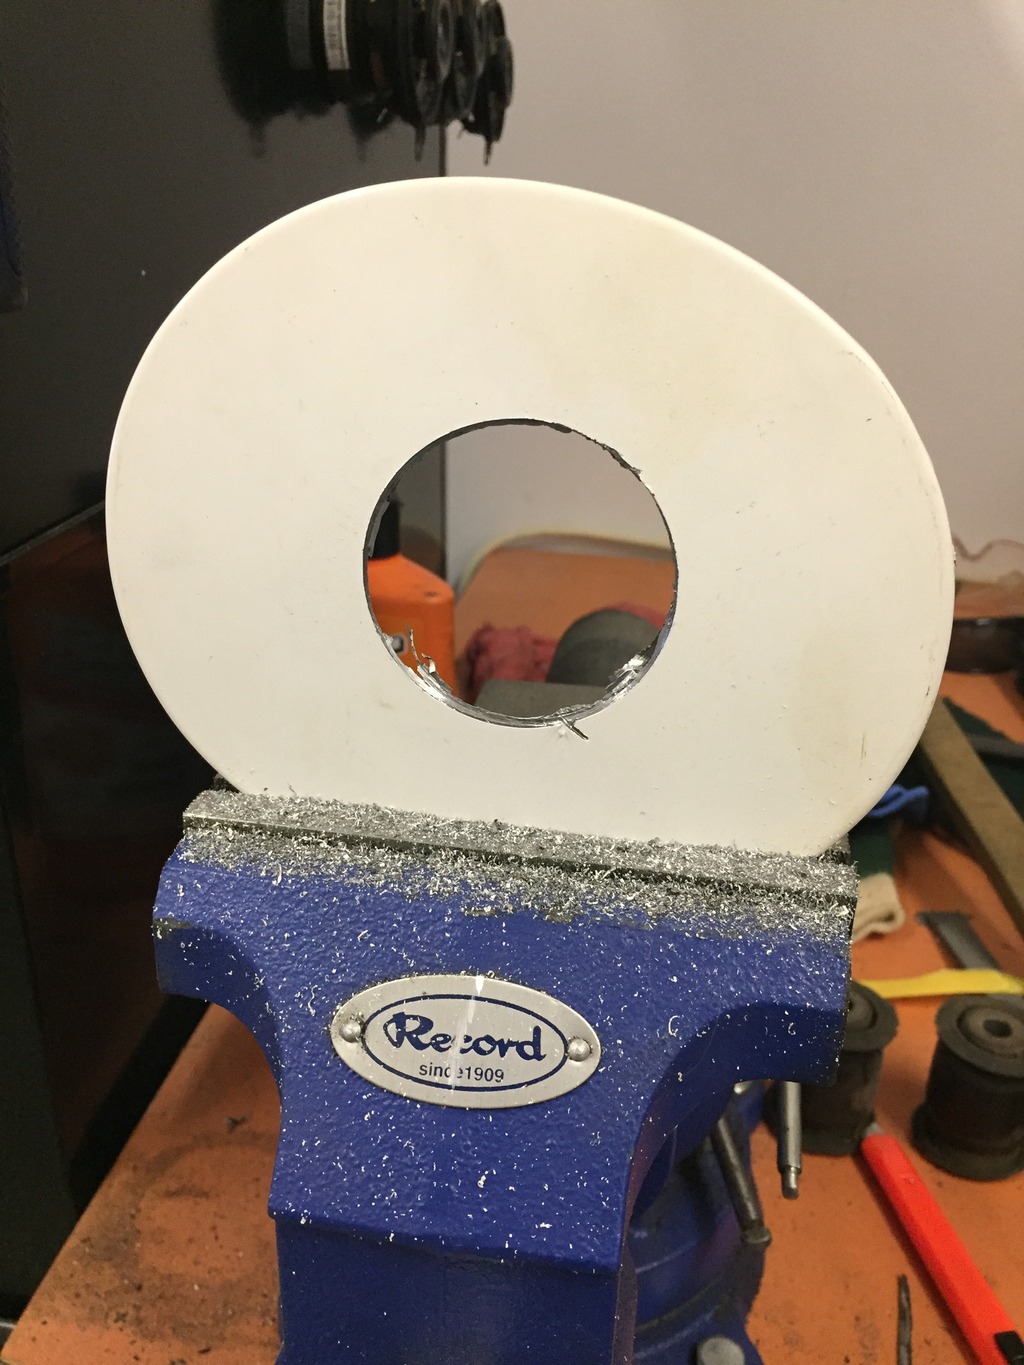
Then used the new piece to mark a piece of template material (Mountain Dew 12 pack boxes work great for this).
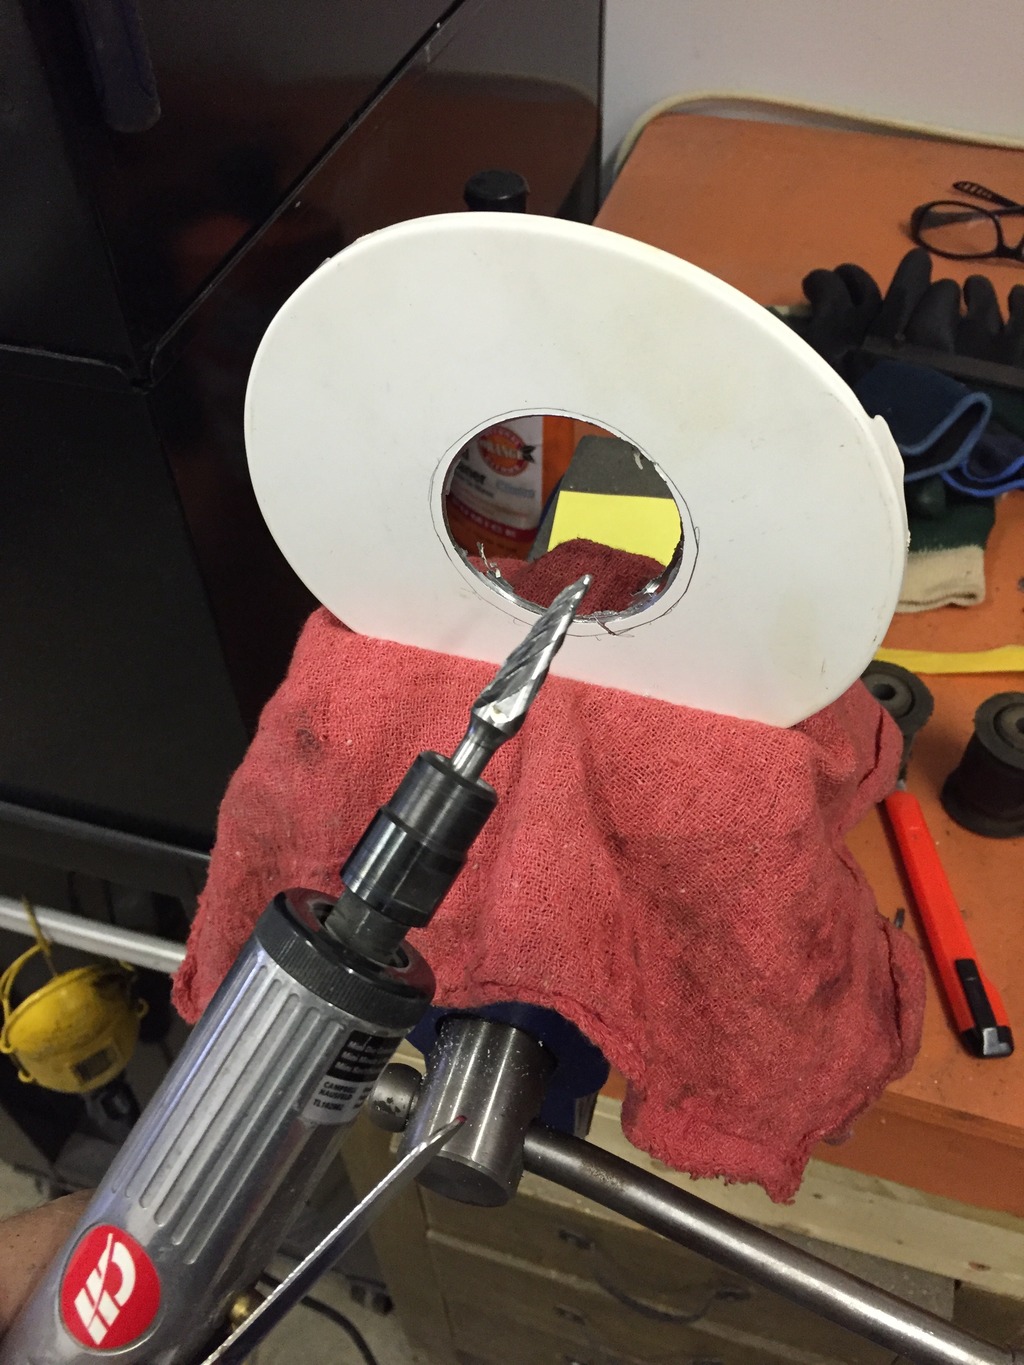
Took that piece and marked the hole to the size it needs to be and used a burr to work it until it fit properly.
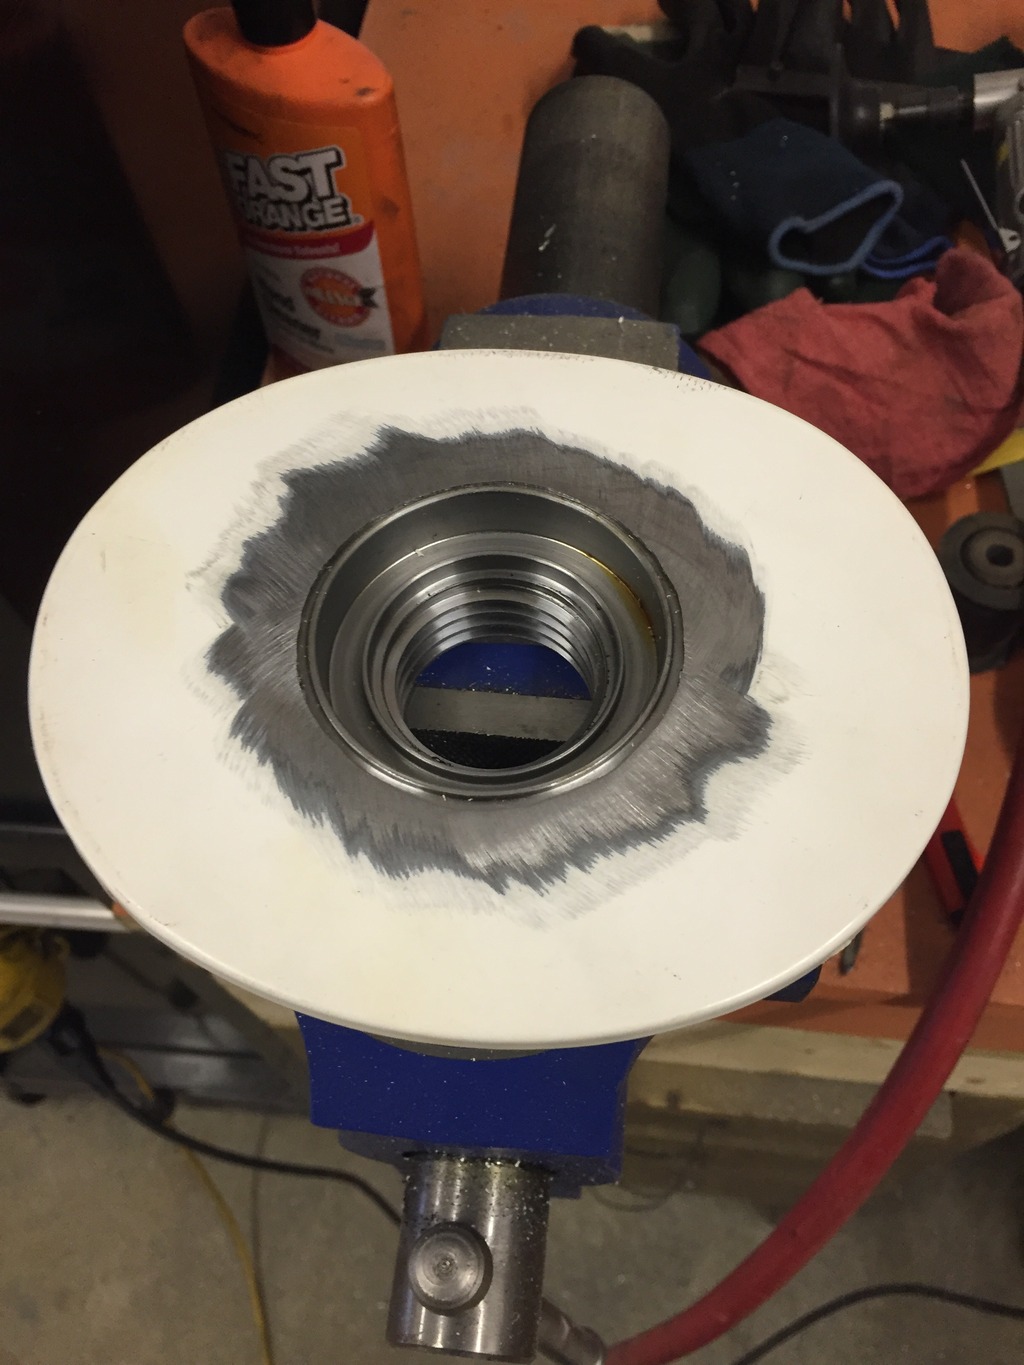
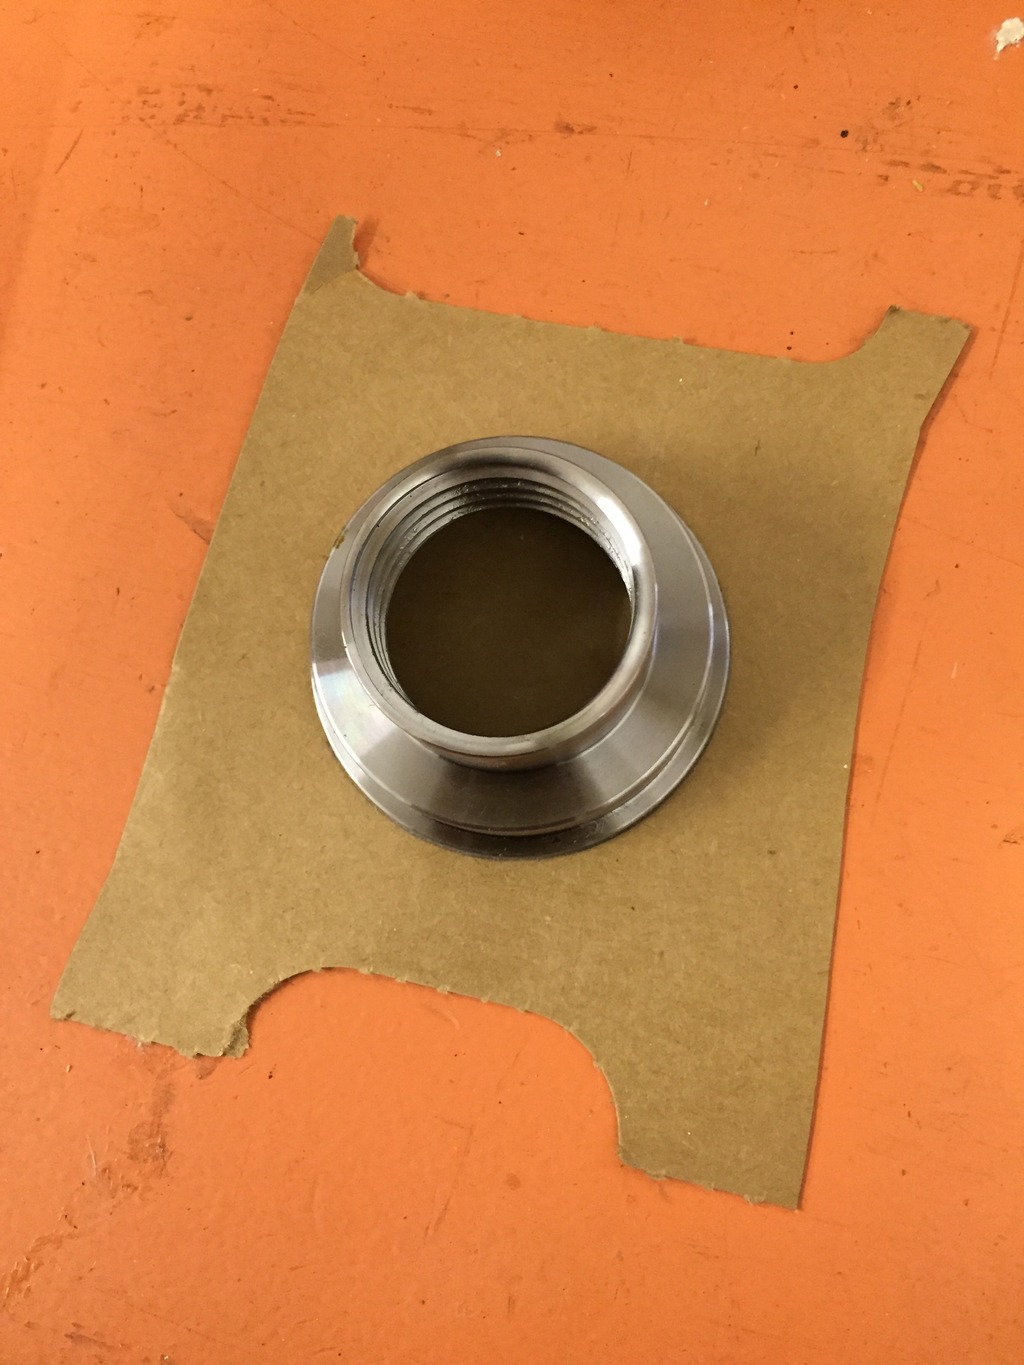
Now that is ready to weld in. But I spent a lot of time painting in the shop that day and didn't feel like exploding. So, I didn't do any welding. I figured that I better think through how to get from the new cap to the tank. I pulled out the stock filler neck and came up with a plan to modify it. That way I get to retain all of its features. The vent line, the mechanism in the neck and the little green thing at the bottom that I assume is there to airate the flow into the tank so it flows better. Whatever it is, I figured it would be wise to keep it all. So, this is the stock piece.
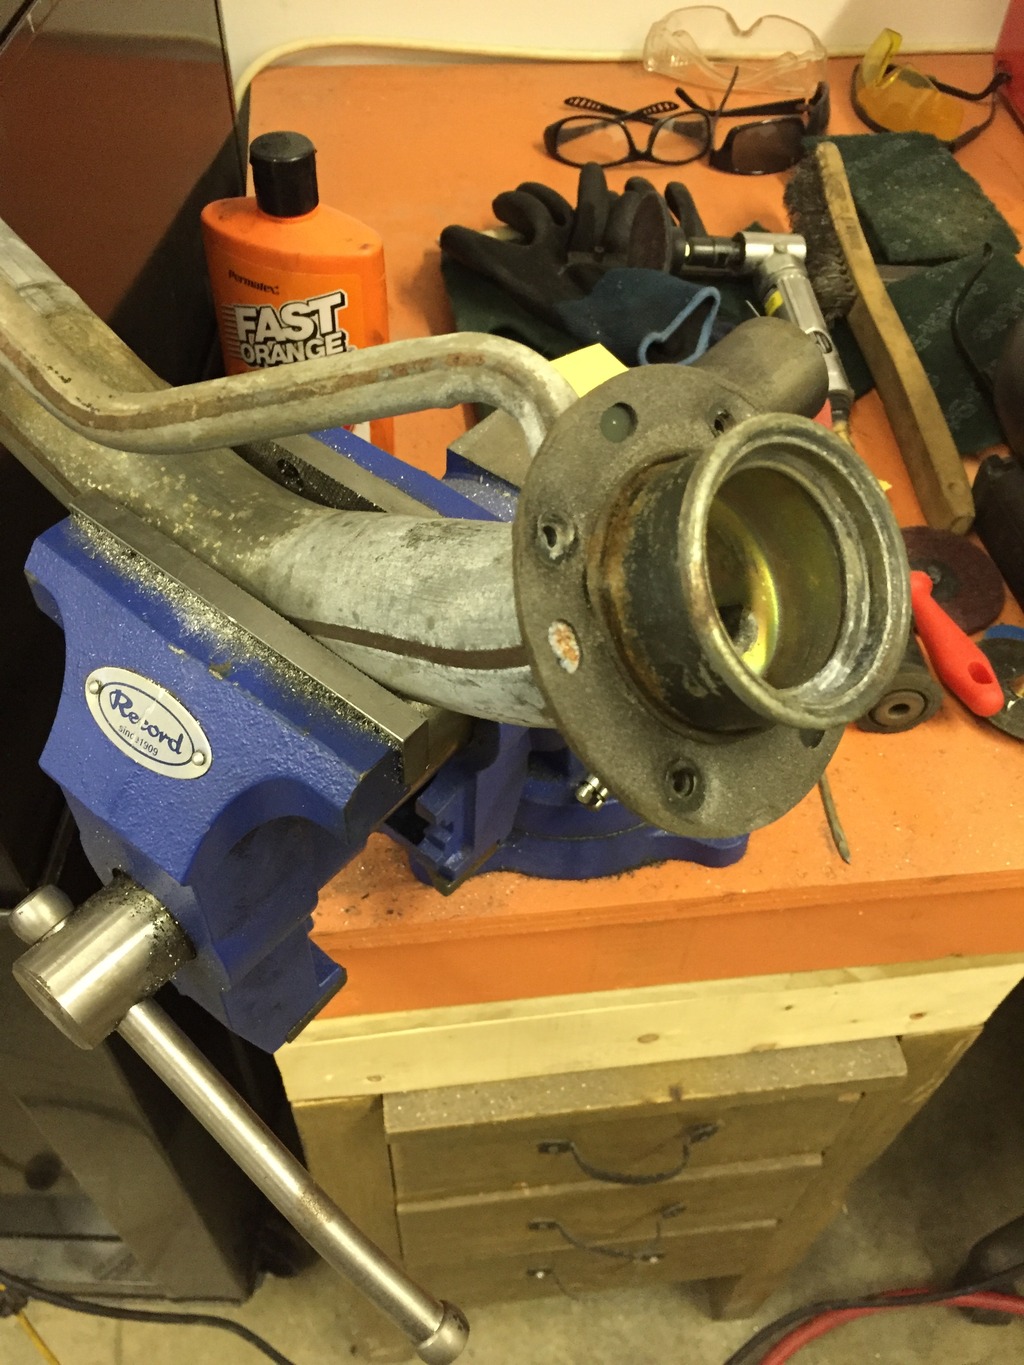
And this is what it looks like after I removed the mounting flange and ground out a little bit of the gas cap threads inside the neck so the new piece would fit.
So this weekend I get to do some final fitting and welding of this piece, mount the rear panel and finally get to play with some filler. Fill, sand, fill, sand ...........
I'm looking forward to the project, not looking forward to the mess.
Add another 5 hours to the clock for that one.
My Time: 175 hours
Friends & Family: 6 hours
Paid labor: $0 (this number does not include the mods made by Monster Miata)
So, a while back when I was working on the tabs for the front fenders, I took a little bit and cut the inner structure off the fuel door.
Here she is in stock form.

And after being put on a diet.

After some cleaning and then grinding, it will be ready to weld in to close up the fender around the new opening. OK, back to our regularly scheduled um, post.
Marked the approximate center of the door.

I didn't have a 2 3/8" hole saw so I got as close as I could.

Then used the new piece to mark a piece of template material (Mountain Dew 12 pack boxes work great for this).

Took that piece and marked the hole to the size it needs to be and used a burr to work it until it fit properly.


Now that is ready to weld in. But I spent a lot of time painting in the shop that day and didn't feel like exploding. So, I didn't do any welding. I figured that I better think through how to get from the new cap to the tank. I pulled out the stock filler neck and came up with a plan to modify it. That way I get to retain all of its features. The vent line, the mechanism in the neck and the little green thing at the bottom that I assume is there to airate the flow into the tank so it flows better. Whatever it is, I figured it would be wise to keep it all. So, this is the stock piece.


And this is what it looks like after I removed the mounting flange and ground out a little bit of the gas cap threads inside the neck so the new piece would fit.


So this weekend I get to do some final fitting and welding of this piece, mount the rear panel and finally get to play with some filler. Fill, sand, fill, sand ...........
I'm looking forward to the project, not looking forward to the mess.
Add another 5 hours to the clock for that one.
My Time: 175 hours
Friends & Family: 6 hours
Paid labor: $0 (this number does not include the mods made by Monster Miata)
10-05-2015, 05:53 PM
#234
V8 Miata Participant
Thread Starter
Well, I didn't get to spend much time at the shop this last weekend. The weather ruined it. The girlscout weekend that my wife was supposed to go on got cancelled. So it turned into a normal, spend time with the wife, type of weekend. But I did get to spend a big part of Saturday at the shop.
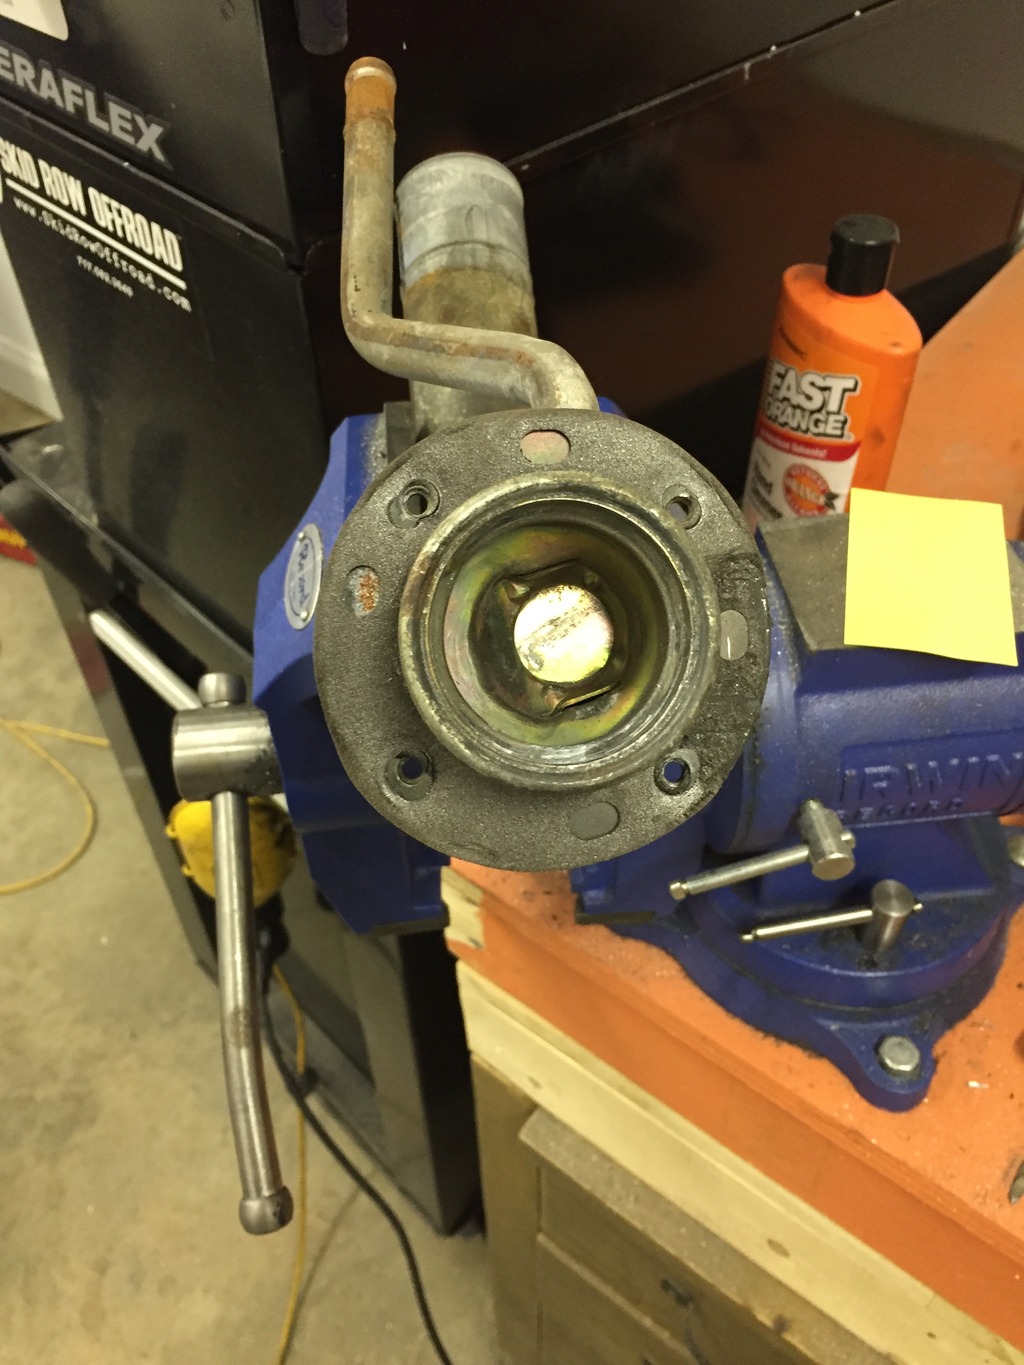
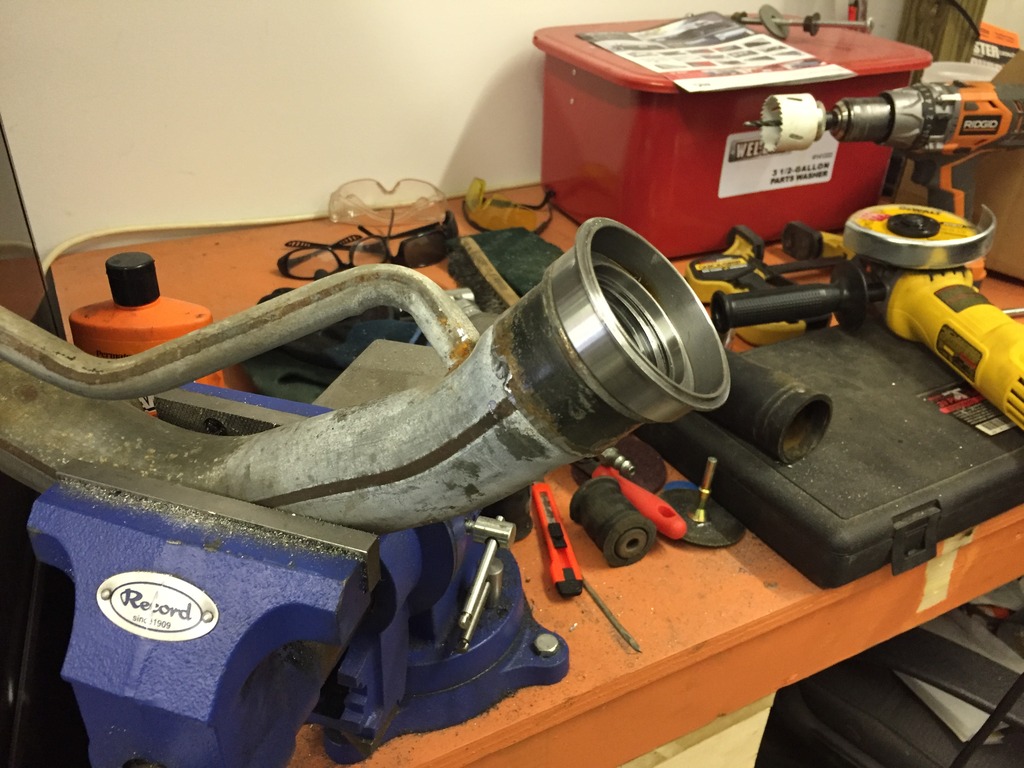
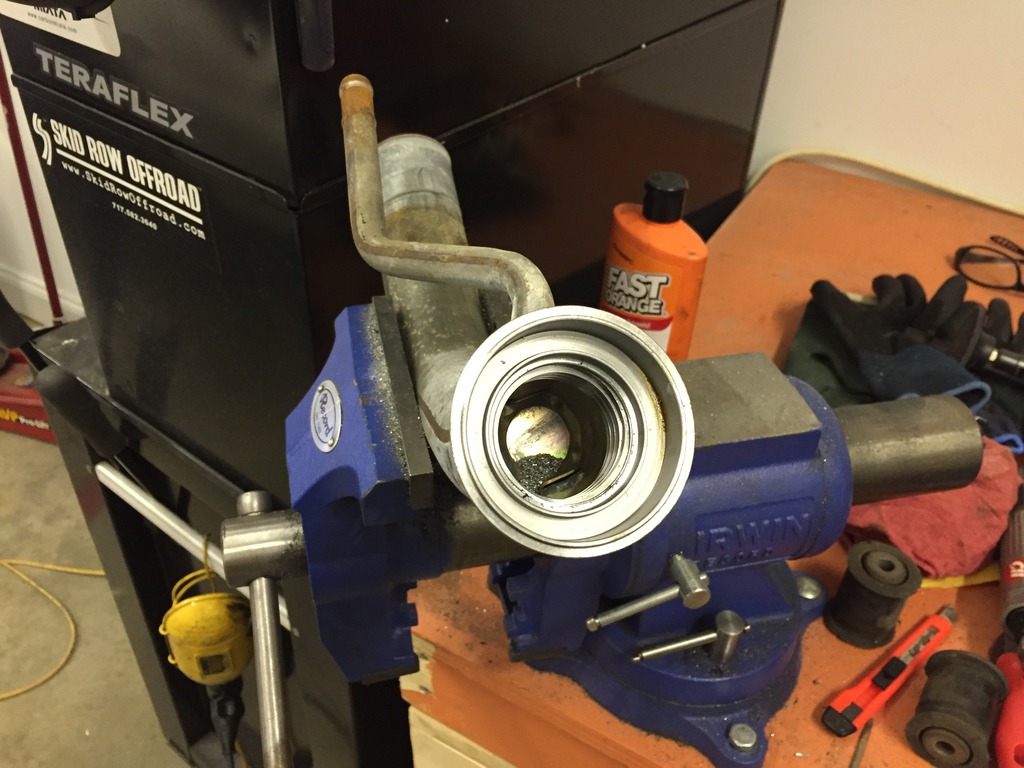
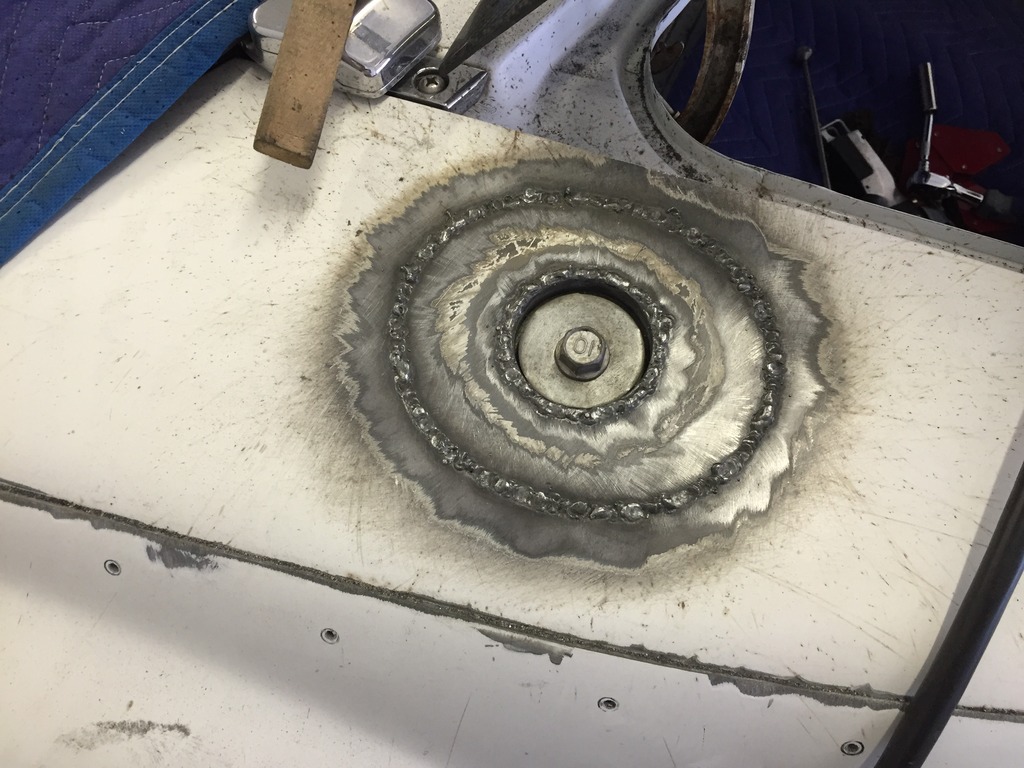
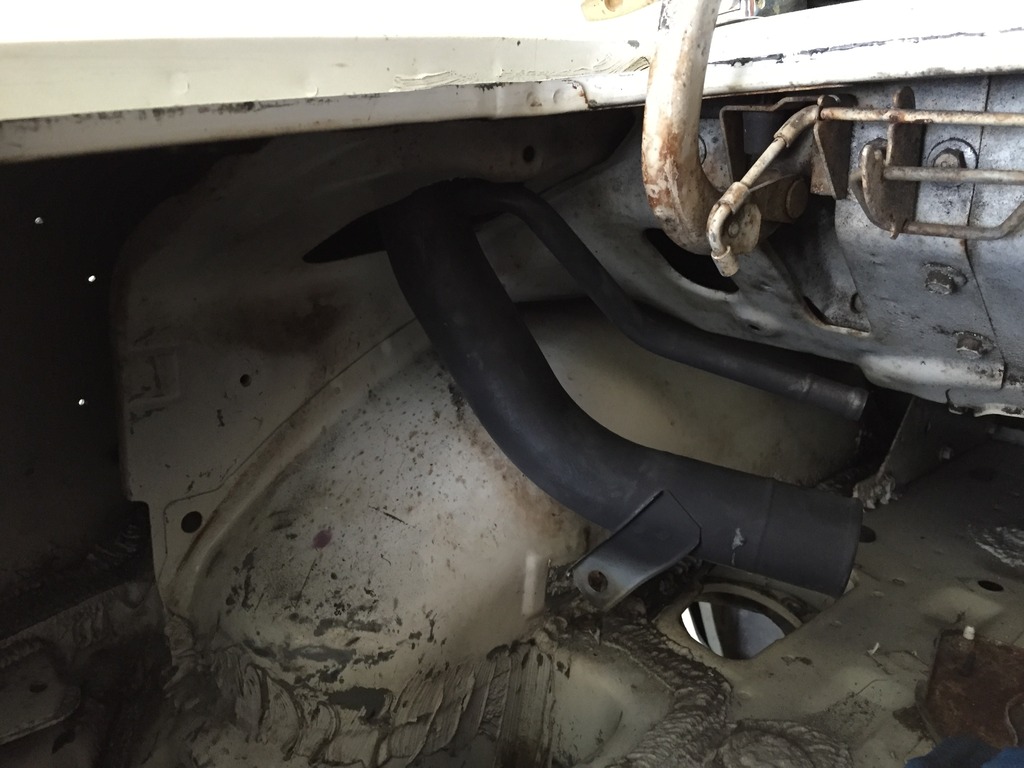
So I worked on the gas cap and driver side rear corner. First, I welded the new end onto the filler tube (I removed the plastic ball and socket from the bottom so I didn't melt it). Then it was time to weld it all onto the car. Here it is all welded in (what you see in the hole is a fat washer with a bolt dropped in it so I didn't splatter onto the threads).
Then some grinding.
Here is a shot of the tube coming into the trunk. I temporarily removed the tab at the bottom because it didn't line up. I will be modifying it and putting it back. It was only off about a half inch.
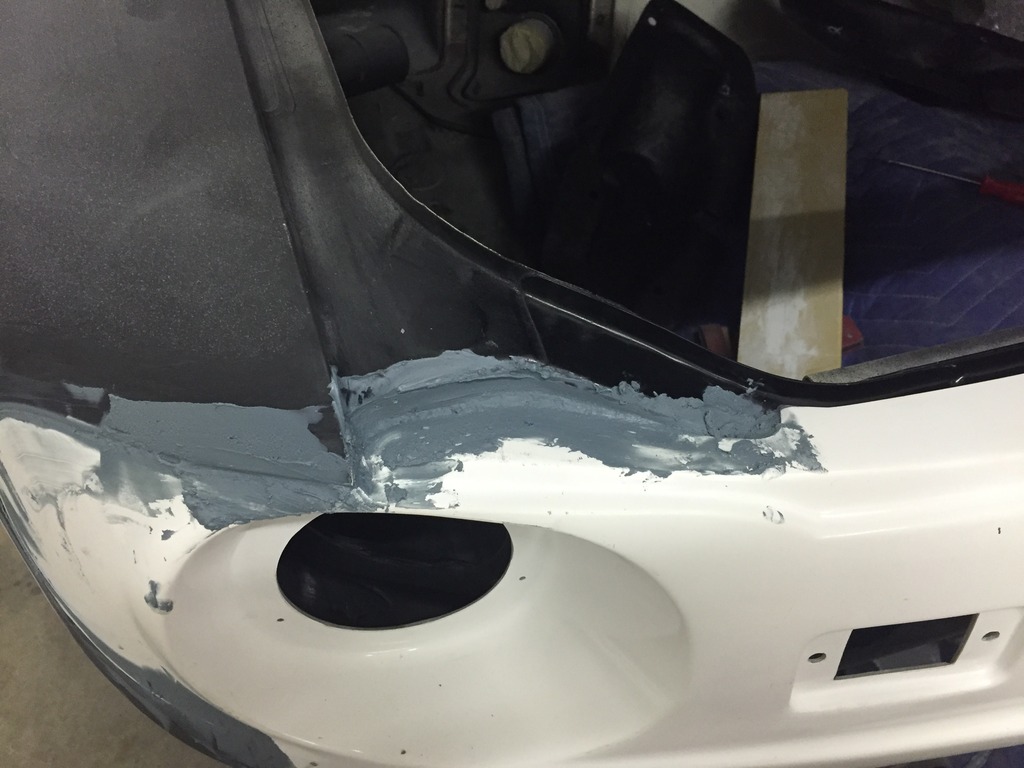
I then took a grinder to the upper edge of the fender flare to start to blend it in. Then the part I have absolutely no experience doing, filler. I tried to pretend I knew what I was doing and just tried to do what I have seen on TV. Here it is with a little sanding.
I definitely have some low spots and a lot of sanding and blending to do. But before I got to that, I figured I would ease all the edges of that panel and start to work on all of it. So out with the grinder again. And holy crap, what a mess.

That's it on that trip. After all the prepping, grinding, priming, welding, sanding, filling, sanding and more grinding (also a couple trips to Lowe's), that took up my whole day. But now I have a little experience. Next weekend I will be going at that rear corner full force. I figure I will just work my way around the car.
The girlscout weekend was rescheduled to November I do believe. If I'm not done with body work by then (probably not), I will be getting ready to complete it on that weekend.
Add another 6.5 hours to the clock for that one.
My Time: 181.5 hours
Friends & Family: 6 hours
Paid labor: $0 (this number does not include the mods made by Monster Miata)
So I worked on the gas cap and driver side rear corner. First, I welded the new end onto the filler tube (I removed the plastic ball and socket from the bottom so I didn't melt it). Then it was time to weld it all onto the car. Here it is all welded in (what you see in the hole is a fat washer with a bolt dropped in it so I didn't splatter onto the threads).

Then some grinding.

Here is a shot of the tube coming into the trunk. I temporarily removed the tab at the bottom because it didn't line up. I will be modifying it and putting it back. It was only off about a half inch.

I then took a grinder to the upper edge of the fender flare to start to blend it in. Then the part I have absolutely no experience doing, filler. I tried to pretend I knew what I was doing and just tried to do what I have seen on TV. Here it is with a little sanding.

I definitely have some low spots and a lot of sanding and blending to do. But before I got to that, I figured I would ease all the edges of that panel and start to work on all of it. So out with the grinder again. And holy crap, what a mess.


That's it on that trip. After all the prepping, grinding, priming, welding, sanding, filling, sanding and more grinding (also a couple trips to Lowe's), that took up my whole day. But now I have a little experience. Next weekend I will be going at that rear corner full force. I figure I will just work my way around the car.
The girlscout weekend was rescheduled to November I do believe. If I'm not done with body work by then (probably not), I will be getting ready to complete it on that weekend.
Add another 6.5 hours to the clock for that one.
My Time: 181.5 hours
Friends & Family: 6 hours
Paid labor: $0 (this number does not include the mods made by Monster Miata)
10-12-2015, 04:14 PM
#235
V8 Miata Participant
Thread Starter
Spent another round working on the body. What a mess.
Got to work removing paint and primer.
Then filler, sand, filler, sand and then repeat.
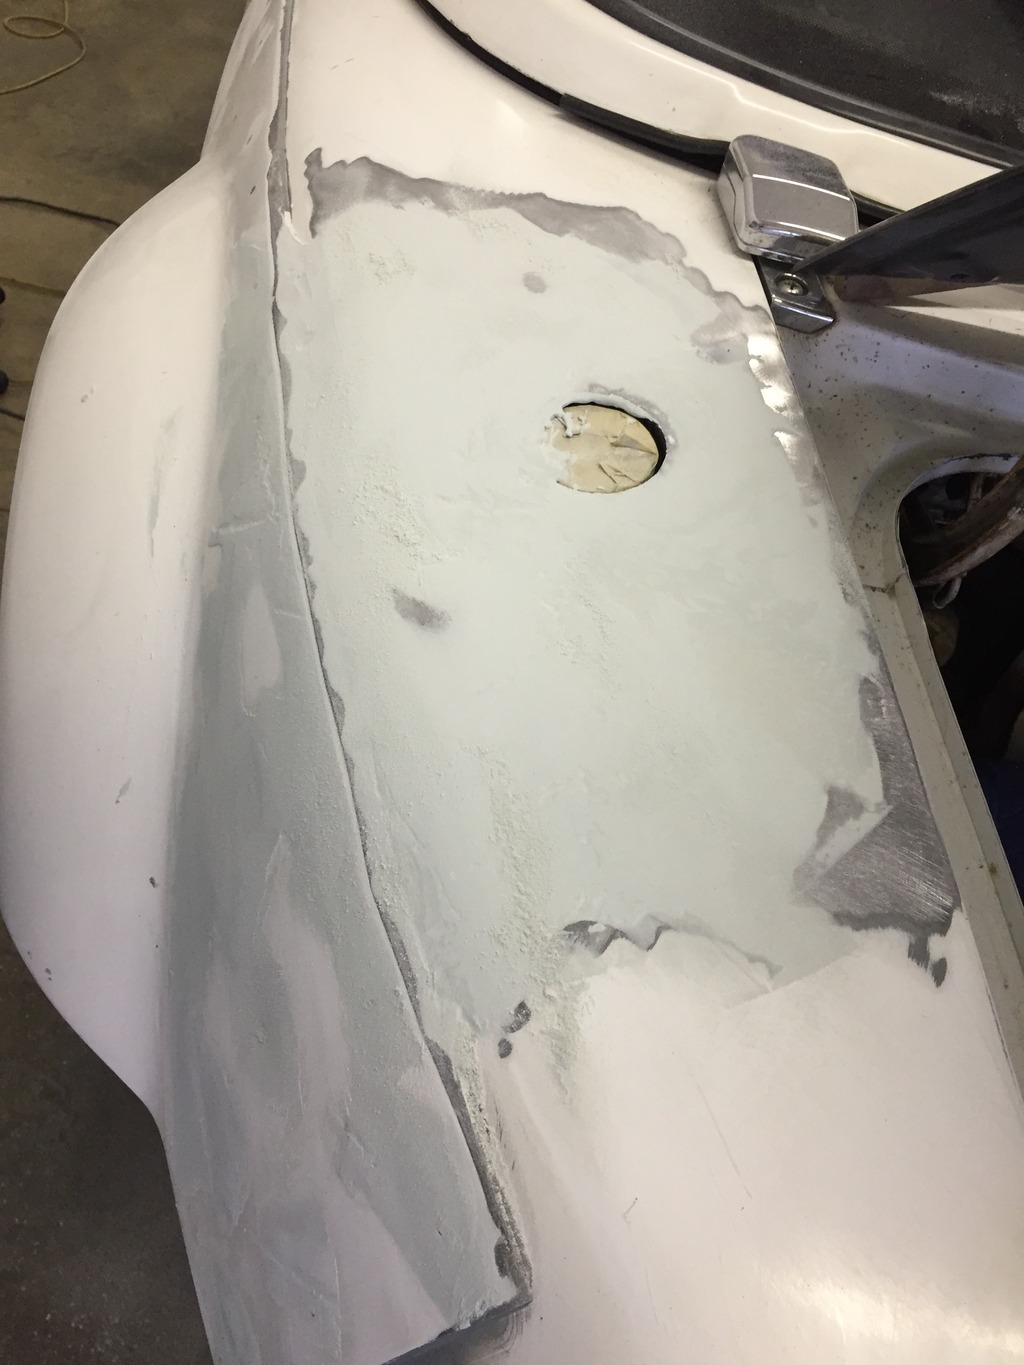
Then as it got closer to smooth I thought I would work on the gas cap itself. Here it is in place.
And popped up.
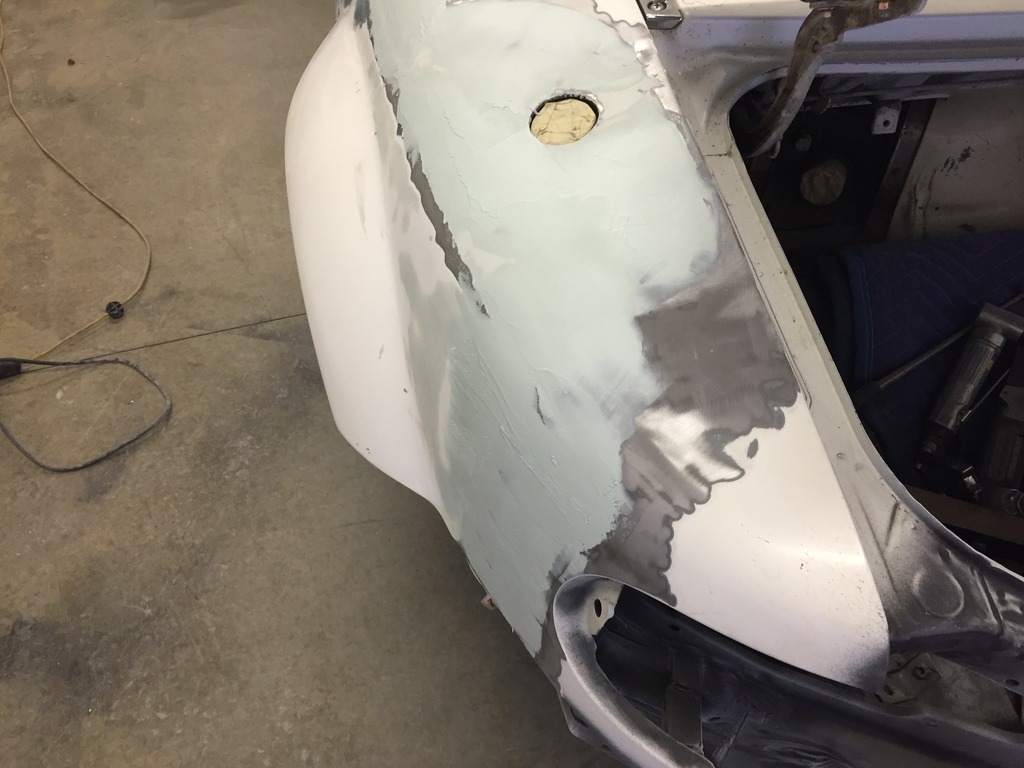
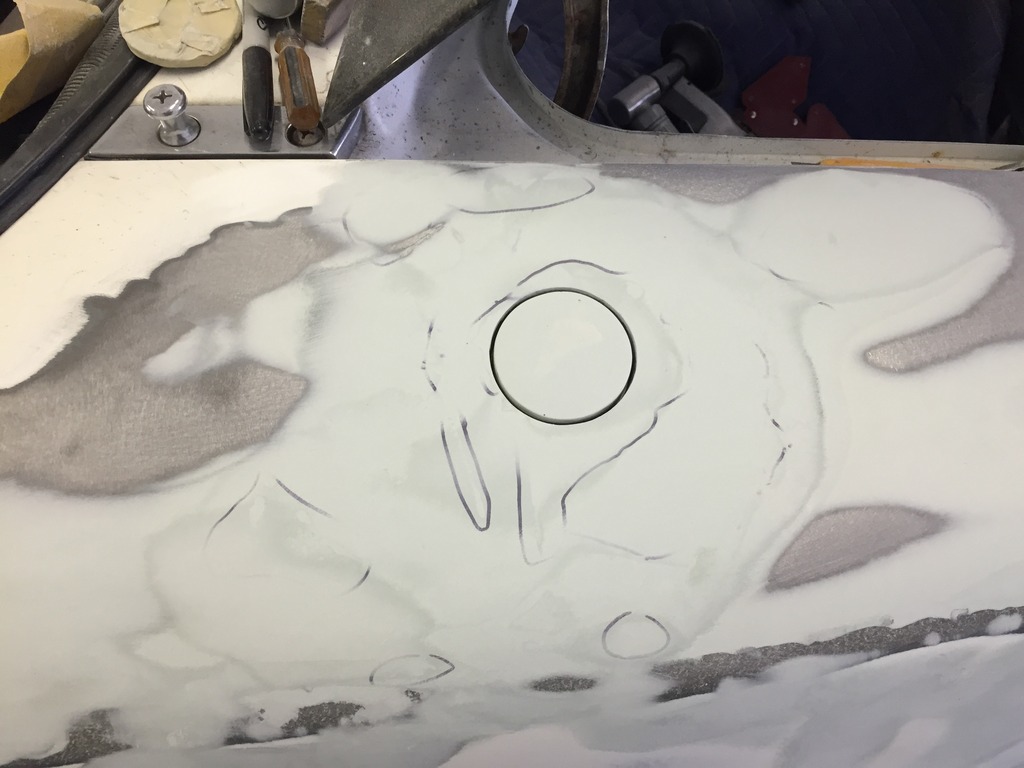
What you can't really see is that after all the body work and trying to level out the warpage from the welding, the cap sat about 1/16th to 1/8th below the body surface. I didn't like that. Also the cap is slightly dome shaped and I wanted it to be smooth. So, I took some agressive sand paper to the top. Built a tape dam around it and plopped some filler on it.
I overdid the filler on the cap. WAY too much. But, I figured I would rather have a little too much and sand it down then have to reapply to such a small item. And here is a shot of it all sanded down and the hole cleaned up and the edges rounded slightly.
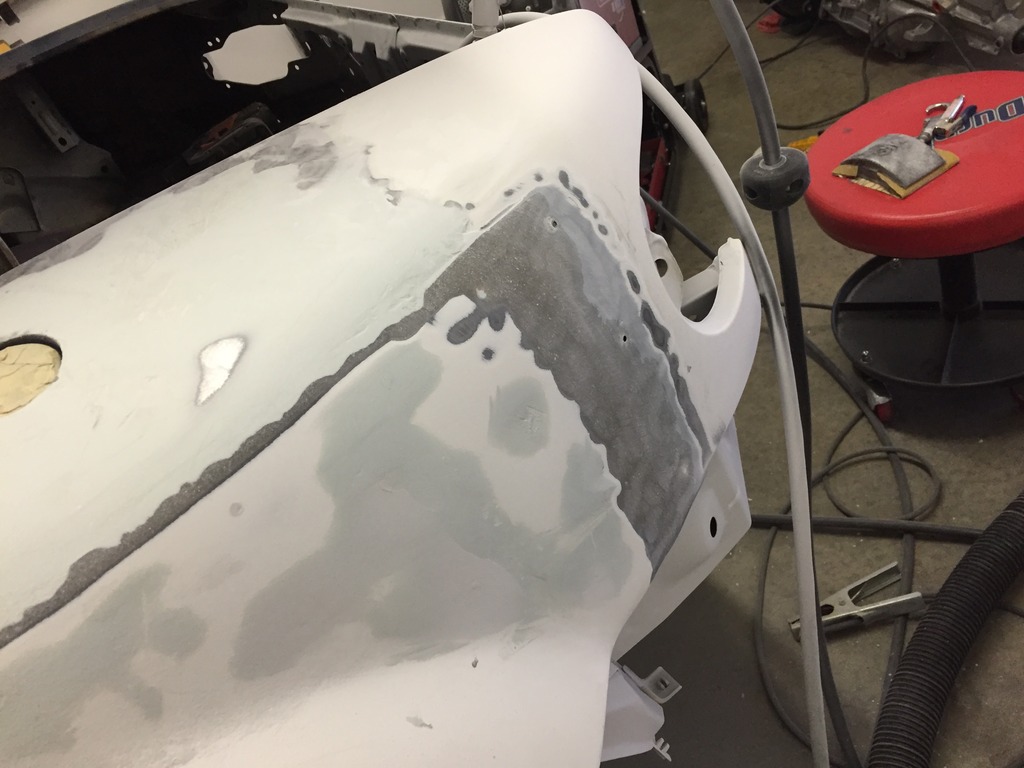
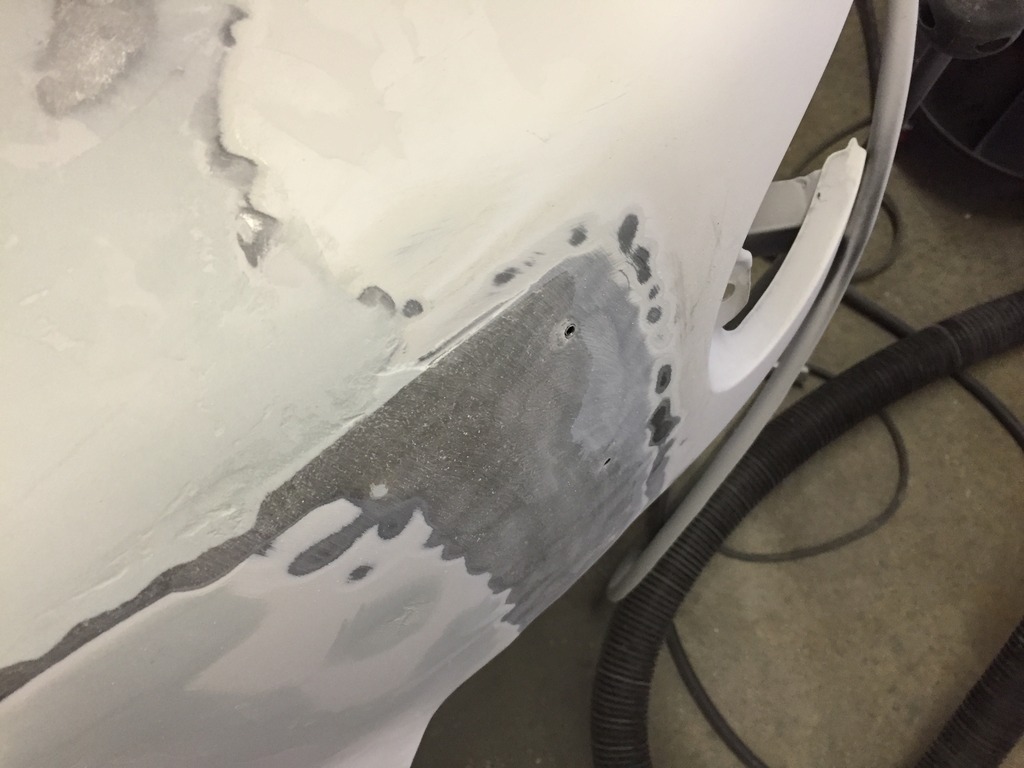
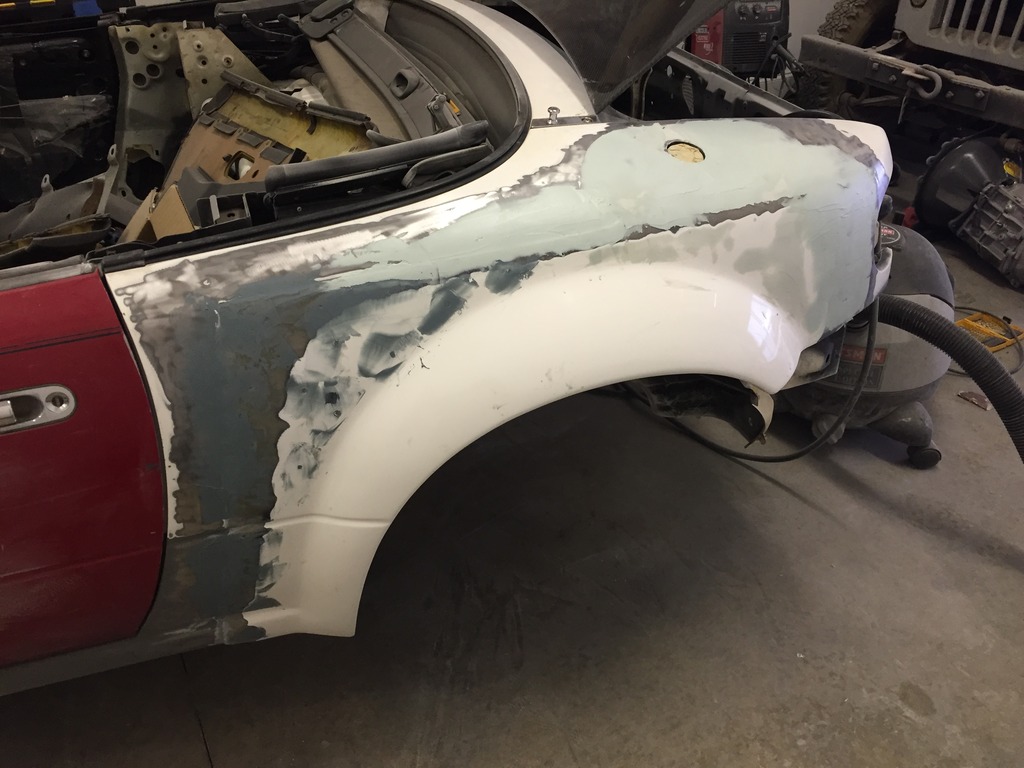
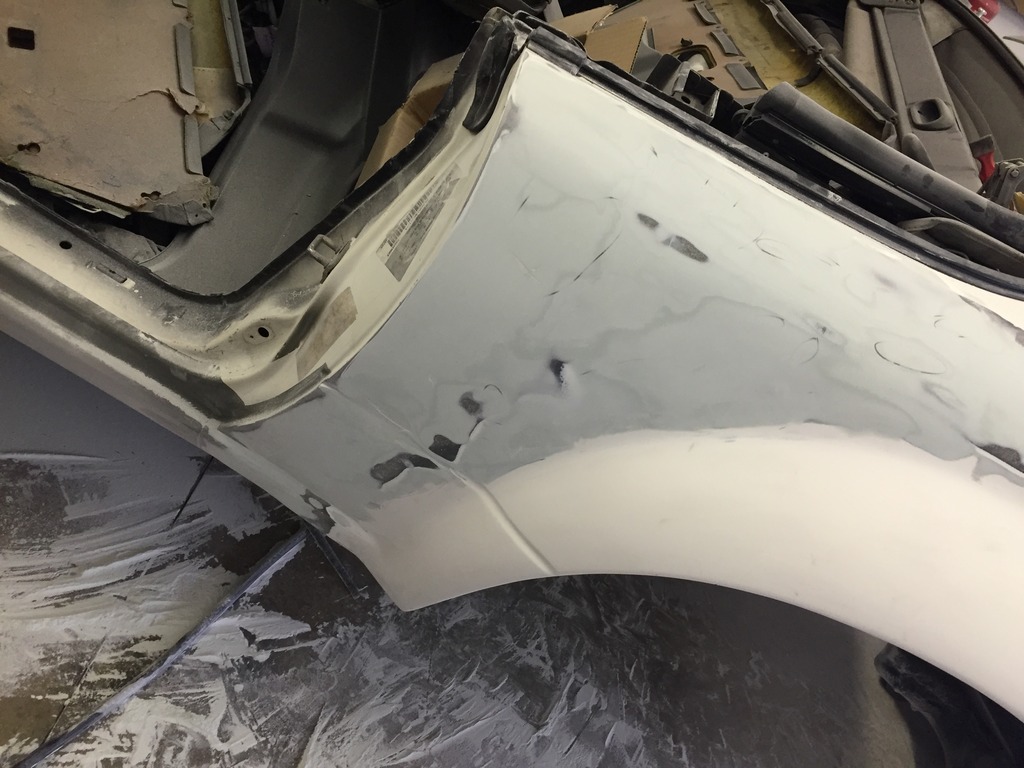
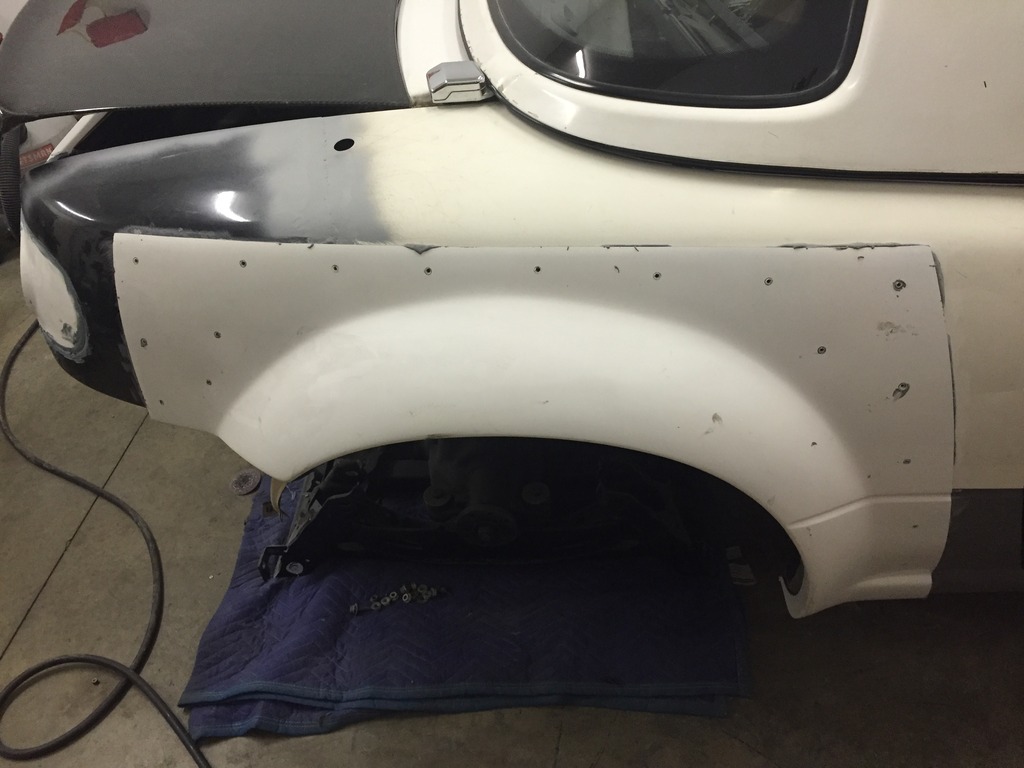
Then I worked the front of the fender some more. I finally just leveled the body line and I'm going to recut it. I left the front and the back edges so I can line them up. But it was just not very level so I figured I would just rework it.
I have a couple more hours on this fender and then I'll move around the back and then to the other fender. The rear of this car will be most of the work. The rest is just little items that should go somewhat quickly. Then I just need to figure out if I will attempt to paint this thing myself. If anyone knows someone that would do a good job and not cost a fortune in the Charlotte area, let me know.
Add another 6 hours to the clock for that one.
My Time: 187.5 hours
Friends & Family: 6 hours
Paid labor: $0 (this number does not include the mods made by Monster Miata)
Got to work removing paint and primer.


Then filler, sand, filler, sand and then repeat.


Then as it got closer to smooth I thought I would work on the gas cap itself. Here it is in place.

And popped up.

What you can't really see is that after all the body work and trying to level out the warpage from the welding, the cap sat about 1/16th to 1/8th below the body surface. I didn't like that. Also the cap is slightly dome shaped and I wanted it to be smooth. So, I took some agressive sand paper to the top. Built a tape dam around it and plopped some filler on it.


I overdid the filler on the cap. WAY too much. But, I figured I would rather have a little too much and sand it down then have to reapply to such a small item. And here is a shot of it all sanded down and the hole cleaned up and the edges rounded slightly.

Then I worked the front of the fender some more. I finally just leveled the body line and I'm going to recut it. I left the front and the back edges so I can line them up. But it was just not very level so I figured I would just rework it.

I have a couple more hours on this fender and then I'll move around the back and then to the other fender. The rear of this car will be most of the work. The rest is just little items that should go somewhat quickly. Then I just need to figure out if I will attempt to paint this thing myself. If anyone knows someone that would do a good job and not cost a fortune in the Charlotte area, let me know.
Add another 6 hours to the clock for that one.
My Time: 187.5 hours
Friends & Family: 6 hours
Paid labor: $0 (this number does not include the mods made by Monster Miata)
10-17-2015, 06:41 AM
#236
V8 Miata Fanatic

Your creative ideas and ability to carry them out impresses the hell out of me. This is going to be one mean little roadster... I may have to ask for an invite to come see this when you get towards the finish line. Keep the updates coming!
11-12-2015, 03:45 PM
#237
V8 Miata Noob

Join Date: Nov 2015
Location: Md
Posts: 3
Likes: 0
Received 0 Likes
on
0 Posts
looking to change my t5 out for an automatic. It needs a clutch and just considering going automatic Any help on what unit would fit and work and other change that would be required? Getting old and knees are wearing out!
11-16-2015, 03:58 PM
#238
V8 Miata Participant
Thread Starter
No idea. You may want to post this in the technical section (or someone can move it there). You will get the answers you need. Good luck.
11-17-2015, 08:08 PM
#239
V8 Miata Participant
Thread Starter
I really hope to be getting more time in the shop soon. My business has been eating up my time. As it should. But I'll never quit.
Once it is done, I will be going to a lot of the events. So hopefully I will get to meet everyone. But if you want to swing by Charlotte, I would be more than happy to show it to you.
11-17-2015, 09:12 PM
#240
V8 Miata Fanatic
Awesome. Now I'm REALLY impressed. "First time doing body work." You ain't scared! Nice... I may need to do a day trip in the V8Roadster and see it this winter.
Will stay in touch and try and make an appt!
Will stay in touch and try and make an appt!
09-12-2016, 05:10 PM
#241
V8 Miata Participant
Thread Starter
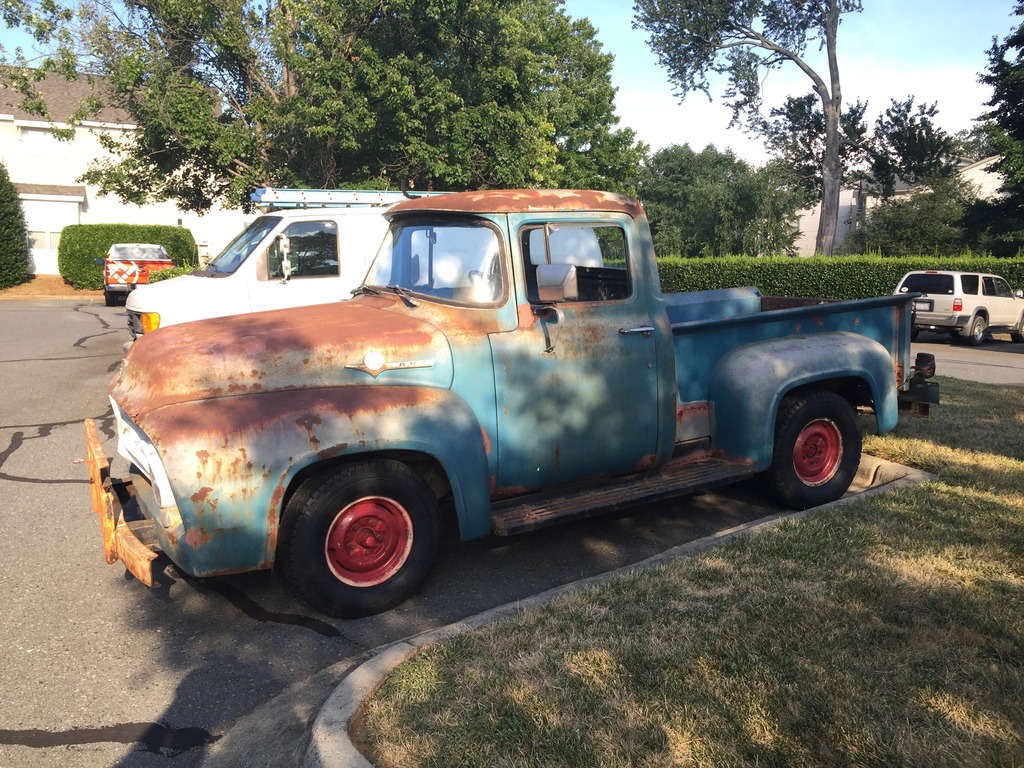
Well, it's about time. I'm back. I know, WTF DUDE! Well, I decided I needed a truck back in my life and my wife would not let me get anything but a classic. So we picked this up earlier this year.
She is on the road, so it is back to the monster. Well, almost. My dad and brother are coming into town this weekend and we are going to work on the ****** for the weekend, but once they are gone, back on the monster.
Looking forward to getting back to posting some progress and make it to the Mitty one of these years.
09-24-2016, 07:06 PM
#242
V8 Miata Participant
Thread Starter
OK, after 10 months of collecting dust while working on other projects, here we go. Time to get some MX-5 work done.
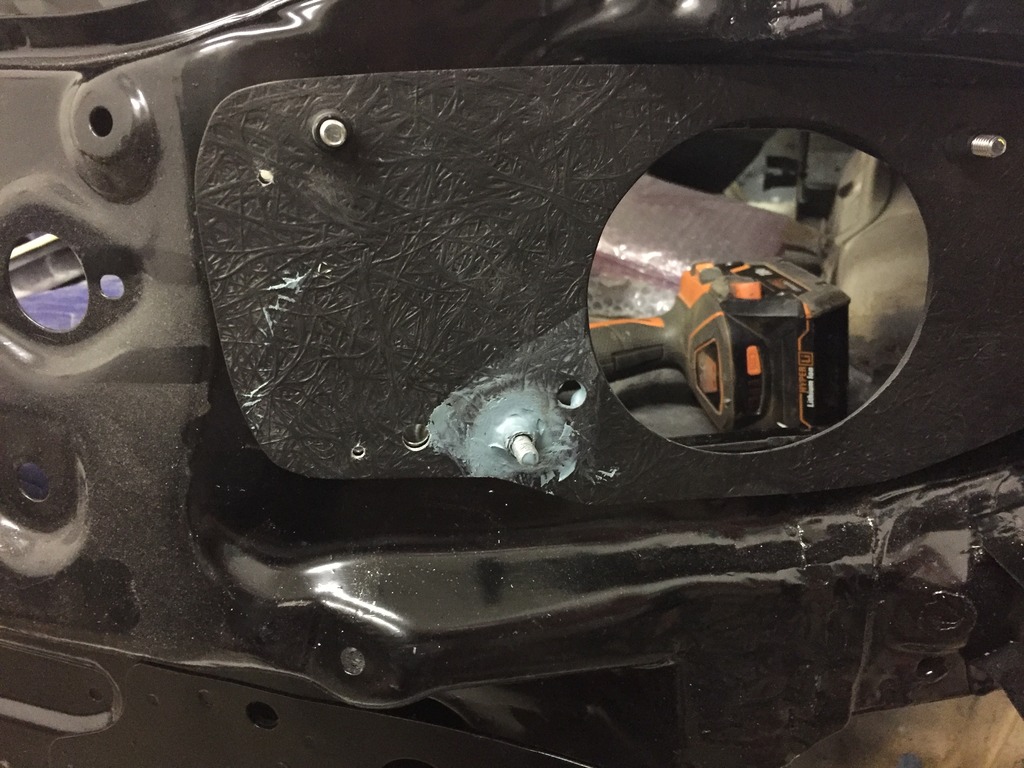
My first goal is to get the bodywork done on the rear. So I wanted to get the new rear finish panel mounted. But as I mentioned before, it is a bolt on piece, but I want to make it permanent and body work it in. But before I can do that, I need to find a way to permanently fix the tail light mounting plates to the body because once I bodywork the rear panel in I won't have easy access to them. Here is what one looks like with two of the inner bucket bolts holding it in place.
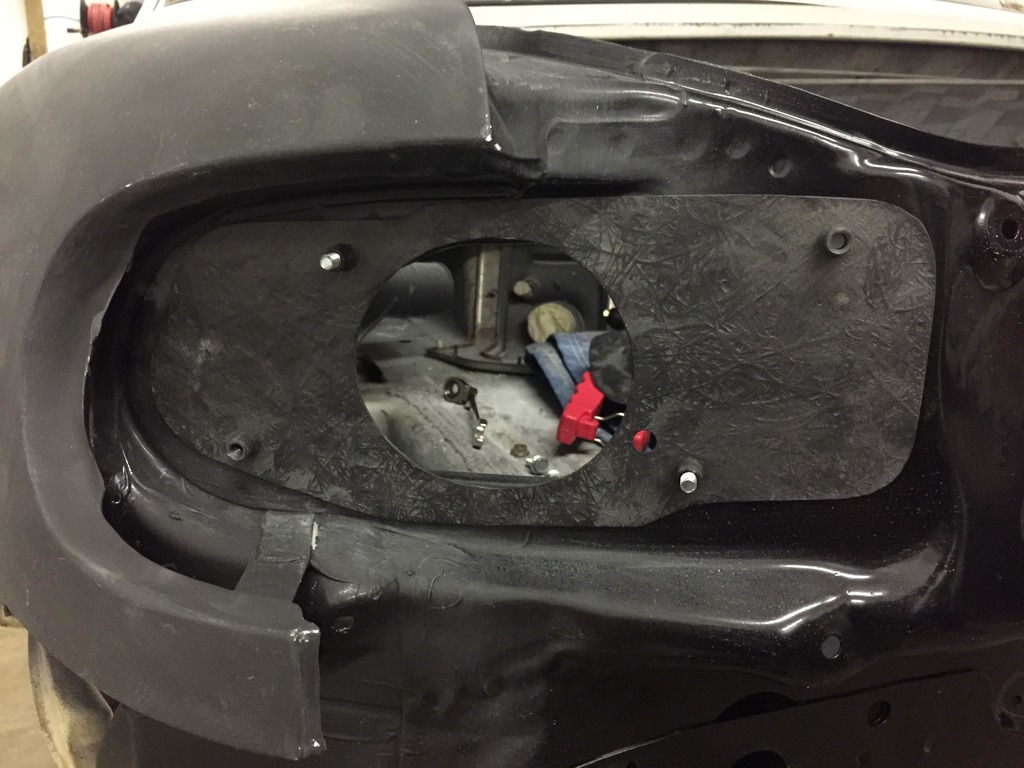
I figured it would be a good solution to rivet them in place. Here is my first attempt.
Pretty good, but after mounting both of them like this, I tried to mock up the rear panel and quickly found that one of the captured nuts on the mounting plate was interfering on each side. Kind of a design flaw I guess. Here is where it was hitting. On the inside of the light bucket.
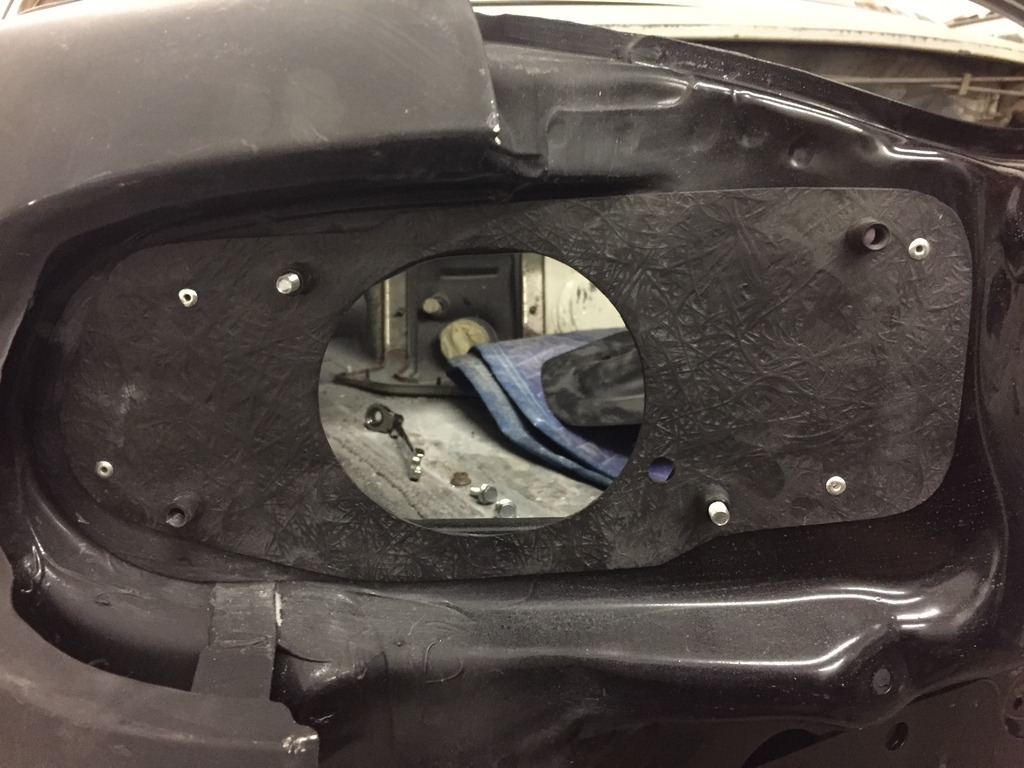
I was kind of glad that I needed to remove the mounting plates because I forgot to put something between them and the body. A sure fire way to have a rattle. So I drilled the rivets and drilled the new location for the captured nut. I cut off the nuts and tried to use panel adhesive to bond them in the new location. Looks like this (sorry for jumping sides, this pic is of the passenger side):
OK, somehow I had major brain fart. If you didn't catch my horrible mistake, I actually bonded the nut right back in the same hole I removed it from. . WTF! So, I popped them off before the adhesive set and did it the right way. Tossed the ones I cut off and inserted new rivnuts.
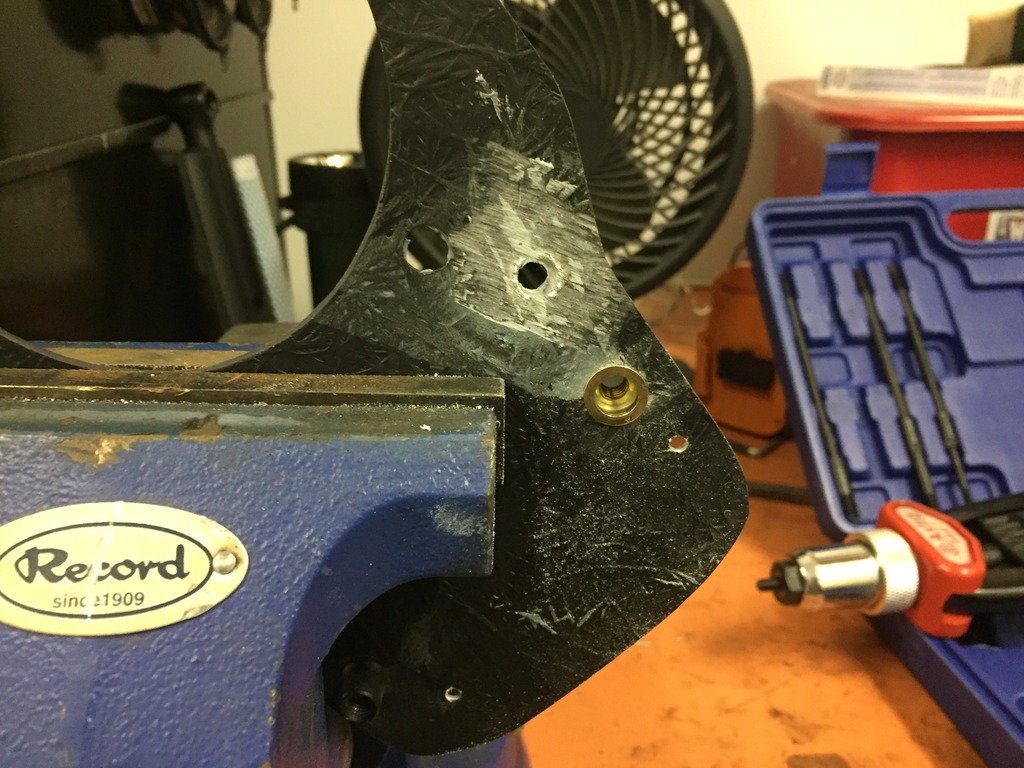
That's better. Now put some clear silicone around the opening in the body and put them back for good.

Moving on. I prepped all the areas around the rear to bond the new panel in place.
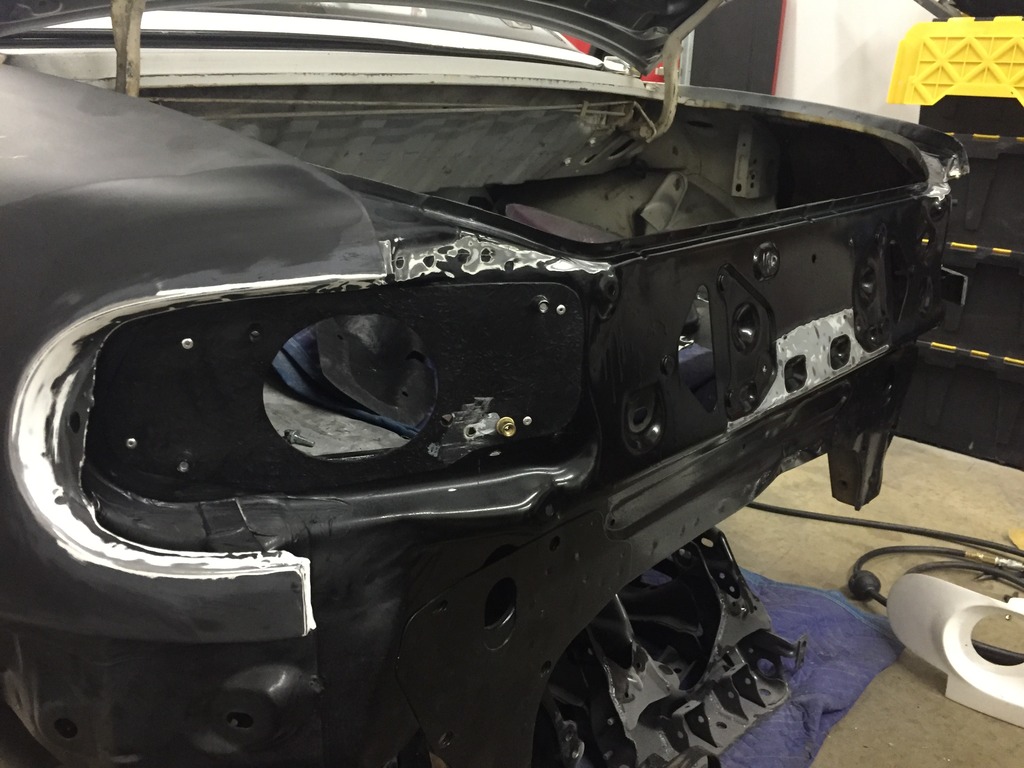
Then bonded the **** out of it.
Here is a quick look at it in place.
While that sets up, time to work on the passenger side rear corner.
My first goal is to get the bodywork done on the rear. So I wanted to get the new rear finish panel mounted. But as I mentioned before, it is a bolt on piece, but I want to make it permanent and body work it in. But before I can do that, I need to find a way to permanently fix the tail light mounting plates to the body because once I bodywork the rear panel in I won't have easy access to them. Here is what one looks like with two of the inner bucket bolts holding it in place.

I figured it would be a good solution to rivet them in place. Here is my first attempt.

Pretty good, but after mounting both of them like this, I tried to mock up the rear panel and quickly found that one of the captured nuts on the mounting plate was interfering on each side. Kind of a design flaw I guess. Here is where it was hitting. On the inside of the light bucket.

I was kind of glad that I needed to remove the mounting plates because I forgot to put something between them and the body. A sure fire way to have a rattle. So I drilled the rivets and drilled the new location for the captured nut. I cut off the nuts and tried to use panel adhesive to bond them in the new location. Looks like this (sorry for jumping sides, this pic is of the passenger side):

OK, somehow I had major brain fart. If you didn't catch my horrible mistake, I actually bonded the nut right back in the same hole I removed it from.
. WTF! So, I popped them off before the adhesive set and did it the right way. Tossed the ones I cut off and inserted new rivnuts.
That's better. Now put some clear silicone around the opening in the body and put them back for good.

Moving on. I prepped all the areas around the rear to bond the new panel in place.

Then bonded the **** out of it.


Here is a quick look at it in place.

While that sets up, time to work on the passenger side rear corner.
09-24-2016, 07:20 PM
#243
V8 Miata Participant
Thread Starter
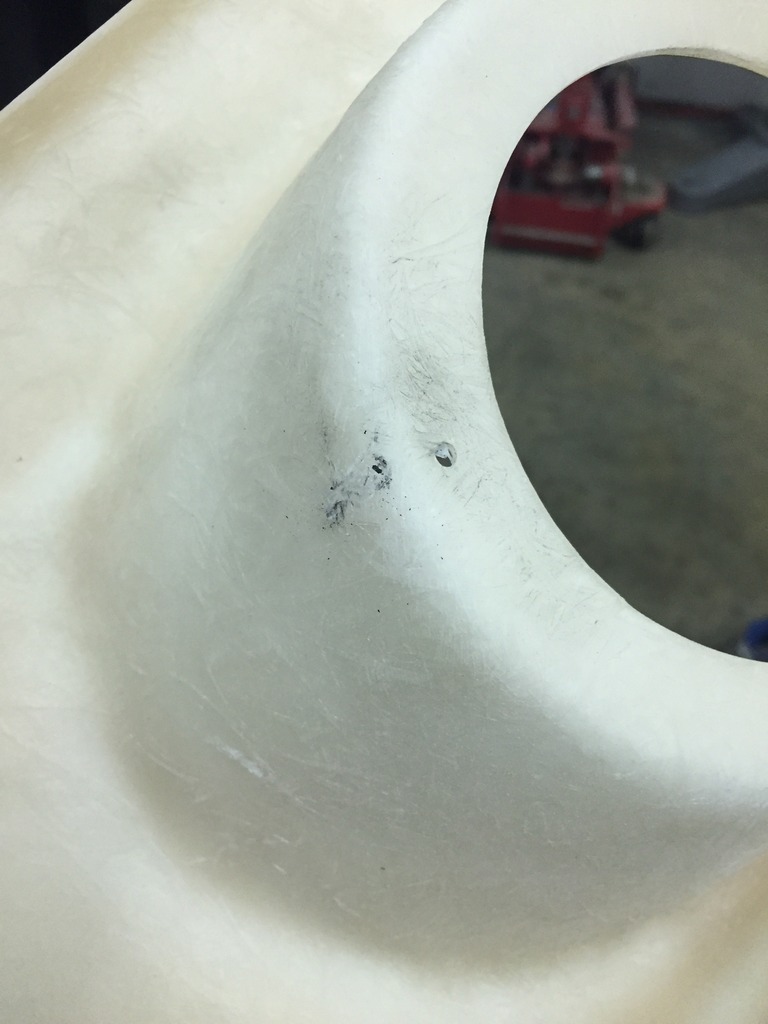
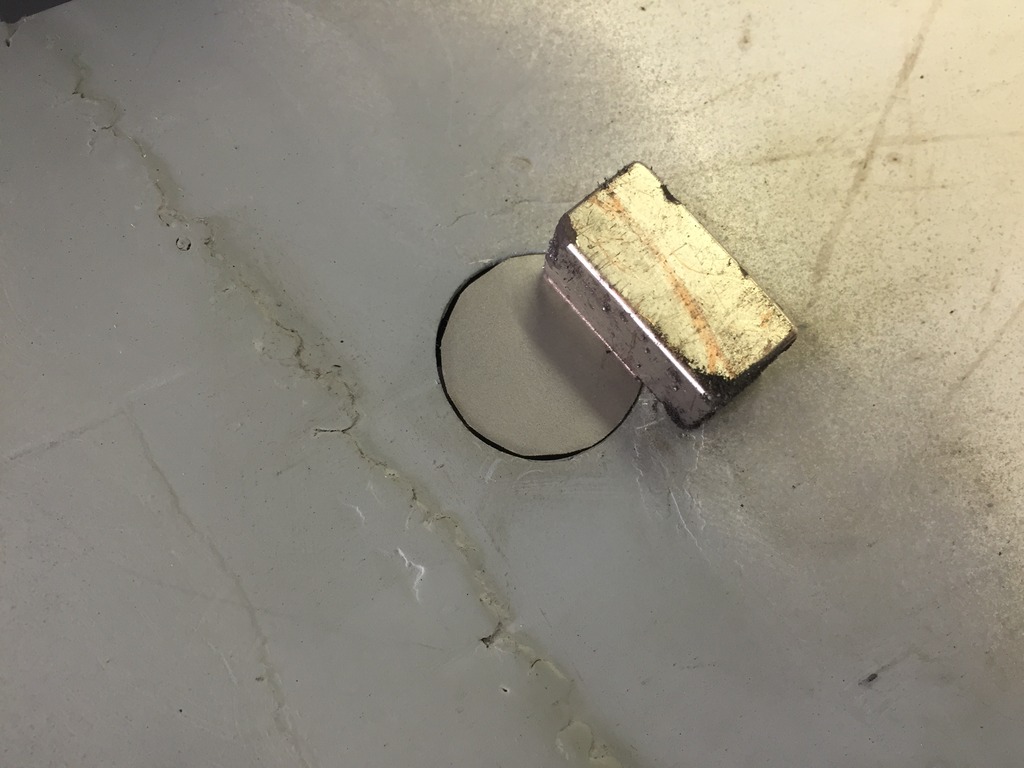
Before I start grinding, sanding and filling, I needed to fill the hole that the antenna normally mounts in (I'm going to have satellite radio, so, lets clean up the body while I can). Here is how I made a quick template.

I cut a little filler piece and held it in place with a magnet. Then welded it up. Here it is before welding.
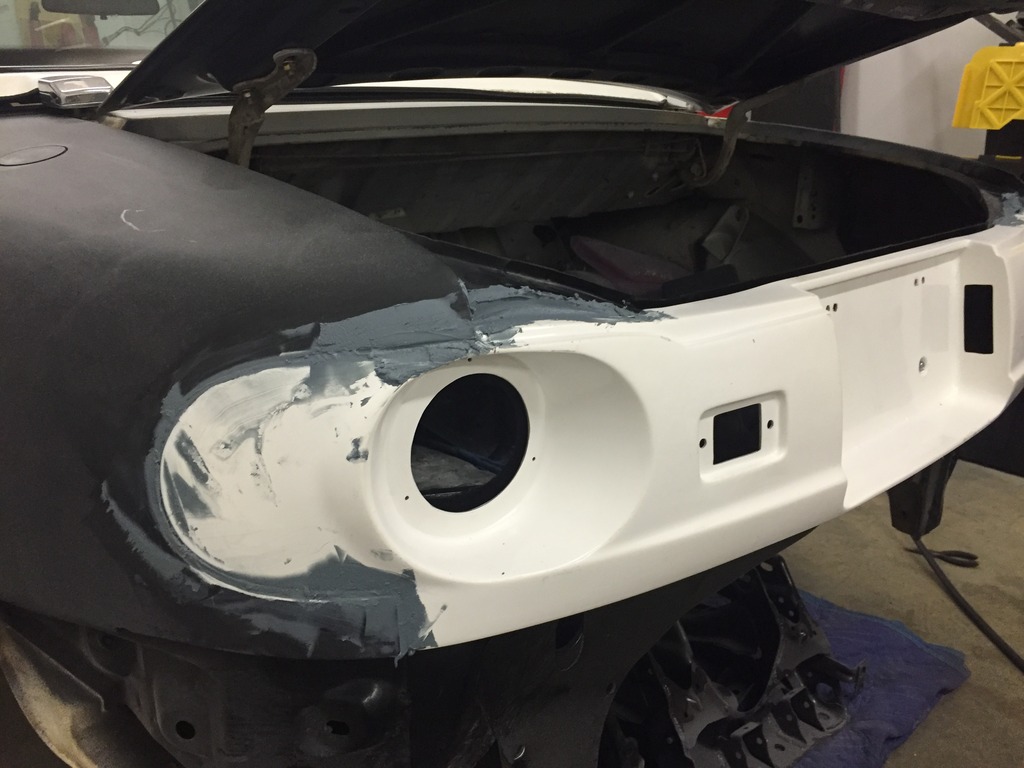
I didn't get a picture of it welded and ground down. I'm glad of that, because it looked like crap. I couldn't get the welder to burn good on that surface no matter how much I tried. But onward. Time to grind. Here is the new flare before grinding.
And after grinding.
Then I did a quick sanding on the sides of the bonded rear panel so I could hit it with some filler at the same time as the rear quarter. Then wiped down ready for some filler (if you look close, you can see my crappy welding job on the antenna hole).
First round of filler on and sanded (80 grit).
Looking back at my last entries. It looks like I left out a day at the shop. As you can see in these pictures, the driver side rear corner is pretty much done and has a coat of black primer on it. I will go ahead and add hours to this total to make sure that time was accounted for and I'll post up some pictures tomorrow of that corner so you can see what it looks like.
Add another 6.5 hours to the clock for today and 5 hours for the missing day.
My Time: 199 hours
Friends & Family: 6 hours
Paid labor: $0 (this number does not include the mods made by Monster Miata)

I cut a little filler piece and held it in place with a magnet. Then welded it up. Here it is before welding.

I didn't get a picture of it welded and ground down. I'm glad of that, because it looked like crap. I couldn't get the welder to burn good on that surface no matter how much I tried. But onward. Time to grind. Here is the new flare before grinding.

And after grinding.

Then I did a quick sanding on the sides of the bonded rear panel so I could hit it with some filler at the same time as the rear quarter. Then wiped down ready for some filler (if you look close, you can see my crappy welding job on the antenna hole).

First round of filler on and sanded (80 grit).


Looking back at my last entries. It looks like I left out a day at the shop. As you can see in these pictures, the driver side rear corner is pretty much done and has a coat of black primer on it. I will go ahead and add hours to this total to make sure that time was accounted for and I'll post up some pictures tomorrow of that corner so you can see what it looks like.
Add another 6.5 hours to the clock for today and 5 hours for the missing day.
My Time: 199 hours
Friends & Family: 6 hours
Paid labor: $0 (this number does not include the mods made by Monster Miata)
09-29-2016, 02:58 PM
#244
V8 Miata Habitu�
This is how you awesome. Thanks for the update. It's one of my favorite builds - home made body actually looks good! Picture the old truck towing this masterpiece... I'd like a poster of that.
I'd like a poster of that.
09-29-2016, 03:33 PM
#245
V8 Miata Participant
Thread Starter
I appreciate the complement. But I don't want to take credit for the body kit, I didn't make it. It is from Monster Miata. But I am doing the work to implement it. Which is taking forever. Mainly because I have never done body work before.
I will be doing some more work this weekend. I'm hoping that once I get done with the major modifications to the rear, it should go a bit quicker. We'll see.
I will be doing some more work this weekend. I'm hoping that once I get done with the major modifications to the rear, it should go a bit quicker. We'll see.
02-21-2017, 06:19 PM
#247
V8 Miata Participant
Thread Starter
Almost back at it again. I have been spending the last month selling off vehicles so they don't distract me from the monster. Another couple weeks and I'll be back on the project.
04-26-2017, 10:28 AM
#248
V8 Miata Participant
Thread Starter
I was wrong about almost being back at it. But there is good news in my future. For years I have lived a split life between two cities that were 2 hours apart. My company is here and my wife's job (and my rented shop) was there. A month or so ago, my wife found a job here and we have now relocated to the house here (Greenville, SC). The really good news is we have started the design phase of remodeling/expanding the house. To include a new shop on the bottom level (YAY!). The bad news is that my current shop is two hours away and that is where all my tools are and the miata, ****** and my Jeep are parked. So until the new construction is done, there will be very little progress. More good news is that I have the budget ready to get everything I need to complete this project in 2018. And since the car will be right downstairs, I will be spending a lot more time in the shop.
To sum this up. There will be no new work on the car this year unless there is some sort of miracle. But next year this baby will be on the road as my daily driver.
More updates on other vehicles: To free up my time to work on this car, I sold the F100, Ducati Monster and the 68 Mustang. There were just too many projects pulling my attention.
04-28-2017, 09:00 PM
#249
V8 Miata Fanatic
Welcome back. SC Upstate is a great area. Sounds like you all have the priorities in correct order and the monster will be on the road next year! Good stuff. Glad you're keeping this thread alive too.
07-04-2017, 12:07 PM
#250
V8 Miata Participant
Thread Starter
Well, life is full of surprises. Once again, plans change. We are now relocating back to Cornelius (Charlotte area). Never did move my shop. It has been sitting dark for the last month or so. But here I am sitting in the shop. Trying to get back on track. I am fighting myself to keep from working on the engine. I need to finish the body work and get it to paint so I can get it back and on the ground. Anybody know a good body shop in this area? I think I am going to get all the major items done and get it close and then have a professional smooth it all out and paint.
I am also still looking for some Lotus Probax seats if anyone has a lead on some.
I am also still looking for some Lotus Probax seats if anyone has a lead on some.


