Exocet Suspension
 10-21-2014, 09:33 PM
#1
V8 Miata Enthusiast
Thread Starter

Join Date: Oct 2013
Location: Colorado Springs, CO
Posts: 421
Likes: 0
Received 33 Likes
on
27 Posts
Not a complete build thread. I broke it up in to parts, so it's easier to read.
The Exocet uses stock Miata components, and pretty much anything that fits a Miata. I would like to use tubular arms with spherical bearings. That would be the best. It's also pretty darned expensive. I'll save that for a later upgrade.
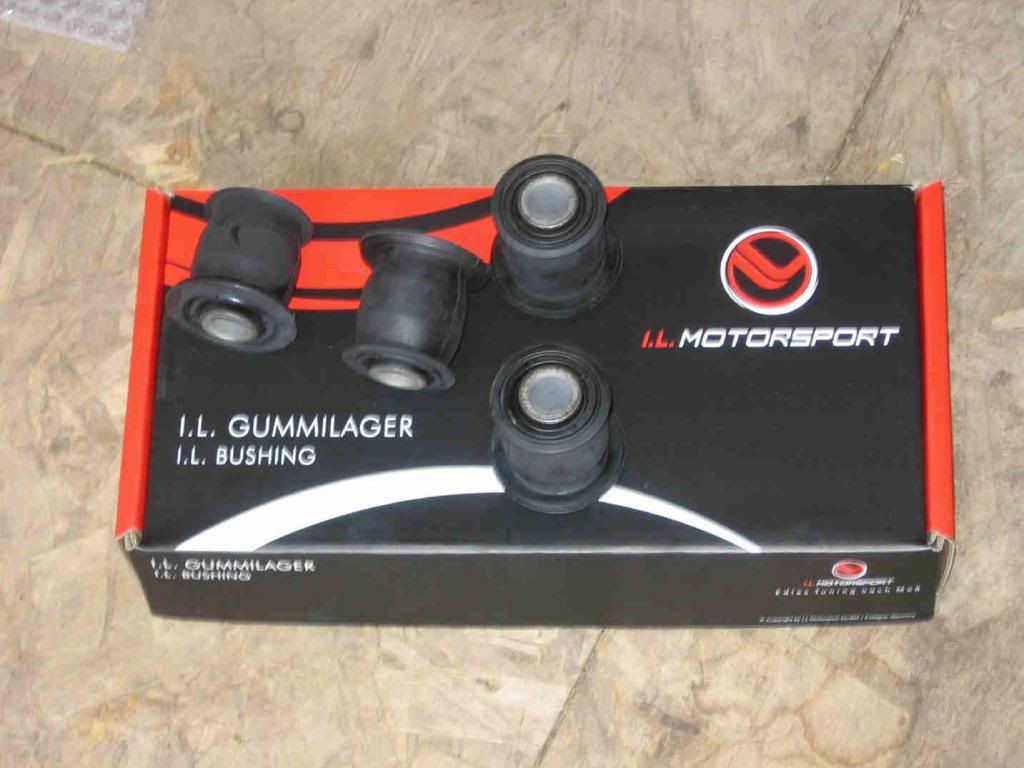
For now, I'll use stock arms. There's no easy way for me to add spherical bearings or rod ends to the stock arms. Poly bushings are stiff, but they require a lot of maintenance to keep them from binding. Delrin bushings would have to be custom made. So, I went with some upgraded rubber bushings. Easy to install, zero maintenance, and better then new stock parts.
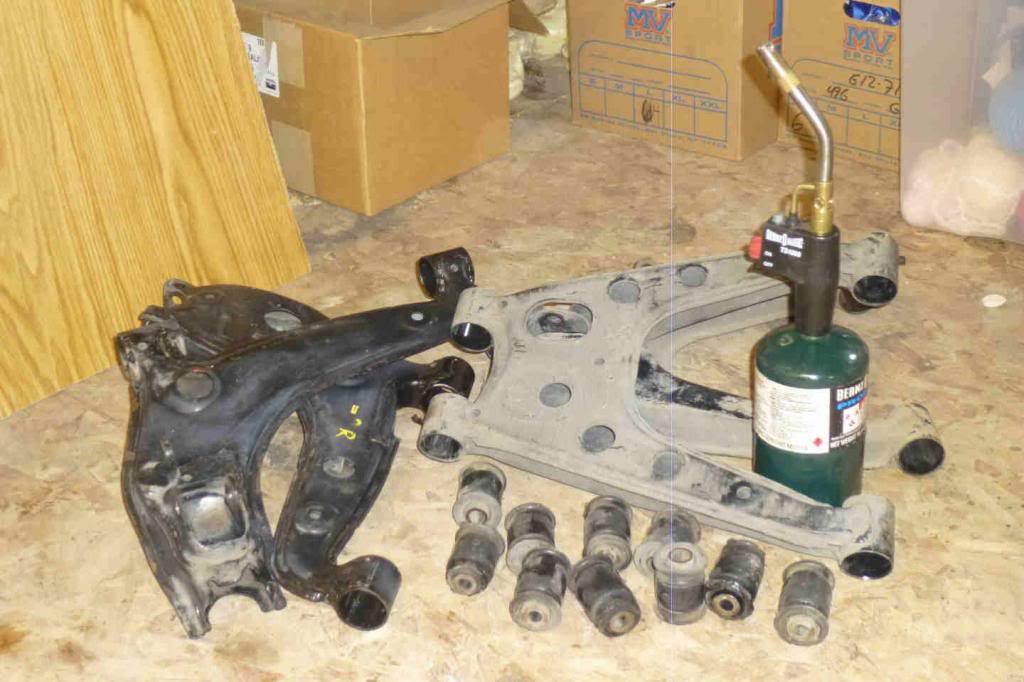
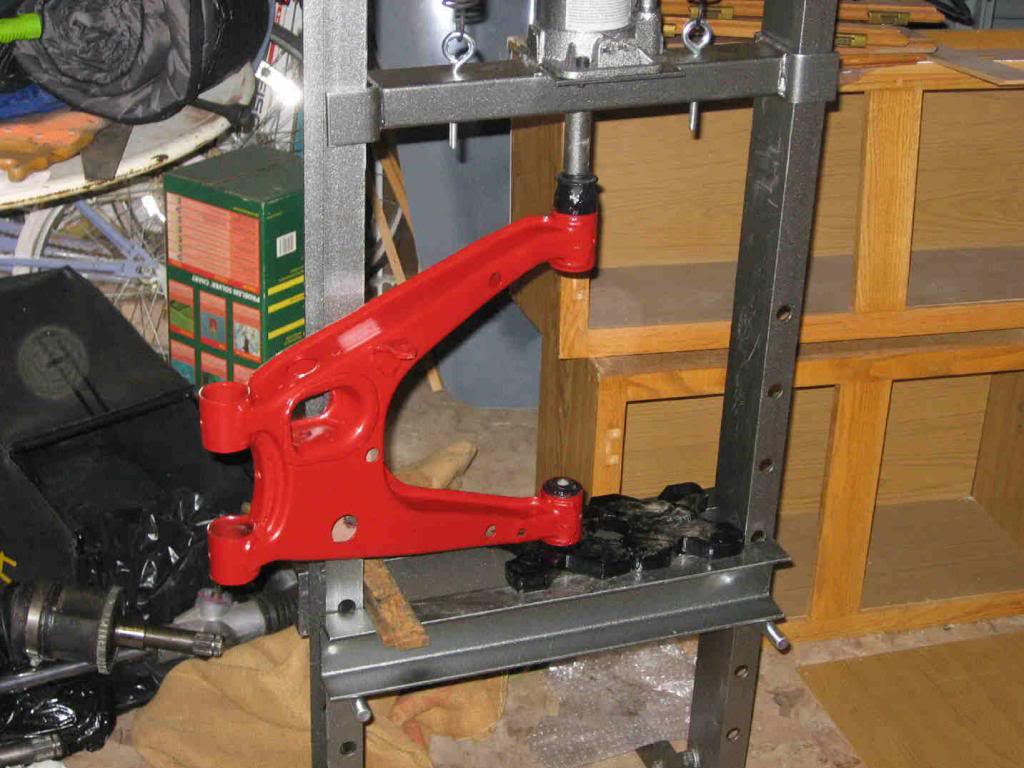
Pressing out the old ones and pressing in the new ones was a pretty simple job. I heated them up a bit with a torche, and they popped right out (in the press).
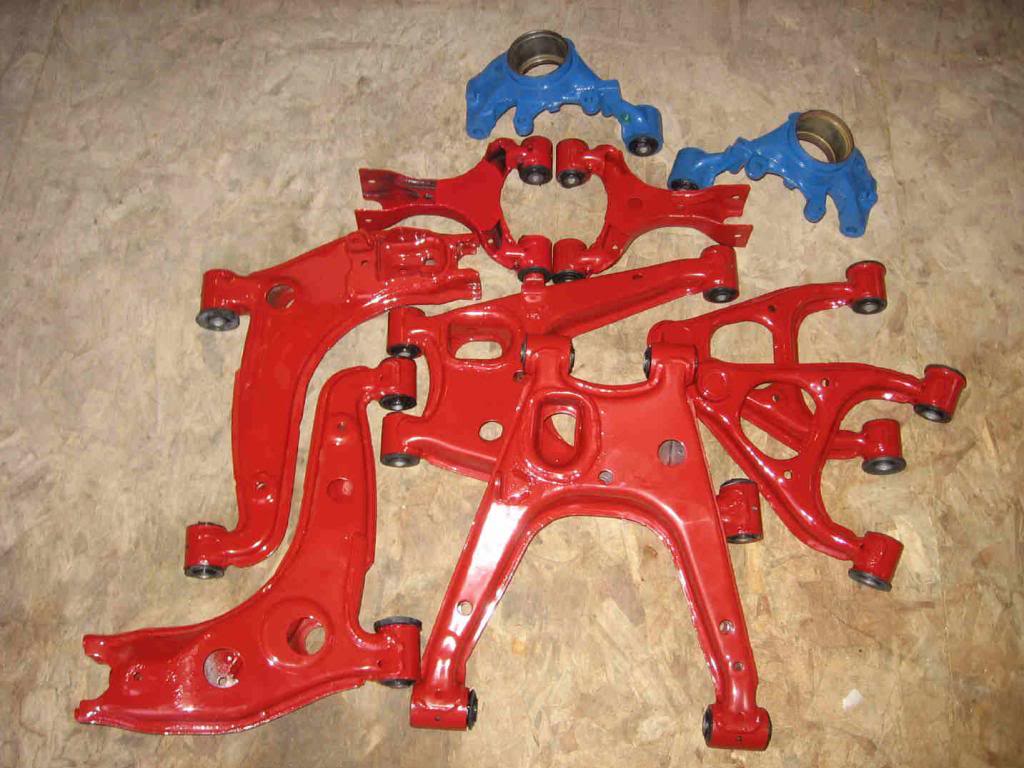
Then I cleaned them up, applied some rust converter, and a coat of paint. I was going to powdercoat them. But the powder would not stick to the rust converter; it must act like an insulator.
The Exocet uses stock Miata components, and pretty much anything that fits a Miata. I would like to use tubular arms with spherical bearings. That would be the best. It's also pretty darned expensive. I'll save that for a later upgrade.
For now, I'll use stock arms. There's no easy way for me to add spherical bearings or rod ends to the stock arms. Poly bushings are stiff, but they require a lot of maintenance to keep them from binding. Delrin bushings would have to be custom made. So, I went with some upgraded rubber bushings. Easy to install, zero maintenance, and better then new stock parts.

Pressing out the old ones and pressing in the new ones was a pretty simple job. I heated them up a bit with a torche, and they popped right out (in the press).

Then I cleaned them up, applied some rust converter, and a coat of paint. I was going to powdercoat them. But the powder would not stick to the rust converter; it must act like an insulator.


 10-21-2014, 09:53 PM
#2
V8 Miata Enthusiast
Thread Starter
Join Date: Oct 2013
Location: Colorado Springs, CO
Posts: 421
Likes: 0
Received 33 Likes
on
27 Posts
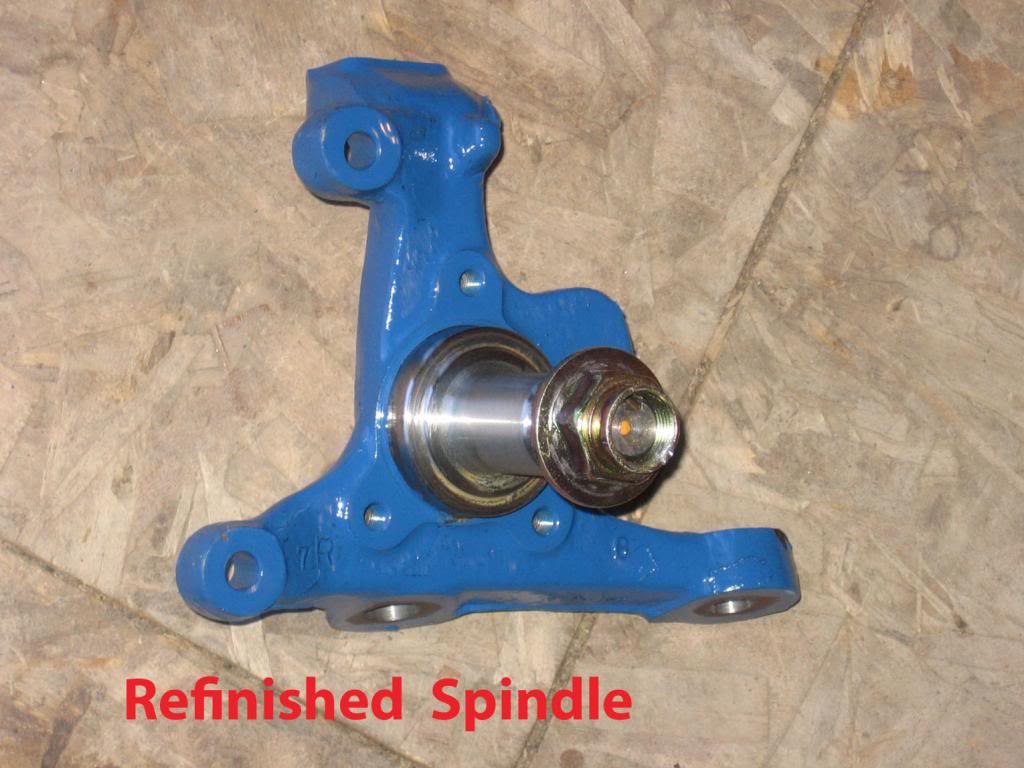
The front spindles were pretty easy. Simply clean them up and blast some Rustoleum on them.
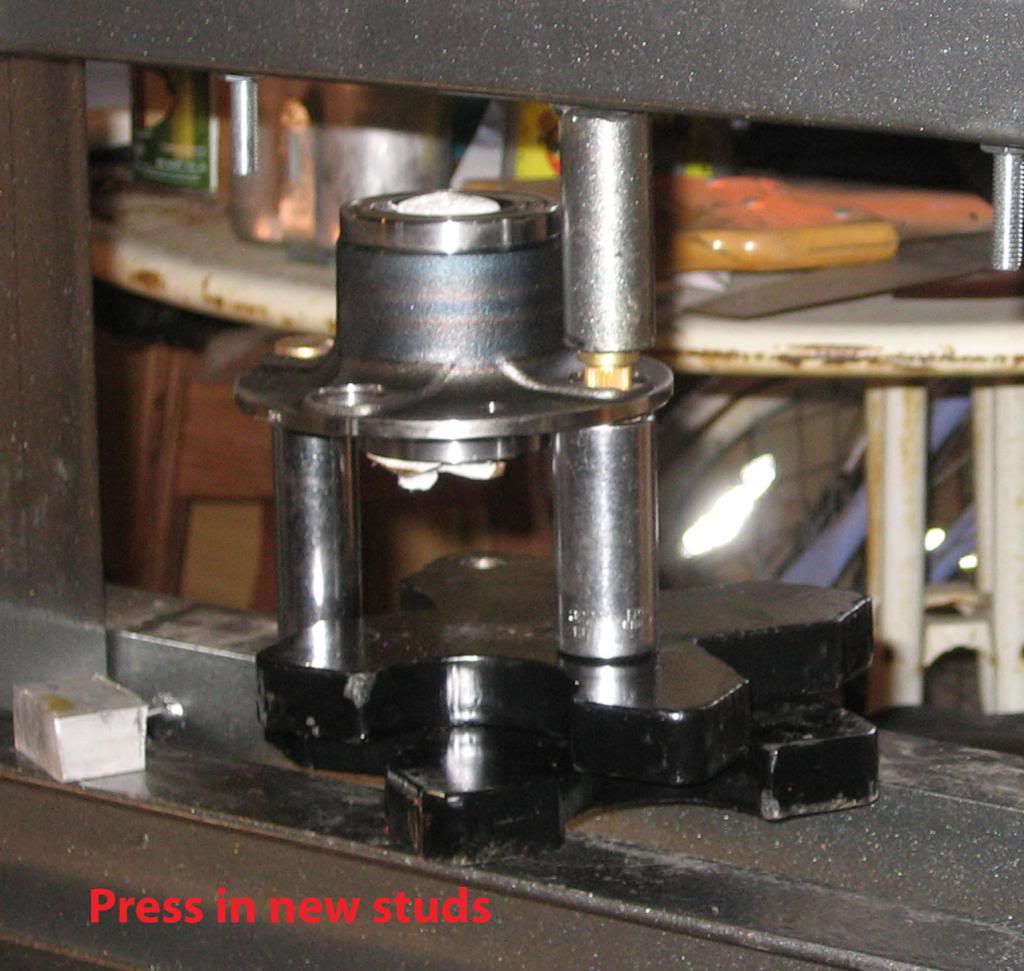
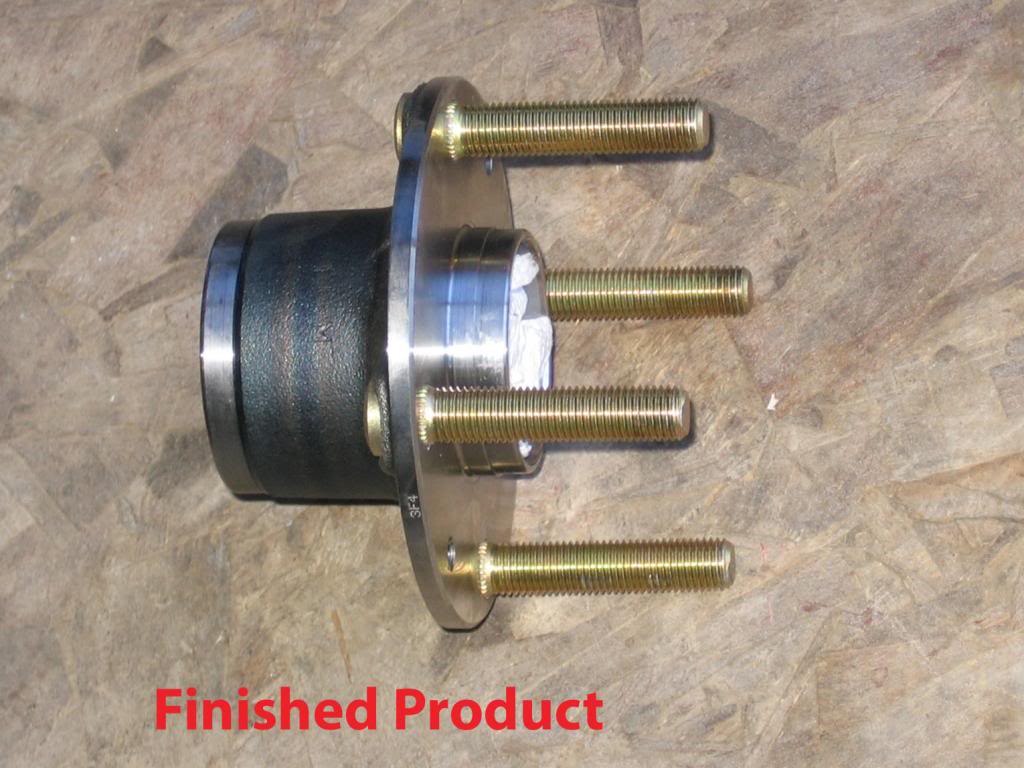
The front hubs are heavy duty units from FM. They get 2-3 season on them in their Targa car. I pressed out the old wheel studs, and pressed in the new ARP studs. I left the new studs in the freezer for a couple of day, and then gently heated the bearing flange. Should make for an extremely tight fit.
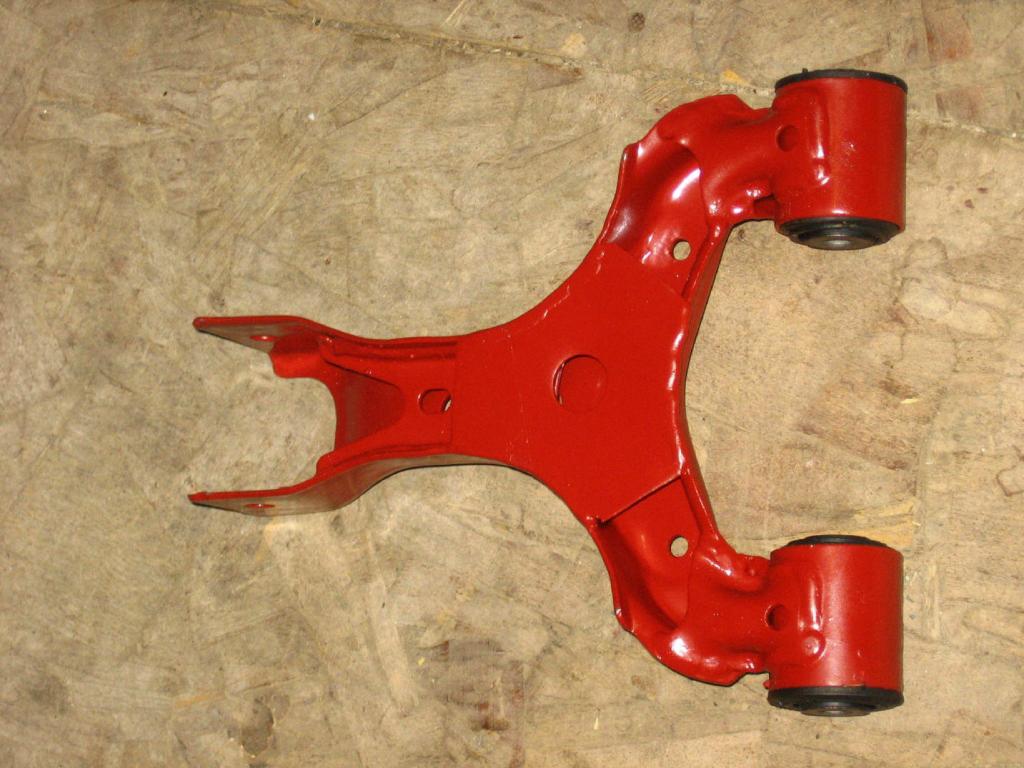
On these arms, I welded a steel plate to the bottom for extra support. That's an old Mustang and Camaro trick. I drilled the big hole in the middle to cut some weight. Will it help? IDK, but it seemed like a good idea at the time.
I have not assembled the rear spindles yet. The rear end kit comes with a new hub and bearing. I haven't purchased those parts yet.
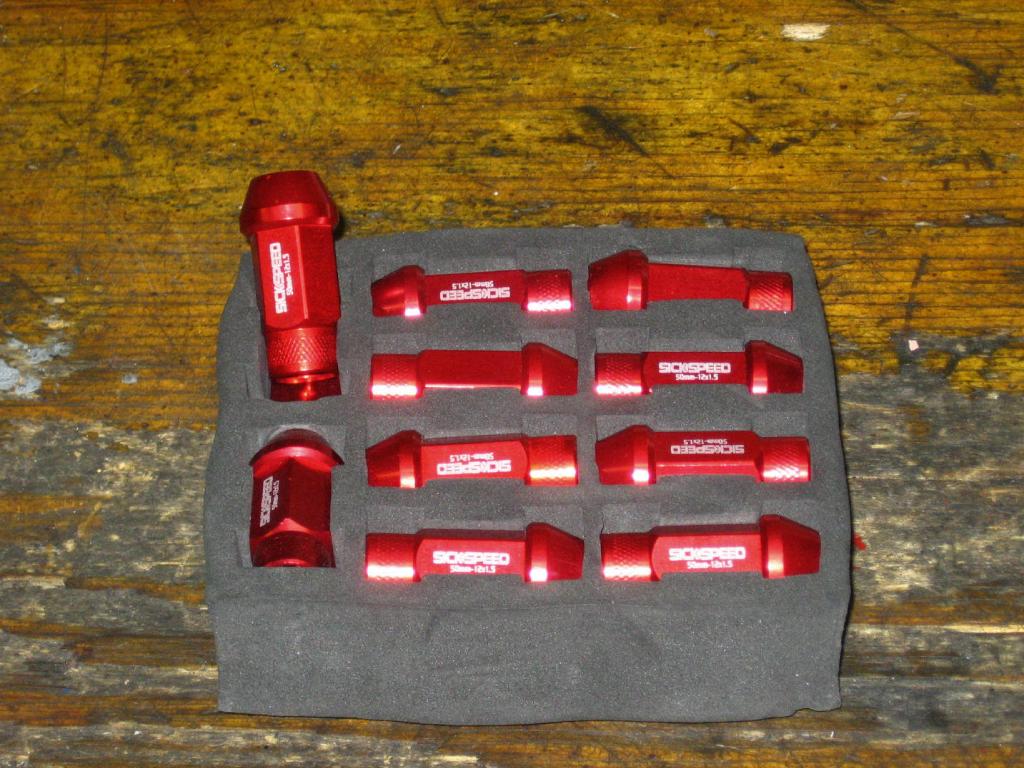
I scored these off of CL yesterday for a nice price. Yeah, I know - Bling. Couldn't help it. They are some good lug nuts, and I needed them anyway.

The front hubs are heavy duty units from FM. They get 2-3 season on them in their Targa car. I pressed out the old wheel studs, and pressed in the new ARP studs. I left the new studs in the freezer for a couple of day, and then gently heated the bearing flange. Should make for an extremely tight fit.


On these arms, I welded a steel plate to the bottom for extra support. That's an old Mustang and Camaro trick. I drilled the big hole in the middle to cut some weight. Will it help? IDK, but it seemed like a good idea at the time.

I have not assembled the rear spindles yet. The rear end kit comes with a new hub and bearing. I haven't purchased those parts yet.
I scored these off of CL yesterday for a nice price. Yeah, I know - Bling. Couldn't help it. They are some good lug nuts, and I needed them anyway.
 10-21-2014, 10:10 PM
#3
V8 Miata Enthusiast
Thread Starter
Join Date: Oct 2013
Location: Colorado Springs, CO
Posts: 421
Likes: 0
Received 33 Likes
on
27 Posts
Now, the question become, which spring/shock package to use? I really like the Afco's, but I'm not sure that I'm a good enough driver to use all that. I might be able to save a grand by going one step down to the V-Max XXtreme's, and match my skill level better.
Some days I say I'll buy the expensive Afco's, and some days I say I won't. Eventually, I'll have to make a decision.
Some days I say I'll buy the expensive Afco's, and some days I say I won't. Eventually, I'll have to make a decision.
10-29-2014, 04:53 PM
#4
V8 Miata Enthusiast
Thread Starter
Join Date: Oct 2013
Location: Colorado Springs, CO
Posts: 421
Likes: 0
Received 33 Likes
on
27 Posts
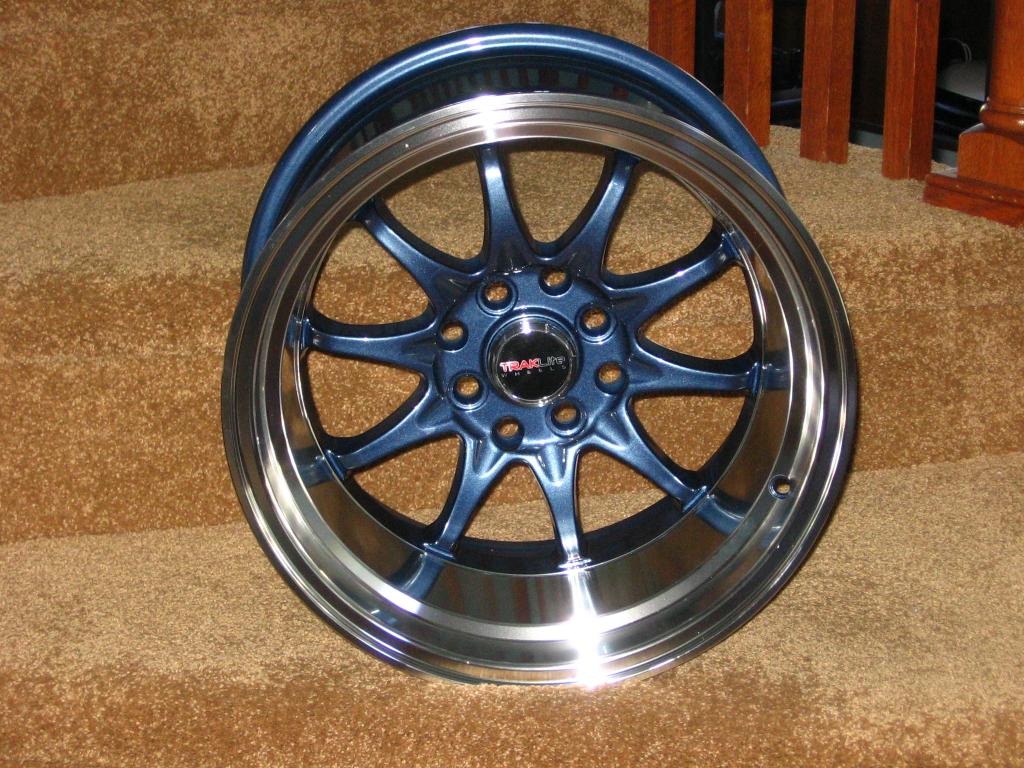
New wheels came in yesterday. Tracklite, 15x9, 0 offset, about 16 pounds. Ordered them through FM.
As for the suspension, I contacted Kieth today and ordered the Afco stuff. Might as well buy the best now, rather than change it later.

As for the suspension, I contacted Kieth today and ordered the Afco stuff. Might as well buy the best now, rather than change it later.
 10-30-2014, 09:25 AM
#6
V8 Miata Fanatic
 01-09-2015, 11:42 PM
#8
V8 Miata Enthusiast
Thread Starter
Join Date: Oct 2013
Location: Colorado Springs, CO
Posts: 421
Likes: 0
Received 33 Likes
on
27 Posts
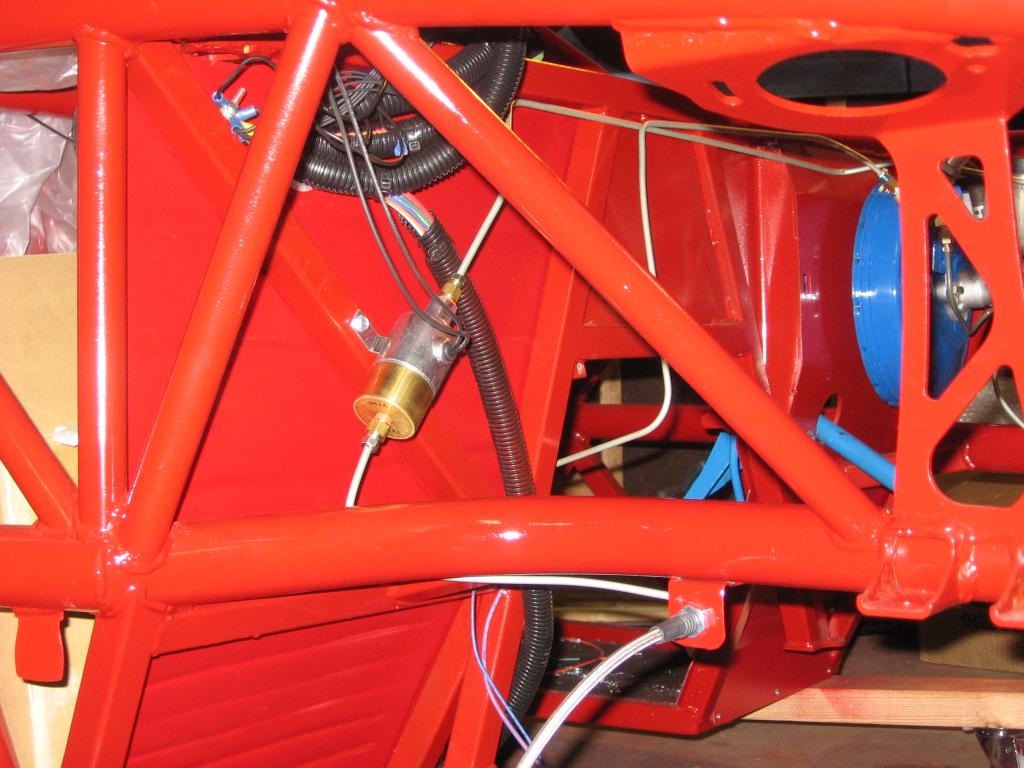
Slow process. Spent a lot of time on the electrical system. That's mostly finished, so I started working on the brake system a little bit.
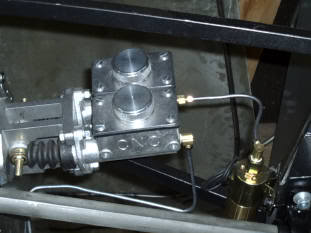
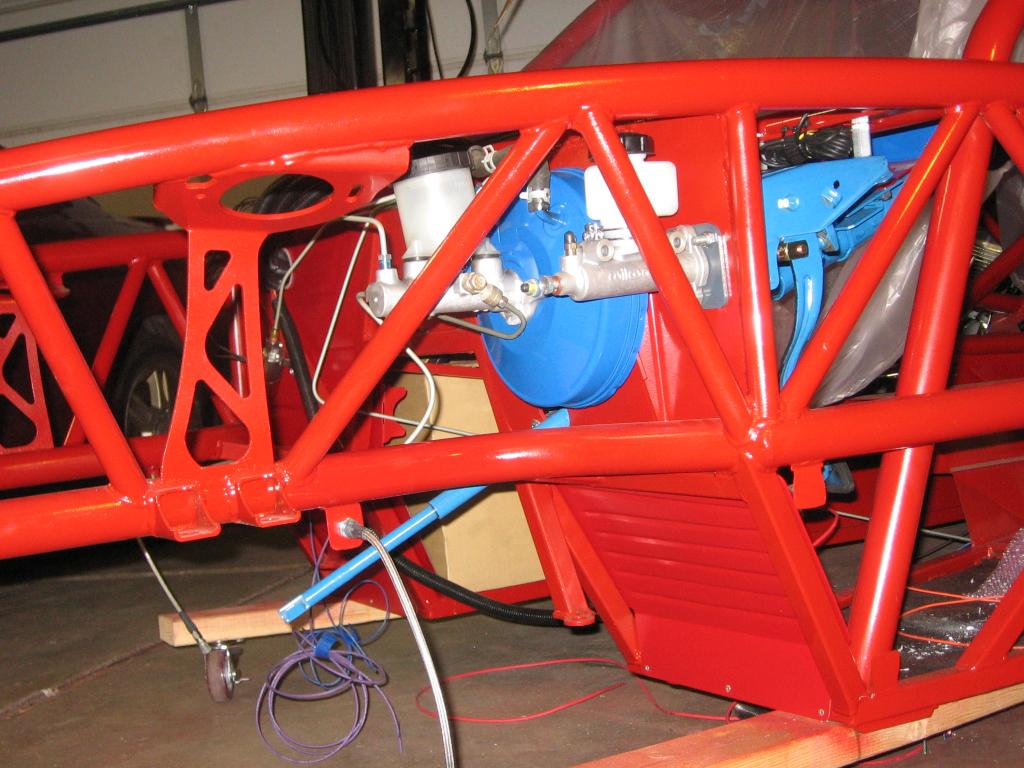
Choosing the correct MC was the first step. My Cobra uses a dual MC from CNC. It's an excellent system, and work really well. The manual pedal provides excellent feel and modulation. BUT, the MC's are not all that durable. They need to be rebuilt every 2-3 years.
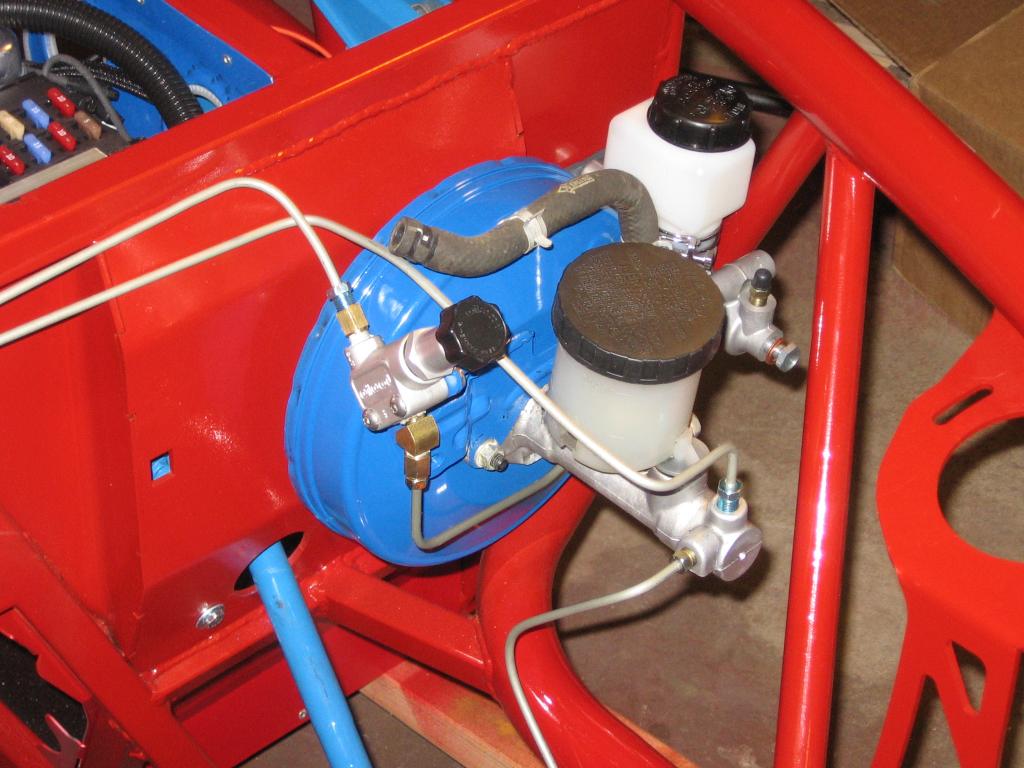
In the interest of durability and longevity, I chose to go with the stock Miata booster and MC. I figure that's what FM uses on their track and Targa cars, so it must work OK.
The pressure reduction valve is mounted on the stock combination valve bracket that was slightly modified. And I used the stock line from the MC to the valve, without any modification.
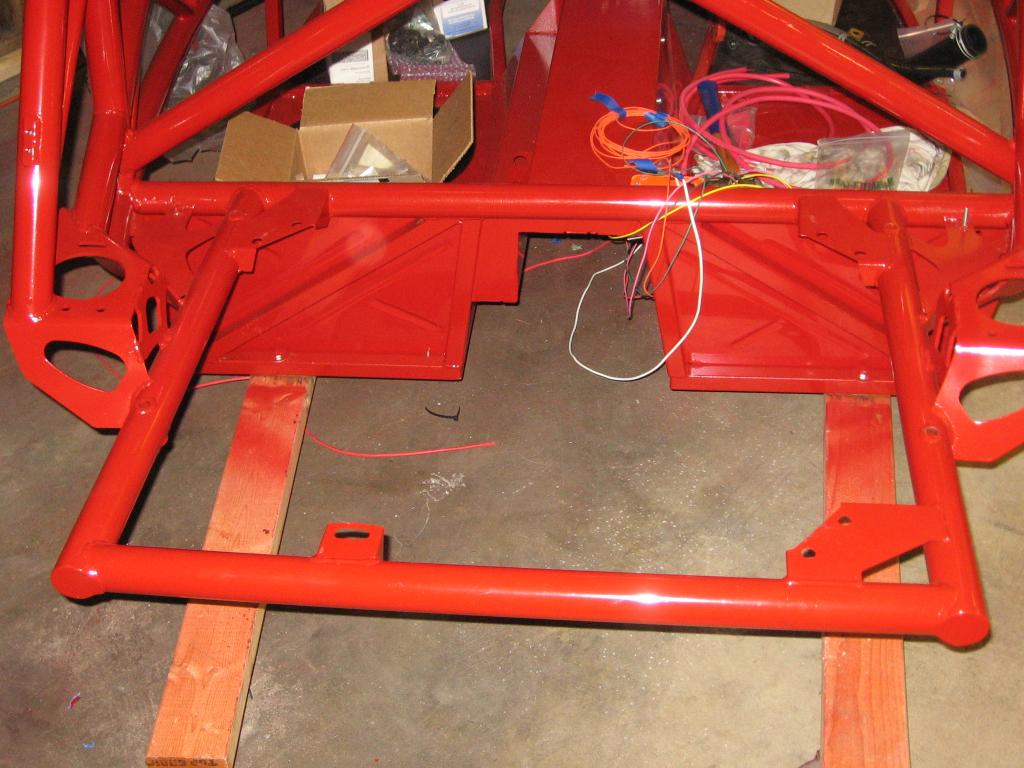
I made the frame tabs out of some old garage door track I had lying around. The shape was right, and I just had to cut a couple of slices of the right thickness, and then shape them for the curved frame.
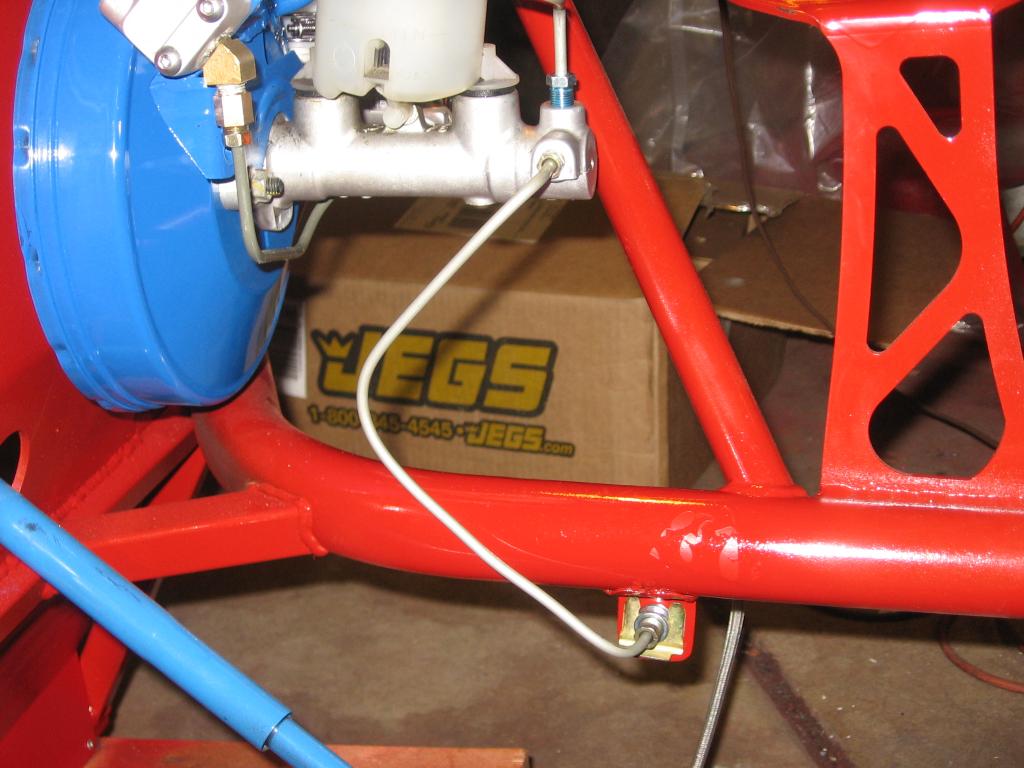
I also installed a line lock. For drag racing it should be installed in both lines for an even burn out. But I want it for loading onto a trailer, starting on my steep driveway, and stuff like that. So it will do fine only working on one front wheel.
Mostly finished in the front.
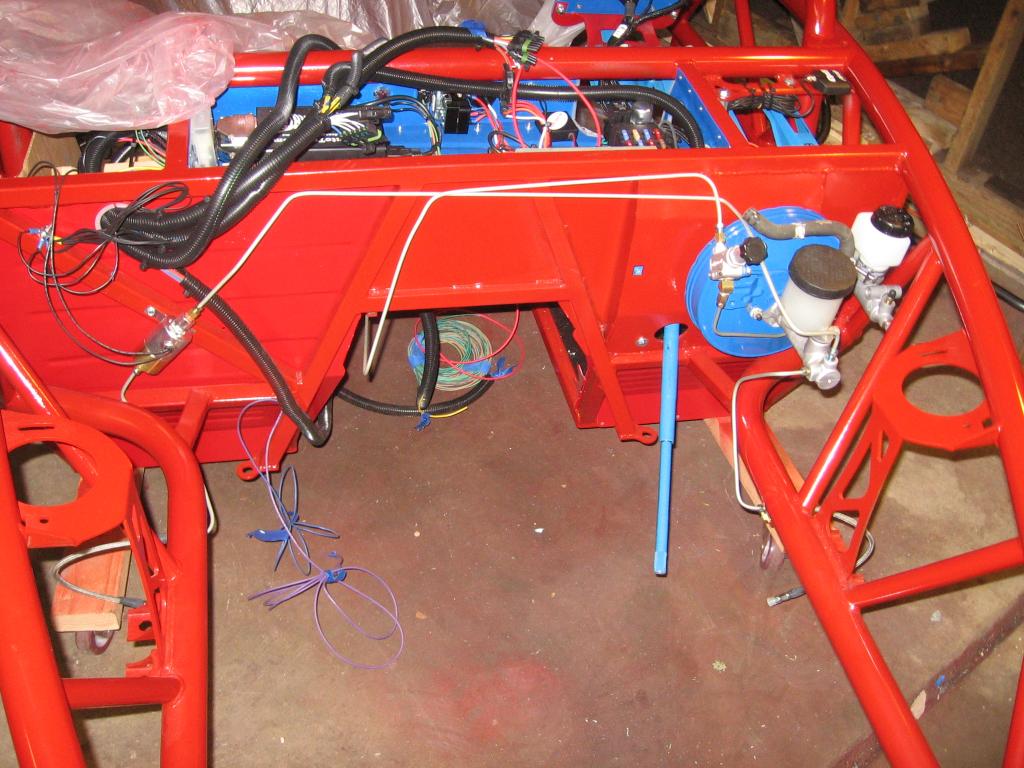
Tomorrow I'll install the rear subframe, and see if I can't finish the rear brake lines. Once the wires, fuel lines, and brakes are run through the trans tunnel, I can install the engine and trans.
Choosing the correct MC was the first step. My Cobra uses a dual MC from CNC. It's an excellent system, and work really well. The manual pedal provides excellent feel and modulation. BUT, the MC's are not all that durable. They need to be rebuilt every 2-3 years.

In the interest of durability and longevity, I chose to go with the stock Miata booster and MC. I figure that's what FM uses on their track and Targa cars, so it must work OK.
The pressure reduction valve is mounted on the stock combination valve bracket that was slightly modified. And I used the stock line from the MC to the valve, without any modification.

I made the frame tabs out of some old garage door track I had lying around. The shape was right, and I just had to cut a couple of slices of the right thickness, and then shape them for the curved frame.

I also installed a line lock. For drag racing it should be installed in both lines for an even burn out. But I want it for loading onto a trailer, starting on my steep driveway, and stuff like that. So it will do fine only working on one front wheel.

Mostly finished in the front.

Tomorrow I'll install the rear subframe, and see if I can't finish the rear brake lines. Once the wires, fuel lines, and brakes are run through the trans tunnel, I can install the engine and trans.
Last edited by .boB; 01-09-2015 at 11:45 PM.
01-10-2015, 11:51 PM
#9
V8 Miata Enthusiast
Thread Starter
Join Date: Oct 2013
Location: Colorado Springs, CO
Posts: 421
Likes: 0
Received 33 Likes
on
27 Posts
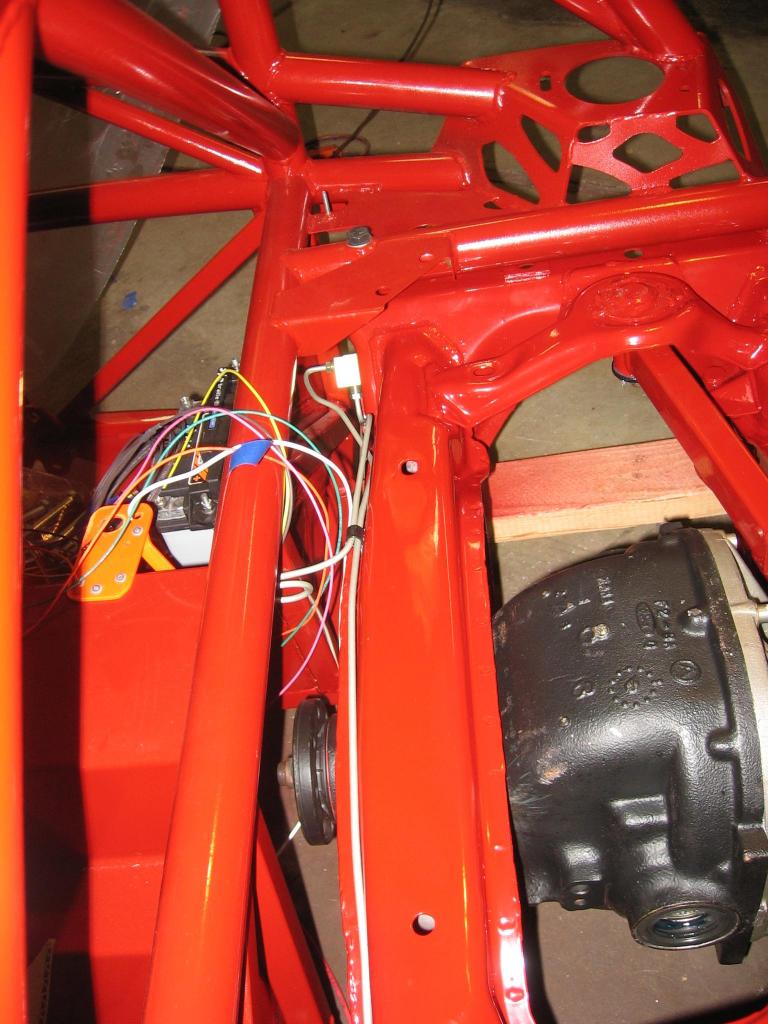
You need to install the clutch MC before the brake booster. It's a very tight fit.
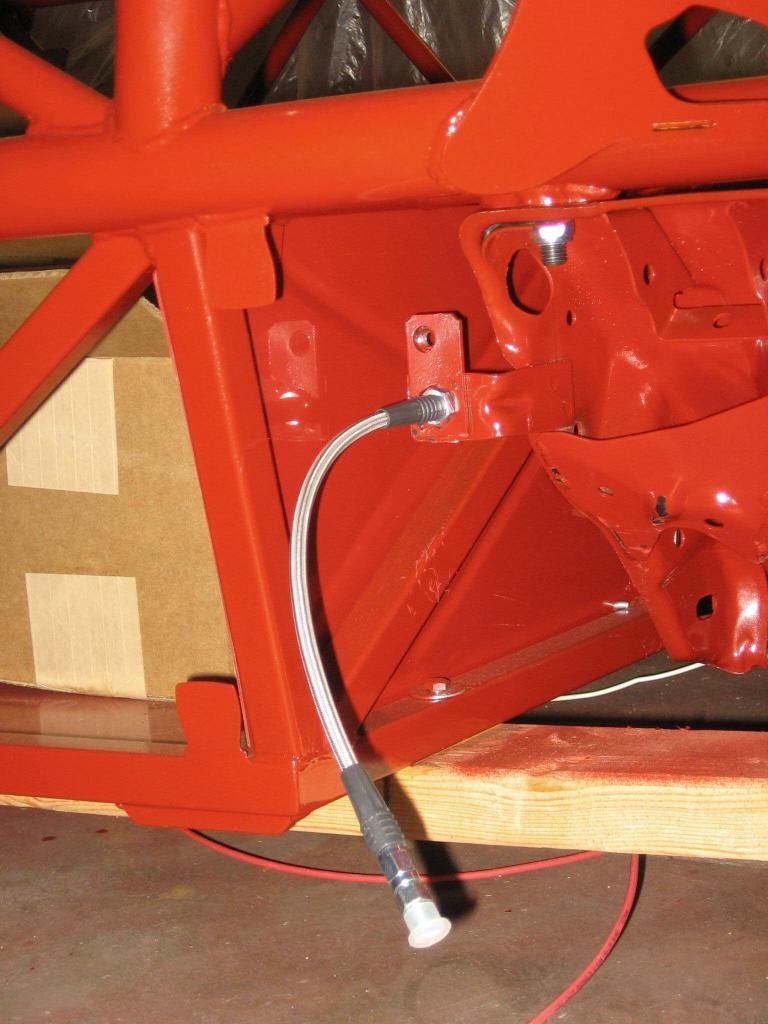
Today I worked on the rear brake lines. Pretty easy, really, and only took a couple of hours. What takes time is figuring out exactly where things will go, and how they will all fit together.
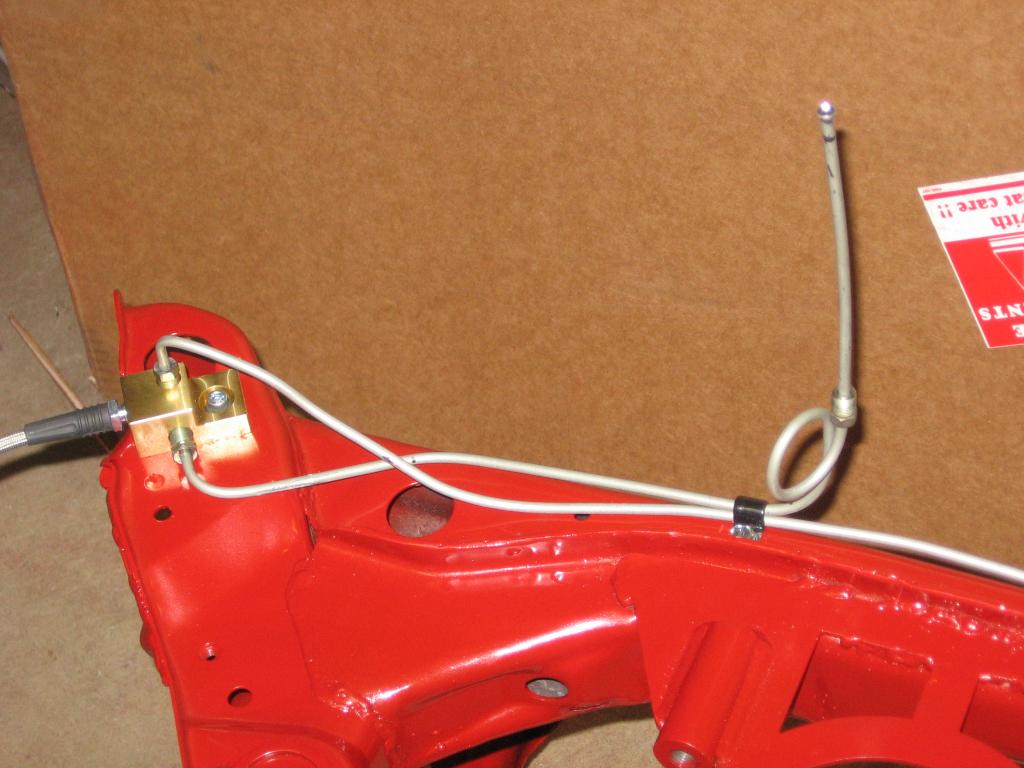
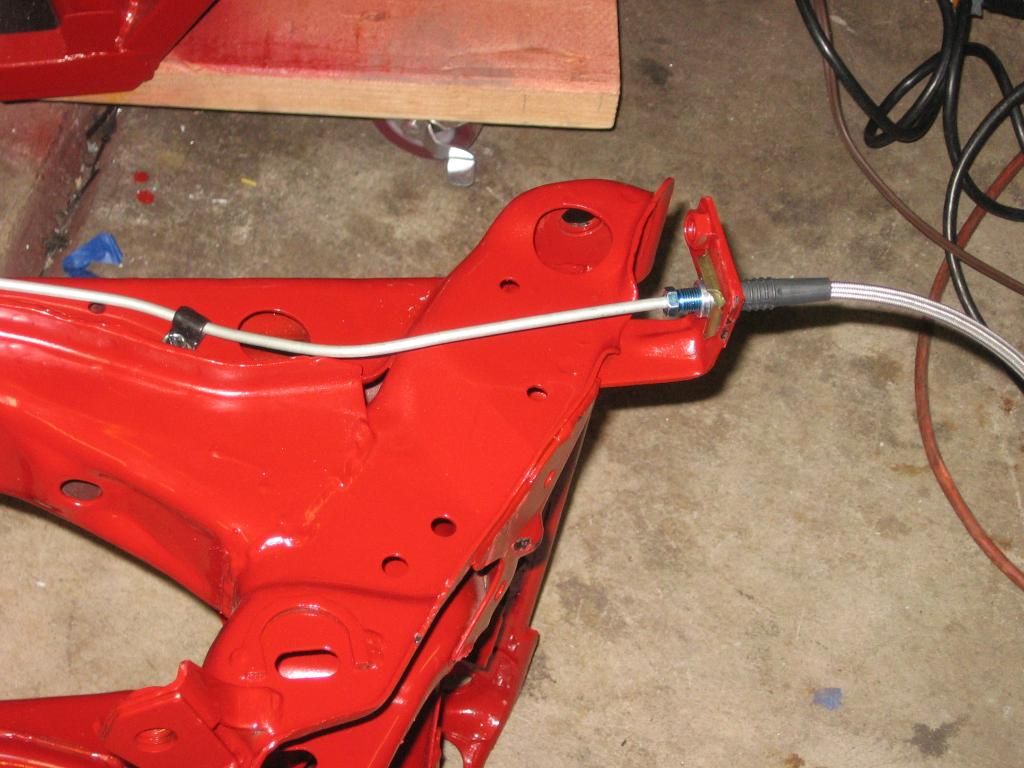
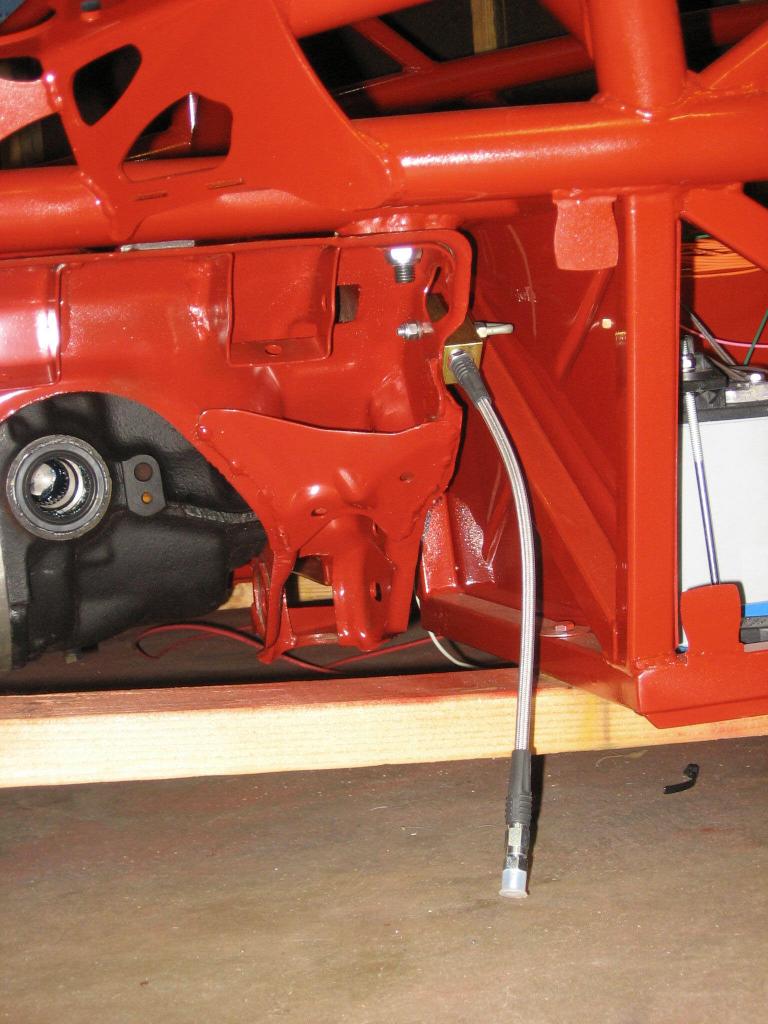
Obviously, this is not going to work right. The is the brake line kit from FM. And I'm sure it works just fine for the stock Miata frame. Here, it needs some small alterations.
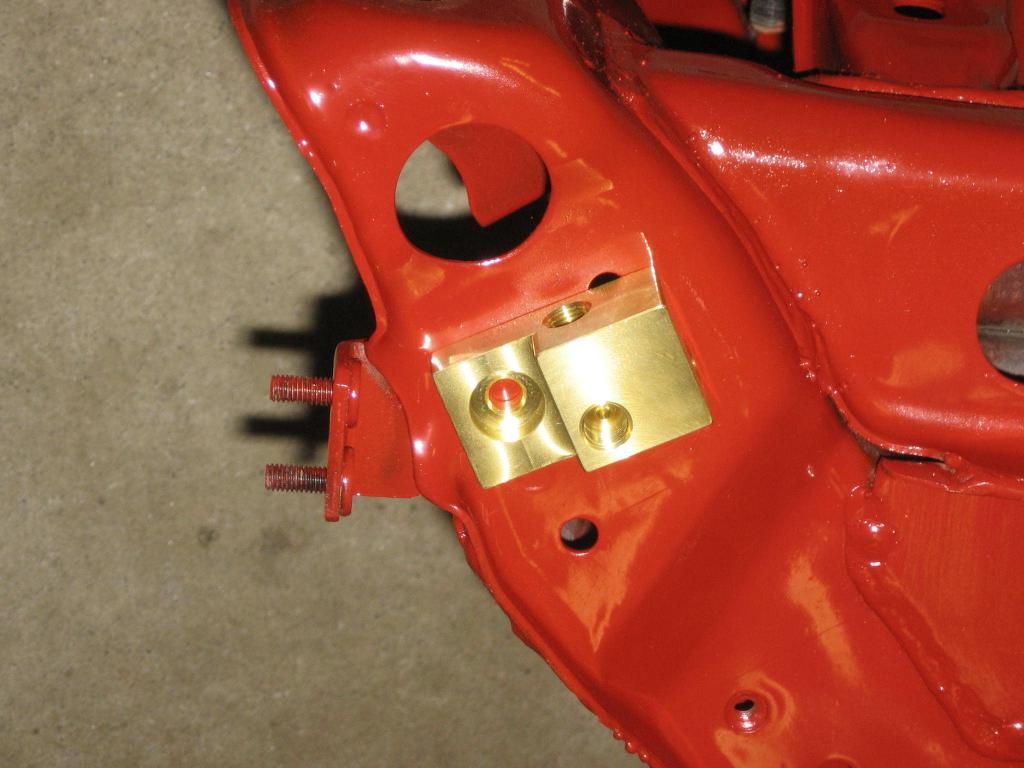
I cut off the mounting tab and studs, and re-worked the metal a little bit. I wanted it to fit close. But I also wanted it to be easy to service later, if I need to. The metal is cut back far enough to allow a wrench on the hose when assembled.
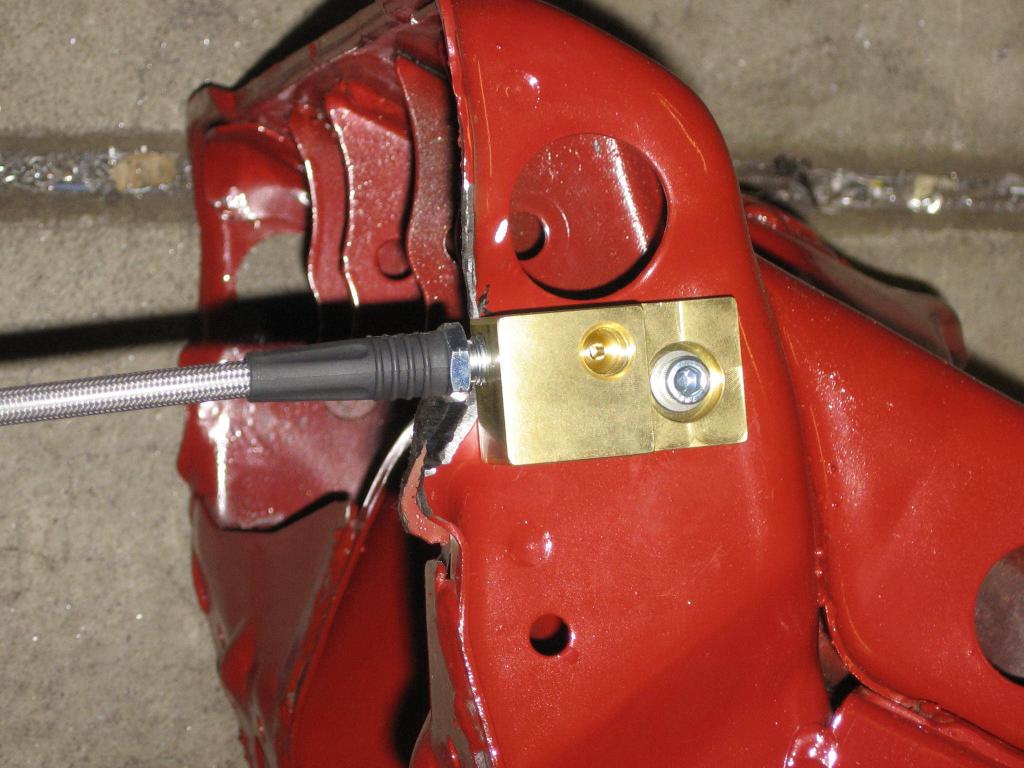
This is the passenger side, front, of the sub frame. The tubing should be well out of the way once assembled. The part that's sticking straight up will extend into the trans tunnel, where there's a union for the rest of the line. I put that loop in there in case I missed the mark a little bit.
The drivers side just uses the factory tab and clip arrangement. I'm not sure what's supposed to bolt to that end of the bracket, so I'm reluctant to cut it off just yet.
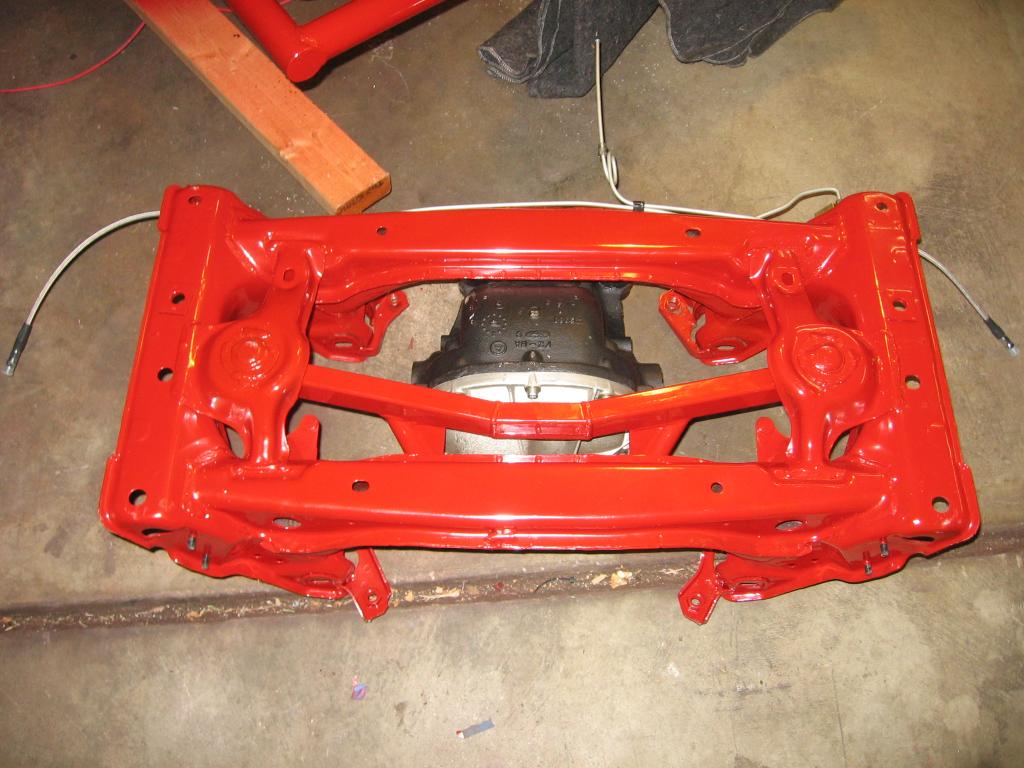
Next, I'll install the rear sub frame with the differential.

Today I worked on the rear brake lines. Pretty easy, really, and only took a couple of hours. What takes time is figuring out exactly where things will go, and how they will all fit together.
Obviously, this is not going to work right. The is the brake line kit from FM. And I'm sure it works just fine for the stock Miata frame. Here, it needs some small alterations.


I cut off the mounting tab and studs, and re-worked the metal a little bit. I wanted it to fit close. But I also wanted it to be easy to service later, if I need to. The metal is cut back far enough to allow a wrench on the hose when assembled.

This is the passenger side, front, of the sub frame. The tubing should be well out of the way once assembled. The part that's sticking straight up will extend into the trans tunnel, where there's a union for the rest of the line. I put that loop in there in case I missed the mark a little bit.

The drivers side just uses the factory tab and clip arrangement. I'm not sure what's supposed to bolt to that end of the bracket, so I'm reluctant to cut it off just yet.

Next, I'll install the rear sub frame with the differential.
01-14-2015, 07:03 AM
#10
V8 Miata Enthusiast
Thread Starter
Join Date: Oct 2013
Location: Colorado Springs, CO
Posts: 421
Likes: 0
Received 33 Likes
on
27 Posts
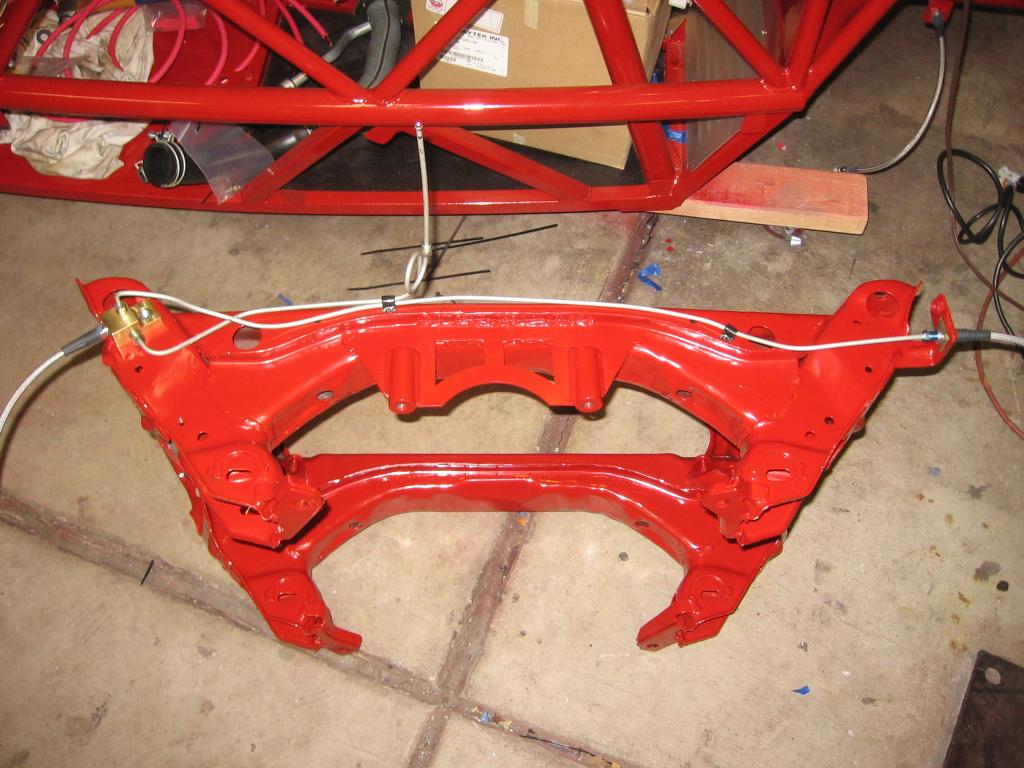
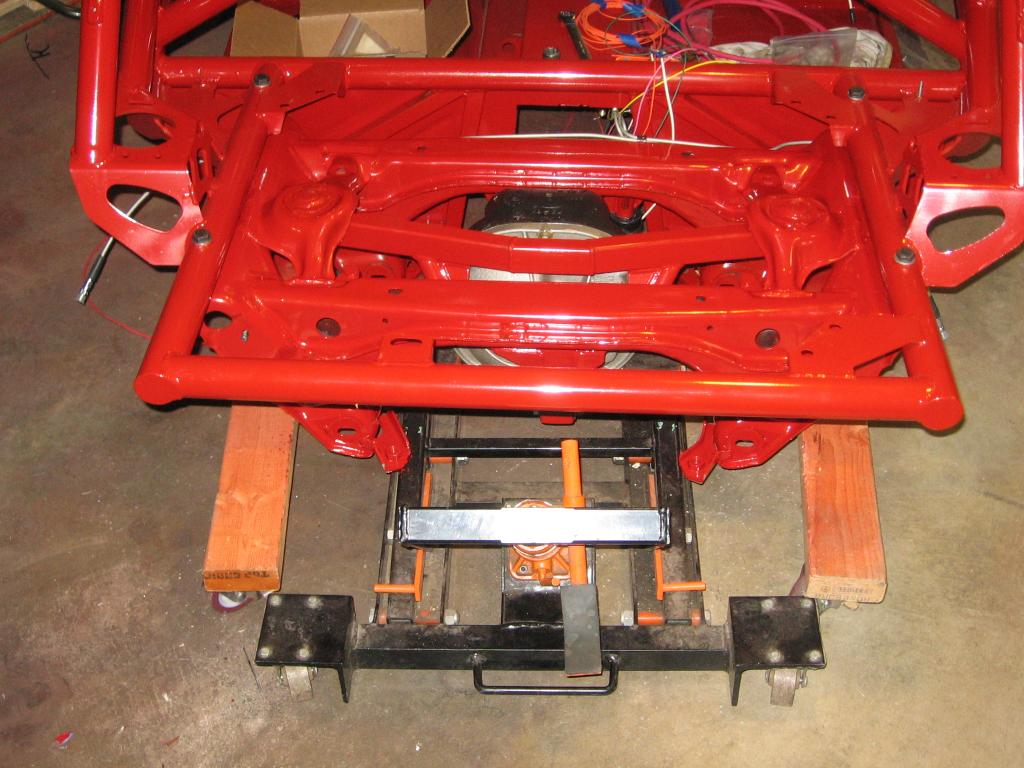
Installing the diff was fairly easy. The V8R rear diff bracket didn't fit exactly right. it was off by a couple of millimeters. some gentle coaxing got it installed OK, though.
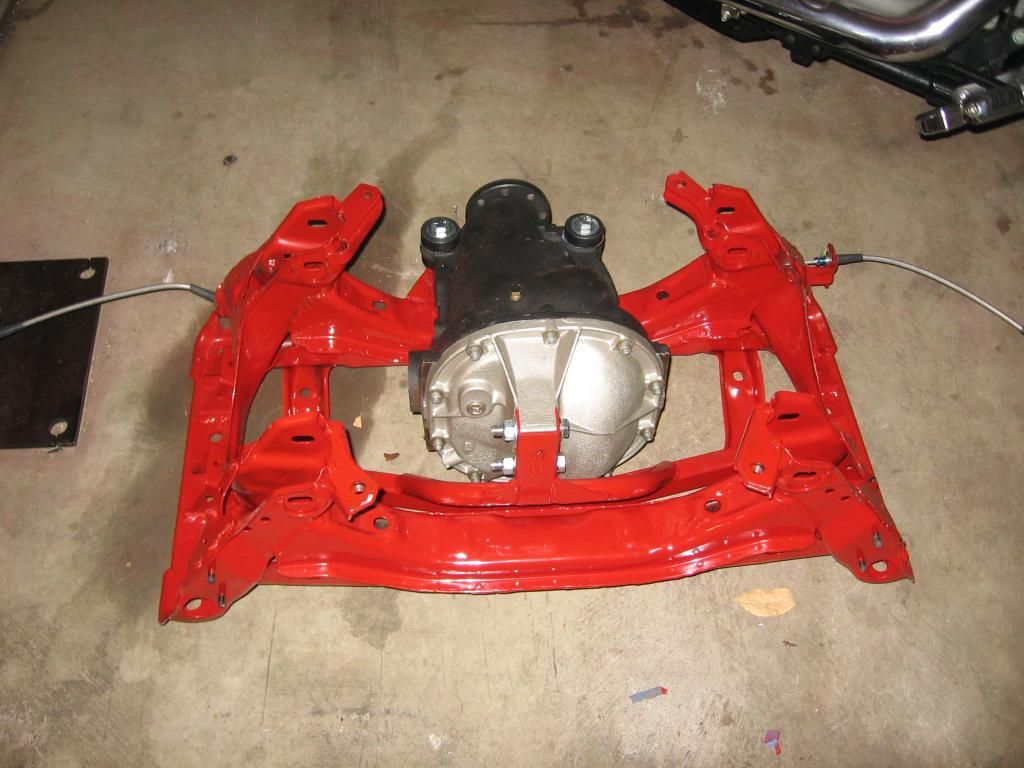
Once installed in the cradle, it was a pretty simple matter of installing it in the frame. I used a motorcycle jack to move it into position and line of the bolts. Then I used some careful measurements to get it square in the chassis. IMO, that matters a lot, so I took a fair amount of time, and measured from multiple points. Then I re-measured after the bolts were torqued.
V8R supplied new hardware for this, including Nylock nuts. I prefer to use Nylock or star washers wherever possible.


The following users liked this post:
WykidOne (08-09-2016)
01-14-2015, 07:07 AM
#11
V8 Miata Enthusiast
Thread Starter
Join Date: Oct 2013
Location: Colorado Springs, CO
Posts: 421
Likes: 0
Received 33 Likes
on
27 Posts
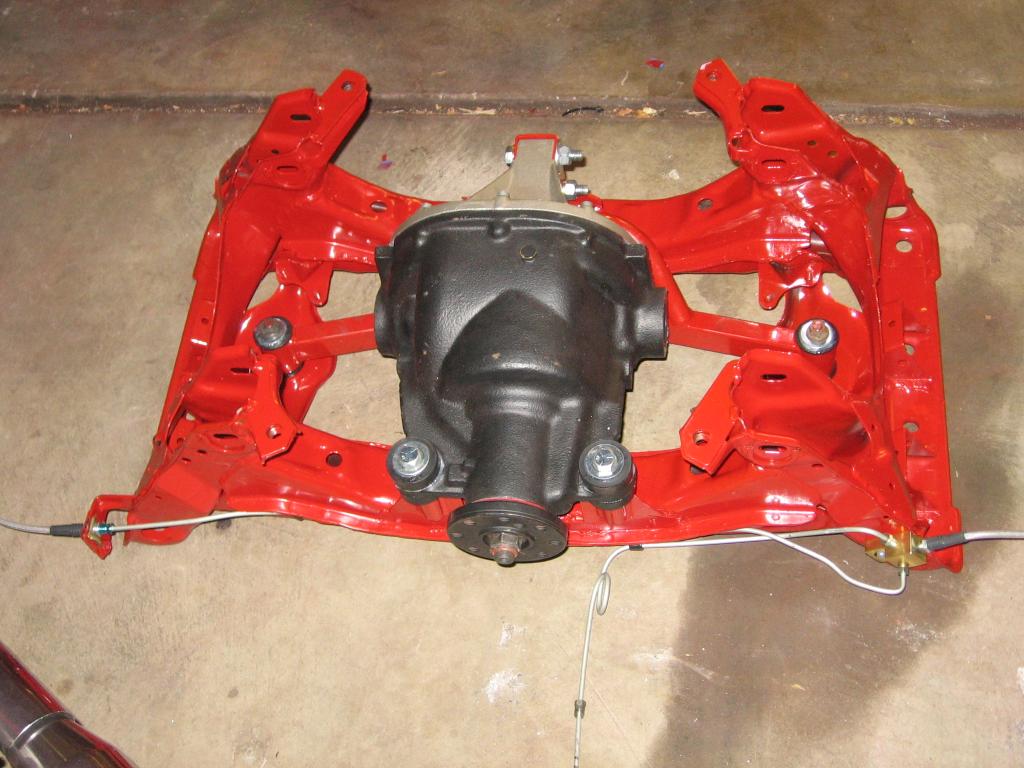
The brake lines fit pretty much like a stock Miata frame, except for that passenger side distribution block. But there's enough room in there to make them fit easily enough.
I was tempted to cut off half of this bracket. But I don't know if it's going to be needed later on so I left it there.
From here on, it should be pretty standard Miata parts installation.


I was tempted to cut off half of this bracket. But I don't know if it's going to be needed later on so I left it there.

From here on, it should be pretty standard Miata parts installation.
01-10-2016, 12:15 PM
#12
V8 Miata Enthusiast
Thread Starter
Join Date: Oct 2013
Location: Colorado Springs, CO
Posts: 421
Likes: 0
Received 33 Likes
on
27 Posts
Building this car is a lot more involved than I thought it was going to be. My original intention of this thread - and others like it - was to document the differences from dropping a V8 into a Miata. I wanted this information to be easily found and referenced for the next guy. But keeping these threads updated and organized isn't working out all that well.
So, I built a web site. Racing the Exocet
This site only documents those steps, problems, and solutions specific to the Exocet. I'm sure some of it will apply to a Miata. But since I've never owned one, I can't say. I'll still read this site nearly every day, like I have been. And I still think this is the best site not only for V8 Miata's, but Miata performance in general.
No, this is not a commercial web site. It's for information only. I'm not selling anything, promoting anything, or asking for anything. Peruse the site at your leisure. Or not.

Thread
Thread Starter
Forum
Replies
Last Post
Meierznutz
Other V8, V6, 4 cyl build threads including Exocet, Catfish, Westfield, Ratrod, etc
209
11-09-2020 09:05 AM
.boB
Other V8, V6, 4 cyl build threads including Exocet, Catfish, Westfield, Ratrod, etc
5
02-28-2016 09:14 AM
Currently Active Users Viewing This Thread: 1 (0 members and 1 guests)


