pj_mcgarvey's - LS1/T56 NB build thread

 09-20-2016, 06:57 PM
#1
V8 Miata Enthusiast
Thread Starter

It was the summer of 2015 that I first got the itch to build a V8 Miata. I had recently decided to sell my 85 Golf Turbo track car - just got tired of man handling a high-powered FWD car around the track the last couple of years. Been a mostly FWD guy since I started autocrossing, and it just struck me as the wrong way to do things.

I also fell in love with the V8 sound, and thought it would be outrageous to hear that coming out the back of a Miata, not to mention the power and capable chassis that be part of the package.
Eventually I sold the Golf in July 2015, and had already had my eye on a few Miatas by that time. I was thinking supercharged so it would have enough power to "hold me over" while I planned the LS swap. Found an autocross setup M45 SC'd, rollbar'd NB locally for a good price. Figured the LSD and SC might make some money back after I pulled them.

Bought a 1999 Black Miata in August 2015 and enjoyed driving it the rest of summer and fall, then it sat in the garage for the winter and I did suspension bushings, new top, 6UL wheels, track dog racing SC pulleys, and other mods that would later be "nice to haves" once the LS was in there.
I thought I would get the chance to track the Miata this summer, but that never materialized. Meanwhile I had to do emergency headgasket change on our Subaru during June/July.
For the engine my initial idea was to search for an alum. block "LS" such as an L33 or other truck motor, and piece together something that would fit in the Miata. Not sure why I was stuck on this idea for so long, but I eventually realized these were hard to find, and the time/money aspect didn't make sense. I came to my senses and started to keep my eye out for LS1s. In April 2016 I picked up a used, 30k mile LS1 "drop out", mounted it on an engine stand and started to go over it.

I also fell in love with the V8 sound, and thought it would be outrageous to hear that coming out the back of a Miata, not to mention the power and capable chassis that be part of the package.
Eventually I sold the Golf in July 2015, and had already had my eye on a few Miatas by that time. I was thinking supercharged so it would have enough power to "hold me over" while I planned the LS swap. Found an autocross setup M45 SC'd, rollbar'd NB locally for a good price. Figured the LSD and SC might make some money back after I pulled them.
Bought a 1999 Black Miata in August 2015 and enjoyed driving it the rest of summer and fall, then it sat in the garage for the winter and I did suspension bushings, new top, 6UL wheels, track dog racing SC pulleys, and other mods that would later be "nice to haves" once the LS was in there.
I thought I would get the chance to track the Miata this summer, but that never materialized. Meanwhile I had to do emergency headgasket change on our Subaru during June/July.
For the engine my initial idea was to search for an alum. block "LS" such as an L33 or other truck motor, and piece together something that would fit in the Miata. Not sure why I was stuck on this idea for so long, but I eventually realized these were hard to find, and the time/money aspect didn't make sense. I came to my senses and started to keep my eye out for LS1s. In April 2016 I picked up a used, 30k mile LS1 "drop out", mounted it on an engine stand and started to go over it.
 09-20-2016, 07:06 PM
#2
V8 Miata Enthusiast
Thread Starter
Since this was supposedly a 30k mile engine, I didn't anticipate doing any internal engine modifications, and everything looked in good shape, despite some dirt and leaves from when the engine sat, maybe uncovered - as it came out of a sideswipe-wrecked Convertible in Maine.
I cleaned up the block with a wire wheel and brush, and painted it Duplicolor red. Removed intake, exhaust, steam pipes and cleaned up the surfaces with a green abrasive pad.
One of the first parts I ordered was the Flying Miata steel baffled oil pan. Had to do some massaging of the pan to clear the oil pump feed tube

The feed tube itself needed some grinding

Cut the oil pan baffle to clear the low profile of the new pan

Had to shorten some of the oil pan bolts so they wouldn't bottom out in the holes, wonder if FM was supposed to send me new bolts? Ah well.. Once all the clearance was checked with silly putty I loosely bolted down the pan.
Next up was to install a new oil pump and double roller timing chain.
Oil pump was a new GM part. I didn't take any pics but I used a small die grinder to clean up some casting flash on the inlet side and smoothed it out. Every little bit counts. Then cleaned out the pump and reassembled with loctite, etc.
The double roller chain seemed like a good upgrade considering I will track this car and drive it hard. Initially went with this chain from Summit: https://www.summitracing.com/parts/tfs-30678533
Learned a lesson in not checking the parts before installation as I noticed the teeth on the gear were mushroomed.
My guess is that someone had installed this prior to me, tried to turn over the engine and torqued it too hard and the chain mashed up into the gears. Of course it was returned and no mention made of the damage and no one apparently looked at the return part and just put it back on the shelf. I told Summit this, but my guess is it's back on the shelf and now someone else's problem Those little bits of metal will not make for a happy engine.
Went with a Comp Cams timing set and installation seemed smooth, better instructions and maybe a better name to back it up. With a double roller chain, they provide small spacers to push the pump away from the engine about 1/8" to clear the chain.
Doing some research I found out that it's a good idea to shim the oil pump gears, so I found a kit that does this: http://schumannsdynamicperformance.c.../131433/LSALTL
This may be overkill, but again in a track situation I'd rather be on the safe side of keeping this engine oiled properly.
Final update for this post is a snag with the timing cover. Due to the double roller chain and the oil pump needing to be spaced out 1/8" it was rubbing on the cover. Used a die grinder to very lightly remove metal from the cover where it was needed.
Used silly putty again (I asked my daughter first ;-) to check the clearance and with a new gasket installed and torqued down I didn't detect any issues. New front seal was installed of course and cover painted to match.
Shot of oil pan installed

I cleaned up the block with a wire wheel and brush, and painted it Duplicolor red. Removed intake, exhaust, steam pipes and cleaned up the surfaces with a green abrasive pad.
One of the first parts I ordered was the Flying Miata steel baffled oil pan. Had to do some massaging of the pan to clear the oil pump feed tube
The feed tube itself needed some grinding
Cut the oil pan baffle to clear the low profile of the new pan
Had to shorten some of the oil pan bolts so they wouldn't bottom out in the holes, wonder if FM was supposed to send me new bolts? Ah well.. Once all the clearance was checked with silly putty I loosely bolted down the pan.
Next up was to install a new oil pump and double roller timing chain.
Oil pump was a new GM part. I didn't take any pics but I used a small die grinder to clean up some casting flash on the inlet side and smoothed it out. Every little bit counts. Then cleaned out the pump and reassembled with loctite, etc.
The double roller chain seemed like a good upgrade considering I will track this car and drive it hard. Initially went with this chain from Summit: https://www.summitracing.com/parts/tfs-30678533
Learned a lesson in not checking the parts before installation as I noticed the teeth on the gear were mushroomed.
My guess is that someone had installed this prior to me, tried to turn over the engine and torqued it too hard and the chain mashed up into the gears. Of course it was returned and no mention made of the damage and no one apparently looked at the return part and just put it back on the shelf. I told Summit this, but my guess is it's back on the shelf and now someone else's problem Those little bits of metal will not make for a happy engine.
Went with a Comp Cams timing set and installation seemed smooth, better instructions and maybe a better name to back it up. With a double roller chain, they provide small spacers to push the pump away from the engine about 1/8" to clear the chain.
Doing some research I found out that it's a good idea to shim the oil pump gears, so I found a kit that does this: http://schumannsdynamicperformance.c.../131433/LSALTL
This may be overkill, but again in a track situation I'd rather be on the safe side of keeping this engine oiled properly.
Final update for this post is a snag with the timing cover. Due to the double roller chain and the oil pump needing to be spaced out 1/8" it was rubbing on the cover. Used a die grinder to very lightly remove metal from the cover where it was needed.
Used silly putty again (I asked my daughter first ;-) to check the clearance and with a new gasket installed and torqued down I didn't detect any issues. New front seal was installed of course and cover painted to match.
Shot of oil pan installed
Last edited by pj_mcgarvey; 08-25-2017 at 10:53 AM.
09-20-2016, 07:09 PM
#3
V8 Miata Enthusiast
Thread Starter
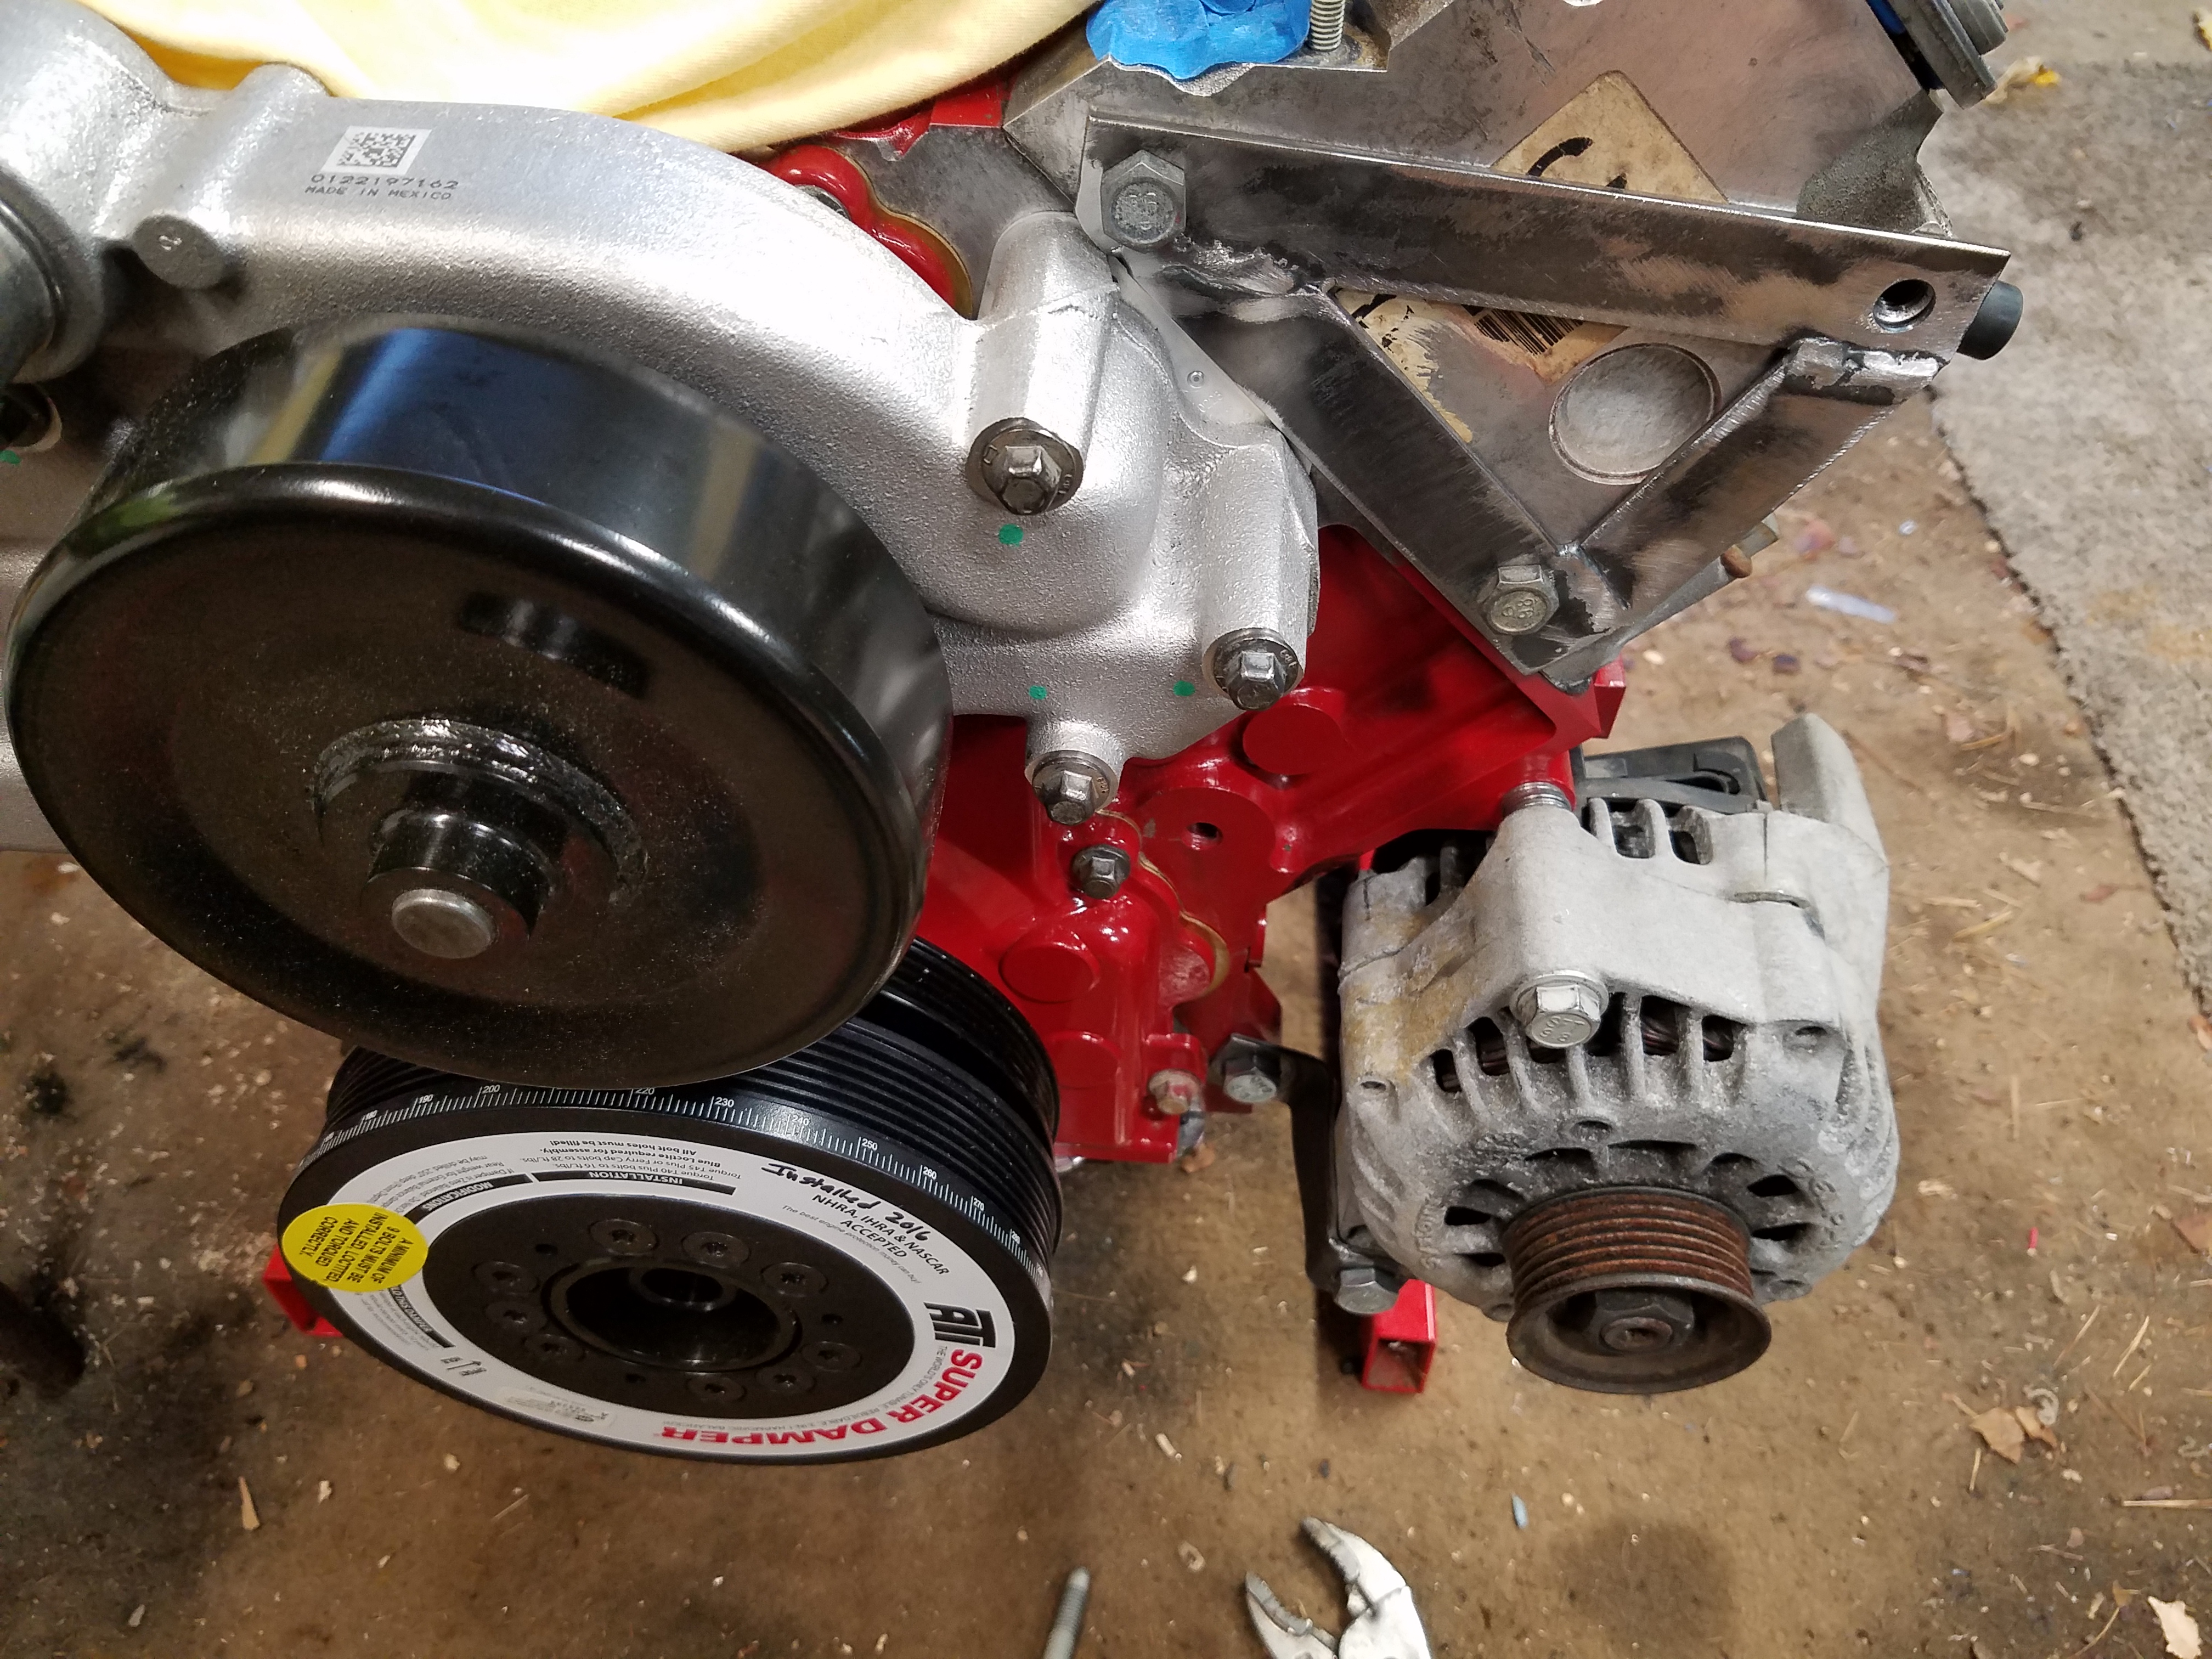
Another thing I picked up early on after getting the LS1 was an ATI Super Damper crank balancer. The original balancer showed some cracking in the rubber damping ring (it's an almost 20 year old engine) and I wanted to get a lower profile balancer to help with clearance at the front of the engine.
https://www.summitracing.com/parts/ATI-917266 This is for the Corvette LS1, and it saves about 1" I think.
The balancer gets installed with a special tool (seems to be alot of special pullers and installers in the LS world)
Balancer tool: https://www.amazon.com/gp/product/B019HR8XK0
Torqued it on with an ARP bolt which called for 235 ft. lbs.

Seems excessive so I settled for 190 on my wrench.
ARP Bolt: https://www.amazon.com/gp/product/B001D0MJNC
ATI Damper installed

To play nice with the belt alignment of the ATI damper I also installed the matching Corvette style water pump, which also saves about 1" at the pulley.
This is the water pump to get: https://www.amazon.com/gp/product/B000JZZ8EO
Along with the matching tensioner: https://www.amazon.com/gp/product/B0049Z4TTA
Not my pic, but here's a comparison of the regular FBody WP and the Corvette WP:

Next up will be the clutch/flywheel, and the Miata engine coming out.
https://www.summitracing.com/parts/ATI-917266 This is for the Corvette LS1, and it saves about 1" I think.
The balancer gets installed with a special tool (seems to be alot of special pullers and installers in the LS world)
Balancer tool: https://www.amazon.com/gp/product/B019HR8XK0
Torqued it on with an ARP bolt which called for 235 ft. lbs.
Seems excessive so I settled for 190 on my wrench.
ARP Bolt: https://www.amazon.com/gp/product/B001D0MJNC
ATI Damper installed
To play nice with the belt alignment of the ATI damper I also installed the matching Corvette style water pump, which also saves about 1" at the pulley.
This is the water pump to get: https://www.amazon.com/gp/product/B000JZZ8EO
Along with the matching tensioner: https://www.amazon.com/gp/product/B0049Z4TTA
Not my pic, but here's a comparison of the regular FBody WP and the Corvette WP:
Next up will be the clutch/flywheel, and the Miata engine coming out.
09-20-2016, 07:15 PM
#4
V8 Miata Enthusiast
Thread Starter
With the front of the engine looking spiffy with some new parts, it was time to turn my attention to the rear.
Reading some of the forums here and on v8miata it seemed like people had good experiences with Monster clutches. I went with the Stage 2 kit and 18lb (light) flywheel.
I placed my order with Maryland Speed which had the best prices, though they were a bit slow on processing and shipping the order. The clutch/flywheel/pressure plate shipped form Monster. The slave and Tick speed bleeder took a bit longer. It's a good thing I wasn't someone with their daily driver down with a bad clutch. In the end everything worked out, so no harm, no foul.
Clutch kit: http://marylandspeed.com/monster-clu...ii-p-2084.html
I had installed a new rear main seal sometime before. Didn't see any signs of leaking, but good insurance. Also ordered a new pilot bearing with the clutch kit. Put it in the freezer a few days before. Rented a tool from Autozone that pulled the bearing in a matter of seconds. http://www.autozone.com/loan-a-tools...et/391362_0_0/
Just used a socket that matched the outside diameter of the bearing and slowly tapped it into place.
Cleaned off the crank mounting surface with a scotch brite pad in prep for the flywheel. Went with the ARP bolts for flywheel and PP.

As you'll see here, ARP doesn't say much about the type of tool needed to install the bolts.

One might assume that a metric socket would work, but no. Turns out this needed a 1/2" 12 point socket. I didn't have one of these and wasn't willing to settle for a similar metric size that might do the job. I ran to Home Depot and luckily found a single socket for about $4.
Used the loctite and lube and torqued them in. The crank balancer tool I bought also came with a flywheel locking tool that bolts into the starter location and holds the flywheel tight so you can torque in the balancer and the flywheel/pressure plate. https://www.amazon.com/gp/product/B019HR8XK0
Here it is installed

Monster publishes their install instructions online: https://monsterclutches.com/pdf/Sing...nstalltips.pdf
Cleaned off the flywheel with plenty of brake clean, and then laid in the clutch disc with the included alignment tool

There are 3 included dowel pins that will need to be installed into the flywheel that help align the pressure plate. The instructions detail where these go. These are hardened metal pins so I used a body work hammer to light tap them in until they took a set inside the hole and then took some harder swings to set them in. Make sure you don't miss and strike the flywheel.
ARP at it again with the vague instructions. No mention of what size bolts are in my package on the package itself or in the instructions. I looked up the ARP part number online to find out these are 10mm bolts, so 50 ft. lbs was the order of the day. Monster says 52 in their instructions. I really would've expected more from ARP....

After cleaning off the PP with plenty of brake clean, I laid it in and threaded the bolts. Didn't have any alignment issues here. Used a cordless impact to tighten the PP down to the flywheel using a criss cross pattern. Used a torque wrench to do the final criss cross torque down dance.

To top things off I installed the bellhousing. This will allow me to do a few test fits in the engine bay when the time comes without the transmission being attached. You know Amazon has EVERYTHING when you can buy an LS style T56 bellhousing with free shipping. I had been looking for a used one but felt like I was running out of time so pulled the trigger on a new one for $220 from Amazon.

I just used the impact to tighten it on, it will get a final torque later on. Used bolts I also bought from Amazon

Bought the same set for the trans to bell housing connection.
One question I have that I have not researched is the gap at the bottom of the bell where the FBody oil pan used to be. You can see I'm pointing to one of the two bolt holes that are not being used on the bottom half of the bell.

The custom FM oil pan doesn't have provisions for connecting the bell to the oil pan, so I'm just hoping there is enough strength there. I emailed Flyin Miata, and they responded:
"The lack of bracing on the lower two bellhousing bolts isn�t something we consider a problem. We have many street cars as well as race cars with this setup that have experienced zero issues. Adding brackets to the oil pan would put it under undue stress since it�s not designed to be a structural member like the F-Body oil pan. You would also risk warping the pan or its mating flange with welding heat.
What we do recommend is our LSx Flywheel cover plate. It is basically an inspection cover that bolts in place using the two lower bellhousing mounting holes and acts to keep large debris out of the bellhousing. The part number is 26-04105 and retails for $19.50 plus shipping. It�s not available individually through the webstore so if you�re interested give us a call."
I have a rebuilt T56 coming to me soon. I'll have more details on this in another post.
Reading some of the forums here and on v8miata it seemed like people had good experiences with Monster clutches. I went with the Stage 2 kit and 18lb (light) flywheel.
I placed my order with Maryland Speed which had the best prices, though they were a bit slow on processing and shipping the order. The clutch/flywheel/pressure plate shipped form Monster. The slave and Tick speed bleeder took a bit longer. It's a good thing I wasn't someone with their daily driver down with a bad clutch. In the end everything worked out, so no harm, no foul.
Clutch kit: http://marylandspeed.com/monster-clu...ii-p-2084.html
I had installed a new rear main seal sometime before. Didn't see any signs of leaking, but good insurance. Also ordered a new pilot bearing with the clutch kit. Put it in the freezer a few days before. Rented a tool from Autozone that pulled the bearing in a matter of seconds. http://www.autozone.com/loan-a-tools...et/391362_0_0/
Just used a socket that matched the outside diameter of the bearing and slowly tapped it into place.
Cleaned off the crank mounting surface with a scotch brite pad in prep for the flywheel. Went with the ARP bolts for flywheel and PP.
As you'll see here, ARP doesn't say much about the type of tool needed to install the bolts.
One might assume that a metric socket would work, but no. Turns out this needed a 1/2" 12 point socket. I didn't have one of these and wasn't willing to settle for a similar metric size that might do the job. I ran to Home Depot and luckily found a single socket for about $4.
Used the loctite and lube and torqued them in. The crank balancer tool I bought also came with a flywheel locking tool that bolts into the starter location and holds the flywheel tight so you can torque in the balancer and the flywheel/pressure plate. https://www.amazon.com/gp/product/B019HR8XK0
Here it is installed
Monster publishes their install instructions online: https://monsterclutches.com/pdf/Sing...nstalltips.pdf
Cleaned off the flywheel with plenty of brake clean, and then laid in the clutch disc with the included alignment tool
There are 3 included dowel pins that will need to be installed into the flywheel that help align the pressure plate. The instructions detail where these go. These are hardened metal pins so I used a body work hammer to light tap them in until they took a set inside the hole and then took some harder swings to set them in. Make sure you don't miss and strike the flywheel.
ARP at it again with the vague instructions. No mention of what size bolts are in my package on the package itself or in the instructions. I looked up the ARP part number online to find out these are 10mm bolts, so 50 ft. lbs was the order of the day. Monster says 52 in their instructions. I really would've expected more from ARP....
After cleaning off the PP with plenty of brake clean, I laid it in and threaded the bolts. Didn't have any alignment issues here. Used a cordless impact to tighten the PP down to the flywheel using a criss cross pattern. Used a torque wrench to do the final criss cross torque down dance.
To top things off I installed the bellhousing. This will allow me to do a few test fits in the engine bay when the time comes without the transmission being attached. You know Amazon has EVERYTHING when you can buy an LS style T56 bellhousing with free shipping. I had been looking for a used one but felt like I was running out of time so pulled the trigger on a new one for $220 from Amazon.
I just used the impact to tighten it on, it will get a final torque later on. Used bolts I also bought from Amazon
Bought the same set for the trans to bell housing connection.
One question I have that I have not researched is the gap at the bottom of the bell where the FBody oil pan used to be. You can see I'm pointing to one of the two bolt holes that are not being used on the bottom half of the bell.
The custom FM oil pan doesn't have provisions for connecting the bell to the oil pan, so I'm just hoping there is enough strength there. I emailed Flyin Miata, and they responded:
"The lack of bracing on the lower two bellhousing bolts isn�t something we consider a problem. We have many street cars as well as race cars with this setup that have experienced zero issues. Adding brackets to the oil pan would put it under undue stress since it�s not designed to be a structural member like the F-Body oil pan. You would also risk warping the pan or its mating flange with welding heat.
What we do recommend is our LSx Flywheel cover plate. It is basically an inspection cover that bolts in place using the two lower bellhousing mounting holes and acts to keep large debris out of the bellhousing. The part number is 26-04105 and retails for $19.50 plus shipping. It�s not available individually through the webstore so if you�re interested give us a call."
I have a rebuilt T56 coming to me soon. I'll have more details on this in another post.
09-20-2016, 07:19 PM
#5
V8 Miata Enthusiast
Thread Starter
Started attacking the dashboard the last couple days. Didn't find any really good guides out there, but one site seemed to focus in on some details: http://mostlymiata.blogspot.com/2013...h-removal.html
I also looked at the FSM for my year car, which was good in some areas but not very detailed.
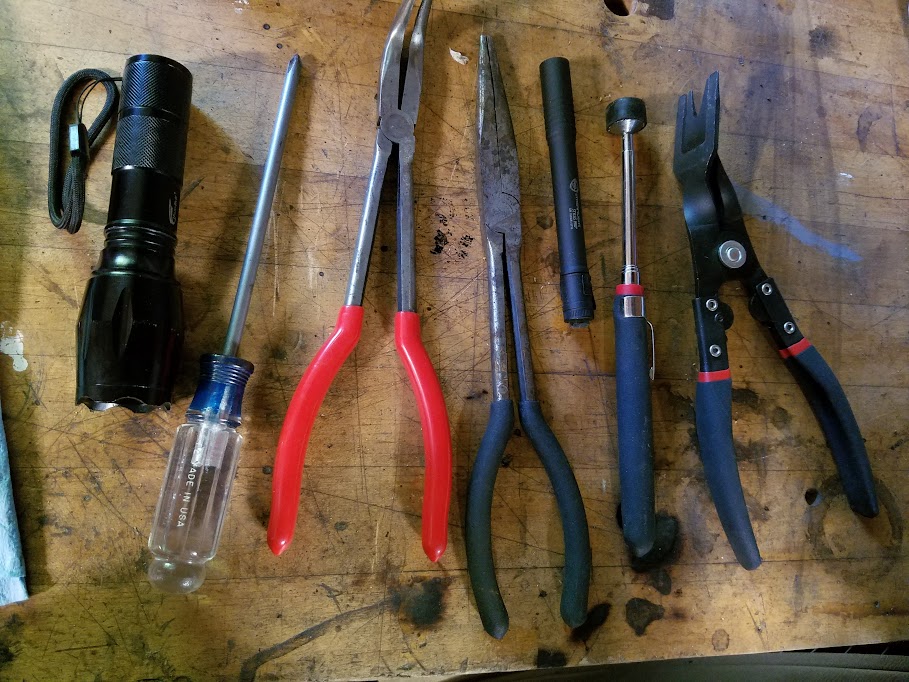
Here are some of the tools that helped me out. You will be using various flashlights to get into tight spaces and see where the next connector, bolt or wire is that you need to remove.
These pics are from the FSM in PDF form I have. You can find these pretty readily online in PDF form.


Once the large bolts pictured above are out, the whole assembly should start to move a bit so you know it's coming loose. In my case it became obvious that modifications over the years have routed wires through spaces that will require you to cut the connections, label where they go back together and do that after the dash is out, or reroute on the spot.
There will be some wire connectors that you will not be able to see or reach until you have the dash a few inches out. Once those are disconnected and nothing is snagged on the dash, it should come out pretty easily.
I used various methods of labeling my connections to make it easier when I put it back together

I even labeled parts of the metal dash structure with numbers that correlate to the plastic "pop out" connectors that hold the wires in place inside the dash. I also labeled the wire near the connector. I think once you get a few of these connected to start you off the rest should fall into place...let's hope.

One of two oddball connectors that took me a few minutes to figure out. You press in a small green tab at the front of that green piece, and then should be able to lift up the larger green piece with a small screwdriver. Left it up as far as it will go, and then remove the female harness connector from one side (not shown) that fits into the larger white connector you see.

This is what it looks like as of 9pm one night

I also looked at the FSM for my year car, which was good in some areas but not very detailed.
Here are some of the tools that helped me out. You will be using various flashlights to get into tight spaces and see where the next connector, bolt or wire is that you need to remove.
These pics are from the FSM in PDF form I have. You can find these pretty readily online in PDF form.
Once the large bolts pictured above are out, the whole assembly should start to move a bit so you know it's coming loose. In my case it became obvious that modifications over the years have routed wires through spaces that will require you to cut the connections, label where they go back together and do that after the dash is out, or reroute on the spot.
There will be some wire connectors that you will not be able to see or reach until you have the dash a few inches out. Once those are disconnected and nothing is snagged on the dash, it should come out pretty easily.
I used various methods of labeling my connections to make it easier when I put it back together
I even labeled parts of the metal dash structure with numbers that correlate to the plastic "pop out" connectors that hold the wires in place inside the dash. I also labeled the wire near the connector. I think once you get a few of these connected to start you off the rest should fall into place...let's hope.
One of two oddball connectors that took me a few minutes to figure out. You press in a small green tab at the front of that green piece, and then should be able to lift up the larger green piece with a small screwdriver. Left it up as far as it will go, and then remove the female harness connector from one side (not shown) that fits into the larger white connector you see.
This is what it looks like as of 9pm one night
09-20-2016, 07:20 PM
#6
V8 Miata Enthusiast
Thread Starter
Good news is that with the dash out, I should be able to fix part of the vent system that got hacked up by the previous owner when he installed a gauge in one of the middle eyeball vents. I had moved the gauges into an A-pillar gauge pod, and used duct foil tape to seal the connection

closeup of the foil tape. The hvac piece is about $22 online, so that should be an easy fix.

closeup of the foil tape. The hvac piece is about $22 online, so that should be an easy fix.
09-21-2016, 09:18 AM
#8
V8 Miata Enthusiast
Thread Starter
09-21-2016, 12:32 PM
#10
V8 Miata Enthusiast
Thread Starter
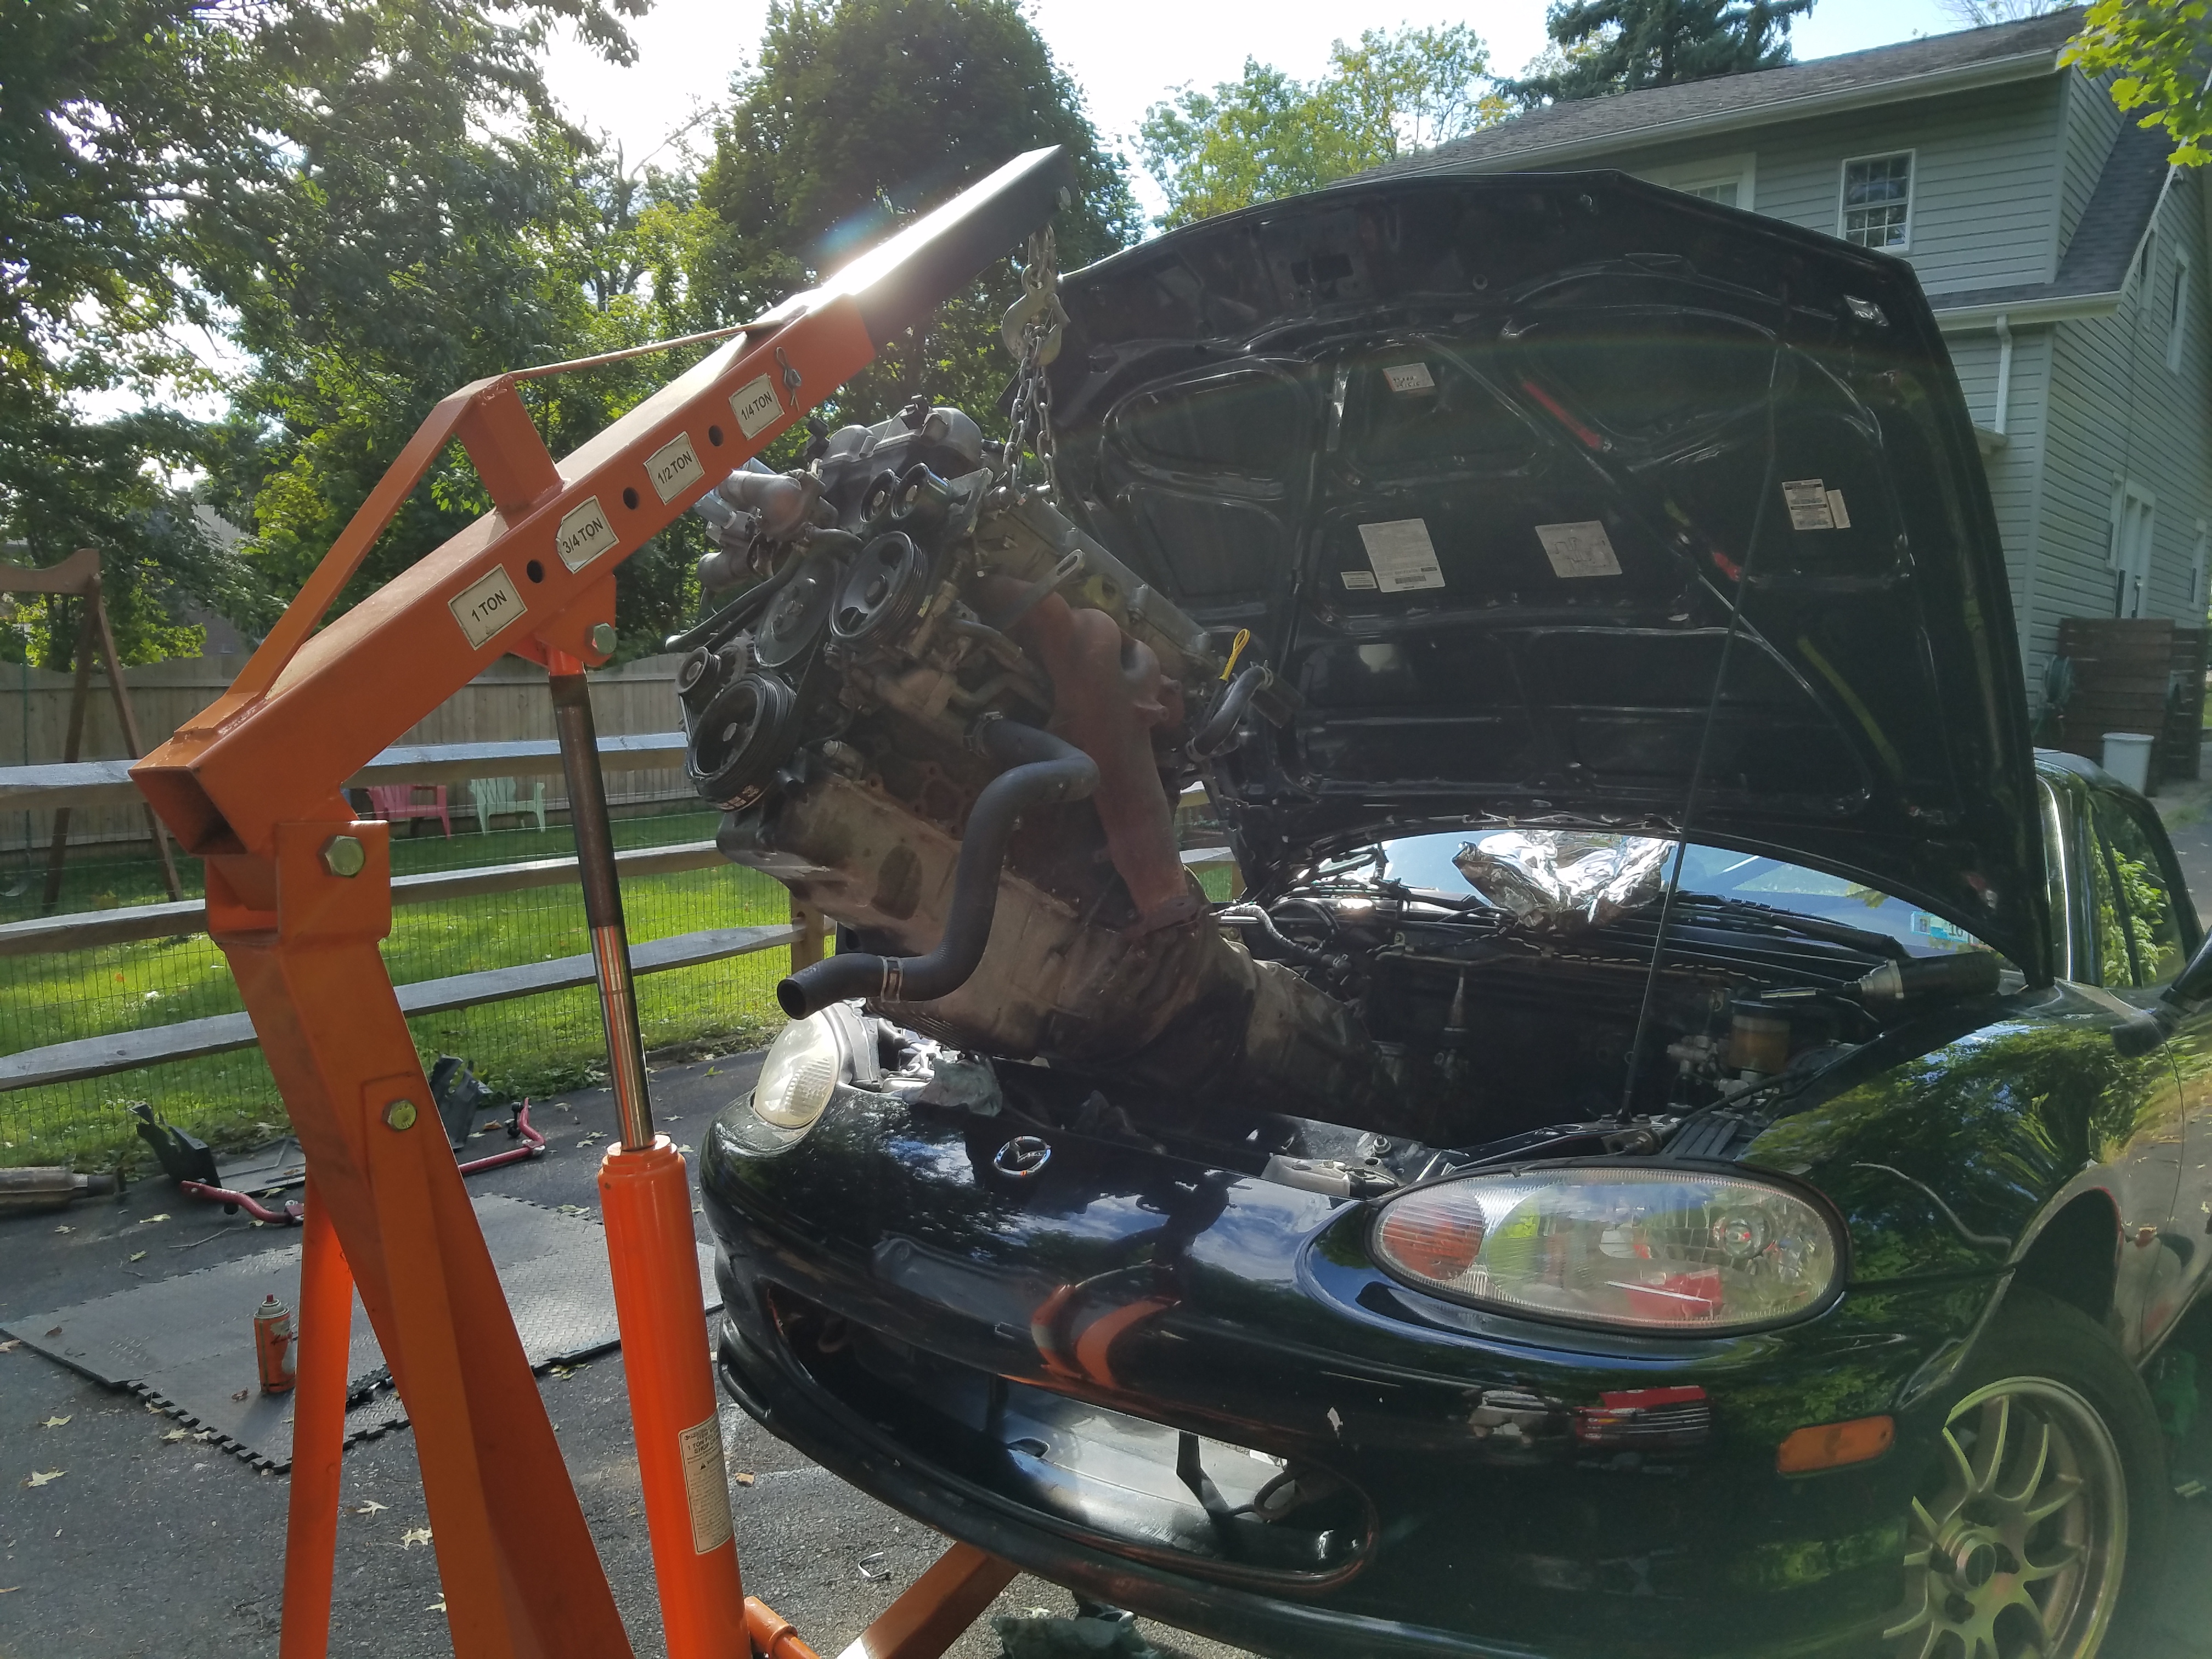
This post is a bit out of order with the previous ones, but I have a few pics of the engine pullout.
I decided to pick Labor Day weekend as the weather was looking nice, and I could do it in the driveway w/out fear of rain. One side of the two car garage might've been able to pull it off, but the engine hoist makes WIDE TURNS like a Semi and my garage floor is not very level... old house, old garage.
Had to turn to Youtube to figure out how the PPF detaches from the rear differential at the top. Exhaust to header bolts were easy and it was just a matter of cataloging the bolts and nuts as I removed them so they would go back together.
I have a load leveler for the hoist, but turns out I didn't need it. Weight distribution seemed ok to get it out.
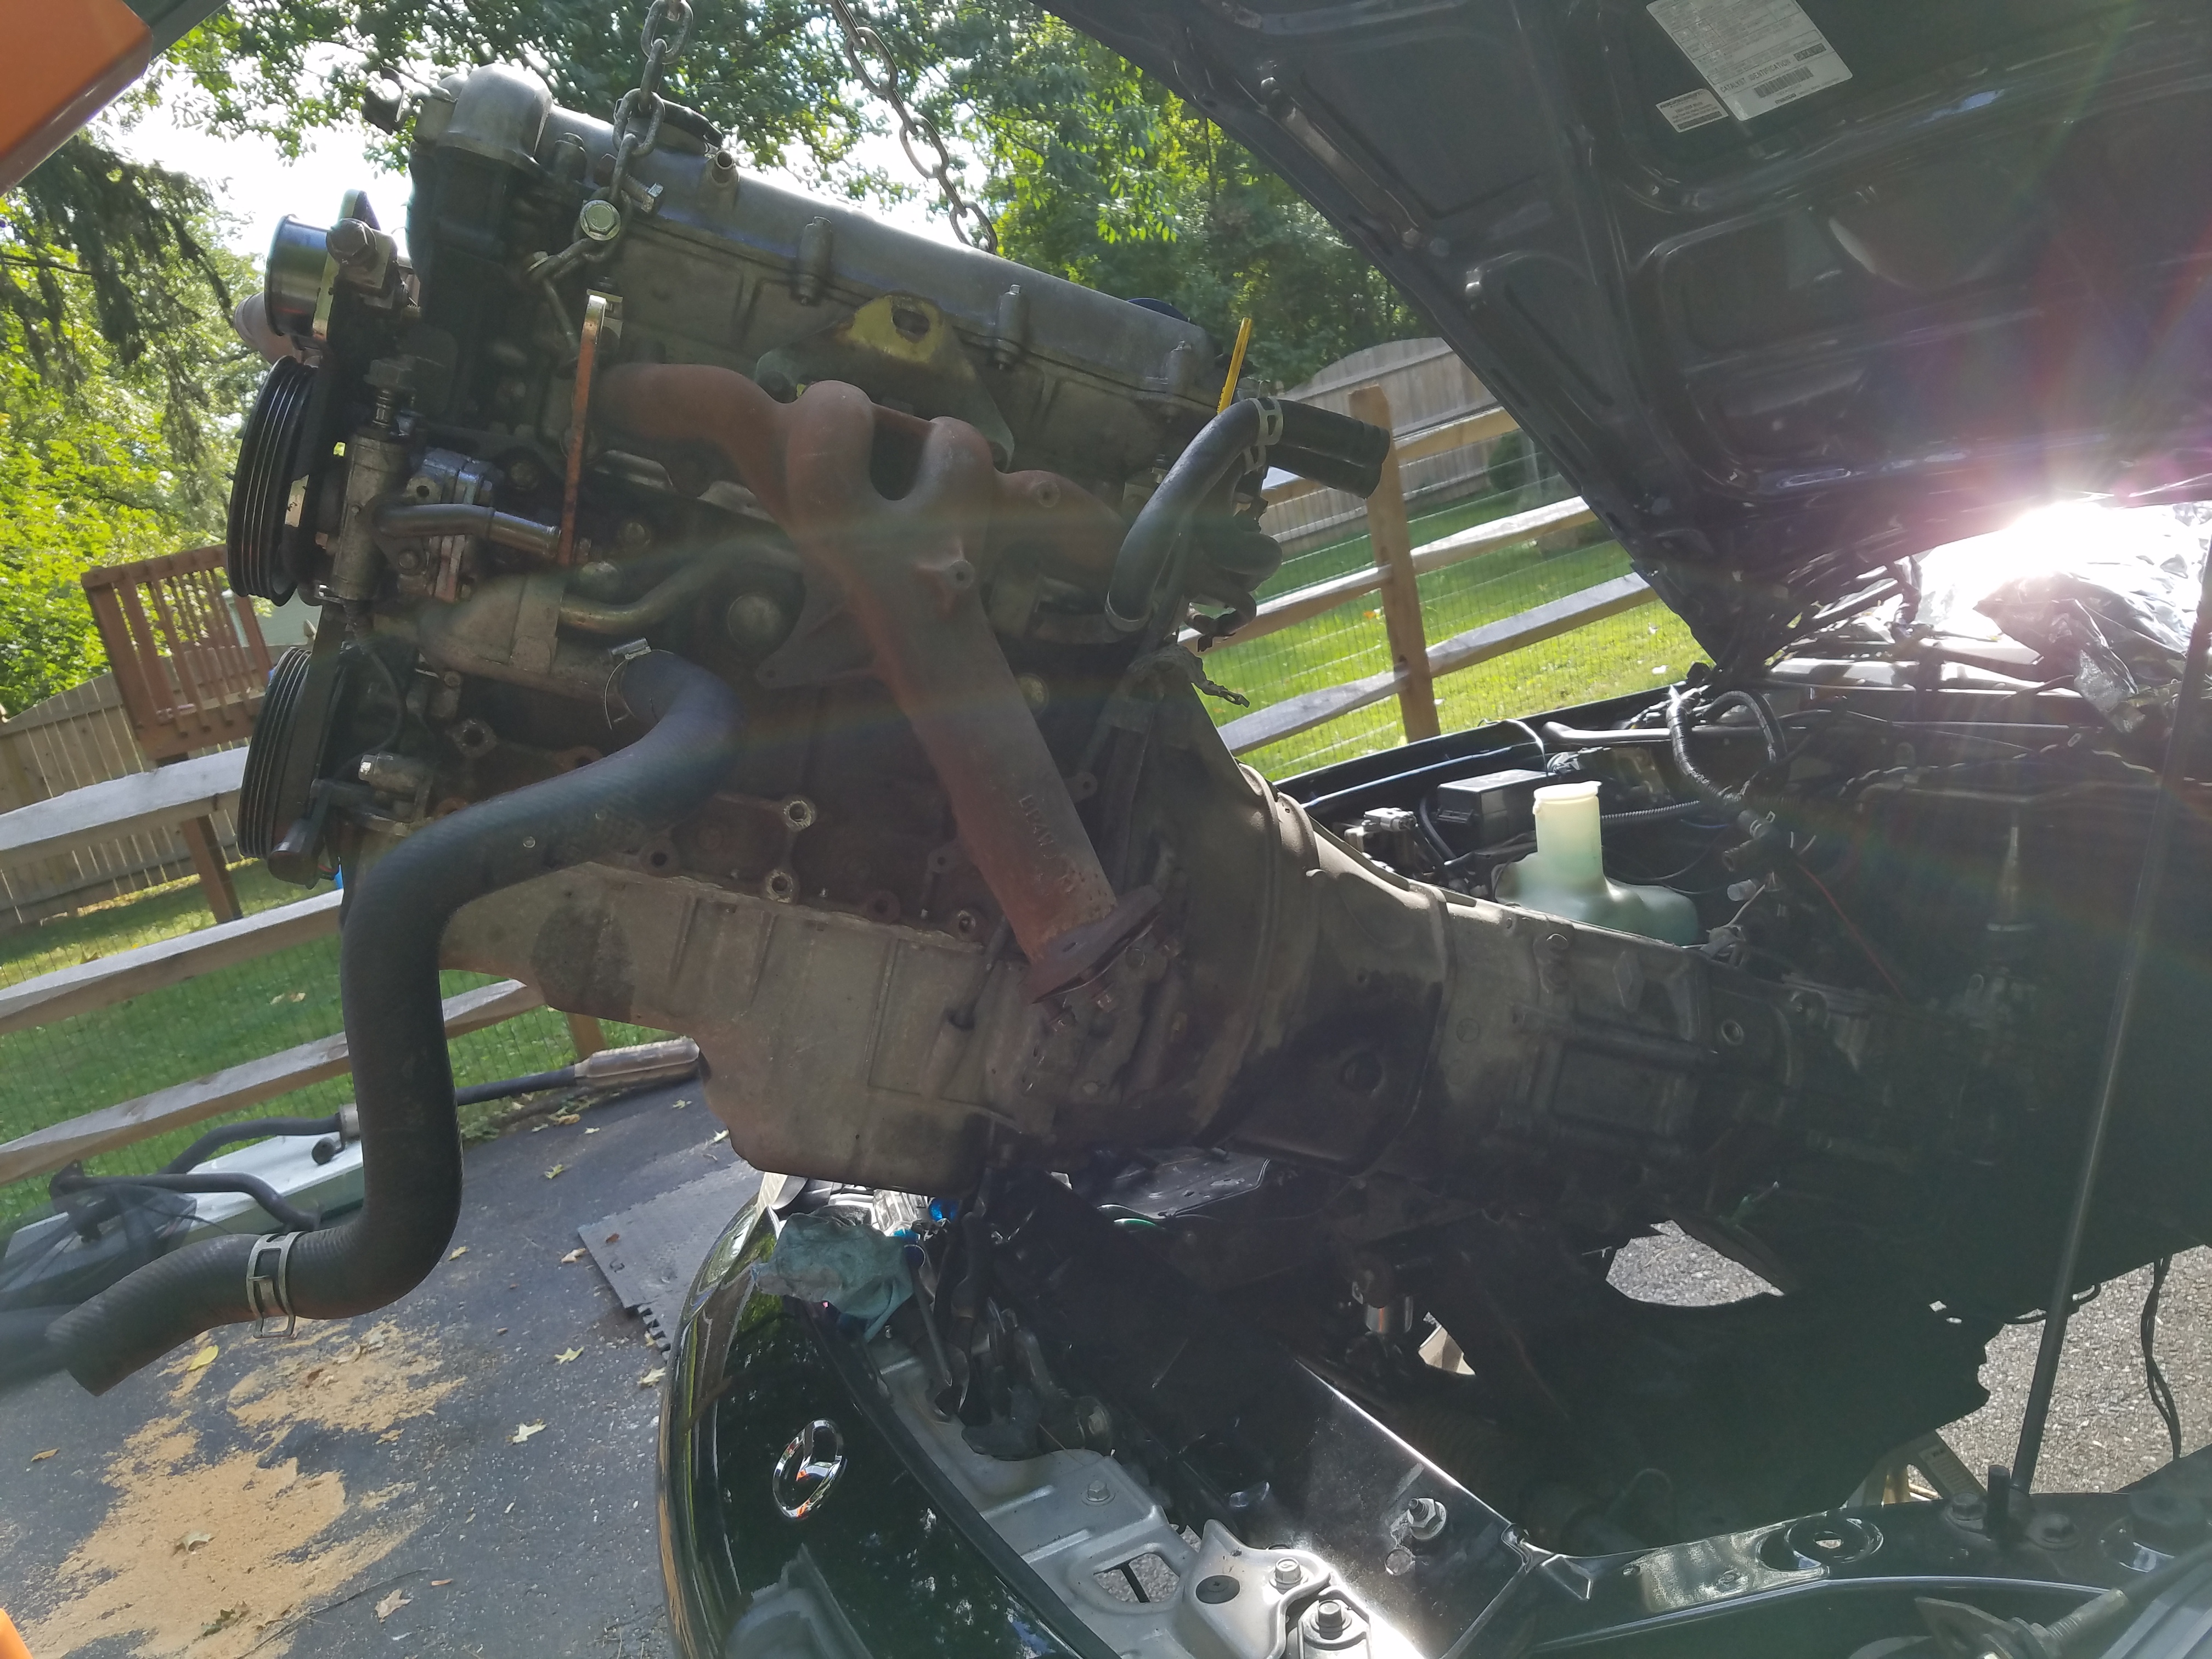
Also, I totally forgot about the shifter inside the car The trans was caught on something while in the air and I couldn't figure it out. So I quickly jumped in the car and pushed the shifter through, tearing the rubber boot in the process.... might be reusable.
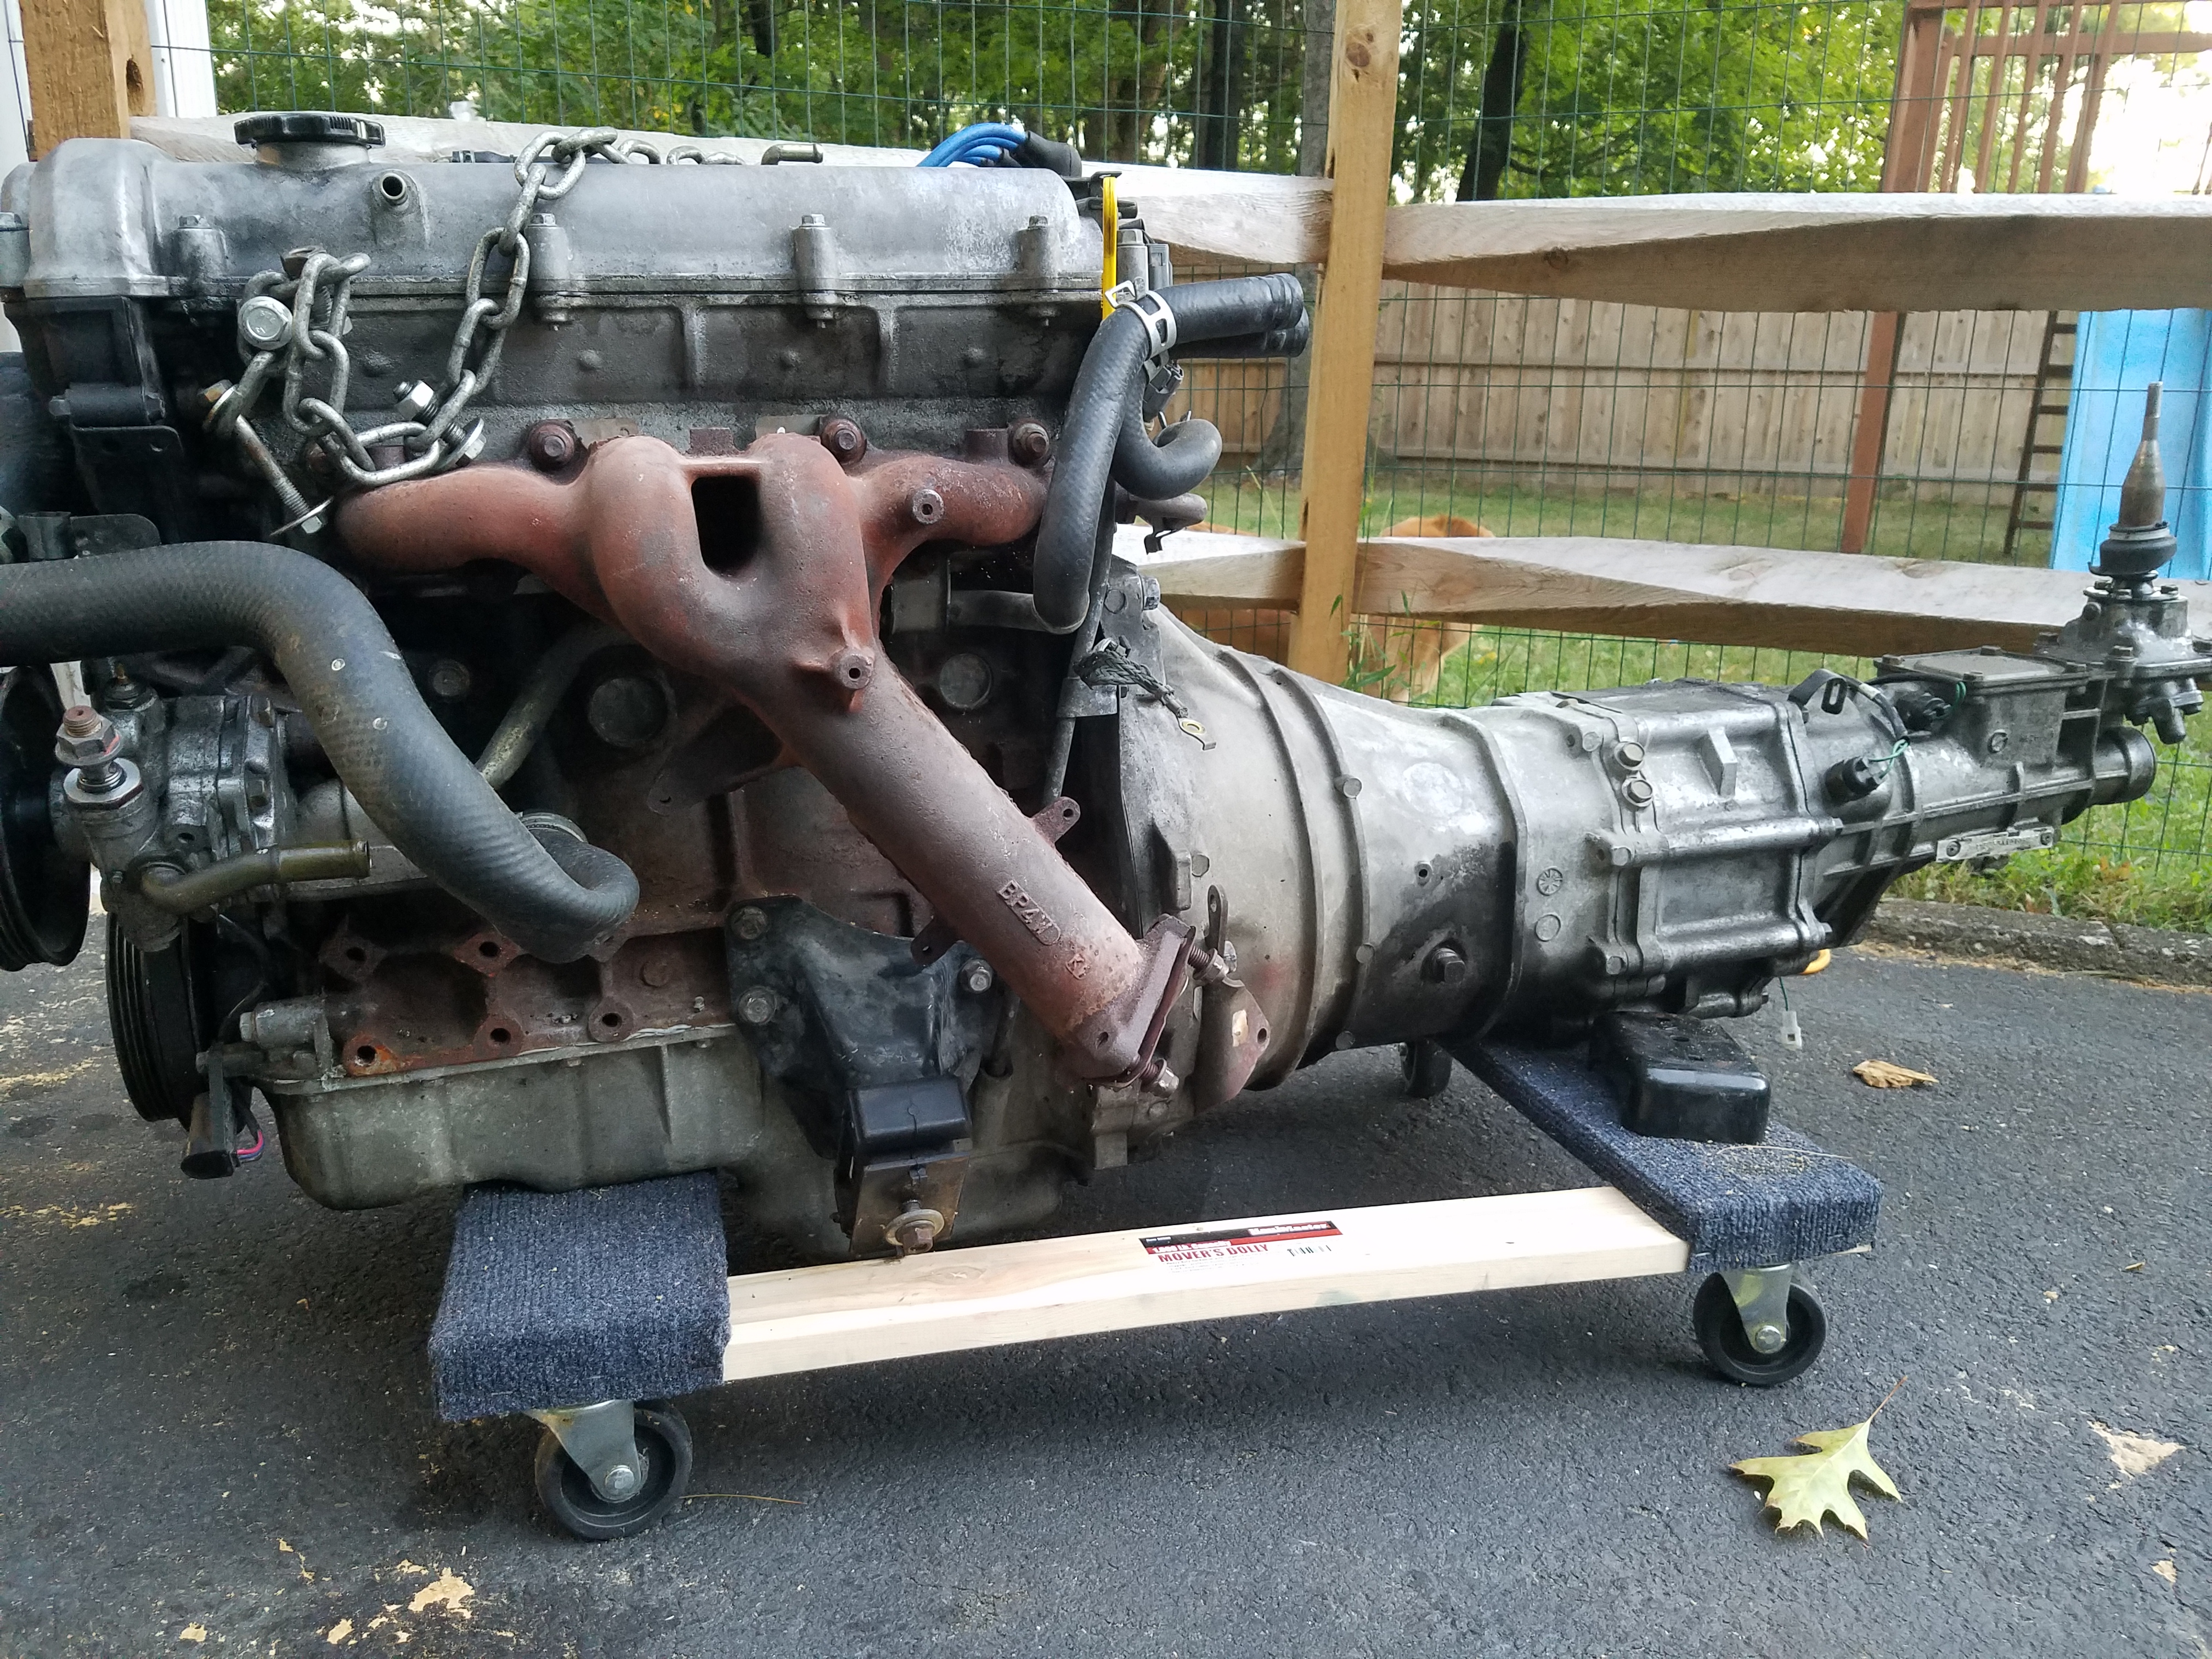
I'd say it took about 4 hours, about the same as my Subaru engine I removed in June, though that came out w/out the trans.
Dropped it on a moving dolly so I could manage space in the driveway if needed
One warning I will make, that I'm pretty sure I've read on the forums is that the weight distribution with the engine out and the car on jackstands is a bit sketchy. Please be aware of this. Depending on where you place the jackstands and what you pulled out it could tilt off the jackstands pretty easily.
I found this out while I was UNDER the car and using a breaker bar to loosen the front subframe bolts. The torque I was putting on them moved the car a bit and I was like WTF!!! Got out from the car and realized I could lift the front of the car an inch or two off the front jackstands with one hand, and not much force. At that point I placed some wood blocks under the rear wheels so they wouldn't tilt down, then proceeded carefully.
Now that I have the rear subframe and driveline out, the balance is much better. But the car is so light now that it's still worth paying attention to.
I decided to pick Labor Day weekend as the weather was looking nice, and I could do it in the driveway w/out fear of rain. One side of the two car garage might've been able to pull it off, but the engine hoist makes WIDE TURNS like a Semi and my garage floor is not very level... old house, old garage.
Had to turn to Youtube to figure out how the PPF detaches from the rear differential at the top. Exhaust to header bolts were easy and it was just a matter of cataloging the bolts and nuts as I removed them so they would go back together.
I have a load leveler for the hoist, but turns out I didn't need it. Weight distribution seemed ok to get it out.
Also, I totally forgot about the shifter inside the car The trans was caught on something while in the air and I couldn't figure it out. So I quickly jumped in the car and pushed the shifter through, tearing the rubber boot in the process.... might be reusable.
I'd say it took about 4 hours, about the same as my Subaru engine I removed in June, though that came out w/out the trans.
Dropped it on a moving dolly so I could manage space in the driveway if needed
One warning I will make, that I'm pretty sure I've read on the forums is that the weight distribution with the engine out and the car on jackstands is a bit sketchy. Please be aware of this. Depending on where you place the jackstands and what you pulled out it could tilt off the jackstands pretty easily.
I found this out while I was UNDER the car and using a breaker bar to loosen the front subframe bolts. The torque I was putting on them moved the car a bit and I was like WTF!!! Got out from the car and realized I could lift the front of the car an inch or two off the front jackstands with one hand, and not much force. At that point I placed some wood blocks under the rear wheels so they wouldn't tilt down, then proceeded carefully.
Now that I have the rear subframe and driveline out, the balance is much better. But the car is so light now that it's still worth paying attention to.
Last edited by pj_mcgarvey; 01-30-2019 at 10:53 PM.
09-21-2016, 01:09 PM
#12
V8 Miata Enthusiast
Thread Starter
 09-21-2016, 01:24 PM
#14
V8 Miata Fanatic

That is no joke....itsallrigged was about a month or so ahead of me on his build and his progress was actually a consistent source of motivation so I could make progress.
09-21-2016, 01:41 PM
#15
V8 Miata Enthusiast
Thread Starter
 (the Thunderbolt Miata LS build on Youtube really inspired me) - but needed to sell one car buy another (Miata) first. My goal was to enjoy the Miata this past summer which I did. My state inspection expired at end of August, so I figured why reup that and get the needed alignment (replaced bad shock). So I just saved the money and tore into it. The car is from the midwest so has very little rust, but has some "hail rash".
 So I officially started on Labor Day. Trying to spend a few hours during the week where I can in addition to available weekend hours to get me going. The pleasant weather helps when we can get it.
I upgraded heat in the garage from a propane powered "bullet" heater (too noisy, and too much risk of carbon monoxide) to a 5000w/220v electric heater. This should help keep it comfortable once it gets a bit colder.
I have some Friday's and Mondays planned to be off from work, so I can have a day to myself to get alot done if the weekends don't work out.
My goal is by Spring to have it running.
09-21-2016, 01:45 PM
#16
V8 Miata Habitu�

Hello pj_mcgarvey
Does your internet service provider give you any web space? I am with Telus in BC and they provide me with 100 megs of storage,(lame for a web page),but is enough to store many 800 X 600 photo's. Then you don't have to put up with all the crap the a free picture storage site has on it and you also remain the owner of your pics, if you care. I use a FTP file uploader, FileZilla (free), to upload my pics to my web space then just link to them. I hate free pic sites that force you to give them the rights to your pictures but then that's only me. If you need help feel free to PM me and I can walk you through the whole process, that is if you have web space available.
Just a thought if interested.
Dean0
09-21-2016, 06:00 PM
#17
V8 Miata Fan

One warning I will make, that I'm pretty sure I've read on the forums is that the weight distribution with the engine out and the car on jackstands is a bit sketchy. Please be aware of this. Depending on where you place the jackstands and what you pulled out it could tilt off the jackstands pretty easily.
I found this out while I was UNDER the car and using a breaker bar to loosen the front subframe bolts. The torque I was putting on them moved the car a bit and I was like WTF!!! Got out from the car and realized I could lift the front of the car an inch or two off the front jackstands with one hand, and not much force. At that point I placed some wood blocks under the rear wheels so they wouldn't tilt down, then proceeded carefully.
I found this out while I was UNDER the car and using a breaker bar to loosen the front subframe bolts. The torque I was putting on them moved the car a bit and I was like WTF!!! Got out from the car and realized I could lift the front of the car an inch or two off the front jackstands with one hand, and not much force. At that point I placed some wood blocks under the rear wheels so they wouldn't tilt down, then proceeded carefully.
 09-24-2016, 01:57 PM
#19
V8 Miata Follower

I tried the comp cams double chain timing set. Wound up sending it back to Summit because it would interfere with the cam position sensor on the LS3 front cover. Went to a single row setup from some Australian company. Haven't started the engine but at least now the engine turns over by hand again. Scared me a bit. LOL
09-24-2016, 09:55 PM
#20
V8 Miata Prot�g�


You may want to re-torque that harmonic balancer bolt. I've read numerous issues with the ARP bolt even when torqued correctly. I went with a factory bolt. Also fwiw, when I went to remove it my 1/2" Milwaukee impact barely removed it and it is advertised at like 1100 or 1200 ft/lbs so tbh, I bet the factory way over torques it.
09-26-2016, 07:38 AM
#21
V8 Miata Enthusiast
Thread Starter
You may want to re-torque that harmonic balancer bolt. I've read numerous issues with the ARP bolt even when torqued correctly. I went with a factory bolt. Also fwiw, when I went to remove it my 1/2" Milwaukee impact barely removed it and it is advertised at like 1100 or 1200 ft/lbs so tbh, I bet the factory way over torques it.
Maybe later LS engines have keyed pulleys, and I think you can have this modification done, but still. Not sure I'm willing to risk overtorquing the bolt at this point. Maybe once it's in and has some miles on it, I'll come back and recheck it.
09-26-2016, 08:13 PM
#22
V8 Miata Enthusiast
Thread Starter
Made some progress on the engine bay today, took the day off to work on the car, after a long week of other stuff going on, and not getting much done in the garage. Was a nice cool day, so had the garage doors open and the music blaring.
Cutting out the engine bay gussets was fun, but not really. I picked up some Harbor Freight spot weld drill bits and they were working OK at first, but they didn't last as long as I hoped. The teeth on them would crack and pretty soon become useless. I've gone through about 5 of them so far in the engine bay and on the interior engine tunnel gussets. I've still got most of the driver's side gusset to drill out, so I may go back and buy more, or try another spot weld kit online...
Here is one engine bay gusset removed and found the remnants of a small woodland creature's meal
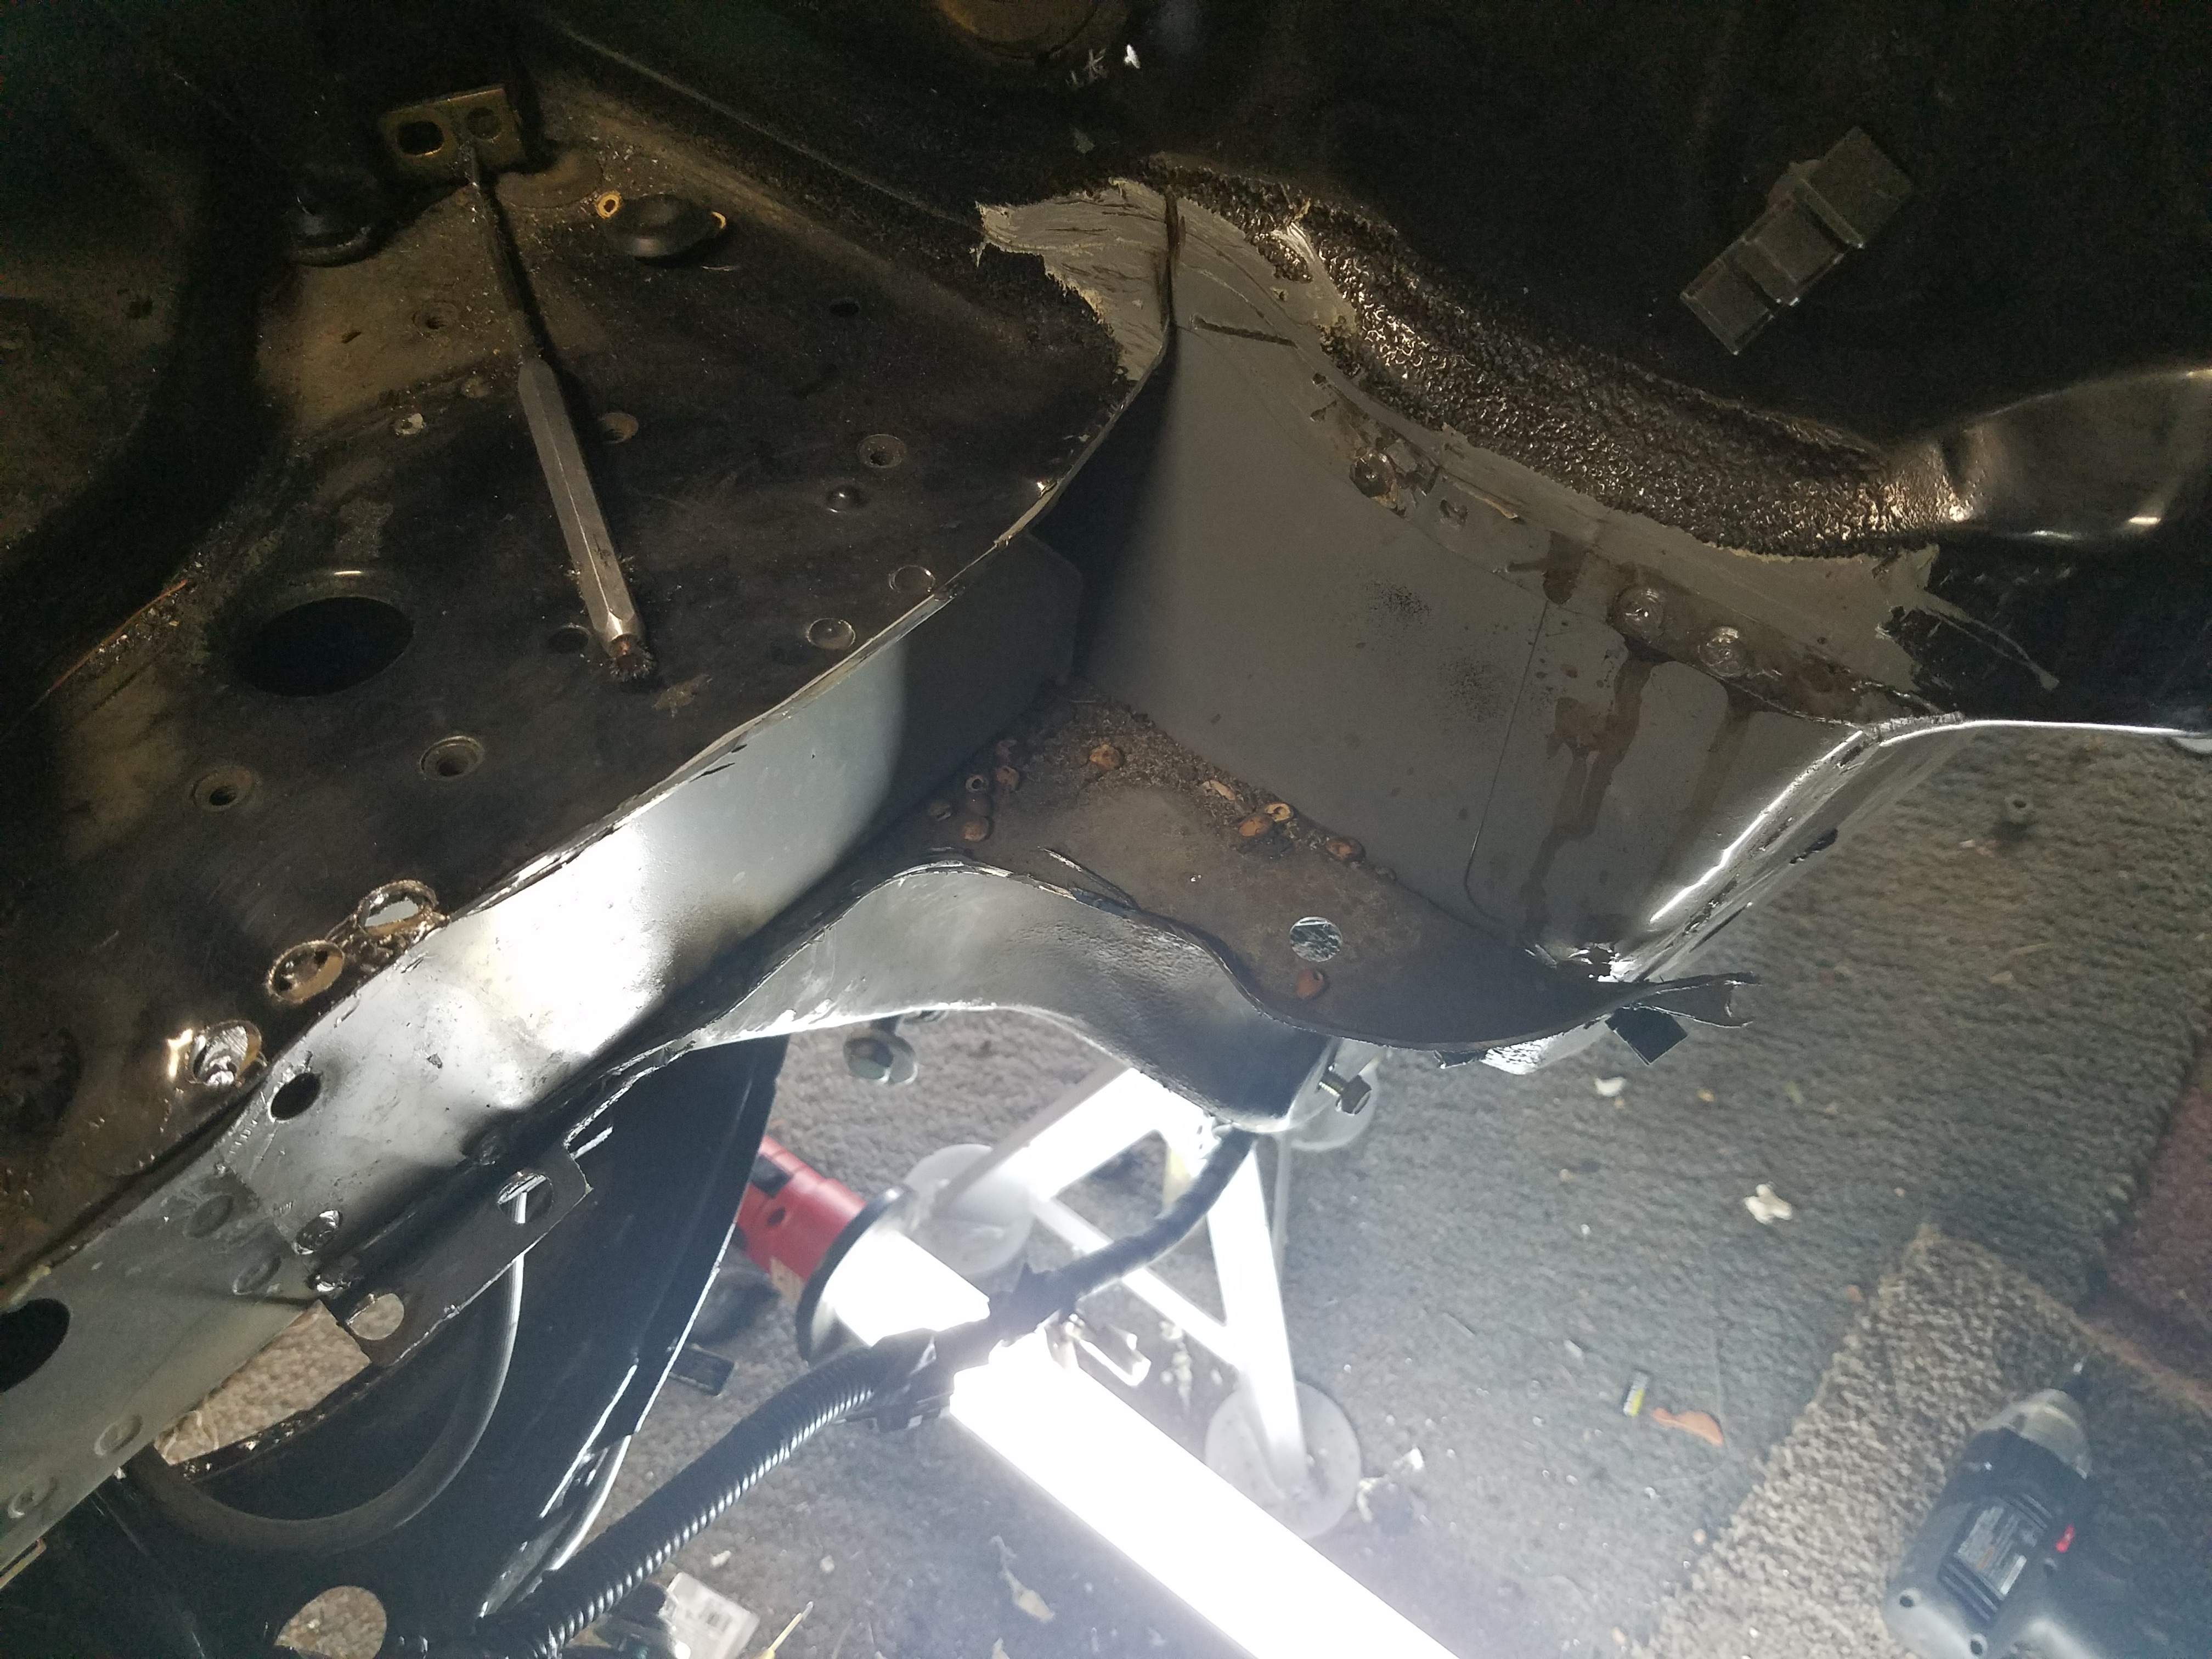
On the first one on the passenger's side, I tried to drill out spot welds where I could, and did some cutting from the bottom. Seemed a bit laborious. On the driver's side, I did the spot welds from the top and was able to bend it down and then could make the cuts from the top.
I used a combination of DeWalt 4" grinder with cutting wheel, and air-powered cutting wheel (underpowered) and body saw (also underpowered). There are some situations where a powerful electric grinder with cutting wheel get a bit sketchy, such as tight spaces where a false move could kick the grinder back. I'd rather not go there.
Mostly cleaned up on both sides. Waiting to do the interior gussets/braces before I slit the tunnel open.
The parts of the car that can now see sunlight look in alot better shape than the ones in the Flyin Miata guides, which look very rusty.
Cutting out the engine bay gussets was fun, but not really. I picked up some Harbor Freight spot weld drill bits and they were working OK at first, but they didn't last as long as I hoped. The teeth on them would crack and pretty soon become useless. I've gone through about 5 of them so far in the engine bay and on the interior engine tunnel gussets. I've still got most of the driver's side gusset to drill out, so I may go back and buy more, or try another spot weld kit online...
Here is one engine bay gusset removed and found the remnants of a small woodland creature's meal
On the first one on the passenger's side, I tried to drill out spot welds where I could, and did some cutting from the bottom. Seemed a bit laborious. On the driver's side, I did the spot welds from the top and was able to bend it down and then could make the cuts from the top.
I used a combination of DeWalt 4" grinder with cutting wheel, and air-powered cutting wheel (underpowered) and body saw (also underpowered). There are some situations where a powerful electric grinder with cutting wheel get a bit sketchy, such as tight spaces where a false move could kick the grinder back. I'd rather not go there.
Mostly cleaned up on both sides. Waiting to do the interior gussets/braces before I slit the tunnel open.
The parts of the car that can now see sunlight look in alot better shape than the ones in the Flyin Miata guides, which look very rusty.
Last edited by pj_mcgarvey; 11-27-2016 at 08:30 PM.
09-26-2016, 08:30 PM
#23
V8 Miata Enthusiast
Thread Starter
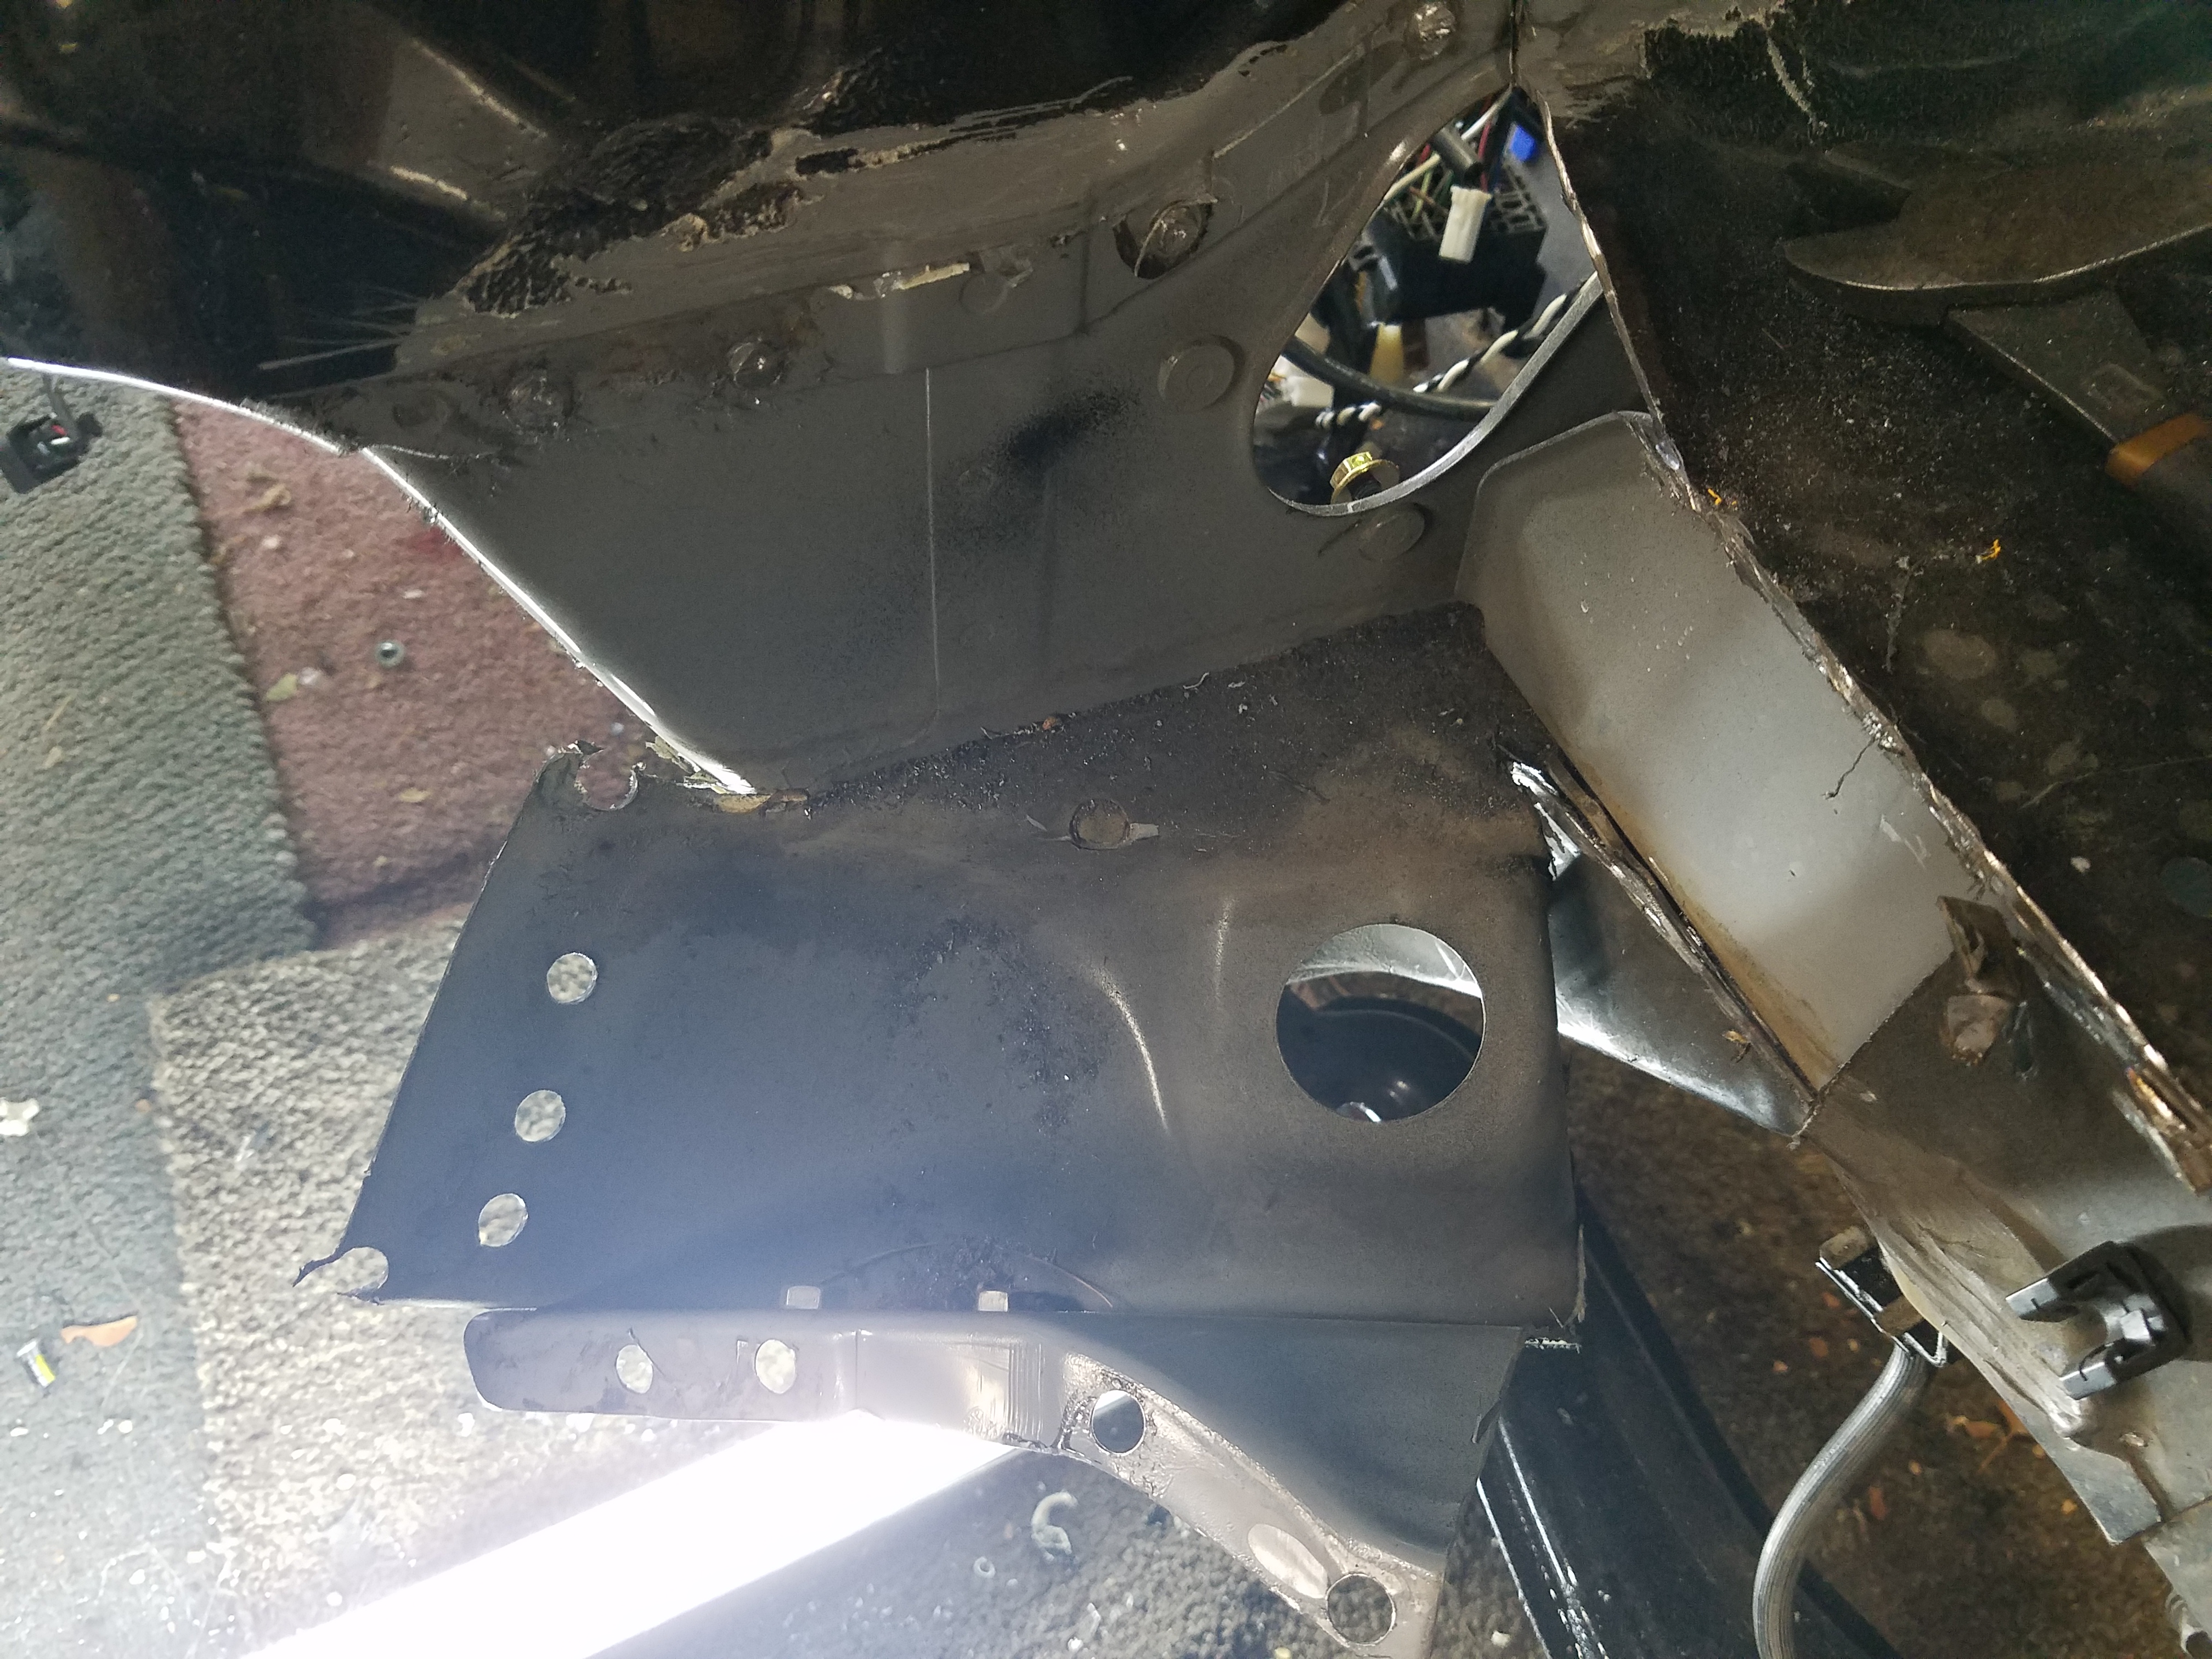
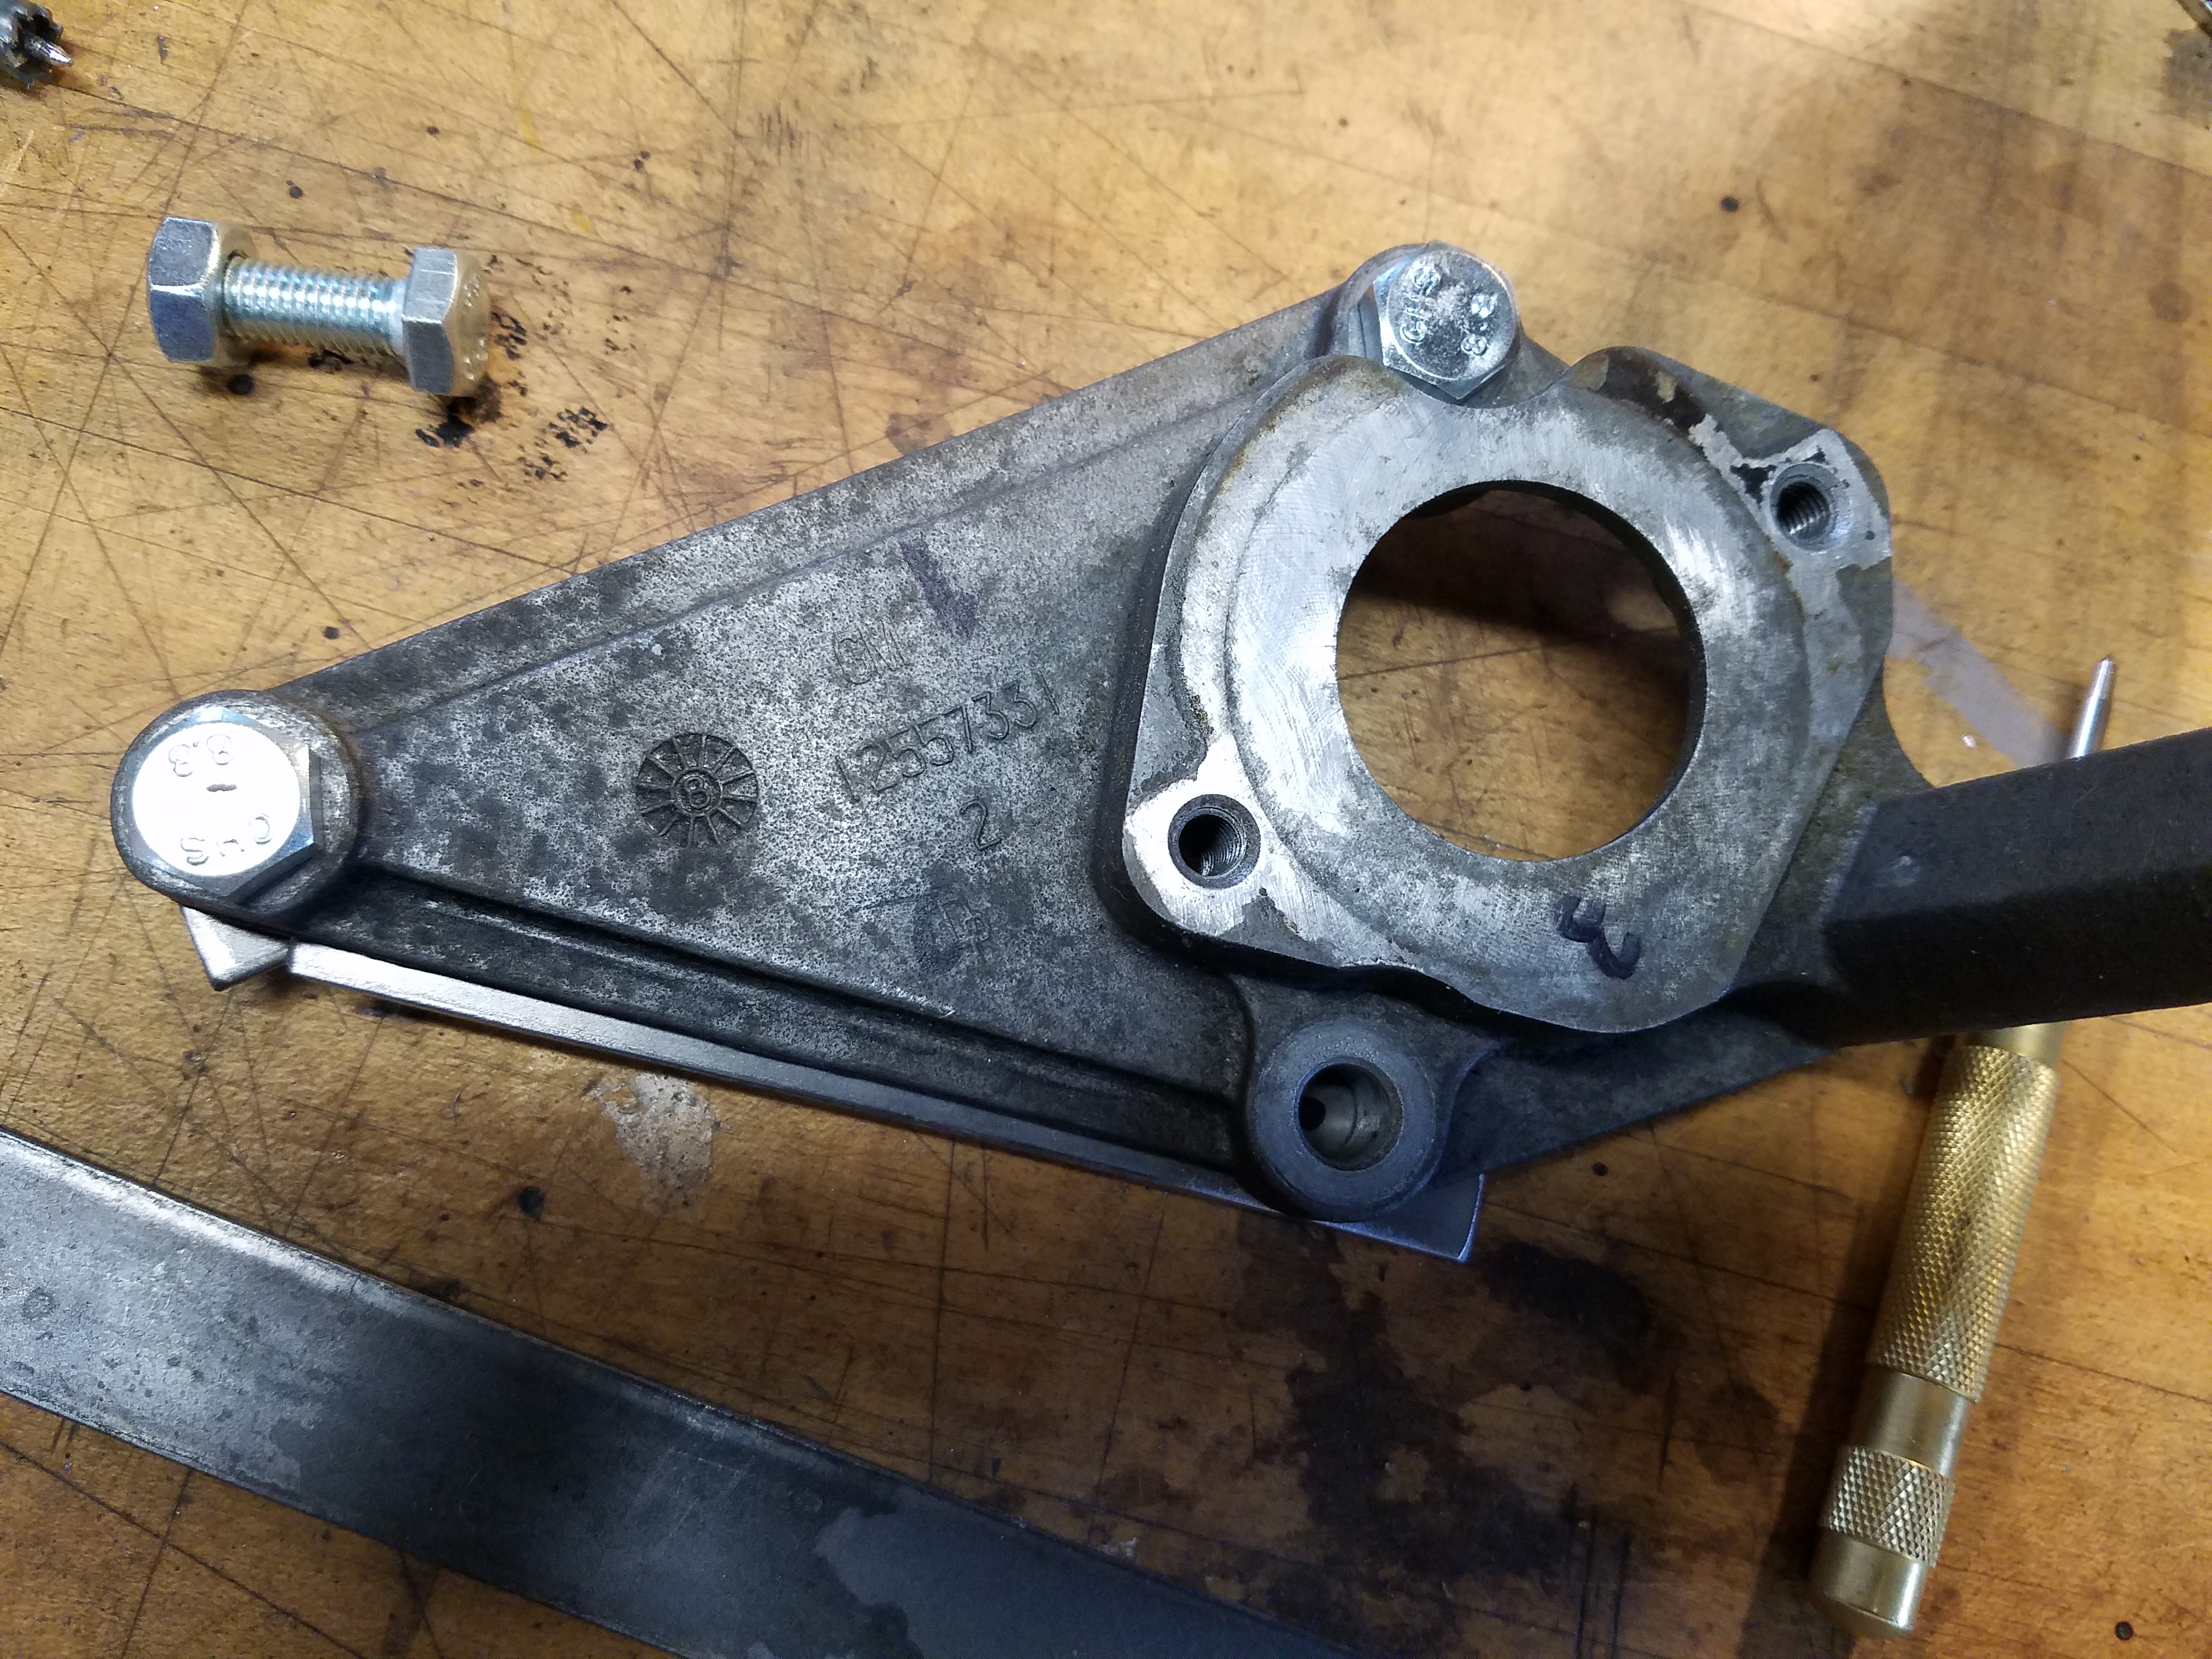
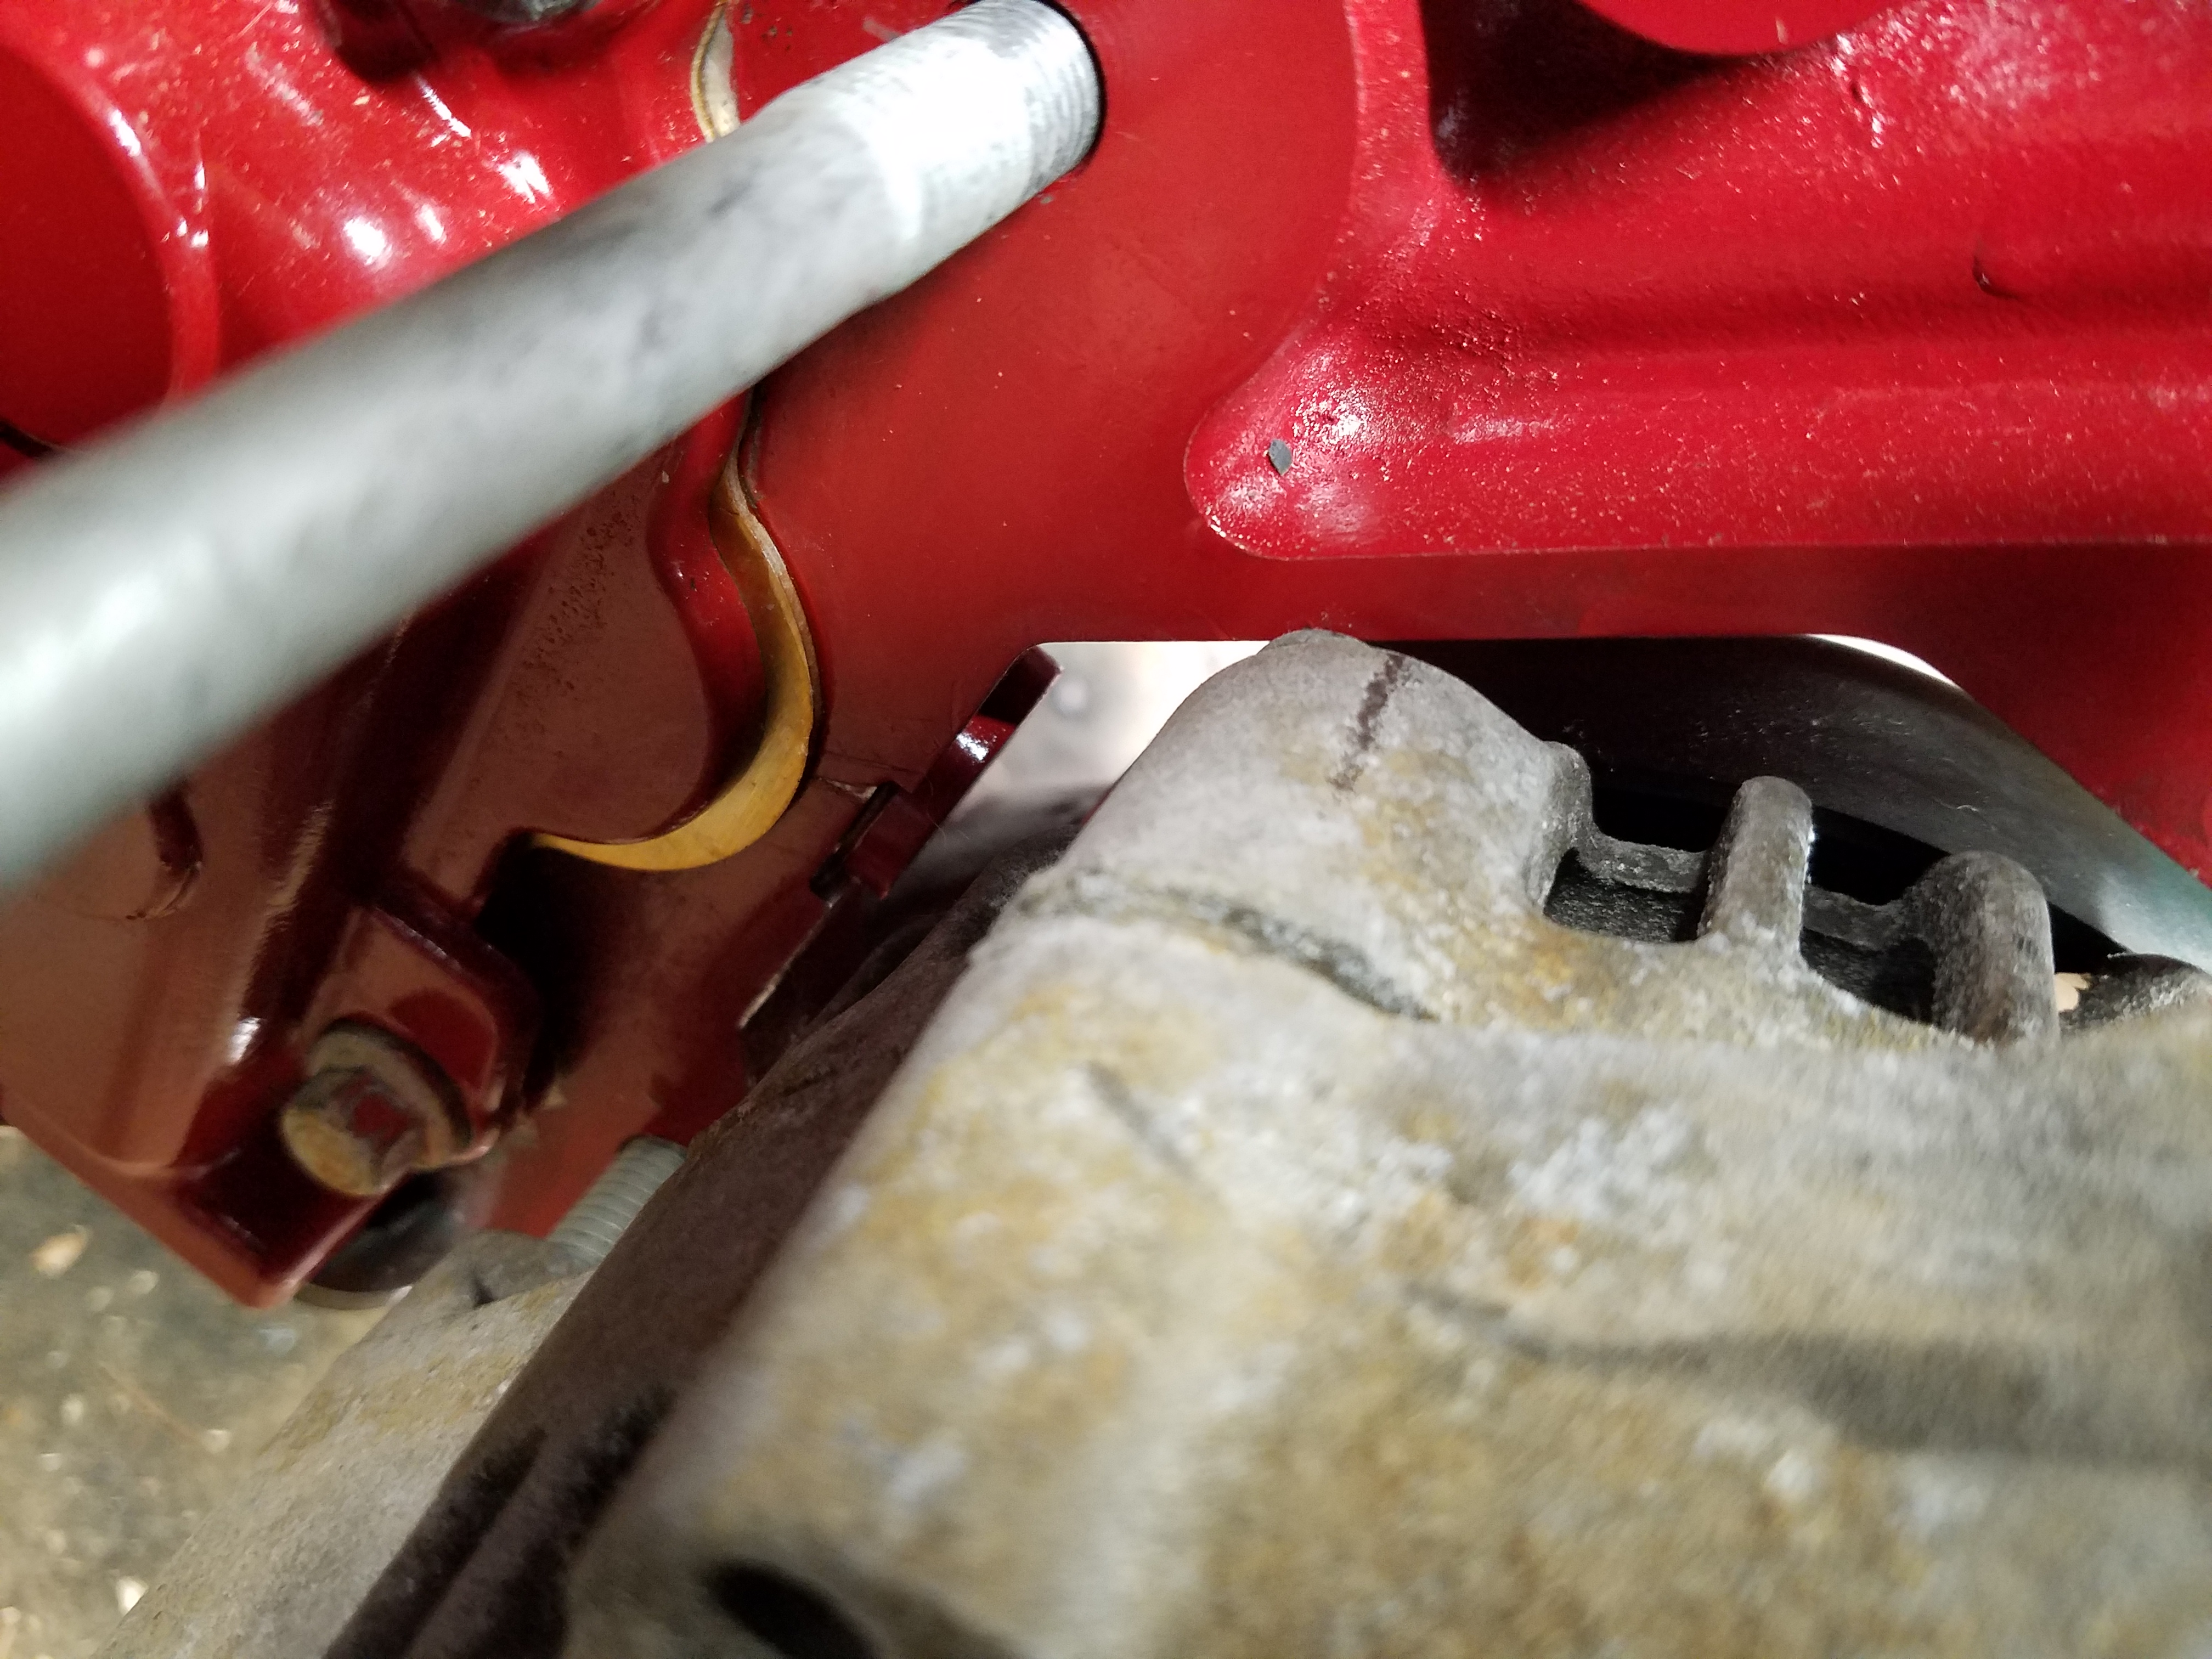
You may recognize this as an FBody power steering pump bracket. To take a break from standing in the engine bay, I decided to work on some bracketry for the pump and alternator.
Started with a foundation of 3/16" bar in a triangular pattern to match the bolt holes of the oem bracket
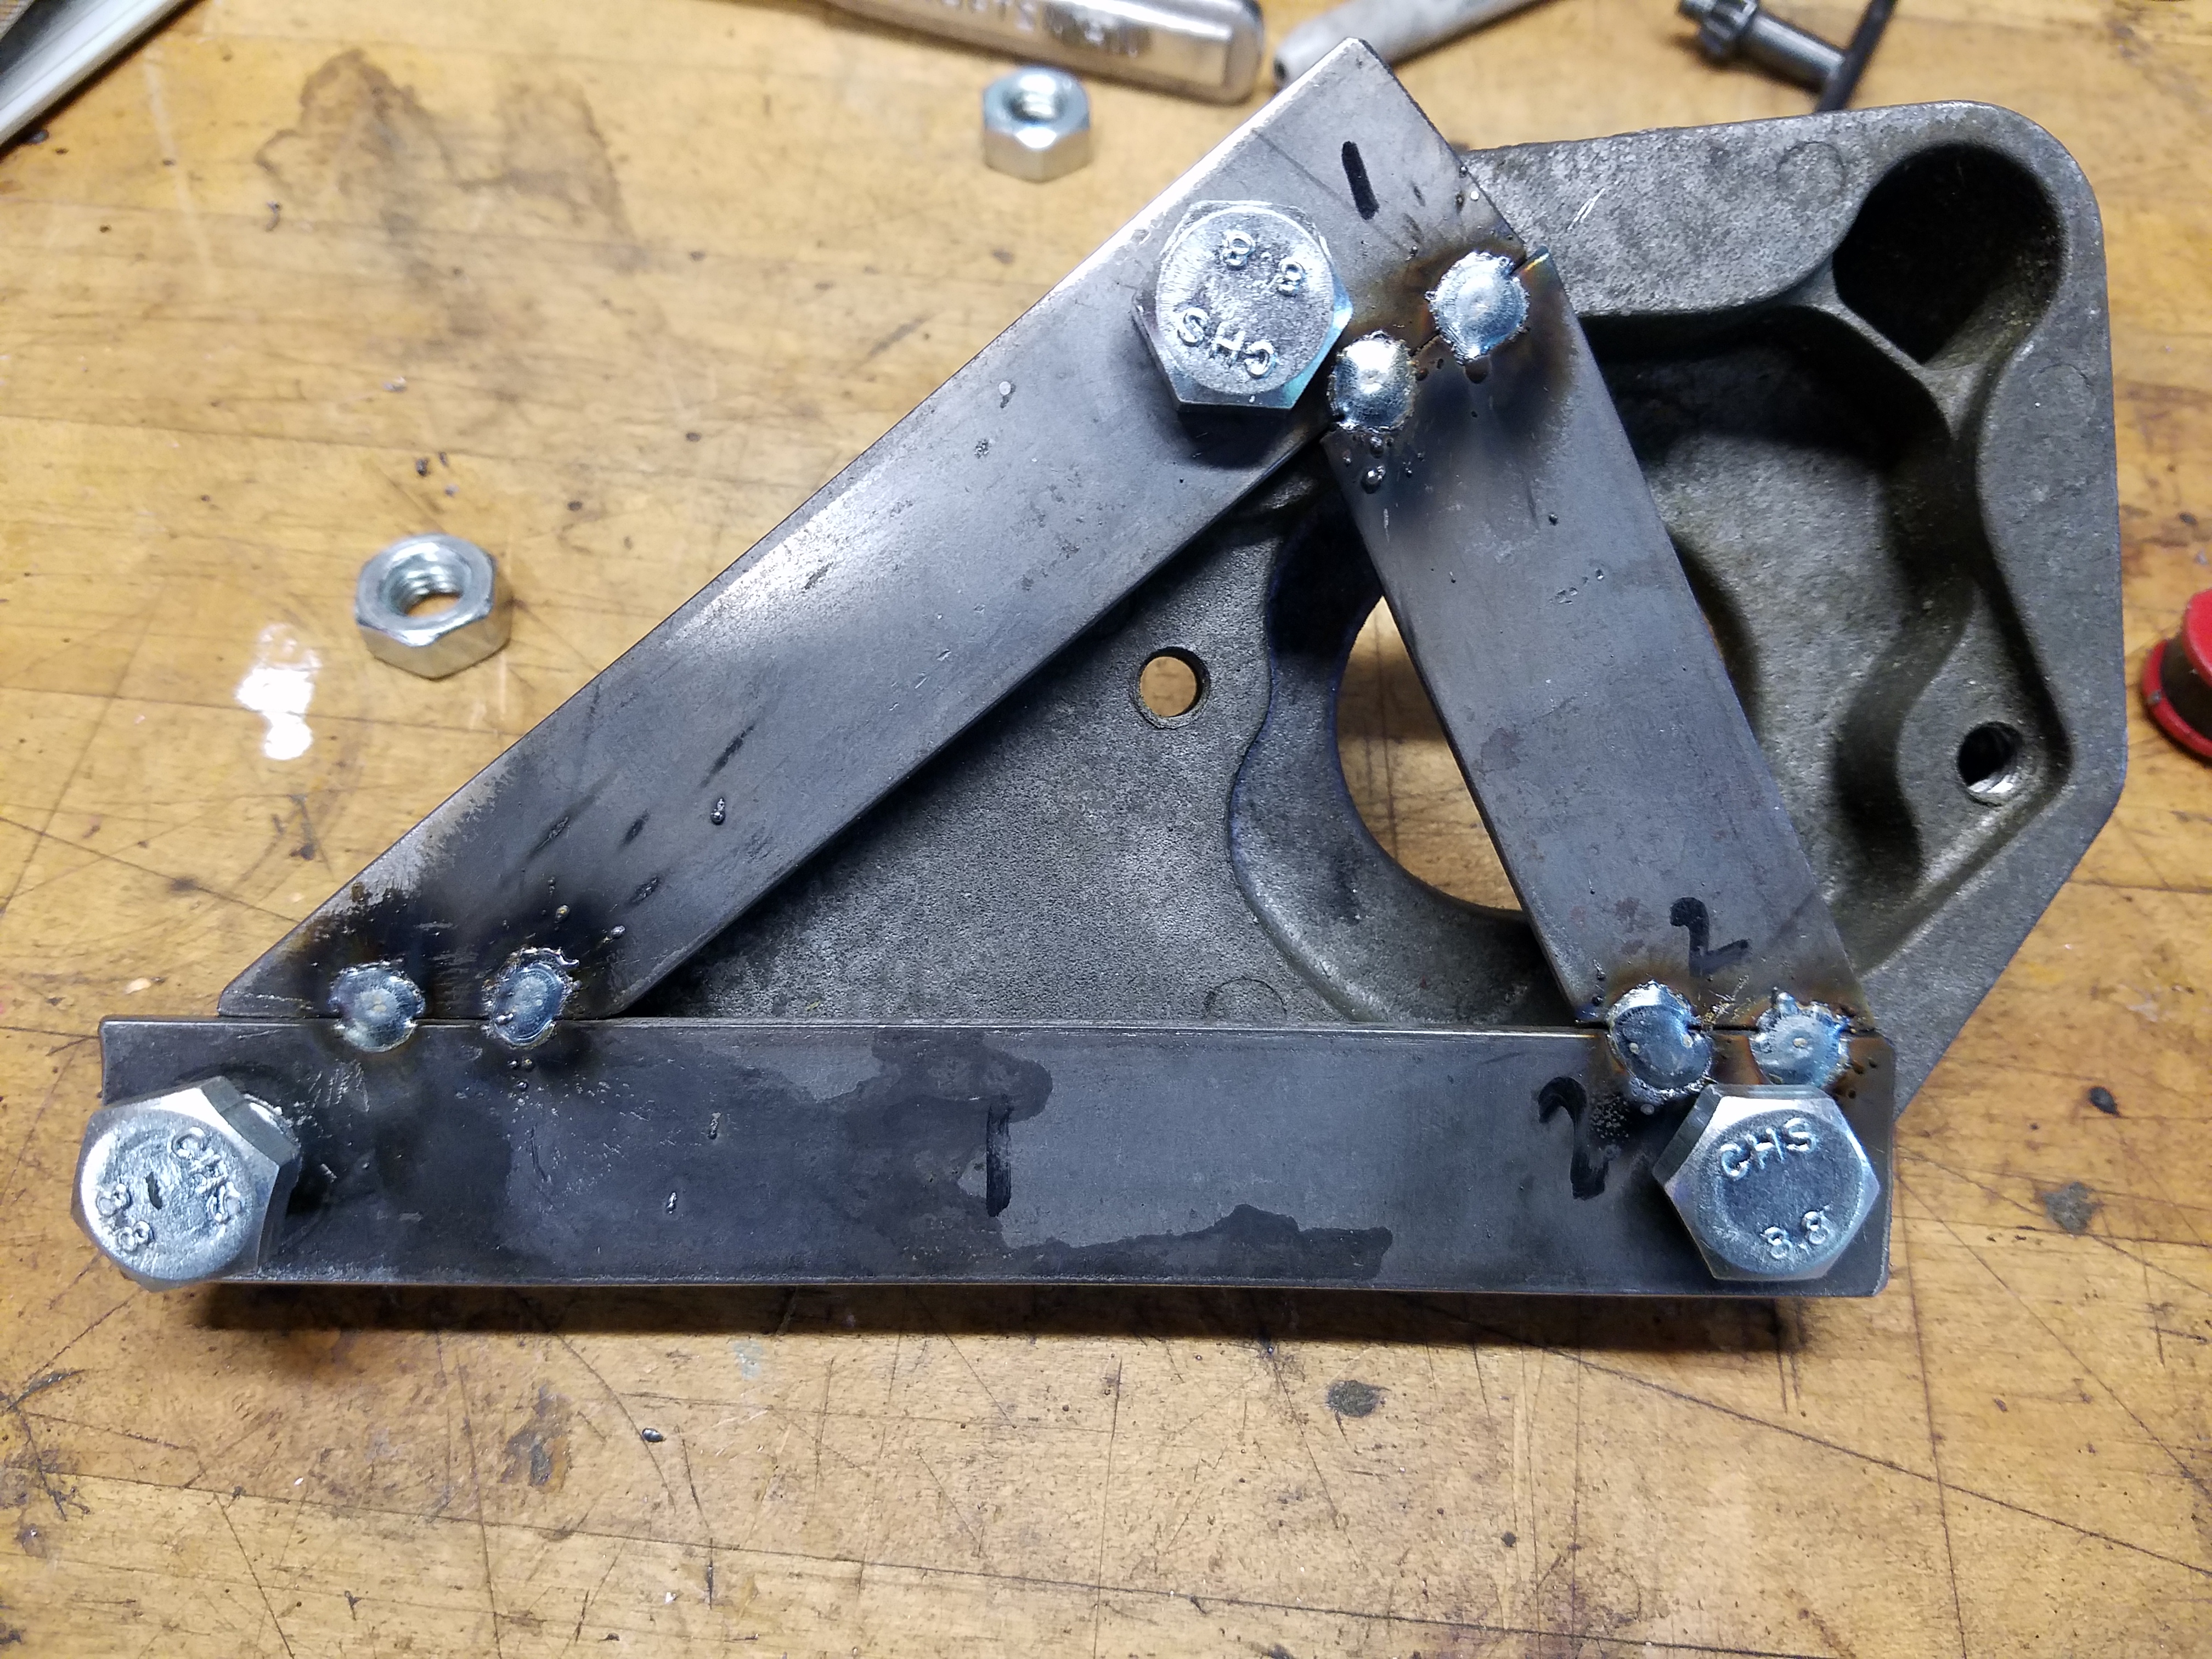
I bolted the pieces in place one by one for an accurate fit. I overlapped the pieces and used by spring loaded punch to scratch a cutline. Used the cutting wheel and my benchtop grinder/wire wheel to fine tune the pieces and tacked them together.

Bracket cleaned up a bit and bolted into place
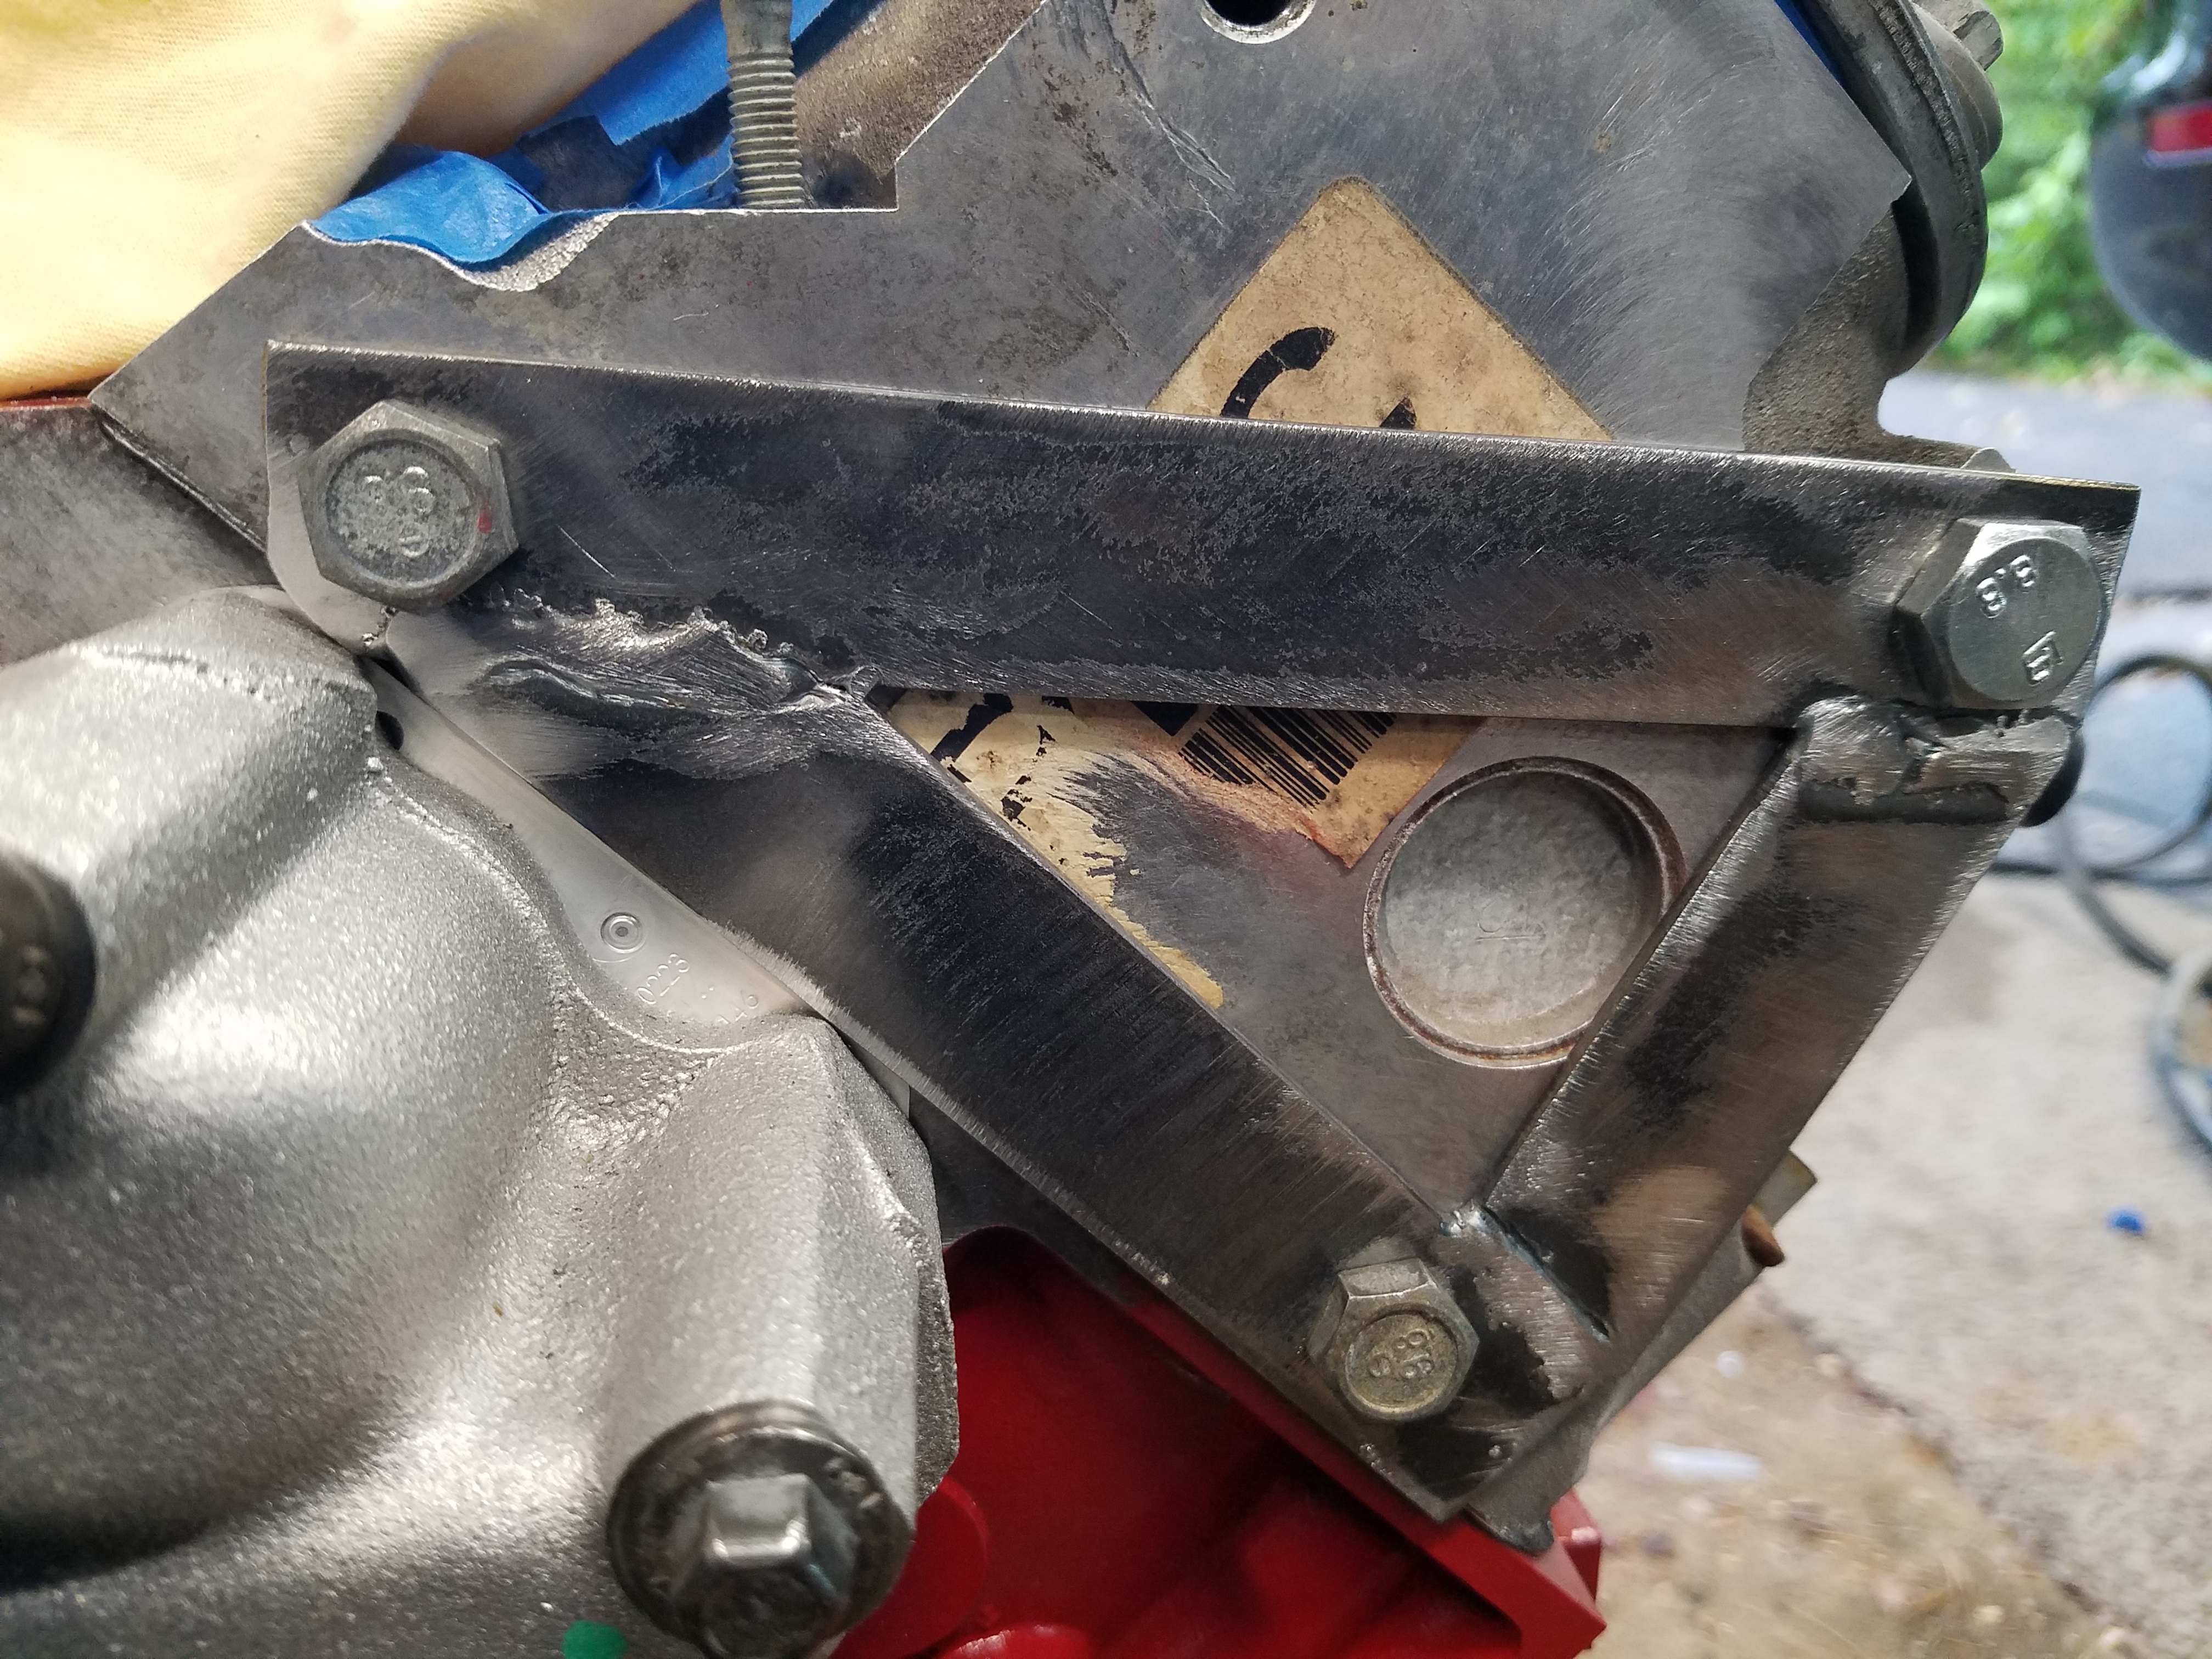
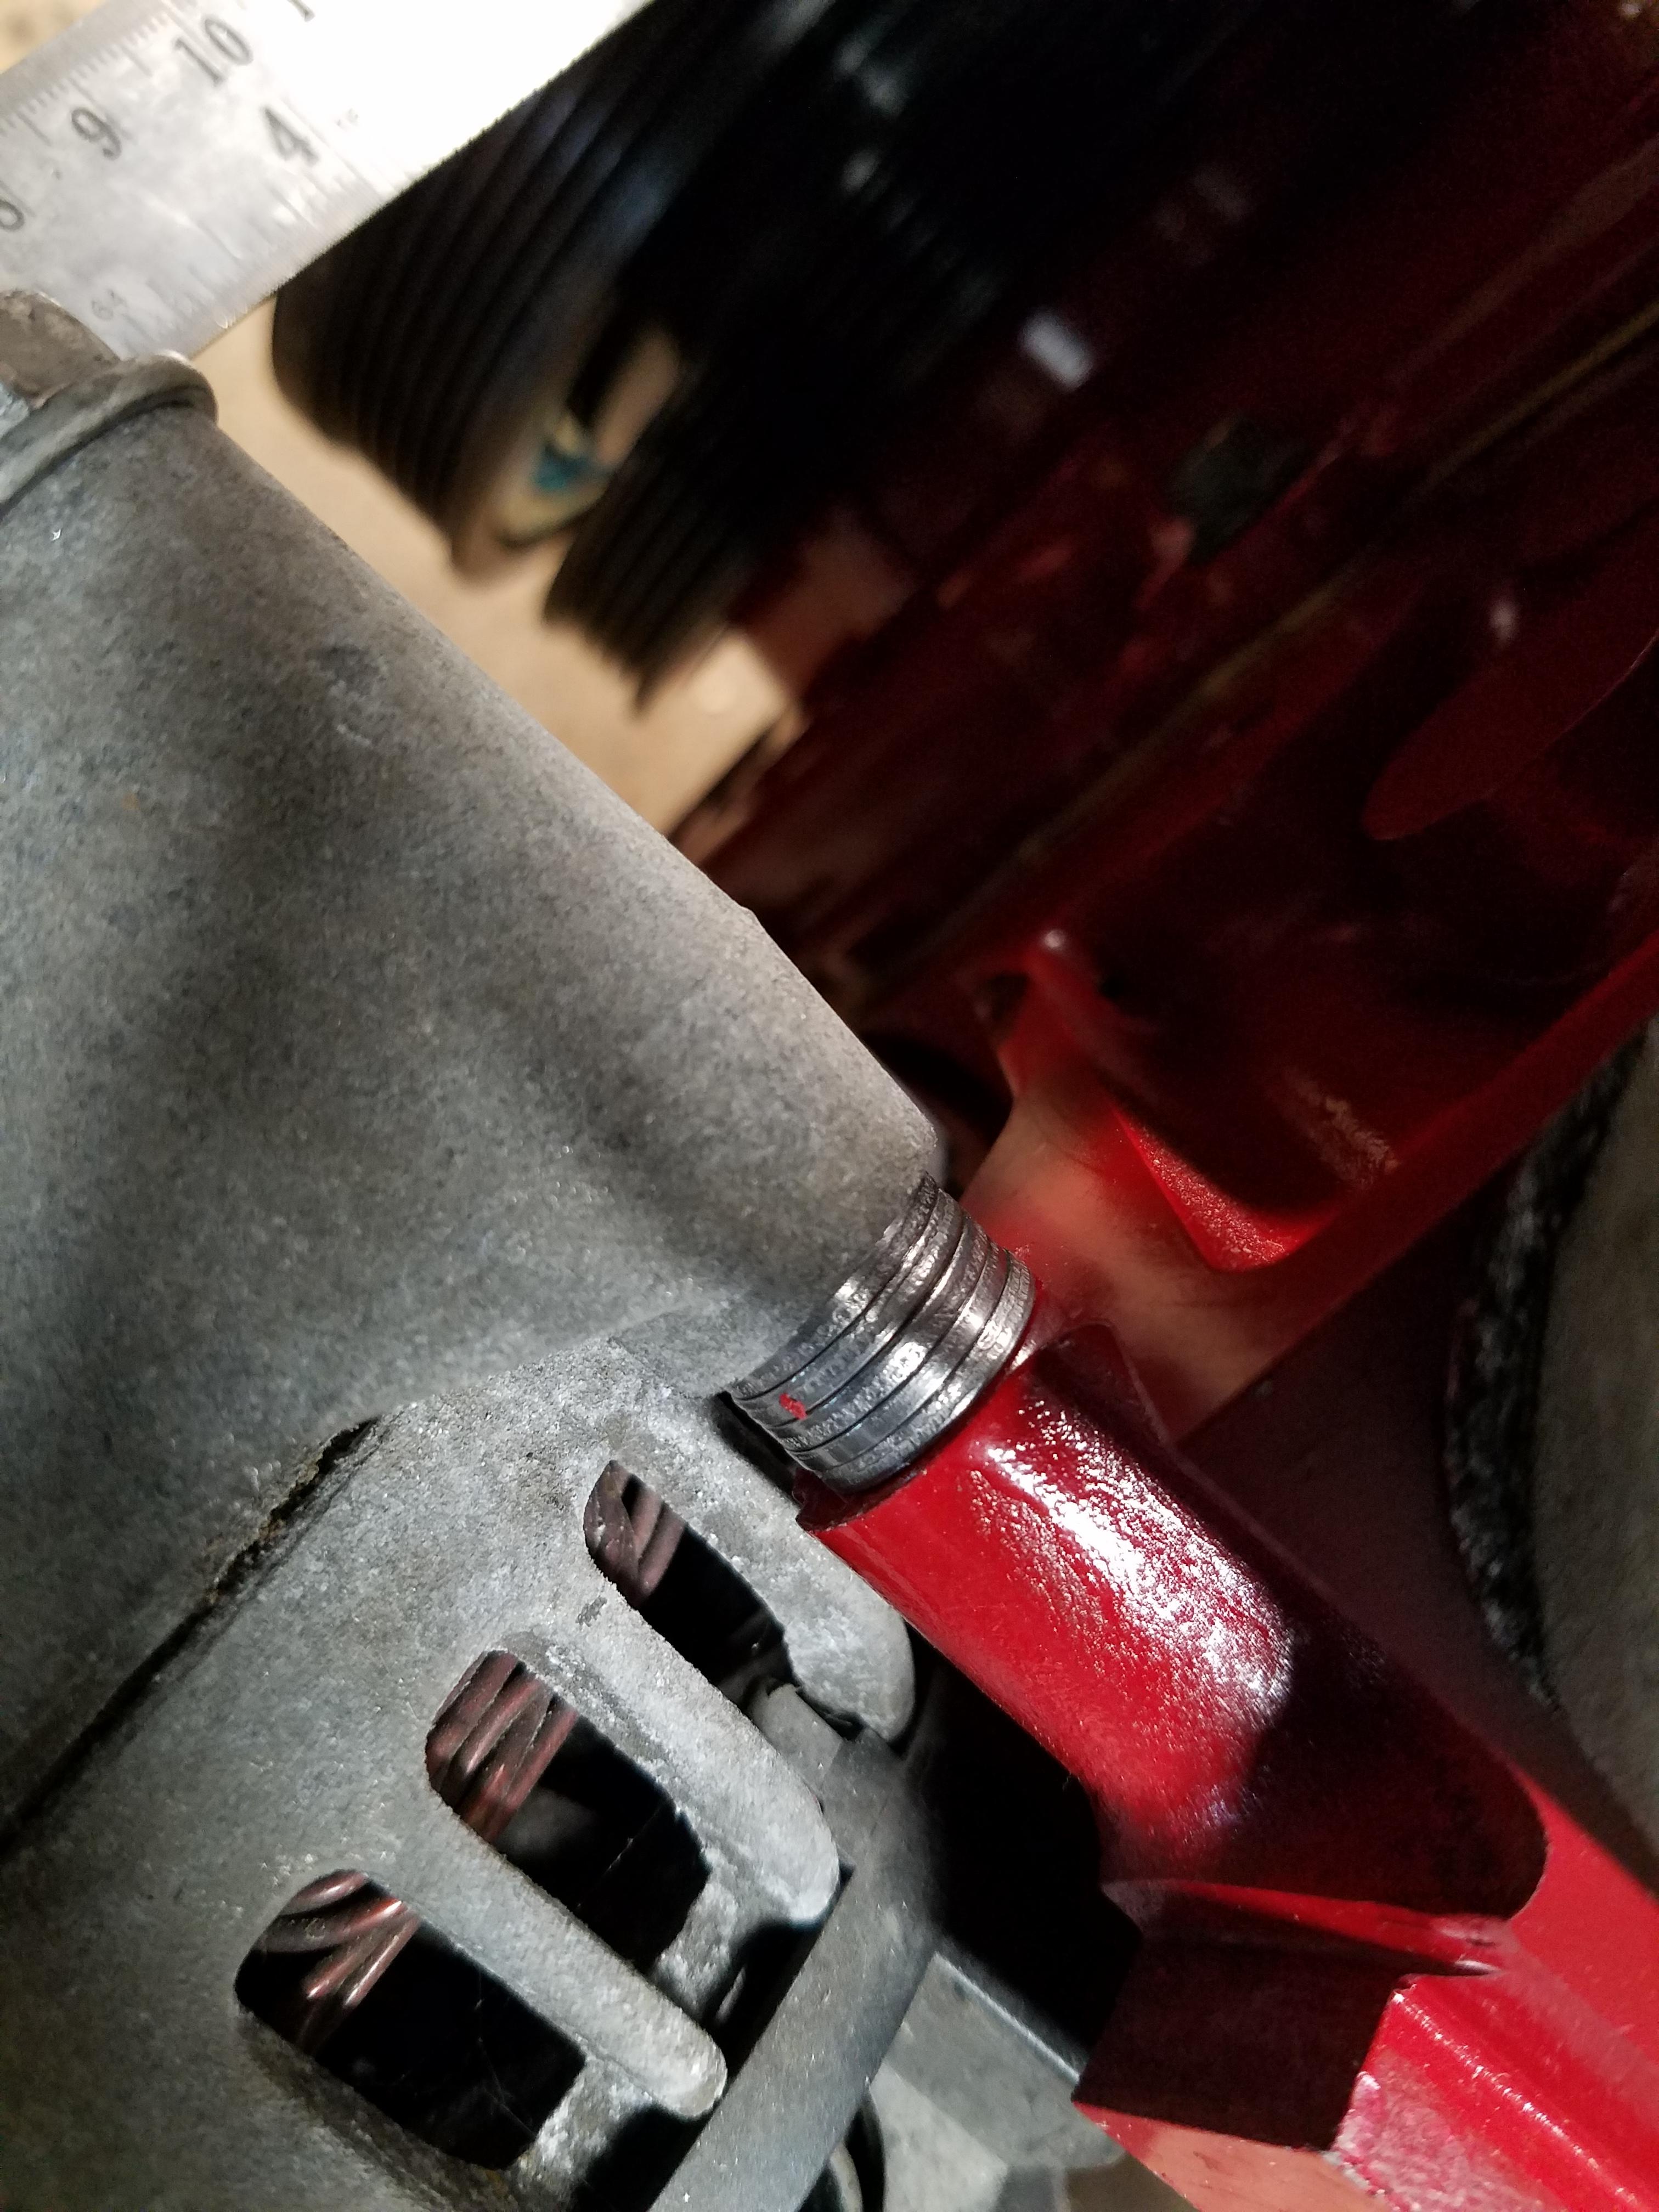
And what I realized is that Fbody pump makes for a pretty tight fit if I want to align the belt with my Corvette (shorter) style crank damper.
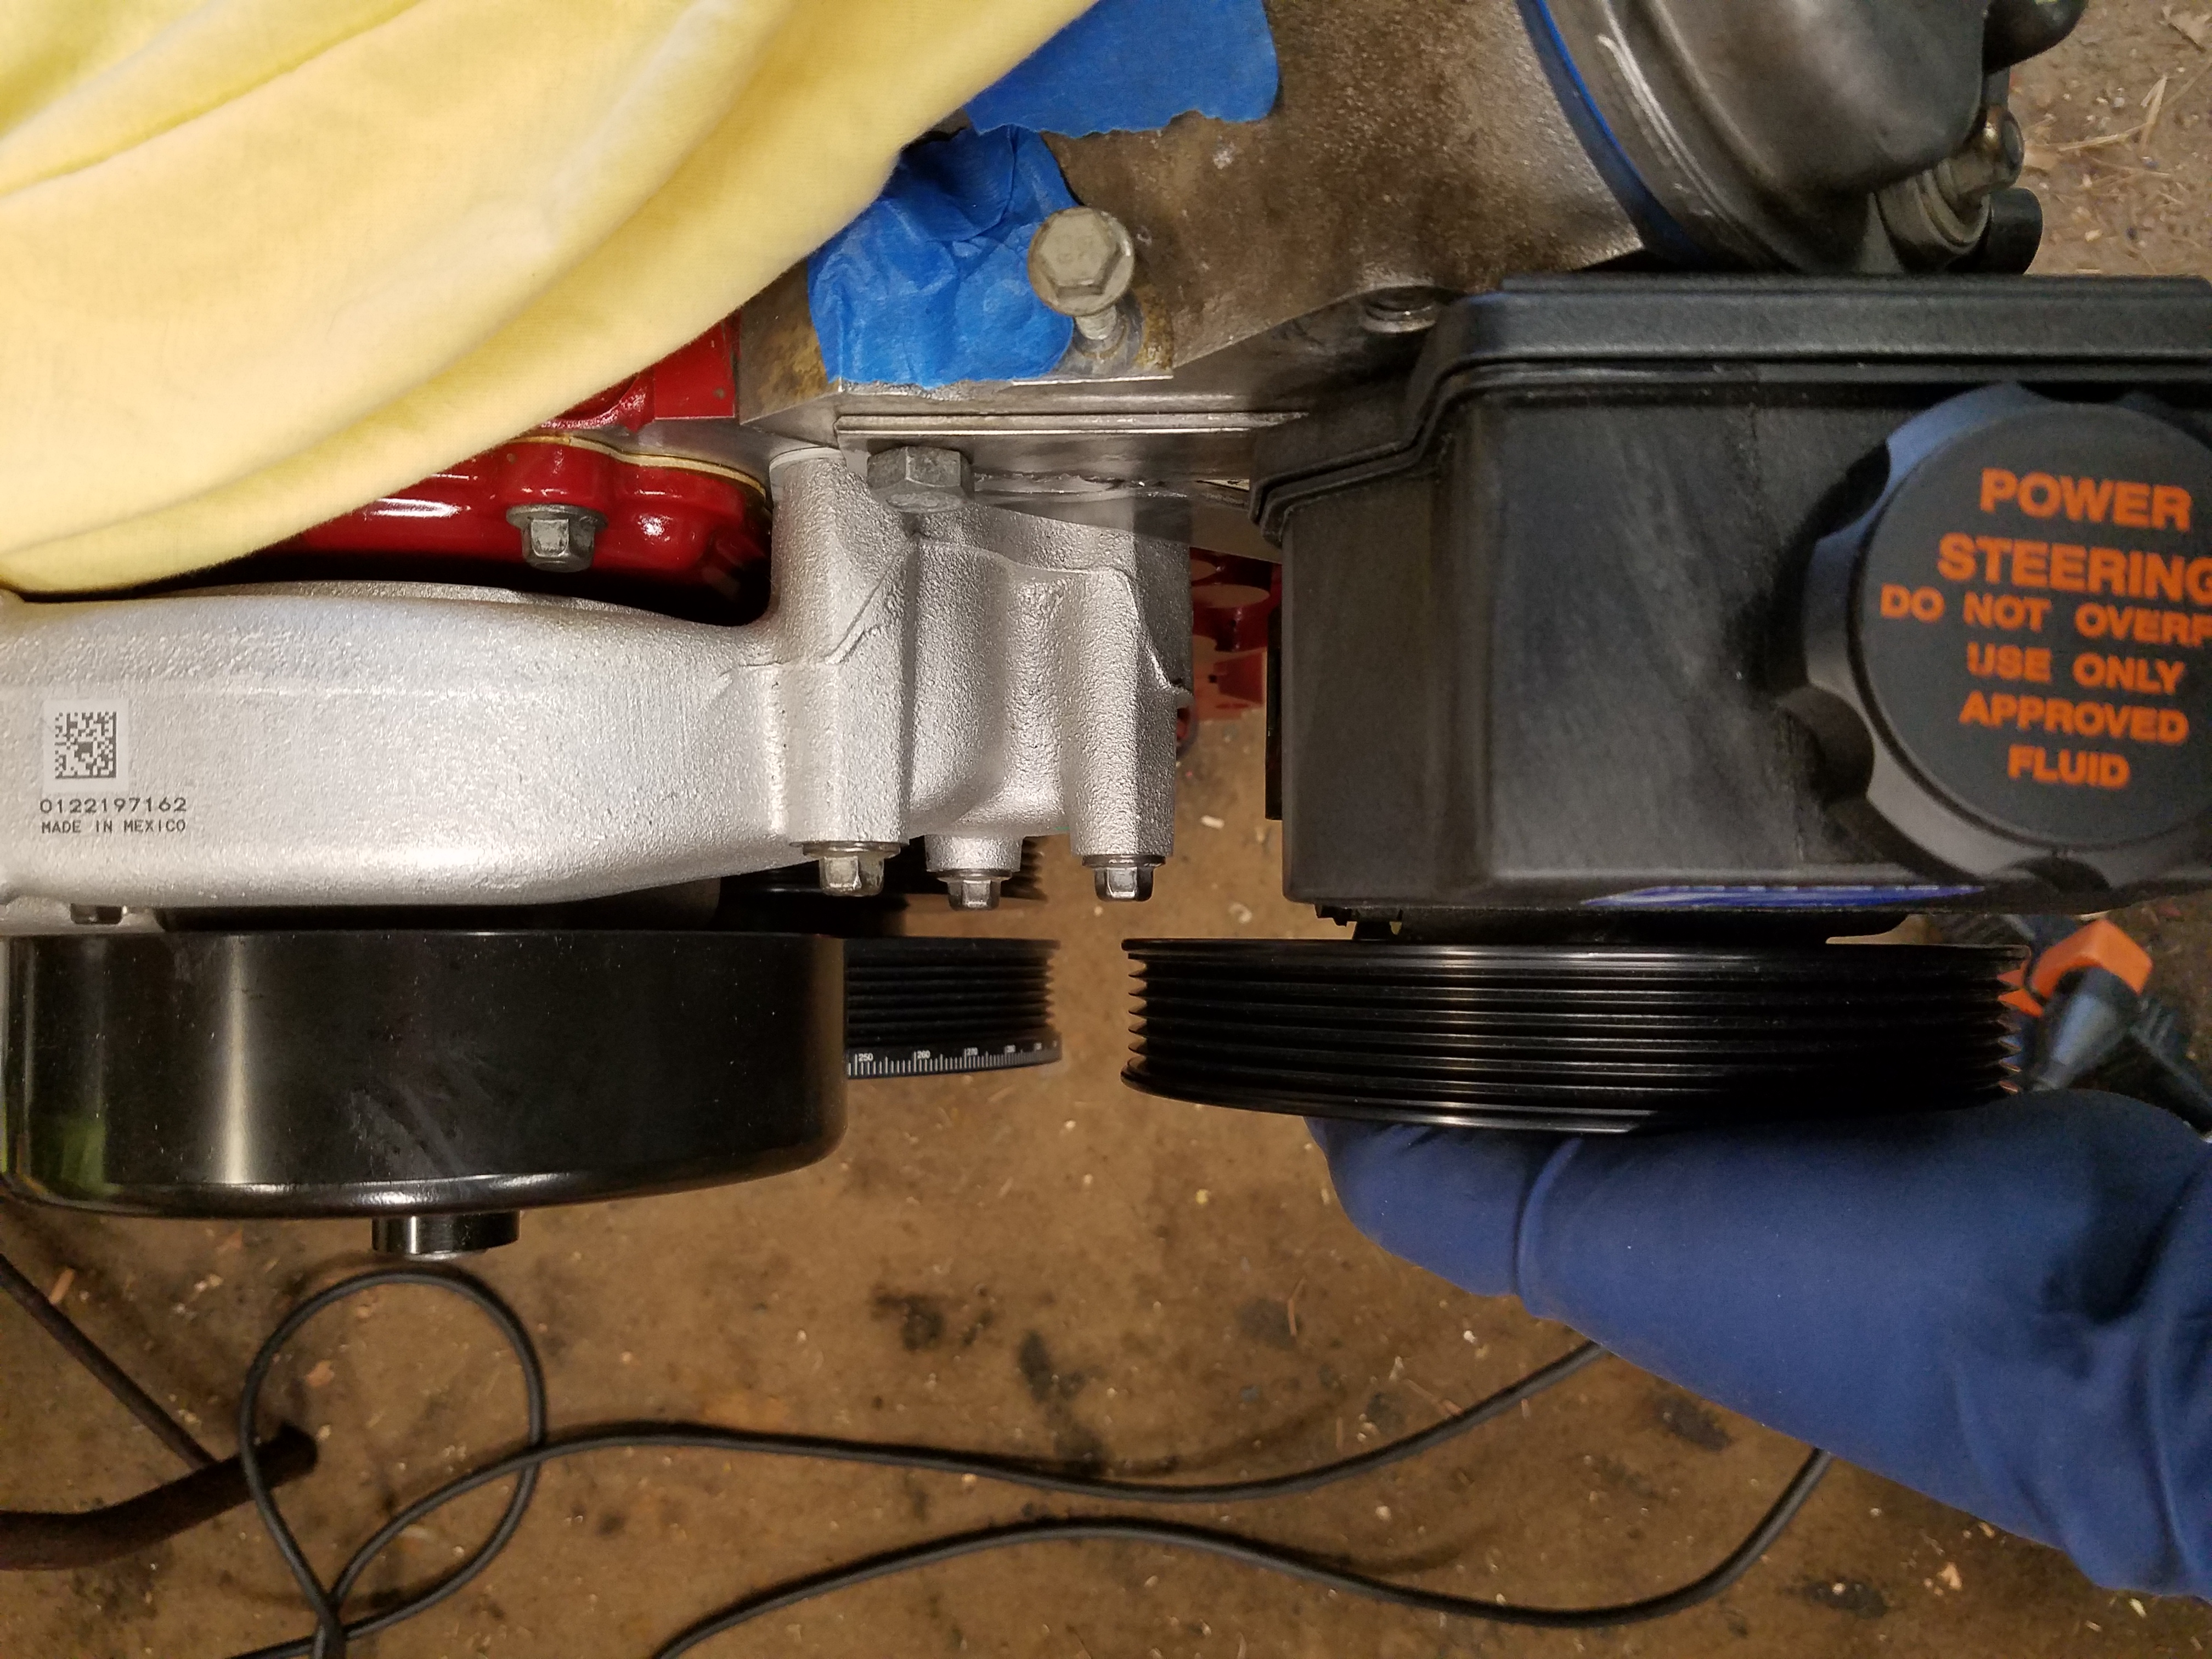
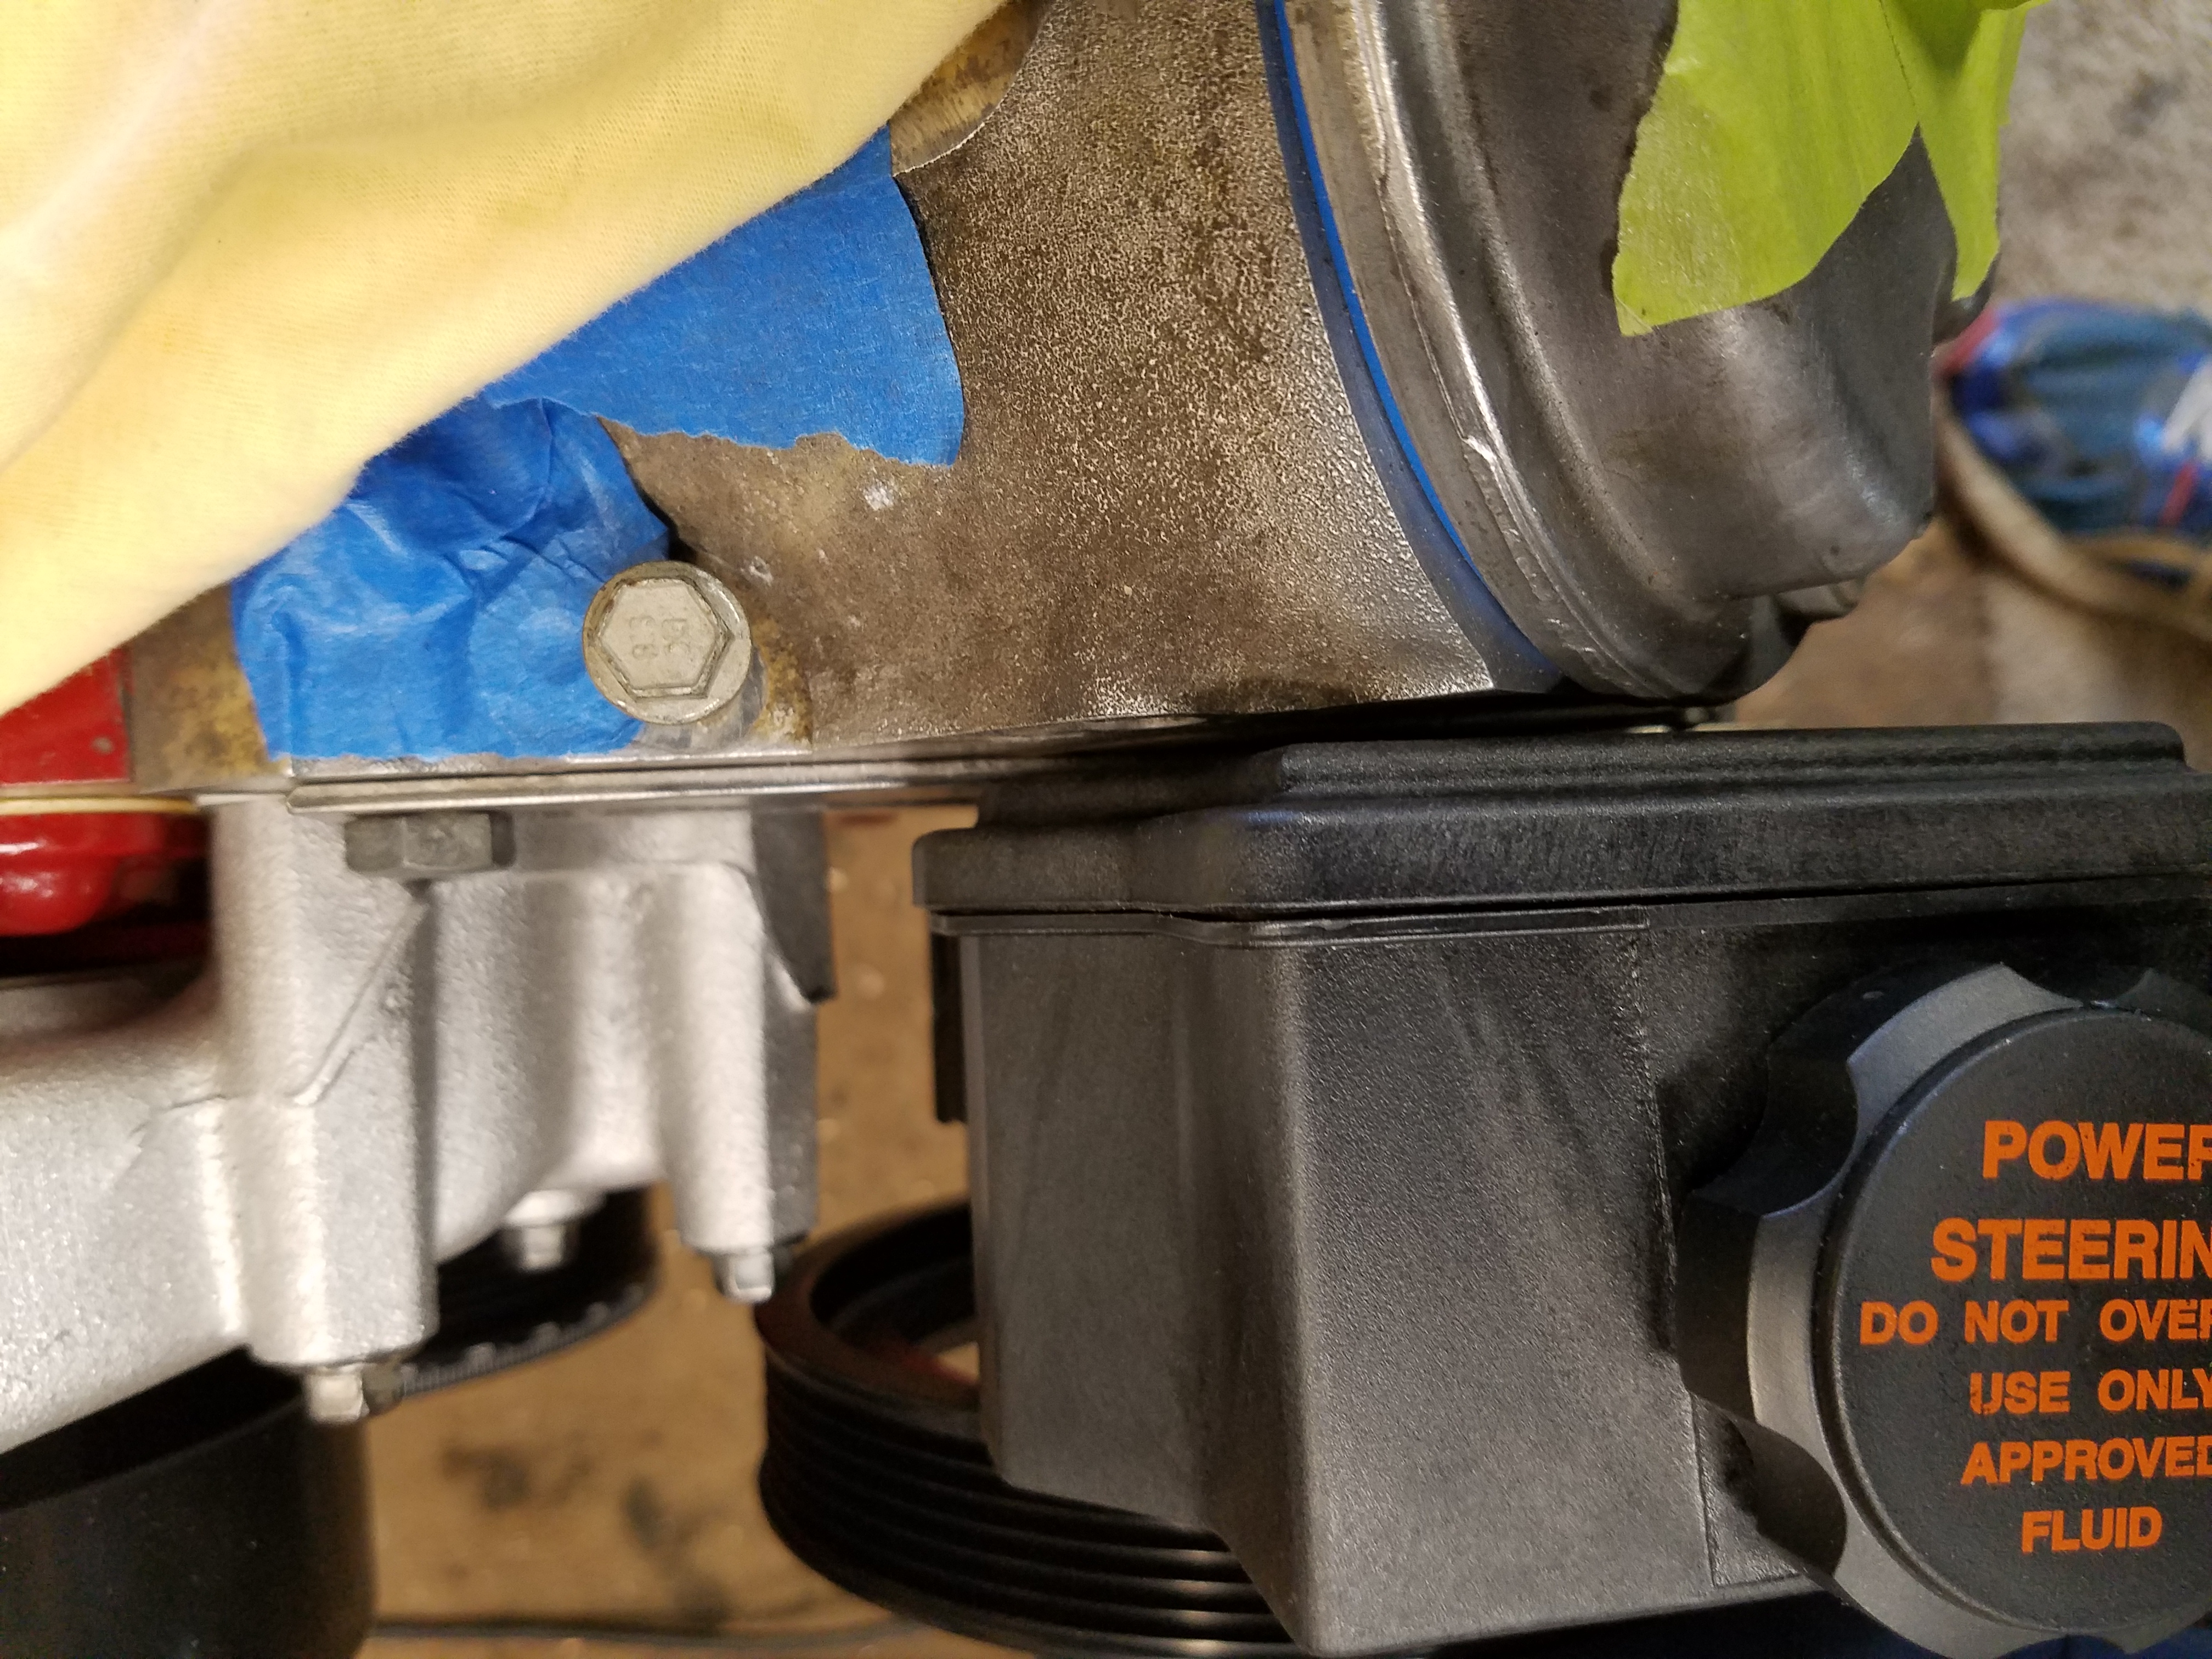
Closeup of the tight fit... basically the reservoir is up against the head. If I cut out part of the 3/16" bracket thickness I'll have some breathing room.
I'm motivated to make this work, b/c I dropped some coin on this nice pump and pulley awhile back.
Turn One
The existing pump that came with the engine arrived with a cracked pulley, and then found out the threads you need to engage with on the pump shaft to remove the pulley were all f'd up. Basically the pump was unusable. The Turn one pump is setup for track racing where Fbody pumps apparently have an issue with overheating and eating themselves.
I'm going to put this side project to the side for a bit until the engine is mounted, so I can see how much clearance I'll have with the hood of the Miata.
Started with a foundation of 3/16" bar in a triangular pattern to match the bolt holes of the oem bracket
I bolted the pieces in place one by one for an accurate fit. I overlapped the pieces and used by spring loaded punch to scratch a cutline. Used the cutting wheel and my benchtop grinder/wire wheel to fine tune the pieces and tacked them together.
Bracket cleaned up a bit and bolted into place
And what I realized is that Fbody pump makes for a pretty tight fit if I want to align the belt with my Corvette (shorter) style crank damper.
Closeup of the tight fit... basically the reservoir is up against the head. If I cut out part of the 3/16" bracket thickness I'll have some breathing room.
I'm motivated to make this work, b/c I dropped some coin on this nice pump and pulley awhile back.
Turn One
The existing pump that came with the engine arrived with a cracked pulley, and then found out the threads you need to engage with on the pump shaft to remove the pulley were all f'd up. Basically the pump was unusable. The Turn one pump is setup for track racing where Fbody pumps apparently have an issue with overheating and eating themselves.
I'm going to put this side project to the side for a bit until the engine is mounted, so I can see how much clearance I'll have with the hood of the Miata.
Last edited by pj_mcgarvey; 11-27-2016 at 08:34 PM.
09-26-2016, 08:51 PM
#24
V8 Miata Enthusiast
Thread Starter
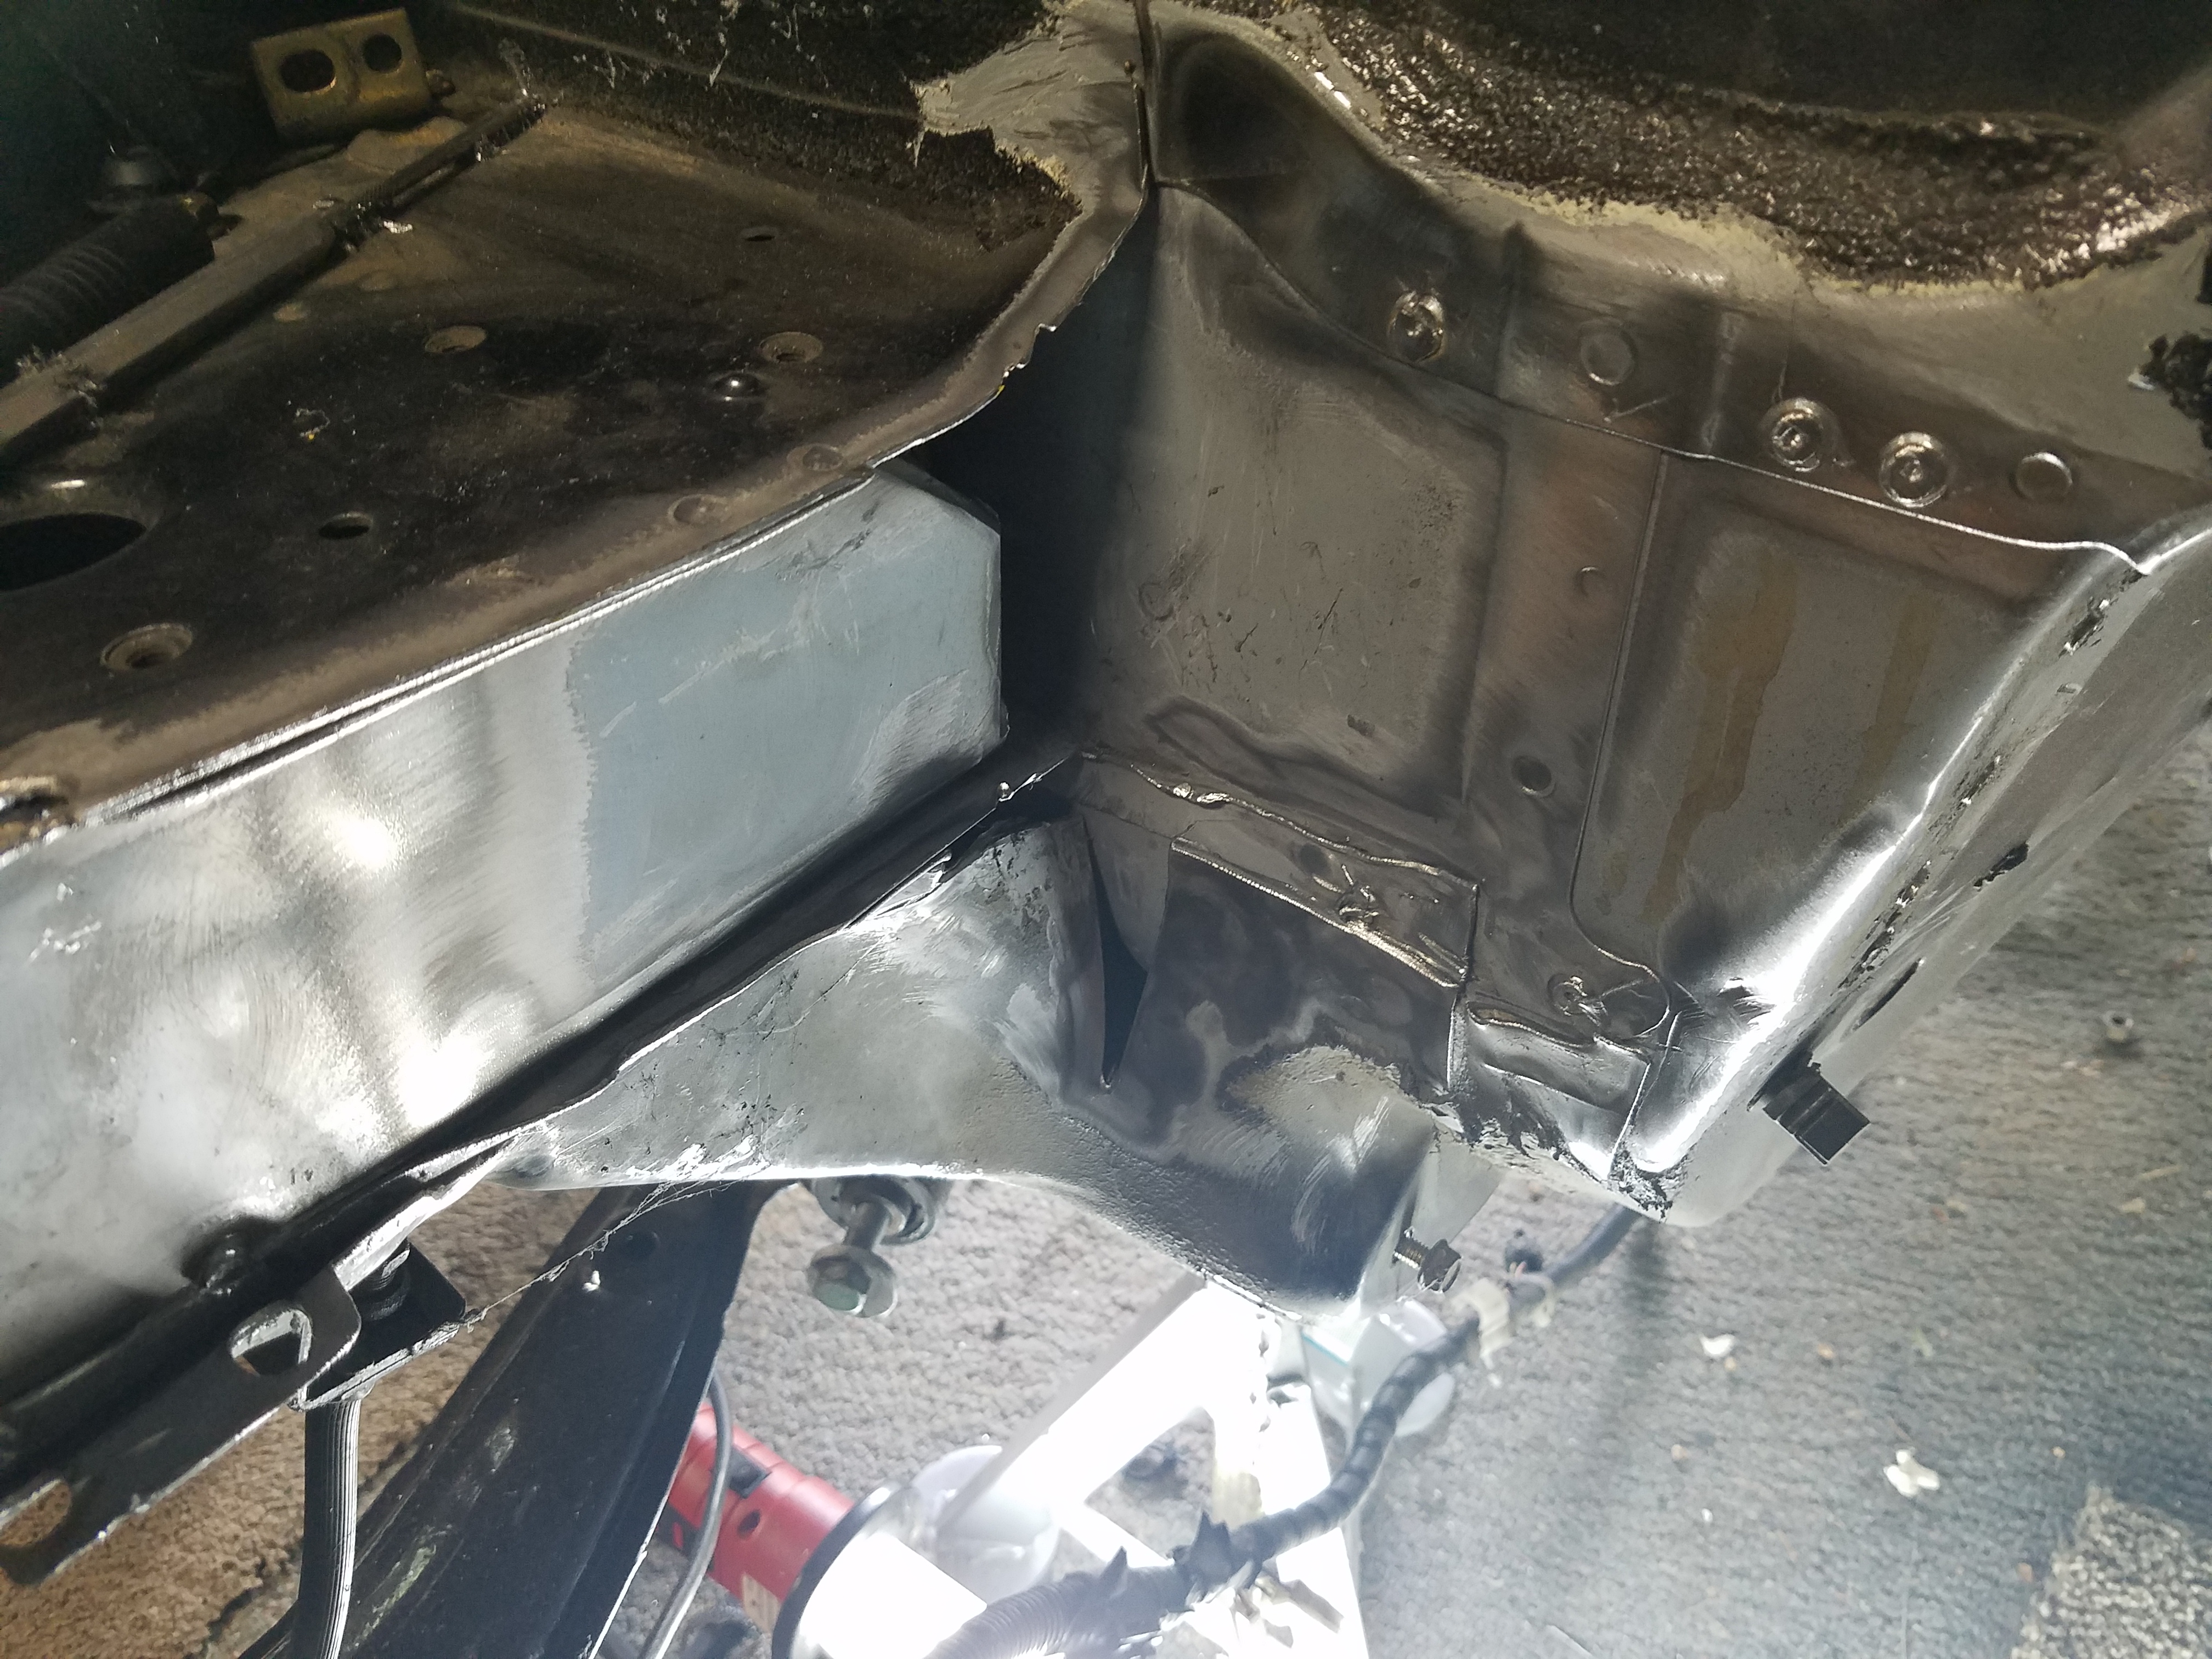
With the power steering bracket on hold, I decided to do some more fab work on the alternator bracket. You can apparently have the aluminum bracket milled down to line up with your crank pulley of choice. I decided to try and go DIY on this as I cracked open my first beer of the night.
If you take the oem bracket out of the equation and just bolt up the alternator...
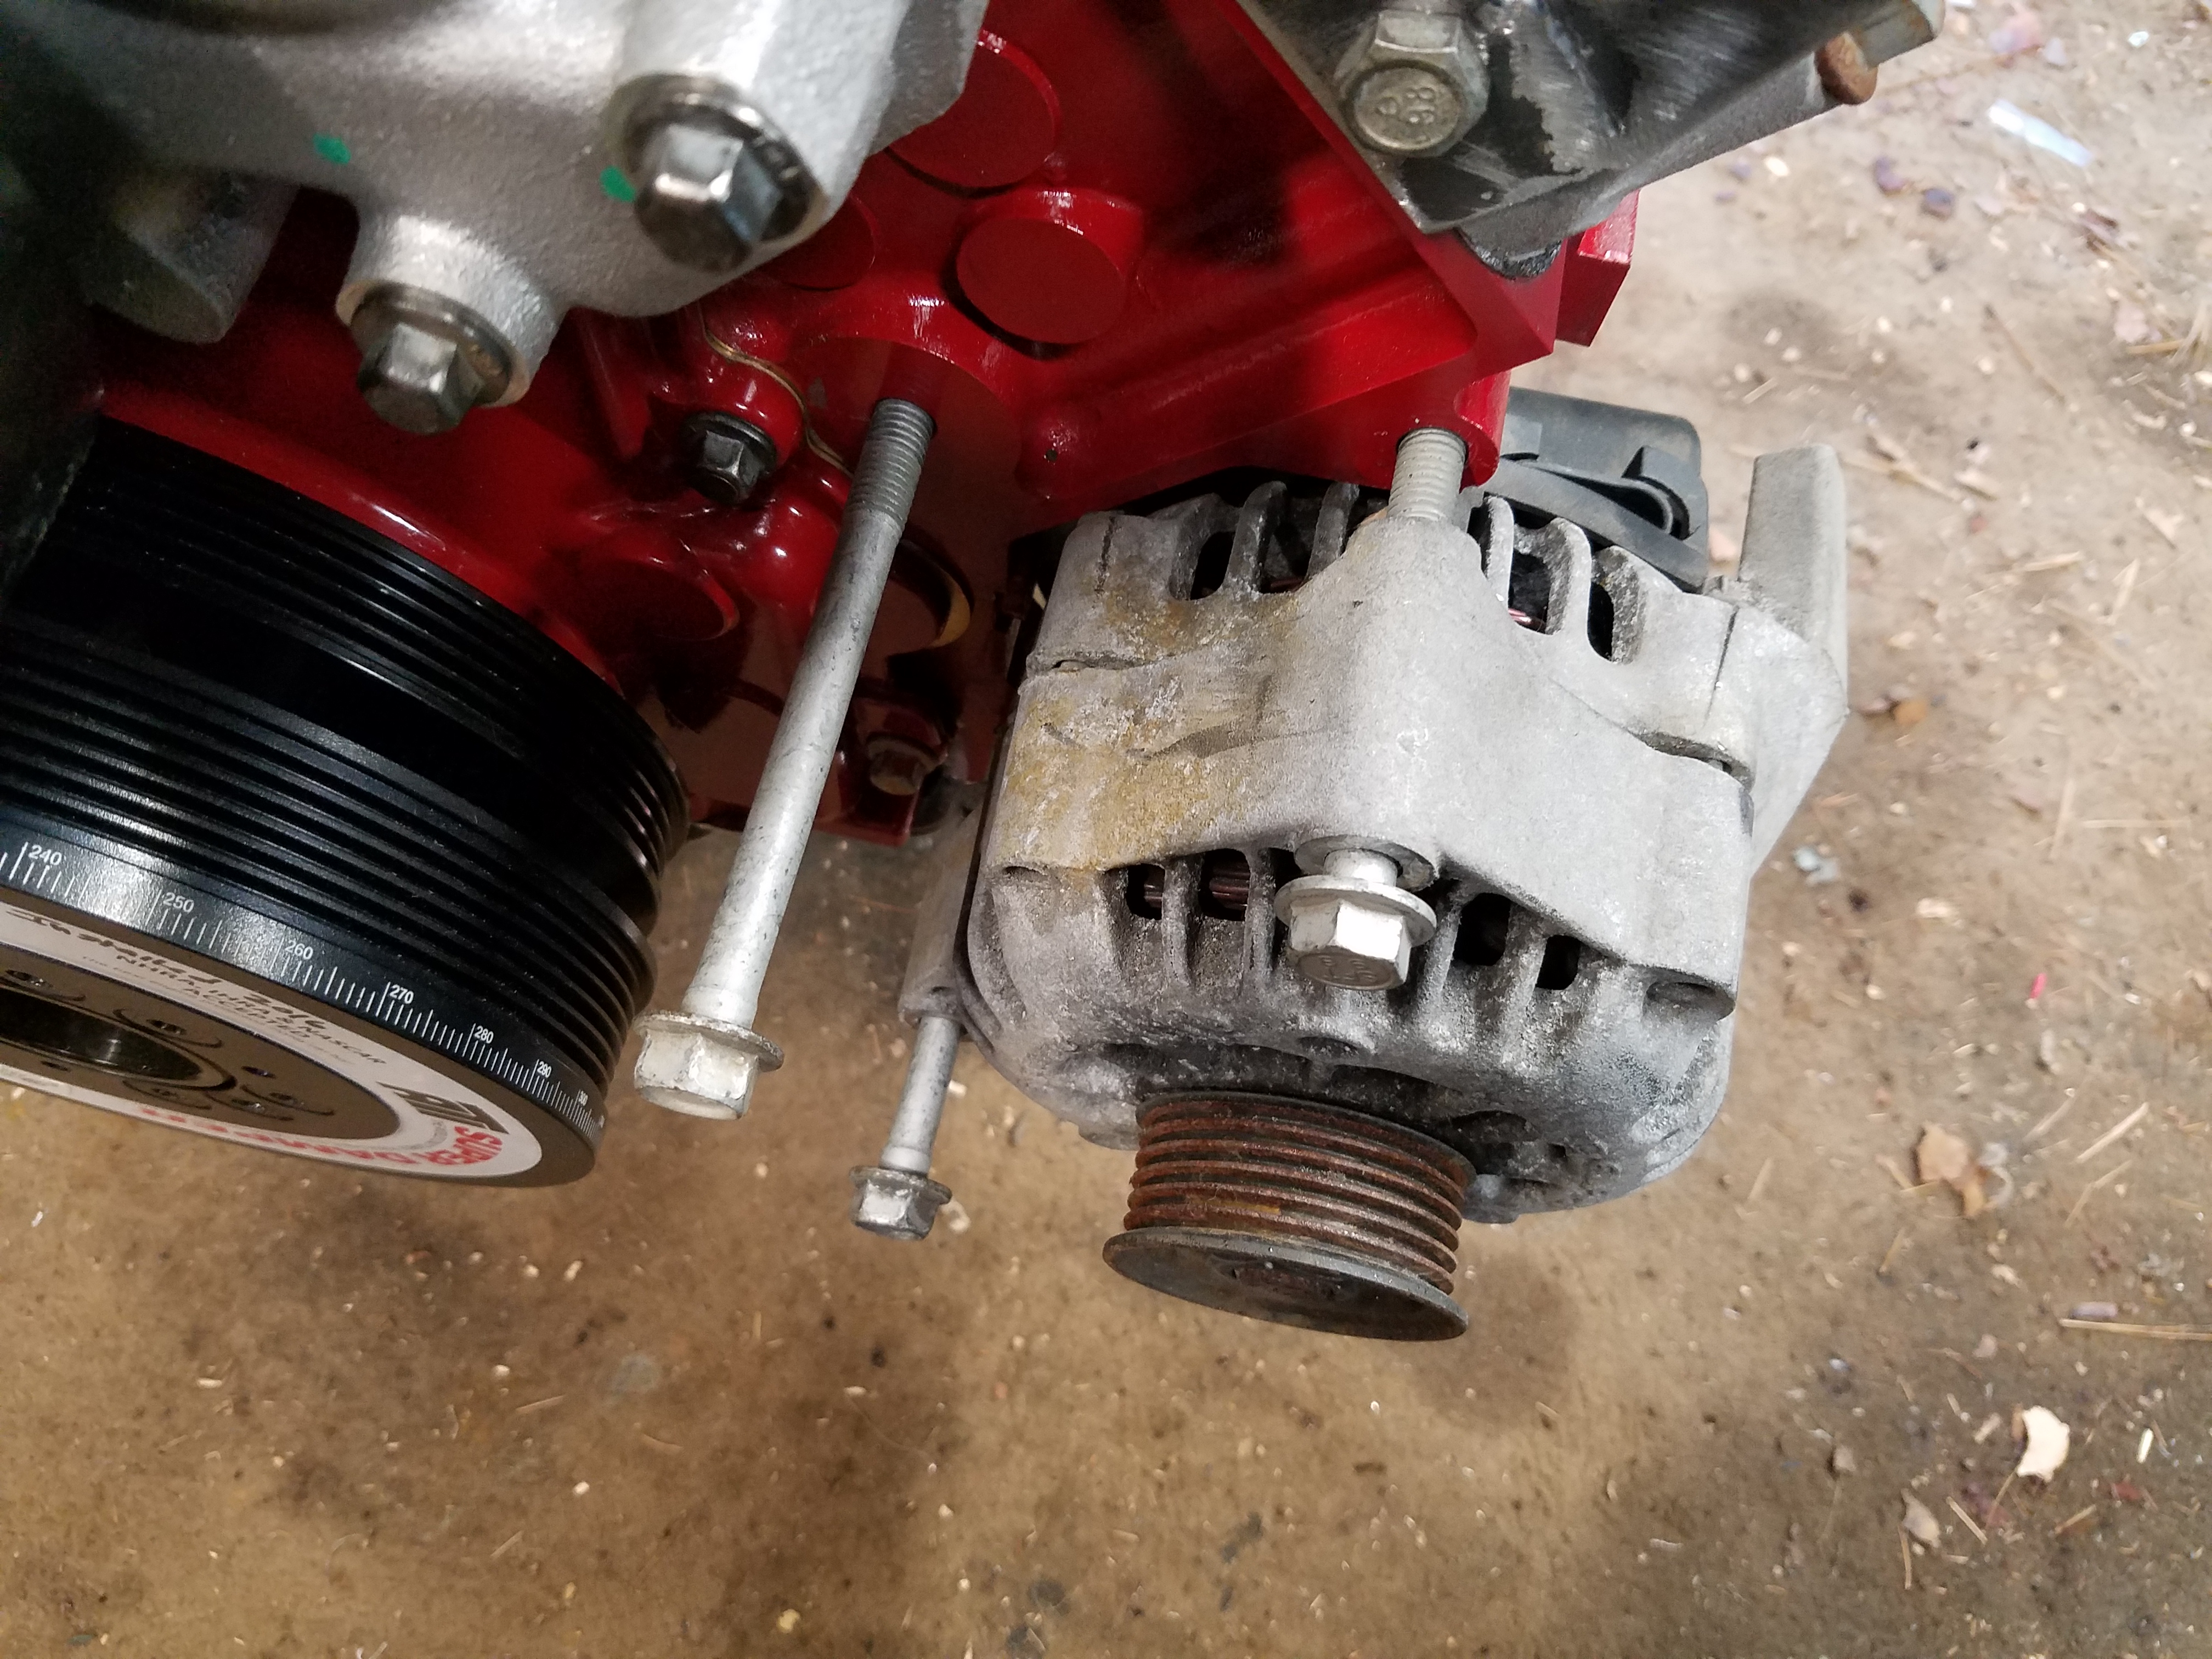
there is a bit of a clearance issue
The solution is to allow the bottom of the alternator to swing away a bit for clearance.
If I add about 5mm of washers I had laying around from a Wilwood brake kit on my previous car, I was able to get the alternator shimmed to where the pulleys lined up and also kept the alternator in place where I could work with it.
I started at the bottom bolt with a new bracket. I'm going to add some gusseting to this one to strengthen it.
This is where I left this project for the night.
I will be adding a bracket for the front of the top bolt and tie it into the 3rd mounting location used by the oem location. I'll also add a bracket for the mount at the back of the alternator.
If you take the oem bracket out of the equation and just bolt up the alternator...
there is a bit of a clearance issue
The solution is to allow the bottom of the alternator to swing away a bit for clearance.
If I add about 5mm of washers I had laying around from a Wilwood brake kit on my previous car, I was able to get the alternator shimmed to where the pulleys lined up and also kept the alternator in place where I could work with it.
I started at the bottom bolt with a new bracket. I'm going to add some gusseting to this one to strengthen it.
This is where I left this project for the night.
I will be adding a bracket for the front of the top bolt and tie it into the 3rd mounting location used by the oem location. I'll also add a bracket for the mount at the back of the alternator.
Last edited by pj_mcgarvey; 11-27-2016 at 08:38 PM.
09-26-2016, 09:01 PM
#25
V8 Miata Enthusiast
Thread Starter
I decided to wrap up the night with some seam welding on the passenger side door frame
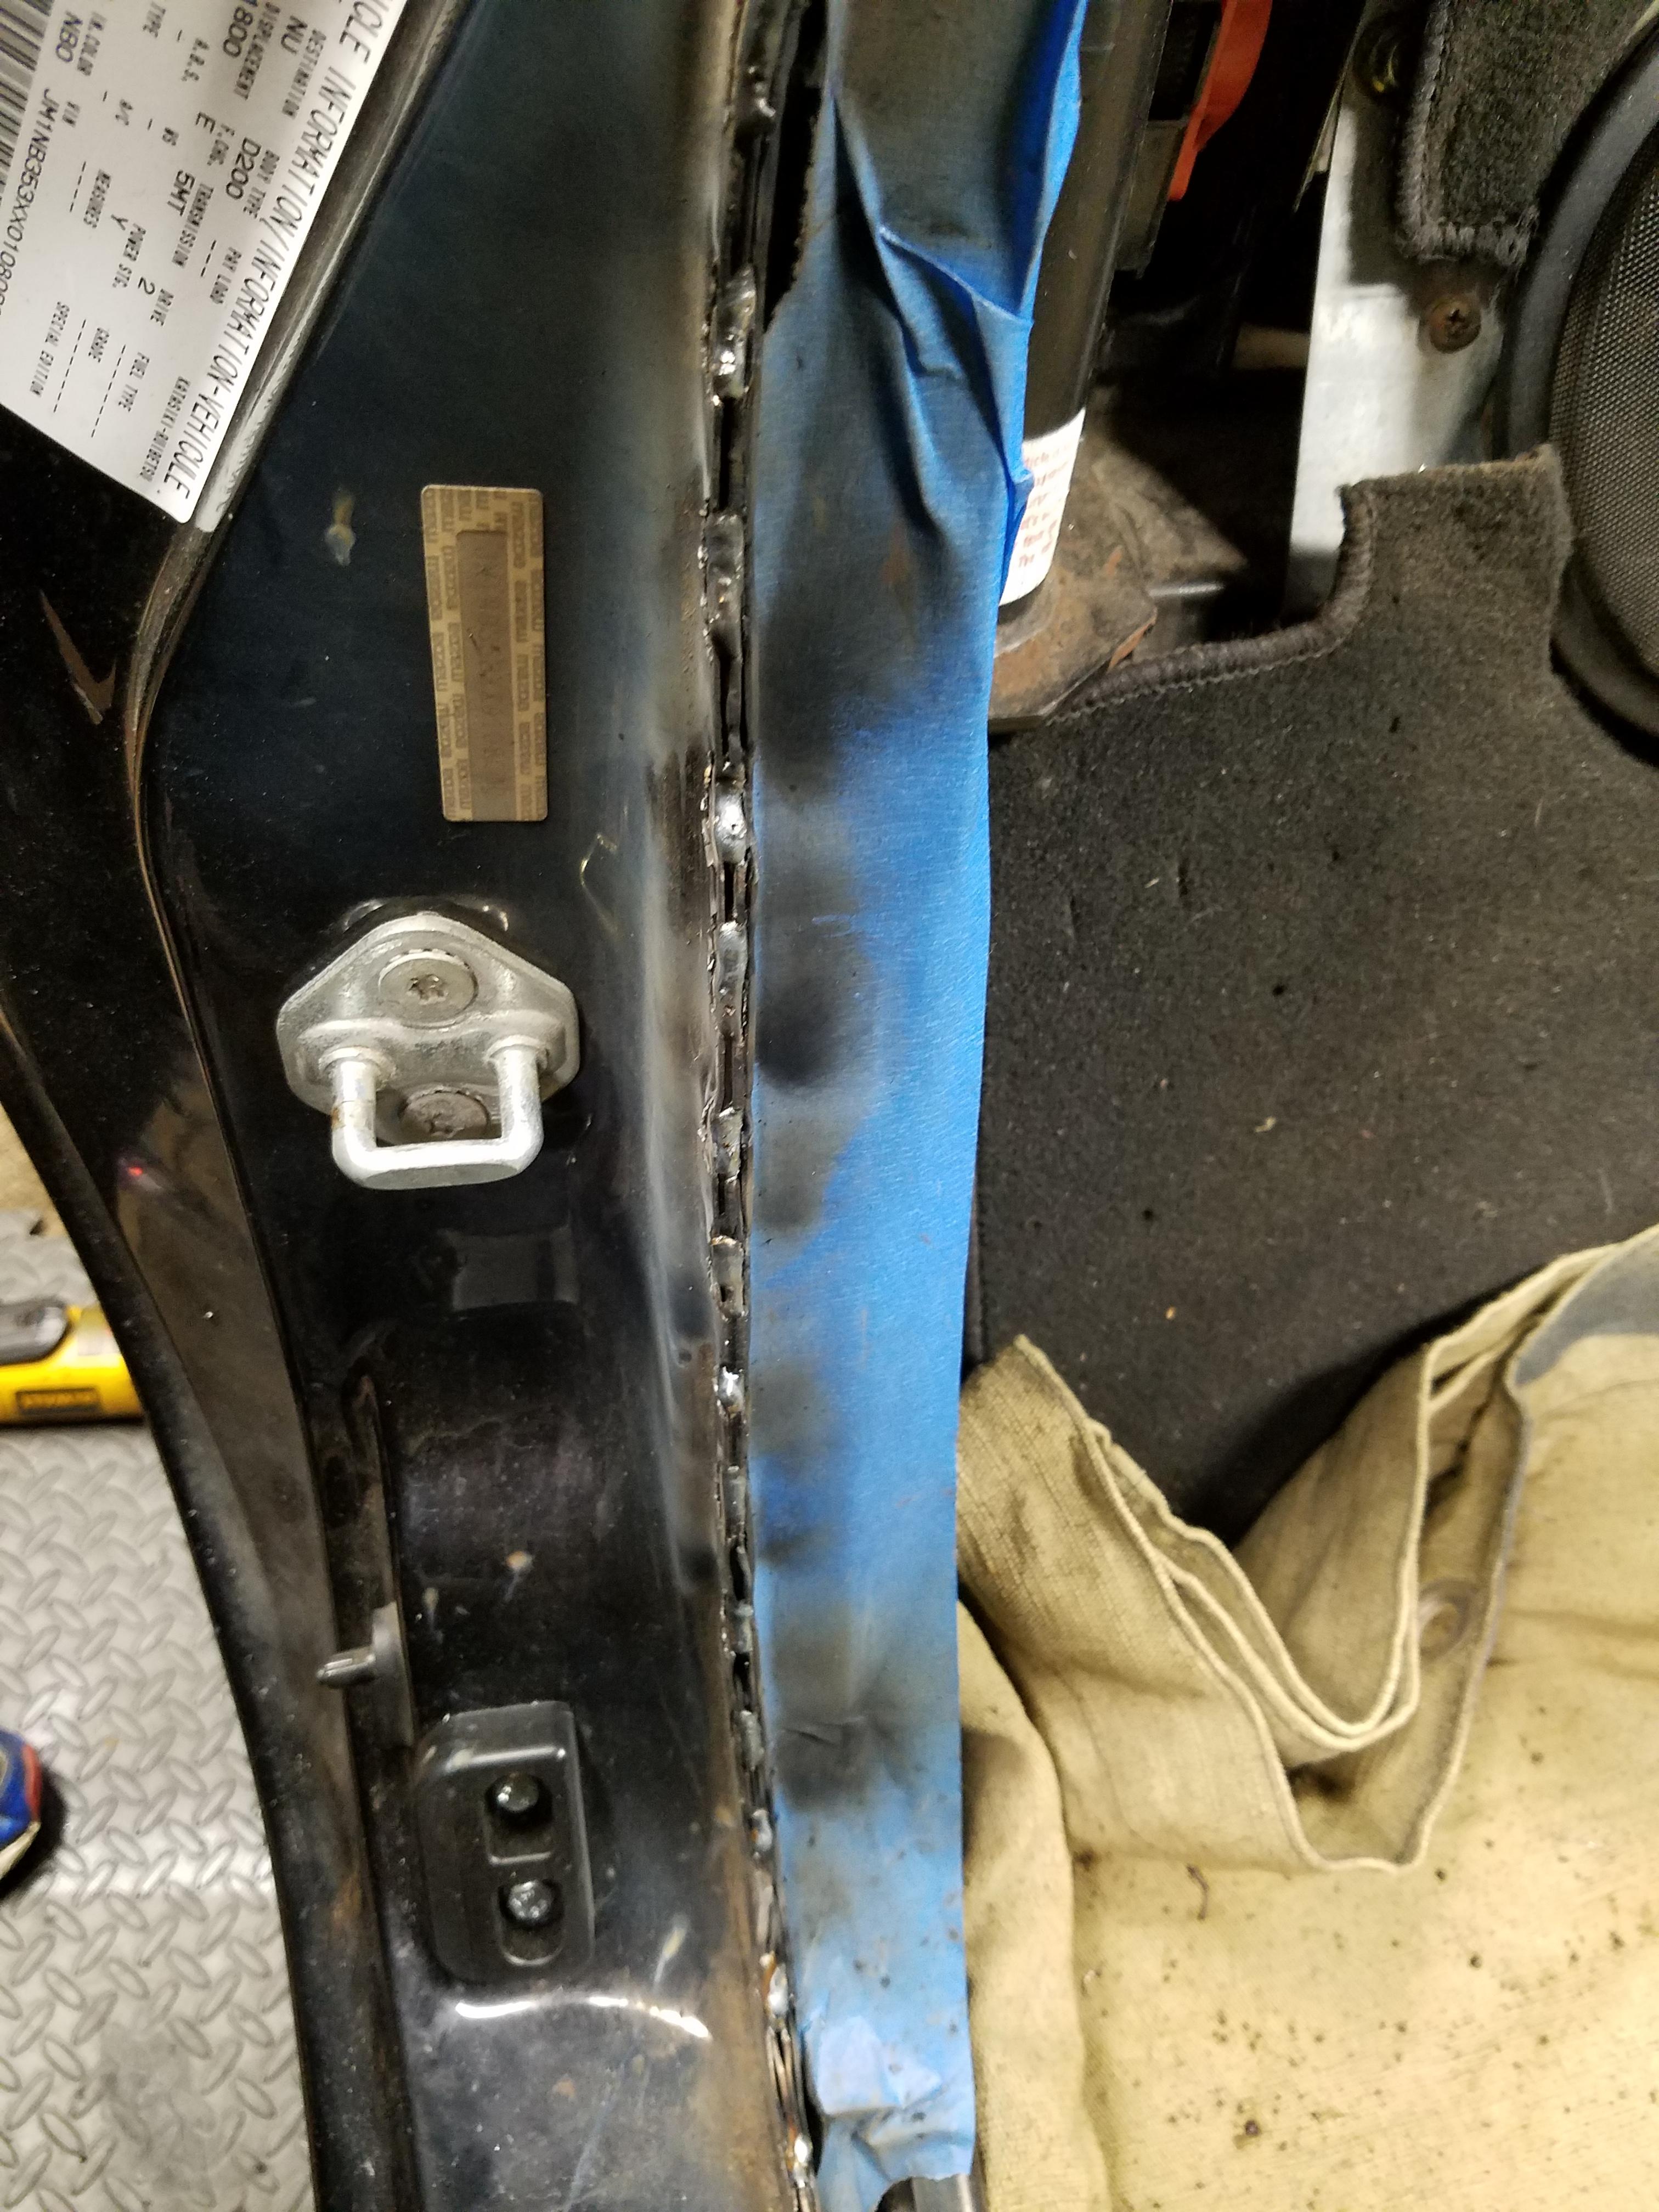
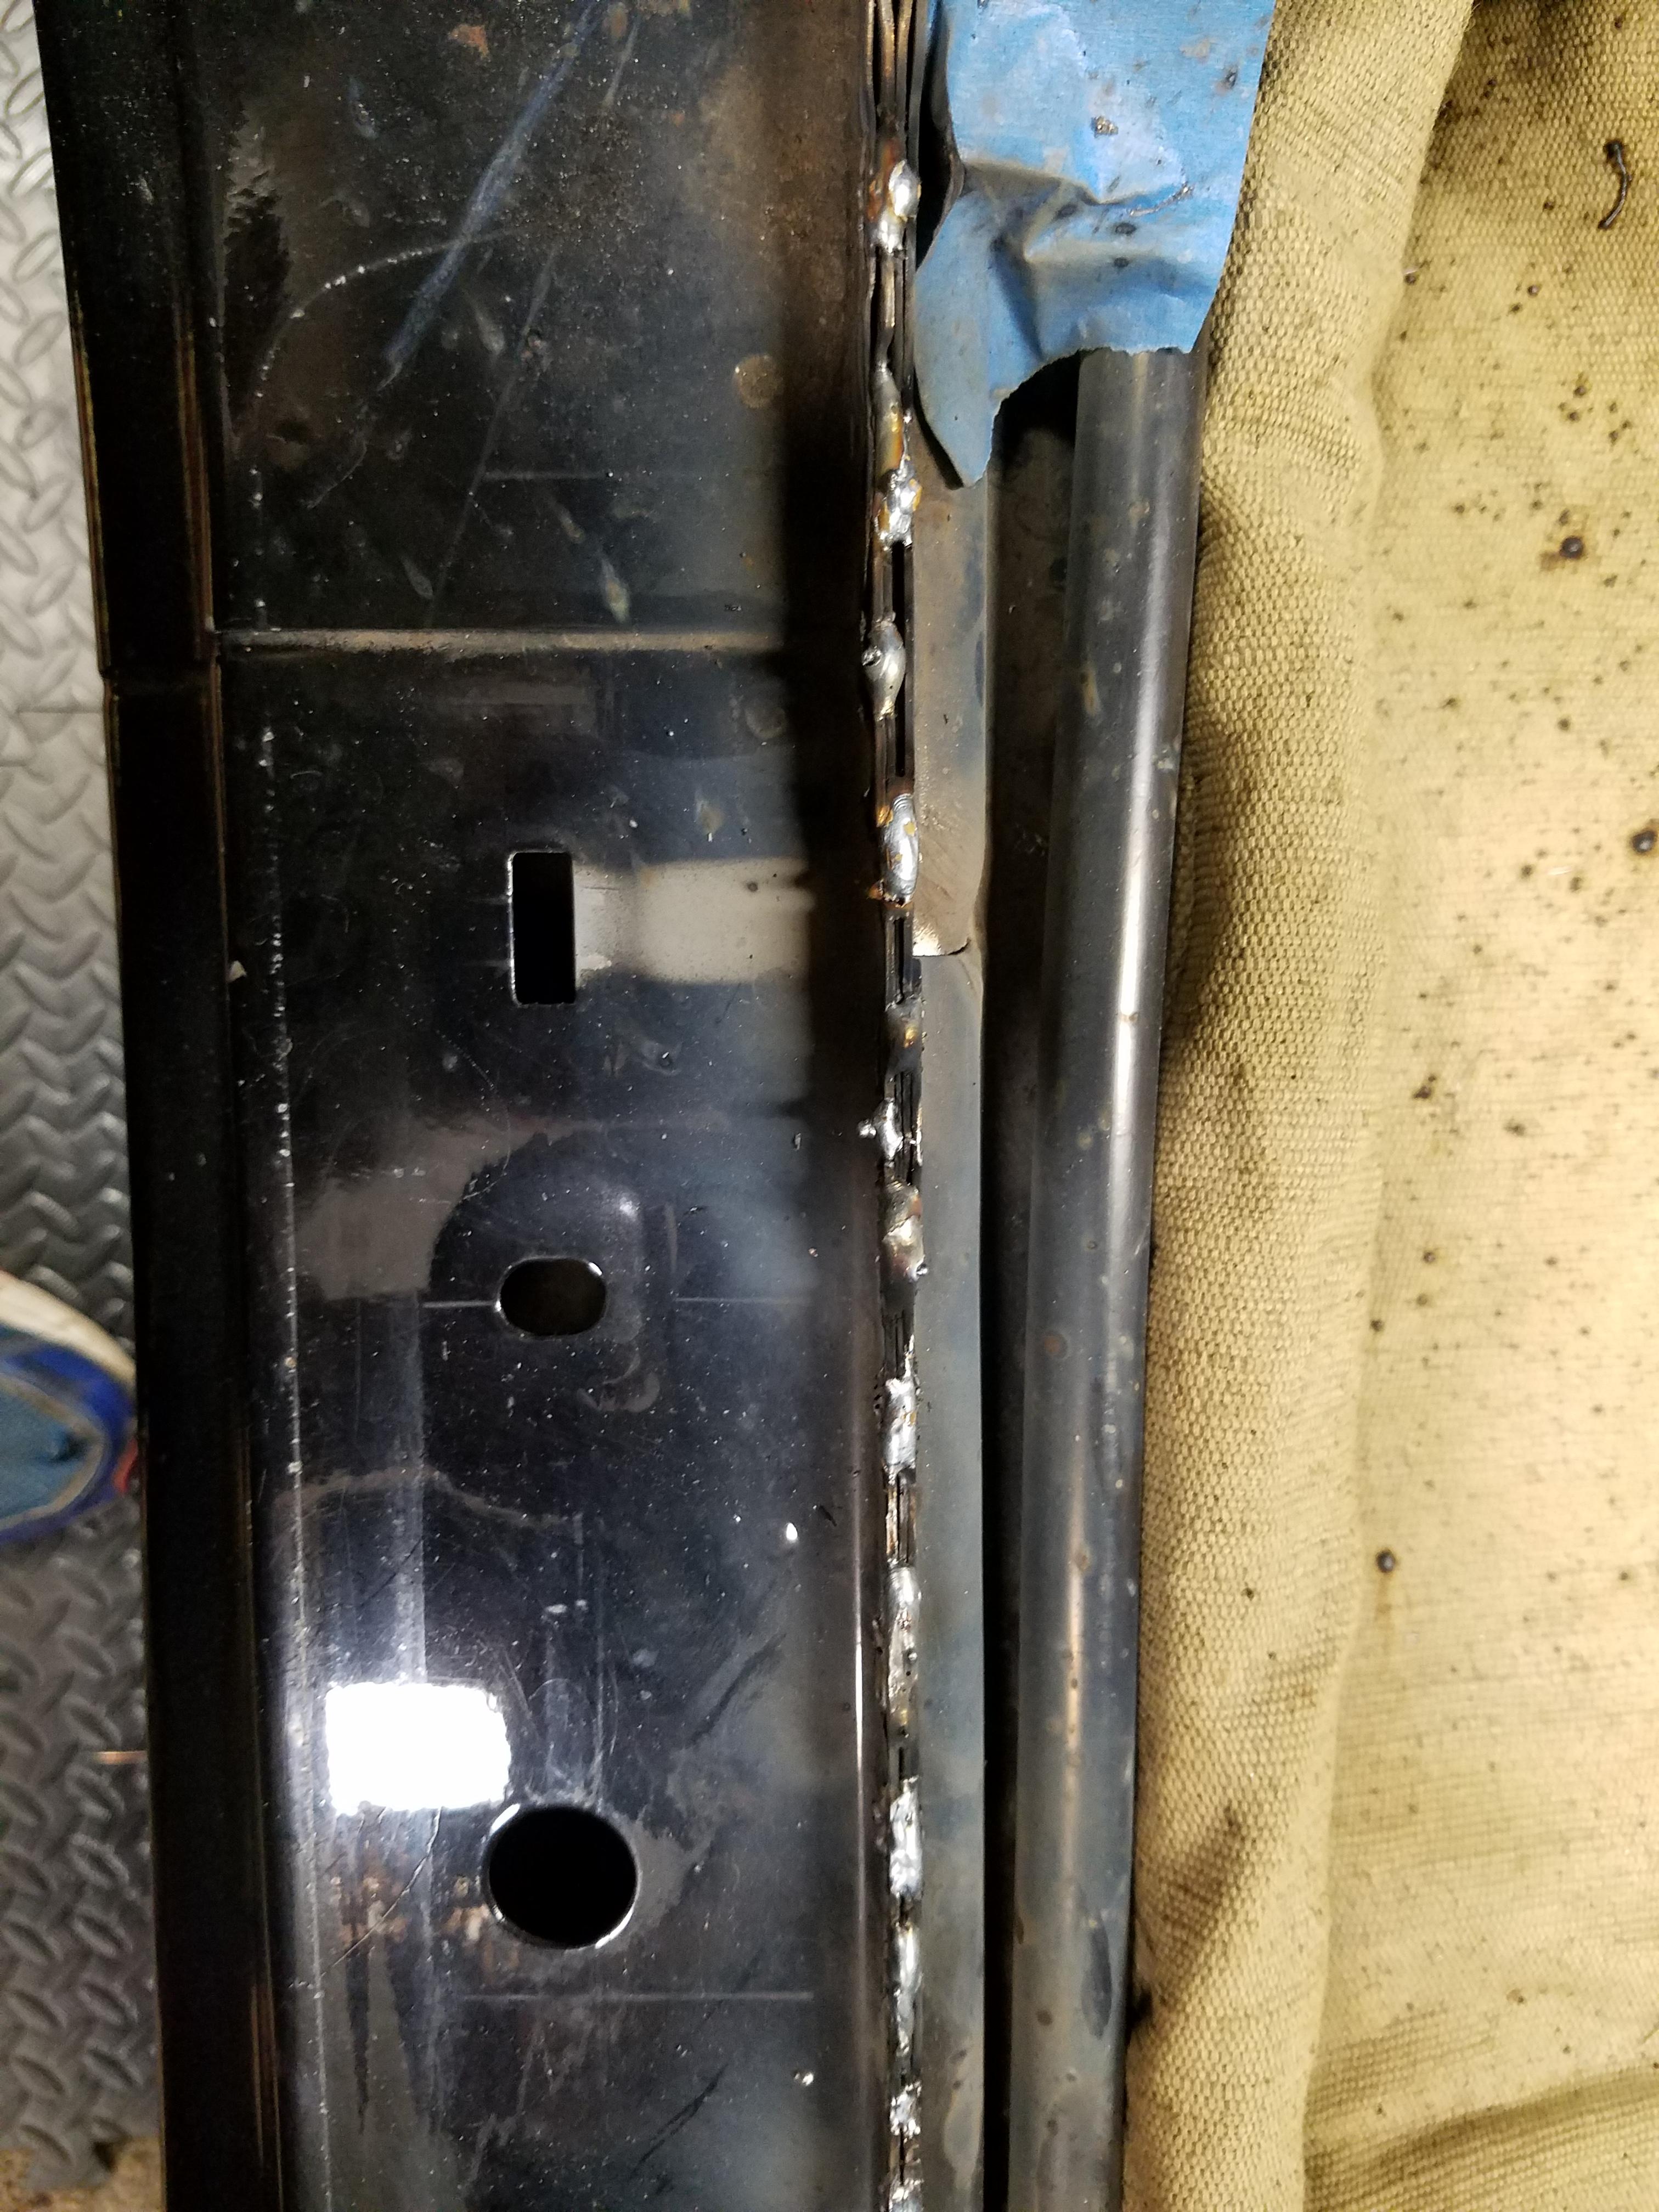
As I worked my way up the A pillar, there is some sealant or something where the top pieces of sheet metal meet. It was very gooey and I think it was creating a problem for the welds to set. Got alot of snap crackle pop. Maybe it was the goo in there, so I might try to remove some of it and try again.
I'm also going to seam weld alot of the engine bay, so I started a bit on removing seam sealer before I called it quits for the night.
Last edited by pj_mcgarvey; 11-27-2016 at 08:41 PM.


