A "Fabricators" Build Thread
 06-23-2016, 10:38 AM
#1
V8 Miata Follower
Thread Starter

Well I originally was thinking my build thread was going to be retrospective. But to appease the masses, as well as get a kick in the pants when I need to make more progress. I decided to bite the bullet.
Plans:
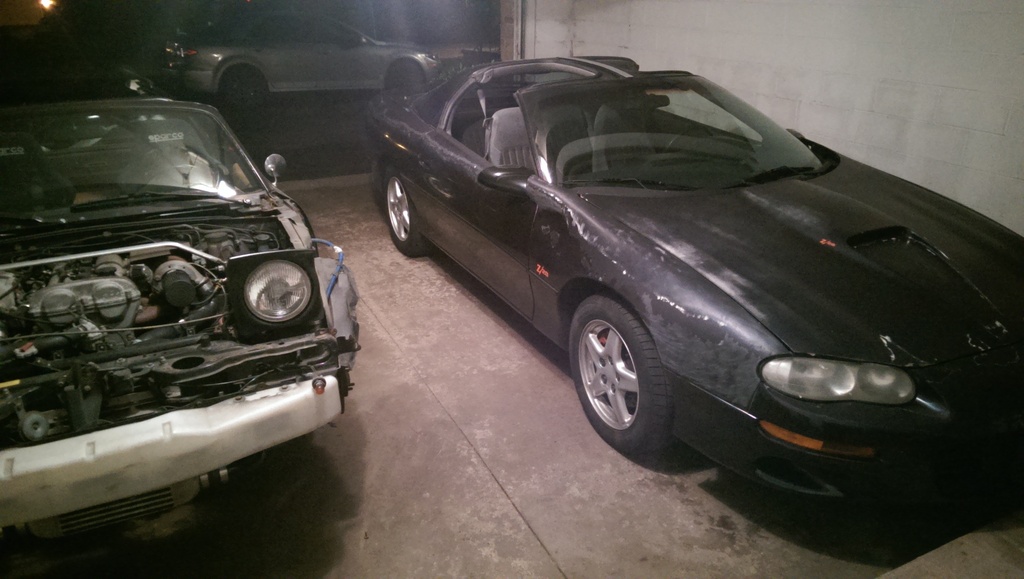
-The Donor: 1999 Z28 M6 w/ 128k on the clock
- Swap in "as-is" with only minor maintenance at this time including
accessory kit, GM LS2 Timing Chain, Melling 10296, clutch & external gaskets.
- Modified Camaro harness
- HPTuners to delete unused ancillaries
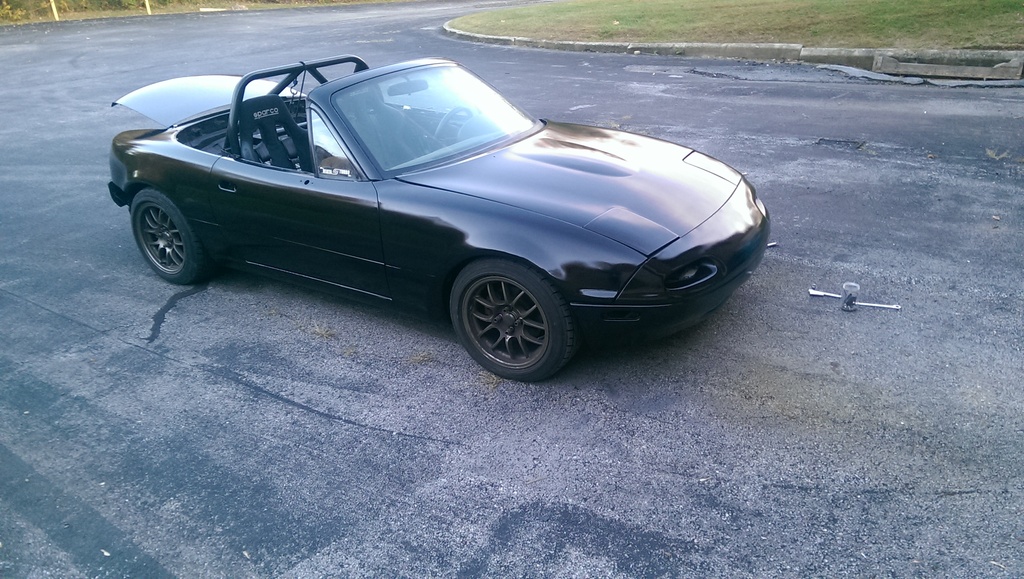
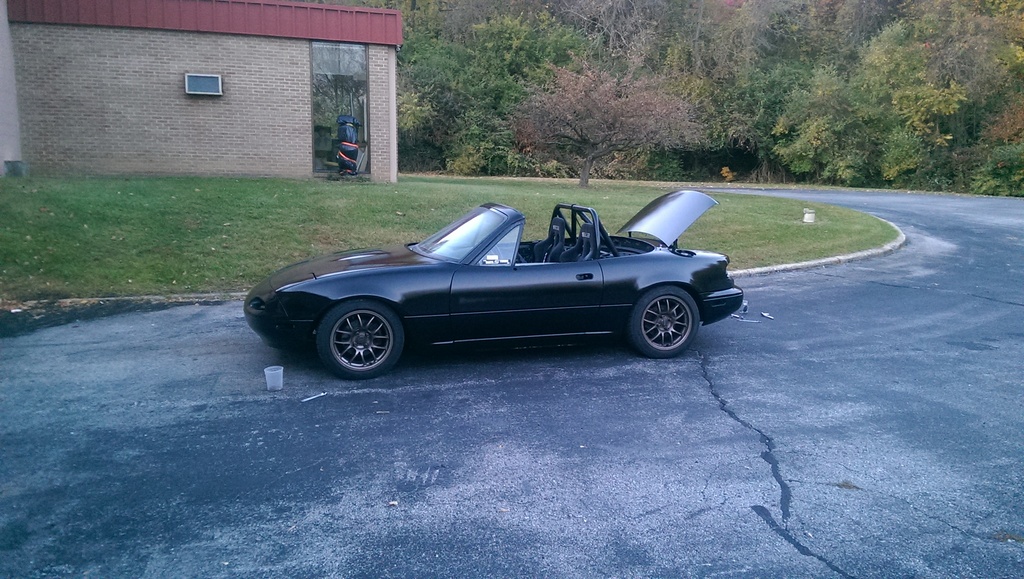
-The Miata : 1993 Greddy turbo, previous making 250/240 at the wheels.
- Sparco Sprint 5's
- Schroth 4 Points
- FM/KYB Suspensions w/FCM bumpstops
- FM front & rear sway bars
- 949 adjustable endlinks
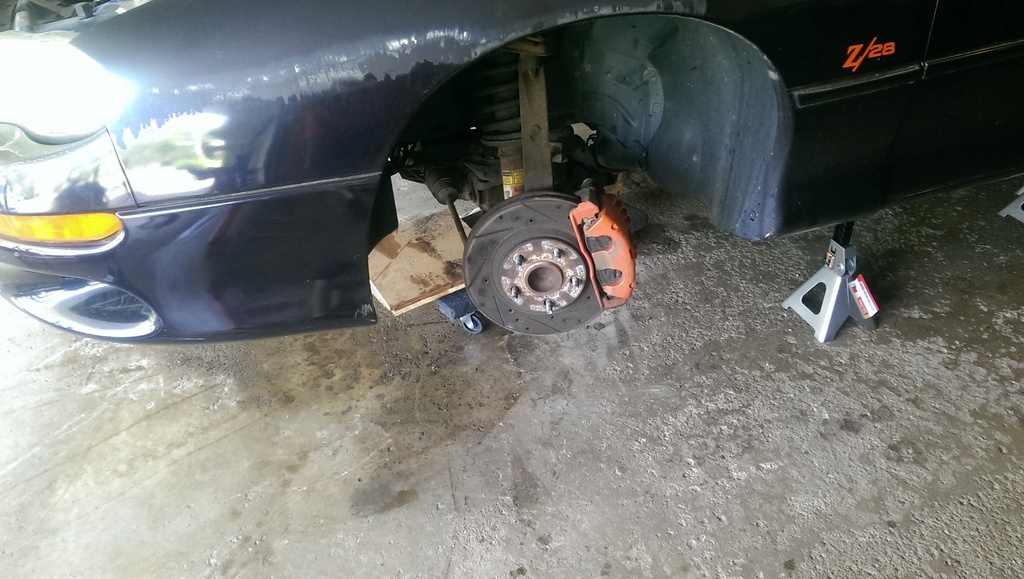
- 1.8 sport brake upgrade w/ axxis ULT pads
- 15x8 6ULs
- HDHCDD Roll Bar
After a lot of debate. I plan to:
-Modify factory Miata subframe for LS1
-Take a new approach to trans brace that does not use frame rail pickup points and will hopefully improve exhaust clearance even more
-DIY differential mounts (the designs for the Getrag are stupid simple)
-DIY Miata/Camaro frankenstein harness
-Shortened F-Body aluminum driveshaft
-Custom DSS "Stage 2" 650 hp axles/hub for room to grow
- Energy Suspension Control Arm Bushings
Stuffs that will wait until after the swap is running:
-Upgrade from FM Spring/KYB setup
-Upgrade from 1.8 Sport Brakes
-Upgrade from 15x8 6ULs to something stickier and wider
A Link to continuously updated build/cost sheet:
https://docs.google.com/spreadsheets...AiI/edit#gid=0
Progress to date:
- Starting last november, I decided to tackle the rocker rust that was starting to take hold on my 77k mile Miata.
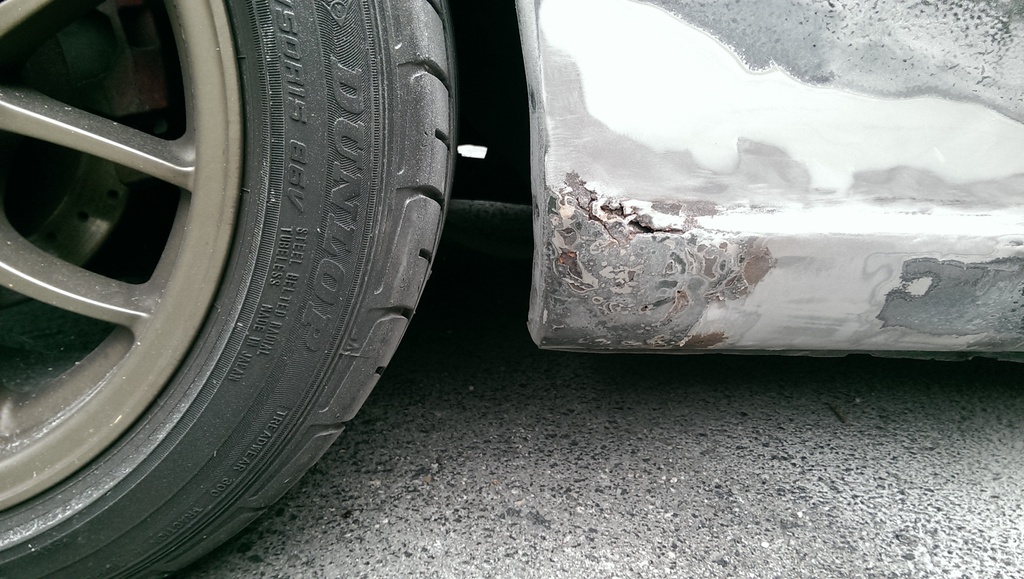
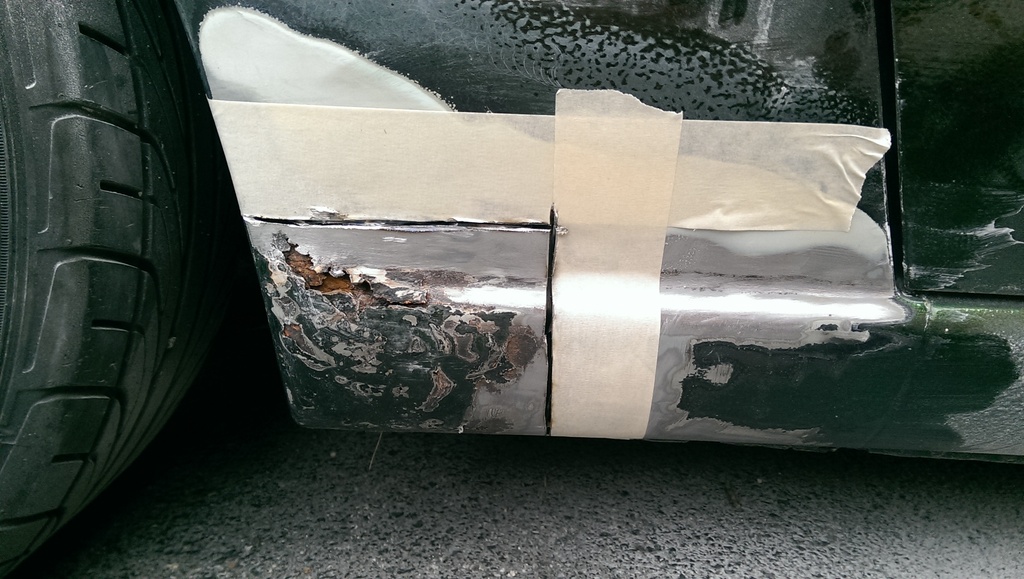
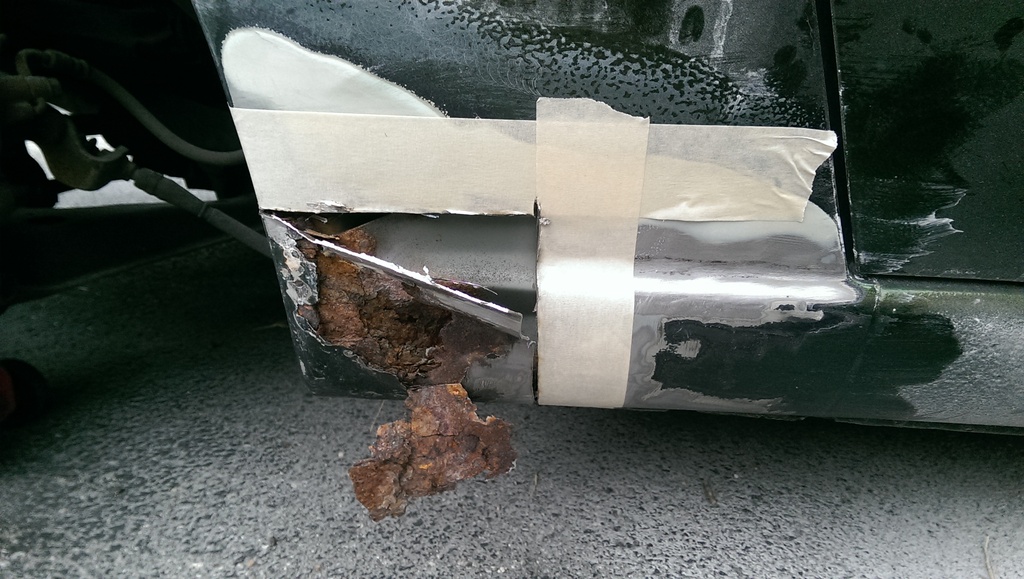
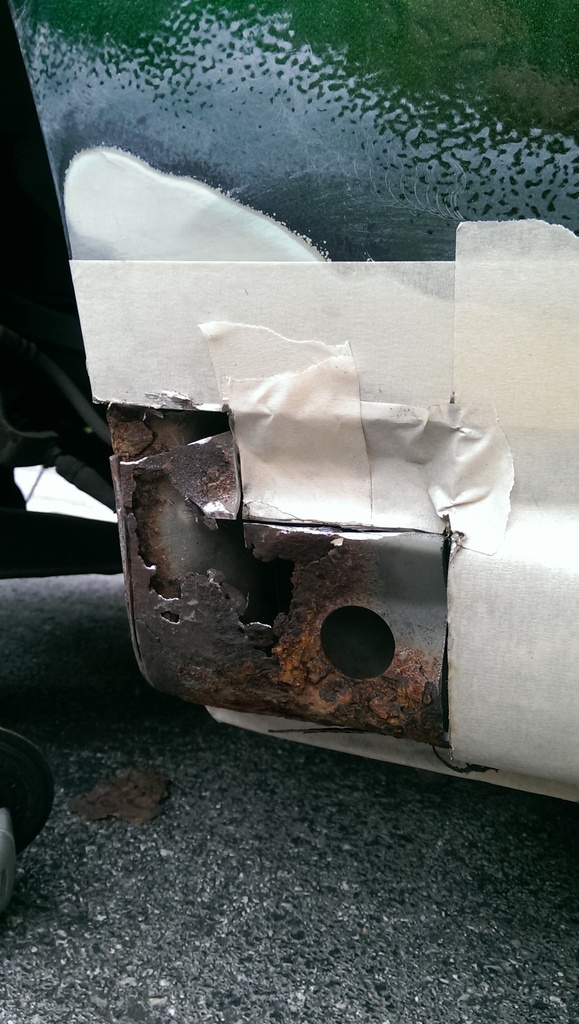
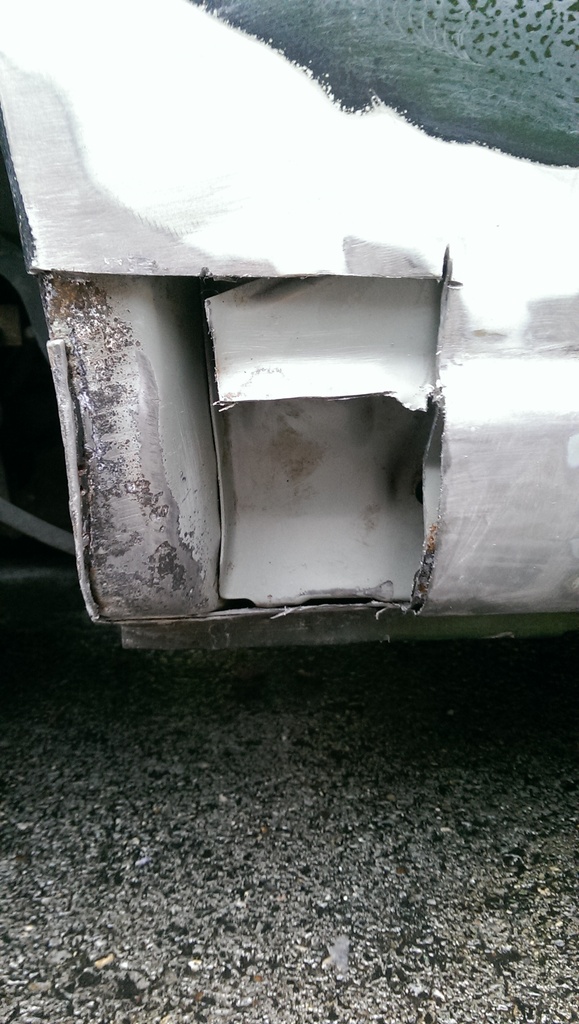


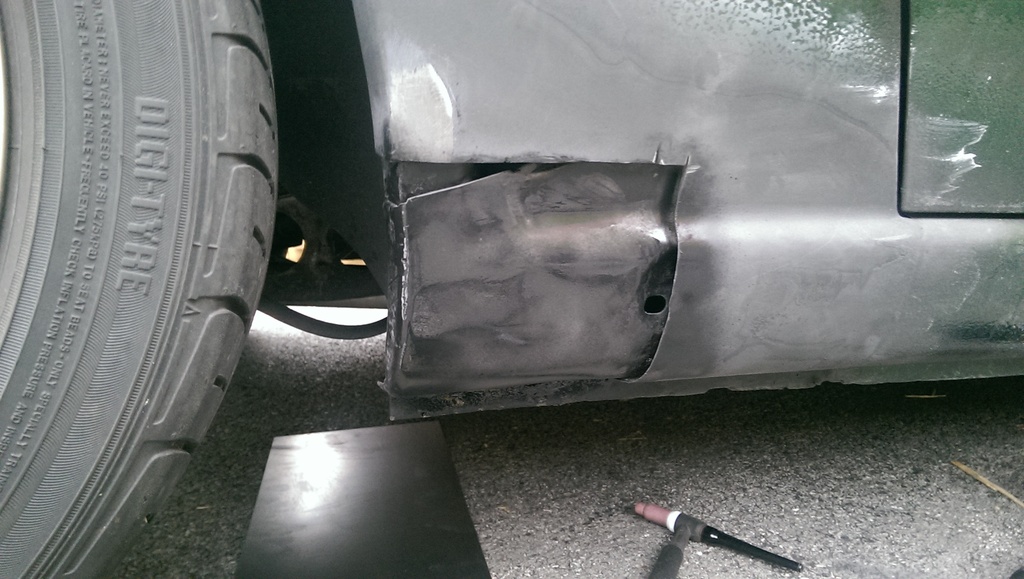
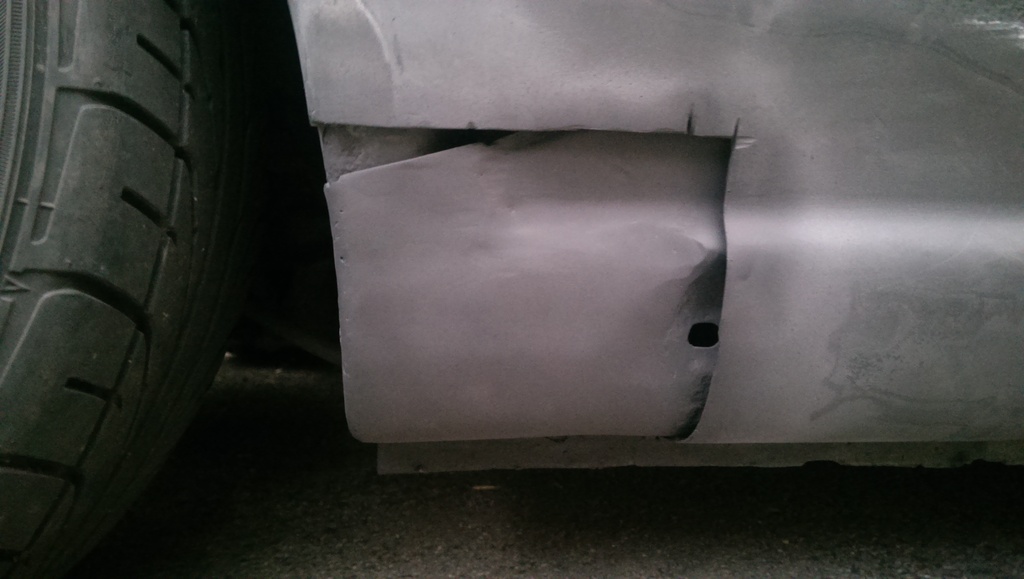
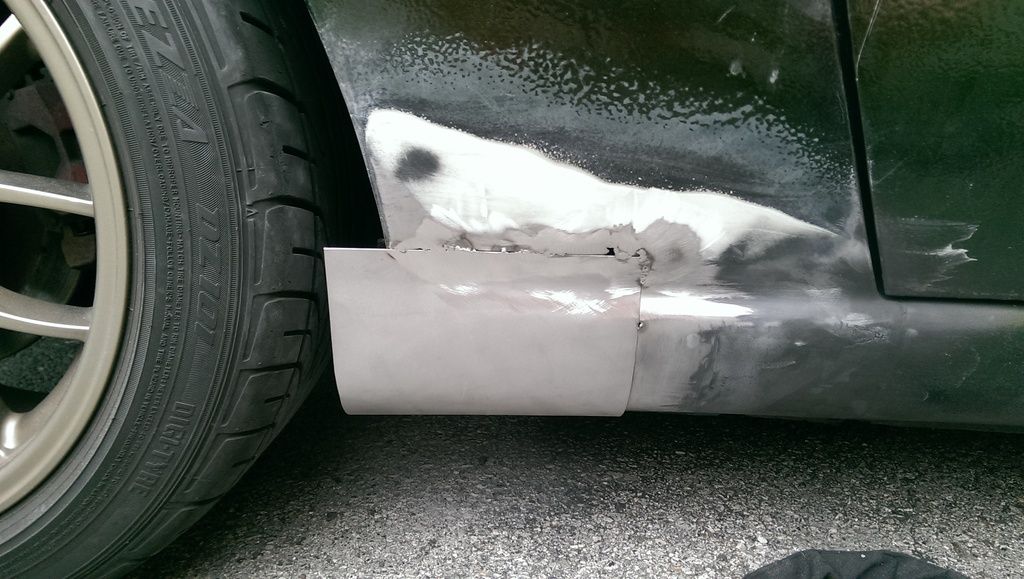
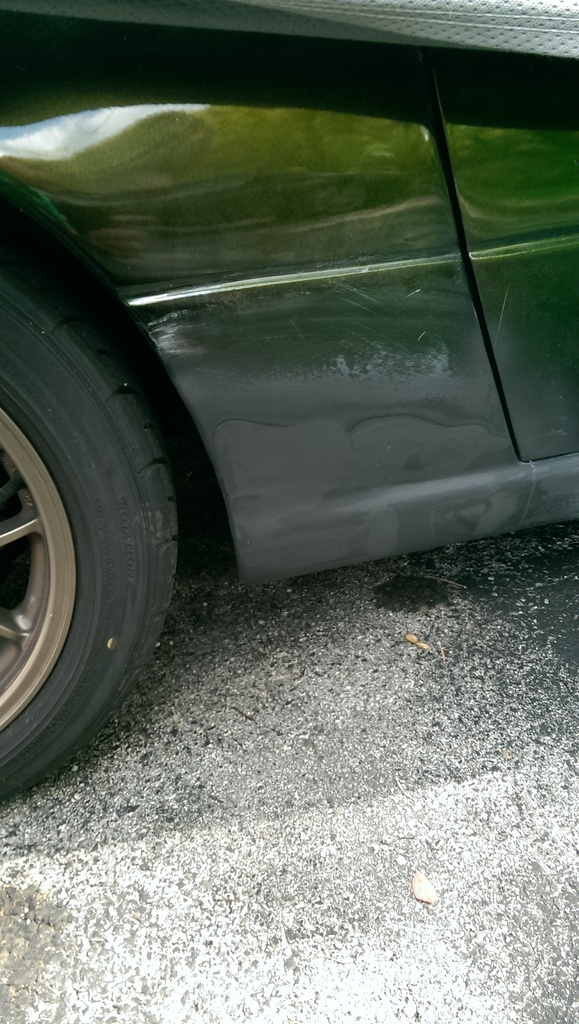
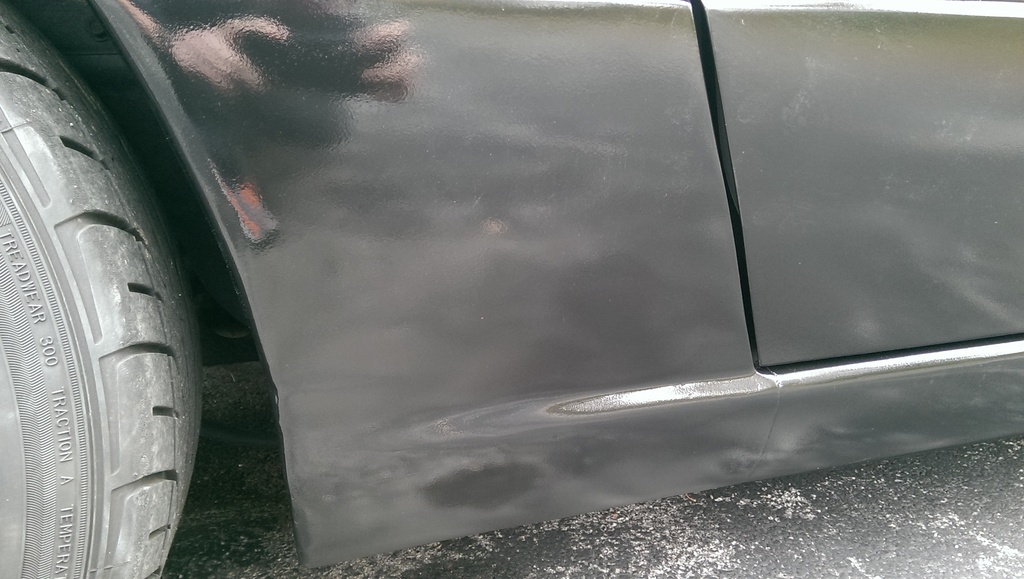
-Everything was repaired by yours truely, using some pretty basic tools and really wasnt bad. I am by no means a body man though. Oh and in case you were wondering, yes there were a lot of steps that I didnt upload pictures for; yes I promise I got all of the rust, and yes i did use weld-thru primer, and yes I did finish weld everything. After the repair was completed it was time for a paint job...... because race car, Rustoleum black!
-In hindsight, after going through all of the prep work for paint, a small part of me wishes I had shelled out for a profession to spray the car with real paint. However I am really happy with my finish, and I wont be upset when I scratch/chip/scuff the paint at autocross or other events! Easy touchup was a deciding factor here!
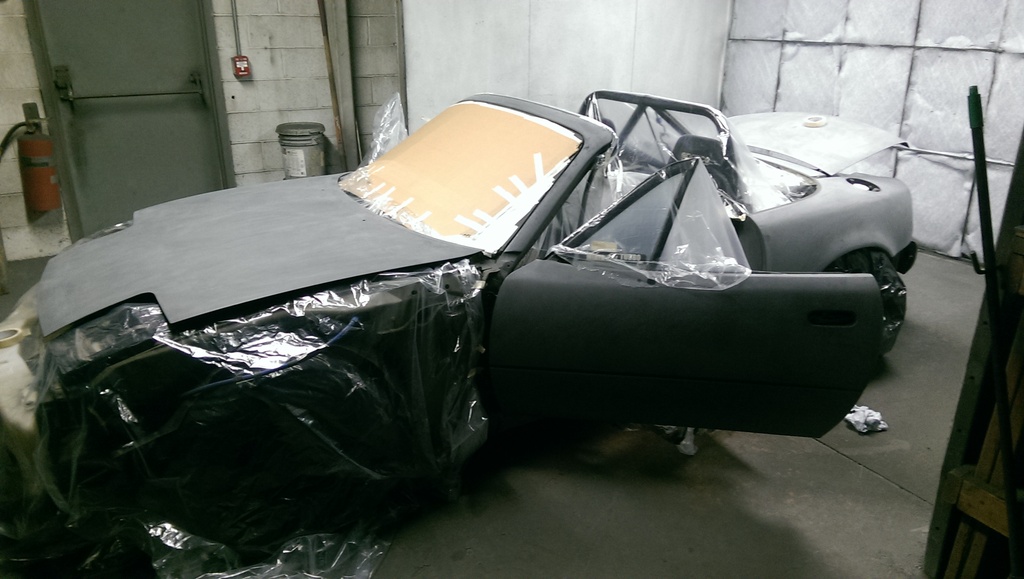
And that bring us to today! I guess you could say the build has begun!

Plans:
-The Donor: 1999 Z28 M6 w/ 128k on the clock
- Swap in "as-is" with only minor maintenance at this time including
accessory kit, GM LS2 Timing Chain, Melling 10296, clutch & external gaskets.
- Modified Camaro harness
- HPTuners to delete unused ancillaries
-The Miata : 1993 Greddy turbo, previous making 250/240 at the wheels.
- Sparco Sprint 5's
- Schroth 4 Points
- FM/KYB Suspensions w/FCM bumpstops
- FM front & rear sway bars
- 949 adjustable endlinks
- 1.8 sport brake upgrade w/ axxis ULT pads
- 15x8 6ULs
- HDHCDD Roll Bar

After a lot of debate. I plan to:
-Modify factory Miata subframe for LS1
-Take a new approach to trans brace that does not use frame rail pickup points and will hopefully improve exhaust clearance even more
-DIY differential mounts (the designs for the Getrag are stupid simple)
-DIY Miata/Camaro frankenstein harness
-Shortened F-Body aluminum driveshaft
-Custom DSS "Stage 2" 650 hp axles/hub for room to grow
- Energy Suspension Control Arm Bushings
Stuffs that will wait until after the swap is running:
-Upgrade from FM Spring/KYB setup
-Upgrade from 1.8 Sport Brakes
-Upgrade from 15x8 6ULs to something stickier and wider
A Link to continuously updated build/cost sheet:
https://docs.google.com/spreadsheets...AiI/edit#gid=0
Progress to date:
- Starting last november, I decided to tackle the rocker rust that was starting to take hold on my 77k mile Miata.


-Everything was repaired by yours truely, using some pretty basic tools and really wasnt bad. I am by no means a body man though. Oh and in case you were wondering, yes there were a lot of steps that I didnt upload pictures for; yes I promise I got all of the rust, and yes i did use weld-thru primer, and yes I did finish weld everything. After the repair was completed it was time for a paint job...... because race car, Rustoleum black!


-In hindsight, after going through all of the prep work for paint, a small part of me wishes I had shelled out for a profession to spray the car with real paint. However I am really happy with my finish, and I wont be upset when I scratch/chip/scuff the paint at autocross or other events! Easy touchup was a deciding factor here!
And that bring us to today! I guess you could say the build has begun!


Last edited by wcw5023; 07-28-2016 at 09:52 AM.

The following users liked this post:
charchri4 (10-06-2016)
06-23-2016, 12:54 PM
#3
V8 Miata Fanatic

Rough start or not, glad to see you decided to do a build thread. As funny as it seems, some of the other threads here were motivation for me to keep working on my car during the slowest parts. Itsallrigged's thread in particular since he was a couple months ahead of me.
Looks like you are off to a great start!
Looks like you are off to a great start!
The following users liked this post:
charchri4 (06-23-2016)
 06-27-2016, 10:15 AM
#5
V8 Miata Follower
Thread Starter
Okay this weekend's update. Not a whole lot exciting happened. Saturday morning went up to the local steel supply joint and bought me a bunch of metal. $130 for hopefully everything ill need to fabricate all of my mounts. I expect Ill have to make another small trip or two for some more bits as my design progress'. But even at $200.... Ill take that any day over 2K worth of V8R mounts.
-(4) 10ft lengths of 1" sq. .120 wall tubing
-(1) 10ft length of 1.5" OD .125 wall tubing
-(1) 5ft length of 1"OD .065 wall tubing
-(2) Pieces of .125" plate
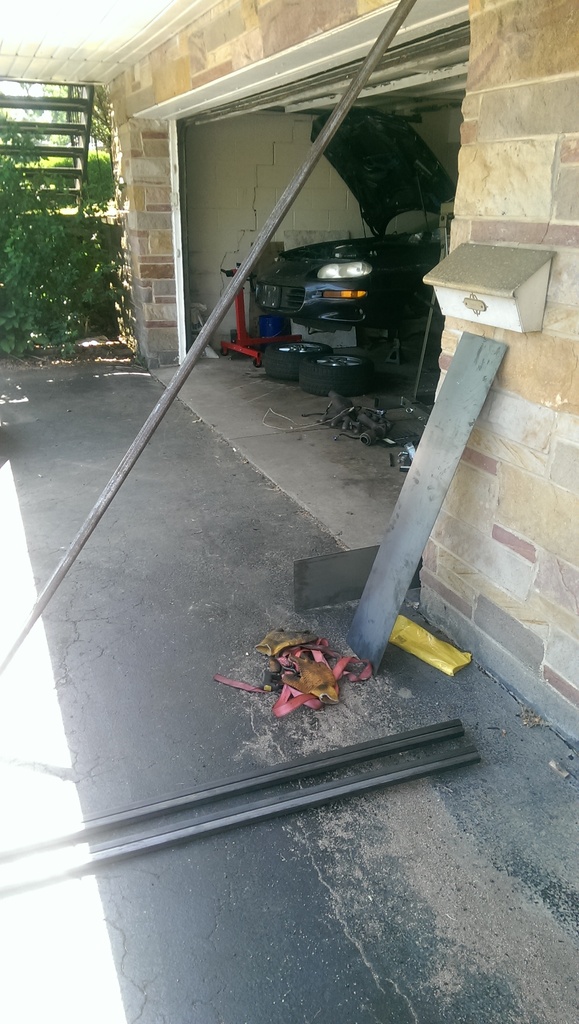
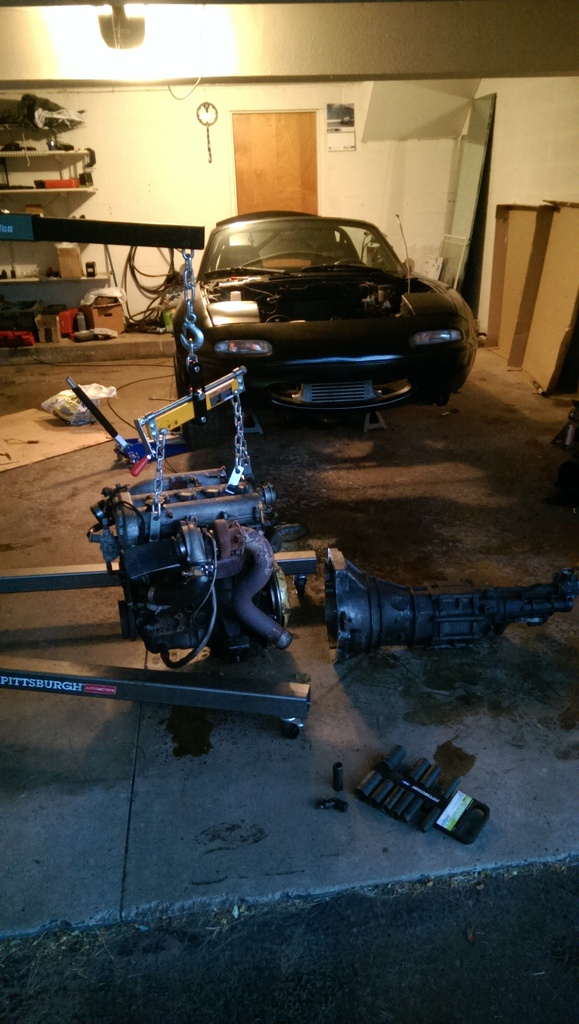
From there. I got the engine/trans separated from the subframe, while getting PS fluid everywhere.
And the Camaro subframe back in the car so it is a roller again. Hopefully I can sell the roller quick and have some space back!
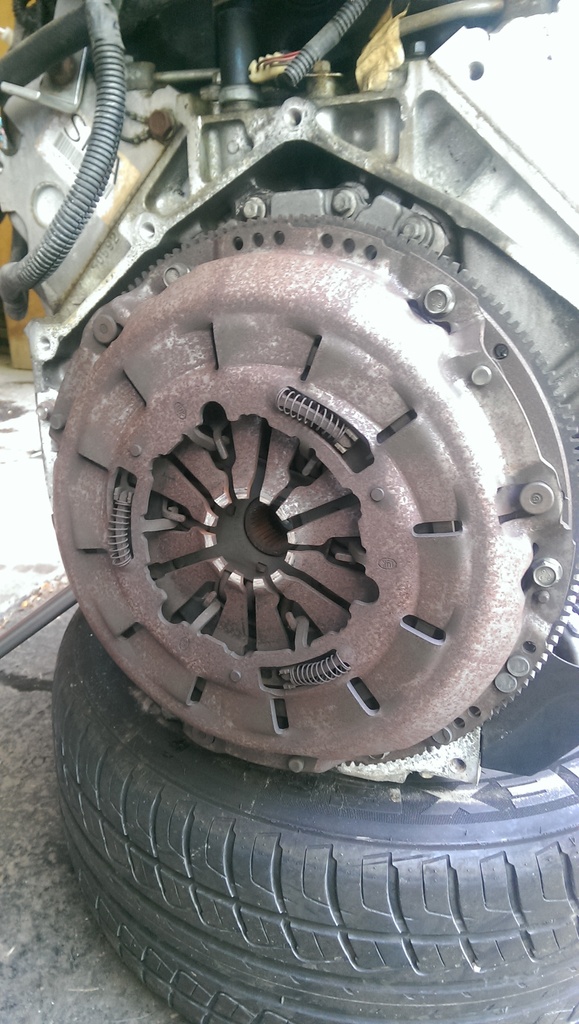
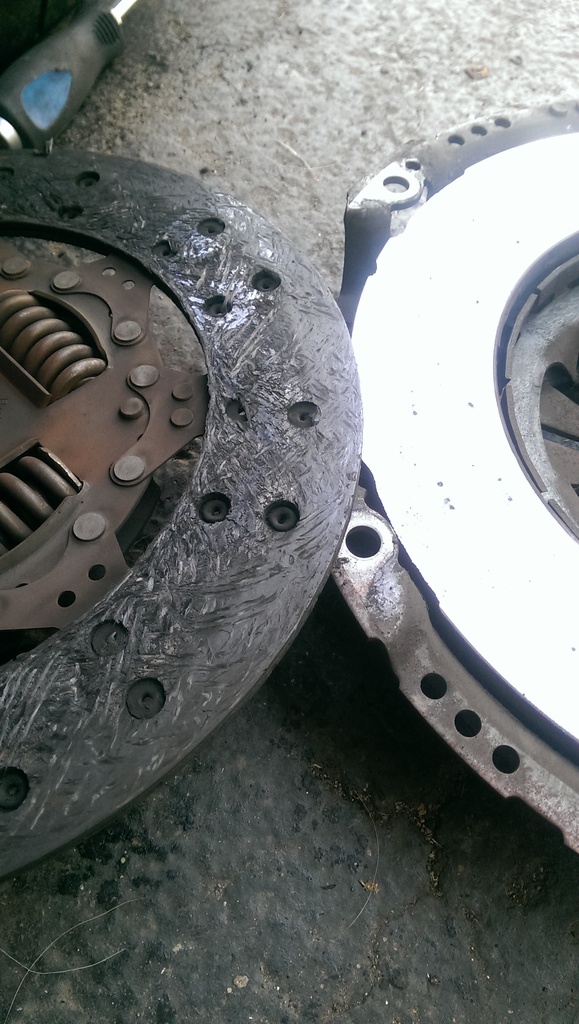
So I wanted to get the motor up on to a stand so it was time to separate the engine from the transmission. Took some work to get it started, the dowel pins werent happy. But it gave up eventually. Say hello to a whooped OEM 128k clutch assembly.
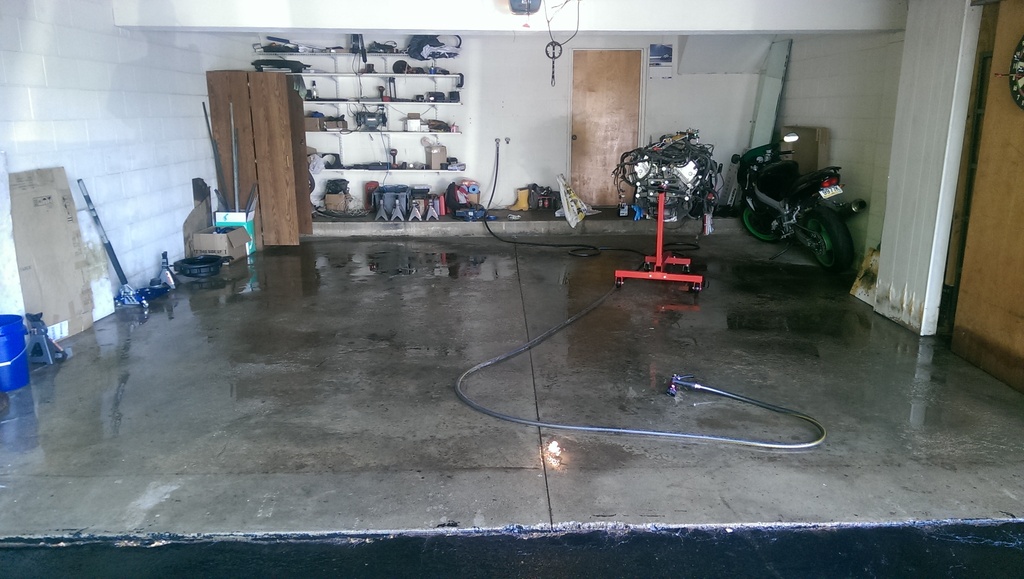
Finally. Took the girls out for some much needed sunshine while I cleaned up the garage. Laying on a clean floor is much nicer than an oily/kittylittery floor. Plus is also makes it much easier to find that nut/bolt/clip you just dropped.
Thats all for now. Before I get to any major fabrication. I want to get the Camaro gone. so next on my list is to dismantle more of the miata, get the interior out. Wiring harness finish labeled, then its on to some firewall work!
-(4) 10ft lengths of 1" sq. .120 wall tubing
-(1) 10ft length of 1.5" OD .125 wall tubing
-(1) 5ft length of 1"OD .065 wall tubing
-(2) Pieces of .125" plate

From there. I got the engine/trans separated from the subframe, while getting PS fluid everywhere.

And the Camaro subframe back in the car so it is a roller again. Hopefully I can sell the roller quick and have some space back!

So I wanted to get the motor up on to a stand so it was time to separate the engine from the transmission. Took some work to get it started, the dowel pins werent happy. But it gave up eventually. Say hello to a whooped OEM 128k clutch assembly.


Finally. Took the girls out for some much needed sunshine while I cleaned up the garage. Laying on a clean floor is much nicer than an oily/kittylittery floor. Plus is also makes it much easier to find that nut/bolt/clip you just dropped.


Thats all for now. Before I get to any major fabrication. I want to get the Camaro gone. so next on my list is to dismantle more of the miata, get the interior out. Wiring harness finish labeled, then its on to some firewall work!
07-08-2016, 09:49 AM
#6
V8 Miata Follower
Thread Starter
Well I suppose im about due for an update. I feel like im progressing very slowly. But I hope this is my turning point, because as of Wednesday (07/06/16) The Camaro is gone! wooooo! Although it is kinda sad for me, even though we were only together for maybe 4 short weeks, That car was a blast.
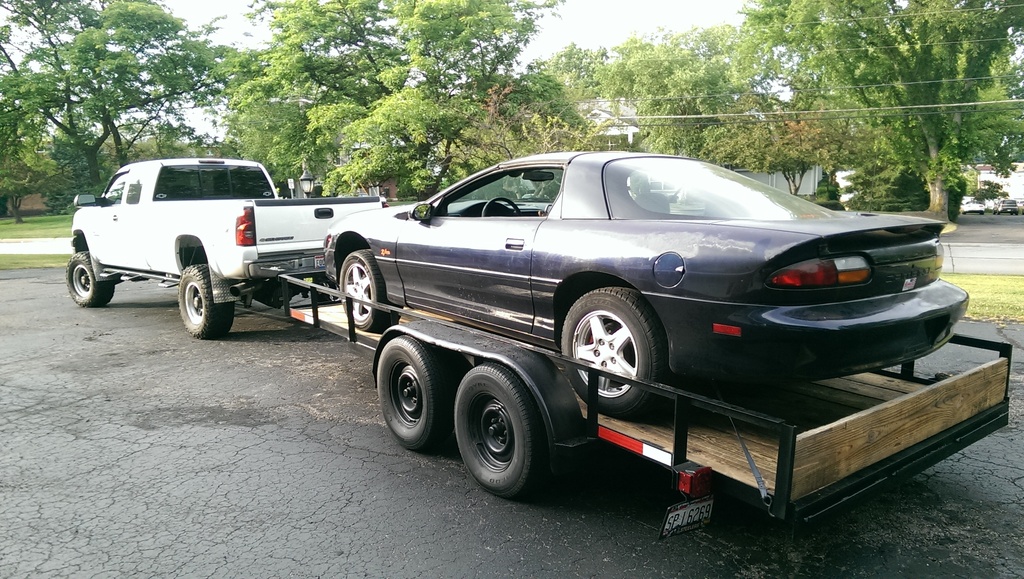
I feel like I couldve gotten a good bit more money out of it, however the space was a little more valuable to me. So I look the deal. As a reminder, I am trying to stay up to date on my cost spreadsheet, so I wont clutter up the thread with numbers.
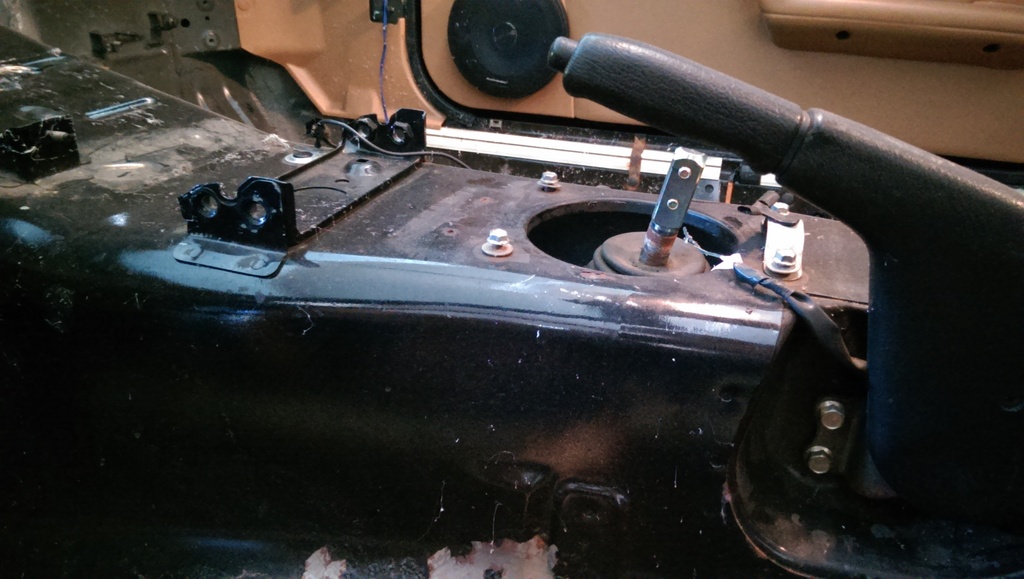
Anyhow, most of my time this week was spent either straightening up the garage again now that I have some space back. And working on getting the miata dash & wiring out.
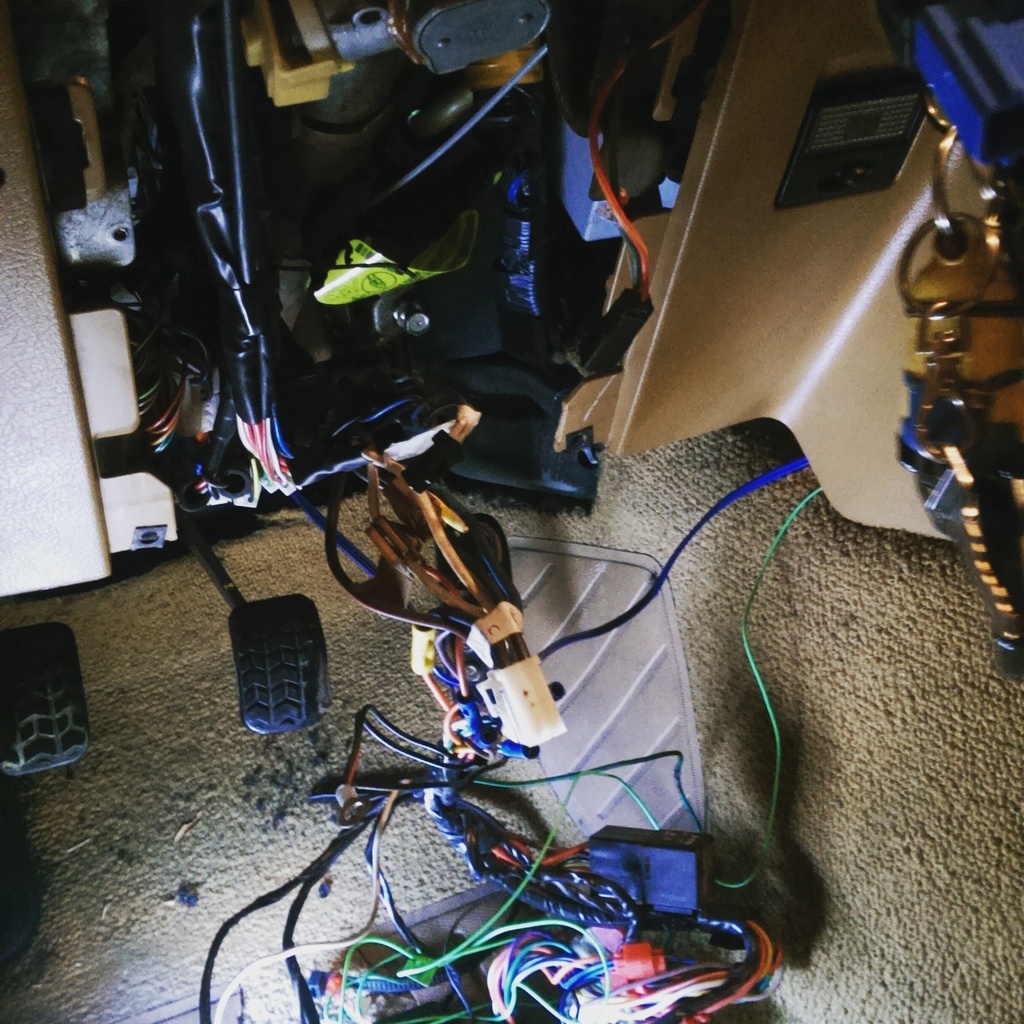
I kind of forgot up until this point, that at some point in its life, my car had an aftermarket alarm installed. So I spent a night on getting my seats out, and untangleing that mess. Fortunately it was pretty straight forward.
Then as of last night. The dash, steering column and seats are out!
I dont have much on my plate for this weekend on the homefront. So my goal is to get all the wiring and carpet out of the car, and start hacking up firewall! Woo!

I feel like I couldve gotten a good bit more money out of it, however the space was a little more valuable to me. So I look the deal. As a reminder, I am trying to stay up to date on my cost spreadsheet, so I wont clutter up the thread with numbers.
Anyhow, most of my time this week was spent either straightening up the garage again now that I have some space back. And working on getting the miata dash & wiring out.
I kind of forgot up until this point, that at some point in its life, my car had an aftermarket alarm installed. So I spent a night on getting my seats out, and untangleing that mess. Fortunately it was pretty straight forward.

Then as of last night. The dash, steering column and seats are out!

I dont have much on my plate for this weekend on the homefront. So my goal is to get all the wiring and carpet out of the car, and start hacking up firewall! Woo!
07-12-2016, 08:13 AM
#7
V8 Miata Follower
Thread Starter
Well I didnt get as much done over the weekend as I had hoped. Decided to stay out of the garage Sunday to hang out with the lady friend since she is going to be out of town the rest of this week. Gotta keep her happy 
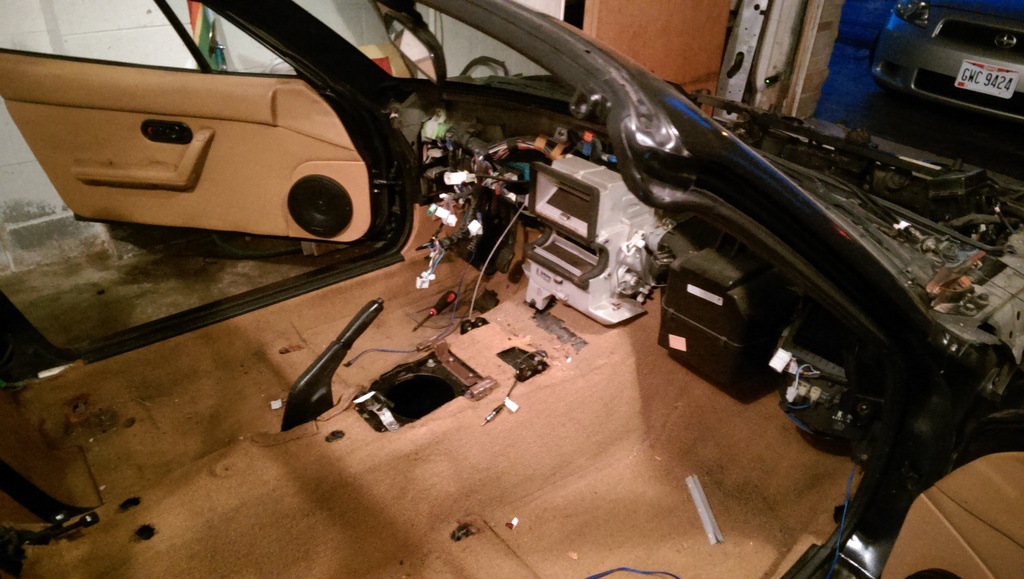
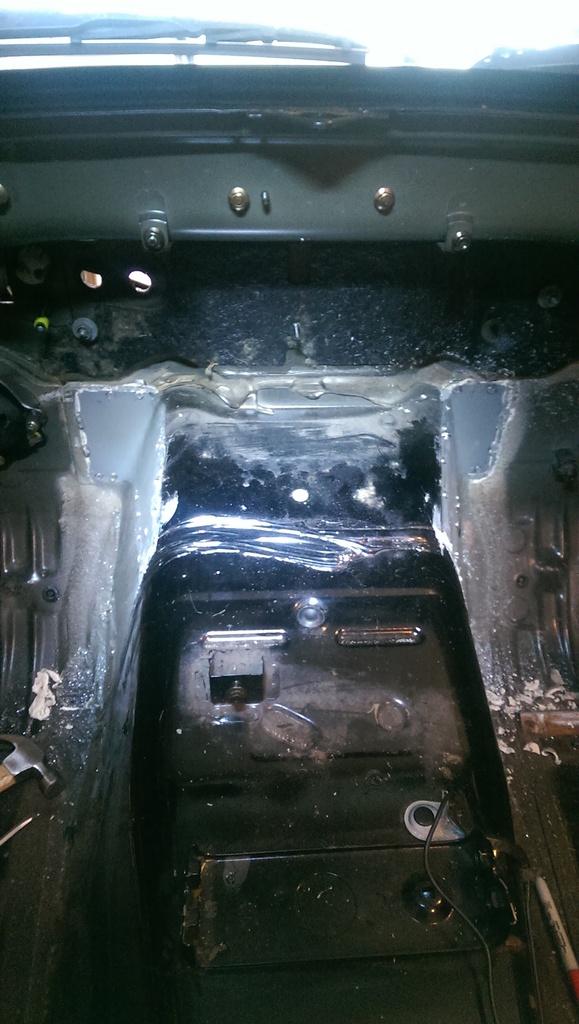
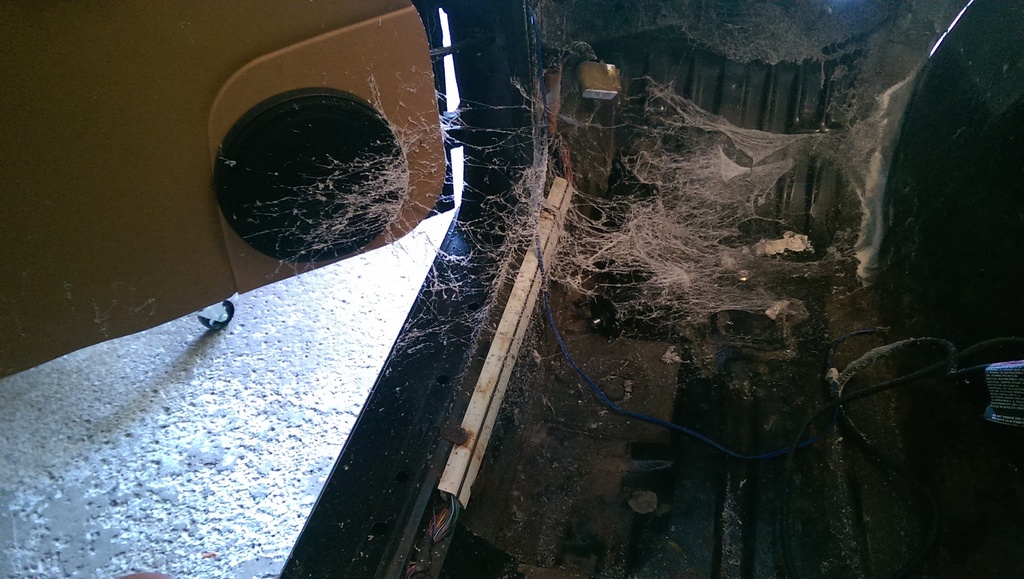
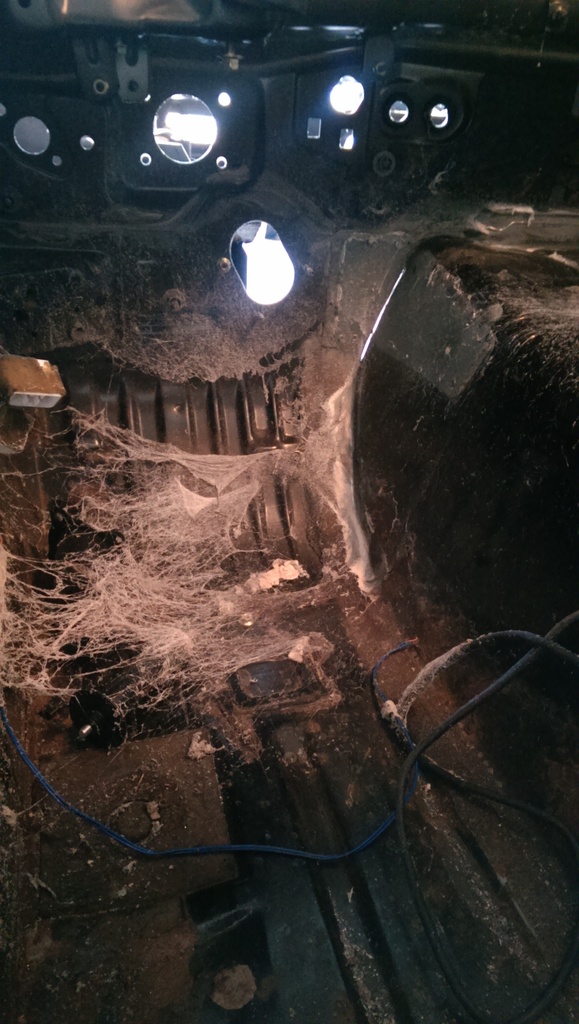
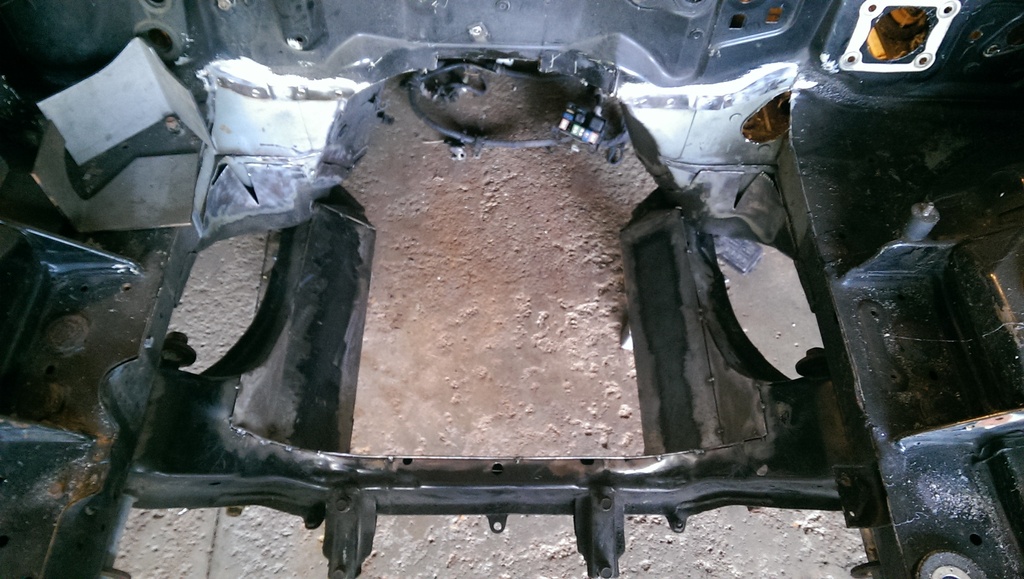
Anyhow, progress is progress. I got the carpet and dash and all the wiring out. There is some rust starting to form on the floorboards which was a disappointment, but thats okay, no better time than now to repair it! fortunately, its not bad enough that it wil require any welding. just some wirebrush/rust convertor/ paint etc will do it!
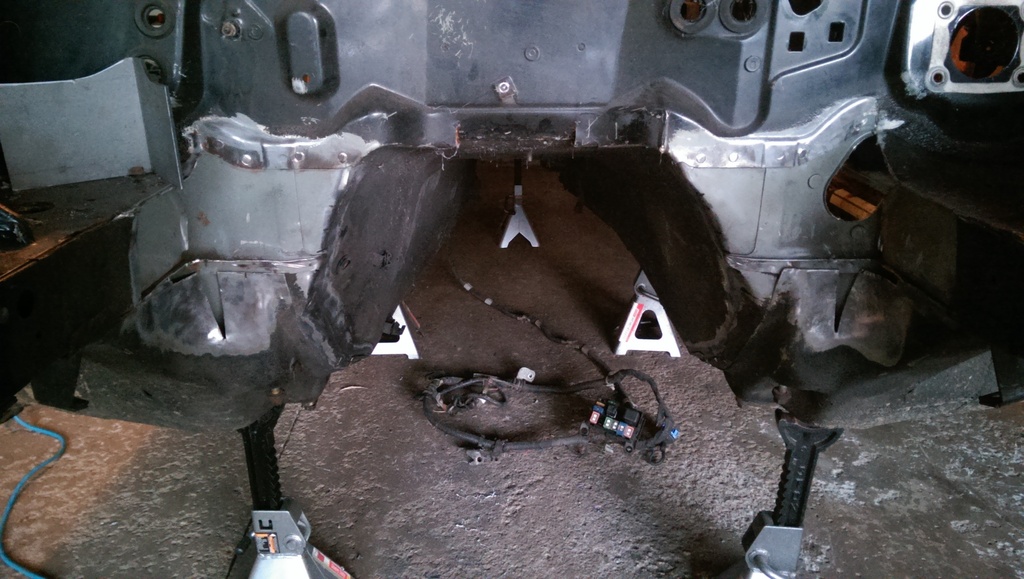
Anyhow. Cut the braces cut off the trans tunnel.
I was ready to start making the cuts in the engine bay, however I decided this would be a good time to roll her back outside while shes still on wheels. and Simple Green scrub down the engine bay etc. So that is my plan for the week.
Oh yeah and I got some parts in the mail the other day
Anyhow, progress is progress. I got the carpet and dash and all the wiring out. There is some rust starting to form on the floorboards which was a disappointment, but thats okay, no better time than now to repair it! fortunately, its not bad enough that it wil require any welding. just some wirebrush/rust convertor/ paint etc will do it!
Anyhow. Cut the braces cut off the trans tunnel.

I was ready to start making the cuts in the engine bay, however I decided this would be a good time to roll her back outside while shes still on wheels. and Simple Green scrub down the engine bay etc. So that is my plan for the week.
Oh yeah and I got some parts in the mail the other day


 They will need to ship you more than one beer to complete that project.
The following users liked this post:
charchri4 (10-06-2016)
07-13-2016, 09:44 AM
#9
V8 Miata Follower
Thread Starter
07-20-2016, 08:45 AM
#10
V8 Miata Follower
Thread Starter
So about that time for another update. Again I wish I could report a lot more progress than I have made. But there are simply not enough hours in the day! I got very little accomplished over the weekend due to a member of the local mazdaspeed club coming over with his tubular exhaust manifold that he wanted "help" installing..... Yeah, goodbye weekend. Anyone who has worked on a mazdaspeed 3/6 will know how much of a bear that job can be.
*le sigh
Anyhow, on to more exciting things.
Degussetizing
Gussets removed!

The cuts i made ended up not perfect. I cut a little too low, so after beating in the lower area, I wound up with more missing material than I wanted. Oh well, more welding for me I guess.
Next up was to open up that trans tunnel. I needed to remove a bit more seam sealer in the interior first however.
Seam sealer + wire wheel = spider webs everywhere!!!
Starting the cuts.
And pounded out!!
After going back and comparing some measurements to Flyin' Miatas instructions, I think I am going to need to "tweak" a little but more, about 0.5". But this overall wasnt too bad! Another step down.
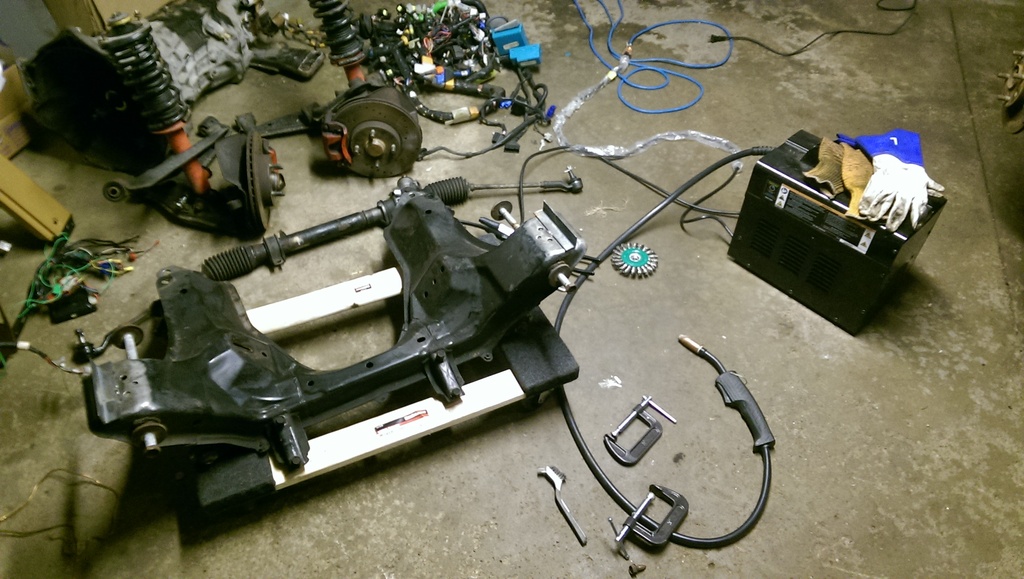
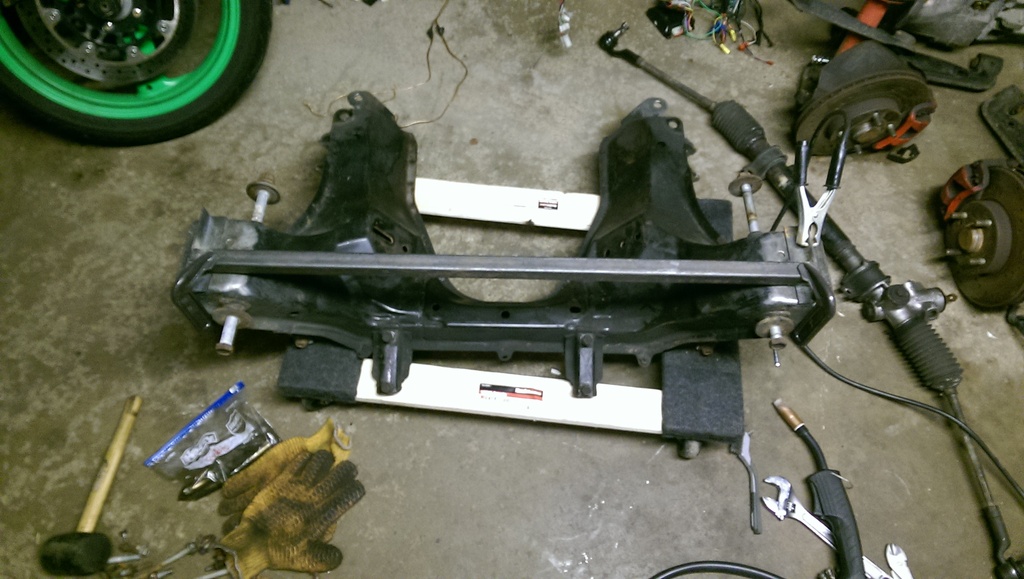
I pulled the uprights and steering rack off the front subframe last night and am hoping to get started on a light subframe fixture this week before I start cutting it up.
Stay tuned!
*le sigh

Anyhow, on to more exciting things.
Degussetizing

Gussets removed!

The cuts i made ended up not perfect. I cut a little too low, so after beating in the lower area, I wound up with more missing material than I wanted. Oh well, more welding for me I guess.
Next up was to open up that trans tunnel. I needed to remove a bit more seam sealer in the interior first however.
Seam sealer + wire wheel = spider webs everywhere!!!

Starting the cuts.

And pounded out!!

After going back and comparing some measurements to Flyin' Miatas instructions, I think I am going to need to "tweak" a little but more, about 0.5". But this overall wasnt too bad! Another step down.
I pulled the uprights and steering rack off the front subframe last night and am hoping to get started on a light subframe fixture this week before I start cutting it up.
Stay tuned!
07-25-2016, 11:21 AM
#11
V8 Miata Follower
Thread Starter
Well, only got 1 solid day of work in this weekend. But felt accomplished for a single day!
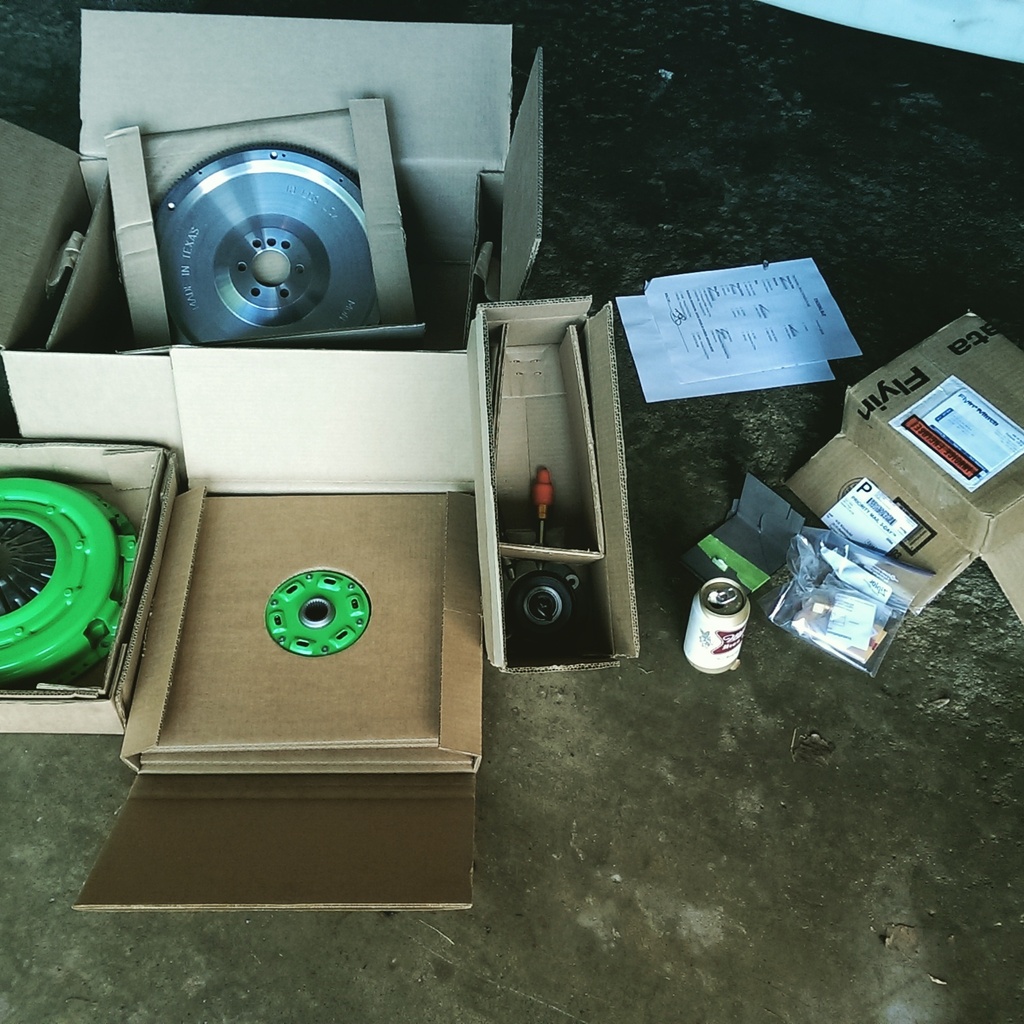
Got some parts in the mail on Thursday! Sanderson coated headers and LS2 FEAD parts! Also to my surprise the LS2 pulley that arrived was actually an ASP 25% underdrive. Not sure if I want to use it or not based on everything ive read about them. But we will see.
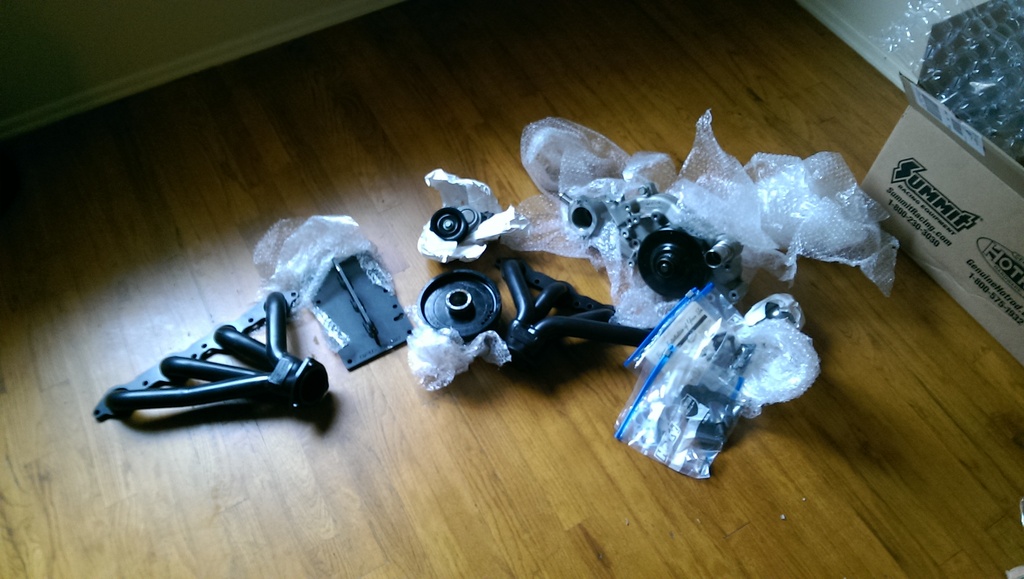
As for the headers, they were not originally a part of my plan, I was toying with the idea of fabbing up my own, but figured that would be a project better suited for the off season, and I got these sandersons at a deal! So I will put of project DIY long-tubes for another time!
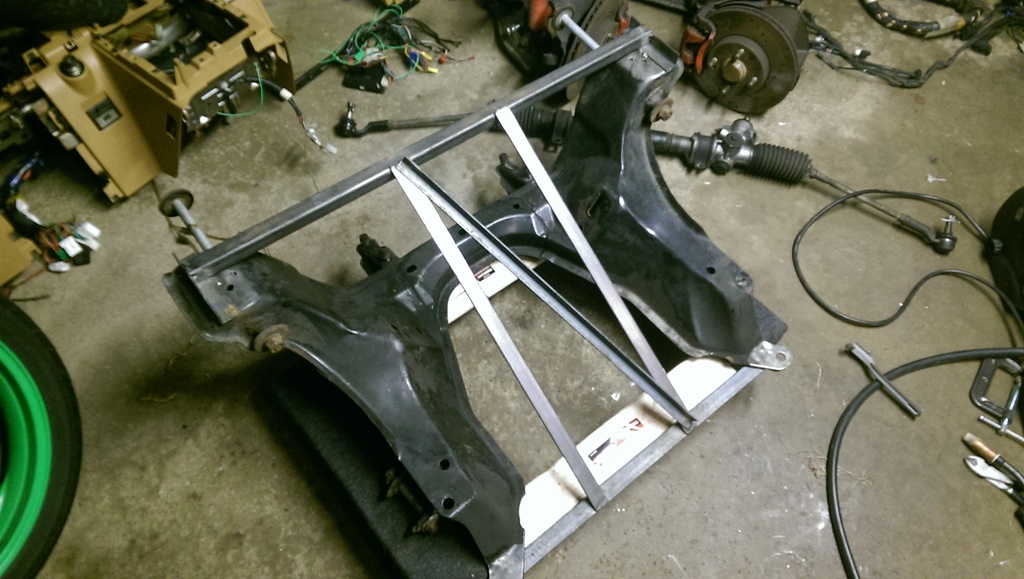
So, finally, its time to tackle this front subframe. Going to do some light bracing to keep it relatively fixed while I modify it.
I just migged on some steel stock for bracing, Final welding will all be tigged.
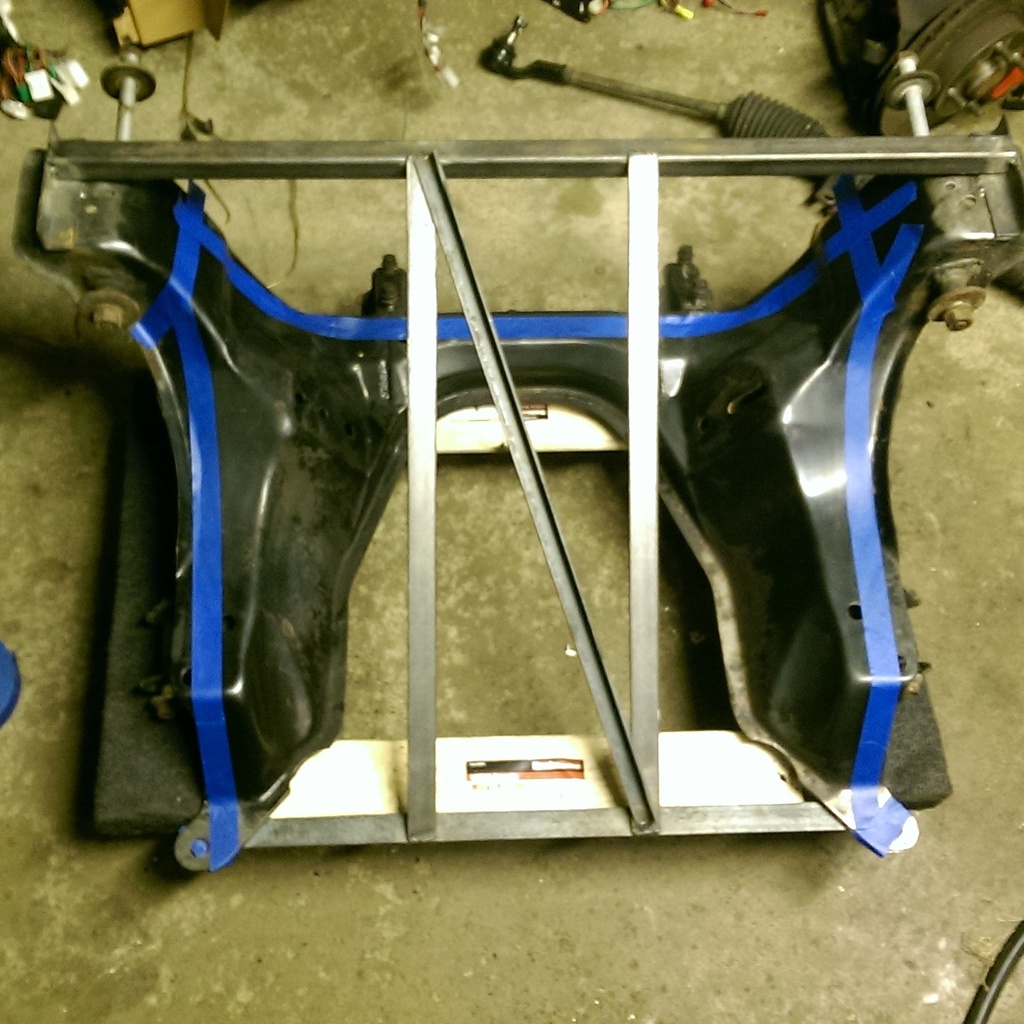
Annnnd laid down some tape for where I want to cut.
I am almost finished cutting as of today, and probably woudlve finished this weekend. However we got hit with a pretty nasty thunderstorm Sunday morning and came down to the garage to find my garage had turned into a lake!! =( Ill be getting the fans out tonight and seeing if I can get back on track by tomorrow!

Got some parts in the mail on Thursday! Sanderson coated headers and LS2 FEAD parts! Also to my surprise the LS2 pulley that arrived was actually an ASP 25% underdrive. Not sure if I want to use it or not based on everything ive read about them. But we will see.

As for the headers, they were not originally a part of my plan, I was toying with the idea of fabbing up my own, but figured that would be a project better suited for the off season, and I got these sandersons at a deal! So I will put of project DIY long-tubes for another time!
So, finally, its time to tackle this front subframe. Going to do some light bracing to keep it relatively fixed while I modify it.

I just migged on some steel stock for bracing, Final welding will all be tigged.


Annnnd laid down some tape for where I want to cut.

I am almost finished cutting as of today, and probably woudlve finished this weekend. However we got hit with a pretty nasty thunderstorm Sunday morning and came down to the garage to find my garage had turned into a lake!! =( Ill be getting the fans out tonight and seeing if I can get back on track by tomorrow!
 08-01-2016, 02:44 PM
#12
V8 Miata Follower
Thread Starter
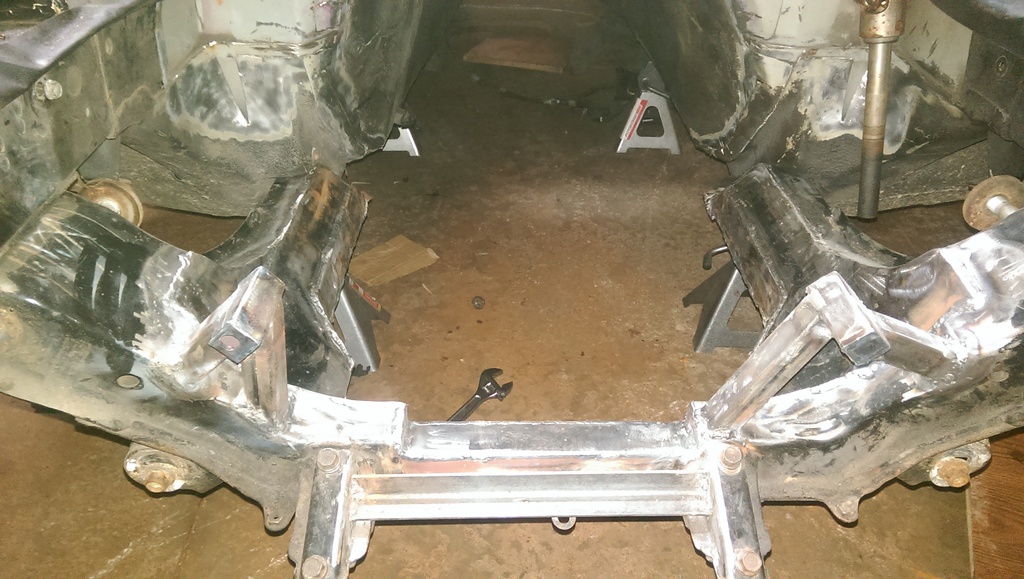
I feel like I keep coming back here disappointed that I didnt make more progress over the weekend. But the good news is, the subframe is all finished! So lets just run through some pictures here showing its progress between my last update and now.
Large chunks cut out:
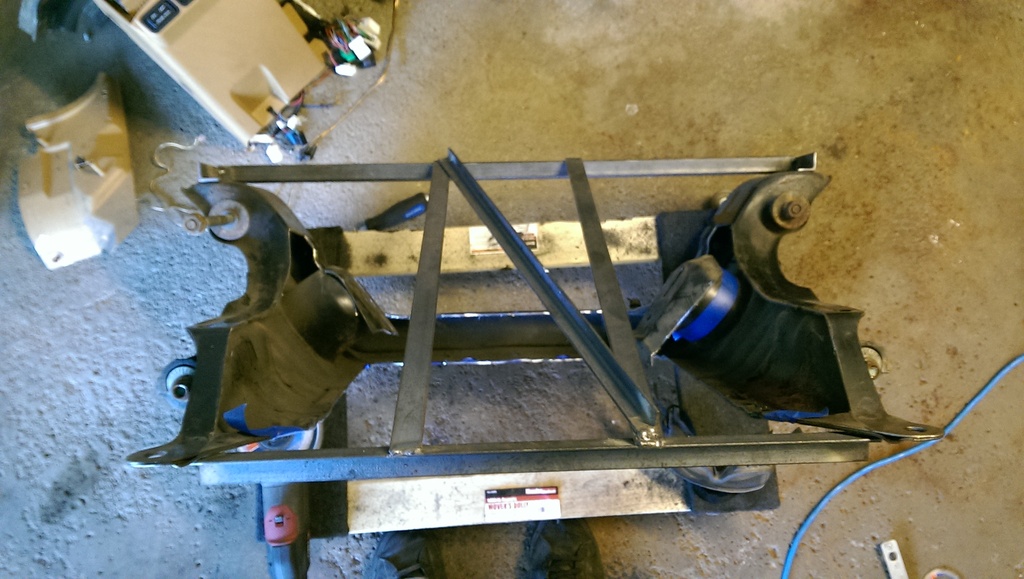
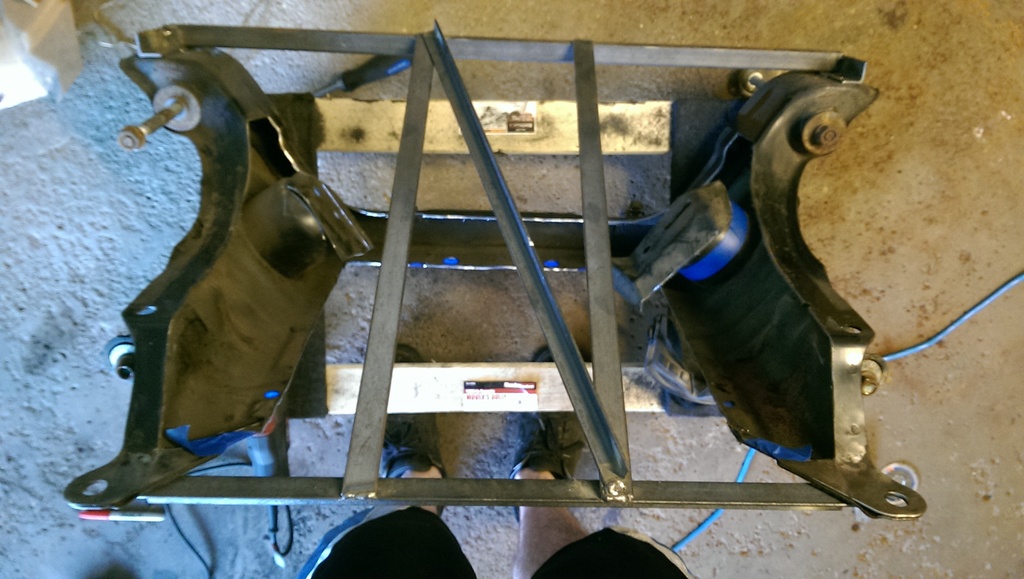
Id like to thank: Sharpies, cardboard, cut-off wheels, tape measures and grinders , for making this all possible.
First side tacked up. This half probably took me nearly 6hrs, with probably half of that just pondering exactly how I wanted to approach this. Main considerations were obviously simplicity. And minimal welding to lessen the chances of warpage. I also spent a lot of time finessing the motor mount "cups" , I wanted to be sure to get a good fitup so I could easily weld them to the backside of the plates for rigidity.
The second half went much quicker now that I had a direction and was simply mirroring the other side. I was happy to find that my cuts mustve been very accurate since using the identical cardboard templates as the drivers side worked perfectly for the passenger side. Woo!
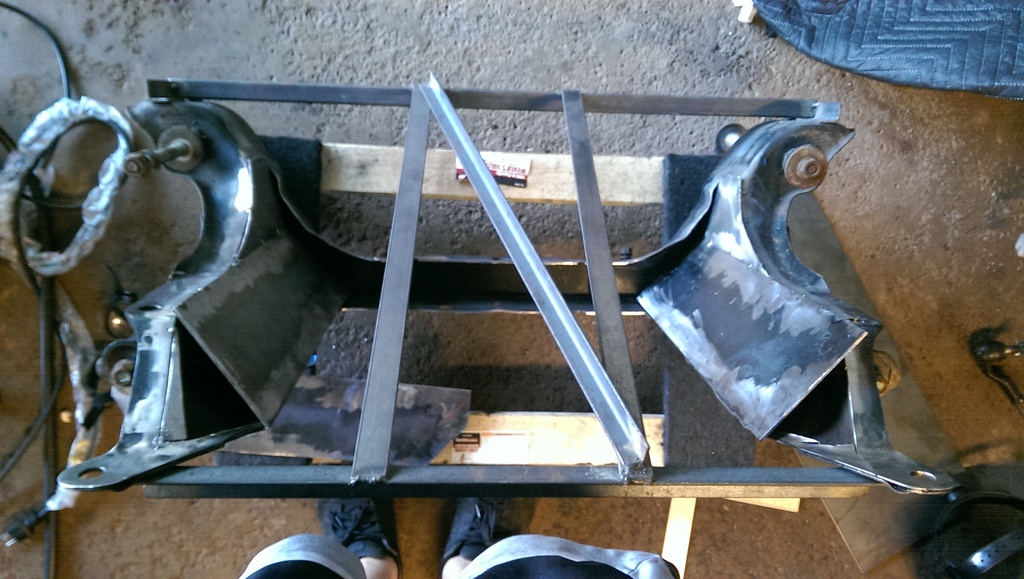
And the front portion:
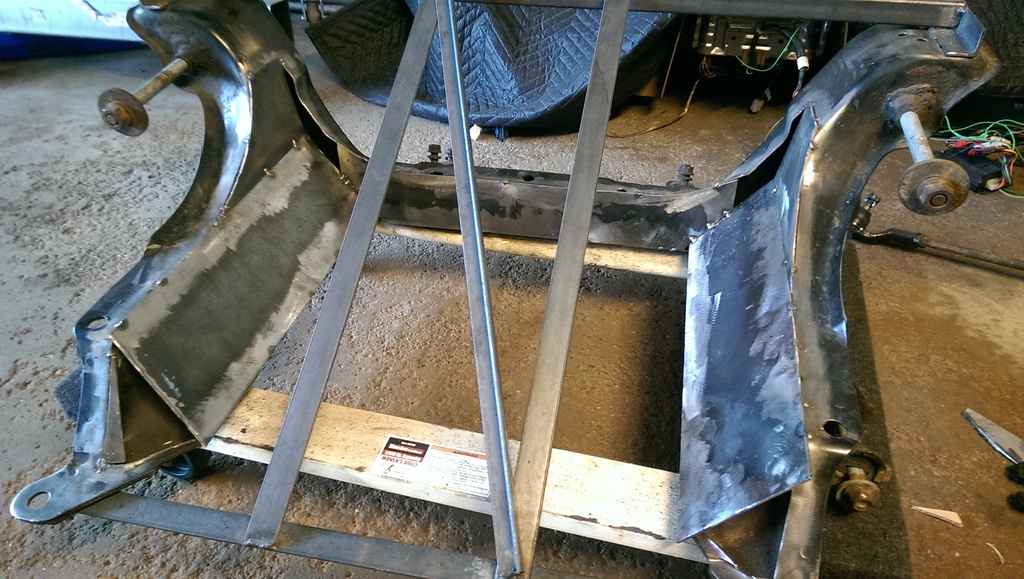
Now just filling in the little bits:
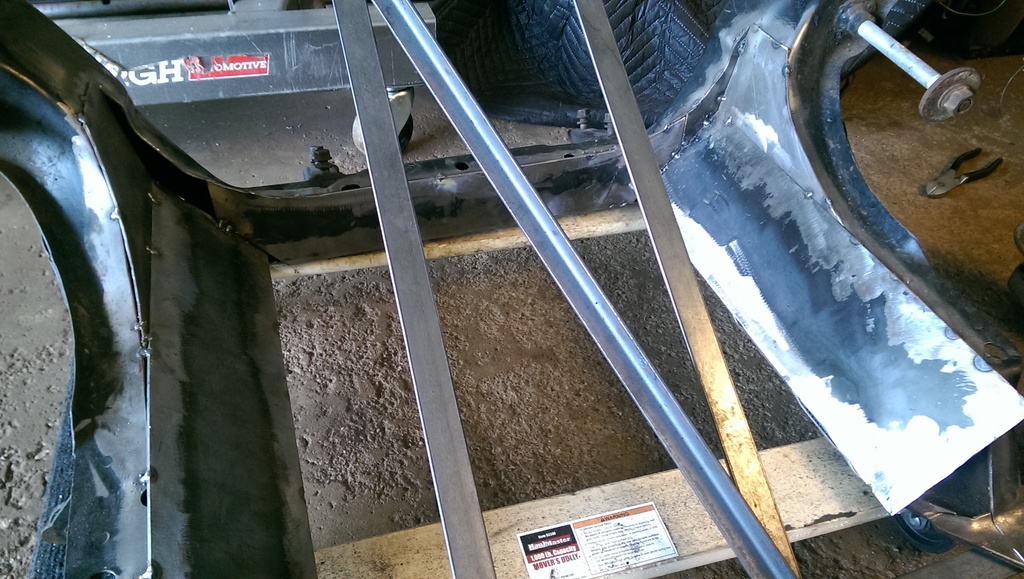
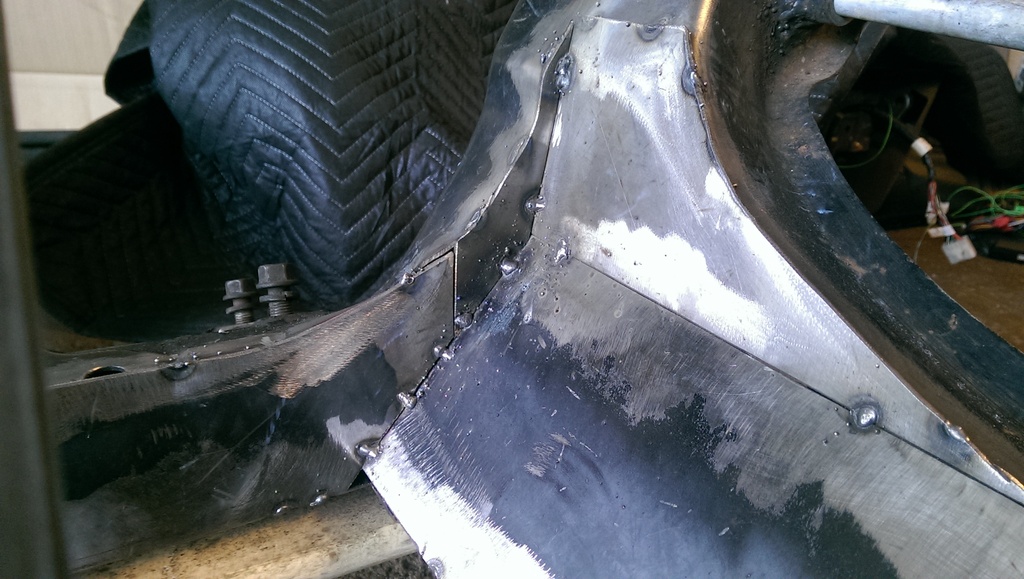
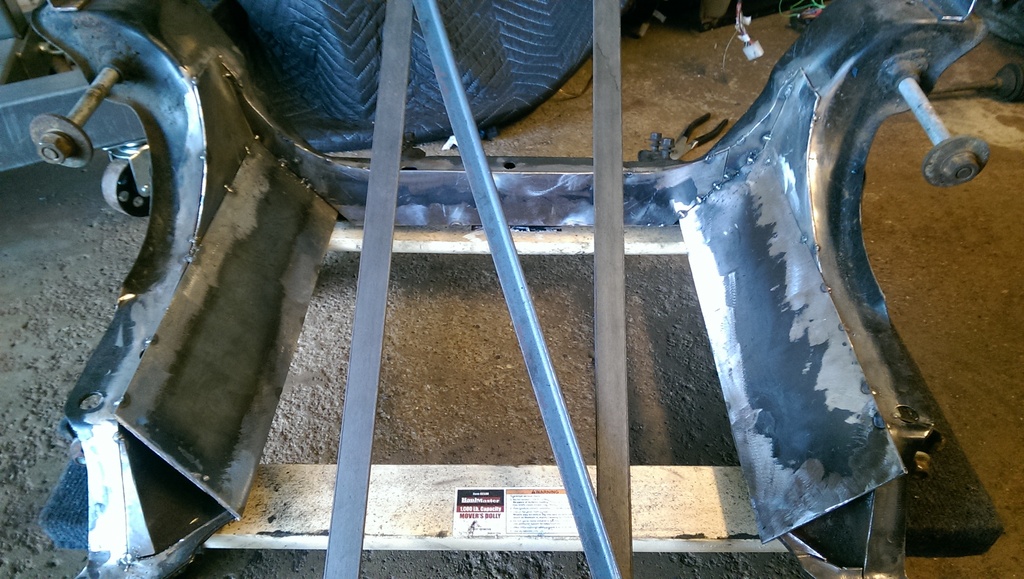

Done!! woo!
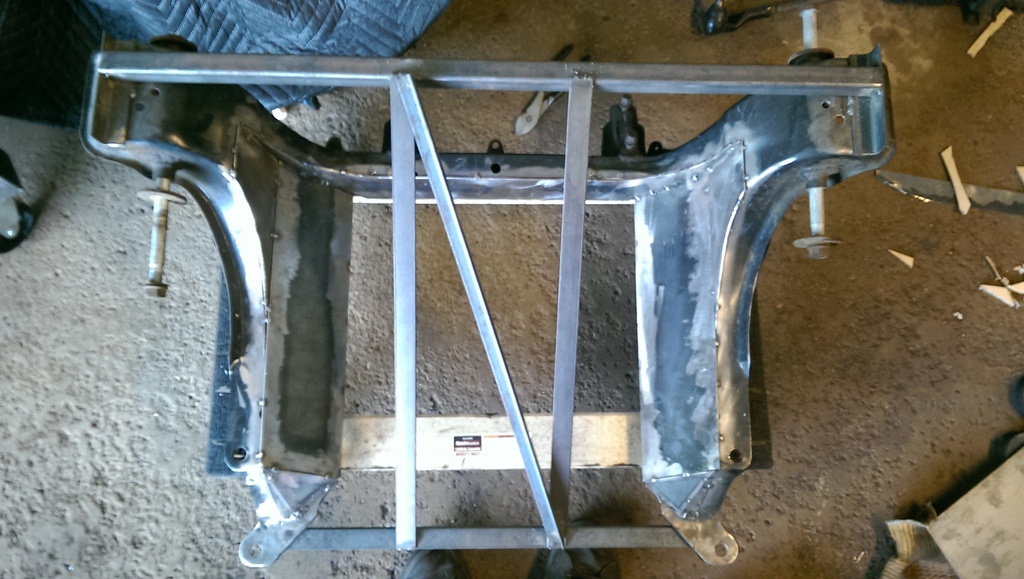
So now, ive been pondering if I should risk cutting off my braces at this stage for a test fit in the car to ensure it hasnt : A. Already warped bad enough to warrant cutting tacks and refixturing. or 2. Require additional clearances overall.
My worry is, that if I do cut off the braces, that the subframe will instantly "potatoe chip". Which is having me wonder if I should just finish weld it , as-is.
So anyhow, thats my question of the day. Until next time internet!
Large chunks cut out:


Id like to thank: Sharpies, cardboard, cut-off wheels, tape measures and grinders , for making this all possible.

First side tacked up. This half probably took me nearly 6hrs, with probably half of that just pondering exactly how I wanted to approach this. Main considerations were obviously simplicity. And minimal welding to lessen the chances of warpage. I also spent a lot of time finessing the motor mount "cups" , I wanted to be sure to get a good fitup so I could easily weld them to the backside of the plates for rigidity.

The second half went much quicker now that I had a direction and was simply mirroring the other side. I was happy to find that my cuts mustve been very accurate since using the identical cardboard templates as the drivers side worked perfectly for the passenger side. Woo!

And the front portion:

Now just filling in the little bits:


Done!! woo!

So now, ive been pondering if I should risk cutting off my braces at this stage for a test fit in the car to ensure it hasnt : A. Already warped bad enough to warrant cutting tacks and refixturing. or 2. Require additional clearances overall.
My worry is, that if I do cut off the braces, that the subframe will instantly "potatoe chip". Which is having me wonder if I should just finish weld it , as-is.
So anyhow, thats my question of the day. Until next time internet!
The following users liked this post:
charchri4 (10-06-2016)
08-01-2016, 03:27 PM
#13
V8 Miata Participant

Not sure if you're asking, but you might consider tacking the upper cross piece to the "inside" of the upper mounting surfaces, then cutting away the 3" or so on each side of the cross piece that interfere with actually mounting the wings to the frame of the car. That way the somewhat shorter cross piece is still attached and bracing, but you should be clear to bolt the subframe in.
Mike
Mike
08-01-2016, 04:09 PM
#14
V8 Miata Follower
Thread Starter
Mike!
Not a bad idea! I think maybe adding an "additional" brace in the area you are talking about, BEFORE cutting off my existing brace would make me feel more comfortable.
The reason I didn't put the brace there to begin with, was for two reason, 1. Because I wanted to focus the constraint as close to the mounting bolt location as possible (aka on top) and 2. So it wouldn't get in my way when cutting/welding.
 08-02-2016, 09:21 AM
#16
V8 Miata Follower
Thread Starter
Oh trust me, I wouldnt say I have much welding "skill". This has all just been tacking so far.
But I figured, what do miata subframes go for? $50? So I figured that and a bit of metal, what do I have to lose? Well besides that, and a lot of my time.
Worst case scenario I have to cave and buy a V8R. ( Although I dont intend on it, ill be pretty stubborn on making this work ).
But thank you for the compliment! I am pleased with how its turned out so far. Lets just hope it fits! Planning for a subframe only test fit tonight.
08-02-2016, 12:52 PM
#17
V8 Miata Follower

What thickness of steel plate did you use? Do you know what thickness the stock subframe is? Do you have an idea on how you're going to make the actual engine mount yet?
I'm just trying to get a feel for how much material needs removed, and how long it's going to take to do so with the tools I have. I basically have an angle grinder now, but will be picking up a compressor and basic air tools. I currently was planning on using the V8r subframe, but you've got me thinking about how I could save almost a grand, since I already have the transmission mount.
I'm just trying to get a feel for how much material needs removed, and how long it's going to take to do so with the tools I have. I basically have an angle grinder now, but will be picking up a compressor and basic air tools. I currently was planning on using the V8r subframe, but you've got me thinking about how I could save almost a grand, since I already have the transmission mount.
08-02-2016, 12:58 PM
#18
V8 Miata Follower
Thread Starter
The steel plate I used was ~0.120" HRS , and matches the thickness of the stock subframe very closely. I cant say exactly as I have not taken a pair of calipers to the metal.
As for the mounting, I will using tube stock I have to create something very similar to the way the V8R does it. Using energy suspension poly mounts. I plan to have that portion completed at the latest by this weekend so check back and see what I come up with!
As for the tools, I did this all with a 4-1/2" grinder, cardboard, tape, sharpies, scissors and a welder. I dont even have a compressor! lol, so dont let that discourage you! Give it a shot!
What thickness of steel plate did you use? Do you know what thickness the stock subframe is? Do you have an idea on how you're going to make the actual engine mount yet?
I'm just trying to get a feel for how much material needs removed, and how long it's going to take to do so with the tools I have. I basically have an angle grinder now, but will be picking up a compressor and basic air tools. I currently was planning on using the V8r subframe, but you've got me thinking about how I could save almost a grand, since I already have the transmission mount.
I'm just trying to get a feel for how much material needs removed, and how long it's going to take to do so with the tools I have. I basically have an angle grinder now, but will be picking up a compressor and basic air tools. I currently was planning on using the V8r subframe, but you've got me thinking about how I could save almost a grand, since I already have the transmission mount.
08-02-2016, 01:03 PM
#19
V8 Miata Follower
Well, I think you have me sold. It'll be nice to actually fabricate something, I haven't done much welding or fitting since my FSAE days.
Looks great, I hope mine turns out just as good!
Looks great, I hope mine turns out just as good!
08-02-2016, 03:30 PM
#20
V8 Miata Follower
Thread Starter
08-29-2016, 09:55 AM
#21
V8 Miata Follower
Thread Starter
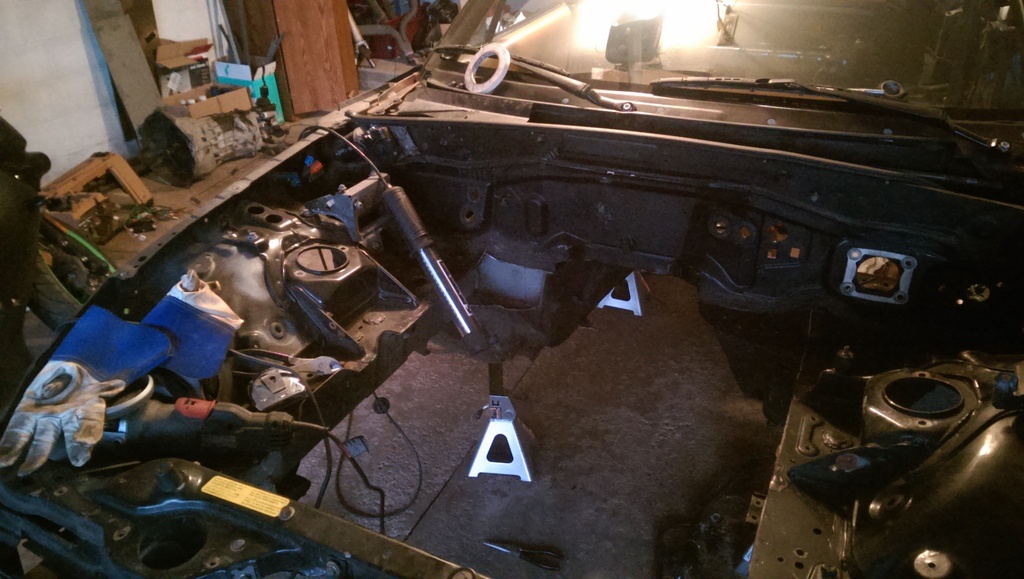
Alright guys, I know im WAY overdue for an update, and honestly Ive been putting it off because I wanted to have something more substantial to report . I digress.
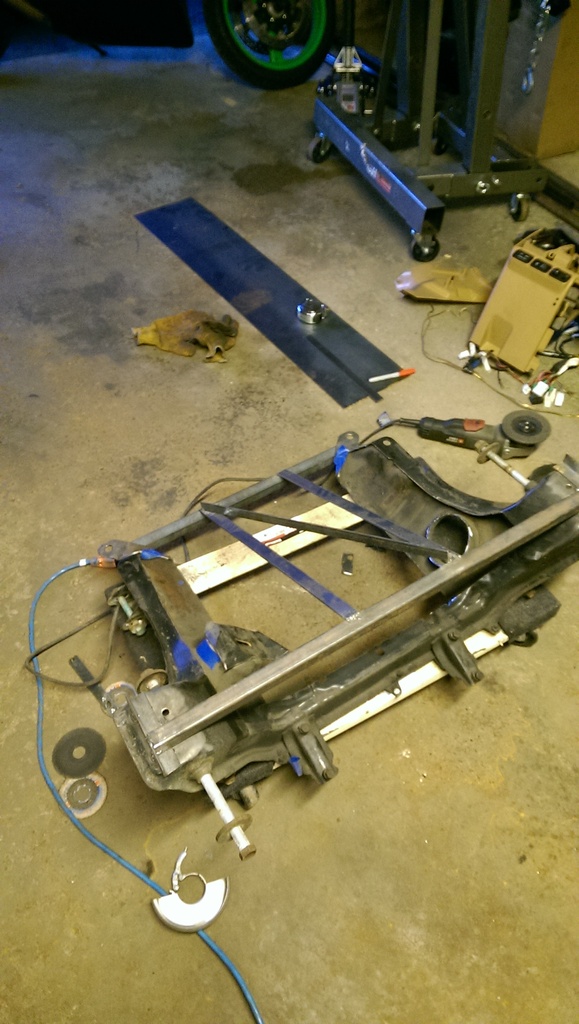
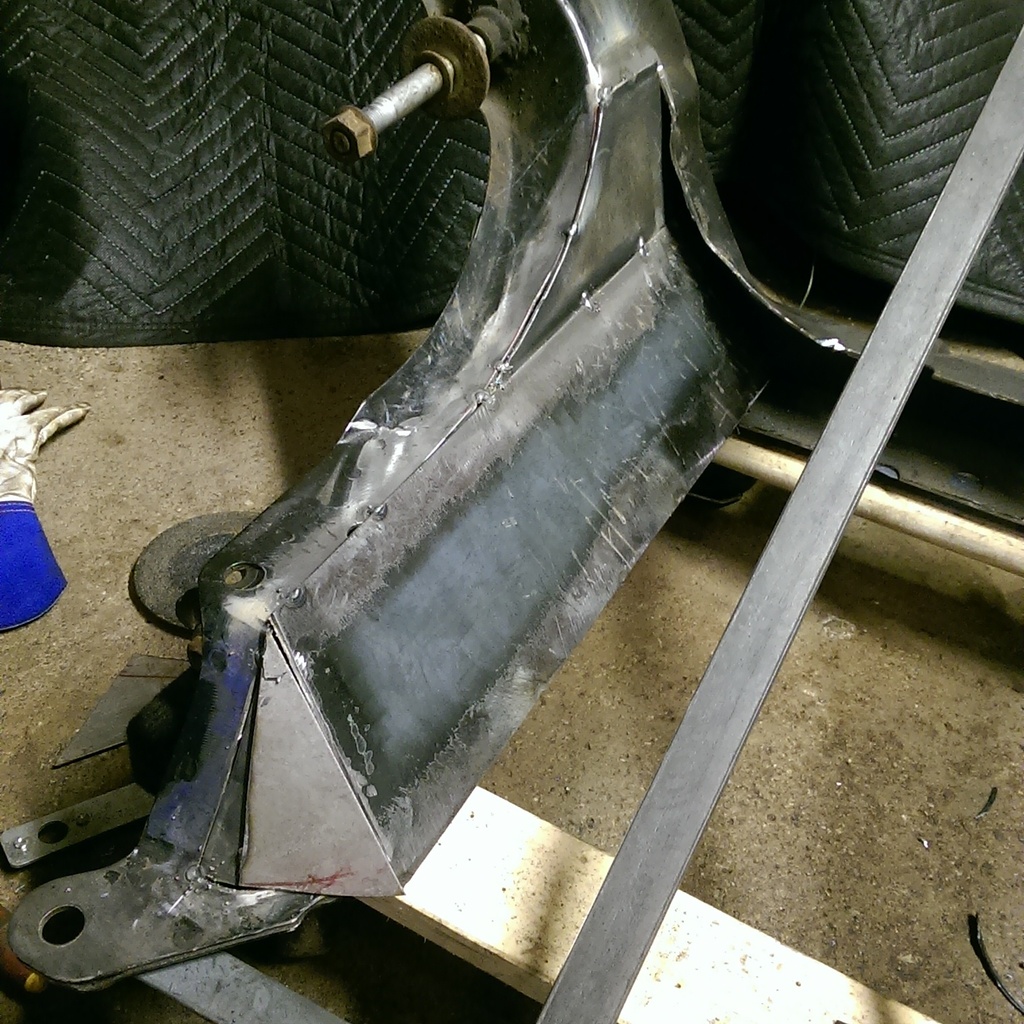
I spend a LOT of time, trying to make my subframe work with stock F-body oil pan without cutting and welding the notch. People said it couldnt be done, so natually I was determined to prove them otherwise. Ill let the pictures do the talking here shortly, but ultimatly, I COULD have gotten it to work, but I would have sacrificed my ideal engine positioning. Getting the engine low and as far rearward as possible were more important to me, so I opted to use the Holley 302-2.

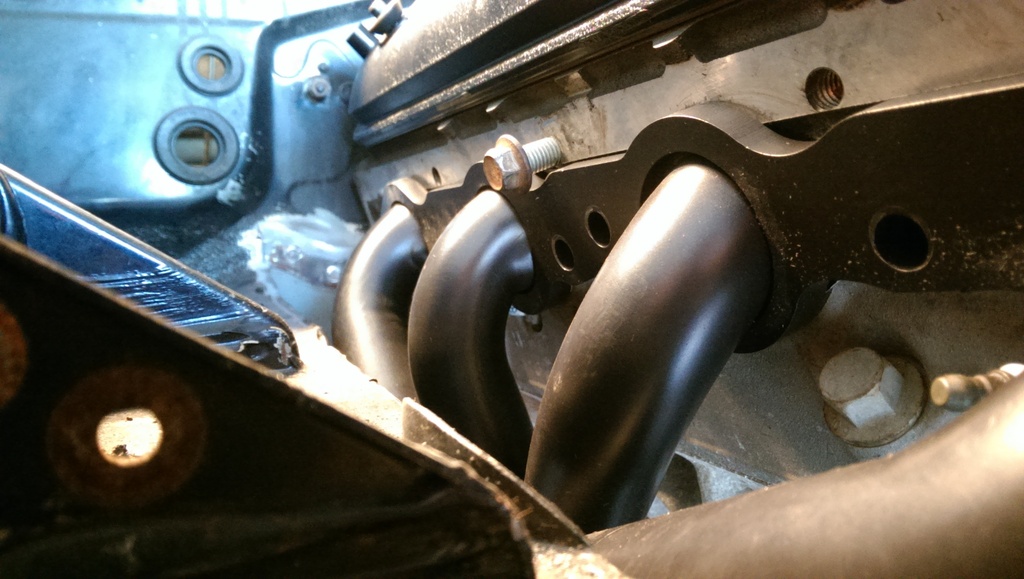
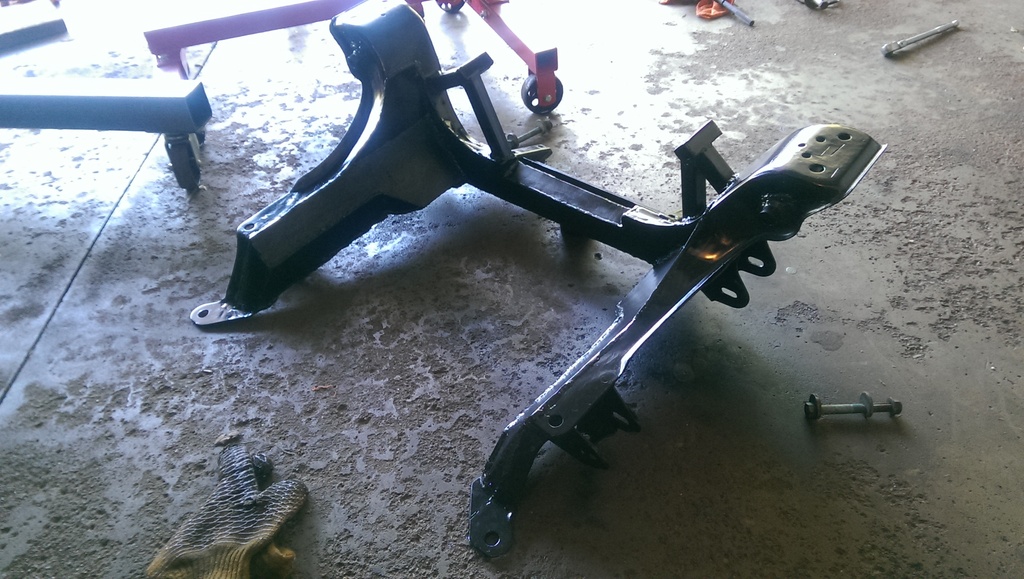
So once I gave up on that. I slapped the 302-2 on, and had plenty of room! So then it was time to start working on the motor mounts. When the subframe came out again, I stared on some more pretty heavy modifications to the subframe to allow for more exhaust clearance. I got kinda lazy with pictures at this stage.
Vertical supports for the mount were added later.
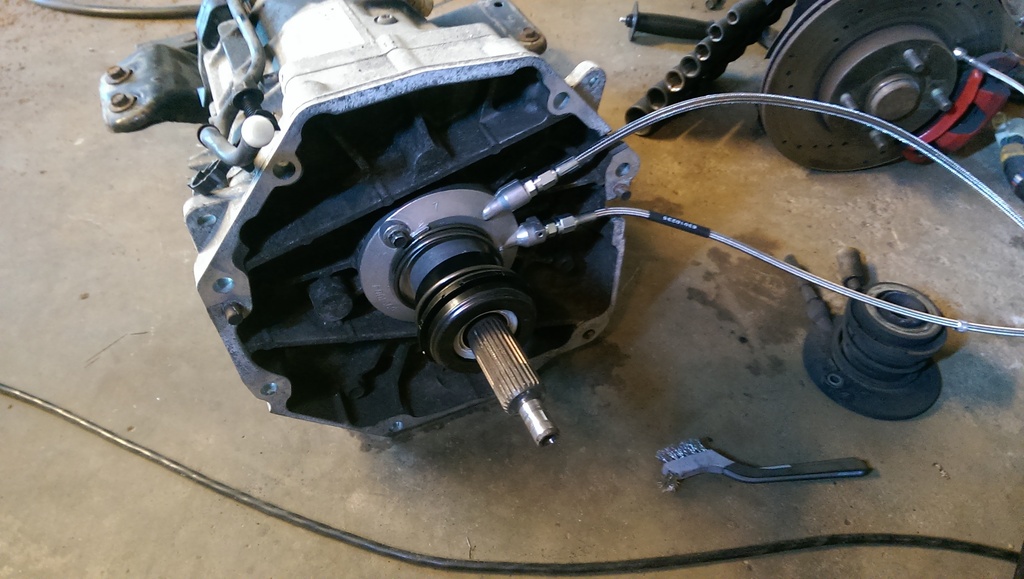
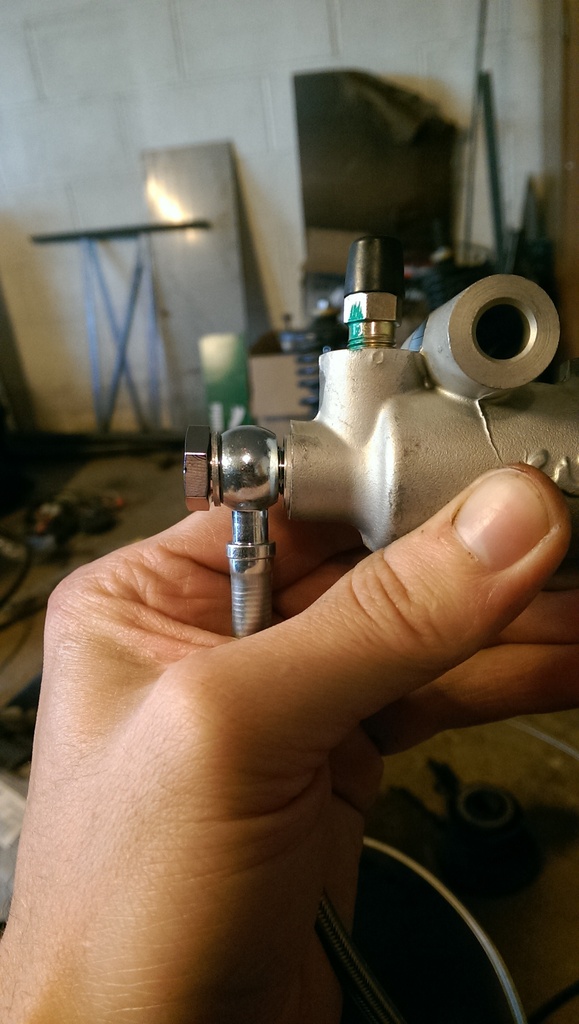
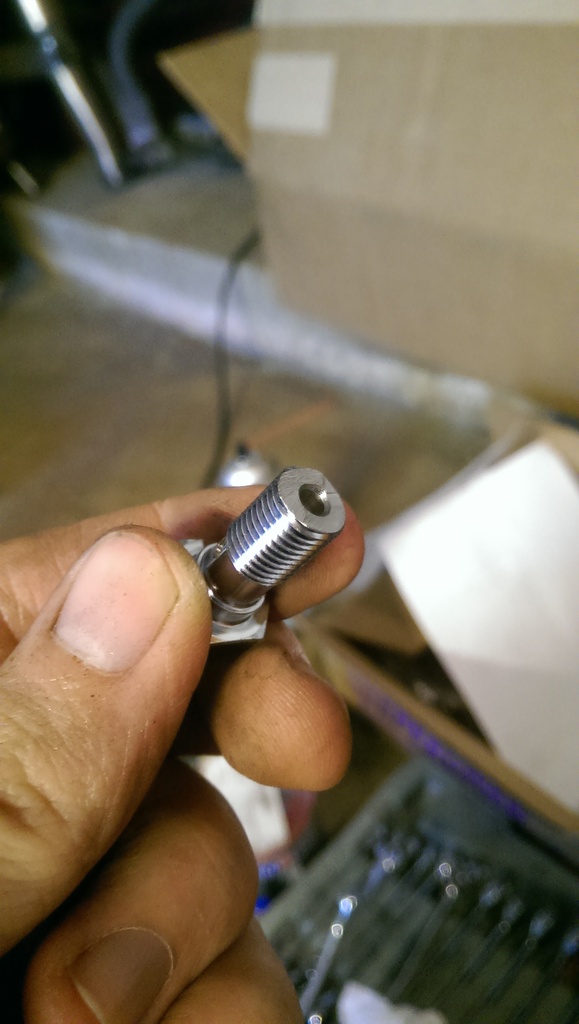
On nights were I only had an hour or two to spare, I worked on things like installing clutch hydraulics. Turns out the banjo bolt I ordered was a bit too long for the Wilwood master, nothing a dremel wouldnt fix =P
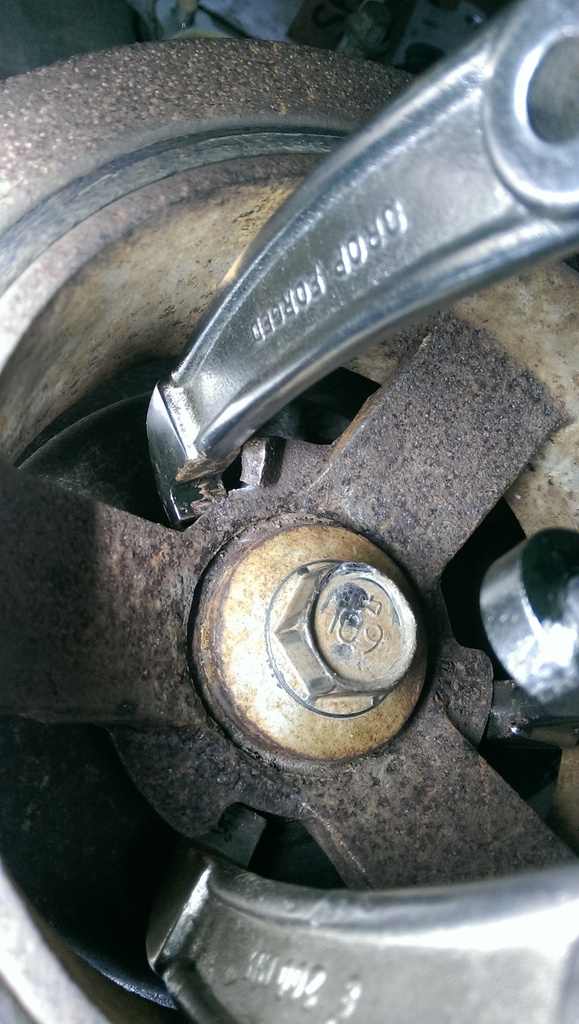
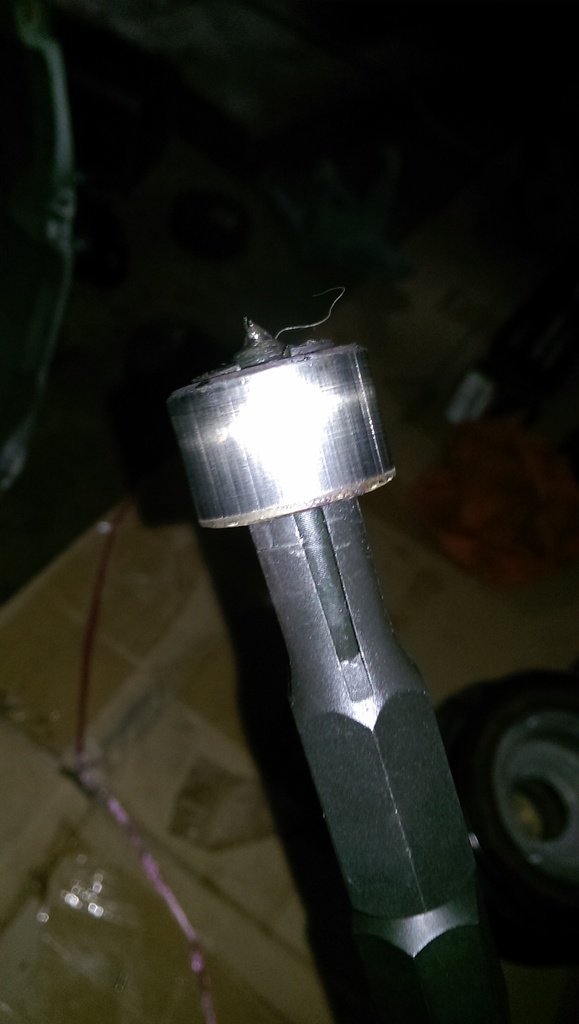
I also may have accidentally caved and ordered more go fast parts. You would know this if youve been paying attention to my excel document =P TSP 228R cam kit, and an LS6 intake..... Also, who the hell packs an intake manifold in this ****?!?! Had a fun time trying to get off the OEM crank pulley too as you can see. Finally got it by heating up the pulley using the TIG torch, modified crank bolt, and a badass puller.

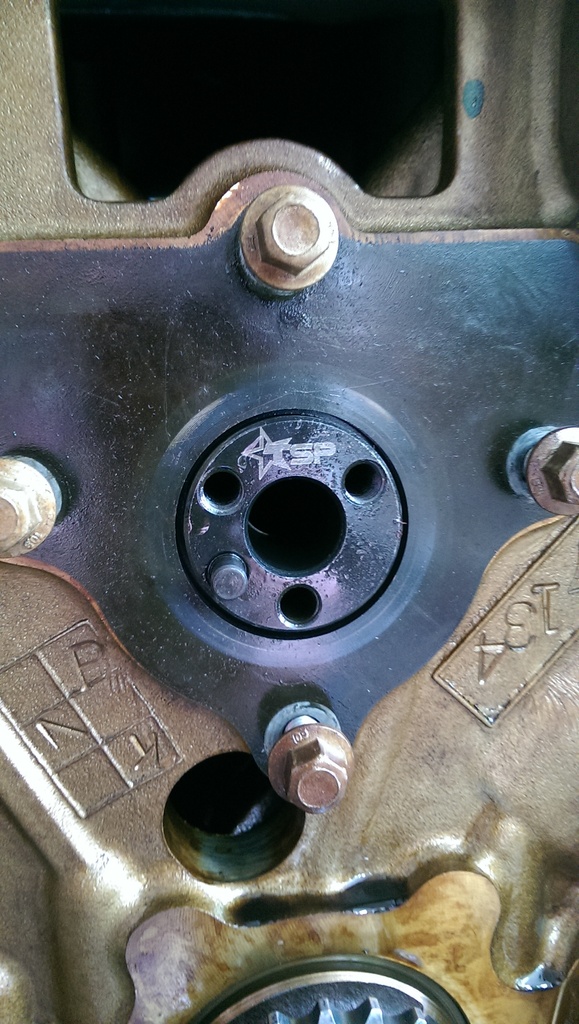
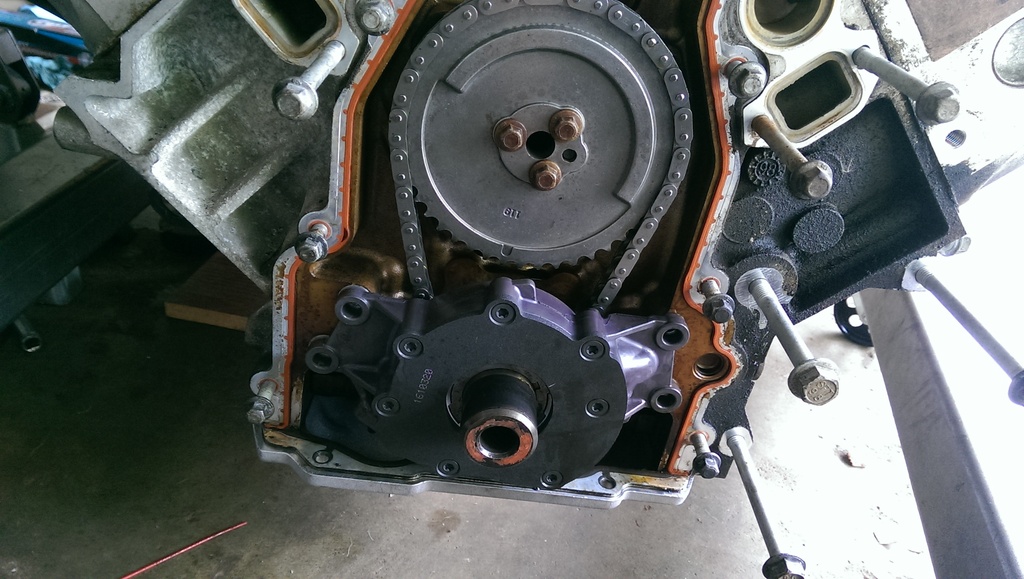
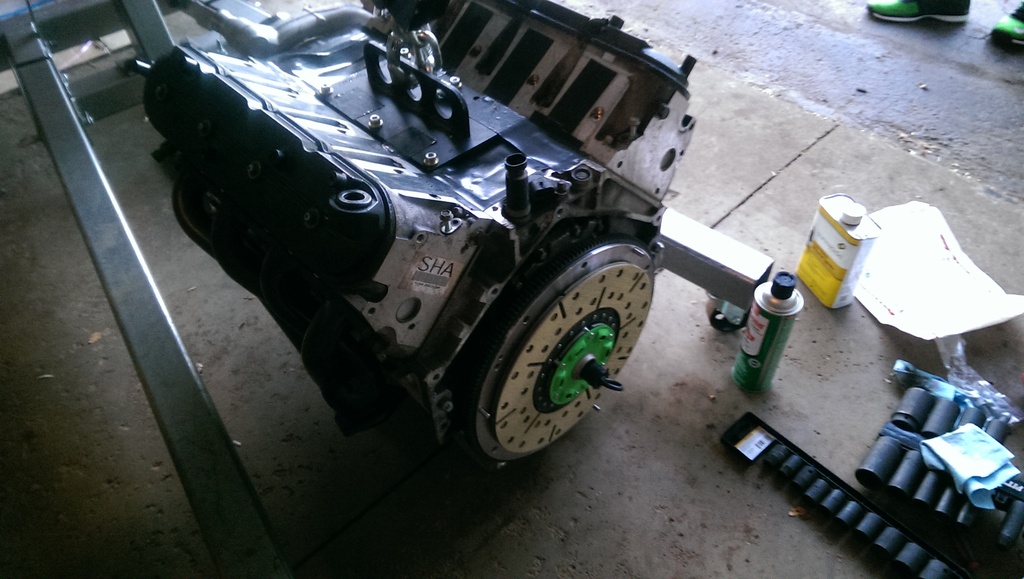
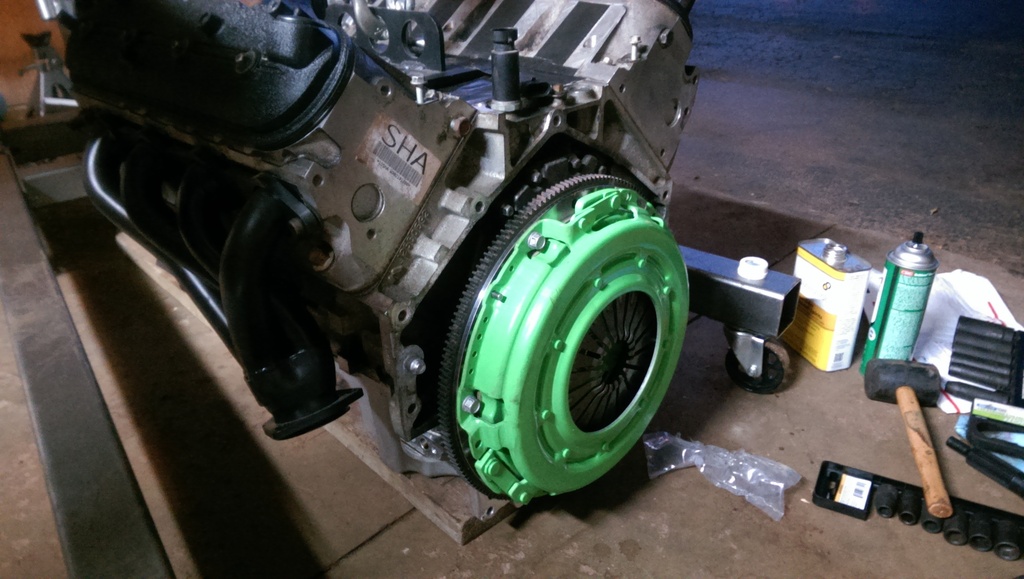
LS2 timing chain, gears, melling 10296, and 228r cam installed.
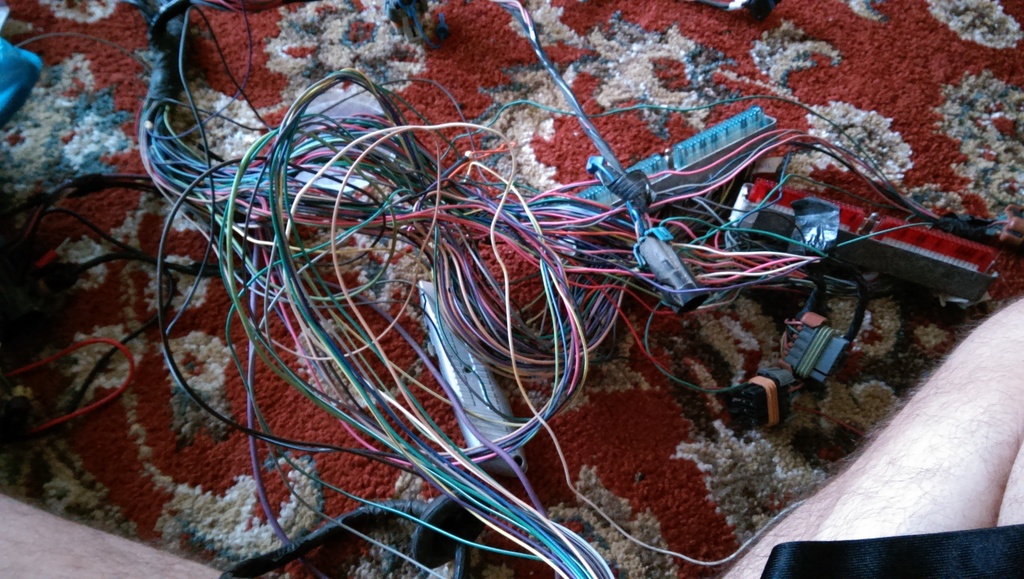
Other than that, on nights that im not feeling super motivated, I try and still make progress by tackling this mess in the living room.
Stay tuned for more updates, trying to get as much done as I can during the week. Wedding season is KILLING both me and my liver, between bachelors parties, and the weddings themselves, plus holidays like upcoming labor day, are reducing my productivity to almost zero. But im trying over here! =P
I spend a LOT of time, trying to make my subframe work with stock F-body oil pan without cutting and welding the notch. People said it couldnt be done, so natually I was determined to prove them otherwise. Ill let the pictures do the talking here shortly, but ultimatly, I COULD have gotten it to work, but I would have sacrificed my ideal engine positioning. Getting the engine low and as far rearward as possible were more important to me, so I opted to use the Holley 302-2.


So once I gave up on that. I slapped the 302-2 on, and had plenty of room! So then it was time to start working on the motor mounts. When the subframe came out again, I stared on some more pretty heavy modifications to the subframe to allow for more exhaust clearance. I got kinda lazy with pictures at this stage.

Vertical supports for the mount were added later.
On nights were I only had an hour or two to spare, I worked on things like installing clutch hydraulics. Turns out the banjo bolt I ordered was a bit too long for the Wilwood master, nothing a dremel wouldnt fix =P


I also may have accidentally caved and ordered more go fast parts. You would know this if youve been paying attention to my excel document =P TSP 228R cam kit, and an LS6 intake..... Also, who the hell packs an intake manifold in this ****?!?! Had a fun time trying to get off the OEM crank pulley too as you can see. Finally got it by heating up the pulley using the TIG torch, modified crank bolt, and a badass puller.


LS2 timing chain, gears, melling 10296, and 228r cam installed.

Other than that, on nights that im not feeling super motivated, I try and still make progress by tackling this mess in the living room.

Stay tuned for more updates, trying to get as much done as I can during the week. Wedding season is KILLING both me and my liver, between bachelors parties, and the weddings themselves, plus holidays like upcoming labor day, are reducing my productivity to almost zero. But im trying over here! =P
The following users liked this post:
charchri4 (10-06-2016)
08-30-2016, 12:03 PM
#22
V8 Miata Fanatic
Hey hey....I like that engine setup, identical to mine except I used the V8R longtubes and no underdrive. I'll be curious to see your numbers just for comparisons sake to see what the longtubes did for me.
08-30-2016, 12:51 PM
#23
V8 Miata Follower
Thread Starter
Ill be very curious as well! I was very close to pulling the trigger on the long tubes. But I decided to save the money and tackle DIY long tubes on the off season, especially since I did my own subframe and cant guarantee the V8R's would fit anyways.
09-06-2016, 11:44 AM
#24
V8 Miata Follower
Thread Starter
Alrighty, LDW progress report!
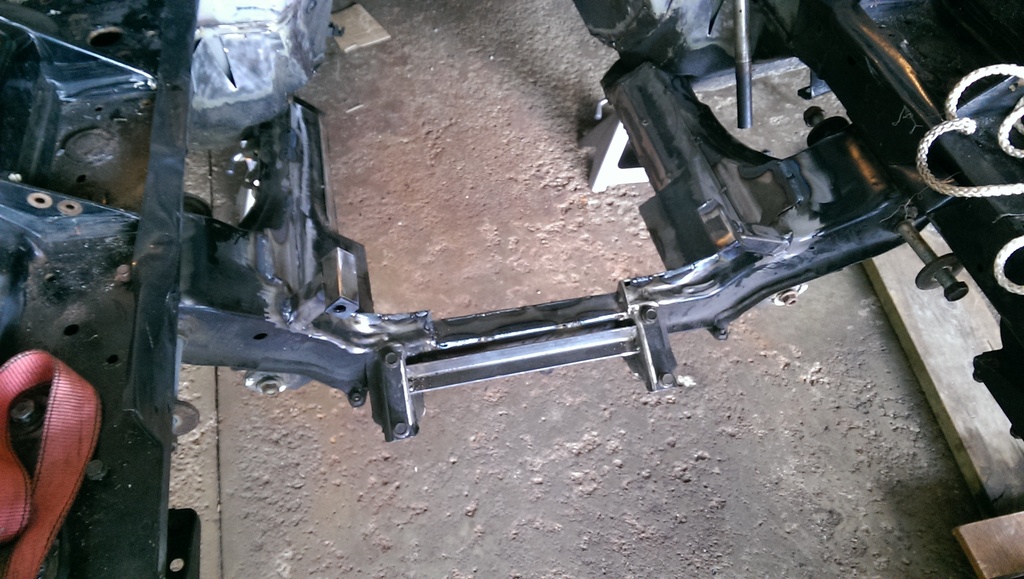
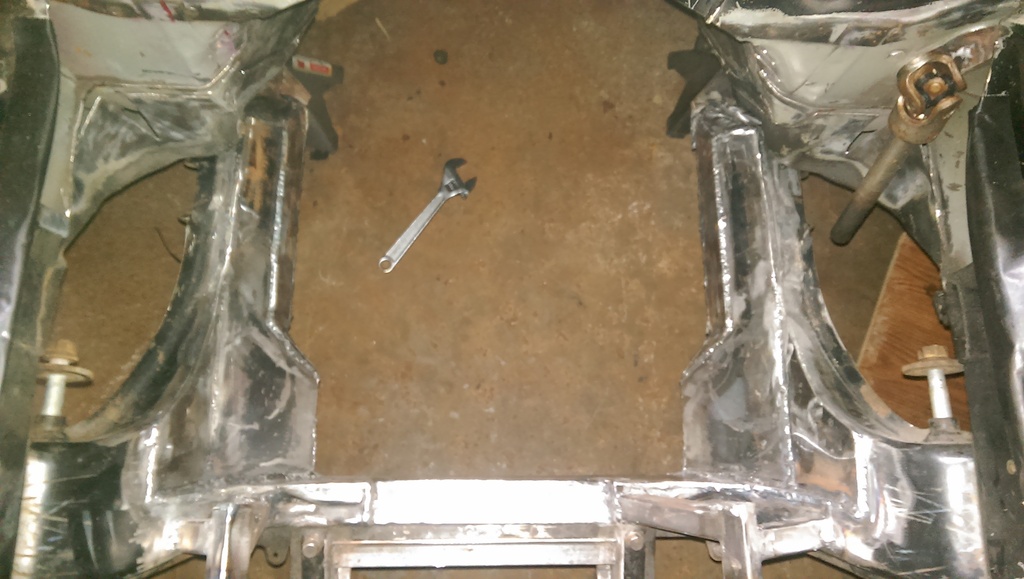
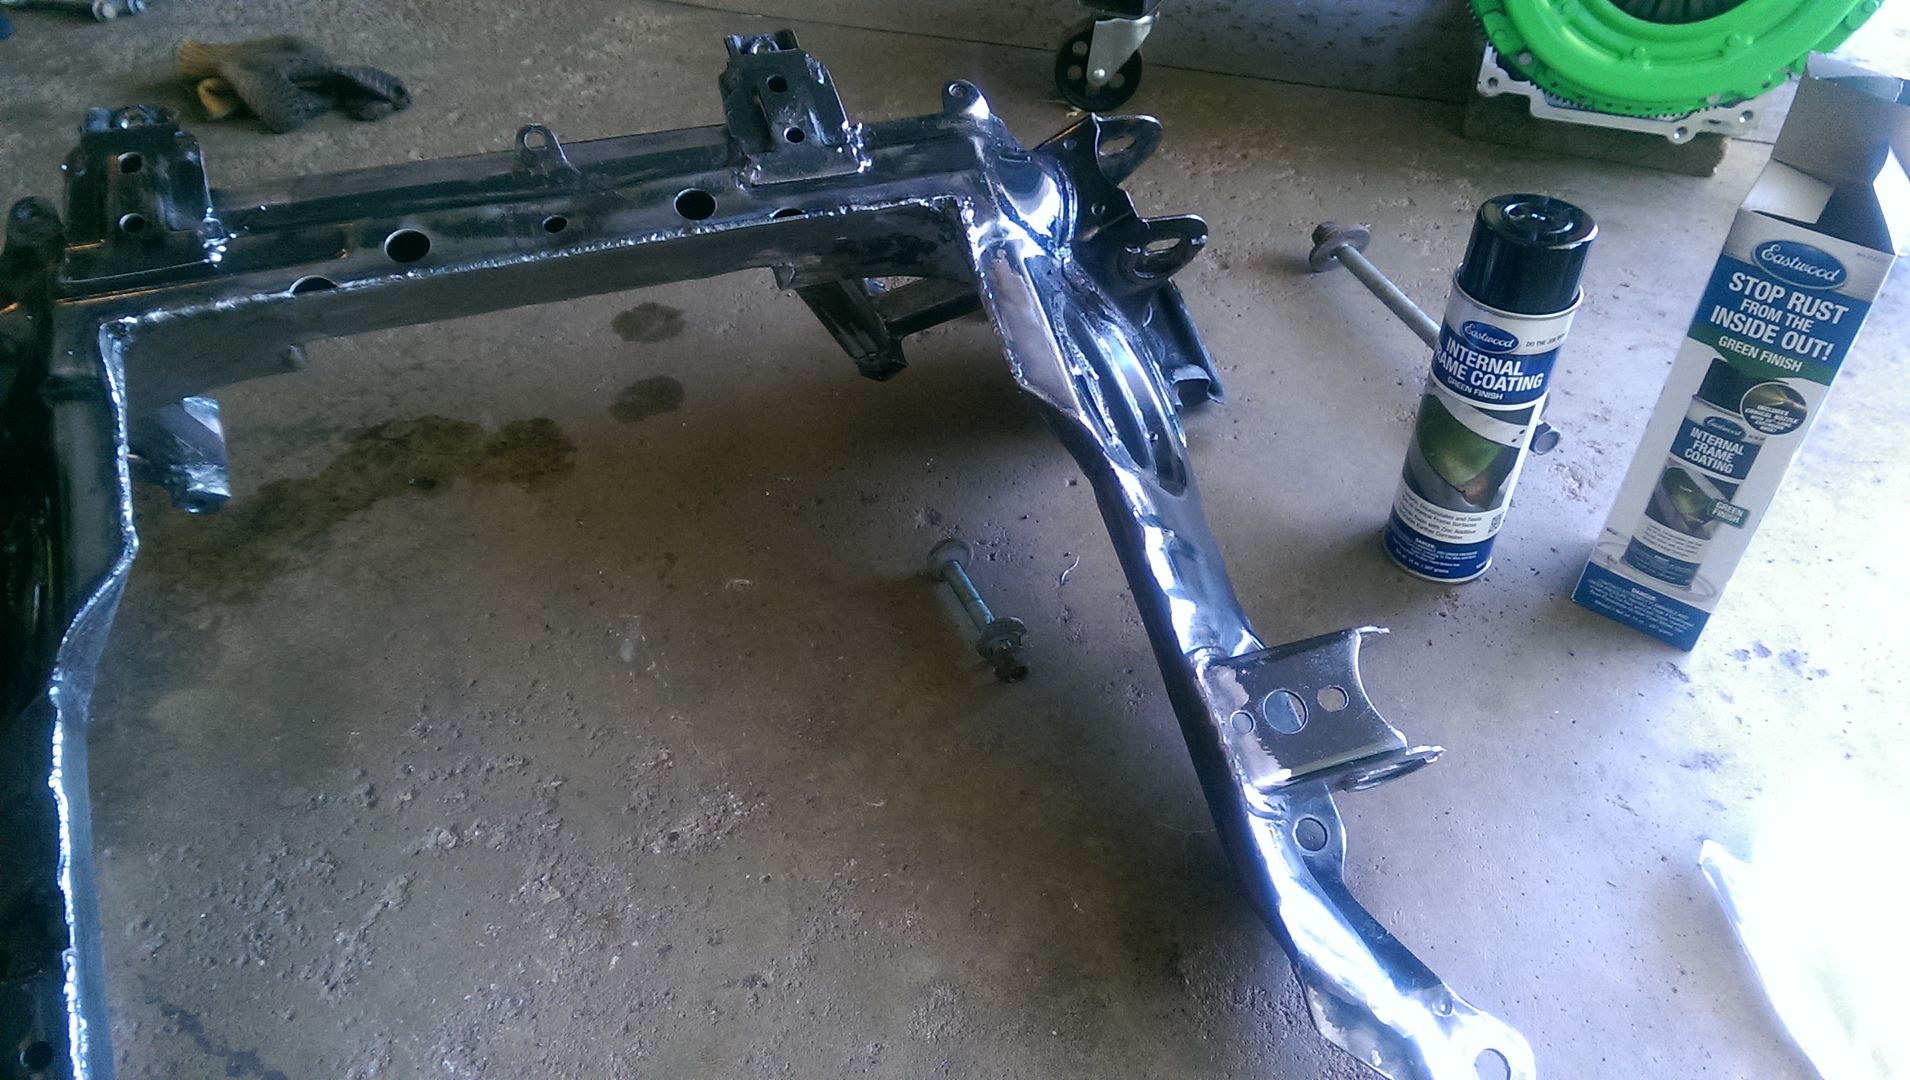
I forgot you guys never saw the completed subframe! Here was the last test fit before painting.
Used Eastwoods internal frame coating to try and protect the inside of the subframe as much as possible....people arent kidding when they say that stuff gets EVERYWHERE.
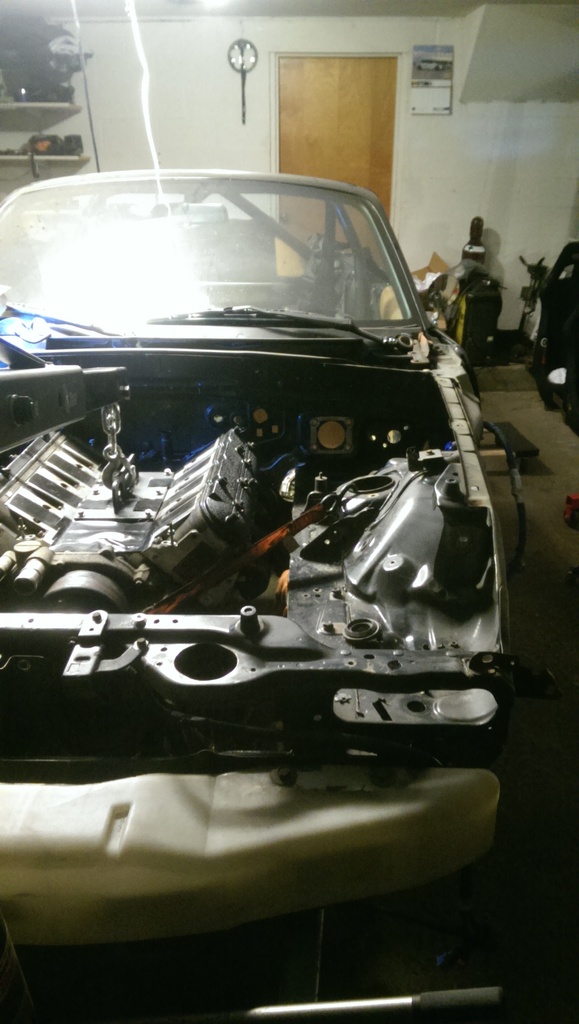
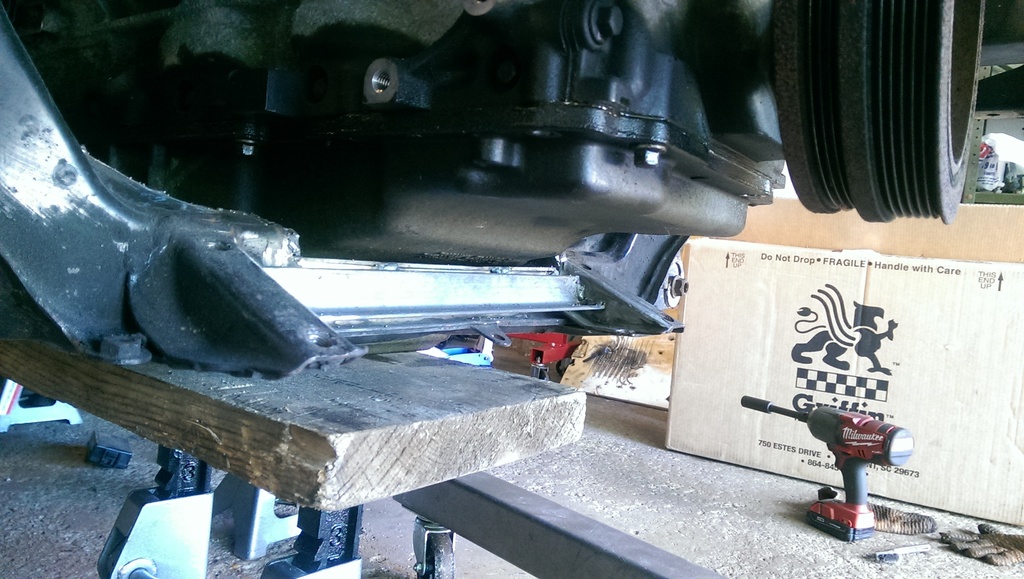
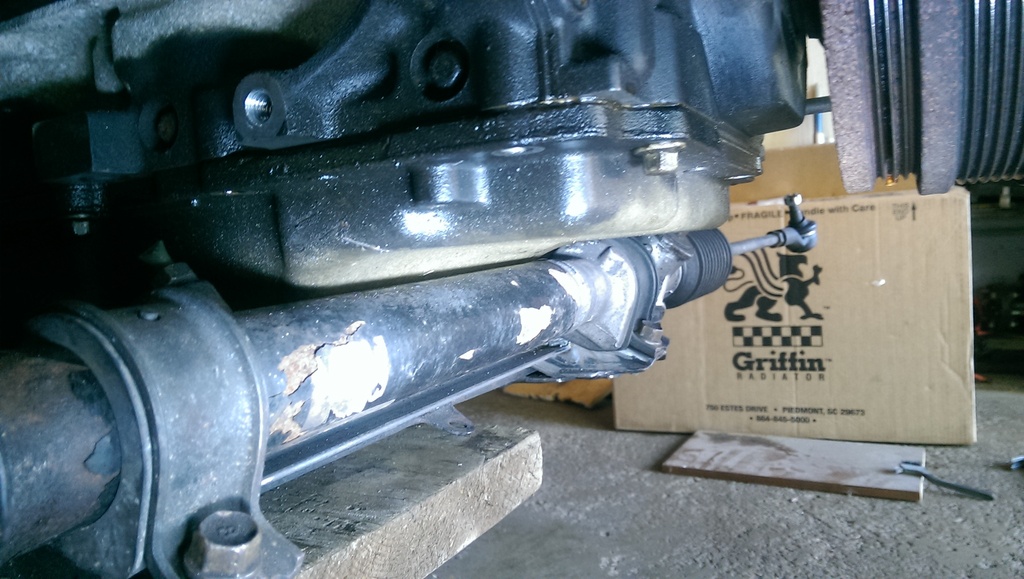
I finished getting the engine all buttoned up. Installed oil pan with new gasket, which involved trimming the windage tray for the new oil pickup tube.
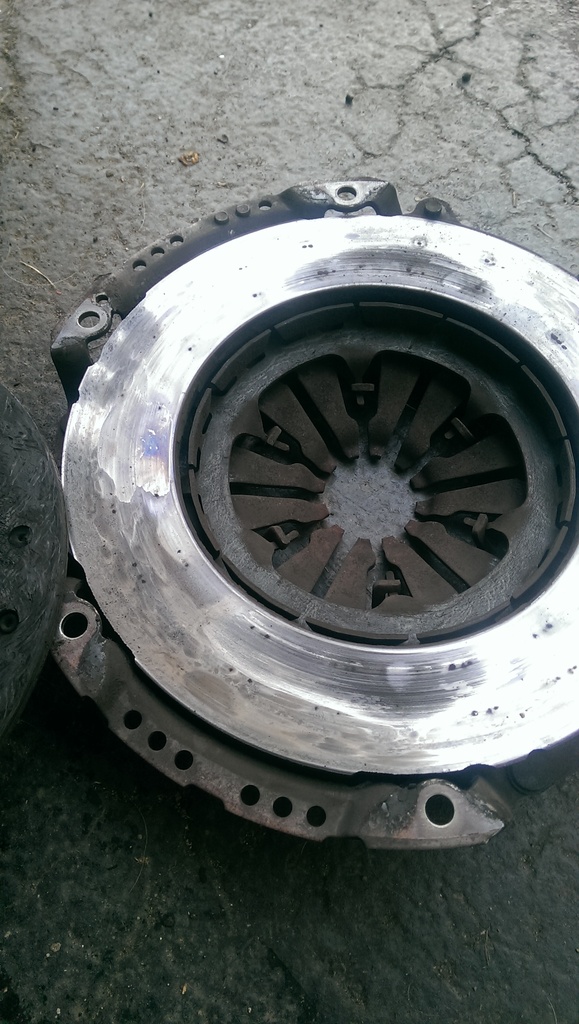
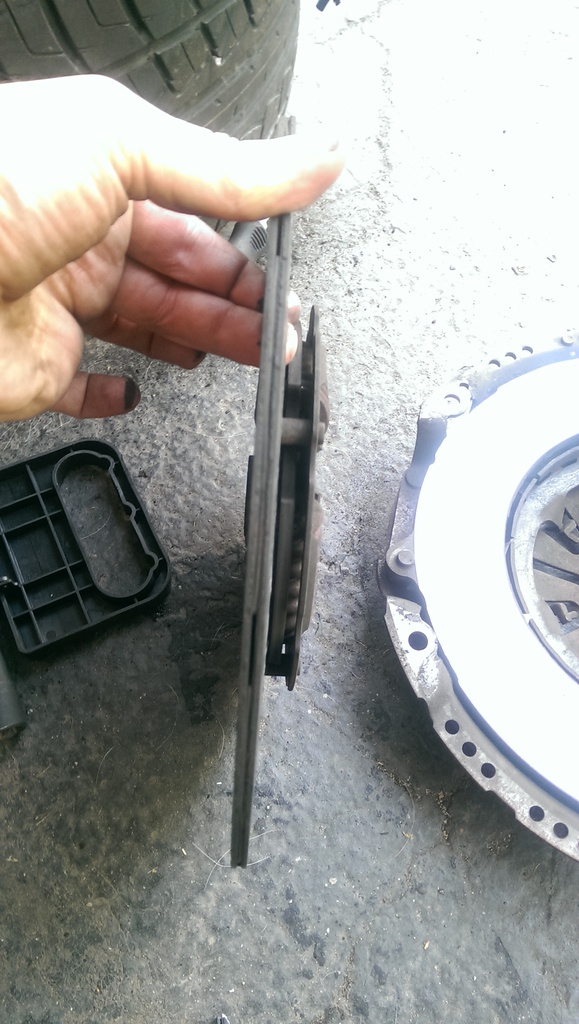
New pilot bearing, then the clutch install.
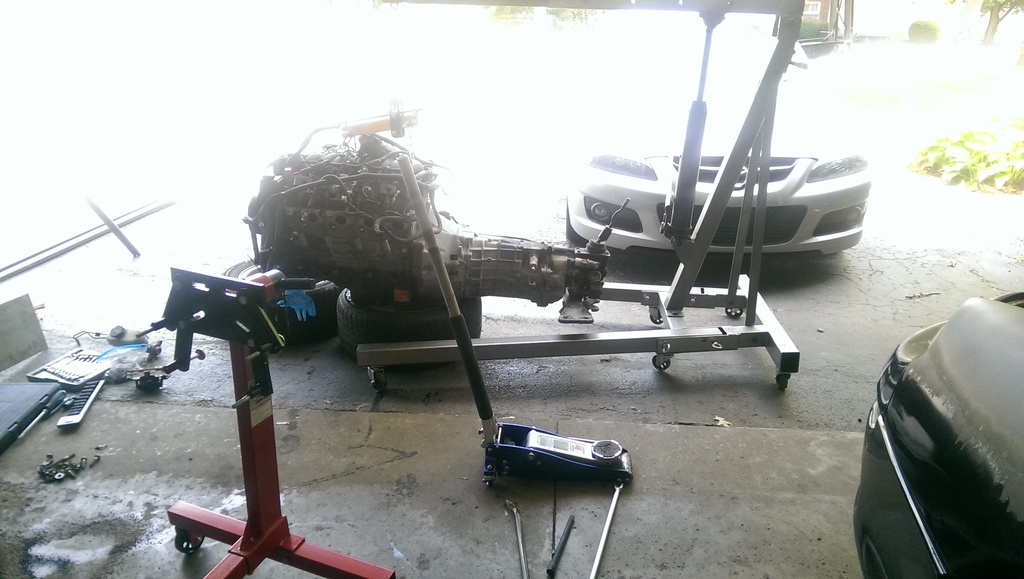
I just cant get over how freakin heavy that T56 is. My arms and legs are all bruised and sore from just trying to get it mated back up to the engine. My method here was to lower the engine into the bay, then I rotated the engine 90 degrees, and slid the trans on through the passenger wheelwell, then rotated the whole thing back under the car. Lifted the engine back up on the hoist, with assistance on the tailshaft with a floor jack. Not that the engine is finally mounted, Im working on a trans mount. Ive started to put something together, but Ill wait until I see if it works or not before I share =P
I forgot you guys never saw the completed subframe! Here was the last test fit before painting.


Used Eastwoods internal frame coating to try and protect the inside of the subframe as much as possible....people arent kidding when they say that stuff gets EVERYWHERE.


I finished getting the engine all buttoned up. Installed oil pan with new gasket, which involved trimming the windage tray for the new oil pickup tube.

New pilot bearing, then the clutch install.


I just cant get over how freakin heavy that T56 is. My arms and legs are all bruised and sore from just trying to get it mated back up to the engine. My method here was to lower the engine into the bay, then I rotated the engine 90 degrees, and slid the trans on through the passenger wheelwell, then rotated the whole thing back under the car. Lifted the engine back up on the hoist, with assistance on the tailshaft with a floor jack. Not that the engine is finally mounted, Im working on a trans mount. Ive started to put something together, but Ill wait until I see if it works or not before I share =P
 09-07-2016, 07:08 PM
#25
V8 Miata Prot�g�


Nice progress! Imo the easiest way for the engine/transmission and subframe to go in is to bolt the engine to the transmission and subframe and then lower the car onto it.


